“`html
Table of Contents
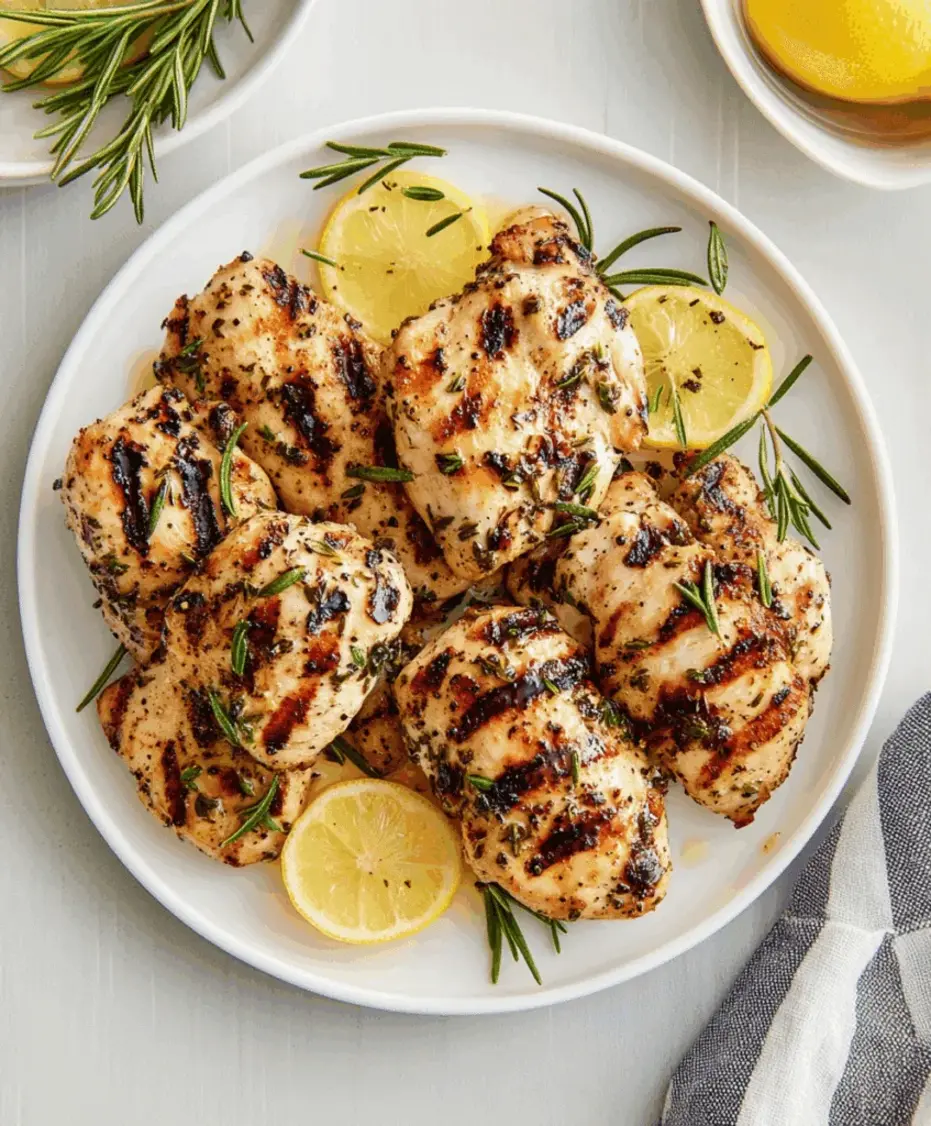
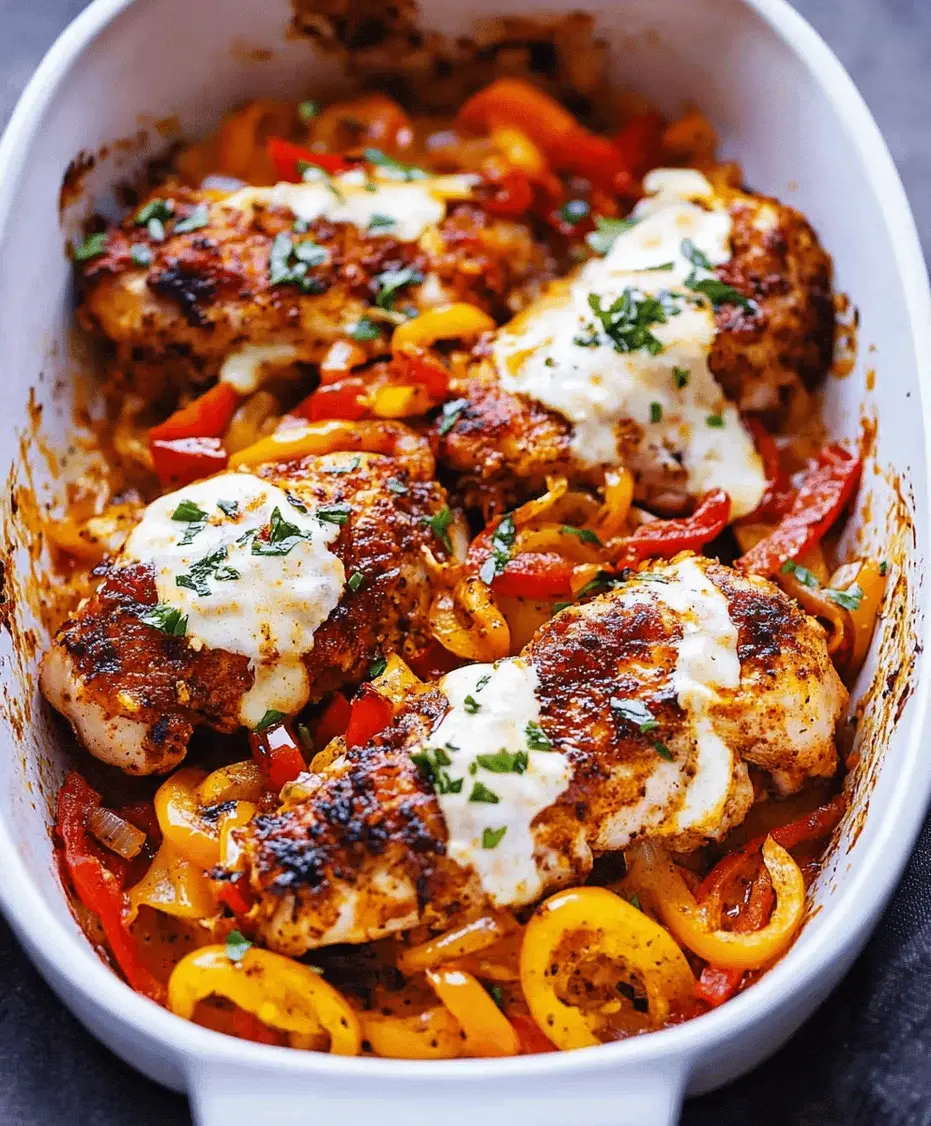
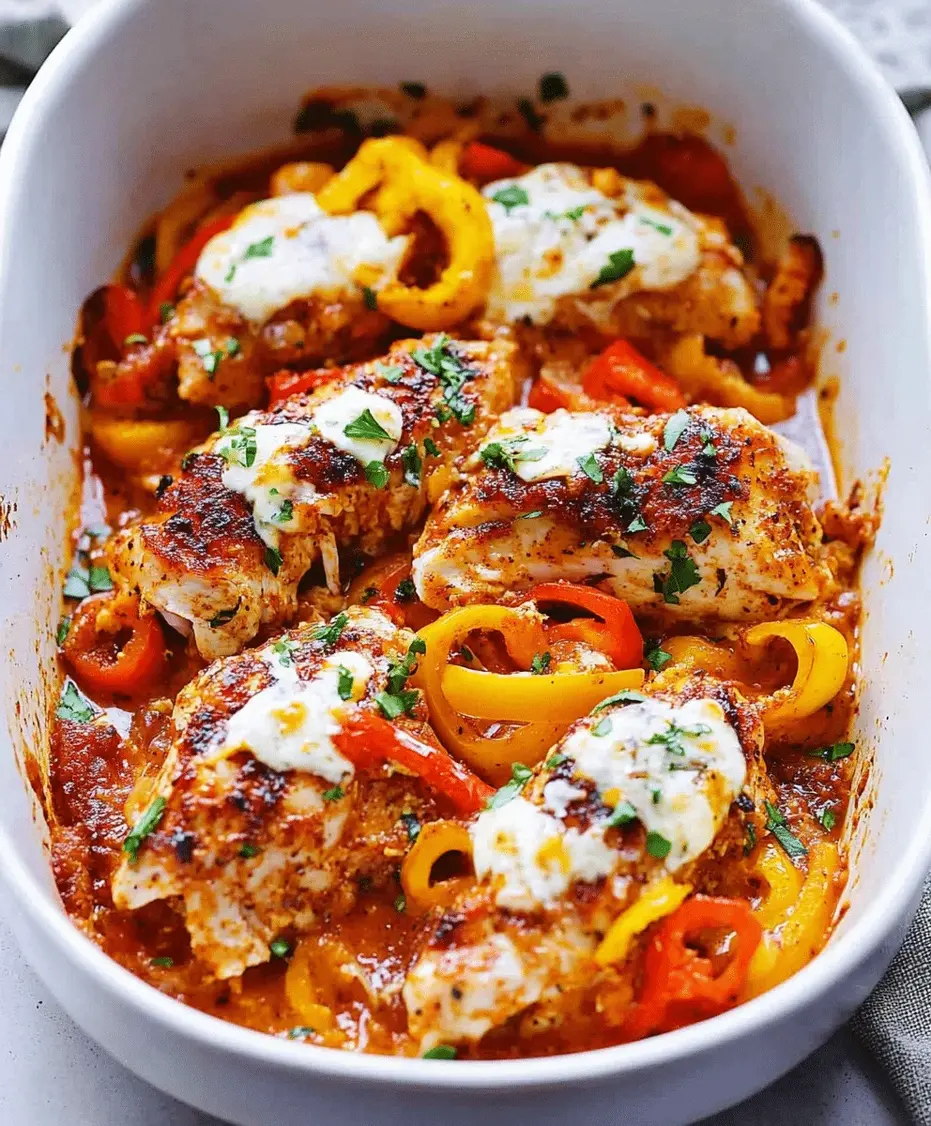
Cajun Chicken With Sweet Peppers Recipe
Craving a Flavorful Weeknight Meal?
Are you looking for a weeknight dinner that’s both lightning-fast and bursting with bold, exciting flavors? If you’re nodding your head, then this Cajun Chicken with Sweet Peppers recipe is about to become your new go-to! This dish is a vibrant explosion of taste and color, combining tender, seasoned chicken with the natural sweetness of bell peppers. It’s incredibly versatile – perfect for busy evenings, fantastic for meal prepping, and adaptable to various dietary needs. Get ready to transport your taste buds straight to the heart of Louisiana with this simple yet incredibly satisfying meal!
What You’ll Need for This Flavor Fiesta
The beauty of this Cajun Chicken with Sweet Peppers recipe lies in its simplicity and the way humble ingredients come together to create something extraordinary. Each component plays a vital role, from the spice that awakens your palate to the sweetness that balances it perfectly.
-
Chicken Breasts: 1.5 lbs boneless, skinless chicken breasts, cut into bite-sized pieces. Look for plump, firm chicken breasts; they’ll remain juicy when cooked properly.
Substitution: Boneless, skinless chicken thighs work wonderfully here too for an even richer flavor. -
Bell Peppers: 2 large bell peppers (any color – red, yellow, orange, and green provide a beautiful visual medley!), seeded and sliced. Choose peppers that are firm and have a vibrant, unblemished skin. The sweetness intensifies as they ripen.
Substitution: Anaheim or poblano peppers can add a touch more heat if you like. - Onion: 1 medium yellow onion, thinly sliced. A classic aromatic that adds depth and a subtle pungency.
- Garlic: 3-4 cloves garlic, minced. The fragrant soul of many great dishes. Freshly minced garlic offers the best aroma and flavor.
-
Olive Oil: 2 tablespoons extra virgin olive oil. A versatile, healthy fat that helps brown the chicken and sauté the vegetables beautifully.
Substitution: Avocado oil or a high-smoke point neutral oil like grapeseed oil are good alternatives. -
Cajun Seasoning: 2-3 tablespoons Cajun seasoning (adjust to your spice preference). This is where the magic happens! A good quality Cajun blend will have a complex mix of paprika, cayenne, garlic powder, onion powder, oregano, and thyme.
DIY Cajun Blend: Mix 1 tbsp paprika, 2 tsp salt, 1 tsp cayenne pepper, 1 tsp black pepper, 1 tsp garlic powder, 1 tsp onion powder, 1 tsp dried oregano, 1 tsp dried thyme. - Salt and Black Pepper: To taste. Even with Cajun seasoning, a little final adjustment ensures perfect flavor balance.
- Optional: Pinch of brown sugar or a dash of honey: To enhance the sweetness of the peppers if desired, especially if using greener peppers.
Get Cooking: Time Breakdown
Just enough time to chop your veggies and get everything measured out.
Quickly sear the chicken and sauté the peppers to tender-crisp perfection.
Significantly faster than the average busy weeknight meal, clocking in at under 40 minutes!
Let’s Make Some Cajun Magic!
Follow these simple steps to create a dish that’s as visually appealing as it is delicious. We’re aiming for perfectly cooked chicken and nicely softened, yet slightly crisp, peppers.
1. Prep the Chicken
First things first, let’s get that chicken ready. Pat the chicken breasts completely dry with paper towels. This is a crucial step for achieving a beautiful sear. Then, slice the chicken breasts into roughly 1-inch bite-sized pieces. Uniform pieces will ensure they cook evenly. Set them aside in a bowl.
2. Chop the Peppers
Now, let’s tackle those vibrant bell peppers. Wash them, slice them in half, remove the seeds and membranes, and then slice them into thin strips, about ¼ inch thick. Slice the yellow onion similarly. Mince your garlic cloves finely. Having all your vegetables prepped and ready makes the cooking process smooth and enjoyable.
3. Season the Chicken
To the bowl with the chicken pieces, add about 2 tablespoons of the Cajun seasoning, a good pinch of salt, and a grind of black pepper. Toss everything together until the chicken is thoroughly coated. You want every piece to have that beautiful spicy crust forming. You can let it marinate for a few minutes while you heat the pan if you have time, but it’s not essential.
4. Cook the Chicken
Heat the olive oil in a large skillet or cast-iron pan over medium-high heat. Once the oil is shimmering (but not smoking!), carefully add the seasoned chicken pieces in a single layer. Don’t overcrowd the pan – cook in batches if necessary. Sear the chicken for about 3-4 minutes per side, until it’s golden brown and cooked through. Remove the cooked chicken from the skillet and set it aside on a plate. This searing locks in all those delicious juices!
5. Sauté the Peppers
In the same skillet (no need to clean it – those browned bits add flavor!), add a little more olive oil if needed. Add the sliced bell peppers and onions. Sauté them over medium heat for about 5-7 minutes, stirring occasionally, until they start to soften but still have a slight crispness. You want them tender-crisp, not mushy. Add the minced garlic during the last minute of sautéing and cook until fragrant, being careful not to burn it.
6. Combine and Finish
Return the cooked chicken to the skillet with the softened peppers and onions. Add the remaining 1 tablespoon of Cajun seasoning (or to your taste). Toss everything together to combine and allow the flavors to meld for another 1-2 minutes. If you’re using the optional brown sugar or honey, stir it in now to kiss the vegetables with a touch of sweetness. Taste and adjust salt and pepper if needed. And there you have it – your beautifully aromatic Cajun Chicken with Sweet Peppers is ready!
Nutritional Snapshot
- Calories: Approximately 300-400 per serving (varies based on exact quantities and preparation).
- Protein: High, excellent source from chicken breasts.
- Carbohydrates: Moderate, primarily from bell peppers and onions.
- Fat: Moderate, dependent on the amount of olive oil used. Rich in healthy monounsaturated fats.
- Fiber: Good source from the vegetables.
Please note: This is an estimated nutritional breakdown and can vary significantly based on portion size, specific ingredients used, and cooking methods.
Keep it Healthy: Smart Swaps
This recipe is already quite healthy, but here are a couple of ways to make it even lighter without sacrificing flavor:
- Reduce Oil: Use a non-stick skillet and a spray of olive oil or a tablespoon of broth for sautéing the vegetables if you want to significantly cut down on added fats.
- Leaner Protein: While chicken breasts are already lean, consider extra-lean ground turkey or even firm tofu (for a vegetarian option) seasoned with Cajun spices.
- Control Sodium: Opt for low-sodium Cajun seasoning blends or make your own with reduced salt.
How to Serve Your Delicious Creation
This Cajun Chicken with Sweet Peppers is incredibly versatile and pairs beautifully with a variety of sides:
- Over Rice: The classic Southern pairing! Serve over fluffy white rice, brown rice, or even cauliflower rice for a low-carb option.
- Pasta Delight: Toss with your favorite cooked pasta for a heartier meal. A light, creamy sauce or even just a drizzle of olive oil works wonders.
- Lettuce Wraps: For a super light and refreshing meal, spoon the mixture into crisp lettuce cups.
- Low-Carb Bowls: Serve alongside a generous portion of steamed broccoli, green beans, or a fresh side salad.
- With Cornbread: A dollop of this hearty chicken and pepper mix on top of warm cornbread is pure comfort food.
Avoid These Pitfalls: Common Mistakes
To ensure your Cajun Chicken with Sweet Peppers turns out perfectly every time, watch out for these common issues:
- Overcrowding the Pan: This leads to steaming instead of searing the chicken, resulting in a less flavorful, pale piece of poultry. Cook in batches.
- Mushy Vegetables: Sautéing vegetables for too long will make them limp and watery. Aim for tender-crisp.
- Burning the Garlic: Minced garlic cooks very quickly. Add it towards the end of sautéing vegetables to prevent a bitter taste.
- Not Patting Chicken Dry: Moisture is the enemy of a good sear. Ensure chicken is thoroughly dried before adding it to the hot pan.
Smart Storage: Making it Last
Leftovers are your friend with this dish! Once cooled, store your Cajun Chicken with Sweet Peppers in an airtight container in the refrigerator. It should stay fresh for 3-4 days. This makes it an excellent candidate for meal prepping lunches or quick dinners later in the week. Reheat gently on the stovetop or in the microwave, adding a splash of water or broth if it seems dry.
Frequently Asked Questions
***Can I use chicken thighs instead of breasts?***
Absolutely! Chicken thighs are often more forgiving and can remain more moist than breasts, offering a richer flavor. Just ensure they are cooked through.
***How spicy is Cajun seasoning?***
Cajun seasoning can vary greatly in heat level depending on the brand. Most have a noticeable kick but are balanced with other spices. Always start with the recommended amount and add more to taste if you like it hotter.
***Can I make this vegetarian or vegan?***
Yes! You can substitute the chicken with firm tofu, tempeh, or even a hearty mushroom like portobello, ensuring they are well-seasoned and cooked until tender.
***What are the best colors of bell peppers to use?***
Red, yellow, and orange bell peppers are sweeter and more mature than green ones, providing a lovely contrast to the spicy Cajun seasoning. However, any color will work!
***Can I add other vegetables?***
Certainly! Broccoli florets, snap peas, or zucchini slices would be delicious additions. Add them when you add the peppers and onions, adjusting cooking time as needed.
Taste the Louisiana Sunshine!
There you have it – a simple, flavorful, and quick Cajun Chicken with Sweet Peppers recipe that’s perfect for any night of the week. It’s a dish that brings vibrant colors and bold tastes to your table with minimal fuss. Whether you’re a seasoned cook or just starting, this recipe is sure to impress. Don’t wait any longer to spice up your dinner routine!
Cajun Chicken With Sweet Peppers Recipe
Description
ThisCajun Chicken with Sweet Peppers recipeis bursting with bold flavors and vibrant colors! Tender chicken breasts are seasoned with a spicy Cajun blend and sautéed with sweet bell peppers, making it a quick, easy, and healthy meal. Perfect for weeknight dinners or meal prepping, this dish brings a taste of Louisiana to your table. Whether you serve it over rice, pasta, or enjoy it low-carb, it’s a family favorite!
Ingredients
- 2boneless, skinless chicken breasts (sliced thin)
- 1 tablespoonCajun seasoning
- 1 tablespoonolive oil
- 1red bell pepper (sliced)
- 1yellow bell pepper (sliced)
- 1green bell pepper (sliced)
- 1small red onion (sliced)
- 2cloves garlic (minced)
- Salt and pepper to taste
- Fresh parsley for garnish
Instructions
Notes
Adjust the level of spiciness by adding extra Cajun seasoning or red pepper flakes.
Great served with rice, cauliflower rice, or in tortillas for wraps.
You can substitute chicken thighs for even juicier meat.
Nutrition
- Calories: 250
- Sugar: 4g
“`