“`html
Table of Contents
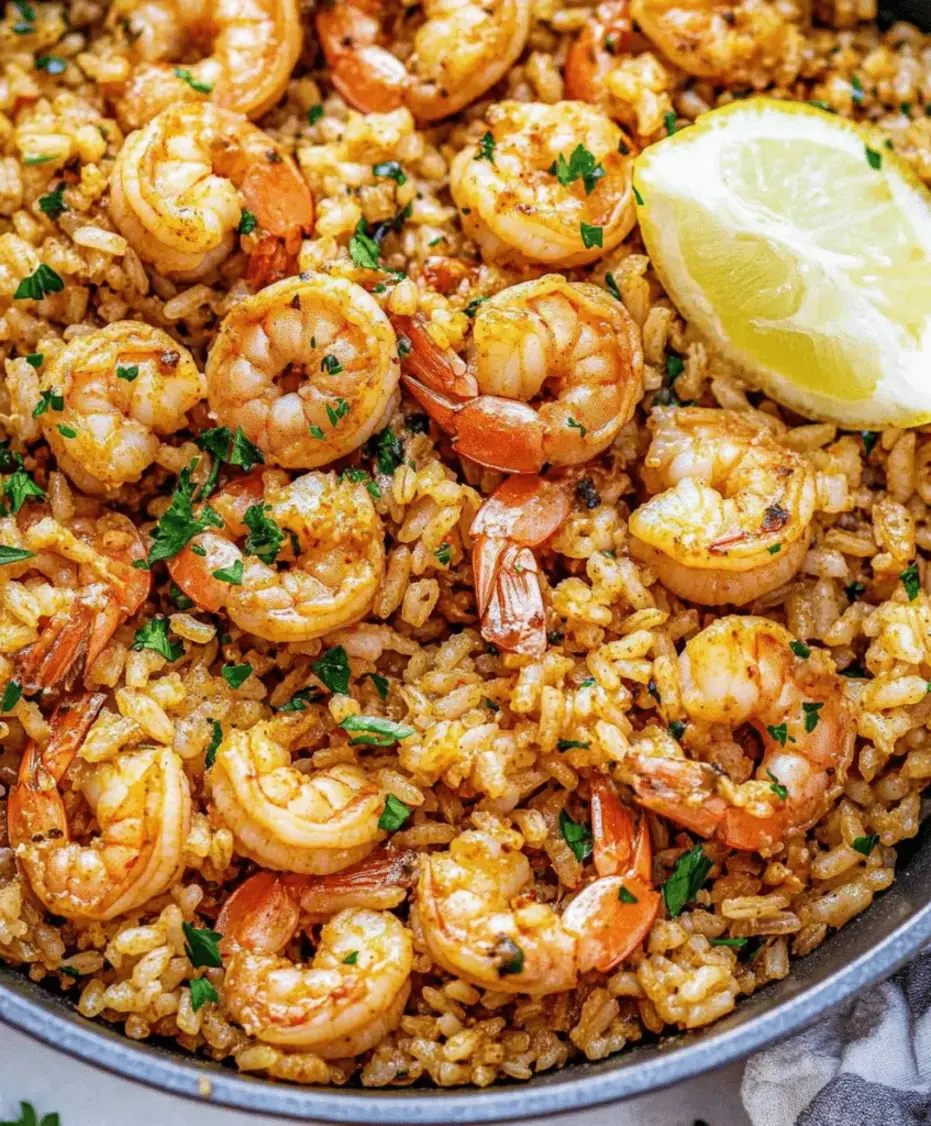
Cajun Sausage And Rice Skillet Recipe
Craving Bold Flavors in Under an Hour?
Are you tired of the weeknight dinner dilemma, searching for a meal that’s both quick and bursting with mouthwatering flavor? If you’re nodding along, then you’re in the right place! This easy Cajun Sausage and Rice Skillet recipe is the answer you’ve been searching for. With an average prep time of just 15 minutes and a cook time of around 30 minutes, this one-pan wonder delivers robust Louisiana tastes without a fuss. Imagine tender, smoky sausage mingling with vibrant bell peppers, sweet onions, and perfectly seasoned rice, all cooked together in a single skillet. It’s a hearty, comforting, and incredibly satisfying dish that will transport your taste buds straight to the heart of Cajun country. Let’s dive into making this sensational meal!
Flavorful Ingredients for Your Skillet
The magic of this Cajun Sausage and Rice Skillet lies in its simple yet powerful combination of ingredients. Each component plays a crucial role in building those authentic Louisiana flavors. Here’s what you’ll need:
- 1 tablespoon olive oil or vegetable oil (for searing and sautéing; a neutral oil is best to let the other flavors shine)
- 1 pound smoked sausage (such as andouille, kielbasa, or even a good quality smoked chorizo), sliced into 1/2-inch rounds (the smoky, slightly spicy notes are key here; choose one with good flavor!)
- 1 medium yellow onion, chopped (adds a sweet, aromatic base)
- 2 bell peppers (any color combination, like red and green), chopped (for a touch of sweetness and vibrant color)
- 2 cloves garlic, minced (essential for that pungent depth of flavor)
- 1 cup uncooked long-grain white rice (fluffy, separate grains are ideal; basmati or jasmine work well too)
- 2 cups chicken broth or vegetable broth (acts as the cooking liquid for the rice and adds savory depth; low-sodium is recommended so you can control saltiness)
- 1 teaspoon Cajun seasoning (or more, to taste! This is where the signature flavor comes from. Look for a blend with paprika, cayenne, garlic powder, onion powder, oregano, and thyme.)
- 1/2 teaspoon dried thyme
- Salt and freshly ground black pepper, to taste
- Optional garnishes: chopped fresh parsley or green onions (for a fresh, herbaceous finish)
Ingredient Substitutions and Notes:
- Sausage: If you can find authentic andouille sausage, it will bring the most traditional Cajun flavor. Kielbasa is a readily available and delicious alternative. For a vegetarian option, use a plant-based smoked sausage.
- Broth: Water can be used in a pinch, but broth will significantly enhance the overall flavor.
- Rice: While long-grain white rice is recommended for its texture and cooking time, you can experiment with brown rice, though it will require more liquid and a longer cooking time.
- Spice Level: Adjust the amount of Cajun seasoning and add a pinch of cayenne pepper if you prefer a spicier dish.
Perfect Timing for a Speedy Meal
This Cajun Sausage and Rice Skillet is impressively quick, especially when compared to many other hearty one-pan meals. The average time for similar recipes can easily creep past an hour, making this a fantastic weeknight savior for busy families or anyone short on time but big on flavor cravings.

Effortless Step-by-Step Instructions
Step 1: Prepare Your Foundation
Let’s get our flavor base ready! Start by slicing your smoked sausage into 1/2-inch thick rounds. Chop the yellow onion and bell peppers into bite-sized pieces. Mince your garlic cloves – the smaller, the better for even distribution of that potent aroma. Having everything prepped and ready to go in this way is our little secret to a smooth cooking process. This is often called “mise en place,” and it makes all the difference!
Step 2: Sear the Sausage for a Golden Crust
Grab a large skillet or Dutch oven (one that has a lid is ideal). Heat 1 tablespoon of olive oil over medium-high heat until shimmering. Add the sliced smoked sausage to the hot pan, spreading it out in a single layer. Let the sausage cook for about 4-5 minutes per side, until beautifully browned and slightly crispy in places. This searing process renders some of the fat and develops a wonderful depth of flavor and texture. Once browned, use a slotted spoon to remove the sausage from the skillet and set it aside on a plate, leaving the rendered fat in the pan.
Step 3: Build the Flavor Base
Reduce the heat to medium. If there’s an excessive amount of fat in the skillet (more than about 2 tablespoons), you can drain some off. Add the chopped onion and bell peppers to the rendered sausage fat. Sauté for about 5-7 minutes, stirring occasionally, until the vegetables have softened and the onion is translucent. Now, add the minced garlic, dried thyme, and Cajun seasoning to the skillet. Stir and cook for another minute until the garlic is fragrant – be careful not to burn it!
Step 4: Combine Rice and Liquid
Stir the uncooked long-grain white rice into the vegetable and spice mixture. Toast the rice for about 1 minute, stirring constantly. This step helps the rice grains stay separate and absorb flavor better. Pour in the chicken or vegetable broth. Add the cooked sausage back into the skillet. Stir everything together well, scraping up any browned bits from the bottom of the pan – that’s pure flavor!
Step 5: Simmer to Perfection
Bring the mixture to a gentle boil. Once boiling, reduce the heat to low, cover the skillet tightly with a lid, and let it simmer for 15-20 minutes, or until the rice is tender and most of the liquid has been absorbed. Avoid lifting the lid too often, as this releases steam and can affect the cooking time. Once the rice is cooked, remove the skillet from the heat and let it stand, covered, for about 5 minutes. This allows the rice to steam and become perfectly fluffy. Fluff the rice with a fork, stir in fresh parsley or green onions if desired, and season with salt and pepper to taste. Serve hot!
Nutritional Snapshot
While exact nutritional values can vary based on specific ingredients and brands used, a typical serving of this Cajun Sausage and Rice Skillet is approximately:
- Calories: 450-550 kcal
- Protein: 20-25g
- Fat: 25-35g (mostly from sausage and oil)
- Carbohydrates: 30-40g
- Fiber: 3-5g
Note: These are estimates and can be influenced by the type of sausage, amount of oil used, and broth choices.
Making it Healthier Without Sacrificing Flavor
Want to lighten up this already relatively healthy one-pan meal? Here are a few swaps you can make:
- Leaner Sausage: Opt for a turkey or chicken smoked sausage, which typically has less fat than pork-based varieties.
- More Veggies: Bulk up the skillet with extra vegetables like chopped celery, zucchini, or spinach. Add spinach in the last few minutes of cooking until it wilts.
- Brown Rice: If you have the time, switch to brown rice. It offers more fiber but requires a bit more liquid and a longer simmering time (follow package directions).
- Reduced Sodium Broth: Always a good choice to minimize sodium intake.
- Less Oil: If your sausage is particularly fatty, you might need less added oil for sautéing.
Serving Suggestions to Complete the Meal
This Cajun Sausage and Rice Skillet is a hearty meal on its own, but here are some ideas to round out your plate:
- Fresh Green Salad: A simple side salad with a vinaigrette provides a refreshing contrast.
- Steamed Green Beans or Broccoli: Add extra fiber and nutrients.
- Cornbread: A classic Southern pairing that’s perfect for soaking up any extra sauce.
- Hot Sauce: For those who love an extra kick, offer a bottle of your favorite Louisiana-style hot sauce at the table.
Common Mistakes to Avoid
To ensure your Cajun Sausage and Rice Skillet turns out perfectly every time, be mindful of these common pitfalls:
- Not Prepping Ingredients: This dish cooks relatively quickly, so having everything chopped and measured before you start is crucial.
- Burning the Garlic: Garlic can burn easily. Add it towards the end of sautéing the vegetables and cook only until fragrant.
- Over-Stirring Rice: While you want to stir the rice initially to toast it and prevent sticking, avoid stirring too much during the simmering process, as this can make the rice mushy.
- Lifting the Lid Too Soon: Let the rice steam undisturbed for the recommended time for optimal texture.
- Under-Seasoning: Cajun seasoning blends can vary in salt content. Taste and adjust with salt and pepper at the end.
Storing and Reheating This Delicious Dish
This skillet meal is fantastic for leftovers!
- To Store: Once cooled, transfer any leftover Cajun Sausage and Rice Skillet to an airtight container and refrigerate for up to 3-4 days.
- To Reheat:
- Stovetop: The best method! Gently reheat in a skillet over medium-low heat, adding a tablespoon or two of broth or water if needed to prevent sticking and restore moisture. Stir occasionally until heated through.
- Microwave: Place a portion in a microwave-safe dish, cover loosely, and heat in 30-60 second intervals, stirring in between, until hot.
The rice might absorb some liquid as it sits, so don’t be surprised if a splash of liquid helps revive it during reheating.

Frequently Asked Questions
***What kind of sausage is best for this recipe?***
Smoked sausage is key. Andouille is the most authentic Cajun choice, offering a spicy kick. Kielbasa, chorizo, or even a good quality ham sausage will also work well. The goal is a flavorful, smoked sausage that holds its shape when cooked.
***Can I use white rice other than long-grain?***
While long-grain white rice is recommended for its texture, you can use medium-grain white rice. Short-grain rice tends to get stickier. Brown rice is an option but requires significantly more liquid and a longer cooking time, so you’d need to adjust the recipe accordingly.
***How do I make it spicier?***
Increase the amount of Cajun seasoning, add a pinch of cayenne pepper, or stir in some chopped jalapeños with the onions and bell peppers. A dash of your favorite hot sauce at the end can also boost the heat.
***Can I add other vegetables?***
Absolutely! Diced celery is a classic addition to Cajun dishes and can be sautéed with the onions and peppers. Peas, corn, zucchini, or finely chopped carrots would also work. Add heartier vegetables like carrots earlier in the sautéing process.
***Why is my rice mushy?***
Mushy rice is often a result of too much liquid, over-stirring during the simmer, or lifting the lid too often. Measure your liquid accurately, resist the urge to stir constantly once covered, and allow the rice to steam undisturbed.
Your New Go-To Weeknight Meal!
There you have it – a foolproof recipe for a Cajun Sausage and Rice Skillet that’s packed with flavor, incredibly satisfying, and remarkably easy to make. This one-pan wonder proves that you don’t need hours in the kitchen to create a meal that’s both comforting and exciting. Whether you’re a seasoned cook or just starting out, this recipe is sure to become a staple in your rotation. Give it a try and let the vibrant taste of Louisiana spice up your dinner table!

Cajun Sausage And Rice Skillet Recipe
Description
This easy Cajun Sausage and Rice Skillet is a flavorful one-pan meal featuring smoked sausage, bell peppers, onions, and Cajun-seasoned rice. It’s a quick and hearty dish with bold Louisiana flavors, perfect for weeknight dinners.
Ingredients
- 1lb smoked sausage, sliced
- 1 cuplong-grain white rice
- 1 ½ cupschicken broth
- 1can (14.5 oz) diced tomatoes, undrained
- 1small onion, chopped
- 1bell pepper, diced
- 2cloves garlic, minced
- 1 tspCajun seasoning
- ½ tspsmoked paprika
- ½ tspsalt (adjust to taste)
- ¼ tspblack pepper
- 1 tbspolive oil
- 2green onions, sliced (for garnish)
Instructions
Notes
Adjust Cajun seasoning for desired spice level.
Use andouille sausage for an authentic Cajun taste.
Swap white rice for brown rice (increase cook time by 10 minutes).
Nutrition
- Calories: 420
- Sugar: 4g
“`