“`html
Table of Contents
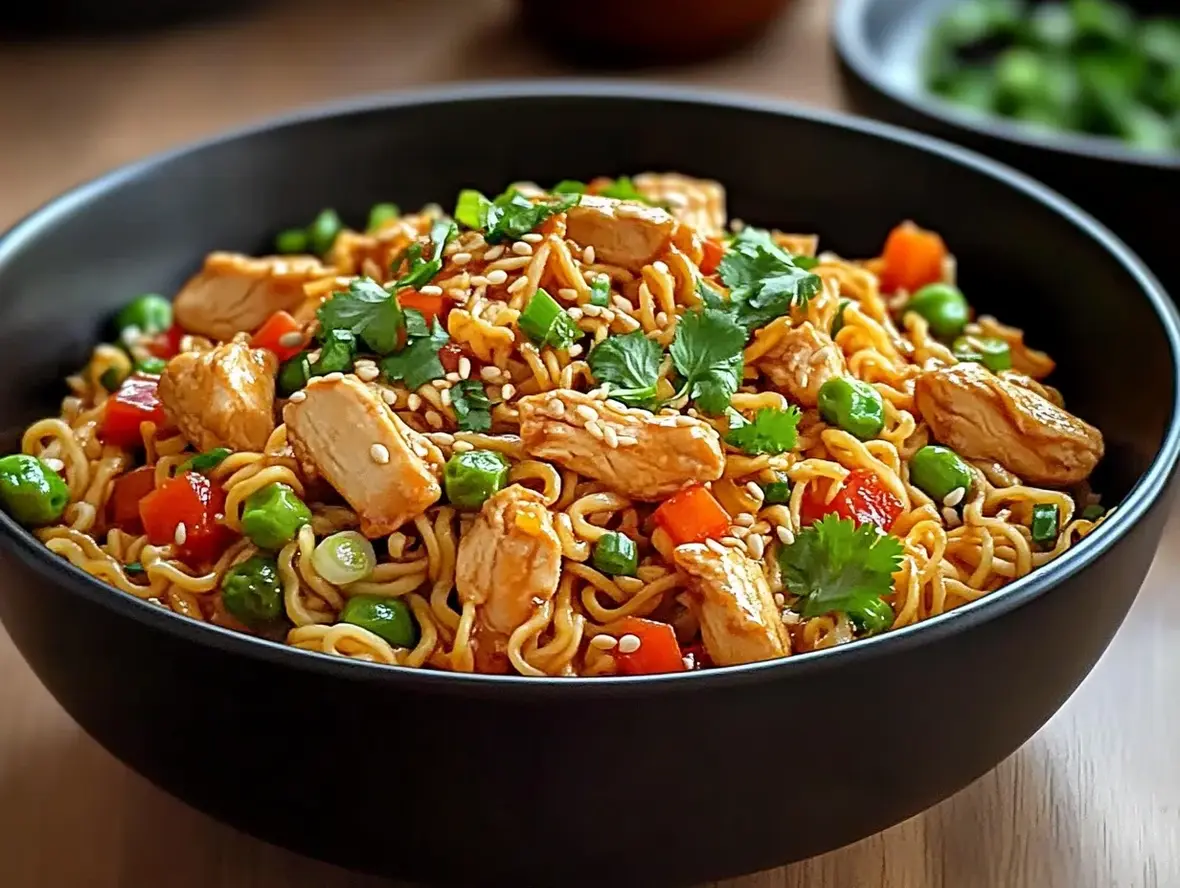
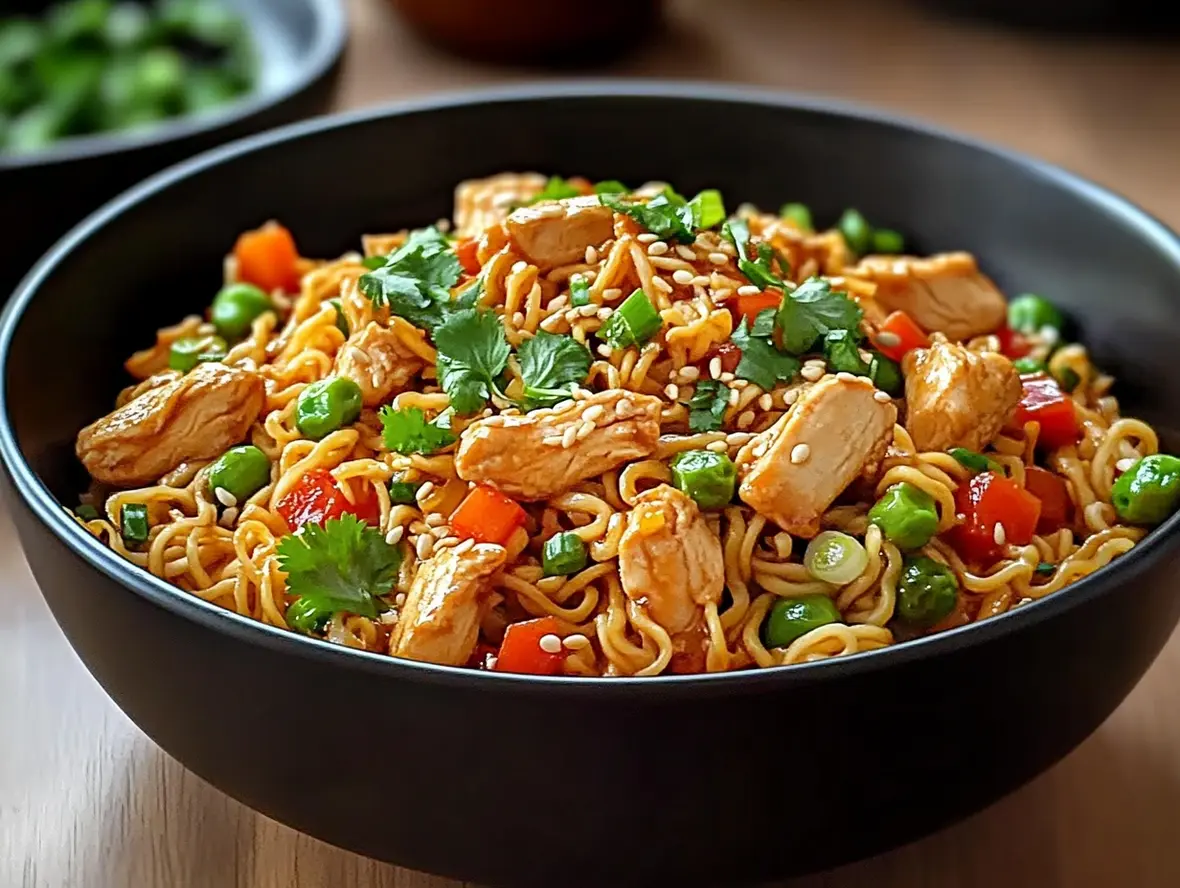
Delicious Chicken Ramen Stir Fry Recipe for Quick Meals
Craving a Flavorful Weeknight Meal?
Are you finding yourself staring into the abyss of your refrigerator on a busy weeknight, desperately searching for a meal that’s both quick and incredibly satisfying? We’ve all been there. The good news is, you don’t need to sacrifice flavor or nutrition for speed. This Delicious Chicken Ramen Stir Fry Recipe is designed to be your new go-to for those moments when hunger strikes fast. In under 30 minutes, you can transform simple ingredients into a vibrant, savory one-pan wonder that the whole family will love. Forget takeout – this recipe brings the deliciousness of your favorite ramen and stir-fry dishes right to your kitchen table, with tender chicken, crisp veggies, and perfectly coated noodles.
Ingredients You’ll Need
The beauty of this dish lies in its flexibility. Feel free to swap out vegetables based on what you have on hand! The key is to have a colorful mix for both visual appeal and nutritional variety. Let’s break down what you’ll need:
For the Protein (Chicken)
- 1 pound boneless, skinless chicken breasts or thighs: Cut into bite-sized pieces. Chicken thighs will remain more moist, while breasts are leaner.
- 1 tablespoon soy sauce: For a foundational umami flavor. Use tamari for a gluten-free option.
- 1 teaspoon cornstarch: This helps to create a tender crust on the chicken as it cooks,locking in its juices.
- 1 tablespoon cooking oil (like vegetable or canola): For searing the chicken.
For the Veggies
- 1 tablespoon cooking oil: For stir-frying.
- 1 medium onion: Thinly sliced. Yellow or red onions work well.
- 2 cloves garlic: Minced. The aromatic heart of many stir-fries.
- 1 cup broccoli florets: Small, bite-sized pieces.
- 1 cup sliced bell peppers: Any color variety adds sweetness and crunch.
- 1/2 cup snow peas or snap peas: For a delightful crisp texture.
- Optional additions: Sliced carrots, mushrooms, zucchini, or baby corn.
For the Noodles
- 2 (3-ounce) packages instant ramen noodles: Discard the seasoning packets or save them for another use. These cook up in minutes, making them perfect for quick meals.
For the Savory Stir-Fry Sauce
- 1/4 cup soy sauce: The salty, umami base.
- 2 tablespoons oyster sauce: Adds depth, sweetness, and a glossy finish. (Vegetarian oyster sauce is also available).
- 1 tablespoon rice vinegar: For a touch of acidity to balance the flavors.
- 1 tablespoon brown sugar or honey: To impart a subtle sweetness and help the sauce thicken.
- 1 teaspoon sesame oil: For that signature nutty aroma and flavor.
- 1 teaspoon cornstarch: To thicken the sauce to a beautiful, glossy consistency.
- 1/4 cup water or chicken broth: To help create enough sauce to coat everything.
When Time is of the Essence
This recipe is a champion of speed!
Compared to many complex dinner recipes that can take an hour or more, this Chicken Ramen Stir Fry is incredibly efficient. The average stir-fry recipe might require more elaborate marinating or vegetable prep, but we’ve streamlined this for maximum flavor with minimum fuss. It’s designed for those weeknights when cooking feels like a chore but you still crave something homemade and delicious.
Let’s Get Cooking!
Step 1: Prepare the Chicken
Begin by prepping your chicken. If you haven’t already, slice the boneless, skinless chicken breasts or thighs into bite-sized pieces, about 1-inch cubes. In a medium bowl, toss the chicken pieces with 1 tablespoon of soy sauce and 1 teaspoon of cornstarch. Make sure each piece is lightly coated. This simple marinade not only adds flavor but also creates a lovely, slightly crisp exterior when it hits the hot pan.
Step 2: Sear the Chicken
Heat 1 tablespoon of cooking oil in a large skillet or wok over medium-high heat. Once the oil is shimmering, carefully add the marinated chicken in a single layer. Avoid crowding the pan; cook in batches if necessary. Sear the chicken for about 3-4 minutes per side, until golden brown and cooked through. The cornstarch will help create a beautiful crust. Once cooked, remove the chicken from the skillet and set it aside on a plate. Don’t worry about cleaning the pan.
Step 3: Prep Your Veggies
While the chicken is cooking or resting, quickly prepare your vegetables. Slice the onion, mince the garlic, chop the broccoli into small florets, slice the bell peppers, and trim the snow peas. Having everything prepped and ready to go is key to a successful stir-fry, as the cooking process moves very quickly.
Step 4: Prepare the Ramen Noodles
Bring a pot of water to a boil. Add the ramen noodle blocks and cook according to package directions, usually about 3 minutes. Drain the noodles thoroughly. Do not overcook them, as they will continue to cook slightly in the stir-fry. You can toss them with a tiny bit of oil to prevent sticking if you like.
Step 5: Whisk Together the Stir-Fry Sauce
In a small bowl, whisk together all the sauce ingredients: 1/4 cup soy sauce, 2 tablespoons oyster sauce, 1 tablespoon rice vinegar, 1 tablespoon brown sugar (or honey), 1 teaspoon sesame oil, 1 teaspoon cornstarch, and 1/4 cup water or chicken broth. Whisk until the cornstarch is fully dissolved and there are no lumps. Set aside.
Step 6: Sauté the Vegetables
Add the remaining 1 tablespoon of cooking oil to the same skillet you used for the chicken, still over medium-high heat. Add the sliced onions and sauté for about 1-2 minutes until they begin to soften. Add the minced garlic and stir-fry for about 30 seconds until fragrant. Then, add the broccoli florets, sliced bell peppers, and snow peas. Stir-fry for 3-5 minutes, or until the vegetables are tender-crisp. You want them cooked but still with a pleasant bite.
Step 7: Bring It All Together
Pour the prepared stir-fry sauce over the vegetables in the skillet. Bring the sauce to a simmer, stirring constantly. The cornstarch will begin to thicken the sauce, creating a beautiful glaze. Once the sauce has thickened (about 1-2 minutes), add the cooked chicken back into the skillet along with the drained ramen noodles. Toss everything together gently to ensure the chicken and noodles are evenly coated in the savory sauce. Cook for another 1-2 minutes, just until everything is heated through.
Step 8: Serve Immediately
Taste and adjust seasoning if necessary – you might want a little more soy sauce or a pinch of red pepper flakes for heat. Serve your delicious Chicken Ramen Stir Fry hot, garnished with sesame seeds or chopped green onions if desired.
Nutritional Snapshot
While exact nutritional values can vary based on specific ingredients and portion sizes, this Chicken Ramen Stir Fry typically offers a good balance of macronutrients. A standard serving generally contains:
- Calories: Approximately 450-550 kcal
- Protein: Around 30-40g (primarily from chicken)
- Carbohydrates: Approximately 40-50g (from noodles and vegetables)
- Fat: Roughly 15-25g (depending on oil used and chicken thigh choice)
It also contributes essential vitamins and minerals from the variety of vegetables included.
Healthier Twists on a Classic
Looking to make this dish even healthier without sacrificing taste? Here are a few simple swaps:
- Noodles: Swap instant ramen for whole wheat spaghetti, soba noodles, or even zucchini noodles (zoodles) for a lower-carb option. Cook them separately and add them just before serving.
- Vegetables: Load up on more non-starchy vegetables like bok choy, asparagus, or Brussels sprouts.
- Sauce: Reduce the amount of brown sugar or honey. Use low-sodium soy sauce to cut down on sodium.
- Protein: Opt for chicken breast for a leaner protein source, or consider adding tofu or edamame for plant-based protein.
Serving Up Success
This stir-fry is a complete meal on its own! However, if you’re looking to enhance your meal, consider these serving suggestions:
- Garnish: Top with toasted sesame seeds, chopped fresh green onions, or a sprinkle of chili flakes for an extra kick.
- Add crunch: A side of crispy fried wonton strips or baked tofu cubes can add interesting textures.
- Freshness: A squeeze of fresh lime juice or a dollop of sriracha can brighten up the flavors.
Avoiding Common Pitfalls
Even with a simple recipe, a few common mistakes can happen. Keep these tips in mind:
- Overcrowding the pan: This leads to steaming rather than searing, resulting in less flavorful and potentially soggy chicken and vegetables. Cook in batches if necessary.
- Not prepping ingredients ahead: Stir-frying is fast-paced. Have all your chopping done and measured before you start cooking.
- Overcooking the noodles: Ramen noodles become mushy quickly. Cook them al dente, as they’ll continue to soften in the sauce.
- Using a cold pan: Ensure your pan and oil are hot before adding ingredients to achieve that desirable sear and crisp texture.
Smart Storing Strategies
Leftovers are rare with this dish, but if you do have some, store them in an airtight container in the refrigerator for up to 3 days. Reheat gently on the stovetop or in the microwave. Be aware that the noodles might absorb more sauce and become softer upon reheating.
Frequently Asked Questions
What kind of chicken is best for this recipe?
Both chicken breasts and thighs work well. Thighs tend to stay more moist and tender due to their higher fat content, while breasts are leaner. For this stir-fry, cutting them into uniform, bite-sized pieces is key for even cooking.
Can I make this vegetarian or vegan?
Absolutely! Substitute the chicken with firm or extra-firm tofu (pressed and cubed), tempeh, or a generous mix of hearty vegetables like mushrooms and extra broccoli. For the oyster sauce, look for a vegetarian or vegan alternative, or simply use more soy sauce and a touch of hoisin sauce.
My sauce didn’t thicken. What went wrong?
Ensure you’re whisking one teaspoon of cornstarch with the other sauce ingredients to get rid of lumps. You also need to bring the sauce to a simmer and let it cook for a minute or two while stirring continuously. If it’s still too thin, you can mix another teaspoon of cornstarch with a tablespoon of cold water (a slurry) and stir it into the simmering sauce.
Can I use a different type of noodles?
Yes! While the recipe specifies instant ramen for speed, you can absolutely use other noodles like lo mein, udon, soba, or even spaghetti. Just be sure to cook them according to their package directions and drain them well before adding them to the stir-fry.
Loved this recipe? Share your creations with us on social media and don’t forget to leave a comment below! Your feedback makes our day!
Chicken Ramen Stir Fry
Description
A quick and delicious one-pan meal that combines tender chicken, crisp vegetables, and ramen noodles coated in a savory, slightly sweet stir-fry sauce. Perfect for weeknight dinners when you’re craving something flavorful and satisfying.
Ingredients
- For the Noodles and Chicken:2packages (6 oz each) ramen noodles (seasoning packets discarded)1lb boneless, skinless chicken thighs, cut into bite-sized pieces2 tbspvegetable oilFor the Vegetables:1red bell pepper, sliced1 cupsnap peas1carrot, julienned3cloves garlic, minced1 tbspginger, minced3green onions, sliced (white and green parts separated)For the Sauce:¼ cupsoy sauce2 tbspoyster sauce1 tbspsesame oil1 tspsugar¼ tspwhite pepper
- 2packages (6 oz each) ramen noodles (seasoning packets discarded)1lb boneless, skinless chicken thighs, cut into bite-sized pieces2 tbspvegetable oil
- 1lb boneless, skinless chicken thighs, cut into bite-sized pieces2 tbspvegetable oil
- 2 tbspvegetable oil
- For the Vegetables:1red bell pepper, sliced1 cupsnap peas1carrot, julienned3cloves garlic, minced1 tbspginger, minced3green onions, sliced (white and green parts separated)For the Sauce:¼ cupsoy sauce2 tbspoyster sauce1 tbspsesame oil1 tspsugar¼ tspwhite pepper
- 1red bell pepper, sliced1 cupsnap peas1carrot, julienned3cloves garlic, minced1 tbspginger, minced3green onions, sliced (white and green parts separated)
- 1 cupsnap peas1carrot, julienned3cloves garlic, minced1 tbspginger, minced3green onions, sliced (white and green parts separated)
- 1carrot, julienned3cloves garlic, minced1 tbspginger, minced3green onions, sliced (white and green parts separated)
- 3cloves garlic, minced1 tbspginger, minced3green onions, sliced (white and green parts separated)
- 1 tbspginger, minced3green onions, sliced (white and green parts separated)
- 3green onions, sliced (white and green parts separated)
- For the Sauce:¼ cupsoy sauce2 tbspoyster sauce1 tbspsesame oil1 tspsugar¼ tspwhite pepper
- ¼ cupsoy sauce2 tbspoyster sauce1 tbspsesame oil1 tspsugar¼ tspwhite pepper
- 2 tbspoyster sauce1 tbspsesame oil1 tspsugar¼ tspwhite pepper
- 1 tbspsesame oil1 tspsugar¼ tspwhite pepper
- 1 tspsugar¼ tspwhite pepper
- ¼ tspwhite pepper
Instructions
- 1️⃣Prepare the Sauce:In a small bowl, mix together soy sauce, oyster sauce, sesame oil, sugar, and white pepper. Set aside.
- 2️⃣Cook the Chicken:Heat 1 tablespoon of vegetable oil in a large wok or skillet over high heat. Add the chicken pieces and stir-fry for 5–6 minutes, or until golden brown and fully cooked. Remove the chicken from the pan and set aside.3️⃣Stir-Fry the Vegetables:In the same pan, add the remaining tablespoon of vegetable oil. Stir-fry the red bell pepper, snap peas, and carrot for 2–3 minutes, or until they are crisp-tender.4️⃣Add Aromatics:Add the minced garlic, ginger, and the white parts of the green onions to the pan. Stir-fry for about 30 seconds, or until fragrant.5️⃣Cook the Noodles:While the vegetables are cooking, boil the ramen noodles in a pot of water for 2 minutes. Drain well, ensuring the noodles are slightly undercooked, as they will continue cooking in the stir-fry.6️⃣Combine Everything:Add the cooked chicken back to the pan with the vegetables. Toss in the cooked ramen noodles and pour the prepared sauce over the mixture. Stir-fry for 2–3 minutes, ensuring everything is evenly coated and heated through.7️⃣Garnish and Serve:Sprinkle the green parts of the sliced green onions over the dish. Serve hot and enjoy!
- 3️⃣Stir-Fry the Vegetables:In the same pan, add the remaining tablespoon of vegetable oil. Stir-fry the red bell pepper, snap peas, and carrot for 2–3 minutes, or until they are crisp-tender.4️⃣Add Aromatics:Add the minced garlic, ginger, and the white parts of the green onions to the pan. Stir-fry for about 30 seconds, or until fragrant.5️⃣Cook the Noodles:While the vegetables are cooking, boil the ramen noodles in a pot of water for 2 minutes. Drain well, ensuring the noodles are slightly undercooked, as they will continue cooking in the stir-fry.6️⃣Combine Everything:Add the cooked chicken back to the pan with the vegetables. Toss in the cooked ramen noodles and pour the prepared sauce over the mixture. Stir-fry for 2–3 minutes, ensuring everything is evenly coated and heated through.7️⃣Garnish and Serve:Sprinkle the green parts of the sliced green onions over the dish. Serve hot and enjoy!
- 4️⃣Add Aromatics:Add the minced garlic, ginger, and the white parts of the green onions to the pan. Stir-fry for about 30 seconds, or until fragrant.
- 5️⃣Cook the Noodles:While the vegetables are cooking, boil the ramen noodles in a pot of water for 2 minutes. Drain well, ensuring the noodles are slightly undercooked, as they will continue cooking in the stir-fry.6️⃣Combine Everything:Add the cooked chicken back to the pan with the vegetables. Toss in the cooked ramen noodles and pour the prepared sauce over the mixture. Stir-fry for 2–3 minutes, ensuring everything is evenly coated and heated through.7️⃣Garnish and Serve:Sprinkle the green parts of the sliced green onions over the dish. Serve hot and enjoy!
- 6️⃣Combine Everything:Add the cooked chicken back to the pan with the vegetables. Toss in the cooked ramen noodles and pour the prepared sauce over the mixture. Stir-fry for 2–3 minutes, ensuring everything is evenly coated and heated through.7️⃣Garnish and Serve:Sprinkle the green parts of the sliced green onions over the dish. Serve hot and enjoy!
- 7️⃣Garnish and Serve:Sprinkle the green parts of the sliced green onions over the dish. Serve hot and enjoy!
Notes
Protein Options:Swap chicken thighs with chicken breast, shrimp, beef, or tofu for variety.Vegetable Variations:Broccoli, mushrooms, or bok choy are great additions to the stir fry.Spice It Up:Add a dash of sriracha, red chili flakes, or chili oil to the sauce for a spicy kick.Leftovers:Store in an airtight container in the fridge for up to 3 days. Reheat in a skillet for the best texture.
Vegetable Variations:Broccoli, mushrooms, or bok choy are great additions to the stir fry.Spice It Up:Add a dash of sriracha, red chili flakes, or chili oil to the sauce for a spicy kick.Leftovers:Store in an airtight container in the fridge for up to 3 days. Reheat in a skillet for the best texture.
Spice It Up:Add a dash of sriracha, red chili flakes, or chili oil to the sauce for a spicy kick.Leftovers:Store in an airtight container in the fridge for up to 3 days. Reheat in a skillet for the best texture.
Leftovers:Store in an airtight container in the fridge for up to 3 days. Reheat in a skillet for the best texture.
“`