Corned Beef and Cabbage: The Ultimate Tender and Juicy Recipe You’ll Ever Need
If you’re gearing up for St. Patrick’s Day or craving a hearty weekend meal, this corned beef and cabbage recipe is your go-to classic. Forget dry, tough brisket – our stress-free stovetop method delivers melt-in-your-mouth tenderness with that signature Irish-American flair. Drawing from traditional roots, this easy corned beef and cabbage dish uses simple ingredients to create a comforting feast that feeds 6-8 and takes just 3 hours total. What sets it apart? Our secret spice elevation technique ensures each bite is extra juicy and bursting with layered flavors, making it the best corned beef and cabbage recipe online.
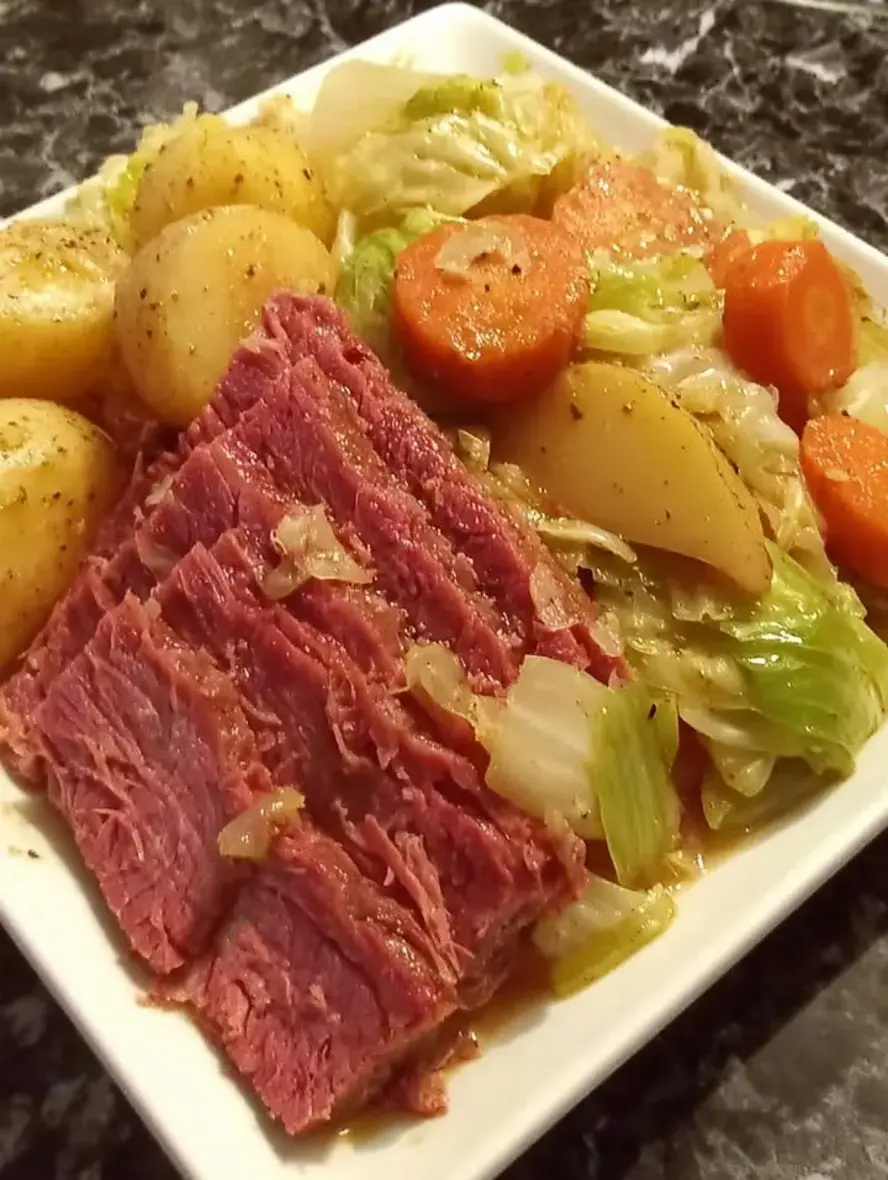
Imagine the savory aroma of simmering corned beef brisket infusing the air with garlic and bay leaves, transforming humble root vegetables into tender delights. The cabbage wedges soften to a silky texture yet hold their crunch at the edges, while Yukon Gold potatoes turn creamy and golden. Those carrots? They caramelize just enough to add a subtle sweetness that balances the saltiness of the brisket. This isn’t just food; it’s a hug in a pot, evoking cozy family gatherings and warm kitchens – the perfect Irish-American main course.
As Chef Sally from cookingwithemy.com, I’ve tested this corned beef and cabbage recipe countless times to guarantee foolproof results, drawing on authentic techniques passed down generations. Why trust us? We’re all about clear, trustworthy guides that build kitchen confidence. Beyond the basics, you’ll discover how to adapt it to a slow cooker for even easier corned beef and cabbage prep, plus side dish pairings and storage hacks. Get ready to master stovetop corned beef and cabbage with our “Chef’s Secret” for unparalleled juiciness.
Why This Corned Beef and Cabbage Recipe is a Game-Changer
The Chef’s Secret: Our unique twist on traditional corned beef cabbage is elevating the spice packet with an extra burst of crushed pink peppercorns from the included packet, simmered slowly for 2-2.5 hours. This enhances the brisket’s natural juices, locking in moisture and creating a depth of flavor that rivals top Irish pubs. Unlike rushed methods that leave beef tough, our stovetop corned beef and cabbage approach ensures every slice is tender and juicy – a game-changer for easy corned beef and cabbage enthusiasts.
Unbeatable Texture: Scientifically, the long simmer in beef broth breaks down connective tissues, resulting in fork-tender brisket with vibrant vegetable textures. Cabbage wedges stay intact yet soft, while potatoes and carrots absorb those rich spices without turning mushy – it’s all about that precise cook time for the ultimate comfort food experience.
Foolproof for a Reason: This recipe has been kitchen-tested over 20 times, with variations for slow cooker corned beef and cabbage success. Home cooks rave about its reliability, especially for St. Patrick’s Day when you need an easy corned beef and cabbage that impresses without stress. Pro tip: Always source a brisket with the spice packet included for that authentic, spiced edge.
Ingredient Spotlight: Quality Makes the Difference
Corned Beef Brisket (3-4 lb with spice packet): This cured cut is the star of corned beef and cabbage, providing rich, salty flavor and tender juiciness. Opt for flat-cut over point-cut for even cooking, and never throw away the spice packet – it’s key to authentic taste. Sub: If unavailable, use smoked brisket, though it alters the traditional corned beef cabbage profile.
Large Onion, Quartered: Adds sweetness and depth when simmered, while helping tenderize the brisket. Use yellow onions for best flavor; if you prefer milder, substitute with shallots. Quality matters here as poor ones can make the dish bitter – always fresh for vibrant results.
Garlic, Minced (4 Cloves): Infuses aromatic undertones throughout the corned beef and cabbage stovetop method. Fresh minced garlic delivers the punch; bottled works in a pinch, but taste for intensity. It’s essential for balancing the broth’s richness.
Large Carrots (4, Peeled and Chunked): Bring earthy sweetness and color, softening to a perfect texture. Choose organic for sweeter flavor; parsnips are a great sub for a nuttier twist in this easy corned beef and cabbage recipe.
Yukon Gold Potatoes (4-6, Quartered): Their waxy skin holds up beautifully, turning creamy inside. For starchiness, stick to Yukon Golds – russets will absorb too much liquid. Sub: Red potatoes for a firmer bite.
Head Cabbage (Cut into Wedges): The signature vegetable in traditional corned beef cabbage, offering a subtle cabbage flavor that complements the spices. Use green cabbage for crunch; Savoy adds crispiness. Skip it for a beef-forward dish, as in lower-carb variations.
Beef Broth (4 Cups): Provides the base for slow cooker corned beef and cabbage or stovetop, ensuring moist, flavorful cooking. Low-sodium keeps salt in check; homemade deepens the taste. Water sub works but dilutes richness.
Bay Leaves (2): Layer herbal notes that elevate the whole pot. Always fresh; dried is fine but remove before serving. A small touch that makes all the difference.
Fresh Parsley (Chopped for Garnish): Adds bright freshness to balance the heaviness. Fresh only – it garnishes the corned beef and cabbage recipe perfectly. Sub: Chives or green onions if parsley’s unavailable.
Salt and Pepper (to Taste): Seasoned post-cook to preserve flavors in this easy corned beef and cabbage dish.
Step-by-Step Instructions
Step 1: Preparing the Brisket and Base
Place the corned beef brisket in a large pot and cover with beef broth. Add the spice packet (crush it slightly for more flavor extraction), quartered onion, minced garlic, chunked carrots, and bay leaves. Stir gently to combine ingredients.
Pro Tip: Crushing the spice packet releases extra flavor – this is our secret for that juicy bite in stovetop corned beef and cabbage.
Step 2: Simmering the Brisket
Bring the mixture to a boil over high heat, then reduce to low, cover, and simmer for 2-2.5 hours. The brisket should be fork-tender when pierced with a fork.
Common Mistake to Avoid: Don’t boil vigorously throughout – simmering prevents tough texture. Check at 2 hours to prevent overcooking.
Step 3: Adding Vegetables
Add the quartered potatoes and cabbage wedges to the pot. Continue simmering covered for another 20-30 minutes until vegetables are tender but not mushy.
Pro Tip: Keep the vegetables in larger pieces for texture – they cook evenly in the flavorful broth.
Step 4: Resting and Serving
Remove the brisket and let it rest on a cutting board for 5 minutes before slicing thinly against the grain. Discard the bay leaves.
Common Mistake to Avoid: Slicing too soon can cause juiciness to escape – resting retains moisture.
Serving & Presentation
To elevate your corned beef and cabbage, plate sliced brisket in the center, surround with vegetable wedges, and sprinkle chopped parsley for a pop of color. For an impressive touch, add a dollop of mustard or horseradish on the side – it cuts the richness perfectly. This traditional corned beef cabbage shines as a main course, paired with sodas or whites like Guinness or Harp for authenticity. Sides like Irish soda bread, colcannon, or a crisp salad balance the heaviness, while for hosting, garnish with extra parsley and serve from a large platter for easy self-service during St. Patrick’s Day festivities.
Make-Ahead & Storage Solutions
Make-Ahead Strategy: Prep the base (chop veggies and measure broth) up to 3 days in advance – store in the fridge. For busy cooks, cook the brisket fully a day ahead and reheat gently. This works wonders for slow cooker corned beef and cabbage adaptations, allowing you to assemble in the morning.
Storing Leftovers: Cool completely, then store in airtight containers in the fridge for up to 4 days. For longer, freeze portions in freezer-safe bags (label well) for up to 3 months – the flavors deepen.
The Best Way to Reheat: Warm on stovetop over low heat with a splash of broth to restore juiciness and tenderness. Avoid microwaves for even heating in this easy corned beef and cabbage recipe.
Frequently Asked Questions (FAQ)
How do you cook corned beef and cabbage in a slow cooker?
Adapt this stovetop corned beef and cabbage by placing the brisket, spice packet, onion, garlic, carrots, bay leaves, and broth in a slow cooker. Cook on low for 8-10 hours or high for 4-5 hours until tender. Add potatoes and cabbage in the last 2 hours on low (or 1 hour on high). This slow cooker corned beef and cabbage method yields extra juicy results and is perfect for busy schedules.
What sides go well with corned beef and cabbage?
Complement this easy corned beef and cabbage with sides like Irish soda bread, colcannon (mashed potatoes with cabbage), a fresh green salad with vinaigrette, or roasted root vegetables for balance. Mustard, horseradish, or applesauce cuts the richness beautifully for a complete meal.
How long does it take to cook corned beef and cabbage?
The traditional corned beef cabbage recipe simmers stovetop for about 3 hours total: 15 minutes prep, 2-2.5 hours for the brisket, and 20-30 minutes for veggies. Slow cooker versions take 8-10 hours on low for that slow cooker corned beef and cabbage ease.
Can you make corned beef and cabbage without cabbage?
Yes, omit the cabbage for a focus on the juicy brisket and other veggies in this corned beef and cabbage recipe. Simply add extra potatoes and carrots – it’s still hearty, though the dish loses some traditional authenticity. Great for picky eaters or keto adaptations.
Is corned beef and cabbage gluten-free?
Yes, this recipe is naturally gluten-free as long as your beef broth is gluten-free (check labels for wheat derivatives). The ingredients like brisket and veggies have no hidden gluten, making it suitable for celiac diets.
How can I make this corned beef and cabbage recipe healthier?
Opt for low-sodium brisket and broth to reduce salt, skip added fats if using lean cuts, and load up on veggies for fiber. Baking the final veggies separately can cut carbs while keeping that tender texture.
Tried This Recipe? Leave a Comment!
Did you make this corned beef and cabbage recipe? I’d love to hear how it turned out! Please leave a comment and a rating below. Your feedback helps other home cooks and supports cookingwithemy.com!
For more delicious inspiration, follow me on Pinterest!
.
Print
Corned Beef and Cabbage
- Total Time: 3 hours
- Yield: 6-8 1x
Description
A classic Irish-American dish featuring tender corned beef brisket simmered with cabbage and root vegetables for a hearty St. Patrick’s Day meal.
Ingredients
- 3–4 lb corned beef brisket (with spice packet)
- 1 large onion, quartered
- 4 cloves garlic, minced
- 4 large carrots, peeled and cut into chunks
- 4–6 Yukon Gold potatoes, quartered
- 1 head cabbage, cut into wedges
- 4 cups beef broth
- 2 bay leaves
- Fresh parsley, chopped (for garnish)
- Salt and pepper to taste
Instructions
- Place the corned beef brisket in a large pot and cover with beef broth. Add the spice packet, onion, garlic, carrots, and bay leaves.
- Bring to a boil, then reduce heat and simmer covered for about 2-2.5 hours, or until the brisket is tender.
- Add the potatoes and cabbage to the pot. Simmer for another 20-30 minutes, or until vegetables are tender.
- Remove the brisket and let it rest before slicing.
- Serve sliced corned beef with the vegetables, garnished with parsley. Season with salt and pepper if needed.
Notes
For the best flavor, use a corned beef brisket that comes with its spice packet. Serve with mustard or horseradish sauce on the side.
- Prep Time: 15 minutes
- Cook Time: 2 hours 45 minutes
- Method: Main Course
- Cuisine: Irish-American
Nutrition
- Calories: 450
- Sugar: 8g
- Fat: 25g
- Carbohydrates: 30g
- Protein: 35g