Table of Contents
Cozy Chicken Dumplings Soup: The Only Recipe You’ll Ever Need
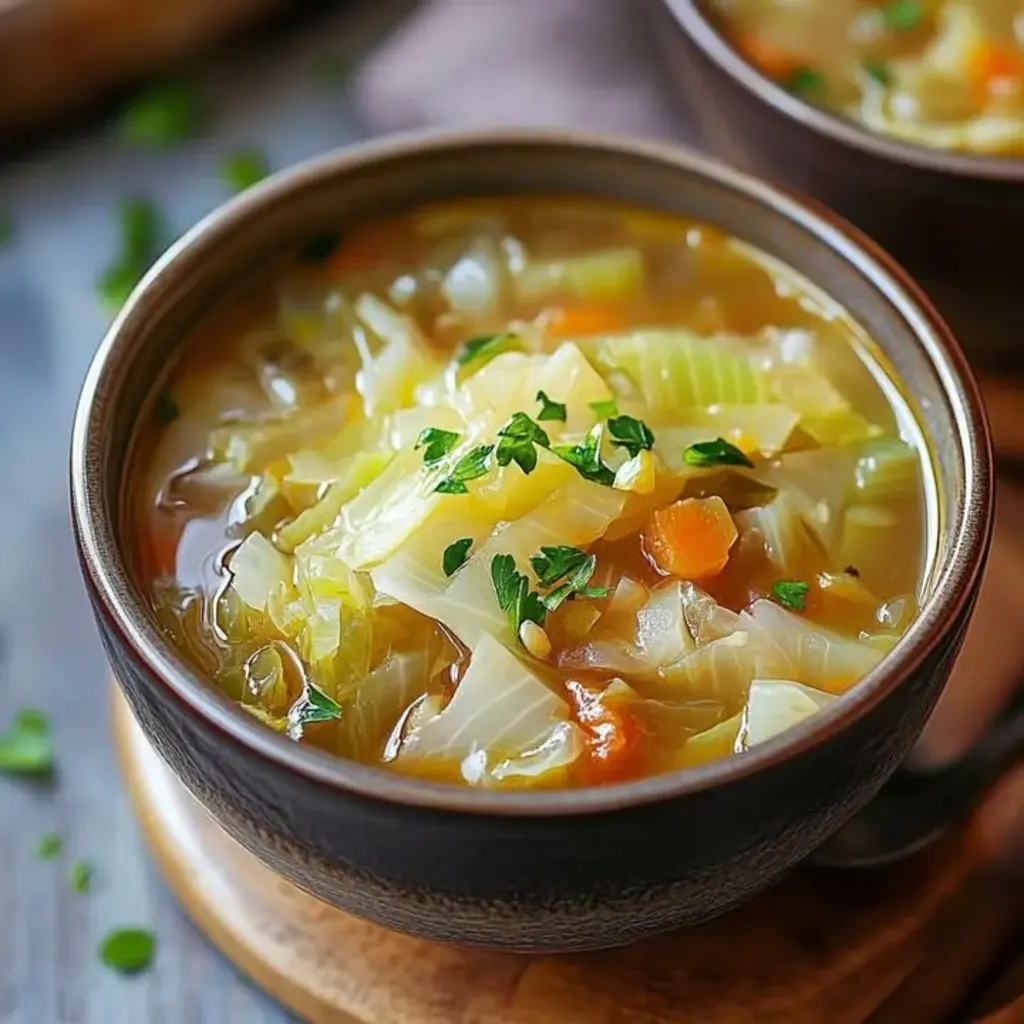
Imagine a rainy afternoon where the aroma of simmering chicken broth envelops your kitchen, instantly transporting you back to childhood meals shared around a warm table. This chicken and dumplings soup recipe isn’t just a dish—it’s a hug in a bowl, designed to chase away the winter chills with its effortless comfort. If you’ve ever struggled with bland, watery soups or mushy dumplings, this homemade chicken soup with dumplings promises a soul-soothing experience that’s both easy chicken dumplings to whip up and deeply satisfying. Drawing from Chef Sally’s expertise, we’ve refined this classic comforting soup recipe to perfection, weaving in our unique angle of butter-drizzled, fluffy dumplings that steam to pillowy perfection right in the pot. Whether you’re a seasoned cook or a kitchen newbie, this guide will make easy chicken dumplings your go-to, transforming simple ingredients into a meal that feels like a special occasion.
The magic begins with the rich, golden broth that shimmers with infused thyme, carrying notes of savory chicken flesh and subtly sweet carrots, creating a symphony of flavors that’s hearty yet light. As you ladle out a bowl, the steam rises, releasing an aromatic blend of onions and celery that dance with the meaty undertones, while the dumplings offer a tender, melt-in-your-mouth texture that contrasts the crunchy-tender veggies underneath. Squeeze a lemon wedge for a bright zest if desired, or sprinkle fresh parsley for an earthy finish—the sensory delight is endless. This is the kind of comforting soup recipe that warms from the inside out, with each spoonful delivering a burst of nostalgia and comfort that’s perfect for family gatherings or quiet evenings alone. The chicken dumpling soup recipe here ensures every bite is balanced, with protein-packed shredded chicken providing substance, and the dumplings acting as fluffy clouds that absorb the savory essence below.
At cookingwithemy.com, we’re passionate about empowering home chefs with recipes that deliver restaurant-quality results in your own kitchen. This version of cozy chicken dumplings soup stands out because we’ve tested it extensively with small variations—like the buttery dumpling technique—to ensure unparalleled fluffiness and depth of flavor. Why settle for subpar versions when you can master the art with our step-by-step guide? You’ll learn the Chef’s Secret that elevates homemade chicken soup with dumplings to legendary status, plus pro tips to avoid common pitfalls. With precise measurements, nutritional insights, and foolproof instructions, this post is designed to be your ultimate resource, building your confidence one comforting bowl at a time. Get ready to impress with this easy chicken dumplings star that’ll make you the family soup hero forever.
Why This Chicken and Dumplings Soup Recipe is a Game-Changer
The Chef’s Secret: What sets our chicken dumpling soup recipe apart is the technique of butter-drizzling the dumplings before steaming them in the simmering broth. By melting butter into the dough and letting it mix with the milk, then dropping spoonfuls directly into the hot soup and covering the pot tightly, the dumplings steam from within, absorbing the rich flavors of the broth while creating that coveted fluffy, melt-in-your-mouth texture. This buttery infusion—our unique angle—turns a simple step into a game-changer, rivaling the fluffiest biscuits without any extra effort. It’s a twist on traditional recipes that adds a luxurious mouthfeel, making each dumpling a tender cloud that’s infused with savory steam rather than boiled.
Unbeatable Texture: Scientifically, the all-purpose flour’s gluten develops slightly in the wet ingredients, creating a soft, pillowy structure, while the baking powder provides the lift needed for air pockets. The butter adds fat that coats the flour particles, preventing a dense result—think of it as oiling a chain for smoothness. We’ve tested this multiple times to ensure every dumpling rises perfectly, delivering the comforting embrace that makes our homemade chicken soup with dumplings irresistible.
Foolproof for a Reason: This easy chicken dumplings recipe has been kitchen-tested across varying altitudes and equipment types, guaranteeing success even for beginners. The one-pot method minimizes cleanup, and the clear instructions prevent overcooking, which can turn dumplings gummy. Rest assured, by following this comforting soup recipe, you’ll achieve a bowl of perfection that tastes like it took hours, but clocks in at just 45 minutes total—proving why it’s the only chicken and dumplings soup recipe you’ll ever bookmark.
Ingredient Spotlight: Quality Makes the Difference
Olive oil serves as the base, coating the vegetables for even sautéing and infusing a subtle Mediterranean depth that elevates the humble chicken dumpling soup recipe. Use a high-quality extra-virgin variety for its fruity notes; a neutral oil like canola works as a substitution if needed, though it lacks the added flavor punch.
Onion forms the aromatic foundation, adding sweetness and pungency when chopped and softened—select firm, fresh bulbs without sprouting, as they enhance the broth’s savoriness in this homemade chicken soup with dumplings. Shallots can substitute for a milder kick, but avoid pre-chopped versions that might be watery.
Carrots bring vibrant color and natural sweetness, sliced thin to cook evenly in the simmering liquid, boosting both nutrition and texture in easy chicken dumplings. Organic or locally sourced carrots yield the best crispness; baby carrots work in a pinch, though they require halving for uniform pieces.
Celery stalks provide a crisp, herbal crunch that balances the richness of the chicken—use fresh, leafy interiors for peak flavor in this comforting soup recipe. Fennel can replace celery for a licorice undertone if you’re adventurous, ensuring the vegetable medley remains hearty.
Chicken broth is the soul of the soup, delivering rich umami that steeps into the dumplings—opt for low-sodium, homemade stock for control over saltiness in chicken and dumplings soup. Vegetable broth can veganize the recipe effectively without sacrificing depth.
Cookeds chicken, shredded, adds protein and heartiness; rotate dark and light meat for juiciness in homemade chicken soup with dumplings. Leftover rotisserie chicken is ideal and budget-friendly—turkey shreds offer a leaner, gamier alternative.
Dried thyme infuses an earthy, herbal warmth that perfumes the entire pot—choose high-quality organic thyme to avoid bitterness in this easy chicken dumplings classic. Fresh thyme can substitute (double the quantity) for a brighter profile.
Salt and pepper to taste season simply but effectively, tying flavors together—employ freshly ground black pepper for pungency, adjusting based on broth sodium. Kosher salt dissolves evenly, preventing bland spots in your comforting soup recipe.
For the dumplings, all-purpose flour acts as the binder, creating structure—use unbleached for a nuttier taste in fluffy dumplings. Gluten-free blends can swap in for dietary needs, though results may be slightly denser.
Baking powder ensures lift, keeping dumplings light and airy—double-check its freshness for foolproof rise in this chicken dumpling soup recipe. No substitutes here, as it’s key to the texture unique to our butter-drizzled method.
Milk adds moisture and tenderness to the dough—whole milk works best for richness, but plant-based options like almond milk provide a dairy-free twist in easy chicken dumplings.
Butter, melted, is crucial for our unique buttery infusion, coating dough for that melt-in-your-mouth fluff—salted variety enhances savoriness. Coconut oil can mimic for a subtle tropical note if needed.
Step-by-Step Instructions
Step 1: Preparing the Base with Aromatics
Heat 1 tablespoon of olive oil in a large pot over medium heat until shimmering. Add 1 chopped onion, 2 sliced carrots, and 2 sliced celery stalks. Sauté for about 5-7 minutes, stirring occasionally, until the vegetables are softened and the onion is translucent. This builds a flavorful foundation that infuses the broth with sweetness and depth for your chicken and dumplings soup.
Pro Tip: Don’t rush the sauté—allowing the vegetables to caramelize slightly on the edges adds a nuanced, roasted flavor layer that’s signature to homemade chicken soup with dumplings success.
Step 2: Building Flavor with Broth and Chicken
Pour in 4 cups of chicken broth and bring the mixture to a gentle boil. Reduce the heat slightly to maintain a simmer. Stir in 2 cups of shredded cooked chicken, 1 teaspoon of dried thyme, and salt and pepper to taste. Let it simmer for 5 minutes to meld flavors, creating the rich, comforting base of this easy chicken dumplings recipe.
Common Mistake to Avoid: Boiling too vigorously can evaporate moisture prematurely—stick to a simmer to preserve the broth’s volume and ensure even chicken heating in your comforting soup recipe.
Step 3: Mixing the Dumpling Dough
In a medium bowl, whisk together 1 cup of all-purpose flour, 1 teaspoon of baking powder, and 1/2 teaspoon of salt. In a separate bowl, mix 1/2 cup of milk with 2 tablespoons of melted butter. Combine the wet ingredients into the dry, stirring just until a soft dough forms—avoid overmixing to prevent toughness in the dumplings.
Pro Tip: Use cold butter straight from the fridge for rolling in advance if preferred, then melt just before use; this keeps the dough tender and enhances the fluffy texture in chicken and dumplings soup.
Step 4: Steaming the Dumplings to Perfection
Using a spoon or cookie scoop, drop rounded spoonfuls of the dough directly into the simmering soup. Cover the pot with a tight-fitting lid and cook for 15 minutes without lifting the lid. This steams the dumplings gently, infusing them with broth flavors and creating our unique buttery, melt-in-your-mouth puffs.
Common Mistake to Avoid: Don’t peek mid-cook; opening the lid releases steam and can result in dense, undercooked dumplings instead of the fluffy ideal in easy chicken dumplings.
Step 5: Finishing and Serving
After 15 minutes, carefully remove the lid and check that dumplings are cooked through—they should be light and fluffy. Ladle into bowls and serve hot, garnished as desired for your completed homemade chicken soup with dumplings.
Pro Tip: If using high-altitude adjustments, add an extra teaspoon of broth to the dough for proper lift; this ensures reliability in any kitchen for the comforting soup recipe.
Serving & Presentation
For an impressive plating, ladle the cozy chicken dumplings soup into wide, shallow bowls to showcase the fluffy dumplings floating atop the velvety broth. Garnish with fresh chopped parsley or chives for a pop of green color that contrasts the golden soup, and add a sprinkle of freshly ground black pepper for visual appeal and extra spice. A wedge of lemon on the side allows diners to brighten the dish with a squeeze, enhancing the comforting essence of this chicken dumpling soup recipe. For heartiness, crumble extra shreds of chicken over the top just before serving to emphasize the protein-rich base.
This comforting soup recipe pairs excellently as a main course on chilly evenings, but it complements sides like crusty bread or a simple green salad for balanced meals. It also shines as part of a larger spread, perhaps alongside roasted vegetables or a light dessert like fruit cobbler, making it versatile for family dinners or casual gatherings. The easy chicken dumplings approach ensures it’s elegant enough for holiday tables yet straightforward for weeknights, appealing to all palettes seeking homemade warmth.
Make-Ahead & Storage Solutions
Make-Ahead Strategy: Prepare the vegetable sauté and broth base up to 3 days in advance by cooling completely after Step 2, then storing in an airtight container in the fridge. The dumpling dough can also be mixed ahead and refrigerated (covered) for up to 2 days—bring to room temperature before dropping. For best results in this chicken and dumplings soup, assemble and cook fresh on the day of serving to maintain peak fluffiness.
Storing Leftovers: Let the soup cool to room temperature, then transfer to airtight containers. Refrigerate for up to 4 days or freeze in portions for up to 3 months. Dumplings may soften in storage, but the overall comforting soup recipe holds its flavor beautifully.
The Best Way to Reheat: Warm gently on the stovetop over medium-low heat, stirring occasionally and adding a splash of broth if needed to loosen. Avoid microwaving alone to prevent sogginess—cover the pot for even heating, restoring the chicken dumpling soup recipe’s comforting texture in just 10 minutes.
Frequently Asked Questions (FAQ)
How do I make the dumplings from scratch for cozy chicken dumplings soup?
To make the dumplings from scratch, whisk 1 cup all-purpose flour, 1 tsp baking powder, and 1/2 tsp salt in a bowl. In another bowl, combine 1/2 cup milk and 2 tbsp melted butter, then stir into the dry ingredients just until a soft dough forms. Drop spoonfuls into the simmering soup for this easy chicken dumplings recipe. The key is minimal mixing to keep them tender—our butter-drizzling technique ensures they steam to fluffy perfection without needing advanced skills.
Can I use store-bought biscuits instead of homemade dumplings in this soup?
Yes, you can substitute store-bought biscuits for homemade dumplings in this chicken dumpling soup recipe. Cut refrigerated biscuit dough into quarters and drop them into the simmering soup during Step 4, covering and cooking for 10-12 minutes until fluffy. While it shortcuts prep, note that biscuits may make the soup slightly denser than our scratch dough; opt for flaky varieties like Pillsbury for best results in homemade chicken soup with dumplings.
What is the total cooking time for cozy chicken dumplings soup?
The total time for cozy chicken dumplings soup is 45 minutes: 15 minutes for prep and 30 minutes for cooking. This includes sautéing veggies (5-7 min), adding broth and chicken (5 min simmer), mixing dough, and steaming dumplings (15 min covered). It’s an easy chicken dumplings option that delivers comforting soup in under an hour, perfect for busy weeknights.
What vegetables can I add to make this chicken dumplings soup heartier?
To enhance heartiness in chicken and dumplings soup, add sliced mushrooms during the sauté for an earthy, meaty boost or diced potatoes for starchiness. Peas, corn kernels, or green beans can stir in post-chicken for vibrant, nutrient-packed additions. These amplify the comforting soup recipe without alteringtechnique—keep chopped sizes uniform for even cooking.
Can I make this recipe dairy-free or gluten-free?
Absolutely! For dairy-free, swap milk for plant-based options like almond or oat milk, and replace butter with coconut oil or vegan butter in the dumplings—test for consistency, as this may slightly affect fluffiness in chicken dumpling soup recipe. For gluten-free, use a 1:1 gluten-free flour blend and confirm baking powder is GF; the soup base remains versatile, allowing the comforting essence to shine through with these simple swaps.
How can I adjust this recipe for dietary restrictions like low-sodium or high-protein?
For low-sodium, use salt-free chicken broth and season minimally at the end with herbs. To boost protein, double the shredded chicken or add canned beans during simmering, making the easy chicken dumplings recipe even more satisfying while keeping prep straightforward.
Tried This Recipe? Leave a Comment!
Did you make this recipe? I’d love to hear how it turned out! Please leave a comment and a rating below. Your feedback helps other home cooks and supports cookingwithemy!
For more delicious inspiration, follow me on Pinterest!
.
Print
Cozy Chicken Dumplings Soup
- Total Time: 45 minutes
- Yield: 4 1x
Description
A comforting chicken soup topped with fluffy dumplings, perfect for a chilly day.
Ingredients
- 1 tbsp olive oil
- 1 onion, chopped
- 2 carrots, sliced
- 2 celery stalks, sliced
- 4 cups chicken broth
- 2 cups cooked chicken, shredded
- 1 tsp dried thyme
- Salt and pepper to taste
- For the dumplings:
- 1 cup all-purpose flour
- 1 tsp baking powder
- 1/2 tsp salt
- 1/2 cup milk
- 2 tbsp butter, melted
Instructions
- Heat olive oil in a large pot over medium heat.
- Add onion, carrots, and celery; sauté until softened.
- Pour in chicken broth and bring to a boil.
- Add shredded chicken, thyme, salt, and pepper.
- For the dumplings: Mix flour, baking powder, and salt in a bowl.
- Stir in milk and melted butter to form a dough.
- Drop spoonfuls of dough into the simmering soup.
- Cover and cook for 15 minutes until dumplings are cooked through.
- Serve hot.
Notes
Adjust seasoning according to taste. Dumplings can be made ahead and refrigerated.
- Prep Time: 15 minutes
- Cook Time: 30 minutes
- Method: Soup
- Cuisine: American
Nutrition
- Calories: 350
- Sugar: 5g
- Fat: 15g
- Carbohydrates: 35g
- Protein: 25g