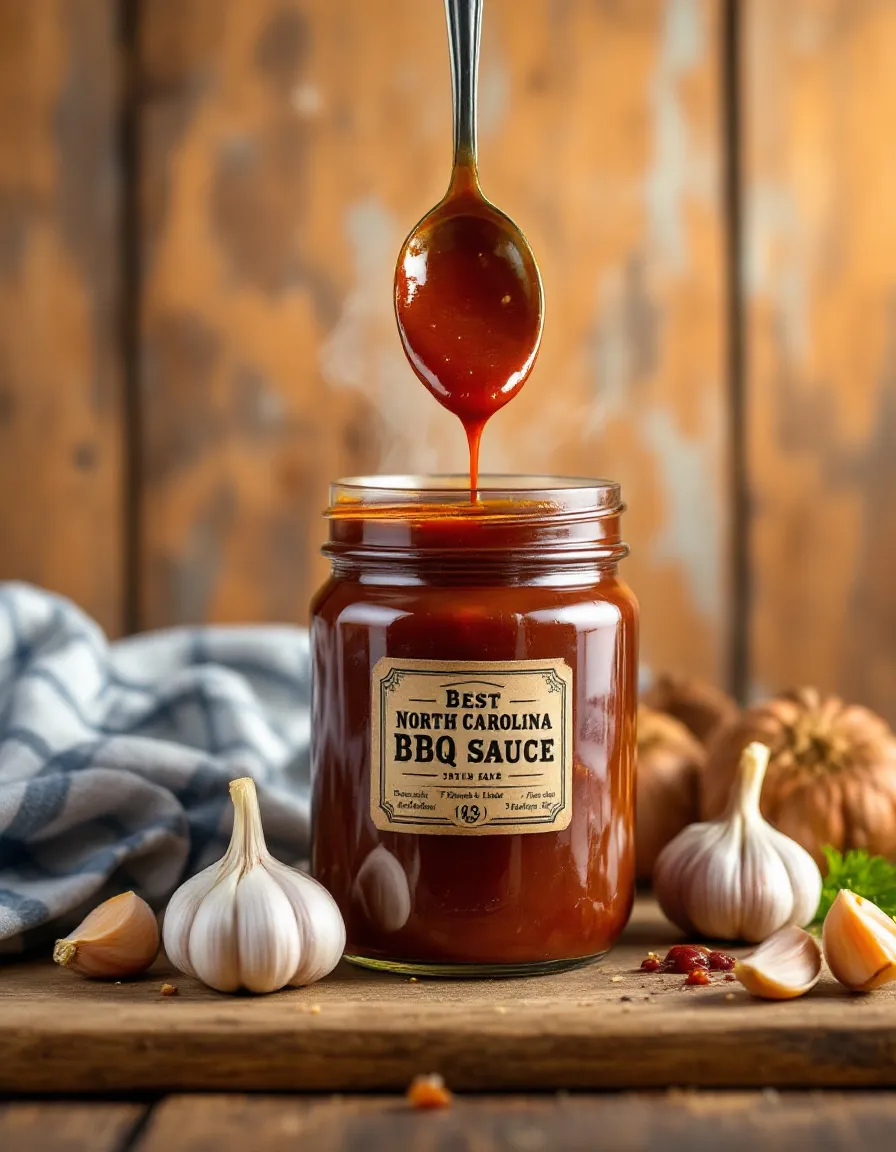
Easy Mini Chicken Quesadillas – Perfect for Parties or Snacks

Delicious Mini Chicken Quesadillas: A Perfect Snack for Any Occasion

⚖️
Difficulty
Easy

⏲️
Prep Time
10 mins

🕒
Cook Time
15 mins

⏱️
Total Time
25 mins

🍽️
Servings
4

Mini Chicken Quesadillas are the ultimate bite-sized snack that packs a punch of flavor in each crispy bite. Perfect for game days, casual gatherings, or an easy family dinner, these quesadillas combine tender chicken, gooey cheese, and a hint of spice, creating an irresistible explosion of taste. Whether you’re devouring them on a cozy movie night or serving them up at your next party, they are sure to please everyone at the table.

What sets these Mini Chicken Quesadillas apart is not just their flavor but also their versatility. Made with easily accessible ingredients and customizable fillings, they can cater to any palate. You can go classic with chicken and cheese or get adventurous by adding veggies, beans, or even different cheeses. The crunchy, golden tortilla envelops the delicious filling, creating a satisfying harmony of textures, making these quesadillas a go-to recipe you’ll return to time and time again.

Quick Recipe Highlights

  • Flavor Profile: Savory chicken paired with melty cheese and spices creates a delightful balance that satisfies cravings.
  • Texture: The crispy tortilla wraps perfectly contrasts with the soft, melty cheese and tender chicken.
  • Aroma: The mouthwatering aroma of grilled tortillas and seasoned chicken will have everyone flocking to the kitchen.
  • Visual Appeal: Golden-brown quesadillas cut into perfect triangles, garnished with fresh cilantro, are a feast for the eyes.
  • Skill Level Needed: This recipe is beginner-friendly, making it perfect for cooking novices and seasoned chefs alike.
  • Special Equipment: A non-stick skillet is essential to achieve the perfect level of crispness without sticking.

Recipe Overview

  • Difficulty Level: Easy, due to minimal cooking techniques and quick prep time, making it accessible for cooks of all levels.
  • Category: Appetizer or Snack, ideal for small bites that can complement a variety of meals.
  • Cuisine: These quesadillas are rooted in Mexican culinary tradition, showcasing the delicious balance of textures and flavors typical of the cuisine.
  • Cost: Economical, as the ingredients are budget-friendly and can be sourced at local grocery stores.
  • Season: Great year-round, but particularly delightful in cooler weather for warm, comforting snacks.
  • Occasion: Suitable for parties, game nights, after-school snacks, or casual dinners with family.

Why You’ll Love This Recipe

Mini Chicken Quesadillas are a go-to recipe for gatherings and weeknight meals because of their tantalizing taste and texture appeal. The combination of melted cheese and savory chicken wrapped in a crispy tortilla creates an irresistible snack that will leave everyone wanting more. Each bite offers a delightful crunch followed by creamy, cheesy goodness, creating a satisfying mouthfeel that will keep your taste buds engaged.

One of the conveniences of this Mini Chicken Quesadilla recipe is its quick preparation time. In just 10 minutes, you can have the filling ready, and within 25 minutes, the entire dish is ready to serve. This time-efficient recipe is perfect for busy days when you need a delicious meal on the table without a lot of fuss.

Nutritionally, these quesadillas can fit into a healthy lifestyle with the right choices. By using lean chicken and whole wheat tortillas, you can create a protein-packed snack that offers energy and sustenance. Plus, incorporating veggies into the filling adds fiber and vitamins, making them a great option for a balanced diet.

Socially, Mini Chicken Quesadillas shine as the ultimate snack for entertaining. Their bite-sized nature makes them perfect for sharing among friends and family, encouraging conversation and delight as everyone reaches for more. Pair them with salsa, guacamole, or sour cream for a flavorful dipping experience that enhances the enjoyment.

Lastly, these quesadillas are highly cost-effective. The core ingredients are affordable, and the recipe is flexible—allowing you to use leftovers or what you already have on hand. This makes Mini Chicken Quesadillas not only delicious and convenient but also a smart choice for home cooks looking to maximize their budget.

Historical Background and Cultural Significance

Mini Chicken Quesadillas, like many traditional Mexican dishes, have their roots in ancient culinary practices. The original quesadilla traces back to the indigenous peoples of Mexico, who filled tortillas with ingredients they cultivated, such as beans, cheese, and meats. As these foods evolved, so did the quesadilla, becoming a staple dish enjoyed in various forms across regions.

Culturally, quesadillas represent the innovation of Mexican cuisine, showcasing the versatility of tortillas and their ability to envelop an array of delicious fillings. This dish has transcended generations, becoming a symbol of communal gatherings and celebrations, often serving as a functional food that nourishes families and friends alike.

Over time, the quesadilla has undergone transformations to adapt to modern tastes and ingredients, with varieties popping up worldwide. Mini Chicken Quesadillas exemplify this evolution by offering a bite-sized version that’s perfect for contemporary dining, balancing rustic heritage with modern convenience.

Regionally, variations of quesadillas can be found throughout Mexico, with different ingredients and preparation methods reflecting local flavors and preferences. From the addition of spicy peppers in the South to the use of cheese in the North, the quesadilla has embraced regional differences, allowing it to maintain its relevance and popularity.

Ingredient Deep Dive

Chicken is a staple protein in many cuisines around the world, valued for its versatility and ease of preparation. When selecting chicken for this recipe, opt for boneless chicken breasts or thighs for the best flavor and texture. Nutritionally, chicken is an excellent source of lean protein, essential for muscle growth and repair, and rich in vitamins and minerals, including B6, niacin, and phosphorus.

To maximize freshness and flavor, choose chicken that is bright pink with minimal visible fat. Proper storage is crucial; store uncooked chicken in the fridge for up to two days or freeze for longer preservation. For substitutions, consider using turkey or plant-based proteins for a healthier twist.

Cheese adds a rich creaminess to the Mini Chicken Quesadillas, enhancing the overall taste. Popular choices include Monterey Jack, cheddar, or a Mexican cheese blend, which has a delightful melt and flavor profile. Cheese provides calcium, which is vital for bone health and adds delicious richness to dishes.

When selecting cheese for your quesadillas, look for freshly grated options for optimal meltability. Store cheese in airtight containers to maintain its freshness and extended shelf life. If you’re looking for healthier alternatives, low-fat cheese or vegan cheese can work wonderfully in this recipe without compromising on flavor.

Tortillas are the backbone of any quesadilla. For this recipe, flour tortillas are preferred for their soft and pliable nature, while corn tortillas can be used for a gluten-free option. Tortillas provide a fulfilling base and are a great source of carbohydrates and fiber.

Choose tortillas that are soft and free from tears. Opt for whole grain varieties for added nutrition. Store tortillas in a cool, dry place, and they can last for days. Experiment with alternative flours like almond or coconut for those looking for low-carb options.

Common Mistakes to Avoid

  • Overfilling the tortillas can lead to messiness and difficulty cooking. Keep the filling balanced to prevent spillage during cooking.
  • Using cheese that doesn’t melt well can result in a dry quesadilla. Choose cheese varieties known for their meltability, such as Monterey Jack or mozzarella.
  • Not pre-heating the skillet adequately can make the tortillas soggy instead of crispy. Ensure a medium-high heat before adding the quesadilla.
  • Skipping the toasting step for tortillas can lead to a lack of crunch. Always toast until golden-brown for the best texture.
  • Neglecting to season the filling can result in bland quesadillas. Always season chicken or other fillings to enhance flavor.
  • Using low-quality tortillas can affect the overall taste. Opt for fresh, high-quality tortillas for superior flavor.
  • Flipping quesadillas too early can lead to one side being undercooked. Wait until they are golden before flipping.
  • Forgetting to let the cooking quesadilla rest can make slicing difficult. Let them sit for a minute to set before cutting.
  • Overcooking the chicken can result in a dry filling. Cook just until the chicken is no longer pink, then let it rest.
  • Not experimenting with different fillings limits flavor variety. Don’t be afraid to try out various ingredients for exciting quesadillas!

Essential Techniques

One essential technique in making Mini Chicken Quesadillas is sautéing the chicken properly. This method allows for even heat distribution and locks in moisture. To master this technique, cut chicken into small, evenly sized pieces and cook over medium heat until golden. Look for a consistent golden-brown color to ensure even cooking.

Additionally, ensuring your tortillas are toasted correctly is crucial for achieving that delightful crunch. When toasting, monitor the heat closely, and turn them over once they reach a perfect golden color. Overheating can cause them to burn, while undercooking will leave them chewy.

Pro Tips for Perfect Mini Chicken Quesadillas

To achieve the perfect Mini Chicken Quesadillas, start by seasoning your chicken well before cooking. A flavorful chicken filling is key to delicious quesadillas. Experiment with spices like paprika, cumin, or chili powder for an extra kick.

Use fresh ingredients for a vibrant taste. Adding elements like fresh cilantro, chopped peppers, or an extra layer of cheese can take your quesadillas to the next level. The freshness of ingredients elevates the overall flavor profile.

Ensure your skillet is hot before adding the quesadillas for optimal crispiness. Medium-high heat is ideal for achieving a delightful crunch on the outside while keeping the insides melty and gooey.

Don’t forget to slice the quesadillas in a classic triangle shape for a more appealing presentation. Use a sharp knife to cut through without tearing, and enjoy that beautiful layering of filling and tortilla.

Garnish with fresh toppings like diced tomatoes, avocado, or sour cream to add visual appeal and a burst of flavor. This not only enhances presentation but also adds layers of taste for each bite.

Lastly, making a big batch can be a great time-saver! You can assemble and freeze uncooked quesadillas for a quick meal option later. Just cook them from frozen, adding a few minutes to the cooking time for perfectly crispy results.

Variations and Adaptations

Mini Chicken Quesadillas can easily be adapted for seasonal flavors by incorporating various vegetables like roasted peppers and zucchini during the summer months. In the fall, consider using sweet potatoes or butternut squash for an autumn twist.

Dietary needs are easily addressed through creative substitutions. For gluten-free options, use corn tortillas or gluten-free wraps. Vegan adaptations can be achieved by swapping out chicken for grilled mushrooms or jackfruit, and using plant-based cheese alternatives.

Flavor variations can be endless; adding spices like taco seasoning can introduce new dimensions to the basic recipe. For a kick, toss in jalapeños or red pepper flakes to spice things up according to personal preference.

Texture modifications can be explored by using different tortilla types. Whole wheat or spinach tortillas not only enhance nutritional content but also offer unique flavor implications. For even more crunch, consider pan-frying the quesadillas instead of traditional toasting.

Presentation options are vast—serve with a side of salsa or guacamole in decorative ramekins or arrange them on a platter with vibrant garnishes, such as sliced limes and cilantro, for a festive display.

Serving and Presentation Guide

When serving Mini Chicken Quesadillas, consider a stylish platter to enhance presentation. Cutting them into wedges allows for easy sharing and makes them visually appealing.

Use garnishing techniques such as sprinkling with fresh cilantro or microgreens to add color and freshness. Placing a small bowl of salsa, guacamole, or sour cream alongside elevates the dining experience, encouraging people to dip.

Temperature plays a significant role in enjoyment. Serve these quesadillas warm, as this enhances their aroma and texture. For large gatherings, consider keeping them in a warming drawer until it’s time to serve.

Mind portion control; stacking quesadillas horizontally in single layers rather than on top of one another helps maintain crispiness while preventing them from becoming soggy. Each stack should be no more than two layers.

Lastly, add a touch of modernity by pairing the quesadillas with craft beverages. A chilled, fruity soda or a light beer can complement the flavors beautifully, enhancing the overall experience.

Wine and Beverage Pairing

For wine enthusiasts, a crisp Sauvignon Blanc pairs beautifully with Mini Chicken Quesadillas. Its acidity cuts through the richness of the cheese while complementing the spices in the chicken. Alternatively, a light-bodied red like Pinot Noir offers a fruit-forward profile, balancing the dish nicely.

If you prefer non-alcoholic options, consider fresh fruit-infused water or a citrus soda that matches the zest of the quesadilla filling. The refreshing qualities help cleanse the palate between bites while enhancing the flavors.

Coffee lovers can treat themselves to a light roasty blend, served iced, which can harmonize pleasantly with the savory notes of the quesadillas. For tea aficionados, a citrus herbal tea can offer a bright contrast, invigorating the overall meal experience.

Temperature plays a role; serve wines at the appropriate temperatures: whites chilled and reds slightly below room temperature will enhance the drinking experience while balancing the flavors found in your quesadillas.

Lastly, for a fun twist, consider crafting margaritas. Their tangy flavor complements the quesadillas wonderfully, making them a crowd favorite at any gathering.

Storage and Shelf Life

To extend the shelf life of Mini Chicken Quesadillas, proper storage is essential. After cooking, allow them to cool completely before wrapping them tightly in plastic wrap or aluminum foil. They can typically be stored in the refrigerator for up to three days.

For longer storage, consider freezing the quesadillas. Place them in a single layer on a baking sheet to freeze individually, then transfer them to a freezer-safe container. Frozen quesadillas can last for up to three months.

Signs of spoilage include an off smell or discoloration in the filling. If you notice any of these signs, it’s best to discard the quesadillas for safety. When reheating, ensure they reach an internal temperature of 165°F to reduce any risk of foodborne illness.

When reheating, you can utilize a skillet over medium heat for even warmth and crisper tortillas, or bake them in the oven for a quick solution. If reheating from frozen, increase cooking time for satisfactory results.

Follow these guidelines for maintaining food safety, ensuring that each bite of your Mini Chicken Quesadillas remains as delicious as the first serving.

Make Ahead Strategies

Preparing Mini Chicken Quesadillas in advance can significantly simplify mealtime. Begin by prepping your ingredients in advance—chop your veggies and cook chicken a day prior. Store these components separately in airtight containers in the fridge.

You can assemble the quesadillas a few hours ahead of serving. Layer raw tortillas with filling and stack them with parchment paper in between to prevent sticking. Cover the assembled quesadillas with a damp cloth to keep them from drying out.

Quality can be preserved by avoiding adding ingredients that may become soggy, such as fresh tomatoes. Instead, add these delicate items right before cooking to maintain freshness and texture.

When ready to serve, simply pan-fry or bake directly from the fridge. If they’re frozen, allow them to defrost in the refrigerator overnight or bake directly from the freezer, slightly increasing cooking time.

Don’t forget to add fresh elements after reheating, like sliced avocados or herbs, to enhance flavors and provide a touch of freshness. This will elevate the final dish and enhance your guests’ dining experience.

Scaling Instructions

Scaling Mini Chicken Quesadillas to serve a crowd is straightforward. For smaller gatherings, simply halve the recipe as needed. If doubling or tripling, consider using larger skillets or baking sheets to accommodate the increased volume, and work in batches to ensure even cooking.

Equipment adjustments for larger quantities may involve using electric griddles or multiple stovetop pans to keep up with demand. Timing modifications should account for the need to work in batches, ensuring that all quesadillas are cooked evenly without overcrowding.

Storage considerations become important with larger batches. After assembly, place uncooked quesadillas on baking sheets lined with parchment paper and stack them with dividers. This prevents sticking while being stored in the fridge or freezer.

By following these scaling instructions, you can easily cater to gatherings of any size while maintaining the flavor and quality of your Mini Chicken Quesadillas.

Nutritional Deep Dive

Analyzing the macro breakdown of Mini Chicken Quesadillas reveals a balanced combination of protein, carbohydrates, and fats. Each serving typically offers a good source of protein from the chicken, providing essential amino acids for body repair and growth.

The cheese adds an essential fat component, contributing to a satisfying mouthfeel while supplying calcium for bone health. Tacos also provide carbohydrates from the tortillas, delivering energy for daily activities, making this dish nutritionally well-rounded.

In terms of micronutrient analysis, ingredients contribute several key vitamins and minerals. Chicken is rich in B vitamins, which support metabolism, while vegetables and spices contribute phytonutrients and antioxidants, aiding overall health.

When considering portion analysis, each quesadilla is filling due to the combination of flavors and textures. One or two can serve as a complete meal when paired with salads or sides, making them an effective option for managing hunger.

If weight management is a concern, controlling portion size by limiting the number of tortillas and opting for leaner fillings can help create a healthier version of the dish without sacrificing the enjoyment.

Dietary Adaptations

Mini Chicken Quesadillas can easily be tailored to fit various dietary requirements. For gluten-free options, substituting corn tortillas instead of flour can maintain delicious texture and flavor while ensuring they are safe for gluten-sensitive individuals.

For those following a dairy-free diet, using plant-based cheese or nutritional yeast can mimic that cheesy flavor without dairy. Utilizing chickpea, lentils, or mushrooms in place of chicken makes the recipe vegan, accommodating those with specific dietary preferences.

Low-carb adaptations are possible by using lettuce wraps or cauliflower tortillas instead of traditional tortillas, maintaining the essence of the quesadilla while aligning it with low-carb goals.

If you’re aiming for a paleo diet, consider using ingredients like grilled chicken, vegetables, and avocado, ensuring that you also avoid processed oils or non-paleo-approved seasonings.

Other specific diets, such as keto or low-FODMAP, can be easily accommodated through ingredient substitutions focusing on low-carb produce and avoiding high-FODMAP ingredients such as garlic or onions.

Troubleshooting Guide

If you encounter texture issues with your quesadillas, such as soggy tortillas, ensure that your filling is not overly wet. Drain excess liquid from ingredients like beans, and thoroughly cook your chicken before assembling.

Flavor balance may present challenges if your quesadillas taste too bland. To fix this, ensure you season your filling adequately with herbs and spices, and perhaps add a splash of lime juice to brighten flavors.

Temperature problems can arise if the skillet is not hot enough; this results in a chewy instead of crunchy tortilla. Always preheat your skillet and adjust heat levels as needed during the cooking process.

Equipment challenges can occur with different stove types. If cooking on an electric stove, ensure that the surface heats evenly. Alternatively, an oven or air fryer can be employed to achieve desired results.

Ingredient substitutions may lead to unexpected flavor or texture changes. Be mindful when replacing key ingredients, and utilize online resources for potential replacements, or experiment in small batches first.

Timing concerns are common when making numerous quesadillas; if they cool too much before serving, they can lose their crispness. Cover finished quesadillas with a clean kitchen towel to keep them warm until they are ready to be served.

Recipe Success Stories

Our community feedback for Mini Chicken Quesadillas has been overwhelmingly positive, with an array of delicious variations shared by readers. From spicy jalapeño versions to veggie-packed adaptations, home cooks have embraced this versatile recipe by making it their own.

Many readers have successfully substituted ingredients based on what they had at home, sharing how creative combinations like barbecue chicken and smoked gouda can elevate the dish. These adaptations inspire others to think outside the box and explore new flavor profiles.

Photography tips have emerged from readers showcasing their presentations, leading to discussions about plating techniques and garnishing ideas. Sharing photos has fostered a sense of community among our readers as they inspire one another.

Additionally, recipe reviews highlight the ease of preparation, with many mentioning how Mini Chicken Quesadillas became a family favorite due to their appealing flavor and satisfying crunch. This dish has received rave reviews for meal prep, allowing busy families to enjoy quick lunches or dinners throughout the week.

Success stories demonstrate the wide appeal of Mini Chicken Quesadillas. Many have even noted how these can be a hit at children’s birthday parties, where kids love the interactive element of dipping and enjoying.

Frequently Asked Questions

Can I make Mini Chicken Quesadillas in advance?

Absolutely! You can prep the fillings and assemble the quesadillas ahead of time, storing them in the refrigerator until you are ready to cook. This saves time during busy days!

What kind of cheese works best for quesadillas?

Cheeses like Monterey Jack, cheddar, or a Mexican blend are excellent choices due to their meltability and flavor. Experiment with your favorites to find what works best for your palate.

How do I freeze Mini Chicken Quesadillas?

To freeze, prepare your quesadillas as normal, then place them on a baking sheet in a single layer until firm. Transfer them to airtight containers or freezer bags, where they can last up to three months.

Can I use leftovers to make quesadillas?

Definitely! Leftover chicken, vegetables, and even beans work wonderfully in quesadillas, allowing you to minimize waste while creating a delicious meal.

How do I reheat my quesadillas?

Reheat your quesadillas in a skillet on medium heat until crispy and warmed through. Alternatively, you can bake them in the oven at 350°F for about 10-15 minutes until heated.

Can these be made vegetarian?

Yes! You can easily make vegetarian quesadillas by substituting chicken for mushrooms, beans, or a mix of colorful vegetables that will still provide satisfying texture and flavor.

What dipping sauces pair well with quesadillas?

Popular dipping sauces include salsa, guacamole, sour cream, or even a zesty ranch. Feel free to get creative with sauces that cater to your taste preferences.

How can I make these quesadillas spicy?

To boost the heat, add diced jalapeños, cayenne pepper, or even a hot sauce of your choice directly into the chicken mixture. Adjust according to your heat tolerance!

Is there a low-carb version of Mini Chicken Quesadillas?

Yes! Swap out traditional tortillas for cauliflower tortillas, lettuce wraps, or cheese wraps to keep it low-carb while still enjoying all the delicious flavors.

Can I bake Mini Chicken Quesadillas instead of frying?

Certainly! Arrange your quesadillas on a baking sheet and bake at 400°F for 15-20 minutes for a crispy finish without the oil.

How can I incorporate more vegetables?

Feel free to add a variety of vegetables like bell peppers, corn, or spinach into your chicken mixture. This can enhance both the nutritional value and flavor profile.

Additional Resources

For those looking to further explore the world of quesadillas, consider trying out related recipes such as Breakfast Quesadillas, loaded with eggs and veggies, or Veggie Quesadilla featuring a medley of seasonal produce.

Delve into technique guides that focus on the art of perfect tortilla making or mastering various fillings. These foundational skills will enhance your cooking and enable you to create custom designs as you explore culinary creativity.

You can also find ingredient information, providing details on the nutritional value and cooking methods for items like chicken, cheese, and tortillas—key elements in crafting the perfect quesadilla.

Consider investing in equipment recommendations such as non-stick skillets or electric griddles, which can enhance your cooking experience and achieve consistent results.

Explore seasonal variations to create timely versions of your quesadillas using fresh produce and herbs available at local farmers’ markets, embracing the essence of seasonal cooking.

Join the Conversation

We invite you to share your experiences with Mini Chicken Quesadillas through social media platforms. Showcase your unique adaptations, share photos of your creations, or engage with our community by putting your own spin on this classic recipe.

Consider leaving a review on the blog, where your feedback can help others in their cooking journey. Engage with fellow food enthusiasts who share your passion for cooking, learning, and evolving their culinary skills.

Additionally, don’t hesitate to discuss your recipe variations. Many community members appreciate innovative takes on traditional recipes, and you could inspire someone to try something new and exciting.

Join in discussions about successful cooking techniques or share tips on how to make the perfect quesadilla. Community engagement enhances learning and growth for everyone involved in the culinary journey.

Don’t forget—sharing your successes and culinary experiments allows the exploration of flavors and cooking cultures that enrich our dining experiences.

The Recipe

Mini Chicken Quesadillas

Serves: 4

Prep Time: 10 mins

Cook Time: 15 mins

Total Time: 25 mins

Kitchen Equipment Needed

  • Non-stick skillet
  • Spatula
  • Cutting board
  • Knife
  • Measuring cups and spoons

Ingredients

  • 2 cups cooked, shredded chicken
  • 1 cup shredded cheese (Monterey Jack or Cheddar)
  • 4 large flour tortillas
  • 1 tablespoon olive oil
  • 1 teaspoon taco seasoning (optional)
  • Sour cream, salsa, and guacamole for serving

Directions

  1. In a mixing bowl, combine shredded chicken, cheese, and taco seasoning (if using).
  2. Heat a non-stick skillet over medium-high heat and add a little olive oil.
  3. Place one tortilla in the skillet and fill half with the chicken mixture.
  4. Fold the tortilla over and cook until golden brown on both sides, about 2-3 minutes each side.
  5. Remove from skillet, let cool for a minute, and slice into wedges.
  6. Repeat with remaining tortillas and filling.
  7. Serve warm with sour cream, salsa, and guacamole.

Recipe Notes

  • Feel free to use leftover chicken or rotisserie chicken for ease.
  • Experiment with different veggie fillings such as bell peppers or spinach.
  • For a spicier kick, add sliced jalapeños to the filling.
  • You can bake the quesadillas in the oven at 400°F for about 15-20 minutes if preferred.

Ultimate Chicken & Waffle Sliders – Perfect for Parties

Chicken & Waffle Sliders: A Delightful Twist on a Classic

⚖️
Difficulty
Medium

⏲️
Prep Time
30 mins

🕒
Cook Time
25 mins

⏱️
Total Time
55 mins

🍽️
Servings
6 servings

Chicken & Waffle Sliders combine the deliciousness of crispy fried chicken with the sweet indulgence of fluffy waffles, creating a delightful handheld treat that’s perfect for any gathering. Whether you’re hosting a brunch or a casual dinner, these sliders will impress your guests with their unique flavor combination. The contrast of textures and flavors—from the savory richness of the chicken to the sweetness of the waffles—will tantalize your taste buds and leave everyone wanting more.

In addition to being incredibly tasty, this recipe is also fun to prepare. You can make each slider your own by adding your favorite sauces or toppings, such as maple syrup, honey, or even a spicy aioli. It’s an innovative twist on a classic dish that adds a sense of whimsy to your meal. This Chicken & Waffle Sliders recipe is not just about nourishment; it’s an experience that brings friends and family together around the table, sharing bites of deliciousness and laughter.

Quick Recipe Highlights

  • Flavor Profile: Savory fried chicken paired with sweet, soft waffles and a hint of maple syrup creates an irresistible combination.
  • Texture: You’ll enjoy a crunchy, juicy chicken bite enveloped by the fluffy, slightly crispy waffle.
  • Aroma: The comforting aromas of fried chicken with maple and vanilla wafting through the kitchen will wake up your senses.
  • Visual Appeal: These sliders are beautifully presented with golden-brown waffles and glistening chicken, garnished with fresh herbs for a pop of color.
  • Skill Level Needed: Even if you’re a novice cook, you will find success with this approachable recipe that requires basic cooking skills.
  • Special Equipment: A waffle iron is essential to create those delightful mini waffles; other than that, standard cooking utensils will suffice.

Recipe Overview

  • Difficulty Level: Medium. While this recipe doesn’t require advanced cooking techniques, it does involve frying, which can present some challenges for beginners.
  • Category: This dish fits perfectly within brunch, lunch, or casual dinner categories, making it versatile for any occasion.
  • Cuisine: Inspired by Southern comfort food, these sliders reflect the soulful culinary traditions that celebrate hearty, flavorful dishes.
  • Cost: Overall, the cost of ingredients is reasonably low, allowing you to serve up a delicious meal without breaking the bank.
  • Season: Perfect for any season, these sliders bring warmth during winter or a sense of cookout joy in summer gatherings.
  • Occasion: Ideal for brunches, parties, or casual family dinners, Chicken & Waffle Sliders are sure to be a crowd-pleaser.

Why You’ll Love This Recipe

The taste and texture of Chicken & Waffle Sliders are a match made in culinary heaven. The crispy fried chicken provides a satisfying crunch, while the warm, fluffy waffles offer a soft, pillowy contrast. Together, they create a delightful combination that tantalizes your palate, making every bite equally delicious. Adding a drizzle of maple syrup elevates the flavor profile to new heights, blending sweet and savory in a way that will make you crave more.

Convenience is key, especially for busy hosts. This recipe allows for great make-ahead options, with waffle prep that can be done in advance. Just fry the chicken and assemble when guests arrive. Both elements can be made ahead of time, making this dish perfect for entertaining without the last-minute chaos. You’ll impress your friends with the scrumptious flavors while enjoying the party yourself.

Nutritiously, Chicken & Waffle Sliders offer protein from chicken, essential nutrients from the waffles, and don’t forget the added vitamins when served with fresh fruits or other healthy accompaniments. While it may not be a daily go-to, indulging occasionally helps satisfy savory and sweet cravings without sacrificing nutrition.

For social gatherings, sliders make for easy sharing and conversation starters. Their bite-sized nature encourages guests to mingle and interact while sampling a little bit of everything. You’ll find that these sliders spark joy and engagement at any event, from backyard barbecues to holiday parties.

Finally, cost-effectiveness is another reason to love this recipe. With generally affordable ingredients, you can serve a crowd and still keep your budget intact. Chicken & Waffle Sliders are an accessible treat that combines indulgence and practicality, making them a must-try in your recipe repertoire.

Historical Background and Cultural Significance

The origins of Chicken & Waffle Sliders can be traced back to the comforting combination of fried chicken and waffles that dates back to the 19th century in the United States. This dish emerged as a culinary staple, particularly in the Southern regions where both fried chicken and waffles hold dear places in the local culture. Historically, it was served as a late-night meal in restaurants after jazz shows, becoming popular among African American communities.

Culturally, this dish has evolved into a symbol of Southern hospitality and comfort, often featured at gatherings and celebrations. The combination of savory and sweet represents the culinary ingenuity that Southern cooking is celebrated for. It has become a cherished part of American cuisine, with diverse interpretations from various chefs across the nation.

Over time, the traditional recipe has undergone numerous transformations. From simple home-cooked meals to the gourmet offerings seen in trendy restaurants, Chicken & Waffle variations abound. Today, culinary creativity has infused this classic dish with new flavors, textures, and presentations, keeping it relevant and appealing to all generations.

Regional variations have also emerged, with some areas adapting the recipe to include unique spices, sauces, or local ingredients. Whether it’s a spicy twist from New Orleans or a more straightforward version in the Midwest, Chicken & Waffle Sliders reflect the dynamic nature of American cooking and the ability to bring people together around good food.

Ingredient Deep Dive

Fried chicken, a key ingredient, is renowned for its rich history and cultural significance in both Southern and American cuisine. It offers a satisfying crunch that many people cherish in comfort food. Nutritionally, chicken is an excellent source of protein, essential for muscle growth and overall health. When selecting chicken, look for fresh pieces with firm, moist skin and no off-smells. For storage, keep it refrigerated or freeze it for longer freshness, and consider marinating it for enhanced flavor.

Waffles are another star ingredient in this recipe. Their origins can be traced back to medieval Europe, with various cultures creating their versions over centuries. Waffles are typically made with flour, eggs, milk, and baking powder, making them a rich source of carbohydrates and a bit of protein. When looking for good quality waffles, opt for those that are light and airy. They should be golden and crispy on the outside but light and fluffy on the inside. Storing waffles can be straightforward; they can be kept in the refrigerator for a few days or frozen for longer, allowing for quick breakfasts or snacks whenever desired.

Common Mistakes to Avoid

  • Not Preheating the Waffle Iron: Always preheat your waffle iron to the recommended temperature. This ensures that your waffles are cooked evenly and have the right crispy texture.
  • Overcrowding the Frying Pan: When frying the chicken, avoid overcrowding the pan as this can lead to uneven cooking and a greasy finish. Fry in batches instead.
  • Skipping the Marination Step: Marinating the chicken can significantly enhance its flavor. Don’t skip this step for the best results.
  • Using Cold Ingredients: Ensure that ingredients like eggs and milk are at room temperature to help with better batter consistency and rise.
  • Inadequate Batter Coating: Properly coating your chicken before frying ensures maximum crunch. Use a seasoned flour mixture for added flavor.
  • Adjusting Cooking Times: Avoid changing the cooking times drastically without testing; do so gradually to achieve the desired doneness.
  • Attempting to Cook Without Oil: Ensure you’re using enough oil in your frying pan for frying chicken. Insufficient oil can lead to sticking and uneven cooking.
  • Neglecting Presentation: Presentation matters! Take time to garnish and arrange your sliders beautifully; it makes a huge difference in the dining experience.
  • Eating Immediately: Allow your chicken to cool slightly after frying. This lets it finish cooking and ensures that it remains tender and juicy.
  • Skimping on Seasoning: Properly season all components of your sliders, from the chicken to the waffles, to achieve a well-rounded flavor.

Essential Techniques

Frying chicken is a classic technique that must be mastered for this recipe. Start by ensuring your oil is hot enough to avoid soggy breading. Use a thermometer to gauge the temperature, aiming for around 350°F. Once you’re comfortable with frying, ensure to turn the chicken only once during cooking for optimal browning and to preserve moisture inside.

Making the waffle batter correctly is crucial for achieving that perfect fluffiness. Whisk together the dry and wet ingredients separately before combining them. This avoids overmixing, which can lead to dense waffles. Another great tip is to let the batter rest for a few minutes; this allows the gluten to relax, resulting in softer waffles.

Pro Tips for Perfect Chicken & Waffle Sliders

Use fresh buttermilk for marinating your chicken; it tenderizes the meat and adds a rich flavor. Always drain fried chicken on a wire rack instead of paper towels to maintain its crispiness. When preparing your waffles, ensure the batter is slightly lumpy—overmixing can lead to tough waffles. Use a variety of dipping sauces, such as ranch or spicy mustard, to allow guests to customize their sliders. For a twist, consider adding crumbled bacon to your waffle batter for added flavor and texture. Always serve the sliders warm for the best experience, and consider pairing with fresh berries for a refreshing touch.

Variations and Adaptations

There are infinite ways to adapt Chicken & Waffle Sliders to suit various tastes. For regional flair, consider integrating barbecue sauce into your chicken preparation or using cornmeal waffles. In terms of seasonality, you could include seasonal fruits like peaches or strawberries as toppings during summer. Dietary modifications can include using gluten-free flour for the waffles and replacing chicken with tofu for a vegan twist. Flavor variations such as adding different spices like Cajun seasoning to the chicken can heighten the experience. Additionally, you can serve the sliders on a bed of greens for a fresh take or pair with sweet potato fries for a delightful side option.

Serving and Presentation Guide

Plating Chicken & Waffle Sliders can elevate their appeal significantly. Start by stacking the chicken between two waffles, ensuring they are symmetrical and stable. Employ garnishing techniques using fresh herbs like parsley or chives to add a burst of color. Serve with dipping sauces on the side in small ramekins for an interactive dining experience. Consider using a wooden board or a large platter as a serving surface to create an inviting spread, and keep temperature in mind, serving the sliders warm for maximum flavor. Portion control can help in maintaining everyone’s appetite—this dish is filling, so keep the sliders moderate in size.

Wine and Beverage Pairing

Wines that pair beautifully with Chicken & Waffle Sliders include a crisp Chardonnay, which complements the dish’s richness. Alternatively, a sparkling wine can brighten the flavor profile and cleanse the palate. If you prefer non-alcoholic options, consider serving sweet iced tea or homemade lemonade for a refreshing partner to balance the savory flavors. A well-brewed coffee or a latte can also be delightful if you serve these sliders for brunch. Temperature considerations are important here; wines should be well-chilled, while coffee should be served hot.

Storage and Shelf Life

For storage, keep leftover Chicken & Waffle Sliders in an airtight container in the refrigerator for up to three days. Ensure the chicken is fully cooled before sealing to prevent moisture build-up. If freezing, separate components to maintain texture; store chicken and waffles in freezer-safe bags. They can typically be frozen for up to three months. Signs of spoilage include off smells or discoloration of the chicken. For reheating, consider using an oven to retain crispiness; preheat to 350°F, placing on a baking sheet for about 10-15 minutes until thoroughly warmed.

Make Ahead Strategies

Planning ahead is simple with Chicken & Waffle Sliders. Prepare the waffle batter and refrigerate overnight to allow for deeper flavor development. You can also fry your chicken ahead of time and store it in the refrigerator. This allows quick assembly when guests arrive—just reheat the chicken and waffles. When cooking in batches, set aside time to allow everything to cool before storing. For optimal quality, consider assembling the sliders just before serving. Lastly, add fresh elements like arugula or fresh fruit directly before plating, ensuring your dish is vibrant and appetizing.

Scaling Instructions

Scaling the Chicken & Waffle Sliders recipe is straightforward. To halve the recipe, simply divide all ingredients by two, and keep an eye on cooking times. If doubling or tripling, ensure your cooking equipment can handle the volume; you may need to fry in batches. Adjust timing carefully when increasing the quantities, allowing adequate space in your frying pan. For large gatherings, consider preparing the components separately to ensure everyone gets fresh sliders. When scaling, remember to account for storage considerations, especially if any of the ingredients have different shelf lives.

Nutritional Deep Dive

The nutritional breakdown of Chicken & Waffle Sliders typically features a healthy balance of protein and carbohydrates. Chicken provides lean protein, crucial for muscle repair and energy, while waffles offer carbohydrates for quick energy. Consider adding fiber-rich toppings like fresh fruit or greens to enhance the meal’s overall nutritional profile. Notably, the micronutrient content from various ingredients, such as calcium from dairy and vitamins from vegetables, should not be overlooked. Portion analysis encourages enjoyment without overindulgence, making these sliders a fun yet balanced treat for celebratory occasions.

Dietary Adaptations

For those following gluten-free diets, using a gluten-free pancake mix or flour combination in place of traditional flour works perfectly. For dairy-free preferences, consider using almond or oat milk in the waffle batter and skip dairy-based toppings. Vegans can switch out chicken for a plant-based alternative and use flaxseed to create a binding agent for the waffle batter. Low-carb dieters can explore options like cauliflower waffles or zucchini fritters as a substitute. Exploring these adaptations encourages inclusivity at any gathering, ensuring everyone can enjoy the deliciousness of Chicken & Waffle Sliders.

Troubleshooting Guide

Texture issues, such as soggy waffles, can often result from overmixing the batter. Aim for a slightly lumpy batter to achieve a desirable fluffiness. If flavor balance seems off, reassess your seasoning; sometimes, a hint of acidity from vinegar or lemon juice can uplift the entire dish. If your chicken isn’t cooking evenly, ensure you’re using enough oil and adjust the heat level. Equipment challenges can arise if your waffle iron isn’t heating properly; check for a power source or consider purchasing a higher-quality model. For timing concerns, take notes after the first attempt to adjust cooking times for larger batches.

Recipe Success Stories

Readers rave about their success with Chicken & Waffle Sliders, particularly how easy the recipe is to follow. Many share stories of adapting the recipe for personal tastes—experimenting with different sauces or fillings that made their sliders unique. Success stories often highlight how these sliders became staples at gatherings, from birthday parties to casual get-togethers, with guests routinely requesting the dish. Those new to frying have reported that with the right guidance, they could create perfectly crispy chicken without mishaps, gaining confidence in their cooking skills. Photography tips shared by the community emphasize natural light usage to showcase the delicious color and texture contrasts of the sliders beautifully.

Frequently Asked Questions

Can I use frozen chicken for this recipe?
Yes! However, it’s recommended to thaw the chicken completely before marinating and frying for best results and even cooking.

How can I ensure my waffles are fluffy?
Make sure to not overmix your batter; it’s best to keep it slightly lumpy. Letting the batter rest can also help improve fluffiness.

What sauces pair well with these sliders?
Great options include spicy mayo, ranch dressing, or classic maple syrup for drizzling on top, depending on your taste preferences.

Can I prepare the chicken ahead of time?
Absolutely! You can fry the chicken ahead of time and store it in the refrigerator. Just reheat before assembling your sliders.

How do I store leftovers?
Store leftovers in an airtight container in the fridge for up to three days. You can also freeze components separately for longer storage.

Can I make the waffles in advance?
Yes, you can make waffles a day ahead. Just reheat them in the oven to retain their crispiness before serving.

What type of frying oil should I use?
For frying chicken, vegetable oil, peanut oil, or canola oil work well. These oils withstand high heat and enhance flavor without overpowering.

Is this recipe suitable for kids?
Yes, these sliders are perfect for kids! Their fun size and combination of flavors make them appealing to younger eaters.

What variations can I try?
You can experiment with different marinades for the chicken, such as spicy or herbed variations. Adding unique garnishes can also enhance the experience.

Can I use a different type of meat?
Yes! Feel free to substitute chicken with turkey, fish, or even a plant-based alternative to suit your dietary needs and preferences.

Additional Resources

Explore more recipes that accompany Chicken & Waffle Sliders, such as Southern-style sides like coleslaw and cornbread that can enhance your meal experience. Technique guides, particularly on frying and waffle-making, offer enthusiasts deeper insight for finer achievements. Ingredient information can guide your selections, ensuring top-quality components in your dishes. Consider investing in essential kitchen equipment for these recipes, including a reliable waffle iron or cast-iron skillet, which can significantly enhance your cooking. Additionally, seasonal variations provide inspiration for adapting flavors and ingredients based on what’s fresh at the market.

Join the Conversation

We encourage you to share your Chicken & Waffle Sliders creations on social media, showcasing your unique interpretations and plating styles. Capturing beautiful photographs of your sliders can inspire your friends and family to try their hands at this delightful recipe. Engage with our community by sharing your reviews and experiences, allowing others to learn from your successes or adaptations. Your insights can help craft this recipe into various delicious versions, igniting creativity in our cooking community.

The Recipe

Chicken & Waffle Sliders

Serves: 6 servings

Prep Time: 30 mins

Cook Time: 25 mins

Total Time: 55 mins

Kitchen Equipment Needed

  • Waffle iron
  • Deep fryer or large skillet
  • Mixing bowls
  • Whisk
  • Meat thermometer
  • Wire rack

Ingredients

  • 2 cups all-purpose flour
  • 1 tablespoon baking powder
  • 1 teaspoon salt
  • 1 tablespoon sugar
  • 2 cups buttermilk
  • 2 large eggs
  • 1 pound chicken breasts, sliced
  • 1 cup buttermilk (for marinating)
  • 1 ½ cups seasoned bread crumbs
  • Vegetable oil for frying
  • Maple syrup for drizzling
  • Fresh herbs for garnishing

Directions

  1. Marinate chicken in buttermilk for at least 1 hour or overnight for maximum flavor.
  2. Preheat your waffle iron and prepare the batter by combining flour, baking powder, salt, sugar, buttermilk, and eggs in a mixing bowl.
  3. Heat vegetable oil in a skillet over medium-high heat.
  4. Remove chicken from the marinade, coat in bread crumbs, and fry until golden brown and cooked through (about 5-7 minutes per side).
  5. Cook waffles according to your waffle iron’s instructions until golden brown.
  6. Assemble sliders by placing a piece of fried chicken between two waffles.
  7. Drizzle with maple syrup and garnish with fresh herbs, if desired.
  8. Serve immediately and enjoy!

Recipe Notes

  • Feel free to adjust the level of sweetness in your waffles by adding more or less sugar to the batter.
  • For a bit of heat, consider adding cayenne pepper to the breading mix.
  • Experiment with different sauces to find the perfect flavor combination that you love.

Best Juicy Steak with Creamy Garlic Sauce for Dinner

Juicy Steak with Creamy Garlic Sauce: A Flavorful Experience

⚖️
Difficulty
Easy

⏲️
Prep Time
10 mins

🕒
Cook Time
15 mins

⏱️
Total Time
25 mins

🍽️
Servings
4

Welcome to your next culinary adventure with this Juicy Steak with Creamy Garlic Sauce. Imagine a perfectly seared steak, tender and succulent, drizzled with a rich, creamy garlic sauce that melts in your mouth. This dish not only tantalizes your taste buds but also elevates your dinner table with its elegant presentation. Perfect for special occasions or a cozy family dinner, this recipe promises a burst of flavor in every bite and is sure to impress anyone fortunate enough to be invited to the table.

The combination of a juicy steak seasoned to perfection, paired with the aromatic, garlicky sauce creates an unforgettable dining experience. This recipe is simple enough for a weeknight meal yet elegant enough for entertaining guests, making it a versatile addition to your culinary repertoire. With every slice, the juices from the steak mingle with the creamy sauce, creating an irresistible harmony of textures and flavors that is difficult to resist.

Quick Recipe Highlights

  • Flavor Profile: This dish features a savory steak flavor complemented by a rich and creamy garlic sauce. The addition of herbs enhances the sauce’s depth, creating a robust companion to the meat.
  • Texture: The steak is juicy and tender with a slight crust from the searing process, while the creamy sauce adds a smooth and velvety mouthfeel that coats each bite beautifully.
  • Aroma: The aromatic garlic melds with the meaty goodness of the steak, creating a heartwarming and appetizing fragrance that will have everyone gathering around the table.
  • Visual Appeal: The dish is visually stunning, with the contrast of the deep brown steak against the creamy, pale sauce, garnished with herbs for an elegant touch.
  • Skill Level Needed: This recipe is excellent for beginners who are getting comfortable in the kitchen and want to impress with minimal effort.
  • Special Equipment: A heavy skillet or cast-iron pan is essential for an excellent sear on the steak, while a whisk is needed to incorporate the sauce’s ingredients smoothly.

Recipe Overview

  • Difficulty Level: This Juicy Steak with Creamy Garlic Sauce is classified as easy, primarily because it requires basic cooking techniques that are manageable even for novice cooks.
  • Category: This dish fits perfectly into the dinner category, especially for those looking to enjoy a hearty and filling meal without much fuss.
  • Cuisine: Inspired by classic steakhouse dishes, this recipe embodies traditional American flavors while allowing creativity to flourish through ingredient choices.
  • Cost: The cost is quite reasonable, especially when utilizing cuts of steak that deliver exceptional flavor without breaking the bank. Expect to spend around $15-$25 for quality ingredients.
  • Season: This dish is perfect year-round, but it’s particularly delightful in cooler months when hearty meals are most comforting.
  • Occasion: Perfect for romantic dinners, family gatherings, or celebratory occasions, this recipe will fit any festive setting seamlessly.

Why You’ll Love This Recipe

The appeal of this Juicy Steak with Creamy Garlic Sauce goes beyond its delicious flavors. The taste and texture are absolutely divine, with the steak delivering a satisfying savory experience that contrasts wonderfully with the rich, creamy sauce. Each bite resonates with layers of flavor, highlighting the quality of the ingredients and the love poured into the cooking process.

When it comes to convenience, this recipe shines. The steps are straightforward, allowing for quick preparation and minimal cleanup. This means you can spend more time enjoying the meal and less time worrying about complicated cooking processes. Plus, the simple ingredients can be easily sourced from your local grocery store, making it an accessible yet impressive dish to whip up.

Nutritionally, steak offers a wealth of protein and essential vitamins, ensuring a fulfilling meal that nourishes as well as delights. The creamy garlic sauce enhances the experience while adding healthy fats, especially when made with quality ingredients, making every spoonful worth the indulgence.

Socially, this recipe is great for entertaining. It serves beautifully on a platter, inviting guests to gather around and share stories over a delicious meal. Everyone enjoys a warm, hearty steak dinner, unlocking lively conversations and moments of joy around the dining table.

Finally, the cost-effectiveness of this recipe cannot be overstated. Using affordable cuts of steak, you can create an impressive meal that rivals any high-end restaurant without putting a strain on your wallet. With minimal expense and maximum flavor, it’s a win-win!

Historical Background and Cultural Significance

The origins of steak can be traced back to ancient cultures that relied on cattle for sustenance. Steaks, notably, became a staple in American cuisine, partly due to the rise of steakhouses in the 19th century. Each region developed its unique flavors and cooking methods, contributing to the rich tapestry of steak-related dishes we enjoy today.

Culturally, steak holds a significant place in many societies as a symbol of celebration and abundance. In the United States, a well-cooked steak has become synonymous with indulgence and luxury dining experiences. It often features in family gatherings and celebrations, cementing its status as a beloved dish.

As culinary practices evolved, so too did the methods of preparing steak. From simple seasoning to the elaborate sauces we create today, the evolution of steak recipes reflects not only changes in taste preferences but also advancements in cooking techniques. Nowadays, the focus is on enhancing natural flavors through complementary sauces and side dishes.

Regionally, variations of steak exist worldwide, from the Argentine Asado to the classic French steak frites. These adaptations showcase local ingredients and cultural tastes, adding depth to the experience of enjoying a steak

Ingredient Deep Dive

Steak: The primary ingredient in our dish, steak, has a rich history and is celebrated for its protein content. High-quality cuts, such as ribeye or sirloin, are essential for the best flavor. When choosing steak, look for marbling, which adds juiciness. Store in the fridge and consume within 3-5 days for peak freshness.

Garlic: A staple in many cuisines, garlic is renowned for its flavor and health benefits. It has antibacterial properties and is rich in essential vitamins. When selecting garlic, choose firm bulbs with dry skins. Store in a cool, dark place, and it can last for several weeks. Substitute with garlic powder if needed.

Common Mistakes to Avoid

  • Not seasoning the steak before cooking: This can lead to blandness. Always season generously with salt and pepper to enhance flavor.
  • Overcooking the steak: Use a meat thermometer to ensure proper doneness for juiciness.
  • Skipping the resting phase: Allow the steak to rest after cooking to let juices redistribute for a more flavorful bite.
  • Using low-quality ingredients: Good quality meat and fresh garlic vastly improve dish quality.
  • Cooking in a cold pan: Always preheat the skillet to achieve a great sear and prevent sticking.
  • Being impatient: Allowing the sauce to reduce properly enhances flavors significantly.
  • Overcrowding the pan: This leads to steaming instead of searing, affecting texture.
  • Not tasting the sauce: Adjust seasoning and balance flavors before serving, making sure it complements the steak.

Essential Techniques

Cooking the Perfect Steak: Mastering the technique of searing steak is essential for a great crust. Start with a preheated, oiled pan to achieve the desired caramelization. Avoid flipping too often; let it develop a crust before turning.

Making the Creamy Sauce: For a velvety sauce, slowly incorporate cream into the garlic mixture to prevent curdling. Use a whisk to evenly blend ingredients, and allow for gentle simmering to enhance flavors without boiling.

Pro Tips for Perfect Juicy Steak with Creamy Garlic Sauce

1. Choose steaks that are at least 1 inch thick for optimal cooking without drying out.

2. Always use room-temperature steak; this helps achieve a more consistent cook throughout.

3. Incorporate fresh herbs like thyme or rosemary into your sauce for an elevated flavor profile.

4. Experiment with different creams like sour cream or crème fraîche for variations in taste.

5. Always let your sauce cool before storage to enhance preservation quality.

6. Try pairing with seasonal vegetables as sides to add color and nutrition to your plate.

Variations and Adaptations

For regional variations, consider incorporating spices characteristic of various cuisines, such as chimichurri for a South American twist. Seasonal adaptations may include swapping the creamy sauce for a fresh chimichurri sauce in warmer months.

Dietary modifications can cater to specific diets. For a gluten-free version, ensure the cream is free from gluten additives. Flavor variations could see the addition of different cheeses in the sauce, while texture modifications can involve adding a crunchy topping like toasted breadcrumbs for contrast.

Presentation alternatives could involve serving the steak on a bed of sautéed spinach, offering a vibrant contrast to the creamy garlic sauce and deep brown steak.

Serving and Presentation Guide

Use elegant plating techniques to enhance the presentation of your dish. Start with a generous pool of creamy garlic sauce in the center of the plate, positioning the steak artfully on top. Garnish with fresh herbs for a pop of color, and serve with roasted vegetables or a simple salad on the side for balance.

Consider temperature when serving; ensure the sauce is warm but not steaming, as excess heat can alter the garlic’s flavor. Portion control is key; keep servings concise for a refined dining experience.

Wine and Beverage Pairing

A full-bodied red wine, such as a Cabernet Sauvignon, pairs beautifully with the hearty flavors of steak. For a refreshing alternative, consider a light-bodied Sauvignon Blanc that contrasts with the rich creaminess of the sauce. For non-alcoholic options, try a sparkling water with a splash of citrus to cleanse the palate.

Storage and Shelf Life

Store leftovers in an airtight container in the refrigerator for up to three days. For longer storage, wrap the steak tightly and freeze for up to three months. Always ensure the temperature stays below 40°F to prevent spoilage. When reheating, do so gently over medium heat to preserve juiciness.

Make Ahead Strategies

Prepping the sauce ahead of time can save significant cooking time. Store the sauce in the refrigerator for up to three days and lightly reheat before serving. You can also marinate your steak a day in advance to deepen flavors and tenderness.

Scaling Instructions

For halving the recipe, simply divide all ingredient measurements by two, ensuring to adjust cooking times as necessary. When doubling or tripling the recipe, consider how many steaks can fit in your pan without overcrowding. Adjust your cooking methods and timing based on the quantity while maintaining the integrity of the dish.

Nutritional Deep Dive

This dish packs a punch nutritionally. Steak is an excellent source of protein, iron, and B vitamins, essential for energy and overall health. The creamy garlic sauce brings healthy fats to the table, especially when made with cream instead of alternatives packed with fillers.

Dietary Adaptations

For gluten-free options, ensure no gluten-containing ingredients are used. Substitute dairy with coconut cream for a dairy-free alternative while ensuring flavors remain rich. For those on a keto or low-carb diet, simply reduce carbohydrate sides and maintain high protein content.

Troubleshooting Guide

If you encounter texture issues, check the cooking time; overcooked steak can become tough. For flavor balance, consider adjusting seasoning in the sauce to enhance garlic notes without overwhelming them. If cooking equipment fails, ensure you are using a preheated pan to avoid sticking and maintain appropriate cooking temperatures.

Recipe Success Stories

Many home cooks have expressed delight in the ease of this recipe and its ability to impress. Families have shared stories of using this recipe for gatherings and special occasions, often receiving requests for a repeat performance. Additionally, variations suggested by readers have inspired tweaks that enhance the original recipe, showcasing its versatility.

Frequently Asked Questions

1. Can I use a different cut of steak?

Absolutely! While ribeye or sirloin are preferred for their flavor, you can use flank steak, tenderloin, or even chuck for different textures and tastes.

2. How can I make the sauce healthier?

Using lighter cream options or making a sauce with Greek yogurt can substantially reduce calories while keeping a similar texture and taste.

3. Is it necessary to let the steak rest?

Yes, resting allows the juices to redistribute, resulting in a juicy and flavorful steak. Aim for a resting time of at least 5 minutes before slicing.

4. Can I meal prep this dish?

Yes, both the steak and sauce can be prepared in advance and stored. Just make sure to reheat gently to maintain quality.

5. How do I know when the steak is done?

Using a meat thermometer is the best way to check doneness. Aim for 130°F for medium-rare and adjust according to your preference.

6. What should I serve with this dish?

Consider pairing it with roasted vegetables, a fresh salad, or a side of creamy mashed potatoes for a complete meal.

7. Can I freeze the sauce?

Yes, the sauce can be frozen in an airtight container for up to three months. Just reheat carefully when ready to use.

8. What herbs can I add to the sauce?

Fresh thyme, parsley, or rosemary work well and complement the garlic flavor beautifully.

9. Can I use garlic powder instead of fresh garlic?

While fresh garlic gives a more robust flavor, garlic powder can be substituted in a pinch. Use about 1/8 teaspoon for each clove of fresh garlic.

10. What is the best way to store leftovers?

Store leftovers in an airtight container and refrigerate for up to three days or freeze for longer storage.

Additional Resources

For more delicious steak recipes, explore our collection of mouth-watering dishes. You will also find tips on mastering other essential cooking techniques and guides on the best kitchen equipment to enhance your cooking experience.

Join the Conversation

We love hearing about your culinary adventures! Share your creations and variations on social media, and tag us to join our community of food lovers. Your photography can inspire others, and we welcome all your feedback and recipe suggestions!

The Recipe

Juicy Steak with Creamy Garlic Sauce

Serves: 4

Prep Time: 10 mins

Cook Time: 15 mins

Total Time: 25 mins

Kitchen Equipment Needed

  • Heavy skillet or cast-iron pan
  • Whisk
  • Meat thermometer

Ingredients

  • 4 ribeye steaks (1-inch thick)
  • Salt and pepper to taste
  • 2 tablespoons olive oil
  • 4 cloves garlic, minced
  • 1 cup heavy cream
  • Fresh parsley, chopped (for garnish)

Directions

  1. Season both sides of the steaks with salt and pepper.
  2. Heat olive oil in a skillet over medium-high heat until hot.
  3. Add the steaks to the pan and cook for about 4-5 minutes on each side for medium-rare.
  4. Remove steaks from the pan and let them rest for 5 minutes.
  5. In the same pan, add minced garlic and cook for 1 minute, stirring frequently.
  6. Lower the heat and pour in the heavy cream, whisking to combine.
  7. Allow the sauce to simmer and thicken for about 3-5 minutes. Season to taste.
  8. Serve the steaks with the creamy garlic sauce drizzled on top, garnished with chopped parsley.

Recipe Notes

  • Feel free to adjust the number of steaks based on your needs, ensuring cooking time accounts for thickness.
  • This dish pairs beautifully with sides such as mashed potatoes or a fresh garden salad.

Homemade Chili’s Queso Dip – Creamy and Perfect for Parties

Chili’s Queso Dip: The Ultimate Cheesy Indulgence

⚖️
Difficulty
Easy

⏲️
Prep Time
10 mins

🕒
Cook Time
20 mins

⏱️
Total Time
30 mins

🍽️
Servings
8

If you’re searching for the perfect cheesy indulgence that will elevate your snack game, look no further than this Chili’s Queso Dip. This rich, creamy, and incredibly flavorful dip is a crowd-pleaser, perfect for game days, parties, or even a cozy night in. With its delightful combination of melted cheese, seasonings, and tomatoes, each bite promises an explosion of savory goodness that will leave you craving more.

Chili’s Queso Dip embodies comfort and warmth. It’s the kind of dish that invites conversation and creates memories, whether shared with friends or family. Picture yourself scooping up this velvety concoction with crispy tortilla chips, the strings of cheese stretching tantalizingly with every dip. The comforting aroma wafting through your kitchen will draw everyone in, eager to partake in this irresistible treat.

Quick Recipe Highlights

  • Flavor Profile: The rich, creamy base with a hint of spiciness is perfectly balanced with tangy tomatoes and spices.
  • Texture: Smooth and creamy, with the perfect amount of stretch from the melted cheese, complemented by the crunch of tortilla chips.
  • Aroma: The tantalizing scent of melting cheese, garlic, and spices envelops your kitchen, enticing everyone around.
  • Visual Appeal: A luscious, cheesy yellow hue dotted with vibrant tomato and jalapeño pieces makes for an inviting presentation.
  • Skill Level Needed: Suitable for beginners, this recipe requires minimal culinary skills to prepare a sensational dip.
  • Special Equipment: A microwave-safe bowl or stovetop friendly pot is all you need to whip up this delicious queso dip.

Recipe Overview

  • Difficulty Level: This recipe is classified as easy, making it accessible for cooks of all skill levels. With just a few simple steps, you can create a dip that will impress any crowd.
  • Category: Perfect as an appetizer or snack, this dip fits seamlessly into game day spreads, movie nights, or casual gatherings.
  • Cuisine: Inspired by Tex-Mex cuisine, this queso dip showcases the vibrant flavors and comforting nature of Mexican-inspired dishes.
  • Cost: The ingredients for this queso dip are relatively inexpensive, typically costing around $10 to prepare, making it suitable for budget-friendly meals.
  • Season: This dip can be enjoyed year-round, but it shines especially during the cooler months, providing warmth and comfort during gatherings.
  • Occasion: Ideal for parties, potlucks, or as a delightful treat for family movie nights, it fits any occasion that calls for sharing good food.

Why You’ll Love This Recipe

This Chili’s Queso Dip is not just any ordinary dip; its taste and texture will leave a lasting impression on your palate. The combination of creamy cheese blended with spices creates a harmony that is both indulgent and satisfying. Each spoonful brings multiple layers of flavor, from buttery and rich to slightly spicy and savory, making it impossible to resist alongside some crispy tortilla chips.

Not only does this dip taste amazing, but it is also incredibly convenient to prepare. With just a few basic ingredients and minimal cooking time, you can whip up this cheesy delight in under half an hour. It’s a fantastic option for last-minute gatherings, ensuring you always have something delightful on hand to share with friends and family.

Additionally, this queso dip provides some nutritional benefits, especially if you use fresh ingredients. The tomatoes and optional jalapeños introduce vitamins and antioxidants, making this dip not just a guilty pleasure but a fun way to enjoy snacking whilst incorporating some vegetables into your diet.

The social aspect of sharing this dip cannot be understated. It serves as a centerpiece for gatherings, encouraging conversation and connection as everyone gathers around to enjoy it. Whether it’s a football game, birthday party, or simple get-together, this queso dip is sure to spark joy and laughter.

Lastly, its cost-effectiveness is a bonus; you can make a large batch without breaking the bank. Pair it with your favorite chips, and you have a sensational spread that leaves your guests asking for the recipe—and you won’t mind sharing it!

Historical Background and Cultural Significance

Chili’s Queso Dip has its roots in the vibrant Tex-Mex culinary tradition, which melds Mexican and American flavors into comforting and flavorful dishes. The word “queso” translates to ‘cheese’ in Spanish, and this dip reflects the central role cheese plays in many Mexican-inspired foods. Over the years, queso dip has become a staple appetizer in both restaurants and homes, embodying the warm hospitality known in Tex-Mex culture.

Culturally, queso dip symbolizes gatherings and celebrations. Originating in the southwestern United States, it reflects the blending of Hispanic and American culinary practices that came about during the 20th century. As people moved and communities expanded, so did the popularity of shared dishes like queso, which brought people together over good food and camaraderie.

This delightful dip has continued to evolve, with different regions adding their spin. While traditional recipes feature a simple blend of processed cheese and spices, many variations now include ingredients like meat, beans, and varied spices, bringing unique local flavors into the mix.

Today, queso dip is synonymous with the Tex-Mex dining experience. Whether ordered as a starter or served at home, the familiar appeal of this cheesy concoction bridges cultural gaps while celebrating shared moments of joy, delicious food, and community.

Ingredient Deep Dive

– Cheese: Cheese is not only the star ingredient of queso dip, but it also plays a vital cultural role as a staple in Mexican cuisine. It adds richness and texture, providing essential nutrients like calcium and protein. For the best flavor, opt for a blend of cheeses, like Velveeta for creaminess and cheddar for sharp flavor. Store cheese in a cool, dry place, and keep it tightly sealed to prevent spoilage. If you’re looking for alternatives, consider cream cheese or a vegan cheese substitute.

– Tomatoes: Fresh tomatoes or canned diced tomatoes bring acidity and balance to queso dip. They hold significant nutritional value, offering vitamins A and C, as well as potassium. When selecting tomatoes, look for vibrant color and firmness. If using canned, choose low-sodium versions for a healthier option. Store fresh tomatoes at room temperature for optimal flavor and use within a week. Diced tomatoes can be substituted with salsa for added flavor.

– Spices: Cumin, chili powder, and jalapeños give queso dip its signature zesty kick. The cultural importance of spices in cooking cannot be overstated, as they not only enhance flavor but also provide health benefits such as antioxidants. When selecting spices, look for freshness, checking expiration dates. Store spices in a cool, dark place to maintain potency. For substitutions, consider experimenting with smoked paprika or cayenne pepper for varying heat levels.

Common Mistakes to Avoid

  • Using pre-shredded cheese: Pre-packaged shredded cheese contains anti-caking agents that prevent it from melting smoothly. Always opt for freshly grated cheese for the best texture and flavor.
  • Overheating the mixture: Heating your dip too quickly can lead to a grainy texture. It’s best to melt cheese over low heat or in intervals, stirring frequently.
  • Neglecting to season: A lack of seasoning can result in bland queso. Be sure to taste and adjust spices, adding salt and pepper to enhance the flavor profile.
  • Using canned tomatoes without draining: Excess liquid from canned tomatoes can affect the dip’s consistency. Drain them well before adding to the cheese mixture.
  • Skipping the starch: Adding a starch like cornstarch or flour can help stabilize the cheese dip, preventing it from becoming too runny.
  • Not mixing adequately: Properly mixing ingredients is essential for an even flavor throughout the dip. Make sure to stir well and incorporate all ingredients.
  • Monitoring freshness: Using spoiled cheese or vegetables can affect both taste and safety. Always check ingredients before preparing your queso dip.
  • Not using a double boiler: For a smoother queso dip, melt ingredients using a double boiler to prevent direct heat from cooking the cheese too fast.
  • Skipping optional add-ins: Not adding jalapeños or other desired flavor profiles can diminish the dip’s full potential. Customize to your taste for ultimate satisfaction.
  • Overcooking it: Letting the dip sit too long on heat can cause it to toughen. Serve immediately for the best experience.

Essential Techniques

Melting Cheese: Mastering the art of melting cheese is crucial for achieving a smooth queso dip. Overheating can lead to a rubbery texture, so always melt on low heat or use a double boiler. Keep a watchful eye to avoid burning and stir continuously for even melting. Don’t rush this process; patience is key to achieving that perfect creaminess.

Stirring Techniques: Regular stirring is essential for incorporating all ingredients and ensuring even cooking. Use a silicone spatula to scrape the sides of your pot, which helps prevent any sticking or burning. Stir with care, as a gentle folding motion can help preserve the cheese’s delicate texture while ensuring everything blends together beautifully.

Combining Flavors: Understanding how to effectively combine flavors can elevate your queso dip. Experiment with different spices and fresh ingredients to enhance depth and character. Tasting as you go ensures that flavors meld perfectly, balancing the heat and creaminess. Don’t be afraid to adjust the recipe based on your preference, making it uniquely yours.

Pro Tips for Perfect Chili’s Queso Dip

1. Always use a combination of cheddar and processed cheese for that perfect melt and flavor balance.
2. Add diced jalapeños for an extra kick! Fresh or pickled types can add various levels of heat and flavor complexity.
3. If you prefer a smoother dip, consider blending the mixture in a food processor before serving to achieve a velvety consistency.
4. For a more authentic touch, include cooked chorizo or ground beef, seamlessly integrating protein and flavor.
5. Garnish with chopped cilantro or green onions right before serving to add freshness and color against the creamy backdrop.
6. Serve immediately after preparing. If it thickens too much as it cools, loosen it with a splash of milk or cream beforere serving.
7. For additional taste, consider adding a touch of hot sauce or diced tomatoes with green chilies for a zesty twist.
8. To make the dip ahead, prepare the base without cheese and finish spinning it together just before serving to maintain texture.

Variations and Adaptations

Chili’s Queso Dip can be easily customized to fit regional preferences. For a Southwestern flair, consider adding roasted green chiles for depth and extra flavor. If you’re a fan of creaminess, using cream cheese or sour cream can add richness while keeping the dip thick and satisfying.

During seasonal gatherings, adapt your queso dip by integrating seasonal produce like corn during harvest time, contributing sweetness and texture. For dietary modifications, you could substitute regular cheese with vegan cheese or cashew cream to cater to plant-based eaters.

Additionally, feel free to explore flavor variations by mixing in unique ingredients such as grilled bell peppers or sautéed mushrooms. For those wanting a crispy texture, top your queso with crunchy tortilla strips just before serving, adding a delightful contrast to the smooth dip.

Serving and Presentation Guide

Achieving a stunning presentation with your queso dip is simple and effective. First, choose a beautiful, shallow bowl for serving to allow for easy scooping. Consider using a bright, contrasting color that complements the dip’s yellow hue.

Garnishing the dip with chopped cilantro, diced tomatoes, or thinly sliced jalapeños creates an inviting appearance. You can also lay out an assortment of colorful tortilla chips around the serving dish, showcasing various sizes and textures for your guests to dive into.

Additionally, serve it warm in a slow cooker for longer events, keeping the dip creamy and perfect to enjoy at any moment. For a fun touch, provide skewers for guests to combine chips and dip with any additional ingredients you include.

Always consider the temperature; serving dips at the right warmth enhances flavor experience. Finally, focus on portion control to ensure guests can enjoy without overindulging too soon!

Wine and Beverage Pairing

When it comes to pairing wine with your Chili’s Queso Dip, a crisp Chardonnay or Sauvignon Blanc complements the creaminess without overwhelming the flavor. Those who prefer red should consider a light-bodied wine like Pinot Noir, which can balance the spice without clashing.

For non-alcoholic options, consider serving refreshing beverages like a fruity sparkling water or iced hibiscus tea, which cleanse the palate while ensuring you remain hydrated. If you’re feeling adventurous, a Mexican beer or paloma cocktail pairs beautifully, enhancing the enjoyment of this shared comfort food.

Serve these drinks chilled, allowing for a comfortable and refreshing experience as they intermingle with the richness of the queso dip. Always consider your guests’ preferences to ensure everyone finds something delightful to sip alongside this cheesy masterpiece.

Storage and Shelf Life

Proper storage of your queso dip is key to maintaining its taste and quality. If you have leftovers, allow the dip to cool completely before transferring it to an airtight container. Store in the refrigerator for up to 3 days; ensure that it is tightly sealed to prevent moisture from affecting the consistency.

To reheat, gently warm it on the stovetop or in the microwave, stirring frequently to maintain its creamy texture. If it has thickened, add a splash of milk while reheating to restore the dip’s original consistency.

For longer storage, you may freeze the queso dip for up to three months. Make sure to use a freezer-safe container, and when ready to serve, thaw it overnight in the fridge and reheat it slow. Avoid freezing ingredients like fresh herbs or dairy, as their texture may change once thawed.

Make Ahead Strategies

To save time during gatherings, prep your Chili’s Queso Dip ahead of time. Start by preparing the base; cook and combine your ingredients, then store them separately in the fridge before guests arrive. This can be done a day in advance!

When you’re ready to serve, simply warm the mixture on the stove, adding in any fresh herbs, toppings, or cheese right before serving. Prioritize prepping ingredients such as tomatoes and spices, so you can spend less time chopping or measuring during the gathering.

Quality control is essential; consider how flavors meld over time, with cooked spices becoming more potent. Finally, consider layering flavors in stages. Introducing ingredients gradually, like adding spices before introducing cheese, can help build depth in flavor that dazzles your guests.

Scaling Instructions

If you need to adjust your Chili’s Queso Dip recipe for a larger group, doubling or tripling can be easily achieved. Maintaining proportional cooking times while monitoring texture is essential; if doubling, use a large saucepan to allow even heating.

To halve the recipe, reduce ingredients evenly and consider adjusting seasoning gradually as cooking times may vary. Ensure good mixing to distribute flavors effectively; don’t just cut back on amounts but maintain balance by tasting as you adjust.

When scaling, consider your available kitchen equipment. You may need larger mixing bowls or appliances to accommodate the increased quantities. Always factor in cooking times as larger portions can take longer to melt uniformly—be patient in stirring!

Nutritional Deep Dive

This flavorful Chili’s Queso Dip has its nutritional pros and cons. The primary ingredients—cheese, tomatoes, and spices—offer valuable macronutrients such as protein and fats, providing an energy boost while being rich in calcium and vitamins.

Cheddar cheese is an excellent source of calcium, essential for bone health. Additionally, tomatoes contribute vitamin C and potassium, supporting overall well-being. However, with cheese being high in saturated fat and sodium, moderation is key for those monitoring intake.

When enjoyed as part of a well-rounded diet, queso dip can complement gatherings without detracting from nutritional goals. Keep portion sizes reasonable, allowing indulgence without guilt, while still delivering exceptional taste and experience.

Dietary Adaptations

Creating a vegan-friendly version of Chili’s Queso Dip is simple; use nutritional yeast, cashew cream, or vegan cheese alternatives to achieve a creamy texture without dairy. Add nutritional yeast for cheesy flavor without the fat.

For those with gluten sensitivities, rest assured that this dip is naturally gluten-free as long as you serve it with gluten-free chips. Always check labels for added sauces or ingredients, ensuring they adhere to dietary restrictions.

To cater to a low-carb audience, serve with fresh vegetable sticks instead of chips, creating a perfect satisfying snack without excess carbohydrates. For spicy aficionados, consider morita peppers in place of jalapeños to heighten the flavor while maintaining dietary preferences.

Troubleshooting Guide

If your queso dip turns out too thick, adding a splash of milk or cream during reheating can restore a desirable dip consistency. Always reheat slowly, stirring until it regains creaminess.

In case of grainy texture, it often indicates overheating. Consider melting cheese gently and gradually, using a double boiler for better temperature control. If mixed improperly, stop alongside stirring—not overblend!

For overpowering spice, tame the heat by balancing flavors. Adding sour cream or additional cheese can help tone down heat levels while maintaining flavor setting.

If you ran out of ingredients mid-recipe, don’t hesitate to get creative! Substitute ingredients based on availability—rotating beans or different cheeses can add freshness without losing excitement.

Recipe Success Stories

Our community loves sharing their twists on this Chili’s Queso Dip recipe! Many have found success in adding unexpected ingredients, such as artichoke hearts or smoked brisket, which have become fan favorites at gatherings.

Recipe variations have also popped up, with readers incorporating local spices from their regions. A few have created their versions featuring blended cheeses and herbs while sharing helpful photography tips for making their dishes look as good as they taste.

Feedback has poured in, praising this dip’s simplicity and fantastic taste. Individuals have reported consistently coming back for seconds: a true testament to how enticing queso can be!

Frequently Asked Questions

Can I make Chili’s Queso Dip in advance?

Yes, you’re welcome to prepare the dip ahead of time! Cook and assemble the ingredients and store in the fridge until you’re ready to reheat and serve.

Can I freeze the Queso Dip?

Yes, this dip can be frozen for up to three months. Be sure to store it in an airtight container and thaw it in the fridge before reheating.

What type of cheese should I use?

For the best flavor and creaminess, use a combination of cheddar and processed cheese. Avoid pre-shredded options due to added stabilizers.

Can I make this dip spicy?

Absolutely! You can increase the spiciness by adding more jalapeños or even some cayenne pepper to suit your heat tolerance.

What’s the best way to serve the dip?

Serve warm in a shallow bowl, surrounded by crispy tortilla chips, and garnished with fresh cilantro or diced tomatoes for added flavor and presentation.

How long does leftovers last?

Leftover Queso Dip can be stored in an airtight container in the fridge for about 3 days. Make sure to check for spoilage before consuming.

Can I make this dip vegan?

Yes! Substitute traditional cheese with vegan cheese or cashew cream, and season with nutritional yeast for cheesy flavor without the dairy.

What alternative toppings work well?

Some creative alternatives include adding avocado, diced red onion, or even a layer of fresh pico de gallo for added color and flavor.

What’s the best way to reheat the dip?

Reheat the dip slowly on the stove or in the microwave. If it thickens, mix in a small amount of milk or cream to return its creamy texture.

Could I use different vegetables?

Yes, adding some sautéed bell peppers or corn can add sweetness and texture to your dip while keeping it flavorful and delicious!

Additional Resources

Are you looking for more delicious dip recipes? Check out our guides on refreshing salsa recipes, creamy guacamole, and flavorful bean dips to accompany your parties! Additionally, explore techniques for mastering grilled vegetables and ways to incorporate seasonal ingredients into your dishes.

For those interested in cooking equipment, we recommend investing in a slow cooker for convenient warming and melting—and don’t overlook the versatility of a good food processor for seamless ingredient blending.

Seasonal variations on this chili queso dip can help keep your appetizers fresh and exciting! Consider highlighting seasonal vegetables alongside your dips to complement flavors and contribute to a vibrant spread.

Join the Conversation

Let’s connect! We love hearing how you customize your Queso Dip experiences. Share your success stories, unique variations, or even your food photography efforts on social media. Tag us using #[YourBlogHashtag] to showcase your mouth-watering results, and inspire others in the community.

Community engagement is essential! Share your ideas and preferences to influence our next recipe guides, as we continually seek to enhance our repertoire based on reader contributions. We appreciate each feedback and share recipes that resonate with your taste buds!

The Recipe

Chili’s Queso Dip

Serves: 8

Prep Time: 10 mins

Cook Time: 20 mins

Total Time: 30 mins

Kitchen Equipment Needed

  • Stovetop pot or microwave-safe bowl
  • Mixing spoon or spatula
  • Measuring cups

Ingredients

  • 16 oz of processed cheese, cubed
  • 8 oz of cheddar cheese, shredded
  • 1 cup of diced tomatoes, drained
  • 1-2 jalapeños, diced (adjust to taste)
  • 1 teaspoon of cumin
  • 1 teaspoon of chili powder
  • Salt and pepper to taste
  • 1/4 cup of milk (optional, for thinning)

Directions

  1. In a stovetop pot or microwave-safe bowl, combine the cubed processed cheese and shredded cheddar.
  2. Add the diced tomatoes and jalapeños to the cheese mixture, mixing well.
  3. Sprinkle in spices—cumin, chili powder, salt, and pepper—then stir until combined.
  4. If desired, add milk to achieve a creamier consistency.
  5. Heat over low-medium heat, stirring frequently until melted and smooth. Alternatively, microwave in 30-second intervals, stirring in between.
  6. Once fully melted and combined, remove from heat.
  7. Serve warm with tortilla chips and garnish as desired with cilantro or tomatoes.

Recipe Notes

  • This dip can be customized by adding cooked chorizo, different cheeses, or vegetables of your choice, like spinach or artichokes.
  • For a vegan variation, swap traditional cheese for cashew cream or nutritional yeast blended for flavor.

Best Quick & Easy Chimichurri Steak Recipe for Busy Nights

Quick & Easy Chimichurri Steak: A Flavorful Delight for Any Occasion

⚖️
Difficulty
Easy

⏲️
Prep Time
10 mins

🕒
Cook Time
15 mins

⏱️
Total Time
25 mins

🍽️
Servings
4

Chimichurri steak is a dish that promises bold South American flavors with minimal effort, making it perfect for both busy weeknights and casual gatherings. The combination of fresh herbs, garlic, and vinegar in the chimichurri sauce complements the savory richness of the grilled steak, creating an explosion of taste with every bite. This quick and easy recipe not only serves as a delightful main course but also elevates your dining experience with its vibrant colors and fresh aromas.

As you prepare this dish, the fragrant notes of parsley and garlic will fill your kitchen, making the cooking process not just practical but enjoyable. The bright green chimichurri not only adds a zesty punch to the dish but also makes for an impressive presentation on your plate. Perfectly cooked steak, coated in the colorful sauce, will leave your guests in awe and craving for seconds.

Quick Recipe Highlights

  • Flavor Profile: This chimichurri steak features a tantalizing blend of tangy, spicy, and herbaceous notes, bringing excitement to the palate.
  • Texture: The juicy and tender steak is perfectly complemented by the slightly chunky texture of the chimichurri sauce, creating a rich mouthfeel.
  • Aroma: The fragrant herbs, combined with the savory aroma of grilled steak, create an irresistible scent that invites everyone to the table.
  • Visual Appeal: The vibrant green chimichurri contrasts beautifully with the rich, golden-brown steak, making it a feast for both the eyes and the stomach.
  • Skill Level Needed: This recipe is simple enough for beginners while still providing impressive results for more seasoned cooks.
  • Special Equipment: All you need is a grill or skillet, a knife for cutting, and a bowl for mixing the chimichurri ingredients.

Recipe Overview

  • Difficulty Level: This recipe is categorized as easy, making it accessible for cooks at any level, from beginners to seasoned chefs.
  • Category: This dish falls under the main course category, ideal for family dinners or entertaining guests.
  • Cuisine: Originating from Argentina, chimichurri sauce is a staple in Latin American cuisine and has gained popularity worldwide.
  • Cost: The approximate cost for this dish is affordable, making it a budget-friendly option while still delivering on flavor and presentation.
  • Season: While delicious year-round, chimichurri steak shines particularly in the warmer months when grilling is most enjoyable.
  • Occasion: This dish suits a variety of occasions, from casual barbecues to formal dinner parties.

Why You’ll Love This Recipe

This chimichurri steak recipe is a celebration of tastes and textures, combining juicy grilled meat with a vibrant herb sauce that sings with flavor. The dish’s rich and indulgent taste is balanced by the fresh, zesty notes of the chimichurri, making each bite a tantalizing experience. The steak cooked to perfection is tender and succulent, while the chimichurri adds a refreshing element that brightens each mouthful.

Convenience is another reason to embrace this quick and easy chimichurri steak recipe. In just 25 minutes—from prep to plate—you can create an impressive meal that rivals those found in fine dining restaurants. Preparing the chimichurri sauce is a breeze, requiring minimal chopping and just a few quick pulses in a food processor or manual mixing. This effortless approach means you can enjoy a delicious homemade meal even on the busiest of nights.

Beyond its convenience, this dish also brings nutritional benefits to the table. Lean cuts of steak offer high-quality protein and essential nutrients, making it a filling and satisfying meal. The chimichurri sauce, packed with fresh herbs and garlic, introduces antioxidants and healthy fats from olive oil, enhancing not just the flavor but also the overall healthiness of the dish.

Chimichurri steak is also perfect for social gatherings or entertaining friends. When laid out on a platter, it creates a centerpiece that invites sharing and conversation. The bold flavors and vibrant appearance of the dish will garner compliments from guests, making you the star of the event.

Lastly, this recipe stands out for its cost-effectiveness. With simple yet flavorful ingredients, you can whip up a dish that feels fancy without breaking the bank. The accessibility of the ingredients means you can often find everything you need at your local grocery store without any hassle.

Historical Background and Cultural Significance

Chimichurri has a rich history rooted in Argentine culinary traditions. Believed to have originated in the mid-19th century, this versatile green sauce was initially a complement to grilled meats, especially the famed Argentine asado. The sauce likely has roots in Spanish and Italian cuisines, with the blending of fresh herbs and garlic reflecting Mediterranean influences in Argentina’s diverse culinary landscape.

Culturally, chimichurri is more than just a condiment; it’s a symbol of Argentine hospitality. In gatherings and family celebrations, you’ll often find chimichurri accompanying steaks and sausages, reflecting the importance of shared meals in their culture. The sauce represents a connection to heritage and the communal enjoyment of food, making it a beloved staple at barbecues and other gatherings.

Over the years, the recipe for chimichurri has evolved, allowing for variations that incorporate different herbs and spices to suit local palates. Some regions might add red pepper flakes for heat or use different oil types to create unique takes on the traditional recipe. This evolution showcases the adaptability of chimichurri, reflecting the personal touch of each cook.

Regional variations of chimichurri exist, with some areas in South America favoring a spicier version or even using fruits like mango for a novel twist. Ultimately, these variations celebrate the versatility of the sauce, ensuring it remains a cherished part of South American cuisine and continues to be enjoyed globally.

Ingredient Deep Dive

– **Steak**: Steak is a significant protein source, rich in iron, zinc, and vitamins. Choosing high-quality cuts, like ribeye or flank steak, will yield the best results. Freshness is key; look for bright red meat with minimal browning. Proper storage in the refrigerator can maintain freshness for several days. If you’re looking for alternatives, chicken breast or portobello mushrooms can serve as delicious substitutes.

– **Parsley**: As one of the key ingredients in chimichurri, parsley is packed with vitamins A, C, and K, and boasts numerous health benefits, including anti-inflammatory properties. When selecting parsley, opt for vibrant green leaves without wilting. It’s best stored in a cool environment, either wrapped in a damp paper towel or in a glass of water in the fridge. If parsley isn’t available, cilantro can provide a similar flavor profile in a pinch.

– **Garlic**: Garlic is well-known for its strong flavor and health benefits, including immune-boosting properties. When selecting garlic, choose firm, plump cloves without any noticeable sprouting. Store garlic in a cool, dry place, and it can last for several weeks. Should you need a substitute, garlic powder or shallots can work, but fresh garlic will always provide the best flavor.

– **Olive Oil**: This healthy fat is a cornerstone of many cuisines, offering heart-healthy benefits and richness to dishes. When choosing olive oil, look for extra virgin varieties for the best flavor. Store oil in a cool, dark place to maintain freshness. For alternatives, avocado oil or grapeseed oil can be used to achieve similar results, though they may alter the flavor profile slightly.

– **Red Wine Vinegar**: This vinegar provides a tangy flavor that balances the richness of the steak and contributes to the overall brightness of chimichurri. Choose a quality vinegar for depth of flavor, and store it in a cool pantry away from direct sunlight. If necessary, substitute with white wine vinegar or even lemon juice for a twist.

Common Mistakes to Avoid

  • Over-marinating the steak: It’s easy to let the steak marinate too long, leading to a mushy texture. Aim for no more than 2 hours for optimal flavor without compromising texture.
  • Using dried herbs instead of fresh: The vibrant flavor of chimichurri comes from fresh herbs; using dried versions may result in a bland sauce. Always choose fresh herbs whenever possible.
  • Not balancing the flavor: Be mindful of the acidity in the chimichurri; too much vinegar can overpower other flavors. Start with less and adjust to taste.
  • Overcooking the steak: Different cuts require different cooking times. Use a meat thermometer to gauge doneness and ensure a juicy steak.
  • Chopping herbs too fine: Chimichurri should have a chunky texture. Avoid over-processing in a food processor for the best mouthfeel.
  • Not seasoning properly: Herb-heavy sauces like chimichurri benefit from salt, so taste and adjust as needed to bring out the flavors.
  • Skimping on garlic: Garlic is integral to the flavor of chimichurri; using too little can result in a flat taste. Don’t be afraid to add more!
  • Neglecting to let the sauce rest: Allow chimichurri to sit for at least 30 minutes before using to let the flavors meld together beautifully.
  • Serving it cold: Chimichurri should be served at room temperature to allow its flavors to shine; take it out of the fridge beforehand.
  • Using low-quality oil: The quality of olive oil affects the flavor of the sauce; invest in good-quality extra virgin olive oil for a rich, harmonious taste.

Essential Techniques

– **Marinade Creation**: A well-balanced chimichurri is essential. Combine garlic, parsley, olive oil, and vinegar in proper ratios to achieve a harmonious sauce. Taste regularly to adjust the balance between acidity and richness. Avoid overpowering with too much garlic; that can make the dish unpalatable.

– **Steak Grilling**: Preheat your grill to high before cooking steak. This cooking method promotes a beautiful sear, enhances flavor through caramelization, and seals in juices. Never flip the meat too soon; let it develop a crust and only turn once for a perfect finish. Use a meat thermometer to ensure proper doneness.

– **Sauce Resting**: After preparing chimichurri, allow it to sit for at least 30 minutes to let the flavors meld. This resting time transforms it into a vibrant finishing sauce that brings out the best in your steak. Don’t skip this step to maximize flavor absorption!

Pro Tips for Perfect Quick & Easy Chimichurri Steak

– Choose high-quality cuts of steak, such as ribeye or flank, for maximum flavor and tenderness.
– For extra flavor, try marinating steak in a small amount of chimichurri beforehand.
– Use a mix of fresh herbs like parsley and cilantro for a unique twist on traditional chimichurri.
– Opt for coarsely chopped herbs in your chimichurri to maintain a balanced texture.
– Let your chimichurri sit in the refrigerator for up to 2 days to deepen flavors without losing freshness.
– Grill the steak on high heat for the best sear and flavor, ensuring it remains juicy inside.
– Pair with grilled vegetables or a fresh salad for a complete and balanced meal.
– Have extra chimichurri on hand; it’s fantastic as a dipping sauce or marinade for other proteins.

Variations and Adaptations

– **Regional Variations**: In Argentina, you can find different versions of chimichurri that incorporate regional herbs such as oregano or even local peppers, which can give the sauce an interesting kick.
– **Seasonal Adaptations**: Consider adding seasonal herbs like basil in the summer or sage in the fall to reflect the changing seasons and offer a new taste experience.
– **Dietary Modifications**: For those following a low-carb or keto diet, use alternate sweeteners if you want to modify marinades or sides without straying from your dietary goals.
– **Flavor Variations**: Experiment with adding smoked paprika or chili flakes in your chimichurri to give it a smoky, spiced depth which transforms its flavor entirely.
– **Texture Modifications**: Play with the thickness of your chimichurri by adjusting the amount of olive oil and vinegar; thicker versions are excellent for spreads, while thinner ones work great as marinades.
– **Presentation Alternatives**: For an elegant meal, serve individual portions of steak topped with a drizzle of chimichurri on a bed of creamy polenta or mashed potatoes.

Serving and Presentation Guide

To plate chimichurri steak, slice the cooked meat against the grain for maximum tenderness and present it on a vibrant plate to showcase the nice golden-brown exterior. Drizzle the chimichurri generously over the steak, allowing the bright green sauce to create a beautiful contrast against the meat. For added elegance, consider garnishing with fresh herb sprigs or microgreens.

Incorporate color by serving alongside grilled seasonal vegetables or a fresh salad, adding both nutritional value and visual appeal to your meal. Temperature is crucial—allow the chimichurri steak to rest for a few minutes before serving it, ensuring that the juices redistribute while maintaining an ideal serving temperature.

For portion control, aim for a serving size of around 4-6 ounces of steak accompanied by a few tablespoons of chimichurri. This ensures each guest enjoys a satisfying meal that doesn’t overwhelm the palate.

Wine and Beverage Pairing

When pairing wine with chimichurri steak, bold red wines such as Malbec or Cabernet Sauvignon complement the rich flavors of grilled meat beautifully. The tannins in these wines balance the steak’s fats and enhance its savory taste. If you prefer a white wine, try an oaked Chardonnay that can hold its own against the robust steak.

For non-alcoholic alternatives, consider a tangy sparkly water with a splash of lemon as a refreshing palate cleanser. If you’re more inclined towards traditional soft drink options, choose a cola or ginger beer, which can stand up to the robust flavors of the dish. Serving temperature is also important; red wines should be slightly below room temperature, while white wines should be served chilled.

Storage and Shelf Life

To maintain the freshness of chimichurri steak, refrigerate any leftovers within two hours of cooking. Stored properly in an airtight container, steak can last up to 3-4 days in the refrigerator. The chimichurri sauce itself can be stored separately for additional days, as its flavors will continue to develop while refrigerated.

When reheating steak, reintroduce it to a skillet over low heat to gently warm without drying it out. Alternatively, you can enjoy it cold in a salad, creating a refreshing dish. For longer-term storage, consider freezing the steak and chimichurri in separate containers, which can last for up to three months. Thaw in the refrigerator before reheating for the best results.

Make Ahead Strategies

Prepping chimichurri steak in advance can simplify your meal preparation. To create a timeline, consider marinating the steak in chimichurri for up to two hours ahead of grilling for flavorful and tender meat. Prepare chimichurri sauce a day in advance to allow the flavors to deepen, making the final cooking process quicker and more relaxed.

When assembling later, store the marinated steak and chimichurri sauce separately in the refrigerator. The steak can be grilled just before serving, while the chimichurri can be drizzled fresh for enhanced flavor and color. Just before serving, consider mixing in fresh herbs to bring an additional depth of flavor. This not only saves time but also presents a fresh and vibrant dish.

Scaling Instructions

Should you wish to scale your recipe, halving it is straightforward: simply divide the ingredient quantities by two for a smaller gathering. Conversely, for larger events, double or triple the recipe while keeping an eye on cooking times, which may require adjustments based on the quantity of steaks prepared.

When adjusting cooking times, remember that multiple steaks can be grilled at once, but ensure they have enough space on the grill to sear properly. For storage considerations, if you make a large batch, consider portioning out the steak and chimichurri separately for ease of serving and to optimize freshness for later meals.

Nutritional Deep Dive

When evaluating the nutrition of chimichurri steak, we see that it’s an excellent source of protein, essential for muscle repair and growth, especially when using lean cuts. Each serving can provide around 25-30 grams of protein, making it a filling choice for active individuals or families.

The chimichurri sauce offers a wealth of health benefits due to its fresh ingredients. Parsley, a central component, contains vitamins A, C, and K, contributing to overall wellness. Olive oil adds healthy fats, which support heart health and can help with inflammation. Understanding the macro breakdown can assist individuals in making informed dietary choices while enjoying this flavor-packed meal.

Portion analysis is crucial, as it can help with weight management. Serving 4-6 ounces of steak along with a generous helping of chimichurri can provide a balanced meal when paired with wholesome sides like vegetables or whole grains.

Dietary Adaptations

For those following a gluten-free diet, chimichurri steak can be enjoyed without modification, as the ingredients are naturally gluten-free. The focus on fresh herbs, olive oil, and quality steak ensures a satisfying meal without compromising dietary preferences.

Dairy-free eaters will also appreciate this recipe, as no dairy ingredients are involved, allowing anyone with lactose intolerance to enjoy it without concern. For those opting for a vegan lifestyle, consider substituting the steak with hearty vegetables like portobello mushrooms or eggplant, marinated and grilled to perfection with chimichurri drizzled on top.

Low-carb and keto diets can still savor chimichurri steak without the burden of traditional carb-heavy sides. Emphasizing grilled or roasted non-starchy vegetables can complement the meal for those looking to keep their carb intake lower, while the flavors remain impactful.

Overall, this dish can easily adapt to various dietary needs, highlighting its versatility and broad appeal while ensuring no flavors are sacrificed.

Troubleshooting Guide

If you encounter issues with your chimichurri steak, identifying flavor imbalances is key. If the dish tastes too acidic, consider adding a pinch of sugar to balance out the flavors. Conversely, if it’s lacking brightness, a splash more vinegar may do the trick.

Texture concerns may arise if the chimichurri is too thin; simply add more herbs or some crushed nuts to thicken it up. If your steak becomes overcooked, consider slicing it thinly and serving it in a taco style with chimichurri drizzled over for an alternate approach.

For fresh ingredients that have lost their quality, ensure you’re using the freshest herbs and oil; older ingredients can produce a muted flavor. Lastly, timing can be a challenge; make sure to watch the steak closely while cooking to avoid any over- or undercooking issues. Utilizing a meat thermometer is a foolproof method to achieve perfect doneness.

Recipe Success Stories

Our community has embraced the quick and easy chimichurri steak recipe, sharing multiple feedback and adaptations that highlight its versatility and flavor. Many readers reported trying the chimichurri on alternative proteins such as shrimp and tofu, finding success in those variations as well.

Adaptation stories include those experimenting with spicier variants of chimichurri, adding jalapeños for added heat, resulting in rave reviews. Others have shared their techniques for presenting this dish dramatically on platters, making it a stunning centerpiece in their family gatherings.

Additionally, photography tips from our readers have illuminated the best angles to shoot, emphasizing the vibrancy of the chimichurri against the beautifully grilled steak. These community contributions not only bring joy but foster a love for cooking and sharing!

Frequently Asked Questions

Can chimichurri sauce be made in advance?

Absolutely! Chimichurri sauce can be prepared a day in advance. This not only saves time but allows the flavors to meld beautifully, enhancing its taste when served with the steak.

What type of steak is best for chimichurri?

Flank steak, skirt steak, and ribeye are popular options due to their rich flavor and tenderness when grilled. Each type can absorb the chimichurri flavors well, making them an excellent choice.

Can I freeze chimichurri sauce?

Yes, chimichurri sauce freezes well. Store it in an airtight container for up to three months. Thaw in the refrigerator before using it as a marinade or topping.

What can I serve chimichurri steak with?

Chimichurri steak pairs well with grilled vegetables, potatoes, or salads. It also works great in tacos with some fresh toppings for a modern twist!

How do I adjust the spiciness of the chimichurri?

To adjust spiciness, you can add red pepper flakes or diced jalapeños based on your preference. Adjust to taste for the right level of heat.

Is chimichurri sauce gluten-free?

Yes, chimichurri sauce is naturally gluten-free as it consists of herbs, garlic, vinegar, and olive oil. Enjoy it freely!

How thick should the chimichurri sauce be?

The chimichurri should have a slightly thick yet pourable consistency—neither too watery nor too chunky. Adjust the olive oil and herbs for the perfect texture.

Can I use dried herbs in chimichurri?

While fresh herbs are recommended for optimal flavor, you can use dried herbs in a pinch. However, note that the taste will differ significantly.

What if I don’t like garlic?

If garlic isn’t for you, consider reducing its quantity or omitting it altogether. You can enhance the flavors with more fresh herbs or add a bit of lemon zest.

What’s the best way to store leftover steak?

Store leftover chimichurri steak in an airtight container in the refrigerator for up to four days. For longer storage, you can freeze it for up to three months.

Additional Resources

If you enjoyed this quick and easy chimichurri steak recipe, consider exploring our other vibrant recipes featuring fresh herbs and grilling techniques. Discover techniques on how to perfect your grilling skills for top-notch steaks and marinades. Check out our ingredient guides for insights on selecting the best produce and oils to enhance your meals, and dive into seasonal variations to incorporate local produce into your preparations.

Join the Conversation

Engage with us on social media to share your experience with the quick and easy chimichurri steak recipe! We encourage you to post your photos and variations, plus the tips you found helpful during your cooking adventure. Join our community by leaving feedback, sharing suggestions, or simply telling your story of how chimichurri steak made a special meal even more memorable. Your contributions help forge a warm cooking community that shares the love of delicious meals.

The Recipe

Quick & Easy Chimichurri Steak

Serves: 4

Prep Time: 10 mins

Cook Time: 15 mins

Total Time: 25 mins

Kitchen Equipment Needed

  • Grill or skillet
  • Mixing bowl
  • Knife
  • Meat thermometer

Ingredients

  • 1 lb flank steak
  • 1 cup fresh parsley, chopped
  • 4 cloves garlic, minced
  • 1/2 cup olive oil
  • 1/4 cup red wine vinegar
  • 1 tsp salt
  • 1/2 tsp red pepper flakes (optional)

Directions

  1. In a mixing bowl, combine parsley, garlic, olive oil, red wine vinegar, salt, and red pepper flakes. Mix well to create chimichurri sauce.
  2. Apply half of the chimichurri sauce to the steak, ensuring it is evenly coated. Allow it to marinate for up to 2 hours in the refrigerator.
  3. Preheat the grill or skillet over high heat.
  4. Grill the steak for approximately 5-7 minutes on each side for medium-rare, checking with a meat thermometer (130°F-135°F).
  5. Remove the cooked steak from the heat and let it rest for 5 minutes.
  6. Slice the steak against the grain and drizzle the remaining chimichurri sauce over the top to serve.

Recipe Notes

  • Chimichurri sauce can be made up to 2 days in advance and stored in the refrigerator.
  • Feel free to adjust the herbs and spices in chimichurri to suit your taste.
  • For added flavor, consider marinating the steak overnight.

Easy Mini Baked Potatoes – Perfect for Appetizers or Sides

Mini Baked Potatoes: A Wholesome Comfort Food Delight

⚖️
Difficulty
Easy

⏲️
Prep Time
15 mins

🕒
Cook Time
30 mins

⏱️
Total Time
45 mins

🍽️
Servings
4

Mini baked potatoes are a delightful treat that can serve as a perfect appetizer or side dish. These little bundles of goodness offer a crispy exterior while staying soft and fluffy inside, creating a tantalizing contrast in every bite. When topped with your favorite ingredients, they transform into a versatile canvas suitable for any meal of the day. Picture them filled with creamy sour cream, crispy bacon bits, and fresh chives, delivering an explosion of flavors that will please everyone at your table.

Not only are mini baked potatoes easy to prepare, but they also infuse a comforting aroma that fills your kitchen, enticing everyone to gather around the dinner table. Their visual appeal, garnished with vibrant herbs and savory toppings, makes them as appealing to the eyes as they are to the palate. These baked potatoes bring warmth and satisfaction, making them an exceptional addition to any gathering.

Quick Recipe Highlights

  • Flavor Profile: Mini baked potatoes deliver a savory and buttery flavor that pairs perfectly with toppings like cheese, sour cream, and herbs.
  • Texture: The crispy skin contrasts with the light and fluffy potato interior, creating a delightful mouthfeel.
  • Aroma: Roasting these little potatoes brings out a fragrant and comforting scent that fills the air.
  • Visual Appeal: Their golden brown exterior and colorful toppings make them a feast for the eyes.
  • Skill Level Needed: This recipe is quite simple, making it ideal even for novice cooks.
  • Special Equipment: A baking sheet and aluminum foil are essential for this recipe.

Recipe Overview

  • Difficulty Level: Easy and straightforward, these mini baked potatoes are perfect for any skill level. The steps are simple to follow, ensuring your success in preparing a fantastic dish.
  • Category: This dish falls into appetizers, side dishes, and even main dishes category, offering versatility for your meals.
  • Cuisine: A staple in many culinary traditions, baked potatoes find their roots in comfort food worldwide, with each culture adding its unique flair.
  • Cost: Utilizing inexpensive ingredients, this recipe is budget-friendly and cost-effective to make.
  • Season: Mini baked potatoes shine during fall and winter, serving as a cozy comfort food alongside seasonal dishes.
  • Occasion: Perfect for gatherings, game days, or a simple family dinner, these potatoes are bound to be a hit.

Why You’ll Love This Recipe

Mini baked potatoes are a delightful blend of taste and texture, offering a crispy exterior with a tender, fluffy inside. Each bite feels satisfying, especially when loaded with toppings like cheese and fresh herbs. The versatility allows you to customize flavors to suit your cravings, whether savory or a hint of spice. You’ll find this comfort food irresistible, making it a staple in your culinary repertoire.

This recipe is incredibly convenient, requiring minimal prep time and cooking effort. The straightforward steps make it accessible for busy weeknights or impromptu gatherings. You can easily prepare a large batch and watch them disappear, delighting your guests with little fuss. They’re perfect for meal prep as individual servings and incredibly versatile, complementing various main courses or salads.

Nutritionally, mini baked potatoes offer a range of vitamins and minerals, especially when you choose healthy toppings. They’re an excellent source of potassium and vitamin C while being naturally gluten-free. You can enjoy guilt-free indulgence by topping them with nutritious options, from Greek yogurt to fresh veggies, making them a wholesome addition to your meals.

Socially, these mini baked potatoes are the ultimate conversation starters. Ideal for parties or casual get-togethers, they encourage sharing and experimenting with different toppings, making it a fun interactive experience. Guests will love creating their unique blend, ensuring everyone leaves satisfied.

Cost-effectiveness is another reason to love this recipe. Potatoes are inexpensive and readily available, making them a budget-friendly choice. Pairing them with affordable toppings, you can create an impressive dish without breaking the bank, perfect for families or large gatherings.

Historical Background and Cultural Significance

The history of baked potatoes dates back centuries, with their origins rooted in the Andean region of South America, where they are native. As they traveled across the globe, they became a staple in various cultures, embraced for their versatility and nourishment. The simple act of baking potatoes has been cherished as a comforting and satisfying method of preparation.

Culturally, baked potatoes have significant importance in different cuisines. In the United Kingdom, they are often filled with cheese and baked beans, known commonly as “jacket potatoes.” In the United States, the classic loaded potato topped with bacon, cheese, and sour cream reigns supreme, showcasing the baked potato’s ability to adapt across cultural lines.

Over time, the recipe for baked potatoes has evolved, incorporating modern flavors and diverse toppings. From traditional butter and herbs to more elaborate creations adorned with various ethnic ingredients, this adaptable dish meets the tastes of every generation. Today, it stands as a culinary staple known for its comforting nature and satisfying flavors.

Regionally, the baked potato has inspired countless variations. From spicy chili toppings to Mediterranean-inspired pesto spreads, this dish continues to evolve, reflecting local ingredients and culinary trends while maintaining its core identity as a beloved comfort food.

Ingredient Deep Dive

Potatoes: Potatoes are not only a staple food worldwide but also rich in history and tradition. Their nutritional profile includes vital vitamins such as vitamin C and important minerals like potassium. When choosing potatoes for baking, select firm and blemish-free ones, and store them in a cool, dark place to prolong freshness. You can substitute with sweet potatoes for a different flavor and nutritional boost.

Butter: Butter enhances the flavor and promotes moistness in baked potatoes. It adds richness, creating a delightful contrast with the fluffy potato interior. When selecting butter, opt for unsalted for greater control over salt levels. Store in a refrigerator for freshness, and consider using alternatives like olive oil or plant-based butter for healthier options.

Common Mistakes to Avoid

  • Not washing potatoes: Failing to wash the potatoes thoroughly before baking can result in dirt and grit on the final dish. Always rinse them properly and scrub away any soil.
  • Skipping the pricking step: Not pricking the potatoes can lead to explosions in the oven as steam builds. Make sure to poke several holes around each potato with a fork.
  • Overcrowding the baking sheet: Overcrowding can trap steam, leading to soggy potatoes. Space them apart on the baking sheet for even cooking.
  • Cooking at too low a temperature: Baking potatoes at a temperature that is too low will result in a longer cooking time and an unsatisfactory texture. Aim for a temperature of at least 400°F (200°C).
  • Not waiting for them to cool: Cutting into the potatoes too soon can result in a very hot interior. Allow them to rest for a few minutes before slicing.
  • Neglecting proper seasoning: Failing to season the inside of the baked potato can make for a bland experience. Generously add salt and butter after cutting them open.
  • Using the wrong potatoes: Not all potatoes are suited for baking, such as waxy varieties. Choose starchy potatoes like Russets for the best results.
  • Not adjusting for size variations: Baking different sizes of potatoes together without adjusting the cooking time can lead to uneven doneness. Size matters in cooking times!

Essential Techniques

Baking: Baking is critical for achieving that fluffy potato texture. To master baking, make sure your oven is at the right temperature and rotate the baking sheet halfway through cooking. Visual cues include a crispy skin and tender flesh when pierced with a fork.

Pricking: This technique releases steam during cooking. Use a fork to prick the potatoes on all sides. If done correctly, you should hear a soft hiss as steam escapes when they are in the oven.

Pro Tips for Perfect Mini Baked Potatoes

Ensure you choose stubby, uniform potatoes for even cooking; any variations in size will result in inconsistent textures and cooking times.

Always preheat your oven properly before baking. A hot oven ensures crispy skin and a fluffy interior.

Brush the potatoes lightly with olive oil before baking to ensure a crispier skin.

Experiment with toppings to suit your palate; try adding spices like paprika or garlic powder to your oil for extra flavor.

Once baked, let them rest for a few minutes before slicing to enhance the robust flavors inside.

Leftover baked potatoes can be transformed into a hash or potato salad the next day for meals that require minimal effort.

Variations and Adaptations

Regional variations of mini baked potatoes are abundant; in Latin American cuisine, you might enjoy them topped with spicy salsa or guacamole, adding a delightful twist to the traditional recipe.

During different seasons, experiment with seasonal toppings like fresh herbs in spring or roasted vegetables in the fall to keep the dish interesting and tied to the time of year.

Dietary modifications are easy to execute; transform mini baked potatoes into a vegan delight by substituting dairy products with cashew cream or avocado.

Flavor variations are endless, from cheesy jalapeño popper styles to Mediterranean vibes with feta and olive tapenade, ensuring every palate finds a joy in this dish.

Texture modifications are also possible; add crispy toppings like fried onions or crushed tortilla chips to create a desirable crunch.

Presentation alternatives can elevate the dining experience; serve on a rustic wooden board with a variety of dips for a beautiful and interactive setup at your next gathering.

Serving and Presentation Guide

When it comes to plating, you can create a rustic look by simply placing the mini baked potatoes on a wooden board. This creates a welcoming atmosphere for your guests.

Garnishing ideas include fresh herbs like parsley, chives, or cilantro sprinkled on top for vibrant color and freshness.

Traditional accompaniments such as sour cream, cheese, or bacon bits enhance the flavor profile beautifully and invite your guests to customize their potatoes.

Modern serving suggestions can include stylish small dishes for toppings, allowing guests to personalize their mini baked potatoes as they like.

Temperature considerations are essential; serve them warm to showcase their optimal flavor and texture.

Portion control tips: Since they are small, provide several at a time, allowing guests to indulge without feeling overly full.

Wine and Beverage Pairing

Pair your mini baked potatoes with a crisp white wine like Sauvignon Blanc, enhancing the buttery flavor. The acidity will provide a refreshing contrast.

If you prefer non-alcoholic options, serve sparkling water with a lemon twist to cleanse the palate between bites, upholding the dining experience.

For coffee or tea pairings, a rich roast coffee can balance the earthiness of the potatoes while a light herbal tea offers a calming finish.

Temperature considerations are important; serve wines chilled to highlight their crisp flavor against the warm potatoes.

In terms of serving suggestions, consider medium-sized glasses or elegant carafes for a refined presentation at your dinner table.

Storage and Shelf Life

To store your mini baked potatoes, let them cool down at room temperature before placing them in an airtight container. They can last in the fridge for up to 4 days.

Temperature requirements: Keep them away from heat sources to avoid spoilage. Frozen baked potatoes will maintain integrity for about 2-3 months when properly wrapped.

Container recommendations include glass or BPA-free plastic, which are excellent for maintaining freshness without affecting flavor.

Signs of spoilage include an off smell or visible mold; when in doubt, discard them to avoid any health risks.

Reheating instructions: Microwave individual potatoes for 1-2 minutes covered with a damp paper towel, or re-bake in the oven at 350°F (175°C) for 15-20 minutes for best results.

Freezing guidelines involve wrapping each potato tightly in plastic wrap before placing them in a freezer-safe bag to prevent freezer burn.

Make Ahead Strategies

For a prep timeline, mini baked potatoes can be prepared a day in advance; simply store them in the fridge after baking. Allow time for reheating right before serving.

Storage between steps is simple; you can bake them, fill them with different toppings, and cover them tightly until ready to serve.

Quality impact assessment: Making these potatoes ahead of time won’t compromise texture and flavor if stored correctly, making them a perfect candidate for meal prep.

Assembly tips include keeping toppings separate until ready to eat, ensuring crispy textures remain intact.

Reheating guidelines are key; a quick microwave will work in a pinch, but follow oven methods for top-notch consistency and taste.

Add fresh elements such as herbs or cheese puffs just before serving to revitalize the dish and keep it vibrant.

Scaling Instructions

For halving the recipe, simply divide the number of potatoes and toppings while keeping the same bake temperature and timing.

Doubling or tripling is straightforward; adjust based on the size of your baking sheet, making sure to space them out appropriately for even cooking.

Equipment adjustments may be necessary when cooking larger batches; consider using multiple baking sheets and rotating them halfway through cooking time.

Timing modifications should be monitored, as larger quantities may require a slight increase in baking time; keep an eye on the skin’s crispiness.

Storage considerations: Extra cooked potatoes should be stored in batches to maintain freshness and flavor over time for easier access later.

Nutritional Deep Dive

The macro breakdown of mini baked potatoes reveals a healthy balance of carbohydrates derived from the potatoes, providing essential energy for daily activities.

Micronutrient analysis shows that they are rich in potassium and vitamin C, significant for cardiovascular health and immune support.

Health benefits include being naturally low in fat and high in fiber, making them suitable for balanced diets and weight management.

Dietary considerations involve their gluten-free nature, allowing those with gluten sensitivity to enjoy them without concern.

Portion analysis typically suggests one to two potatoes per serving, depending on sides, ensuring a well-rounded meal without excess.

Weight management tips would include pairing with more vegetables as toppings for added nutrients and bulk without excess calories.

Dietary Adaptations

For a gluten-free version, this recipe is naturally gluten-free as long as toppings are checked for any hidden gluten ingredients.

Dairy-free adaptations are easy to implement using vegan cheese and plant-based sour cream for those on lactose-free diets.

Vegan mini baked potatoes can be equally tasty when topped with hummus or a generous scoop of guacamole, maintaining the dish’s integrity.

Low-carb variations may involve replacing traditional potatoes with cauliflower, delivering a similar texture with fewer carbs.

The keto approach involves incorporating high-fat ingredients like cheese and avocado, maintaining low carb counts while enhancing flavor.

Paleo adaptations lean on using whole food toppings like avocado or grilled veggies, steering clear of processed ingredients.

Low-FODMAP options should carefully consider the toppings, steering clear of beans and garlic if necessary for sensitive gut health.

Other specific diets can easily adjust with the same base ingredients by merely switching the toppings to meet various dietary restraints.

Troubleshooting Guide

Texture issues can be addressed by ensuring even-sized potatoes are selected and pricked before baking; this ensures they cook evenly and achieve the desired fluffiness.

Flavor balance can be achieved by seasoning the inside of the baked potatoes adequately before serving; always taste and adjust as needed.

Temperature problems often stem from overcrowding the baking sheet; ensure ample space between potatoes for optimal heat circulation.

Equipment challenges may arise if the oven doesn’t properly heat; utilizing an oven thermometer can help ensure accurate temperature readings.

Ingredient substitutions might lead to unsatisfactory textures; always consider the specific properties of substitutes to avoid surprises.

Timing concerns usually surface during busy meal prep; consider a timer to manage when to start other components so that everything finishes together.

Recipe Success Stories

Community feedback often highlights how these mini baked potatoes became a family favorite during gatherings. Encouraged by their tasty versatility, many readers have shared their twists on toppings.

Variation successes often showcase readers trying new twang with east Asian flavors, integrating kimchi or hoisin sauce, creating a flavor-packed experience that delighted everyone involved.

Adaptation stories show how many families have embraced them as a staple, crafting them into weeknight dinners, proving that mini baked potatoes can make a serious culinary impact.

Reader suggestions about photography tips have elevated the presentation of their dishes, showcasing the beauty and appeal of mini baked potatoes showcased on social media.

Frequently Asked Questions

Can I make mini baked potatoes in advance? Yes! You can prepare mini baked potatoes a day in advance and store them in the refrigerator. Just reheat them before serving for optimal flavor and texture.

What types of potatoes work best? Starchy potatoes like Russets are ideal for baking due to their high starch content, providing the fluffy texture you’re aiming for.

How do I ensure my potatoes cook evenly? Make sure to choose similarly sized potatoes and avoid overcrowding the baking sheet. This ensures consistent cooking and desirable texture.

What toppings can I use for my mini baked potatoes? Common toppings include sour cream, cheese, bacon bits, and fresh herbs. Feel free to get creative with your favorites!

How do I store leftovers? Allow the potatoes to cool completely, then store them in an airtight container. They can be kept in the fridge for up to four days.

Can I freeze baked potatoes? Yes! Wrap cooled, baked potatoes tightly in plastic wrap and place them in a freezer bag. They will last for approximately three months in the freezer.

What is the best way to reheat mini baked potatoes? Reheat mini baked potatoes in the microwave for a quick method. Alternatively, you can re-bake them in a preheated oven at 350°F (175°C) for a few minutes.

How long do mini baked potatoes take to cook? Typically, mini baked potatoes will take around 30-40 minutes at 400°F (200°C), but this may vary by size.

Can I use sweet potatoes instead? Absolutely! Sweet potatoes are a great alternative, offering a different flavor profile and more nutrients.

Are mini baked potatoes suitable for gluten-free diets? Yes! Mini baked potatoes are naturally gluten-free, making them a wholesome choice for those avoiding gluten.

Additional Resources

For more delicious recipes, consider exploring related dishes like loaded baked potatoes or potato skins that showcase similar flavor profiles.

Technique guides on baking and preparing potatoes can enhance your culinary skills, ensuring better results in the kitchen.

Ingredient information on potatoes will help you understand their nutritional benefits, fostering a deeper appreciation for the humble spud.

Equipment recommendations for essential kitchen tools can assist in elevating your cooking experience and ensuring you have everything you need on hand.

Seasonal variations of mini baked potatoes can encourage creativity and inspire you to try new toppings that suit the time of year, maximizing flavor and enjoyment.

Join the Conversation

We invite you to engage with us on social media! Share your mini baked potato creations with the community and provide feedback on this recipe.

Don’t forget to capture beautiful photos of your baked potatoes to inspire others and showcase your culinary talents!

We thrive on community engagement, so feel free to share variations or tips you’ve tried to personalize these delightful bites for others to see.

The Recipe

Mini Baked Potatoes

Serves: 4

Prep Time: 15 mins

Cook Time: 30 mins

Total Time: 45 mins

Kitchen Equipment Needed

  • Baking sheet
  • Aluminum foil
  • Fork
  • Airtight container for storage

Ingredients

  • 8 mini potatoes
  • 2 tablespoons olive oil
  • 1 teaspoon salt
  • 1/2 cup sour cream
  • 1 cup shredded cheese
  • 1/2 cup cooked bacon bits
  • 2 tablespoons chopped chives

Directions

  1. Preheat your oven to 400°F (200°C).
  2. Wash the mini potatoes thoroughly and dry them with a towel.
  3. Using a fork, prick each potato several times to allow steam to escape while baking.
  4. Place the potatoes on a baking sheet and drizzle with olive oil, then sprinkle with salt.
  5. Bake in the preheated oven for 30-40 minutes, or until the potatoes are tender when pierced with a fork.
  6. Once baked, let them cool for a few minutes, then slice them open carefully.
  7. Top each potato with sour cream, cheese, bacon bits, and chives as desired. Serve warm and enjoy!

Recipe Notes

  • Feel free to use sweet potatoes for a different flavor.
  • Customize toppings based on dietary preferences, such as using vegan cheese or plant-based sour cream for dairy-free options.

Irresistible Crack Chicken Tenders Recipe for Ultimate Snack Time Delight

Crack Chicken Tenders: Irresistibly Flavored Chicken Delight

⚖️
Difficulty
Easy

⏲️
Prep Time
15 mins

🕒
Cook Time
20 mins

⏱️
Total Time
35 mins

🍽️
Servings
4 servings

Crack Chicken Tenders are a mouthwatering addition to any meal, perfect for family dinners or entertaining guests. These tenders are not just your average chicken dish; they’re infused with a rich blend of flavors that create an unforgettable dining experience. Each bite showcases juicy, tender chicken enveloped in a savory blend of spices and seasonings that keep you craving more. The combination of the creamy sauce and crisp texture delivers a satisfying crunch that perfectly complements the moist chicken, making them irresistible.

This recipe is not only easy to prepare but also versatile enough to suit various palates. Whether you enjoy them on their own, in a sandwich, or over a salad, these Crack Chicken Tenders are sure to impress. With minimal prep time and a quick cooking process, you’ll have a delightful dish on the table in no time. The delightful aroma of the chicken seasoning wafts through your kitchen, setting the stage for a cozy meal that brings everyone together.

Quick Recipe Highlights

  • Flavor Profile: Savory, slightly tangy, and creamy from the mix of ranch dressing and cheese.
  • Texture: Crispy on the outside with a tender, juicy interior that melts in your mouth.
  • Aroma: An enticing blend of herbs and spices that fills the kitchen as the chicken cooks.
  • Visual Appeal: Crispy golden tenders served with a garnish of fresh herbs create an inviting presentation.
  • Skill Level Needed: Perfect for beginners, as the steps are simple and straightforward.
  • Special Equipment: A shallow dish for breading and a baking sheet for cooking.

Recipe Overview

  • Difficulty Level: This recipe is easy to follow, with clearly defined steps and minimal ingredients, making it suitable for cooks of all skill levels.
  • Category: These chicken tenders fall under the categories of finger foods and main dishes, perfect for casual meals or party snacks.
  • Cuisine: Though inspired by Southern comfort food, this dish embodies a universal appeal with familiar flavors found in many kitchens.
  • Cost: Affordability is key; with a few inexpensive ingredients, you can create a delicious meal without breaking the bank.
  • Season: These tenders are great year-round, but they shine during gatherings and barbecues, making them a crowd-pleaser in any season.
  • Occasion: Ideal for casual family dinners, potlucks, and game nights—the versatility makes them suitable for any gathering.

Why You’ll Love This Recipe

Crack Chicken Tenders stand out not just for their delicious flavor but also for their fantastic texture. Meat lovers will appreciate how the crispy coating of the tenders contrasts beautifully with the juicy, tender chicken inside. The blend of ranch seasoning and cheese adds a rich complexity that takes this dish to another level. It’s hard to resist reaching for seconds, making it an excellent option for those with hearty appetites.

Convenience plays a significant role in why these Crack Chicken Tenders are beloved. The simple ingredients are pantry staples, making this meal quick to whip up on busy weeknights. You don’t need to spend hours in the kitchen; from prep to plate, this dish comes together in under an hour. The straightforward process means even novice cooks can produce a flavorful dish effortlessly.

From a nutritional standpoint, Crack Chicken Tenders can be tailored to include more vegetables or whole wheat flour for the breading. The primary ingredient, chicken, is a lean protein source that provides essential nutrients, making it a healthier choice compared to traditional fried tenders. By adding sides of fresh veggies or a colorful salad, you can create a well-rounded meal.

Socially, these tenders are perfect for entertaining. Their finger-food nature makes them easy to serve and share, encouraging guests to mingle and enjoy themselves. Whether served at a backyard barbecue or a cozy indoor buffet, they never fail to wow the crowd. Pair them with dipping sauces for additional flavor and fun, ensuring everyone has something to enjoy.

Lastly, the cost-effectiveness of this dish makes it accessible to all home cooks. Chicken tenders are often affordable, and since this recipe requires minimal ingredients, it won’t stress your budget. The ability to create a mouthwatering dish at home from simple, inexpensive ingredients adds to its charm. These Crack Chicken Tenders are not just a meal; they are a delightful experience that offers both comfort and satisfaction.

Historical Background and Cultural Significance

The history of chicken tenders can be traced back many generations, originating from a time when simpler cooking methods defined home-style cooking. While no one knows the exact origins of marinades, the blending of spices and sauces have been recorded across various cultures as an essential practice for enhancing flavors. Chicken tenders as we know them gained popularity in the United States, especially among families looking for quick, easy meal ideas.

Culturally, chicken has long held a vital place in traditional meals across the globe. In Southern cuisine, chicken holds a prestigious reputation, often appearing during celebrations, family gatherings, and holidays. This connection elevates chicken tenders, linking them to feelings of warmth, community, and comfort—perfect for bringing friends and family together.

The evolution of the chicken tender has seen a shift from ordinary fried pieces to gourmet variations found in restaurants today. Chefs often add creative flair by incorporating unique spices, sauces, and cooking methods, pushing boundaries while still retaining that nostalgic sense of home. Crack Chicken Tenders embody this trend while still leaning on that familiar comfort food vibe.

Regional variations also enrich the narrative around chicken tenders. From Southern styles with extensive seasoning to the more straightforward, slow-cooked variations, every region seems to have its interpretation. This diversity offers home cooks opportunities to experiment and personalize their takes, further enhancing the significance of these tenders in various households.

Ingredient Deep Dive

– **Chicken Breast**: Chicken breast serves as the primary ingredient in Crack Chicken Tenders and is celebrated for its versatility and nutrition. Lean and packed with protein, it’s favored by health-conscious cooks. Select breasts that are plump, firm, and free from blemishes for the best quality. Store fresh chicken in the refrigerator and use within two days or freeze for later use. For alternative proteins, turkey breast can be a delightful substitute.

– **Ranch Dressing Mix**: The ranch dressing mix brings a blend of herbs and spices that elevate the chicken’s flavor profile. Its creation can be traced back to the ranching communities of the American West, becoming a staple in households across the U.S. Rich in flavor and subtly tangy, the mix is often a crowd favorite. When selecting, opt for a brand without artificial additives. If unavailable, homemade mixes incorporating dried dill, garlic powder, and onion powder can work wonders.

– **Cheese (Cheddar or Cream Cheese)**: Cheese adds a creamy texture and depth to Crack Chicken Tenders. Cheddar is a popular choice due to its sharp flavor, while cream cheese contributes a luscious smoothness. Both types boast significant calcium and protein content. Choose block cheese for optimal freshness, and store leftovers wrapped tightly in the refrigerator. If you’re looking for lighter options, low-fat cheese varieties can also be used without sacrificing flavor.

– **Breadcrumbs**: Breadcrumbs provide the crispy coating that makes chicken tenders delightful. Traditional breadcrumbs can be made from stale bread seasoned to your liking. This ingredient creates a satisfying crunch when fried or baked. Look for options that are plain to allow the flavors of the chicken to shine. For gluten-free variations, alternatives like almond flour or crushed cornflakes may be utilized.

Common Mistakes to Avoid

  • Not marinating long enough: Allowing the chicken to marinate enhances its flavor and juiciness. Aim for at least 30 minutes, or overnight for best results.
  • Using cold chicken: Cooking chicken straight from the fridge can lead to uneven cooking. Always start with room temperature chicken for consistent results.
  • Skipping the breading process: Breading is essential for achieving that desired crunch. Ensure each piece of chicken is coated evenly for the best texture.
  • Overcrowding the frying pan: Giving each piece space ensures even cooking. Overcrowding can cause steaming instead of frying, leading to soggy tenders.
  • Not preheating the oven or oil: For best results, always preheat your cooking surface to achieve optimal crispness.
  • Using expired seasonings or ingredients: Always check expiration dates to guarantee maximum flavor from fresh ingredients.
  • Trying to force fully cooked chicken out of the pan: Letting the chicken rest will keep its juices locked in. Trying to force them out can lead to dryness.
  • Underestimating cooking time: Always use a meat thermometer to ensure chicken reaches an internal temperature of 165°F for safe consumption.
  • Neglecting to check for doneness: Check the tenders not just for timing but visually and with a thermometer to prevent undercooked chicken.
  • Not letting chicken rest before serving: Allowing the chicken to rest post-cooking keeps the juices intact, leading to a more flavorful bite.

Essential Techniques

– **Breading**: This technique is crucial for developing that signature crispy texture of Crack Chicken Tenders. It involves coating the chicken in flour, egg, and breadcrumbs. Mastering this technique requires practice to ensure even coverage without clumps. Look for visual cues like a uniform golden color once cooked, indicating success.

– **Marinating**: Marinating chicken is essential to infuse flavors deep into the meat. This typically involves soaking the chicken in a mixture of seasonings and acids. To master it, be mindful of time—marinating too long can alter the tenderness negatively. Ideally, aim for at least 30 minutes to get the full benefit from the marinade.

– **Frying/Baking**: Achieving the just-right crispy finish relies on the cooking method used. For frying, maintain the oil temperature to avoid greasy tenders; for baking, ensure an even layer on the baking sheet. Common pitfalls are uneven cooking and undercooked chicken. Check with a thermometer, looking for that delightful golden hue.

– **Resting**: Letting your chicken tenders rest after cooking might seem unimportant, but it’s essential for preserving moisture. Master this by timing your meal prep so the tenders can rest fully before serving, leading to juicier results and more satisfying bites.

Pro Tips for Perfect Crack Chicken Tenders

– **Choose quality chicken**: Fresh, high-quality chicken breasts make a significant difference in flavor and texture. Opt for organic or free-range when possible for enhanced quality.

– **Adjust spice levels**: Customize the seasoning to cater to your taste buds. Feel free to add extra spices, chili powder, or cayenne for a spicy kick.

– **Experiment with coating**: Try different breading options like panko breadcrumbs or crushed pretzels for unique textures and flavors.

– **Oven-fry for healthier options**: Opt for a healthier twist by baking the tenders instead of frying them, ensuring they still achieve a crunchy texture.

– **Cleanup with foil**: Line your baking sheet with foil or parchment for easy cleanup.

– **Try different dips**: Serve with a variety of dips ranging from honey mustard to spicy aioli for added zest.

– **Marinate overnight for max flavor**: For a deeper flavor infusion, allow the tenders to marinate in the fridge overnight.

– **Make a larger batch**: If prepping for a gathering, double the recipe to ensure you’re well-stocked with this crowd-pleasing dish.

Variations and Adaptations

– **Regional variations**: Consider adding a Southern twist by incorporating Cajun seasonings for extra spice or BBQ flavors for a smoky profile. Each region’s flair will add a unique touch.

– **Seasonal adaptations**: Incorporate seasonal herbs like rosemary or sage in the marinade for a fresh flavor that complements the season’s palate.

– **Dietary modifications**: For gluten-free variations, substitute traditional breadcrumbs with gluten-free alternatives or crushed nuts.

– **Flavor variations**: Add cheese to the breading or use flavored ranch seasoning mixes to bring a new twist to the classic recipe.

– **Texture modifications**: Experiment with different frying techniques—air fryer options create a less oily, equally crunchy alternative.

– **Presentation alternatives**: Serve over a vibrant salad or in lettuce wraps for a fresh, healthier presentation.

Serving and Presentation Guide

To plate your Crack Chicken Tenders beautifully, consider stacking them high on a rustic wooden platter, attending to the color contrast with a vibrant dipping sauce drizzled on the side. Garnishing with fresh parsley or chives adds a touch of color and elevates the dish visually. Traditional accompaniments can include coleslaw or pickles, providing a refreshing contrast in flavor and texture.

Modern serving suggestions include adding them to sliders with fresh toppings for a fun twist. When serving, keep an eye on temperature—these tenders are best enjoyed hot and fresh. For portion control, offer smaller bites to allow guests to sample various sauces alongside. The presentation can be refined further by using parchment paper to line the serving dish, giving it a chic, restaurant-style appeal.

Wine and Beverage Pairing

Pair these flavorful Crack Chicken Tenders with a crisp white wine like Sauvignon Blanc or a light-bodied Chardonnay. These wines complement the savory notes without overpowering the dish. For those preferring non-alcoholic options, a sparkling water with a splash of lemon enhances the dish’s flavors.

If coffee or tea is more your style, try serving mild black tea or iced tea for a refreshing accompaniment. Temperature considerations are important; ensure that any beverages served are appropriately chilled or warmed, depending on preference, to enhance the overall dining experience.

Storage and Shelf Life

Store any leftover Crack Chicken Tenders in an airtight container in the refrigerator, where they can last for up to three days. Proper storage is essential to maintain their texture and flavor. When reheating, use an oven to restore their crispiness, as microwave heating tends to make them soggy.

You can also freeze uncooked, breaded tenders. Simply freeze them in a single layer on a baking sheet, then transfer them to a freezer bag once frozen. They can be kept frozen for up to three months—ideal for quick meals. Recall to label and date your containers to stay on top of freshness.

Make Ahead Strategies

Prep your Crack Chicken Tenders by marinating the chicken several hours or even the night before. This not only enhances flavor but also saves you time on the day of serving. Breading the chicken can also be done ahead of time; just ensure you store the breaded tenders in the fridge to keep them fresh.

When storing between cooking steps, keep the tenders separated on parchment paper to prevent sticking. If you’re planning a gathering, consider preparing a large batch and freezing prior to cooking. This allows you to have a stress-free meal ready to go.

When reheating, aim to get a fresh element back into the presentation, such as fresh herbs or spring onions, for a beautiful finish that looks freshly made.

Scaling Instructions

To halve or double the recipe, simply adjust the ingredient quantities accordingly while keeping the ratios the same. For doubling, ensure your cooking equipment can handle the increased volume. Timing may slightly vary with larger or smaller batches—just keep an eye on the doneness of your chicken as it cooks.

Additionally, if you increase your batch, cook in smaller increments to ensure even cooking. Store any excess intended for future meals, using proper labeling to avoid confusion.

For portion control, consider preparing smaller tenders that are easier to manage and serve for gatherings or large families, while ensuring that storage containers are sufficient for any leftovers.

Nutritional Deep Dive

Crack Chicken Tenders provide a balanced macro breakdown, primarily composed of lean protein from chicken, with the added benefits of wholesome ingredients such as spices and herbs. Healthy fats may vary depending on added cheese and cooking methods.

In terms of micronutrient analysis, chicken is an excellent source of B vitamins, iron, and phosphorus, making it a nutritional powerhouse. The herbs and spices used can introduce additional vitamins and minerals, further enhancing the health benefits of this dish.

For individuals watching their dietary requirements, being mindful of portion sizes and accompaniments can greatly assist with weight management. By serving with fresh produce or whole grains, you can spruce up the nutritional profile while enjoying satisfying flavors.

Dietary Adaptations

For those with gluten sensitivities, an easy adaptation involves substituting standard breadcrumbs with gluten-free varieties, ensuring everyone can enjoy this delicious dish. A dairy-free approach could mean using cashew cream or nutritional yeast in place of cream cheese for a similar rich taste without the dairy.

Vegan adaptations might explore textured vegetable protein (TVP) as a substitute for chicken, coated and prepared in the same manner. Low-carb or Keto variations can use almond flour instead of breadcrumbs, and brined chicken breasts can achieve that same crunch without carbs.

For a more holistic approach, consider Paleo-friendly ingredients by utilizing almond flour, natural oils, and fresh produce to sustain those dietary preferences. Finally, an approach for Low-FODMAP diets might include avoiding garlic in marinades, ensuring a suitable recipe for those affected.

Troubleshooting Guide

If you encounter texture issues, it might be because the chicken is not properly breaded. Ensure each piece is evenly coated, replacing any omitted steps. For flavor balance, taste your marinades before applying them to ensure the right seasoning levels.

If you find your tenders are undercooked, monitor cooking times more carefully and always use a reliable meat thermometer to check for doneness. If you find your oil smoking during frying, the temperature might be too high—reduce heat to achieve a gentle fry.

In case you face equipment challenges, ensure your oven temperature is calibrated correctly and that you’re using the appropriate tools for frying or baking, such as baking sheets or frying pans.

When adjusting ingredient substitutions, keep in mind that some alternatives may hold additional moisture, so adjust your cooking times as necessary to prevent sogginess.

Recipe Success Stories

Community feedback on these Crack Chicken Tenders consistently highlights their flavor and ease of preparation. Many share stories of successful gatherings where these tenders took center stage, with guests pleading for the recipe.

Variations have sprung from readers trying different marinades or spices, often leading to delightful adaptations that please picky eaters and adventurous palettes alike. These anecdotes demonstrate that food brings people together, creating lasting memories over shared meals.

Readers have provided stunning photography tips, encouraging others to capture the beauty of this dish when served at their tables. Such active engagement fosters a sense of community around the recipe while inspiring further creativity.

Frequently Asked Questions

Can I freeze Crack Chicken Tenders?
Yes, you can freeze the cooked or uncooked chicken tenders. Ensure they are well-wrapped in plastic or stored in airtight containers to maintain freshness, and they can last for up to three months in the freezer.

What can I serve with Crack Chicken Tenders?
These tenders pair beautifully with a variety of side dishes, such as coleslaw, roasted vegetables, or a side salad. Feel free to mix and match to create a well-rounded meal.

Can I make this recipe gluten-free?
Absolutely! Simply switch out the breadcrumbs for gluten-free alternatives like ground nuts or gluten-free breadcrumbs, and ensure all sauces used are also gluten-free.

How long should I marinate the chicken?
Marinating the chicken for at least 30 minutes is ideal; however, for richer flavor, marinating overnight is highly recommended.

Can I use other meats or proteins?
Yes, while the recipe is designed for chicken, you can use turkey or even plant-based proteins as an alternative. Just adjust the cooking times accordingly based on thickness.

What is the best way to reheat leftover tenders?
The oven is the best method for reheating, as it helps retain the tenders’ crispiness. Place them on a baking tray and heat at 350°F (175°C) until warmed through.

Can I bake these instead of frying?
Yes, baking is a healthier option. Lightly coat the tenders with oil and bake in a preheated oven at 400°F (200°C) until crispy and cooked through.

What type of ranch mix should I use?
You can use store-bought ranch dressing mix or make your own from dried herbs and spices to control the flavor according to your preferences.

How do I achieve the crispy coating?
Achieve a crispy coating by ensuring each chicken tender is properly breaded and not overcrowding the cooking surface, which can lead to steaming rather than frying.

Can I make this ahead of time?
Definitely! You can prep the chicken and bread it ahead of time. Store in the fridge until you’re ready to cook, or freeze originally breaded instead to have ready-made meals.

Additional Resources

Looking for more delicious recipes? Check out our collections of chicken dishes that include inventive variations on classic favorites. For techniques, explore guides on proper marinating and frying techniques to elevate your cooking skills.

Discover ingredient information that can enhance your understanding of the nutritional profiles and seasonal availability of the products you love. Lastly, consider investing in quality kitchen equipment that makes cooking simpler and more enjoyable.

Join the Conversation

We love connecting with our readers! Share your photos of Crack Chicken Tenders on social media and tag us; we’d love to showcase your creations. Leave comments on how you’ve customized the recipe or any tips you’ve discovered along the way for making it even better.

Recipe reviews play an essential role in our community. Your feedback helps others make informed decisions and sparks conversation among food lovers.

Don’t hesitate to engage with us for recipe variations or share your creative spins. The joy of cooking is a shared experience, and we’re here to celebrate each other’s culinary adventures!

The Recipe

Crack Chicken Tenders

Serves: 4 servings

Prep Time: 15 mins

Cook Time: 20 mins

Total Time: 35 mins

Kitchen Equipment Needed

  • Baking sheet
  • Shallow dish for breading
  • Mixing bowls
  • Meat thermometer
  • Oven mitts

Ingredients

  • 1 lb chicken breasts, sliced into strips
  • 1 packet ranch dressing mix
  • 1 cup shredded cheddar cheese
  • 1 cup breadcrumbs (regular or gluten-free)
  • 2 eggs, beaten
  • Salt and pepper to taste
  • Cooking spray or oil for frying

Directions

  1. Preheat the oven to 400°F (200°C) or heat oil in a frying pan over medium heat.
  2. In a shallow dish, combine the ranch dressing mix, breadcrumbs, salt, and pepper.
  3. In another bowl, beat eggs and add shredded cheese to mix well.
  4. Dip each chicken tender in the egg mixture, then coat evenly with the breadcrumb mixture.
  5. If baking, place coated tenders on a baking sheet and spray with cooking oil. Bake for 20 minutes or until golden brown and cooked through.
  6. If frying, fry tenders for about 4-5 minutes on each side until golden and cooked through. Ensure an internal temperature of 165°F (74°C).
  7. Let chicken tenders rest for a few minutes before serving.

Recipe Notes

  • For added heat, incorporate cayenne pepper into the breadcrumb mix.
  • These tenders can be served with various dipping sauces like ranch, honey mustard, or BBQ sauce.
  • If you prefer a lighter option, baking tends to retain flavor and reduces calories.

Best Crockpot Jalapeno Corn Dip – Perfect for Parties

Crockpot Jalapeno Corn Dip: The Ultimate Party Delight

⚖️
Difficulty
Easy

⏲️
Prep Time
15 mins

🕒
Cook Time
2 hours

⏱️
Total Time
2 hours 15 mins

🍽️
Servings
8 servings

Crockpot Jalapeno Corn Dip is a tantalizingly creamy dish that will make your next gathering a flavorful feast. Made with sweet corn and spicy jalapenos, this dip creates a harmonious blend of aromas and tastes that brings comfort and joy with every bite. As it slowly cooks in your crockpot, the ingredients meld together, creating a rich and luscious texture that will leave your guests craving more. Whether served with crunchy tortilla chips or fresh veggies, this dip is sure to be a crowd-pleaser, enhancing your party atmosphere.

This delightful dip is not just about flavor; it’s also deeply satisfying in its warmth and creaminess. The combination of melted cheeses, flecks of green from the jalapenos, and the golden kernels of corn make for a vibrant and appealing presentation. Each scoop promises a balanced bite of savory cheese and sweet corn, followed by just enough heat from the jalapenos. Perfect for game days, family gatherings, or any occasion that calls for sharing good food, the Crockpot Jalapeno Corn Dip encapsulates what it means to enjoy great company and delicious flavors.

Quick Recipe Highlights

  • Flavor Profile: This dip has a delightful combination of sweet and spicy, with notes of cheddar cheese that perfectly complements the corn and jalapenos.
  • Texture: The dip is creamy and smooth, with a slight crunch from the corn and the added warmth of the jalapenos giving it a satisfying mouthfeel.
  • Aroma: You’ll be greeted with an inviting aroma of melted cheese and a piquant hint from the jalapenos as it cooks in your crockpot.
  • Visual Appeal: The bright yellow corn against the vivid green jalapenos and the creamy white cheese creates an eye-catching dip that’s perfect for serving.
  • Skill Level Needed: This recipe is easy enough for beginners, with simple steps that almost anyone can follow.
  • Special Equipment: All you need is a crockpot for this dish, making it an accessible option for anyone with minimal kitchen equipment.

Recipe Overview

  • Difficulty Level: This recipe is rated easy. Featuring only a handful of ingredients and minimal prep time, it’s a straightforward dish that offers impressive flavor.
  • Category: Ideal for appetizers or snacks, this dip is a versatile choice that pairs well with both formal gatherings and casual get-togethers.
  • Cuisine: Rooted in Tex-Mex traditions, the use of corn and jalapenos reflects the vibrant culinary landscape of this region.
  • Cost: The approximate cost of ingredients is budget-friendly, making it easy to feed a crowd without breaking the bank.
  • Season: This dip is great year-round but shines especially during the warmer months when gatherings and outdoor events ramp up.
  • Occasion: Perfect for game day, picnics, and potlucks, it’s a must-have dish for events where fun and flavor meet.

Why You’ll Love This Recipe

This Crockpot Jalapeno Corn Dip is not just about taste; it’s a whole sensory experience. The creamy texture combined with the light crunch of corn and a refreshing heat from jalapenos creates an addictive snack. Every scoop captures a burst of flavor that dance on your taste buds, making it impossible to stop at just one serving. This dip evokes nostalgia and joy; it’s like a warm hug served in a bowl.

One of the great appeals of this recipe is its convenience. Simply toss your ingredients into the crockpot and let it do the work for you. This means you can spend more time enjoying your gathering without constantly hovering near the stove. The long, slow cooking process enhances the flavors, allowing the ingredients to blend beautifully. Plus, the slow cooker keeps it warm for hours, ensuring that your dip remains a delectable treat from the start to the end of the party.

Nutritionally, this dish offers several benefits. Corn is a whole grain that provides fiber and essential vitamins, while cheese adds protein and calcium. The jalapenos not only bring a pleasant zing but are also known to boost metabolism. You can feel good about serving this dip, knowing you’re offering something that’s both satisfying and packed with wholesome ingredients.

There’s also a social aspect to this recipe that can’t be overlooked. Food brings people together, and this dip is a fantastic conversation starter at gatherings. Whether everyone’s gathered around the table or milling about the room, this dip will have people sharing recipes and laughing over its irresistible taste. It creates an ambiance of warmth and comfort, making shared moments even more special.

Finally, the cost-effectiveness of this dish is impressive. With affordable ingredients, you can whip up a large batch without overspending, allowing you to feed a crowd or simply ensure there are leftovers for later. It’s an accessible dish designed to fit any budget, translating into great value for your next event.

Historical Background and Cultural Significance

Crockpot Jalapeno Corn Dip boasts a rich history rooted in Tex-Mex cuisine, a culinary tradition that emerged along the Texas-Mexico border. This region has long been a melting pot of cultures, where traditional Mexican flavors meet American staples. The use of corn in this recipe pays homage to its deep agricultural roots, highlighting the significance of corn in both Mexican and Southern U.S. cultures as a staple food.

While dips of this nature have been enjoyed for decades, the crockpot introduction has transformed them into easy, crowd-pleasing options that fit modern lifestyles. The evolution of this dish reflects the current trend of slow cooking, emphasizing convenience without sacrificing flavor. This adaptation allows for unique spins on traditional recipes, showcasing how culinary practices continue to evolve in response to changing times.

Culturally, the importance of such recipes cannot be overstated. They serve as connectors, bringing families and friends together around shared tables. Dishes like Crockpot Jalapeno Corn Dip are often made for festive occasions, reinforcing traditions while creating new memories. It’s a representation of hospitality and warmth, staples that remain integral in many cultures today.

Regional variations are abundant, with some tweaking the base recipe to include different kinds of cheeses or even incorporating meats like bacon. Such adaptations are a testament to the recipe’s versatility, proving that it can be customized to satisfy a wide range of taste preferences while still being faithful to its origins.

Ingredient Deep Dive

– **Corn:** Corn holds a significant place in both Native American and Mexican cuisines, serving as a foundational food source. Its nutritional benefits include being high in fiber, vitamins, and antioxidants. When selecting corn, aim for fresh or frozen options and store it in a cool place. Canned corn can work in a pinch, but fresh or frozen really enhances flavor. If you wish to substitute, try using roasted corn for a smoky depth.

– **Jalapenos:** Hailing from Mexico, jalapenos are a staple in many spicy dishes, adding both flavor and heat. They are an excellent source of vitamins C and B6, and they also contain capsaicin, which studies suggest may help boost metabolism. When choosing jalapenos, look for firm peppers with no soft spots. Store them in a cool and dry place. You can swap jalapenos for another mild pepper if you prefer less heat or even use pickled jalapenos for a tangy twist.

– **Cheese:** Cheese has been a beloved ingredient across various cuisines for centuries, providing richness to countless dishes. In this dip, it delivers creaminess and depth of flavor. Opt for freshly grated cheese for the best melty texture. Store cheese wrapped properly to maintain freshness. If you’re looking to change up the flavors, consider sharp cheddar or pepper jack cheese for an extra kick.

– **Cream Cheese:** This soft cheese has a rich history in American cuisine and adds an exceptionally creamy element to the dip. Nutritionally, cream cheese has a higher fat content, lending a luxurious texture to the recipe. When selecting cream cheese, opt for full-fat versions for creaminess. You can use Greek yogurt as a lighter alternative, though the flavor will differ.

Common Mistakes to Avoid

  • **Not letting it cook long enough:** Ensure the dip cooks for the full duration to achieve a rich and blended flavor.
  • **Using low-quality ingredients:** Higher quality ingredients will yield a far superior taste.
  • **Overcrowding the crockpot:** Avoid filling the crockpot beyond its capacity, as this can lead to uneven cooking.
  • **Not adjusting seasoning:** Since flavors deepen over time, make sure to taste and adjust seasoning before serving.
  • **Skipping the preps:** Properly chopping ingredients like jalapenos can affect flavor distribution.
  • **Serving it too hot:** Allow the dip to cool slightly post-cooking; temperatures can be deceiving.
  • **Choosing the wrong corn:** Opt for sweet corn; using some other variety can change the overall taste.
  • **Ignoring leftovers:** Reheated dip can still taste great, so don’t let it go to waste!

Essential Techniques

– **Chopping:** Proper chopping ensures even cooking and even flavor distribution. Use a sharp knife to finely chop jalapenos and corn for optimal consistency. Avoid large chunks as they can disrupt the creamy texture.

– **Layering ingredients:** Layer ingredients in the crockpot for better flavor melding. Start with cream cheese at the bottom, followed by corn and jalapenos, and top with cheese. This helps prevent burning and ensures even melting.

Pro Tips for Perfect Crockpot Jalapeno Corn Dip

– **Taste and adjust:** Regularly taste the mixture as it cooks and adjust seasoning to your preference, adding more jalapenos or cheese as desired.
– **Use fresh ingredients:** Fresh corn and peppers will provide superior flavor over canned options. Try to incorporate them when possible.
– **Grease the pot:** Lightly greasing the crockpot pot will prevent sticking and make cleanup easier.
– **Optional toppings:** Consider adding extra cheeses or cilantro before serving for garnishing and a flavor boost.
– **Keep it warm:** If serving over a longer period, use a warm setting to maintain the dip’s desired temperature without overcooking it.

Variations and Adaptations

– **Regional variations:** Try adding spices such as cumin or chili powder for a more complex flavor profile typical in Southwestern cuisine.
– **Seasonal adaptations:** In autumn, consider adding roasted autumn veggies like butternut squash for added sweetness.
– **Dietary modifications:** For a dairy-free option, switch to vegan cream cheese and nutritional yeast for a cheesy flavor without dairy.
– **Flavor variations:** Add crumbled bacon for a savory kick or smoked paprika for a rich, smoky flavor that pairs beautifully with the cheese.
– **Texture modifications:** For extra crunch, incorporate crushed tortilla chips as a topping for added texture.
– **Presentation alternatives:** Serve in a hollowed-out bread bowl or within a colorful vegetable platter for visual appeal.

Serving and Presentation Guide

To present your Crockpot Jalapeno Corn Dip, consider using an attractive serving vessel that holds heat—like a stoneware bowl. For a rustic touch, serve directly from the crockpot. Garnish with freshly chopped cilantro for a pop of color and serve alongside an array of dippables such as tortilla chips, crunchy vegetables, or soft bread slices. This not only elevates the presentation but allows guests to serve themselves, fostering interaction.

Keep in mind temperature control as well; the dip should be served warm but not scalding hot. If you prepare it ahead of time, consider a slow reheat just before serving. Moreover, always consider portion controls by providing small bowls for individual servings, enticing guests to come back for more without overindulging.

Wine and Beverage Pairing

A crisp white wine, such as Sauvignon Blanc, pairs beautifully with the heat and creaminess of the dip, enhancing the overall palate experience. Alternatively, a chilled light beer or ale complements the flavors without overpowering them. For non-alcoholic options, consider serving refreshing lemonade or iced tea with a slice of lime, harmonizing perfectly with the savory aspects of the dip.

When serving wine, ensure it’s chilled to balance the richness of the dip, making for a delightful pairing. If guests prefer coffee, a mild brew can provoke contrasting flavors, enhancing the enjoyment of the dip.

Storage and Shelf Life

To store your leftovers, place any uneaten dip into an airtight container and refrigerate promptly; it can last for 3-5 days. For long-term storage, consider freezing portions in individual bags for convenience, allowing you to defrost and enjoy later. Reheating can be done in the microwave or on the stovetop but ensure gentle warmth to maintain creaminess. Always check for signs of spoilage, such as off odors or unusual texture before consuming again.

When reheating, add a splash of milk or cream to retain the dip’s luscious consistency, as it may thicken upon cooling.

Make Ahead Strategies

To maximize your time, consider preparing the dip ingredients in advance—chop the jalapenos and measure out cheeses the night before. Keep those prepped ingredients stored in the fridge until it’s time to cook. Additionally, if you wish to combine flavors, mix the cream cheese, corn, and jalapenos a few hours before cooking; this enhances flavor development.

When making ahead, remember to let the dip cool completely before storing it. Reheating should be done gently to maintain its smooth texture; add a bit of liquid if necessary to restore creaminess.

Scaling Instructions

To halve the recipe for a smaller gathering, simply reduce each ingredient by 50% while keeping the cook time the same, as this ensures adequate heat exposure for all components. If doubling or tripling, be cautious about exceeding your crockpot’s capacity; consider splitting the batch across two pots if necessary. Adjusting cooking times might be necessary as well; larger quantities may need a longer cooking time to ensure everything heats thoroughly and blends nicely.

Always account for storage considerations when scaling, as larger batches mean potential for longer storage needs, so be prepared with suitable containers for leftovers.

Nutritional Deep Dive

When looking at nutrition, this dip offers an appealing macro balance of carbohydrates from corn, proteins from cheese, and healthy fats. Each serving is rich in necessary vitamins and minerals, making it an enjoyable yet wholesome addition to your meal. Corn provides dietary fiber, while the jalapenos introduce a demure source of vitamin C, contributing to your daily vegetable intake.

Besides macros and vitamins, this dip can have health benefits if consumed in moderation, supporting weight management. The fiber from corn assists with digestion while the protein from cheese helps promote satiety, reducing the chances of overindulging in other snacks.

Dietary Adaptations

– **Gluten-free:** All ingredients used in this dip are naturally gluten-free, making it a safe choice for those with gluten sensitivities.
– **Dairy-free:** Swap out traditional dairy products for vegan cheese and coconut cream, which creates a similar creamy texture without the lactose.
– **Vegan:** Stick to plant-based versions of cream cheese and cheese substitutes to maintain vegan standards while enjoying this delicious dip.
– **Low-carb:** Use reduced-carb cream cheeses and serve with crunchy celery or cucumber slices instead of chips for a health-conscious, low-carb alternative.
– **Keto:** Focus on high-fat options with full-fat cheeses and heavy cream to keep it aligned with ketogenic dietary goals.
– **Paleo:** Substitute with natural ingredients devoid of processed foods, such as cream made from nuts rather than traditional dairy products.

Troubleshooting Guide

If your dip appears too thick, add a little milk or cream during reheating to restore its creamy texture. Conversely, if it’s too watery, let it cook uncovered for a while to assist in evaporation. Balance flavors can sometimes lean too heavily on spiciness; add more cream cheese or even a touch of sugar to mellow the heat. Should you face equipment challenges, ensure your crockpot settings are correctly adjusted, as overcooking can lead to ingredient separation or burnt textures.

Timing concerns can also arise; ensure that ingredients are added in the proper order to avoid undercooking, especially with easily burnt components like cheese.

Recipe Success Stories

Our community has enjoyed countless successful adaptations of this Crockpot Jalapeno Corn Dip. Readers have reported back with enthusiasm, sharing creative tweaks such as adding different kinds of cheeses or even integrating diced tomatoes for a fresher taste. Many have found it to be the highlight of family gatherings, often requesting the recipe after their first taste.

Photographers in the community have shared stunning visuals of their completed versions, demonstrating how creativity in presentation can elevate the visual appeal of this dish. The success stories continue, showcasing how versatile this recipe is, whether made with minor changes or as it was originally intended.

Frequently Asked Questions

Can I prepare this dip in advance?

Yes, you can prepare the ingredients ahead of time and store them separately in the fridge. Combine everything in the crockpot just before cooking.

How spicy is this dip?

The spice level depends on the amount of jalapenos you add. For those who prefer a milder flavor, consider removing the seeds or using fewer jalapenos.

What is the best way to store leftovers?

Store leftovers in an airtight container in the refrigerator. It can typically last for 3-5 days. For longer storage, freeze in portions.

Can this dip be made without cream cheese?

Yes! You can replace cream cheese with Greek yogurt or a vegan alternative to keep it creamy without dairy.

Is there a way to make this dish spicier?

To ramp up the heat, consider adding sliced fresh jalapenos or a pinch of cayenne pepper in addition to the jalapenos already in the recipe.

What dishes pair well with this dip?

It pairs perfectly with tortilla chips, fresh vegetable sticks, or sliced bread. Consider adding a fresh salsa or guacamole for variety.

Can I use frozen corn instead of canned?

Absolutely! Frozen corn is a great alternative and often has better flavor than canned corn. Just thaw it before adding to the mixture.

Is the dip gluten-free?

Yes, all the ingredients included in this dip are naturally gluten-free, making it a safe choice for those with gluten sensitivities.

Can I double the recipe?

You can double the recipe! Just be cautious about capacity limits for your crockpot and adjust cooking times as needed.

How do I reheat the dip without losing texture?

Reheat the dip gently on low heat, adding a splash of cream or milk to keep it creamy. Stir frequently to prevent sticking.

Can I use different types of cheese?

Yes! Feel free to experiment with various cheeses like pepper jack for an added kick, or a blend for different flavor profiles.

Additional Resources

Check out our related recipes for more crowd-pleasing ideas like Buffalo Chicken Dip or Spinach and Artichoke Dip. Each recipe brings a twist that can complement your next gathering perfectly. Additionally, look for our technique guides that delve into crockpot cooking, ensuring you’re fully equipped to handle any dish that comes your way.

Our ingredient information section provides insight about the best fresh produce and how to select quality cheese, while our equipment recommendations will point you to the best crockpots for all your cooking needs. Seasonal variations throughout the year will inspire you to make the most of seasonal ingredients, keeping your recipes fresh and exciting.

Join the Conversation

We invite you to share your dining experiences on social media by posting a picture of your Crockpot Jalapeno Corn Dip. Use our hashtag so that others in the community can find your post and applaud your culinary creativity. Additionally, we’d love to hear your variations and personal stories about the dish. Your insights can inspire fellow home cooks and transform this delightful dip into a family favorite for many.

Feeling inspired? Don’t forget to leave reviews with your adaptation successes; whether it’s a flavor twist or an exciting new side dish, we encourage you to keep the conversation going. Let’s connect through kitchens and creativity!

The Recipe

Crockpot Jalapeno Corn Dip

Serves: 8 servings

Prep Time: 15 mins

Cook Time: 2 hours

Total Time: 2 hours 15 mins

Kitchen Equipment Needed

  • Crockpot
  • Knife
  • Cutting board
  • Measuring cups and spoons
  • Spoon for mixing

Ingredients

  • 1 can (15 oz) sweet corn, drained
  • 1 cup jalapenos, diced (fresh or pickled)
  • 1 cup cream cheese, softened
  • 1 cup shredded cheddar cheese
  • 1/2 cup mayonnaise
  • 1/4 cup green onions, chopped
  • 1 tsp garlic powder
  • Salt and pepper to taste

Directions

  1. In a large mixing bowl, combine softened cream cheese, mayonnaise, garlic powder, salt, and pepper until smooth.
  2. Stir in the drained corn, diced jalapenos, shredded cheddar, and green onions until evenly mixed.
  3. Transfer the mixture into the crockpot, spreading evenly.
  4. Cover and cook on low for 2 hours or until bubbly and heated through.
  5. Stir again before serving, adjusting seasoning as necessary.
  6. Enjoy warm with tortilla chips or fresh veggies!

Recipe Notes

  • This dip can easily be customized with additional spices or toppings.
  • For a thicker texture, consider adding more cream cheese or reducing the amount of mayonnaise.
  • Leftovers keep well in the fridge and are perfect for reheating!

Best Steak with Creamy Garlic Sauce for a Perfect Dinner

Steak with Creamy Garlic Sauce: A Decadent Delight

⚖️
Difficulty
Intermediate

⏲️
Prep Time
15 mins

🕒
Cook Time
20 mins

⏱️
Total Time
35 mins

🍽️
Servings
4 servings

Steak with Creamy Garlic Sauce is an exquisite dish that elevates a simple cut of meat into an unforgettable culinary experience. The rich, creamy sauce infused with roasted garlic complements the steak’s robust flavors and juicy tenderness perfectly. Imagine slicing into a perfectly cooked steak, with the creamy sauce dripping down the sides, creating an appetizing presentation and a mouthwatering aroma that will captivate your senses. This dish is suitable for both quiet family dinners and festive gatherings, making it a versatile favorite.

The marriage of flavors in Steak with Creamy Garlic Sauce is truly a celebration of culinary craftsmanship. The savory depth of the steak blends seamlessly with the buttery richness of the sauce, which is further enhanced by a hint of white wine and earthy herbs. Each bite offers a satisfying burst of umami that leaves you craving more. This dish not only stands out for its taste but also for its ability to transform even the simplest of meals into something special.

Quick Recipe Highlights

  • Flavor Profile: The creamy garlic sauce adds a zesty richness that balances the savory, juicy flavors of the steak.
  • Texture: The contrast between the tender steak and the velvety sauce creates a delightful mouthfeel.
  • Aroma: Aromatic notes of garlic and herbs fill your kitchen, enhancing the anticipation of this wonderful meal.
  • Visual Appeal: The rich brown color of the sauce beautifully coats the perfectly seared steak, making for an impressive presentation.
  • Skill Level Needed: This recipe requires some familiarity with cooking meat and making sauces, perfect for home cooks looking to improve their skills.
  • Special Equipment: A cast-iron skillet is recommended for achieving a nice sear on the steak, giving it a crisp exterior and juicy interior.

Recipe Overview

  • Difficulty Level: This recipe falls under the intermediate category, requiring attention to detail when cooking the steak to the desired doneness.
  • Category: Ideal for a main course, this dish is perfect for dinner parties or a special family meal.
  • Cuisine: This recipe is inspired by classic American steakhouse traditions combined with a touch of French culinary finesse.
  • Cost: Steak with Creamy Garlic Sauce can be somewhat indulgent, with the cost of quality steak and ingredients being around $20-$30 for four servings.
  • Season: This dish is best enjoyed year-round, making it suitable for both warm summer nights and cozy winter dinners.
  • Occasion: Perfect for romantic dinners, celebratory gatherings, or simply a treat for yourself after a long week.

Why You’ll Love This Recipe

Taste and texture appeal are at the forefront of this dish. The steak is seared to create a beautifully caramelized crust while remaining juicy and tender inside. Paired with the creamy garlic sauce, it becomes a dish that tantalizes the taste buds with each mouthful. You will appreciate how the garlic lends its flavor without overwhelming the dish, allowing the natural taste of the steak to shine.

Convenience is another reason to embrace this recipe. Most ingredients are kitchen staples, making it easy to prepare on a whim. The steps are straightforward, requiring only a few pans and minimal cleanup. This means you can enjoy a restaurant-quality meal without the hassle of complicated cooking processes.

The nutritional advantages of this dish are noteworthy. Steak is a great source of protein, iron, and essential vitamins, while garlic offers various health benefits, including boosting the immune system and reducing blood pressure. The balance provided by the creamy sauce allows for a satisfying yet nutritious dining experience.

Social and entertaining value is maximized with this dish, as it serves as a conversation starter at the dinner table. Impress your guests with your culinary skills while enjoying the rich flavors together. The elegance of the dish makes it perfect for sharing memorable moments.

Cost-effectiveness is often underestimated when it comes to making a gourmet meal at home. With a little investment in quality ingredients, you can create a luxurious experience that would otherwise cost much more at a restaurant. This recipe allows you to indulge without breaking the bank, making it accessible for everyone.

Historical Background and Cultural Significance

The history of steak is rich and diverse, originating from ancient pastoral societies where the domestication of cattle began. Over the centuries, steak has evolved into a staple in various cuisines worldwide, particularly in American and European culinary traditions. The combination of steak and garlic sauce resonates with the concept of elevating simple ingredients into a gourmet dish.

In many cultures, serving steak during festivities signifies abundance and celebration. In the United States, steakhouses have become cultural landmarks, representing a tradition of dining out in style. The dish embodies comfort and indulgence, catering to the desire for fine dining experiences in a casual setting.

The evolution of steak recipes has seen an increased focus on flavor pairings. Garlic, for instance, has been a beloved ingredient across cultures, celebrated for its boldness and versatility. The creamy garlic sauce used in this recipe reflects modern culinary trends, merging traditional cooking with contemporary tastes.

Regional variations are abundant, with each area adding its twist to steak dishes. From the classic French steak frites to Argentinian asado, the manipulation of flavors and techniques showcases regional pride and cultural importance, with garlic sauce frequently appearing as a beloved accompaniment.

Ingredient Deep Dive

Steak: The primary focus of this dish, steak is not only a great source of protein but also provides essential nutrients like iron and zinc, crucial for overall health. Choosing high-quality cuts such as ribeye or sirloin can significantly enhance the flavor. Look for marbling in the meat, which indicates tenderness and juiciness. Store your steak in the refrigerator and consume it within 3-5 days for optimal freshness, or freeze for longer storage. Alternatives include pork chops or chicken breast for lighter options.

Garlic: This aromatic bulb has been used for centuries, praised for its health benefits and bold flavor. Rich in vitamins and minerals, garlic can help immunity and heart health. When selecting garlic, look for firm cloves with no soft spots or sprouting. Store in a cool, dark place in a mesh bag to allow airflow. Garlic can be easily substituted with garlic powder or roasted garlic for a milder flavor.

Common Mistakes to Avoid

  • Overcooking the steak: Always use a meat thermometer and understand the desired doneness to avoid a dry steak.
  • Not letting the steak rest: Allow the meat to rest for a few minutes before slicing, ensuring juices redistribute for a juicier bite.
  • Inadequate seasoning: Season your steak generously with salt and pepper to enhance its natural flavors; an underseasoned steak can taste bland.
  • Rushing the garlic sauce: Allowing the garlic to sauté properly develops its flavors; burning it can make the sauce bitter.
  • Using cold ingredients: Bring your steak to room temperature before cooking for an even cook; cold meat will cook unevenly.
  • Piling too much sauce: Use the sauce sparingly to maintain the steak’s flavor; overwhelming it can mask the meat’s natural taste.
  • Improper pan temperature: Ensure your skillet is hot enough before adding the steak to achieve perfect searing.
  • Skipping quality meat: Investing in good quality steak will result in a richer flavor and better dining experience.

Essential Techniques

Searing is a crucial technique in this recipe. It locks in the moisture and develops the crust that enhances the steak’s flavor. To master it, heat your skillet until very hot, then place the steak down without moving it for several minutes. Look for a deep brown color as the visual cue for success.

Making the creamy garlic sauce requires understanding the balance of flavors. Begin by sautéing garlic until it’s fragrant but not burned, then deglaze the pan with white wine for added depth, scraping any caramelized bits. This process melds the flavors beautifully, while maintaining the sauce’s silky texture.

Pro Tips for Perfect Steak with Creamy Garlic Sauce

Using a meat thermometer ensures you achieve the perfect doneness, which can vary from rare to well-done depending on your preference. For steak lovers, medium-rare is often considered ideal at an internal temperature of 130°F to 135°F.

Let the steak rest for at least five minutes post-cooking; this is essential as it prevents the juices from running out when you cut into it. Resting allows for a more succulent steak that’s enjoyable to eat.

Always taste and adjust your sauce. Each ingredient can vary in strength; taste the sauce as it cooks to ensure the flavors balance well. If it tastes a bit off, consider adding a pinch of salt or a splash of vinegar.

Consider marinating the steak prior to cooking. A simple marinade using olive oil, vinegar, and spices can add layers of flavor and tenderness, enhancing the overall dining experience.

For a twist, incorporate herbs into the garlic sauce, such as thyme or rosemary. This adds nuanced flavors that can amplify the dish and match the garlic’s earthiness.

If you’re feeling adventurous, try adding a splash of heavy cream after removing the pan from heat for an extra creamy sauce, or for a lighter version, swap in Greek yogurt to bring a tangy bite.

Experiment with different cuts of beef. While ribeye is luxurious, sirloin or flank steak can also yield delicious results that are easier on the wallet.

For presentation, drizzle the sauce artistically over the steak before serving. Use fresh herbs, such as parsley or chives, for a pop of color and freshness on the plate.

Variations and Adaptations

Regional variations can be explored by altering the sauce. For instance, incorporating bleu cheese crumbles can provide a bold flavor twist, or you could use chimichurri for a South American influence.

Seasonal adaptations might include adding fresh herbs during the warmer months or incorporating mushrooms for an autumnal dish, enriching the sauce with their earthy flavor.

For dietary modifications, consider using low-fat cream or dairy alternatives in the sauce to make it suitable for those watching their fat intake. Vegan options can utilize plant-based meat substitutes and almond cream for a non-dairy version.

Flavor variations can include the addition of different spices like smoked paprika or cayenne pepper for a kick. You can also try adding caramelized onions to your sauce for an additional layer of depth.

Texture modifications could be achieved by blending the sauce for a smoother consistency or leaving it chunky by adding sautéed vegetables for extra crunch.

Lastly, for presentation alternatives, nestle the steak on a bed of sautéed spinach or serve it alongside roasted vegetables for a colorful and nutritious plate.

Serving and Presentation Guide

Plating techniques can turn a simple meal into a gourmet experience. Use a large white plate to emphasize the colors of the steak and sauce. Place a generous scoop of sauce onto the plate, then set the steak on top allows the sauce to cascade over it.

Garnishing with fresh herbs is a fantastic way to add bright color and freshness to the dish. A sprinkle of chopped parsley or microgreens can elevate the visual appeal significantly.

Traditional accompaniments to consider include mashed potatoes or a fresh garden salad to balance the richness of the steak and sauce, while modern suggestions could involve a quinoa salad or roasted sweet potatoes for a healthier twist.

Temperature considerations cannot be overstated. Ensure the steak rests at room temperature before cooking and is served immediately after preparation for optimal flavor and texture.

Finally, portion control is vital. Cutting the steak properly can ensure even distribution among guests while keeping the plated meal visually appealing and well-proportioned.

Wine and Beverage Pairing

Wine pairings with Steak with Creamy Garlic Sauce can truly enhance the dining experience. A full-bodied red wine, such as Cabernet Sauvignon or Malbec, complements the richness of the steak beautifully. The tannins in the wine cut through the creaminess, creating a balanced palate.

For those seeking non-alcoholic alternatives, consider pairing with sparkling water with lime or a sophisticated mocktail crafted from herbs and citrus to refresh your palate between bites.

Coffees or teas, particularly rich brews like espresso or herbal blends, can offer a contrasting finish to the meal. Opt for a light brew rather than a heavy roast for a satisfying pairing that doesn’t overwhelm the dish.

Temperature is also crucial; ensure that red wine is served slightly below room temperature to enhance its flavors, while sparkling water should be well-chilled.

Serving suggestions can vary as well; serve wine in elegant glassware, complement your dishes with stylish table settings, and don’t hesitate to add a few candles for an inviting atmosphere.

Storage and Shelf Life

Storage methods are essential to maintain the quality of the steak and sauce after cooking. Leftover steak should be wrapped tightly in foil or plastic wrap or placed in an airtight container to retain moisture.

Temperature requirements dictate that cooked steak should be refrigerated within two hours of cooking and consumed within 3-4 days. The sauce can generally last 3-5 days refrigerated, allowing for easy reheating.

Use glass containers for storage, as they won’t absorb flavors and are easier to clean than plastic options. When it comes to reheating, aim for gentle warmth in a skillet to maintain the steak’s texture.

Signs of spoilage include a sour smell or discoloration of the sauce. If you notice any of these indicators, it’s best to err on the side of caution and dispose of the leftovers.

For freezing guidelines, consider cutting the steak into portions before freezing if you’ll be saving leftovers. It can typically last 2-3 months in the freezer when well-wrapped, ensuring that you have a delicious meal ready to thaw and enjoy.

Make Ahead Strategies

Prep timelines can enhance your cooking experience, allowing for a more relaxed meal preparation. You might opt to season the steak a day in advance for deep flavor infusion, or you could prepare the garlic sauce ahead of time and reheat it just before serving.

Storing between steps is invaluable for meal prep. Keep sliced or seasoned steak covered in the refrigerator until ready to sear, and let the sauce cool before transferring it to an airtight container for storage.

Quality impact assessment is essential. The freshness of ingredients will impact flavor; make sure that all ingredients are as fresh as possible, particularly the garlic, to maintain flavor integrity.

Assembly tips include prepping side dishes ahead of the main event to minimize last-minute rushes. Having everything ready allows you to focus on cooking the steak perfectly.

Reheating guidelines suggest warming the sauce gently in a saucepan while ensuring that the steak is seared fresh to maintain its texture and juiciness. You can serve everything at once for an inviting table presentation.

Finally, adding fresh elements like a squeeze of lemon or a sprinkle of fresh herbs just before serving can reinvigorate flavors and elevate the dish.

Scaling Instructions

Halving the original recipe is a straightforward adjustment if you’re looking to serve just two people. Simply reduce all ingredients by half and follow the same timing.

Doubling or tripling the recipe allows for easy scaling; keep an eye on cooking times as larger quantities may require slightly longer for even cooking. Make sure to adjust the skillet size accordingly.

Equipment adjustments, such as using two skillets or batches, may be necessary to ensure even cooking for larger gatherings without overcrowding the pan.

Timing modifications should be anticipated. While the steak’s cooking time remains largely the same, allowing residual cooking from the resting period will be essential, especially with larger cuts.

Storage considerations should also include how to refrigerate or freeze leftover portions properly as larger amounts will require more space in your fridge or freezer.

Nutritional Deep Dive

Macro breakdown of Steak with Creamy Garlic Sauce reveals a meal rich in protein, offering around 30 grams per serving. The sauce will contribute fats primarily, particularly saturated fats from the cream.

Micronutrient analysis shows that this dish provides essential vitamins and minerals, including Vitamin B12 from the steak, aiding in energy production and brain health. Garlic also carries a range of beneficial compounds with anti-inflammatory properties.

Health benefits abound, as incorporating lean cuts of steak offers essential amino acids necessary for muscle building and repair, making it a great choice for those active in sports or fitness.

Dietary considerations come into play; be mindful of your overall daily fat intake when enjoying richer sauces. Balancing this meal with lighter sides like veggies can ensure a well-rounded diet.

Portion analysis suggests enjoying this dish in moderation, particularly if watching caloric intake. Keeping an eye on serving sizes can help maintain a balanced dietary approach.

Weight management tips could include pairing this steak with a larger serving of vegetables or a salad to fill your plate without excessive caloric intake.

Dietary Adaptations

For a gluten-free option, be sure to use gluten-free thickeners for your sauce, ensuring that all ingredients comply while still delivering delicious flavors.

Dairy-free adaptations can include using coconut cream or almond milk instead of heavy cream, offering a lighter sauce that retains creaminess without dairy.

Vegan adjustments will necessitate a complete overhaul of the protein source, opting for plant-based steak alternatives, and ensuring the sauce is dairy-free while incorporating nutritional yeast for added flavors.

Low-carb options can include substituting the creamy sauce with a fresh chimichurri or a sauce based on vegetables and herbs to keep the flavor while removing excess carbs.

The keto diet would allow for this recipe with modifications to the sauce using heavy cream and full-fat ingredients, combining them with non-starchy vegetables as a side dish.

For those following a paleo approach, remove processed dairy and substitute with cashew cream blended with garlic for a creamy finish that’s wholesome and satisfying.

Low-FODMAP diets can benefit from avoiding garlic; using garlic-infused oil can provide the essence without triggering symptoms, maintaining delicious flavors.

Finally, adhering to any other specific diets requires careful consideration of each ingredient and seeking alternatives that suit the required dietary needs while delivering on taste.

Troubleshooting Guide

Texture issues often arise from overcooking steak. To avoid rubbery results, keep a close eye on timing and test with a thermometer to ensure optimal doneness.

Flavor balance problems could emerge if the sauce is either too salty or too bland. Be sure to continuously taste during preparation; addition of seasonings can be adjusted incrementally to prevent overpowering the dish.

Temperature problems may occur if the skillet isn’t hot enough when searing. Setting the right pan temperature is crucial; if in doubt, test with a drop of water; it should sizzle and evaporate immediately.

Equipment challenges can hinder progress. If one skillet is insufficient to sear all meat at once, don’t hesitate to work in batches while keeping the finished steak warm in a low oven.

Ingredient substitutions should be made thoughtfully; if out of garlic, consider shallots or leeks for a subtle flavor alternate. Also, remember that the final taste may shift with different types of stock or cream substitutes.

Timing concerns can affect both sauce and steak preparation. Always prep ingredients in advance to streamline your cooking process and ensure everything comes together seamlessly.

Recipe Success Stories

Community feedback on this dish often highlights the intense flavors and ease of preparation. Many home cooks have shared their experiences of hosting dinner parties where this recipe stole the show.

Variation successes abound, with readers trying different cuts of meat or adding spices to the garlic sauce, discovering new favorites and sharing their adaptations enthusiastically.

Adaptation stories illustrate how people have used this recipe as a base for creating their signature dishes, tailoring ingredients to fit their tastes and dietary preferences while retaining its essence.

Photography tips can come from successful preparers who ventured to document their dishes, gaining confidence in food styling and capturing stunning images that showcase the beauty of the meal.

Encouragement from readers to write about their twists on this recipe fosters an interactive community, as many people bond over their love of cooking and sharing culinary experiences.

Frequently Asked Questions

Q: Can I make the creamy garlic sauce in advance?
A: Yes, you can prepare the sauce ahead of time. Just store it in an airtight container and reheat gently before serving. This allows the flavors to meld nicely.

Q: What steak cuts work best for this recipe?
A: The best cuts for this dish include ribeye, sirloin, or filet mignon. These cuts offer a perfect balance of tenderness and flavor, enhancing the dish’s overall quality.

Q: How do I know when my steak is done?
A: Using a meat thermometer is the best way to ensure perfect doneness. For medium-rare, look for an internal temperature of 130°F to 135°F.

Q: Is it possible to make this dish dairy-free?
A: Yes, you can use coconut cream or nut-based cream alternatives to create a dairy-free version of the creamy garlic sauce while maintaining a rich consistency.

Q: Can I freeze the leftover steak?
A: Absolutely! Just wrap the cooked steak tightly in foil or an airtight container and freeze it. It should maintain its quality for about 2-3 months.

Q: How do I reheat the steak without drying it out?
A: To reheat steak, place it in a warm oven (around 250°F) until heated through. This gentle warming method will help keep the steak tender and juicy.

Q: What are some good side dishes to serve with this recipe?
A: Great accompaniments include mashed potatoes, grilled asparagus, or a simple green salad, which help balance the dish’s richness perfectly.

Q: Can this recipe be doubled for a larger crowd?
A: Yes, you can easily double the recipe. Just ensure to adjust cooking times as necessary and use larger pans to avoid crowding the meat.

Q: How do I prevent the garlic from burning?
A: Keep a close eye on the heat and sauté garlic over medium heat, removing it from the pan once fragrant. This will prevent the garlic from becoming bitter.

Q: What wine pairs best with this steak dish?
A: A full-bodied red wine, such as Cabernet Sauvignon, complements the richness of the steak beautifully, enhancing the overall dining experience.

Additional Resources

If you enjoyed Steak with Creamy Garlic Sauce, check out our related recipes for sides that beautifully complement this dish, such as garlic mashed potatoes or roasted Brussels sprouts. Technique guides on how to properly sear meats and make rich sauces can further enhance your culinary repertoire.

Ingredient information is essential for choosing quality cuts of meat; we provide sources for purchasing fresh steak and checking seasonal produce to elevate your cooking. For those interested in equipment recommendations, look for high-quality skillet options that ensure even cooking and longevity in your kitchen.

Lastly, don’t miss our seasonal variations that showcase how to adapt this recipe for spring or fall, using ingredients that highlight the flavors of the month.

Join the Conversation

We invite you to share your own creations inspired by Steak with Creamy Garlic Sauce! Post your photos on social media and tag us, or leave a review to share your experience. Photography tips on capturing stunning food shots can also be found on our blog.

Engage with our community by discussing variations you’ve created or suggesting improvements. Creating a dialogue around recipes fosters a sense of connection and allows us all to learn from each other’s cooking journeys. Our goal is to inspire culinary creativity, so don’t hesitate to join us in this flavorful exploration.

The Recipe

Steak with Creamy Garlic Sauce

Serves: 4

Prep Time: 15 mins

Cook Time: 20 mins

Total Time: 35 mins

Kitchen Equipment Needed

  • Cast-iron skillet
  • Meat thermometer
  • Cutting board
  • Sharp knife
  • Airtight container for storage

Ingredients

  • 4 ribeye steaks (1-inch thick)
  • 1 cup heavy cream
  • 6 cloves garlic, minced
  • 1/2 cup white wine
  • 2 tablespoons olive oil
  • Salt and pepper, to taste
  • Fresh parsley, for garnish

Directions

  1. Season the steaks with salt and pepper on both sides and let them sit at room temperature for 15 minutes.
  2. In a cast-iron skillet, heat olive oil over medium-high heat until shimmering.
  3. Cook the steaks for about 4-5 minutes on each side for medium-rare, or until desired doneness is reached. Use a meat thermometer to check internal temperature.
  4. Remove the steaks and let them rest on a cutting board while preparing the sauce.
  5. In the same skillet, reduce heat to medium and add minced garlic, sautéing for about 1 minute until fragrant.
  6. Deglaze the pan with white wine, scraping up any bits stuck to the bottom, and allow it to simmer for 2-3 minutes.
  7. Add the heavy cream and stir to combine, letting the sauce simmer until it thickens, about 5-7 minutes.
  8. Return the steaks to the skillet, coating them in the creamy sauce for 1-2 minutes.
  9. Slice the steaks and serve with a drizzle of the creamy garlic sauce, garnishing with fresh parsley.

Recipe Notes

  • For best flavor, use fresh garlic and quality steak cuts.
  • Adjust seasoning of the sauce to personal preference; feel free to add herbs like thyme or rosemary.
  • Store any leftovers in an airtight container in the refrigerator for up to 3-4 days.

Easy Tater Tot Appetizer Cups with Cheesy Filling

Tater Tot Appetizer Cups: Your New Favorite Party Snack

⚖️
Difficulty
Easy

⏲️
Prep Time
15 mins

🕒
Cook Time
20 mins

⏱️
Total Time
35 mins

🍽️
Servings
12 cups

Tater Tot Appetizer Cups are a delightful and fun dish that brings comfort and creativity to any gathering. Imagine crispy, golden tater tots forming the perfect cup shape, filled with savory mixes that tantalize your taste buds. These appetizer cups are not only visually appealing but also packed with flavor that your guests will adore. Whether you’re looking to impress at a party or simply enjoy a cozy night in, these bite-sized wonders are the perfect solution.

This recipe takes the classic tater tot to new heights, combining the creaminess of cheese with the freshness of vegetables and the richness of meats, making it a versatile option that can be adapted to suit different palates. The warm, crispy exterior coupled with the melty fillings creates a sensory delight that’s hard to resist. Perfect for family gatherings, casual get-togethers, or even as game day snacks, the Tater Tot Appetizer Cups will quickly become a favorite in your snack repertoire.

Quick Recipe Highlights

  • Flavor Profile: These Tater Tot Appetizer Cups showcase a delicious blend of savory and cheesy flavors, making them irresistible.
  • Texture: The contrasting textures of crispy tater tots and a creamy filling create a delightful experience with each bite.
  • Aroma: A mouthwatering aroma of baked potatoes mingles with melted cheese and spices, enticing your guests.
  • Visual Appeal: The golden brown of the tater tots paired with colorful vegetable fill makes for an inviting presentation.
  • Skill Level Needed: This recipe is simple, requiring basic kitchen skills, making it accessible to cooks of all levels.
  • Special Equipment: You will need a muffin tin to shape and bake these delicious appetizer cups.

Recipe Overview

  • Difficulty Level: This recipe is categorized as easy, making it suitable for both novice and experienced cooks.
  • Category: Perfect for appetizers or snacks, these cups fit well in any meal setting.
  • Cuisine: While primarily American comfort food, they can be adapted with international flavors to enhance their appeal.
  • Cost: The ingredients are budget-friendly, typically costing around $15 for a batch that serves multiple guests.
  • Season: These appetizer cups shine at year-round events but are especially delightful in the fall and winter during holiday gatherings.
  • Occasion: Serve them at parties, picnics, game nights, or as a fun family meal addition.

Why You’ll Love This Recipe

This engaging appetizer is perfect for any occasion, thanks to its bold flavors and inviting presentation. The Tater Tot Appetizer Cups offer a satisfying crunch from the perfectly baked tater tots, melding seamlessly with a variety of fillings that range from classic cheese to gourmet options. The versatility allows you to customize these bites to suit different tastes, making it a crowd-pleaser at gatherings.

The convenience of preparing Tater Tot Appetizer Cups makes them an enticing option for hosts. You can easily prepare and assemble them in advance, allowing you more time to enjoy the festivities or simply relax with your guests. This adaptability also extends to ensuring they can be made on short notice by keeping tater tots and various fillings handy.

Nutritionally, you can incorporate ingredients rich in vitamins and minerals, such as colorful vegetables, lean proteins, and wholesome toppings, turning this tasty treat into a semi-healthy option. You can even sneak in extra veggies or swap out cheese for lighter alternatives for those mindful of their dietary choices.

Socially, these Tater Tot Cups foster interaction as guests can easily grab them from a platter, making socializing around food a delightful experience. They invite creative conversation over flavor combinations and can even inspire little culinary competitions among friends and family to see who can create the best version.

Lastly, the cost-effectiveness of this recipe stands out. With a relatively low ingredient list, you can whip up a sizable batch, making it a wallet-friendly choice for large gatherings where snacks can often add up.

Historical Background and Cultural Significance

Tater tots were devised in the 1950s by a family-run business, Ore-Ida, which initially aimed to combat potato waste while providing a new culinary innovation. Initially enjoyed on their own, tater tots have since become a staple in American cuisine, often associated with comfort food and childhood nostalgia, leading to creative adaptations like our Tater Tot Appetizer Cups.

In many households, the introduction of tater tots signified a shift in cooking, favoring convenience and quick meal solutions. As they gained popularity in school cafeterias and fast-food establishments, they became ingrained in American culture, signifying not just a meal but community and shared experiences of dining together.

Over the years, these crunchy little bites have evolved into a canvas for culinary creativity from home cooks to gourmet chefs. They pair beautifully with various toppings—ranging from chili and cheese to gourmet sauces—showing their adaptability that reflects regional tastes, confirming their status as an American classic.

Regional variations have emerged, with some areas particularly embracing cheese-filled, spicy, or vegetarian adaptations. The Tater Tot Appetizer Cups can easily be molded to highlight local flavors, tying into community traditions and variations that make them irresistibly popular across diverse gatherings.

Ingredient Deep Dive

Tater tots are the star ingredient of this dish. They are made from grated potatoes that are parboiled and then formed into small cylinders before being deep-fried or baked. The cultural significance of potatoes in global cuisines cannot be overstated; they are a staple food source providing sustenance and versatility in countless dishes worldwide. Nutritionally, potatoes are rich in potassium, vitamin C, and dietary fiber, making them a healthy choice when prepared without excess fats.

When purchasing tater tots, opt for products that feature minimal added ingredients. Look for packages that boast ingredients like real potatoes and avoid those with excessive preservatives or artificial flavors. For storage, keep them in the freezer until you are ready to prepare them, and they will maintain their freshness.

As for substitutions, sweet potatoes can work beautifully in place of regular potatoes to offer a sweeter flavor and enhanced nutritional profile. You can also consider hash browns or even baked mashed potatoes for a different base.

Another essential ingredient is cheese, most commonly cheddar, which adds a creamy, savory quality to the cups. Cheese has been an integral element in cooking, enhancing the flavor of dishes across cultures. It packs nutritional benefits such as calcium and protein, making it a sustainable option for enriching meals.

Choose high-quality, aged cheeses for deeper flavors and better melting characteristics. Proper storage in the fridge is crucial to maintain its freshness, typically lasting about a week in airtight packaging. If you’re looking for lower-fat alternatives, options like feta or part-skim mozzarella provide great flavor without the extra calories.

Finally, seasonings and vegetables round out the dish. Fresh herbs, spices, and vegetables like bell peppers, onions, and spinach not only bring flavor but also nutritional value. When selecting greens, fresh produce is always best, ensuring vibrant colors and flavors, while stored correctly will keep for days in the refrigerator.

Common Mistakes to Avoid

  • Not Thawing Tater Tots Properly: Cooking frozen tater tots without thawing can result in uneven cooking, leading to a soggy filling and undercooked tater tots.
  • Overfilling the Cups: Stuffing too much filling into the cups can make them hard to manage; it’s best to stick to about 1-2 tablespoons for optimal balance.
  • Skipping Preheating the Oven: Not preheating the oven can cause the tots to cook unevenly, compromising texture and flavor.
  • Using Low-Quality Cheese: Low-quality cheese can affect both the taste and melting of your filling. Opt for good quality, fresh cheese for the best results.
  • Not Cooking to Golden Brown: Aim for a golden-brown color for the tots to achieve maximum crunch and flavorful depth—under-baking can lead to a pale, unappetizing appearance.
  • Ignoring Seasoning: Failing to season adequately can result in bland flavors; herbs and spices enhance taste significantly, so don’t skimp!
  • Using Too Much Oil: Excess oil can lead to greasy tots. Use just enough to achieve a crisp finish, avoiding a heavy-textured final product.
  • Inconsistent Cup Sizes: Ensure your cups are even in size so they cook uniformly and present well on a platter.
  • Poor Plating: Neglecting presentation can lessen the appeal of any dish; take care to arrange the cups nicely on a serving platter.
  • Not Allowing to Cool: Serving them immediately out of the oven might result in burns; let them cool slightly to enhance the eating experience.

Essential Techniques

Baking the Tater Tot Appetizer Cups properly is crucial for achieving that perfect crisp outside while ensuring the inside is perfectly cooked. To master this technique, preheat your muffin tin with a light spray of oil to facilitate easy release. Visual cues for success include a golden brown crust and bubbling filling.

Assembling the cups requires care; avoid stuffing too much filling inside. Master the art of filling by using a tablespoon to evenly distribute the mixture into each snugly formed tater tot cup. A well-filled cup should be stable enough to hold its structure without overflowing.

Finally, seasoning is a key technique in elevating the cups’ flavor profile. Start with a base of salt and pepper and then add herbs or spices according to your chosen filling. Taste-testing before final assembly can ensure each cup bursts with optimal flavor.

Pro Tips for Perfect Tater Tot Appetizer Cups

1. **Chill Before Baking:** After filling the cups, refrigerate them for 15-20 minutes to help them hold their shape better during baking.

2. **Mix Your Fillings:** Combine various fillings for unique flavor profiles—think of a taco-themed filling with ground beef, cheese, and salsa, or a veggie-packed mix with spinach and feta.

3. **Use Leftovers:** These cups are a great way to utilize leftovers from other meals—think rotisserie chicken, veggies, or that last bit of cheese.

4. **Experiment with Spices:** Add a pinch of cayenne, smoked paprika, or a mix of Italian herbs to your filling for a delightful twist.

5. **Personalize Toppings:** Provide a variety of toppings on the side for guests to customize their cups, from sour cream to guacamole, salsa, or even unexpected items like hot sauce.

6. **Don’t Rush the Cooking:** Baking at the right temperature ensures evenly cooked and crispy tater tots. Patience leads to better texture.

7. **Mix and Match Fillings:** Try playing with flavor combinations—like barbecue chicken with cheddar or a Mediterranean flavor of spinach and feta for diverse tastes.

8. **Keep It Warm:** Serve the appetizer cups in a warm dish to maintain their crispy texture longer at gatherings.

Variations and Adaptations

For a seasonal adaptation, consider incorporating fall ingredients like pumpkin puree or stuffing for a holiday twist. In dire need of a regional spin? Reflect the flavors of different cultures through your fillings—think buffalo chicken for an American kick or Mediterranean veggies and feta.

Dietary modifications can also turn this dish into an inclusive delight. Create gluten-free options by using gluten-free tater tots, or make it vegan by substituting cheese with nutritional yeast and incorporating beans or lentils as a protein source.

For flavor variations, think outside the box! Utilize international spices, such as curry powder for an Indian flair or use taco seasoning for a Mexican-themed gathering.

In terms of texture modifications, consider roasting your vegetables for added crunch before folding them in. Presentation alternatives might include serving the cups on a colorful platter with vibrant garnishes like fresh cilantro or parsley to brighten up the dish.

Serving and Presentation Guide

When it comes to plating, arrange the Tater Tot Appetizer Cups on tiered stands to make a stunning visual impact at any gathering. Add splashes of color by laying them out alongside dips or garnishes like salsa, guacamole, or sour cream.

For garnishing, consider a sprinkle of chopped fresh herbs or a drizzle of spicy ranch on top of each serving for an extra touch of flavor and color. Traditional accompaniments can include a side of crisp salads or a platter of fresh vegetables to enhance the experience.

Serving temperature is crucial; aim to serve them warm. If they cool down too much, their texture might become chewy rather than deliciously crispy, so keeping them in a warming drawer or low oven prior to serving is advisable.

Finally, keep an eye on portion control—these cups can be addictive! About 2-3 cups per person can suffice for a gathering, but that can vary based on accompanying foods.

Wine and Beverage Pairing

When it comes to wine pairings, a light white wine like Sauvignon Blanc or a sparkling wine complements the flavors of the tater tot cups, enhancing their savory profile without overpowering the dish. Red blends or a light-bodied pinot noir can also work well, especially if your filling leans towards heartier ingredients.

For non-alcoholic options, consider serving sparkling waters infused with fresh fruits or homemade lemonade, which will resonate nicely with the dish’s flavor profile. Smoothies made with leafy greens and fruits can provide a refreshing contrast.

If you are serving tea or coffee, opt for herbal teas like mint or a light-roast coffee to cleanse the palette and keep the mood upbeat.

Storage and Shelf Life

Storing Tater Tot Appetizer Cups is essential for maintaining their freshness. Ideally, keep uneaten cups in an airtight container in the refrigerator where they will last for 2-3 days. If you have fillings that can spoil quickly, consider removing those elements before storing.

For optimum texture, reheat them in the oven at 350°F (175°C) for about 10-15 minutes rather than microwaving, which can result in sogginess.

If you need to prepare ahead of time, these cups can be frozen before baking. Lay them on a baking sheet until solid, then transfer to a freezer-safe container for up to 3 months. Bake them from frozen, adding an additional 5 minutes to the cooking time.

Signs of spoilage include an off smell or discoloration in the filling—if in doubt, it’s best to throw it out to avoid foodborne illnesses.

Make Ahead Strategies

A great tip for preparing Tater Tot Appetizer Cups ahead of time is to assemble the filling and the tater tots separately. Mix your chosen fillings and store them in an airtight container in the refrigerator one day prior.

You can also shape and semi-freeze the tater tot cups ahead of time before a gathering, allowing you to pop them into the oven when guests arrive. This makes for an effortless way to serve a hot snack without spending too much time in the kitchen.

Quality is crucial, so assess the filling’s freshness before combining; avoid making it too far in advance, as dairy and sauces might separate after being stored.

If there are fresh ingredients to be included at the end, such as herbs or sauces, consider waiting until just before serving to add these for optimal freshness and flavor impact.

Scaling Instructions

To adjust the recipe for larger or smaller gatherings, you can easily halve or double the ingredients. For smaller servings, maintain the same process but reduce the cooking time slightly to prevent overbaking.

If doubling the recipe, make sure to use a second muffin tin or batch bake in intervals. Ensure your oven can accommodate both trays comfortably to maintain even cooking.

Additionally, keep portions in mind; each cup should remain filled around the same amount to preserve texture and flavor consistency.

Lastly, always be mindful of ingredient storage, particularly if you’re preparing ahead. Avoid overcrowding the fridge or freezer to keep things organized and fresh for assembly.

Nutritional Deep Dive

Tater Tot Appetizer Cups offer a harmonious balance of macros. Each cup typically contains carbohydrates primarily from the potatoes, while the fillings can add proteins, fats, and vitamins depending on the ingredients used.

Micronutrient analysis shows that potatoes are a good source of potassium, vitamin C, and B vitamins, while the addition of vegetables in the filling enhances the fiber content and boosts vitamins A and K.

For those watching their intake, consider dividing them into smaller portions. Keep track of the type of fillings used; heartier ingredients like meats or cheese can substantially increase caloric value.

Weight management tips include serving these cups with a side salad or vegetable platter, providing satisfying lower-calorie options alongside your delectable bites.

Dietary Adaptations

For gluten-free variations, ensure to use certified gluten-free tater tots, or make your homemade version to ensure no cross-contamination occurs. For those needing dairy-free options, substitute regular cheese with plant-based alternatives and use dairy-free fillings to keep flavors rich and satisfying.

Vegan adaptations are readily possible—replace cheese with nutritional yeast for that cheesy flavor, and use black beans or lentils as hearty, protein-packed fillings.

Low-carb interpretations can involve substituting tater tots made from cauliflower or zucchini for a lighter, veggie-forward option. Experiment with flavors specific to keto or paleo diets for a unique twist that stays within dietary restrictions.

Troubleshooting Guide

If your tater tot cups are coming out soggy, check your oven temperature to ensure it reaches the proper setting before baking. Proper cooking times directly affect the crispiness of the tater tots.

Flavor balance issues can arise if too much seasoning is used; adjusting and tasting as you go can help you achieve the desired profile without being overpowering.

For ingredient substitutions, ensure you understand the implications of using replacements as they may affect flavor and texture—experiment carefully to find your preferred combinations.

In case of temperature problems, using a kitchen thermometer can help regulate the internal cooking temperature for consistent results.

If timing concerns arise, consider multitasking—preparing dips or side salads while the cups bake can streamline the process and keep you on track.

Recipe Success Stories

Feedback from the community indicates that Tater Tot Appetizer Cups have become a staple at many gatherings. Home cooks often share their variations that were particularly successful, like adding spices or using different base ingredients to cater to their audiences.

Some readers emphasize how these cups sparked creativity in their pots, leading them to experiment with unique flavor combinations, making great stories about unexpected successes at family meals or parties.

Adaptation stories abound—whether hosting an unexpected guest or facing dietary restrictions, cooks have shared how easily this recipe adjusted to their needs, allowing for the perfect dish every time.

Photography enthusiasts also find this recipe compelling as its colorful, creative appearance makes for excellent social media shares, helping spread the love for this easy and fun appetizer!

Frequently Asked Questions

Can I make Tater Tot Appetizer Cups in advance?

Absolutely! You can prepare the filling and shape the cups in advance. Just store them covered in the refrigerator and bake them when you are ready to serve.

What are the best fillings for Tater Tot Cups?

The options are limitless! Fillings can include meats, cheeses, vegetables, or even dips. Popular combinations include taco filling or spinach and artichoke dip.

How long does it take to bake these cups?

Generally, baking takes about 20 minutes. Make sure to check for that golden-brown color for the perfect texture.

Are these appetizer cups freezer-friendly?

Yes! You can freeze unbaked cups to save time. Just remember to add a few extra minutes to the cooking time when baking from frozen.

What’s the best way to store leftovers?

Store leftovers in an airtight container in the refrigerator for up to 3 days. Reheat in the oven to maintain crispiness.

Can I use sweet potatoes instead of regular potatoes?

Definitely! Sweet potatoes will give a different flavor and a slightly sweeter taste, adding a unique twist to your cups.

What dips pair well with the cups?

Favorites include ranch dressing, spicy salsa, guacamole, or a creamy cilantro lime dip that complements the savory flavors.

Is it possible to make these cups vegan?

Yes! Simply use plant-based cheese and include hearty plant-based fillings such as beans or lentils to maintain the texture and flavor.

Can I use leftover tater tots for this recipe?

Absolutely! Using leftover tater tots can save time and reduce waste while bringing in great flavor.

How can I spiff up the presentation?

Arrange them on colorful platters, garnish with breadcrumbs or herbs, or serve with a variety of sauces for guests to enjoy.

Additional Resources

For more delightful snack options, check out our other appetizer recipes such as loaded nachos or creamy stuffed mushrooms. Dive deeper into essential cooking techniques that can elevate your home cooking styles, such as mastering the art of baking or exploring various ingredient flavors.

Consider investigating ingredient guides that help you select the best produce for your Tater Tot Appetizer Cups or find out how different cheeses impact flavors and textures.

Seasonal variations are vital; as seasons change, so can your ingredients. Explore guides on which produce to source in summer versus winter to best compliment your dish.

Join the Conversation

We would love to hear from you! Join us on social media to share your version of the Tater Tot Appetizer Cups or tag us to showcase your culinary creations. Begin conversations about flavor twists and plating styles, and don’t forget to leave your feedback or suggestions for future recipes based on your experiences.

Sharing your photography tips or tricks for taking captivating food photos can inspire fellow cooks in our community to explore and express their creativity. Let’s come together to celebrate the joy of cooking and the love of food!

The Recipe

Tater Tot Appetizer Cups

Serves: 12 cups

Prep Time: 15 mins

Cook Time: 20 mins

Total Time: 35 mins

Kitchen Equipment Needed

  • Muffin tin
  • Mixing bowl
  • Measuring cups and spoons
  • Oven mitts
  • Spatula

Ingredients

  • 1 package (32 oz) frozen tater tots
  • 1 cup shredded cheddar cheese
  • 1/2 cup cooked bacon, crumbled
  • 1/2 cup chopped green onions
  • 1/4 cup sour cream
  • Salt and pepper to taste

Directions

  1. Preheat the oven to 400°F (200°C).
  2. Spray a muffin tin with cooking spray.
  3. In a mixing bowl, combine tater tots, cheese, bacon, green onions, sour cream, salt, and pepper.
  4. Evenly distribute about a tablespoon of the mixture into each muffin cup and press down lightly.
  5. Bake for 20 minutes, or until golden brown and crispy.
  6. Allow to cool for a few minutes before removing from the muffin tin.
  7. Serve with additional sour cream or your favorite dip and enjoy!

Recipe Notes

  • Experiment with fillings for a personalized touch.
  • For a healthier option, use oven-baked or air-fried tater tots.
  • Leftover cups can be stored in an airtight container for up to 3 days.