“`html
Table of Contents
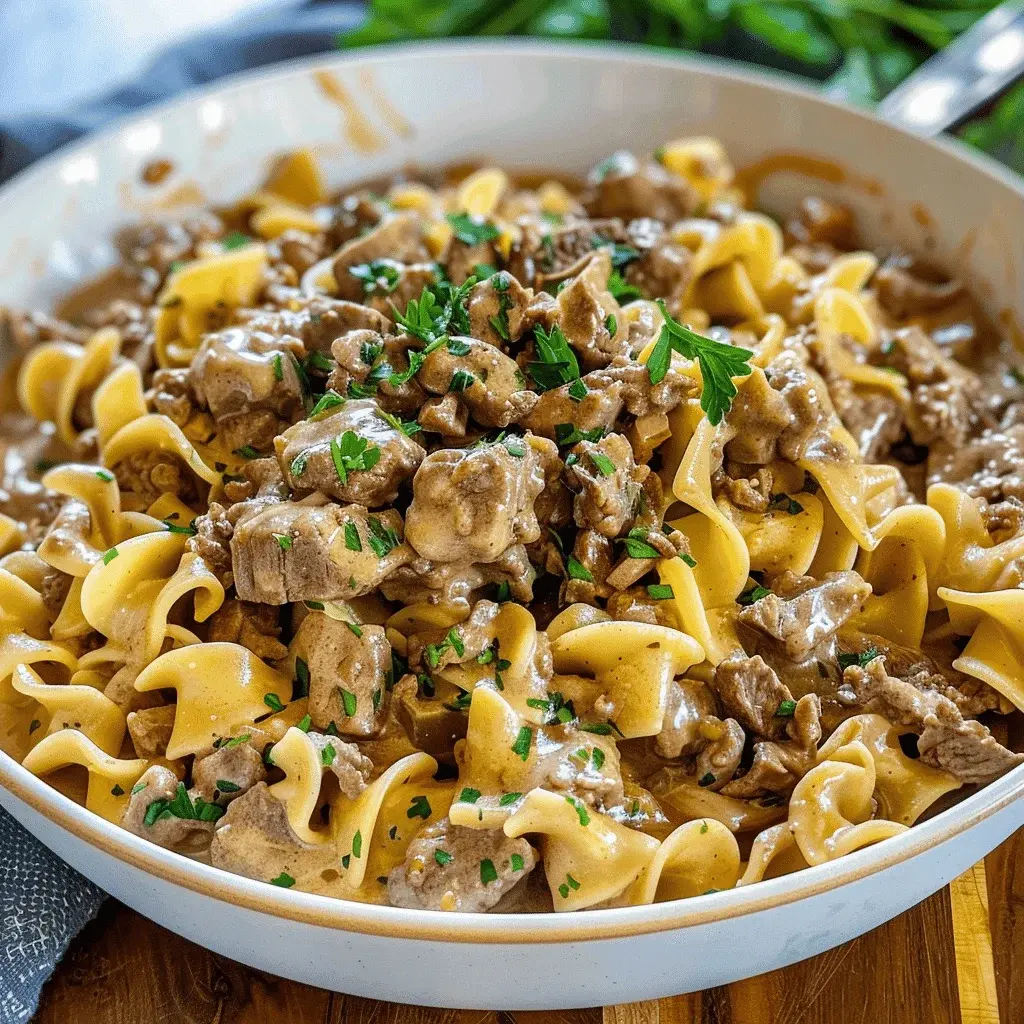
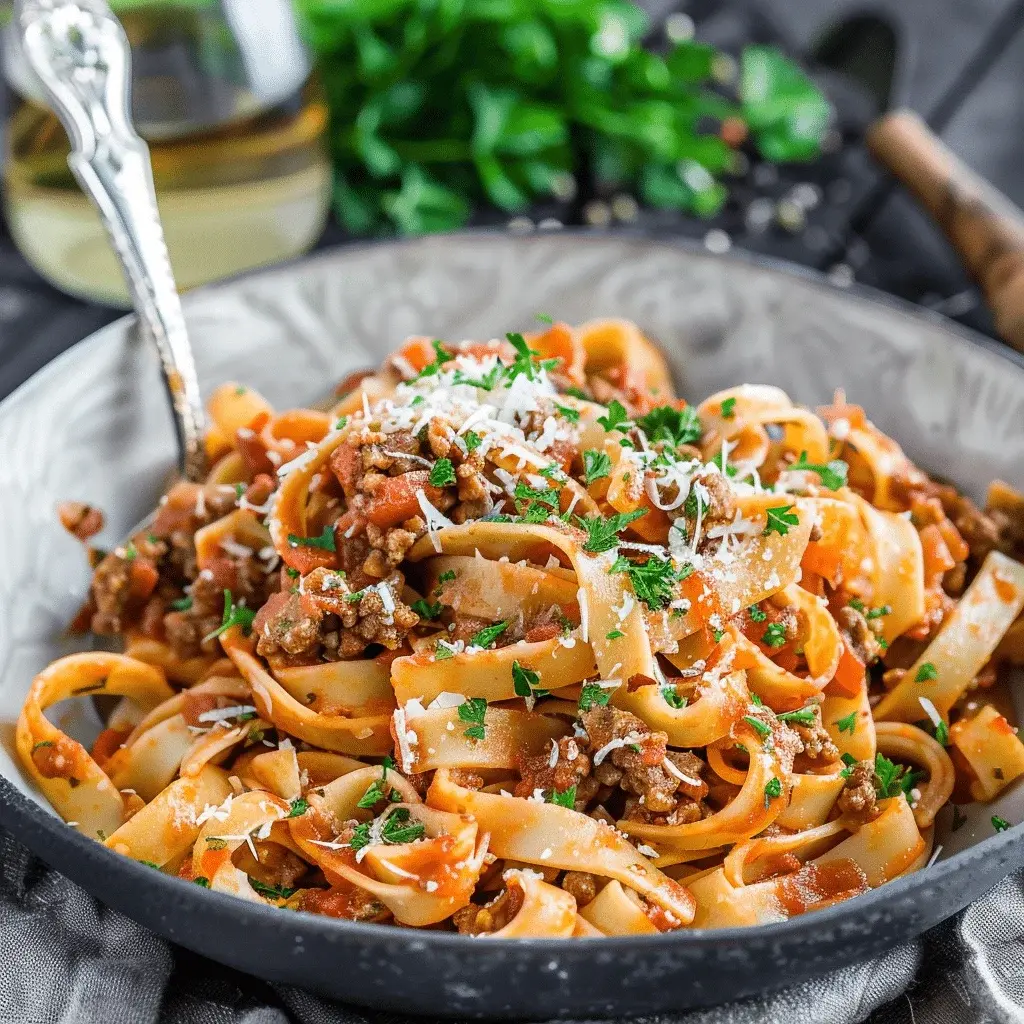
One Pot Beef Ragu Pasta Recipe
Introduction
Did you know that over 70% of home cooks cite “too many dirty dishes” as their top deterrent for making a homemade dinner? That’s where the magic of a one pot meal like this One Pot Beef Ragu Pasta comes in. This isn’t just another pasta dish; it’s a culinary hug in a bowl, a rich and hearty beef ragu pasta that simmers to perfection in a single vessel, transforming simple ingredients into a symphony of deep, savory flavors. Forget about juggling multiple pots and pans—this recipe delivers a restaurant-quality, soul-satisfying meal with minimal cleanup, making it the ultimate easy dinner recipe for busy weeknights, lazy Sundays, or anytime you crave genuine comfort food.
Imagine tender ground beef, slowly cooked with aromatic onions, garlic, and herbs, melding with sweet tomatoes and robust red wine to create a sauce so flavorful it clings to every strand of fettuccine. The pasta cooks right in the sauce, absorbing all that deliciousness and thickening it into a luxurious coating. It’s a complete, balanced meal that feels indulgent yet is surprisingly straightforward to prepare. Whether you’re cooking for a family, meal-prepping for the week, or impressing guests with your culinary prowess, this One Pot Beef Ragu is a guaranteed crowd-pleaser that proves gourmet taste doesn’t require gourmet effort.
Ingredients List
Gather these simple, flavorful ingredients. Don’t be afraid to use substitutions based on what you have on hand!
- 1 tablespoon olive oil: For that initial, fragrant sizzle. Extra virgin adds a peppery note.
- 1 medium yellow onion, finely diced: The sweet, foundational base of the sauce. Substitute: 1 large shallot for a milder flavor.
- 2-3 garlic cloves, minced: Use the full three for a robust, aromatic punch that’s essential to any great ragu.
- 1 pound (450g) ground beef (80/20 blend recommended): The star! The slight fat content (20%) renders down, creating an incredibly rich and juicy sauce. Substitute: Ground turkey, chicken, or a plant-based crumble for a lighter version.
- 1 teaspoon dried oregano: Earthy and slightly bitter, it’s the classic Italian herb backbone.
- 1/2 teaspoon dried thyme (or 3-4 fresh sprigs): Adds a subtle, floral complexity. Fresh thyme is a game-changer if you have it.
- 1/4 teaspoon red pepper flakes (optional): Just a pinch for a gentle, warming heat in the background.
- 1/2 cup dry red wine (like Cabernet Sauvignon or Merlot): Do not skip! This deglazes the pan and adds a deep, fruity acidity that balances the tomatoes. Substitute: 1/2 cup beef or vegetable broth mixed with 1 tablespoon balsamic vinegar.
- 1 (28 oz) can crushed tomatoes: The body of the sauce. Look for San Marzano tomatoes for their sweet, low-acid profile.
- 2 cups beef broth or stock: Use low-sodium to control the salt level. This is the liquid that will cook your pasta.
- 12 ounces (340g) fettuccine pasta: The broad, flat noodles are perfect for holding the thick, chunky sauce. Substitute: Pappardelle, tagliatelle, or rigatoni.
- Salt and freshly ground black pepper: Season in layers—taste as you go!
- 1/2 cup freshly grated Parmesan cheese, plus more for serving: For stirring in at the end, creating a creamy, umami-rich finish.
- Fresh basil or parsley, chopped (for garnish): A bright, fresh pop of color and flavor to contrast the rich sauce.
Timing
At just 45 minutes from start to finish, this recipe is a true weeknight warrior. Compared to traditional ragus that can simmer for hours, this one-pot method accelerates the process without sacrificing depth of flavor. The active cooking time is minimal—most of the 30-minute cook time is hands-off simmering, allowing you to set the table, pour a drink, or simply relax. It’s significantly faster than the average multi-pot pasta dish, which often requires separate boiling, draining, and sauce-making steps.
Step-by-Step Instructions
Step 1: Brown the Beef
Heat the olive oil in a large, heavy-bottomed pot or Dutch oven over medium-high heat. Add the ground beef, breaking it up with a wooden spoon. Don’t stir constantly! Let it sit for a minute to develop a beautiful, flavorful brown crust—this is called the Maillard reaction, and it’s the secret to deep, meaty flavor. Cook until no pink remains, about 5-7 minutes. Season with a pinch of salt and pepper.
Step 2: Sauté the Aromatics
Push the beef to the sides of the pot, creating a clear space in the center. Add the diced onion to that space with a tiny pinch of salt. Sauté for 3-4 minutes until softened and translucent. Then, add the minced garlic, oregano, thyme, and red pepper flakes. Stir everything together with the beef and cook for just 1 more minute until incredibly fragrant. Be careful not to burn the garlic.
Step 3: Build the Ragu Sauce
Pour in the red wine. Use your wooden spoon to scrape up all those delicious browned bits (the “fond”) from the bottom of the pot—this is pure flavor! Let the wine simmer and reduce by half, about 2-3 minutes. This cooks off the alcohol and concentrates the wine’s flavor. Next, stir in the crushed tomatoes and beef broth. Bring the mixture to a lively simmer.
Step 4: Add Pasta and Simmer
Break the fettuccine in half (this makes it easier to stir and serve from one pot) and submerge it into the simmering sauce. Give it a good stir to ensure all noodles are coated. Reduce the heat to medium-low, cover the pot, and let it simmer for 12-15 minutes. Stir every 4-5 minutes to prevent sticking. The pasta will cook directly in the sauce, absorbing its flavor and releasing starch to thicken it naturally. Cook until the pasta is al dente and the sauce has thickened to a rich, clingy consistency.
Step 5: Finish and Serve
Turn off the heat. Stir in the 1/2 cup of freshly grated Parmesan cheese until it melts into the sauce, creating a creamy, velvety texture. Taste and adjust seasoning with more salt and pepper if needed. Let it sit, covered, for 2-3 minutes—this allows the flavors to marry and the sauce to thicken a touch more. Serve immediately, garnished generously with more Parmesan and a sprinkle of fresh basil or parsley.
Nutritional Information
(Approximate values per serving, based on 6 servings)
- Calories: ~480 kcal
- Protein: 28g
- Carbohydrates: 52g
- Dietary Fiber: 4g
- Sugars: 8g
- Fat: 18g (Saturated Fat: 7g)
- Sodium: ~680mg (varies with broth and cheese used)
Healthier Alternatives
You can easily adapt this beef ragu pasta to fit various dietary needs without losing its soul-satisfying essence:
- Leaner Protein: Swap the 80/20 beef for 93% lean ground beef, ground turkey, or ground chicken. Add an extra tablespoon of olive oil at the beginning to compensate for the lower fat content.
- Whole Grain Boost: Use whole wheat or legume-based fettuccine. You may need to add an extra 1/4 cup of broth and extend the simmering time by 2-3 minutes.
- Dairy-Free/Vegan: Omit the Parmesan cheese or use a high-quality nutritional yeast or vegan parmesan alternative. Use a plant-based ground “meat” and vegetable broth.
- Lower Sodium: Use no-salt-added crushed tomatoes and low-sodium or homemade beef broth. You control all the salt!
- Extra Veggies: Sneak in 1 cup of finely diced carrots, celery, or mushrooms with the onions in Step 2 for added nutrients, fiber, and flavor.
Serving Suggestions
This One Pot Beef Ragu is a complete meal, but a few simple accompaniments can elevate it:
- The Essential: A simple green salad with a sharp vinaigrette (like balsamic) cuts through the richness perfectly.
- Bread is a Must: Serve with crusty garlic bread, focaccia, or breadsticks for sopping up every last drop of sauce.
- Wine Pairing: Enjoy with the same dry red wine you used in the recipe—a Chianti or Sangiovese is classic.
- For a Fancier Touch: Drizzle with a high-quality extra virgin olive oil or a swirl of basil pesto just before serving.
Common Mistakes
- Overcrowding the Pot When Browning: If your pot is too small, brown the beef in two batches. Crowding steams the meat instead of browning it.
- Skipping the Wine Reduction: Let the wine simmer for the full 2-3 minutes. This step is crucial for mellowing the alcohol and intensifying flavor.
- Using Pre-Grated Parmesan: Pre-grated cheese contains anti-caking agents that prevent it from melting smoothly. Always grate your own for a silky sauce.
- Overcooking the Pasta: Remember, the pasta will continue to cook slightly in the residual heat after you turn off the stove. Aim for al dente when testing.
- Not Stirring During Simmer: Stir every few minutes to prevent the pasta from sticking to the bottom and cooking unevenly.
Storing Tips
- Refrigeration: Cool completely and store in an airtight container in the fridge for up to 4 days. The flavors often improve the next