“`html
Table of Contents
Air Fryer Turkey Wings Recipe
Introduction
Did you know that air fryers can reduce the fat content in poultry by up to 70% compared to traditional deep-frying? This makes the Air Fryer Turkey Wings recipe not just a delicious choice, but a smart one for health-conscious food lovers. Forget the hours of oven roasting or the mess of deep frying. This recipe delivers the ultimate comfort food experience—crispy, golden-brown skin encasing incredibly tender and juicy meat—all with minimal hands-on effort and a fraction of the oil.
Perfect for a weeknight dinner that feels special or as a standout dish for your holiday table, these wings are seasoned to perfection with a robust blend of garlic powder, smoked paprika, and aromatic thyme. The air fryer’s powerful convection technology ensures every nook and cranny gets that irresistible crunch. Let’s dive into how you can create this simple, flavorful, and healthy meal in less than an hour.
Ingredients List
Gather these simple ingredients for perfectly seasoned, crispy turkey wings. The combination creates a savory, slightly smoky, and herbaceous flavor profile.
- 2-3 lbs Turkey Wings (about 2 whole wings, separated into drumettes and flats): Look for wings with plump, moist-looking skin for the best results. Pat them very dry with paper towels—this is the secret to ultimate crispiness.
- 2 tbsp Olive Oil or Avocado Oil: This helps the seasoning adhere and promotes browning. Avocado oil has a higher smoke point, ideal for air frying.
- 1 ½ tsp Kosher Salt: The coarse grains distribute evenly and enhance the natural turkey flavor without being overly salty.
- 1 tsp Black Pepper (freshly ground): Provides a warm, sharp bite that cuts through the richness.
- 1 ½ tsp Garlic Powder: Imparts a sweet, savory depth that permeates the meat. Substitution: Use 3-4 minced fresh garlic cloves mixed with the oil for a more pungent kick.
- 1 ½ tsp Smoked Paprika: The star of the show! This gives a deep, smoky aroma and a beautiful red hue. Substitution: Regular paprika plus a tiny pinch of chipotle powder.
- 1 tsp Dried Thyme: Adds an earthy, slightly floral note that pairs classically with poultry. Substitution: 1 tbsp fresh thyme leaves or 1 tsp dried rosemary or poultry seasoning.
- ½ tsp Onion Powder: Offers a sweet, allium backbone that rounds out the seasoning blend.
- Optional for Glaze: 2 tbsp honey or maple syrup mixed with 1 tbsp hot sauce, brushed on in the last 5 minutes of cooking for a sticky, sweet-heat finish.
Timing
10 minutes
35-40 minutes
~50 minutes
Compared to traditional oven-baked turkey wings, which can take 90 minutes to 2 hours, the air fryer cuts the cooking time by more than half. The active prep time is remarkably short—just 10 minutes of simple seasoning. This efficiency makes it a fantastic “set it and forget it” option for busy nights, delivering a result that often surpasses the oven in terms of skin texture and moisture retention.
Step-by-Step Instructions
Step 1: Prepare the Turkey Wings
Remove the turkey wings from their packaging and place them on a clean cutting board. If your wings are whole, use a sharp knife or kitchen shears to separate them at the joints into drumettes and wing flats. This increases the surface area for more crispy edges. The most crucial step here is to dry the wings thoroughly with several layers of paper towels. Dab them on all sides until the paper towel comes away dry. Moisture is the enemy of crisp skin!
Step 2: Create the Seasoning Rub
In a small bowl, combine the kosher salt, black pepper, garlic powder, smoked paprika, dried thyme, and onion powder. Use a fork or small whisk to blend them evenly. This ensures every bite is perfectly seasoned. In a separate large bowl, add the olive oil.
Step 3: Season the Wings
Place the dried turkey wings in the large bowl with the oil. Use your hands to toss and massage the oil onto every part of the wings, ensuring they are lightly but completely coated. This oil layer acts as a glue. Next, sprinkle your mixed seasoning rub over the wings. Again, use your hands to massage the seasoning into the skin, pressing gently so it adheres. Don’t be shy—get it into all the crevices!
Step 4: Preheat and Air Fry
Preheat your air fryer to 380°F (193°C) for about 3 minutes. This jump-starts the cooking process for immediate crisping. Arrange the wings in a single layer in the air fryer basket, ensuring they are not touching or overlapping. You may need to cook in batches. Air fry for 20 minutes. After 20 minutes, open the basket (most models will prompt you to turn food) and use tongs to flip each wing. Increase the temperature to 400°F (204°C) and cook for an additional 15-20 minutes, until the skin is deep golden brown, crispy, and the internal temperature reaches 165°F (74°C) when checked with a meat thermometer at the thickest part, avoiding bone.
Step 5: Rest and Serve
Once cooked, carefully transfer the wings to a clean plate or platter. Let them rest for 5 minutes. This allows the hot juices to redistribute throughout the meat, guaranteeing a moist and tender bite with every piece. Serve immediately while the skin is at its peak crispiness.
Nutritional Information
Estimated per serving (one wing portion):
- Calories: ~280-320 kcal
- Protein: 25-30g (Excellent source for muscle repair)
- Fat: 18-22g (Mostly unsaturated from the oil and natural poultry fat)
- Saturated Fat: 4-5g
- Carbohydrates: 1-2g (Nearly zero carb, perfect for low-carb diets)
- Sodium: ~600-700mg (Can be reduced by using less salt)
Healthier Alternatives
You can easily adapt this recipe for specific dietary needs without sacrificing the iconic flavor and crunch:
- Lower Sodium: Reduce kosher salt to 1 tsp and add ½ tsp of lemon zest or a splash of citrus juice before cooking. The acidity brightens flavors, reducing the perceived need for salt.
- Oil-Free: For an oil-free version, use 2 tbsp of low-sodium chicken or vegetable broth to moisten the wings before applying a dry rub. The result will be slightly less crispy but still delicious and flavorful.
- Herb-Forward: Double the amount of fresh herbs (like thyme and rosemary) and use a salt-free seasoning blend to minimize sodium while maximizing aromatic flavor.
- Skinless Option: For significantly lower fat, remove the skin before seasoning. Increase the smoked paprika and garlic powder by ½ tsp each to compensate for lost flavor. The meat will still be juicy from the air fryer’s rapid cooking.
Serving Suggestions
These versatile wings pair beautifully with a wide array of sides. For a classic comfort meal, serve with:
- Creamy Mashed Cauliflower or Potatoes: The perfect vehicle for soaking up any delicious juices.
- Roasted Green Vegetables: Asparagus, broccoli, or green beans roasted with a little garlic complement the smoky wings.
- Fresh, Tangy Salad: A simple arugula salad with a lemon vinaigrette cuts through the richness.
- Southern Classics: For a true feast, pair with mac and cheese, collard greens, and cornbread.
- Dipping Sauces: Offer a trio of sauces: a cool ranch or blue cheese, a spicy buffalo, and a sweet honey mustard.
Common Mistakes
- Not Drying the Wings: This is the #1 reason for soggy skin. Pat relentlessly until bone-dry.
- Overcrowding the Basket: Wings must be in a single layer with space for air circulation. Cook in batches if necessary.
- Skipping the Preheat: A quick preheat ensures immediate crisping action.
- Not Using a Meat Thermometer: Visual cues can be misleading. A digital thermometer guarantees safe, perfectly cooked meat without over-drying.
- Skipping the Rest Time: Cutting in immediately lets the precious juices run out, leading to drier meat.
Storing Tips
- Refrigeration: Let leftovers cool completely, then store in an airtight container in the fridge for up to 3-4 days.
- Freezing: Place cooled wings in a single layer on a baking sheet to freeze solid, then transfer to a freezer bag for up to 2 months. This prevents them from sticking together.
- Reheating for Best Crispiness: Do not microwave. Reheat in an air fryer at 375°F for 5-8 minutes or in a conventional oven at 400°F on a wire rack for 10-12 minutes. This will revive the crispy texture.
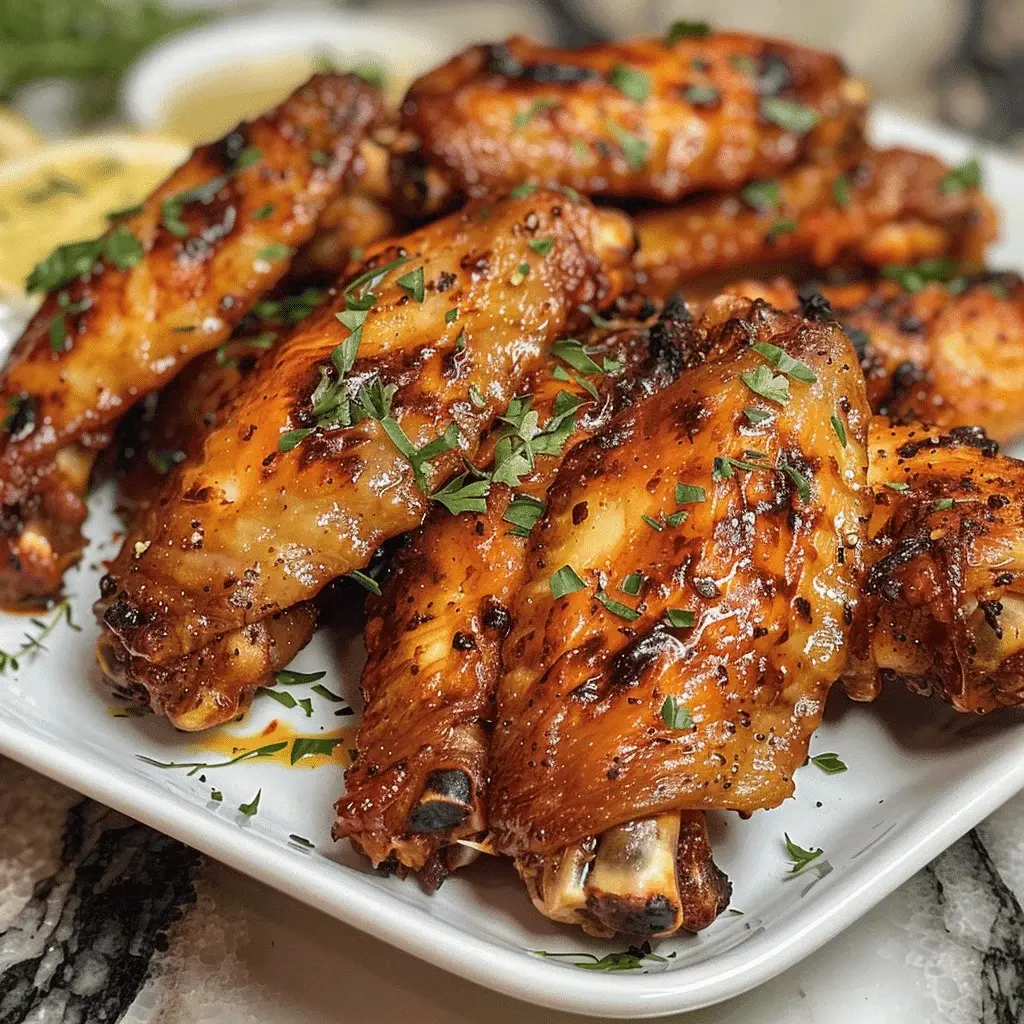
Air Fryer Chicken Wings Recipe

“`html
Table of Contents
Air Fryer Chicken Wings Recipe
Introduction
Did you know that air fryer chicken wings can contain up to 70% less fat than their deep-fried counterparts, while still achieving that irresistible, crispy skin? This isn’t just a healthier alternative; it’s a culinary game-changer. If you’re searching for the ultimate air fryer chicken wings recipe that delivers restaurant-quality results with minimal effort and maximum flavor, you’ve landed in the right place. Gone are the days of greasy kitchens and soggy wings. This recipe leverages the powerful convection technology of your air fryer to create wings with a shatteringly crisp exterior and a juicy, tender interior, all seasoned with just a few simple pantry staples. Perfect for game day, a party centerpiece, or a surprisingly quick weeknight dinner, these wings are about to become your new go-to.
Ingredients List
The beauty of this recipe lies in its simplicity. Each ingredient plays a crucial role in building flavor and texture.
- 2 lbs (about 900g) chicken wings – Look for wings that are plump and have a glistening, pinkish skin. You can buy whole wings and separate them yourself (drumette, flat/wingette, and tip) or purchase pre-separated party wings. Patting them completely dry is non-negotiable for crispiness.
- 1 ½ teaspoons kosher salt – Kosher salt adheres better and seasons more evenly than fine table salt. Its clean, pure taste enhances the chicken’s natural flavor without bitterness.
- 1 teaspoon freshly ground black pepper – Freshly ground offers a brighter, more aromatic heat compared to pre-ground. It provides a warm, earthy backbone to the seasoning.
- 1 tablespoon olive oil or avocado oil (optional but recommended) – A light coating helps the seasoning cling and promotes even browning and crisping. It adds a subtle richness. Substitution: For an oil-free version, use a high-quality non-stick cooking spray very sparingly, or simply omit it if your wings have enough natural fat.
- 1 teaspoon baking powder (optional, for EXTRA crispiness) – This is a professional chef’s secret. A small amount of aluminum-free baking powder raises the pH of the skin, helping it dry out and become incredibly crisp during cooking. You won’t taste it, but you’ll definitely see (and hear) the difference.
Timing
Compared to traditional oven-baked wings, which can take 45-60 minutes, or the messy process of deep-frying, this air fryer chicken wings recipe slashes your active cooking time by nearly half. The air fryer’s rapid air circulation cooks food faster and more efficiently. Most of the “cook time” is hands-off, allowing you to prepare dips, sides, or simply relax.
Step-by-Step Instructions
Step 1: Prepare the Chicken Wings
Remove the wings from their packaging and place them on a large plate or cutting board lined with paper towels. Use additional paper towels to thoroughly pat every single wing completely dry. This step is the absolute foundation for crispy skin, as any surface moisture will steam instead of crisp. If using whole wings, separate them at the joints and discard the tips (or save for stock).
Step 2: Season Perfectly
In a large bowl, combine the dried wings with the salt, pepper, and optional baking powder. Drizzle with the olive oil (if using). Now, get your hands in there! Toss and massage the seasoning and oil onto every nook and cranny of the wings until they are evenly coated. This ensures every bite is perfectly seasoned.
Step 3: Air Fry to Crispy Perfection
Preheat your air fryer to 400°F (200°C) for 3-5 minutes if your model recommends it. Arrange the wings in a single layer in the air fryer basket, ensuring they are not touching or overcrowded. Air needs to circulate freely for even cooking. Cook for 22-26 minutes, flipping the wings halfway through the cooking time. You’ll know they’re done when the skin is deep golden brown, crispy, and the internal temperature reaches 165°F (74°C) when checked with a meat thermometer.
Step 4: Rest and Serve
Once cooked, transfer the wings to a clean plate or serving platter. Let them rest for 3-5 minutes. This allows the juices to redistribute throughout the meat, ensuring maximum juiciness. Serve immediately while they are piping hot and at their crispiest!
Nutritional Information
(Approximate values per serving, based on 4 servings, using olive oil):
- Calories: ~320 kcal
- Protein: ~27g
- Total Fat: ~22g (Saturated Fat: ~6g)
- Carbohydrates: ~0g
- Sodium: ~950mg (varies with salt used)
Healthier Alternatives
You can easily tailor this recipe to fit various dietary preferences without sacrificing the iconic crispy texture:
- Oil-Free: Omit the oil entirely. The chicken’s own rendered fat will be enough to promote browning, especially if you use the baking powder trick.
- Lower Sodium: Reduce the salt to 1 teaspoon and rely more on aromatic herbs and spices like garlic powder, smoked paprika, or onion powder for flavor depth.
- Skinless Option: While you’ll lose the ultimate crisp factor, you can use skinless wings or chicken tenders. Reduce the cook time by 4-5 minutes to prevent drying out.
Serving Suggestions
These versatile wings are a blank canvas for flavors! Serve them “naked” with their perfect seasoning, or toss them in your favorite sauce immediately after cooking. Classic Buffalo, sticky honey garlic, sweet chili, or a simple squeeze of fresh lemon are all fantastic. For a complete spread, pair with cooling dips like blue cheese, ranch, or a Greek yogurt-based dip, alongside crisp celery and carrot sticks, and perhaps some seasoned fries or a fresh garden salad.
Common Mistakes
- Overcrowding the Basket: This is the #1 reason for soggy wings. Cook in batches if necessary.
- Skipping the Drying Step: Wet wings = steamed skin. Pat them until the paper towel comes away dry.
- Not Preheating: While not always mandatory, preheating ensures immediate crisping action.
- Saucing Too Early: Always sauce the wings after they come out of the air fryer to preserve their crunch.
Storing Tips
Let leftover wings cool completely, then store them in an airtight container in the refrigerator for up to 3 days. To reheat and restore the crispiness, use the air fryer again! Reheat at 375°F (190°C) for 3-5 minutes until hot and re-crisped. Avoid the microwave, as it will make them rubbery.

Conclusion
Mastering the perfect air fryer chicken wings recipe is a simple process that yields spectacular, crowd-pleasing results. With minimal ingredients, less than 10 minutes of hands-on prep, and a fraction of the oil, you can achieve wings that rival any sports bar or restaurant. The key takeaways are simple: dry your wings, don’t overcrowd, and let the air fryer work its magic. Now that you have the blueprint, it’s time to get cooking! We’d love to see your crispy creations. Tag us on social media with your results or leave a comment below telling us your favorite way to sauce them up!
Made this recipe? Share your photo and tag @spicemingle! We feature our favorite reader creations every week.
FAQs
***Can I use frozen chicken wings?***
Yes, but for best results, thaw them completely in the refrigerator first and then pat them extremely dry. Cooking from frozen will result in uneven cooking and less crispy skin.
***Why are my wings not crispy?***
The most likely culprits are: 1) Wings were not patted dry before seasoning, 2) The air fryer basket was overcrowded, or 3) Your air fryer may need preheating. Ensure you’re following the drying and spacing steps closely.
***Do I really need to flip the wings?***
Yes, flipping halfway through is crucial for even browning and crispiness on all sides. It only takes a moment and makes a significant difference.
***Can I make these wings ahead of time for a party?***

Air Fryer Chicken Wings Recipe
Description
Enjoy crispy air fryer chicken wings made with simple ingredients like chicken wings, salt, pepper, and optional olive oil. Perfectly seasoned and cooked to perfection, these wings are a crowd-pleaser for any occasion. Ideal for game days, parties, or a quick weeknight meal.
Ingredients
- 3pounds chicken wings, thawed
- 1 teaspoonsalt, or to taste
- 1 teaspoonpepper, or to taste
- 2 tablespoonsolive oil (optional)
Instructions
Notes
For extra crispy wings, avoid overcrowding the air fryer basket.
Adjust seasoning to taste.
Serve with celery sticks and blue cheese dressing for a classic touch.
Nutrition
- Calories: 250
- Sugar: 0g
“`