Table of Contents
Peanut Butter Brownies: The Only Recipe You’ll Ever Need
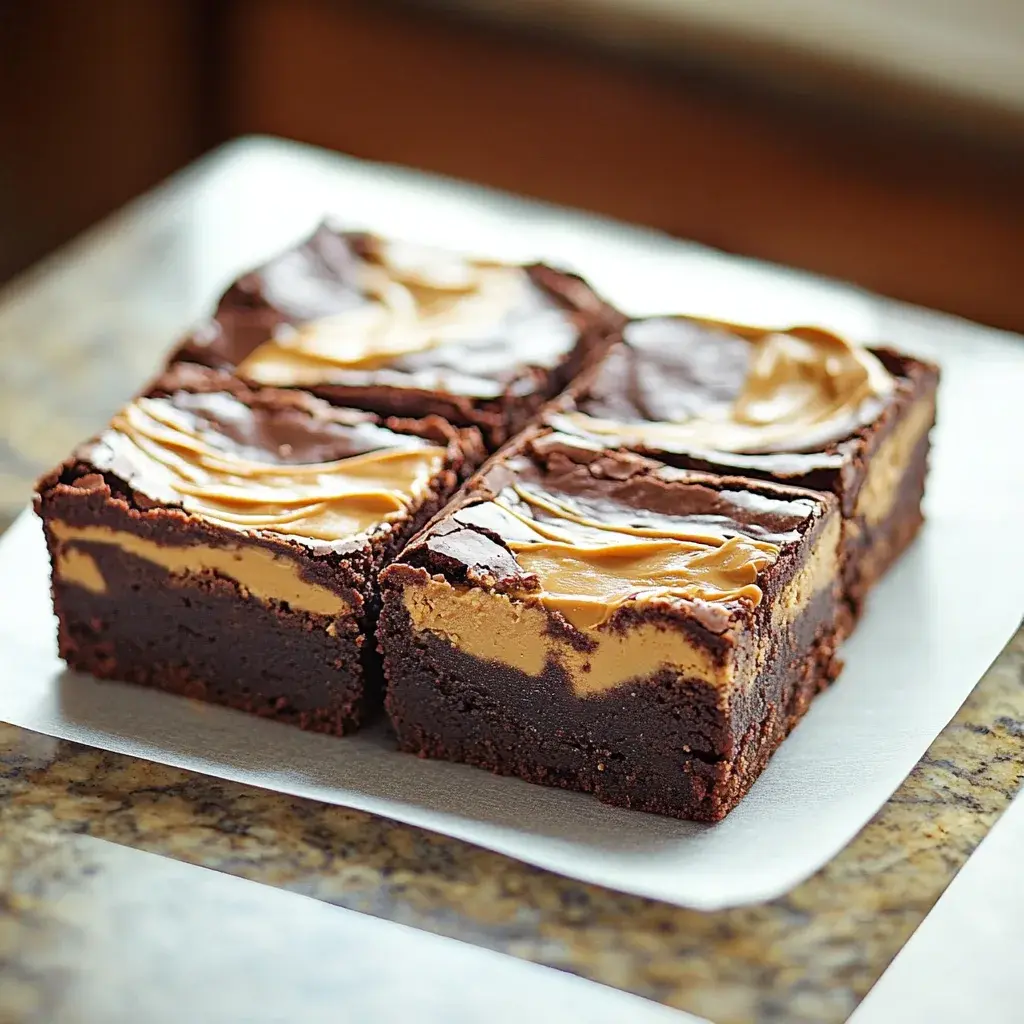
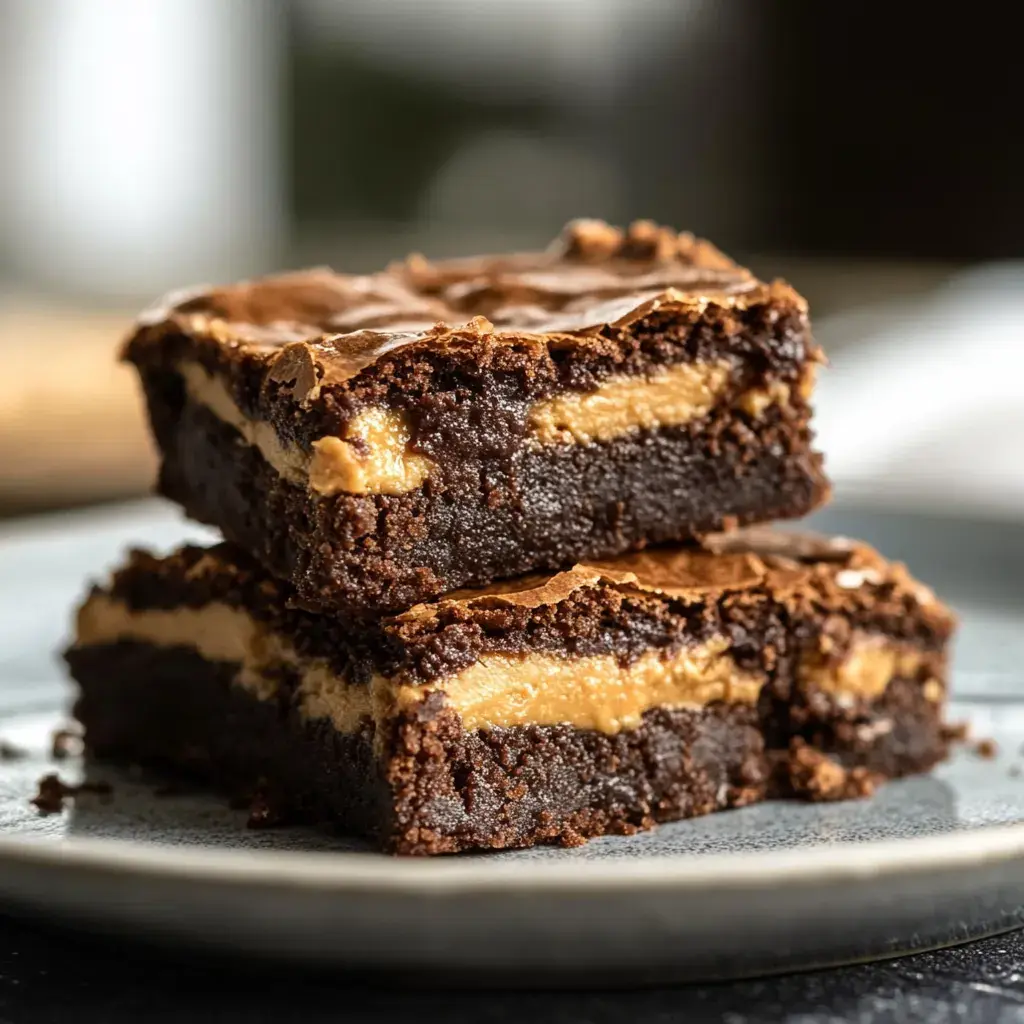
Imagine coming home after a long day, craving something that combines the irresistible creaminess of peanut butter with the deep, chocolatey richness of a fudgy brownie. That’s exactly what these Peanut Butter Brownies deliver—a simple, decadent treat that elevates your dessert game without requiring fancy equipment or hours in the kitchen. As the ultimate fudgy delight, this recipe stands out for its one-bowl simplicity and melt-in-your-mouth texture, making it perfect for busy home cooks who want homemade Peanut Butter Brownies without the hassle. Whether you’re a baking novice or a seasoned pro, this easy Peanut Butter Brownies recipe will become your go-to for quick indulgences.
The allure of these Peanut Butter Brownies lies in their sensory explosion: each bite offers a perfect harmony of flavors, from the nutty, buttery smoothness of high-quality peanut butter to the sweet, chocolate undertones that linger on your palate. Picture the brownies emerging from the oven with a glossy top that cracks just slightly, revealing a dense, fudgy interior that’s chewy around the edges and impossibly tender in the center. The aroma alone—warm peanut butter mingling with hints of vanilla and chocolate—will fill your kitchen, drawing everyone in for a taste. This isn’t just any brownie; it’s a textural masterpiece that feels luxurious yet effortless to achieve.
What makes this Peanut Butter Brownies recipe from cookingwithemy.com the single best resource on the internet is our commitment to reliability, tested techniques, and insider tips that ensure your baking success every time. We’ve refined this version through multiple trials to guarantee foolproof results, incorporating a Chef’s Secret that takes these brownies from good to extraordinary. In this post, you’ll learn step-by-step instructions, smart ingredient swaps, and creative serving ideas that build your confidence in the kitchen. Plus, we’ll cover FAQs and storage hacks, so you can enjoy these homemade Peanut Butter Brownies anytime, making it a comprehensive guide you won’t find elsewhere.
Why This Peanut Butter Brownies Recipe is a Game-Changer
The Chef’s Secret to these Peanut Butter Brownies is the emphasis on a one-bowl method that maximizes creaminess while minimizing cleanup, creating an ultra-fudgy texture that’s hard to resist. By blending the peanut butter directly with sugar before adding eggs, we ensure a silky batter that locks in moisture, resulting in brownies that are denser and more flavorful than traditional versions. This technique, combined with the optional chocolate chips, elevates the recipe by infusing a rich, gooey center that mimics a high-end bakery treat—all from your own oven.
Unbeatable Texture: The science behind these Peanut Butter Brownies comes from the high fat content in creamy peanut butter, which acts as both a binder and emulsifier. This creates a fudgy consistency by preventing over-development of gluten in the flour, ensuring the brownies remain soft and chewy rather than cakey. When baked at the precise temperature, the edges set perfectly while the middle stays molten, providing that signature brownie experience.
Foolproof for a Reason: This recipe has been tested in various home kitchens to account for common variables like oven differences, guaranteeing consistent results. With straightforward steps and precise measurements, even beginners can achieve success, making it a reliable staple for your Peanut Butter Brownies repertoire.
Ingredient Spotlight: Quality Makes the Difference
Starting with creamy peanut butter, the star of these Peanut Butter Brownies, it’s essential for that signature nutty flavor and moisture. Opt for a natural, high-quality brand without added oils or sugars to avoid a greasy texture—think 100% peanuts for the best taste. This ingredient binds the batter while adding healthy fats, contributing to the fudgy consistency. If you have allergies, a substitution like sunflower seed butter works well, maintaining the creaminess without altering the flavor profile much.
Granulated sugar plays a crucial role in these Peanut Butter Brownies by providing sweetness and helping create that crackly top. Using fine-grained sugar ensures it dissolves evenly, leading to a smooth batter and caramelized edges. Quality matters here; avoid substitutes like brown sugar, which could make the brownies cakier. For a lower-calorie option, try swapping with coconut sugar, but note it might slightly change the color and add a subtle tropical undertone.
Large eggs are vital for structure and richness in Peanut Butter Brownies, acting as a leavening agent that helps the batter rise just enough for the perfect density. Fresh, room-temperature eggs incorporate air better, resulting in a tender crumb. If you’re short on eggs, unsweetened applesauce can replace one, but use it sparingly to prevent excess moisture that might lead to soggy brownies.
Vanilla extract adds depth and aroma to these Peanut Butter Brownies, enhancing the overall flavor without overpowering the peanut butter. Always choose pure vanilla over imitation for authentic taste; a high-quality extract from real vanilla beans will make your brownies more aromatic. If you’re out, almond extract can substitute in a pinch, but use half the amount to avoid dominating the nutty notes.
All-purpose flour provides the necessary structure in Peanut Butter Brownies, keeping them from being too gooey. Sift it for even distribution and use unbleached for a more natural result. For gluten-free Peanut Butter Brownies, swap with a 1:1 gluten-free flour blend, ensuring it’s xanthan gum-fortified to maintain the chewy texture.
Salt enhances the flavors in these Peanut Butter Brownies, balancing sweetness and bringing out the peanut butter’s savoriness. A fine sea salt works best for even mixing; don’t skip it, as it prevents the brownies from tasting flat. If you’re watching sodium, a reduction of 1/8 teaspoon is fine, but too little might dull the overall taste.
Chocolate chips, while optional, add bursts of melty chocolate to these Peanut Butter Brownies, making them even more indulgent. Choose high-cocoa varieties for a richer contrast. If omitting them, increase peanut butter by 2 tablespoons for extra creaminess, or use chopped nuts for a different crunch without sacrificing the fudgy base.
Step-by-Step Instructions
Step 1: Preparing Your Oven and Pan
Preheat your oven to 350°F (175°C) and grease an 8×8-inch baking pan or line it with parchment paper for easy removal. This step ensures even baking and prevents sticking, which is key for perfect Peanut Butter Brownies.
Pro Tip: Use a metal pan for better heat conduction, which helps achieve that ideal fudgy center faster.
Step 2: Creating the Creamy Base
In a mixing bowl, combine the 1 cup of creamy peanut butter and 1 cup of granulated sugar until smooth and creamy. Use a whisk or electric mixer on low speed to blend thoroughly, avoiding any lumps for a uniform texture.
Common Mistake to Avoid: Over-mixing at this stage can incorporate too much air, leading to cakey brownies; mix just until combined to keep them fudgy.
Step 3: Adding the Eggs and Flavor
Add the 2 large eggs one at a time, mixing well after each addition, then stir in the 1 teaspoon of vanilla extract. This gradual incorporation helps emulsify the mixture, ensuring the eggs blend seamlessly for a cohesive batter in your Peanut Butter Brownies.
Pro Tip: Let eggs come to room temperature first; this makes them easier to incorporate and results in a smoother, more even bake.
Step 4: Incorporating Dry Ingredients
Gradually fold in the 1/2 cup of all-purpose flour and 1/4 teaspoon of salt until just combined, then add the 1/2 cup of chocolate chips if desired. Be gentle to avoid overworking the batter, which preserves the fudgy texture of these Peanut Butter Brownies.
Common Mistake to Avoid: Adding all the flour at once can create pockets of dry spots; sift it in gradually and fold lightly for even distribution.
Step 5: Spreading the Batter
Spread the batter evenly into the prepared pan, using a spatula to smooth the top and ensure consistent thickness. This step is crucial for uniform baking and that signature crackly surface on your Peanut Butter Brownies.
Pro Tip: Tap the pan on the counter a few times to release air bubbles, which helps prevent uneven rising.
Step 6: Baking to Perfection
Bake for 20-25 minutes or until a toothpick inserted in the center comes out with a few moist crumbs attached. Keep an eye on it after 20 minutes to avoid overbaking, as this maintains the fudgy center in your Peanut Butter Brownies.
Common Mistake to Avoid: Opening the oven door too early can cause the brownies to sink; wait until the minimum time before checking.
Step 7: Cooling the Brownies
Allow the brownies to cool completely in the pan on a wire rack before cutting into squares. This resting period helps them set, making for cleaner cuts and better texture in your homemade Peanut Butter Brownies.
Pro Tip: For faster cooling, place the pan in the fridge for 15 minutes, but don’t rush it too much to preserve the fudgy interior.
Serving & Presentation
Elevate your Peanut Butter Brownies with creative plating that turns them into a showstopper. Dust the tops with a light sprinkle of powdered sugar or drizzle with melted dark chocolate for an elegant touch, enhancing their fudgy appeal. Serve them warm with a scoop of vanilla ice cream to contrast the richness, or pair with fresh fruit like strawberries for a balanced dessert. For a more impressive presentation, stack them in a tower on a sharing platter, garnished with crushed peanuts for added crunch and visual interest.
When it comes to complementary pairings, these Peanut Butter Brownies shine alongside a cup of coffee or milk to cut through the sweetness. They’re perfect as a standalone treat for afternoon snacks or as the finale to a meal, perhaps after a light salad or grilled chicken. For special occasions, incorporate them into a dessert board with cheeses and fruits, making your Peanut Butter Brownies the star of the show and impressing guests with their homemade quality.
Make-Ahead & Storage Solutions
For a Make-Ahead Strategy, prepare the batter up to 24 hours in advance and store it covered in the fridge; when ready, let it sit at room temperature for 10 minutes before baking to ensure even cooking. You can also mix dry ingredients ahead and store them in an airtight container for up to 3 days, then combine with wet ingredients just before use.
Storing Leftovers: Once cooled, wrap Peanut Butter Brownies tightly in plastic wrap or place in an airtight container at room temperature for up to 3 days. For longer freshness, refrigerate them for up to a week, or freeze in a freezer-safe bag for up to 3 months—thaw overnight in the fridge to maintain their fudgy texture.
The Best Way to Reheat: To restore the original gooeyness, warm individual squares in the microwave for 10-15 seconds or in a 300°F oven for 5 minutes. Avoid high heat to prevent drying out, ensuring your Peanut Butter Brownies taste freshly baked every time.
Frequently Asked Questions (FAQ)
How do you make Peanut Butter Brownies from scratch?
Making Peanut Butter Brownies from scratch is straightforward: start by preheating your oven and mixing peanut butter with sugar until creamy, then add eggs and vanilla, followed by flour and salt. Fold in chocolate chips if desired, bake in a greased pan at 350°F for 20-25 minutes, and cool before serving. This method ensures a fudgy texture that’s perfect for homemade treats.
What can I substitute for peanut butter in Peanut Butter Brownies?
If you’re allergic or prefer alternatives, substitute peanut butter with almond butter for a milder nutty flavor, or sunflower seed butter for a nut-free option. Both maintain the creamy consistency and fudgy texture, though you might need to add a pinch more salt to balance flavors. Avoid using crunchy versions to keep the batter smooth.
How long does it take to bake Peanut Butter Brownies?
Baking Peanut Butter Brownies typically takes 20-25 minutes at 350°F, depending on your oven. Check for doneness by inserting a toothpick—it should come out with a few moist crumbs. Factors like pan type can affect time, so start checking at the 20-minute mark for the best results.
What are some creative ways to serve Peanut Butter Brownies?
Get creative with Peanut Butter Brownies by topping them with whipped cream and banana slices for a sundae twist, or crumbling them over yogurt for a breakfast treat. They’re also great in ice cream sandwiches or as brownie bites in a dessert charcuterie board, adding a fun, fudgy element to any occasion.
Can I add nuts or other mix-ins to Peanut Butter Brownies?
Absolutely! Adding chopped nuts like walnuts or pecans can provide extra crunch, enhancing the fudgy base. Mix in about 1/2 cup with the chocolate chips for balanced flavor—be sure not to overfill, as it could affect baking time and texture.
Are Peanut Butter Brownies suitable for kids with allergies?
Yes, with modifications. For nut allergies, use sunflower seed butter and ensure your kitchen is nut-free. For gluten-free needs, swap the flour with a gluten-free blend, and always check labels on ingredients like chocolate chips to avoid cross-contamination.
Can I make this recipe vegan or gluten-free?
To make this Peanut Butter Brownies recipe vegan, replace the eggs with flax eggs (1 tablespoon ground flaxseed mixed with 3 tablespoons water per egg) and use a vegan-friendly peanut butter. For gluten-free, substitute the all-purpose flour with a 1:1 gluten-free flour mix that includes xanthan gum. These swaps keep the fudgy texture intact while accommodating dietary needs.
Tried This Recipe? Leave a Comment!
Did you make this recipe? I’d love to hear how it turned out! Please leave a comment and a rating below. Your feedback helps other home cooks and supports cookingwithemy!
For more delicious inspiration, follow me on Pinterest!

Peanut Butter Brownies
Description
Peanut butter brownies are a delightful indulgence that perfectly combines the rich flavor of chocolate with the creamy goodness of peanut butter. These fudgy treats offer a melt-in-your-mouth texture and are incredibly easy to make, making them the ideal dessert for any occasion. Whether you’re celebrating a special event or simply craving something sweet, this recipe will satisfy your taste buds and impress your guests. Just whip up a few simple ingredients, bake, and enjoy these irresistible brownies warm or cooled—either way, they are sure to become a favorite in your household!
Ingredients
- 1 cupcreamy peanut butter
- 1 cupgranulated sugar
- 2large eggs
- 1 teaspoonvanilla extract
- 1/2 cupall-purpose flour
- 1/4 teaspoonsalt
- 1/2 cupchocolate chips (optional)
Instructions
- Preheat your oven to 350°F (175°C). Grease an 8×8-inch baking pan or line it with parchment paper.
- In a mixing bowl, combine the peanut butter and sugar until smooth and creamy.
- Add the eggs one at a time, mixing well after each addition. Stir in the vanilla extract.
- Gradually fold in the flour and salt until just combined; add chocolate chips if desired.
- Spread the batter evenly into the prepared pan.
- Bake for 20-25 minutes or until a toothpick inserted comes out with a few moist crumbs attached.
- Allow cooling before cutting into squares.
Nutrition
- Calories: 210
- Sugar: 18g
- Fat: 10g
- Carbohydrates: 26g
- Protein: 5g
Conclusion
This recipe offers a flavorful and straightforward way to enjoy homemade meals that bring warmth and comfort to any gathering, perfect for busy weeknights or family dinners. Its balanced blend of ingredients creates a satisfying taste that’s both hearty and versatile, making it easy to customize based on your preferences. For a serving tip, pair it with fresh greens for a lighter option, or experiment with adding herbs for a new twist. If you’re in the mood for more delicious ideas, try the Chocolate Mousse Cups Recipe for a decadent dessert, or explore the Crispy Korean Mozzarella Corn Dogs Recipe for a fun and crispy snack.