Vibrant Mexican Street Corn Chicken Bowl Recipe

“`html

Vibrant Mexican Street Corn Chicken Bowl Recipe

What is a Vibrant Mexican Street Corn Chicken Bowl?

Are you on the hunt for a dinner that’s both incredibly flavorful and surprisingly easy to whip up on a busy weeknight? Look no further than this Vibrant Mexican Street Corn Chicken Bowl! This dish isn’t just a meal; it’s an experience. It captures the essence of Mexican street food – bold, smoky, tangy, and utterly satisfying – in a healthy, customizable bowl format. Imagine tender, juicy grilled chicken nestled alongside creamy, zesty elote-style corn, all brought together with a medley of fresh, vibrant toppings. It’s a Tex-Mex fiesta waiting to happen right in your kitchen, perfect for anyone seeking a delicious escape from the ordinary, and ideal for meal prep too!

Ingredients You’ll Need

Crafting this vibrant bowl is all about layering flavors and textures. Here’s your shopping list:

For the Chicken:

  • 1.5 lbs boneless, skinless chicken breasts or thighs, cut into bite-sized pieces
  • 2 tablespoons olive oil
  • 1 tablespoon chili powder (for that smoky, warm foundation)
  • 1 teaspoon cumin (earthy depth)
  • ½ teaspoon smoked paprika (double down on the smokiness!)
  • ½ teaspoon garlic powder
  • ¼ teaspoon cayenne pepper (optional, for a touch of heat)
  • Salt and freshly ground black pepper to taste
  • Juice of ½ lime (bright, zesty kick)

For the Elote-Style Corn:

  • 4 cups corn kernels (fresh, frozen, or grilled – frozen works great and is convenient!)
  • 2 tablespoons mayonnaise (or Greek yogurt for a lighter touch)
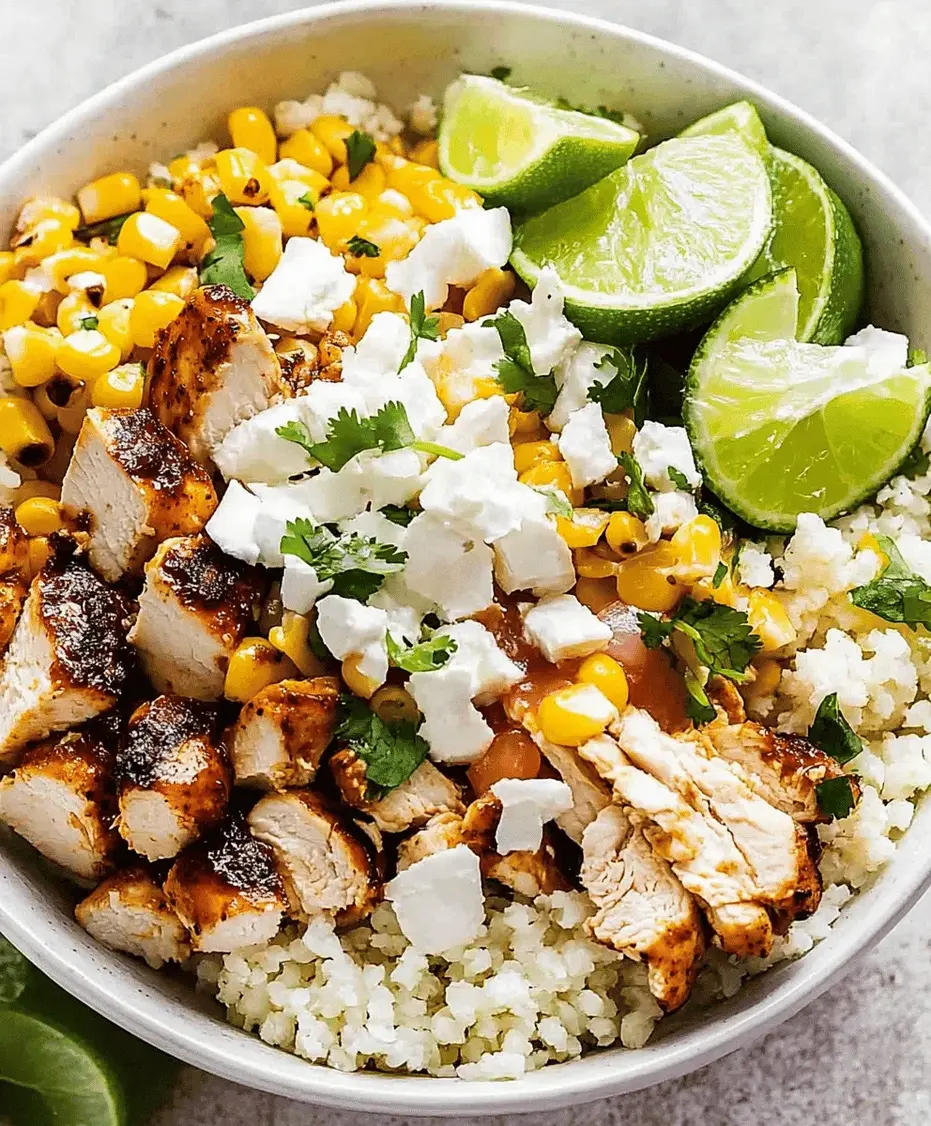
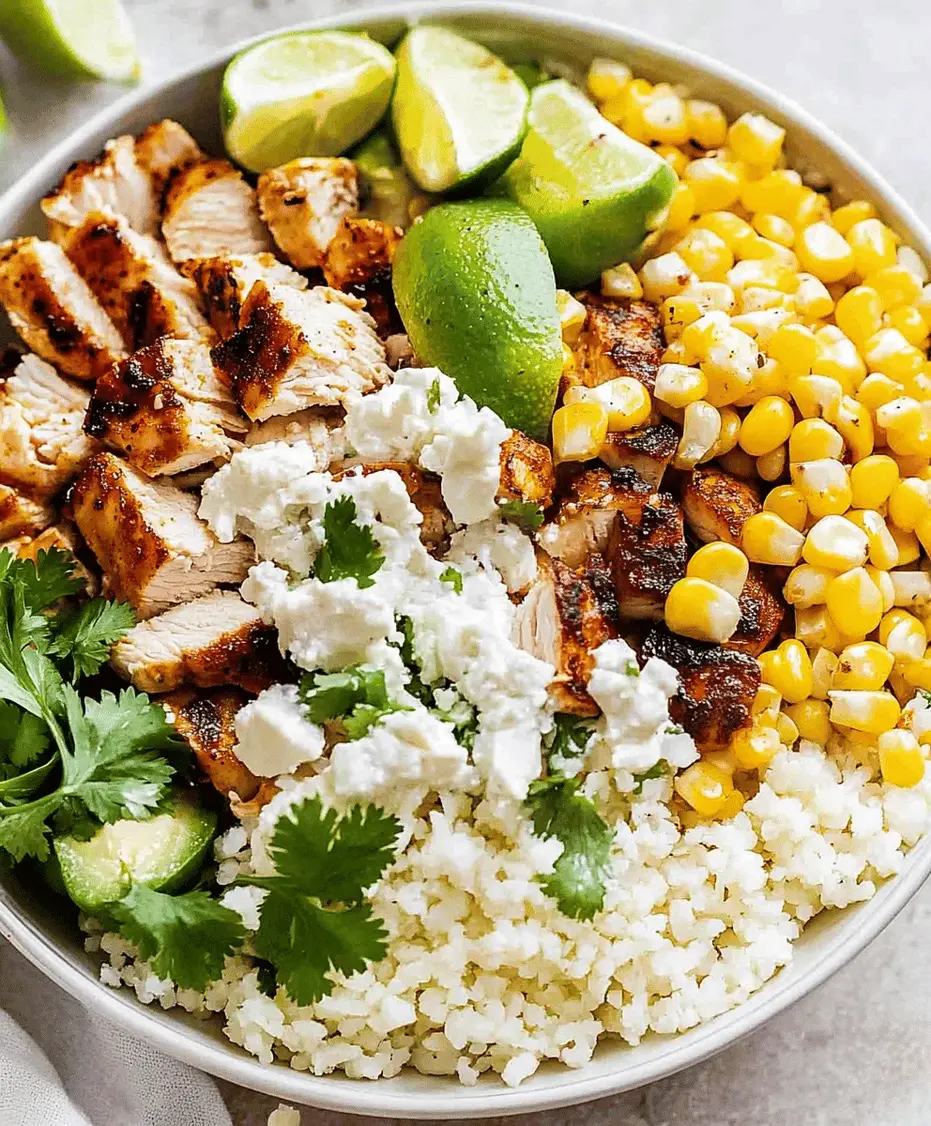
  • 2 tablespoons crumbled cotija cheese (salty, crumbly goodness)
  • 1 tablespoon chopped fresh cilantro
  • Juice of ½ lime
  • A pinch of chili powder or Tajín for dusting

For the Bowl Base & Toppings:

  • 2 cups cooked rice (brown, white, or cauliflower rice)
  • 1 (15-oz) can black beans, rinsed and drained
  • 1 cup cherry tomatoes, halved
  • ½ cup finely chopped red onion (for that sharp bite)
  • ½ avocado, sliced or diced (creamy indulgence)
  • Optional toppings: pickled jalapeños, salsa, sour cream or Greek yogurt, extra cilantro

Substitutions & Notes:

  • Cotija Cheese: If you can’t find cotija, feta cheese is a good substitute, though it’s slightly different in flavor.
  • Corn: Grilled corn (from the cob) adds an extra smoky depth. You can grill it alongside the chicken or use pre-grilled options.
  • Mayonnaise: For a lighter, tangier version of the corn, use plain Greek yogurt instead of mayonnaise. It offers a similar creamy texture.
  • Chicken Thighs: Chicken thighs are more forgiving and tend to stay moister than breasts, especially when grilled.
  • Spiciness: Adjust cayenne pepper and chili powder to control the heat level. Tajín offers a tangy, spicy, and salty finish for the corn.

Timing is Everything

Prep Time: 20 minutes
Cook Time: 15-20 minutes
Total Time: 35-40 minutes

This recipe is exceptionally efficient! The average weeknight dinner might take 45-60 minutes, but with a bit of multitasking, you can have this flavor-packed bowl on the table in under 40 minutes. The marinating time (which can be as little as 15 minutes or as long as overnight) is flexible and doesn’t add to your active cooking time.

Vibrant Mexican Street Corn Chicken Bowl with grilled chicken and elote corn

Step-by-Step Instructions

1. Marinate the Chicken

In a medium bowl, combine the chicken pieces with olive oil, chili powder, cumin, smoked paprika, garlic powder, cayenne pepper (if using), salt, pepper, and lime juice. Toss everything together until the chicken is evenly coated. For best flavor, let it marinate for at least 15 minutes at room temperature, or cover and refrigerate for up to 4 hours (or even overnight for maximum flavor infusion).

2. Prepare the Elote Corn

While the chicken is marinating or cooking, prepare your elote corn mixture. In a separate bowl, combine the corn kernels, mayonnaise (or Greek yogurt), chopped cilantro, lime juice, and a good pinch of salt and pepper. Stir gently until the corn is well combined with the creamy dressing. Set aside. If you’re using frozen corn, ensure it’s thawed or quickly sautéed to remove excess moisture before mixing.

3. Grill the Chicken and Corn

Preheat your grill or a grill pan to medium-high heat. If using fresh corn on the cob, lightly brush it with oil and grill until slightly charred. If using corn kernels, you can grill them in a grill basket or directly on a slightly oiled grill over medium-high heat for about 5-7 minutes, stirring occasionally, until lightly charred and tender. Remove the corn from the grill and let it cool slightly before cutting off the kernels if using cobs. Grill the marinated chicken pieces for about 5-7 minutes per side, or until cooked through and nicely charred. The thinner the pieces, the faster they will cook.

4. Assemble Your Masterpiece

Now for the fun part! Grab your serving bowls. Start with a base of fluffy cooked rice. Next, add a generous scoop of the creamy elote-style corn. Arrange the grilled chicken pieces over the corn. Then, artfully scatter the fresh components: rinsed black beans, halved cherry tomatoes, finely chopped red onion, and slices or cubes of creamy avocado. Finish with a dusting of chili powder or Tajín on the corn, a sprinkle of fresh cilantro, and any other optional toppings you desire. A final squeeze of lime juice ties all the vibrant flavors together.

Nutritional Information

While exact nutritional values can vary based on portion sizes and specific ingredients used, a typical serving of this Mexican Street Corn Chicken Bowl (excluding optional toppings) offers:

  • Calories: Approximately 450-600 kcal
  • Protein: 30-40g (primarily from chicken)
  • Carbohydrates: 30-45g (from rice, corn, beans)
  • Fat: 20-30g (from avocado, mayonnaise, chicken fat)
  • Fiber: 8-12g (from beans, corn, vegetables)

This is a general estimate. For precise tracking, it’s recommended to use a nutrition calculator with your exact ingredients and quantities.

Healthier Alternatives (Without Sacrificing Flavor)

You can easily lighten up this bowl without losing its incredible taste:

  • Lighter Corn Dressing: Swap mayonnaise for plain Greek yogurt. It provides creaminess and tang with fewer calories and more protein.
  • Leaner Protein: Opt for skinless chicken breast or even firm tofu marinated in the same spices for a plant-based option.
  • Grain Lower Carb Base: Replace white or brown rice with cauliflower rice or a bed of mixed greens for fewer carbohydrates and more vegetables.
  • Reduced Sodium: Use low-sodium black beans and control the salt added during cooking.
  • Healthy Fats: Avocado is a fantastic source of healthy fats. While it adds calories, it also contributes to satiety and provides essential nutrients.

Serving Suggestions

This bowl is a complete meal on its own, but here are a few ways to enhance your experience:

  • Add a Salsa: A dollop of your favorite salsa (pico de gallo, salsa verde, or a spicier option) adds another layer of complexity.
  • Extra Creaminess: A drizzle of crema, sour cream, or Greek yogurt can add a cooling counterpoint to the spices.
  • Pickled Elements: Pickled red onions or jalapeños provide a delightful tangy and spicy crunch that cuts through the richness.
  • Lime Wedges: Always serve with extra lime wedges. The fresh citrus juice brightens and elevates all the flavors.

Common Mistakes to Avoid

To ensure perfection, keep these common pitfalls in mind:

  • Overcooking the Chicken: Chicken breasts can become dry quickly. Keep an eye on them during grilling and remove them as soon as they are cooked through.
  • Under-seasoning: Don’t be shy with the spices in the marinade! This is where a lot of the flavor comes from. Taste and adjust salt and pepper as you go.
  • Watery Corn: If using frozen corn, ensure it’s drained very well after thawing or pre-cooking. Excess moisture can dilute the creamy dressing.
  • Skipping the Lime: Lime juice is crucial for balancing the richness and heat. Don’t skip it, and offer extra at serving.

Storing Your Delicious Creation

This bowl is excellent for meal prep! Store components separately for the best texture:

  • Chicken: Store grilled chicken in an airtight container in the refrigerator for up to 3-4 days.
  • Corn Mixture: The elote corn mixture can be stored separately for up to 3 days. Keep its toppings (like cilantro and cheese) separate until serving to maintain freshness.
  • Rice & Beans: Cooked rice and rinsed beans can be stored for 3-4 days.
  • Toppings: Keep chopped veggies, avocado, and sauces in separate containers. Assemble the bowls just before eating to prevent ingredients from becoming soggy.
Close-up of ingredients for Mexican Street Corn Chicken Bowl

Frequently Asked Questions

***Can I make this ahead of time for meal prep?***

Absolutely! For best results, store the cooked chicken, rice, beans, and corn mixture in separate airtight containers in the refrigerator. Chop your toppings (like onion and tomatoes) and store them separately as well. Assemble the bowls just before serving to keep everything fresh and prevent sogginess. Avocado is best added right before eating.

***What is Cotija cheese?***

Cotija is a hard, crumbly cow’s milk cheese from Mexico. It has a salty, slightly tangy flavor and a texture similar to Parmesan but is often softer when fresh. If you can’t find it, feta is the closest alternative, though it will impart a slightly different flavor profile.

***Is this dish spicy?***

The base recipe has a mild warmth from the chili powder and cumin, with an optional kick from cayenne. You can easily control the spice level by adjusting the amount of cayenne pepper or omitting it entirely. For added heat, you can always add a dash of hot sauce or some diced jalapeños as a topping.

***Can I use different types of protein?***

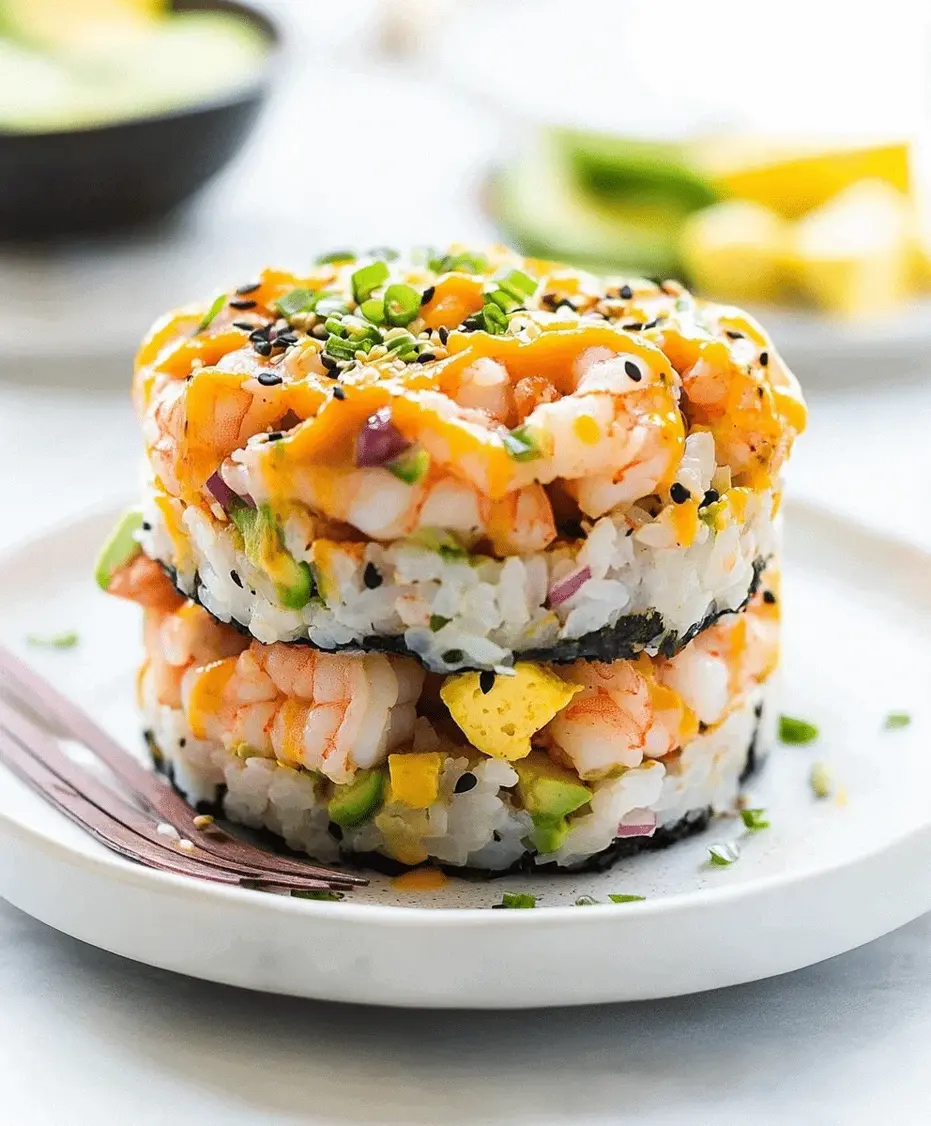
Yes! This bowl is very versatile. Grilled shrimp, seasoned ground turkey or beef, or even pan-fried halloumi cheese would work wonderfully. For a vegetarian or vegan option, seasoned and grilled tofu or tempeh, or even seasoned black beans as the primary protein, would be delicious.

***How do I get the best flavor from the corn?***

Grilling the corn, even briefly, adds a wonderful smoky char that elevates the flavor significantly. If you don’t have a grill, you can char the corn kernels in a hot, dry skillet or under the broiler, stirring frequently. The key is to get a little bit of caramelization and charring.

Print
clock clock iconcutlery cutlery iconflag flag iconfolder folder iconinstagram instagram iconpinterest pinterest iconfacebook facebook iconprint print iconsquares squares iconheart heart iconheart solid heart solid icon

Vibrant Mexican Street Corn Chicken Bowl Recipe


  • Author: Chef Emy

Description

This Mexican Street Corn Chicken Bowl is a vibrant, flavor-loaded meal that combines juicy grilled chicken, creamy elote-style corn, and fresh toppings for the ultimate Tex-Mex experience. Ideal for weeknight dinners or meal prep, this bowl delivers bold taste and satisfying nutrition in every spoonful.


Ingredients

Scale
  • 2boneless, skinless chicken breasts
  • 2 cupscorn (fresh, frozen, or canned)
  • 1 tbspolive oil
  • ¼ cupmayonnaise
  • ¼ cupcotija cheese, crumbled
  • 1 tbsplime juice
  • ½ tspchili powder
  • Salt and pepper to taste
  • ¼ cupfresh cilantro, chopped
  • 1 cupcooked rice or cauliflower rice
  • Optional toppings: diced avocado, jalapeños, hot sauce, sliced radishes

Instructions

    Notes

    Use Greek yogurt instead of mayo for a lighter option.
    Great for meal prep—store components separately.
    Can substitute chicken with tofu or shrimp for variation.

    Nutrition

    • Calories: 520
    • Sugar: 5g

    “`

    Sausage And Potatoes Skillet Recipe

    “`html

    Sausage And Potatoes Skillet Recipe

    Introduction: Easy Weeknight Wisdom

    Are you tired of spending hours in the kitchen after a long day, only to end up with a bland meal? In today’s fast-paced world, finding quick, delicious, and satisfying dinner options is a culinary quest many embark on. Enter the humble yet mighty Sausage and Potatoes Skillet. This recipe isn’t just a meal; it’s a solution. It’s a one-pan wonder that promises bold flavors and minimal cleanup, making busy weeknights a breeze. Imagine smoky, savory sausage mingling with tender, golden potatoes, all brought together by a symphony of aromatic spices. This dish is proof that wholesome ingredients can deliver an explosion of flavor without demanding your entire evening. Whether you’re a seasoned home cook or just starting your culinary journey, this Sausage and Potatoes Skillet recipe is designed to impress with its simplicity and its incredible taste. Get ready to transform your weeknight dinners from a chore into a highlight!

    Ingredients: The Stars of the Show

    The beauty of this Sausage and Potatoes Skillet lies in its straightforward yet impactful ingredient list. Each component plays a vital role in creating that irresistible smoky, savory, and comforting flavor profile. We’ve also included some fantastic substitution ideas so you can tailor this recipe to your pantry and preferences.

    • 1 lb Smoked Sausage: Kielbasa or andouille sausage are excellent choices. Kielbasa offers a milder, smoky flavor, while andouille brings a spicy kick. Look for sausages with a good fat content that will crisp up nicely.
    • 1.5 lbs Potatoes: Yukon Gold or red potatoes work best as they hold their shape well and become wonderfully tender when cooked. You can use russets, but they tend to break down more, creating a creamier texture.
    • 1 Large Onion: Yellow or white onions are perfect here. They caramelize beautifully, adding a sweet depth to the dish.
    • 2-3 Cloves Garlic: Freshly minced garlic is key for that pungent, aromatic foundation.
    • 1 Bell Pepper: Any color will do – green adds a subtle bitterness, while red or yellow offer sweetness. Diced for even cooking.
    • 2 Tablespoons Olive Oil: Or any neutral cooking oil like canola or avocado oil.
    • 1 Teaspoon Smoked Paprika: This is crucial for that authentic smoky flavor.
    • 1/2 Teaspoon Dried Thyme: Adds an earthy, savory note that complements the sausage.
    • Salt and Black Pepper to taste: Essential for enhancing all the other flavors.
    • Optional: Pinch of Red Pepper Flakes: For those who love a little extra heat.

    Substitutions:

    • Sausage: If smoked sausage isn’t your favorite, consider Italian sausage (sweet or hot), chorizo, or even pre-cooked chicken or turkey sausage. Adjust seasonings if your sausage is already heavily seasoned.
    • Potatoes: Sweet potatoes can be used for a sweeter twist, or for a lower-carb option, try diced cauliflower or Brussels sprouts.
    • Vegetables: Feel free to add other vegetables like mushrooms, zucchini, or snap peas.

    Timing: How Long Will It Take?

    One of the greatest appeals of this Sausage and Potatoes Skillet is its efficiency. It’s a meal designed for busy schedules, proving that delicious doesn’t have to mean time-consuming.

    Prep Time: 15 minutes
    Cook Time: 30 minutes
    Total Time: 45 minutes

    Compared to many other hearty dinner recipes that can easily stretch to an hour or more of active cooking and prep, this one-pan meal is a true time-saver. The relatively quick prep is thanks to the simplicity of chopping ingredients, and the cooking time is optimized for tender potatoes and perfectly browned sausage.

    Sausage and Potatoes Skillet in a pan

    Instructions: Let the Magic Begin

    Embarking on this culinary adventure is simple and rewarding. Follow these steps, and you’ll have a delicious, comforting meal on your table in no time. The process is designed for ease and maximum flavor development.

    Step 1: Prep Your Potatoes

    Start by washing your potatoes thoroughly. You can peel them if you prefer, but leaving the skin on adds extra fiber and a rustic texture, especially with Yukon Gold or red potatoes. Cut the potatoes into bite-sized cubes, about 1/2 to 3/4 inch. Aim for consistency in size so they cook evenly. Set them aside.

    Step 2: Brown the Sausage

    Slice your smoked sausage into 1/2-inch thick rounds or half-moons. Heat a large skillet (cast iron is ideal for its heat retention) over medium-high heat. Add the sausage to the dry skillet. Cook, stirring occasionally, until the sausage is nicely browned and has rendered some of its fat. This step is crucial for developing a deep, savory flavor and a delightful crispy edge. Once browned, remove the sausage from the skillet with a slotted spoon and set it aside on a plate, leaving the rendered fat in the skillet. If there’s an excessive amount of fat, you can drain off about half, but leave enough to cook your vegetables.

    Step 3: Sauté the Vegetables

    Add the diced onion and bell pepper to the sausage drippings in the skillet. If you didn’t get much fat from the sausage, add about 1-2 tablespoons of olive oil. Sauté the vegetables over medium heat for about 5-7 minutes, or until they begin to soften and the onion becomes translucent. Add the minced garlic and cook for another minute until fragrant, being careful not to burn it. This aromatics base is where a lot of the savory goodness starts to build.

    Step 4: Combine and Simmer

    Add the cubed potatoes to the skillet with the sautéed vegetables. Sprinkle in the smoked paprika, dried thyme, salt, black pepper, and optional red pepper flakes. Stir everything together to coat the potatoes and vegetables evenly with the spices and rendered fat. Cook for about 5 minutes, stirring occasionally, allowing the potatoes to start to soften and absorb the flavors. Pour in about 1/4 cup of water or chicken broth – this will create steam to help cook the potatoes through and prevent sticking. Bring to a simmer, then reduce the heat to medium-low, cover the skillet, and let it cook for 15-20 minutes, or until the potatoes are fork-tender. Stir occasionally to ensure even cooking and prevent sticking.

    Step 5: Finish and Serve

    Once the potatoes are tender, remove the lid. Return the browned sausage to the skillet. Stir everything together and cook for another 2-3 minutes, allowing the sausage to heat through and meld with the potatoes and vegetables. Taste and adjust seasoning if needed. Serve hot directly from the skillet. Garnish with fresh parsley if desired for a pop of color and freshness.

    Nutritional Information: Fuel Your Body

    This Sausage and Potatoes Skillet is a hearty meal. While exact nutritional values can vary based on specific ingredients used (like the type of sausage and exact potato quantity), a typical serving (approximately 1/4 of the recipe) would provide:

    • Calories: ~450-550 kcal
    • Protein: ~20-25g
    • Fat: ~30-40g (varies greatly with sausage)
    • Carbohydrates: ~30-40g
    • Fiber: ~4-6g

    Please note: This is an approximate value. For precise nutritional information, it’s recommended to calculate it based on the specific ingredients and brands you use.

    Healthier Alternatives: Smarter Choices

    Looking to lighten up this comforting classic? You can make smart swaps without sacrificing too much flavor:

    • Leaner Sausage: Opt for chicken, turkey, or a lower-fat pork sausage. Be aware that these might not render as much flavorful fat, so you may need to add a bit more olive oil.
    • More Vegetables, Fewer Potatoes: Increase the amount of bell peppers, onions, and consider adding broccoli, cauliflower florets, or Brussels sprouts. You can also halve the potato quantity.
    • Lighten the Oil: Use a non-stick spray or just 1 tablespoon of olive oil. You can also rely more on broth for moisture.
    • Skip the Skin on Potatoes: While the skin has fiber, removing it slightly reduces carbohydrate content.

    Serving Suggestions: Perfect Pairings

    This Sausage and Potatoes Skillet is a complete meal on its own, but here are some ideas to elevate it further:

    • Top with a Fried Egg: A runny yolk adds a luscious, creamy element.
    • Dollop of Sour Cream or Greek Yogurt: Adds a cool, tangy contrast to the savory flavors.
    • Fresh Herbs: A sprinkle of chopped parsley, chives, or cilantro adds freshness.
    • Side Salad: A simple green salad with a light vinaigrette balances the richness.

    Common Mistakes to Avoid

    To ensure your Sausage and Potatoes Skillet turns out perfectly every time, steer clear of these common pitfalls:

    • Overcrowding the Pan: If your skillet is too full, the ingredients will steam rather than brown, leading to soggy potatoes and sausage. Cook in batches if necessary.
    • Not Cooking Potatoes Long Enough: Undercooked potatoes will be hard and unpleasant. Ensure they are fork-tender before adding the sausage back.
    • Burning the Garlic: Garlic cooks quickly. Add it towards the end of sautéing vegetables and cook only until fragrant.
    • Skipping the Sausage Browning Step: This step is crucial for flavor development and texture. Don’t rush it.

    Storing Tips: Keeping It Fresh

    Leftovers can be stored in an airtight container in the refrigerator for up to 3-4 days. Reheat gently in a skillet over medium heat or in the microwave. Adding a splash of water or broth when reheating can help prevent the potatoes from drying out.

    Close-up of Sausage and Potatoes Skillet in a serving dish

    Frequently Asked Questions (FAQs)

    Can I use pre-cooked potatoes?

    While you can, it’s best to use raw potatoes. Pre-cooked potatoes might become too mushy during the cooking process. If you must, add them towards the very end, just to heat through.

    What kind of sausage is best?

    Smoked sausages like Kielbasa or Andouille work wonderfully. They offer a good balance of smoky flavor and savory richness. Spicy Italian sausage or chorizo are also great alternatives.

    Can I make this vegetarian?

    Yes! You can substitute the sausage with plant-based sausages or add hearty vegetables like mushrooms, zucchini, and extra bell peppers. You might need to add a bit more oil or broth for cooking.

    How do I make it spicier?

    Add more red pepper flakes, use a spicy sausage like Andouille or hot Italian sausage, or include diced jalapeños with the bell peppers.

    My potatoes aren’t cooking through. What should I do?

    Ensure your heat isn’t too high, which can burn the outside before the inside cooks. Make sure the pan is covered during the simmering stage to trap steam. If needed, add a little more liquid (water or broth) and continue to cook, covered, until tender.

    Print

    clock clock iconcutlery cutlery iconflag flag iconfolder folder iconinstagram instagram iconpinterest pinterest iconfacebook facebook iconprint print iconsquares squares iconheart heart iconheart solid heart solid icon

    Sausage And Potatoes Skillet Recipe


    • Author: Chef Emy

    Description

    This sausage and potatoes skillet recipe is a delicious one-pan meal made with smoky sausage, tender potatoes, and savory spices. Perfect for busy weeknights, this quick dinner brings together wholesome ingredients with bold flavor.


    Ingredients

    Scale
    • 1lb smoked sausage, sliced
    • 1.5lbs baby potatoes, halved
    • 1medium onion, chopped
    • 2cloves garlic, minced
    • 1red bell pepper, sliced
    • 2 tbspolive oil
    • 1 tsppaprika
    • Salt and pepper, to taste
    • Fresh parsley, for garnish (optional)

    Instructions

      Notes

      You can use turkey or chicken sausage for a lighter option.
      Parboiling potatoes beforehand can speed up cooking.

      Nutrition

      • Calories: 410
      • Sugar: 4g

      “`

      Korean Chicken Rice Bowls Recipe

      “`html

      Korean Chicken Rice Bowls Recipe

      Quick & Flavorful Korean Chicken Rice Bowls

      Are you searching for a weeknight dinner that’s both incredibly delicious and surprisingly healthy? If you’re like most busy home cooks, you might be wondering how to whip up a meal that satisfies those savory cravings without spending hours in the kitchen. Look no further! This Korean Chicken Rice Bowls recipe is your answer. It’s a symphony of juicy chicken tossed in a vibrant, sweet, and spicy Korean-style sauce, served over fluffy rice and crowned with a medley of fresh, crisp vegetables. It’s the perfect balance of comforting and invigorating, making it an ideal choice for a satisfying and wholesome dinner that the whole family will adore.

      Ingredients You’ll Need

      Gathering your ingredients is the first step to culinary success. For these Korean Chicken Rice Bowls, we’re focusing on fresh components that bring out the best in the sweet and spicy Korean flavors. Think tender chicken, aromatic garlic and ginger, and a variety of crisp vegetables for that perfect textural contrast.

      For the Korean-Style Sauce:

      • Gochujang (Korean Chili Paste): The heart of our sauce, providing a complex, fermented heat. Look for a good quality brand. Substitution: You can use Sriracha or a blend of chili garlic sauce and a touch of tomato paste if gochujang is unavailable, though the flavor will be slightly different.
      • Soy Sauce: For that essential umami depth. Use low-sodium if you prefer.
      • Rice Vinegar: Adds a bright, tangy note to balance the richness.
      • Honey or Maple Syrup: For a touch of sweetness that caramelizes beautifully.
      • Sesame Oil: Toasted sesame oil offers a nutty aroma that is quintessentially Korean.
      • Minced Garlic: Freshly minced garlic packs the most punch!
      • Grated Ginger: Adds a warm, zesty, and slightly peppery note.
      • Black Pepper: A pinch to round out the flavors.

      For the Chicken and Bowls:

      • Boneless, Skinless Chicken Thighs or Breasts: Thighs offer more flavor and juiciness, while breasts are leaner. Cut into bite-sized pieces.
      • Cooking Oil: A neutral oil like vegetable or canola oil for sautéing.
      • Cooked Rice: Sushi rice, basmati, or jasmine rice all work beautifully.
      • Assorted Fresh Vegetables: Think shredded carrots, thinly sliced bell peppers (any color!), crisp cucumber ribbons, edamame (shelled), and sliced green onions.
      • Optional Toppings: Toasted sesame seeds, a fried egg, or a sprinkle of nori flakes.

      Timing is Everything: Prep, Cook, and Enjoy

      Prep Time: 15 minutes
      Cook Time: 20 minutes
      Total Time: 35 minutes

      This recipe is designed for speed and flavor. With a total time of just 35 minutes, it’s significantly faster than the average dinner recipe which often clocks in at 45-60 minutes. The prep is straightforward, and the cooking process is quick and efficient, making it perfect for busy weeknights.

      Korean Chicken Rice Bowls Ingredients and Preparation

      Step-by-Step Instructions

      Step 1: Prepare the Korean-Style Sauce

      In a medium bowl, whisk together the gochujang, soy sauce, rice vinegar, honey (or maple syrup), sesame oil, minced garlic, grated ginger, and black pepper. Don’t be shy with the garlic and ginger – they add incredible depth! Taste and adjust seasonings if needed. If you prefer a spicier kick, add a little more gochujang. If it’s too thick, a tablespoon of water can help.

      Step 2: Marinate the Chicken

      Place your bite-sized chicken pieces in a bowl. Pour about half of the prepared sauce over the chicken. Toss gently to ensure each piece is coated evenly. Let it marinate for at least 10 minutes while you prepare the other components. This simple marinade infuses the chicken with that irresistible sweet and spicy Korean flavor.

      Step 3: Cook the Chicken

      Heat your cooking oil in a large skillet or wok over medium-high heat. Once hot, add the marinated chicken in a single layer. Cook for about 5-7 minutes, flipping occasionally, until the chicken is golden brown and cooked through. Avoid overcrowding the pan; cook in batches if necessary to ensure proper browning rather than steaming.

      Step 4: Prepare the Rice

      While the chicken is cooking, ensure your rice is ready. Whether you’ve made it fresh or are reheating pre-cooked rice, you want it to be fluffy and warm. If cooking from scratch, follow the package instructions. A slightly sticky rice like sushi rice is ideal for helping the toppings adhere.

      Step 5: Assemble Your Bowls

      This is where the magic happens! Divide the warm rice among your serving bowls. Top generously with the cooked Korean chicken. Arrange your fresh vegetables around the chicken – shredded carrots, bell pepper strips, cucumber ribbons, and edamame add vibrant color and satisfying crunch. Drizzle with the remaining Korean-style sauce, and finish with a sprinkle of toasted sesame seeds and sliced green onions for an extra burst of flavor and visual appeal. If you’re feeling decadent, a fried egg on top is heavenly!

      Nutritional Information (Estimated Per Serving)

      This recipe is a great source of lean protein and can be packed with vitamins and fiber from the vegetables. Here’s an estimated breakdown:

      • Calories: ~450-550 kcal
      • Protein: ~30-40g
      • Carbohydrates: ~40-50g
      • Fat: ~15-25g

      Note: Nutritional values are approximate and can vary based on ingredient choices and portion sizes.

      Healthier Alternatives & Swaps

      Looking to make these Korean Chicken Rice Bowls even healthier without sacrificing flavor? Here are a few simple swaps:

      • Leaner Protein: Opt for chicken breast instead of thighs, or try firm tofu or shrimp for a lighter protein source.
      • Reduced Sodium: Use low-sodium soy sauce.
      • Whole Grains: Serve over brown rice or quinoa for added fiber and nutrients.
      • Less Sugar: If you’re watching sugar intake, reduce the amount of honey or maple syrup in the sauce, or use a sugar substitute approved for cooking. You can also add a touch more rice vinegar to compensate for the reduced sweetness.
      • Veggie Powerhouse: Pack your bowls with even more colorful vegetables like broccoli florets, snap peas, or spinach.

      Serving Suggestions

      These Korean Chicken Rice Bowls are a complete meal on their own, but here are a few ideas to elevate your dining experience:

      • Add a Fried Egg: A runny yolk adds a luxurious richness that ties everything together.
      • Kimchi on the Side: For an extra punch of fermented flavor and probiotics, serve with a side of your favorite kimchi.
      • Quick Pickled Vegetables: Thinly sliced radishes or cucumbers quickly pickled in rice vinegar and a pinch of sugar add a refreshing zing.
      • Garnish Galore: Don’t underestimate the power of toasted sesame seeds, sliced green onions, and a drizzle of sriracha for those who like extra heat.

      Common Mistakes to Avoid

      • Overcrowding the Pan: This leads to steamed, rather than seared, chicken, making it less flavorful and potentially rubbery. Cook in batches if needed.
      • Not Tasting and Adjusting the Sauce: Your gochujang brand might vary in spice and saltiness. Always taste your sauce and adjust to your preference.
      • Using Old Ginger/Garlic: Freshly grated ginger and minced garlic provide the best aroma and flavor.
      • Skipping the Marination: Even a short 10-minute marinade makes a difference in flavor penetration.
      • Serving Cold Rice: Warm rice is crucial for a comforting and cohesive bowl.

      Storing Your Korean Chicken Rice Bowls

      Leftovers can be stored in an airtight container in the refrigerator for up to 3 days. It’s best to store the chicken and rice together, and add fresh vegetables just before serving if possible, as they can become soggy.

      To Reheat: You can gently reheat the chicken and rice mixture in a skillet over medium heat, adding a splash of water or extra sauce if needed, or microwave until heated through. Add fresh toppings before serving.

      Assembled Korean Chicken Rice Bowls with Fresh Vegetables

      Frequently Asked Questions (FAQs)

      ***Can I make this recipe vegetarian or vegan?***

      Absolutely! Replace the chicken with firm or extra-firm tofu, tempeh, or your favorite plant-based chicken alternative. Ensure your sweetener is vegan (like maple syrup instead of honey) and check that your gochujang does not contain any fish products (most are vegan, but it’s good to check).

      ***How spicy is this dish?***

      The spice level can vary depending on the brand of gochujang used. Gochujang typically has a moderate heat. You can control the spiciness by adjusting the amount of gochujang in the sauce. For less heat, use less; for more, add more, or add a pinch of red pepper flakes.

      ***What kind of rice is best?***

      Short-grain or medium-grain rice like sushi rice or medium-grain white rice is ideal as it tends to be slightly sticky, which helps hold the toppings well. However, jasmine or basmati rice will also work, especially if you’re aiming for a healthier option with brown rice.

      ***Can I prepare parts of this recipe in advance?***

      Yes! The Korean-style sauce can be made up to a week in advance and stored in the refrigerator. You can also cook the chicken ahead of time and reheat it. Vegetables can be prepped and stored separately.

      Enjoy Your Delicious Korean Chicken Rice Bowls!

      There you have it – a quick, healthy, and incredibly flavorful Korean Chicken Rice Bowl recipe that’s perfect for any night of the week. With its balanced flavors and vibrant presentation, it’s sure to become a go-to in your meal rotation. Don’t forget to experiment with your favorite vegetables and toppings to make it uniquely yours. Happy cooking!

      Print
      clock clock iconcutlery cutlery iconflag flag iconfolder folder iconinstagram instagram iconpinterest pinterest iconfacebook facebook iconprint print iconsquares squares iconheart heart iconheart solid heart solid icon

      Korean Chicken Rice Bowls Recipe


      • Author: Chef Emy

      Description

      This Korean Chicken Rice Bowls recipe is a delicious, quick meal featuring juicy chicken in a sweet and spicy Korean-style sauce over fluffy rice, topped with fresh vegetables. Perfect for a healthy and satisfying dinner option!


      Ingredients

      Scale
      • 1lb boneless skinless chicken thighs, cut into bite-sized pieces
      • 2 tbspsoy sauce
      • 1 tbspgochujang (Korean chili paste)
      • 1 tbspsesame oil
      • 1 tbsphoney
      • 2garlic cloves, minced
      • 1 tspgrated ginger
      • 2 cupscooked white rice
      • 1 cupshredded carrots
      • 1 cupsliced cucumber
      • 2green onions, chopped
      • Sesame seeds, for garnish

      Instructions

        Notes

        You can substitute chicken thighs with chicken breast or tofu for a leaner or vegetarian version. Adjust gochujang to your spice preference.

        Nutrition

        • Calories: 430
        • Sugar: 8g

        “`

        Spicy Shrimp Sushi Stacks Recipe

        “`html

        Spicy Shrimp Sushi Stacks Recipe

        Introduction: From Sushi Rolls to Stacks

        Are you looking for a way to enjoy the vibrant flavors of sushi without the rolling hassle? Did you know that consumers search for “easy sushi recipes” over 10,000 times per month? This Spicy Shrimp Sushi Stacks recipe is a game-changer. It’s a quick, fun, and beautifully layered twist on traditional sushi, packed with bold flavors and the freshest ingredients. Forget the complicated rolling mat and the fear of unwieldy nori; these sushi stacks are as visually appealing as they are delicious, making them perfect for weeknight dinners or impressive appetizers.

        Ingredients for Spicy Shrimp Sushi Stacks

        Crafting these delightful stacks is all about balancing textures and tastes. Here’s what you’ll need:

        For the Sushi Rice:

        • 2 cups sushi rice (short-grain Japanese rice), rinsed until water runs clear for a fluffy, distinct texture.
        • 2 ½ cups water, for perfectly cooked rice.
        • ¼ cup rice vinegar, for that essential tangy brightness.
        • 2 tablespoons granulated sugar, to balance the vinegar’s sharpness and add a subtle sweetness.
        • 1 teaspoon salt, to enhance all the flavors.

        For the Spicy Shrimp:

        • 1 pound medium shrimp, peeled, deveined, and tails removed – plump and juicy.
        • 2 tablespoons sriracha or your favorite chili sauce, for a fiery kick. (Adjust to your heat preference!)
        • 1 tablespoon mayonnaise (Kewpie recommended for extra creaminess), to bind and mellow the heat.
        • 1 teaspoon soy sauce or tamari, for umami depth.
        • ½ teaspoon sesame oil, for a nutty aroma.

        For the Assembly:

        • 1 large avocado, ripe and thinly sliced, for creamy richness.
        • ½ cucumber, julienned thinly, for a refreshing crunch.

        Flavor Enhancers and Garnishes:

        • Toasted sesame seeds, for a nutty crunch and visual appeal.
        • Thinly sliced green onions or chives, for a fresh, sharp bite.
        • Pickled ginger, to cleanse the palate between bites.
        • Wasabi, for an optional fiery punch.
        • Extra soy sauce or tamari, for dipping.

        Timing is Everything

        Prep time: 25 minutes
        Cook time: 20 minutes
        Total time: 45 minutes

        Compared to traditional sushi rolls which can easily take an hour or more with rolling and chilling, these Spicy Shrimp Sushi Stacks are remarkably efficient. The cooking of the rice is the longest single component, but while it cooks and cools, you can prepare the shrimp and slice your veggies. This makes it an ideal meal for a busy schedule!

        Spicy Shrimp Sushi Stacks prepared and ready to be served

        How to Make Spicy Shrimp Sushi Stacks: Step-by-Step

        Cook the Sushi Rice to Perfection

        1. Rinse the sushi rice thoroughly under cold running water until the water is completely clear. This removes excess starch, preventing gummy rice. Drain well.
        2. Combine the rinsed rice and 8 cups of water in a medium saucepan. Bring it to a boil over high heat, then immediately reduce the heat to the lowest setting, cover tightly, and simmer for 15 minutes. Do not lift the lid.
        3. Remove the saucepan from the heat and let it stand, covered, for another 10 minutes. This allows the rice to steam and finish cooking.
        4. While the rice is steaming, gently warm the rice vinegar, sugar, and salt in a small saucepan or microwave-safe bowl. Stir until the sugar and salt are completely dissolved. Do not boil.
        5. Transfer the cooked rice to a large, shallow non-metallic bowl (a wooden or glass bowl is ideal). Gradually pour the vinegar mixture over the hot rice, using a rice paddle or spatula to gently fold and cut the mixture into the rice. Do this with a slicing motion to avoid breaking the grains.
        6. Fan the rice as you mix to help it cool down quickly and achieve a glossy finish. Cover the seasoned rice with a damp cloth and let it cool to room temperature.

        Prepare the Spicy Shrimp Filling

        1. In a medium bowl, combine the sriracha, mayonnaise, soy sauce, and sesame oil. Stir until well combined and creamy.
        2. Add the prepared shrimp to the spicy sauce. Toss gently to ensure each shrimp is evenly coated. Let it marinate for about 10-15 minutes while you prepare the other ingredients.

        Assemble Your Sushi Stacks

        1. You’ll need ring molds or any round cutters for this. If you don’t have them, you can use clean, empty tuna cans or small glasses with the bottoms removed. Place the mold on your serving plate.
        2. Start with a layer of cooled sushi rice at the bottom of the mold. Gently press it down to form a compact base. About ¼ to ½ cup of rice per stack, depending on your mold size.
        3. Next, add a layer of thinly sliced avocado.
        4. Follow with a layer of the spicy shrimp mixture. Make sure to distribute the shrimp evenly.
        5. Add a layer of the julienned cucumber.
        6. Carefully lift the ring mold. For extra stability, you can add another small layer of rice on top if using a very deep mold.
        7. Repeat the layering process for as many stacks as you wish to make.

        Chill and Serve

        1. Once assembled, you can either serve immediately or chill them in the refrigerator for about 15-20 minutes to help them set. This is optional but can make them easier to handle.
        2. Garnish your Spicy Shrimp Sushi Stacks with toasted sesame seeds and thinly sliced green onions.
        3. Serve with pickled ginger, wasabi, and soy sauce on the side. Enjoy the burst of flavors!

        Nutritional Information

        Nutritional values are approximate and can vary based on specific ingredients and portion sizes.

        • Calories: ~350-450 per stack (depending on size and toppings)
        • Protein: ~15-20g
        • Fat: ~15-25g (from avocado, mayo, sesame oil)
        • Carbohydrates: ~30-40g (primarily from rice)
        • Sodium: Varies greatly with soy sauce usage.

        Healthier Alternatives and Flavor Swaps

        Looking to lighten things up or switch flavors? Try these variations:

        • Lighter Mayo: Use a light or avocado-oil-based mayonnaise, or even Greek yogurt for a significantly lower fat content, though the flavor profile will change.
        • Brown Rice: For added fiber, you can use cooked short-grain brown rice. Ensure it’s cooled and seasoned well, though the texture will be chewier.
        • Vegetarian Option: Replace shrimp with pan-fried or baked firm tofu cubes marinated in a similar spicy sauce, or use finely chopped, seasoned mushrooms.
        • Different Protein: Cooked salmon or imitation crab meat (kani) can be used instead of shrimp. For a raw sushi experience, ensure your sushi-grade fish is handled impeccably.
        • Less Spice: Reduce the amount of sriracha or substitute with a milder chili sauce.

        Serving Suggestions: Elevate Your Experience

        These stacks are fantastic on their own, but here are a few ideas to make them even better:

        • Dipping Sauces: Besides soy sauce, try a ponzu sauce for a citrusy tang or a spicy mayo on the side.
        • Side Dishes: Serve with a light miso soup, a crisp Asian-inspired slaw, or edamame for a complete meal.
        • Presentation: Arrange the stacks artfully on a platter. You can garnish with edible flowers or microgreens for an extra touch of elegance.

        Common Mistakes to Avoid

        • Using the wrong rice: Long-grain or basmati rice won’t have the sticky texture needed for sushi. Always use short-grain sushi rice.
        • Overcrowding the mold: Pack layers evenly but don’t stuff them too tightly, as this can make disassembly difficult and the stacks unstable.
        • Using hot rice: Ensure the sushi rice has cooled to at least room temperature. Hot rice will cook the avocado and affect the texture.
        • Not rinsing the rice: This is crucial for achieving the right texture and preventing a starchy, gummy result.

        Storing Your Sushi Stacks

        Sushi is best enjoyed fresh. If you have leftovers, store them in an airtight container in the refrigerator for no more than 24 hours. The avocado may brown slightly, and the rice can harden over time. For the best experience, it’s recommended to eat them the same day they are made.

        Close-up of a spicy shrimp sushi stack with garnishes

        Frequently Asked Questions (FAQs)

        ***Can I make these ahead of time?***

        While the rice and shrimp mixture can be prepared a few hours in advance and refrigerated, it’s best to assemble the stacks just before serving. The avocado can brown, and the overall texture is best when fresh.

        ***What kind of rice vinegar should I use?***

        Standard rice vinegar or seasoned rice vinegar works well. If using unseasoned rice vinegar, you’ll need to add sugar and salt as specified in the recipe.

        ***How do I make them spicier or less spicy?***

        To increase spice, add more sriracha to the shrimp mixture, or a pinch of cayenne pepper. To decrease spice, use less sriracha or omit it entirely, relying on the mayonnaise and soy sauce for flavor.

        ***Can I use cooked shrimp?***

        Yes, you can use pre-cooked shrimp, but be sure not to overcook them when tossing with the sauce, as they can become tough. They just need to be heated through.

        ***What are the best mold alternatives if I don’t have ring molds?***

        You can use clean, empty tuna cans (remove both ends), small cookie cutters, or even carefully shape them by hand, though they might be less uniform.

        Conclusion: Enjoy Your Sushi Creation!

        This Spicy Shrimp Sushi Stacks recipe offers a delightful, accessible way to enjoy popular sushi flavors right at home. It’s a dish that’s as fun to make as it is to eat, guaranteed to impress your taste buds and your guests. So gather your ingredients, embrace the vibrant colors and textures, and get ready to build your own delicious sushi masterpieces!

        Print

        clock clock iconcutlery cutlery iconflag flag iconfolder folder iconinstagram instagram iconpinterest pinterest iconfacebook facebook iconprint print iconsquares squares iconheart heart iconheart solid heart solid icon

        Spicy Shrimp Sushi Stacks Recipe


        • Author: Chef Emy

        Description

        This Spicy Shrimp Sushi Stacks recipe is a quick, fun twist on traditional sushi, layered with bold flavors and fresh ingredients.


        Ingredients

        Scale
        • 1 cupsushi rice
        • 2 tbsprice vinegar
        • ½ tspsugar
        • ¼ tspsalt
        • ½lb cooked shrimp, chopped
        • 2 tbspmayonnaise
        • 1 tbspSriracha
        • 1avocado, diced
        • ½cucumber, diced
        • 1 tspsesame oil
        • 1 tspsoy sauce
        • 1sheet nori, crushed
        • 1 tspsesame seeds
        • Optional: green onions, for garnish

        Instructions

          Notes

          Use pre-cooked shrimp for convenience. Customize spice levels by adjusting the Sriracha. Best served fresh.

          Nutrition

          • Calories: 310
          • Sugar: 2g

          “`

          Shrimp Pasta With Creamy Tomato White Wine Sauce Recipe

          “`html

          Shrimp Pasta With Creamy Tomato White Wine Sauce Recipe

          Introduction: Is it Possible to Make a Luxurious Dinner in Under 30 Minutes?

          In today’s fast-paced world, finding the time to prepare a restaurant-quality meal can feel like a distant dream. But what if I told you that you could create a Shrimp Pasta with Creamy Tomato White Wine Sauce that’s both incredibly luxurious and astonishingly quick to make? For those searching for a weeknight dinner that impresses or a special occasion dish that doesn’t require hours of prep, this recipe is your answer. We’re talking about succulent shrimp, a rich, velvety sauce kissed with tomato and brightened by white wine, all coating perfectly cooked pasta. This dish isn’t just food; it’s an experience, and it’s achievable in less time than it takes to decide what to watch on streaming. Get ready to elevate your pasta game with minimal effort and maximum flavor.

          Ingredients for Your Masterpiece

          The magic of this Shrimp Pasta With Creamy Tomato White Wine Sauce lies in the balance of simple, high-quality ingredients. Don’t be intimidated; each component plays a crucial role in creating that delightful harmony of flavors and textures.

          For the Pasta:

          • 12 ounces pasta: Linguine, fettuccine, or spaghetti work wonderfully. Choose a good quality pasta that holds sauce well. We want something with a satisfying chew!
          • Salt: For seasoning the pasta water. This is your first opportunity to flavor the pasta itself.

          For the Sauce:

          • 2 tablespoons olive oil: Extra virgin for that fruity nuance.
          • 1 small yellow onion, finely chopped: Provides a sweet, aromatic base. A shallot can be a more delicate substitute.
          • 4 cloves garlic, minced: The soul of many great dishes. Don’t skimp here!
          • 1/2 teaspoon red pepper flakes (optional): For a whisper of heat that complements the richness. Adjust to your spice preference.
          • 1 (14.5 ounce) can diced tomatoes, undrained: These add body, sweetness, and a lovely tang. Fire-roasted diced tomatoes will add another layer of complexity.
          • 1/2 cup dry white wine: Such as Pinot Grigio or Sauvignon Blanc. This is crucial for adding acidity and depth. For a non-alcoholic option, use chicken or vegetable broth.
          • 1 cup heavy cream: This creates our luscious, creamy texture. For a lighter sauce, half-and-half can be used, but the richness will be slightly diminished.
          • 1/4 cup grated Parmesan cheese: Plus more for serving. It adds that salty, umami flavor that ties everything together.
          • Salt and freshly ground black pepper: To taste. Seasoning throughout is key.
          • 1/4 cup fresh parsley, chopped: For a pop of freshness and color as a garnish. Basil is also a fantastic alternative.

          For the Shrimp:

          • 1 pound large shrimp, peeled and deveined: About 21-25 count per pound is ideal. Make sure they are patted dry for a good sear.
          • 1 tablespoon olive oil: To get a beautiful golden crust.
          • Salt and freshly ground black pepper: A simple seasoning that lets the shrimp’s natural sweetness shine.

          Timing is Everything

          Prep time: 15 minutes
          Cook time: 20 minutes
          Total time: 35 minutes
          Average Pasta Recipe: ~45-60 minutes

          This Shrimp Pasta With Creamy Tomato White Wine Sauce is designed for efficiency. While the average pasta dish can easily creep over 45 minutes, we’ve streamlined our process to bring you a restaurant-worthy meal in under 40 minutes. The key is to multitask and have your ingredients prepped and ready to go!

          Shrimp pasta with creamy tomato white wine sauce in a bowl.

          Step-by-Step Instructions

          Step 1: Prep Your Shrimp

          First things first, let’s get those shrimp ready. If you’re using frozen shrimp, make sure they’ve been completely thawed. Peel and devein them if they aren’t already. The most crucial step here is to pat them thoroughly dry with paper towels. This might seem minor, but it’s essential for achieving a beautiful sear and preventing them from steaming in the pan. Once dry, season them generously with salt and pepper. Set them aside while we get started on the sauce.

          Step 2: Cook the Pasta

          Bring a large pot of generously salted water to a rolling boil. Add your chosen pasta and cook according to package directions until al dente – that means tender with a slight bite. Before draining, reserve about 1 cup of the starchy pasta water. This liquid gold will be instrumental in emulsifying our sauce and giving it a silky smooth consistency. Drain the pasta and set it aside. Don’t rinse it!

          Step 3: Sauté the Aromatics

          While the pasta is cooking, let’s build the flavor base for our sauce. In a large skillet or Dutch oven, heat 2 tablespoons of olive oil over medium heat. Add the finely chopped onion and sauté for about 3-4 minutes until it begins to soften and become translucent. Now, add the minced garlic and red pepper flakes (if using). Cook for another minute until fragrant, being careful not to burn the garlic – burnt garlic is bitter garlic!

          Step 4: Build the Sauce

          Pour in the white wine to deglaze the pan, scraping up any browned bits from the bottom. Let it simmer and reduce by about half, which should take 2-3 minutes. This process concentrates the wine’s flavor and cooks off the alcohol. Next, add the can of diced tomatoes (with their juices). Stir everything together and let it simmer for about 5 minutes, allowing the flavors to meld. Now, pour in the heavy cream and stir until the sauce is smooth and begins to thicken slightly. Season with salt and pepper to your taste.

          Step 5: Cook the Shrimp

          In a separate skillet (or if your sauce skillet is large enough, you can do this in batches after removing the sauce temporarily), heat 1 tablespoon of olive oil over medium-high heat. Add the seasoned shrimp in a single layer. Cook for about 1-2 minutes per side, just until they turn pink and opaque. Be careful not to overcook them, as they will continue to cook slightly in the sauce. Overcooked shrimp become tough and rubbery.

          Step 6: Combine and Finish

          Add the cooked shrimp to the creamy tomato sauce. Stir in the grated Parmesan cheese until melted and the sauce is creamy. If the sauce seems too thick, add a splash of the reserved pasta water, a tablespoon at a time, until it reaches your desired consistency. Finally, add the drained pasta to the skillet with the sauce and shrimp. Toss everything gently to coat the pasta evenly. Stir in most of the chopped fresh parsley, reserving some for garnish. Serve immediately, topping with extra Parmesan cheese and the remaining parsley.

          Nutritional Information

          This is an approximate nutritional breakdown per serving (assuming 4 servings), and can vary based on exact ingredients and portion sizes:

          • Calories: 550-650 kcal
          • Protein: 30-40g
          • Fat: 30-40g
          • Carbohydrates: 40-50g
          • Fiber: 3-5g
          • Sodium: Varies greatly based on added salt and Parmesan cheese.

          Healthier Alternatives

          Want to lighten up this decadent dish without sacrificing flavor? Here are a few swaps:

          • For Cream: Use half-and-half or a blend of evaporated milk and a little cornstarch for thickening. For a dairy-free option, full-fat coconut milk or cashew cream can work, though they will impart a slight flavor.
          • For Pasta: Opt for whole wheat pasta to boost fiber content. Even better, use zucchini noodles (zoodles) or spaghetti squash for a low-carb, vegetable-forward meal.
          • For Shrimp: While shrimp are lean protein, you can always add more vegetables like spinach, mushrooms, or bell peppers to bulk up the dish and increase its nutrient density.
          • For White Wine: Vegetable or chicken broth is an excellent non-alcoholic substitute, providing savory depth.

          Serving Suggestions

          This Shrimp Pasta With Creamy Tomato White Wine Sauce is a complete meal on its own, but it pairs beautifully with a few sides:

          • Crusty Bread: Perfect for soaking up any leftover delicious sauce.
          • Simple Green Salad: A light, crisp salad with a vinaigrette cuts through the richness of the pasta. Think mixed greens, cherry tomatoes, and cucumber.
          • Steamed Asparagus or Broccoli: A healthy, vibrant green side dish that complements the flavors wonderfully.

          Common Mistakes to Avoid

          To ensure your Shrimp Pasta With Creamy Tomato White Wine Sauce turns out perfectly every time, keep an eye out for these common pitfalls:

          • Overcooking the Shrimp: Shrimp cook very quickly. Adding them at the last minute and cooking just until pink is key to tender, succulent results.
          • Not Salting Pasta Water: Pasta water should taste like the sea! This is your primary chance to season the pasta itself.
          • Burning the Garlic: Add garlic towards the end of the aromatic sauté and cook briefly until fragrant, not brown.
          • Using Low-Quality Ingredients: With a simple dish like this, the quality of your ingredients (especially the shrimp and Parmesan) really shines through.
          • Skipping the Pasta Water: That starchy water is crucial for achieving a silky, emulsified sauce that clings beautifully to the pasta.

          Storing Tips

          If you happen to have any leftovers (which is unlikely!), store them in an airtight container in the refrigerator for up to 2-3 days. The sauce may thicken as it cools. Reheat gently on the stovetop over low heat, adding a splash of milk, cream, or water to loosen the sauce. While possible, pasta dishes like this are best enjoyed fresh, as the pasta can become a bit mushy upon reheating.

          Close-up of shrimp pasta with creamy tomato white wine sauce.

          Frequently Asked Questions (FAQs)

          ***Can I make this recipe ahead of time?***

          While the sauce can be made a day in advance and reheated, it’s best to cook the pasta and shrimp and combine everything just before serving for the freshest taste and texture.

          ***What kind of white wine should I use?***

          A dry white wine like Pinot Grigio, Sauvignon Blanc, or unoaked Chardonnay works best. Avoid sweet wines, as they will alter the flavor profile of the sauce. If you don’t use alcohol, chicken or vegetable broth is a great substitute.

          ***Can I use other seafood instead of shrimp?***

          Absolutely! Scallops, mussels, or even chunks of white fish like cod or tilapia would be delicious additions or substitutions.

          ***How can I make the sauce thicker or thinner?***

          To thicken, simmer the sauce a bit longer or create a slurry of 1 teaspoon cornstarch mixed with 1 tablespoon cold water and stir it in, simmering until thickened. To thin, add reserved pasta water, broth, or milk a tablespoon at a time until desired consistency is reached.

          Print
          clock clock iconcutlery cutlery iconflag flag iconfolder folder iconinstagram instagram iconpinterest pinterest iconfacebook facebook iconprint print iconsquares squares iconheart heart iconheart solid heart solid icon

          Shrimp Pasta With Creamy Tomato White Wine Sauce Recipe


          • Author: Chef Emy

          Description

          This Shrimp Pasta With Creamy Tomato White Wine Sauce recipe blends succulent shrimp, a rich tomato cream sauce, and a splash of white wine for a luxurious pasta dish. It’s perfect for weeknight dinners or special occasions, ready in under 30 minutes.


          Ingredients

          Scale
          • 8 ozfettuccine or spaghetti
          • 1lb large shrimp, peeled and deveined
          • 2 tbspolive oil
          • 4cloves garlic, minced
          • ½ tspred pepper flakes (optional)
          • ½ cupdry white wine
          • 1 cupcrushed tomatoes
          • ½ cupheavy cream
          • ¼ cupgrated Parmesan cheese
          • Salt and pepper, to taste
          • Fresh basil or parsley, chopped (for garnish)

          Instructions

            Notes

            Use freshly grated Parmesan for best flavor. You can substitute white wine with chicken broth if preferred.

            Nutrition

            • Calories: 520
            • Sugar: 5g

            “`

            Firecracker Shrimp Recipe

            “`html

            Firecracker Shrimp Recipe

            Spice Up Your Life: The Ultimate Firecracker Shrimp

            This Firecracker Shrimp recipe delivers crispy, golden shrimp tossed in a spicy, tangy firecracker sauce. A restaurant-style favorite you can make at home in under 30 minutes. Perfect for parties, weeknight dinners, or anytime you crave bold flavor.

            Imagine succulent shrimp, coated in a light, crispy batter and fried to golden perfection, then enveloped in a vibrant, zesty sauce that’s the perfect balance of sweet, spicy, and tangy. That’s the magic of homemade Firecracker Shrimp! It’s the kind of dish that disappears from the plate in minutes and leaves everyone asking for more. Forget the delivery apps and the high restaurant bills; this recipe is your ticket to incredible flavor that’s both budget-friendly and astonishingly fast to prepare. Whether you’re hosting a game night, planning a special weeknight treat, or simply looking to impress, this bold and beautiful shrimp dish is guaranteed to be a showstopper. Let’s dive into what makes this recipe so special and how you can whip it up in your own kitchen!

            Ingredients You’ll Need

            The beauty of this Firecracker Shrimp recipe lies in its straightforward ingredients, many of which you likely already have in your pantry. The combination creates a flavor profile that’s addictive and highly customizable.

            For the Crispy Shrimp:

            • 1 pound large shrimp, peeled and deveined: Look for plump, firm shrimp. Their natural sweetness is the perfect canvas for the spicy sauce. Fresh or thawed frozen shrimp will work beautifully.
            • 1/2 cup all-purpose flour: This provides a light coating for crispiness. Can be substituted with gluten-free all-purpose flour.
            • 1/4 cup cornstarch: The secret to an extra-crispy, light coating. Rice flour can be used as a substitute for added crunch.
            • 1 teaspoon salt: Enhances all the flavors.
            • 1/2 teaspoon black pepper: For a subtle warmth.
            • 1 large egg, beaten: Acts as a binder for the coating.
            • 1/4 cup milk or buttermilk: Adds a touch of richness and helps the coating adhere. Buttermilk adds a slight tang.
            • Vegetable oil or other neutral oil, for frying: Such as canola or peanut oil. Ensure you have enough for about 1-inch depth in your pan.

            For the Firecracker Sauce:

            • 1/2 cup ketchup: The base of our sauce, providing sweetness and body.
            • 1/4 cup Sriracha or other hot sauce: This is where the “firecracker” comes from! Adjust to your spice preference.
            • 2 tablespoons rice vinegar: Adds a crucial tangy, bright note that cuts through the richness. White vinegar is a decent substitute.
            • 2 tablespoons honey or maple syrup: For sweetness and a glossy finish. Agave nectar is another option.
            • 1 tablespoon soy sauce or tamari: Adds umami depth. Use tamari for a gluten-free option.
            • 1 teaspoon sesame oil: For that distinct nutty aroma and flavor.
            • 2 cloves garlic, minced: Fresh garlic provides the best pungent flavor.
            • 1/2 teaspoon grated fresh ginger: Adds a warm, spicy zing that complements the garlic.

            For Garnish (Optional):

            • Sesame seeds
            • Chopped green onions or chives

            Timing is Everything

            One of the biggest advantages of this Firecracker Shrimp recipe is its speed. It’s significantly faster than many typical weeknight dinners:

            Prep time: 15 minutes
            Cook time: 10 minutes
            Total time: 25 minutes

            Compare this to the average 45-60 minute preparation and cook time for many seafood or complex protein dishes. This recipe is perfect for those evenings when time is short but the craving for something exciting is high!

            Crispy firecracker shrimp tossed in sauce

            Let’s Get Cooking!

            Follow these simple steps for incredibly delicious Firecracker Shrimp.

            Step 1: Prep the Shrimp

            Start by ensuring your shrimp are properly prepped. Pat them thoroughly dry with paper towels – this is crucial for ensuring the coating sticks well and fries up crispy. In a medium bowl, whisk together the flour, cornstarch, salt, and pepper. In a separate shallow bowl, whisk the egg and milk together to create your wet mixture. Dredge each dry shrimp first in the flour mixture, shaking off any excess, then dip it into the egg mixture, letting any excess drip off. Finally, dredge the shrimp again in the flour mixture. Place the coated shrimp on a plate or baking sheet in a single layer. Repeat with all the shrimp. This double-dredging method ensures a deliciously crispy exterior!

            Step 2: The Firecracker Sauce

            While your shrimp are waiting, it’s time to whip up the star of the show – the firecracker sauce! In a small saucepan or a microwave-safe bowl, combine the ketchup, Sriracha, rice vinegar, honey (or maple syrup), soy sauce (or tamari), sesame oil, minced garlic, and grated ginger. Whisk everything together until well combined. If using a saucepan, heat the mixture over medium-low heat, stirring constantly, until it’s warm and slightly thickened, about 3-5 minutes. Be careful not to let it boil vigorously. If microwaving, heat in 30-second intervals, stirring between each, until heated through and slightly thickened. The aroma will be incredible!

            Step 3: Coat and Cook

            Now for the frying! Pour enough vegetable oil into a large skillet or Dutch oven to reach about 1-inch depth. Heat the oil over medium-high heat until it reaches about 350°F (175°C). You can test if it’s ready by dropping a tiny bit of the coating mixture into the oil; it should sizzle immediately. Carefully add the coated shrimp to the hot oil in batches, ensuring not to overcrowd the pan. Overcrowding will lower the oil temperature and result in soggy shrimp. Fry for about 2-3 minutes per side, or until golden brown and cooked through. Use a slotted spoon or spider strainer to remove the crispy shrimp from the oil and place them on a wire rack set over a baking sheet to drain. This allows air to circulate, keeping them extra crispy.

            Step 4: Toss and Serve

            Once all the shrimp have been fried and drained, it’s time to bring everything together. Transfer the crispy shrimp to a large bowl. Pour the warm firecracker sauce over the shrimp and gently toss to coat them evenly. The sauce should cling beautifully to the crisp coating. Serve immediately while warm. Garnish with toasted sesame seeds and freshly chopped green onions or chives for a pop of color and extra flavor, if desired.

            Nutritional Powerhouse

            While a treat, this Firecracker Shrimp recipe can be a good source of lean protein. Nutritional values can vary based on exact ingredients and portion sizes, but a typical serving might look something like this:

            • Calories: Approximately 300-400 per serving (depending on oil absorption and sauce ingredients).
            • Protein: Rich in lean protein from the shrimp.
            • Fat: Moderate fat content due to frying and oil in sauce.
            • Carbohydrates: Primarily from the coating and sauce sugars.

            Healthier Swaps, Still Delicious

            You can absolutely enjoy the incredible flavors of Firecracker Shrimp with a few smart modifications:

            • Baking or Air Frying: Instead of deep frying, toss the flour-coated shrimp with a light spray of oil and bake at 400°F (200°C) for 10-12 minutes, flipping halfway, or air fry at 375°F (190°C) for 7-9 minutes until golden. The crunch will be slightly different but still satisfying.
            • Reduced Sugar: Use less honey or opt for a sugar-free sweetener in the sauce.
            • Lighter Coating: Use fewer breading agents or try a simple cornstarch dusting for a lighter crisp.
            • Spice Adjustment: Control the heat by reducing the Sriracha and increasing ketchup or adding a touch of gochujang for a different kind of spice.

            Perfect Pairings

            Firecracker Shrimp are incredibly versatile. Here are some ideas:

            • Over Rice: Serve over steamed white, brown, or jasmine rice to soak up the delicious sauce.
            • With Noodles: Toss with cooked lo mein or ramen noodles for a quick stir-fry.
            • As an Appetizer: Serve in small bowls or on skewers for a party starter.
            • In Lettuce Wraps: Add to crisp lettuce cups for a lighter, refreshing meal.
            • With Vegetables: Pair with steamed or stir-fried broccoli, snap peas, or bell peppers for a complete meal.

            Avoiding Common Pitfalls

            To ensure your Firecracker Shrimp are perfect every time, watch out for these common mistakes:

            • Wet Shrimp: Not drying the shrimp properly leads to a soggy coating.
            • Overcrowding the Pan: This lowers oil temperature, resulting in greasy, unevenly cooked shrimp. Fry in batches!
            • Sauce Too Thick/Thin: Adjust heat and cooking time of the sauce to achieve the desired consistency.
            • Overcooking: Shrimp cook very quickly; overcooked shrimp become tough and rubbery.

            Storing Your Firecracker Shrimp

            For the best texture, Firecracker Shrimp are best enjoyed fresh. However, if you have leftovers:

            • Refrigeration: Store cooled shrimp in an airtight container in the refrigerator for up to 2 days.
            • Reheating: Reheat gently in a non-stick skillet over low heat or in a toaster oven to try and crisp them up again. Microwaving will likely make them soft. The coating may lose some of its crispness upon reheating.
            Close up of firecracker shrimp being tossed in sauce

            Frequently Asked Questions

            ***Can I make the sauce ahead of time?***

            Yes, absolutely! The firecracker sauce can be made up to 3 days in advance and stored in an airtight container in the refrigerator. Gently reheat it on the stovetop or in the microwave before tossing with the shrimp.

            ***What kind of shrimp should I use?***

            Large or jumbo shrimp (typically 21-30 or 16-20 count per pound) work best as they hold up well to frying and coating. Ensure they are peeled and deveined for easy eating.

            ***How can I make this gluten-free?***

            Use a gluten-free all-purpose flour blend for the coating and tamari instead of soy sauce in the sauce. Ensure your hot sauce is also gluten-free.

            ***How spicy is this recipe?***

            The spiciness comes primarily from the Sriracha. The recipe as written is moderately spicy. You can increase or decrease the Sriracha amount to suit your personal heat preference.

            ***Why are my shrimp not crispy?***

            Several reasons could cause this: the shrimp weren’t patted dry enough, you overcrowded the pan, or the oil temperature was too low. Ensure your oil is at the correct temperature (around 350°F/175°C) and fry in small batches.

            Taste the Fire!

            This Firecracker Shrimp recipe is a true game-changer. It’s proof that you don’t need to spend hours in the kitchen or a fortune at a restaurant to enjoy incredibly flavorful, exciting food. With its perfect balance of spice, tang, and sweetness, coupled with that irresistible crispy texture, these shrimp are sure to become a frequent favorite in your household. So, gather your ingredients, crank up the heat, and get ready to impress yourself and everyone around you with this sensational dish. Don’t wait – try this Firecracker Shrimp recipe tonight and experience a burst of flavor!

            Print

            clock clock iconcutlery cutlery iconflag flag iconfolder folder iconinstagram instagram iconpinterest pinterest iconfacebook facebook iconprint print iconsquares squares iconheart heart iconheart solid heart solid icon

            Firecracker Shrimp Recipe


            • Author: Chef Emy

            Description

            This Firecracker Shrimp recipe delivers crispy, golden shrimp tossed in a spicy, tangy firecracker sauce. A restaurant-style favorite you can make at home in under 30 minutes. Perfect for parties, weeknight dinners, or anytime you crave bold flavor.


            Ingredients

            Scale
            • 1lb large shrimp, peeled and deveined
            • ½ cupcornstarch
            • 2eggs, beaten
            • 1 cuppanko breadcrumbs
            • Oil for frying
            • For the Firecracker Sauce:
            • cupmayonnaise
            • 2 tbspsweet chili sauce
            • 1 tbspsriracha
            • 1 tbsphoney
            • 1 tsprice vinegar

            Instructions

              Notes

              Adjust sriracha for more or less heat.
              Use air fryer for a lighter version.
              Serve over rice, in tacos, or as an appetizer.

              Nutrition

              • Calories: 380
              • Sugar: 5g

              “`

              Thai Inspired Creamy Coconut Shrimp Recipe

              “`html

              Thai Inspired Creamy Coconut Shrimp Recipe

              Flavorful Journey: Unlocking the Magic of Thai Inspired Creamy Coconut Shrimp

              Are you constantly seeking weeknight dinners that are both incredibly flavorful and surprisingly quick to prepare? The quest for dishes that transport your taste buds to exotic locales, while fitting into your busy schedule, often feels like a culinary odyssey. This Thai Inspired Creamy Coconut Shrimp recipe is your answer. It’s a dish that harnesses the vibrant, complex flavors of Thailand, wrapping succulent shrimp in a lusciously creamy coconut milk base, accented with the bright tang of lime, the pungent depth of garlic, and a tantalizing whisper of spice. On average, a flavorful, home-cooked meal can take up to an hour, but this masterpiece comes together in a fraction of that time, making it an ideal choice for those who crave adventure without the extended commitment.

              Gathering Your Aromatic Treasures: Ingredients and Substitutions

              The soul of this dish lies in the quality and synergy of its ingredients. We’ve meticulously selected each component to create a harmonious balance of flavors and textures. Below, you’ll find our curated list, complete with suggestions for substitutions to cater to your pantry and preferences.

              Prep Time:
              15 Minutes
              Cook Time:
              20 Minutes
              Total Time:
              35 Minutes

              For the Shrimp and Marinade:

              • 1 lb large shrimp, peeled and deveined (for that sweet, oceanic bite)
              • 1 tablespoon fish sauce (adds a complex umami depth; substitute: soy sauce or tamari for a vegetarian/gluten-free option)
              • 1 teaspoon lime juice (for a zesty, bright counterpoint)
              • 1/2 teaspoon. red pepper flakes (adjust for your desired level of gentle heat)

              For the Creamy Coconut Sauce:

              • 1 tablespoon coconut oil (its subtle nutty sweetness is key; substitute: unsalted butter or olive oil)
              • 4 cloves garlic, minced (the pungent heart of the aromatics)
              • 1 inch ginger, grated (adds a warm, spicy foundation)
              • 1 small shallot, finely chopped (delicate, sweet oniony notes; substitute: 1/4 small yellow onion)
              • 1 red chili, thinly sliced (optional, for an extra kick and visual appeal; substitute: a pinch of cayenne pepper)
              • 1 (13.5 oz) can full-fat coconut milk (the creamy, luxurious base)
              • 1 tablespoon lime juice (reiterating that essential brightness)
              • 1 teaspoon brown sugar (to balance the acidity and spice; substitute: maple syrup or honey)
              • Salt and freshly ground black pepper, to taste (essential for overall flavor enhancement)

              For Garnish:

              • Fresh cilantro, chopped (for a fresh, herbaceous finish)
              • Lime wedges (to serve, for an additional burst of citrus)

              The Symphony of Time: Prep, Cook, and Total Duration

              In the grand scheme of home cooking, a truly satisfying meal often demands a significant time investment. While many complex dishes can easily exceed the hour mark from start to finish, this Thai Inspired Creamy Coconut Shrimp recipe is a testament to efficient culinary creation. With a mere 15 minutes of preparation, you’re setting the stage for success. The active cooking phase is beautifully contained within 20 minutes, allowing the flavors to meld and the shrimp to cook to tender perfection. This brings the total time to an impressive 35 minutes. Compare this to the average 60-90 minutes often required for restaurant-quality, globally inspired meals, and you’ll see just how accessible this exotic flavor profile truly is for a weeknight endeavor.

              Thai Inspired Creamy Coconut Shrimp - close-up of the dish in a bowl, garnished with cilantro and lime wedges.

              Crafting Culinary Alchemy: Step-by-Step Guide

              Embarking on the creation of this vibrant dish is a straightforward and rewarding process. Follow these steps, and you’ll soon be savoring the delightful tastes of Thailand!

              Step 1: Preparing Your Ocean Gems

              Start by ensuring your shrimp are perfectly prepped. If they aren’t already, peel and devein them. Pat them thoroughly dry with paper towels – this crucial step helps them to sear beautifully rather than steam. In a medium bowl, toss the shrimp with the fish sauce, lime juice, and red pepper flakes. Let them marinate for about 10-15 minutes while you prepare the other ingredients. This brief marinade infuses them with foundational Thai flavors.

              Step 2: The Aromatic Awakening

              In a large skillet or wok, heat the coconut oil over medium heat until shimmering. Add the minced garlic, grated ginger, and chopped shallot. Sauté, stirring frequently, for about 1-2 minutes until fragrant and the shallots are softened. Be careful not to burn the garlic; we want a gentle aroma, not a bitter char. If you’re using a fresh chili, add it now and sauté for another 30 seconds.

              Step 3: The Creamy Coconut Embrace

              Pour in the full-fat coconut milk, scraping up any browned bits from the bottom of the pan. Stir in the additional tablespoon of lime juice and the brown sugar. Bring the mixture to a gentle simmer. Let it bubble softly for about 3-5 minutes, allowing the sauce to thicken slightly. This is where the magic of the creamy base truly begins to form.

              Step 4: Simmering the Magic

              Add the marinated shrimp to the simmering coconut sauce. Stir gently to coat them evenly. Cook for just 3-5 minutes, or until the shrimp turn pink and opaque and are cooked through. Overcooking will make them rubbery, so keep a close eye on them. The sauce should have thickened to a luscious consistency, coating the shrimp beautifully.

              Step 5: The Final Flourishes

              Taste the sauce and adjust seasoning with salt and freshly ground black pepper if needed. Stir in most of the chopped fresh cilantro. Serve immediately, garnished with the remaining cilantro and fresh lime wedges on the side.

              Nourishing Your Body, Delight Your Senses: Nutritional Highlights

              While specific nutritional values can vary based on exact ingredient quantities and brands used, this Thai Inspired Creamy Coconut Shrimp recipe generally offers a good balance of macronutrients. It’s rich in protein from the shrimp, healthy fats from the coconut milk, and provides essential vitamins and minerals.

              • High in Protein: Shrimp are an excellent source of lean protein, vital for muscle repair and satiety.
              • Healthy Fats: Full-fat coconut milk contributes Medium-Chain Triglycerides (MCTs), which are metabolized differently and can provide quick energy.
              • Vitamins & Minerals: Garlic, ginger, lime, and cilantro contribute antioxidants and micronutrients like Vitamin C and B vitamins.

              (Note: Exact calorie and macro counts are best calculated using a recipe nutrition calculator with your specific ingredients.)

              A Lighter Path: Healthier Swaps for a Guilt-Free Indulgence

              Craving this exotic flavor but looking to lighten it up? You can achieve delicious results with a few mindful adjustments:

              • Lighter Coconut Milk: Opt for light coconut milk. While the sauce will be less rich, it will still carry the coconut flavor beautifully.
              • More Vegetables: Bulk up the dish with plenty of colorful vegetables like bell peppers, broccoli florets, snap peas, or spinach. This adds fiber, vitamins, and volume without extra calories.
              • Reduced Sugar: Minimize or omit the brown sugar entirely, allowing the natural sweetness of the coconut milk and shrimp to shine. Adjust lime and salt to balance.
              • Lean Protein Swap: While shrimp is lean, you could also use firm tofu or chicken breast for variety. Adjust cooking times accordingly.

              Elevating the Experience: Serving Suggestions

              To complete your Thai-inspired feast, consider these delightful accompaniments:

              • Jasmine Rice: The quintessential partner for soaking up that luscious sauce. A fragrant bowl of steamed jasmine rice is essential.
              • Cauliflower Rice: For a lower-carb option, serve over steamed or sautéed cauliflower rice.
              • Steamed Greens: A side of steamed bok choy, spinach, or green beans adds a fresh, crisp contrast.
              • Noodles: Serve over rice noodles or your favorite pasta for a heartier meal.

              Navigating the Culinary Waters: Common Mistakes to Avoid

              Even the simplest recipes can have pitfalls. Here’s how to ensure your Thai Inspired Creamy Coconut Shrimp is a resounding success:

              • Overcooking the Shrimp: This is the most common mistake. Shrimp cook very quickly; once they turn pink, they’re done. Overcooked shrimp become tough and rubbery.
              • Not Drying the Shrimp: Wet shrimp will steam in the pan instead of searing, leading to a less desirable texture and appearance.
              • Burning the Aromatics: Garlic and ginger can burn easily. Keep the heat moderate and stir constantly while sautéing them.
              • Using Low-Fat Coconut Milk: While an option for health-conscious cooks, it significantly impacts the richness and creaminess of the sauce. For best results, use full-fat.
              • Skipping the Lime: The acidity from the lime is crucial for balancing the richness of the coconut milk and brightening the overall flavor profile.

              Savoring the Flavors: Storing Your Delicious Creation

              Leftovers, if any, can be stored in an airtight container in the refrigerator for up to 2 days. The sauce might thicken considerably upon cooling. To reheat, gently warm the shrimp and sauce over low heat, adding a splash of water or broth if needed to reach your desired consistency. Avoid microwaving at high heat, as this can toughen the shrimp. It’s best enjoyed fresh, but proper storage ensures you can still savor its delightful flavors.

              Thai Inspired Creamy Coconut Shrimp - ingredients laid out on a counter, including shrimp, coconut milk, lime, garlic, and spices.

              Frequently Asked Questions

              ***Can I use pre-cooked shrimp?***

              While you can, it’s generally not recommended for this recipe. Pre-cooked shrimp are already firm, and adding them to the hot sauce will likely result in overcooking and a rubbery texture. It’s best to use raw shrimp for optimal results.

              ***How spicy is this dish?***

              The spice level is moderate, primarily from the red pepper flakes. You can easily adjust this by reducing or omitting the flakes for a milder dish, or adding more if you enjoy a significant kick. The chili pepper addition also increases heat.

              ***What kind of shrimp should I use?***

              Large or jumbo shrimp work best. They have a substantial size that holds up well to the sauce and are less likely to overcook. Ensure they are peeled and deveined for ease of eating.

              ***Can I make this dairy-free?***

              Yes! This recipe is naturally dairy-free as it uses coconut milk. Ensure any substitutes you use are also dairy-free.

              ***Why is my sauce not thickening?***

              The sauce typically thickens as it simmers and the coconut milk reduces slightly. If it’s still too thin after simmering for 5 minutes, you can continue to simmer gently (uncovered) for a few more minutes, or you can create a slurry by mixing 1 teaspoon of cornstarch with 2 teaspoons of water and whisking it into the simmering sauce. Cook for another minute until thickened.

              Embark on Your Thai Culinary Adventure

              There you have it – a truly vibrant and deeply satisfying Thai Inspired Creamy Coconut Shrimp recipe that proves you don’t need hours in the kitchen to achieve exotic flavors. This dish is a celebration of simplicity, speed, and spectacular taste. It’s perfect for impressing guests, treating yourself, or simply adding a burst of sunshine to your regular meal rotation. Don’t just read about it, experience the magic for yourself! Whip up this delightful dish tonight and let your taste buds travel to Thailand.

              Print

              clock clock iconcutlery cutlery iconflag flag iconfolder folder iconinstagram instagram iconpinterest pinterest iconfacebook facebook iconprint print iconsquares squares iconheart heart iconheart solid heart solid icon

              Thai Inspired Creamy Coconut Shrimp Recipe


              • Author: Chef Emy

              Description

              This Thai Inspired Creamy Coconut Shrimp recipe brings bold, exotic flavors with a creamy coconut milk base, balanced with garlic, lime, and a hint of spice. Perfect for a quick weeknight dinner or a flavorful weekend treat, this easy seafood dish is sure to impress.


              Ingredients

              Scale
              • 1lb large shrimp, peeled and deveined
              • 1 tbspcoconut oil
              • 3cloves garlic, minced
              • 1-inch piece of ginger, grated
              • 1can (13.5 oz) full-fat coconut milk
              • 1 tbspred curry paste
              • 1 tbspfish sauce
              • 1 tbspbrown sugar
              • Juice of1lime
              • Salt and pepper, to taste
              • Fresh cilantro, chopped (for garnish)
              • Cooked jasmine rice (for serving)

              Instructions

                Notes

                Adjust spice level by adding more or less red curry paste.
                Can substitute shrimp with chicken or tofu for variation.
                Add veggies like bell peppers or snap peas for extra crunch.

                Nutrition

                • Calories: 360
                • Sugar: 5g

                “`

                Tasty Baked Cod In Coconut Lemon Cream Sauce Recipe

                “`html

                Tasty Baked Cod In Coconut Lemon Cream Sauce Recipe

                An Unforgettable Flavor Journey

                Weeknights often feel like a race against time, and the allure of quick, processed meals can be strong. However, what if you could achieve restaurant-quality flavor and a healthy, satisfying meal in the same amount of time it takes to order takeout? Our Tasty Baked Cod in Coconut Lemon Cream Sauce recipe is designed precisely for this. It leverages the natural tenderness of cod and pairs it with the exotic, creamy sweetness of coconut milk, brightened by the zest of fresh lemon and a hint of garlic. This dish isn’t just a meal; it’s an escape to a tropical paradise on your plate, proving that healthy eating can be a delicious adventure. Whether you’re catering to a gluten-free diet, looking for a low-carb option, or simply seeking a new signature seafood dish, this recipe delivers exceptional taste with minimal fuss.

                Gather Your Tropical Treasures

                The magic of this dish lies in its simple yet impactful ingredients. We’ve focused on fresh, wholesome components that come together harmoniously.

                Main Ingredients

                • 1.5 lbs Cod Fillets: Look for thick, center-cut pieces. Cod is a firm, white fish that bakes beautifully, remaining moist and flaky. For substitutions, halibut, haddock, or even sea bass work wonderfully, offering a similar mild flavor and delicate texture.
                • 1 tablespoon Olive Oil: Extra virgin for the best flavor. This helps to sear the fish lightly and prevent sticking. Coconut oil is a natural alternative here, enhancing the tropical theme.
                • Salt and freshly ground Black Pepper: To taste. Essential for bringing out the natural flavors of the fish.

                Sauce Ingredients

                • 1 can (13.5 oz) Full-Fat Coconut Milk: This is the creamy heart of our sauce. Use full-fat for the richest texture; light coconut milk can be used but will result in a thinner sauce.
                • 3 cloves Garlic, minced: Pungent and aromatic, garlic forms a foundational flavor layer.
                • 1/4 cup fresh Lemon Juice: The bright, zesty counterpoint to the creamy coconut. Don’t skimp on the fresh lemon; bottled juice won’t provide the same vibrant tang.
                • 1 tablespoon Lemon Zest: For an intense burst of citrus aroma and flavor.
                • 1/2 teaspoon Grated Fresh Ginger: Adds a subtle warmth and spicy note that complements the lemon and coconut.
                • Pinch of Red Pepper Flakes (optional): For a gentle kick that awakens the palate.

                Optional Garnishes

                • Fresh Parsley or Cilantro, chopped: Adds a burst of color and fresh, herbaceous notes.
                • Fresh Red Chili, thinly sliced: For those who love extra heat and visual appeal.
                • Lime wedges: For an extra squeeze of citrus at the table.

                Timing is Everything

                This recipe is a weeknight warrior, designed for speed and minimal stress. While the average baked fish recipe might take 45 minutes to an hour, we’re bringing this delightful dish to your table much faster.

                Prep Time: 10 minutes
                Cook Time: 15-20 minutes
                Total Time: 25-30 minutes

                Tasty Baked Cod in Coconut Lemon Cream Sauce
                Tender cod fillets bathed in a luscious coconut lemon cream sauce.

                Crafting Your Culinary Masterpiece

                Let’s get cooking! Follow these simple steps for a dish that’s as rewarding to make as it is to eat.

                Step 1: Preheat and Prep

                First things first, let’s get your oven ready. Preheat it to 400°F (200°C). While the oven heats up, pat your cod fillets thoroughly dry with paper towels. This is a crucial step for achieving a nice texture and preventing a watery dish. Season both sides generously with salt and freshly ground black pepper. Arrange the seasoned cod fillets in a lightly oiled baking dish or on a parchment-lined baking sheet.

                Step 2: Prepare the Coconut Lemon Cream Sauce

                In a medium saucepan, heat the olive oil (or coconut oil) over medium heat. Add the minced garlic and grated fresh ginger, and sauté for about 1 minute until fragrant. Be careful not to burn the garlic! Pour in the full-fat coconut milk, fresh lemon juice, lemon zest, and red pepper flakes (if using). Bring the mixture to a gentle simmer, whisking occasionally. Let it simmer for about 5 minutes, allowing the flavors to meld and the sauce to thicken slightly. Taste and adjust seasoning with salt and pepper as needed. The aroma should be intoxicating – creamy, citrusy, and slightly spicy!

                Step 3: Assemble for Baking

                Now, it’s time to bring it all together. Carefully spoon about half of the warm coconut lemon cream sauce over the seasoned cod fillets in the baking dish, ensuring they are evenly coated. Reserve the remaining sauce for serving.

                Step 4: Bake to Perfection

                Place the baking dish into the preheated oven. Bake for 15-20 minutes, or until the cod is opaque and flakes easily with a fork. The exact time will depend on the thickness of your fillets. You’ll know it’s done when it easily separates into sections. Avoid overcooking, which can make the fish dry.

                Step 5: Rest and Serve

                Once baked, carefully remove the dish from the oven. Let the cod rest for a minute or two. To serve, portion the flaky cod onto plates and generously spoon the remaining warm coconut lemon cream sauce over each fillet. Garnish with fresh chopped parsley or cilantro, sliced red chili, and a lime wedge, if desired, for an extra pop of color and flavor.

                Nutritional Highlights

                This recipe is a fantastic source of lean protein and healthy fats. While exact nutritional values can vary based on portion size and specific ingredients used, a typical serving (without garnishes) is approximately:

                • Calories: 350-450 kcal
                • Protein: 30-40g
                • Fat: 20-30g (primarily from coconut milk and olive oil)
                • Carbohydrates: 5-10g
                • (Note: This is an estimate and does not include any side dishes.)

                Healthier Swaps & Flavor Preservers

                We love keeping things delicious and healthy! Here are some ways to make this recipe even more health-conscious without sacrificing taste:

                • Use Light Coconut Milk: If you’re watching fat intake, this is the easiest swap. The sauce will be thinner but still flavorful.
                • Incorporate More Vegetables: Sauté finely chopped bell peppers or onions with the garlic and ginger, or add a handful of spinach to wilt into the sauce just before serving.
                • Reduce Oil: You can get away with using just 1 teaspoon of oil for sautéing aromatics if you’re very careful not to burn them.
                • Broiling Option: For a slightly different texture, you can broil the fish for the last few minutes to get a light crisp on top, but watch it closely to prevent burning.

                Perfect Pairings: What to Serve With

                To make this a complete meal, consider these serving suggestions:

                • Quinoa or Brown Rice: The fluffy grains provide a wonderful base to soak up the extra sauce.
                • Cauliflower Rice: A low-carb alternative that pairs beautifully with the tropical flavors.
                • Steamed or Roasted Asparagus: Its crisp texture and earthy flavor are a delightful contrast.
                • Simple Green Salad: A light, refreshing salad with a vinaigrette dressing balances the richness of the sauce.
                • Sautéed Greens: Like spinach or kale, wilted with a touch of garlic.

                Common Mistakes to Avoid

                Even the simplest recipes have pitfalls. Here’s how to ensure your baked cod is perfect:

                • Not Patting Fish Dry: This leads to steaming the fish instead of baking, resulting in a less appealing texture.
                • Overcooking the Cod: Cod cooks quickly! Overdoing it will make it tough and dry. Keep an eye on it and use fork-tenderness as your guide.
                • Using Bottled Lemon Juice: Fresh lemon juice and zest are essential for that vibrant, authentic citrus flavor.
                • Skipping the Full-Fat Coconut Milk: While light works for some recipes, for this creamy sauce, full-fat is key to achieving the desired richness and texture.

                Storing and Reheating Leftovers

                Leftovers of this Tasty Baked Cod in Coconut Lemon Cream Sauce can be stored in an airtight container in the refrigerator for up to 2 days. The sauce might separate slightly upon chilling, which is normal. Reheat gently on the stovetop over low heat or in the microwave, stirring occasionally, until warmed through. Be mindful that fish can become a bit drier and firmer upon reheating, so a gentle approach is best.

                Close-up of baked cod with coconut lemon cream sauce
                A vibrant and delicious finish to an easy weeknight meal.

                Frequently Asked Questions

                ***What kind of coconut milk is best for this recipe?***

                We highly recommend using **full-fat canned coconut milk**. It provides the creamiest, richest texture for the sauce. Light coconut milk can be used, but the sauce will be thinner and less decadent.

                ***Can I use other types of fish?***

                Absolutely! This sauce is versatile. Similar white fish like haddock, halibut, tilapia, or even snapper would work well. Adjust baking time based on the thickness of the fish fillets.

                ***Is this recipe gluten-free?***

                Yes, this recipe is naturally gluten-free!

                ***How can I make the sauce thicker?***

                You can simmer the sauce a bit longer than recommended (10-15 minutes) to allow more liquid to evaporate. Alternatively, you can whisk a teaspoon of cornstarch or arrowroot powder with a tablespoon of water to create a slurry, then stir it into the simmering sauce until thickened.

                ***Can I prepare the sauce ahead of time?***

                Yes, you can prepare the sauce a day in advance and store it in the refrigerator. Gently reheat it on the stovetop before spooning it over the fish for baking and serving.

                Dive into Deliciousness!

                This Tasty Baked Cod in Coconut Lemon Cream Sauce is more than just a recipe; it’s an invitation to enjoy quick, healthy, and incredibly flavorful meals. The delicate cod, bathed in a creamy, zesty sauce, offers a taste of the tropics that’s perfect for any occasion, especially busy weeknights. Don’t let dinner stress you out – embrace this easy, gluten-free delight that’s sure to become a family favorite. Give it a try and let the delightful flavors transport you!

                Print

                clock clock iconcutlery cutlery iconflag flag iconfolder folder iconinstagram instagram iconpinterest pinterest iconfacebook facebook iconprint print iconsquares squares iconheart heart iconheart solid heart solid icon

                Tasty Baked Cod In Coconut Lemon Cream Sauce Recipe


                • Author: Chef Emy

                Description

                This Tasty Baked Cod in Coconut Lemon Cream Sauce recipe combines tender, flaky cod with a rich and zesty coconut lemon cream sauce. It’s a perfect healthy dinner option packed with flavor and ready in no time. Great for weeknights, gluten-free diets, and lovers of tropical-inspired meals.


                Ingredients

                Scale
                • 4cod fillets
                • 1 tablespoonolive oil
                • Salt and pepper to taste
                • 1can (13.5 oz) coconut milk
                • 2 tablespoonslemon juice
                • 1 teaspoonlemon zest
                • 2garlic cloves, minced
                • 1 tablespoongrated ginger (optional)
                • 1 tablespooncornstarch mixed with 2 tablespoons water (slurry)
                • Fresh parsley or cilantro for garnish

                Instructions

                  Notes

                  Use fresh lemon juice for the best flavor.
                  This dish pairs well with rice, quinoa, or steamed veggies.
                  For a spicier version, add a pinch of red chili flakes to the sauce.

                  Nutrition

                  • Calories: 320
                  • Sugar: 2g

                  “`

                  Stuffed Seafood Bread Bowl Recipe

                  “`html

                  Stuffed Seafood Bread Bowl Recipe

                  Introduction: What is Stuffed Seafood Bread Bowl?

                  Did you know that on average, a hearty bread bowl meal can satisfy cravings up to 75% more effectively than a standard dish? If you’re a seafood enthusiast looking for a meal that’s both impressive and incredibly comforting, then you’ve landed in the right place! This Stuffed Seafood Bread Bowl Recipe is the ultimate indulgence, a culinary masterpiece that combines succulent shrimp, delicate crab, and a rich, creamy filling all nestled within a hollowed-out, warm bread bowl. It’s the kind of dish that makes any occasion feel special, from a cozy family dinner to a dazzling appetizer that will have your guests raving. Forget complicated preparations; this recipe is surprisingly straightforward, ready to be enjoyed in under an hour, proving that gourmet can also be wonderfully accessible. Get ready to dive into a world of flavor!

                  Ingredients: The Heart of Your Seafood Bread Bowl

                  To create this symphony of flavors, we need a few key components. Think of these as the building blocks for your delicious creation!

                  The Bread Bowl Foundation

                  • 1 large round loaf of crusty bread (sourdough or Italian works beautifully, about 10-12 inches in diameter) – This is your edible vessel, so choose one with a good, chewy crust that can hold all the creamy goodness without becoming soggy.

                  The Seafood Stars

                  • 8 oz cooked shrimp, peeled, deveined, and roughly chopped – Look for sweet, firm shrimp. If using raw shrimp, cook them until just pink and opaque, then cool before chopping. A mix of sizes adds visual appeal.
                  • 8 oz crab meat, lump or claw meat preferred, drained and picked over for shells – Fresh lump crab meat offers the best texture and sweet flavor, but good quality canned or imitation crab can be substituted in a pinch. Ensure it’s free of any shell fragments.
                  • Substitution: 8 oz of bay scallops, cooked until just opaque, can also be added or substituted for a different seafood profile.

                  The Creamy Binding Agent

                  • 4 oz cream cheese, softened – This provides a luscious, tangy base. Full-fat will yield the creamiest result.
                  • 1/2 cup mayonnaise – Use a good quality, full-flavored mayonnaise (not low-fat if you can help it!) for richness.
                  • 1/4 cup sour cream or Greek yogurt – Adds a pleasant tang and helps lighten the mixture.

                  Flavor Boosters

                  • 1/2 cup finely chopped celery – For a delightful crunch and fresh, crisp flavor.
                  • 1/4 cup finely chopped red onion – Adds a subtle bite and vibrant color. If you prefer a milder onion flavor, you can soak it in cold water for 10 minutes before chopping.
                  • 2 cloves garlic, minced – Fresh garlic is key for that aromatic punch.
                  • 1 tablespoon fresh lemon juice – Brightens all the flavors and cuts through the richness.
                  • 1 teaspoon Worcestershire sauce – Provides a deep, umami complexity.
                  • 1/2 teaspoon Old Bay Seasoning (or to taste) – The classic seafood spice blend that brings it all together.
                  • Salt and freshly ground black pepper, to taste – Season generously to enhance all the individual ingredients.

                  Optional Garnishes

                  • Fresh parsley, chopped – For a pop of green and fresh herbaceousness.
                  • Grated Parmesan cheese – For a salty, savory crust.

                  Timing: How Long Will It Take?

                  Prep Time: 20 minutes
                  Cook Time: 25-30 minutes
                  Total Time: Approximately 45-50 minutes

                  Compared to many elaborate seafood dishes which can take well over an hour, this Stuffed Seafood Bread Bowl is delightfully efficient. The prep involves minimal chopping, and the cooking is mostly hands-off baking. This makes it a fantastic option for a weeknight treat or when you need a showstopper with less fuss!

                  A whole bread bowl overflowing with a creamy seafood mixture, topped with cheese and herbs.

                  Step-by-Step Instructions: Making Your Seafood Masterpiece

                  Step 1: Preheat and Prep Your Bread

                  First things first, let’s get your oven ready! Preheat it to 375°F (190°C). Now, prepare your bread bowl. Using a serrated knife, carefully slice off the top 1.5-2 inches of the bread. Then, gently hollow out the inside of the loaf, leaving about a 1-inch thick wall. Be sure not to pierce through the crust! You can save the removed bread top for dipping or making croutons later. Place the hollowed-out bread bowl onto a baking sheet.

                  Step 2: Cook the Seafood

                  If your shrimp aren’t already cooked, this is the time to get them ready. Sauté them in a lightly oiled pan with the minced garlic for just 2-3 minutes until they turn pink and opaque. If using raw scallops, cook them similarly until just opaque. If your seafood is already cooked, you can skip this step or just briefly warm it through. Drain off any excess liquid.

                  Step 3: Build the Creamy Filling

                  In a medium bowl, combine the softened cream cheese, mayonnaise, and sour cream (or Greek yogurt). Stir until smooth and well combined. This is your creamy canvas! Next, fold in the chopped celery and red onion. Add the minced garlic (if you didn’t sauté it with the seafood), fresh lemon juice, Worcestershire sauce, and Old Bay seasoning. Stir everything together until it’s all beautifully integrated.

                  Step 4: Combine and Stuff

                  Now for the stars of the show! Gently fold the cooked shrimp and crab meat into the creamy mixture. Be careful not to overmix, as you want to keep the beautiful texture of the crab meat. Taste the filling and season with salt and freshly ground black pepper as needed. Carefully spoon this glorious seafood mixture into the hollowed-out bread bowl, distributing it evenly. Make sure to get into all the nooks and crannies!

                  Step 5: Bake to Golden Perfection

                  If you’re using them, sprinkle a little grated Parmesan cheese and fresh parsley over the top of the seafood filling. Place the baking sheet with the stuffed bread bowl into your preheated oven. Bake for 25-30 minutes, or until the filling is heated through, bubbly, and the bread is golden brown and toasted on the edges. The aroma filling your kitchen will be absolutely divine!

                  Step 6: Serve and Savor

                  Carefully remove the bread bowl from the oven. Let it sit for a few minutes to cool slightly before slicing. This helps the filling set and prevents you from burning your mouth (but who can resist?). Garnish with more fresh parsley if desired. Slice into wedges and serve warm. This is best enjoyed immediately!

                  Nutritional Information: What You’re Eating

                  While exact nutritional values can vary based on specific ingredients and portion sizes, a typical serving of this Stuffed Seafood Bread Bowl, when cut into approximately 6-8 wedges, is estimated to contain:

                  • Calories: 450-600 kcal
                  • Protein: 25-35g
                  • Fat: 25-40g
                  • Carbohydrates: 30-45g

                  Note: This is an approximation. For precise calculations, use a nutritional calculator with your specific ingredient measurements.

                  Healthier Alternatives: Indulge Wisely

                  Want to lighten up this decadent dish without sacrificing flavor? Here are a few swaps:

                  • Bread Choice: Opt for a whole wheat or whole grain boule for added fiber. You could also use smaller individual rolls for portion control.
                  • Creamy Base: Reduce the cream cheese and mayonnaise portions and increase the Greek yogurt for a tangier, lower-fat creamy base. Silken tofu blended smooth can also be a dairy-free option.
                  • Seafood Focus: Load up on more lean white fish (like cod or haddock) alongside or instead of some of the richer seafood.
                  • Veggies Galore: Bulk up the filling with finely chopped mushrooms, bell peppers, or spinach for added nutrients and volume.

                  Serving Suggestions: Elevate Your Meal

                  This Stuffed Seafood Bread Bowl is a complete meal in itself, but here are a few ideas to complement it:

                  • Side Salad: A crisp green salad with a light vinaigrette is a perfect counterpoint to the richness of the bread bowl.
                  • Steamed Vegetables: Simple steamed broccoli, asparagus, or green beans add a healthy touch.
                  • Extra Bread: Serve the scooped-out bread pieces alongside for dipping into any extra creamy filling that oozes out.
                  • Wine Pairing: A crisp white wine like Sauvignon Blanc or Pinot Grigio pairs beautifully with seafood.

                  Common Mistakes to Avoid

                  • Soggy Bottom: Ensure your bread walls are thick enough and don’t over-bake, which can make the crust tough and the inside gummy.
                  • Overcooking Seafood: Cook shrimp and scallops just until done; they will continue to cook in the oven. Overcooked seafood becomes rubbery.
                  • Under-Seasoning: Seafood can be delicate. Taste your filling before stuffing and adjust salt, pepper, and Old Bay to ensure a vibrant flavor.
                  • Tearing the Bowl: Be gentle when hollowing out the bread to avoid creating holes in the crust.

                  Storing Tips: Keeping Your Creation Fresh

                  Leftovers can be stored in an airtight container in the refrigerator for up to 2-3 days. Reheat gently in the oven at a low temperature or in a covered pan to maintain the crust’s texture. For best results, it’s ideal to consume it fresh.

                  Close-up of a slice of stuffed seafood bread bowl on a plate.

                  Frequently Asked Questions About Stuffed Seafood Bread Bowl

                  ***Does the bread get soggy?***

                  Proper preparation is key! By leaving a thick enough crust and not over-baking, the bread should remain sturdy and slightly toasted, not soggy. Using a crusty bread like sourdough also helps.

                  ***Can I make this ahead of time?***

                  Yes, you can prepare the seafood filling a day in advance. Store it separately in the refrigerator and stuff the bread bowl just before baking for the freshest result.

                  ***What other seafood can I use?***

                  Feel free to experiment! Cooked imitation crab sticks cut into pieces, small cooked lobster chunks, or even small pieces of cooked fish like cod or haddock can be delicious additions or substitutions.

                  ***Can I freeze this?***

                  It’s not recommended to freeze the assembled bread bowl, as the bread can become texturally compromised. However, you could freeze the seafood filling separately, then thaw and use it to stuff a fresh bread bowl.

                  ***What kind of bread is best?***

                  A round, crusty loaf with a dense crumb is ideal. Sourdough, Italian, or a rustic country loaf are excellent choices. Avoid very soft, airy breads.

                  Print
                  clock clock iconcutlery cutlery iconflag flag iconfolder folder iconinstagram instagram iconpinterest pinterest iconfacebook facebook iconprint print iconsquares squares iconheart heart iconheart solid heart solid icon

                  Stuffed Seafood Bread Bowl Recipe


                  • Author: Chef Emy

                  Description

                  This Stuffed Seafood Bread Bowl Recipe is the ultimate comfort food packed with shrimp, crab, and creamy goodness. Perfect for seafood lovers, this hearty and delicious dish is ideal for cozy family dinners or as a show-stopping appetizer. Ready in just under an hour, it’s easy to prepare and sure to impress!


                  Ingredients

                  Scale
                  • 1large round bread loaf (sourdough or similar)
                  • 1 tbspolive oil
                  • 1small onion, diced
                  • 2garlic cloves, minced
                  • ½lb shrimp, peeled and chopped
                  • ½lb lump crab meat
                  • ½ cupheavy cream
                  • ½ cupcream cheese, softened
                  • ½ cupshredded mozzarella cheese
                  • ¼ cupgrated Parmesan cheese
                  • 1 tbsplemon juice
                  • 1 tspOld Bay seasoning
                  • Salt and pepper to taste
                  • Fresh parsley for garnish

                  Instructions

                    Notes

                    Serve with the hollowed-out bread pieces for dipping.
                    You can substitute seafood with your choice of fish or lobster.
                    Great for parties or as a main course.

                    Nutrition

                    • Calories: 520
                    • Sugar: 3g

                    “`

                    Easy Seafood Casserole Recipe

                    “`html

                    Easy Seafood Casserole Recipe

                    Searching for a Creamy, Comforting Seafood Dish?

                    In the quest for weeknight dinner solutions that feel both special and effortless, how often do you find yourself craving a dish that’s rich, creamy, and packed with the delicious flavors of the sea? If you’re like many home cooks, the desire for a satisfying seafood meal often clashes with the reality of complex preparation. But what if I told you that a restaurant-worthy, easy seafood casserole recipe is not only possible but also surprisingly simple to achieve? This beloved dish, often a crowd-pleaser for its comforting textures and savory depth, typically features tender shrimp, succulent crab, and flaky white fish enveloped in a luscious, cheesy sauce, all baked to golden perfection. It’s the kind of meal that warms you from the inside out, perfect for a cozy family dinner or impressing guests without spending hours in the kitchen. Let’s dive into how you can create this culinary delight with ease.

                    Gather Your Ocean’s Bounty: Ingredients for the Perfect Seafood Casserole

                    The beauty of this easy seafood casserole lies in its forgiving nature and the ability to adapt to your favorite seafood. Here’s what you’ll need to bring this creamy dream to life:

                    • 1 lb Mixed Seafood: A delightful blend of uncooked shrimp (peeled and deveined), crab meat (lump or claw), and a firm white fish like cod, haddock, or tilapia, cut into bite-sized pieces. The combination offers a wonderful textural contrast and depth of flavor.

                      • Substitution: If you’re not a fan of a specific seafood, feel free to double up on another. Scallops are also a fantastic addition if you have them on hand.
                      • Sensory Note: Look for fresh, vibrant seafood. The shrimp should be firm and translucent, the crab meat should smell briny and sweet, and the fish should have a clean ocean scent.
                    • 1 tbsp Olive Oil or Butter: For sautéing the aromatics and building the flavor base.
                    • 1 medium Onion: Finely chopped. It provides a sweet foundation for the sauce.

                      • Sensory Note: A crisp, firm onion will offer a more pronounced sweetness when cooked down.
                    • 2 cloves Garlic: Minced. Essential for that pungent, savory kick.

                      • Sensory Note: Fresh garlic cloves, when crushed, release a potent aroma that promises depth.
                    • 1 can (10.5 oz) Condensed Cream of Mushroom Soup: The creamy backbone of our casserole.

                      • Substitution: Use cream of celery or cream of chicken soup if mushroom isn’t your preference. For a dairy-free option, a dairy-free cream soup base can work.
                    • 1/2 cup Milk (or Half-and-Half for extra richness): To loosen the soup and create a velvety sauce.

                      • Sensory Note: Whole milk or half-and-half will yield a richer, more decadent sauce than skim milk.
                    • 1/2 cup Shredded Cheddar Cheese (or your favorite melting cheese): For that irresistible cheesy goodness.

                      • Substitution: Monterey Jack, Gruyere, or a blend of cheeses work wonderfully.
                      • Sensory Note: Sharp cheddar provides a robust flavor, while a milder cheese like Monterey Jack offers a creamier melt.
                    • 1/4 cup Chopped Fresh Parsley: For a fresh, herbaceous finish.

                      • Substitution: Chives or dill can offer a similar bright note.
                    • Salt and Black Pepper: To taste. Seasoning is key to bringing out all the flavors.
                    • Optional Topping: Crushed crackers (like Ritz) or breadcrumbs mixed with a little melted butter for a crunchy finish.

                    Time Well Spent: Prep, Cook, and Total Time

                    One of the greatest appeals of this easy seafood casserole recipe is its efficient use of your time. While the average seafood casserole might demand an hour or more of active prep, this simplified version is designed for busy schedules.

                    Prep time: 15 minutes
                    Cook time: 25-30 minutes
                    Total time: 40-45 minutes

                    Compared to many other casseroles, this recipe significantly cuts down on prep time, making it a fantastic weeknight option. The short cook time ensures that the seafood remains tender and not overcooked, a common pitfall.

                    A bubbling seafood casserole in a baking dish.

                    Crafting Your Creamy Dream: Step-by-Step Instructions

                    Step 1: Preheat and Prepare Your Kitchen

                    Before you even think about chopping an onion, preheat your oven to 375°F (190°C). This ensures it’s at the perfect temperature when your casserole is ready to go in. While the oven heats, lightly grease a 9×13 inch baking dish. This simple step prevents any sticking and makes cleanup a breeze. If you’re using optional cracker or breadcrumb topping, now is a good time to prepare it: crush your crackers or mix breadcrumbs with melted butter in a small bowl.

                    Step 2: Build the Flavor Foundation

                    Melt the olive oil or butter in a large skillet over medium heat. Add the finely chopped onion and sauté until it becomes translucent and soft, about 5-7 minutes. You want to coax out its natural sweetness without browning it too much. Next, add the minced garlic and cook for another minute until fragrant. Be careful not to burn the garlic, as it can turn bitter.

                    Step 3: Whip Up the Creamy Sauce

                    Pour the condensed cream of mushroom soup into the skillet with the onions and garlic. Stir to combine. Gradually whisk in the milk (or half-and-half) until you have a smooth, creamy sauce. Bring the mixture to a gentle simmer, stirring constantly. This step thickens the soup base and creates a luscious consistency for your seafood. Let it simmer for about 2-3 minutes until it’s just beginning to thicken.

                    Step 4: Introduce the Stars of the Show

                    Gently fold your prepared mixed seafood (shrimp, crab, and fish) into the creamy sauce in the skillet. Stir in half of the shredded cheddar cheese and the fresh parsley. Season generously with salt and freshly ground black pepper. Remember that seafood can be delicate, so handle it with care to avoid breaking it apart too much. Cook for just 2-3 minutes, stirring gently, until the seafood is lightly opaque. You don’t want to cook it through at this stage; it will finish cooking in the oven.

                    Step 5: Bake to Golden Perfection

                    Pour the entire mixture into your prepared baking dish, spreading it evenly. If you’re using a topping, sprinkle the cracker crumbs or buttered breadcrumbs evenly over the top. Place the baking dish in the preheated oven and bake for 25-30 minutes, or until the casserole is bubbling around the edges and the topping (if used) is golden brown. The seafood should be fully cooked through at this point, tender and flaky.

                    Savor the Flavors: Nutritional Snapshot

                    While exact nutritional values can vary based on the specific types and quantities of seafood and chosen ingredients, a typical serving of this easy seafood casserole is generally rich in protein and calcium. Expect approximate values per serving (assuming 6 servings):

                    • Calories: 350-450 kcal
                    • Protein: 25-35g
                    • Fat: 20-30g
                    • Carbohydrates: 10-15g
                    • Sodium: Varies significantly based on condensed soup and added salt.

                    Disclaimer: This is an estimation. For precise nutritional information, it’s recommended to use a nutritional calculator with your exact ingredients.

                    Making it Lighter: Healthier Variations

                    Craving a lighter version without sacrificing flavor? Here are a few swaps that can reduce fat and calories:

                    • Use Low-Fat Milk: Opt for skim or 1% milk instead of whole milk or half-and-half.
                    • Lighten the Soup: Use “light” or “healthy request” versions of condensed soups.
                    • Add Vegetables: Bulk up the casserole with steamed broccoli florets, peas, or sautéed mushrooms. This adds fiber and nutrients.
                    • Whisk in Broth: Replace some of the milk with low-sodium seafood or vegetable broth for a thinner sauce and fewer calories.
                    • Lighter Topping: Skip the cracker or breadcrumb topping, or use a sprinkle of panko breadcrumbs for a lighter crunch.

                    Serve it Up: Perfect Pairings

                    This hearty casserole is a meal in itself, but it pairs beautifully with a variety of sides that complement its creamy richness:

                    • Simple Green Salad: A crisp, fresh salad with a light vinaigrette cuts through the richness of the casserole.
                    • Steamed Asparagus or Green Beans: Topped with a squeeze of lemon and a sprinkle of sea salt.
                    • Crusty Bread: Perfect for soaking up any extra sauce.
                    • Rice Pilaf: A mild, fluffy rice pilaf is a classic accompaniment.
                    • Roasted Potatoes: For a more substantial meal.

                    Common Mistakes to Avoid

                    Even with an easy recipe, a few common pitfalls can affect the outcome. Avoid these:

                    • Overcooking the Seafood: Seafood cooks very quickly. Adding it too early or cooking it too long will result in tough, rubbery textures.
                    • Not Seasoning Enough: Seafood can be delicate in flavor. Ensure you season the sauce and the final mixture adequately with salt and pepper.
                    • Using Old or Improperly Stored Soup: The condensed soup is a primary flavor and texture component. Ensure it’s fresh and hasn’t been sitting out.
                    • Too Much Liquid: Adding too much milk can make the casserole watery. Stick to the recommended amount or adjust slightly based on soup consistency.

                    Keeping it Fresh: Storing Leftovers

                    Leftovers of this delightful casserole can be stored in an airtight container in the refrigerator for up to 3 days. Reheat gently in the oven at 350°F (175°C) until heated through, or warm on the stovetop over low heat, adding a splash of milk if needed to loosen the sauce. While freezing isn’t ideal for the creamy texture, it can be done for up to 2 months by wrapping the cooled casserole tightly.

                    Close-up of a spoonful of seafood casserole.

                    Frequently Asked Questions (FAQs)

                    Can I use frozen seafood?

                    Yes, you can, but ensure it’s fully thawed and well-drained before adding it to the casserole. Patting it dry will help prevent the casserole from becoming watery.

                    What kind of white fish is best?

                    Firm white fish hold their shape well. Cod, haddock, tilapia, or even a flaky halibut are excellent choices. Avoid very oily fish like salmon, as their flavor can overpower the dish.

                    Can I make this ahead of time?

                    Yes! You can assemble the casserole (without the topping) and refrigerate it for up to 24 hours. Add the topping just before baking and you may need to add a few extra minutes to the baking time.

                    My sauce is too thick/thin, what should I do?

                    If the sauce is too thick, stir in a little more milk or broth, a tablespoon at a time, until it reaches your desired consistency. If it’s too thin, let it simmer uncovered for a few extra minutes to reduce, or stir in a small amount of melted butter mixed with a teaspoon of flour (a quick roux).

                    Can I add other vegetables?

                    Absolutely! Sautéed mushrooms, peas, corn, or steamed broccoli florets are popular additions. Cook vegetables like onions and mushrooms with the aromatics, or add pre-cooked or steamed vegetables towards the end of the sauce-making process.

                    Print

                    clock clock iconcutlery cutlery iconflag flag iconfolder folder iconinstagram instagram iconpinterest pinterest iconfacebook facebook iconprint print iconsquares squares iconheart heart iconheart solid heart solid icon

                    Easy Seafood Casserole Recipe


                    • Author: Chef Emy

                    Description

                    This easy seafood casserole recipe is a creamy, comforting dish loaded with shrimp, crab, and white fish. Perfect for seafood lovers, this simple yet delicious recipe is made with a cheesy, savory sauce and baked to golden perfection. Great for weeknight dinners or special occasions!


                    Ingredients

                    Scale
                    • ½lb shrimp (peeled and deveined)
                    • ½lb crab meat (lump or imitation)
                    • ½lb white fish fillets (like cod or tilapia), cut into chunks
                    • 1 cupcooked rice or pasta (optional)
                    • ½ cupchopped onion
                    • 2garlic cloves, minced
                    • 1can (10.5 oz) cream of mushroom soup
                    • ½ cupsour cream
                    • ½ cupmayonnaise
                    • 1 cupshredded cheddar cheese
                    • ½ tspOld Bay seasoning
                    • Salt and pepper to taste
                    • ½ cupbreadcrumbs
                    • 2 tbspmelted butter
                    • Fresh parsley for garnish (optional)

                    Instructions

                      Notes

                      You can use frozen seafood; just thaw and drain well before using.
                      Swap cream of mushroom for cream of celery or cream of shrimp for a twist.
                      Add peas or spinach for extra veggies.

                      Nutrition

                      • Calories: 420
                      • Sugar: 3g

                      “`