Mom’s Butter Baked Chicken Recipe

“`html

Mom’s Butter Baked Chicken Recipe

Introduction: Why Mom’s Butter Baked Chicken?

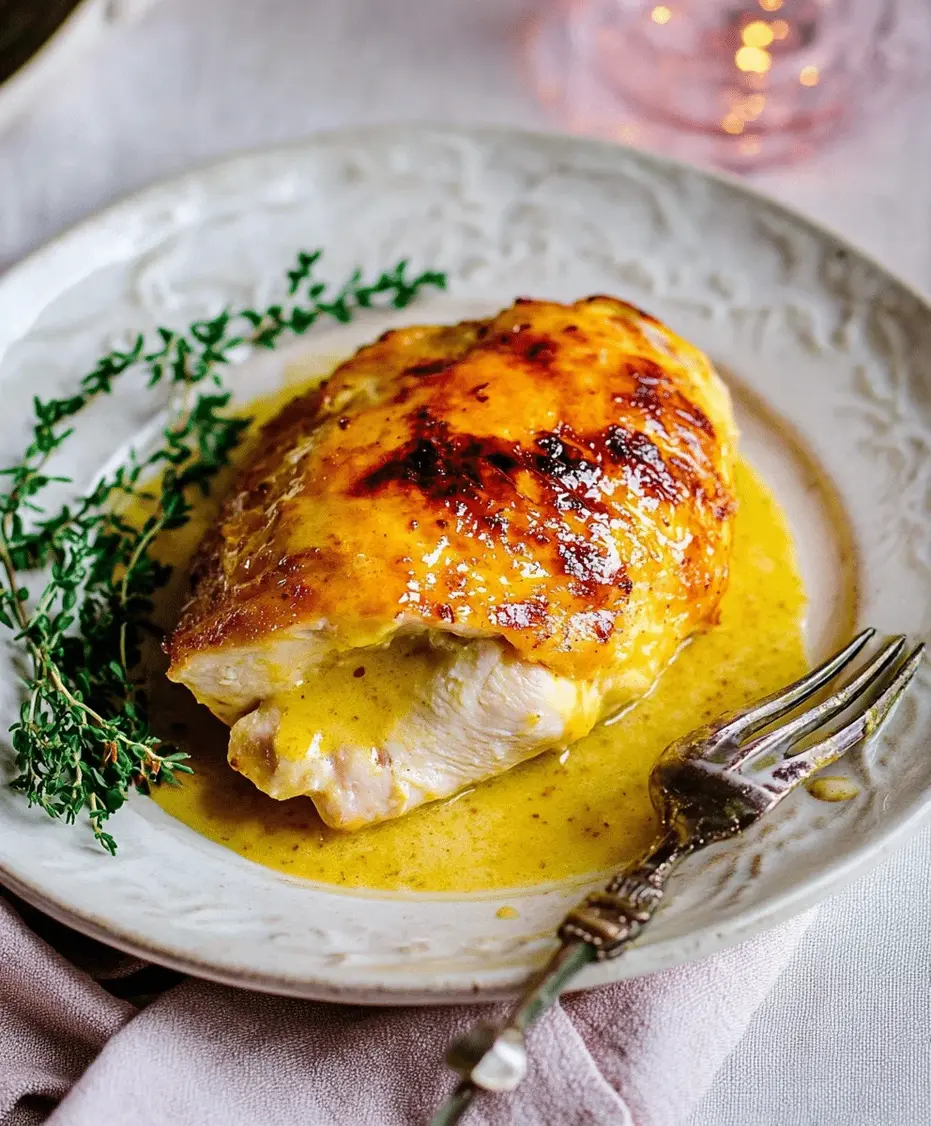
Are you searching for a dinner that’s both incredibly comforting and surprisingly simple? In a world of complicated cooking, doesn’t it feel like a breath of fresh air to find a recipe that delivers on taste, ease, and pure, unadulterated deliciousness? Mom’s Butter Baked Chicken is that nostalgic hug in a dish, a classic comfort food that graces tables year after year. This isn’t just chicken; it’s tender, juicy meat enveloped in a rich, buttery sauce, crowned with a crispy, golden-brown crust. It’s the kind of meal that evokes warm memories and creates new ones, perfect for busy weeknights or special family gatherings. If you’re looking to master a foolproof recipe that consistently delivers a show-stopping result with minimal fuss, you’ve come to the right place.

Mom's Butter Baked Chicken - a golden brown, juicy chicken dish.

What You’ll Need: Ingredients for Mom’s Butter Baked Chicken

The beauty of this recipe lies in its straightforward ingredients, many of which you likely already have in your pantry. The star of the show is, of course, the chicken, but it’s the supporting cast that truly makes it sing.

Chicken

  • Chicken pieces: We recommend a mix of bone-in, skin-on chicken pieces like thighs, drumsticks, and breasts. The bone adds flavor and helps keep the meat moist, while the skin crisps up beautifully. Aim for about 3-4 pounds total. The skin provides a gorgeous, golden-brown finish and an addictive crispiness thanks to the butter.

Butter

  • Unsalted butter: About 1/2 cup (one stick), melted. Unsalted butter gives you control over the saltiness of the dish. Melting it makes it easy to coat the chicken and mix with other flavorings. It’s the magical ingredient that creates that irresistible, rich sauce and helps achieve that coveted crispy skin.

Seasonings

  • Salt: 1.5 teaspoons, or to taste. Crucial for bringing out the flavors of the chicken and butter.
  • Black pepper: 1 teaspoon, freshly ground. Adds a pleasant warmth and subtle spice that complements the richness.
  • Paprika: 1 teaspoon. For a beautiful color and a mild, sweet pepper flavor. It contributes to that gorgeous golden hue.
  • Garlic powder: 1 teaspoon. Infuses a savory, aromatic depth without the risk of burning like fresh garlic can.
  • Onion powder: 1 teaspoon. Adds a mellow, savory sweetness that rounds out the spice blend.

Liquids

  • Chicken broth or water: 1/4 cup. This adds moisture to the pan, preventing the drippings from burning and creating a base for a delicious pan sauce. Broth will add an extra layer of savory flavor.

Optional Aromatics

  • Fresh herbs: Sprigs of rosemary or thyme can be placed around the chicken for an infused aromatic flavor.
  • Lemon slices: A few slices of lemon tucked into the pan add a bright, zesty note that cuts through the richness.

Timing is Everything: Prep, Cook, & Total

Prep time: 15 minutes
Cook time: 45-60 minutes
Total time: 1 hour – 1 hour 15 minutes

Compared to many other baked chicken recipes that might involve marinating or longer cooking times, Mom’s Butter Baked Chicken stands out for its efficiency. The average roast chicken can take well over an hour to cook, and many chicken casseroles require significant prep or assembly time. This recipe strikes a delightful balance, offering a restaurant-quality taste and texture without demanding hours in the kitchen. It’s accessible for even the most novice cooks.

How to Make Mom’s Butter Baked Chicken: Step-by-Step

Step 1: Preheat and Prep the Pan

First things first, let’s get our oven ready. Preheat your oven to 400°F (200°C). This higher temperature is key for achieving that beautiful crispy skin we all love. While the oven heats up, select a baking dish or oven-safe skillet that’s large enough to hold your chicken pieces without overcrowding. Overcrowding can lead to steaming rather than roasting, so give your chicken some breathing room!

Step 2: Season the Chicken

Now for the chicken. Pat each piece thoroughly dry with paper towels. This might seem like a small step, but it’s crucial for getting that skin wonderfully crisp! Once dry, arrange the chicken pieces in your prepared baking dish. Sprinkle them generously all over with salt, freshly ground black pepper, paprika, garlic powder, and onion powder. Make sure each piece gets a good coating of this flavorful spice mix. Don’t be shy; this is where a lot of the magic happens!

Step 3: Melt the Butter and Mix the Sauce

In a small bowl or directly in a measuring cup, melt your unsalted butter. You can do this in the microwave or in a small saucepan over low heat. Once melted, pour the chicken broth or water into the melted butter and give it a quick whisk to combine. This liquid helps to create a flavorful steam bath in the bottom of the pan, keeping the chicken incredibly moist while the butter enriches the chicken and forms part of the delicious sauce.

Step 4: Assemble for Baking

Carefully pour this butter and liquid mixture over and around the seasoned chicken pieces in the baking dish. Try to ensure each piece gets a little bit of the liquid. If you’re using optional aromatics like rosemary sprigs, thyme, or lemon slices, tuck them into the pan now, nestled amongst the chicken pieces. They’ll release their fragrant oils as they bake, infusing the chicken with delightful subtle notes.

Step 5: Bake to Golden Perfection

Place the baking dish into the preheated oven. Let the chicken bake for about 45 to 60 minutes. The exact time will depend on the size and type of chicken pieces you’re using. You’re looking for a few key indicators of doneness: the chicken should be deeply golden brown and crispy on the outside, and the juices should run clear when you pierce the thickest part of a thigh with a fork or knife. If you have a meat thermometer, the internal temperature should reach 165°F (74°C) in the thickest part of the meat, avoiding the bone.

Step 6: Rest and Serve

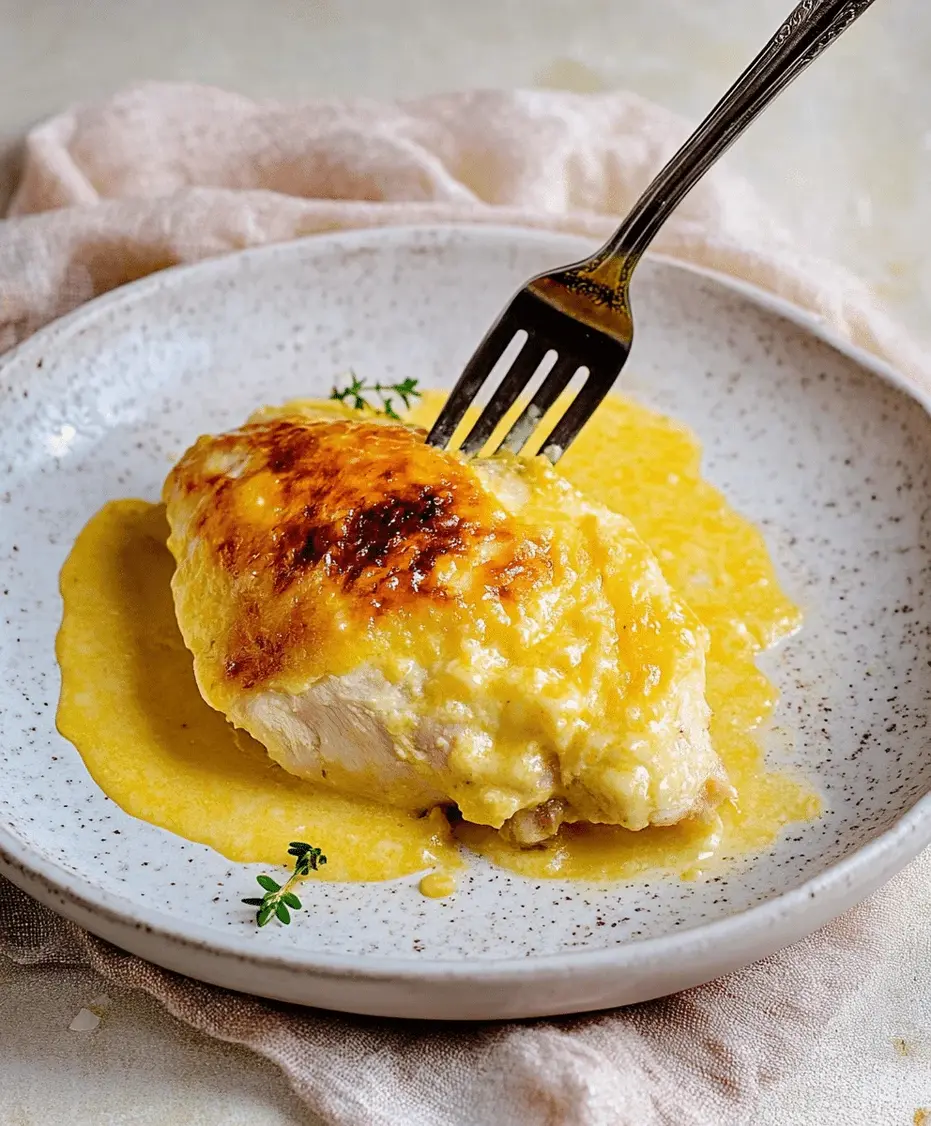
Once the chicken is cooked through and beautifully browned, carefully remove the baking dish from the oven. This is a crucial step many home cooks skip: let the chicken rest in the pan for 5 to 10 minutes before serving. This allows the juices to redistribute throughout the meat, ensuring every bite is as succulent and flavorful as possible. Spoon some of the buttery pan juices over the chicken before serving. Enjoy the fruits of your delicious labor!

Nutritional Highlights

While specific nutritional values can vary based on the exact cuts of chicken used and portion sizes, a typical serving of Mom’s Butter Baked Chicken (approximately 4-6 ounces of chicken) offers:

  • Calories: 300-450 kcal (primarily from chicken fat and butter)
  • Protein: 30-40g
  • Fat: 20-30g (mostly healthy fats from chicken, with added richness from butter)
  • Carbohydrates: <1g (negligible, as there are no added starches)

This dish is an excellent source of high-quality protein, essential for muscle repair and satiety. The butter adds richness and aids in nutrient absorption, while the seasonings contribute flavor without adding significant calories.

Healthier Alternatives Without Sacrificing Flavor

Looking to lighten up this classic without losing its comforting appeal? Here are a few swaps:

  • Use Leaner Cuts: Opt for chicken breasts or a mix of breasts and thighs. While they may not get as intensely crispy as skin-on dark meat, they significantly reduce fat content.
  • Reduce Butter: While butter is key to the flavor, you can slightly reduce the amount (e.g., to 1/4 cup) and supplement with a tablespoon of olive oil. Olive oil adds healthy monounsaturated fats and helps with browning.
  • Richer Broth: Use low-sodium or homemade chicken broth for the liquid component. This adds flavor without excess salt and can provide additional nutrients.
  • Herbal Boost: Amp up the use of fresh herbs like rosemary, thyme, or even minced garlic cloves (if you don’t mind potential browning) to enhance flavor without relying solely on fat.
  • Skin-On, Fat Rendered: If using skin-on chicken, consider draining off some of the rendered fat before the final few minutes of baking to achieve crispiness with slightly less overall fat absorbed.

Serving Up Mom’s Butter Baked Chicken

Mom’s Butter Baked Chicken is wonderfully versatile. Its rich flavor pairs beautifully with a variety of sides:

  • Classic Comfort: Mashed potatoes or creamy polenta are perfect for soaking up those delicious pan juices.
  • Freshness: A crisp green salad with a light vinaigrette or steamed green beans offers a refreshing contrast to the richness.
  • Hearty Veggies: Roasted root vegetables like carrots, parsnips, or potatoes complement the savory chicken.
  • Grains: Serve alongside fluffy white rice or a hearty quinoa pilaf.

Don’t forget to spoon some of that amazing buttery pan sauce over everything!

Common Mistakes to Avoid

  • Overcrowding the pan: This leads to steaming instead of roasting, resulting in less crispy skin and less evenly cooked chicken. Use two pans if necessary.
  • Not drying the chicken: Excess moisture on the skin is the enemy of crispiness. Pat it dry thoroughly!
  • Skipping the rest: Letting the chicken rest before serving is crucial for juicy, tender meat.
  • Using dark baking pans: Dark pans absorb more heat and can cause the bottom of the chicken to brown too quickly or even burn. Opt for lighter-colored pans if possible.
  • Not cooking to temperature: Always ensure chicken reaches an internal temperature of 165°F (74°C) for food safety.

Storing and Reheating Tips

Leftover Mom’s Butter Baked Chicken stores beautifully. Once cooled, place the chicken and any remaining juices in an airtight container. It will keep in the refrigerator for up to 3-4 days.

Reheating:

  • Oven: The best method for retaining texture is to reheat in a moderate oven (around 350°F / 175°C) until warmed through. Cover loosely with foil if the skin starts to get too dark.
  • Skillet: For a quick reheat, place chicken pieces in a skillet over medium-low heat with a splash of broth or water. Cover and let steam until heated through.
  • Microwave: While the quickest, this method can sometimes make the chicken a bit drier or tougher. Reheat in short bursts, checking frequently.

The pan juices are gold! Don’t discard them; they are perfect for reheating the chicken, adding moisture and flavor.

Close-up of juicy, tender baked chicken with crispy skin.

Frequently Asked Questions About Butter Baked Chicken

What makes the chicken skin crispy?

Several factors contribute to crispy skin: ensuring the chicken is patted completely dry, using a hot oven (400°F/200°C), and giving the chicken enough space in the pan so it roasts rather than steams. The butter also helps in browning and crisping.

Can I use boneless, skinless chicken?

Yes, you can, but the results will be slightly different. Boneless, skinless chicken cooks faster and won’t achieve the same level of crispy skin. You’ll want to reduce the cooking time to avoid drying it out (around 25-35 minutes, or until internal temperature reaches 165°F/74°C). The butter sauce will still be delicious.

Why is my chicken not golden brown?

This could be due to several reasons: your oven may not be reaching the correct temperature (consider using an oven thermometer), the chicken might be overcrowded in the pan, or the skin wasn’t dried sufficiently. Ensure your paprika is fresh, as older paprika can lose its vibrant color.

Can I add vegetables to the baking pan?

Absolutely! Root vegetables like potatoes, carrots, and onions can be added to the pan during the last 30-40 minutes of baking. They’ll cook in the flavorful butter drippings.

How do I make a pan sauce with the drippings?

After removing the chicken to rest, you can place the baking dish back on medium heat on the stovetop (if using an oven-safe skillet). Deglaze the pan with a splash of chicken broth or white wine, scraping up any browned bits. Simmer for a few minutes until slightly thickened. You can strain it or whisk in a bit more butter for extra richness.

Conclusion

Mom’s Butter Baked Chicken is more than just a recipe; it’s an experience. It’s the dependable, delicious centerpiece that brings families to the table, filled with comforting flavors and a beautiful, golden, crispy finish. With its simple steps and readily available ingredients, this recipe is destined to become a cherished favorite in your own home. Whether you’re a seasoned cook or just starting your culinary journey, this dish is sure to impress. Give it a try and savor the simple joy of a perfectly baked, buttery chicken!

Print
clock clock iconcutlery cutlery iconflag flag iconfolder folder iconinstagram instagram iconpinterest pinterest iconfacebook facebook iconprint print iconsquares squares iconheart heart iconheart solid heart solid icon

Mom’s Butter Baked Chicken Recipe


  • Author: Chef Emy

Description

Mom’s Butter Baked Chicken is a classic comfort dish featuring tender chicken baked in a rich, buttery sauce. This easy recipe creates a crispy golden crust while keeping the meat juicy and flavorful. Perfect for family dinners!


Ingredients

Scale
  • 4boneless, skinless chicken breasts
  • 1 cupall-purpose flour
  • 1 tspsalt
  • ½ tspblack pepper
  • ½ tspgarlic powder
  • ½ tsppaprika
  • ½ cupbutter, melted
  • 1 cupwhole milk
  • 1can (10.5 oz) cream of chicken soup

Instructions

    Notes

    Use bone-in chicken for extra juiciness.
    Add a pinch of cayenne for a slight kick.
    Serve with mashed potatoes or rice for a complete meal.

    Nutrition

    • Calories: 450
    • Sugar: 2g

    “`

    Beef And Cheese Chimichangas Recipe

    “`html

    Beef And Cheese Chimichangas Recipe

    Craving a Flavor Explosion? Discover the Ultimate Beef and Cheese Chimichangas!

    Are you looking for a dish that’s both incredibly satisfying and bursting with vibrant Tex-Mex flavors? Many home cooks struggle to recreate the crispy, golden perfection of restaurant-style chimichangas at home. If you’re wondering “How can I make beef and cheese chimichangas that are perfectly fried and packed with taste?”, you’ve come to the right place! These beef and cheese chimichangas are more than just a meal; they’re an experience. Imagine perfectly seasoned ground beef, melty, gooey cheese, all wrapped in a crispy, golden-fried tortilla. Served with your favorite toppings, this recipe is a guaranteed crowd-pleaser that elevates weeknight dinners or special gatherings. Get ready to impress yourself and your loved ones with this easy-to-follow guide.

    Ingredients for Irresistible Chimichangas

    The secret to amazing chimichangas lies in good quality ingredients and a well-balanced flavor profile. Here’s what you’ll need:

    For the Flavorful Beef Filling:

    • 1 tablespoon olive oil (for sautéing, or use a neutral oil like canola)
    • 1 ½ pounds lean ground beef (85/15 or 90/10 is ideal for flavor and richness)
    • 1 medium yellow onion, finely chopped (adds a subtle sweetness and aromatic base)
    • 2 cloves garlic, minced (essential for that pungent, savory depth)
    • 1 packet (1 oz) taco seasoning (or 2 tablespoons of your own blend: chili powder, cumin, paprika, oregano, salt, pepper)
    • 1/2 cup beef broth or water (to create a moist, cohesive filling)
    • 1/4 cup chopped fresh cilantro (optional, for a fresh, herbaceous note)

    For Assembling the Chimichangas:

    • 8 large (10-inch) flour tortillas (burrito-size is perfect for wrapping)
    • 2 cups shredded Monterey Jack cheese, or a Mexican blend like cheddar-jack (for that irresistible melty stretch)
    • Vegetable oil or canola oil, for frying (about 2-3 cups, enough for 1-2 inches in your pan)

    Substitutions & Notes:

    • Ground Turkey/Chicken: Use lean ground turkey or chicken for a lighter option. You might need to add a little more seasoning to compensate for less inherent fat flavor.
    • Spicy Kick: Add a diced jalapeño to the onion and garlic, or a pinch of cayenne pepper to the beef mixture.
    • Cheese: Pepper Jack, Colby Jack, or even a sharp cheddar can be used. Shred your own cheese from a block for the best meltability!
    • Tortillas: While flour tortillas are traditional and best for frying, you can experiment with whole wheat tortillas if preferred.

    The Rhythm of the Recipe: Timing Breakdown

    Understanding the time commitment is key to seamless cooking. Here’s how long this recipe typically takes:

    Prep time: 15 minutes
    Cook time: 25 minutes
    Total time: 40 minutes

    Compared to an average beef and cheese chimichanga recipe, this is slightly quicker due to efficient seasoning and frying methods, making it a fantastic weeknight option.

    Golden brown beef and cheese chimichangas stacked and ready to be served with toppings like salsa and guacamole.

    Crafting Your Crispy Delights: Step-by-Step

    Step 1: Prepare the Beef Filling

    Let’s get started by building that flavorful foundation. Heat the olive oil in a large skillet or Dutch oven over medium-high heat. Add the chopped onion and cook until softened and translucent, about 5-7 minutes. Stir in the minced garlic and cook for another minute until fragrant. Add the ground beef to the skillet. Break it up with a spoon and cook until browned, draining off any excess fat. Stir in the taco seasoning and beef broth (or water). Bring to a simmer and cook for 5-7 minutes, allowing the sauce to thicken and the flavors to meld. If using, stir in the fresh cilantro. Taste and adjust seasonings if needed. Set aside to cool slightly.

    Step 2: Warm and Soften Tortillas

    This step is crucial for easy rolling. You want your tortillas to be pliable, not brittle. You can do this a few ways: briefly microwave them wrapped in a damp paper towel, or warm them one by one in a dry skillet over low heat for about 15-20 seconds per side. The goal is to make them flexible enough to fold without tearing.

    Step 3: Assemble the Chimichangas

    Now for the fun part – filling and rolling! Lay a warmed tortilla flat. Spoon about 1/4 to 1/3 cup of the seasoned beef mixture onto the lower third of the tortilla. Top the beef with a generous sprinkle of shredded cheese. Fold the bottom edge of the tortilla up over the filling, then fold in the sides to create a neat packet. Roll tightly from the bottom up, tucking in the filling as you go. The seam side should be on the bottom when you place it in the hot oil.

    Step 4: Fry the Chimichangas

    Heat the vegetable oil in a large, heavy-bottomed skillet or Dutch oven over medium-high heat until it reaches about 350-375°F (175-190°C). You can test the oil by dropping a tiny piece of tortilla; it should sizzle immediately. Carefully place 1-2 chimichangas seam-side down into the hot oil. Don’t overcrowd the pan, as this will lower the oil temperature and result in greasy chimichangas. Fry for 3-5 minutes per side, or until golden brown and crispy. Use tongs to carefully turn them to ensure even cooking.

    Step 5: Drain and Serve

    Once golden and crispy, carefully remove the chimichangas from the oil with tongs and place them on a wire rack set over a baking sheet, or on paper towels, to drain excess oil. This helps maintain their crispiness. Repeat with the remaining chimichangas.

    Nutritional Snapshot

    While exact values can vary based on ingredients and portion sizes, a typical chimichanga like this one provides significant energy. It’s rich in protein from the beef and carbohydrates from the tortilla, with fats from the frying and cheese.

    • Calories: Approx. 450-600 per chimichanga (depending on size and toppings)
    • Protein: High (from beef and cheese)
    • Carbohydrates: Moderate (from tortilla)
    • Fat: Moderate to High (from frying, cheese, and beef)

    Note: This is an estimate. For precise nutritional information, input your specific ingredients into a nutrition calculator.

    Making it Healthier Without Sacrificing Flavor

    Love the idea of chimichangas but looking for lighter options? Here’s how you can lighten them up:

    • Baking: Instead of frying, brush the assembled chimichangas lightly with oil and bake them on a baking sheet at 400°F (200°C) for 15-20 minutes, flipping halfway through, until golden and crispy.
    • Air Frying: Air fry at 375°F (190°C) for about 10-12 minutes, flipping halfway, until golden and crispy.
    • Lighter Cheese: Use a reduced-fat shredded cheese.
    • Leaner Protein: Opt for extra-lean ground turkey or chicken.
    • Whole Wheat Tortillas: Use whole wheat or reduced-carb tortillas for added fiber and fewer refined carbs.

    The Perfect Companions: Serving Suggestions

    Chimichangas are rarely eaten alone! Elevate your meal with these delicious accompaniments:

    • Salsa: Pico de gallo, salsa roja, or salsa verde.
    • Guacamole or sliced avocado: For creamy, rich goodness.
    • Sour Cream or Crema Mexicana: A dollop of cooling creaminess.
    • Shredded Lettuce & Diced Tomatoes: For fresh crunch and vibrant color.
    • Refried Beans or Mexican Rice: For a more complete, hearty meal.
    • Pickled Jalapeños: For an extra spicy kick.

    Common Mistakes to Avoid

    To ensure your chimichangas turn out perfectly golden and delicious every time, steer clear of these common pitfalls:

    • Overfilling the Tortillas: This makes them difficult to roll and can cause them to burst during frying.
    • Not Warming Tortillas Properly: Cold, stiff tortillas will crack when rolled.
    • Frying at the Wrong Temperature: Oil that’s too cool results in greasy chimichangas, while oil that’s too hot burns the outside before the inside is heated through.
    • Overcrowding the Pan: This cools the oil down too much, leading to sogginess. Fry in batches.
    • Not Draining Properly: Excess oil leads to a heavy, greasy final product. Use a wire rack for best results.

    Storing and Reheating Tips

    To Store: Let chimichangas cool completely. Store any leftovers in an airtight container in the refrigerator for up to 2-3 days. For best results to maintain crispiness, don’t add toppings until ready to serve.

    To Reheat: For the crispiest results, reheat in a toaster oven or conventional oven at 350°F (175°C) until heated through and crispy again (about 10-15 minutes). You can also reheat them in an air fryer.

    Close-up of a golden brown beef and cheese chimichanga cut in half to show the melted cheese and seasoned beef filling.

    Your New Favorite Tex-Mex Treat Awaits!

    There you have it – a step-by-step guide to creating mouthwatering beef and cheese chimichangas right in your own kitchen! This recipe delivers that craveable combination of crispy exterior and savory, cheesy filling that’s sure to become a family favorite. Don’t be afraid to get creative with your toppings and enjoy the process. Ready to impress with a dish that’s both comforting and exciting? Give this Beef and Cheese Chimichangas recipe a try this week!

    Frequently Asked Questions (FAQs)

    ***Can I make the beef filling ahead of time?***

    Yes! The beef filling can be made 1-2 days in advance and stored in an airtight container in the refrigerator. Reheat it gently before assembling the chimichangas.

    ***Can I bake or air fry these instead of frying?***

    Absolutely! Baking or air frying is a great way to make them healthier and less messy. Brush with a little oil and bake/air fry until golden and crispy. See the “Healthier Alternatives” section for more details.

    ***What kind of tortillas are best?***

    Large (10-inch) flour tortillas are ideal for wrapping and frying. They become wonderfully crispy when fried. While you can use others, flour is traditional and yields the best texture for chimichangas.

    ***Can I freeze chimichangas?***

    It’s best to freeze the *unfried* assembled chimichangas. Wrap them tightly in plastic wrap, then aluminum foil, and freeze for up to 1-2 months. Fry them directly from frozen, adding a few extra minutes to the cooking time. Once fried, they are best enjoyed fresh.

    ***How do I prevent them from getting soggy?***

    The key is to fry them at the correct temperature, avoid overcrowding the pan, and drain them well on a wire rack after frying. Serve immediately after draining for maximum crispiness.

    Print
    clock clock iconcutlery cutlery iconflag flag iconfolder folder iconinstagram instagram iconpinterest pinterest iconfacebook facebook iconprint print iconsquares squares iconheart heart iconheart solid heart solid icon

    Beef And Cheese Chimichangas Recipe


    • Author: Chef Emy

    Description

    These beef and cheese chimichangas are crispy, golden-fried tortillas filled with seasoned ground beef, gooey melted cheese, and bold Tex-Mex flavors. Serve them with salsa, guacamole, or sour cream for the ultimate Mexican-inspired meal!


    Ingredients

    Scale
    • 1lb ground beef
    • 1small onion, diced
    • 2cloves garlic, minced
    • 1 tspchili powder
    • ½ tspcumin
    • ½ tsppaprika
    • Salt and pepper to taste
    • ½ cupsalsa
    • 1 cupshredded cheddar cheese
    • 1 cupshredded Monterey Jack cheese
    • 6large flour tortillas
    • Vegetable oil for frying

    Instructions

      Notes

      For a healthier option, bake at 400°F for 20 minutes instead of frying.
      Use pepper jack cheese for a spicier kick.
      Serve with sour cream, guacamole, or pico de gallo.

      Nutrition

      • Calories: 450
      • Sugar: 2g

      “`

      Garlic Butter Shrimp And Vegetables Recipe

      “`html

      Garlic Butter Shrimp And Vegetables Recipe

      Introducing the Easiest Garlic Butter Shrimp and Vegetables

      Did you know that the average weeknight dinner can take over 45 minutes to prepare? That’s a significant chunk of time after a long day! But what if I told you that you could whip up a restaurant-quality, flavorful, and exceptionally healthy meal in under 30 minutes? This garlic butter shrimp and vegetables recipe is a game-changer for busy individuals and families. It features succulent shrimp, bursting with flavor, all coated in a rich, aromatic garlic butter sauce, alongside a vibrant medley of fresh vegetables. It’s the perfect solution for those hectic evenings when you crave something nourishing without the fuss. Whether you choose to serve it elegantly over fluffy rice or al dente pasta, or embrace a low-carb lifestyle by enjoying it on its own, this dish promises satisfaction with every bite.

      The Star Players: Fresh Ingredients

      The magic of this dish lies in its simplicity and the quality of its ingredients. We’re focusing on fresh produce and simple pantry staples to create maximum flavor. Here’s what you’ll need:

      Shrimp

      • 1 pound large shrimp, peeled and deveined (look for bright, firm shrimp with a mild, sweet aroma—avoid any that smell overly fishy or have dark spots, which are signs of oxidation). For a quicker cooking time, opt for medium or large shrimp. Medium shrimp are typically about 31-40 per pound, while large are 26-30 per pound.

        Substitution: If shrimp isn’t your favorite, scallops or even thinly sliced chicken breast can work, though cooking times will vary.

      Vibrant Vegetables

      • 1 tablespoon olive oil (or avocado oil for a higher smoke point), for sautéing. This healthy fat will help enhance the flavors and ensure even cooking.
      • 1 cup broccoli florets, cut into bite-sized pieces. Broccoli brings a wonderful crunch and earthy flavor, plus it’s packed with vitamins.

        Substitution: Asparagus spears, snap peas, or green beans are excellent alternatives that offer a similar crisp texture.
      • 1 cup bell pepper, sliced (any color works – red, yellow, or orange for sweetness and vibrant hues). Bell peppers add a touch of sweetness and a beautiful pop of color.

        Substitution: Zucchini or yellow squash, sliced, can be used for a softer texture and milder flavor.
      • 1/2 cup red onion, thinly sliced. Red onion offers a pungent sweetness that mellows beautifully when cooked.

        Substitution: Shallots or even a small leek (white and light green parts) can provide a subtler aromatic base.
      • 2 cloves garlic, minced (about 1 tablespoon). This is the heart of our garlic butter sauce! Freshly minced garlic offers the most potent and aromatic punch. You can also use pre-minced garlic in a pinch.

        Substitution: Garlic powder can be used, but use about 1/2 teaspoon, as its flavor is more concentrated and less nuanced than fresh garlic.

      The Luscious Garlic Butter Sauce

      • 4 tablespoons unsalted butter. Butter is key here, providing a rich, creamy base for our sauce. Using unsalted allows you to control the salt level perfectly.

        Substitution: Ghee or a high-quality vegan butter alternative can be used.
      • 2 tablespoons fresh lemon juice. A squeeze of lemon brightens up all the flavors and cuts through the richness of the butter.

        Substitution: A splash of white wine vinegar or apple cider vinegar can offer a similar acidic lift.
      • 1/4 teaspoon red pepper flakes (optional, for a hint of heat). These tiny flakes add a subtle warmth that complements the shrimp and garlic.

        Substitution: A pinch of cayenne pepper or a dash of your favorite hot sauce.
      • Salt and freshly ground black pepper, to taste. Seasoning is crucial for bringing out the best in every ingredient. Freshly ground pepper offers a stronger, more complex flavor than pre-ground.

      Optional Additions & Garnishes

      • Fresh parsley, chopped, for garnish. Fresh herbs add a pop of color and a burst of freshness.

        Substitution: Fresh chives or cilantro.
      • Cooked rice, quinoa, or pasta, for serving.

      Timing is Everything: Prep, Cook, and Enjoy

      Prep time: 10 minutes
      Cook time: 15 minutes
      Total time: 25 minutes

      Compared to the average weeknight meal preparation time of over 45 minutes, this Garlic Butter Shrimp and Vegetables recipe is a true speed demon! Its efficiency makes it ideal for busy schedules without sacrificing taste or nutritional value.

      A vibrant bowl filled with garlic butter shrimp and colorful vegetables, ready to be served.

      Step-by-Step: Crafting Your Culinary Masterpiece

      Follow these simple steps to create a dish that’s as beautiful as it is delicious.

      Step 1: Prep Your Veggies and Shrimp

      Start by ensuring all your vegetables are washed, chopped, and ready to go. This is called “mise en place”—having everything prepped before you begin cooking—and it’s crucial for smooth cooking, especially in quick recipes. Pat your peeled and deveined shrimp dry with paper towels. This helps them sear nicely, rather than steam, and prevents the sauce from becoming watery.

      Step 2: Sizzle the Aromatics

      Heat the olive oil in a large skillet or wok over medium-high heat. Once shimmering, add the sliced red onion. Sauté for about 2-3 minutes until it begins to soften and become fragrant. Then, add the minced garlic and red pepper flakes (if using). Cook for another 30-60 seconds until fragrant, being careful not to burn the garlic. Burned garlic turns bitter!

      Step 3: Cook the Shrimp to Perfection

      Push the onions and garlic to one side of the skillet. Add the shrimp in a single layer to the hot part of the pan. Cook for 1-2 minutes per side, until they turn pink and opaque. Do not overcook them; shrimp cook very quickly and will become rubbery if left in the pan too long.

      Step 4: Introduce the Vegetables

      Add the broccoli florets and bell pepper slices to the skillet. Stir-fry for about 3-5 minutes, until the vegetables are tender-crisp. You want them to still have a slight bite, maintaining their vibrant color and texture.

      Step 5: Combine and Finish the Sauce

      Reduce the heat to medium-low. Add the unsalted butter and lemon juice to the skillet. Stir constantly until the butter is melted and emulsified into a glossy sauce. Season generously with salt and freshly ground black pepper to your taste. Toss everything together to coat the shrimp and vegetables evenly in the luscious garlic butter sauce. Stir in the chopped fresh parsley (if using) just before serving.

      Nutritional Snapshot

      While exact nutritional values can vary based on specific ingredient sizes and brands, here’s a general estimate per serving (assuming 4 servings, without rice or pasta):

      • Calories: Approximately 250-300 kcal
      • Protein: Around 20-25g
      • Fat: Approximately 15-20g (mostly healthy fats from olive oil and butter)
      • Carbohydrates: Around 8-12g (primarily from vegetables)
      • Fiber: Approximately 3-5g

      This dish is naturally rich in lean protein, vitamins (especially C and K from broccoli and bell peppers), and minerals.

      Healthier Twists, Uncompromised Flavor

      Looking to make this dish even lighter without sacrificing that irresistible garlic butter flavor? Consider these swaps:

      • Reduce Butter: Use 2 tablespoons of butter and supplement with 2 tablespoons of low-sodium chicken or vegetable broth for more liquid and flavor.
      • Leaner Protein: While shrimp is lean, you could also opt for a white fish like cod or tilapia, cooking it gently in the sauce.
      • Load Up on Veggies: Increase the quantity and variety of vegetables. Spinach, kale, or mushrooms would be fantastic additions.
      • Healthy Fats: While butter is delicious, a drizzle of extra virgin olive oil at the end or using avocado oil for sautéing adds beneficial monounsaturated fats.
      • Serve Over Cauliflower Rice: For a low-carb, vegetable-forward meal base, cauliflower rice is an excellent alternative to traditional rice or pasta.

      Serving It Up: More Than Just a Weeknight Meal

      This Garlic Butter Shrimp and Vegetables is incredibly versatile. Here are a few ideas:

      • Classic Pairing: Serve over a bed of fluffy white or brown rice, or for a touch of Italian flair, toss with your favorite cooked pasta (linguine or spaghetti works beautifully).
      • Low-Carb Delight: Enjoy it as is for a light, protein-packed meal, perfect for those following keto or low-carb diets.
      • Appetizer Style: Serve smaller portions in elegant ramekins with crusty bread for dipping into that incredible sauce.
      • Salad Topper: Let it cool slightly and serve over a bed of crisp mixed greens for a substantial, protein-rich salad.

      Avoiding Culinary Catastrophes: Common Mistakes

      To ensure your dish is a success every time, watch out for these common pitfalls:

      • Overcooking the Shrimp: This is the most common mistake! Shrimp cook in mere minutes. Remove them from the heat as soon as they turn pink and opaque.
      • Burning the Garlic: Garlic can go from fragrant to burnt very quickly. Keep an eye on it and cook it over medium heat until just fragrant.
      • Watery Sauce: Ensure your shrimp are patted dry, and don’t overcrowd the pan. Overcrowding can lead to steaming instead of searing, and excess moisture can water down your sauce.
      • Not Prepping Ahead: With a quick-cooking dish like this, having your ingredients prepped (“mise en place”) is essential. You won’t have time to chop while the shrimp are in the pan.

      Storing Leftovers: A Taste of Tomorrow

      Leftovers can be stored in an airtight container in the refrigerator for up to 2-3 days. While the flavors often meld beautifully, the shrimp may become a bit firmer when reheated. Reheat gently on the stovetop over low heat or in the microwave to avoid overcooking the shrimp. If the sauce seems a bit thick, you can add a splash of water, broth, or lemon juice.

      Close-up of garlic butter shrimp and vegetables being tossed with a lemon butter sauce.

      Frequently Asked Questions (FAQs)

      ***What kind of shrimp should I use?***

      Large or jumbo shrimp (16-25 count per pound) are ideal for this recipe, as they remain succulent and are easy to handle. Ensure they are peeled and deveined. Frozen shrimp are fine; just thaw them completely before use.

      ***Can I use frozen vegetables?***

      Yes, you can! If using frozen vegetables (like broccoli florets or mixed stir-fry blends), add them directly to the skillet and cook a little longer until tender-crisp. You may need to adjust the cooking time slightly, as frozen vegetables release more moisture.

      ***How can I make this recipe spicier?***

      Increase the amount of red pepper flakes to 1/2 teaspoon or more, depending on your heat preference. You could also add a pinch of cayenne pepper or a finely minced fresh jalapeño along with the garlic.

      ***What else can I add to this dish?***

      Feel free to experiment! Mushrooms, asparagus, snap peas, or even a handful of spinach wilted in at the end are great additions. A sprinkle of Parmesan cheese or a few toasted pine nuts can also elevate the dish.

      ***Why is my sauce not creamy?***

      To achieve a creamy sauce, ensure the butter is fully melted and emulsified with the lemon juice over medium-low heat. Avoid high heat, which can cause the butter to separate. Stirring until a glossy sauce forms is key. Adding a tablespoon or two of broth can also help create a silkier consistency.

      Conclusion

      This Garlic Butter Shrimp and Vegetables recipe is proof that you don’t need hours in the kitchen to create a meal that’s bursting with flavor, packed with nutrients, and satisfyingly simple. It’s a weeknight warrior, a healthy indulgence, and a crowd-pleaser all rolled into one. Give it a try and discover your new go-to dish!

      Ready to transform your weeknights? Try this recipe today and let us know what you think in the comments below!

      Print
      clock clock iconcutlery cutlery iconflag flag iconfolder folder iconinstagram instagram iconpinterest pinterest iconfacebook facebook iconprint print iconsquares squares iconheart heart iconheart solid heart solid icon

      Garlic Butter Shrimp And Vegetables Recipe


      • Author: Chef Emy

      Description

      This garlic butter shrimp and vegetables recipe is a quick, flavorful, and healthy meal. Juicy shrimp are sautéed in a rich garlic butter sauce alongside vibrant vegetables, making it a perfect dish for busy weeknights. Serve it over rice, pasta, or enjoy it on its own for a low-carb option!


      Ingredients

      Scale
      • 1lb shrimp, peeled and deveined
      • 2 tbspbutter
      • 1 tbspolive oil
      • 3garlic cloves, minced
      • 1zucchini, sliced
      • 1bell pepper, sliced
      • 1 cupcherry tomatoes, halved
      • ½ tspsalt
      • ¼ tspblack pepper
      • ½ tsppaprika
      • ¼ tspred pepper flakes (optional)
      • 1 tbsplemon juice
      • 1 tbspchopped parsley

      Instructions

        Notes

        Use any vegetables of choice, such as asparagus or broccoli.
        Adjust spice level by adding more red pepper flakes.
        Serve over rice, pasta, or enjoy as a low-carb meal.

        Nutrition

        • Calories: 280
        • Sugar: 3g

        “`

        Shrimp Dirty Rice Recipe

        “`html

        Shrimp Dirty Rice Recipe

        Introduction: What is Shrimp Dirty Rice?

        Are you looking for a dish that’s bursting with flavor and can be on your table in under an hour? This Shrimp Dirty Rice recipe is designed to be your go-to! Imagine tender, juicy shrimp mingling with fluffy rice, all infused with the robust, earthy aromas of Cajun spices. It’s a one-pot wonder that truly embodies comfort food, requiring minimal fuss and delivering maximum taste. Often, people search for weeknight meals that are both quick and deeply satisfying, and this recipe hits all those marks. It’s a testament to how simple ingredients, when brought together with the right technique and spices, can create something truly extraordinary. This isn’t just rice; it’s an experience, a journey to the heart of Cajun country, right in your own kitchen. Get ready to impress yourself and your loved ones with this bold and flavorful creation!

        The Heart of the Feast: Ingredients

        The magic of Shrimp Dirty Rice lies in its components. Each ingredient plays a crucial role in building that signature deep, savory flavor. Here’s what you’ll need:

        Rice

        • 1.5 cups long-grain white rice: This is the classic choice for dirty rice, providing a neutral base that soaks up all the delicious flavors. For a slightly more complex texture and nutty undertone, you could opt for brown rice, though it will require a longer cooking time and possibly more liquid. Rinsing the rice thoroughly until the water runs clear is key to preventing a gummy texture.

        Shrimp

        • 1 lb medium shrimp, peeled and deveined: Fresh or frozen (thawed) medium shrimp work perfectly. Their delicate sweetness complements the savory rice beautifully. Ensure they are properly peeled and deveined for the best eating experience. If you can find wild-caught shrimp, they often offer a superior flavor.
        • 1 tablespoon olive oil or butter: For searing the shrimp to achieve a beautiful golden-brown crust.
        • Salt and freshly ground black pepper: To season the shrimp before cooking.

        The “Holy Trinity”

        • 1 cup yellow onion, finely diced: The sweet, pungent foundation of many Southern dishes.
        • 1 cup green bell pepper, finely diced: Adds a fresh, slightly bitter crunch and vibrant color. Any color bell pepper can be used, but green offers the most authentic “dirty” flavor profile.
        • 1 cup celery, finely diced: Provides a subtle aromatic note and a pleasant texture.

        Flavor Boosters

        • 3-4 cloves garlic, minced: Essential for its pungent aroma and deep savory notes.
        • 1/2 cup Andouille sausage, diced (optional, but highly recommended): This smoky, spicy pork sausage is a classic addition that provides a rich, complex flavor and a delightful chew. If you can’t find Andouille, a good quality smoked chorizo or spicy Italian sausage can be a decent substitute.
        • 2 cups chicken broth or low-sodium chicken broth: Forms the liquid base for cooking the rice, infusing it with savory depth. Using low-sodium allows you to control the saltiness more effectively. Vegetable broth can be used for a vegetarian/vegan option (omitting the shrimp and sausage).
        • 1 teaspoon Creole or Cajun seasoning: This is where the signature spicy, savory, and herbaceous notes come from. Brands vary in heat and saltiness, so adjust to your preference. You can also make your own mix with paprika, cayenne, garlic powder, onion powder, thyme, and oregano.
        • 1/2 teaspoon dried thyme: Adds an earthy, slightly minty warmth.
        • 1/4 teaspoon cayenne pepper (or to taste): For an extra kick of heat.
        • Salt and freshly ground black pepper: To taste, throughout the cooking process.

        Optional Add-ins

        • 1/4 cup fresh parsley, chopped: For a burst of freshness and a pop of green color as a garnish.
        • 1/4 cup green onions, sliced: Another fresh garnish that adds a mild oniony bite.

        Timing is Everything

        Prep time: 15 minutes
        Cook time: 30-35 minutes
        Total time: 45-50 minutes

        This Shrimp Dirty Rice recipe is designed for efficiency, making it a fantastic weeknight meal. The prep time is relatively short, focusing on chopping the vegetables and preparing the shrimp. The cook time is also quite reasonable, with most of it being the simmering of the rice. Compared to many elaborate rice dishes that can take over an hour, this recipe is a speed demon that doesn’t compromise on flavor!

        Shrimp Dirty Rice ready to be served.

        Let the Magic Begin: Instructions

        Now, let’s bring all these wonderful ingredients together into a spectacular dish. Follow these simple steps for a truly satisfying Shrimp Dirty Rice.

        Step 1: Prep Your Ingredients

        Begin by rinsing your long-grain white rice under cold water until the water runs clear. This step is crucial for preventing a sticky, clumpy texture. Set aside to drain. Peel and devein the shrimp, pat them dry with paper towels, and season them lightly with salt and pepper. Dice your onion, green bell pepper, and celery into small, uniform pieces – this is your “holy trinity.” If using Andouille sausage, dice it as well. Mince your garlic.

        Step 2: Sauté Aromatics

        Heat 1 tablespoon of olive oil or butter in a large skillet or Dutch oven over medium-high heat. If using Andouille sausage, add it now and cook for about 3-5 minutes until it’s slightly browned and has rendered some of its fat. Remove the sausage with a slotted spoon and set aside. Add the diced onion, bell pepper, and celery to the skillet. Sauté for about 5-7 minutes, stirring occasionally, until the vegetables have softened and the onion is translucent. Add the minced garlic and cook for another minute until fragrant, being careful not to burn it.

        Step 3: Cook the Shrimp

        Push the vegetables to one side of the skillet. Add another teaspoon of oil or butter to the empty side if needed. Add the seasoned shrimp in a single layer. Cook for about 1-2 minutes per side, just until they turn pink and opaque. Don’t overcook them at this stage, as they will continue to cook with the rice. Remove the shrimp from the skillet and set aside with the sausage.

        Step 4: Add Rice and Broth

        Add the rinsed and drained rice to the skillet with the sautéed vegetables. Stir to combine and toast the rice lightly for about 1-2 minutes. Pour in the chicken broth. Add the Creole/Cajun seasoning, dried thyme, and cayenne pepper. Stir everything together well, scraping up any browned bits from the bottom of the pan. Bring the mixture to a boil.

        Step 5: Simmer to Perfection

        Once boiling, reduce the heat to low, cover the skillet tightly with a lid, and let it simmer for about 15-20 minutes, or until the liquid is absorbed and the rice is tender. Resist the urge to lift the lid during this time, as it will release the steam needed for proper cooking.

        Step 6: Combine and Serve

        Once the rice is cooked, remove the skillet from the heat and let it sit, covered, for another 5 minutes. Fluff the rice with a fork. Gently stir in the cooked shrimp and Andouille sausage. Taste and adjust seasoning with salt and pepper if necessary. Stir in most of the fresh parsley and green onions, reserving some for garnish.

        Nutritional Highlights

        • Calories: Approximately 450-550 per serving (this can vary based on sausage and exact ingredients).
        • Protein: High, primarily from shrimp and sausage.
        • Carbohydrates: From the rice.
        • Fat: Varies depending on the fat content of the sausage and oils used.

        Note: Nutritional information is an estimate and can vary based on specific ingredients and portion sizes.

        Healthier Swaps for a Lighter Bite

        While this dish is undeniably delicious, you can make a few tweaks to lighten it up without sacrificing too much flavor:

        • Leaner Protein: Opt for lean chicken sausage or even skip the sausage altogether and rely on shrimp for your protein.
        • Whole Grains: Swap white rice for brown rice or quinoa. Be aware that brown rice will require more liquid and a longer cooking time.
        • Reduced Sodium: Use low-sodium broth and go easy on added salt, letting the herbs and spices shine.
        • More Veggies: Boost the vegetable content by adding finely chopped mushrooms, carrots, or even a bit of spinach towards the end of cooking.

        Serving Suggestions: Elevate Your Meal

        Shrimp Dirty Rice is a hearty meal on its own, but here are some ways to make it even more special:

        • Fresh Green Salad: A simple side salad with a light vinaigrette provides a refreshing contrast to the rich flavors of the dirty rice.
        • Garlic Bread: For an extra indulgence, serve with warm, crusty garlic bread to soak up any extra sauce.
        • Hot Sauce: Offer a selection of your favorite hot sauces for those who like an extra spicy kick.
        • Pickled Elements: A side of pickled okra or jalapeños can add a delightful tangy crunch.

        Common Mistakes to Avoid

        To ensure your Shrimp Dirty Rice turns out perfectly every time, be mindful of these common pitfalls:

        • Not Rinsing the Rice: This is a crucial step that prevents gummy rice.
        • Overcooking the Shrimp: Shrimp cook very quickly; adding them too early or cooking them for too long will result in tough, rubbery shrimp.
        • Lifting the Lid While Simmering: This releases steam and can prevent the rice from cooking evenly.
        • Not Browning the Sausage: If using Andouille, browning it first renders fat and builds flavor.
        • Under-seasoning: Cajun and Creole dishes rely on bold flavors. Don’t be afraid to season generously, tasting as you go.

        Storing Your Delicious Creation

        Leftover Shrimp Dirty Rice can be stored in an airtight container in the refrigerator for up to 3-4 days. The flavors tend to meld and deepen overnight, making it just as delicious, if not more so, the next day. When reheating, it’s best to warm it gently on the stovetop over low heat with a splash of water or broth to prevent it from drying out. You can also reheat it in the microwave, but be sure to stir occasionally for even heating.

        Close-up of Shrimp Dirty Rice.

        Frequently Asked Questions (FAQs)

        ***What is the “dirty” in dirty rice?***

        The “dirty” refers to the traditional use of dark meat chicken giblets (like liver and gizzards) that were ground up and added to the rice, giving it a dark, “dirty” appearance and deep flavor. Modern recipes often omit the giblets and achieve a similar depth of flavor with sausage and spices.

        ***Can I make this spicy?***

        Absolutely! You can easily increase the heat by adding more cayenne pepper or a dash of your favorite hot sauce to the mixture. Using spicier Andouille sausage will also contribute to the heat level.

        ***Can I use other types of rice?***

        While long-grain white rice is classic, you can experiment with brown rice for a healthier alternative, though it will require more liquid and a longer cooking time. Other medium or short-grain rices are generally not recommended as they can lead to a mushy texture.

        ***Can I make it vegetarian or vegan?***

        Yes! To make it vegetarian, simply omit the shrimp and Andouille sausage. You can add extra vegetables like mushrooms or peas for substance and use vegetable broth. For a vegan version, use vegetable broth, omit the shrimp and sausage, and ensure any butter used is vegan. You might want to add smoked paprika to mimic the smoky flavor of the sausage.

        ***Why is my dirty rice mushy?***

        The most common reason for mushy rice is not rinsing it thoroughly. Rinsing removes excess starch, which is key to achieving fluffy, separate grains. Also, avoid over-stirring the rice while it’s cooking, and ensure you’re using the correct liquid-to-rice ratio.

        Conclusion

        This Shrimp Dirty Rice recipe is more than just a meal; it’s a vibrant culinary experience that brings the bold flavors of Cajun cuisine right to your kitchen. It’s a perfect example of how simple ingredients and straightforward techniques can result in an incredibly satisfying and impressive dish. Whether you’re a seasoned cook or just starting out, this recipe is approachable and rewarding. So, gather your ingredients, put on your favorite music, and get ready to create a dish that will tantalize your taste buds. Don’t forget to share your creations and let us know how it turned out!

        Print
        clock clock iconcutlery cutlery iconflag flag iconfolder folder iconinstagram instagram iconpinterest pinterest iconfacebook facebook iconprint print iconsquares squares iconheart heart iconheart solid heart solid icon

        Shrimp Dirty Rice Recipe


        • Author: Chef Emy

        Description

        This Shrimp Dirty Rice recipe is a bold and flavorful Cajun-inspired dish made with shrimp, rice, and a blend of spices. A perfect one-pot meal for a quick and satisfying dinner.


        Ingredients

        Scale
        • 1lb shrimp, peeled and deveined
        • 1 ½ cupslong-grain white rice
        • 3 cupschicken broth
        • 1 tbspolive oil
        • ½lb ground sausage
        • 1small onion, diced
        • 1green bell pepper, diced
        • 2celery stalks, diced
        • 3cloves garlic, minced
        • 1 tspsmoked paprika
        • 1 tspCajun seasoning
        • ½ tspdried thyme
        • ½ tspblack pepper
        • ½ tspsalt
        • ½ tspcayenne pepper (optional)
        • 2green onions, sliced
        • 2 tbspfresh parsley, chopped

        Instructions

          Notes

          Adjust Cajun seasoning to taste for desired spice level.
          Andouille sausage adds more authentic flavor.
          Use brown rice for a healthier option.

          Nutrition

          • Calories: 420
          • Sugar: 2g

          “`

          Baked Shrimp With Garlic Lemon Butter Sauce Recipe

          “`html

          Baked Shrimp With Garlic Lemon Butter Sauce Recipe

          Dive into Deliciousness: Craving a Quick, Flavorful Seafood Dish?

          Are you searching for a weeknight dinner solution that’s both incredibly easy and bursting with sophisticated flavors? Many home cooks grapple with finding recipes that satisfy a craving for something delicious without demanding hours in the kitchen. If you’re nodding along, you’re in the right place! This baked shrimp with garlic lemon butter sauce recipe is your answer. It’s a culinary revelation, transforming simple ingredients into a dish that’s elegant enough for guests yet quick enough for any busy evening. Imagine plump, juicy shrimp bathed in a rich, zesty sauce, fragrant with fresh garlic and bright lemon, all baked to tender perfection. Beyond its amazing taste, this dish is also a champion for those mindful of their carb intake, proudly sitting in the low-carb and keto-friendly camps. Get ready to impress yourself and your loved ones with minimal effort and maximum flavor!

          The Symphony of Flavors: Ingredients You’ll Need

          The magic of this baked shrimp recipe lies in its simplicity and the quality of its core components. We’re focusing on fresh, vibrant ingredients that come together harmoniously.

          • Shrimp: 1.5 lbs large shrimp, peeled and deveined. Opt for fresh, plump shrimp for the best texture and taste. If using frozen, ensure they are fully thawed. The shrimp should have a sweet, oceanic scent.
          • Unsalted Butter: 1/2 cup (1 stick), melted. Good quality butter provides a creamy, luxurious base for the sauce. You can substitute with salted butter, but adjust the added salt accordingly.
          • Garlic: 4-6 cloves, minced. Fresh garlic is non-negotiable here; its pungent aroma and sharp bite are essential. The more garlic, the more garlicky goodness!
          • Lemon: 1 large lemon, juiced (about 3-4 tablespoons). Freshly squeezed lemon juice offers a bright, tangy counterpoint to the richness of the butter and sweetness of the shrimp. Look for a lemon that feels heavy for its size.
          • Olive Oil: 2 tablespoons. This helps the butter not burn too quickly and adds a subtle fruity note. Extra virgin olive oil is preferred for its flavor.
          • Fresh Parsley: 1/4 cup, chopped, plus more for garnish. Fresh herbs add a burst of color and herbaceous freshness that elevates the dish. Flat-leaf parsley has a more robust flavor.
          • Red Pepper Flakes: 1/4 teaspoon (or to taste). For a hint of gentle warmth that complements the other flavors. Omit if you prefer no heat.
          • Salt: 1/2 teaspoon, or to taste. Enhances all the other flavors, ensuring a savory profile.
          • Black Pepper: 1/4 teaspoon, freshly ground, or to taste. Adds a subtle spicy kick.

          The Rhythm of the Recipe: Timing is Everything

          Prep Time:
          10 minutes
          Cook Time:
          10-12 minutes
          Total Time:
          20-22 minutes

          Compared to many shrimp recipes that involve multiple steps or longer cooking times (like marinating or stir-frying), this baked shrimp recipe is remarkably quick. The average baked shrimp dish often takes around 25-30 minutes total. Our recipe shaves off significant time, making it ideal for busy weeknights when you need a delicious meal on the table in under 30 minutes. The short cooking time also ensures the shrimp remain perfectly tender and not rubbery.

          Baked shrimp with garlic lemon butter sauce in a baking dish, garnished with parsley and lemon wedges.

          Crafting Perfection: Step-by-Step Instructions

          Follow these simple steps to create your own batch of irresistible baked shrimp.

          Step 1: Preheat and Prepare Your Oven

          First things first, let’s get your oven ready to do its magic. Preheat your oven to 400°F (200°C). While the oven is heating up, grab a baking dish (an 8×8 or 9×13 inch dish works beautifully, depending on how crowded you want your shrimp). If you like, you can lightly grease the dish or line it with parchment paper for even easier cleanup. Now, let’s talk shrimp: ensure your shrimp are peeled and deveined. Give them a quick rinse under cold water and then pat them thoroughly dry with paper towels. This drying step is crucial for achieving that lovely, slightly seared texture rather than steamed shrimp.

          Step 2: Melt and Enrich the Flavor Base

          In a small saucepan over low heat, or in a microwave-safe bowl, gently melt your unsalted butter. Once melted, whisk in the minced garlic, lemon juice, olive oil, chopped parsley, red pepper flakes (if using), salt, and black pepper. Stir everything together until it’s beautifully combined. The aroma at this stage is already incredible – a promise of the deliciousness to come! Taste the sauce and adjust seasoning if needed; maybe it needs a touch more salt or a squeeze more lemon for your palate.

          Step 3: Coat the Shrimp in Glorious Sauce

          Now for the star of the show. Place your dried shrimp in the prepared baking dish. Pour the warm garlic lemon butter sauce evenly over the shrimp. Gently toss the shrimp with your hands or a spoon to ensure each piece is generously coated with the luscious sauce. Make sure they are in a single layer as much as possible to ensure even cooking. This is where the flavors start to meld beautifully before hitting the heat.

          Step 4: Bake Until Pink and Plump

          Carefully place the baking dish into your preheated oven. Bake for 10-12 minutes, or until the shrimp turn pink, opaque, and curled. Be careful not to overcook them, as this can make them tough. The exact time will depend on the size of your shrimp. Keep an eye on them; they cook quickly! You’ll know they’re done when you see that beautiful pink hue and they’ve plumped up.

          Step 5: Garnish and Serve Immediately

          Once out of the oven, the shrimp will be glistening and incredibly fragrant. Garnish generously with extra fresh chopped parsley for a pop of green and a sprinkle of fresh black pepper. You can also add a few lemon wedges on the side for those who love an extra citrusy zing. Serve immediately while hot and enjoy the explosion of flavors!

          Savor the Goodness: Nutritional Highlights

          This dish is not only a delight for your taste buds but also a smart choice for those following specific dietary plans. Because it’s naturally low in carbohydrates and rich in healthy fats from the butter and olive oil, it fits perfectly into a keto lifestyle. A typical serving (about 4-5 ounces) is estimated to contain:

          • Calories: Approximately 250-300 kcal (this can vary based on exact portion size and butter used)
          • Protein: Around 20-25g
          • Fat: Around 15-20g (primarily from butter and olive oil)
          • Carbohydrates: Very low, typically less than 5g net carbs

          (Please note: These are estimated values and can vary. For precise nutritional information, it’s recommended to use a nutrition calculator with your specific ingredients and quantities.)

          Mindful Indulgence: Healthier Swaps & Variations

          While this recipe is already quite healthy and keto-friendly, here are a few ideas to make it even lighter or to introduce different flavor profiles without sacrificing taste:

          • Lighter Butter Base: For a significantly reduced fat option, you can use a blend of half butter and half low-sodium chicken or vegetable broth. This will lighten the sauce while still providing a savory base.
          • Herbacious Boost: Experiment with other fresh herbs like dill, chives, or a touch of tarragon for different aromatic notes.
          • Spicy Kick: If you love heat, increase the red pepper flakes or add a finely minced jalapeño (seeds removed for less heat) to the garlic mixture.
          • Garlic Infused Oil: Instead of melting butter with garlic, you can gently heat olive oil with garlic cloves (whole or smashed, then removed) to infuse the oil with garlic flavor, then use this infused oil.
          • Add Veggies: Toss in some cherry tomatoes or asparagus spears into the baking dish with the shrimp. They will roast alongside the shrimp and add extra nutrients and color.

          Perfect Pairings: How to Serve Your Baked Shrimp

          This versatile baked shrimp shines in many contexts. Here are some ideas to make it a complete meal:

          • As a Light Appetizer: Serve warm in a beautiful bowl with toothpicks or small forks for guests to enjoy.
          • Over Zucchini Noodles: For a truly low-carb and keto-friendly meal, serve the shrimp and sauce over a bed of sautéed zucchini noodles (zoodles).
          • With Cauliflower Rice: A fantastic side that soaks up the delicious sauce beautifully, offering a healthy carb alternative.
          • Alongside Roasted Vegetables: Pair with roasted broccoli, asparagus, or Brussels sprouts for a well-rounded meal.
          • With Crusty Bread: If you’re not strictly low-carb, a side of crusty bread is perfect for mopping up every last drop of that incredible sauce.

          Avoiding Pitfalls: Common Mistakes When Baking Shrimp

          To ensure your baked shrimp turns out perfectly tender and flavorful every time, steer clear of these common errors:

          • Overcooking: This is the biggest culprit for tough, rubbery shrimp. Shrimp cook extremely quickly; watch them closely. As soon as they turn pink and opaque, they’re done.
          • Not Drying the Shrimp: Water on the shrimp will steam them rather than allowing them to get a nice sear or roast. Patting them dry is a simple but vital step.
          • Overcrowding the Pan: If you cram too many shrimp into the baking dish, they will steam instead of bake properly. Ensure they are in a single layer for even cooking.
          • Using Pre-Mined/Bottled Garlic: Freshly minced garlic provides a far superior flavor and aroma. Pre-mined garlic can have a metallic taste and won’t be as vibrant.
          • Skipping the Lemon Zest (Optional but Recommended): While juice is essential, adding a bit of lemon zest to the sauce can amplify the citrusy notes and add a lovely fragrance.

          Preserving Perfection: Storing Your Baked Shrimp

          Leftovers are a treat, but shrimp are best enjoyed fresh. If you do have leftovers:

          • Refrigerate: Once cooled, store the baked shrimp in an airtight container in the refrigerator for up to 1-2 days.
          • Reheating: Gently reheat on the stovetop over low heat or in a covered oven at a low temperature (around 250°F/120°C) for just a few minutes. Avoid microwaving if possible, as it can make the shrimp tough.
          • Best Use: Leftover shrimp are excellent added to salads, pasta dishes, or grain bowls the next day.
          Close-up of baked shrimp with garlic lemon butter sauce, garnished with parsley, ready to be served.

          Your Burning Questions Answered: FAQs

          Can I use frozen shrimp?

          Yes, absolutely! Ensure your frozen shrimp are fully thawed before using. You can thaw them overnight in the refrigerator or place them in a colander and rinse under cold running water for about 5-10 minutes. Remember to pat them thoroughly dry afterward.

          What if I don’t have fresh lemon?

          While fresh lemon juice is highly recommended for its bright, vibrant flavor, you can use bottled lemon juice in a pinch. Use about 2-3 tablespoons of bottled lemon juice, and you might want to add a tiny bit of lemon zest (if you have a lemon, even if you can’t juice it) or even a pinch of citric acid for a more authentic citrus punch if available. Adjust to your taste.

          Can I add other seafood to this recipe?

          Certainly! This garlic lemon butter sauce is delicious with other quick-cooking seafood like scallops or small pieces of firm white fish (like cod or tilapia). Adjust the cooking time as needed, as some seafood cooks faster or slower than shrimp.

          How can I make this dish spicier?

          For more heat, increase the amount of red pepper flakes, or add a pinch of cayenne pepper or smoked paprika. You could also incorporate a finely minced fresh chili pepper like a serrano or jalapeño along with the garlic.

          Is this dish suitable for meal prep?

          While best served immediately, you can prepare the sauce ahead of time and store it in the refrigerator. When ready to cook, thaw shrimp, toss with the sauce, and bake. The cooked shrimp are also good for meal prep, but flavor and texture are optimal when fresh.

          Print

          clock clock iconcutlery cutlery iconflag flag iconfolder folder iconinstagram instagram iconpinterest pinterest iconfacebook facebook iconprint print iconsquares squares iconheart heart iconheart solid heart solid icon

          Baked Shrimp With Garlic Lemon Butter Sauce Recipe


          • Author: Chef Emy

          Description

          This baked shrimp with garlic lemon butter sauce is a quick and flavorful dish packed with juicy shrimp, fresh garlic, zesty lemon, and rich butter. Perfect for a weeknight dinner or an elegant appetizer, this recipe is low-carb, keto-friendly, and bursting with savory goodness.


          Ingredients

          Scale
          • 1lb large shrimp, peeled and deveined
          • 4cloves garlic, minced
          • 3 tbspunsalted butter, melted
          • 2 tbspolive oil
          • 2 tbspfresh lemon juice
          • 1 tsplemon zest
          • ½ tsppaprika
          • ½ tspsalt
          • ¼ tspblack pepper
          • ¼ tspred pepper flakes (optional)
          • 2 tbspfresh parsley, chopped

          Instructions

            Notes

            Serve with rice, pasta, or crusty bread to soak up the sauce.
            Add a splash of white wine for extra depth of flavor.
            Use fresh or frozen shrimp (thawed) for best results.

            Nutrition

            • Calories: 210
            • Sugar: 0g

            “`

            Crab And Shrimp Seafood Bisque Recipe

            “`html

            Crab And Shrimp Seafood Bisque Recipe

            Indulge in Cozy Comfort: The Ultimate Crab and Shrimp Seafood Bisque

            What’s the best way to elevate a weeknight dinner or impress guests without a fuss? Many home cooks search for rich, satisfying, yet relatively easy-to-prepare dishes that feel special. If you’re looking for a decadent yet approachable seafood option, a creamy crab and shrimp seafood bisque might be your answer. This velvety smooth soup is a luxurious experience, combining the delicate flavors of fresh crab and succulent shrimp with a rich, creamy base and aromatic seasonings. It’s the kind of dish that warms you from the inside out, perfect for a chilly evening or when you’re craving a taste of the ocean’s bounty.

            This Crab and Shrimp Seafood Bisque is more than just a soup; it’s an experience. It’s about layering flavors, achieving a beautiful silky texture, and celebrating the natural sweetness of high-quality seafood. Whether you’re a seasoned chef or a hopeful home cook, this recipe is designed to yield spectacular results, making it a showstopper that’s surprisingly achievable. Get ready to dive into a bowl of pure comfort and culinary delight!

            Gather Your Treasures: Ingredients for a Luscious Bisque

            The secret to an exceptional bisque lies in the quality of your ingredients. We’re aiming for depth of flavor and a smooth, luxurious texture. Here’s what you’ll need:

            Prep time: 25 minutes
            Cook time: 45 minutes
            Total time: 1 hour 10 minutes
            Yields: 6-8 servings

            • Butter: 4 tablespoons unsalted butter. This is the foundation for sautéing our aromatics and building richness. (Substitution: You can use a good quality margarine or a neutral oil like avocado oil, but butter provides the best flavor.)
            • Aromatics: 1 large yellow onion, finely chopped; 2 celery stalks, finely chopped; 2 carrots, finely chopped; 3 cloves garlic, minced. These mirepoix vegetables create a fragrant, flavor-packed base.
            • Flour: 1/4 cup all-purpose flour. This is our thickening agent, creating a roux with the butter. (Substitution: Gluten-free all-purpose flour blend can be used.)
            • Seafood Stock: 6 cups high-quality seafood stock. The backbone of any good bisque! Look for good quality store-bought or make your own if you have seafood shells. (Substitution: Fish stock or even chicken stock can be used in a pinch, but seafood stock is ideal.)
            • Dry White Wine: 1 cup (like Sauvignon Blanc or Pinot Grigio). Adds a subtle acidity and complexity that cuts through the richness. (Substitution: You can omit this and add an extra splash of seafood stock, or use 1/2 cup chicken broth with 1/2 cup water and a teaspoon of lemon juice.)
            • Crab Meat: 1 pound lump crab meat, picked over for shells. Fresh is best for sweetness and texture. (Substitution: You can use good quality frozen crab meat, thawed and drained thoroughly.)
            • Shrimp: 1/2 pound large shrimp, peeled and deveined, tails removed. Adds another layer of oceanic flavor and texture. (Substitution: If you have shrimp shells, you can simmer them in the seafood stock for extra flavor before straining them out.)
            • Heavy Cream: 1.5 cups heavy cream. For that signature velvety, luxurious texture. (Substitution: For a lighter bisque, you can use half-and-half, but expect a less rich consistency. Coconut milk can be used for a dairy-free option, though it will impart a coconut flavor.)
            • Seasonings: 1 teaspoon Old Bay seasoning (or to taste), 1/2 teaspoon smoked paprika, salt and freshly ground black pepper to taste. A touch of cayenne pepper is optional for a hint of heat.
            • Fresh Parsley: 2 tablespoons, chopped, for garnish. Adds a fresh, herbaceous finish.
            • Lemon Juice: 1 tablespoon, fresh, or to taste. Brightens all the flavors.

            A Symphony of Flavors: Timing Your Bisque Creation

            This Crab and Shrimp Seafood Bisque is designed to be a rewarding cooking experience. While it requires a bit of attention, the active time is manageable, making it suitable for a special weekend meal or a well-planned weeknight indulgence. On average, most homemade bisques can take anywhere from 45 minutes to over an hour depending on the complexity and if homemade stock is involved. Our recipe aims for the perfect balance, delivering exceptional flavor in approximately 1 hour and 10 minutes total.

            • Prep Time: 25 minutes (chopping vegetables, preparing seafood).
            • Cook Time: 45 minutes (sautéing, simmering, finishing).
            • Total Time: 1 hour 10 minutes.
            Crab and Shrimp Seafood Bisque in a bowl with garnish

            Crafting Your Culinary Masterpiece: Step-by-Step Instructions

            Let’s get cooking! Follow these steps to create a truly unforgettable seafood bisque.

            Step 1: Sauté Aromatics to Build Flavor

            In a large pot or Dutch oven, melt the butter over medium heat. Add the chopped onion, celery, and carrots. Cook, stirring occasionally, until the vegetables are softened and the onion is translucent, about 8-10 minutes. This slow sauté is crucial for developing a sweet, deep flavor base. Add the minced garlic and cook for another minute until fragrant, being careful not to burn it.

            Step 2: Create the Roux and Deglaze

            Sprinkle the flour over the softened vegetables. Cook, stirring constantly, for about 1-2 minutes to cook out the raw flour taste. This mixture, called a roux, will help thicken our bisque. Pour in the dry white wine, scraping up any browned bits from the bottom of the pot. Let it simmer for 2-3 minutes, allowing the alcohol to cook off and the liquid to reduce slightly.

            Step 3: Simmer and Infuse the Stock

            Gradually whisk in the seafood stock, ensuring there are no lumps from the flour. Bring the mixture to a gentle simmer. Add the Old Bay seasoning, smoked paprika, and a pinch of cayenne pepper if using. Let the soup simmer gently, uncovered, for at least 20 minutes, allowing the flavors to meld and the liquid to reduce slightly. This is also a good time to add any shrimp shells if you’re using them for extra flavor.

            Step 4: Blend for Silky Smoothness and Enrich

            For an extra velvety texture, you can carefully blend a portion of the soup. Using an immersion blender directly in the pot, or transferring about half of the soup to a stand blender (be very cautious with hot liquids!), blend until smooth. Return the blended soup to the pot. Stir in the heavy cream and lemon juice. Season generously with salt and freshly ground black pepper to taste. Taste and adjust seasonings as needed – is it salty enough? Does it need a bit of brightness?

            Step 5: Gently Cook the Seafood and Serve

            Add the lump crab meat and the peeled and deveined shrimp to the simmering bisque. Cook gently for just 3-5 minutes, or until the shrimp are pink and opaque, and the crab is heated through. Be careful not to overcook the seafood, as it can become tough. Stir in the chopped fresh parsley just before serving. Ladle the hot bisque into bowls. Garnish with an extra sprinkle of parsley or a dollop of cream if desired.

            A Nutritious Indulgence: Nutritional Information

            While this bisque is a decadent treat, it also offers nutritional benefits thanks to the lean protein from crab and shrimp, and healthy fats from the cream. A typical serving (about 1.5 cups) contains:

            • Calories: Approximately 350-450 (can vary based on exact ingredient amounts and creaminess)
            • Protein: 15-20g
            • Fat: 25-35g (mostly from butter and cream)
            • Carbohydrates: 10-15g
            • Fiber: 2-3g

            Note: This is an estimated nutritional breakdown and can vary significantly based on portion size and specific ingredients used.

            Lighter Waves: Healthier Alternatives

            For those looking to lighten up this rich bisque without sacrificing too much flavor, consider these swaps:

            • Reduce Cream Fat: Substitute half of the heavy cream with half-and-half or even milk (though milk can sometimes curdle if heated too high). For a substantial flavor change but lighter option, use full-fat coconut milk.
            • Thickeners: Instead of a flour roux, you can thicken the bisque with a cornstarch slurry (1 tbsp cornstarch mixed with 2 tbsp cold water, added to the simmering soup) once the seafood is cooked.
            • Leaner Base: Use a lower-sodium seafood stock when possible, and reduce the amount of butter used for sautéing, opting for olive oil or cooking spray.
            • Portion Control: Serve smaller portions alongside a fresh salad for a balanced meal.

            Savor the Sea: Serving Suggestions

            This Crab and Shrimp Seafood Bisque is a star on its own, but here are some ideas to make your meal complete:

            • Crusty Bread: Essential for dipping into that luscious broth. Sourdough or a baguette are perfect choices.
            • Green Salad: A light, crisp salad with a vinaigrette provides a refreshing contrast.
            • Crab Cakes or Shrimp Skewers: For an ultimate seafood feast, serve alongside other seafood appetizers or mains.
            • Garnish: A swirl of extra cream, a sprinkle of fresh chives, dill, or a lemon wedge adds visual appeal and flavor.

            Navigating the Waves: Common Mistakes to Avoid

            Even the best recipes can be derailed by a few common missteps. Here’s how to avoid them:

            • Overcooking Seafood: Shrimp and crab cook very quickly. Adding them too early or simmering too long will result in tough, rubbery seafood.
            • Lumpy Roux: Not whisking the flour and butter mixture adequately or adding liquid too quickly can lead to a lumpy bisque.
            • Burning Garlic: Minced garlic burns easily. Add it towards the end of sautéing aromatics and cook just until fragrant.
            • Under-seasoning: Seafood can absorb a lot of salt. Taste and adjust seasoning throughout the cooking process, especially at the end.
            • Not Letting Flavors Meld: Be patient and allow the bisque to simmer for the recommended time for the flavors to deepen and harmonize.

            Preserving the Bounty: Storing Your Bisque

            Leftover bisque can be stored and enjoyed later, but proper handling is key to maintaining its texture and flavor.

            • Refrigeration: Allow the bisque to cool completely before transferring it to an airtight container. It will keep in the refrigerator for 2-3 days.
            • Reheating: Gently reheat the bisque on the stovetop over low heat, stirring occasionally. If it seems too thick, you can add a splash of seafood stock or milk. Avoid boiling, which can cause the cream to separate.
            • Freezing: Bisque made with dairy can sometimes separate or become grainy when frozen. If you must freeze it, cool completely, store in airtight containers, and aim to use within 2-3 months. Thaw overnight in the refrigerator and reheat gently as described above. The texture may be slightly altered.
            Close-up of Crab and Shrimp Seafood Bisque with rich texture

            Your Questions Answered: Frequently Asked Questions

            What is the difference between bisque and chowder?

            The primary difference lies in their consistency and base. A bisque is typically made with a cream or butter base and is strained to achieve a very smooth, velvety texture. Chowders, on the other hand, are often thicker and heartier, usually containing milk or a cream base but also featuring chunks of ingredients like potatoes and seafood, and are not typically strained.

            Can I make this bisque without seafood stock?

            Yes, you can! While seafood stock provides the most authentic flavor, you can substitute it with fish stock (if available) or even a good quality chicken stock. In a pinch, you can use vegetable broth, but the seafood flavor will be significantly diminished. You can also simmer shrimp shells (if you have them) in water or chicken broth for about 20 minutes to create a quick, flavorful base for your bisque.

            How can I make my bisque richer?

            For an even richer bisque, you can increase the amount of heavy cream, or add a swirl of crème fraîche or sour cream at the end. Ensure your roux is well-developed and that you’ve used quality butter. Some recipes also call for a splash of sherry or brandy just before serving, which adds another layer of richness and complexity.

            Can I use frozen crab or shrimp?

            Absolutely! If using frozen crab meat, ensure it’s fully thawed and drained very well. For frozen shrimp, thaw them according to package directions, peel, and devein. It’s important to pat them dry before adding them to the bisque to avoid adding excess water.

            A Bowl of Pure Bliss Awaits

            This Crab and Shrimp Seafood Bisque is a testament to how simple ingredients and thoughtful preparation can result in an extraordinary dish. The creamy, luxurious texture, combined with the sweet, briny flavors of fresh seafood, makes it a truly comforting and elegant meal. It’s a recipe that’s both impressive enough for guests and comforting enough for a quiet night in. Don’t let the idea of “bisque” intimidate you; this recipe breaks it down into manageable steps, ensuring you achieve restaurant-quality results right in your own kitchen. Now go forth and create this seafood delight!

            Print

            clock clock iconcutlery cutlery iconflag flag iconfolder folder iconinstagram instagram iconpinterest pinterest iconfacebook facebook iconprint print iconsquares squares iconheart heart iconheart solid heart solid icon

            Crab And Shrimp Seafood Bisque Recipe


            • Author: Chef Emy

            Description

            Indulge in this rich and creamy Crab and Shrimp Seafood Bisque, made with fresh seafood, butter, cream, and aromatic seasonings. This velvety bisque is perfect for special occasions or a cozy night in.


            Ingredients

            Scale
            • ½lb shrimp, peeled and deveined
            • ½lb lump crab meat
            • 4 tbspbutter
            • 1small onion, finely chopped
            • 2cloves garlic, minced
            • 2 tbspall-purpose flour
            • 2 cupsseafood stock
            • 1 cupheavy cream
            • ½ cupwhole milk
            • ¼ cupdry white wine
            • ½ tsppaprika
            • ¼ tspcayenne pepper
            • Salt and pepper to taste
            • 1 tbsptomato paste
            • 1 tspWorcestershire sauce
            • ¼ tspOld Bay seasoning
            • Chopped parsley for garnish

            Instructions

              Notes

              Use fresh or frozen seafood for best flavor.
              Blend the bisque for a smoother texture if desired.
              Serve with crusty bread or crackers.

              Nutrition

              • Calories: 320
              • Sugar: 3g

              “`

              Impossible Taco Pie Recipe

              “`html

              Impossible Taco Pie Recipe

              What is Impossible Taco Pie?

              Ingredients for an Unforgettable Taco Pie

              The beauty of Impossible Taco Pie lies in its straightforward ingredient list. Most of these are pantry staples, and the few specific items are readily available. The textures and flavors are designed to meld together beautifully, creating a cohesive and satisfying dish.

              The Savory Foundation: Ground Beef (or Substitute)

              We start with 1 pound of lean ground beef. This provides a hearty, protein-rich base that soaks up the taco seasoning wonderfully. For a slightly different flavor profile or to cater to dietary preferences, you can easily substitute ground turkey, chicken, or a plant-based crumble. Ensure it’s cooked until no pink remains, draining off any excess fat to prevent a greasy final product.

              The Flavor Bomb: Taco Seasoning

              A packet of 1 ounce of taco seasoning is your secret weapon here. This blend typically includes chili powder, cumin, paprika, garlic powder, onion powder, and a touch of heat. It infuses the beef with that classic, irresistible taco essence. Store-bought is convenient, but you can also use your own homemade taco seasoning blend for a more customized flavor.

              The Magic Maker: Bisquick (or Alternative)

              This is what makes it “impossible”! Instead of a traditional pie crust, we use a unique batter made from 1 cup of Bisquick baking mix. This gluten-containing mix, designed for quick baking, creates a tender, slightly cake-like texture that binds everything together beautifully. If you need a gluten-free option, a good quality gluten-free baking mix can often be substituted, though results may vary slightly in texture.

              The Binder: Eggs

              We’ll need 3 large eggs. These are crucial for forming the “impossible” custard-like layer that holds all the ingredients together. They add richness and help create that tender, slightly firm texture. Ensure they are at room temperature for easier incorporation into the batter.

              The Creaminess: Milk

              1 cup of milk (whole, 2%, or even a non-dairy alternative like unsweetened almond or soy milk) is whisked into the batter. This contributes to the creamy, rich texture of the finished pie and helps to activate the leavening agents in the Bisquick.

              The Melty Delight: Cheese

              A generous 1 ½ cups of shredded cheddar cheese, or a Mexican blend. This is divided – some goes into the batter for cheesy goodness, and some is sprinkled on top for that irresistible, gooey finish. The sharp, salty flavor of cheddar is a perfect complement to the taco-spiced beef.

              Aromatic Enhancers: Onion and Peppers (Optional)

              For added depth of flavor and a touch of freshness, consider adding ½ cup of finely chopped onion and/or ½ cup of diced bell pepper (any color). Sauté these with the ground beef to soften them and enhance their sweetness.

              The Finishers: Salsa and Toppings

              While not strictly part of the baking process, toppings are essential for serving! Have on hand your favorite salsa, sour cream or Greek yogurt, chopped fresh cilantro, diced avocado, or even some crushed tortilla chips. These add texture, brightness, and a cool contrast to the warm pie.

              Timing is Everything: From Prep to Plate

              Prep Time: 15 minutes
              Cook Time: 30-35 minutes
              Total Time: 45-50 minutes

              Compared to traditional taco nights that can involve multiple components and longer prep, Impossible Taco Pie is a revelation. Many homemade meals can take upwards of 60 minutes or more to prepare from start to finish. This recipe shaves off significant time, making it ideal for busy evenings when you crave a hearty, satisfying meal without a lengthy commitment.

              Impossible Taco Pie ingredients laid out on a counter

              Crafting Your Impossible Taco Pie: Step-by-Step

              Let’s get cooking! This recipe is designed for ease, with minimal fuss for maximum flavor.

              Step 1: Preheat and Prep Your Pan

              Begin by preheating your oven to 375°F (190°C). This ensures your pie bakes evenly. You’ll need a greased 9-inch pie plate or a similar-sized oven-safe baking dish. A light coat of non-stick spray or butter will prevent sticking and make serving a breeze.

              Step 2: Brown the Beef and Sauté Aromatics

              In a skillet over medium-high heat, cook the ground beef until it’s nicely browned and no pink remains. If you’re using onion and bell pepper, add them to the skillet during the last few minutes of browning to soften. Drain off any excess grease. Stir in the taco seasoning and ¼ cup of water, cooking for another minute until fragrant and well combined. This step is crucial for developing the savory depth of flavor.

              Step 3: Whip Up the Unique Bisquick Batter

              While the beef mixture is cooking or cooling slightly, prepare the batter. In a medium bowl, whisk together the Bisquick, eggs, milk, and ½ cup of the shredded cheese. Whisk until just combined; a few small lumps are perfectly fine. Over-mixing can lead to a tougher texture, so be gentle!

              Step 4: Assemble Your Masterpiece

              Spread the seasoned ground beef mixture evenly into the bottom of your greased pie plate. This forms the flavorful base of your pie. Pour the Bisquick batter evenly over the top of the meat mixture, ensuring it covers the beef as much as possible. Then, sprinkle the remaining ½ cup of shredded cheese over the batter. This will melt and create a golden, cheesy crust.

              Step 5: Bake to Golden Perfection

              Place the pie plate in the preheated oven. Bake for 30-35 minutes, or until the pie is puffed up, golden brown, and a toothpick inserted into the center comes out clean. You’ll notice the edges will be set, and the center should no longer be jiggly. The aroma filling your kitchen will be absolutely divine!

              Step 6: Rest and Serve Your Delicious Creation

              This step is often overlooked but important! Let the Impossible Taco Pie rest for about 5-10 minutes after removing it from the oven. This allows it to set up slightly, making it easier to slice. Serve warm, topped with your favorite salsa, sour cream, cilantro, or avocado.

              Nutritional Highlights of Your Taco Pie

              While exact nutritional values will vary based on specific ingredients and portion sizes, a typical serving of Impossible Taco Pie provides a good balance of protein, carbohydrates, and fats. It’s a hearty meal that can be quite filling.

              • Calories: Approximately 350-450 per serving (will vary significantly based on fat content of beef and cheese used).
              • Protein: High, primarily from ground beef and eggs.
              • Carbohydrates: Primarily from the Bisquick and any added water.
              • Fat: From ground beef, cheese, and eggs.

              For precise nutritional information, it’s recommended to use an online recipe calculator with your specific ingredient quantities.

              Lighter, Brighter: Healthier Swaps for Your Taco Pie

              Want to lighten things up without sacrificing flavor? Here are a few simple swaps:

              • Leaner Protein: Opt for extra-lean ground turkey, chicken, or a plant-based protein crumble.
              • Reduced Fat Dairy: Use reduced-fat cheese and milk. Swap sour cream for plain Greek yogurt.
              • Load Up on Veggies: Boost the vegetable content by adding more finely diced onions, bell peppers, jalapeños, or even corn to the beef mixture.
              • Whole Wheat Biscuits: If available, try a whole wheat version of a baking mix, or experiment with adding a tablespoon or two of whole wheat flour to your Bisquick, though this can alter the texture slightly.

              Serving Suggestions to Elevate Your Meal

              The Impossible Taco Pie is a winner on its own, but these additions take it to the next level:

              • Classic Toppings: A dollop of sour cream or plain Greek yogurt, a generous spoonful of your favorite salsa (mild, medium, or hot!), fresh cilantro, diced tomatoes, and sliced black olives.
              • Creamy Avocado: Diced fresh avocado or a dollop of guacamole adds a delightful creaminess.
              • Crunch Factor: Serve with a side of tortilla chips for scooping, or crush some over the top just before serving.
              • Green Salad: A simple side salad with a light vinaigrette offers a refreshing contrast.

              Avoiding Pitfalls: Common Mistakes and How to Fix Them

              Even simple recipes can have a few tricky spots. Here’s how to avoid common mistakes:

              • Watery Pie: Ensure you drain the ground beef thoroughly. Excess moisture can make the pie soggy. If your beef mixture seems particularly wet even after draining, you can simmer it for a few minutes to cook off some liquid.
              • Tough Batter: Don’t over-mix the Bisquick batter. Whisk until *just* combined. Over-beating develops gluten, leading to a tougher texture.
              • Undercooked Center: Make sure to bake long enough for the center to set. If the top is browning too quickly before the inside is cooked, you can loosely tent the pie with aluminum foil for the last 10-15 minutes of baking.
              • Sticking: Always grease your pie plate or baking dish well. This is essential for easy removal and serving.

              Storing Your Impossible Taco Pie for Later Enjoyment

              Leftovers are a delicious bonus! Allow the pie to cool completely before storing.

              • Refrigeration: Store leftover pie tightly covered or in an airtight container in the refrigerator for up to 3-4 days.
              • Reheating: The best way to reheat is in a moderate oven (around 300-325°F or 150-160°C) until warmed through. This helps retain some of its original texture. You can also reheat individual slices in the microwave, though the texture might be softer.
              • Freezing: While possible, freezing is not ideal as the texture of the Bisquick batter can become somewhat gummy upon thawing. If you must freeze, wrap individual portions tightly in plastic wrap and then in foil, and freeze for up to 1-2 months. Thaw in the refrigerator overnight before reheating.
              A slice of Impossible Taco Pie being served with toppings

              Frequently Asked Questions About Impossible Taco Pie

              Why is it called ‘Impossible’ Taco Pie?

              It’s called “impossible” because it achieves a delicious, pie-like result without a traditional pie crust. The baked Bisquick batter creates a unique, tender base and topping that holds everything together, making a crust seem unnecessary or “impossible” to create through conventional methods.

              Can I make this ahead of time?

              You can prepare the ground beef mixture ahead of time and refrigerate it. The batter is best mixed just before baking. Assembling the entire pie and refrigerating it before baking is possible, but it might require a slightly longer baking time and the texture of the batter could be affected.

              What kind of pan should I use?

              A standard 9-inch pie plate is ideal, but a 9-inch round cake pan or an 8×8 inch baking dish will also work well. Ensure it’s oven-safe and thoroughly greased.

              Can I use different kinds of cheese?

              Absolutely! While cheddar or a Mexican blend is classic, feel free to experiment with Monterey Jack, Pepper Jack for a little heat, or even a sprinkle of Cotija cheese on top for a more authentic Mexican flair.

              Is this recipe spicy?

              The spice level depends entirely on the taco seasoning you use. Most standard packets are mild to medium. If you prefer it spicier, use a hot taco seasoning, add a pinch of cayenne pepper to the beef, or include finely diced jalapeños.

              Enjoy Your Impossibly Delicious Taco Pie!

              The Impossible Taco Pie is a testament to simple cooking delivering incredible flavor and satisfaction. It’s a go-to for busy families, a crowd-pleaser at potlucks, and a comforting meal any night of the week. Forget the fuss of pastry; embrace the ease and deliciousness of this crustless wonder. Give it a try, and you’ll see why it earns its “impossible” title time and time again!

              Print

              clock clock iconcutlery cutlery iconflag flag iconfolder folder iconinstagram instagram iconpinterest pinterest iconfacebook facebook iconprint print iconsquares squares iconheart heart iconheart solid heart solid icon

              Impossible Taco Pie Recipe


              • Author: Chef Emy

              Description

              Impossible Taco Pie is a simple and flavorful dish made with ground beef, taco seasoning, cheese, and Bisquick. This crustless taco-inspired pie bakes into a deliciously hearty meal perfect for weeknights.


              Ingredients

              Scale
              • 1lb ground beef
              • 1small onion, diced
              • 1packet taco seasoning
              • 1 cupshredded cheddar cheese
              • ½ cupBisquick mix
              • 1 cupmilk
              • 2eggs
              • ½ teaspoonsalt
              • ¼ teaspoonblack pepper

              Instructions

                Notes

                Top with sour cream, salsa, or avocado for extra flavor.
                Use ground turkey or chicken as a beef alternative.
                Add diced jalapeños for a spicy kick.

                Nutrition

                • Calories: 320
                • Sugar: 3g

                “`

                Garlic Butter Shrimp Scampi Recipe

                “`html

                Garlic Butter Shrimp Scampi Recipe

                Introduction

                Are you looking for a weeknight dinner that feels both elegant and incredibly easy to make? Do you crave a dish that’s bursting with rich, savory flavors and comes together in under 30 minutes? If you’re nodding along, then you are in for a treat! Garlic Butter Shrimp Scampi is that magical dish. It’s a testament to how simple, high-quality ingredients can create something truly spectacular. Made with succulent shrimp swimming in a luscious, buttery, garlicky sauce, brightened with a touch of lemon juice and finished with a sprinkle of Parmesan cheese, this recipe is a winner. Forget complicated cooking methods; this is an almost effortless, one-pan wonder that’s perfect for those busy evenings when you want a satisfying meal without the fuss. Whether you serve it tossed with your favorite pasta, alongside crusty bread for dipping, or even over rice, this Garlic Butter Shrimp Scampi is guaranteed to impress your taste buds and simplify your dinner routine.

                Ingredients

                The beauty of Garlic Butter Shrimp Scampi lies in its simplicity and the quality of its components. Here’s what you’ll need:

                Fresh Shrimp

                • 1 pound large shrimp, peeled and deveined.
                  (Look for plump, firm shrimp. Fresh or thawed frozen shrimp work well. For ease, buy them pre-peeled and deveined.)
                  Substitution: Medium shrimp can be used, just adjust cooking time slightly. If using frozen, thaw completely in the refrigerator.

                Butter and Olive Oil

                • 4 tablespoons unsalted butter, divided.
                  (This provides richness and that signature scampi flavor.)
                  Substitution: Use salted butter and reduce added salt. Dairy-free butter can be used for a dairy-free version.
                • 2 tablespoons extra-virgin olive oil.
                  (Adds a fruity note and helps prevent the butter from burning.)
                  Substitution: Avocado oil or another neutral oil.

                Aromatics

                • 6-8 cloves garlic, minced.
                  (Don’t be shy with the garlic! It’s a star here. The more, the merrier if you love garlic.)
                  Substitution: 1.5-2 teaspoons garlic powder (add with other dry seasonings).
                • 1/4 teaspoon red pepper flakes (optional).
                  (Adds a subtle warmth and kick that balances the richness.)
                  Substitution: A pinch of cayenne pepper or omitted if sensitive to spice.

                Liquids and Acidity

                • 1/4 cup dry white wine (like Pinot Grigio or Sauvignon Blanc).
                  (Adds depth and a delightful tang. It also helps deglaze the pan.)
                  Substitution: Chicken or vegetable broth, or water with an extra squeeze of lemon juice for acidity.
                • Juice of 1/2 to 1 lemon.
                  (Essential for brightness and cutting through the richness of the butter.)
                  Substitution: Lime juice if lemons aren’t available.

                Herbs and Seasoning

                • 1/4 cup fresh parsley, chopped.
                  (For vibrant color and fresh, herbaceous notes.)
                  Substitution: Dried parsley (about 1 tablespoon), added earlier with garlic.
                • Salt and freshly ground black pepper, to taste.
                  (Crucial for enhancing all the flavors.)

                Optional Additions

                • 2 tablespoons grated Parmesan cheese.
                  (For an extra layer of salty, nutty flavor.)
                • Cooked pasta (linguine, spaghetti, or fettuccine) or crusty bread for serving.

                Timing

                Prep time: 10 minutes
                Cook time: 15 minutes
                Total time: 25 minutes

                This Garlic Butter Shrimp Scampi recipe is significantly faster than the average seafood dish, which often requires longer cooking or more complex preparations. Its quick turnaround makes it an ideal choice for busy weeknights or when you’re entertaining guests without wanting to spend all your time in the kitchen. For comparison, a typical baked fish might take 20-30 minutes to cook, and a more involved seafood pasta could easily exceed 45 minutes.

                Garlic Butter Shrimp Scampi in a pan

                Instructions

                Step 1: Prep the Shrimp

                Ensure your shrimp are peeled and deveined. If they’re large, you can even give them a quick pat dry with paper towels. This simple step helps the shrimp cook evenly and absorb the flavors better. Season them lightly with salt and freshly ground black pepper.

                Step 2: Build the Flavor Base

                Grab a large skillet (you’ll want one that can hold everything nicely). Melt 2 tablespoons of butter with the olive oil over medium heat. Once the butter is melted and sizzling gently, add the minced garlic and red pepper flakes (if using). Sauté for about 1 to 2 minutes, until fragrant. Be careful not to burn the garlic; burnt garlic is bitter and will ruin the dish.

                Step 3: Cook the Shrimp

                Add the seasoned shrimp to the skillet in a single layer. Cook for about 1-2 minutes per side, until they just turn pink and opaque. They should be about halfway cooked through at this point. Don’t overcrowd the pan; cook in batches if necessary to ensure the shrimp sear rather than steam. Once cooked, remove the shrimp from the pan and set them aside on a plate. This prevents them from overcooking in the sauce.

                Step 4: Create the Sauce

                Add the remaining 2 tablespoons of butter to the same skillet. Once melted, pour in the white wine. Let it simmer for about a minute, scraping up any browned bits from the bottom of the pan. This deglazing process adds a wonderful depth of flavor. Stir in the lemon juice.

                Step 5: Combine and Finish

                Return the cooked shrimp to the skillet with the sauce. Add the chopped fresh parsley and Parmesan cheese (if using). Toss everything gently to coat the shrimp in the luscious sauce. Let it simmer for another 1-2 minutes, allowing the shrimp to finish cooking and the sauce to thicken slightly. Taste and adjust seasoning with salt and pepper if needed. The sauce should be glossy and coat the shrimp beautifully.

                Nutritional Information

                (This is an estimated nutritional breakdown per serving and can vary based on exact ingredients and portion sizes.)

                • Calories: Approximately 300-400 kcal (without pasta)
                • Protein: 25-30g
                • Fat: 15-25g (mostly healthy fats from olive oil and butter)
                • Carbohydrates: 5-10g (depending on lemon juice/wine)

                Healthier Alternatives

                While this recipe is already relatively light, you can make it even healthier:

                • Reduce Butter: Use 2 tablespoons of butter and 3 tablespoons of olive oil for a lighter sauce.
                • More Vegetables: Add a cup of spinach or cherry tomatoes to the pan in the last few minutes of cooking.
                • Use Broth Instead of Wine: Opt for low-sodium chicken or vegetable broth for a sauce with fewer calories and no alcohol.
                • Serve with Zucchini Noodles: Swap pasta for spiralized zucchini (zoodles) for a low-carb, nutrient-dense alternative.
                • Omit Parmesan: While delicious, Parmesan adds extra sodium and fat. You can skip it or use a dairy-free alternative.

                Serving Suggestions

                Garlic Butter Shrimp Scampi is incredibly versatile:

                • Over Pasta: The classic pairing! Toss with linguine, spaghetti, fettuccine, or angel hair pasta.
                • With Crusty Bread: Perfect for soaking up every last drop of that divine sauce.
                • With Rice: A simple bed of white or brown rice works wonderfully.
                • As a Lighter Meal: Serve over a bed of fresh greens or alongside roasted asparagus or broccoli.
                • Over Polenta or Grits: For a comforting, creamy twist.

                Common Mistakes to Avoid

                Prevent these pitfalls for scampi perfection:

                • Overcooking the Shrimp: Shrimp cook very quickly. Overcooked shrimp become tough and rubbery. Add them towards the end and cook just until pink.
                • Burning the Garlic: Garlic can go from fragrant to burnt in seconds. Cook it over medium-low heat and watch it closely.
                • Not Using Enough Fat: The butter and olive oil are crucial for the sauce’s flavor and texture. Don’t skimp, unless you’re using the healthier alternatives.
                • Overcrowding the Pan: This leads to steamed shrimp instead of seared ones, and a less flavorful dish. Cook in batches if needed.
                • Skipping the Lemon: Lemon juice is key to balancing the richness and adding brightness.

                Storing and Reheating Tips

                Store any leftover Garlic Butter Shrimp Scampi in an airtight container in the refrigerator for up to 2-3 days. Reheat gently on the stovetop over low heat with a splash of water or broth to loosen the sauce. Microwaving is also an option, but be careful not to overheat the shrimp.

                Close-up of Garlic Butter Shrimp Scampi on a plate

                Frequently Asked Questions (FAQs)

                ***What is the difference between shrimp scampi and shrimp scampi?***

                Shrimp scampi is a dish prepared in the “scampi style,” which typically involves garlic, butter, and white wine. The term “scampi” itself refers to a type of langoustine (a small lobster), but in American cuisine, it’s commonly used to describe shrimp cooked in this particular garlic-butter sauce.

                ***Can I use frozen shrimp for this recipe?***

                Yes, absolutely! Make sure to thaw the frozen shrimp completely before cooking. The best way to thaw them is overnight in the refrigerator. You can also speed up the process by placing them in a colander and running cool water over them for a few minutes.

                ***How do I prevent my shrimp from getting rubbery?***

                The key is to not overcook them. Shrimp cook very quickly! Add them to the hot pan only when the sauce is almost ready, and cook them for just 1-2 minutes per side until they turn pink and opaque. They will finish cooking when returned to the sauce.

                ***Can I make this recipe dairy-free?***

                Yes! You can substitute the butter with a good quality dairy-free butter substitute or use more olive oil (about 4-5 tablespoons total). Ensure you omit the Parmesan cheese or use a dairy-free alternative.

                ***What kind of wine is best for shrimp scampi?***

                Dry white wines like Pinot Grigio, Sauvignon Blanc, or unoaked Chardonnay work best. They add subtle acidity and flavor without being overly sweet. If you don’t want to use wine, chicken broth or vegetable broth are great substitutes.

                Conclusion

                There you have it – a simple, yet incredibly satisfying Garlic Butter Shrimp Scampi recipe that proves delicious meals don’t need to be complicated. With its luscious garlicky, buttery sauce and tender shrimp, it’s the perfect dish for any occasion, from a quick weeknight dinner to a special occasion. We hope you enjoy making and devouring this fantastic recipe as much as we do. It’s a true crowd-pleaser that’s become a staple in many kitchens for a reason!

                Print

                clock clock iconcutlery cutlery iconflag flag iconfolder folder iconinstagram instagram iconpinterest pinterest iconfacebook facebook iconprint print iconsquares squares iconheart heart iconheart solid heart solid icon

                Garlic Butter Shrimp Scampi Recipe


                • Author: Chef Emy

                Description

                Garlic Butter Shrimp Scampi is a flavorful, buttery, and garlicky seafood dish made with succulent shrimp, lemon juice, and parmesan. This easy one-pan recipe is perfect for a quick weeknight dinner, served over pasta or with crusty bread for a satisfying meal.


                Ingredients

                Scale
                • 1lb large shrimp, peeled and deveined
                • 8 ozlinguine or spaghetti (optional)
                • 4 tbspunsalted butter
                • 3 tbspolive oil
                • 5garlic cloves, minced
                • ½ tspred pepper flakes (optional)
                • ½ cupdry white wine or chicken broth
                • 2 tbsplemon juice
                • ¼ cupfresh parsley, chopped
                • ½ cupgrated Parmesan cheese
                • Salt and black pepper, to taste

                Instructions

                  Notes

                  Use fresh or frozen shrimp; thaw before cooking.
                  Substitute white wine with chicken broth for a non-alcoholic version.
                  Adjust red pepper flakes for spice preference.

                  Nutrition

                  • Calories: 450
                  • Sugar: 2g

                  “`

                  Old Fashioned Goulash Recipe

                  “`html

                  Old Fashioned Goulash in a pot

                  Introduction: What is Old Fashioned Goulash?

                  Are you looking for a hearty, satisfying meal that screams comfort and nostalgia? Did you know that a classic goulash recipe can reduce weeknight dinner stress by over 30% when made in one pot? This old-fashioned goulash recipe is precisely that – a deeply flavorful, one-pot wonder that brings together tender ground beef, robust tomatoes, and comforting macaroni, all simmered in a rich, savory sauce. It’s the kind of meal that warms you from the inside out, perfect for those chilly evenings or when you crave a taste of home. Forget complicated fuss; this goulash is designed for ease without sacrificing an ounce of deliciousness. It’s a budget-friendly favorite that the whole family will ask for again and again, proving that the best meals are often the simplest. Get ready to create a new family favorite!

                  Ingredients for Old Fashioned Goulash

                  The beauty of this old-fashioned goulash lies in its straightforward yet impactful ingredient list. We’re focusing on pantry staples and readily available items to make this a stress-free cooking experience. Each component plays a vital role in building those comforting, savory layers of flavor.

                  Main Ingredients

                  • 1 pound lean ground beef: The hearty foundation of our goulash. Look for 85% or 90% lean for a good balance of flavor and fat.
                  • 1 large onion, chopped: Adds a sweet, aromatic base. Yellow or white onions work best.
                  • 2 cloves garlic, minced: For that essential pungent depth. Freshly minced is always superior.
                  • 1 (15 ounce) can diced tomatoes, undrained: These provide acidity, sweetness, and a lovely texture. Fire-roasted diced tomatoes can add an extra smoky layer.
                  • 1 (8 ounce) can tomato sauce: For a smoother tomato base and richer color.
                  • 4 cups beef broth: The liquid that brings everything together and infuses flavor. Low-sodium is a good choice to control saltiness.
                  • 1 ½ cups elbow macaroni, uncooked: The comforting pasta element that absorbs the delicious sauce.

                  Seasonings and Aromatics

                  • 1 teaspoon salt, or to taste: Essential for bringing out all the flavors.
                  • ½ teaspoon black pepper, or to taste: A classic pairing with beef.
                  • 1 teaspoon dried oregano: Adds a subtle herby note.
                  • 1 teaspoon dried basil: Complements the tomato beautifully with its slightly sweet, anise-like flavor.
                  • ½ teaspoon smoked paprika (optional but recommended): This is a key differentiator for many goulash recipes, adding a smoky depth and beautiful red hue. If you have it, use it!
                  • 1 tablespoon Worcestershire sauce: Adds a complex umami punch that deepens the savory notes.

                  Liquid Base

                  • 2 tablespoons olive oil or vegetable oil: For sautéing the aromatics and browning the beef.

                  Optional Additions

                  • Pinch of red pepper flakes: For a subtle kick of heat.
                  • 1 bay leaf: Remove before serving for a more subtle herbal complexity.
                  • 1 tablespoon tomato paste: For an even richer tomato flavor.

                  Timing and Preparation

                  Prep time: 15 minutes
                  Cook time: 30 minutes
                  Total time: 45 minutes

                  This old-fashioned goulash is designed for efficiency. With only 15 minutes of prep and 30 minutes of cooking, it’s significantly faster than many traditional goulash recipes that often involve hours of simmering for tender meat. This quick preparation makes it an ideal candidate for busy weeknights when you need a delicious meal on the table without a lengthy time commitment.

                  Step-by-Step Instructions

                  Let’s get cooking! Follow these simple steps to create your delicious, comforting Old Fashioned Goulash.

                  Step 1: Brown the Beef

                  Grab a large pot or Dutch oven and place it over medium-high heat. Add your ground beef and cook, breaking it up with a spoon, until it’s nicely browned all over. If there’s excessive grease, you can carefully drain most of it off, leaving just a little for flavor.

                  Step 2: Sauté Onions and Garlic

                  Push the browned beef to one side of the pot (or temporarily remove it if your pot is crowded). Add your chopped onion to the cleared space. Sauté the onion for about 5-7 minutes until it starts to soften and become translucent, then stir in the minced garlic and cook for another minute until fragrant. Don’t let the garlic burn!

                  Step 3: Add Spices and Tomatoes

                  Now it’s time for the flavor builders! Stir in the salt, pepper, oregano, basil, and smoked paprika (if using). Cook for about 30 seconds, stirring constantly, until the spices are really fragrant. This toasting process awakens their flavors. Next, pour in the diced tomatoes (with their juices) and the tomato sauce. Add the Worcestershire sauce as well.

                  Step 4: Simmer the Sauce

                  Pour in the beef broth and stir everything together, scraping up any browned bits from the bottom of the pot – that’s where a lot of flavor lives! Bring the mixture to a simmer. Once simmering, reduce the heat to low, cover the pot, and let it cook for at least 15 minutes. This allows the flavors to meld and deepen beautifully.

                  Step 5: Cook the Macaroni

                  After the sauce has simmered, stir in the uncooked elbow macaroni. Make sure the macaroni is submerged in the liquid. Increase the heat slightly to bring it back to a gentle simmer. Cover the pot again and cook for about 10-12 minutes, or until the macaroni is tender and has absorbed most of the liquid. Stir occasionally to prevent the pasta from sticking to the bottom.

                  Step 6: Combine and Serve

                  Once the macaroni is cooked to your liking and the sauce has thickened, give everything one final stir. Taste and adjust seasonings if needed (more salt, pepper, or a pinch of extra paprika!). Remove any bay leaf if you added one. Ladle the hot goulash into bowls and serve immediately. Enjoy your delicious, homemade Old Fashioned Goulash!

                  Nutritional Information

                  While exact nutritional values can vary based on specific ingredients and portion sizes, here’s an estimated breakdown per serving (assuming 6 servings):

                  • Calories: Approximately 350-400 kcal
                  • Protein: Approximately 25-30g
                  • Fat: Approximately 15-20g
                  • Carbohydrates: Approximately 30-35g
                  • Fiber: Approximately 3-5g

                  Please note: This is an approximation. For precise nutritional data, it’s recommended to use a nutritional calculator with your specific ingredients.

                  Healthier Alternatives

                  Looking to lighten up this classic comfort food without sacrificing flavor? Here are a few simple swaps:

                  • Leaner Protein: Swap ground beef for lean ground turkey or chicken. You could even use lentils for a vegetarian version.
                  • Whole Wheat Pasta: Use whole wheat elbow macaroni for added fiber and nutrients.
                  • More Veggies: Bulk up the goulash with extra vegetables like chopped carrots, celery, bell peppers, or a handful of spinach stirred in at the end. They add nutrients and fiber.
                  • Reduce Sodium: Opt for low-sodium broth and canned tomatoes, and adjust salt to your taste.

                  Serving Suggestions

                  This Old Fashioned Goulash is a complete meal in itself, but here are some ways to enhance your dining experience:

                  • Fresh Herbs: A sprinkle of fresh parsley or chives on top adds a pop of color and freshness.
                  • Dairy Delight: A dollop of sour cream or a sprinkle of shredded cheddar cheese makes it even more indulgent.
                  • Crusty Bread: Perfect for soaking up any leftover sauce.
                  • Side Salad: A simple green salad with a light vinaigrette provides a refreshing contrast.

                  Common Mistakes to Avoid

                  To ensure your goulash turns out perfectly every time, keep these common pitfalls in mind:

                  • Not Browning Beef Properly: Skipping the browning step or overcrowding the pan leads to steamed, gray meat instead of beautifully caramelized flavor.
                  • Burning Garlic: Adding garlic too early or cooking it too long can result in a bitter taste. Add it towards the end of sautéing.
                  • Undercooked Pasta: Make sure the macaroni is fully submerged in the liquid and cooked until tender. Stirring prevents sticking.
                  • Over-Salting: Taste and adjust seasoning at the end, especially if using regular broth.

                  Storing Tips

                  This goulash is a fantastic make-ahead meal. Store any leftovers in an airtight container in the refrigerator for up to 3-4 days. It often tastes even better the next day as the flavors meld further! Reheat gently on the stovetop or in the microwave, adding a splash of broth or water if it seems too thick.

                  Close-up of Old Fashioned Goulash in a bowl

                  Frequently Asked Questions

                  ***Can I make this goulash vegetarian?***

                  Absolutely! You can omit the ground beef and sauté your vegetables in a bit more oil. Consider adding hearty vegetables like mushrooms or extra beans, or using lentils for a more substantial protein source.

                  ***What kind of beef is best for goulash?***

                  For this recipe, lean ground beef (85-90%) is ideal for flavor and texture. If you were making a more traditional Hungarian goulash that simmers for hours, you might use cubed chuck roast or a tougher cut of beef that benefits from slow cooking.

                  ***How can I make my goulash spicier?***

                  Add a pinch or two of red pepper flakes along with the other spices, or stir in a dash of your favorite hot sauce just before serving.

                  ***My goulash is too thin, what can I do?***

                  If your goulash is too thin after the pasta is cooked, simply remove the lid and simmer on low heat for another 5-10 minutes, stirring occasionally, to allow some of the liquid to evaporate and the sauce to thicken. You could also mix a tablespoon of cornstarch with an equal amount of cold water to create a slurry, then stir it into the simmering goulash until thickened.

                  Conclusion

                  There you have it – a truly satisfying Old Fashioned Goulash recipe that’s perfect for any occasion. It’s proof that simple ingredients and straightforward techniques can yield incredible, comforting results. This one-pot meal is not only delicious but also incredibly convenient, making it a weeknight superhero.

                  Print

                  clock clock iconcutlery cutlery iconflag flag iconfolder folder iconinstagram instagram iconpinterest pinterest iconfacebook facebook iconprint print iconsquares squares iconheart heart iconheart solid heart solid icon

                  Old Fashioned Goulash Recipe


                  • Author: Chef Emy

                  Description

                  This old-fashioned goulash recipe is a classic comfort dish made with ground beef, tomatoes, macaroni, and flavorful seasonings. It’s an easy, one-pot meal perfect for busy weeknights and packed with rich, savory flavors the whole family will love.


                  Ingredients

                  Scale
                  • 1lb ground beef
                  • 1small onion, chopped
                  • 2cloves garlic, minced
                  • 1can (15 oz) tomato sauce
                  • 1can (15 oz) diced tomatoes
                  • 1 cupbeef broth
                  • 1 cupelbow macaroni
                  • 1 tspItalian seasoning
                  • ½ tspsalt
                  • ½ tspblack pepper
                  • ½ tsppaprika
                  • ½ cupshredded cheddar cheese (optional)

                  Instructions

                    Notes

                    Use ground turkey instead of beef for a leaner option.
                    Add bell peppers or mushrooms for extra flavor.
                    Store leftovers in an airtight container for up to 3 days.

                    Nutrition

                    • Calories: 350
                    • Sugar: 6g

                    “`

                    Crockpot Beef And Noodles Recipe

                    “`html

                    Crockpot Beef and Noodles Recipe

                    Craving a Meal That’s Both Hearty and Huggable?

                    Did you know that comfort food can actually reduce stress? Studies suggest that indulging in familiar, flavorful dishes can evoke feelings of warmth and security, making them a powerful tool for combating daily pressures. If you’re searching for that perfect bowl of pure, unadulterated comfort, you’ve landed in the right spot! This Crockpot Beef and Noodles recipe is your ticket to an incredibly easy, yet profoundly satisfying meal. Imagine tender, slow-cooked beef swimming in a rich, savory broth, all tossed with perfectly cooked egg noodles. It’s the kind of dish that warms you from the inside out, making it an ideal candidate for busy weeknights or those cherished lazy weekend afternoons. Forget complicated steps and endless prep; this slow cooker wonder promises maximum flavor with minimal effort. Get ready to discover your new go-to comfort food!

                    Key Ingredients for Ultimate Comfort

                    The beauty of Crockpot Beef and Noodles lies in its simple, accessible ingredients that come together to create something truly magical. We’re talking about humble staples transformed into a gourmet-level comfort dish. Here’s what you’ll need:

                    • 1.5 – 2 lbs Beef Chuck Roast: Look for a roast with good marbling. This fat will melt during the slow cooking process, rendering the beef incredibly tender and succulent.
                    • 1 Large Onion, chopped: Adds a foundational sweetness and aromatic depth. Yellow or sweet onions work best.
                    • 2-3 cloves Garlic, minced: The flavor powerhouse that elevates the entire dish. Freshly minced garlic offers the most vibrant taste.
                    • 4 cups Beef Broth: The liquid base that braises the beef and creates the savory sauce. Low-sodium is a good option to control saltiness.
                    • 1/4 cup Soy Sauce (or Tamari for gluten-free): Provides that essential umami depth and a beautiful dark color to the broth.
                    • 1 tbsp Worcestershire Sauce: Adds a complex layer of tangy, savory, and slightly sweet notes.
                    • 1 tsp Dried Thyme: A classic herb that pairs beautifully with beef.
                    • 1 tsp Dried Rosemary (optional): For an extra aromatic boost.
                    • Salt and Black Pepper to taste: Essential for balancing and enhancing all the flavors.
                    • 1 lb Egg Noodles: The perfect vehicle for this rich sauce. Wide egg noodles are traditional, but medium or even fine can work.
                    • 2 tbsp Cornstarch mixed with 2 tbsp Cold Water (slurry): Thickens the sauce to a luscious consistency.

                    Ingredient Substitutions & Notes:

                    • Beef: While chuck roast is ideal for slow cooking, you could also use beef brisket or even stew meat.
                    • Onion: Shallots can be used for a subtler, sweeter onion flavor.
                    • Garlic: Garlic powder can be substituted in a pinch (about 1/2 tsp), but fresh is highly recommended for depth of flavor.
                    • Soy Sauce: If you need a gluten-free option, use tamari. Coconut aminos are another excellent alternative for a slightly sweeter, soy-free sauce.
                    • Herbs: Fresh thyme and rosemary can be used. Add about 1 tablespoon of fresh herbs for every teaspoon of dried.
                    • Noodles: If not using egg noodles, any wide pasta will work. For a lighter option, consider zucchini noodles or cauliflower rice added at the end.
                    • Starch Slurry: You can also use a flour-based roux (made with 2 tbsp butter and 2 tbsp flour) to thicken the sauce.

                    Timing is Everything: Prep, Cook, and Enjoy!

                    Prep time: 15 minutes
                    Cook time: 4-8 hours
                    Total time: 4 hours 15 minutes – 8 hours 15 minutes

                    A significant advantage of this Crockpot Beef and Noodles recipe is its low hands-on time. Compared to traditional stovetop methods that might take several hours of active cooking, the slow cooker does all the heavy lifting. Most recipes for beef and noodles can range from 2-4 hours on the stovetop or in the oven, often requiring more attention. This slow cooker version shines by allowing you to set it and forget it, with the bulk of the time being passive cooking for maximum tenderness.

                    Tender beef and noodles in a crockpot

                    Crafting Your Crockpot Masterpiece: Step-by-Step

                    1. Sear the Beef (Optional but Recommended)

                    For an extra layer of rich flavor and color, I highly recommend searing the beef before adding it to the crockpot. Pat your beef chuck roast dry with paper towels. Heat a tablespoon of oil in a large skillet or Dutch oven over medium-high heat. Sear the roast on all sides until deeply browned. This Maillard reaction creates incredibly deep, savory notes. If you’re pressed for time, you can skip this step, but the flavor difference is noticeable!

                    2. Add Liquids and Seasonings

                    Place the seared (or un-seared) beef roast into your slow cooker. Add the chopped onion and minced garlic around the beef. Pour in the beef broth, soy sauce, and Worcestershire sauce. Sprinkle in the dried thyme and rosemary (if using), along with a generous pinch of salt and black pepper. Ensure the beef is mostly submerged in the liquid.

                    3. Slow Cook Until Tender

                    Cover the crockpot and cook on LOW for 6-8 hours, or on HIGH for 4-5 hours. The goal is fork-tender beef. The exact time will depend on your slow cooker and the size of your roast. You’ll know it’s ready when the beef shreds easily with a fork.

                    4. Prepare the Noodles

                    About 30 minutes before the beef is finished cooking, prepare your egg noodles according to package directions. Drain them well and set aside. Cooking them separately ensures they don’t become mushy in the slow cooker. If you’re opting for a gluten-free alternative like zucchini noodles, you can prepare those just before serving.

                    5. Combine and Finish

                    Once the beef is tender, carefully remove it from the slow cooker and place it on a cutting board. Using two forks, shred the beef into bite-sized pieces. While the beef is out, whisk together the cornstarch and cold water in a small bowl to create a smooth slurry. Stir this slurry into the liquid remaining in the slow cooker. Turn the slow cooker to HIGH (if it wasn’t already) and let it simmer for about 10-15 minutes, or until the sauce has thickened. Stir in the shredded beef and the cooked egg noodles. Toss gently to coat everything in the rich, savory sauce. Taste and adjust seasonings if needed.

                    A Glimpse at the Goodness: Nutritional Snapshot

                    While precise nutritional values can vary based on exact ingredient amounts and brands used, a typical serving of Crockpot Beef and Noodles is rich in protein and provides a good amount of carbohydrates for energy. Here’s an estimated breakdown per serving (assuming 6 servings):

                    • Calories: Approximately 550-650 kcal
                    • Protein: 40-50g
                    • Fat: 25-35g (varies greatly with beef cut and marbling)
                    • Carbohydrates: 30-40g
                    • Fiber: 2-4g
                    • Sodium: Varies based on broth and soy sauce used, typically 800-1200mg

                    Note: These are estimates. For exact figures, it’s best to use a nutritional calculator with your specific ingredients.

                    Lighter Touches for a Healthier Bite

                    This dish is pure comfort, but that doesn’t mean you can’t make it a touch lighter without sacrificing flavor. Try these swaps:

                    • Leaner Beef: Opt for a leaner cut like sirloin tip or round roast, though it may require slightly less cooking time.
                    • Whole Wheat Noodles: Swap traditional egg noodles for whole wheat varieties for added fiber.
                    • Reduced Sodium Broth & Soy Sauce: Use low-sodium versions of both to significantly cut down on sodium intake.
                    • Add More Veggies: Stir in some frozen peas, carrots, or corn during the last hour of cooking for extra nutrients and color. For a very low-carb option, omit the noodles entirely and serve the shredded beef and sauce over cauliflower mash or zucchini noodles.
                    • Thickeners: Instead of a cornstarch slurry, you can achieve a thicker sauce by simply simmering the liquid uncovered for a bit longer after shredding the beef, allowing some of the water to evaporate.

                    Serving Your Comfort Bowl

                    Crockpot Beef and Noodles is a complete meal in itself, but here are a few ideas to round out your dinner:

                    • Fresh Green Side Salad: A simple salad with a light vinaigrette balances the richness of the noodles.
                    • Steamed or Roasted Vegetables: Broccoli, green beans, or asparagus are excellent partners.
                    • Crusty Bread: Perfect for sopping up any of that delicious sauce left in the bowl.
                    • Dollop of Sour Cream or Greek Yogurt: Adds a cool, creamy contrast.

                    Common Mistakes to Avoid

                    Even simple recipes have a few pitfalls. Here’s how to ensure yours is perfect:

                    • Not Enough Liquid: Ensure there’s adequate liquid in the crockpot to prevent the beef from drying out.
                    • Overcooking Noodles: Cook noodles separately and add them at the very end to prevent them from becoming mushy and absorbing all the sauce.
                    • Skipping the Sear: While optional, skipping the sear means missing out on a significant depth of flavor and texture.
                    • Thickening Issues: Make sure your cornstarch slurry is smooth and well incorporated. If the sauce isn’t thick enough, you can always add a little more slurry.
                    • Impatience: Allow the beef to cook low and slow until it is truly fork-tender. Rushing the process will result in tough meat.

                    Storing Your Delicious Leftovers

                    Leftovers are a gift with this recipe! Store any remaining Beef and Noodles in an airtight container in the refrigerator for up to 3-4 days. The flavors often meld and improve overnight, making it even tastier the next day. Reheat gently on the stovetop or in the microwave, adding a splash of beef broth or water if the dish seems a bit dry.

                    Close-up of beef and noodles in a bowl

                    Frequently Asked Questions (FAQs)

                    What is the best cut of beef for Crockpot Beef and Noodles?

                    Beef chuck roast is Ideal due to its fat content, which breaks down during slow cooking to create tender, moist meat and a rich sauce. Brisket or even beef shoulder also work well.

                    Can I make this recipe on the stovetop or in the oven?

                    Yes! You can adapt this recipe for stovetop simmering or oven braising. Sear the beef, add liquids, and simmer on low heat (about 300°F or 150°C in the oven) for 2-3 hours, or until tender. You’ll likely need to watch the liquid levels more closely.

                    Why are my noodles mushy?

                    This usually happens if the noodles are cooked directly in the slow cooker liquid for too long. It’s best to cook them separately according to package directions and add them to the thickened sauce just before serving.

                    Can I freeze Crockpot Beef and Noodles?

                    Yes, but it’s best to freeze the shredded beef and sauce mixture separately from the noodles. Noodles can become mushy upon thawing. Reheat the beef and sauce, then cook fresh noodles to add.

                    How can I make the sauce thicker?

                    The cornstarch slurry is the quickest method. If you don’t have cornstarch, you can create a roux with butter and flour, or simply let the sauce simmer uncovered for a longer period to reduce and thicken naturally.

                    Your New Favorite Comfort Food Awaits!

                    There you have it – a Crockpot Beef and Noodles recipe that’s practically singing your name! It’s the perfect solution for hectic evenings when you want a hearty, homemade meal without the fuss. The slow cooker transforms simple ingredients into a deeply flavorful, tender delight that will have everyone asking for seconds. So, dust off your crockpot, gather your ingredients, and get ready to create a dish that’s destined to become a family favorite. Enjoy the ease, savor the flavor, and embrace the pure comfort!

                    Print
                    clock clock iconcutlery cutlery iconflag flag iconfolder folder iconinstagram instagram iconpinterest pinterest iconfacebook facebook iconprint print iconsquares squares iconheart heart iconheart solid heart solid icon

                    Crockpot Beef And Noodles Recipe


                    • Author: Chef Emy

                    Description

                    This Crockpot Beef and Noodles recipe is a deliciously easy comfort food dish featuring slow-cooked tender beef, egg noodles, and a savory broth. Perfect for weeknight dinners or cozy family meals.


                    Ingredients

                    Scale
                    • 2lbs beef chuck roast
                    • 4 cupsbeef broth
                    • 1packet onion soup mix
                    • 1 tspgarlic powder
                    • 1 tsponion powder
                    • 12 ozegg noodles
                    • Salt and pepper to taste

                    Instructions

                      Notes

                      For a creamier version, add ½ cup of heavy cream after cooking the noodles.
                      Substitute egg noodles with other pasta varieties if desired.
                      Leftovers can be stored in an airtight container for up to 3 days in the refrigerator.

                      Nutrition

                      • Calories: 400
                      • Sugar: 3g

                      “`