Easy Beef Empanadas

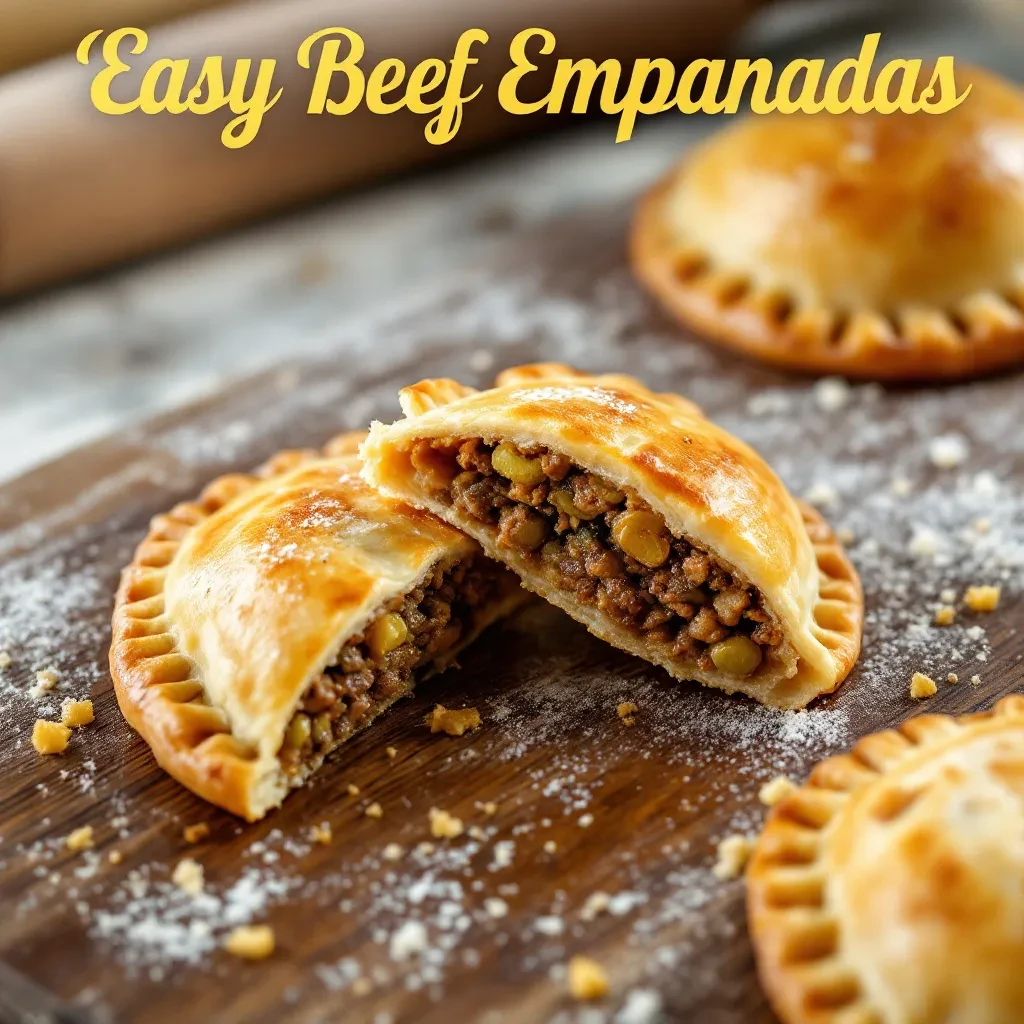
Easy Beef Empanadas: A Flavorful Handheld Dinner Everyone Will Love

There’s something magical about biting into a warm, flaky empanada—crispy on the outside, juicy and savory on the inside. Whether you’re craving comfort food or need a crowd-pleasing appetizer, these Easy Beef Empanadas deliver every time. As a mom of two with a never-ending to-do list, I adore recipes that feel special but don’t demand hours in the kitchen. This one checks all the boxes: simple ingredients, forgiving prep, and leftovers that reheat like a dream (if they last that long!).

Empanadas might seem intimidating, but trust me—this version is weeknight-friendly. I skip the fuss of homemade dough (store-bought pie crust works beautifully!) and focus on the star: a boldly seasoned beef filling with golden onions, smoky paprika, and a hint of sweetness from raisins. It’s a riff on my abuela’s recipe, streamlined for modern life. Serve them with chimichurri or a dollop of cool sour cream, and watch them disappear. Pro tip: Double the batch and freeze some for those “I forgot to meal prep” emergencies—your future self will thank you!

Why You’ll Love These Easy Beef Empanadas

  • Time-saving: Uses pre-made dough for a shortcut that doesn’t sacrifice flavor.
  • Versatile: Perfect for dinner, lunchboxes, or party appetizers.
  • Freezer-friendly: Make ahead and bake straight from frozen.
  • Kid-approved: Picky eaters? The handheld shape makes them a hit.

How to Make Easy Beef Empanadas

Ingredients You’ll Need

  • 1 lb ground beef (85% lean)
  • 1 medium onion, finely diced
  • 2 cloves garlic, minced
  • 1 tsp smoked paprika
  • ½ tsp cumin
  • ¼ cup raisins (trust me!)
  • 2 store-bought pie crusts (or homemade if you’re ambitious)
  • 1 egg (for egg wash)

Step-by-Step Instructions

  1. Brown the beef: In a skillet over medium heat, cook the beef until no pink remains. Drain excess fat.
  2. Sauté aromatics: Add onion and garlic, cooking until soft (about 5 minutes). Stir in spices, raisins, and a pinch of salt.
  3. Roll and cut: Unroll pie crusts and cut into 6-inch circles (a bowl works as a guide!).
  4. Fill and fold: Spoon 2 tbsp filling onto each circle, fold over, and crimp edges with a fork.
  5. Bake: Brush with egg wash and bake at 375°F for 20–25 minutes until golden.

Tips for the Best Empanadas

Want to avoid a soggy bottom? Place empanadas on a parchment-lined baking sheet—no sticking! For extra flavor, try adding a sprinkle of grated cheese to the filling or swapping beef for ground turkey. If you’re short on time, check out my 5-Ingredient Dinners roundup for more speedy ideas.

Frequently Asked Questions

Can I make beef empanadas ahead? Absolutely! Assemble and refrigerate unbaked empanadas for up to 24 hours, or freeze for 3 months.

What’s the best dipping sauce for empanadas? I love chimichurri (a herby Argentine sauce) or spicy mayo.

Can I use puff pastry instead? Yes, but the texture will be lighter and flakier—delicious, but less traditional.

How do I reheat leftover empanadas? Pop them in a 350°F oven for 10 minutes to revive the crispness.

Are empanadas gluten-free? Not with regular pie crust, but gluten-free crusts work well (check out my gluten-free baking guide).

What sides go with empanadas? Keep it simple with a citrusy slaw or black bean salad.

There you have it—a recipe that’s equal parts comforting and convenient. These Easy Beef Empanadas have saved me on hectic nights and impressed guests more times than I can count. The best part? They remind me that great food doesn’t need to be complicated to feel like a celebration. Now, who’s stealing the first one off the tray? (Spoiler: It’s always me.)

Print
clock clock iconcutlery cutlery iconflag flag iconfolder folder iconinstagram instagram iconpinterest pinterest iconfacebook facebook iconprint print iconsquares squares iconheart heart iconheart solid heart solid icon

Easy Beef Empanadas


  • Author: Maria's Kitchen

Description

These flaky, golden beef empanadas are filled with a savory mixture of ground beef, onions, and spices. Perfect for appetizers or a main dish!


Ingredients

Scale

For the Crust:

  • For the dough:
  • 2 1/2 cups all-purpose flour
  • 1 tsp salt
  • 1/2 cup cold unsalted butter, cubed
  • 1 large egg
  • 1/4 cup ice water
  • For the filling:
  • 1 lb ground beef
  • 1 small onion, finely chopped
  • 2 cloves garlic, minced
  • 1 tsp ground cumin
  • 1 tsp paprika
  • 1/2 tsp dried oregano
  • Salt and pepper to taste
  • 1 tbsp olive oil
  • For assembly:
  • 1 egg, beaten (for egg wash)

Instructions

1. Prepare the Crust:

  1. 1. Make the dough: In a large bowl, mix flour and salt. Cut in butter until mixture resembles coarse crumbs.
  2. 2. Whisk egg and ice water together, then gradually add to flour mixture until dough forms. Wrap in plastic and chill for 30 mins.
  3. 3. Prepare filling: Heat olive oil in a pan over medium heat. Cook onions until soft, then add garlic and ground beef. Cook until browned.
  4. 4. Stir in cumin, paprika, oregano, salt, and pepper. Cook for 2 more minutes, then remove from heat and let cool.
  5. 5. Preheat oven to 375°F (190°C). Roll out dough to 1/8-inch thickness and cut into 5-inch circles.
  6. 6. Place 1-2 tbsp filling on each circle, fold over, and crimp edges with a fork. Brush with egg wash.
  7. 7. Bake for 20-25 minutes until golden brown. Serve warm.

Notes

For a shortcut, use store-bought empanada dough or pie crust. Filling can be made ahead and refrigerated for up to 2 days.

Slow Cooker Lemon Garlic Chicken

Slow Cooker Lemon Garlic Chicken: A Bright & Easy Weeknight Dinner

There’s something magical about coming home to a meal that’s been simmering away all day, filling the house with irresistible aromas. This Slow Cooker Lemon Garlic Chicken is one of those dishes—simple, flavorful, and practically hands-off. Whether you’re juggling work, kids, or just life’s endless to-do list, this recipe is your ticket to a stress-free dinner that tastes like you spent hours in the kitchen (when really, you just tossed everything in the crockpot and walked away).

Lemon and garlic are a match made in culinary heaven, and when paired with tender chicken thighs or breasts, they create a dish that’s bright, savory, and deeply satisfying. The slow cooker does all the heavy lifting, infusing the chicken with tangy citrus and aromatic garlic while keeping it juicy. Serve it over fluffy rice, buttered noodles, or a crisp salad—it’s versatile enough to please everyone at the table. Plus, leftovers (if you’re lucky enough to have any) taste even better the next day!

Why You’ll Love This Slow Cooker Lemon Garlic Chicken

If you’re on the fence about trying this recipe, here are a few reasons it’s about to become a regular in your rotation:

  • Effortless Prep: Just 10 minutes of prep, and the slow cooker handles the rest.
  • Bold, Fresh Flavors: Zesty lemon and punchy garlic elevate simple chicken into something special.
  • Meal Prep Friendly: Cook once and enjoy leftovers for lunches or quick dinners.
  • Crowd-Pleasing: Even picky eaters can’t resist this cozy, flavorful dish.

How to Make Slow Cooker Lemon Garlic Chicken

Ingredients You’ll Need

  • 1.5 lbs boneless, skinless chicken thighs or breasts
  • 3 cloves garlic, minced
  • 1 lemon, thinly sliced (plus extra for garnish)
  • 1/2 cup chicken broth
  • 2 tbsp olive oil
  • 1 tsp dried oregano
  • Salt and pepper to taste
  • Fresh parsley for garnish (optional)

Step-by-Step Instructions

  1. Season the Chicken: Pat the chicken dry and season generously with salt, pepper, and oregano.
  2. Sear (Optional but Recommended): Heat olive oil in a skillet over medium-high heat. Sear the chicken for 2–3 minutes per side for extra flavor.
  3. Layer in the Slow Cooker: Place chicken in the crockpot, scatter garlic over the top, and arrange lemon slices on top. Pour in chicken broth.
  4. Cook: Cover and cook on LOW for 4–5 hours or HIGH for 2–3 hours, until chicken is tender.
  5. Serve: Garnish with fresh parsley and extra lemon slices. Spoon the cooking juices over the chicken for extra flavor.

Tips for the Best Lemon Garlic Chicken

Here are a few tricks I’ve learned after making this dish countless times:

  • Don’t Skip the Sear: A quick sear adds depth of flavor, but if you’re truly pressed for time, you can skip it.
  • Adjust the Zest: Love lemon? Add a teaspoon of lemon zest for an extra punch.
  • Thicken the Sauce: If you prefer a thicker sauce, mix 1 tbsp cornstarch with 2 tbsp cold water and stir it into the cooking juices after removing the chicken. Simmer for 5 minutes.

What to Serve With Lemon Garlic Chicken

This dish pairs beautifully with so many sides! Try it with:

  • Fluffy white rice or quinoa to soak up the juices
  • Roasted asparagus or green beans for a crisp contrast
  • Crusty bread to mop up every last bit of sauce

Frequently Asked Questions

Can I use frozen chicken? Yes, but thaw it first for even cooking. Frozen chicken may release excess liquid and dilute flavors.

How long can I store leftovers? Keep in an airtight container in the fridge for up to 3 days. Reheat gently to avoid drying out the chicken.

Can I make this with bone-in chicken? Absolutely! Just increase the cooking time by 1–2 hours on LOW.

Is this recipe gluten-free? Yes, as long as you use gluten-free chicken broth (check labels).

Can I add vegetables? Definitely! Toss in baby potatoes, carrots, or bell peppers for a one-pot meal.

What’s the best lemon substitute? Try lime for a different twist, or a splash of white wine vinegar for acidity.

There you have it—a fuss-free, flavor-packed dinner that’s as easy as it is delicious. Whether you’re meal prepping for the week or just craving a cozy, citrusy dish, this Slow Cooker Lemon Garlic Chicken delivers every time. For more easy slow cooker recipes, check out my favorite weeknight wins. Now, go set that crockpot and let dinner practically make itself!

Print
clock clock iconcutlery cutlery iconflag flag iconfolder folder iconinstagram instagram iconpinterest pinterest iconfacebook facebook iconprint print iconsquares squares iconheart heart iconheart solid heart solid icon

Slow Cooker Lemon Garlic Chicken


  • Author: Chef Emily Carter

Description

Tender, juicy chicken infused with bright lemon and aromatic garlic, cooked effortlessly in a slow cooker for maximum flavor. Perfect for busy weeknights!


Ingredients

Scale

For the Crust:

  • For the chicken:
  • 4 boneless, skinless chicken breasts
  • 1 teaspoon salt
  • 1/2 teaspoon black pepper
  • 1 teaspoon dried oregano
  • For the sauce:
  • 1/4 cup olive oil
  • 1/4 cup chicken broth
  • 4 cloves garlic (minced)
  • 2 lemons (juiced and zested)
  • 1 teaspoon honey
  • 1/2 teaspoon red pepper flakes (optional)
  • For garnish:
  • Fresh parsley (chopped)
  • Lemon slices

Instructions

1. Prepare the Crust:

  1. 1. Season chicken breasts with salt, pepper, and oregano. Place in slow cooker.
  2. 2. In a bowl, whisk together olive oil, chicken broth, garlic, lemon juice, zest, honey, and red pepper flakes (if using).
  3. 3. Pour sauce over chicken, ensuring it’s evenly coated.
  4. 4. Cover and cook on LOW for 4-5 hours or HIGH for 2-3 hours until chicken reaches 165°F internally.
  5. 5. Remove chicken and shred or slice. Return to slow cooker and mix with juices.
  6. 6. Garnish with parsley and lemon slices before serving.

Notes

For crispier texture, broil cooked chicken for 2-3 minutes before serving. Adjust red pepper flakes for desired spice level.

Baked Sweet and Sour Chicken

Baked Sweet and Sour Chicken: A Healthier Takeout Fakeout

There’s something about sweet and sour chicken that feels like a warm hug from your favorite takeout spot. But let’s be honest—sometimes, the greasy aftermath leaves you wondering if it was worth it. Enter this Baked Sweet and Sour Chicken: all the crispy, tangy, finger-licking goodness without the deep-fried guilt. Whether you’re meal-prepping for the week or craving a cozy Friday night dinner, this recipe is your ticket to satisfaction.

I first stumbled on this method after one too many “I’ll just have a small portion” takeout fails (we’ve all been there). Baking the chicken keeps it tender inside while still giving it that crave-worthy crunch. And the sauce? A perfect balance of sweet, tangy, and just a little kick—like your favorite takeout, but better. Plus, it’s a hit with kids and adults alike, which in my house is basically a culinary miracle.

Why You’ll Love This Baked Sweet and Sour Chicken

This dish isn’t just delicious—it’s also:

  • Healthier: No deep-frying means less oil but all the flavor.
  • Meal-prep friendly: Reheats like a dream for lunches.
  • Customizable: Add extra veggies or adjust the sauce to your taste.
  • Kid-approved: Even picky eaters gobble it up (trust me).

How to Make Baked Sweet and Sour Chicken

Ingredients You’ll Need

  • 1.5 lbs boneless, skinless chicken breasts, cubed
  • 1 cup cornstarch
  • 2 large eggs, beaten
  • 1/4 cup vegetable oil (or avocado oil)
  • 1 red bell pepper, chopped
  • 1 cup pineapple chunks (fresh or canned)
  • 3/4 cup sugar (or honey for a healthier swap)
  • 1/2 cup ketchup
  • 1/2 cup apple cider vinegar
  • 2 tbsp soy sauce (or tamari for gluten-free)
  • 1 tsp garlic powder
  • 1/2 tsp red pepper flakes (optional)

Step-by-Step Instructions

  1. Prep the chicken: Toss cubed chicken in cornstarch, then dip in beaten eggs.
  2. Bake: Spread on a greased baking sheet and bake at 375°F for 20 minutes, flipping halfway.
  3. Make the sauce: Whisk sugar, ketchup, vinegar, soy sauce, garlic powder, and red pepper flakes in a saucepan over medium heat until thickened (about 5 minutes).
  4. Combine: Toss baked chicken, bell pepper, and pineapple in the sauce, then return to the oven for 10 more minutes.

Pro Tips for the Best Results

For extra crispiness, broil the chicken for the last 2–3 minutes. If you love veggies, toss in some broccoli or snap peas—they’ll soak up the sauce beautifully. And if you’re short on time? Use pre-cut chicken to speed things up!

Serving Suggestions

Pair this with fluffy white rice or garlic fried rice for a complete meal. A side of steamed broccoli or a quick cucumber salad adds freshness. Leftovers? They’re even better the next day (if they last that long).

Frequently Asked Questions

Can I use chicken thighs instead of breasts?
Absolutely! Thighs stay juicier and add extra flavor—just adjust baking time to 25 minutes.

How do I store leftovers?
Keep them in an airtight container in the fridge for up to 3 days. Reheat in the oven or microwave.

Is there a substitute for cornstarch?
Arrowroot powder or flour works, but cornstarch gives the crispiest texture.

Can I make this gluten-free?
Yes! Use tamari instead of soy sauce and ensure your cornstarch is gluten-free.

What’s the best pineapple to use?
Fresh or canned both work—just drain canned pineapple well to avoid excess liquid.

Can I freeze baked sweet and sour chicken?
Freeze before adding the sauce for best results. Thaw, then reheat with sauce.

There you have it—a healthier, homemade version of the takeout classic that’s just as comforting (and way more rewarding). Whether it’s a busy weeknight or a lazy weekend, this Baked Sweet and Sour Chicken is sure to become a regular in your rotation. Now, who’s ready to ditch the delivery menu?

Print
clock clock iconcutlery cutlery iconflag flag iconfolder folder iconinstagram instagram iconpinterest pinterest iconfacebook facebook iconprint print iconsquares squares iconheart heart iconheart solid heart solid icon

Baked Sweet and Sour Chicken


  • Author: Chef Jamie

Description

This Baked Sweet and Sour Chicken recipe is a healthier take on the classic takeout favorite. Tender chicken pieces are coated in a crispy breading, baked to perfection, and tossed in a homemade sweet and sour sauce that’s perfectly balanced between tangy and sweet. It’s an easy, family-friendly meal that pairs wonderfully with steamed rice and vegetables.


Ingredients

Scale

For the Crust:

  • For the Chicken:
  • 1.5 lbs boneless, skinless chicken breasts, cut into 1-inch pieces
  • 1 cup cornstarch
  • 2 large eggs, beaten
  • 1/4 cup vegetable oil
  • Salt and pepper to taste
  • For the Sweet and Sour Sauce:
  • 3/4 cup granulated sugar
  • 1/2 cup ketchup
  • 1/2 cup apple cider vinegar
  • 1 tablespoon soy sauce
  • 1 teaspoon garlic powder
  • For Garnish:
  • 2 green onions, sliced
  • 1 tablespoon sesame seeds

Instructions

1. Prepare the Crust:

  1. Preheat oven to 325°F (165°C). Lightly grease a 9×13-inch baking dish.
  2. Season chicken pieces with salt and pepper. Place cornstarch in a shallow bowl and beaten eggs in another shallow bowl.
  3. Dip each chicken piece in cornstarch to coat, then dip in beaten eggs. Shake off excess.
  4. Heat oil in a large skillet over medium-high heat. Working in batches, cook chicken until golden brown on all sides (about 1-2 minutes per side). Transfer to prepared baking dish.
  5. In a medium bowl, whisk together all sauce ingredients until smooth. Pour evenly over chicken in baking dish.
  6. Bake for 45-50 minutes, stirring every 15 minutes, until sauce is thickened and chicken is cooked through.
  7. Garnish with sliced green onions and sesame seeds before serving. Serve hot over rice.

Notes

For extra crispiness, you can broil the chicken for 1-2 minutes at the end of baking. Adjust the sweetness/tanginess by adding more vinegar or sugar to taste. Leftovers store well in the refrigerator for up to 3 days.

Creamy Mushroom Chicken Skillet

Creamy Mushroom Chicken Skillet: A Comforting One-Pan Dinner

There’s something magical about a dish that comes together in a single skillet—less cleanup, more flavor, and that satisfying feeling of pulling off a restaurant-worthy meal at home. This Creamy Mushroom Chicken Skillet is exactly that: juicy chicken thighs nestled in a rich, garlicky sauce with golden mushrooms and a splash of cream. It’s the kind of meal that makes you pause mid-bite, close your eyes, and think, “Yes, this is exactly what I needed.”

If you’re like me, weeknights are a whirlwind of to-do lists and hungry mouths. That’s why I lean on recipes like this one—quick, forgiving, and packed with cozy vibes. The mushrooms add an earthy depth (no fancy foraging required; basic creminis work beautifully), while the sauce? Oh, the sauce. It’s luxuriously creamy without being heavy, thanks to a splash of chicken broth and a whisper of Dijon mustard. Serve it over mashed potatoes, egg noodles, or even quinoa if you’re feeling virtuous. (But let’s be real: potatoes are the move here.)

Why You’ll Love This Creamy Mushroom Chicken Skillet

This dish isn’t just delicious—it’s a weeknight warrior. Here’s why it’ll earn a permanent spot in your rotation:

  • 30 minutes start to finish: Faster than takeout, but so much tastier.
  • One-pan wonder: Fewer dishes = more happiness.
  • Pantry-friendly: Swap herbs or use dried spices if needed—it’s flexible!
  • Crowd-pleaser: Kids, partners, and picky eaters alike will ask for seconds.

How to Make Creamy Mushroom Chicken Skillet

Ingredients You’ll Need

  • 4 boneless, skinless chicken thighs (or breasts, if you prefer)
  • 8 oz cremini mushrooms, sliced
  • 3 garlic cloves, minced
  • 1 cup chicken broth
  • ½ cup heavy cream
  • 1 tbsp Dijon mustard
  • 1 tsp fresh thyme (or ½ tsp dried)
  • Salt and pepper to taste
  • 2 tbsp olive oil

Step-by-Step Instructions

  1. Sear the chicken: Heat oil in a large skillet over medium-high. Season chicken with salt and pepper, then cook for 5–6 minutes per side until golden. Transfer to a plate.
  2. Sauté the mushrooms: In the same skillet, add mushrooms and cook until browned (about 5 minutes). Stir in garlic and thyme for 30 seconds until fragrant.
  3. Make the sauce: Pour in chicken broth to deglaze the pan, scraping up any browned bits. Stir in cream and Dijon, then simmer for 3–4 minutes until slightly thickened.
  4. Finish and serve: Return chicken to the skillet, spooning sauce over it. Cook for 2 more minutes to heat through. Garnish with fresh parsley if you’re feeling fancy.

Tips for the Best Creamy Mushroom Chicken

Want to take this dish to the next level? Here are my pro tips:

  • Don’t overcrowd the pan: Give the chicken and mushrooms space to brown properly—cook in batches if needed.
  • Use thighs for extra flavor: They stay juicier than breasts, but either works!
  • Deglaze like a boss: Those browned bits = free flavor. Don’t let them go to waste!
  • Need a lighter option? Substitute half-and-half for heavy cream—it’ll still be luscious.

What to Serve With Your Skillet

This dish is a team player. Pair it with:

  • Fluffy garlic mashed potatoes (my top pick!)
  • Buttered egg noodles or rice
  • A crisp green salad or roasted broccoli for balance
  • Crusty bread to swipe up every last drop of sauce

Frequently Asked Questions

Can I use chicken breasts instead of thighs?
Absolutely! Just reduce cooking time by 1–2 minutes per side to avoid dryness.

How do I store leftovers?
Keep in an airtight container in the fridge for up to 3 days. Reheat gently on the stove with a splash of broth.

Can I freeze creamy mushroom chicken?
The sauce may separate slightly, but it’ll still taste great. Freeze for up to 2 months.

What mushrooms work best?
Cremini or button mushrooms are perfect, but shiitakes add a deeper flavor. Avoid delicate varieties like enoki.

Is there a dairy-free alternative?
Try coconut milk or cashew cream, but note the flavor will change slightly. For more dairy-free ideas, check out Minimalist Baker’s guide.

Can I add wine to the sauce?
Yes! A splash of white wine (like Chardonnay) before the broth adds lovely depth. Here’s how to cook with wine if you’re new to it.

There you have it—a creamy, dreamy skillet dinner that’s as easy to make as it is to love. Whether you’re cooking for a busy family or treating yourself to a little midweek comfort, this Creamy Mushroom Chicken Skillet delivers every time. And hey, if you accidentally “forget” to share? I won’t tell. For more cozy one-pan meals, try my Lemon Garlic Salmon next. Happy cooking!

Print
clock clock iconcutlery cutlery iconflag flag iconfolder folder iconinstagram instagram iconpinterest pinterest iconfacebook facebook iconprint print iconsquares squares iconheart heart iconheart solid heart solid icon

Creamy Mushroom Chicken Skillet


  • Author: Chef Emily Carter

Description

A rich and comforting one-pan dish featuring tender chicken breasts smothered in a creamy mushroom sauce with garlic, thyme, and a touch of white wine. Perfect for weeknight dinners yet elegant enough for company.


Ingredients

Scale

For the Crust:

  • For the chicken:
  • 4 boneless, skinless chicken breasts
  • 1 teaspoon salt
  • 1/2 teaspoon black pepper
  • 1 teaspoon paprika
  • 2 tablespoons olive oil
  • For the sauce:
  • 8 oz cremini mushrooms, sliced
  • 3 cloves garlic, minced
  • 1 small yellow onion, diced
  • 1/2 cup dry white wine
  • 1 cup chicken broth
  • 1 cup heavy cream
  • 1 teaspoon dried thyme
  • 1/2 teaspoon salt
  • 1/4 teaspoon black pepper
  • 1 tablespoon Dijon mustard
  • 1/4 cup grated Parmesan cheese
  • For garnish:
  • 2 tablespoons chopped fresh parsley

Instructions

1. Prepare the Crust:

  1. 1. Season chicken breasts with salt, pepper, and paprika on both sides.
  2. 2. Heat olive oil in a large skillet over medium-high heat. Add chicken and cook for 5-6 minutes per side until golden brown. Remove and set aside.
  3. 3. In the same skillet, add mushrooms and cook for 4-5 minutes until browned. Add onion and garlic, cooking for 2 more minutes until fragrant.
  4. 4. Pour in white wine to deglaze the pan, scraping up any browned bits. Simmer for 2 minutes.
  5. 5. Stir in chicken broth, heavy cream, thyme, salt, pepper, and Dijon mustard. Bring to a gentle simmer.
  6. 6. Return chicken to the skillet, spooning sauce over the top. Cover and simmer for 10-12 minutes until chicken is cooked through.
  7. 7. Sprinkle with Parmesan cheese and let melt into the sauce. Garnish with fresh parsley before serving.

Notes

For a thicker sauce, mix 1 teaspoon cornstarch with 1 tablespoon water and stir into the sauce before adding the chicken back. Substitute half-and-half for heavy cream if preferred. Leftovers keep well refrigerated for up to 3 days.

Spinach and Feta Stuffed Chicken

Spinach and Feta Stuffed Chicken: A Flavorful Weeknight Favorite

There’s something magical about a dish that feels fancy but comes together effortlessly—like this Spinach and Feta Stuffed Chicken. Whether you’re trying to impress dinner guests or simply treating yourself to a cozy weeknight meal, this recipe delivers big flavors with minimal fuss. The tender chicken, creamy feta, and vibrant spinach create a harmony of textures and tastes that’ll have everyone asking for seconds.

I first discovered this recipe during a busy season when I needed quick, satisfying meals that didn’t skimp on flavor. Stuffed chicken sounded intimidating at first, but once I tried it, I realized how forgiving and versatile it is. Plus, it’s a fantastic way to sneak in some greens (hello, spinach!) without anyone noticing. If you’ve ever stared blankly into your fridge wondering what to make, this dish is your answer—simple, wholesome, and downright delicious.

Why You’ll Love Spinach and Feta Stuffed Chicken

This recipe is a winner for so many reasons. Here’s why it’s become a staple in my kitchen:

  • Protein-packed: Chicken breasts are lean and filling, making this a great post-workout meal.
  • Hidden veggies: Spinach adds nutrients without overpowering the dish—perfect for picky eaters.
  • Easy to customize: Swap feta for goat cheese or add sun-dried tomatoes for extra depth.
  • Meal-prep friendly: Make ahead and reheat for lunches or dinners throughout the week.

How to Make Spinach and Feta Stuffed Chicken

This dish comes together in just a few simple steps. Here’s what you’ll need:

Ingredients

  • 4 boneless, skinless chicken breasts
  • 1 cup fresh spinach, chopped
  • ½ cup crumbled feta cheese
  • 2 cloves garlic, minced
  • 1 tsp dried oregano
  • Salt and pepper to taste
  • 1 tbsp olive oil

Instructions

  1. Preheat your oven to 375°F (190°C).
  2. In a bowl, mix the spinach, feta, garlic, and oregano.
  3. Cut a pocket into each chicken breast, being careful not to slice all the way through.
  4. Stuff each breast with the spinach-feta mixture and secure with toothpicks.
  5. Season the outside with salt and pepper.
  6. Heat olive oil in an oven-safe skillet over medium-high heat. Sear the chicken for 2–3 minutes per side until golden.
  7. Transfer the skillet to the oven and bake for 20–25 minutes, or until the chicken reaches 165°F internally.
  8. Let rest for 5 minutes before serving.

Tips for the Best Stuffed Chicken

Here are a few tricks I’ve learned along the way to make this dish foolproof:

  • Pound it out: If your chicken breasts are thick, gently pound them to an even thickness for even cooking.
  • Don’t overstuff: Too much filling can cause leaks—aim for about 2 tbsp per breast.
  • Use fresh spinach: Frozen spinach works in a pinch, but fresh gives the best texture.
  • Try air frying: For a crispier finish, cook at 375°F in an air fryer for 15–18 minutes.

Pair this dish with a simple garlic parmesan roasted potatoes or a light Mediterranean cucumber salad for a complete meal.

Variations to Try

One of the best things about this recipe is how adaptable it is. Here are a few fun twists:

  • Mediterranean style: Add kalamata olives and sun-dried tomatoes to the filling.
  • Creamy version: Mix a spoonful of cream cheese into the feta for extra richness.
  • Spicy kick: Stir in a pinch of red pepper flakes or a dash of hot sauce.

For more stuffed chicken ideas, check out Food Network’s creative variations.

Frequently Asked Questions

Can I use frozen spinach?

Yes, but be sure to thaw and squeeze out all excess moisture to prevent a soggy filling.

How do I know when the chicken is done?

Use a meat thermometer—the internal temperature should reach 165°F.

Can I make this ahead of time?

Absolutely! Assemble the stuffed chicken, cover, and refrigerate for up to 24 hours before cooking.

What can I substitute for feta?

Goat cheese, ricotta, or even shredded mozzarella work well.

How should I store leftovers?

Keep in an airtight container in the fridge for up to 3 days. Reheat gently in the oven or microwave.

Can I freeze stuffed chicken?

Yes, freeze before baking. Thaw overnight in the fridge before cooking as directed.

There you have it—a dish that’s as versatile as it is delicious. Whether you’re cooking for one or feeding a crowd, this Spinach and Feta Stuffed Chicken is sure to become a go-to in your recipe rotation. For more easy dinner inspiration, try my one-pan lemon garlic salmon or browse Allrecipes’ dinner ideas. Happy cooking!

Print
clock clock iconcutlery cutlery iconflag flag iconfolder folder iconinstagram instagram iconpinterest pinterest iconfacebook facebook iconprint print iconsquares squares iconheart heart iconheart solid heart solid icon

Spinach and Feta Stuffed Chicken


  • Author: Chef Maria

Description

A delicious and healthy dish featuring tender chicken breasts stuffed with a flavorful mixture of spinach, feta cheese, and herbs. Perfect for a weeknight dinner or special occasion.


Ingredients

Scale

For the Crust:

  • For the chicken:
  • 4 boneless, skinless chicken breasts
  • 1 tablespoon olive oil
  • 1 teaspoon salt
  • 1/2 teaspoon black pepper
  • For the stuffing:
  • 2 cups fresh spinach, chopped
  • 1/2 cup crumbled feta cheese
  • 1/4 cup cream cheese, softened
  • 2 cloves garlic, minced
  • 1 teaspoon dried oregano
  • 1/2 teaspoon red pepper flakes (optional)
  • For garnish:
  • 1 lemon, sliced
  • Fresh parsley, chopped

Instructions

1. Prepare the Crust:

  1. 1. Preheat oven to 375°F (190°C).
  2. 2. In a bowl, mix together the spinach, feta cheese, cream cheese, garlic, oregano, and red pepper flakes (if using) to make the stuffing.
  3. 3. Carefully cut a pocket into each chicken breast, being careful not to cut all the way through.
  4. 4. Stuff each chicken breast with the spinach and feta mixture, then secure with toothpicks if needed.
  5. 5. Heat olive oil in an oven-safe skillet over medium-high heat. Season the chicken with salt and pepper.
  6. 6. Sear the chicken for 2-3 minutes per side until golden brown.
  7. 7. Transfer the skillet to the oven and bake for 20-25 minutes, or until the chicken reaches an internal temperature of 165°F (74°C).
  8. 8. Garnish with lemon slices and fresh parsley before serving.

Notes

For extra flavor, you can add sun-dried tomatoes or olives to the stuffing mixture. Make sure to remove toothpicks before serving.

Sweet BBQ Chicken and Rice Skillet

Sweet BBQ Chicken and Rice Skillet: A One-Pan Weeknight Wonder

There’s something magical about a dish that comes together in a single skillet—less cleanup, more flavor, and that cozy feeling of a meal made with love. This Sweet BBQ Chicken and Rice Skillet is exactly that kind of recipe. Picture juicy chicken thighs glazed in a sticky-sweet barbecue sauce, nestled into fluffy rice with just the right amount of caramelized edges. It’s the kind of dinner that makes everyone at the table pause mid-bite to say, “Wow, this is GOOD.”

As a mom of two (and a self-proclaimed lazy dishwasher), I’m always on the hunt for meals that are big on flavor but low on fuss. This skillet checks all the boxes: it’s ready in under 45 minutes, uses pantry staples, and even sneaks in some veggies if you’re feeling fancy. Plus, that BBQ sauce? It’s like a cozy blanket for your taste buds—smoky, tangy, and just sweet enough to make kids (and let’s be honest, adults too) come back for seconds. If you’re craving a meal that’s equal parts comforting and effortless, grab your favorite cast-iron skillet and let’s get cooking!

Why You’ll Love This Sweet BBQ Chicken and Rice Skillet

This isn’t just another chicken and rice dish—it’s a flavor-packed, one-pan masterpiece with serious crowd appeal. Here’s why it’ll become a regular in your rotation:

  • Weeknight superhero: Minimal prep, one pan, and hands-off cooking while the rice soaks up all that saucy goodness.
  • Kid-approved (but not boring): The sweet BBQ glaze makes it a hit with picky eaters, while chili powder or a dash of hot sauce keeps it interesting for grown-ups.
  • Budget-friendly: Chicken thighs stay juicy and cost less than breasts, and rice stretches the meal beautifully.
  • Leftover magic: Tastes even better the next day—if you manage to have any left!

How to Make Sweet BBQ Chicken and Rice Skillet

Ingredients You’ll Need

  • 1.5 lbs boneless, skinless chicken thighs
  • 1 cup long-grain white rice (or jasmine rice for extra fragrance)
  • 1.5 cups chicken broth (or water in a pinch)
  • 1/2 cup BBQ sauce (homemade or store-bought—I love this easy homemade version)
  • 1 bell pepper, diced (any color)
  • 1 small onion, diced
  • 2 cloves garlic, minced
  • 1 tsp smoked paprika
  • Salt & pepper to taste
  • Optional: chopped parsley or green onions for garnish

Step-by-Step Instructions

  1. Sear the chicken: Heat 1 tbsp oil in a large skillet over medium-high. Season chicken with salt, pepper, and smoked paprika, then sear 4–5 minutes per side until golden. Remove and set aside.
  2. Sauté the veggies: In the same skillet, add onion and bell pepper. Cook 3 minutes until softened, then stir in garlic for 30 seconds until fragrant.
  3. Add rice & liquids: Stir in rice to coat with pan juices, then pour in chicken broth and BBQ sauce. Scrape up any browned bits—that’s flavor gold!
  4. Simmer & finish: Nestle chicken back into the skillet, reduce heat to low, cover, and simmer 20 minutes (no peeking!). Let rest 5 minutes off heat before serving.

Pro Tips for the Best BBQ Chicken Skillet

Want to take this dish from great to when are you making this again? status? Try these tricks:

  • Char it up: For extra smokiness, broil the skillet for 2–3 minutes before serving to caramelize the sauce.
  • Veggie boost: Stir in a handful of spinach or frozen peas at the end for color and nutrients.
  • Rice swap: Brown rice works too—just add 1/2 cup extra liquid and cook 10 minutes longer.
  • Make it ahead: Prep veggies and measure rice the night before for even faster cooking.

Sweet BBQ Chicken and Rice Skillet FAQs

Can I use chicken breasts instead of thighs?

Yes, but reduce cooking time by 3–4 minutes to avoid dryness. Thighs stay juicier, though!

What’s the best BBQ sauce for this recipe?

A smoky-sweet sauce works best. Try our homemade smoky BBQ sauce or a store-bought favorite like Stubb’s.

Can I make this in a rice cooker?

Not recommended—the skillet’s direct heat creates that delicious caramelized crust on the rice.

How do I store leftovers?

Keep in an airtight container 3–4 days. Reheat with a splash of broth to revive the rice.

Can I freeze this dish?

Absolutely! Freeze portions for up to 3 months. Thaw overnight before reheating.

What sides pair well with BBQ chicken and rice?

Try a crisp avocado salad or roasted Brussels sprouts for balance.

There you have it—a skillet dinner that’s as easy to make as it is delicious to eat. Whether you’re wrangling hungry kids after soccer practice or just craving a no-fuss meal that tastes like you spent hours cooking, this Sweet BBQ Chicken and Rice Skillet delivers every time. The next time you’re staring blankly into the fridge at 5:30 PM, remember this recipe: simple, satisfying, and guaranteed to leave everyone asking for seconds. Now, who’s ready to ditch the dishes and dig in?

Print
clock clock iconcutlery cutlery iconflag flag iconfolder folder iconinstagram instagram iconpinterest pinterest iconfacebook facebook iconprint print iconsquares squares iconheart heart iconheart solid heart solid icon

Sweet BBQ Chicken and Rice Skillet


  • Author: SkilletMaster

Description

A one-pan wonder featuring tender chicken, fluffy rice, and a sweet BBQ glaze that comes together in under 30 minutes. Perfect for weeknight dinners with minimal cleanup!


Ingredients

Scale

For the Crust:

  • For the chicken:
  • 1.5 lbs boneless, skinless chicken thighs (cut into 1-inch pieces)
  • 1 tbsp olive oil
  • 1 tsp smoked paprika
  • 1/2 tsp garlic powder
  • 1/2 tsp onion powder
  • Salt and pepper to taste
  • For the skillet:
  • 1 cup long-grain white rice (uncooked)
  • 1.5 cups chicken broth
  • 1/2 cup sweet BBQ sauce
  • 1 red bell pepper (diced)
  • 1 small onion (diced)
  • 2 cloves garlic (minced)
  • For garnish:
  • 2 green onions (sliced)
  • 1 tbsp fresh parsley (chopped)

Instructions

1. Prepare the Crust:

  1. 1. Season chicken pieces with paprika, garlic powder, onion powder, salt, and pepper.
  2. 2. Heat olive oil in large skillet over medium-high heat. Add chicken and cook until browned (5-6 minutes). Remove and set aside.
  3. 3. In same skillet, add onion and bell pepper. Cook 3-4 minutes until softened. Add garlic and cook 30 seconds until fragrant.
  4. 4. Stir in uncooked rice, coating grains with oil. Pour in chicken broth and BBQ sauce, stirring to combine.
  5. 5. Return chicken to skillet, nestling pieces into rice mixture. Bring to boil, then reduce heat to low.
  6. 6. Cover and simmer 18-20 minutes until rice is tender and liquid is absorbed.
  7. 7. Remove from heat. Let stand covered for 5 minutes. Fluff rice with fork.
  8. 8. Garnish with green onions and parsley before serving.

Notes

For spicier version: Add 1/4 tsp cayenne to chicken seasoning. Substitute regular BBQ sauce with spicy variety. Leftovers keep refrigerated for 3 days – add splash of broth when reheating.

Hot Honey Chicken Wings

Hot Honey Chicken Wings: The Perfect Sweet & Spicy Game Day Snack

There’s something magical about the combination of sweet and spicy—especially when it’s slathered over crispy, golden chicken wings. These Hot Honey Chicken Wings are my go-to crowd-pleaser, whether it’s game day, a casual get-together, or just a Tuesday night when I’m craving something indulgent. The sticky glaze, the hint of heat, and that satisfying crunch? Pure perfection.

I first fell in love with hot honey at a little Brooklyn pizzeria, drizzled over pepperoni slices. But when I tried it on wings? Game over. The balance of fiery chili and rich, floral honey takes ordinary wings to superstar status. And the best part? They’re surprisingly easy to make. No deep fryer needed—just a sheet pan, a few pantry staples, and about 45 minutes. Trust me, once you try these, you’ll be making them on repeat.

Why You’ll Love These Hot Honey Chicken Wings

If you need convincing (though one bite will do the trick), here’s why these wings are a must-make:

  • Sweet, spicy, and crispy—the ultimate flavor trifecta.
  • Easy to customize—adjust the heat level to your liking.
  • Baked, not fried—less mess, same delicious crunch.
  • Crowd-friendly—perfect for parties or solo snacking.

How to Make Hot Honey Chicken Wings

Ingredients You’ll Need

  • 2 lbs chicken wings, split at joints
  • 1 tbsp baking powder (for extra crispiness!)
  • 1 tsp salt
  • 1 tsp garlic powder
  • 1/2 cup honey
  • 2 tbsp hot sauce (like Frank’s RedHot)
  • 1 tbsp apple cider vinegar
  • 1 tbsp butter
  • 1/2 tsp crushed red pepper flakes (optional, for extra heat)

Step-by-Step Instructions

  1. Prep the wings: Pat wings dry with paper towels (this helps them crisp up). Toss with baking powder, salt, and garlic powder.
  2. Bake: Arrange wings on a wire rack over a baking sheet. Bake at 425°F for 40–45 minutes, flipping halfway, until golden and crispy.
  3. Make the glaze: In a small saucepan, combine honey, hot sauce, vinegar, butter, and red pepper flakes. Simmer for 3–4 minutes until slightly thickened.
  4. Toss and serve: Drizzle hot honey glaze over wings and toss to coat. Garnish with sesame seeds or chopped parsley if desired.

Tips for the Best Hot Honey Wings

Want to take these wings to the next level? Here are my pro tips:

  • Dry those wings! Moisture is the enemy of crispiness. Pat them thoroughly before seasoning.
  • Baking powder is key. It helps create that restaurant-style crunch without frying.
  • Double the glaze. Because let’s be honest—extra sauce is always a good idea.
  • Serve with cooling sides. A creamy ranch dressing or blue cheese dip balances the heat.

Pairing Suggestions

These wings are fantastic on their own, but if you’re serving them as part of a spread, try pairing them with:

  • A crisp, cold beer (an IPA works great with the spice)
  • A simple coleslaw for crunch
  • Loaded potato skins or potato wedges

Frequently Asked Questions

Can I make hot honey chicken wings ahead of time?
Yes! Bake the wings and store them (un-sauced) in the fridge for up to 2 days. Reheat in the oven, then toss with warmed glaze.

How spicy are these wings?
The heat level depends on your hot sauce. For milder wings, use less hot sauce or a sweet chili sauce instead.

Can I use an air fryer?
Absolutely! Air fry at 400°F for 20–25 minutes, shaking the basket occasionally.

What’s the best honey for hot honey glaze?
I prefer raw honey for its floral notes, but any honey works. For a deeper flavor, try buckwheat honey.

Can I use frozen wings?
Yes, but thaw them completely and pat dry to avoid soggy wings.

How do I store leftovers?
Store in an airtight container for up to 3 days. Reheat in the oven to maintain crispiness.

There you have it—the ultimate Hot Honey Chicken Wings recipe that’s guaranteed to disappear fast. Whether you’re hosting friends, treating yourself, or just need a little spicy-sweet comfort, these wings deliver every time. Don’t be surprised if they become your new signature dish. And hey, if you’re feeling adventurous, try drizzling leftover hot honey on pizza, fried chicken, or even roasted veggies. Trust me, it’s life-changing.

Print
clock clock iconcutlery cutlery iconflag flag iconfolder folder iconinstagram instagram iconpinterest pinterest iconfacebook facebook iconprint print iconsquares squares iconheart heart iconheart solid heart solid icon

Hot Honey Chicken Wings


  • Author: Chef Alex

Description

Crispy baked chicken wings coated in a sweet and spicy hot honey glaze, perfect for game day or any gathering. These wings are sticky, flavorful, and have just the right amount of heat.


Ingredients

Scale

For the Crust:

  • For the wings:
  • 2 lbs chicken wings, split into drumettes and flats
  • 1 tbsp baking powder
  • 1 tsp salt
  • 1 tsp black pepper
  • 1 tsp garlic powder
  • 1 tsp paprika
  • For the hot honey glaze:
  • 1/2 cup honey
  • 2 tbsp hot sauce (such as Frank’s RedHot)
  • 2 tbsp unsalted butter
  • 1 tbsp apple cider vinegar
  • 1/2 tsp crushed red pepper flakes
  • 1/4 tsp salt
  • For garnish:
  • 1 tbsp chopped fresh parsley
  • 1 tsp sesame seeds

Instructions

1. Prepare the Crust:

  1. 1. Preheat oven to 425°F (220°C). Line a baking sheet with aluminum foil and place a wire rack on top.
  2. 2. Pat the chicken wings dry with paper towels. In a large bowl, toss the wings with baking powder, salt, black pepper, garlic powder, and paprika until evenly coated.
  3. 3. Arrange the wings in a single layer on the wire rack. Bake for 45-50 minutes, flipping halfway through, until golden brown and crispy.
  4. 4. While the wings bake, make the hot honey glaze: In a small saucepan over medium heat, combine honey, hot sauce, butter, apple cider vinegar, red pepper flakes, and salt. Simmer for 3-4 minutes, stirring occasionally, until slightly thickened.
  5. 5. Once wings are done, transfer them to a large bowl. Pour the hot honey glaze over the wings and toss until fully coated.
  6. 6. Garnish with chopped parsley and sesame seeds. Serve immediately.

Notes

For extra crispy wings, let them sit uncovered in the refrigerator for 1 hour before baking. Adjust the amount of hot sauce and red pepper flakes to control the spice level. Leftovers can be stored in an airtight container for up to 3 days.

Chicken and Broccoli Alfredo Bake


Chicken and Broccoli Alfredo Bake: A Comforting Weeknight Dinner

There’s something magical about a dish that’s both indulgent and easy to make—especially on those nights when you’re juggling work, kids, and a never-ending to-do list. That’s why this Chicken and Broccoli Alfredo Bake has become a staple in my kitchen. It’s creamy, cheesy, and packed with tender chicken and crisp broccoli, all baked to golden perfection. Plus, it comes together in under an hour, making it the ultimate comfort food for busy weeknights.

I first discovered this recipe when I was craving something hearty but didn’t want to spend hours in the kitchen. Alfredo sauce has always been a weakness of mine (who can resist that velvety richness?), and pairing it with chicken and broccoli felt like a no-brainer. The best part? My kids—who usually turn their noses up at anything green—actually devoured the broccoli without a single complaint. If that’s not a win, I don’t know what is!

Why You’ll Love This Chicken and Broccoli Alfredo Bake

This dish is a crowd-pleaser for so many reasons. Here are just a few:

  • Easy to make: No fancy techniques or hard-to-find ingredients—just simple, wholesome goodness.
  • Family-friendly: Even picky eaters will love the creamy Alfredo sauce and tender chicken.
  • Meal-prep friendly: Make it ahead and reheat for a quick dinner later in the week.
  • Versatile: Swap the broccoli for spinach or add mushrooms for extra flavor.

How to Make Chicken and Broccoli Alfredo Bake

This recipe is as straightforward as it gets. Here’s how to bring it to life:

Ingredients You’ll Need

  • 2 cups cooked chicken, shredded or diced
  • 3 cups broccoli florets, steamed
  • 16 oz fettuccine or penne pasta
  • 2 cups Alfredo sauce (homemade or store-bought)
  • 1 cup shredded mozzarella cheese
  • ½ cup grated Parmesan cheese
  • 1 tsp garlic powder
  • Salt and pepper to taste

Step-by-Step Instructions

  1. Preheat your oven to 375°F (190°C) and grease a 9×13-inch baking dish.
  2. Cook the pasta according to package instructions, then drain and set aside.
  3. In a large bowl, combine the cooked pasta, chicken, broccoli, Alfredo sauce, garlic powder, salt, and pepper. Mix well.
  4. Transfer the mixture to the baking dish and top with mozzarella and Parmesan cheeses.
  5. Bake for 20–25 minutes, or until the cheese is bubbly and golden brown.
  6. Let it cool for a few minutes before serving. Enjoy!

Tips for the Best Alfredo Bake

Want to take this dish to the next level? Try these pro tips:

  • Make your own Alfredo sauce: It’s easier than you think! Check out my Homemade Alfredo Sauce Recipe for a foolproof version.
  • Add a crunchy topping: Sprinkle breadcrumbs mixed with melted butter over the cheese for extra texture.
  • Use rotisserie chicken: A store-bought rotisserie chicken saves time and adds delicious flavor.

Frequently Asked Questions

Can I use frozen broccoli?

Absolutely! Just thaw and drain it well to avoid excess moisture in the bake.

Can I make this dish ahead of time?

Yes! Assemble the bake, cover it, and refrigerate for up to 24 hours before baking. You may need to add a few extra minutes to the baking time.

What’s the best pasta for Chicken and Broccoli Alfredo Bake?

Short pasta like penne or rotini works great, but fettuccine or linguine also hold up well. For more pasta tips, see my guide to the best pasta for casseroles.

Can I use a different cheese?

Of course! Try Gruyère, fontina, or even a sprinkle of cheddar for a twist.

How do I store leftovers?

Keep them in an airtight container in the fridge for up to 3 days. Reheat in the oven or microwave.

Is this recipe freezer-friendly?

Yes! Freeze before baking, then thaw overnight in the fridge before cooking. For more freezer meal ideas, visit Eating Well’s freezer meal guide.

Whether you’re feeding a hungry family or just craving some comfort food, this Chicken and Broccoli Alfredo Bake is sure to hit the spot. It’s the kind of meal that feels like a warm hug—simple, satisfying, and full of love. So grab your baking dish and get ready to enjoy a dish that’s as easy to make as it is delicious!


Print
clock clock iconcutlery cutlery iconflag flag iconfolder folder iconinstagram instagram iconpinterest pinterest iconfacebook facebook iconprint print iconsquares squares iconheart heart iconheart solid heart solid icon

Chicken and Broccoli Alfredo Bake


  • Author: Chef Maria

Description

A creamy, cheesy Alfredo bake loaded with tender chicken and fresh broccoli, perfect for a comforting family dinner.


Ingredients

Scale

For the Crust:

  • For the Alfredo Sauce:
  • 1/2 cup unsalted butter
  • 2 cups heavy cream
  • 2 cloves garlic, minced
  • 1 1/2 cups grated Parmesan cheese
  • 1/4 teaspoon black pepper
  • 1/4 teaspoon salt
  • For the Bake:
  • 2 cups cooked chicken, shredded or diced
  • 3 cups broccoli florets, steamed
  • 8 oz fettuccine pasta, cooked al dente
  • 1 cup shredded mozzarella cheese
  • 1/2 cup shredded cheddar cheese
  • 1/4 teaspoon Italian seasoning
  • 1/4 teaspoon paprika (optional)

Instructions

1. Prepare the Crust:

  1. Preheat oven to 375°F (190°C). Lightly grease a 9×13-inch baking dish.
  2. In a saucepan over medium heat, melt butter. Add minced garlic and sauté until fragrant (about 1 minute).
  3. Pour in heavy cream, stirring constantly. Bring to a gentle simmer.
  4. Gradually whisk in Parmesan cheese until fully melted and smooth. Season with salt and black pepper. Remove from heat.
  5. In a large bowl, combine cooked pasta, chicken, and steamed broccoli. Pour Alfredo sauce over and mix well.
  6. Transfer mixture to the prepared baking dish. Sprinkle mozzarella and cheddar cheese on top, followed by Italian seasoning and paprika (if using).
  7. Bake for 20-25 minutes, or until cheese is bubbly and golden.
  8. Let cool for 5 minutes before serving.

Notes

For extra crispiness, broil for the last 2-3 minutes. Leftovers can be refrigerated for up to 3 days.

Spinach and Feta Stuffed Chicken

Spinach and Feta Stuffed Chicken: A Flavorful Weeknight Wonder

There’s something magical about a dish that feels fancy but is secretly easy to pull off—especially on a busy weeknight. That’s exactly what this Spinach and Feta Stuffed Chicken delivers. With juicy chicken breasts stuffed with creamy feta, garlicky spinach, and a hint of lemon, it’s a meal that tastes like you spent hours in the kitchen (when really, it comes together in under 30 minutes). Whether you’re cooking for your family or hosting a last-minute dinner party, this recipe is a lifesaver.

I first discovered this dish during a chaotic week when my fridge was nearly empty except for a block of feta, a bag of spinach, and some chicken breasts. Desperation led to experimentation, and voilà—a new family favorite was born. Now, it’s my go-to when I need a meal that’s both nourishing and indulgent. Plus, it pairs beautifully with a simple side salad or roasted potatoes. If you love dishes that are as versatile as they are delicious, you’ll adore this one.

Why You’ll Love This Spinach and Feta Stuffed Chicken

This recipe checks all the boxes: quick, healthy, and packed with flavor. Here’s why it’s a winner:

  • Protein-packed: Chicken breasts are lean and filling, making this dish satisfying without being heavy.
  • Veggie-loaded: Spinach adds a boost of iron and vitamins, sneaking in greens effortlessly.
  • Easy to customize: Swap feta for goat cheese or add sun-dried tomatoes for extra zing.
  • Meal-prep friendly: Make a batch ahead and reheat for lunches or dinners all week.

How to Make Spinach and Feta Stuffed Chicken

This recipe is straightforward, but a few tips ensure perfection every time:

  1. Butterfly the chicken: Slice each breast horizontally, leaving one edge intact to create a pocket.
  2. Sauté the filling: Cook spinach with garlic and olive oil until wilted, then mix with crumbled feta.
  3. Stuff and sear: Fill each chicken breast, secure with toothpicks, and pan-sear until golden.
  4. Finish in the oven: Bake until the chicken reaches 165°F for juicy, tender results.

Recipe Tips for Success

Want to take this dish to the next level? Try these tricks:

  • Add a sprinkle of red pepper flakes for a subtle kick.
  • Use kitchen twine instead of toothpicks for easier slicing.
  • Let the chicken rest for 5 minutes before cutting to lock in juices.

Serving Suggestions

Pair this stuffed chicken with:

  • A crisp Greek salad for a Mediterranean twist.
  • Garlic mashed potatoes or roasted vegetables for a cozy meal.
  • A drizzle of balsamic glaze for extra depth.

Frequently Asked Questions

Can I use frozen spinach? Yes! Thaw and squeeze out excess water before using.

How do I store leftovers? Keep in an airtight container for up to 3 days; reheat gently in the oven.

Can I grill this stuffed chicken? Absolutely—just secure the filling well and cook over medium heat.

What’s a good feta substitute? Goat cheese or ricotta work beautifully.

How do I prevent the filling from leaking? Don’t overstuff, and seal the edges tightly.

Is this recipe gluten-free? Yes, as long as you skip breadcrumbs (or use a GF version).

There you have it—a dish that’s as fun to make as it is to eat. Whether you’re a seasoned cook or just starting out, this Spinach and Feta Stuffed Chicken is sure to impress. For more easy dinner ideas, check out my weeknight meal roundup. Happy cooking!

Print
clock clock iconcutlery cutlery iconflag flag iconfolder folder iconinstagram instagram iconpinterest pinterest iconfacebook facebook iconprint print iconsquares squares iconheart heart iconheart solid heart solid icon

Spinach and Feta Stuffed Chicken


  • Author: Chef Maria

Description

A delicious and healthy dish featuring tender chicken breasts stuffed with a creamy spinach and feta filling, baked to perfection. This recipe is perfect for a weeknight dinner or a special occasion.


Ingredients

Scale

For the Crust:

  • For the Chicken:
  • 4 boneless, skinless chicken breasts
  • 1 tablespoon olive oil
  • 1 teaspoon salt
  • 1/2 teaspoon black pepper
  • 1 teaspoon garlic powder
  • For the Filling:
  • 2 cups fresh spinach, chopped
  • 1/2 cup crumbled feta cheese
  • 4 ounces cream cheese, softened
  • 1/4 cup grated Parmesan cheese
  • 1 teaspoon dried oregano
  • 1/2 teaspoon garlic powder
  • 1/4 teaspoon red pepper flakes (optional)
  • For Garnish:
  • Fresh parsley, chopped
  • Lemon wedges

Instructions

1. Prepare the Crust:

  1. Preheat the oven to 375°F (190°C).
  2. In a mixing bowl, combine the chopped spinach, feta cheese, cream cheese, Parmesan cheese, oregano, garlic powder, and red pepper flakes (if using). Mix well until fully combined.
  3. Using a sharp knife, carefully cut a pocket into the side of each chicken breast, being careful not to cut all the way through.
  4. Stuff each chicken breast with the spinach and feta mixture, then secure the opening with toothpicks if needed.
  5. Rub the outside of each chicken breast with olive oil, then season with salt, black pepper, and garlic powder.
  6. Place the stuffed chicken breasts in a baking dish and bake for 25-30 minutes, or until the internal temperature reaches 165°F (74°C).
  7. Remove from the oven and let rest for 5 minutes before serving.
  8. Garnish with fresh parsley and serve with lemon wedges on the side.

Notes

For extra flavor, you can add sun-dried tomatoes or roasted red peppers to the filling. If you prefer a crispier exterior, broil the chicken for the last 2-3 minutes of cooking.

Sweet BBQ Chicken and Rice Skillet

Sweet BBQ Chicken and Rice Skillet: A One-Pan Family Favorite

There’s something magical about a meal that comes together in a single skillet—less cleanup, more flavor, and that cozy feeling of comfort food without the fuss. This Sweet BBQ Chicken and Rice Skillet is exactly that kind of dish. Imagine juicy chicken thighs glazed in a sticky-sweet BBQ sauce, nestled into fluffy rice that soaks up all those smoky, tangy flavors. It’s the kind of dinner that makes everyone at the table pause mid-bite to say, “Wow, this is good.”

As a mom of two picky eaters (who somehow transform into food critics at dinnertime), I’m always on the hunt for recipes that are quick, adaptable, and packed with flavor. This skillet meal checks all the boxes. Plus, it’s forgiving—swap the veggies, adjust the spice level, or use whatever BBQ sauce you have lurking in your fridge. It’s also a great way to repurpose leftover rice, which I wrote about here. Trust me, this dish is about to become your weeknight MVP.

Why You’ll Love This Sweet BBQ Chicken and Rice Skillet

Here’s why this recipe deserves a permanent spot in your rotation:

  • One-pan wonder: Fewer dishes = more happiness.
  • Kid-approved: The sweet BBQ sauce is a universal crowd-pleaser.
  • Meal-prep friendly: Tastes even better as leftovers.
  • Customizable: Add bell peppers, black beans, or a sprinkle of cheese.

How to Make Sweet BBQ Chicken and Rice Skillet

Ingredients You’ll Need

  • 1 lb boneless, skinless chicken thighs (or breasts)
  • 1 cup long-grain white rice (or jasmine rice)
  • 1 ½ cups chicken broth
  • ½ cup BBQ sauce (I love Stubbs or Sweet Baby Ray’s)
  • 1 small onion, diced
  • 2 cloves garlic, minced
  • 1 tbsp olive oil
  • Salt, pepper, and smoked paprika to taste

Step-by-Step Instructions

  1. Sear the chicken: Heat oil in a large skillet over medium-high. Season chicken with salt, pepper, and paprika, then sear for 4–5 minutes per side until golden. Remove and set aside.
  2. Sauté the aromatics: In the same skillet, add onion and garlic, cooking until soft (about 3 minutes).
  3. Add rice and liquids: Stir in rice, then pour in chicken broth and BBQ sauce. Scrape up any browned bits—that’s flavor gold!
  4. Simmer and finish: Return chicken to the skillet, nestling it into the rice. Cover, reduce heat to low, and cook for 18–20 minutes until rice is tender. Let rest for 5 minutes before serving.

Recipe Tips & Tricks

Want to take this dish to the next level? Here’s how:

  • For extra smokiness, add a pinch of cumin or a dash of liquid smoke.
  • Short on time? Use pre-cooked rice and reduce the broth to ½ cup.
  • Garnish with fresh cilantro or green onions for a pop of color.

Fun story: The first time I made this, my husband (who claims he “doesn’t like sweet dinners”) went back for thirds. Now it’s on our monthly meal plan—proof that even the skeptics can’t resist BBQ-glazed chicken!

Pairing Suggestions

Serve this skillet with a simple side salad (try my 5-Minute Avocado Salad) or roasted veggies. A cold beer or sparkling lemonade balances the sweetness perfectly.

Frequently Asked Questions

Can I use frozen chicken for this BBQ chicken skillet?
Yes! Thaw it first for even cooking, or add 5–7 extra minutes to the simmer time.

What’s the best rice for skillet meals?
Long-grain white rice or jasmine rice works best—avoid quick-cook or instant varieties, which can turn mushy.

How do I store leftover BBQ chicken and rice?
Keep it in an airtight container for up to 3 days. Reheat with a splash of broth to revive the rice.

Can I make this recipe gluten-free?
Absolutely! Use GF BBQ sauce (like this one) and ensure your broth is gluten-free.

Is this dish spicy?
Not unless you want it to be! For heat, add diced jalapeños or a pinch of cayenne.

Can I substitute chicken with another protein?
Pork chops or shrimp would be delicious—just adjust cooking times accordingly.

There you have it—a fuss-free, flavor-packed dinner that’s as easy to make as it is to love. Whether you’re feeding a hungry family or meal-prepping for the week, this Sweet BBQ Chicken and Rice Skillet is guaranteed to deliver smiles (and clean plates). Now, who’s ready to dig in?

Print
clock clock iconcutlery cutlery iconflag flag iconfolder folder iconinstagram instagram iconpinterest pinterest iconfacebook facebook iconprint print iconsquares squares iconheart heart iconheart solid heart solid icon

Sweet BBQ Chicken and Rice Skillet


  • Author: Chef Jamie

Description

A one-pan wonder that combines tender chicken, fluffy rice, and a sweet BBQ glaze for a quick and delicious weeknight meal. Perfect for busy families!


Ingredients

Scale

For the Crust:

  • For the chicken:
  • 1.5 lbs boneless, skinless chicken thighs
  • 1 tbsp olive oil
  • 1 tsp smoked paprika
  • 1/2 tsp garlic powder
  • Salt and pepper to taste
  • For the rice:
  • 1 cup long-grain white rice
  • 2 cups chicken broth
  • 1 tbsp butter
  • For the BBQ glaze:
  • 1/2 cup BBQ sauce
  • 2 tbsp honey
  • 1 tbsp apple cider vinegar
  • 1 tsp Worcestershire sauce
  • For garnish:
  • 2 green onions, sliced
  • 1 tbsp chopped fresh parsley

Instructions

1. Prepare the Crust:

  1. 1. Season chicken thighs with paprika, garlic powder, salt, and pepper.
  2. 2. Heat olive oil in large skillet over medium-high heat. Add chicken and cook 5-6 minutes per side until browned. Remove and set aside.
  3. 3. In same skillet, melt butter and add rice. Toast for 1-2 minutes until slightly golden.
  4. 4. Pour in chicken broth, scraping up any browned bits from pan. Bring to simmer.
  5. 5. Return chicken to skillet, nestling pieces into rice. Cover and reduce heat to low. Cook 20 minutes.
  6. 6. Meanwhile, whisk together BBQ sauce, honey, vinegar, and Worcestershire sauce.
  7. 7. After 20 minutes, uncover and brush chicken with BBQ glaze. Cover and cook 5 more minutes.
  8. 8. Remove from heat and let rest 5 minutes. Garnish with green onions and parsley before serving.

Notes

For spicier version, add 1/2 tsp chili powder to chicken seasoning. Leftovers keep well in fridge for 3 days. Reheat with splash of water to prevent drying.