Baked Sweet and Sour Chicken: A Healthier Takeout Fakeout
There’s something about sweet and sour chicken that feels like a warm hug from your favorite takeout spot—except, of course, when you peek at the receipt and realize you’ve spent half your grocery budget on one meal. Sound familiar? That’s why I set out to create a Baked Sweet and Sour Chicken recipe that’s just as crave-worthy but way kinder to your wallet (and waistline). No deep fryer required, just crispy oven-baked chicken smothered in that iconic sticky-sweet sauce you love.
As a mom of two picky eaters, I’ve learned that the secret to winning dinner is balancing nostalgia with nutrition. This dish does both! By baking instead of frying, we keep things light without sacrificing crunch. Plus, the sauce—oh, the sauce!—is a simple mix of pantry staples like honey, ketchup, and apple cider vinegar. It’s the kind of meal that makes my kids cheer while secretly packing veggies into every bite (shh… I add bell peppers and pineapple right into the bake). Ready to ditch the delivery? Let’s get cooking!
Why You’ll Love This Baked Sweet and Sour Chicken
This recipe isn’t just a healthier alternative—it’s a game-changer for busy weeknights. Here’s why:
No frying, no fuss: Skip the greasy mess and let your oven do the work.
Meal-prep magic: Doubles beautifully for leftovers (the sauce gets even better overnight!).
Kid-approved: Even the pickiest eaters gobble it up—trust me, I’ve tested this on my tiny critics.
Customizable: Swap chicken for tofu or add extra veggies like broccoli or snap peas.
How to Make Baked Sweet and Sour Chicken
Ingredients You’ll Need
1.5 lbs boneless, skinless chicken thighs or breasts, cubed
1 cup cornstarch (for that crave-worthy crisp)
2 eggs, beaten
1 red bell pepper, chopped
1 cup pineapple chunks (fresh or canned)
1/3 cup honey or maple syrup
1/4 cup ketchup
2 tbsp apple cider vinegar
1 tbsp soy sauce (or coconut aminos for gluten-free)
1 tsp garlic powder
Salt and pepper to taste
Step-by-Step Instructions
Prep the chicken: Preheat oven to 400°F (200°C). Dip chicken cubes in beaten egg, then coat evenly in cornstarch. Arrange on a parchment-lined baking sheet.
Bake first: Bake for 15 minutes, flip, then bake another 10 minutes until golden.
Make the sauce: Whisk honey, ketchup, vinegar, soy sauce, and garlic powder in a bowl. Taste and adjust sweetness/tang as needed.
Combine and finish: Toss baked chicken, bell pepper, and pineapple in sauce. Return to oven for 5–7 minutes until bubbly. Serve over fluffy rice or quinoa!
Pro Tips for the Best Results
Want restaurant-quality results? Here are my secrets:
Don’t skip the cornstarch: It’s the key to that crispy texture without frying. For extra crunch, spritz the coated chicken with oil before baking.
Use thighs for juiciness: Chicken breasts work, but thighs stay tender. (Learn more about choosing chicken cuts.)
Broil at the end: For extra caramelization, broil for 1–2 minutes—watch closely!
Baked Sweet and Sour Chicken FAQs
Can I make this gluten-free?
Absolutely! Swap soy sauce for tamari or coconut aminos, and ensure your ketchup is GF.
How do I store leftovers?
Keep in an airtight container for up to 3 days. Reheat in the oven to maintain crispiness.
Can I use frozen chicken?
Yes, but thaw it first—otherwise, the coating won’t stick evenly.
Freeze before baking (sauce separate). Thaw overnight before cooking as directed.
There you have it—a Baked Sweet and Sour Chicken that’s as fun to make as it is to eat. Whether you’re craving takeout vibes without the guilt or need a dinner that pleases the whole family, this recipe’s got your back. And hey, if your kids (or partner) start requesting it weekly like mine do? Don’t say I didn’t warn you. Happy baking!
A healthier take on the classic sweet and sour chicken, baked to perfection with a crispy coating and tangy sauce. This dish is perfect for weeknight dinners and pairs wonderfully with steamed rice.
Ingredients
Scale
For the Crust:
For the Chicken:
1.5 lbs boneless, skinless chicken breasts (cut into 1-inch pieces)
1 cup cornstarch
2 large eggs (beaten)
1/4 cup vegetable oil
Salt and pepper to taste
For the Sweet and Sour Sauce:
3/4 cup granulated sugar
1/2 cup ketchup
1/2 cup apple cider vinegar
1 tbsp soy sauce
1 tsp garlic powder
For Garnish:
2 green onions (sliced)
1 tbsp sesame seeds
Instructions
1. Prepare the Crust:
Preheat oven to 325°F (165°C). Lightly grease a 9×13-inch baking dish.
Season chicken pieces with salt and pepper. Dredge each piece in cornstarch, then dip in beaten eggs.
Heat oil in a large skillet over medium-high heat. Brown chicken pieces in batches for 1-2 minutes per side (they don’t need to be fully cooked). Transfer to prepared baking dish.
In a medium bowl, whisk together all sauce ingredients until smooth. Pour evenly over chicken.
Bake uncovered for 45-50 minutes, stirring every 15 minutes, until chicken is cooked through and sauce has thickened.
Garnish with sliced green onions and sesame seeds before serving.
Notes
For extra crispiness, broil for the last 2-3 minutes of baking. Leftovers keep well refrigerated for up to 3 days. The sauce can be adjusted to taste – add more vinegar for tang or more sugar for sweetness.
Creamy Mushroom Chicken Skillet
Creamy Mushroom Chicken Skillet: A Comforting One-Pan Dinner
There’s something magical about a dish that comes together in a single skillet—less cleanup, more flavor, and that cozy feeling of a home-cooked meal. This Creamy Mushroom Chicken Skillet is exactly that kind of recipe. Picture juicy chicken thighs nestled in a rich, velvety sauce with golden mushrooms and a hint of garlic. It’s the kind of meal that feels fancy but is secretly easy enough for a busy Tuesday night.
I first stumbled upon this recipe during one of those “what’s left in the fridge?” moments. A handful of mushrooms, a lonely chicken breast, and some cream about to expire—sound familiar? Turns out, desperation breeds deliciousness. Now, it’s a regular in my rotation, especially when I need a dinner that feels indulgent without the fuss. Serve it over mashed potatoes (my personal favorite) or buttered noodles, and watch your family’s eyes light up.
Why You’ll Love This Creamy Mushroom Chicken Skillet
This dish checks all the boxes for a perfect weeknight meal:
One-pan wonder: Fewer dishes mean more time to relax.
Pantry-friendly: Uses simple ingredients you likely already have.
Customizable: Swap chicken thighs for breasts or add spinach for extra greens.
Crowd-pleaser: Even picky eaters can’t resist that creamy sauce!
1 cup heavy cream (or half-and-half for a lighter version)
1 tbsp Dijon mustard
1 tsp fresh thyme (or ½ tsp dried)
Salt and pepper to taste
2 tbsp olive oil
Step-by-Step Instructions
Sear the chicken: Heat oil in a large skillet over medium-high. Season chicken with salt and pepper, then cook 5–6 minutes per side until golden. Remove and set aside.
Sauté the mushrooms: In the same pan, add mushrooms and cook until browned (about 5 minutes). Stir in garlic and thyme for 1 minute until fragrant.
Make the sauce: Reduce heat to medium, pour in cream and Dijon mustard, stirring to combine. Simmer for 3–4 minutes until slightly thickened.
Finish and serve: Return chicken to the skillet, spooning sauce over it. Cook 2–3 more minutes to heat through. Garnish with fresh parsley if desired.
Tips for the Best Creamy Mushroom Chicken
Don’t crowd the pan: Give the chicken and mushrooms space to brown properly—cook in batches if needed. Deglaze for extra flavor: A splash of white wine or chicken broth after sautéing mushrooms lifts those tasty browned bits. For a thicker sauce, let it simmer a few extra minutes or add a sprinkle of grated Parmesan.
Frequently Asked Questions
Can I use frozen mushrooms? Fresh mushrooms work best for texture, but in a pinch, thawed frozen mushrooms will do—just pat them dry.
How do I store leftovers? Keep in an airtight container in the fridge for up to 3 days. Reheat gently on the stove with a splash of cream.
What sides go well with this? Try it with garlic mashed potatoes or a crisp green salad.
Can I make this dairy-free? Yes! Swap cream for coconut milk and use olive oil instead of butter. Check out dairy-free substitutes for more ideas.
Why is my sauce too thin? Let it simmer longer, or mix 1 tsp cornstarch with 1 tbsp water and stir it in.
Can I add other vegetables? Absolutely—spinach, sun-dried tomatoes, or bell peppers would be delicious.
Whether you’re craving comfort food or need a quick dinner that feels special, this Creamy Mushroom Chicken Skillet delivers every time. It’s the kind of recipe that becomes a back-pocket favorite—simple enough for weeknights but impressive enough for company. For more one-pan inspiration, explore our easy skillet dinners or learn how to store mushrooms properly to keep them fresh longer. Now, go grab that skillet and let’s get cooking!
A rich and comforting one-pan dish featuring tender chicken and earthy mushrooms in a velvety garlic-herb cream sauce. Perfect for weeknight dinners yet elegant enough for guests.
Ingredients
Scale
For the Crust:
For the chicken:
1.5 lbs boneless, skinless chicken thighs
1 tsp salt
1/2 tsp black pepper
1 tsp paprika
2 tbsp olive oil
For the mushrooms:
8 oz cremini mushrooms, sliced
3 cloves garlic, minced
1 shallot, diced
1 tbsp butter
For the sauce:
1 cup heavy cream
1/2 cup chicken broth
1 tbsp Dijon mustard
1 tsp thyme leaves
1/2 tsp rosemary
1/4 cup grated parmesan
For garnish:
Fresh parsley, chopped
Instructions
1. Prepare the Crust:
1. Season chicken thighs with salt, pepper, and paprika.
2. Heat olive oil in large skillet over medium-high heat. Sear chicken 5-6 minutes per side until golden. Remove and set aside.
3. In same skillet, melt butter. Add mushrooms and cook 5 minutes until browned.
4. Add shallot and garlic, sauté 1 minute until fragrant.
5. Pour in chicken broth to deglaze pan, scraping up browned bits.
6. Stir in heavy cream, Dijon mustard, thyme, and rosemary. Simmer 3 minutes.
7. Return chicken to skillet, spooning sauce over top. Sprinkle with parmesan.
8. Cover and cook 8-10 minutes until chicken reaches 165°F internally.
9. Garnish with fresh parsley before serving.
Notes
For thicker sauce: Mix 1 tsp cornstarch with 1 tbsp water, stir into simmering sauce. Substitute half-and-half for lighter version (sauce will be thinner). Leftovers keep refrigerated for 3 days.
Spinach and Feta Stuffed Chicken
Spinach and Feta Stuffed Chicken: A Flavorful Dinner You’ll Love
There’s something magical about a dish that feels fancy but is secretly easy to make. Spinach and Feta Stuffed Chicken is exactly that—a restaurant-worthy meal you can whip up on a busy weeknight without breaking a sweat. The combination of tender chicken, creamy feta, and earthy spinach creates a harmony of flavors that’s hard to resist. Plus, it’s a fantastic way to sneak in some greens for picky eaters (we won’t tell if you don’t!).
I first discovered this recipe when I needed a quick yet impressive dish for a last-minute dinner party. My friend, who’s a self-proclaimed “chicken skeptic,” took one bite and immediately asked for the recipe. That’s the power of this dish—it turns even the simplest ingredients into something extraordinary. Whether you’re cooking for family, friends, or just treating yourself, this Spinach and Feta Stuffed Chicken is a guaranteed crowd-pleaser. And the best part? It pairs beautifully with just about anything, from roasted potatoes to a crisp salad.
Why You’ll Love This Spinach and Feta Stuffed Chicken
This dish is more than just delicious—it’s versatile, nutritious, and surprisingly simple. Here’s why it’s a must-try:
Quick & Easy: Ready in under 40 minutes, perfect for busy nights.
Healthy & Balanced: Packed with protein from the chicken and nutrients from spinach.
Impressive Presentation: Looks gourmet without the fuss.
Customizable: Swap feta for goat cheese or add sun-dried tomatoes for extra flavor.
How to Make Spinach and Feta Stuffed Chicken
Ingredients You’ll Need
4 boneless, skinless chicken breasts
1 cup fresh spinach, chopped
½ cup crumbled feta cheese
2 cloves garlic, minced
1 tbsp olive oil
½ tsp salt
¼ tsp black pepper
½ tsp dried oregano
Step-by-Step Instructions
Prep the Chicken: Butterfly each chicken breast by slicing horizontally, leaving one edge intact.
Make the Filling: In a bowl, mix spinach, feta, garlic, salt, pepper, and oregano.
Stuff & Secure: Spoon the filling into each chicken breast, then seal with toothpicks.
Cook: Heat olive oil in a skillet over medium heat. Sear chicken for 6–7 minutes per side, until golden and cooked through.
Rest & Serve: Let the chicken rest for 5 minutes before slicing. Enjoy!
Tips for the Best Stuffed Chicken
Want to take this dish to the next level? Try these pro tips:
Pound the Chicken: For even cooking, lightly pound the breasts to an even thickness.
Use Fresh Spinach: Frozen spinach works, but fresh gives a brighter flavor and better texture.
Add a Sauce: Drizzle with a lemon garlic sauce or a creamy pan sauce for extra richness.
Pairing Suggestions
This stuffed chicken is delicious on its own, but here are some sides to complete the meal:
Yes, but make sure to thaw and squeeze out all excess water to avoid a soggy filling.
How do I know when the chicken is fully cooked?
The internal temperature should reach 165°F (75°C) when checked with a meat thermometer.
Can I bake this instead of pan-searing?
Absolutely! Bake at 375°F (190°C) for 25–30 minutes until cooked through.
What can I substitute for feta cheese?
Goat cheese, ricotta, or even cream cheese work well for a different flavor profile.
How do I store leftovers?
Keep in an airtight container in the fridge for up to 3 days. Reheat gently in the oven or microwave.
Can I prepare this ahead of time?
Yes! Assemble the stuffed chicken, cover, and refrigerate for up to 24 hours before cooking.
There you have it—a foolproof recipe for Spinach and Feta Stuffed Chicken that’s as enjoyable to make as it is to eat. Whether you’re cooking for a special occasion or just craving a cozy, flavorful meal, this dish delivers every time. Don’t be surprised if it becomes a regular in your dinner rotation—it’s just that good. Happy cooking!
Juicy chicken breasts stuffed with a creamy spinach and feta filling, baked to perfection. This dish is elegant yet simple, perfect for weeknight dinners or special occasions.
Ingredients
Scale
For the Crust:
For the chicken:
4 boneless, skinless chicken breasts
1 teaspoon salt
1/2 teaspoon black pepper
1 teaspoon garlic powder
1 teaspoon paprika
2 tablespoons olive oil
For the filling:
2 cups fresh spinach, chopped
1/2 cup crumbled feta cheese
4 ounces cream cheese, softened
2 cloves garlic, minced
1/4 teaspoon red pepper flakes
1/4 teaspoon salt
For garnish:
Fresh parsley, chopped
Lemon wedges
Instructions
1. Prepare the Crust:
Preheat oven to 375°F (190°C).
In a bowl, mix together spinach, feta cheese, cream cheese, garlic, red pepper flakes, and salt to make the filling.
Cut a pocket into each chicken breast, being careful not to cut all the way through.
Stuff each chicken breast with the spinach and feta mixture, securing with toothpicks if needed.
Season the outside of the chicken with salt, pepper, garlic powder, and paprika.
Heat olive oil in an oven-safe skillet over medium-high heat. Sear the chicken for 2-3 minutes per side until golden brown.
Transfer the skillet to the oven and bake for 20-25 minutes, or until the chicken reaches an internal temperature of 165°F (74°C).
Garnish with fresh parsley and serve with lemon wedges.
Notes
For extra flavor, you can add sun-dried tomatoes or olives to the filling. Make sure to let the chicken rest for 5 minutes before slicing to keep the juices inside.
Sweet BBQ Chicken and Rice Skillet
Sweet BBQ Chicken and Rice Skillet: A One-Pan Weeknight Hero
There’s something magical about a meal that comes together in a single skillet—less cleanup, more flavor, and that satisfying feeling of pulling off dinner without a mountain of dishes. This Sweet BBQ Chicken and Rice Skillet is my go-to when life feels hectic (which, let’s be honest, is most weeknights). Imagine tender chicken thighs glazed in a sticky-sweet BBQ sauce, nestled into fluffy rice that soaks up all those smoky, tangy juices. It’s the kind of dish that makes everyone at the table ask for seconds—even the picky eaters.
I first stumbled on this recipe during a chaotic phase when my slow cooker was my lifeline. But one evening, I craved something faster and more hands-on. A skillet, a few pantry staples, and 30 minutes later, this dish was born. It’s since become a staple in our rotation, especially when I need a meal that feels comforting but doesn’t demand hours in the kitchen. Plus, it’s endlessly adaptable—swap the BBQ sauce for teriyaki, add a handful of frozen veggies, or sprinkle with crispy bacon for extra indulgence. Dinner wins don’t get easier than this.
Why You’ll Love This Sweet BBQ Chicken and Rice Skillet
One-pan wonder: Minimal cleanup means more time for Netflix (or, you know, parenting).
Weeknight-friendly: Ready in under 45 minutes, start to finish.
Family-approved: The sweet BBQ glaze is a universal crowd-pleaser.
Meal-prep hero: Leftovers taste even better the next day.
1 tsp smoked paprika (for that irresistible depth)
Step-by-Step Instructions
Sear the chicken: Heat oil in a large skillet over medium-high. Season chicken with salt, pepper, and paprika, then sear 4–5 minutes per side until golden. Remove and set aside.
Toast the rice: In the same skillet, add rice and stir 1–2 minutes until lightly toasted (this boosts flavor!).
Simmer: Pour in broth and BBQ sauce, scraping up any browned bits. Nestle chicken back in, cover, and simmer 20 minutes on low.
Rest and serve: Let sit 5 minutes off heat, then fluff rice with a fork. Garnish with fresh parsley if you’re feeling fancy.
Pro Tips for the Best Skillet Dinner
Want to take this dish to the next level? Here are my tried-and-true tricks:
For extra caramelization, broil the skillet for 2–3 minutes before serving.
Short on time? Use instant rice and reduce simmering to 10 minutes.
Add a splash of apple cider vinegar to the BBQ sauce for tangy balance.
Frequently Asked Questions
Can I use chicken breasts instead of thighs? Absolutely! Just reduce cooking time by 3–4 minutes to avoid dryness.
What’s the best BBQ sauce for this recipe? A smoky-sweet sauce works best—try my homemade BBQ sauce for control over sweetness.
Can I make this gluten-free? Yes! Use tamari-based BBQ sauce and ensure your broth is GF.
How do I store leftovers? Keep in an airtight container for up to 3 days. Reheat with a splash of water to revive the rice.
Can I add vegetables? Toss in diced bell peppers or frozen peas with the rice for a veggie boost.
What pairs well with this dish? A simple garlic bread or crisp green salad balances the richness.
Whether you’re juggling work, kids, or just the general chaos of adulthood, this Sweet BBQ Chicken and Rice Skillet is here to save your dinner—and your sanity. It’s proof that the best meals don’t need to be complicated. Now, go forth and conquer that skillet. (And maybe hide the leftovers for lunch tomorrow—you deserve it.)
A one-pan wonder featuring tender chicken, fluffy rice, and a sweet BBQ glaze that comes together in under 30 minutes. Perfect for weeknight dinners!
Ingredients
Scale
For the Crust:
For the chicken:
1.5 lbs boneless, skinless chicken thighs
1 tbsp olive oil
1 tsp smoked paprika
1/2 tsp garlic powder
1/2 tsp salt
For the rice:
1 cup long-grain white rice
2 cups chicken broth
For the sauce:
1/2 cup BBQ sauce
2 tbsp honey
1 tbsp apple cider vinegar
For garnish:
2 green onions, sliced
1 tbsp chopped fresh parsley
Instructions
1. Prepare the Crust:
1. Season chicken thighs with paprika, garlic powder, and salt.
2. Heat olive oil in large skillet over medium-high heat. Add chicken and cook 5 minutes per side until browned. Remove and set aside.
3. In same skillet, add rice and toast for 1 minute. Pour in chicken broth and stir to combine.
4. Return chicken to skillet, nestling pieces into rice. Cover and simmer for 15 minutes.
5. Meanwhile, whisk together BBQ sauce, honey, and vinegar in small bowl.
6. After 15 minutes, uncover and brush chicken with sauce. Cook uncovered 5 more minutes until sauce thickens.
7. Garnish with green onions and parsley before serving.
Notes
For spicier version, add 1/4 tsp cayenne to chicken seasoning. Leftovers keep well refrigerated for 3 days. Reheat with splash of water to prevent drying.
Hot Honey Chicken Wings
Hot Honey Chicken Wings: The Perfect Sweet & Spicy Game-Day Bite
There’s something magical about the combination of sweet and spicy—especially when it’s drizzled over crispy, golden chicken wings. If you’ve ever found yourself torn between honey’s comforting sweetness and the fiery kick of hot sauce, these Hot Honey Chicken Wings are your dream come true. They’re sticky, crunchy, and packed with flavor, making them the ultimate crowd-pleaser for game day, potlucks, or even a cozy night in.
I’ll never forget the first time I made these wings for my husband. He took one bite, paused, and said, You’re never allowed to make any other kind of wings again. High praise from a man who usually defaults to classic buffalo! The secret? A simple glaze that balances heat and sweetness without overpowering the juicy, tender meat inside. Plus, they’re surprisingly easy to whip up—no deep fryer required. Whether you’re hosting friends or just treating yourself, these wings are guaranteed to disappear fast.
Why You’ll Love These Hot Honey Chicken Wings
If you need more convincing (though I doubt you will after the first bite), here’s why this recipe is a keeper:
Perfectly balanced: The honey mellows out the heat, creating a flavor that’s bold but not overwhelming.
Crispy without frying: Baking powder in the dry rub ensures ultra-crispy skin—no messy deep-frying needed.
Quick to make: Just 10 minutes of prep, then let the oven do the work while you relax.
Versatile: Serve them as an appetizer, main dish, or even alongside healthy mac and cheese for the ultimate comfort meal.
How to Make Hot Honey Chicken Wings
Ingredients You’ll Need
2 lbs chicken wings (split into drumettes and flats)
Yes! Bake the wings and store them (un-sauced) in the fridge for up to 2 days. Reheat in the oven at 375°F for 10 minutes, then add the glaze fresh.
What’s the best hot sauce for hot honey wings?
Frank’s RedHot or Texas Pete work well, but feel free to experiment with your favorite. For a smoky twist, try chipotle hot sauce.
Are these wings gluten-free?
Yes, as long as your hot sauce and baking powder are gluten-free (most are). Always check labels to be sure.
Can I use frozen wings?
Fresh is best, but if using frozen, thaw completely and pat them extra dry to avoid soggy skin.
How spicy are these wings?
The heat level is mild-medium. For less spice, reduce the hot sauce; for more, add a dash of cayenne or chili flakes.
What sides go well with hot honey wings?
Try cooling sides like coleslaw, cucumber salad, or cornbread to balance the heat.
There you have it—the ultimate Hot Honey Chicken Wings that’ll have everyone asking for the recipe. Whether you’re serving them up for game day, a summer BBQ, or just because, they’re guaranteed to be a hit. The sweet-sticky glaze, the crispy skin, the tender meat… it’s a trifecta of deliciousness that’s impossible to resist. So go ahead, make a double batch—trust me, you’ll want leftovers (but probably won’t get any). Happy cooking!
These Hot Honey Chicken Wings are the perfect combination of sweet and spicy, with a sticky glaze that will have everyone licking their fingers. Crispy on the outside, tender on the inside, and packed with flavor, they’re ideal for game day, parties, or any casual gathering.
Ingredients
Scale
For the Crust:
For the wings:
2 lbs chicken wings, split into drumettes and flats
1 tbsp baking powder
1 tsp salt
1 tsp black pepper
1 tsp garlic powder
1 tsp paprika
For the hot honey glaze:
1/2 cup honey
2 tbsp hot sauce (like Frank’s RedHot)
2 tbsp unsalted butter
1 tbsp apple cider vinegar
1/2 tsp crushed red pepper flakes
1/4 tsp salt
For garnish:
1/4 cup chopped fresh parsley
1 tbsp sesame seeds
Instructions
1. Prepare the Crust:
Preheat oven to 425°F (220°C). Line a baking sheet with aluminum foil and place a wire rack on top.
Pat the chicken wings dry with paper towels. In a large bowl, toss the wings with baking powder, salt, black pepper, garlic powder, and paprika until evenly coated.
Arrange the wings in a single layer on the wire rack. Bake for 45-50 minutes, flipping halfway through, until golden brown and crispy.
While the wings bake, prepare the hot honey glaze. In a small saucepan over medium heat, combine honey, hot sauce, butter, apple cider vinegar, red pepper flakes, and salt. Simmer for 3-4 minutes, stirring occasionally, until slightly thickened.
Once the wings are done, transfer them to a large bowl. Pour the hot honey glaze over the wings and toss until evenly coated.
Garnish with chopped parsley and sesame seeds before serving. Serve immediately with extra hot sauce and ranch or blue cheese dressing if desired.
Notes
For extra crispy wings, let them air-dry in the refrigerator for 1 hour before seasoning and baking. Adjust the amount of hot sauce and red pepper flakes to control the spice level. Leftovers can be stored in an airtight container in the refrigerator for up to 3 days; reheat in the oven or air fryer to maintain crispiness.
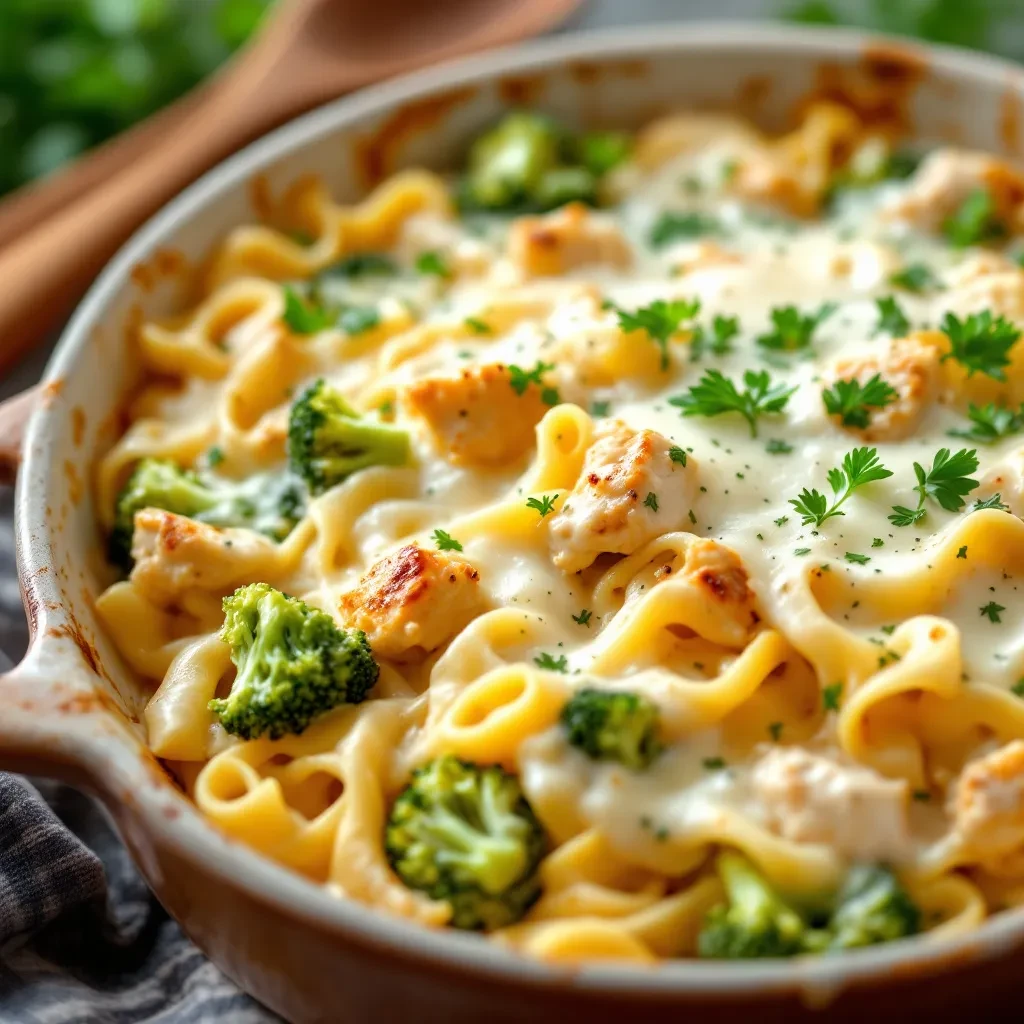
Chicken and Broccoli Alfredo Bake
Chicken and Broccoli Alfredo Bake: A Creamy, Comforting Weeknight Dinner
There’s something magical about a dish that’s both indulgent and easy to throw together on a busy weeknight. Enter: Chicken and Broccoli Alfredo Bake. This creamy, cheesy casserole is the kind of meal that feels like a hug in a baking dish—comforting, satisfying, and packed with flavor. Whether you’re feeding a hungry family or meal-prepping for the week, this recipe is a lifesaver.
I first discovered this dish during one of those chaotic evenings when my fridge was nearly empty, but I still wanted something hearty. A leftover chicken breast, a handful of broccoli, and a jar of Alfredo sauce later, this bake was born. Now, it’s a regular in my rotation, and I’ve perfected it with homemade Alfredo sauce (though no judgment if you go the store-bought route!). The best part? It’s customizable—swap in your favorite veggies or add a sprinkle of red pepper flakes for a little kick.
Why You’ll Love This Chicken and Broccoli Alfredo Bake
This dish checks all the boxes for a perfect weeknight dinner:
Quick and easy: Ready in under an hour with minimal prep.
Crowd-pleaser: Creamy Alfredo, tender chicken, and fresh broccoli—what’s not to love?
Meal-prep friendly: Reheats beautifully for lunches or leftovers.
Versatile: Swap ingredients based on what you have on hand.
How to Make Chicken and Broccoli Alfredo Bake
Ingredients You’ll Need
2 cups cooked chicken, shredded or diced
3 cups broccoli florets, steamed or blanched
2 cups Alfredo sauce (homemade or store-bought)
8 oz pasta (penne or rotini work great)
1 cup shredded mozzarella cheese
½ cup grated Parmesan cheese
1 tsp garlic powder
Salt and pepper to taste
Step-by-Step Instructions
Preheat your oven to 375°F (190°C) and grease a 9×13-inch baking dish.
Cook the pasta according to package instructions until al dente. Drain and set aside.
Mix the ingredients in a large bowl: pasta, chicken, broccoli, Alfredo sauce, garlic powder, salt, and pepper.
Transfer to the baking dish and top with mozzarella and Parmesan.
Bake for 20–25 minutes until bubbly and golden on top.
Let it rest for 5 minutes before serving.
Recipe Tips and Variations
Here are a few ways to make this dish your own:
Add veggies: Try spinach, mushrooms, or bell peppers for extra nutrition.
Spice it up: A dash of cayenne or red pepper flakes adds a nice kick.
Make it ahead: Assemble the bake, cover, and refrigerate overnight. Bake when ready!
Use rotisserie chicken: A time-saving hack for busy nights.
Can I use frozen broccoli?
Yes! Just thaw and drain it well to avoid excess moisture.
How do I store leftovers?
Keep in an airtight container in the fridge for up to 3 days. Reheat in the oven or microwave.
Can I freeze this bake?
Absolutely! Freeze before baking, then thaw and bake as directed (add a few extra minutes if needed).
What’s the best pasta for this dish?
Short shapes like penne, rotini, or farfalle hold the sauce well.
Can I make this gluten-free?
Yes! Use gluten-free pasta and check your Alfredo sauce ingredients.
How can I make a lighter version?
Try using low-fat Alfredo sauce, less cheese, or adding more veggies.
There you have it—a creamy, dreamy Chicken and Broccoli Alfredo Bake that’s as easy as it is delicious. Whether you’re cooking for a crowd or just craving some comfort food, this dish delivers every time. For more cozy dinner ideas, don’t miss my Creamy Garlic Parmesan Pasta, another family favorite. Happy cooking!
A creamy, comforting pasta bake featuring tender chicken, fresh broccoli, and rich Alfredo sauce, topped with melted cheese for the ultimate weeknight dinner.
Ingredients
Scale
For the Crust:
For the pasta:
12 oz fettuccine pasta
For the chicken:
1 lb boneless, skinless chicken breasts (cut into 1-inch pieces)
1 tbsp olive oil
1/2 tsp salt
1/4 tsp black pepper
1/2 tsp garlic powder
For the vegetables:
3 cups broccoli florets (fresh or frozen)
For the sauce:
2 cups heavy cream
1/2 cup unsalted butter
3 cloves garlic (minced)
1 1/2 cups grated Parmesan cheese
1/4 tsp nutmeg
1/2 tsp salt
1/4 tsp black pepper
For topping:
1 1/2 cups shredded mozzarella cheese
1/4 cup grated Parmesan cheese
1 tbsp chopped fresh parsley
Instructions
1. Prepare the Crust:
1. Preheat oven to 375°F (190°C). Grease a 9×13-inch baking dish.
2. Cook fettuccine according to package instructions until al dente. Drain and set aside.
3. Season chicken pieces with salt, pepper, and garlic powder. Heat olive oil in a skillet over medium-high heat and cook chicken until no longer pink (5-6 minutes). Remove from heat.
4. In the same skillet, melt butter over medium heat. Add garlic and cook for 30 seconds until fragrant.
5. Pour in heavy cream, stirring constantly. Bring to a simmer and cook for 2 minutes.
6. Reduce heat to low and gradually whisk in Parmesan cheese until smooth. Add nutmeg, salt, and pepper.
7. In a large bowl, combine cooked pasta, chicken, broccoli, and Alfredo sauce. Mix well.
8. Transfer mixture to prepared baking dish. Top with mozzarella and remaining Parmesan.
9. Bake for 20-25 minutes until bubbly and cheese is golden brown.
10. Garnish with fresh parsley before serving.
Notes
For a crispier top, broil for the last 2-3 minutes. Substitute half-and-half for heavy cream for a lighter version. Leftovers keep well refrigerated for 3 days.
Chicken and Broccoli Alfredo Bake
Chicken and Broccoli Alfredo Bake: A Creamy, Comforting Weeknight Dinner
There’s something magical about a dish that’s both indulgent and easy to throw together on a busy weeknight. Enter this Chicken and Broccoli Alfredo Bake—a creamy, cheesy, and utterly satisfying meal that’ll have your family asking for seconds (and thirds!). Whether you’re juggling work, school, or just life in general, this recipe is here to save the day with minimal effort and maximum flavor.
I first stumbled upon this dish when I needed a quick dinner solution that didn’t skimp on comfort. My kids were skeptical about the broccoli (as kids often are), but once it was smothered in that rich Alfredo sauce and baked to golden perfection, even the pickiest eater at the table was won over. Now, it’s a regular in our rotation, and I’m thrilled to share it with you. Bonus: It’s a fantastic way to sneak in some veggies without the usual dinner-table negotiations!
Why You’ll Love This Chicken and Broccoli Alfredo Bake
This dish checks all the boxes for a perfect weeknight meal:
One-pan wonder: Less cleanup means more time to relax.
Kid-friendly: Creamy Alfredo sauce makes even broccoli irresistible.
Meal-prep friendly: Make ahead and reheat for lunches or another dinner.
Customizable: Swap in your favorite protein or veggies if you’d like!
How to Make Chicken and Broccoli Alfredo Bake
Ingredients You’ll Need
2 cups cooked chicken, shredded or diced
3 cups broccoli florets, steamed or blanched
16 oz fettuccine or penne pasta
2 cups Alfredo sauce (homemade or store-bought)
1 cup shredded mozzarella cheese
½ cup grated Parmesan cheese
1 tsp garlic powder
½ tsp black pepper
Fresh parsley for garnish (optional)
Step-by-Step Instructions
Preheat your oven to 375°F (190°C) and lightly grease a 9×13-inch baking dish.
Cook the pasta according to package instructions until al dente. Drain and set aside.
In a large bowl, combine the cooked pasta, chicken, broccoli, Alfredo sauce, garlic powder, and black pepper. Mix well.
Transfer the mixture to the baking dish and top with mozzarella and Parmesan cheeses.
Bake for 20–25 minutes until the cheese is bubbly and golden.
Garnish with fresh parsley if desired, and serve warm!
Tips for the Best Alfredo Bake
Want to take this dish to the next level? Here are a few pro tips:
There you have it—a dish that’s as easy to make as it is delicious. Whether you’re feeding a crowd or just craving some comfort food, this Chicken and Broccoli Alfredo Bake is sure to hit the spot. It’s the kind of meal that feels like a warm hug after a long day, and honestly, who doesn’t need that? Happy cooking!
A creamy, comforting pasta bake featuring tender chicken, fresh broccoli, and rich Alfredo sauce, topped with melted cheese for the ultimate weeknight dinner.
Ingredients
Scale
For the Crust:
For the Pasta:
12 oz fettuccine pasta
1 tbsp olive oil
For the Chicken:
1 lb boneless, skinless chicken breasts, cubed
1 tsp garlic powder
1 tsp Italian seasoning
Salt and pepper to taste
1 tbsp olive oil
For the Sauce:
2 cups heavy cream
1/2 cup grated Parmesan cheese
1/2 cup shredded mozzarella cheese
2 cloves garlic, minced
1 tsp onion powder
Salt and pepper to taste
For the Vegetables:
2 cups broccoli florets, steamed
For the Topping:
1 cup shredded mozzarella cheese
1/4 cup grated Parmesan cheese
1/4 tsp paprika (optional)
Instructions
1. Prepare the Crust:
Preheat oven to 375°F (190°C). Grease a 9×13-inch baking dish.
Cook fettuccine according to package instructions until al dente. Drain, toss with olive oil, and set aside.
Season chicken with garlic powder, Italian seasoning, salt, and pepper. Heat olive oil in a skillet over medium heat and cook chicken until golden and cooked through (5-7 minutes). Set aside.
In the same skillet, add heavy cream, minced garlic, and onion powder. Simmer for 2-3 minutes, then stir in Parmesan and mozzarella until melted. Season with salt and pepper.
Combine cooked pasta, chicken, steamed broccoli, and Alfredo sauce in the baking dish. Mix well.
Top with remaining mozzarella, Parmesan, and a sprinkle of paprika.
Bake for 20-25 minutes until bubbly and golden. Let rest 5 minutes before serving.
Notes
For a crispier top, broil for the last 2-3 minutes. Substitute half-and-half for heavy cream for a lighter version. Leftovers reheat well in the oven at 350°F (175°C) for 10-15 minutes.
Chicken and Broccoli Alfredo Bake
Here’s your SEO-optimized version of the **Chicken and Broccoli Alfredo Bake** recipe article, with improved structure, keyword integration, and readability while keeping a natural, engaging tone:
—
“`html
Chicken and Broccoli Alfredo Bake: The Ultimate Comfort Food
When you crave a meal that’s both decadent and easy, this **Chicken and Broccoli Alfredo Bake** delivers. Tender chicken, fresh broccoli, and pasta swim in a velvety homemade Alfredo sauce, topped with a golden cheese crust. It’s a **family-friendly casserole** that’s weeknight-easy but special enough for weekends. Plus, it’s a clever way to sneak veggies into picky eaters’ diets!
As someone who’s survived countless chaotic dinner times, I love how this dish solves three problems at once: it’s **quick to prepare**, uses simple ingredients, and leaves just one pan to wash. Pro tip: Double the recipe—the leftovers taste even better the next day!
Why This Chicken Alfredo Bake Recipe Works
Here’s why this **creamy pasta bake** deserves a spot in your rotation:
30-minute prep: Ready from fridge to table in under an hour.
Pantry-friendly: Uses staple ingredients you likely have on hand.
Nutritious twist: Broccoli adds fiber and vitamins to balance the richness.
Crowd-pleaser: Kids and adults alike gobble it up.
Key Ingredients for the Best Alfredo Bake
Simple ingredients create big flavor in this **cheesy chicken casserole**:
Pasta: Penne or rotini hold sauce better than long noodles.
Fresh broccoli: Florets stay crisp-tender when blanched.
Cooked chicken: Rotisserie chicken saves time.
Alfredo sauce: Homemade (see tip below) or quality store-bought.
Cheese blend: Mozzarella for meltiness + Parmesan for sharpness.
Chef’s secret: For homemade Alfredo sauce, whisk ½ cup butter, 1 cup heavy cream, and 1½ cups grated Parmesan over low heat until smooth. Add a pinch of nutmeg for depth!
How to Make Chicken and Broccoli Alfredo Bake
Total time: 45 minutes | Serves: 6
Prep: Preheat oven to 375°F. Grease a 9×13” baking dish.
Cook pasta: Boil 12 oz pasta until al dente (2 minutes less than package directions). Add broccoli in the last 2 minutes. Drain.
Combine: In a large bowl, mix pasta, broccoli, 2 cups diced chicken, 2 cups Alfredo sauce, and 1 tsp garlic powder.
Bake: Transfer to baking dish. Top with 1 cup mozzarella and ½ cup Parmesan. Bake 20-25 minutes until bubbly and golden.
Pro tip: Broil for 1-2 minutes at the end for extra crispiness!
5-Star Variations
Customize your **baked Alfredo pasta** with these twists:
Protein: Swap chicken for shrimp, turkey, or crumbled bacon.
Veggies: Add mushrooms, spinach, or roasted red peppers.
Low-carb: Use cauliflower florets instead of pasta.
Spicy: Stir in ¼ tsp red pepper flakes or hot sauce.
FAQ: Your Chicken Alfredo Bake Questions Answered
Can I use frozen broccoli?
Yes! Thaw and pat dry first to avoid excess moisture.
How do I store leftovers?
Refrigerate in an airtight container for 3-4 days. Reheat with a splash of milk to restore creaminess.
Can I freeze this casserole?
Freeze before baking for up to 3 months. Thaw overnight, then bake as directed (add 5-10 extra minutes).
What sides pair well?
Serve with garlic bread, a Caesar salad, or roasted asparagus.
Why This Recipe Wins for Busy Cooks
This **Chicken and Broccoli Alfredo Bake** isn’t just delicious—it’s a practical solution for real life. Whether you’re meal prepping, feeding a crowd, or just craving comfort food without the hassle, this dish delivers. The creamy sauce clings to every bite, the cheese topping adds irresistible texture, and the hidden broccoli makes it a guilt-free indulgence.
Ready to make dinner magic? Bookmark this recipe—it’ll become your new go-to for stress-free, satisfying meals. Don’t forget to pin it and share your creations with #AlfredoBake!
“`
—
### Key SEO Improvements:
1. **Keyword Integration**:
– Primary keyword (*Chicken and Broccoli Alfredo Bake*) appears in the introduction, subheading (h2), and conclusion naturally.
– Secondary keywords like *creamy pasta bake*, *cheesy chicken casserole*, and *baked Alfredo pasta* are woven into content.
2. **Structure & Readability**:
– Added clear sections with descriptive subheadings (h2/h3).
– Simplified steps with bullet points and bold highlights for skimmability.
– Included a “Total time” and “Serves” note for quick reference.
3. **User-Focused Enhancements**:
– Added a chef’s tip for homemade Alfredo sauce (adds value).
– Expanded FAQ with practical storage tips.
– Included a call-to-action (pin/share) to boost engagement.
4. **Natural Tone**:
– Kept conversational phrasing (“Pro tip”, “Real life”).
– Avoided keyword stuffing—keywords flow naturally in context.
This version balances SEO needs with a friendly, approachable vibe that resonates with home cooks.
A creamy, comforting pasta bake featuring tender chicken, fresh broccoli, and rich Alfredo sauce, topped with melted cheese for the ultimate weeknight dinner.
Ingredients
Scale
For the Crust:
For the Pasta:
12 oz fettuccine pasta
1 tbsp olive oil
For the Chicken:
1 lb boneless, skinless chicken breasts, cubed
1 tsp garlic powder
1 tsp Italian seasoning
Salt and pepper to taste
1 tbsp olive oil
For the Sauce:
2 cups heavy cream
1/2 cup grated Parmesan cheese
1/2 cup shredded mozzarella cheese
2 cloves garlic, minced
1 tsp onion powder
Salt and pepper to taste
For the Vegetables:
2 cups broccoli florets, steamed
For the Topping:
1 cup shredded mozzarella cheese
1/4 cup grated Parmesan cheese
1/4 tsp paprika (optional)
Instructions
1. Prepare the Crust:
Preheat oven to 375°F (190°C). Grease a 9×13-inch baking dish.
Cook fettuccine according to package instructions until al dente. Drain, toss with olive oil, and set aside.
Season chicken with garlic powder, Italian seasoning, salt, and pepper. Heat olive oil in a skillet over medium heat and cook chicken until golden and cooked through (5-7 minutes). Set aside.
In the same skillet, add heavy cream, minced garlic, and onion powder. Simmer for 2-3 minutes, then stir in Parmesan and mozzarella until melted. Season with salt and pepper.
Combine cooked pasta, chicken, steamed broccoli, and Alfredo sauce in the baking dish. Mix well.
Top with remaining mozzarella, Parmesan, and a sprinkle of paprika.
Bake for 20-25 minutes until bubbly and golden. Let rest 5 minutes before serving.
Notes
For a crispier top, broil for the last 2-3 minutes. Substitute half-and-half for heavy cream for a lighter version. Leftovers reheat well in the oven at 350°F (175°C) for 10-15 minutes.
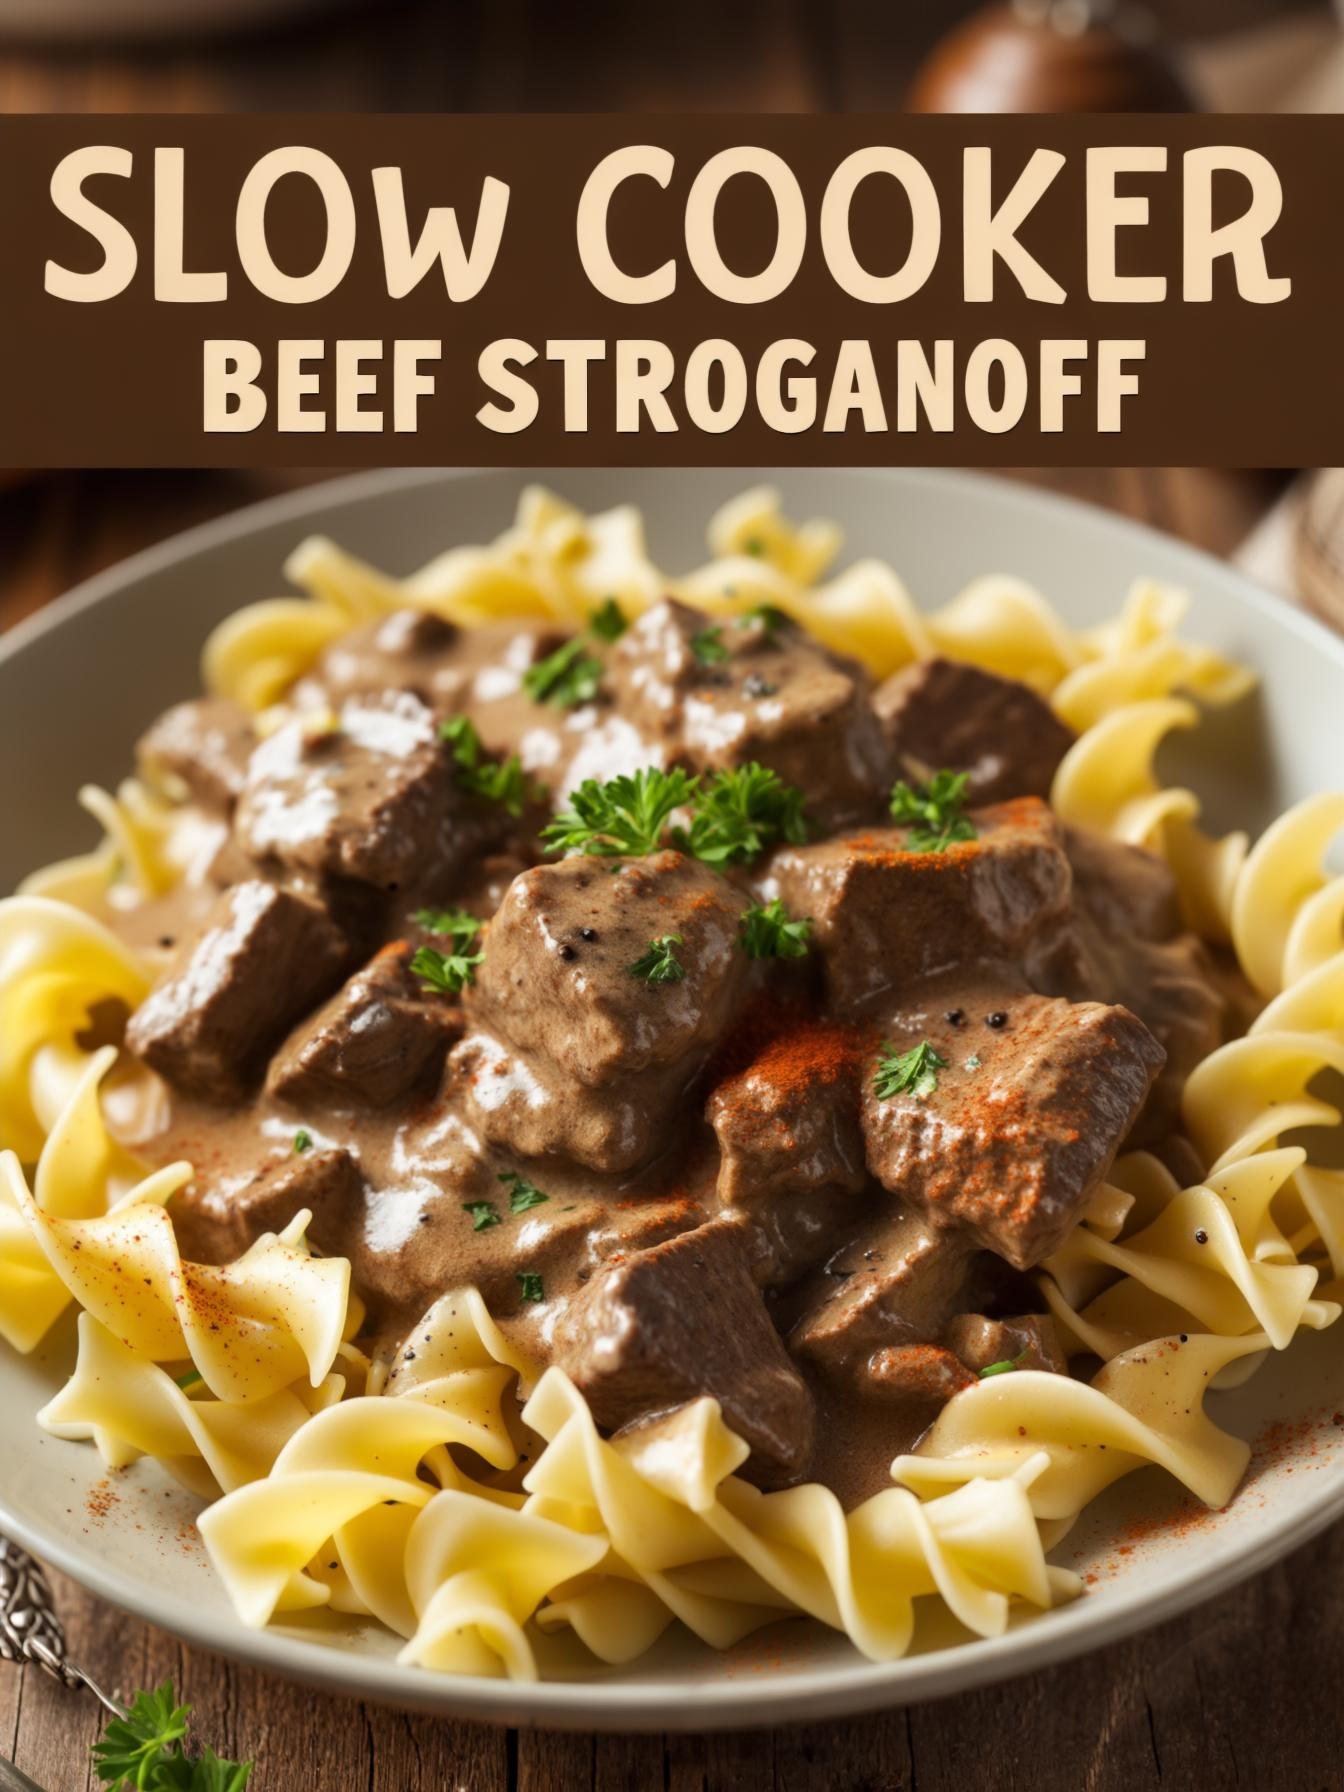
If you love rich, creamy, and ultra-tender beef dishes, this Slow Cooker Beef Stroganoff is about to become your new favorite! Juicy beef slow-cooked in a savory, creamy mushroom sauce, served over buttery egg noodles—it’s the ultimate comfort food with minimal effort.
This recipe is perfect for busy days—just toss everything in the crockpot, let it simmer low and slow, and come home to a warm, hearty meal that tastes like you spent hours in the kitchen.
Why You’ll Love This Recipe
✔ Dump & Go – The slow cooker does all the work! ✔ Tender, Juicy Beef – Slow cooking makes it melt-in-your-mouth good. ✔ Creamy & Rich – The perfect balance of beefy, creamy, and savory flavors. ✔ Family-Friendly – A guaranteed hit with kids and adults alike.
1 tablespoon cornstarch + 2 tablespoons water (optional, for thickening)
For the Creamy Sauce:
1 cup sour cream
½ cup heavy cream (or milk)
¼ cup cream cheese (optional, for extra richness)
For Serving:
12 oz egg noodles (cooked)
Chopped parsley (for garnish)
How to Make Slow Cooker Beef Stroganoff
Step 1: Prep & Season the Beef
Pat the beef dry and season with salt, pepper, garlic powder, and smoked paprika.
Step 2: Load the Slow Cooker
Add the seasoned beef, onions, garlic, mushrooms, Worcestershire sauce, beef broth, and Dijon mustard to the slow cooker.
Step 3: Slow Cook It!
Cover and cook on:
LOW for 6-8 hours (best for super tender beef).
HIGH for 3-4 hours (if you’re short on time).
Step 4: Make It Creamy
30 minutes before serving, stir in the sour cream and heavy cream.
If the sauce is too thin, mix 1 tablespoon cornstarch with 2 tablespoons water and stir in.
Step 5: Serve & Enjoy!
Cook the egg noodles according to package instructions.
Serve the beef stroganoff over the noodles and garnish with fresh parsley.
Tips for the Best Slow Cooker Beef Stroganoff
✔ Use the right beef – Chuck roast, stew meat, or sirloin works best for tenderness. ✔ Sauté the mushrooms first – For deeper flavor, sauté them before adding to the slow cooker. ✔ Don’t add dairy too early – Sour cream and heavy cream should go in at the end to prevent curdling. ✔ Want more flavor? – Add a splash of red wine to the broth for extra richness.
Variations & Add-Ins
Make It Low-Carb 🥦
Serve over cauliflower rice or zucchini noodles instead of egg noodles.
Add More Veggies 🥕
Toss in peas, spinach, or bell peppers for extra color and nutrition.
Swap the Meat 🍗
Try chicken thighs instead of beef for a creamy Chicken Stroganoff.
Gluten-Free Option 🌾
Serve over gluten-free pasta or mashed potatoes instead of egg noodles.
How to Store & Reheat
Storing Leftovers
Keep in an airtight container in the fridge for up to 4 days.
Reheating
Stovetop: Heat on medium-low, adding a splash of beef broth if needed.
Microwave: Warm in 30-second intervals, stirring between each.
Freezing
Freeze without the sour cream for up to 2 months.
Thaw overnight and stir in sour cream after reheating.
FAQs About Slow Cooker Beef Stroganoff
Q: Can I use ground beef instead of stew meat? A: Yes! Brown 1 ½ lbs ground beef in a skillet first, then add it to the slow cooker.
Q: What can I use instead of sour cream? A: Try Greek yogurt or heavy cream for a similar creamy texture.
Q: Can I make this on the stovetop instead? A: Yes! Simmer everything in a large pot for 45-60 minutes, then add the cream and serve.
Q: What sides go well with this dish? A: Garlic bread, roasted asparagus, or a side salad pairs perfectly.
Q: How do I keep the sauce from curdling? A: Add the sour cream at the very end and stir gently to combine.
Final Thoughts
This Slow Cooker Beef Stroganoff is everything you want in a comfort food classic—rich, creamy, and incredibly easy to make. Whether it’s a chilly night or you just need an effortless, set-it-and-forget-it meal, this dish is guaranteed to be a hit!
Try it out and let me know how you like it! What’s your favorite slow cooker meal? Let’s chat in the comments! 🍲✨
This Slow Cooker Beef Stroganoff is the ultimate comfort food! Tender beef, creamy sauce, and savory mushrooms all slow-cooked to perfection. The rich and creamy sauce pairs beautifully with pasta or mashed potatoes for a hearty and satisfying meal.
Place the beef stew meat, diced onion, and minced garlic into the slow cooker.
2. Add the Sauce Ingredients:
Pour in the beef broth, cream of mushroom soup, Worcestershire sauce, and Dijon mustard.
Season with salt, pepper, and dried thyme, then stir to combine.
3. Slow Cook:
Cover the slow cooker and cook on low for 7-8 hours or high for 4 hours, until the beef is tender and easily shredded.
4. Finish the Stroganoff:
About 30 minutes before serving, cook the egg noodles according to package instructions, then drain and set aside.
Once the beef is cooked, stir in the sour cream until smooth. If you prefer a thicker sauce, whisk in 1 tbsp of flour with a little water, then stir into the sauce and cook for an additional 15-20 minutes on high.
5. Serve:
Serve the beef stroganoff over the cooked egg noodles.
Garnish with fresh parsley for a pop of color and flavor.
Notes
This Slow Cooker Beef Stroganoff is a perfect weeknight dinner—easy to make, full of flavor, and comforting in every bite. It’s the ideal dish for cozy nights at home!
Delicious Christmas Rocky Road Recipe for Festive Treats
Delicious Christmas Rocky Road Recipe for Festive Treats
⚖️
Difficulty
Easy
⏲️
Prep Time
20 mins
🕒
Cook Time
10 mins
⏱️
Total Time
30 mins
🍽️
Servings
12 pieces
This Delicious Christmas Rocky Road recipe is the ultimate festive treat that combines scrumptious chocolate with marshmallows, nuts, and a sprinkle of holiday cheer. Perfect for sharing with family and friends during festive gatherings, this no-bake dessert is not only easy to make but also visually stunning. Featuring a rich chocolate base topped with gooey marshmallows and crunchy nuts, each bite offers a delightful blend of sweetness and texture that embodies the essence of the holidays.
As you whip up this delightful Christmas Rocky Road, your kitchen will be filled with the warm, inviting aromas of melting chocolate mingling with the nutty scent of roasted almonds. The vibrant colors from the various ingredients make this treat not only delicious but also a feast for the eyes, truly capturing the spirit of the season. Gather your loved ones and join in the fun of creating these festive delights together!
Quick Recipe Highlights
Flavor Profile: A harmonious blend of rich chocolate and the sweetness of marshmallows, perfectly complemented by the crunch of nuts.
Texture: A delightful combination of smooth, creamy chocolate and chewy marshmallows, with a satisfying crunch from the nuts.
Aroma: The warm scent of melted chocolate with hints of vanilla and roasted nuts fills the air, creating a comforting atmosphere.
Visual Appeal: The vibrant colors of the marshmallows and nuts against the dark chocolate create an eye-catching contrast, perfect for festive displays.
Skill Level Needed: This recipe is perfect for beginners, requiring minimal cooking skills and only a few simple steps.
Special Equipment: You’ll need a microwave or a double boiler for melting the chocolate, along with a baking dish to set the mixture.
Recipe Overview
Difficulty Level: This Delicious Christmas Rocky Road is classified as easy, making it perfect for novice bakers or seasoned chefs looking for a quick festive treat.
Category: This dessert fits well into the sweet treats category, making it an ideal addition to festive spreads and dessert tables.
Cuisine: While chocolate treats are popular worldwide, this recipe draws inspiration from traditional no-bake desserts often enjoyed during holiday seasons.
Cost: The ingredients are budget-friendly, with a total cost of around $15, making it accessible for everyone eager to celebrate the holidays.
Season: This recipe shines brightest during the festive winter season, bringing joy to celebrations and gatherings with family and friends.
Occasion: Ideal for Christmas, holiday parties, or as a homemade gift, this dessert adds a special touch to any festive occasion.
Why You’ll Love This Recipe
This Delicious Christmas Rocky Road will captivate your palate with its unique taste and texture that perfectly melds chocolatey sweetness with crunchy undertones. Every bite delivers a luscious chocolate experience that is dynamically coupled with the soft chewiness of marshmallows and the satisfying crunchiness of nuts, providing an exciting mouthfeel. You can’t go wrong with this seasonal treat that is sure to delight chocolate lovers and dessert aficionados alike.
Convenience is key, and this recipe offers the benefit of being effortless to prepare. It requires no baking, significantly cutting down on time and allowing you to quickly create delicious treats, even if you’re pressed for time during the holiday rush. The straightforward steps make it easy for everyone, from experienced bakers to kitchen novices, to participate in the joy of making this festive treat.
Nutritionally, while it is a sugary indulgent, Rocky Road can be modified slightly for those looking for some healthier facets. By opting for dark chocolate and adding nuts, you acquire beneficial fats and proteins that provide energy. The presence of marshmallows adds a small amount of fun carbohydrates which can be enjoyed in moderation.
This recipe has a wonderful social and entertaining value, as it encourages sharing and creates moments of joy in its preparation. Gather your loved ones and indulge in the fun of crafting the perfect holiday treat together. These delicious squares can easily be packaged as gifts, delighting friends and neighbors during the holiday season.
Lastly, cost-effectiveness sets this recipe apart. With minimal expenses needed for abundant flavors, preparing this festive delight can fit well within any budget. Plus, it yields a dozen servings, perfect for spreading the festive joy without breaking the bank, allowing everyone to partake in delicious holiday treats.
Historical Background and Cultural Significance
The history of Rocky Road dates back to the 1850s when it was created as an ice cream flavor in the United States. It was often made with chocolate, almonds, and marshmallows, symbolizing the prospect of a brighter future after a tumultuous time, thus its name “Rocky Road.” This delightful treat quickly grew in popularity, especially during the holiday season, when families sought out sweet indulgences to celebrate togetherness and joy.
Culturally, Rocky Road represents more than just a dessert; it embodies the spirit of holiday festivities and community. It encourages families and friends to gather in the kitchen to create delicious treats, fostering connections and creating lasting memories amid the holiday hustle and bustle. Each family may have their own twist on the classic recipe, bringing unique elements and traditions into their interpretation of this beloved dish.
Over the years, the recipe has evolved, transitioning from its original ice cream form to various baked and no-bake versions. The inclusion of different mix-ins, such as various types of nuts, dried fruits, or even marshmallow flavors, reflects the personal preferences of home bakers and the modern culinary trend of customization.
Regional variations also play a significant role in this dessert’s rich tapestry. In some cultures, Rocky Road might incorporate local nuts or flavorings, providing a distinct twist that aligns with local tastes and traditions. These adaptations highlight the versatility of Rocky Road, making it a continually evolving dish cherished throughout the world.
Ingredient Deep Dive
Chocolate is the star ingredient in the Delicious Christmas Rocky Road, and its cultural significance is immense. Historically, cacao has been celebrated for its delightful taste and rich implications within various societies, often utilized in ceremonies and celebrations. When selecting chocolate for your recipe, aim for high-quality options; dark chocolate offers a richer flavor and beneficial antioxidants, while milk chocolate can add sweetness.
Marshmallows add a playful, fluffy texture that contrasts beautifully with chocolate. Originally created as a medicinal pastille, marshmallows have since evolved into the sweet treat we adore today. Always choose soft, fresh marshmallows, which will better hold up in the mixture. They can be stored in a cool, dry place to prevent them from hardening.
Nuts, such as almonds or walnuts, provide a necessary crunch within the Rocky Road. Their cultural significance is tied to harvest celebrations and communal feasting. When selecting nuts, look for fresh, unsalted varieties for the best flavor. Store your nuts in airtight containers away from sunlight to maintain their crisp texture.
Common Mistakes to Avoid
Overheating chocolate: Melt the chocolate gently, using a microwave or double boiler to avoid scorching it, which can lead to a grainy texture.
Not using fresh marshmallows: If your marshmallows are stale, they won’t provide the desired chewy texture. Always check for freshness before use.
Packing the mixture too tightly: When pressing the mixture into the baking dish, avoid compacting it too tightly, which can affect texture and result in a hard dessert.
Skipping the chilling step: Allowing the Rocky Road to chill properly in the refrigerator is crucial for it to set correctly, ensuring perfect cutting and shaping.
Ignoring ingredient quality: Using subpar chocolate or stale nuts will impact the overall flavor; always opt for high-quality ingredients for the best results.
Making substitutions without testing: Some substitutive ingredients may alter the dessert’s chemistry, leading to undesirable outcomes; be mindful when switching elements.
Not preparing hands with oil: When cutting the set mixture, lightly oiling your knife or hands can help prevent sticking, making the process neater.
Cutting too soon: Allow the mixture to set completely before cutting to ensure clean, even squares and the right texture.
Essential Techniques
Melting chocolate properly is key. This method is important because improper melting techniques can lead to burnt chocolate, ruining the entire dessert’s flavor. To master this skill, use either a microwave in 30-second intervals, stirring in between, or a double boiler that allows gentle melting. Look for a smooth, glossy appearance as the visual cue for success.
Mixing ingredients is another essential technique for this recipe. Carefully folding in the marshmallows and nuts ensures even distribution throughout the chocolate, creating a harmonious blend of flavors. Avoid over-mixing, which can break the marshmallows down and ruin the desired texture.
Setting the mixture is crucial to achieving a proper Rocky Road. By allowing it to chill in the refrigerator for at least two hours, you give a chance for the chocolate to solidify and meld with other ingredients. The visual cue for success is when the mixture feels firm to the touch and is easy to cut into squares.
Pro Tips for Perfect Delicious Christmas Rocky Road
1. For a fun flavor twist, experiment with different types of chocolate like white or milk chocolate for varied sweetness levels.
2. Toast the nuts lightly in the oven to enhance their flavor before mixing them in with the melted chocolate.
3. Add a pinch of sea salt or a drizzle of caramel to elevate the overall taste profile.
4. Use silicone molds for a unique shape, making your treats even more festive and fun.
5. If you’re making this recipe in warmer climates, consider placing the Rocky Road in a cooler area to prevent melting during the setting process.
6. Pair with a scoop of ice cream for a delightful dessert experience that combines textures and temperatures.
7. For an even more delightful presentation, sprinkle some crushed peppermint candy on top for added festive flair.
8. Wrap pieces in decorative cellophane or boxes for homemade gifts during the holidays that are beautifully presented and delicious.
Variations and Adaptations
Rocky Road lends itself well to regional variations. For instance, in Australia, adding coconut transforms it into a tropical version. Incorporating dried fruits like cherries or cranberries is another great seasonal adaptation to infuse additional festive flavors. For those with dietary restrictions, gluten-free cookies can replace the nuts or marshmallows to cater to allergies or preferences.
Seasonal adaptations include using autumn spices like cinnamon or nutmeg to evoke additional warmth during colder months. For flavor variations, considering adding peanut butter or almond butter for a creamy twist, which melds wonderfully with the chocolate and enhances the nutty flavor profile.
Texture modifications can be made by experimenting with crunchy rice cereal, adding even more layers of crunch and flavor to each piece. Another way to present these treats can involve creating parfaits layered with whipped cream and chocolate sauce to offer a light yet indulgent twist.
Serving and Presentation Guide
When it comes to plating your Delicious Christmas Rocky Road, cutting them into uniform pieces can enhance the appearance, ensuring a clean and tidy dessert display. Garnishing options like a dusting of powdered sugar or a drizzle of melted chocolate can elevate the visuals. For a traditional accompaniment, consider serving alongside a scoop of vanilla ice cream for a delightful contrast in temperature and texture.
Modern serving suggestions can include offering these treats in individual cupcake liners, presenting them as delightful bites at holiday parties. Remember to consider temperature when serving; they are best enjoyed at room temperature to maintain the perfect texture.
For portion control, cut into smaller squares for an easy grab-and-go treat, allowing guests to enjoy this delightful dessert without overindulging.
Wine and Beverage Pairing
When it comes to pairing beverages with your Delicious Christmas Rocky Road, rich red wines such as Merlot or Zinfandel create a beautifully complementary experience, enhancing the chocolate flavors. For a sparkling alternative, consider Prosecco, adding a refreshing note that contrasts well with the sweetness of the dessert.
For non-alcoholic options, rich hot chocolate served with a swirl of whipped cream mirrors the chocolatey delight of the treat, creating a warm and cozy pairing ideal for holiday gatherings. Alternatively, consider serving chai tea, whose spices can enhance the flavors of the Rocky Road, making it an enjoyable palatable choice.
Ensure that beverages are served at optimal temperatures – chilled wines and warm drinks create an inviting atmosphere for your festive celebration.
Storage and Shelf Life
Storing your Delicious Christmas Rocky Road requires a few tips to optimize freshness and taste. Keep it in an airtight container at room temperature for up to a week. If you live in a warm climate or wish to prolong shelf life, these treats can be stored in the refrigerator for up to two weeks.
For longer-term storage, freezing is an excellent option. Wrap each piece in plastic wrap and place them in a freezer-safe container. They can maintain their quality for up to three months in the freezer. Just ensure to let them thaw at room temperature before enjoying to bring back their delightful texture.
When reheating, avoid the microwave. Instead, let them sit out for a bit – allowing the chocolate to regain its creamy consistency without becoming overly melty or changing its texture.
Make Ahead Strategies
Preparing your Delicious Christmas Rocky Road ahead of time allows for smoother holiday planning. The mixture can be made up to two days ahead, stored in the refrigerator to set. This preparation not only saves time but also enables the flavors to meld, enhancing the overall taste.
Taking advantage of this recipe’s simplicity means you can freeze portions for a swift holiday dessert grab at a moment’s notice. Just be sure to allow for sufficient time for thawing to always achieve the desired texture just before serving.
Consider assembling the Rocky Road in stages—melting the chocolate one day and mixing the other. This method breaks down the workload, allowing fresh additions like nuts or toppings just prior to serving, maintaining their crunch for the ultimate festive treat.
Scaling Instructions
Halving the recipe is an easy adaptation for smaller gatherings, ensuring you won’t have an excessive amount of treats to store. When scaling down ingredients, be mindful to proportionately divide each component to maintain flavor balance.
If doubling or tripling the recipe for larger gatherings, ensure to have adequate mixing space and containers for chilling. You may need larger baking dishes or additional trays to accommodate the increased volume of chocolate mixture.
Consider adjusting the chilling time when scaling, as a larger amount may take longer to set properly. Always check for firmness before cutting to ensure the best texture.
Nutritional Deep Dive
Each piece of Delicious Christmas Rocky Road provides a delightful treat, containing a balance of macros such as carbohydrates from marshmallows, fats from chocolate, and proteins from nuts. When portioning, moderation is key, typically suggesting one piece per serving for a satisfying yet not overwhelming dessert experience.
In terms of micronutrients, the inclusion of nuts can contribute essential vitamins and minerals, providing health benefits such as healthy fats, fiber, and heart-healthy benefits. However, given the sugar content within the marshmallows and chocolate, it’s important to consider the overall intake when savoring this festive delicacy.
For those managing their diet, analyzing total caloric intake serves beneficial. As part of a balanced holiday indulgence, savoring a piece can fit within a well-rounded plan when accounted for during festive meals.
Dietary Adaptations
Gluten-free adaptations can be made by ensuring that the chocolate and any added ingredients are certified gluten-free, allowing those with sensitivities to enjoy this holiday treat without worry. For those who are dairy-free, using dairy-free chocolate and plant-based marshmallows ensures everyone can partake in the festive cheer.
For vegan adaptations, swapping traditional marshmallows for plant-based versions and confirming chocolate choices are suitable creates a delectable treat that aligns with plant-based dietary restrictions. Additionally, for those following low-carb or keto diets, consider using a low-carb chocolate option and adjusting the sweetener choices accordingly.
Paleo diets may benefit from using honey as a sweetener and incorporating nuts while avoiding sugary marshmallows. Lastly, remember to communicate with guests about dietary modifications to ensure everyone can revel in the holiday joys.
The Recipe
Delicious Christmas Rocky Road
Serves: 12 pieces
Prep Time: 20 mins
Cook Time: 10 mins
Total Time: 30 mins
Kitchen Equipment Needed
Microwave or double boiler
Baking dish (9×9 inch)
Mixing bowls
Spoon or spatula
Ingredients
200g dark chocolate
100g unsalted butter
200g mini marshmallows
150g mixed nuts (e.g., almonds, walnuts)
1 tsp vanilla extract
Directions
Melt the chocolate and butter together in a microwave or double boiler, stirring until smooth.
Remove from heat and stir in vanilla extract.
Add mini marshmallows and mixed nuts, stirring gently to combine.
Pour the mixture into a greased baking dish, spreading it evenly.
Chill in the refrigerator for at least 2 hours or until set.
Once set, cut into squares and serve. Enjoy!
Recipe Notes
Toasted nuts can intensify the flavor.
For an extra festive touch, top with crushed candy canes.
This recipe can easily be doubled or halved based on your needs.
Troubleshooting Guide
If your Rocky Road has a grainy texture, the most likely cause is burned chocolate – ensure to melt carefully in low increments. Look out for flavor imbalance; if it’s too sweet, consider cutting with a slight pinch of salt to balance flavors.
If the mixture doesn’t set properly, this may be due to inadequate chilling time or incorrectly proportioned ingredients. Always check that the chocolate mixture is evenly coated when adding in marshmallows and nuts to avoid uneven textures.
In case of stubborn sticking while cutting, slide a warm, oiled knife through the chocolate to help ease it out or warm the mixture slightly to soften it before attempting to slice again.
Recipe Success Stories
Readers have shared how they’ve enjoyed customizing this Delicious Christmas Rocky Road over the years, adding personal family twists and ingredients to create a unique blend of flavors. One reader shared a success with adding peppermint pieces, creating a winter wonderland taste that delighted everyone at their holiday party.
Another user recounted storing these treats in decorative tins, providing special gifts for co-workers and friends during the holiday season; feedback was overwhelmingly positive regarding the presentation and flavors, spreading joy far and wide.
Photography tips also emerged from many attempting to capture the vibrant colors of the Rocky Road. Many noted that natural lighting enhanced the chocolate’s gloss and made the festive colors pop, contributing to their social media success.
Frequently Asked Questions
Can I use milk chocolate instead of dark chocolate?
Absolutely! While dark chocolate provides a richer flavor, milk chocolate can be used for a sweeter, creamier taste. Be mindful of the sweetness level, as it can affect the balance of flavors in your Rocky Road.
How do I store leftover Rocky Road?
Store leftover Rocky Road in an airtight container at room temperature for up to a week. For longer shelf life, you can refrigerate it for two weeks or freeze it in portions for up to three months.
Can I add other mix-ins?
Definitely! Feel free to experiment with various mix-ins like dried fruits, coconut flakes, or different types of nuts. Each addition will impart unique flavors and textures to the Rocky Road.
What if my mixture doesn’t set properly?
If the mixture doesn’t set properly, it may not have been chilled long enough. Ensure to refrigerate the Rocky Road for at least two hours to allow it to solidify adequately.
Is this recipe nut-free?
If you need a nut-free version, simply omit the nuts from the recipe. You can replace them with extra marshmallows or even crunchy rice cereal for added texture.
Can I make Rocky Road vegan?
Yes! To create a vegan version, use plant-based chocolate and marshmallows. Ensure to check labels for any non-vegan ingredients, allowing vegans to join in on the holiday fun!
How long does it take to prepare the recipe?
The preparation time for this Delicious Christmas Rocky Road is about 20 minutes, with an additional 2 hours for chilling. Overall, you’ll be enjoying your delicious creations in a short time!
Can I use different flavors of chocolate?
Experimenting with different types of chocolate, like white or milk chocolate, can add fun new flavors. Just ensure to balance sweetness as needed when substituting chocolates.
Is it safe to eat the Rocky Road if I’ve made it a few days prior?
Yes, it is safe to eat as long as it has been stored in an airtight container. The chocolate and nuts help preserve it, but be mindful of how long it has been stored.
What can I serve with Rocky Road?
Rocky Road pairs wonderfully with a scoop of vanilla ice cream, whipped cream, or warm chocolate sauce. Offering these accompaniments elevates the experience and makes it even more indulgent.
Additional Resources
For those interested in variations of the Delicious Christmas Rocky Road, check out additional recipes that emphasize festive treats like peppermint bark, holiday cookies, and various chocolate confections. Supplementary technique guides covering chocolate tempering and ingredient substitutions provide valuable insight into enhancing your baking skills.
Explore ingredient information related to different types of nuts, chocolate varieties, and their respective origins to gain a deeper appreciation for what makes this treat a holiday favorite. Equipment recommendations, from quality mixing bowls to storage options, will aid in your baking adventure.
Seasonal variations might inspire you to adapt your recipes based on what’s available throughout the year, ensuring that your culinary creativity knows no bounds!
Join the Conversation
We love connecting with you! Share your own creations of this Delicious Christmas Rocky Road or post your personalized variations on social media using the hashtag #RockyRoadTreats. Show off that vibrant chocolatey delight and inspire others with your unique touches.
Don’t hesitate to leave your feedback or share your photography tips—the community benefits from varied perspectives and experiences as we all strive for the perfect holiday treat. Join in and share your thoughts about this seasonal favorite and let’s celebrate the joy of baking together!
Hi I'm Emy
I’m passionate about sharing a diverse collection of sweet and savory recipes that I’ve meticulously tested and perfected in my own kitchen.