Delicious Pear and Brie Cheese Salad Skewers Recipe

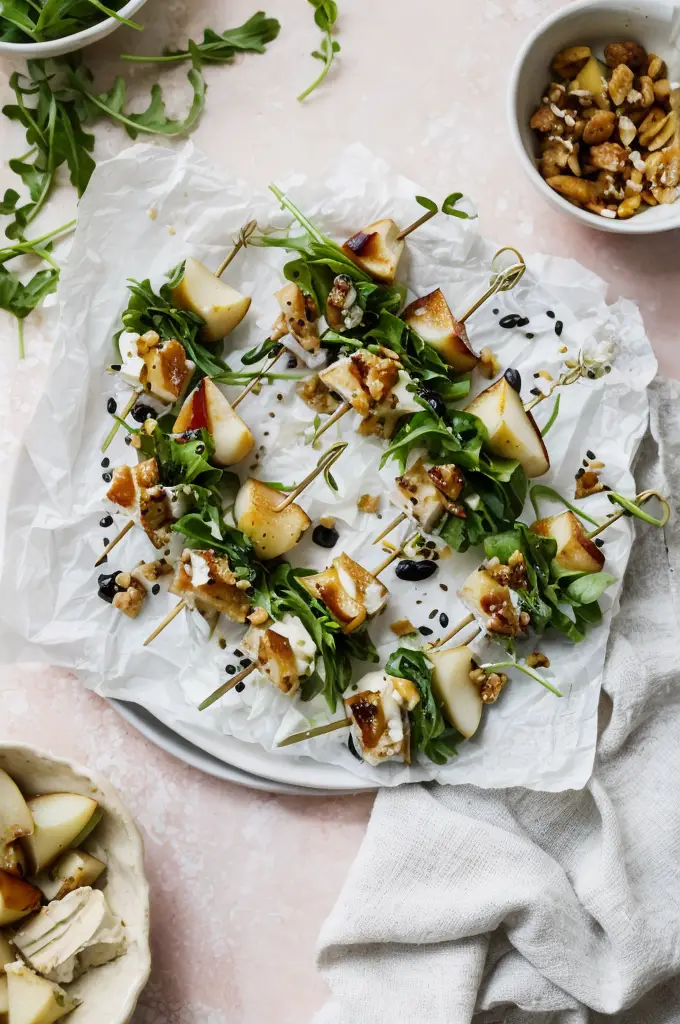
Delicious Pear and Brie Cheese Salad Skewers Recipe: A Perfect Appetizer for Any Gathering

⚖️
Difficulty
Easy

⏲️
Prep Time
15 mins

🕒
Cook Time
0 mins

⏱️
Total Time
15 mins

🍽️
Servings
6 servings

Indulge in the delightful combination of flavors with our Delicious Pear and Brie Cheese Salad Skewers Recipe. This easy-to-make appetizer not only bursts with freshness but also offers a unique blend of creamy brie and the juicy sweetness of ripe pears. Perfect for summer gatherings, picnics, or as an elegant starter for dinner parties, these skewers will impress your guests and tantalize their taste buds. Each bite provides a satisfying contrast of textures: the smoothness of the brie balances beautifully with the crispness of fresh greens and the tender bite of juicy pear.

The beauty of this salad skewers recipe lies in its simplicity. You’ll find that no cooking is required, making it incredibly convenient for busy hosts. Preparing this dish takes just 15 minutes, keeping stress levels low while still allowing you to serve a visually stunning platter. Also, customizable to personal tastes, the ingredients can be adjusted to feature seasonal fruits or different types of cheese, ensuring your skewers are always fresh and exciting.

Quick Recipe Highlights

  • Flavor Profile: The sweet flavor of ripe pears complements the earthy richness of brie, creating a balanced taste that is refreshing and light.
  • Texture: The smooth, creamy texture of brie contrasts with the firm, juicy bite of the pears, while the crispy greens add a crunch.
  • Aroma: The subtle nuttiness of brie pairs beautifully with the sweet aroma of fresh fruit, inviting you to indulge.
  • Visual Appeal: These skewers are visually striking with the contrasting colors of green, yellow, and white, making them a delightful centerpiece on any table.
  • Skill Level Needed: This is an easy recipe suitable for novice cooks, requiring no prior cooking experience or special skills.
  • Special Equipment: You will need skewers or toothpicks to assemble the salad skewers, along with a cutting board and knife for preparation.

Recipe Overview

  • Difficulty Level: This recipe is classified as easy due to its minimal preparation and no cooking required, making it accessible for everyone.
  • Category: The Delicious Pear and Brie Cheese Salad Skewers Recipe falls under appetizers and finger foods, perfect for gatherings.
  • Cuisine: It is inspired by French cuisine, known for its sophisticated use of cheese paired with fruits, highlighting gourmet flavors.
  • Cost: The ingredients are relatively inexpensive, with costs primarily coming from the brie cheese and fresh produce, making it an affordable option for entertaining.
  • Season: This recipe is best enjoyed in late summer to early fall when pears are in season, ensuring the ripeness and sweetness of the fruit.
  • Occasion: Ideal for casual summer parties, potlucks, or elegant dinner parties, these skewers bring a touch of sophistication to any occasion.

Why You’ll Love This Recipe

The combination of sweet pears and creamy brie is not only delicious but also offers an appealing contrast that delights the senses. With each bite, the juicy fruit mingles with the rich cheese, resulting in a culinary experience that balances both savory and sweet flavors. This unique pairing ensures a satisfying taste while providing freshness, making it feel light yet indulgent. Whether served as a party appetizer or a light snack, this salad recipe captures the essence of satisfying but simple fare.

In terms of preparation, you will appreciate how quick and effortless this recipe is. Designed for minimal fuss, it allows you to spend more time with your guests rather than slaving away in the kitchen. Simply slice the pears, cube the cheese, and assemble the skewers—it’s as easy as that! You’ll be able to whip up this recipe in about 15 minutes, ensuring you can easily accommodate spontaneous gatherings.

Nutritionally, the pears are a great source of dietary fiber and essential vitamins, while brie offers protein and calcium. Together, they create a snack that’s not only tasty but also nutritious. When you’re looking for a guilt-free solution to satisfy your cravings, this recipe is an excellent option.

When entertaining guests, these delicious skewers provide an elegant presentation that always impresses. The combination of the richness of cheese and the sweetness of fruit elevates them beyond typical snacks, allowing for a sophisticated dining experience. It’s a surefire way to make your gathering memorable while providing an element of fun as guests pick and choose their preferred skewers.

Lastly, the affordability of this recipe ensures that you don’t have to break the bank to create an impressive appetizer. With simple, readily available ingredients, anyone can make this dish without any high-cost items, enabling you to host gatherings while remaining budget-friendly.

Historical Background and Cultural Significance

The origins of pairing cheese and fruit can be traced back to ancient civilizations where rich dairy products were enjoyed with fresh, local produce. This tradition has evolved over centuries, particularly in European cuisine, where the balance of flavors is a hallmark of many well-composed dishes. The French have played a significant role in popularizing cheese boards that include fruits, making this a widely appreciated culinary combination.

Culturally, cheese holds a significant place in many European diets, with specific contexts in which it is consumed. For instance, artisan cheeses, such as brie, are often celebrated in France, where they are paired with a variety of accompaniments, including fruits, nuts, and bread. This practice highlights the idea of gastronomy as an art form and emphasizes the importance of sourcing high-quality ingredients.

Over the years, the recipe has metamorphosed, adapting to various dietary preferences and ingredient availability. The Delicious Pear and Brie Cheese Salad Skewers Recipe reflects this evolution, demonstrating a playful and modern take on a classic tradition. Seasonal variations allow for diverse ways to enjoy this combination throughout the year, ensuring that flavors remain vibrant and enticing.

Regional adaptations have further diversified how cheese and fruit are paired worldwide. In some countries, a selection of cheese and fresh fruit is served as part of an antipasto spread, while in others, cooked fruits might accompany cheese boards. The versatility of cheese and fruit pairings exemplifies a culinary practice that transcends borders, inviting endless creativity in preparation and presentation.

Ingredient Deep Dive

Pears

Pears have a rich history dating back to ancient Greece and Rome, where they were praised for their sweet and juicy flesh. The fruit symbolizes prosperity and nourishment across cultures. Nutritionally, pears are a fantastic source of fiber, vitamin C, and antioxidants, making them a healthy choice in any recipe. When selecting pears for this skewer recipe, look for ones that yield slightly to pressure and have a fragrant aroma. Store ripe pears in the fridge to prolong freshness, and consider alternative fruits like apples or figs if pears are out of season.

Brie Cheese

Brie cheese, with its soft rind and creamy interior, hails from France, where it’s celebrated for its rich flavor and luxurious texture. It is a high-quality cheese packed with protein, calcium, and essential fats. When choosing brie, opt for cheeses with a creamy, supple texture and a fresh aroma. Store brie in the cheese drawer of your refrigerator, wrapped tightly to maintain its quality. While brie is a fantastic pairing, you could substitute it with camembert or another mild cheese for a different taste experience.

Common Mistakes to Avoid

  • Overripe Peaches: Selecting overly ripe pears can lead to undesirable mushiness. Aim for pears that are firm yet yield slightly to pressure.
  • Skewer Stability: Not ensuring the ingredients are balanced on the skewers may lead to them falling apart. Place heavier items on the bottom for better stability.
  • Serving Temperature: Serving the salad skewers either too cold or too warm can impact flavor. Allow them to sit out for a few minutes before serving for the best taste experience.
  • Inappropriate Pairings: Not considering complementary flavors can result in less enjoyable skewers. Always pair fruits with cheeses that contrast in flavor profiles.
  • Neglected Garnishes: Forgetting to add fresh herbs or a drizzle of balsamic glaze can make the dish visually and flavor-wise less appealing.
  • Preparing Too Early: Assembling skewers too long before serving can cause the ingredients to oxidize. Prepare them no more than an hour in advance.
  • Using Inferior Quality Ingredients: Skimping on cheese or fruit quality can detract from the overall experience. Always opt for fresh and gourmet choices for the best results.
  • Overcomplicating the Recipe: Adding too many ingredients can overwhelm the flavor profile. Keep it simple to let the pears and brie shine through.
  • Ignoring Dietary Restrictions: Not considering guests’ dietary needs may lead to uneaten skewers. Always have a variety of options available.
  • Poor Presentation: Serving the skewers haphazardly can diminish their visual appeal. Arrange them intentionally on a beautiful platter for the best presentation.

Essential Techniques

Cutting Fruits

Properly cutting fruits like pears is crucial to maintaining the visual appeal of your skewers. Aim for even, bite-sized pieces to ensure easy handling. Using a sharp knife will provide cleaner cuts, which prevents the fruit from browning quickly. Watch for common pitfalls, such as cutting fruits before they are fully ripe, leading to excessive juiciness, or unevenness that affects presentation.

Assembling Skewers

Assembly is key to creating visually appealing skewers. Begin with a base layer of greens, then add alternating pieces of pears and brie, ensuring a beautiful contrast. Be cautious not to overcrowd the skewers; too much weight can cause them to snap. Pay attention to the arrangement of colors and textures for maximum impact.

Pro Tips for Perfect Delicious Pear and Brie Cheese Salad Skewers

– Choose ripe but firm pears that will hold their shape on the skewer and provide a sweet, juicy bite.
– When selecting brie, look for high-quality artisan options for a richer flavor.
– Consider marinating the pear slices in a splash of lemon juice to preserve their color and enhance their tartness.
– Serve with a side of balsamic reduction as a dipping sauce to add a tangy element to the skewers.
– Opt for decorative skewers or toothpicks that complement the dish’s aesthetic for added flair.
– Prepare extra skewers to cater for unexpected guests and ensure everyone has a taste.
– Experiment with adding nuts or prosciutto between the layers for added crunch and flavor.
– Arrange the skewers on a beautiful platter, garnished with fresh herbs or edible flowers for an elegant touch.

Variations and Adaptations

For regional variations, explore using local fruits that are fresh and in season, such as figs, peaches, or apples instead of pears. Seasonal adaptations allow you to enhance flavor profiles. In the fall, consider adding roasted seasonal veggies for a heartier skewer. For dietary modifications, use vegan cheese alternatives to make the dish entirely plant-based, ensuring everyone can enjoy it.

If you’re looking to enhance flavors, try different cheese pairings such as goat cheese for a tangy contrast or sharp cheddar for a bolder taste. Texture modifications could include adding crispy bacon or toasted nuts for a savory crunch. Presentation alternatives might involve serving the skewers in small cups with dipping sauces on the side for easy handling.

Serving and Presentation Guide

Plating techniques are essential to showcasing your Delicious Pear and Brie Cheese Salad Skewers. Arrange them in a circular pattern on a large white platter to draw the eye and make the colors pop. Garnishing the dish with fresh herbs, like basil or mint, will elevate the dish’s appearance. Traditional accompaniments, such as crackers or French baguette slices, can be served alongside for an appealing contrast.

For modern servings, consider individual servings in small jars or cups for a fun and trendy presentation. Be mindful of temperature; these skewers should be served at room temperature to ensure the best flavor experience. Lastly, with portion control in mind, serve 2-3 skewers per guest, allowing for satisfaction without overindulgence.

Wine and Beverage Pairing

When it comes to wine pairings, a chilled Chenin Blanc or a light Rosé complements the sweet and creamy notes of the pears and brie wonderfully. If looking for non-alcoholic alternatives, consider sparkling apple cider or a refreshing mint lemonade that can balance the flavors beautifully.

Additionally, coffee or tea aficionados might enjoy a light herbal tea to accompany these skewers, offering a soothing contrast to the richness of this appetizer. Always serve drinks chilled, particularly white wines and ciders, to ensure the best pairing experience.

Storage and Shelf Life

To keep your Delicious Pear and Brie Cheese Salad Skewers fresh, store them in an airtight container in the refrigerator for up to two days. Ensure you layer parchment paper between layers to prevent moisture buildup and maintain texture. When assembled, the skewers should be consumed fresh to enjoy the best taste and appearance. If you need to reheat leftover ingredients, consider allowing them to come to room temperature before serving again, avoiding the microwave to reduce the risk of melting the cheese excessively.

If you’re considering freezing leftover ingredients, do so before assembly, as the texture of the fruit and cheese may degrade after freezing, impacting later preparation.

Make Ahead Strategies

To streamline preparation, consider slicing the pears and cheese in advance, storing them in separate airtight containers until ready to assemble. You can also wash and dry greens a few hours ahead of time, keeping them crisp for serving. The skewers can be assembled and kept in the refrigerator under a damp paper towel for up to an hour before guest arrival, minimizing last-minute stress.

To maintain quality, avoid placing the skewers on ice as condensation can cause the cheese to become watery. Instead, prepare to serve them on a warm summer day with ample time for guests to mingle before enjoying.

Scaling Instructions

For halving the recipe, simply divide the quantities of all ingredients in half while maintaining the preparation time. Doubling or tripling the recipe can be easily done, ensuring that you have ample skewers for larger gatherings; however, when scaling up, consider the size of your serving platter to allow for a beautiful presentation. Keep in mind that assembly time may increase slightly due to the volume.

Storage considerations also become important at larger scales; ensure adequate refrigeration is available after prep to maintain freshness.

Nutritional Deep Dive

Each serving of the Delicious Pear and Brie Cheese Salad Skewers provides a healthy balance of macronutrients. Expect approximately 150 calories per serving, with a blend of carbohydrates from the pears and proteins from the brie. Both pears and brie offer micronutrients, including vitamin A, calcium, and potassium, contributing to overall health.

This appetizers also supports dietary flexibility with its plant-based ingredients. For weight management, consider portion control by serving smaller quantities while allowing guests to return for seconds without excess waste.

Dietary Adaptations

For gluten-free options, ensure all components are certified gluten-free, especially any sauces or dips served alongside. Dairy-free variations can be accommodated with coconut cream cheese or other vegan alternatives to brie for a similar creamy texture without dairy.

If catering to specific diet plans like low-carb or keto, opting for lower-carb fruits and cheeses can make this a delightful option. Additionally, those on Paleo diets can also substitute the cheese with nuts or avocados for a creamy quality while remaining true to dietary restrictions.

The Recipe

Delicious Pear and Brie Cheese Salad Skewers

Serves: 6 servings

Prep Time: 15 mins

Cook Time: 0 mins

Total Time: 15 mins

Kitchen Equipment Needed

  • Skewers or toothpicks
  • Cutting board
  • Knife
  • Airtight containers for storage

Ingredients

  • 3 ripe pears, sliced
  • 8 oz brie cheese, cut into cubes
  • 2 cups mixed greens (arugula, spinach)
  • Balsamic reduction for drizzling (optional)
  • Fresh basil for garnish (optional)

Directions

  1. Prepare all ingredients by slicing pears and cubing brie cheese.
  2. Assemble the skewers by alternating pieces of pear and brie cheese, leaving space for greens.
  3. Add greens onto each skewer, ensuring balance in weight.
  4. Drizzle with balsamic reduction if desired and garnish with fresh basil.
  5. Serve immediately or refrigerate for up to an hour before serving.

Recipe Notes

  • Feel free to substitute pears with seasonal fruits like figs or seasonal apples.
  • Can add nuts (walnuts or pecans) for an extra delicious crunch.

Troubleshooting Guide

If you experience texture issues such as overly mushy fruit, ensure to select pears that are ripe yet firm when preparing the skewers. If flavor balance seems off, try adjusting the brie volume or drizzling a bit more balsamic reduction for added depth.

Temperature problems may occur if skewers are prepared too early; always allow them to rest at room temperature for the best flavor. If equipment challenges arise, ensure sharp knives are employed for all preparations to minimize struggle.

Should you need ingredient substitutions, always consider seasonal fruits or local cheese varieties that provide comparable textures. Timing concerns may arise if skewers were prepared too early – remember to keep them covered in the fridge, but not for too long before serving to maintain optimal quality.

Recipe Success Stories

Our community has shared their creative adaptations of this Delicious Pear and Brie Cheese Salad Skewers Recipe, showcasing its versatility. Variations such as adding prosciutto have received rave reviews for adding a savory twist to this already sweet and creamy starter. Many have enjoyed sharing alongside their cheese boards during gatherings, elevating their entertaining game.

Readers have also shared that their children loved assembling the skewers themselves, making it a fun activity for family bonding time. Others noted that the vivid colors and fresh ingredients made for stunning social media photos, highlighting the appetizing nature of this dish. Recipe tips on making the skewers more visually appealing have continued to roll in, inspiring greater creativity in presentation.

Frequently Asked Questions

Can I make these skewers in advance?

Yes, you can prepare the ingredients ahead of time, but it’s best to assemble the skewers no more than an hour before you plan to serve them to maintain freshness and crispness.

What are some good substitutes for brie cheese?

If you don’t have brie, you could use camembert, goat cheese, or cream cheese for a different flavor profile. Each will provide a creamy texture.

Are there any other fruits that pair well with brie?

Absolutely! Other fruits such as figs, apples, or even grapes work beautifully with brie and can add diverse flavors and textures to your skewers.

Can I use different greens?

Definitely! Feel free to use any fresh greens you prefer, such as arugula, spinach, or kale, to complement the flavors of the brie and pears.

Is this recipe gluten-free?

Yes, this recipe is gluten-free as it uses only fresh fruit and cheese. Ensure any garnishing or accompanying sauces are also gluten-free.

How long can I store leftover skewers?

Leftover skewers should be consumed within two days when stored in an airtight container in the refrigerator. However, they are best eaten fresh.

What drinks pair well with this dish?

Chenin Blanc or light rosé wines are excellent for pairing. For non-alcoholic options, try sparkling apple cider or herbal tea to balance the flavors.

Can I make this recipe vegan?

Yes, you can make this recipe vegan by substituting brie with a nut-based cheese or vegan cream cheese, and ensure all other components are plant-based.

What kind of skewers can I use?

You can use wooden or metal skewers. Just make sure to soak wooden skewers in water if you are going to put them on the grill or cook them.

Do I need to peel the pears?

No, you do not need to peel the pears. The skin adds fiber and texture to the dish; just make sure to wash them thoroughly before use.

Additional Resources

If you’re interested in exploring more related recipes, consider checking out our fruit and cheese platter ideas or exploring appetizers that emphasize seasonal produce. Additionally, our technique guides on cheese carving and cheese pairing suggestions can enhance your culinary skills. Don’t forget to read up on ingredient information to get the most out of your purchases, while our equipment recommendations can provide ideas for the best cookware and serveware to use for this recipe.

Join the Conversation

We invite you to share your experience with our Delicious Pear and Brie Cheese Salad Skewers Recipe! Connect with us on social media by sharing your photography tips and enjoyed variations. Your feedback is invaluable and helps us continue to provide the best recipe recommendations. Engage with fellow culinary enthusiasts and inspire them with your personal adaptations and suggestions for making this delightful skewers recipe your own.

Create a Stunning Charcuterie Wreath for Your Holiday Feast

Create a Stunning Charcuterie Wreath for Your Holiday Feast: A Festive Culinary Centerpiece

⚖️
Difficulty
Easy

⏲️
Prep Time
30 mins

🕒
Cook Time
0 mins

⏱️
Total Time
30 mins

🍽️
Servings
8-10 servings

As the holidays approach, many are looking to create a festive atmosphere that includes delicious food and beautiful presentations. One of the most eye-catching items you can add to your holiday table is a stunning charcuterie wreath. This delightful display not only serves as a fantastic appetizer that will impress your guests but also allows for a wide variety of flavors and textures. Imagine colorful cheeses, crispy crackers, and vibrant fruits elegantly arranged to resemble a lush, festive wreath that invites everyone to indulge.

The beauty of a charcuterie wreath lies in its versatility. You can customize it to fit your taste preferences and dietary needs, making it a perfect fit for any gathering. Featuring an array of meats, cheeses, seasonal fruits, and creativity, this dish can serve as both a starter and a conversation piece that climaxes the holiday celebration experience. Each bite is bursting with flavor, and the decorative nature of the wreath ensures that it will be a centerpiece at your holiday feast.

Quick Recipe Highlights

  • Flavor Profile: Expect a delightful balance of savory from the meats, creamy from the cheeses, and a touch of sweetness from the seasonal fruits.
  • Texture: The mix of crunchy crackers and soft, creamy cheeses creates a satisfying combination that is pleasing to the palate.
  • Aroma: The fragrant spices of cured meats blend with the fresh bouquet of herbs and seasonal fruits, making it irresistibly inviting.
  • Visual Appeal: The vibrant colors of the fruits, nuts, and cured meats come together to create a visually stunning wreath that is sure to draw attention.
  • Skill Level Needed: This recipe is easy to assemble, perfect for both novice cooks and seasoned chefs looking for a festive project.
  • Special Equipment: A large platter or a round board will be essential for arranging your charcuterie wreath elegantly.

Recipe Overview

  • Difficulty Level: This charcuterie wreath is classified as easy since it involves no cooking. It’s all about the arrangement of prepared ingredients.
  • Category: This dish falls under hors d’oeuvres or appetizers, making it ideal for holiday gatherings or cocktail parties.
  • Cuisine: Drawing from various culinary traditions, charcuterie combines elements of French and Italian cuisines, celebrating their love for cured meats and cheeses.
  • Cost: Depending on your ingredient choices, the cost may range from moderate to slightly high but can be tailored to fit any budget.
  • Season: The best seasons for this dish are during the holiday months, where the ingredients are at their peak freshness and availability.
  • Occasion: Perfect for holiday gatherings, parties, and family celebrations, this wreath adds a touch of elegance to any occasion.

Why You’ll Love This Recipe

The taste and texture appeal of a charcuterie wreath make it a favorite among many. Each bite offers a different flavor experience, from the tangy cheese to the rich, savory meats, paired with crisp crackers that bring texture and crunch to the mixture. The variety of elements means there’s something for everyone, ensuring all guests leave happy and satisfied.

Convenience is another reason to love this recipe. With no cooking required, assembly is stress-free and can be done quickly. Gathering your ingredients ahead of time allows for easy setup when guests arrive, making it perfect for impromptu gatherings or carefully planned parties alike.

Nutritionally, a homemade charcuterie wreath can be balanced with healthier ingredients. Opting for lean meats, low-fat cheeses, and including plenty of fruits and nuts can give your guests a healthier snacking option while still satisfying their taste buds.

Socially, this wreath brings people together. Guests will gather around the colorful platter, chatting and selecting their favorites, fostering an element of interaction that elevates the dining experience. It encourages sharing, and conversation, and provides a hands-on eating experience that feels festive.

Lastly, the cost-effectiveness of this dish cannot be overlooked. You can easily substitute expensive ingredients with more affordable ones without compromising the overall look and taste. This means you can treat your guests to something high-end without stretching your budget too thin.

Historical Background and Cultural Significance

The origins of charcuterie date back to ancient times when meats were cured as a method of preservation before the advent of refrigeration. Initially stemming from French traditions, charcuterie has evolved over the centuries and has incorporated influences from various regions, including Italy’s antipasto and Spain’s tapas. The enchanting visual appeal of beautifully arranged cured meats and cheeses has always captivated individuals during feasts and celebrations.

Culturally, the charcuterie board represents hospitality and generosity. The act of sharing food is foundational in human connection, and when beautifully displayed, a charcuterie wreath embodies the spirit of welcome and warmth during gatherings. This tradition transcends holidays; it’s a celebration of community, love, and the joy of good food.

Over time, the art of charcuterie has expanded beyond just meats to include a plethora of ingredients. With the rise of gourmet charcuterie, various gourmet cheeses, artisan crackers, and seasonal vegetables have become staples in modern arrangements. This evolution continues to open doors to creativity, allowing for personalized touches.

Regional variations also play a significant role in the cultural significance of charcuterie. Different areas highlight local flavors, whether it’s cured meats specific to a region or cheeses renowned for their unique characteristics. This local tradition infuses the charcuterie wreath with a sense of identity and pride in culinary craftsmanship.

Ingredient Deep Dive

Meats

Cured meats are the star of any charcuterie board. Historically, these preparations were born of necessity in order to preserve meat for future use. Today, there’s a wide array of options available, each with its own unique flavor profile, such as prosciutto, salami, or chorizo. Nutritionally, these meats can offer protein and essential vitamins, but they can also be high in sodium and preservatives, so selecting high-quality options is advisable.

When selecting meats, look for artisanal products that are free of artificial additives or fillers. It’s also best to purchase them from a reputable deli or butcher who can provide recommendations on freshness. Proper storage includes refrigeration, and for longer storage, freezing may be an option.

Cheeses

Cheese brings richness and diversity to your charcuterie wreath. From creamy brie to sharp cheddar, each cheese offers both texture and flavor that pairs beautifully with meats and fruits. Cheese also provides protein, calcium, and beneficial fats. Selecting a variety of textures and flavors is key—aim for a mix of hard, soft, and blue cheeses.

While choosing cheese, seek out high-quality cheeses from local dairies or specialty shops. When storing cheese, keep it wrapped in breathable wax paper, and maintain the temperature in a cheese drawer of your refrigerator to preserve the quality. If replacing a cheese due to dietary restrictions, look for vegan cheese options or low-fat alternatives.

Fruits and Nuts

Fruits like grapes, figs, and apples not only enhance flavor but also add a natural sweetness that balances the saltiness of meats and richness of cheeses. Nuts add a satisfying crunch and are a source of healthy fats and protein. Including these ingredients contributes to a well-rounded nutritional profile.

To select fruits, it’s best to choose seasonal options for the freshest taste. For example, berries are perfect in summer, while pomegranates shine in fall and winter. Nuts should be fresh and unsalted to ensure they enhance but do not overpower the other ingredients. Store dried fruits and nuts in airtight containers away from heat to prolong their shelf life.

Common Mistakes to Avoid

  • Overloading the wreath: A common mistake is overcrowding the platter, which can make it look messy. Focus on balance and allow space between items for a visually appealing arrangement.
  • Choosing mismatched flavors: While variety is important, complementing flavors is crucial. Ensure that meats, cheeses, and fruits work well together to enhance the overall experience.
  • Ineffective ingredient prep: Cutting fruits and arranging meats ahead of time is essential. Avoid waiting until the last minute to prep your ingredients, as it may affect quality and readiness.
  • Ignoring seasonality: Using out-of-season fruits can lead to bland flavors. Always opt for seasonal produce for the best taste and texture.
  • Forgetting garnishes: Herbs like rosemary or thyme can elevate your presentation. Skipping these small details can make the wreath look less festive.
  • Not including a variety of textures: Failing to incorporate creamy, crunchy, and chewy elements can lead to a monotonous mouthfeel.
  • Serving at the wrong temperature: Cheese and meats should be served at room temperature for optimal flavor. Avoid serving cold ingredients straight from the refrigerator.
  • Neglecting dietary needs: Consider the dietary restrictions of your guests. Not having vegetarian or gluten-free options can alienate some attendees.
  • Not replenishing items: If the wreath is out for an extended period, make sure to replenish items that are frequently chosen to keep the presentation appealing.
  • Insufficient tools for assembly: Ensure you have the right platters, cutting boards, and serving utensils before you begin assembling to avoid chaos later on.

Essential Techniques

Arranging Ingredients

Properly arranging the ingredients is crucial in creating an appealing charcuterie wreath. Start with your base items, such as crackers or bread, to form the foundation. Then, layer the meats and cheeses accordingly. Use fruits and nuts to fill in the gaps for visual interest. A circular or spiral arrangement usually works best, with larger items placed first and smaller ones filling in spaces.

Choosing Complementary Flavors

Understanding flavor profiles will ensure maximum enjoyment for your guests. For instance, pairing tangy cheeses with sweet fruits or savory meats with tart pickles enhances the overall experience. Experimenting with various pairings can lead to delightful discoveries. Pay attention to textures as well, mixing crispy, creamy, and chewy ingredients will add depth to the dish.

Presentation Skills

The presentation of your charcuterie wreath is key to its appeal. Use vibrant colors, contrasting shapes, and varying heights within your arrangement. Garnishing with fresh herbs or edible flowers adds a professional touch that can impress guests. Aim for a balanced visual where no one ingredient overpowers the others.

Understanding Portion Control

Portion control is essential in ensuring all guests have the chance to experience every component. Pre-cut cheeses into small triangular pieces and arrange meats in overlapping patterns to give clear servings. Providing small serving tongs at both ends of the wreath also helps manage portion sizes effectively.

Pro Tips for Perfect Charcuterie Wreath

1. Use a seasonal theme to inspire your ingredient selection, such as cranberries and pumpkin seeds for fall or vibrant berries in summer.

2. Incorporate a small dish of honey or jam as a sweet complement to the flavors, allowing guests to customize their bites.
3. Freeze fresh herbs in ice cubes and use them for decoration, adding a fun twist while promoting fresh flavors.
4. Cold cut meats should be laid out in an overlapping style to enhance visual intrigue and allow for easy grabbing.
5. Do not limit yourself to traditional ingredients; feel free to experiment with different cheeses or add charred vegetables for a unique twist.
6. Arrange on a wooden board or elegant platter to elevate the aesthetic appeal and allow for easy access for your guests.
7. Ensure everything is at room temperature for serving to maximize taste and enjoyment.
8. Prepare the wreath just before serving time to maintain freshness and color vibrancy.

Variations and Adaptations

One of the joys of creating a charcuterie wreath is the opportunity to incorporate regional variations. For instance, if you’re in the Mediterranean, consider using local meats like prosciutto along with olives and feta cheese. A Southern-style adaptation could include smoked meats and homemade preserves alongside cornbread crackers.

You can also adapt your wreath according to the season. For summer gatherings, fresh berries and light cheeses provide a refreshing taste, while autumn can highlight pumpkin-spiced cheeses or roasted nuts to embrace the cozy vibes.

For guests with dietary restrictions, it’s important to include alternatives. Vegan cheese, gluten-free crackers, or nut-based spreads can effectively cater to those avoiding animal products or gluten without sacrificing enjoyment.

Flavor variations are endless; consider adding chocolate pieces or spicy nuts to introduce sweetness or heat into the mix. The texture can also be modified; for a crunchier experience, include grilled vegetable slices or a variety of crackers with different flavors.

Finally, presentation alternatives will help to beautify your wreath. You may choose to use a large wooden cutting board or a festive platter that features elegant materials to enhance the visual feast.

Serving and Presentation Guide

Arranging your charcuterie wreath can set the stage for a delightful experience. Start by positioning your main items towards the center, allowing smaller elements like fruits and nuts to encircle them. For garnishing, consider fresh herbs like rosemary or thyme sprigs which can add vibrancy and a seasonal touch.

In terms of temperature, it’s best to present your wreath at room temperature, as both meats and cheese taste best when slightly warmed. Pay attention to portion control; offer small plates or napkins for guests to easily navigate and enjoy their selections.

Serve your charcuterie wreath with a side of dips or spreads to enhance the flavor. Mustard, flavored oils, or a selection of jams can complement the elements beautifully. Finally, remember to consider the visual aspects, using colorful ingredients that will draw the eye and make your wreath an irresistible centerpiece.

Wine and Beverage Pairing

A charcuterie wreath pairs best with a variety of wines. A crisp Sauvignon Blanc or a light Pinot Noir can complement the richness of the cheeses and meats beautifully. For a fuller-bodied wine, a robust Cabernet Sauvignon or Malbec would work well with stronger flavors of aged cheeses and cured meats.

If you prefer non-alcoholic options, sparkling water infused with fruits, or herbal iced teas can be refreshing alternatives that cleanse the palate. For coffee lovers, a light roast coffee served at room temperature on the side provides an interesting contrast when enjoyed with sweeter fruits and nuts.

Temperature is key when selecting wines; they should be served at their ideal temperatures for maximum enjoyment. White wines should be chilled, whereas red wines can be slightly warmer to enhance their flavors.

Storage and Shelf Life

To best store your charcuterie wreath, wrap leftover ingredients tightly in plastic wrap or place them in airtight containers. Meats and cheeses will generally keep for up to 3 days, but it’s important to keep an eye on freshness, as some items may spoil faster.

Temperature control is crucial. Meats and cheeses are best stored in the fridge; however, they should be brought to room temperature for serving to enhance their flavors. When it comes to prepared herbs or garnishes, they can be stored in the fridge but should be added just before serving for optimal visual appeal.

Recognizing signs of spoilage is key. Look for discoloration, an off-smell, or changes in texture to help gauge freshness. Reheating isn’t necessary for a charcuterie wreath, but any leftover cooked elements can easily be repurposed into salads or sandwiches.

For freezing options, consider freezing leftover cheese only if absolutely necessary; it can alter its texture significantly. Nuts and dried fruits can usually be frozen without affecting their quality, making them a great ingredient to store long term.

Make Ahead Strategies

Planning ahead can be a lifesaver when hosting holiday gatherings. To effectively prepare your charcuterie wreath, consider creating a timeline. You can slice meats and cheeses the night before and store them in the fridge.

Assemble your wreath in stages, laying out the main elements first and storing them separately. The day of the event, finish with the fresh produce and garnish just before serving to ensure maximum freshness and visual appeal.

Quality is paramount, so do a taste test of your selected meats, cheeses, and fruits a day prior to ensure everything is on par. Consider leaving some ingredients to be added fresh, like herbs or certain fruits, that may lose their appeal if prepped too far in advance.

Don’t forget the incorporation of elements that can be added last minute for freshness—items like avocado or fresh herbs—will bring a lively touch to your finished wreath without a lot of last-minute work.

Scaling Instructions

Scaling a charcuterie wreath is straightforward! If you want to create a smaller version, simply halve your ingredients while still maintaining the same variety. For larger gatherings, doubling or even tripling the ingredients can accommodate larger groups; just ensure that your platter can handle the volume.

Equipment adjustments may include using larger cutting boards or platters to accommodate more ingredients. Timing can remain flexible, as most components can be assembled quickly regardless of size.

When scaling, keep in mind that some ingredients may need extra space to shine. Allow for proper layering and arrangement to prevent overcrowding. Additionally, consider the storage space in your fridge when prepping for a larger wreath.

Nutritional Deep Dive

Breaking down the nutritional content of a charcuterie wreath can be enlightening. The macro breakdown typically reveals a good source of protein from meats and cheeses, healthy fats from nuts, and vitamins from fruits. Adjustments can be made depending on preferences, with options for lower-fat cheeses or leaner meats.

Micronutrient analysis shows that incorporating various fruits can enhance nutrient density, providing fibers, vitamins, and antioxidants. This is particularly important during the holiday season when maintaining healthy habits can be challenging.

The health benefits should not be overlooked; choosing leaner ingredients and adding fresh produce increases fiber content while reducing saturated fats for a healthier balance. Mindful portion analysis can also aid in weight management while enjoying festive foods.

Lastly, adjusting portion sizes based on guests’ preferences allows for a varied approach—offering everything from bite-sized portions to fuller servings can help meet individual dietary needs.

Dietary Adaptations

Creating a charcuterie wreath that caters to various dietary needs can be easily achieved with some mindful substitutions. For gluten-free diets, ensure you choose alternative crackers made from rice or cornmeal, keeping flavors intact while being accessible.

Dairy-free options can replace cheeses with nut-based alternatives or even vegan cheese spreads. These can satisfy those avoiding dairy without sacrificing the creamy goodness traditionally found in standard recipes.

For vegan diets, focus on plant-based meats or hearty vegetables such as artichoke hearts, alongside hummus or tahini as dips. Low-carb and keto variations can tap into meats, cheeses, and low-carb vegetables like cucumber and radishes.

If your guests are following a paleo diet, stick with natural ingredients that reflect whole foods, leaning on meats, vegetables, and fruits while avoiding processed items. Low-FODMAP dieters can plump for cheeses that are lactose-free and stick to lower-fructose fruits, ensuring everyone can join the festive fun.

The Recipe

Create a Stunning Charcuterie Wreath

Serves: 8-10 servings

Prep Time: 30 mins

Cook Time: 0 mins

Total Time: 30 mins

Kitchen Equipment Needed

  • Large round platter or cutting board
  • Knife for cutting meats and cheeses
  • Serving tongs or toothpicks for easy serving
  • Small dishes for dips and spreads

Ingredients

  • 1 pound of assorted cured meats (e.g., prosciutto, salami, chorizo)
  • 1 pound of assorted cheeses (e.g., brie, cheddar, goat cheese)
  • 2 cups of seasonal fruits (e.g., grapes, figs, apple slices)
  • 1 cup of assorted nuts (e.g., almonds, walnuts, pecans)
  • 1 box of gourmet crackers
  • Fresh herbs for garnish (e.g., rosemary, thyme)
  • Optional: dips or spreads (e.g., honey, mustard, hummus)

Directions

  1. Gather all your ingredients and equipment to begin assembling your wreath.
  2. Start with a base of crackers, arranging them in a circular pattern on your platter or board.
  3. Layer the cured meats, folding or rolling them for an appealing presentation, and section them around the wreath.
  4. Place the cheeses next, cutting them into bite-sized pieces, and distribute them evenly.
  5. Add your seasonal fruits in gaps between the meats and cheeses to add color and diversity.
  6. Fill in with a mix of nuts and any dips or spreads placed in small dishes around the wreath.
  7. Finish by garnishing with fresh herbs to add a festive touch and visual interest.

Recipe Notes

  • Feel free to customize the ingredients based on your preferences or dietary needs.
  • Choose quality cheeses and meats for the best flavor experience.
  • Assembling the wreath just before guests arrive will maximize freshness.

Troubleshooting Guide

If your charcuterie wreath’s texture seems off, it may be due to improper ingredient storage. Ensure that meats and cheeses are kept at optimal temperatures before serving. If flavors seem unbalanced, introduce more fruits or nuts; these can effectively balance the richness of meats and cheeses.

For temperature problems, ensure that meats and cheeses are taken out of the fridge ahead of time to warm up. If ingredients have been unwrapped for too long, consider quickly reheating or chilling, depending on what is needed.

Equipment challenges can sometimes arise; ensure that your area is well-organized and you have the right tools at hand to avoid delays. Ingredient substitutions should be done carefully, as not all replacements offer the same flavor profile, so aim to choose similar-tasting alternatives.

In terms of timing concerns, ensure you prep your ingredients in advance to allow for a smoother assembly process. This can include cutting cheeses and washing fruits a day prior, leading to a stress-free experience when hosting guests.

Recipe Success Stories

In our community, readers have reported rave feedback on creating charcuterie wreaths for their gatherings. Many have shared how elegant settings made a lasting impression on their guests. Variations of the wreath—such as those featuring local ingredients—often led to exciting discoveries that enhanced flavors, drawing on regional traditions.

Photography tips have been a big hit, with followers recommending natural lighting to showcase their arrangements’ colors may amplify social engagement. Furthermore, readers have encouraged others to get creative, suggesting their own adaptations, including themed wreaths based on personal favorites or seasonal inspirations.

Adaptation stories illustrate the versatility of the wreath as hosts tailor ingredients to match specific dietary preferences, effectively including everyone in the celebration. Other readers have emboldened participants to let their imaginations run wild, pushing the boundaries of creativity and allowing their personalities to shine through in their culinary creations.

Frequently Asked Questions

How long will the charcuterie wreath last?

The charcuterie wreath can last up to three days in the fridge, but freshness should be prioritized. Meats and cheeses are best enjoyed when recently prepared, so aim to assemble close to serving time.

What are the best types of cheese for a charcuterie wreath?

Some excellent cheese options include creamy brie, sharp cheddar, tangy goat cheese, and blue cheese. Aim for a balance of flavors and textures to keep guests engaged.

Can I make a charcuterie wreath in advance?

While you can prepare certain elements like cutting fruits or prepping meats ahead of time, it’s best to assemble the wreath just before guests arrive for optimal freshness and appearance.

Are there any dietary restrictions I should be aware of?

Yes, it’s wise to consider guests’ dietary restrictions. Options for gluten-free, dairy-free, and vegan substitutions can be easily incorporated to ensure everyone can enjoy the platter.

How can I make my wreath visually appealing?

To enhance visual appeal, use colorful ingredients, varying sizes, and layers of texture. Adding fresh herbs or edible flowers can also elevate the presentation significantly.

What beverages pair well with a charcuterie wreath?

A range of wines pairs excellently, such as white or light red wines. For non-alcoholic options, try sparkling water infused with fruits or herbal iced teas for a refreshing palate cleanser.

Can I include other foods besides meat and cheese?

Absolutely! Feel free to add crackers, fruits, vegetables, dips, and a selection of nuts. Be creative, as there are no strict guidelines on what can be included.

What is the best way to serve the wreath?

Present the wreath on a large platter or board, allowing guests to serve themselves easily. Providing small plates or napkins can ease the process and keep things organized.

What’s the best way to store leftover charcuterie?

Wrap leftover items tightly or store them in airtight containers in the refrigerator. Ensuring they stay fresh and maintaining quality can enhance their shelf life.

Can I use frozen ingredients?

It’s not recommended to use frozen fresh items on a charcuterie wreath. However, frozen nuts can generally be thawed without losing quality; opt for fresh ingredients whenever possible for the best experience.

How can I ensure portion control for my guests?

Offering small serving utensils and arranging ingredients thoughtfully can promote portion control. Additionally, pre-cut items encourage guests to select appropriate sizes for their plates.

Additional Resources

To complement your charcuterie wreath, consider exploring related recipes that highlight seasonal flavors and festive ingredients. Technique guides for preparing meats and cheeses can elevate your skills, while ingredient information can provide insight into unique products to try.

Equipment recommendations such as high-quality cutting boards or platters can significantly enhance your presentation and ease of assembly. Lastly, seasonal variations on charcuterie boards offer fresh ideas that can keep your culinary creativity flowing throughout the year.

Join the Conversation

We invite you to share your charcuterie wreath creations on social media and engage with fellow cooking enthusiasts! Share your photography tips, provide reviews, and celebrate community engagement through shared experiences.

Encourage friends and family to enter the kitchen with their variations and thoughts. Your unique adaptations could inspire others and further enhance dish enjoyment at holiday gatherings or casual get-togethers.

Let’s continue the dialogue about flavors, creativity, and wonderful culinary moments while diversifying our recipe collections together!

Create a Stunning Charcuterie Wreath for Your Next Gathering

Create a Stunning Charcuterie Wreath for Your Next Gathering

⚖️
Difficulty
Easy

⏲️
Prep Time
30 mins

🕒
Cook Time
0 mins

⏱️
Total Time
30 mins

🍽️
Servings
8-10

If you’re looking to impress your guests at your next gathering, creating a stunning charcuterie wreath is a delightful way to do so. This festive and artistic presentation combines both flavor and aesthetic, making it the centerpiece of any occasion. The charcuterie wreath is not just a treat for the palate, but also a feast for the eyes, elegantly arranged to resemble a seasonal wreath adorned with a variety of meats, cheeses, fruits, and nuts.

Imagine an array of vibrant colors, crunchy textures, and savory flavors that come together in this beautiful, circular arrangement. Each ingredient plays a role; from the rich taste of cured meats to the creamy texture of artisanal cheeses, every bite provides a new culinary experience. Whether it’s for a holiday celebration, a casual gathering with friends, or an elegant dinner party, a charcuterie wreath is sure to elevate your entertaining game.

Quick Recipe Highlights

  • Flavor Profile: The combination of savory meats, creamy cheeses, and sweet fruits creates a balanced taste experience that’s both satisfying and indulgent.
  • Texture: Enjoy the contrast between crunchy nuts and soft cheeses paired with the tenderness of sliced meats.
  • Aroma: The aromatic notes of smoked meats and aged cheese mingle with the fresh scents of herbs and fruits enticing guests from the moment they walk in.
  • Visual Appeal: The wreath’s circular shape, filled with vibrant colors, garnished with fresh herbs, and adorned with edible flowers, makes for an eye-catching display.
  • Skill Level Needed: This easy charcuterie wreath requires minimal culinary skills, making it accessible for everyone.
  • Special Equipment: You’ll need a large serving platter or a round wooden board for optimal presentation.

Recipe Overview

  • Difficulty Level: This charcuterie wreath is classified as easy, perfect for both novice and experienced home cooks looking to showcase their creativity without the stress.
  • Category: Ideal as an appetizer or party snack, this dish fits beautifully into any casual or festive meal setting.
  • Cuisine: Drawing inspiration from French and Italian traditions, the charcuterie board has evolved to become a popular social appetizer worldwide, showcasing artisanal meats and cheeses.
  • Cost: The cost can vary based on the choice of ingredients but expect an average range of $40 to $75 depending on selections.
  • Season: This recipe shines in the fall and winter, taking advantage of festive gatherings and seasonal ingredients.
  • Occasion: Perfect for holidays, birthdays, or any festive gathering where friends and family come together.

Why You’ll Love This Recipe

First and foremost, the taste and texture appeal of a charcuterie wreath will captivate any palate. The beautiful combination of flavors, from the rich and salty curl of prosciutto to the creamy bite of brie, provides something for everyone, making it an ideal communal dish. The freshness of fruits like grapes and figs contrasts perfectly with the aged cheeses, culminating in a delightful taste experience.

Next is the convenience and preparation benefits that come with assembling a charcuterie wreath. There’s no cooking involved, allowing you to prepare this stunning dish in less than 30 minutes. It’s easily adjustable based on dietary restrictions or guest preferences; you can swap out meats or cheeses based on what’s available or your guests’ tastes.

The nutritional advantages should not be overlooked either. Packed with protein from meats and cheeses, as well as vitamins from fruits and nuts, this wreath can also serve as a well-rounded appetizer. With thoughtful ingredient selection, you can create a healthier version that still satisfies cravings.

Socially, a charcuterie wreath serves as a great conversation starter at any gathering. Guests can comfortably congregate around the display, encouraging mingling and interaction. The shared experience of constructing their own plates fosters a relaxed and enjoyable atmosphere, making your gathering memorable.

Lastly, the cost-effectiveness of a charcuterie wreath is impressive. With careful selection, it can be tailored to fit any budget. Many ingredients can be sourced locally, and buying in bulk can further reduce costs while still providing an abundance of flavors and options for your guests to enjoy.

Historical Background and Cultural Significance

The origins of charcuterie can be traced back to ancient times, where preservation methods of meats were vital to survival. The art began in France, where various techniques were developed to make salami, sausages, and other cured meats. Over time, this craft transformed into more than just a method of food preservation, becoming a culinary art form celebrated in dining experiences worldwide.

Charcuterie holds a significant cultural importance as it brings people together to share a meal. It fosters a sense of community during meals, making it a staple at family gatherings, social events, and special occasions. The DIY aspect of charcuterie boards allows for creativity, ensuring that each arrangement can reflect personal tastes and local ingredients.

Over the years, the practice of assembling charcuterie boards has evolved with trends, incorporating diverse flavors and ingredients. The rise of artisanal cheeses and local produce has contributed to this evolution, leading to new styles and presentations including the contemporary charcuterie wreath, which optimizes visual appeal with its wreath shape.

Variations of charcuterie can be found in many regions globally. In Italy, for example, antipasto platters include cheeses, olives, and marinated vegetables, while Spain features tapas. Each cuisine brings its own flavors and traditions, blending seamlessly into the charcuterie concept that we cherish today.

Ingredient Deep Dive

Cured Meats: Cured meats like prosciutto and salami are at the heart of any charcuterie wreath. Historically significant in Mediterranean diets, these meats offer high protein and intense flavor. When selecting cured meats, look for high-quality options without fillers. Store them wrapped in parchment in the refrigerator to maintain freshness, and they can typically last several weeks. Alternatives include turkey breast or vegan deli slices for dietary modifications.

Artisanal Cheeses: Cheeses like brie and aged cheddar provide creamy and rich elements to your wreath. Cheese has long been celebrated in numerous cultures across Europe, bringing both flavor and texture to dishes. Aim for a variety that includes soft, hard, and blue cheeses. For longevity, store cheese wrapped in wax paper and then placed in an airtight container. Substitute with dairy-free options if necessary.

Fresh Fruits: Incorporating fruits like grapes, figs, and apple slices not only adds sweetness but also complements savory elements beautifully. Fruits have cultural significance as symbols of abundance and vitality in numerous traditions. They pack nutritional benefits, like fiber and vitamins, and can be stored in the refrigerator for a few days. For substitutions, consider berries or citrus for variety and seasonality.

Nuts and Seeds: Nuts such as almonds and walnuts add crunch and earthiness to your wreath. These ingredients are rich in healthy fats and protein, and their diverse inclusion reflects their popularity in different cuisines. Store nuts in a cool, dry place to prolong freshness, and if allergies are a concern, seeds like pumpkin or sunflower can be great alternatives.

Common Mistakes to Avoid

  • Overcrowding the Wreath: A common mistake is to overload the wreath, making it difficult for guests to serve themselves. Aim for balance and allow enough space between ingredients for a beautiful presentation.
  • Choosing Generic Ingredients: Not all meats and cheeses are created equal. Opt for high-quality artisanal products rather than generic brands to maximize flavor and impact.
  • Not Balancing Flavors: Avoid creating a wreath that leans heavily to one flavor profile. Balance savory, sweet, and tangy ingredients for a harmonious taste experience.
  • Ignoring Aesthetics: Presentation matters! Dull arrangements can make even the best ingredients seem unappealing. Take the time to arrange your ingredients artistically.
  • Forgetting Accompaniments: Pairing your wreath with the right spreads and sides, like honey or mustard, enhances the flavors and elevates the entire dining experience.
  • Not Using Fresh Herbs: Fresh herbs add bright flavor and visual appeal. Don’t skip garnishing your wreath for that final touch!
  • Improper Storage: If leftovers remain, ensure they are stored properly to maintain freshness. Use airtight containers and consume within a few days.
  • Neglecting Dietary Restrictions: Always check for food allergies and dietary preferences amongst your guests. Provide options to accommodate everyone’s needs.

Essential Techniques

Arranging Ingredients: The art of arranging a charcuterie wreath is vital to its success. Start with your larger items, like cheeses and meats, and then fill in gaps with smaller items like nuts and fruits. This not only creates a visually appealing display but encourages guests to explore the entire arrangement.

Flavor Pairing: Understanding which flavors complement each other is crucial. When selecting meats, cheeses, and fruits, consider the taste and texture combinations. For example, pairing sharp cheddar with sweet figs enhances the flavor profiles beautifully.

Garnishing: Garnishing with fresh herbs or edible flowers can elevate the presentation immensely. Use herbs like rosemary or basil for a fragrant touch, and consider the seasonality of blooms for added decoration.

Pro Tips for Perfect Charcuterie Wreath

1. Use a variety of textures – combine soft, hard, crunchy, and creamy ingredients for an exciting mouthfeel.

2. Incorporate seasonal produce for freshness and vibrant colors that will enhance the overall presentation.

3. Ensure all ingredients are at room temperature before serving, as this allows flavors to shine through.

4. Use a mix of meats and cheeses from different regions to create an eclectic taste experience.

5. Don’t forget about portion sizes; plan accordingly if you’re catering to a larger crowd.

6. Experiment with different shapes – while a wreath is traditional, feel free to try hearts or stars for themed gatherings.

7. Set the stage with beautiful crackers or breads offering a contrast to the richness of the meats and cheeses.

8. Always leave room for creative expression; this is your opportunity to showcase local or favorite ingredients.

Variations and Adaptations

When it comes to regional variations, consider exploring Mediterranean influences by adding olives and hummus, providing different flavor profiles. For a seasonal adaptation, incorporate roasted vegetables in the fall or light, citrus-based fruits in the summer. Dietary modifications can easily be made; for a vegan version, swap meats for marinated tofu and use nut-based cheeses. For texture variations, try adding crispy chickpeas or toasted seeds for extra crunch. And for presentation alternatives, consider using mini wreaths for individual servings at more formal events.

Serving and Presentation Guide

When plating your charcuterie wreath, start with a large, flat surface to allow ample space for arrangement. Group similar items together but keep the layout playful—a mix of colors and shapes can draw the eye. Garnish with fresh herbs to add pops of color and aroma. Include serving utensils like tongs and small forks for convenience. Consider traditional accompaniments, such as crusty bread or artisan crackers, to complement the wreath.

Wine and Beverage Pairing

For a sophisticated pair, opt for a fruity red wine like Pinot Noir that complements the richness of the meats while contrasting the saltiness. If white wine is more preferred, a crisp Sauvignon Blanc can lift the flavors with its acidity. For non-alcoholic options, consider sparkling water infused with citrus or a refreshing iced tea for a lovely balance to the heavier flavors of the charcuterie.

Storage and Shelf Life

When storing your charcuterie wreath, wrap leftovers in plastic wrap or place them in an airtight container to prevent drying out. The wreath is best enjoyed within 2-3 days for optimal freshness. Store in a cool part of the refrigerator, ensuring meats and cheeses do not come into contact over time. If applicable, reheat to desired temperatures, particularly for any cooked components, and avoid refreezing as it alters the texture significantly.

Make Ahead Strategies

To make meal prep easier, you can slice and prepare your meats, cheeses, and fruits a day in advance. Assemble them on your board, cover with plastic wrap, and refrigerate until ready to serve. This strategy maintains freshness while allowing you to display creatively. Add fresh herbs and any delicate components just before serving to maintain crispness and vibrant appearances.

Scaling Instructions

If you plan to halve the recipe, adjust the arrangement slightly to maintain visual appeal while reducing the quantity of each ingredient. For larger gatherings, doubling or even tripling the portions is easy; simply maintain proportionate quantities to achieve balance in taste and presentation. Be mindful of the serving equipment as you scale—larger boards or multiple boards might be necessary to accommodate a bigger display.

Nutritional Deep Dive

When assessing the nutritional aspects of the charcuterie wreath, focus on macro breakdowns; the proteins from meats and cheeses provide vital amino acids, while fats contribute to satiety. Micronutrients from fruits and nuts support overall health, contributing vitamins and minerals essential for various bodily functions. Be attentive to portion sizes, as charcuterie can be quite calorie-dense, making awareness crucial for maintaining weight management goals.

Dietary Adaptations

To cater to gluten-free diets, ensure you use gluten-free crackers or serve with sliced vegetables instead. A dairy-free version can replace all dairy components with plant-based alternatives such as nut cheeses or coconut yogurts. If following a vegan or low-carb lifestyle, there are plenty of meat substitutes available that simulate texture and taste, allowing for creative freedom while staying aligned with dietary preferences.

The Recipe

Create a Stunning Charcuterie Wreath

Serves: 8-10

Prep Time: 30 mins

Cook Time: 0 mins

Total Time: 30 mins

Kitchen Equipment Needed

  • Large serving platter or wooden board
  • Knife for cutting cheese and fruits
  • Small bowls for spreads
  • Tongs or small forks for serving

Ingredients

  • 200g of prosciutto
  • 200g of salami
  • 200g of brie cheese
  • 200g of cheddar cheese
  • 100g of almonds
  • 100g of walnuts
  • 1 cup of grapes
  • 2-3 figs, sliced
  • Fresh rosemary for garnish
  • Crackers or bread for serving

Directions

  1. Begin by choosing a large serving platter or wooden board as your base.
  2. Start arranging the cheeses around the platter, creating a circular shape.
  3. Next, layer the cured meats around the cheeses, overlapping slightly for a beautiful display.
  4. Fill in the gaps with nuts and fresh fruits to create color and variety.
  5. Garnish with fresh herbs for an additional pop of color and flavor.
  6. Serve with a selection of crackers or breads on the side, and enjoy the beautiful presentation!

Recipe Notes

  • Feel free to substitute any meats or cheeses based on your preferences or dietary needs.
  • Experiment with different fruits and nuts for variety with each wreath.

Troubleshooting Guide

For texture issues, ensure meats and cheeses are at room temperature while serving. If flavors feel unbalanced, consider adding acid with lemon zest or vinegar-based dressings to brighten the overall taste. If the arrangement seems challenging, break it down by starting with cheeses, then layering the meats and finishing with fruits and nuts.

Recipe Success Stories

Readers have shared incredibly positive feedback regarding their experiences making the charcuterie wreath for various events. Many felt it was the highlight of their gatherings, praising the vibrant presentation that sparked great conversations. Additionally, several users have mentioned loving the flexibility in modifying the ingredients based on seasonality and personal preference, making it an approachable yet impressive dish.

Frequently Asked Questions

Can I make a charcuterie wreath ahead of time? Yes, you can prepare it a few hours in advance. Just keep it covered in the fridge, and add delicate components just before serving.

What if I have dietary restrictions among my guests? Feel free to substitute ingredients. Use dairy-free cheeses and gluten-free crackers for those with allergies.

How do I keep ingredients fresh for longer? Wrap any leftovers tightly and store them in airtight containers in the refrigerator. Consume within a few days for the best taste.

What are some popular pairings with a charcuterie wreath? Classic pairings include fruits, nuts, and a selection of gourmet crackers or artisan bread.

How can I ensure the best flavor combinations? Consider sweet, savory, and creamy contrasts while choosing your ingredients for a well-balanced wreath.

Are there vegetarian options available? Absolutely! You can use vegetables, cheeses, and plant-based proteins to create a delicious vegetarian wreath.

Can I make a smaller or larger version? Yes! The beauty of a charcuterie wreath is in its flexibility. Adjust ingredient quantities to fit your gathering size.

What to do if I run out of ingredients? Be creative with what you have! Create a unique twist on the traditional wreath using available ingredients.

How do I select the best meats? Look for high-quality cured meats without fillers, and consider regional artisanal options for unique flavors.

What are some fun garnishing ideas? Fresh herbs, edible flowers, or even citrus slices can add visual appeal to your wreath.

Additional Resources

To enhance your culinary experience, explore related recipes like different variations of charcuterie boards. Dive into technique guides for expert tips on selecting the best ingredients, learn about cheese making at home, or discover seasonal variations that can complement different times of the year.

Join the Conversation

We encourage you to share your charcuterie wreath creations on social media using our hashtag. Capture beautiful photography of your wreaths, and exchange tips with the community on variations that successfully wowed your guests. Your reviews and feedback play an essential role in creating a vibrant and growing cooking community. Join us in celebrating our love for engaging culinary experiences!

Easy Creamy Chicken Pesto Pasta Recipe for Busy Weeknights

Effortless Creamy Chicken Pesto Pasta Recipe: A Taste of Italy at Home

⚖️
Difficulty
Easy

⏲️
Prep Time
10 mins

🕒
Cook Time
20 mins

⏱️
Total Time
30 mins

🍽️
Servings
4

If you’re yearning for a comforting bowl of pasta that combines the creamy richness of classic Italian sauces with the vibrant flavors of basil pesto, look no further than this effortless creamy chicken pesto pasta recipe. As the creamy sauce envelops tender pieces of chicken and twirls of al dente pasta, every bite is a harmonious balance of savory and fresh, promising an experience that not only tantalizes the taste buds but also warms the heart. Get ready for an Italian-inspired culinary journey that requires minimal effort yet delivers maximum flavor.

This creamy chicken pesto pasta is an excellent choice for weeknight dinners or casual gatherings, where simplicity and taste are the main goals. The fusion of juicy, lightly seasoned chicken with the nutty and slightly tangy pesto creates a delightful contrast against the velvety cream sauce, while the pasta serves as the perfect canvas to soak up all the goodness. Whether you’re new to cooking or a seasoned chef, this recipe is straightforward to follow and guarantees scrumptious results, making it a staple in your recipe repertoire.

Quick Recipe Highlights

  • Flavor Profile: The dish uniquely marries the rich and savory notes of chicken and cream with bright, herby pesto, accented by a hint of garlic.
  • Texture: You’ll enjoy a wonderful interplay of silky pasta, tender chicken, and a creamy sauce, all harmonized by the pesto’s slight crunch from pine nuts.
  • Aroma: Expect an enticing medley of fresh basil, garlic, and cream, complemented by the enticing aroma of seared chicken.
  • Visual Appeal: A vibrant presentation of green basil pesto against creamy sauce, peppered with juicy chicken bits and sprinkled with parmesan.
  • Skill Level Needed: Simple enough for beginners, requiring basic cooking techniques such as sautéing and stirring for a seamless execution.
  • Special Equipment: A deep skillet or sauté pan, and a stockpot for boiling pasta, making it accessible for anyone with a well-stocked kitchen.

Recipe Overview

  • Difficulty Level: Rated as easy because it involves basic techniques like boiling, sautéing, and stirring—perfect for beginners or quick cooking sessions.
  • Category: This recipe fits into the main dish category, serving as a hearty centerpiece for your meals, whether for lunch or dinner.
  • Cuisine: Inspired by Italian culinary traditions, showcasing the harmonious blend of pasta, pesto, and cream in a single, delicious offering.
  • Cost: Relatively affordable, primarily needing pantry staples and fresh ingredients like chicken, basil, and parmesan—all easily found in local stores.
  • Season: Ideal for spring and summer when basil is freshest, but equally comforting as a winter warmer with its rich, creamy components.
  • Occasion: Perfect for casual family dinners or special occasions where comfort and ease are the priorities, ensuring everyone leaves the table satisfied.

Why You’ll Love This Recipe

This creamy chicken pesto pasta is a testament to the idea that simple ingredients can transform into a complex tapestry of flavors and textures, leaving you longing for more after each bite. The creamy sauce generously coats each piece of pasta and chicken, creating a luscious melt-in-your-mouth experience complemented by the zesty pop of basil pesto—a balance that is both indulgent and fresh. The ease of preparation makes it not only quick to whip up but also ensures that each component shines with minimal fuss and maximum taste.

Convenience is key with this recipe, as it comes together swiftly, making it a lifesaver on busy weeknights when you want something hearty but don’t have hours to spend in the kitchen. Using staple ingredients you likely already have on hand—such as pasta, chicken, and cream—combined with store-bought or homemade pesto, this dish is as straightforward as it is delicious. Whether you’re cooking for one or feeding a crowd, the quantities are easily adjustable to suit your needs without compromising on quality.

Beyond its irresistible taste and ease, this recipe also boasts nutritional benefits. Chicken provides a lean source of protein, while basil pesto adds a burst of vitamins and healthy fats. Adjust the type and amount of pasta to meet your dietary preferences, whether opting for whole grain or gluten-free varieties. This flexibility makes the dish not just delightful but also a nourishing option you can feel good about enjoying regularly.

Socially, this recipe is a crowd-pleaser perfect for entertaining guests or family gatherings. The vibrant flavors and creamy consistency are akin to something you’d find in a fine Italian restaurant, yet anyone can replicate it effortlessly at home. The appeal extends from casual dinners to more formal occasions, ensuring that you’re prepared to impress without breaking a sweat, thereby making every meal an opportunity to forge memories filled with laughter and great food.

Economically, you’ll appreciate the cost-effectiveness of this dish, as none of the ingredients break the bank yet together create a result that’s luxury on a plate. It embodies the principle of getting the most flavorful return from minimal investment—an ideal choice if you’re looking to indulge your taste buds while staying within your budget. Having a meal that is both delightful and accessible is a recipe for satisfied diners and a happy cook.

Historical Background and Cultural Significance

The origins of pesto can be traced back to Genoa in Italy’s Liguria region, where the local basil became the preferred herb due to its robust flavor and aromatic qualities. Traditional pesto is a celebration of fresh, local produce, a nod to the Italian way of using what’s available within reach and transforming it into something magical. Over the years, this vibrant sauce has gained popularity worldwide, not only as a pasta accompaniment but also as a versatile ingredient in various culinary creations.

Culturally, pesto has become synonymous with Italian cuisine, a testament to its adaptability and universal appeal. It represents the bright and fresh flavors typical of many Italian dishes, bringing a touch of the Mediterranean to every meal. The combination of basil, garlic, pine nuts, parmesan cheese, and olive oil—is a perfect encapsulation of Italy’s culinary ethos, where simplicity meets sophistication in every bite.

The evolution of this creamy chicken pesto pasta recipe represents the gradual globalization and fusion of culinary traditions. By integrating the richness of cream into the dish, the recipe expands on the classic pesto pasta, adding layers of texture and taste that appeal to a wider audience. This variation exemplifies modern cooking trends where traditional recipes serve as foundations for innovative twists and creative reimaginings.

Regional variations also exist, with each bringing unique elements based on local tastes and ingredient availability. Some might incorporate sun-dried tomatoes or roasted red peppers for additional color and flavor, while others might swap pine nuts for walnuts or omit them entirely for nut-free adaptations. These variations not only showcase the versatility of the original recipe but also highlight the adaptability of pesto across different culinary landscapes.

Ingredient Deep Dive

Chicken, the cornerstone of this dish, is not just a lean protein choice but also a culturally significant ingredient across countless cuisines. Its mild flavor and ability to absorb surrounding tastes make it a staple in both home cooking and fine dining. Nutritionally, chicken is rich in essential vitamins and minerals, making it an excellent partner to the fiber-rich pasta and nutrient-dense pesto.

Basil, the star of pesto, has a rich history dating back to ancient times, celebrated across many cultures for its aromatic qualities and diverse applications. Packed with vitamins and antioxidants, basil contributes not only flavor but also an array of health benefits. To select the best basil, look for fresh bunches with vibrant, bright green leaves and avoid any signs of wilting. Keep basil fresh by storing it in a glass of water on the countertop or wrapping it in damp paper towels in the refrigerator.

To craft the perfect pesto, ensure your parmesan is freshly grated for optimal texture and taste. Freshly grated cheese incorporates more seamlessly into the pesto sauce and adds a nuanced salty depth. When storing parmesan, wrap it tightly in wax paper followed by aluminum foil to maintain its moisture and flavor balance. Should you need a substitute, try pecorino romano for a sharper bite or nutritional yeast for a vegan-friendly option.

Coined as nature’s butter, pine nuts form the creamy backbone of traditional pesto. While they add a subtle nutty richness, they can be pricey or hard to find. Consider using walnuts or almonds as suitable alternatives, adapting to personal preferences or dietary needs. To preserve the unique flavor of pine nuts, store them in an airtight container within the fridge or freezer, protecting them from rancidity due to their high oil content.

Common Mistakes to Avoid

  • Overcooking the pasta: Al dente is key, as it will continue cooking slightly when combined with the sauce.
  • Using low-quality cream: Opt for high-fat cream to ensure the sauce doesn’t break or turn watery.
  • Skipping the pasta water: Always reserve some for a creamy, cohesive sauce.
  • Adding pesto too early: Stir it in at the end to preserve its vibrant color and fresh taste.
  • Under-seasoning the chicken: Proper seasoning is crucial for flavor depth.
  • Neglecting fresh basil: Ensure your pesto’s flavor is bright and aromatic.
  • Omitting the parmesan: It provides the sauce’s underlying richness and umami.
  • Rushing the chicken browning: A good sear imparts essential caramelized flavors.
  • Letting the sauce cool too much: Serve immediately to enjoy its best texture.

Essential Techniques

When preparing this creamy chicken pesto pasta, one of the crucial techniques is achieving the perfect pasta consistency. Cooking the pasta until it’s al dente is important, as it will continue to soften slightly when mixed with the warm creamy sauce. Additionally, incorporating a splash of reserved pasta water helps the sauce adhere better to the pasta, creating a luscious, cohesive amalgamation of flavor and texture.

Achieving a proper sear on the chicken is another technique that brings depth and richness to the dish. By ensuring the skillet is adequately heated beforehand, you seal in the juices and flavor, which prevents the chicken from becoming dry or bland. Watching for a golden-brown crust as the visual cue will ensure a successful outcome every time.

Pro Tips for Perfect Creamy Chicken Pesto Pasta

For the creamiest sauce, whisk in a small knob of cold butter at the end. It enhances the texture and gives the sauce a shiny finish.

Let the cooked chicken rest for a few minutes before slicing to retain its juices, making it more tender.

Mix the pasta frequently as it cooks to prevent sticking and ensure even heat distribution.

Use a heavy-bottomed skillet to cook the cream sauce evenly and avoid scorching.

If using jarred pesto, amp up the freshness with a squeeze of lemon juice at the end.

Toast nuts lightly beforehand to maximize their flavor in the pesto.

Variations and Adaptations

Regional variations of this pasta recipe might feature sun-dried tomatoes for added sweetness or artichoke hearts for a Mediterranean twist, adapting to different regional flavors. Embrace the seasons by including vegetables like asparagus in the spring or roasted butternut squash in the autumn, creating a dynamic dish that evolves with the calendar.

For dietary modifications, consider swapping the regular pasta with whole-wheat or gluten-free versions to suit different needs. You can reduce caloric content by using light cream or substituting with half-and-half, while retaining the essential creamy consistency of the sauce. These adaptations not only broaden the dish’s accessibility but they additionally personalize the recipe to fit different dietary frameworks.

Enhance the textural dimension by incorporating cooked mushrooms or spinach into the pasta, lending an earthy contrast to the rich sauce. Alternatively, mix up the pesto itself by using arugula or cilantro in place of basil for a fresh twist, exploring varied flavor profiles. When it comes to presentation, garnish with cherry tomatoes or edible flowers for a pop of color that elevates the dish’s visual appeal.

Serving and Presentation Guide

Plating is an art, and with this recipe, it’s about creating a sense of abundance and texture. Begin by swirling the pasta into deep, wide bowls and top with sliced chicken. Generously spoon over the sauce, allowing it to pool around the edges. For garnishing, a sprinkle of grated parmesan, a zest of fresh lemon peel, and a few basil leaves highlight the dish’s freshness and complexity.

Traditionally, garlic bread serves as an excellent accompaniment to this pasta, offering a crispy, buttery counterpoint to the creamy, savory flavors. If a lighter touch is desired, opt for a crisp green salad with a vinaigrette that cuts through the richness with a refreshing note. Whatever the choice, consider temperature—serve the pasta hot to retain the sauce’s desirable creamy consistency, ensuring each bite remains sumptuous.

Wine and Beverage Pairing

Complement the decadent flavors of the creamy chicken pesto pasta with a crisp, dry white wine like a Pinot Grigio or Sauvignon Blanc. These wines evoke a refreshing balance against the creaminess while enhancing the pesto’s brightness. For non-alcoholic options, consider a sparkling water infused with citrus slices, which can provide the same palate-cleansing effect.

For a cozier pairing, a light, fruity rosé offers a lovely balance to the richness of the dish without overwhelming it. The wine’s subtle berry notes amplify the pesto’s herbaceous qualities while maintaining the creamy chicken’s integrity. If you’re serving the dish for a brunch, a delicate herbal green tea can add warmth and a slightly nutty flavor, harmonizing beautifully with the pesto.

Storage and Shelf Life

Store the cooked pasta in an airtight container within the refrigerator for up to 3 days, ensuring the dish remains fresh and flavorful. For optimal texture, keep the sauce and pasta separate during storage and recombine them upon reheating. Use a microwave or stove to gently warm the pasta, adding a splash of water or stock to reinvigorate the sauce’s creaminess, taking care not to overheat, which could break the sauce’s structure.

Freezing is also an option, though the texture may slightly differ upon thawing. If freezing, portion the pasta out and pack it tightly in freezer-friendly containers or bags, expelling any excess air to ward off freezer burn. To enjoy at a later date, let the pasta thaw overnight in the fridge and warm it gently on the stove—this method helps to preserve the dish’s original quality.

Make Ahead Strategies

For those looking to prepare in advance, cook the chicken and pesto a day before and store them separately in the refrigerator. Reserve time for pasta cooking and sauce preparation on serving day to retain the dish’s signature characteristics. Throughout the preparations, keep an appropriate timeline in mind, considering any necessary rearrangements that might arise from partial preparations.

To maintain freshness and flavor while holding pre-made components, sprinkle a few drops of lemon juice on exposed pesto surfaces, limiting oxidative discoloration. If planned appropriately, these strategies preserve the dish’s essential appeal and texture when you’re ready to serve, allowing for seamless integration into your culinary agenda.

Scaling Instructions

Adapt the recipe’s yield as needed, whether reducing to single servings or expanding to accommodate larger guest counts. When halving, adjust the cooking times slightly to accommodate less volume, ensuring the sauce does not reduce excessively. Volume can easily be increased by doubling each component, maintaining balance and flavor proportion.

Adjust cookware size accordingly; larger pans prevent overcrowding, especially when scaling upward to prevent inconsistencies in cooking. Make sure to allow sufficient time for the sauce to develop and pasta to reach al dente perfection, sticking to core principles regardless of the recipe’s scale. Scaling is ultimately about maintaining the dish’s integrity by managing ingredient proportions actively.

Nutritional Deep Dive

This creamy chicken pesto pasta offers a balanced macronutrient profile with protein-rich chicken, fiber-heavy pasta, and healthy fats from the pesto. These elements contribute to a satisfying energy source, perfect for a wholesome meal. Micronutrients from the basil and pine nuts supplement essential vitamins such as Vitamin A, K, and E, enhancing its overall nutritional composition.

Dieters can monitor portions for mindful consumption, capitalizing on the delicious flavors without overindulging. Consider portion sizes based on dietary needs, ensuring everyone gets a nutrient-rich experience. The recipe is versatile enough for caloric management, making adjustments where necessary without sacrificing satisfaction.

Dietary Adaptations

For gluten-free adaptations, swap standard pasta for a gluten-free option, ensuring the use of compliant ingredients throughout. Dairy-free needs can be met by replacing cream with a coconut milk alternative, adjusting the jarred pesto selection away from cheese additives. Vegan options adjust ingredients to omit chicken, using tofu or chickpeas instead, while selecting a vegan pesto for consistency in flavor.

Low-carb adherents might use zucchini noodles in place of traditional pasta, maintaining the dish’s core integrity while aligning with dietary goals. Adaptations for keto or paleo diets follow similar pathways, supporting pasta substitutions with spiralized vegetables or cauliflower rice. These adaptations enhance the dish’s inclusivity, opening it to broader enjoyment across diverse dietary persuasions.

Troubleshooting Guide

Address over-thickened sauce by whisking in reserved pasta water, adjusting consistency while enhancing flavor. Should the sauce lack cohesiveness, monitor temperature management, ensuring creams or milk are not over-boiled, preventing separation. Flavor settings are balanced through seasoning adjustments, using salt and lemon for a refined punch when needed.

Tackle temperature challenges by maintaining steady heat throughout cooking, preventing flare-ups that can ruin base ingredients and overall taste. Ingredient substitutions may arise based on availability—ensure familiarity with potential impacts on the dish’s final profile. Timing remains a core component; mismanaged time can detract from al dente pasta or overdone chicken, remedied by active vigilance and monitoring cues for doneness.

Recipe Success Stories

Our community has embraced this pasta dish with open arms, each personal touch adding unique flair to an already delightful experience. From sundried tomato enhancements shared by a reader to substitution successes with vegan cream options, stories of iteration and adaptation abound. Such testimonials underscore the recipe’s universal allure and versatility, presenting opportunities for fellow cooks to explore new horizons.

Our readers have captured these variations in stunning photography, encapsulating the dish’s essence through thoughtful visual storytelling. Photographers use vibrant garnishes, natural lighting, and styled plating to highlight what makes this recipe shine, paired with stories of shared meals filled with laughter, accomplishment, and culinary joy.

Frequently Asked Questions

Q: Can I use a different type of pasta?

A: Absolutely, feel free to use your favorite pasta shape. Just adjust cooking times based on package instructions to ensure it reaches the perfect texture.

Q: How can I store leftovers of creamy chicken pesto pasta?

A: Store in an airtight container in the refrigerator for up to three days. For best results, keep the pasta and sauce separate when storing and combine when reheating.

Q: Can this recipe be made dairy-free?

A: Yes, you can substitute full-fat coconut milk for cream. Be sure to choose a dairy-free pesto or make your own using nutritional yeast as a cheese alternative.

Q: What if I am allergic to nuts?

A: Just omit the nuts from the pesto or use seeds such as sunflower seeds or pumpkin seeds to add creaminess without nuts.

Q: Is it possible to freeze this dish?

A: You can freeze the pasta and chicken separately for up to two months. However, the sauce may change texture slightly upon thawing, so it’s best to reheat it gently.

Q: How can I make this keto-friendly?

A: Use spiralized zucchini or shirataki noodles instead of pasta to maintain low carb content while enjoying all the creamy goodness.

Q: What wine pairs best with creamy chicken pesto pasta?

A: A crisp white wine such as a Sauvignon Blanc complements the dish’s flavors beautifully, offering a refreshing counterpoint to its richness.

Q: Can I prepare this in advance?

A: Prepare the pesto and cook the chicken ahead of time, storing them separately. Assemble the dish, cooking the pasta fresh at mealtime for optimal taste and texture.

Q: What if I don’t have fresh basil?

A: You can substitute with dried basil in a pinch, but the fresh counterpart is ideal for taste. Alternatively, explore other herbs like arugula or spinach for different flavors.

Q: Is it possible to use pre-cooked chicken?

A: Certainly, using pre-cooked or rotisserie chicken is convenient for saving time, just incorporate it towards the end to warm without drying.

Additional Resources

To expand your culinary toolkit, dive into our related recipes featuring other pesto-infused creations, grounded in traditional Italian techniques and innovative spins. Our collection of equipment recommendations ensures you’re equipped for success, no matter what your kitchen setup. Explore guides that deepen understanding of key ingredients like basil and pine nuts, enhancing your skills and knowledge base.

Discover the nuances of regional Italian cuisine, drawing inspiration for seasonal variations to keep your creations vibrant and fresh. Dedicated practice and understanding elevate your culinary journey, with curated resources designed to transform cooking from an everyday task to a celebrated art form.

Join the Conversation

Engage with fellow food enthusiasts across our social media channels to share your creamy chicken pesto pasta experiences. Showcase your dish with photography tips for captivating presentations, capturing its essence in every snap. Leave recipe reviews and revel in discussions with our community, exchanging ideas and exploring adaptations that might spark your next culinary inspiration.

Embrace the creativity of our shared passion, as each story, photo, and comment contributes to a vibrant tapestry of connection and culinary delight. Your voice and experiences make our community thrive—join us in celebrating the joy of cooking and the continuous discovery of new foodie friendships.

The Recipe

Effortless Creamy Chicken Pesto Pasta

Serves: 4

Prep Time: 10 mins

Cook Time: 20 mins

Total Time: 30 mins

Kitchen Equipment Needed

  • Deep skillet or sauté pan
  • Stockpot for boiling pasta
  • Colander
  • Whisk

Ingredients

  • 8 oz pasta of choice
  • 1 lb chicken breast, cut into strips
  • 2 tbsp olive oil
  • 1 cup heavy cream
  • 1/2 cup basil pesto
  • 1/4 cup grated parmesan cheese
  • Salt and pepper to taste
  • Fresh basil leaves for garnish

Directions

  1. Bring a large pot of salted water to a boil and cook pasta according to package instructions until al dente. Drain and reserve 1/2 cup pasta water.
  2. In a skillet over medium heat, heat olive oil. Season the chicken strips with salt and pepper. Sauté until golden and cooked through, about 7-8 minutes.
  3. Reduce heat to low, add cream to the skillet with the chicken. Simmer for 3 minutes, allowing it to thicken slightly.
  4. Stir in the basil pesto, mixing thoroughly until the sauce is well combined and creamy.
  5. Add the cooked pasta and reserved pasta water as needed, stirring everything together to coat evenly.
  6. Sprinkle parmesan over the top, stirring gently until melted and incorporated.
  7. Remove from heat and serve immediately, garnished with fresh basil leaves and additional parmesan if desired.

Recipe Notes

  • For a lower-calorie option, substitute heavy cream with half-and-half or a plant-based milk alternative.
  • Add vegetables such as spinach or cherry tomatoes to the pasta for extra flavor and nutrients.
  • Leftovers are delicious when reheated gently with a splash of water or stock to refresh the sauce.

Effortless Creamy Chicken Pesto Pasta for Quick Weeknight Dinners

Effortless Creamy Chicken Pesto Pasta: A Delightful Feast

⚖️
Difficulty
Easy

⏲️
Prep Time
10 mins

🕒
Cook Time
15 mins

⏱️
Total Time
25 mins

🍽️
Servings
4 servings

Indulge in the rich flavors of our Effortless Creamy Chicken Pesto Pasta, a dish that brilliantly marries tender chicken, robust pesto, and al dente pasta coated in a luscious cream sauce. This recipe captures the essence of Italian cuisine, offering simplicity and elegance in every bite. Whether you’re hosting a dinner party or seeking comfort food on a weekday night, this pasta dish promises to tantalize your taste buds and elevate your dining experience.

Our creamy chicken pesto pasta is a culinary masterpiece that satisfies with its aromatic blend of garlic and basil in the pesto, complemented by the silken texture of the cream sauce. The pasta’s perfect chew and the chicken’s tender juiciness round out this dish, making it an irresistible choice for pasta lovers. With just a handful of ingredients and a straightforward process, this recipe is both quick and rewarding to prepare, ensuring that you can enjoy gourmet flavors without the hassle.

Quick Recipe Highlights

  • Flavor Profile: A harmonious blend of fresh basil, garlic, and Parmesan in the pesto, balanced by the creamy richness of the sauce and savory chicken.
  • Texture: Creamy and smooth sauce enveloping tender chicken and perfectly al dente pasta, creating a satisfying and hearty mouthfeel.
  • Aroma: The dish exudes the fragrant allure of garlic and basil, intertwined with the aromatic notes of grilled chicken and cracked black pepper.
  • Visual Appeal: A vivid green pesto sauce dotted with juicy chicken pieces against the white backdrop of cream, garnished with bright cherry tomatoes for a pop of color.
  • Skill Level Needed: Ideal for beginners, as it involves simple cooking techniques and familiar ingredients, ensuring success even on the first try.
  • Special Equipment: Only basic kitchen tools are required, such as a skillet for cooking the chicken and a pot for boiling the pasta.

Recipe Overview

  • Difficulty Level: This is an easy recipe that doesn’t require any advanced culinary skills, making it accessible for cooks of all levels and perfect for a quick weeknight meal.
  • Category: Main Course, focusing on hearty pasta dishes that serve as a fulfilling dinner option suitable for any occasion.
  • Cuisine: Inspired by Italian culinary traditions, this dish pays homage to the classic flavors of Italy while embracing a modern, easy-to-make approach.
  • Cost: With a modest ingredient list, this recipe remains budget-friendly, offering gourmet taste at a fraction of the cost of dining out.
  • Season: While it can be enjoyed year-round, the fresh flavors of basil and the creamy comfort of the sauce make it particularly appealing in spring and fall.
  • Occasion: Perfect for family gatherings, casual dinners, or special occasions, this dish strikes a balance between elegance and comfort.

Why You’ll Love This Recipe

The taste and texture of our creamy chicken pesto pasta make it a delightful choice that you will fall in love with at the first bite. The savory umami of the pesto is enriched by the supple texture of the cream, creating a smooth, enveloping mouthfeel. Each ingredient harmoniously complements the others, ensuring that every bite is bursting with flavor. For those who enjoy the unique aroma of basil and garlic combined with the creaminess of Parmesan, this dish is a must-try.

Convenience is one of the standout benefits of this recipe. It requires minimal preparation, with most of the ingredients readily available in your pantry or local grocery store. The straightforward process means you can have a delicious meal on the table in under 30 minutes. This makes it an excellent choice for busy weeknights or when you’re looking to impress without spending hours in the kitchen.

In terms of nutrition, this dish offers a balanced meal, providing protein from the chicken, carbohydrates from the pasta, and healthy fats from the pesto. The dish is easily adaptable to suit various dietary needs. For example, you can use whole grain or gluten-free pasta to increase the fiber content, or substitute the cream for a lighter version if you’re watching your calorie intake. This flexibility enhances its appeal as a wholesome, nutritious option.

Socially, this creamy chicken pesto pasta is a fantastic dish to serve guests. Its vibrant presentation and alluring aroma are sure to make an impression, and the rich, satisfying flavors foster a communal dining experience. Whether you’re hosting a family dinner or a casual get-together with friends, this dish will be a crowd-pleaser, encouraging conversation and connection around the table.

Finally, the recipe is cost-effective and accessible, allowing you to create a gourmet meal without breaking the bank. The ingredients are simple and economical, and the final dish rivals what you might find in a high-end restaurant. This accessibility makes it possible for anyone to enjoy a taste of luxury at home, proving that great food need not be expensive or difficult to prepare.

Historical Background and Cultural Significance

The origins of pesto can be traced back to Genoa in Italy, where basil grows abundantly in the Ligurian region. Traditionally, this sauce was made by crushing fresh basil leaves with garlic, pine nuts, Parmesan cheese, and olive oil using a mortar and pestle. This simple yet fragrant concoction has become a beloved staple in Italian cuisine, celebrated for its fresh, herbal essence that captures the Mediterranean spirit.

Over the centuries, creamy variations of pesto have emerged, particularly in the United States, where the addition of cream lightens and smoothes the sauce, broadening its appeal across diverse palates. In Italy, while purists may favor the rustic authenticity of the traditional recipe, creamy pesto represents a creative evolution that has been warmly embraced for its versatility and comforting flavor profile.

Culturally, pasta dishes such as creamy chicken pesto pasta are an integral part of familial and social gatherings in Italy and beyond. They symbolize abundance, warmth, and togetherness, often served during festive occasions or shared family meals. This dish, in its modern iteration, continues to embody these values while adapting to contemporary cooking styles and dietary preferences.

Regional variations of pesto reflect the unique produce and tastes of specific areas, and even within Italy, you’ll find subtle differences in how pesto is prepared. These adaptations show the recipe’s flexibility and enduring popularity, encouraging home cooks to personalize their culinary experiences, leading to a rich tapestry of flavors and interpretations worldwide.

Ingredient Deep Dive

**Chicken Breast**

– Chicken breast is prized in many cultures for its versatility and lean protein content. A staple in Western cuisine, it is often used in a wide range of dishes, from grilled entrees to hearty stews. Historically, its availability and neutral flavor have made it a favorite for countless recipes across various culinary traditions.

– As a lean protein, chicken breast is low in fat while being high in essential nutrients, making it an excellent choice for health-conscious individuals. Its protein content supports muscle growth and repair, while its B-vitamins and minerals contribute to overall health. When selecting chicken breast, look for firm, pale-pink pieces that are moist and plump. Store it in the refrigerator and use it within 1-2 days for optimal freshness, or freeze it for longer storage. If desired, turkey breast can be a suitable substitute for chicken breast.

**Pesto Sauce**

– Pesto has deep roots in Italian cuisine, particularly in the Ligurian region. Its preparation honors ancient traditions, using simple, fresh ingredients that bring the vibrant flavors of the Mediterranean to life. This sauce, traditionally hand-chopped and ground with care, represents a culinary art form cherished for its bold, defining taste.

– Pesto sauce delivers numerous nutritional benefits, including healthy fats from olive oil and nuts, as well as potent antioxidants and vitamins from fresh basil. Choose a high-quality pesto that highlights its key ingredients’ freshness and vibrancy. Store pesto in a tightly sealed container in the fridge, and top it with a thin layer of olive oil to prevent discoloration. When needed, a pinch of lemon zest or pine nuts can enhance or alter your pesto for a new take on an old favorite.

Common Mistakes to Avoid

  • Overcooking pasta: Be sure to cook your pasta to al dente as it will continue to cook slightly when combined with the sauce.
  • Neglecting to season chicken: Make sure to season the chicken adequately to enhance the flavor of the entire dish.
  • Using low-quality pesto: Select a high-quality pesto to ensure the best flavor outcome.
  • Adding cream too quickly: Gradually incorporate the cream to avoid separation and achieve a smooth sauce.
  • Cooking chicken on too high heat: This may lead to dry chicken; cook over medium heat to ensure tenderness.
  • Not reserving pasta water: Set aside a cup of pasta water to adjust the sauce consistency as needed.
  • Skipping the resting time: Allow the dish to rest for a few minutes before serving to meld flavors fully.
  • Overloading the skillet: Ensure the chicken pieces have adequate space for even cooking.

Essential Techniques

**Cooking Al Dente Pasta**

Achieving the perfect al dente pasta is key to this dish, providing the right texture to balance the creamy sauce. Al dente means the pasta will have a slight resistance when bitten, which allows it to hold its shape and integrate well into the sauce. To master this, boil the pasta in generously salted water, stirring occasionally, and check for doneness a minute or two before the package instructions suggest. Overcooked pasta becomes mushy and won’t complement the creamy chicken pesto sauce as effectively. Draining the pasta just shy of al dente allows it to finish cooking as it absorbs the sauce, maximizing flavor retention and enhancing the overall mouthfeel.

Pro Tips for Perfect Creamy Chicken Pesto Pasta

– When cooking the chicken, don’t rush the process; allow it to develop a golden crust for added flavor and texture.
– For a more intense pesto flavor, add a spoonful of pesto directly into the pasta water.
– Cheese lovers can sprinkle extra Parmesan on top before serving for added richness.
– Gently warm the cream before adding it to the sauce to prevent curdling and ensure a smooth blend.
– For an extra layer of flavor, toss in some sautéed mushrooms or sun-dried tomatoes.
– A squeeze of fresh lemon juice just before serving can brighten the dish and balance the richness of the sauce.

Variations and Adaptations

Create regional adaptations by incorporating local ingredients. For instance, add roasted red peppers to the sauce for a Mediterranean twist, or experiment with a bit of spicy chorizo for a fusion dish. Seasonally, you can substitute or add vegetables in lush climates, such as asparagus in spring or roasted squash in autumn, which will amplify the dish’s vibrancy and nutritional profile.

Dietary modifications are easy with this versatile recipe. For a gluten-free version, simply swap regular pasta for your preferred gluten-free variety. Vegetarians can substitute grilled tofu or plant-based protein for the chicken, maintaining the dish’s protein content while wholly adapting to vegetarian preferences. These variations ensure that everyone can enjoy the deliciousness that creamy chicken pesto pasta has to offer.

Serving and Presentation Guide

To elegantly plate creamy chicken pesto pasta, use a pasta bowl or a shallow dish, which helps retain heat and structure. Gently twirl the pasta onto a fork or a carving fork to create a neat mound at the center of the plate, then strategically place pieces of chicken around it. Garnish with fresh basil leaves, halved cherry tomatoes, or a slight drizzle of extra virgin olive oil to enhance appearance and aroma. Serve with freshly cracked pepper and shaved Parmesan on the side, offering guests customized flavor enhancements. Consider portion control by serving measured portions to prevent overindulgence, which ensures every diner enjoys an appropriately sized serving filled with flavor.

Wine and Beverage Pairing

Wine pairings for creamy chicken pesto pasta often lean toward whites such as Chardonnay or Sauvignon Blanc, which complement the dish’s basil and garlic elements with their crisp acidity. These wines offer refreshing contrast and enhance the meal’s vibrancy, while reds like Pinot Noir can work for those preferring a fuller-bodied accompaniment. For non-alcoholic options, a chilled sparkling water with a twist of lime or lemon can effectively cleanse the palate between bites. Tea enthusiasts may consider a lightly brewed green tea, which mirrors the dish with its subtle, leafy notes and supports digestion.

Storage and Shelf Life

Store leftover creamy chicken pesto pasta in an airtight container, ensuring minimal exposure to air, which can degrade the taste and texture. Refrigerate within two hours of cooking, and consume within three days for optimal freshness. Signs of spoilage, such as off-odors or discoloration, signal the need for discarding. When reheating, gently warm the dish over low heat, stirring frequently and adding a tablespoon or two of milk or broth to restore creaminess and prevent the sauce from drying out.

Make Ahead Strategies

To streamline the process, prep components in advance. Cook the pasta and chicken ahead of time, storing them separately to preserve individual textures and flavors. The pesto sauce can similarly be made ahead of time and refrigerated for up to a week. Combine these elements only when ready to serve, reheating them slowly on the stovetop. Ensure that the cream is added when reheating to maintain a fresh, rich flavor, and garnish with newly toasted pine nuts or basil just before serving to refresh the dish.

Scaling Instructions

Effortlessly scale the creamy chicken pesto pasta for larger gatherings or reduce the quantity for intimate settings. When doubling the recipe, increase the ingredient quantities accordingly, while ensuring you have a skillet or pot large enough to accommodate the expanded volume. Note that cooking times may slightly increase due to greater quantities, and adjustments, such as frequent stirring, might be necessary. If halving the recipe, follow the same ingredient reduction and maintain cooking techniques for quality consistency. Proper storage remains essential to preserve taste, whether scaling up or down.

Nutritional Deep Dive

This creamy chicken pesto pasta offers a balanced nutritional profile with a healthy dose of proteins, carbs, and fats. The macros reveal approximately 25g of protein, 30g of carbs, and 15g of fats per serving, with pesto contributing plant-based fats beneficial for heart health. The dish is rich in micronutrients like vitamins A and C from basil, calcium, and phosphorus from Parmesan. Portion control is crucial to managing calorie intake, as this dish can range from moderate to high in calories depending on portion size and ingredient amounts used.

Dietary Adaptations

Adapting the creamy chicken pesto pasta to fit specific dietary needs is straightforward. For a gluten-free version, substitute traditional pasta with your preferred gluten-free alternative, ensuring similar texture and taste. A dairy-free adaptation might include replacing cream with coconut milk or an oat-based cream alternative to maintain the dish’s luxurious texture. Vegetarians can easily swap out chicken for tofu or a hearty vegetable such as mushroom or zucchini. A low-carb alternative may involve substituting pasta with zucchini noodles. Experiment with these changes to make the dish suitable for everyone.

Troubleshooting Guide

For texture issues, consider the pasta-to-sauce ratio; too little sauce results in dryness, while too much can overwhelm. Flavor imbalance typically arises with insufficient seasoning, so ensure a sufficient amount of salt in the pasta water and sauce. If you encounter equipment challenges, improvising with available tools often suffices. For ingredient substitutions, keep flavors and textures in mind, using options that match or complement originals closely for satisfactory outcomes. Adjust cooking times when modifying ingredient quantities to maintain dish consistency, avoiding prolonged heat exposure, which impacts taste and texture.

Recipe Success Stories

Community feedback raves about the effortless balance of flavors in our creamy chicken pesto pasta. One reader shared a delightful variation that included a touch of lemon zest in the pesto, adding a refreshing citrus note which brightened the dish beautifully. Many have praised how easily the recipe adapts to their kitchen style, perfecting the creamy sauce base to include family favorites like roasted veggies. Inviting others to share photos of their creations on social media prompts a visual feast, inspiring yet more to try their hand at this tantalizing meal.

Frequently Asked Questions

Can I make this recipe with whole wheat pasta?
Absolutely! Whole wheat pasta complements this dish excellently, adding a slightly nutty flavor and increasing the fiber content for a healthier option.

What can I use instead of heavy cream?
Light cream, half-and-half, or dairy-free cream alternatives like coconut cream or oat cream can be used as substitutes to achieve the creamy texture without heavy cream.

What wine pairs best with this dish?
A dry, crisp Chardonnay or a refreshing Pinot Grigio are excellent choices to balance the richness of the creamy sauce and the herbal notes of the pesto.

How can I store leftovers?
Store leftovers in an airtight container in the refrigerator for up to three days. Reheat gently in a saucepan over low heat, adding a splash of milk or cream to restore creaminess.

Is this recipe suitable for meal prep?
Yes, it is perfect for meal prep! Prepare all components in advance, store separately, and combine and reheat just before serving for a fresh-tasting meal.

Can I use store-bought pesto?
Definitely! Store-bought pesto is a convenient option and is readily available. Choose a high-quality brand for the best flavor outcome.

What’s a good substitute for chicken?
For a vegetarian version, replace chicken with tofu, chickpeas, or mushrooms. These alternatives provide a different texture while maintaining the dish’s savory profile.

How do I make it extra creamy?
For an ultra-creamy version, increase the amount of cream used and add a bit more Parmesan, which will enhance richness and texture.

Can I freeze this dish?
Although possible, it’s recommended to freeze components separately to maintain texture upon reheating. Add pasta to the sauce when ready to serve and heat slowly to preserve creaminess.

What garnish works best?
Fresh basil leaves and toasted pine nuts add aromatic flair, while a sprinkle of Parmesan provides a delicious finishing touch.

Additional Resources

For those seeking to expand their culinary repertoire, explore our related recipes, such as lemon basil pesto pasta, chicken Alfredo, and sun-dried tomato pasta. Delve into technique guides for mastering classic Italian sauces, optimize your ingredient choices with freshness and storage advice, and discover the secret to selecting the perfect pasta shapes to pair with sauce varieties. With our seasonal adaptation tips, enrich your cooking with ingredients that align with the time of year, creating meals that feel both timely and timeless.

Join the Conversation

We invite you to share your creamy chicken pesto pasta creations across social media platforms using our dedicated hashtag. Engage with fellow home cooks, exchange tips, and offer feedback on your experience with the recipe. Capture the vibrant colors and enticing presentation of your dish with our photography tips, and contribute to a community that relishes the joy of shared culinary adventures. Whether you have unique adaptations, suggest alternative pairings, or showcase personalized garnishes, we encourage your creativity, input, and inclusivity.

The Recipe

Effortless Creamy Chicken Pesto Pasta

Serves: 4

Prep Time: 10 mins

Cook Time: 15 mins

Total Time: 25 mins

Kitchen Equipment Needed

  • Large pot
  • Skillet
  • Spatula
  • Colander
  • Mortar and pestle (optional)

Ingredients

  • 12 oz pasta of choice (fettuccine or linguine recommended)
  • 1 lb chicken breast, cut into bite-sized pieces
  • 1 cup pesto sauce
  • 1 cup heavy cream
  • 1/4 cup grated Parmesan cheese
  • 2 tbsp olive oil
  • Salt and pepper to taste
  • Fresh basil leaves for garnish
  • Cherry tomatoes, halved (optional)

Directions

  1. Cook pasta according to package instructions until al dente. Reserve 1 cup of pasta water and drain the rest. Set the pasta aside.
  2. In a skillet, heat olive oil over medium heat. Season chicken pieces with salt and pepper, and cook until golden and fully cooked, about 5-7 minutes per side. Remove and set aside.
  3. Lower the heat to medium-low and add heavy cream and pesto sauce to the same skillet, stirring to combine. Let it simmer gently for 2-3 minutes.
  4. Return the cooked chicken to the skillet, along with the reserved pasta water, Parmesan, and cooked pasta. Toss everything together until well coated in the sauce.
  5. Adjust seasoning with salt and pepper if necessary. Let the pasta sit for a minute to allow flavors to meld before serving.
  6. Garnish with fresh basil leaves and halved cherry tomatoes. Serve warm.

Recipe Notes

  • For a more pronounced garlic flavor, consider adding a minced garlic clove when sautéing the chicken.
  • Feel free to substitute heavy cream with a lighter dairy alternative, keeping sauce consistency in mind.
  • Add a handful of spinach or arugula for extra greens.

Quick and Simple Baked Meatballs Recipe for Easy Dinners

Fast and Easy Baked Meatballs Recipe for a Stress-Free Meal

Discover the delightful simplicity of a Fast and Easy Baked Meatballs Recipe for a Stress-Free Meal that promises to satisfy your cravings with minimal effort. These meatballs, bursting with flavorful herbs and spices, offer a delightful experience that combines convenience with gourmet appeal. Whether you’re preparing a weeknight meal or hosting friends over the weekend, this baked meatballs recipe is designed to deliver amazing taste without the stress.

The choice of premium ground meat mixed with aromatic seasonings results in meatballs that are not only tender but also rich in flavor. The best part? They are oven-baked to perfection, ensuring they’re juicy on the inside with a subtle crisp on the outside. This recipe triumphs in balancing hearty flavors for a satisfying culinary experience.

Quick Recipe Highlights

  • Flavor Profile: Robust, savory, with hints of garlic and herbs
  • Texture: Tender interior with a lightly crisped exterior
  • Aroma: Inviting, warm, with notes of garlic and roasted herbs
  • Visual Appeal: Golden-brown exterior with a speckling of herbs
  • Skill Level Needed: Ideal for beginners with basic kitchen skills; steps are straightforward without complex techniques
  • Special Equipment: Baking sheet or tray, mixing bowl

Recipe Overview

  • Difficulty Level: Easy; involves basic mixing and baking techniques with no advanced skills required
  • Category: Main course, Appetizer
  • Cuisine: Italian-inspired with modern twists
  • Cost: Budget-friendly with ground meat and pantry staples being the main cost contributors
  • Season: Perfect for any season with versatile serving options
  • Occasion: Suitable for family dinners, casual gatherings, or meal prep

Why You’ll Love This Recipe

These meatballs offer a delectable taste with their perfect balance of savory spices that cater to all taste buds. The convenience of an easy prep and bake process allows for a quick turnaround, ideal for busy evenings. The nutritional benefits come from using lean meats and the option to incorporate whole-grain breadcrumbs, making it a healthier choice. Socially, they serve as a conversation starter and provide easy sharing at gatherings. Economically, this recipe is accessible with everyday ingredients, ensuring it’s not just delicious but also budget-friendly.

Historical Background and Cultural Significance

Originating from Italy, meatballs hold a cherished place in culinary traditions around the globe. They reflect the ingenuity of maximizing meat in economical and flavorful ways. The concept of meatballs has evolved, adapting to the diverse palates of various regions. Traditionally served in tomato sauce, they’ve crossed cultural boundaries with variations in spices and sauces, adding layers to their significance in both casual and festive settings.

Ingredient Deep Dive

Ground Meat: Varieties such as beef, pork, or turkey provide different flavor profiles. They’re packed with proteins that are essential for muscle building and repair. When selecting, aim for meat with a good balance of fat for juiciness.

Bread Crumbs: Whether using panko or traditional crumbs, they act as binders and provide texture. Opt for whole-grain alternatives for added fiber benefits.

Garlic and Herbs: Essential for depth of flavor; choose fresh where possible to maximize aroma and taste. Store herbs in a cool, dry place to maintain their potency.

Common Mistakes to Avoid

  • Overmixing the meat, leading to tough meatballs
  • Not preheating the oven, affecting cooking time and texture
  • Using lean meat only; a bit of fat helps with flavor
  • Skipping the seasoning, resulting in bland taste
  • Incorrect portioning, which can affect cooking evenly
  • Not using parchment paper, which may cause sticking
  • Underbaking, resulting in raw centers
  • Overcrowding the baking tray, preventing even cooking
  • Using wet hands for shaping, causing sticking during baking
  • Ignoring resting time post-bake, which helps with juiciness

Essential Techniques

Master the art of gently mixing ingredients to avoid tough textures. Understanding the importance of shaping evenly for consistent cooking is key. Baking them instead of frying cuts down on grease and simplifies cleanup while retaining flavor integrity.

Pro Tips for Perfect Fast and Easy Baked Meatballs

Start with room temperature ingredients to blend more smoothly. Incorporate finely chopped onions for added moisture. Chill the meat mixture briefly before shaping to help with consistency. Use a cookie scoop for uniform sizes. Always preheat your oven and allow meatballs to rest post-cooking for an optimal bite.

Variations and Adaptations

Explore Italian regional variations by adding cheese or changing the herb mix. For a seasonal twist, incorporate roasted vegetables or apple chunks in the fall. Dietary modifications such as using gluten-free breadcrumbs or plant-based meats make them adaptable for various diets.

Serving and Presentation Guide

Arrange meatballs on a platter with fresh parsley garnish for a clean look. Serve alongside a bowl of marinara or your favorite pasta for a traditional presentation. Consider portioning as sliders for party settings.

Wine and Beverage Pairing

Pair with an Italian Chianti for a rich experience or a light Pinot Grigio for contrast. For non-drinkers, a sparkling water with a lemon twist or iced tea works well. Serve beverages chilled for best enjoyment.

Storage and Shelf Life

Store meatballs in an airtight container in the fridge for up to 4 days or freeze for longer storage. Reheat gently to retain moisture, avoiding microwave drying.

Make Ahead Strategies

Prepare and shape meatballs a day in advance; store them uncooked in the fridge. Bake just before serving to maintain freshness. Combine with freshly cooked pasta or sauce after baking.

Scaling Instructions

To halve the recipe, simply reduce ingredient amounts by half. For larger gatherings, double the recipe and use two baking sheets. Adjust cooking times by a few minutes if needed based on quantity.

Nutritional Deep Dive

Each serving provides a good balance of protein and iron from the meat. Replace regular with whole-grain options for added fiber. Be mindful of sodium levels if using packaged breadcrumbs.

Dietary Adaptations

Make them gluten-free using a suitable breadcrumb alternative. For a dairy-free version, omit any cheese inclusions. Lean meats assist in adhering to low-carb or keto diets.

Recipe Notes

  • Experiment with various herb blends like oregano or thyme
  • Try adding a sweet element like a dash of honey for contrast
  • Use turkey for a leaner version
  • Incorporate a splash of soy sauce for umami depth

Troubleshooting Guide

Identify texture issues by adjusting meat-to-breadcrumb ratios. Ensure flavor balance by tasting seasoning mixtures before baking. Manage equipment challenges by checking oven calibration.

Recipe Success Stories

Join our community where readers have reimagined these meatballs with local spices or presented them at holiday festivities. Share your photos for inspiration and gain insights on presentation from fellow foodies.

Frequently Asked Questions

Can I use ground turkey instead of beef?

Yes, ground turkey is an excellent substitute and offers a leaner protein option. Just be mindful of cooking times as turkey can dry out quickly.

How can I make this recipe gluten-free?

Substitute regular breadcrumbs with gluten-free alternatives or use crushed gluten-free crackers for binding.

What is the best way to keep meatballs juicy?

Incorporate a small amount of moisture-rich ingredients such as grated onions or soaked bread and avoid overcooking.

Do I need to brown the meatballs before baking?

No, baking them directly saves time and still yields a nicely browned exterior as long as the oven is preheated and at a consistent temperature.

What size should the meatballs be?

For even cooking, aim for golf-ball-sized meatballs—about 1½ inches in diameter.

Can these meatballs be frozen uncooked?

Yes, arrange them on a tray to freeze individually before transferring to a bag for long-term freezing. They can be baked directly from frozen, just add a few extra minutes to the cooking time.

What sauce pairs well with baked meatballs?

Classic marinara or creamy alfredo are popular choices, but you can also experiment with spicy arrabbiata or sweet teriyaki for different flavor profiles.

How do I prevent the meatballs from sticking to the tray?

Using parchment paper or a non-stick baking mat makes removal easy and promotes even browning without sticking.

Is it okay to use dried herbs instead of fresh?

Yes, dried herbs can be used, but remember they are more concentrated, so adjust the quantity to your taste—usually using one-third of the fresh amount is a good guide.

Can I make meatballs in advance and store them?

Absolutely, meatballs can be portioned and shaped ahead of time, then stored in the refrigerator until you’re ready to cook them.

What can I do if my meatballs are falling apart?

Ensure you’re using binding ingredients like eggs and breadcrumbs, and avoid overmixing, which can break down the proteins too much.

Additional Resources

Explore our related recipes such as Spaghetti and Meatballs or learn new techniques with our video on perfecting the art of homemade pasta. Check out our ingredient guide for choosing the best herbs for Mediterranean cuisine.

Join the Conversation

We invite you to share your own variations and photos using hashtag #BakedMeatballDelight on social media. Participate in our monthly meatball challenge and exchange tips with fellow enthusiasts. Share your reviews and suggestions to contribute to our community cookbook.

Fast and Easy Baked Meatballs Recipe for a Stress-Free Meal

Discover the joy of cooking with this Fast and Easy Baked Meatballs Recipe, a perfect solution for a stress-free meal. Whether you are a seasoned chef looking for a quick fix or a beginner eager to impress, these delicious baked meatballs promise a flavor-packed dish with minimal effort. Incorporating simple ingredients and straightforward steps, this meatballs recipe stands out for its unbeatable combination of taste and convenience.

On busy weeknights, finding the time to cook a wholesome meal can be challenging. That’s where this quick meatballs recipe comes to the rescue. By baking instead of frying, you not only reduce cooking time but also enhance the health factor of your dish. This meal is wonderful for families and great for meal prep, ensuring you have delicious leftovers to enjoy throughout the week.

Let’s dive into this guide to creating perfect baked meatballs, exploring everything from preparation to the aromatic flavors that will fill your kitchen. If you long for a meal that marries simplicity with rich taste, this baked meatballs recipe is your ideal companion.

The Recipe

Fast and Easy Baked Meatballs: A Flavorful Delight for All Skill Levels

⚖️
Difficulty
Easy

⏲️
Prep Time
15 mins

🕒
Cook Time
25 mins

⏱️
Total Time
40 mins

🍽️
Servings
4

Serves: 4

Prep Time: 15 mins

Cook Time: 25 mins

Total Time: 40 mins

Kitchen Equipment Needed

  • Mixing bowl
  • Baking sheet
  • Parchment paper
  • Measuring spoons
  • Oven mitts

Ingredients

  • 1 lb ground beef
  • 1/2 cup breadcrumbs
  • 1/4 cup grated Parmesan cheese
  • 1 large egg
  • 2 cloves garlic, minced
  • 1 tablespoon parsley, chopped
  • Salt and pepper to taste
  • 1 tablespoon olive oil

Directions

  1. Preheat your oven to 400°F (200°C). Line a baking sheet with parchment paper.
  2. In a large mixing bowl, combine ground beef, breadcrumbs, Parmesan cheese, egg, garlic, and parsley. Add salt and pepper to taste.
  3. Mix all ingredients thoroughly until well combined.
  4. Shape the mixture into 1-inch meatballs and place them evenly spaced on the prepared baking sheet.
  5. Drizzle olive oil over the meatballs for added flavor and moisture.
  6. Bake in the preheated oven for 20-25 minutes, or until the meatballs are fully cooked and browned on the outside.
  7. Serve hot with your choice of pasta, salad, or crusty bread.

Recipe Notes

  • For a spicier kick, add a pinch of red pepper flakes to the meatball mixture.
  • You can experiment with different herbs like basil or oregano for varied flavors.
  • If the mixture feels too wet, add more breadcrumbs slowly until the desired consistency is achieved.

Quick Recipe Highlights

  • Flavor Profile: Savory and rich with hints of garlic and Parmesan.
  • Texture: Juicy on the inside with a crispy outside layer.
  • Aroma: Inviting notes of garlic and herbs that fill the kitchen.
  • Visual Appeal: Golden-brown meatballs with vibrant green parsley.
  • Skill Level Needed: Beginner-friendly, perfect for all skill levels.
  • Special Equipment: None required; standard kitchen tools suffice.

Irresistible Mini Key Lime Pies: Easy No-Bake Recipe Delight!

Heavenly No-Bake Mini Key Lime Pies Recipe: A Tangy Delight

There’s nothing quite like indulging in a refreshing dessert that captures the essence of summer. These Heavenly No-Bake Mini Key Lime Pies are the perfect treat, combining a zesty lime punch with the creamy texture that key lime pie lovers adore. With just the right amount of sweetness and a buttery graham cracker crust, this no-bake version is an easy-to-make dessert that doesn’t compromise on flavor. Whether you’re hosting a gathering or looking for a quick fix to satisfy your sweet tooth, these mini pies are a delightful solution.

These no-bake wonders are not only a breeze to prepare but also bring an array of lively flavors to your table. Ideal for those hot summer days when turning on the oven seems like a daunting task, the mini pies offer a refreshing twist that’s both traditional and convenient. Perfectly portioned, they are great for picnics, parties, or simply enjoying a quiet evening at home.

Loaded with the aromatic notes of lime and the creamy richness that fans of key lime pie crave, these Heavenly No-Bake Mini Key Lime Pies will quickly become a staple in your dessert repertoire. They’re easy to customize, fun to make, and offer a balance of tartness and sweetness that hits just the right spot.

Quick Recipe Highlights

  • Flavor Profile: A perfect blend of tart lime with creamy sweetness
  • Texture: Smooth and creamy filling on a crumbly, crunchy graham cracker crust
  • Aroma: Fresh and zesty lime
  • Visual Appeal: Bright green filling on a golden crust, topped with whipped cream
  • Skill Level Needed: Easy, suitable for beginners
  • Special Equipment: Mini pie pans or tart molds

Recipe Overview

  • Difficulty Level: Easy due to its no-bake nature and straightforward steps
  • Category: Dessert, Snacks
  • Cuisine: American, with tropical influences from Key West
  • Cost: Budget-friendly with affordable main ingredients like limes and graham crackers
  • Season: Best enjoyed in summer for its refreshing quality, but delightful year-round
  • Occasion: Perfect for parties, picnics, and casual gatherings

Why You’ll Love This Recipe

These mini pies captivate with their perfect balance of tart lime juice and creamy filling, making each bite a taste explosion. The convenience of a no-bake recipe means you’ll spend less time in the kitchen and more time enjoying the pleasures of summertime activities. Nutritionally, the pies are lighter than traditional baked versions, making them a guilt-free treat. Socially, they’re a conversation starter, sure to impress guests with their elegant presentation and bright flavors. Budget-friendly ingredients mean you can indulge without breaking the bank, with limes and graham crackers being readily available even in off-seasons.

Historical Background and Cultural Significance

Key lime pie, the inspiration behind this recipe, has roots in the Florida Keys, where it became a beloved dessert due to the abundance of key limes in the region. Traditionally made with egg yolks and condensed milk, this dessert evolved to accommodate modern convenience, resulting in no-bake versions that maintain the pie’s signature flavors. Each twist on this classic continues to celebrate its origins, with variations appearing across the US, demonstrating the dish’s adaptability.

Ingredient Deep Dive

Graham Crackers: Historically, a staple in American desserts, offering a sturdy, sweet base. Rich in fiber and conveniently shelf-stable, they form the crust’s essential crunch. Lime Juice: Valued for its tangy bite and high vitamin C content, fresh or bottled key lime juice is the star of flavor. Storage tip: Freeze lime juice in ice cube trays for prolonged shelf life. Condensed Milk: A classic thickener and sweetener, adding creamy texture and rich flavor. Store in a cool, dry place. Whipped Cream: Optional topping adding an airy, sweet finish.

Common Mistakes to Avoid

  • Over-soaking crust – Use minimal butter to prevent sogginess
  • Skipping lime zest – Essential for authentic flavor
  • Using low-fat condensed milk – Compromises creaminess
  • Under-refrigerating – Fails to set properly
  • Improper lime juice measurement – Resulting in loss of flavor balance
  • Not tasting for sweetness – Adjust condensed milk as needed
  • Ignoring presentation – Use a piping bag for elegant whipped cream dollops
  • Forgetting to chill mixing tools – Ensures a fluffy whipped cream

Essential Techniques

Crust Making: Blend graham crackers finely for uniform crust; ensure well-pressed for stability. Filling Mixing: Combine lime juice and condensed milk until thick; crucial for setting. Zesting Limes: Only zest the green part to avoid bitterness. Layering: Evenly distribute filling for consistent mini pies. Whipped Cream Dollops: Use chilled tools for optimum results.

Pro Tips for Perfect Heavenly No-Bake Mini Key Lime Pies

Start with high-quality, fresh limes for the best flavor impact. Opt for a handful of graham crackers with added cinnamon for a slight spice kick. Pre-chill your serving plates to maintain pie coolness during presentation. Slowly add lime zest into the filling for evenly distributed flavor. Use clear tart molds for a visually appealing layered effect. Portion control ensures perfect servings for your event, avoiding excessive leftovers.

Variations and Adaptations

Dress the pies with seasonal fruits such as raspberries or blueberries for an extra fruity dimension. Veganize the recipe using coconut condensed milk and whipped coconut cream. Modify for a gluten-free option by using gluten-free graham crackers. Make it winter-appropriate by adding a hint of warming spices like nutmeg. For an even creamier texture, mix in a bit of Greek yogurt with the filling.

Serving and Presentation Guide

Use individual ramekins for a more personalized touch, ensuring even portions. A dollop of whipped cream and a sliver of fresh lime on top creates an elegant appearance. For a modern take, try serving in small glasses for a mini lime pie parfait. Maintain a cool serving temperature to preserve their refreshing nature, ideal for hot days.

Wine and Beverage Pairing

Pair these mini pies with a crisp, chilled Sauvignon Blanc to complement the lime’s acidity. A cool glass of sparkling water with a lime wedge offers a non-alcoholic alternative. For a warm beverage, a light green tea pairs well, echoing the citrus notes. Ensure beverages are chilled or gently warmed to maintain harmony with the dessert’s temperature.

Storage and Shelf Life

Refrigerate pies in an airtight container to maintain freshness for up to three days. Use aluminum trays if preparations are done in advance to avoid flavor absorption. Freeze crust components separately for three months—freeze complete pies with caution. Before serving, ensure proper thawing in the fridge to retain quality.

Make Ahead Strategies

Prepare crust and filling a day in advance, storing them separately for easy assembly on the serving day. Pre-whip and chill your cream to save last-minute preparation hassle. Keep all components refrigerated for optimal freshness. If freezing, assemble just before serving after components are thawed.

Scaling Instructions

To halve the recipe, consistently reduce all components, using smaller molds if necessary. For doubling, double all ingredients but use larger or additional molds to fit all servings. Store surplus pies in airtight containers to preserve the integrity of the crust.

Nutritional Deep Dive

A standard serving is refreshing and relatively light on calories, yet satisfies a sweet tooth. The lime offers vitamin C, supporting immunity. Condensed milk provides calcium, beneficial for bone health. Consider smaller servings for portion control and dietary management.

Dietary Adaptations

For a gluten-free version, substitute graham crackers with gluten-free options. Employ coconut or almond milk-based condensed alternatives to suit dairy-free needs. Incorporate sugar-free condensed milk for a low-carb treat. Use stevia to sweeten the mixture for keto-friendly adaptation.

Recipe Notes

  • Adjust lime acidity to taste preference for optimal flavor balance
  • Try lemon juice for a milder citrus note
  • Include a hint of vanilla extract for added depth

Troubleshooting Guide

Texture issues: Ensure adequate refrigeration time for firm setting. Flavor balance: Adjust sugar or lime juice to personal taste. Temperature problems: Always serve chilled for best enjoyment. Equipment challenges: Ensure molds are non-stick for easy removal. Timing concerns: Prepare in advance to avoid last-minute rush.

Recipe Success Stories

Community feedback has shown creativity in the use of alternative citrus fruits like oranges. Readers have shared plating ideas that involve edible flowers for a stunning presentation. Discover creativity in adaptation stories, with readers embracing vegan cream toppings.

Frequently Asked Questions

How can I store leftover mini pies?

Store leftovers in an airtight container in the refrigerator for up to three days to preserve freshness.

Can I make these pies without condensed milk?

Yes, try using Greek yogurt or coconut-based alternatives for a different texture and flavor.

[Continue format for more FAQ items as needed]

Additional Resources

Explore similar citrus-based recipes, watch technique videos on perfecting pie crust, read ingredient guides for sourcing the best limes, and find recommended equipment like non-stick pie pans.

Join the Conversation

Share your rendition of the pies on social media using #HeavenlyNoBakeDesserts. Engage in community challenges to recreate the most creative variation. Share reviews and tag us for a chance to be featured in our roundup of reader success stories.

Heavenly No-Bake Mini Key Lime Pies

Discover the delightful tangy taste of our Heavenly No-Bake Mini Key Lime Pies. This refreshing dessert perfectly balances sweet and tart flavors, offering a bite-sized treat ideal for any occasion. Experience a tropical twist with every mouthful, as the rich, creamy filling and crumbly crust combine for an unforgettable taste sensation.

These mini key lime pies are not only heavenly by name but also by nature, with a zesty lime filling encased in a buttery, graham cracker crust. No baking is required, making this dessert an easy and quick solution for anyone craving a taste of the tropics without the fuss.

Quick Recipe Highlights

  • Flavor Profile: Tangy and sweet with a refreshing lime punch
  • Texture: Creamy filling with a crunchy crust
  • Aroma: Fresh citrus notes with a hint of vanilla
  • Visual Appeal: Vibrant green filling against a golden crust
  • Skill Level Needed: Beginner-friendly, with no baking required
  • Special Equipment: Standard muffin tin, mixing bowls, whisk

The Recipe

Heavenly No-Bake Mini Key Lime Pies: Bite-Sized Tropical Delights

Serves: 12

Prep Time: 15 mins

Cook Time: 0 mins

Total Time: 15 mins

Kitchen Equipment Needed

  • Standard muffin tin
  • Mixing bowls
  • Whisk
  • Measuring cups and spoons
  • Zester or grater

Ingredients

  • 1 cup graham cracker crumbs
  • 2 tablespoons sugar
  • 5 tablespoons melted butter
  • 1 (14-ounce) can sweetened condensed milk
  • 1/2 cup key lime juice
  • 1 tablespoon lime zest
  • 1 cup heavy cream, whipped

Directions

  1. In a bowl, combine graham cracker crumbs, sugar, and melted butter. Mix until well combined.
  2. Press the crumb mixture into the bottom of each muffin cup to form a crust.
  3. In another bowl, mix sweetened condensed milk, key lime juice, and lime zest until smooth.
  4. Gently fold in the whipped cream until the mixture is smooth and well combined.
  5. Spoon the filling onto the crusts in each muffin cup, smoothing the tops with a spatula.
  6. Refrigerate for at least two hours or until set before serving.

Recipe Notes

  • Substitute regular limes if key limes are unavailable, maintaining zest for extra flavor.
  • Top with additional whipped cream or lime slices for garnish, if desired.
  • Store in the refrigerator for up to 3 days.

Transform Your Meals with This Easy Roasted Cauliflower Recipe

# Easy Roasted Cauliflower: A Simple and Delicious Vegetarian Delight

## Introduction: The Magical Transformation of Cauliflower

We all have that one dish that brings comfort and joy every time we make it. For many, it’s the simplicity and versatility of **Easy Roasted Cauliflower** that captures our hearts (and taste buds) time and again. Picture this: crispy, golden edges, with a soft and flavorful interior, topped with fresh herbs. This roasted delight not only elevates any meal but also fits effortlessly into a healthy lifestyle. Let’s dive into the delicious world of roasted cauliflower and discover why it’s a favorite in kitchens around the globe.

## Section 1: Why Choose Roasted Cauliflower?

### Nutritional Powerhouse

When you choose roasted cauliflower, you’re embracing a dish that’s as nutritious as it is tasty. Cauliflower is a cruciferous veggie packed with essential nutrients. It’s low in calories but high in vitamins like C and K, making it a remarkable addition to a balanced diet. Whether you’re looking to boost your immune system or support bone health, cauliflower’s nutrient profile is impressive. Plus, it’s an excellent source of dietary fiber, which is crucial for maintaining a healthy digestive system.

### Flavor Versatility

One of the most appealing aspects of roasted cauliflower is its ability to soak up flavors beautifully. This vegetable serves as a blank canvas, eagerly absorbing aromas and spices. This characteristic makes roasted cauliflower adaptable to various culinary styles, whether you’re aiming for the warmth of Middle Eastern spices or the tang of Mediterranean ingredients. Experimenting with different seasoning combinations can lead to exciting new flavor experiences each time you make it.

### Ease of Preparation

Roasted cauliflower requires minimal ingredients and effort yet yields maximum flavor. With just a handful of ingredients, you can create a mouthwatering side or main dish. The simplicity of the preparation process means that even novice cooks can feel confident in the kitchen, producing delicious results without fuss.

## Explore Healthy Eating with Roasted Cauliflower

If you’re looking to embrace a healthier lifestyle without sacrificing taste, roasted cauliflower is an excellent gateway. It’s a dish that aligns with various eating plans, from plant-based diets to ketogenic regimens. Enjoy the satisfaction of creating meals that not only nourish your body but also delight your palate.

## Ingredient Table for Easy Roasted Cauliflower

| Ingredients | Quantity |
|——————-|——————–|
| Cauliflower | 1 head, cut into florets |
| Olive Oil | 2 tablespoons |
| Garlic Powder | 1 teaspoon |
| Paprika | 1 teaspoon |
| Salt and Pepper | To taste |
| Fresh Parsley | For garnish |

## Section 2: Step-by-Step Guide to Perfectly Roasted Cauliflower

### The Simple Process of Roasting

1. **Preparation**: Kick off your culinary adventure by preheating your oven to 425°F (220°C). This temperature is critical in achieving a crispy, golden-brown finish without overcooking the interior of the cauliflower.

2. **Seasoning**: Take your cauliflower florets and toss them in a bowl with olive oil, garlic powder, paprika, salt, and pepper. Ensure each floret is evenly coated for a uniform flavor. The olive oil helps the spices adhere while promoting a lovely roast.

3. **Roasting**: Arrange the seasoned florets on a baking sheet in a single layer. Spread them out for even roasting, ensuring no floret is overcrowded. Roast for 25-30 minutes, turning halfway through, until tender and showing slightly browned edges.

4. **Garnishing**: Once roasted to perfection, remove from the oven and sprinkle with fresh parsley for a burst of color and freshness. Serve immediately to savor the just-roasted textures and flavors.

### Tips for Success

– To ensure each piece of cauliflower roasts evenly, make sure it’s coated thoroughly with oil and spices.
– Always spread your florets into a single layer on the baking sheet. Overlapping florets can result in steaming, which detracts from the desired crispness.
– For additional fruity flavor, consider a squeeze of lemon or lime right before serving.

## Section 3: Enhancing Your Roasted Cauliflower

### Experiment with Flavors

Even a simple recipe can be jazzed up with a few creative tweaks:

– **Spice Up Your Life**: Introduce new spices like cumin or chili flakes for extra warmth and complexity.
– **Savory Creations**: A sprinkle of grated Parmesan cheese before or after roasting can add a rich, savory dimension. The cheese crisps up delightfully, giving each bite a delightful crunch and salty punch.

### Alternative Oils

While olive oil is a classic choice, exploring different oils can bring out nuanced taste profiles:

– **Avocado Oil**: Offers a mild, buttery texture and is known for its high smoke point.
– **Coconut Oil**: Provides a subtle sweetness that pairs well with more intense spices.

## Conclusion: Savor the Simplicity of Roasted Cauliflower

Navigating the kitchen doesn’t have to be a daunting task, especially when dishes like **Easy Roasted Cauliflower** exist. This recipe exemplifies how simplicity can lead to surprising depth, with robust flavors and impressive nutritional perks. Whether you’re crafting an intimate dinner or a grand family feast, roasted cauliflower can be your trusted ally, offering an easy way to impress with little effort.

**Call to Action:**

Ready to explore the world of roasted cauliflower? Try out this recipe today and share your variations and experiences with others in the comments below. Don’t forget to subscribe for more delicious and healthy meal ideas straight to your inbox!

## FAQ About Easy Roasted Cauliflower

**Q1: Can I prepare roasted cauliflower in advance?**

A1: Yes! Roasted cauliflower can be stored in an airtight container in the refrigerator for up to 3 days. Reheat in a preheated oven for best results.

**Q2: What can I serve with roasted cauliflower?**

A2: Roasted cauliflower pairs well with grilled chicken, fish, or tossed into salads for added texture and flavor.

**Q3: Can I use frozen cauliflower for this recipe?**

A3: Absolutely! Just be sure to thaw and pat it dry before roasting to avoid excess moisture.

Embark on your roasting adventure, and may your cauliflower be ever crispy and flavorful!

Delicious Baked Pears with Feta Honey and Cranberries Recipe

Baked Pears with Feta, Honey, and Cranberries Recipe

Baked Pears with Feta, Honey, and Cranberries is a delightful and elegant dish that combines sweet and savory flavors to perfection. This extraordinary recipe is perfect for impressing your guests or indulging in a comforting weeknight treat. The warm pears, softened through oven baking, create a succulent base for the tangy feta cheese, crispy walnuts, and sweet-tart cranberries, all drizzled with golden honey. By the end of this post, you’ll be inspired to try this exquisite combination and learn about its cultural significance, key techniques, and more.

Quick Recipe Highlights

  • Flavor Profile: A blend of sweet pears, tangy feta, nutty walnuts, and sweet-tart cranberries, topped with honey
  • Texture: Soft and tender pears with creamy feta, crunchy walnuts, and chewy cranberries
  • Aroma: Warm, fruity, and slightly nutty with a hint of caramelized honey
  • Visual Appeal: A visually stunning dish with vibrant colors and appealing layers
  • Skill Level Needed: Intermediate; requires careful baking and assembling skills
  • Special Equipment: Baking dish, parchment paper

Recipe Overview

  • Difficulty Level: Intermediate – involves baking and precise layering for best presentation
  • Category: Dessert, Appetizer
  • Cuisine: Modern European with Mediterranean influences
  • Cost: Moderate – main costs include fresh pears and quality feta cheese
  • Season: Best in fall and winter when pears are at their peak
  • Occasion: Ideal for dinner parties, holiday gatherings, or a sophisticated sweet treat

Why You’ll Love This Recipe

The Baked Pears with Feta, Honey, and Cranberries recipe offers a unique taste experience with its perfect balance of sweet, savory, and tart flavors. Soft baked pears complement the creamy feta, while walnuts add a satisfying crunch. This dish offers convenience as it requires minimal preparation time and can easily be made ahead for your events. Its simple yet impressive presentation makes it ideal for entertaining. Moreover, the recipe uses readily available and cost-effective ingredients, ensuring it remains accessible year-round. Nutritionally, the dish is a great source of fiber and healthy fats, providing a guilt-free indulgence.

Historical Background and Cultural Significance

The combination of baked fruits with cheese is deeply rooted in European culinary tradition. Historically, pears have been a symbol of luxury, and incorporating them with cheese reflects a fusion of classic and modern flavors. Baked fruits are present in various cuisines, indicating a universal appreciation for the natural sweetness that cooking releases. While this recipe is contemporary, it draws inspiration from Mediterranean dishes that celebrate simple, high-quality ingredients. Over time, this dish has evolved to incorporate diverse elements, such as honey and cranberries, showcasing regional variations and adaptations that highlight cultural exchange.

Ingredient Deep Dive

Pears: A staple in many desserts, pears are known for their subtle sweetness and buttery texture when baked. When selecting, choose firm yet ripe pears that give slightly under pressure. Best stored at room temperature until ripe, then refrigerated.

Feta Cheese: A staple cheese in Mediterranean cuisine, feta offers a tangy flavor that complements the sweetness of the pears. Choose authentic Greek feta for its superior texture. Store in the brine to maintain freshness.

Honey: Provides natural sweetness and enhances the caramelization of pears when baked. Opt for raw, organic honey for maximum flavor and health benefits.

Cranberries: The tartness of dried cranberries balances the sweetness of the pears. Store in a cool, dry place to prevent clumping. Substitute with raisins if desired.

Walnuts: Add a nutty flavor and crunch. Rich in omega-3 fatty acids, they promote heart health. Store in the fridge or freezer to prevent rancidity.

Common Mistakes to Avoid

  • Using overripe pears, which become mushy when baked
  • Under-baking the pears, resulting in them being too firm
  • Overloading with feta, overpowering the pear flavor
  • Forgetting to caramelize honey, missing out on depth of flavor
  • Skipping the nuts, losing textural contrast
  • Not warming the cranberries, which affects the texture
  • Improper pairing of flavors, leading to imbalance
  • Neglecting presentation impacts visual appeal
  • Failing to use fresh ingredients, diminishing flavor quality
  • Not allowing pears to cool slightly before serving

Essential Techniques

Baking Pears: Baking at a medium temperature slowly softens the fruit while retaining flavor. Watch for a golden hue to indicate readiness.

Layering: Arrange the ingredients carefully for visual appeal and balance of flavors.

Honey Drizzle: Achieve a smooth drizzle by slightly warming the honey before use.

Pro Tips for Perfect Baked Pears with Feta, Honey, and Cranberries

– Choose Bartlett or Anjou pears for the best baking experience.
– Toast walnuts briefly in a pan for enhanced aroma and flavor.
– Use a honey dipper for an even drizzle over the dish.
– Let the baked pears rest for a few minutes before topping to maintain integrity.
– If substituting feta, opt for goat cheese for a softer texture.
– Pair with a fresh herb garnish for added visual appeal.
– Serve on a chilled plate for contrast with the warm dish.
– Balance the feta generously to prevent overwhelming the sweetness.

Variations and Adaptations

– Regional: Incorporate local fruits like apples in addition to pears.
– Seasonal Adaptations: Use stone fruits like peaches in the summer.
– Dietary Modifications: Substitute feta with almond cheese for a vegan option.
– Flavor Variations: Add a dash of cinnamon or nutmeg for warmth.
– Texture Modifications: Use toasted oats for a crumble-like effect.
– Presentation: Serve in mini tart shells for a handheld version.

Serving and Presentation Guide

– Plating: Use a white dish to emphasize the vibrant hues of the ingredients.
– Garnishing: Sprinkle with fresh mint leaves for a pop of color.
– Traditional Accompaniments: Pair with crusty bread for a contrasting texture.
– Modern Suggestions: Present with a dollop of yogurt for creaminess.
– Temperature: Best served slightly warm for optimal texture.
– Portion Control: Serve half a pear per person as a light dessert.

Wine and Beverage Pairing

– Wine: Pair with a light, floral white wine like a Muscat or Riesling.
– Non-Alcoholic: Try a sparkling water infused with citrus.
– Coffee/Tea: Earl Grey tea complements the honey notes well.
– Temperature: Serve beverages chilled for a refreshing contrast.
– Suggestions: Offer a digestive like limoncello for a refined finish.

Storage and Shelf Life

– Storage: Refrigerate leftovers in an airtight container for up to 2 days.
– Temperature: Best stored at a cool temperature to maintain texture.
– Container: Use a shallow, covered dish to preserve form and freshness.
– Spoilage Signs: Discard if fruit becomes overly mushy or discolored.
– Reheating: Reheat in an oven-safe dish at low heat to gently refresh.
– Freezing: Not recommended due to texture changes in fruit.
– Quality Expectations: Best enjoyed within a day for peak freshness.

Make Ahead Strategies

– Prep Timeline: Slice pears and prepare other ingredients a day ahead.
– Storage: Keep components separate until assembly to prevent sogginess.
– Quality Impact: Fresher flavors if assembled shortly before serving.
– Assembly Tips: Layer freshly for best visual and textural presentation.
– Reheating: Avoid microwaving to prevent uneven heating.
– Fresh Elements: Add fresh herbs or drizzled honey just before serving.

Scaling Instructions

– Halving: Use fewer pears and adjust cheese and nut quantities accordingly.
– Doubling or Tripling: Scale evenly and use multiple baking dishes as needed.
– Equipment Adjustments: Larger quantities may require extended baking time.
– Timing Modifications: Monitor closely to avoid overbaking.
– Storage for Larger Batches: Use large, covered containers to keep fresh.

Nutritional Deep Dive

– Macros: High in fiber and healthy fats, low in processed sugars.
– Micronutrients: Rich in vitamin C, antioxidants from cranberries and walnuts.
– Health Benefits: Supports heart health and aids digestion.
– Dietary Considerations: Suitable for vegetarian diets, customizable for vegan.
– Portion Size: A balanced small portion can be a satisfying treat.
– Weight Management: Enjoy in moderation to fit within dietary goals.

Dietary Adaptations

– Gluten-Free: Naturally gluten-free when using pure ingredients.
– Dairy-Free: Substitute feta with almond or soy-based cheeses.
– Vegan: Replace honey with maple syrup and use vegan cheese options.
– Low-Carb: Limit cranberries and opt for a keto-friendly sweetener.
– Keto: Use high-fat cheese alternatives and unsweetened cranberries.
– Paleo: Maintain with honey and raw nuts.
– Low-FODMAP: Ensure cheese and pear type adhere to FODMAP guidelines.

Recipe Notes

  • Always use fresh ingredients for best results.
  • Adjust sweetness with honey based on personal preference.
  • Nut substitutions can include pecans or pistachios for variety.
  • Opt for organic pears to avoid pesticide residues.
  • The recipe can be adapted using different cheeses like blue cheese for a bold flavor twist.

Troubleshooting Guide

– Texture Issues: Ensure pears are at proper ripeness before baking.
– Flavor Balance: Adjust honey quantity if feta is too overwhelming.
– Temperature Problems: Confirm oven temperature for accurate baking times.
– Equipment Challenges: Use the correct baking dish size for even cooking.
– Ingredient Substitution Impacts: Test substitutes beforehand to gauge compatibility.
– Timing Concerns: Set timers to prevent overbaking or underbaking.

Recipe Success Stories

– Community Feedback: Many have praised the harmonious balance of flavors.
– Variation Successes: Readers love using mixed fruits for variety.
– Adaptation Stories: Incorporating local spices has personalized regional appeal.
– Serving Suggestions: Shared by users with creative garnishes and accompaniments.
– Photography Tips: Highlight lighting to capture the dish’s vibrant colors.

Frequently Asked Questions

Can I prepare the pears a day in advance?

Yes, you can prep the pears the day before. Store them in an airtight container and assemble them just before baking to maintain freshness.

What’s the best cheese substitute for feta?

Goat cheese or ricotta can be excellent substitutes, providing a similar creamy and tangy profile.

How do I prevent the pears from turning brown after slicing?

Dipping sliced pears in a mixture of water and lemon juice can help prevent browning by reducing their exposure to air.

Is it possible to make this recipe nut-free?

Absolutely, you can omit the walnuts or replace them with a nut-free alternative like toasted sunflower seeds.

Can I use canned pears?

While possible, fresh pears provide better texture and flavor. Canned pears may become too soft during baking.

What type of honey should I use?

Opt for a mild flavored honey like clover or acacia, as they complement the dish without overpowering it.

Do I need to peel the pears before baking?

Peeled pears provide a smoother texture, but you can leave the skin on for additional fiber and nutrients.

Can I add spices to this recipe?

Certainly! Adding spices like cinnamon or allspice can enhance the warmth and complexity of the dish.

How do I ensure even cooking?

Choose pears of similar size for consistent cooking and place them evenly spaced on the baking sheet.

What can I do if the feta melts too much?

To prevent excessive melting, choose a high-quality feta and avoid overly high baking temperatures.

Additional Resources

– Related Recipes: Explore other baked fruit desserts on the blog.
– Technique Videos: Watch video tutorials on precise pear slicing.
– Ingredient Guides: Learn more about selecting and storing fresh pears.
– Equipment Recommendations: Discover tools for perfect fruit baking.
– Seasonal Variations: Adapt recipes with other fruits like apples or peaches.

Join the Conversation

Become part of the community by sharing your Baked Pears with Feta, Honey, and Cranberries creations on social media. Use hashtags like #GourmetPears and #SweetAndSavoryDelight. Try the recipe, take photos, and tag us to join our bi-monthly photography challenges. Share your experience in the comments below, and rate the recipe to contribute to our collective cooking journey.

Baked Pears with Feta, Honey, and Cranberries

Indulge in the delightful combination of sweet and savory with this Baked Pears with Feta, Honey, and Cranberries recipe. This dish captivates with its rich flavors and gorgeous presentation, making it a perfect choice for a cozy autumn evening or a festive holiday table. The tender pears infused with honey’s sweetness and the creamy tang of feta create a mouthwatering experience, while the cranberries add a burst of flavor that’s hard to resist.

Imagine the warmth of baked pears wafting through your kitchen, mingling with notes of spiced cinnamon and the slight zest of cranberries. This dish is not just about taste; it’s a sensory journey that combines textures, aromas, and vibrant colors, offering a gourmet touch with simple, wholesome ingredients. Even if you’re a beginner in the kitchen, this easy-to-follow baked pears recipe is straightforward and rewarding, ensuring an impressive dish with minimal effort.

Quick Recipe Highlights

  • Flavor Profile: The richness and sweetness of baked pears balanced with tangy feta and tart cranberries.
  • Texture: Soft and juicy pears complemented by creamy feta crumbles.
  • Aroma: Inviting scents of honey-baked fruit with hints of spice.
  • Visual Appeal: Golden-brown pears glistening with honey and dotted with vibrant cranberries.
  • Skill Level Needed: Easy – suitable for novice cooks, requiring basic baking skills.
  • Special Equipment: Baking dish, oven.

The Recipe

Baked Pears with Feta, Honey, and Cranberries

Serves: 4

Prep Time: 10 mins

Cook Time: 25 mins

Total Time: 35 mins

Kitchen Equipment Needed

  • Baking dish
  • Oven
  • Small mixing bowl

Ingredients

  • 4 ripe pears, halved and cored
  • 1/2 cup feta cheese, crumbled
  • 1/4 cup dried cranberries
  • 2 tablespoons honey
  • 1 teaspoon ground cinnamon
  • 1/4 cup chopped walnuts (optional)

Directions

  1. Preheat your oven to 375°F (190°C).
  2. Arrange the pear halves in a baking dish, cut side up.
  3. Drizzle each pear half with honey and sprinkle with ground cinnamon.
  4. Fill the center of each pear with crumbled feta cheese and dried cranberries.
  5. Sprinkle walnuts over the pears if you’re using them.
  6. Bake in the preheated oven for 25 minutes or until the pears are tender and the cheese is slightly golden.

Recipe Notes

  • Substitute feta with goat cheese for a creamier texture.
  • Use maple syrup instead of honey for a different flavor profile.
  • Add a scoop of vanilla ice cream when serving for an indulgent treat.

Ultimate Guide to Crafting Delicious Classic Lasagna at Home

Classic Lasagna Recipe: A Delicious Italian Masterpiece

Indulge in the rich flavors and comforting textures of this Classic Lasagna Recipe, a beloved Italian dish that has captured hearts and taste buds across the globe. With layers of perfectly seasoned meat sauce, creamy béchamel, and tender pasta, this timeless classic promises to deliver an unforgettable dining experience. Whether you’re preparing a cozy family dinner or entertaining guests, lasagna offers the perfect balance of savory flavors and satisfying textures.

Lasagna is not just about taste; it’s a culinary journey that invites you to explore the depths of Italian cuisine. As you slice through the layers, the harmonious combination of ingredients creates an irresistible aroma that fills your kitchen, making the anticipation almost as enjoyable as the meal itself. Let’s dive into the essentials of creating a lasagna that will become a staple in your culinary repertoire.

Quick Recipe Highlights

  • Flavor Profile: A rich blend of savory beef, tangy tomato sauce, and creamy béchamel.
  • Texture: Layers of hearty pasta interspersed with smooth sauce and tender meat.
  • Aroma: Inviting notes of garlic, herbs, and simmered tomatoes.
  • Visual Appeal: Golden, bubbling cheese atop layers of deep red sauce and tender noodles.
  • Skill Level Needed: Intermediate, requiring attention to layering and sauce preparation.
  • Special Equipment: A deep baking dish and a sharp slicing knife.

Recipe Overview

  • Difficulty Level: Intermediate; involves multiple steps including sauce preparation and careful layering.
  • Category: Main course, comfort food.
  • Cuisine: Italian, inspired by traditional recipes and modern interpretations.
  • Cost: Moderate. Main expenses include ground beef, cheese, and premium pasta.
  • Season: Suitable year-round, especially comforting during fall and winter months.
  • Occasion: Ideal for family dinners, gatherings, and potlucks.

Why You’ll Love This Recipe

This Classic Lasagna Recipe is loved for its delightful taste and texture, boasting savory layers that melt in your mouth. The recipe is convenient, allowing for preparation in advance, making it perfect for busy families and seamless entertaining. Nutritionally, it offers a balance of protein, carbohydrates, and fats, making it a hearty yet well-rounded meal option.

Lasagna is a great choice for social events and gatherings due to its shareable nature, inviting guests to enjoy a communal dining experience. It is also cost-effective, with accessible ingredients available in most grocery stores. The timeless appeal of lasagna transcends trends, ensuring it remains a family favorite.

Historical Background and Cultural Significance

Lasagna’s roots trace back to ancient Rome, where a dish called “laganum” was a precursor to the modern-day favorite. This dish evolved over centuries, gaining prominence in the Emilia-Romagna region of Italy, renowned for its culinary innovations. Lasagna represents more than just a meal; it reflects a cultural heritage, showcasing the richness and diversity of Italian cuisine.

Each region in Italy has its variation, often showcasing local cheeses and meats, adding a layer of regional pride to this classic dish. Traditionally, lasagna is served during festive occasions and family gatherings, symbolizing warmth and togetherness.

Ingredient Deep Dive

Ground Beef: Central to the lasagna’s savory profile, offering a rich and hearty base. Choose lean cuts for a healthier option and brown thoroughly for depth of flavor.

Tomato Sauce: A tangy complement to the beef, providing acidity and sweetness. Opt for crushed tomatoes with Italian herbs for authenticity and richness. Consider homemade for flavor customization.

Béchamel Sauce: Adds creaminess and balances the tomato’s acidity, creating a smooth, rich texture. Mastery of roux is essential to prevent lumps and ensure a silky finish.

Cheese: Typically a mix of mozzarella and Parmesan for meltability and sharpness. Freshly grated is preferable for optimal texture and flavor.

Lasagna Noodles: Foundation of the dish, should be cooked al dente to maintain structure during baking. No-boil noodles offer convenience without sacrificing texture.

Common Mistakes to Avoid

  • Not seasoning the meat sufficiently. Enhance flavors with salt and herbs.
  • Using too much sauce can lead to a soggy lasagna.
  • Overcooking pasta, resulting in mushy layers. Cook till just firm.
  • Skipping béchamel can leave lasagna dry. It adds critical moisture.
  • Layering unevenly, causing inconsistent cooking. Spread ingredients uniformly.
  • Not letting lasagna rest before slicing. Resting ensures clean cuts.
  • Underestimating baking time. Ensure cheese is bubbly and golden.
  • Using pre-shredded cheese can lead to a less creamy texture.

Essential Techniques

Béchamel Preparation: A classic French technique that involves gradually mixing roux with milk to create a creamy sauce. Essential for achieving the smooth texture in lasagna.

Layering: Critical for ensuring even distribution and cooking. Begin with sauce to prevent sticking, followed by noodles, meat, béchamel, and cheese. Repeat and finish with cheese.

Simmering Sauce: Allows flavors to meld, creating a robust and balanced taste. This step is essential for depth of flavor.

Baking: Use both upper and lower heat if possible, for even cooking and perfect cheese gratinée.

Pro Tips for Perfect Classic Lasagna

Select high-quality meat and cheese to elevate the overall flavor profile. Allow the sauce to simmer long enough for the herbs to infuse thoroughly.

For an added depth of flavor, incorporate a splash of red wine into the meat sauce.

Using a combination of fresh herbs such as basil and oregano enhances authenticity.

Always allow lasagna to rest for at least 15 minutes after baking, which helps the layers set and makes serving easier.

Use whole milk in béchamel for a richer mouthfeel.

Cooking noodles a bit firmer than al dente prevents overcooking in the oven.

When assembling, press down gently on each layer to remove air pockets and prevent collapse.

Cover your lasagna with foil for the majority of bake time to retain moisture, removing it near the end to brown the cheese.

Variations and Adaptations

Explore regional variations like adding ricotta cheese for creaminess or incorporating spinach for Florentine style. Adapting the recipe for different seasons can include swapping meat for roasted vegetables in the summer or using hearty mushrooms in autumn.

Dietary modifications include gluten-free noodles, dairy-free cheese, or a vegan-friendly béchamel using plant milk and non-dairy butter. For a flavor twist, add spice with chorizo or a smoky profile with roasted peppers. Adjust textures by shredding vegetables into the sauce or using pasta alternatives like zucchini slices.

Serving and Presentation Guide

Plating techniques can elevate the dining experience. Create a clean, elegant presentation by slicing lasagna squares with precision and wiping plate edges before serving. Garnish with fresh basil leaves or a sprinkle of Parmesan for an aesthetic touch.

Traditional accompaniments like garlic bread and Caesar salad complement the richness of lasagna, while a fresh tomato and arugula salad provides a modern contrast. Serve warm, ensuring each piece is heated through, and guide portions based on the number of courses.

Wine and Beverage Pairing

A robust red wine such as Chianti or Barbera pairs beautifully, complementing the tomato sauce and meat. For non-alcoholic alternatives, consider a rich grape juice or Italian soda with a herbal note.

Coffee, espresso, or tea can round off the meal elegantly, particularly if served with a small dessert. Always serve beverages at optimal temperatures; reds slightly below room temperature and non-alcoholics well-chilled.

Storage and Shelf Life

Store lasagna in an airtight container in the refrigerator for up to 3 days. For longer storage, freeze portions individually. To avoid freezer burn, use airtight freezer bags or wrap portions in plastic and foil.

Signs of spoilage include off odors and discoloration, particularly on the cheese. Reheat thoroughly, covered with foil to retain moisture, until piping hot throughout. If freezing, allow thawing in the fridge overnight and reheat within 24 hours for best quality.

Make Ahead Strategies

Prepare sauces and cook noodles a day in advance, storing them separately. Assemble lasagna, cover securely, and refrigerate overnight to enhance flavor fusion.

Assess quality impact; some find flavors deepen, whereas noodles may absorb more sauce. Reheat gently, adding fresh basil or a drizzle of olive oil if needed. Consider baking partially, then finishing reheating to avoid dryness.

Scaling Instructions

To halve the recipe, use smaller baking dishes and adjust ingredient proportions. Doubling or tripling requires larger capacity cookware and possibly extending baking time.

Adjust equipment size accordingly, ensuring ovens and mixers can accommodate larger volumes. When storing larger quantities, consider portion freezing to maintain quality.

Nutritional Deep Dive

Lasagna offers a balanced macro profile with its mix of protein from beef and cheese, carbohydrates from pasta, and fats from béchamel and cheese.

It’s rich in vitamins and minerals such as calcium and iron, making it a nourishing dish. However, portion control is key for caloric management; balance with side salads for a fulfilling meal.

Dietary Adaptations

For gluten-free adaptations, use certified gluten-free pasta and all-purpose flour alternatives like rice or potato flour in béchamel.

For dairy-free lasagna, substitute cheese with nutritional yeast and make béchamel with non-dairy milk and coconut oil.

Vegan versions can replace meat with tofu or lentils, béchamel with cashew cream, and incorporate dairy-free cheeses.

For low-carb or keto lasagna, use zucchini slices instead of noodles and adjust the sauce to eliminate added sugars.

Recipe Notes

  • Consider adding finely chopped vegetables like onions and carrots to the sauce for additional nutrients and depth of flavor.
  • Parmesan cheese can be swapped with Asiago for a nutty, less sharp alternative.
  • A dash of nutmeg in béchamel enhances its flavor complexity.
  • Ensure to let it sit before slicing to prevent layers from sliding apart.

Troubleshooting Guide

For texture issues such as soggy noodles, reduce liquid in sauce before layering. Balance flavors by adjusting seasoning mid-cooking, adding salt or herbs as needed.

Temperature control can address uneven cooking; use preheated ovens and monitor levels. Substitute ingredients mindfully – use alternatives with matching textures and flavors to maintain integrity.

Recipe Success Stories

Community feedback showcases creative lasagna takes, from adding regional cheeses to using heirloom tomatoes for a unique profile. Share your adaptation successes and serving suggestions through our social media channels. Enhance your photography with plating advice and capture the vibrant layers of your homemade lasagna.

Frequently Asked Questions

Can I prepare lasagna ahead of time?

Yes, you can assemble it a day prior and refrigerate. The flavors meld beautifully overnight, enhancing the final taste.

How do I make a gluten-free lasagna?

Use gluten-free noodles and substitute flour in béchamel with a gluten-free alternative. Ensure all other ingredients are certified gluten-free.

What is the best way to reheat lasagna?

Cover with foil and reheat in the oven at 325°F until hot, ensuring even heating. This retains moisture and prevents drying out.

Can lasagna be frozen?

Yes, it’s freezable both pre-baked and post-baked. Wrap tightly in foil, then plastic wrap to prevent freezer burn. Thaw in the refrigerator overnight before reheating.

How do I avoid a watery lasagna?

Thoroughly drain cooked noodles and ensure the sauce simmers to reduce excess moisture. Avoid fresh mozzarella, which might release water during baking.

What cheeses can I use for a richer taste?

Add Asiago or Gouda in conjunction with mozzarella and Parmesan for a fuller, creamier flavor.

Is it possible to make a vegan lasagna?

Yes, substitute meats with plant-based proteins like tofu or tempeh. Opt for plant milk in béchamel and vegan cheese alternatives.

Why is my béchamel sauce lumpy?

Gradually whisk milk into the roux over gentle heat to prevent lumps. Use a strainer if necessary to achieve smoothness.

What are the signs that my lasagna is done?

The top should be golden brown and bubbly. Insert a knife into the center; it should come out hot with steam.

How can I enhance the sauce’s flavor?

Consider adding red wine, fresh basil, or a pinch of sugar to balance acidity. Allowing the sauce to simmer longer can also deepen the flavor.

Additional Resources

Explore more Italian delicacies with our pasta-making guides and sauce recipes. Watch detailed videos on béchamel preparation and discover equipment recommendations for enhancing your recipe execution. Seasonal variations are available for those looking to adapt the dish to available produce.

Join the Conversation

Engage with us on social media by using #ClassicLasagna and share your culinary achievements! Participate in our community challenges for a chance to be featured. We’d love to see your photos, offering tips on lighting and angles for the best captures. Share your reviews and stories, helping us create a lively and supportive food enthusiast community.

Classic Lasagna Recipe: A Timeless Italian Delight

If you are on the hunt for the best classic lasagna recipe, look no further! This traditional Italian dish, brimming with rich layers of pasta, meat sauce, and creamy cheese, is the epitome of comfort food. Perfect for special occasions or a delightful family dinner, our classic lasagna recipe brings together authentic flavors and textures that transport you to the heart of Italy.

Lasagna is a versatile dish that can be tailored to suit any palate. Whether you prefer a rich beef or a savory vegetarian version, this classic recipe offers the perfect balance of flavors that have stood the test of time. If you’re ready to experience the joy of a homemade classic lasagna, let’s dive into the flavorful depths of this quintessential Italian masterpiece.

The Recipe

Classic Lasagna Recipe: Heavenly Layers of Flavor

⚖️
Difficulty
Moderate

⏲️
Prep Time
30 mins

🕒
Cook Time
1 hr 30 mins

⏱️
Total Time
2 hrs

🍽️
Servings
8

Serves: 8

Prep Time: 30 mins

Cook Time: 1 hr 30 mins

Total Time: 2 hrs

Kitchen Equipment Needed

  • Large pot
  • Skillet
  • Baking dish
  • Mixing bowl
  • Wooden spoon

Ingredients

  • 12 lasagna noodles
  • 1 pound ground beef
  • 1/2 cup chopped onion
  • 2 cloves garlic, minced
  • 24 ounces marinara sauce
  • 15 ounces ricotta cheese
  • 1 egg
  • 2 cups shredded mozzarella cheese
  • 1/2 cup grated Parmesan cheese
  • Salt and pepper to taste

Directions

  1. Preheat your oven to 375°F (190°C).
  2. Cook lasagna noodles according to package instructions; drain and set aside.
  3. In a skillet, cook ground beef with onion and garlic until browned. Drain excess fat.
  4. Add marinara sauce to the beef mixture and simmer for 10 minutes.
  5. In a mixing bowl, combine ricotta cheese with egg, salt, and pepper.
  6. In a baking dish, spread a layer of meat sauce, arrange a layer of noodles, then a layer of ricotta mixture, and top with mozzarella cheese. Repeat layers until ingredients are used, finishing with a layer of noodles and remaining meat sauce. Sprinkle Parmesan cheese on top.
  7. Cover with foil and