Effortless No-Knead Honey Oat Bread Recipe for Delicious Homemade Bread

“`html
Jump to Recipe

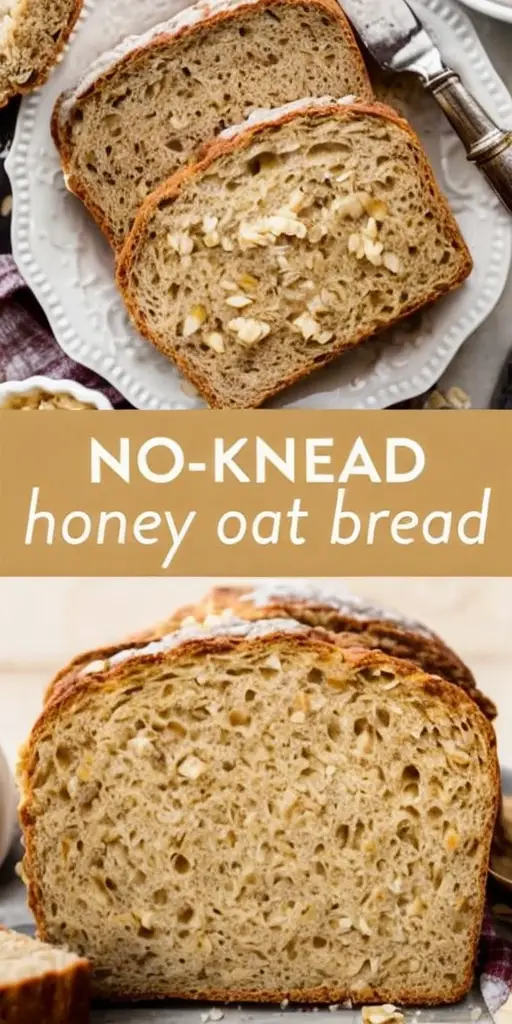
No-Knead Honey Oat Bread: A Simple Delight for All Bread Lovers

Imagine the warm and inviting aroma of freshly baked bread wafting through your kitchen, the crackle of a crisp golden crust as it’s sliced, revealing a tender, slightly sweet crumb within. This No-Knead Honey Oat Bread combines the earthy sweetness of honey with the rustic texture of oats, all in one simple recipe. It’s a bread that’s as comforting to make as it is to eat, without the fuss of traditional bread-making techniques.

Why You’ll Love This Recipe

This bread recipe is a game-changer, especially for those who find conventional bread-making daunting. With its minimal hands-on time and simple ingredients, it removes the need for tedious kneading. Perfect for both beginners and seasoned bakers, it offers:

  • A deliciously sweet and hearty flavor that pairs well with a variety of dishes.
  • The satisfaction of making homemade bread with minimal effort.
  • The health benefits of whole grains from oats.
  • Versatility in enjoying it plain, with spreads, or alongside meals.
  • A perfect base for personal creative twists.

My Personal Bread Journey

This honey oat bread recipe holds a special place in my heart. I recall the first time I made it one chilly autumn evening. The anticipation of waiting through the long rise was rewarded with the comforting aroma that filled my home. Sharing the first warm slices with my family instantly turned this recipe into a cherished favorite. It’s the kind of bread that brings warmth and happiness around the table.

The Story Behind the Bread

No-knead bread was popularized by Jim Lahey in the early 2000s, making artisan bread approachable without the need for advanced skills or equipment. This particular honey oat variation blends rustic simplicity with a touch of sweetness that nods to traditional baking methods, offering a wholesome loaf reminiscent of countryside kitchens where bread was an essential part of daily life.

Tips for Perfect No-Knead Honey Oat Bread

  • Time Your Rise: Planning is key; the dough benefits from a 12-18 hour rise, so start it the day before baking.
  • Water Temperature: Use warm water, around 100°F, to activate the yeast without killing it.
  • Oven Preheat: Preheating the Dutch oven is crucial for creating a crispy crust.
  • Dough Handling: The dough will be sticky but avoid overmixing when adding oats.
  • Experiment with Flours: Substitute part of the all-purpose flour with whole wheat for a nuttier flavor.

Creative Serving Suggestions

This bread is a versatile addition to any table, whether it’s a casual breakfast or a special occasion dinner:

  • Enjoy it warm with a pat of butter and a drizzle of extra honey for an indulgent breakfast treat.
  • Pair with sharp cheeses and charcuterie for a sophisticated appetizer.
  • Use as a base for hearty sandwiches filled with roasted vegetables or lean protein.
  • Toast slices to pair with soups or salads for added texture and flavor.

Storage and Leftovers

This bread keeps well at room temperature for up to three days. Store it in an airtight container to retain its freshness. For longer storage, freeze slices individually wrapped and reheat them in a toaster or oven for that just-baked taste.

Repurpose leftovers by turning them into croutons or a rustic bread pudding. This versatility ensures no slice ever goes to waste.

Recipe Variations and Substitutions

  • Dietary Needs: Substitute honey with maple syrup or agave nectar for a vegan-friendly version.
  • Flavor Variations: Add a handful of nuts or dried cranberries for a festive twist.
  • Seasonal Swap: Incorporate pumpkin puree in place of some water for an autumn-inspired loaf.
  • Gluten-Free Option: Use a 1:1 gluten-free flour blend and ensure oats are certified gluten-free.

FAQ

Can I make this ahead of time? Yes, prepare the dough the evening before and bake the next day for fresh bread.

What substitutions can I use for honey? Try maple syrup or agave nectar for a different flavor profile.

How do I make this gluten-free or vegan? Use gluten-free flour and oats, and replace honey with a vegan-friendly sweetener.

Optional Nutritional Information

  • Calories: Approximately 150 per slice (based on eight servings)
  • Protein: 3g
  • Carbohydrates: 30g
  • Fat: 1g

Final Thoughts

This No-Knead Honey Oat Bread embodies the simplicity and comfort of homemade baking. It’s an invitation to slow down, savor the process, and enjoy wholesome, delicious bread that elevates any meal. Share your creations and experiences in the comments, and explore the joy of making and sharing this delightful bread.

Recipe Section

Serves: 8 slices
Prep Time: 10 minutes
Cook Time: 45-50 minutes
Total Time: 12-18 hours (including rise time)

  • 3 cups all-purpose flour
  • 1/4 tsp instant yeast
  • 1 1/2 tsp salt
  • 1 1/4 cups warm water
  • 1/4 cup honey
  • 1/2 cup rolled oats
  1. In a large mixing bowl, combine flour, yeast, and salt.
  2. Stir in warm water and honey until a shaggy dough forms.
  3. Cover the bowl with plastic wrap and let it sit at room temperature for 12-18 hours.
  4. Preheat the oven to 450°F. Place a covered Dutch oven in the oven to heat up.
  5. Punch down the dough and fold in the rolled oats.
  6. Carefully remove the hot Dutch oven from the oven and place the dough inside.
  7. Cover and bake for 30 minutes. Then remove the lid and bake for an additional 15-20 minutes until golden brown.
  8. Let the bread cool before slicing and serving.

Enjoy this simple and delicious no-knead honey oat bread! #NoKneadBread #HomemadeBread #HoneyOatBread

“`

Easy No-Knead Honey Oat Bread Recipe for Beginners


**Effortless Baking: Discover the Delight of No-Knead Honey Oat Bread 🍞🍯**

### Introduction

Imagine the tantalizing aroma wafting through your home, enveloping each corner with the comforting scent of freshly baked bread. It’s a warmth that signals love, family, and cherished moments gathered around the kitchen table. Baking bread can sometimes seem like an arduous task, reserved for the weekends when time allows. Enter the no-knead method—a game-changer for anyone who cherishes homemade bread but longs for simplicity. With minimal effort and time, you can create a wholesome, delicious loaf of No-Knead Honey Oat Bread that will impress at any meal.

### Simple Ingredients for No-Knead Honey Oat Bread

To embark on your baking journey, let’s gather our stars:

| Ingredient | Quantity |
|———————|——————|
| All-purpose flour | 3 cups |
| Rolled oats | 1/2 cup |
| Salt | 1 1/2 tsp |
| Instant yeast | 1/4 tsp |
| Warm water | 1 1/2 cups |
| Honey | 2 tbsp |

Every component in this recipe plays a crucial role. Flour provides the structure and base; its proteins form gluten, which traps gases and helps the bread rise. Rolled oats contribute a delightful texture and a hint of nuttiness. Salt enhances flavor, while yeast is the silent magician, transforming your ingredients with fermentation. Honey lends a mild sweetness and aids in moisture retention, while warm water brings it all together, activating the yeast.

### How to Make No-Knead Honey Oat Bread

#### Mixing the Ingredients

Begin this journey by bringing together the dry ingredients in a sizable bowl—flour, oats, salt, and yeast. Slowly introduce warm water and honey. Stir until a shaggy, uneven dough forms. There’s no need for a mixer or fancy gadgets; a simple spoon will suffice, embracing the beauty of simplicity.

#### The Magic of Slow Rising

Cover your creation with plastic wrap and allow it to rest at room temperature for a long, luxurious fermentation phase—12 to 18 hours. This unhurried rise works wonders, as yeast slowly develops flavors and improves the bread’s texture. This extensive period allows the dough’s gluten structure to form naturally, resulting in a soft and airy crumb without any kneading.

#### Baking to Perfection

As you near baking time, preheat your oven to a fiery 450°F (232°C). Place your trusty dutch oven, complete with its lid, inside. Pre-heating the vessel ensures an optimal rise and a gratifyingly crisp crust. With care, transfer your dough into the heated dutch oven. Start by baking it covered; this traps steam, contributing to that sought-after crust. After 30 minutes, remove the lid and continue baking for another 15-20 minutes until a golden-brown hue takes over.

### Tips for Perfect No-Knead Bread Every Time

– **Use Room Temperature Ingredients:** This ensures a more consistent dough texture, aiding in even rising.
– **Check Dough Consistency:** Doughs can have a mind of their own, so adjust with extra water or flour if it seems too dry or wet.
– **Experiment with Add-ins:** To personalize your loaf, consider adding nuts or seeds. A sprinkle of sunflower or pumpkin seeds can add satisfying texture and nutrition.

### Why No-Knead Honey Oat Bread Should Be Your Go-To

Homemade bread is not just about flavor; it brings noteworthy health benefits. Unlike many commercial loaves that harbor preservatives and additives, this homemade delight offers pure, recognizable ingredients. Plus, you save money—specialty bread from bakeries comes at a premium, while this recipe utilizes pantry staples at a fraction of the cost.

### FAQs about No-Knead Honey Oat Bread

**Do I Need a Dutch Oven for No-Knead Bread?**
While a dutch oven is recommended for its heat retention and steam-trapping abilities, other heavy, lidded pots can work in a pinch.

**Can I Use Other Types of Flour?**
Certainly! Experimenting with whole wheat or spelt flour can impart new flavors and nutritional benefits. Remember, different flours can affect your dough’s hydration needs.

**How Do I Store No-Knead Honey Oat Bread?**
To maintain its freshness, keep your loaf in a bread box or paper bag at room temperature. For longer storage, slice and freeze, then toast or warm up when you’re ready to enjoy.

### Conclusion

Rest easy knowing that by following this simple guide, you’re fully capable of mastering no-knead baking. Not only will you churn out a loaf that’s delicious and fresh, but you’ll also bask in the sense of accomplishment that comes with baking your own bread. Is there no end to what you can knead, rise, and bake with this easy method? We can’t wait to see your variations! Share your delightful creations with us and fellow bakers on social media or in the comments below. Happy baking!

This structured yet engaging piece offers a comprehensive guide on making delicious No-Knead Honey Oat Bread, perfect for the busy yet culinary-curious individual. By following these steps and tips, you’ll be well on your way to bread-baking mastery—without breaking a sweat!

Irresistible Baked Pumpkin Hand Pies: A Perfect Fall Treat

“`html
Jump to Recipe

Baked Pumpkin Hand Pies: A Cozy Autumn Delight

Imagine biting into a perfectly golden pastry, the flaky crust giving way to a warm, spicy pumpkin filling that tastes like fall wrapped in a hug. These Baked Pumpkin Hand Pies capture the essence of the season, offering an irresistible blend of sweet and spice. With a rich pumpkin filling encased in a buttery crust, this dish is a must-try for those who treasure comfort food and autumn flavors.

Why You’ll Love This Recipe

These Baked Pumpkin Hand Pies are not just delicious; they are a celebration of autumn’s best-loved ingredient: pumpkin. The harmonious blend of cinnamon, nutmeg, ginger, and cloves in the filling evokes the nostalgia of cozy fall evenings. Not only do they offer an explosion of flavors, but their hand-held size makes them a perfect treat for gatherings or a quick sweet indulgence.

As an added bonus, these pies are incredibly easy to prepare, making them ideal for both novice and experienced bakers. The recipe utilizes pre-made pie crusts for simplicity, allowing you to focus on perfecting that rich and fragrant filling. Moreover, these pies are an excellent way to use up any leftover pumpkin puree, cutting down on waste while upping your dessert game.

What sets these hand pies apart is their versatility. Serve them warm out of the oven, or enjoy them cold as a sweet snack. They’re like a warm pumpkin pie condensed into a portable treat, perfect for picnics or lunchbox surprises. The possible dietary variations also mean that everyone can enjoy them, no matter their dietary preferences or restrictions.

Personal Story/Connection

The first time I made these Baked Pumpkin Hand Pies was during a family pumpkin-themed cooking day, a tradition we hold every October. Trying different pumpkin recipes, we stumbled upon the idea of hand pies, an experiment that quickly became a family favorite. Seeing my loved ones’ faces light up as they tasted these pies for the first time warmed my heart, making these pies a cherished recipe in our home.

Context/Background

The tradition of baking with pumpkins has roots stretching back centuries, where pumpkins were first cultivated in Central America and subsequently embraced by various cultures around the globe. Hand pies, known for their portability and convenience, became popular in England and made their way to America, evolving with regional ingredients and seasonal flavors. These Baked Pumpkin Hand Pies embody this marriage of global culinary traditions, celebrating autumn’s bounty with a nod to historical baking techniques.

Tips for Perfect Baked Pumpkin Hand Pies

  • Ensure the pumpkin filling is well-mixed to distribute the spices uniformly, enhancing the flavor.
  • Keep the pie crusts cold until you’re ready to work with them to achieve that flaky texture.
  • Don’t skip the egg wash; it gives the pies a glossy, golden finish and helps the sugar adhere.
  • Experiment with different shapes for the pies using various cutters, adding a touch of fun and personalization.
  • Make sure you cut slits on top of each pie to prevent them from bursting as they bake.

Serving Suggestions

These hand pies are divine on their own, but they can be elevated with a dollop of freshly whipped cream or a scoop of vanilla ice cream on top. For a sophisticated touch, drizzle them with caramel sauce or a sprinkle of powdered sugar just before serving, creating an enticing presentation that’s perfect for dessert displays.

If you’re hosting a fall-themed gathering, pair these pies with a hot cup of spiced cider or chai tea, playing up their warm, cozy flavors. Alternatively, serve them as a complement to a savory soup or stew to balance the meal with a sweet finish.

Storage and Leftovers

Store these pies in an airtight container at room temperature for up to two days. If you’d like them to last a bit longer, refrigerate them for up to five days. For a fresher taste, reheat them in an oven set to 350°F for about 5 minutes.

Should you have leftovers, consider crumbling the pies over yogurt for a delightful breakfast parfait or using them as a base for a fall-themed trifle, layered with cream and fruit for an impressive dessert.

Recipe Variations and Substitutions

For a vegan version, substitute the egg wash with a plant-based milk wash and use a vegan pie crust. You can also tweak the spices to suit your palate, perhaps adding cardamom for an exotic touch or upping the ginger for more spice.

Consider adding chopped nuts or dried fruits like raisins or cranberries to the filling for extra texture and flavor. You can also swap the pumpkin puree for sweet potato or butternut squash puree to explore different flavor profiles.

FAQ

Can I make these ahead of time? Yes, you can prepare the pies and freeze them unbaked. Bake from frozen, adding a couple of minutes to the baking time.

What substitutions can I use for brown sugar? You can substitute with coconut sugar or maple syrup for a slightly different sweetness.

How do I make this gluten-free? Use a gluten-free pie crust; many are available in stores, ensuring everyone can enjoy these delicious pies.

Optional Nutritional Information

  • Calories per pie: Approximately 130 (varies with crust and additional toppings).
  • Fat: 5g; Protein: 2g; Carbohydrates: 20g per pie.

Final Thoughts

Baked Pumpkin Hand Pies offer an irresistible way to savor fall’s flavors in an easy, portable pastry. Whether you’re enjoying them as a treat for yourself or serving them to loved ones, these pies are a testament to the comforting warmth of home baking. We invite you to try this recipe, share your creations, and connect with others who appreciate the joy of seasonal desserts.

Recipe Section

Serves: 8 | Prep Time: 20 mins | Cook Time: 25 mins | Total Time: 45 mins

  • 2 cups pumpkin puree
  • 1/2 cup brown sugar
  • 1 tsp cinnamon
  • 1/2 tsp nutmeg
  • 1/4 tsp ginger
  • 1/4 tsp cloves
  • 1 package refrigerated pie crusts
  • 1 egg, beaten
  • 1 tbsp water
  • 1 tbsp sugar, for sprinkling
  1. Preheat your oven to 375°F and line a baking sheet with parchment paper.
  2. In a mixing bowl, combine the pumpkin puree, brown sugar, cinnamon, nutmeg, ginger, and cloves. Mix until well combined.
  3. Roll out the pie crusts on a lightly floured surface and cut out circles using a cookie cutter or a glass.
  4. Spoon a tablespoon of the pumpkin mixture onto half of the circles, leaving a border around the edge.
  5. Brush the edges with water, then place another pie crust circle on top. Use a fork to crimp the edges and seal the pies.
  6. Brush the tops of the pies with the beaten egg and water mixture, then sprinkle with sugar.
  7. Cut a small slit on the top of each pie for ventilation.
  8. Bake for 20-25 minutes, or until the pies are golden brown.
  9. Allow the pies to cool slightly before serving.

Enjoy these delicious Baked Pumpkin Hand Pies as a festive fall treat!

“`

Irresistible Baked Pumpkin Hand Pies for Your Fall Festivities

# The Ultimate Guide to Baking Perfect Pumpkin Hand Pies

## Introduction: Embrace the Flavors of Fall

As the leaves change and the crispness of autumn settles in, your kitchen becomes the place for cozy warmth and delicious aromas. Envision a delightful pumpkin hand pie fresh from your oven—it’s more than just a dessert; it’s a celebration of the season’s flavors in miniature form. Whether you’re hosting a gathering or indulging in a quiet afternoon treat, these pies capture the very essence of fall’s bounty.

## Ingredients: What You Need for Pumpkin Hand Pies

Before diving into creating these tempting treats, gather your ingredients. You’ll require some kitchen staples and a few autumn-specific items. Here’s a quick reference guide to help organize what you need:

| Ingredient | Quantity |
| ——————— | ———————- |
| All-Purpose Flour | 1 1/4 cups |
| Salt | 1/2 tsp |
| Unsalted Butter | 1/2 cup, cold and cubed|
| Ice Cold Water | 1/4 cup |
| Pumpkin Puree | 1 cup |
| Brown Sugar | 1/3 cup |
| Ground Cinnamon | 1 tsp |
| Nutmeg | 1/2 tsp |
| Ground Ginger | 1/4 tsp |
| Ground Cloves | 1/4 tsp |
| Egg | 1, beaten |
| Water | 1 tbsp |
| Granulated Sugar | 2 tbsp |

### Key Ingredient Tips

– **Pumpkin Puree**: For maximum flavor, use real pumpkin puree rather than pumpkin pie filling which has added spices and sweeteners.
– **Spices**: These bring the warm and aromatic notes typical of fall.

## Step-by-Step Directions to Perfect Hand Pies

### Preparing the Pie Dough

1. **Preheat Your Oven**: Begin by setting your oven to 375°F (190°C). Prepare a baking sheet with parchment paper to prevent sticking.
2. **Mix the Dry Ingredients**: Combine flour and salt in a food processor. This step is crucial for even distribution.
3. **Add Butter**: Introduce cold cubed butter to the mixture. Pulse it until the combination resembles a coarse crumb.
4. **Form the Dough**: Gradually incorporate ice-cold water, one tablespoon at a time, mixing until the dough binds. Wrap it and refrigerate for better manageability.

### Assembling the Hand Pies

1. **Roll and Cut**: On a floured surface, roll out your dough. Use a cookie cutter to create circles, placing half on the baking sheet.
2. **Make the Filling**: Blend pumpkin puree with brown sugar, cinnamon, nutmeg, ginger, and cloves in a bowl. The aroma should evoke the season’s spirit.
3. **Fill and Seal**: Spoon a tablespoon of filling onto each dough circle on the baking sheet. Top with another circle and crimp the edges with a fork for a tight seal.

### Baking the Pies

1. **Egg Wash and Bake**: Beat the egg with water to create an egg wash. Brush it on pie tops and sprinkle with granulated sugar.
2. **Bake**: Position the pies in the oven for about 20-25 minutes until they boast a golden brown hue.
3. **Cool and Enjoy**: Allow the pies to cool slightly. Each bite promises a warm embrace of autumn’s flavor.

## Tips and Tricks for the Best Pumpkin Hand Pies

– **Keeping Butter Cold**: Cold butter is key to achieving that perfect flaky crust. Consider refrigerating your butter before use.
– **Customize Your Spice Mix**: Adjust the spices to match personal preferences; a dash of allspice or more cinnamon can add uniqueness to your pies.
– **Storage Tips**: If there are any leftovers, store them in an airtight container. Rewarming in the oven will help retain their fresh-baked quality.

## FAQs: Your Baked Pumpkin Hand Pies Questions Answered

**Q1: Can I use store-bought pastry for these hand pies?**
A1: Absolutely, if you’re short on time, store-bought pastry offers a convenient alternative. Nonetheless, homemade dough will maximize flavor and texture.

**Q2: What if I don’t have a food processor?**
A2: Not a problem! You can combine the dough manually using a pastry cutter or even forks.

**Q3: How can I make them vegan-friendly?**
A3: Opt for plant-based butter and replace the egg with a mixture of water and flaxseed meal for a delightful vegan option.

## Conclusion: Celebrate Fall with Every Bite

Baked pumpkin hand pies embody the very heart of autumn; a delicious mix of warm spices and sweet pumpkin in a flaky shell. Whether you create them for a family event or a cozy afternoon, these treats promise to bring joy. Revel in the process and the delight of sharing these homemade treasures with those around you. So, don your apron and embark on this pumpkin-infused adventure.

## Call to Action: Share the Joy

Gather your ingredients and let the scent of pumpkin spice fill your home. If you loved creating these hand pies, share your experiences or invite others into your kitchen for a baking day. Don’t forget to share your delightful creations on social media to inspire friends and family!

Now that you have this essential guide to pumpkin hand pies, why wait? Your perfect fall bake awaits.

Delicious Make-Ahead Maple Pecan Sticky Buns Recipe for Brunch

“`html
Jump to Recipe

Make-Ahead Maple Pecan Sticky Buns: Perfect for a Sweet Start

Imagine waking up to the tantalizing aroma of freshly baked Maple Pecan Sticky Buns. These sweet indulgences are the perfect blend of buttery puff pastry, aromatic cinnamon, and rich maple syrup glaze, generously loaded with crunchy pecans. Their gooey, cinnamon-kissed layers make them an irresistible treat for your breakfast table or a cozy afternoon snack. Their make-ahead convenience offers an effortless solution for busy mornings and special brunch gatherings.

Why You’ll Love This Recipe

The beauty of these Make-Ahead Maple Pecan Sticky Buns lies in their simplicity and versatility. Whether you’re hosting family brunch or indulging in a weekend treat, these buns fit effortlessly into any occasion. The make-ahead feature frees up your time, allowing you to focus on enjoying the moment rather than spending hours in the kitchen.

The combination of maple syrup and brown sugar provides a caramel-like sweetness, while the pecans add a delightful crunch, creating a perfect balance of flavors and textures. You will find the preparation straightforward, making it an ideal recipe for both seasoned bakers and beginner cooks alike.

There’s a certain nostalgia that accompanies these sticky buns, evoking memories of cozy family breakfasts and leisurely Sunday mornings. Their rich aroma alone is enough to gather everyone around the table.

Personal Story/Connection

Back when I was a child, weekends were synonymous with special breakfasts. My mother would often prepare variations of sticky buns, and the entire house would fill with their warm, inviting scent. As I grew older and began cooking for my own family, I knew I wanted to bring a piece of those cherished memories into our home. These Maple Pecan Sticky Buns quickly became a beloved tradition, offering not just a delicious treat but a connection to fond family memories.

Context/Background

The origins of sticky buns are believed to be rooted in Eastern European Jewish traditions, where sweet bread filled with nuts and spices was a customary treat. Over time, these buns traveled to America, evolving into the beloved sticky buns we know today, particularly popular in Pennsylvania Dutch country.

Maple Pecan Sticky Buns add a delightful twist with the use of maple syrup, which is heralded as a quintessential North American ingredient. Incorporating this natural sweetener not only enhances the flavor but also pays homage to a rich culinary history.

Tips for Perfect Maple Pecan Sticky Buns

  • Ensure your puff pastry is cold before rolling to make it easier to handle and prevent sticking.
  • For an extra gooey outcome, drizzle additional maple syrup on top just before baking.
  • Consider adding a sprinkling of sea salt over the pecan mixture for a flavor contrast.
  • If you prefer a stronger cinnamon flavor, feel free to increase the cinnamon to 1 teaspoon.
  • To achieve an even rise and bake, be sure to preheat the oven and bake the buns on the middle rack.

Serving Suggestions

These sticky buns are best enjoyed warm, straight from the oven. Serve them with a steaming cup of coffee or tea for a perfect breakfast pairing. For a delightful brunch spread, consider accompanying them with fresh fruit, yogurt, and scrambled eggs.

If you’re hosting a special occasion, display the sticky buns on an elegant platter with a touch of powdered sugar dusted on top for a stunning presentation. They also work beautifully as a dessert option, paired with a scoop of vanilla ice cream.

Storage and Leftovers

If you find yourself with leftovers, these sticky buns store excellently in an airtight container at room temperature for up to two days. For longer storage, refrigerate them for up to a week or freeze them for up to three months.

To reheat, simply place the buns in a preheated oven at 350°F for about 10 minutes or microwave for 20-30 seconds until warm. If reheating from frozen, allow them to thaw first for the best texture.

Recipe Variations and Substitutions

For those seeking a vegan option, substitute the butter with a vegan margarine and ensure your puff pastry is vegan-friendly. You can swap the pecans for walnuts or almonds if desired, each adding a unique flavor profile.

If you’re looking to reduce the sugar content, use coconut sugar in place of brown sugar, and consider a light drizzle of stevia-sweetened syrup as an alternative.

FAQ

  • Can I make this ahead of time? Absolutely! These buns are designed to be prepped a day in advance, making them convenient for busy mornings.
  • What substitutions can I use for butter? Margarine, shortening, or coconut oil are viable options, though the flavor and texture will vary slightly.
  • How do I make this gluten-free? Use a gluten-free puff pastry available in many grocery stores, ensuring it’s handled and prepared according to its specific instructions.

Optional Nutritional Information

Note: Exact values will depend on brands and measurements used. Approximate values per serving:

  • Calories: ~350
  • Total Fat: ~22g
  • Saturated Fat: ~6g
  • Carbohydrates: ~36g
  • Protein: ~4g

Final Thoughts

If you’re looking for a recipe that combines elegance with ease, Make-Ahead Maple Pecan Sticky Buns are a perfect choice. They offer a delightful fusion of flavors that will undoubtedly elevate any meal. They’re more than just pastries; they’re an experience that invites warmth and joy to your table. I invite you to try them for yourself and share your experiences or insights. Bon appétit!

Recipe Section

Servings: 12 buns
Prep Time: 20 minutes
Cook Time: 25-30 minutes
Total Time: Approximately 50 minutes

  • 1/2 cup unsalted butter, softened
  • 1/2 cup brown sugar
  • 1/2 cup maple syrup
  • 1 cup chopped pecans
  • 1/2 tsp cinnamon
  • 1/4 tsp salt
  • 1 package store-bought puff pastry (2 sheets)
  1. In a saucepan, melt the butter and stir in the brown sugar and maple syrup until smooth.
  2. Add the chopped pecans, cinnamon, and salt. Stir until well combined.
  3. Pour the mixture into a baking dish and spread evenly at the bottom.
  4. Roll out the puff pastry sheets and press them together into one large sheet.
  5. Spread the pecan mixture over the puff pastry, leaving a small border around the edges.
  6. Roll up the pastry tightly, starting from the long end.
  7. Cut into 12 equal pieces and place them in a muffin tin.
  8. Cover and refrigerate overnight.
  9. Preheat the oven to 375°F and bake the sticky buns for 25-30 minutes or until golden brown.
  10. Let cool slightly before serving.

#MakeAheadStickyBuns #MaplePecan #SweetTreats #BrunchIdea

“`

Irresistible Make-Ahead Maple Pecan Sticky Buns for Easy Mornings

# Indulge in the Ultimate Make-ahead Maple Pecan Sticky Buns

## Introduction

Imagine waking up to the tantalizing scent of maple and pecans, gently filling every corner of your kitchen. This aroma doesn’t just signal breakfast; it whispers of cozy mornings, shared stories, and family gatherings around the table. These make-ahead maple pecan sticky buns embody all that is comforting and homely. Whether you’re planning a leisurely weekend brunch or marking a special occasion, these buns are the perfect centerpiece. Let your mornings transform into moments of indulgence and pure delight.

## Why Make-ahead Maple Pecan Sticky Buns are a Must-Try

### Convenience and Flexibility

Picture this: you’ve had a packed week, and the weekend beckons with the promise of relaxation and quality time. Enter the world of make-ahead maple pecan sticky buns. With the flexibility these buns offer, you can prepare them at your convenience, ensuring you start your morning with minimal fuss and maximum flavor. Simply prepare the buns the night before, allowing you to enjoy a scrumptious breakfast with practically no effort when you wake up.

### A Treat for All Occasions

These buns are not just a simple breakfast item; they are versatile enough for any occasion. From festive holidays to quiet Sunday mornings, the joy of sharing such homemade goodness brings family and friends together. With each bite, you’ll celebrate the warmth and love that goes into creating something delicious and heartfelt from scratch.

## Ingredients Overview

### Maple Pecan Sticky Buns Ingredients

To craft these delicious buns, you’ll need the following ingredients:

| Ingredient | Quantity |
|———————|—————-|
| Whole Milk | 1 cup |
| Unsalted Butter | 1 cup (cubed and melted) |
| Granulated Sugar | 1/2 cup |
| Active Dry Yeast | 1 packet |
| All-Purpose Flour | 4 1/2 cups |
| Salt | 1/2 teaspoon |
| Eggs | 2 large |
| Maple Syrup | 1/2 cup |
| Pecans (chopped) | 1 cup |
| Brown Sugar | 1/2 cup |
| Cinnamon | 1/2 teaspoon |

### A Closer Look at Star Ingredients

#### Maple Syrup

Maple syrup is not just a sweetener; it’s an experience. It infuses the sticky buns with a rich, natural sweetness and provides a moist texture that enhances each bite. The complexity of its flavor profile pairs beautifully with the pecans, orchestrating a delectable symphony of taste.

#### Pecans

Pecans are the perfect accompaniment to maple, bringing a satisfying crunch and a nuanced nuttiness. They complete the sticky buns, giving them depth and a truly unforgettable flavor.

## Step-by-Step Guide to Perfect Maple Pecan Sticky Buns

### Preparing the Dough

#### Heat and Mix

Begin your journey by gently heating the whole milk and cubed butter until they meld into a smooth mixture. Once cooled, combine it with granulated sugar and a packet of active dry yeast, letting it sit until the yeast foams with life.

#### Kneading Process

Introduce all-purpose flour, salt, and eggs to form a soft, pliable dough. Embrace the rhythm of kneading until the dough becomes smooth. This tactile experience is where the magic begins, and remember—well-kneaded dough is the secret to fluffier, lighter buns.

### Maple Pecan Filling

Combine maple syrup, a generous cup of chopped pecans, brown sugar, melted butter, and a hint of cinnamon. This mixture will serve as the irresistible filling, providing each bun with a burst of flavor.

### Assembling the Sticky Buns

#### Roll and Slice

Roll out the dough into a flat sheet, then spread the rich filling across its surface. Carefully form it into a log, slicing into 12 even pieces that you’ll arrange snugly in a greased baking dish.

#### Refrigeration and Baking

Nestled in their dish, these buns rest overnight in the refrigerator. In the morning, give them a moment to rise and reach room temperature before baking them to golden perfection.

## Pro Tips for Perfect Make-ahead Maple Pecan Sticky Buns

### Timing and Temperature

Remember to let the rolls sit at room temperature before baking. This simple step is essential for achieving buns with the ideal texture and rise.

### Enhancements and Variations

Dare to be creative! Elevate your sticky buns with a dash of additional spices or a drizzle of icing. These tweaks allow you to personalize your morning treat, tailoring it to your taste preferences.

## Conclusion: A Sweet Ending

These maple pecan sticky buns are more than just a dish; they are a culinary embrace, offering warmth and joy with every bite. The ease of make-ahead preparation simplifies your mornings while allowing the complex flavors to leave a lasting impression. By choosing to indulge in these buns, you elevate any occasion to something truly special.

## Frequently Asked Questions

### Can I use a different nut besides pecans?

Absolutely! While pecans offer a fantastic flavor profile, walnuts or almonds can easily substitute. Be mindful that the flavor will vary slightly with different nuts, offering a unique twist each time.

### How long can the prepared buns stay in the refrigerator before baking?

These buns are incredibly accommodating to busy schedules, as they can be refrigerated for up to two days. This flexibility allows you to plan your meals with ease, ensuring you always have a delightful breakfast or brunch option at your fingertips.

### Is it possible to freeze these buns?

Yes, indeed! To freeze, simply prepare the rolls before they undergo their final rise, storing them securely. When you’re ready to bake, allow them to thaw overnight in the refrigerator. This method offers a convenient way to enjoy freshly baked sticky buns whenever the craving strikes.

## Call-to-Action

Now that you’ve discovered the secret to irresistible make-ahead maple pecan sticky buns, why not bring the aroma and flavor into your own kitchen? Try them out this weekend and experience breakfast like never before. Share this recipe with family and friends, and create new memories over these tantalizing treats.

Irresistibly Tangy-Sweet Cranberry Orange Muffins: A Moist Delight

“`html
Jump to Recipe

Cranberry Orange Muffins: A Tangy-Sweet Morning Delight

Imagine savoring a warm, freshly baked muffin that bursts with tangy cranberries, infused with citrusy orange zest—a true explosion of flavors and textures. These Cranberry Orange Muffins are a breakfast dream, wonderfully moist, and irresistibly tangy-sweet. They’re the perfect culinary marriage of tartness and sweetness, making them a permanent fixture in your morning routine or an afternoon snack worth savoring.

Why You’ll Love This Recipe

These Cranberry Orange Muffins are a delightful treat for any time of the day. The combination of fresh cranberries and orange zest creates a beautiful balance between tart and sweet, making each bite a joyful experience. They’re incredibly easy to make, requiring simple ingredients that you likely already have in your pantry.

In addition to their taste and ease, you’ll love the versatility of these muffins. Whether you’re packing a quick breakfast or hosting a brunch, they’re sure to impress. The recipe allows for creative twists, enabling you to adapt the muffins according to seasonal fruits or dietary preferences.

Moreover, these muffins can evoke cherished memories of holiday seasons or brisk autumn mornings, filling your kitchen with a comforting aroma that’s inviting and heartwarming.

Not only do these muffins appeal to your sweet tooth, but they also offer a dose of vitamin C from the oranges and antioxidants from the cranberries, adding a bit of goodness to your day!

Personal Story/Connection

I still remember the first time I baked these Cranberry Orange Muffins on a cold winter morning. The sweet citrus scent combined with the tart freshness of cranberries warmed the house and brought smiles to my family’s faces. They quickly became a beloved recipe, reminiscent of cozy family breakfasts and the joy of sharing homemade treats with loved ones.

Context/Background

The Cranberry Orange Muffin is a classic that draws from the tradition of combining bright, citrusy fruits with berries in baked goods. Historically, cranberries have been a staple in North American cuisine, thriving in its boggy regions and celebrated in various traditional recipes.

Oranges, however, add an intriguing twist, lending their tropical sweetness to this otherwise wild berry muffin. This flavor pairing likely originated as bakers sought new ways to elevate simple muffins with contrasting flavors.

The combination of cranberries and orange is also symbolic of the holiday season, aligning with times of warmth, togetherness, and festive cheer.

Tips for Perfect Cranberry Orange Muffins

  • Always use fresh orange zest for a more vibrant flavor.
  • If using frozen cranberries, do not thaw them to avoid excess moisture in the batter.
  • Gently fold the cranberries into the batter to prevent them from sinking to the bottom.
  • Resist overmixing the batter; stir until just combined for tender muffins.
  • Check muffins with a toothpick at the 20-minute mark to avoid overbaking.

Serving Suggestions

For a breakfast spread, serve these muffins warm with a pat of butter or a drizzle of honey for extra decadence. Pair them with scrambled eggs and bacon for a hearty meal that satisfies.

Consider offering these muffins as part of an afternoon tea, pairing them with a fragrant Earl Grey or a zesty lemon herbal tea to complement their citrusy notes.

During holiday gatherings, present these muffins on a decorative platter with a dusting of powdered sugar for a festive touch that charms guests.

Storage and Leftovers

Store any leftover muffins in an airtight container at room temperature for up to three days to maintain their freshness. For longer storage, refrigerate them for up to a week.

To reheat, pop them in the microwave for a few seconds or warm them in a preheated oven at 325°F for about 5 minutes.

If you have numerous leftovers, consider using these muffins in a creative bread pudding or crumble topping, revamping them into a delectable new dessert.

Recipe Variations and Substitutions

  • For a nutty flavor, add 1/2 cup of chopped walnuts or almonds to the batter.
  • Substitute cranberries with blueberries or raspberries for a different berry experience.
  • To make these muffins vegan, replace the egg with a flax egg and use almond or oat milk instead of regular milk.

FAQ

Can I make this recipe ahead of time? Yes, you can prepare the batter in advance and refrigerate it overnight before baking them fresh the next day.

What substitutions can I use for orange juice? Lemon juice can be a suitable substitute, though it will alter the flavor profile to be more tangy.

How do I make this gluten-free? Use a gluten-free all-purpose flour blend in place of regular flour to accommodate gluten sensitivities.

Optional Nutritional Information

  • Calories: Approximately 180 per muffin
  • Total Fat: 7g
  • Carbohydrates: 28g
  • Protein: 3g

Final Thoughts

These Cranberry Orange Muffins are more than just a baked good—they’re a comforting experience filled with joy and nostalgia. Whether shared with family or savored in solitude, they promise to brighten your day with every bite. Give this recipe a try and share the happiness with others. We’d love to hear how they turned out for you, so feel free to leave a comment or ask questions!

Recipe Section

Serves: 12 muffins | Prep Time: 15 minutes | Cook Time: 20-25 minutes | Total Time: 40 minutes

  • 1 3/4 cups all-purpose flour
  • 1/2 cup sugar
  • 1 tablespoon baking powder
  • 1/2 teaspoon salt
  • 1/2 cup orange juice
  • 1/2 cup milk
  • 1/3 cup vegetable oil
  • 1 egg
  • 1 cup fresh or frozen cranberries, chopped
  • Zest of 1 orange
  1. Preheat oven to 400°F and line a muffin tin with paper liners.
  2. In a large bowl, mix together flour, sugar, baking powder, and salt.
  3. In a separate bowl, whisk together orange juice, milk, oil, and egg.
  4. Pour wet ingredients into the dry ingredients and stir until just combined.
  5. Fold in chopped cranberries and orange zest.
  6. Fill muffin cups 3/4 full with batter.
  7. Bake for 20-25 minutes or until a toothpick inserted in the center comes out clean.
  8. Allow muffins to cool in the pan for 5 minutes before transferring to a wire rack to cool completely.

“`

Irresistible Cranberry Orange Muffins: Tangy-Sweet and Moist Perfection

# Irresistible Tangy-Sweet and Moist Cranberry Orange Muffins

Imagine waking up on a frosty morning, the world outside draped in stillness, and your kitchen slowly filling with a cozy, inviting aroma. There’s something magical about the scent of freshly baked goods that evokes memories, fills your heart with warmth, and satisfies your soul. Cranberry orange muffins, with their delightful mix of tangy cranberries and zesty orange, are more than just a treat; they’re a celebration of flavor and simplicity. These muffins effortlessly transition from a delightful breakfast item to a convenient snack, offering a comforting experience with each bite.

## The Perfect Tangy-Sweet Surprise – Ingredients

Before diving into the baking process, let’s ensure you have everything you need. A clear and concise ingredient list makes all the difference in achieving the perfect muffin.

| **Ingredient** | **Quantity** |
|———————————|————————|
| All-purpose flour | 1 3/4 cups |
| Granulated sugar | 1/2 cup |
| Baking powder | 1 tablespoon |
| Salt | 1/2 teaspoon |
| Unsalted butter, melted | 1/2 cup |
| Milk | 1/2 cup |
| Large eggs | 2 |
| Vanilla extract | 1 teaspoon |
| Fresh or frozen cranberries | 1 cup |
| Zest of 1 orange | |
| Freshly squeezed orange juice | 1/3 cup |

These ingredients combine in a delightful harmony of flavors. The tartness of the cranberries mingles with the sweet and citrusy notes of the orange, creating a muffin that’s bursting with character.

## Directions to Create Your Cranberry Orange Masterpiece

Turning this assortment of ingredients into a culinary masterpiece involves a series of simple, intuitive steps. Follow this guide to craft muffins that are as delightful to gaze upon as they are to devour.

1. **Preheat and Prep the Pan:** Start by preheating your oven to 375°F. Line a muffin tin with paper liners – it’s a small step that makes cleaning up infinitely easier.

2. **Mix Dry Ingredients:** In a large mixing bowl, whisk together the flour, sugar, baking powder, and salt. This dry blend sets the stage for the perfect muffin texture.

3. **Blend Wet Ingredients:** In another bowl, combine the melted butter, milk, eggs, and vanilla extract. Ensure the ingredients are well-blended, allowing the flavors to intermingle effectively.

4. **Combine and Conquer:** Carefully fold the wet ingredients into the bowl of dry ingredients. Stir just enough to integrate, being mindful not to overmix, which could lead to denser muffins.

5. **Add the Star Ingredients:** Gently fold in the cranberries, orange zest, and orange juice. These elements are the stars of the show, infusing your batter with maximum flavor.

6. **Fill and Finish:** Divide the batter evenly among the muffin cups, filling them almost to the brim. This ensures a satisfying muffin size once baked.

7. **Bake to Perfection:** Place your filled tin in the preheated oven and bake for 20 to 25 minutes. A toothpick inserted into the center should come out clean – a sure sign of completion.

8. **Cool Down Before You Enjoy:** Let the muffins cool in the pan for about 5 minutes before transferring them to a wire rack. This step is crucial as it prevents overbaking in hot pans and helps achieve the perfect texture.

## Why These Cranberry Orange Muffins Stand Out

Perfecting this simple recipe involves more than just following steps. It’s about understanding why these muffins captivate taste buds and satisfy cravings.

### Nutritional Benefits

Why just satisfy your sweet tooth when you can nourish your body, too? Cranberries are tiny antioxidants warriors, helping to bolster your immune system and improve overall health. Meanwhile, oranges not only add a burst of flavor but also infuse each muffin with vitamin C and fiber. These muffins are both a treat and a nutrient-rich snack.

### Tips for Best Results

To get the most out of your cranberry orange muffins, consider these suggestions:

– Opt for fresh cranberries when in season. Their natural tartness and juiciness will elevate the muffin’s flavor.
– Avoid overmixing your batter. Fold the ingredients together just until incorporated for muffins that are light and moist.
– Experiment with a sprinkle of raw sugar on top of the batter before baking. It creates a delightful crunchy texture.

## Frequently Asked Questions

We’ve gathered some common questions to guide you through any uncertainties you might face along the way.

**Q1: Can I use frozen cranberries?**

Absolutely! Frozen cranberries are a convenient alternative when fresh ones aren’t available. Use them directly from the freezer without thawing.

**Q2: How do I store these muffins?**

Once baked, keep your muffins fresh by storing them in an airtight container at room temperature for up to three days. For extended storage, freeze them in a sealed container, enjoying them within three months for optimal taste.

**Q3: How can I make these muffins healthier?**

Consider swapping half of the all-purpose flour for whole wheat flour to boost fiber content. You can also replace half the sugar with natural sweeteners like honey or maple syrup for a healthier touch.

## Conclusion

Embarking on the journey to bake these Tangy-Sweet and Moist Cranberry Orange Muffins is an experience that uplifts spirits and tantalizes taste buds. The effortless joy of creating something this delicious from scratch is unmatched. We invite you to explore the pleasure of homemade baking and witness the happiness it brings to others.

### Call to Action

Are you ready to elevate your baking game? Try out this recipe and share your experiences in the comments below. We’d love to hear your personal twists and successes. For more delicious recipes and baking tips, stay connected and keep experimenting in the kitchen. Happy baking!

Deliciously Easy Lemon Blueberry Layer Cake Recipe for Sunshine Sweetness

“`html
Jump to Recipe

Lemon Blueberry Layer Cake: Sunshine Sweet & Super-Moist Delight

Imagine a dessert that captures the essence of a sun-drenched day, each bite a burst of tangy freshness and gentle sweetness. This Lemon Blueberry Layer Cake is a sunshine sweet creation that dances with the vibrant flavors of lemon and blueberry. It’s a super-moist tower of delight that promises to enchant your taste buds and leave your guests craving more.

Why You’ll Love This Recipe

There’s something magical about the combination of lemon and blueberry. Their flavors blend to create a refreshing and zesty sensation that feels like a gentle hug from summer. The cake’s soft, moist texture is kissed by the natural sweetness of blueberries, making it a perfect treat for any occasion.

This recipe is versatile, adaptable for any celebration or quiet afternoon indulgence. It’s simple enough for bakers of all levels, making it a go-to choice for spontaneous gatherings or planned festivities. Whether it evokes memories of cherished family picnics or introduces new ones at a garden party, the cake is a promise of joy and laughter.

The ingredients are straightforward, with a few offering nutritional benefits: lemons are rich in vitamin C, and blueberries bring antioxidants to the table, allowing you to indulge without guilt.

Prepared in just under an hour, it’s an easy yet impressive creation sure to leave an impact. You’ll relish the symphony of flavors and textures that each layer provides.

Personal Story/Connection

Growing up, this cake was a staple at my grandma’s summer gatherings. I remember the excitement I’d feel at seeing her carry it out, the room alive with anticipation. It wasn’t just a cake; it was a symbol of family, laughter, and sunlit afternoons spent chasing bubbles and fireflies. Now, each time I bake it, I’m transported back to those uncomplicated, joy-filled days.

Context/Background

The pairing of lemon and blueberry is a classic one, often found in British and American desserts. Its popularity has surged over time as more people discovered the harmonious blend of tart and sweet. Traditionally, lemon cakes have been favored for their refreshing quality, especially during spring and summer.

Blueberries, native to North America, have long enjoyed a place in various culinary applications, particularly in the Northeastern United States. When combined with the sharpness of lemon, the blueberries add depth and a burst of juiciness that is unrivaled.

Tips for Perfect Lemon Blueberry Layer Cake

  • Room Temperature Ingredients: Ensure butter and eggs are at room temperature for smoother mixing and better texture.
  • Coat Your Blueberries: Toss blueberries in a bit of flour before adding to the batter; this prevents them from sinking.
  • Fresh Is Best: Use fresh lemon juice and zest for the brightest flavor.
  • Don’t Overmix: Once you add the flour, mix gently to prevent a dense texture.
  • Baking Time: Check cakes a few minutes before the recommended time, as ovens vary.
  • Cake Cooling: Cool cakes completely before frosting to avoid melty frosting mishaps.

Serving Suggestions

This lemon blueberry layer cake shines at any event. Its vibrant colors and refreshing taste make it the perfect centerpiece for a summer brunch or a sophisticated tea party. Pair it with a chilled glass of lemonade or a scoop of vanilla ice cream for a truly decadent experience.

For a festive touch, gild the cake with an edible flower crown or arrange a few slices of fresh lemon on top for a visual treat. You might also consider serving it with a light dusting of powdered sugar for added elegance.

To transform a simple family dinner into a memorable occasion, slice the cake generously and watch as the smiles appear with each bite. Its homey yet refreshing qualities make it universally appealing.

Storage and Leftovers

Store the lemon blueberry cake in an airtight container in the refrigerator for up to five days. Its flavors blend beautifully over time, making it just as delightful when served later in the week.

For freezing, wrap individual slices in plastic wrap before placing them in a zip-top bag. Reheat gently in the microwave to restore its just-baked warmth before serving.

Leftover cake can be crumbled and used as a topping for yogurt or added as a surprise layer in parfaits, creating a new dessert experience.

Recipe Variations and Substitutions

Gluten-Free: Substitute all-purpose flour with a gluten-free flour blend to cater to gluten intolerances without compromising on flavor or texture.

Dairy-Free: Replace buttermilk with almond milk mixed with one tablespoon of lemon juice. Substitute butter with a vegan butter alternative.

Citrus Twist: Add fresh orange zest with the lemon for a citrusy twist that intensifies the flavor.

Berry Medley: Incorporate raspberries or blackberries alongside blueberries for a vibrant, mixed berry version.

FAQ

Can I make this ahead of time? Yes, it’s best made a day in advance to allow the flavors to meld. Simply store it covered in the refrigerator.

What substitutions can I use for buttermilk? You can make a homemade version by adding one tablespoon of lemon juice or vinegar to a cup of milk and letting it sit for 5 minutes.

How do I make this gluten-free or vegan? Use quality gluten-free flour and replace dairy ingredients with their plant-based counterparts.

Optional Nutritional Information

  • Calories: Approx. 450 per slice
  • Fat: 22g
  • Carbohydrates: 60g
  • Protein: 5g
  • Fiber: 2g

Final Thoughts

This Lemon Blueberry Layer Cake is more than just a dessert. It’s a celebration of flavor and simplicity—a cake that not only pleases the palate but also stirs the soul. Whether you’re an experienced baker or a kitchen novice, this recipe is your ticket to a crowd-pleasing masterpiece that elevates any occasion. Share your experiences and tips for making this cake even more magical; let’s create a community of lemon blueberry lovers!

Recipe Section

Serves: 8-10

Prep Time: 20 minutes

Cook Time: 30 minutes

Total Time: 50 minutes

  • 1 cup unsalted butter, softened
  • 2 cups granulated sugar
  • 4 large eggs
  • 1 tablespoon lemon zest
  • 3 cups all-purpose flour
  • 1 teaspoon baking powder
  • 1/2 teaspoon baking soda
  • 1/2 teaspoon salt
  • 1 cup buttermilk
  • 1/4 cup fresh lemon juice
  • 1 1/2 cups fresh blueberries
  1. Preheat your oven to 350°F (175°C) and grease and flour three 9-inch round cake pans.
  2. In a large bowl, cream together the butter and sugar until light and fluffy. Beat in the eggs one at a time, then stir in the lemon zest.
  3. In a separate bowl, whisk together the flour, baking powder, baking soda, and salt. Add the dry ingredients to the wet ingredients, alternating with the buttermilk and lemon juice. Mix until just combined.
  4. Gently fold in the blueberries with a spatula.
  5. Divide the batter evenly among the prepared pans. Bake in the preheated oven for 25-30 minutes, or until a toothpick inserted into the center comes out clean.
  6. Allow the cakes to cool in the pans for 10 minutes before transferring to a wire rack to cool completely.
  7. Once the cakes are completely cooled, frost with your favorite lemon cream cheese frosting and top with additional blueberries.
  8. Slice and serve this sunshine sweet and super-moist lemon blueberry layer cake!

“`

Indulge in the Best Sunshine Sweet Super-Moist Lemon Blueberry Cake

# An Easy Recipe for Sunshine Sweet and Super-Moist Lemon Blueberry Layer Cake

## Introduction: The Joy of Baking a Perfect Lemon Blueberry Cake

Creating something delicious and visually captivating in your kitchen fills the heart with joy. Picture the moment you first taste a lemon blueberry cake—the vibrant citrus tang dancing with the sweet burst of blueberries. These flavors can evoke emotions and memories, bringing an unparalleled sense of satisfaction. Imagine the smiles of your loved ones as they gather around your homemade masterpiece—a treat that’s as pleasing to the eyes as it is to the palate. This lemon blueberry cake is more than just a dessert; it’s a means of gathering loved ones, drawing them close to share moments over every delectable slice.

## Ingredients for Sunshine Sweet and Super-Moist Lemon Blueberry Cake

### Main Cake Ingredients
Creating a flavorful and moist cake starts with fresh, high-quality ingredients. Here’s what you’ll need for the cake and the creamy frosting:

| Cake Ingredients | Amount |
|————————————–|—————————–|
| Unsalted butter, softened | 1 cup |
| Granulated sugar | 2 cups |
| Large eggs | 4 |
| Lemon zest | 1 tablespoon |
| Fresh lemon juice | 1/4 cup |
| All-purpose flour | 3 cups |
| Baking powder | 1 teaspoon |
| Baking soda | 1/2 teaspoon |
| Salt | 1/2 teaspoon |
| Buttermilk | 1 cup |
| Fresh blueberries, rinsed and dried | 1 1/2 cups |

### Cream Cheese Frosting Ingredients

| Cream Cheese Frosting Ingredients | Amount |
|————————————–|—————————–|
| Cream cheese, softened | 8 oz. package |
| Unsalted butter, softened | 1/2 cup |
| Powdered sugar | 4 cups |
| Vanilla extract | 1 teaspoon |

With fresh lemon juice and juicy blueberries, your cake is bound to steal the spotlight at any gathering.

## Step-by-Step Directions for Baking

### Preparing the Cake Batter

Crafting the perfect batter is where the magic begins.

1. **Preheat** your oven to 350°F and prepare your cake pans by greasing them or lining with parchment paper.
2. **Cream** the butter and sugar together until the mixture is light and fluffy; this is essential for a tender crumb.
3. **Incorporate** the eggs one at a time, followed by the lemon zest and lemon juice, creating a fragrant base.
4. **Sift** together the dry ingredients—flour, baking powder, baking soda, and salt—in a separate bowl.
5. **Alternate** adding the dry ingredients and buttermilk into your creamed mixture, starting and ending with the dry ingredients.
6. **Fold** in the fresh blueberries gently, being careful not to burst them as you mix.

### Baking the Layers

Divide your batter evenly among the prepared pans. Bake until a toothpick inserted into the center comes out clean, an approximate time of 25-30 minutes. Allow the layers to cool completely before frosting to prevent melting and sliding.

## Crafting the Cream Cheese Frosting

Achieve frosting perfection by blending cream cheese and butter until silky. Gradually add powdered sugar and vanilla extract, continuing to beat until the frosting is smooth and creamy. This rich topping, with its slight tang, pairs divinely with the lemon-infused cake.

## Assembling the Lemon Blueberry Layer Cake

Bringing your cake together is a process of creativity and precision.

– **Layer** each cake tier and spread a generous amount of frosting between each layer.
– **Frost** the entire cake with a thin crumb coat first, then apply a final, smooth layer of frosting.
– **Decorate** with fresh blueberries and optional lemon slices, adding an inviting, elegant touch.

## Tips for Perfecting Your Lemon Blueberry Cake

– **Ingredients Matter**: Choose high-quality, fresh ingredients to ensure the best possible results.
– **Doneness Check**: Use a toothpick to check the cake’s center to ensure it’s fully baked.
– **Cool Completely**: Make sure your cake layers are completely cool before you start frosting to avoid a melted mess.

## Conclusion: Savor the Harmony of Flavors in Each Bite

Baking this lemon blueberry cake is a rewarding endeavor, offering a taste sensation that marries sweetness with the bright tang of citrus. Share this slice of happiness with your friends and family—your fresh, homemade creation is sure to delight and impress.

## FAQ: Sunshine Sweet and Super-Moist Lemon Blueberry Layer Cake

1. **What makes this lemon blueberry cake super-moist?**
– The rich blend of buttermilk and fresh blueberries contributes significant moisture to the cake, ensuring each bite is soft.

2. **Can I substitute frozen blueberries for fresh?**
– You can, although fresh blueberries are preferred to maintain the cake’s balance of moisture and avoid excess water.

3. **How should I store this cake?**
– Store your cake in an airtight container in the refrigerator for up to five days, retaining its freshness and flavor.

4. **What is the best way to ensure my layers are even?**
– For even cake layers, weigh the batter before distributing it among pans, ensuring uniformity in the thickness of each layer.

Embrace the joy of baking and let this easy recipe guide you to creating a cake that’s as beautiful as it is scrumptious. Try it, share it, and spread a little sunshine sweetness wherever you go. Your efforts to craft this delightful dessert will surely be met with appreciative smiles and satisfied appetites. Enjoy the process, delight in the results, and encourage your community of fellow bakers to join in the culinary celebration by sharing this recipe.