Irresistible Pecan Cut-Out Sugar Cookies with Brown Butter Icing

Jump to Recipe

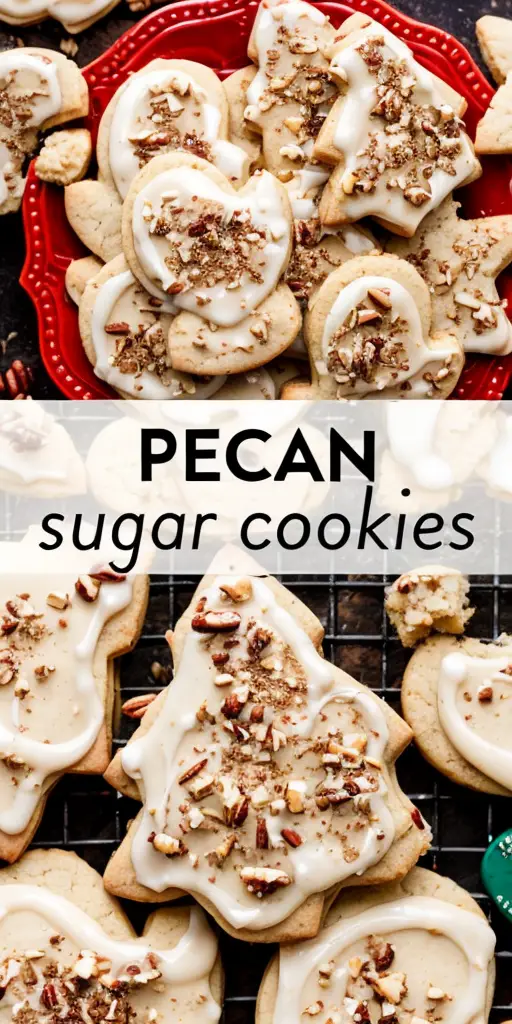
Pecan Cut-Out Sugar Cookies with Brown Butter Icing: A Heavenly Delight

Imagine the melt-in-your-mouth softness of sugar cookies combined with the rich, nutty flavor of brown butter icing. Our Pecan Cut-Out Sugar Cookies with Brown Butter Icing are not just cookies—they’re an experience. The buttery texture and subtle sweetness are perfectly accented by the rich, caramel-like icing that will undoubtedly make these cookies a hit at any gathering.

Why You’ll Love This Recipe

These Pecan Cut-Out Sugar Cookies are a dream come true for anyone seeking a delightful bake that merges tradition with a touch of extravagance. The touch of pecans adds a unique nutty twist to the classic sugar cookie base, offering a delightful crunch that contrasts with the tender dough. Ideal for celebrations, their charming appearance elevates any dessert table, while the nostalgic aroma of brown butter envelops the senses. Easy to prep and bake, these cookies are perfect for both beginners and seasoned bakers. Their flavors invoke memories of festive holidays, making them a comforting treat any time of the year.

Personal Story/Connection

Growing up, baking was a cherished ritual in our family, especially during the holidays. My grandmother would share stories of her childhood as we rolled dough and cut cookies. This recipe holds a special place in my heart as a tribute to those warm, familial moments. The addition of pecans and brown butter icing creates a grown-up version of our cherished tradition, delivering joy to every tasting moment.

Context/Background

The art of cookie cutting dates back centuries, with roots in Europe where elaborately shaped cookies were a festive staple. Sugar cookies, known for their simplicity and adaptability, became popular in the United States during the 1700s, thanks to the Dutch settlers. Over time, these cookies have embraced countless variations. Incorporating brown butter icing into this classic brings a modern twist, marrying traditional baking with gourmet flavors.

Tips for Perfect Pecan Cut-Out Sugar Cookies

  • Ensure your butter is at room temperature for easy creaming with sugar.
  • Chill the dough for at least 30 minutes before rolling to prevent it from sticking.
  • Use a sharp cookie cutter for clean edges and to maintain shape.
  • Toast the pecans lightly to enhance their flavor before adding to the dough.
  • Allow the brown butter to cool slightly before mixing with sugar to prevent runny icing.

Serving Suggestions

These cookies are perfect for any occasion, from holiday parties to simple family gatherings. Arrange them on a decorative platter as the centerpiece dessert at your next event or pair them with a warm mug of spiced tea for a comforting afternoon treat. For a whimsical touch, consider decorating them with sprinkles immediately after icing. On a holiday platter, pair these cookies with an assortment of chocolates and dried fruits to create a visually stunning and tasty display.

Storage and Leftovers

Keep your cookies fresh by storing them in an airtight container at room temperature for up to a week. For longer storage, freeze the cookies before icing them. Let them thaw at room temperature, then add icing once thawed. Leftover cookies can be crumbled as a delicious topping for homemade ice cream or layered in a trifle for a creative dessert.

Recipe Variations and Substitutions

  • Nut-Free: Swap pecans for an extra 1/2 cup of flour for those with nut allergies.
  • Gluten-Free: Use a 1:1 gluten-free flour blend suitable for baking.
  • Vegan: Substitute butter with vegan margarine and egg with flaxseed meal mixed with water.
  • Seasonal Twists: Add a hint of spice by incorporating cinnamon or cardamom into the dough for holiday flavors.

FAQ

Can I make these ahead of time? Yes, you can prepare the dough and freeze it. When ready to bake, allow it to thaw then proceed with the recipe.

What substitutions can I use for pecans? Walnuts or almonds make great substitutes while offering a different flavor profile.

How do I make this gluten-free or vegan? Refer to the variations section for adapting this recipe to gluten-free or vegan diets.

Final Thoughts

These Pecan Cut-Out Sugar Cookies with Brown Butter Icing are more than a dessert—they’re a gesture of love and warmth. Each bite rekindles memories and creates new ones. Perfect for any season, they add that special touch to your culinary repertoire. Share your creations in the comments—we’d love to hear your story and variations!

Recipe Section

Serves: 24 cookies

Prep Time: 15 minutes

Cook Time: 12 minutes

Total Time: 27 minutes

  • 1 cup unsalted butter, softened
  • 1 cup granulated sugar
  • 1 large egg
  • 1 tsp vanilla extract
  • 2 1/2 cups all-purpose flour
  • 1/2 tsp salt
  • 1/2 cup finely chopped pecans

Brown Butter Icing:

  • 1/2 cup unsalted butter
  • 2 cups powdered sugar
  • 1 tsp vanilla extract
  • 2-3 tbsp milk
  1. Cream the butter and sugar until light and fluffy in a large mixing bowl.
  2. Beat in the egg and vanilla extract until well combined.
  3. Gradually add the flour and salt, mixing until the dough comes together.
  4. Fold in the chopped pecans.
  5. Roll out the dough on a floured surface and use cookie cutters to create desired shapes.
  6. Place the cut-out cookies on a baking sheet lined with parchment paper.
  7. Bake at 350°F for 10-12 minutes or until edges are lightly golden.
  8. In a small saucepan, melt the butter over medium heat until golden brown, then remove from heat.
  9. Whisk in the powdered sugar, vanilla extract, and milk until smooth to create the brown butter icing.
  10. Once cookies have cooled, drizzle the brown butter icing over the top.
  11. Allow the icing to set before serving these delicious pecan cut-out sugar cookies.

Irresistible Pecan Sugar Cookies with Decadent Brown Butter Icing

# Pecan Cut-Out Sugar Cookies with Brown Butter Icing: A Holiday Delight

## Introduction

As the first chill of winter settles in, nothing quite compares to the cozy warmth emanating from a kitchen alive with the scents of holiday baking. Imagine the scene: you’re surrounded by clouds of flour, the rhythmic hum of a mixer, and the comforting aroma of cookies baking to perfection. These sensory joys are not just about making something sweet; they’re about crafting memories and traditions that can last a lifetime. With each batch of pecan cut-out sugar cookies topped with rich brown butter icing, you’re not merely baking; you’re weaving a tapestry of nostalgia, evoking recollections of family gatherings, laughter, and the simple pleasures of creating something with love. As you read on, let your mind wander to those cherished moments you’ve had, and discover how you can turn this baking delight into a new family tradition.

## The Magic of Pecan Cut-Out Sugar Cookies

Pecan cut-out sugar cookies offer a unique blend of flavors that delight the senses. The nutty richness of pecans combined with the classic taste of sugar cookies creates an aromatic and buttery treat that’s impossible to resist. Every time you bite into one of these cookies, you’re met with a satisfying crunch followed by a soft, melt-in-your-mouth sensation. It’s a perfect harmony of textures that makes these cookies a standout addition to any dessert spread.

As the holiday season rolls around, these cookies fit seamlessly into festive occasions, from tree-trimming parties to cozy evenings by the fireplace. Yet, their appeal isn’t limited to December alone. These cookies are versatile enough to be enjoyed year-round, offering a taste of warmth and comfort whenever you need it. Whether you’re celebrating with friends and family or savoring a quiet moment alone, these cookies are designed to bring a smile to your face and a bit of magic to your day.

## Ingredients and Preparation Details

Before you begin, gather all your ingredients to ensure a smooth baking experience. Below is a clear guide to everything you’ll need.

| **Cookie Ingredients** | **Quantity** |
|——————————-|————–|
| Unsalted butter, softened | 1 cup |
| Granulated sugar | 1 cup |
| Egg | 1 |
| Vanilla extract | 1 tsp |
| All-purpose flour | 2 1/2 cups |
| Salt | 1/2 tsp |
| Chopped pecans | 1/2 cup |

| **Brown Butter Icing** | **Quantity** |
|——————————-|————–|
| Unsalted butter | 1/2 cup |
| Powdered sugar | 2 cups |
| Vanilla extract | 1 tsp |
| Milk | 2-3 tbsp |

## Baking Directions

### Step-by-Step Guide

1. **Mix and Cream**: Begin by creaming the softened butter and granulated sugar together in a large mixing bowl. This step is crucial for achieving the perfect texture, allowing air to be incorporated, which makes your cookies light and tender. Use a hand mixer or stand mixer for best results, blending until the mixture becomes fluffy and pale.

2. **Dough Formation**: Once creamed, add the egg and vanilla extract to the mixture, beating until fully incorporated. Gradually add the all-purpose flour and salt, mixing at a low speed until just combined. Carefully fold in the chopped pecans, ensuring they’re evenly distributed throughout the dough.

3. **Cut-Out Process**: Roll out the dough on a lightly floured surface to about a quarter-inch thickness. Use your favorite cookie cutters to create festive shapes, transferring the cut-out cookies to a lined baking sheet.

4. **Baking Tips**: Preheat your oven to 350°F (175°C). Bake the cookies for 10-12 minutes, or until the edges begin turning a light golden color. Keep an eye on them, as overbaking can affect their tenderness. Once done, allow the cookies to cool on the baking sheet for a few minutes before transferring them to a wire rack.

## The Art of Brown Butter Icing

### Making Brown Butter

Creating brown butter is an art that adds a depth of flavor that transcends the ordinary. Start by melting unsalted butter over medium heat in a saucepan, swirling occasionally. As it melts, you’ll notice it will start to foam and then turn a golden-brown color, releasing a nutty aroma. Be vigilant during this process, as butter can quickly shift from perfectly browned to burnt. Remove from heat and let it cool slightly.

### Icing Technique

Combine the cooled brown butter with powdered sugar, vanilla extract, and 2-3 tablespoons of milk. Whisk until smooth. The icing should be thick enough to hold its shape but spreadable. For a decorative touch, use a spoon to drizzle over the cooled cookies, creating elegant swirls and patterns.

## Why You’ll Love These Cookies

### Taste and Texture

These pecan cut-out sugar cookies strike the perfect balance between texture and taste. The soft, buttery base pairs beautifully with the crunch of pecans, layered with the smooth, nutty brown butter icing. Each element complements without overpowering, creating a symphony of flavors in every bite.

### Versatility

One of the great things about this recipe is its adaptability. You can change the cookie shapes for different occasions or experiment with additional spices like cinnamon or nutmeg for a seasonal twist. This flexibility ensures that you can make these cookies uniquely yours each time.

### Storage and Shelf-Life

To keep your cookies fresh throughout the holiday season, store them in an airtight container at room temperature. They’ll stay deliciously tender for up to a week, making them perfect for gifting or keeping on hand for unexpected guests.

## Frequently Asked Questions

### Can I make these pecan cut-out sugar cookies with brown butter icing ahead of time?

Yes, you can prepare the dough in advance and freeze it. Roll the dough into a log, wrap it securely, and freeze. When you’re ready to bake, simply thaw the dough in the refrigerator overnight, then proceed with cutting and baking.

### What other nuts can I use in place of pecans?

If you’re looking for a variation, walnuts or almonds make excellent substitutes. Each offers a slightly different flavor profile, while still providing that delightful crunch and complementing the brown butter icing.

## Conclusion

To bring your holiday baking full circle, remember that these pecan cut-out sugar cookies with brown butter icing amplify the joy of creating and sharing. Whether you’re giving them as gifts or serving them at a gathering, you’re offering a piece of warm hospitality and love. This recipe invites you to engage in a sweet tradition that’s bound to be cherished year after year. So roll up your sleeves, preheat that oven, and embrace the magic of baking with loved ones.

## Call-to-Action

Share your cookie-making adventures on social media with the hashtags #PecanCookies and #BrownButterIcing to inspire others and spread the holiday cheer. If you loved this recipe and want more delicious ideas like it, be sure to subscribe to our newsletter. Happy baking, and may your holidays be as sweet as these delightful cookies!

How to Easily Discover and Save Your Favorite Pinterest Pins

“`html
Jump to Recipe

Rainbow Sprinkle Cupcakes: A Burst of Color and Sweet Delight

Imagine biting into a light, fluffy cupcake, with vibrant sprinkles bursting like confetti from each scrumptious mouthful. Rainbow Sprinkle Cupcakes aren’t just a treat for the taste buds—these colorful delights are a festive celebration in every bite. Perfect for parties, special occasions, or a sunny afternoon indulgence, these cupcakes bring joy and vibrancy to any gathering.

Why You’ll Love This Recipe

These Rainbow Sprinkle Cupcakes are a crowd-pleaser for many reasons. Their versatile appeal makes them perfect for both kids and adults alike. The easy preparation means you can whip up a dozen in no time, ensuring a fun and hassle-free baking experience for even novice bakers.

Feel free to indulge without guilt—each cupcake is a sweet pick-me-up that can transform any ordinary day into an extraordinary one. Plus, the vibrant appearance of these cupcakes naturally acts as a mood booster, evoking memories of childhood joys and playful moments.

Personal Story/Connection

Growing up, Rainbow Sprinkle Cupcakes were a staple at every birthday party in our neighborhood. My mom taught me how to make them, and it quickly became our favorite weekend activity. I vividly remember the delight of stirring in the sprinkles, watching them swirl into a kaleidoscope of colors. Those moments are cherished, and with every batch, I’m reminded of a loving home and joyful laughter.

Context/Background

The tradition of funfetti or sprinkle-infused desserts began in the 1980s when bakers sought to add a visual pop to cakes and cupcakes. The colorful elements aren’t just visually appealing but also symbolize celebration and happiness, turning ordinary days into grand events.

Initially popularized in the United States, this trend has now captured global hearts, evolving into myriad forms—from cookies to muffins—yet always retaining its foundational kaleidoscopic charm.

Tips for Perfect Rainbow Sprinkle Cupcakes

  • For the best texture, ensure the butter is softened to room temperature before creaming with sugar.
  • Gently fold in the sprinkles to avoid the colors bleeding into the batter.
  • Use nonpareils rather than jimmies for more vibrant colors.
  • Fill the cupcake liners 3/4 full to achieve a perfectly domed top.
  • Let the cupcakes cool completely before frosting to prevent melting icing.

Serving Suggestions

These cupcakes are wonderful on their own but truly shine with a swirl of creamy vanilla buttercream frosting on top. For an extra touch, consider adding a dollop of whipped cream or a sprinkle of edible glitter for added sparkle.

Serve them as a centerpiece in a colorful dessert table at birthdays, or pair them with a glass of chilled milk or hot cocoa for a cozy evening treat. Complete the experience with party hats and balloons for a celebratory atmosphere.

Storage and Leftovers

To keep your cupcakes fresh, store them in an airtight container at room temperature for up to 3 days. If you’ve layered them with frosting, they can be refrigerated to extend freshness but allow them to reach room temperature before serving for the best texture.

Leftover cupcakes can be crumbled into ice cream as a delightful mix-in, or used as a base for a fun trifle dessert layered with fresh fruits and whipped cream.

Recipe Variations and Substitutions

If you’re looking to tweak this recipe, consider:

  • Gluten-Free: Swap out the regular flour for a gluten-free blend with xanthan gum for structure.
  • Vegan: Use plant-based milk, a vegan butter substitute, and flax eggs as vegan alternatives.
  • Seasonal Twists: Add some zest from citrus fruits for a tangy enhancement or a pinch of cinnamon for warmth.

FAQ

Can I make this ahead of time? Yes, you can bake the cupcakes a day ahead and frost them just before serving to ensure freshness.

What substitutions can I use for milk? Plant-based options like almond or oat milk work well without altering the taste significantly.

How do I make this gluten-free or vegan? Follow the substitutions mentioned in the recipe variations section for a foolproof adaptation.

Optional Nutritional Information

Approximate nutritional information per cupcake:

  • Calories: 250
  • Carbs: 30g
  • Fat: 12g
  • Protein: 3g

Final Thoughts

Rainbow Sprinkle Cupcakes are more than just a treat—they’re a testament to the joy of baking and the simple pleasure of something sweet. Whether you’re a seasoned baker or just starting, these cupcakes offer an opportunity to create delightful memories. We encourage you to try this recipe, share with friends, and let us know your experience. Happy baking!

Recipe Section (Final Element)

Serves: 12 cupcakes

Prep Time: 15 minutes

Cook Time: 18-20 minutes

Total Time: 35 minutes

  • 1 cup flour
  • 1 cup sugar
  • 1/2 cup butter
  • 2 eggs
  • 1 tsp vanilla extract
  • 1/2 cup milk
  • 1/4 cup sprinkles
  • 1/2 tsp baking powder
  • 1/4 tsp salt
  1. Preheat the oven to 350°F and line a muffin tin with cupcake liners.
  2. Cream together the sugar and butter until smooth in a mixing bowl.
  3. Add in the eggs, vanilla extract, and milk. Mix until well combined.
  4. Stir in the flour, baking powder, and salt until just incorporated.
  5. Gently fold in the sprinkles.
  6. Fill each cupcake liner about 3/4 full with the batter.
  7. Bake for 18-20 minutes, or until a toothpick inserted into the center comes out clean.
  8. Allow the cupcakes to cool before frosting and decorating with more sprinkles.
  9. Serve and enjoy your fun and colorful cupcakes!

“`
This WordPress-ready post is crafted with SEO and readability in mind, designed to engage your audience with a combination of rich storytelling, helpful tips, and an easy-to-follow recipe.

Master Pinterest: Discover and Save Your Own Inspiring Pins

# Discover (and Save!) Your Own Pins on Pinterest: The Ultimate Guide to Homemade Honey Garlic Chicken 📌👩‍🍳

## Introduction

### A Taste of Nostalgia
Imagine walking into your home, greeted by the warm, inviting aroma of a home-cooked meal. It’s a sensory experience that evokes memories of cozy family dinners and cherished recipes passed down through generations. Today, the magic of those cherished home-cooked meals meets the digital age, bridging generations through platforms like Pinterest. Let me take you on my journey of discovering a family-favorite recipe for Honey Garlic Chicken on Pinterest, a dish that has not only captured my heart but also the hearts of many who have tasted it.

## Why Pinterest is Your Go-To Platform for Recipe Discovery

### Connect with Culinary Enthusiasts Worldwide
In the world of online exploration, Pinterest reigns supreme for foodies and home cooks alike. It’s a vibrant community where visual discovery drives creativity and inspiration. With millions of recipes at your fingertips, Pinterest allows you to connect with culinary enthusiasts worldwide, sharing ideas and inspirations. The platform’s unique ability to build a personalized digital cookbook makes it an invaluable resource. By saving pins, you quickly create a collection of dishes that cater to your taste, mood, or occasion.

### Optimize Your Food Pins
To make the most of Pinterest’s extensive network, understanding its features is paramount. Use the platform’s tools to organize and save your recipe pins effectively. Create boards categorically—perhaps a board just for chicken recipes, or one dedicated to quick weeknight dinners. This way, accessing your desired recipes becomes seamless. An optimized Pinterest experience means more time to cook and enjoy delicious meals, and less time searching for lost recipes.

## Ingredients for Success: Honey Garlic Chicken Recipe

### The Perfect Ingredient List
Creating a memorable dish begins with the right ingredients. Here’s what you’ll need to whip up a delectable Honey Garlic Chicken:

| Ingredient | Quantity |
|——————————–|————-|
| Boneless, skinless chicken breasts | 1 lb |
| Honey | 1/4 cup |
| Soy sauce | 2 tbsp |
| Garlic, minced | 2 cloves |
| Ground ginger | 1 tsp |
| Red pepper flakes | 1/4 tsp |
| Sliced green onions | 1/4 cup |
| Sesame seeds (garnish) | As needed |
| Cooked white rice | For serving |

Each ingredient plays a crucial role in this savory dish. The chicken provides a hearty base, while honey and soy sauce create an exquisite sweet-salty balance. Garlic and ginger infuse the meal with depth and warmth, while red pepper flakes add just a hint of heat. Green onions introduce a fresh, zesty finish, rounded off by the crunchy garnish of sesame seeds. Serve it over a bed of steaming white rice to soak up every drop of delicious sauce.

## Step-by-Step Directions to Creating Honey Garlic Chicken

### Marinating the Chicken for Maximum Flavor
Unlock the full potential of flavor by marinating your chicken. Here’s how:

1. **Whisk the Marinade**: Combine honey, soy sauce, minced garlic, ginger, and red pepper flakes. Mix until well blended for a harmonious flavor profile.
2. **Prepare the Chicken**: Cut the chicken breasts into bite-sized pieces for even cooking and marination.
3. **Marinate with Precision**: Submerge the chicken in the marinade, ensuring each piece is well coated. Refrigerate for at least 30 minutes, but for optimal flavor, aim for an overnight soak.

Marinating enhances the chicken’s tenderness and intensity of flavor, creating a dish that’s rich and savory with just the right amount of sweetness.

### Cooking with Precision
Once marinated, it’s time to cook this delicious dish:

1. **Preheat the Skillet**: A well-heated skillet is essential for perfect browning. This step locks in the juices while creating a tantalizing caramelized exterior.
2. **Cook to Perfection**: Add the marinated chicken, reserving the extra marinade for later. Cook over medium-high heat until the chicken is browned and cooked through.
3. **Thicken the Sauce**: Pour the reserved marinade into the skillet, allowing it to simmer until thickened. This forms a luscious sauce that clings beautifully to the chicken.

## Enhancing Your Meal with Presentation and Pairings

### Garnishing with Green Onions and Sesame Seeds
Never underestimate the power of garnishing. A sprinkle of sliced green onions and sesame seeds elevates the dish both visually and taste-wise. These elements introduce a burst of fresh flavor and a satisfying crunch, making every bite a delightful experience.

### Perfect Pairings
The right side dishes can transform your Honey Garlic Chicken meal from good to extraordinary. Consider pairing with steamed vegetables for a nutritious balance or opting for fried rice to mirror the dish’s Asian-inspired flavors. The key is to complement, not overpower, the flavors of your main dish.

## FAQs on Discovering and Saving Recipes on Pinterest

**1. How do I save my favorite recipes on Pinterest?**
To save a recipe, simply click the ‘Save’ button on a pin, then select or create a board where you want it stored. This keeps your culinary inspirations organized and easily accessible.

**2. Can I customize this Honey Garlic Chicken recipe?**
Absolutely! You can swap out ingredients based on dietary preferences or what’s available in your kitchen. Suggestions include using tofu for a vegetarian version or adding vegetables like bell peppers or broccoli for added nutrition.

**3. Is there a way to share my successful dishes on Pinterest?**
Yes, Pinterest encourages sharing! After creating a dish, you can pin your own photos and link them back to the original recipe. Share your culinary masterpiece to inspire others in the Pinterest community.

## Conclusion

The simplicity and delight of preparing Honey Garlic Chicken at home is truly rewarding. Easy to make, yet bursting with flavor, it’s a dish that brings warmth and joy to your table. Embrace the benefits of exploring and saving more recipes on Pinterest—it opens a world of culinary possibilities right at your fingertips.

## Call to Action

I invite you to try this Honey Garlic Chicken recipe and experience the joy of creating something delicious. Don’t just stop there—share your experiences and perhaps your unique twists on this recipe with others. Explore related boards and save more pins to inspire your cooking journey. Happy cooking and pinning!

Irresistible Homemade Cornbread Recipe: A Family Favorite Delight

“`html
Jump to Recipe

The Best Cornbread Recipe: A Slice of Warmth and Comfort

Imagine biting into a piece of the best cornbread you’ve ever tasted. Its golden crust gives way to a tender, crumbly interior, hinting at sweetness with every bite. This favorite cornbread recipe offers a delightful blend of rustic cornmeal texture and subtle complexity brought on by the perfect symphony of ingredients. Whether you’re pairing it with a rich stew or enjoying it on its own with a pat of butter, this cornbread is a culinary experience you won’t want to miss.

Why You’ll Love This Recipe

This cornbread is irresistible for its simplicity and flexibility. It’s a one-bowl wonder that’s easy enough for weeknight dinners yet elegant enough for a holiday spread. Not only does its slightly sweet profile make it a family favorite, but it’s also incredibly forgiving – perfect for kitchen novices and seasoned bakers alike.

The appeal of this cornbread lies in its balance. Neither too sweet nor too savory, it serves as the ideal accompaniment to savory dishes, bringing out the best in both.

In addition, it evokes a sense of nostalgia, reminiscent of warm, cozy kitchen gatherings. Each slice holds its own, filled with homey goodness that comforts the soul. Its adaptability also means you can add personal touches like jalapeños for a spicy kick or cheese for extra richness.

Lastly, cornbread is a treasured pantry-friendly recipe. Most ingredients are kitchen staples, ensuring it’s a go-to when you want to whip up something delicious without a trip to the store.

Personal Story/Connection

Cornbread has always been a special recipe in my family, a staple at every Thanksgiving. I remember my grandmother pulling out her well-worn, cast-iron skillet, the one that’s been seasoned by decades of use, and the excitement we’d feel knowing cornbread was on the menu. The buttery aroma would fill the house, making waiting for it to cool the hardest part. Every bite was a comfort, a testament to tradition and togetherness.

Context/Background

Cornbread has its roots deep in Native American history, where it was known as “pone” and made using ground corn. Over time, different regions of the United States adopted it, each adding their unique twist to the recipe. Southern cornbread is renowned for its slightly savory profile and use of buttermilk, while Northern cornbread tends to be sweeter and more cake-like.

This beloved bread has evolved with time, becoming a symbol of communal meals and cultural traditions. Today, cornbread continues to be a versatile treat enjoyed across many dining tables, connecting the generations through its warm, comforting flavors.

Tips for Perfect Cornbread

  • Ensure even mixing but avoid over-mixing to keep the bread tender.
  • Grease the pan thoroughly to prevent sticking and create a golden crust.
  • Preheat your oven fully before baking to ensure consistent cooking.
  • If you prefer a moist cornbread, add a tablespoon of honey or applesauce.
  • For those who love a crispy edge, preheat an oiled cast-iron skillet in the oven before adding the batter.

Serving Suggestions

This cornbread is a perfect side dish for hearty mains like chili, barbecue, or roasted meats. Its subtly sweet flavor provides a delightful contrast to savory dishes. For a more indulgent experience, serve it warm with a spread of honey butter or a spoonful of homemade jam.

On festive occasions, consider serving it as cornbread bites or muffins, which make for mess-free handheld enjoyment. It also pairs wonderfully with a bowl of creamy soup or stew, soaking up the flavors and enhancing each spoonful.

For a Southern-inspired meal, serve alongside collard greens and fried chicken—the classic pairing never disappoints and provides a true taste of comfort food tradition.

Storage and Leftovers

Once cooled, wrap slices of cornbread in aluminum foil or store in an airtight container. It keeps well at room temperature for up to two days. For longer storage, refrigerate it for up to a week, or freeze slices for up to three months.

To reheat, wrap in foil and warm in a 350°F oven for about 10 minutes, or until heated through. You can also microwave slices individually for 20-30 seconds to maintain the softness.

If you find yourself with leftovers, consider using them to make a cornbread stuffing or crumble it into a salad for added texture and flavor. A hearty cornbread pudding is another delicious way to repurpose extra slices.

Recipe Variations and Substitutions

For a healthier twist, substitute half the all-purpose flour with whole wheat flour. This adds a nutty depth to the bread, without compromising its crumbly texture.

To make it gluten-free, use a 1:1 gluten-free baking blend. Similarly, for a vegan version, replace the milk with plant-based alternatives like almond milk and use a flaxseed ‘egg’ (1 tablespoon flaxseed meal + 3 tablespoons water).

Experiment with flavors by adding a cup of sharp cheddar and chopped jalapeños. During autumn, try incorporating canned pumpkin or cinnamon for a seasonal touch.

FAQ

Can I make this ahead of time?

Yes, you can prepare the batter a day in advance and store it in the refrigerator. Allow it to sit at room temperature for about 20 minutes before baking.

What substitutions can I use for milk?

Feel free to use any dairy-free milk such as almond, soy, or oat milk as a substitute. For added richness, buttermilk is also a great alternative.

How do I make this gluten-free or vegan?

For gluten-free cornbread, replace the flour with a gluten-free blend. To adapt for vegans, use a plant-based milk and replace the egg with a flaxseed mixture.

Optional Nutritional Information

  • Calories per Serving: Approximately 180
  • Total Fat: 7g
  • Carbohydrates: 26g
  • Protein: 3g

Final Thoughts

This cornbread recipe is a true testament to the joys of homemade baking. Its versatility and comforting taste are sure to be a hit with family and friends alike. We encourage you to give this recipe a try and discover its delightful simplicity. Don’t forget to share your creations and let us know your favorite variations!

Recipe Section

Serves: 9 | Prep Time: 10 minutes | Cook Time: 20-25 minutes | Total Time: 35 minutes

  • 1 cup all-purpose flour
  • 1 cup yellow cornmeal
  • 1/4 cup granulated sugar
  • 1 tablespoon baking powder
  • 1 teaspoon salt
  • 1 cup milk
  • 1/3 cup vegetable oil
  • 1 egg
  1. Preheat oven to 400°F (200°C) and grease a 9×9 inch baking pan.
  2. In a large bowl, mix together the flour, cornmeal, sugar, baking powder, and salt.
  3. In a separate bowl, whisk together the milk, vegetable oil, and egg.
  4. Pour the wet ingredients into the dry ingredients and stir until just combined.
  5. Pour the batter into the prepared baking pan and smooth the top.
  6. Bake for 20-25 minutes, or until a toothpick inserted into the center comes out clean.
  7. Allow to cool slightly before cutting into squares and serving.

“`

Irresistible Homemade Cornbread Recipe: A Family Favorite Delight

# Discover This Favorite Cornbread Recipe: A Cheesy Twist on a Classic

## Introduction: A Taste of Comfort

Imagine the warmth of a kitchen filled with the rich aroma of fresh cornbread, a scent that has an unparalleled ability to provide a cozy sense of nostalgia. For many, it brings back memories of family meals, festive occasions, or simply the delight of a fresh bake straight from the oven. This cherished cornbread recipe melds the traditional with a delightful cheddar cheese infusion and the option for some zesty jalapeño heat. Get ready for a treat that might just become your family’s new staple.

## Essential Ingredients for Your Cheesy Cornbread

Before embarking on this culinary journey, let’s gear up with the essentials. Here’s exactly what you’ll need to create our deliciously cheesy cornbread with ease.

### Ingredients Table

| Ingredient | Quantity |
|——————————|——————|
| Cornmeal | 1 cup |
| All-purpose flour | 1 cup |
| Granulated sugar | 1/4 cup |
| Baking powder | 1 tablespoon |
| Salt | 1 teaspoon |
| Milk | 1 cup |
| Vegetable oil | 1/4 cup |
| Eggs | 2 |
| Cream-style corn (14.75 oz) | 1 can |
| Shredded cheddar cheese | 1 cup |
| Optional: Sliced jalapeños | As desired |

Keep this list handy while shopping—it’s your guide to a foolproof kitchen stock-up for an unforgettable homemade cornbread.

## Mastering the Art of Cornbread: Step-by-Step Directions

Creating this cornbread masterpiece is straightforward. Simply follow these detailed steps.

### Preparing the Oven and Baking Dish

Start by preheating your oven to a toasty 400°F. The right temperature is critical for that perfect golden crust. Next, grab a 9×9 baking dish and grease it thoroughly. This ensures your cornbread will smoothly slide out, preventing any baking fiascos.

### Mixing Ingredients

#### Dry Ingredients

In a spacious mixing bowl, combine your dry elements: cornmeal, flour, sugar, baking powder, and salt. Mix with care so each component is evenly distributed – the foundation of your cornbread texture depends on it.

#### Wet Ingredients

In a separate bowl, whisk together the milk, vegetable oil, and eggs. This mixture should be smooth, signaling that you’re set to integrate the flavors seamlessly.

### Combining and Baking the Cornbread

Pour the wet ingredients into the dry, slowly and deliberately, mixing until just combined. Be cautious not to overwork the batter – a gentle mix ensures your cornbread stays moist. Introduce the cream-style corn and cheddar cheese into the mix. Want a spicy kick? Add some sliced jalapeños for that edge. Once combined, pour the batter into your prepped baking dish. Place it in the oven and bake for 25-30 minutes. A clean toothpick test in the center will confirm it’s ready.

### Serving Suggestions

Allow your cornbread to cool slightly to lock in its flavors before slicing. Serve as a companion to chili, hearty stews, or a steaming bowl of soup for a meal that’s both comforting and complete.

## The Secret to Perfect Cornbread

### Consistency Matters

For perfect cornbread, consistency is king. Too dry and it crumbles; too moist and it’s more cake than bread. The balance comes from precise ingredient ratios and mindful mixing.

### Cheese Selection

Opt for a sharp cheddar to bring out the savories or try mild varieties for a more subdued taste. The right cheese can transform your cornbread from traditional to gourmet.

## Frequently Asked Questions

### What Makes This Cornbread Recipe Special?

This recipe excels due to its creamy corn and cheddar infusion, resulting in a moist texture with a savory edge that’s utterly irresistible.

### Can I Substitute Any Ingredients?

Absolutely! Whole wheat flour can replace all-purpose for a healthier alternative. Feel adventurous? Try different cheeses for new flavor dimensions.

### How Should I Store Leftovers?

Keep any leftover cornbread in an airtight container at room temperature for up to three days. Want it to last longer? Place it in the fridge to extend its shelf life up to a week.

## Conclusion

Embark on a journey of comfort with this beloved cornbread. Its unique blend of flavors is a testament to the joy of home baking. It’s time now to share this cheesy cornbread delight with those you cherish most. Savor, share, and enjoy the beautiful simplicity of a well-crafted bake. Now, bring your new favorite recipe to the table and create memories with a dish that speaks volumes of warmth and love.

### Call to Action

Ready to fire up your oven? Gather your ingredients, roll up your sleeves, and transform your kitchen into a haven of delightful aromas. Share your cornbread success story with friends and family, and tag us in your culinary creations—because great recipes are meant to be shared!

Easy Homemade Rosemary Garlic Pull Apart Bread Recipe

“`html
Jump to Recipe

Rosemary Garlic Pull Apart Bread: A Fragrant Delight for Every Occasion

Imagine the delightful aroma of fresh rosemary blending harmoniously with the rich scent of garlic wafting through your kitchen. Our Rosemary Garlic Pull Apart Bread is a culinary delight that’s crisp on the outside yet fluffy on the inside, offering a beautiful, golden crust that gently pulls apart to reveal its soft center. With each bite, you’ll experience a symphony of flavors that dance on your tongue, making it a perfect centerpiece for any meal.

Why You’ll Love This Recipe

There’s something utterly enchanting about the combination of rosemary and garlic. This bread brings together extraordinary flavors with the simplicity of a homemade dough, providing a comforting essence reminiscent of a rustic Italian bakery.

One of the joys of this recipe is its versatility. Whether served as an appetizer, alongside soups and salads, or simply enjoyed on its own, its rich taste never fails to impress. Moreover, the recipe is straightforward, even for novice bakers, making it an enjoyable kitchen endeavor.

Health enthusiasts will appreciate its modest use of olive oil for moisture and flavor, making it a guilt-free indulgence. The bread’s inviting aroma and luscious texture foster a sense of warmth and comfort, perfect for sharing with family and friends.

Personal Story/Connection

Every time I bake this Rosemary Garlic Pull Apart Bread, I’m transported back to a summer evening spent at my grandmother’s house. The herbal scent of fresh rosemary, picked straight from her garden, seemed to fill the room as she pulled the beautifully browned loaf out of the oven. It wasn’t just bread; it was a shared experience of love and tradition that made every family gathering special.

Context/Background

Pull apart bread, often associated with American culinary traditions, has found its place in home kitchens worldwide due to its ease of preparation and sharing-friendly form. Although flavored breads have ancient roots in Mediterranean cultures, adding herbs and spices to bread is a practice that has evolved significantly.

Rosemary itself holds a proud place in history, symbolizing remembrance and loyalty, frequently used in both culinary and medicinal contexts. Combined with garlic, an age-old seasoning, this bread encapsulates a rich cultural tapestry that spans continents and centuries.

Tips for Perfect Rosemary Garlic Pull Apart Bread

  • Ensure your yeast is active by checking its expiration date and using warm, not hot water.
  • Knead the dough until it becomes smooth and elastic to ensure a light, airy texture.
  • If the dough is too sticky, incorporate extra flour gently without over-kneading.
  • Rising time can vary based on room temperature; wait until it doubles in size.
  • Customize the size of dough balls based on your preference for bread texture.
  • Brush melted butter generously for a rich flavor and a shiny, golden crust.

Serving Suggestions

This Rosemary Garlic Pull Apart Bread is a versatile dish that pairs wonderfully with numerous meals. Serve it alongside a hearty tomato bisque for a comforting lunch or dinner. The bread also acts as a fantastic companion to a charcuterie board, offering robust flavors that complement various cheeses and meats.

If you’re hosting a casual gathering, consider serving the bread warm with infused olive oils for dipping or using it as a base for bruschetta topped with fresh tomatoes and basil. Take it up a notch by adding caramelized onions and mozzarella for a savory treat.

Storage and Leftovers

To keep your bread fresh, store it in an airtight container at room temperature for up to two days. For longer preservation, consider storing it in the refrigerator, where it can last up to a week.

Reheat the bread in the oven at 350°F for about 10 minutes to retain its original crispiness and softness. Leftover bread can be transformed into a delightful crouton for salads or soups by cutting it into cubes, drizzling with olive oil, and baking until golden.

Recipe Variations and Substitutions

For those with dietary restrictions or preferences, consider trying these variations:

  • Gluten-Free: Substitute all-purpose flour with a gluten-free flour blend. Ensure your yeast is gluten-free as well.
  • Vegan: Use a vegan butter substitute for brushing the bread top and skip the butter altogether in the dough.
  • Cheesy Twist: Add shredded cheddar or mozzarella between the dough balls for an oozy, cheesy version.
  • Seasonal Herbs: Swap rosemary for other fresh herbs like thyme or basil for a seasonal twist.

FAQ

Can I make this ahead of time? Yes, you can prepare the dough a day in advance and let it rise slowly in the fridge overnight. Bring it to room temperature before baking.

What substitutions can I use for the rosemary? Substitute with thyme or oregano for a different flavor profile.

How do I make this gluten-free? Use a reliable gluten-free baking mix and ensure all ingredients are certified gluten-free.

Optional Nutritional Information

  • Calories per serving (1 slice): Approximately 160
  • Carbohydrates: 21g
  • Protein: 3g
  • Fat: 7g

Final Thoughts

Our Rosemary Garlic Pull Apart Bread is a simple yet delightful way to infuse any meal with a touch of artisan flair. Whether for a festive occasion or a cozy family dinner, this bread is a surefire crowd-pleaser. I encourage you to try this recipe, make it your own, and share your experiences with us. Baking brings us all closer, and this recipe is a testament to that joy.

Recipe Section

Serves: 8 | Prep Time: 1 hour 30 minutes | Cook Time: 30 minutes | Total Time: 2 hours

  • 2 1/2 cups all-purpose flour
  • 1 cup warm water
  • 2 1/4 tsp active dry yeast
  • 1 tsp sugar
  • 1/4 cup olive oil
  • 2 cloves garlic, minced
  • 1 tbsp fresh rosemary, chopped
  • 1/2 tsp salt
  • 1/4 cup butter, melted
  1. In a bowl, combine warm water, yeast, and sugar. Let it sit for 5 minutes until frothy.
  2. Add in flour, olive oil, garlic, rosemary, and salt. Mix until a soft dough forms.
  3. Knead the dough on a floured surface until smooth. Place in a greased bowl, cover, and let it rise for 1 hour.
  4. Punch down the dough and divide into small balls. Place them in a greased loaf pan.
  5. Cover and let it rise for another 30 minutes. Preheat the oven to 375°F.
  6. Bake the bread for 25-30 minutes until golden brown.
  7. Brush melted butter on top and sprinkle with additional rosemary.
  8. Serve warm and pull apart to enjoy the delicious flavors.

“`

Irresistible Rosemary Garlic Pull Apart Bread: A Flavorful Homemade Delight

# Easy and Flavorful Rosemary Garlic Pull Apart Bread Recipe

## Introduction: Bringing Warmth to Your Table

There’s something magical about the scent of freshly baked bread, isn’t there? Especially when it intertwines with the savory aroma of garlic and the woodsy fragrance of rosemary. Transport yourself to cozy gatherings and laughter-filled evenings with our Rosemary Garlic Pull Apart Bread. Not just a recipe, but a nostalgic journey into moments of joy and comfort.

## Ingredients and Essentials: What You Need

### Gathering Ingredients for Rosemary Garlic Pull Apart Bread

Ready to create a bread that’s both easy and indulgent? Here’s a comprehensive list to guide you through the process. Each component is a building block in crafting a masterpiece that pleases both the eyes and the palate.

– **French bread**: 1 loaf, fresh for optimal texture.
– **Unsalted butter**: 1/2 cup, melted to marry flavors beautifully.
– **Garlic**: 3 cloves, minced to release its full flavor.
– **Fresh rosemary**: 1 tablespoon, finely chopped for a robust aroma.
– **Salt**: 1/2 teaspoon to enhance every bite.
– **Black pepper**: 1/4 teaspoon for a subtle kick.
– **Mozzarella cheese**: 1 cup, shredded to perfection.
– **Fresh parsley**: Chopped for garnish, offering a fresh pop of color.

### Essential Kitchen Tools for Success

Before diving into this culinary adventure, make sure your kitchen is equipped with these key tools to ensure a seamless bread-making experience:

– **Serrated knife**: For precise cuts.
– **Baking sheet**: To host your bread masterpiece.
– **Parchment paper**: For easy cleanup.
– **Small mixing bowl**: To mix those delightful flavors.
– **Pastry brush**: For even distribution of your buttery blend.
– **Aluminum foil**: Helps retain moisture and encourages even baking.

## Step-by-Step: Creating Your Bread Delight

### Preparing the Bread

1. **Preheat the Oven**: Warm up your oven to 375°F and prepare a baking sheet lined with parchment paper – this way, cleaning up will be a breeze.

2. **Slice the Bread**: Take your serrated knife in hand and gently carve out a grid pattern into your French loaf, being cautious not to slice all the way through the bottom crust. This is where each piece will be infused with flavors.

### Infuse with Flavor

3. **Mix the Ingredients**: In a small bowl, blend together the melted butter, minced garlic, rosemary, salt, and pepper. This mixture is the magic that transforms each bite.

4. **Brush the Bread**: With your pastry brush, generously slather this aromatic concoction into every cut and over the top of the bread, ensuring no crevice is left untouched.

### Add the Cheese and Bake

5. **Cheese it Up**: Lavishly sprinkle your mozzarella cheese across the bread, making sure it nestles into each nook and cranny for melt-in-your-mouth goodness.

6. **Bake**: Envelop the loaf in foil, leaving the top open to allow the cheese to melt. Bake for 15-20 minutes until your kitchen fills with the tantalizing aroma of melted cheese and herbs. For a delightful golden crust, remove the foil and bake for an additional 5 minutes.

## Serving Your Culinary Masterpiece

### Final Touches Tied to Perfection

7. **Garnish and Serve**: Add a charming sprinkle of fresh chopped parsley over the warm bread, providing a vibrant, fresh twist that heightens both flavor and presentation. Serve it hot – a treat for senses and taste buds alike.

### Perfect Pairings for Your Bread Marvel

Amplify your meal experience by pairing your Rosemary Garlic Pull Apart Bread with these well-loved dishes:

– **Creamy Tomato Soup**: A classic combination that’s bound to comfort.
– **Grilled Chicken Salad**: Light and refreshing to balance the richness.
– **Classic Spaghetti Bolognese**: Embrace a filling meal with a touch of elegance.

## FAQs: Your Questions Answered

### How can I store leftover Rosemary Garlic Pull Apart Bread?

No reason to waste a morsel! Simply wrap any leftover slices in foil and pop them in the fridge. They’ll remain fresh for up to 3 days. When the craving hits again, reheat in the oven to recapture that deliciously fresh baked feel.

### Can I use different types of cheese?

Absolutely! Feel free to be adventurous. Cheddar, gouda, or any melt-friendly cheese makes for intriguing variations.

### Is it possible to prepare this bread in advance?

Indeed it is. Assemble everything ahead of time and store it in the fridge. Bake it just before you plan to indulge, ensuring it’s warm and freshly-out-of-the-oven good.

## Conclusion: Elevate Every Meal with Joy

Our Rosemary Garlic Pull Apart Bread isn’t just an appetizer or side dish; it’s a delightful experience waiting to unfold. Whether shared with friends, family, or savored in solitary comfort, this bread is a testament to the joy of simple pleasures. So, roll up your sleeves, ignite your oven, and invite a heartwarming aroma into your home. Enjoy every moment of the baking journey! Happy baking!

Looking to share your masterpiece or discover more culinary delights? Join our community and explore delicious recipes that bring people together.

How to Easily Discover and Save Your Pins on Pinterest

“`html
Jump to Recipe

Teriyaki Chicken Skewers: A Flavorful Grilling Delight

Imagine smoky, juicy bites of perfectly grilled chicken interspersed with sweet pineapple and crisp vegetables, all kissed with a savory teriyaki glaze. The Teriyaki Chicken Skewers are a harmonious blend of flavors and textures, offering a taste of summer all year round. This vibrant dish is not just a feast for the palate but a joy to behold, making it a must-try for grill enthusiasts and those seeking culinary adventure.

Why You’ll Love This Recipe

What makes the Teriyaki Chicken Skewers so special? Firstly, their sheer versatility means they can shine in any setting, from a relaxed family dinner to a festive barbecue. The interplay of savory teriyaki sauce with the sweetness of grilled pineapple offers a taste explosion that is both satisfying and exciting.

Preparing these skewers is also a breeze, with minimal ingredients and steps, making it perfect for busy weeknights. The health-conscious will appreciate that the recipe is low in fat, thanks to lean chicken thighs, and loaded with nutritious vegetables like bell peppers and onions.

Beyond its deliciousness and simplicity, these skewers are guaranteed to evoke nostalgic memories of summer barbecues, fostering joy and togetherness among loved ones.

Personal Story/Connection

Growing up, summer evenings at my house were synonymous with the enticing aroma of grilled goodies wafting from the backyard. My father was the grill master, and teriyaki chicken skewers quickly became a family favorite. We loved creating vibrant patterns with the colorful ingredients, each bite bringing a delightful taste of summer. This dish continues to serve as a cherished reminder of family gatherings and sunny days spent outdoors.

Context/Background

Teriyaki, a cooking technique rooted in Japanese cuisine, involves grilling or broiling foods with a glaze of soy sauce, sake, and sugar. Though it originated in Japan, teriyaki flavors have been widely embraced across the globe, evolving to incorporate fruits like pineapple.

Incorporating fruits such as pineapple into teriyaki dishes adds a North American twist, popularized in the 1950s during the advent of tiki culture, which celebrated tropical-inspired foods and drinks.

Tips for Perfect Teriyaki Chicken Skewers

  • Marinate longer for deeper flavor: If you have time, marinate the chicken overnight.
  • Soak wooden skewers in water for 30 minutes to prevent burning on the grill.
  • Cut ingredients uniformly to ensure even cooking.
  • Use fresh pineapple for the best flavor and texture.
  • Preheat your grill for a perfect sear and to lock in juices.
  • Brush more teriyaki sauce during grilling for an extra-glorious glaze.

Serving Suggestions

While these skewers are delightful on their own, serving them alongside fluffy jasmine rice or savory fried rice makes a hearty meal. For a healthier option, pair them with a crisp garden salad or a side of grilled vegetables.

For an elegant presentation, consider serving the skewers on a large platter garnished with fresh cilantro or green onions. For a complete tiki-inspired feast, accompany them with refreshing fruit cocktails or non-alcoholic tropical punch.

These skewers are also perfect for meal prep — simply remove the cooked chicken and vegetables from the skewers and store them in meal prep containers for an easy, flavorful lunch throughout the week.

Storage and Leftovers

To store leftover skewers, remove chicken and vegetables from the skewers, and transfer to an airtight container. Refrigerate for up to 3 days.

Reheat by microwaving or gently warming on a skillet with a splash of water to maintain moisture. For a quick meal, repurpose leftovers into a hearty salad or a flavorful sandwich with your choice of bread and toppings.

Recipe Variations and Substitutions

For a spicy kick, add a sprinkle of chili flakes or a splash of sriracha to the marinade. Vegetarians can swap chicken with firm tofu or tempeh, ensuring to marinate them adequately for full flavor absorption.

For a gluten-free version, use tamari instead of standard soy-based teriyaki sauce. Incorporate seasonal vegetables like zucchini or cherry tomatoes for a fresh twist each season.

FAQ

Can I make this ahead of time? Yes, marinate the chicken the night before and assemble the skewers in advance. Grill them fresh for the best flavor.

What substitutions can I use for red bell pepper? Green, yellow, or orange bell peppers work great. For a spicier touch, try poblano peppers.

How do I make this gluten-free? Use gluten-free teriyaki sauce, readily available in most stores.

Optional Nutritional Information

  • Calories per serving: Approximately 300-350
  • Protein: 30g
  • Carbohydrates: 25g
  • Fat: 10g

Final Thoughts

Whether you’re seeking a quick weeknight dinner or an impressive dish for your next grill party, Teriyaki Chicken Skewers are sure to deliver a satisfying mix of sweet, savory, and tangy flavors. Give this recipe a try and let it become a cherished part of your culinary repertoire. Dive into the taste adventure and share your experience or questions in the comments below!

Recipe Section

Teriyaki Chicken Skewers

Serves: 4

Prep Time: 40 minutes

Cook Time: 12 minutes

Total Time: 52 minutes

  • 1 lb boneless, skinless chicken thighs
  • 1 cup teriyaki sauce
  • 1 pineapple, sliced
  • 1 red bell pepper, sliced
  • 1 red onion, sliced
  • 1 tbsp olive oil
  • Salt and pepper to taste
  • Skewers
  1. Cut the chicken thighs into bite-sized pieces and marinate them in teriyaki sauce for at least 30 minutes.
  2. Preheat the grill to medium-high heat.
  3. Thread the marinated chicken, pineapple slices, bell pepper, and red onion onto the skewers, alternating for a colorful presentation.
  4. Drizzle olive oil over the assembled skewers and season with salt and pepper.
  5. Grill the skewers for about 10-12 minutes, turning occasionally, until the chicken is cooked through and the vegetables are slightly charred.
  6. Serve the teriyaki chicken skewers hot off the grill and enjoy the delicious flavors!

“`

Master Pinterest: Discover and Save Unique Pins Effortlessly

# Savory Delights Await: Discover (and Save!) Your Own Pins on Pinterest with this Asian-Inspired Chicken Stir-Fry

## Introduction: Embracing Culinary Creativity

**Engaging Opening:**

There’s a certain magic in the air when you first scroll through Pinterest in search of culinary inspiration. Picture this: a quiet Sunday afternoon, a cup of warm tea in hand, the anticipation of discovering a new recipe that promises to be your next family favorite. I remember the day I stumbled upon a vibrant pin that showcased an irresistible chicken stir-fry, its vibrant colors popping against my screen. In that moment, Pinterest wasn’t just a digital scrapbook; it was a gateway to a world of flavors, waiting to be explored in my very own kitchen. There’s something incredibly satisfying about trying a new recipe at home, echoing Pinterest’s promise of creative exploration. The sense of accomplishment when the dish comes together beautifully—a blend of aromas and flavors inspired by a simple online find—is unparalleled.

**Emotional Appeal:**

There’s a universal love for delicious, home-cooked meals that warms not just our bellies but our hearts. The joy of customizing a meal, the freedom to tweak it to our tastes—these make each dish uniquely ours. Whether you’re a seasoned home chef or someone just beginning their culinary journey, the fun lies in the creativity, in crafting a meal that is both delicious and an expression of your personality.

## Why Pinterest is the Ultimate Culinary Playground

### Discover New Recipes:

Pinterest stands as a vibrant collection of inspiration—where recipes are as creative as they are diverse. It’s a dynamic platform where you can stumble upon unique food ideas that you might never have considered on your own. Delve into this endless stream of culinary art, where each pin serves as a potential avenue to expand your gastronomic horizon. It’s more than just discovering; it’s about sharing these gems with friends and family, saving pins for future culinary escapades. Your Pinterest boards become a personalized cookbook, filled with only the most tantalizing selections you’ve curated yourself.

### Personalization and Creativity:

Ever felt like a recipe was nearly perfect, but not quite? Pinterest offers the perfect opportunity to adapt and modify recipes to suit your preferences. Save your variations for easy access and to inspire others. Perhaps you prefer your stir-fry a little spicier or want to incorporate seasonal veggies—Pinterest not only allows but encourages you to make these edits, fostering a sense of culinary agency and creativity. Your pins transform into your culinary playground, where no two meals have to be the same.

## The Perfect Sweet & Savory Chicken Stir-Fry Recipe

If you’re ready to embark on a new cooking adventure, try this sweet and savory chicken stir-fry that’s as delicious as it is Pinterest-worthy.

### Ingredients Breakdown:

Here’s what you’ll need to create your masterpiece. This organized table makes your shopping and cooking experience seamless and straightforward.

| Ingredient | Quantity |
|——————————————-|———–|
| Chicken breast, cut into bite-sized pieces| 1 lb |
| Soy sauce | 1/4 cup |
| Honey | 2 tbsp |
| Sesame oil | 1 tbsp |
| Garlic, minced | 2 cloves |
| Ginger, grated | 1 tsp |
| Pineapple chunks | 1/2 cup |
| Red bell pepper, diced | 1 |
| Red onion, sliced | 1/2 |
| Cooked white rice | 2 cups |
| Sesame seeds and green onions for garnish | As needed |

### Step-by-Step Directions for the Ultimate Chicken Stir-Fry

1. **Marinate the Chicken:**
– Combine soy sauce, honey, sesame oil, garlic, and ginger in a bowl. Immerse the chicken pieces in this concoction, allowing them to marinate for at least 30 minutes to infuse them with rich flavors.

2. **Sizzle and Fry:**
– In a hot skillet, place the marinated chicken, cooking it thoroughly for about 5 to 7 minutes until it’s succulent and cooked through.

3. **Mix and Stir:**
– Add the pineapple, bell pepper, and onion to the skillet. Stir-fry all ingredients together until the vegetables soften, usually taking around 5 minutes.

4. **Serve and Garnish:**
– Lay your savory stir-fry on a bed of cooked white rice. Add a sprinkle of sesame seeds and fresh green onions for a touch of color and extra flavor.

## The Joy of Experimenting with Flavor Combinations

### Why Pineapple and Chicken Make the Perfect Match:

The partnership between pineapple and chicken is an exquisite dance of flavors—where the sweet, tangy pineapple harmonizes with the savory, juicy chicken. This combination is adored by many, not only for its delightful taste but also for its striking balance. It’s no surprise that this pairing gets plenty of pins and likes on Pinterest, making it a must-try for culinary explorers.

## FAQs About Pinterest and Cooking

### Is Pinterest Good for Finding New Recipes?

Absolutely, Pinterest is a goldmine for culinary inspiration. Its platform is designed for visual learners, featuring stunning images of meals that tell you what to expect before you dive into the recipe. Each pin is a possibility, each board a promise of the delicious adventures you can embark on.

### How Can I Save and Organize My Favorite Pins?

Pinterest’s organizational tools are intuitive and user-friendly. Create boards for different types of meals or occasions, and use sections within these boards to categorize your pins even further. This ensures you have easy access to the perfect recipe at all times.

### What Are Some Popular Hashtags for Recipes on Pinterest?

To enhance your Pinterest experience, using popular hashtags is key! Examples include #ChickenStirFry, #PineappleChicken, #AsianInspired, and #EasyDinner. Such hashtags help categorize and streamline your search for culinary inspiration.

## Conclusion: Unleash Your Inner Chef with Pinterest Inspirations

As you close your Pinterest app or browser, carry with you the spirit of creativity and inspiration it fosters. Each scroll could be the start of your next culinary adventure. Embrace the challenge, experiment with flavors, and don’t be afraid to make each recipe your own. The satisfaction of crafting meals that look and taste as if they’ve leaped straight off a Pinterest board is your reward.

### Call to Action:

Now, armed with this delightful chicken stir-fry recipe, it’s your turn to bring it to life! Savor the experience, share your dish, capture your modifications and creations, and spread them on Pinterest and other social media platforms. You never know who you’ll inspire next!