Indulge in Irresistible Chocolate Pecan Caramel Truffles Delight

“`html

Chocolate Pecan Caramel Truffles: A Gourmet Indulgence

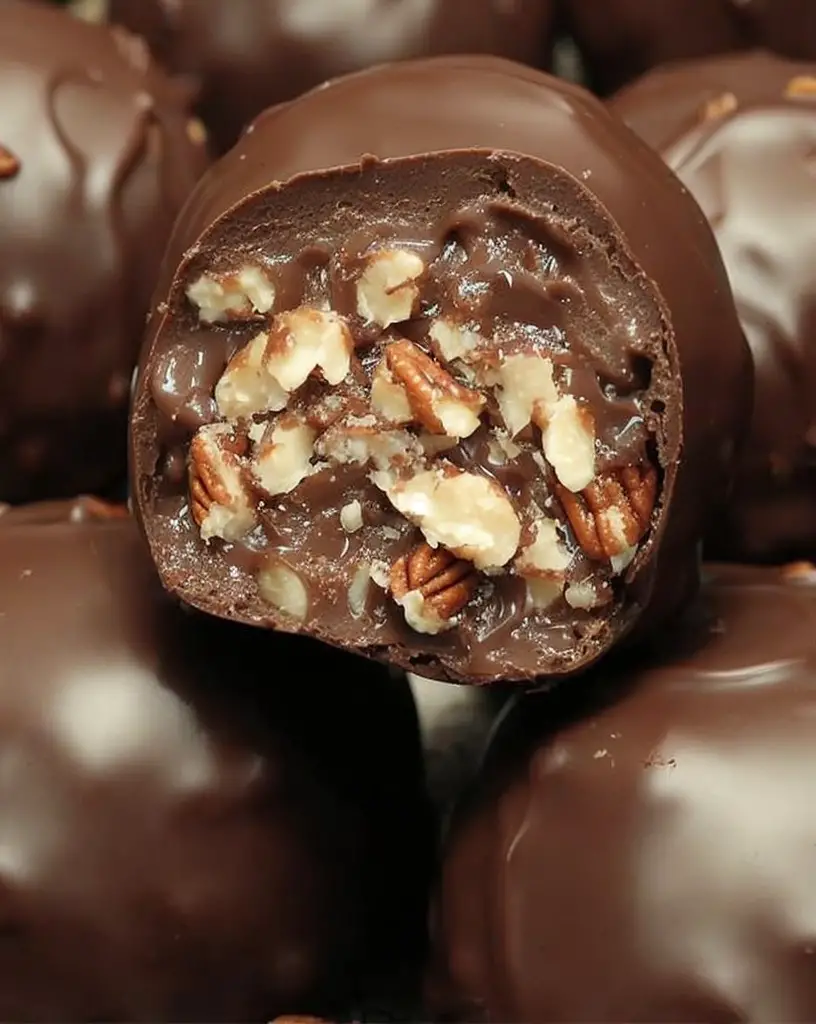
Indulge in the divine decadence of Chocolate Pecan Caramel Truffles, a gourmet treat that effortlessly blends rich chocolate, nutty pecans, and luscious caramel. These delectable morsels offer an irresistible combination of textures and flavors that will captivate your taste buds and leave you craving more. Perfect for special occasions or as a luxurious treat, these truffles are a must-try for chocolate enthusiasts and dessert aficionados alike.

Why You’ll Love This Recipe

Chocolate Pecan Caramel Truffles are a delightfully indulgent treat that combines the richness of chocolate with the buttery crunch of pecans and the smoothness of creamy caramel. The truffles are an absolute pleasure to make and bring a touch of elegance to any event, be it a sophisticated dinner party or a festive celebration. These truffles are not only delicious but also make for an impressive homemade gift that’ll delight any recipient.

The harmonious flavors and textures make these truffles stand out. The deep, luxurious taste of chocolate melds beautifully with the nutty notes of pecans, while the caramel adds a layer of sweetness that is simply irresistible. They are versatile and can be enjoyed as a self-indulgent snack or a more composed dessert with complementary pairings.

Context/Background

The combination of chocolate, nuts, and caramel is a timeless classic rooted in European confectionery traditions. Chocolate truffles were first created in France and have since evolved to include a plethora of flavor combinations and fillings. This particular recipe is an homage to traditional pralines, offering a nod to Southern U.S. cuisine where pecans and caramel are popular staples. The technique involves careful tempering of chocolate and precise sugar heating, showcasing confectionery as both an art and a science.

Recipe Details

Serves: 24 truffles

Prep Time: 30 minutes

Cook Time: 15 minutes

Total Time: 45 minutes

Ingredients

  • 1 cup pecans, finely chopped
  • 1 cup granulated sugar
  • 1/4 cup water
  • 1/2 cup heavy cream
  • 1 tablespoon unsalted butter
  • 8 ounces bittersweet chocolate, finely chopped
  • 1 teaspoon vanilla extract
  • 1/4 teaspoon salt
  • Cocoa powder, for dusting

Directions

  1. Toast the pecans in a dry skillet over medium heat until fragrant and slightly golden, about 5 minutes. Set aside to cool.
  2. In a saucepan, combine sugar and water. Cook over medium heat, swirling the pan occasionally, until the sugar dissolves and turns a deep amber color.
  3. Remove the saucepan from heat and carefully stir in the cream and butter. Stir in the vanilla extract and salt, then let it cool slightly.
  4. Add the chopped chocolate to a heatproof bowl. Pour the caramel over the chocolate and gently stir until the chocolate is fully melted and the mixture is smooth.
  5. Fold in the toasted pecans, then refrigerate the mixture until firm, about 2 hours.
  6. Scoop the mixture into small balls and roll in cocoa powder to coat. Store in an airtight container until ready to serve.

Tips for Perfect Chocolate Pecan Caramel Truffles

  • Ensure sugar is fully dissolved before caramelizing to avoid grainy texture.
  • Use a high-quality chocolate for the best results in flavor and richness.
  • Chill the truffle mixture adequately to make shaping easier and prevent melting.
  • Toast the pecans to enhance their natural nutty flavor.

Serving Suggestions

Serve these truffles as an impressive conclusion to a gourmet meal, accompanied by a glass of port or espresso. They are also a delightful treat for afternoon tea or a sweet gift for loved ones.

Storage and Leftovers

Store the truffles in an airtight container in the refrigerator for up to two weeks. For optimal flavor and texture, bring them to room temperature before serving. The truffles can also be frozen for up to three months; thaw them in the refrigerator before enjoying.

Final Thoughts

If you’re seeking a recipe that embodies sophistication and indulgence, look no further than these Chocolate Pecan Caramel Truffles. They are a true testament to the finer flavors of confectionery, and you’ll find that each bite offers a moment of pure, blissful decadence. Whether for a personal treat or a shared experience, these truffles are bound to delight anyone fortunate enough to taste them.

Recipe Notes

  • For a different texture, roll the truffles in crushed nuts or shredded coconut instead of cocoa powder.
  • Substitute dark chocolate for bittersweet if you prefer a more intense chocolate flavor.
  • Consider adding a pinch of sea salt on top for a savory-sweet contrast.

“`

Maximize Pinterest Potential: Discover and Save Your Own Pins

“`html
Jump to Recipe

Berry Parfait Recipe: A Delicious Symphony of Flavors

Imagine diving your spoon into a vibrant Berry Parfait, a delightful mix of tart berries, creamy Greek yogurt, and crunchy granola. Each layer brings its own texture and burst of flavor, making it a truly irresistible treat. Whether you’re looking for a nutritious breakfast, a midday snack, or a simple yet sophisticated dessert, this Berry Parfait is sure to impress with its delightful combination of fresh ingredients and delectable taste.

Why You’ll Love This Recipe

This Berry Parfait is a celebration of simplicity and taste. With just a few wholesome ingredients, you can create a nutritious masterpiece in minutes. The mix of fresh berries provides a burst of antioxidants, while honey adds a touch of natural sweetness.

It’s a versatile recipe that can be enjoyed any time of the day. Whether you’re in need of a quick breakfast to kick-start your day or a light dessert to round off your meal, the Berry Parfait caters to every occasion.

Nostalgia often plays a big part in our love for food, and this parfait has that comforting appeal. It evokes memories of summer days and family breakfasts, creating a sense of warmth and togetherness.

Not to mention, the ease of preparation makes it a favorite. No cooking is required, just a few minutes of assembly, and you have a visually stunning and tasty dish ready to go.

Personal Story/Connection

Growing up, summer vacations at my grandmother’s house were special. She would often serve this Berry Parfait as a treat at breakfast in her sunny garden. We would gather around the table, sharing stories and savoring each spoonful. To this day, the recipe carries those cherished moments, now shared with my own family.

Context/Background

The parfait, a classic dish with French origins, traditionally signifies layers of ingredients arranged beautifully in a tall glass. While originally created as a frozen dessert, modern adaptations have embraced fresh ingredients for a no-cook option like this Berry Parfait.

In today’s health-conscious world, parfaits have gained popularity for their versatility and balance of fruit, protein, and grains, making them a staple in breakfast menus and snack options.

Tips for Perfect Berry Parfait

  • Use ripe, seasonal berries for the best flavor and sweetness.
  • If Greek yogurt is too tart for your taste, try mixing in a splash of vanilla extract or a scoop of honey.
  • For an extra layer of flavor, toast the granola lightly before adding it to the parfait.
  • If you want to enhance the presentation, layer the ingredients in a clear glass to showcase the beautiful colors.
  • Add a mint sprig for a refreshing touch and extra visual appeal.

Serving Suggestions

For a breakfast treat, serve the Berry Parfait alongside a freshly brewed cup of coffee or your favorite tea. It makes a refreshing start to the day, energizing you with its vibrant flavors.

If you’re hosting a brunch, consider adding a parfait bar where guests can create their own versions. Provide a variety of berries, nuts, and yogurt flavors for a personalized touch.

For dessert, pair the parfait with a dollop of whipped cream or a drizzle of chocolate sauce for an indulgent twist. It’s a light yet satisfying way to end a meal.

Storage and Leftovers

While the Berry Parfait is best enjoyed fresh, you can assemble components in advance. Store washed and chopped berries in an airtight container in the refrigerator for up to three days.

To maintain the crunchiness of the granola, add it just before serving. If you have leftovers, store them in the fridge for a day, but note the granola may soften over time.

Recipe Variations and Substitutions

For a vegan version, replace Greek yogurt with a plant-based alternative like coconut or almond yogurt. Use maple syrup instead of honey as a sweetener.

If you’re looking for a gluten-free option, ensure your granola is certified gluten-free, or use nuts and seeds for the crunchy layer.

During fall, swap the mixed berries for diced apples or pears and add a dash of cinnamon for a cozy twist. In summer, peaches make a luscious alternative.

FAQ

Can I make this ahead of time? Yes, you can prepare the berries and yogurt ahead of time, but add the granola just before serving to maintain its crunch.

What substitutions can I use for honey? Maple syrup, agave nectar, or a fruit-based sweetener work well as alternatives.

How do I make this gluten-free? Use gluten-free granola or substitute with nuts and seeds for a gluten-free version.

Optional Nutritional Information

Approximate per serving:

  • Calories: 220
  • Protein: 8g
  • Carbohydrates: 36g
  • Fat: 5g

Final Thoughts

This Berry Parfait is a versatile and delightful dish that promises to enrich any meal. Its ease and simplicity make it a go-to recipe for those spontaneous sweet cravings or health-conscious choices. I invite you to try this recipe and share your experience or any variations you create with your own twist!

Recipe Section

Serves: 2 | Prep Time: 10 minutes | Total Time: 10 minutes

  • 1 cup mixed berries (strawberries, blueberries, raspberries)
  • 2 tbsp honey
  • 1/2 cup plain Greek yogurt
  • 1/4 cup granola
  1. Start by washing and chopping the berries into bite-sized pieces.
  2. In a small bowl, mix the berries with honey until well coated.
  3. In a serving glass or bowl, layer the Greek yogurt, followed by the honey-coated berries.
  4. Sprinkle granola on top for a satisfying crunch.
  5. Repeat the layers if desired.
  6. Enjoy your parfait creation as a delicious and nutritious breakfast, snack, or dessert!

“`

Pinterest Tips: How to Discover and Save Your Favorite Pins

# Discover (and Save!) Your Own Pins on Pinterest: A Flavorful Stir Fry Chicken Recipe

In today’s fast-paced world, finding time to cook can often feel like a chore. Yet, platforms like Pinterest have revolutionized how we approach home cooking. This brilliant platform not only makes discovering new recipes easier but also turns cooking into a delightful experience. In this article, we’ll dive deep into the wonders of Pinterest and help you create a flavorful stir fry chicken recipe worthy of pinning. So, grab your apron and let’s embark on this culinary journey together!

## A Personal Connection to Pinterest and Cooking

Have you ever found yourself scrolling through Pinterest, only to be captivated by a mouthwatering recipe that piqued your interest? If so, you’re certainly not alone! Pinterest has transformed the culinary world, providing a treasure trove of recipes at your fingertips. It’s a place where creativity and taste collide, encouraging you to try new dishes and explore diverse flavors. In fact, it was during one of these scrolling adventures that I stumbled upon a recipe for a delectable stir fry chicken, which quickly became a family favorite. This experience has awakened my inner chef, making cooking an enjoyable creative outlet and a way to connect with loved ones through the joy of sharing meals.

## The Magic of Pinterest for Home Chefs

For home chefs, Pinterest is nothing short of magical. The platform’s visual-centric approach is a boon for those seeking culinary inspiration. You can easily pin and save ideas, creating a personalized digital cookbook to draw from whenever you feel like experimenting. This ease of access and variety has made Pinterest a go-to platform for many cooking enthusiasts. As you embark on your cooking adventures, I invite you to share some of your favorite pins in the comments below. Let’s expand our culinary horizons together!

## What Makes Our Stir Fry Chicken Recipe a Must-Try

With so many recipes out there, you might wonder why this particular stir fry chicken dish deserves a spot on your dining table. The answer lies in its simplicity, healthiness, and the enchanting balance of flavors it offers. Prepared with fresh ingredients, this dish is not only a feast for the palate but also a quick and easy meal solution for busy weeknights. The interplay of sweet, savory, and spicy notes ensures a dynamic dining experience, while the vibrant mix of vegetables elevates the dish in both taste and appearance.

## Ingredients You’ll Need for Stir Fry Chicken

To create this scrumptious stir fry, let’s focus on the essence of freshness and flavor combinations. Here’s a handy table to guide you through the ingredients:

| Ingredient | Quantity |
|——————————–|———–|
| Boneless, skinless chicken breasts | 1 lb |
| Soy sauce | 1/4 cup |
| Honey | 2 tbsp |
| Sesame oil | 1 tbsp |
| Garlic, minced | 2 cloves |
| Ginger, grated | 1 tsp |
| Red pepper flakes | 1/2 tsp |
| Red bell pepper, sliced | 1 |
| Yellow bell pepper, sliced | 1 |
| Green bell pepper, sliced | 1 |
| Onion, sliced | 1 small |
| Green onions (for garnish) | As needed |
| Cooked rice (for serving) | As needed |

## Step-by-Step Cooking Instructions for Perfect Stir Fry Chicken

Let’s dive into the method that will guide you to stir fry perfection. Follow these steps for a delightful culinary experience:

1. **Marinate the Chicken**: In a bowl, mix the soy sauce, honey, sesame oil, minced garlic, grated ginger, and red pepper flakes. Add the chicken, ensuring it’s well-coated, and set aside to marinate for at least 15 minutes.

2. **Prepare the Skillet**: Heat a large skillet over medium-high heat. Add a splash of oil and cook the marinated chicken for 6-7 minutes until browned and cooked through. Remove from the skillet and set aside.

3. **Sauté the Vegetables**: In the same skillet, add your sliced onion and bell peppers. Sauté them for about 4-5 minutes, or until they are tender-crisp.

4. **Combine and Serve**: Return the chicken to the skillet. Mix everything together, allowing the flavors to meld for another 1-2 minutes. Serve over a bed of cooked rice and garnish with green onions.

## Tips for Making Your Cooking Experience Even Better

Enhancing your cooking experience can be both fun and rewarding. Here are a few tips to streamline the process:

– **Prep Ahead**: Save time by preparing your ingredients ahead of cooking. This way, you can focus on the actual cooking process without interruptions.
– **Customize to Your Taste**: Feel free to experiment by adding different vegetables such as broccoli or snow peas, or swap the chicken for tofu for a vegetarian alternative.

## Frequently Asked Questions about Stir Fry Chicken and Pinterest

### How can I make this stir fry more or less spicy?

If you prefer a milder dish, reduce the amount of red pepper flakes. For more heat, you can add additional flakes or incorporate a dash of hot sauce.

### Can I use other types of protein instead of chicken?

Absolutely! Feel free to substitute the chicken with tofu, shrimp, or beef. Each will bring a unique texture and flavor to the dish.

### How do I save this recipe on Pinterest?

Saving your favorite recipes on Pinterest is simple. First, create a Pinterest account or log in. Then, click the ‘Save’ button on your desired recipe pin, and choose the board you’d like to save it to. This ensures you have easy access to your favorite recipes anytime.

## Conclusion: Cooking with Pinterest: More Than Just Recipes

Pinterest offers more than just an endless collection of recipes; it fosters a sense of community and inspires creativity. This platform connects you with fellow food lovers and encourages you to create and share your own culinary masterpieces. As you try out this stir fry chicken recipe, consider pinning it on Pinterest, and share your delightful creation on social media. Cooking is a journey filled with flavors and creativity—explore it with the vibrant community on Pinterest. Bon appétit!

Indulge in a Rich Deeply Flavored Butterscotch Pudding Pie

# Deeply Flavored Butterscotch Pudding Pie: A Sweet, Indulgent Delight

## Introduction
Picture this: a luscious bite of creamy, rich sweetness enveloping your senses, transporting you to a realm of pure indulgence. This is the magic of deeply flavored butterscotch pudding pie—a dessert that captivates the heart with its nostalgic essence and unparalleled comfort. Whether ushering in cherished childhood memories or simply celebrating the pleasure of a homemade treat, this pie is a delightful addition to any dessert repertoire.

### The Emotional Allure of Butterscotch Desserts
Butterscotch isn’t just another flavor; it’s a doorway to fond memories. Perhaps you recall the joy of sneaking a butterscotch candy from grandma’s jar, relishing the sweet, buttery notes. This pie rekindles those cherished times, offering a comforting embrace with every slice. The universal joy of sinking your fork into a sweet treat like this underscores the emotional resonance of butterscotch, making it a beloved choice for many.

## Ingredients Overview
Creating a masterpiece doesn’t have to involve exotic ingredients or complex preparations. The beauty of this pie lies in its simplicity and accessibility.

### Easy-to-Find Ingredients for Deeply Flavored Butterscotch Pudding Pie

| Ingredient | Quantity |
|————————————|—————-|
| Pre-made graham cracker crust | 1 |
| Instant butterscotch pudding mix | 1 box |
| Cold milk | 2 cups |
| Whipped cream | 1 cup |
| Butterscotch chips (for garnish) | As desired |

#### Ingredient Highlights
Each component plays a vital role in crafting your butterscotch pudding pie:

– **Graham Cracker Crust**: This crunchy foundation offers the perfect counterbalance to the creamy filling, adding texture and a subtle sweetness.
– **Instant Butterscotch Pudding Mix**: The heart of the pie, providing that rich, buttery flavor synonymous with butterscotch.
– **Cold Milk**: Essential for achieving the desired pudding consistency, milk transforms the mix into a silky, smooth filling.
– **Whipped Cream**: A light, fluffy crown that complements the dense richness of the pudding, making each bite heavenly.
– **Butterscotch Chips**: A beautiful garnish that enhances flavor and adds a visual appeal.

Consider swapping the pre-made crust for a homemade version or using dairy alternatives for dietary needs without sacrificing flavor.

## Step-by-Step Directions
Ready to embark on your culinary adventure? Let’s craft this scrumptious butterscotch pudding pie together.

### Crafting Your Butterscotch Pudding Pie

#### Preparing the Pudding
1. **Mix**: Begin by whisking the butterscotch pudding mix with cold milk in a medium bowl. Keep at it until the mixture thickens to perfection.
2. **Pour**: Transfer the luscious pudding into the graham cracker crust, smoothing the top for an even finish.

#### Setting the Pie
3. **Refrigerate**: Allow the pie to chill for a minimum of 2 hours. This step ensures the pudding sets beautifully, ready for slicing.

#### Adding the Finishing Touches
4. **Top**: Add dollops of whipped cream, creating a soft cloud atop your pie.
5. **Garnish**: Sprinkle butterscotch chips generously, offering an additional layer of goodness.

#### Serve and Enjoy
6. **Slice**: Present your stunning creation. Savor each bite, appreciating the symphony of flavors and textures.

## The Magic Behind Butterscotch Flavor
What makes butterscotch nearly irresistible to palate explorers?

### What Makes Butterscotch So Irresistible?
Butterscotch’s allure lies in its exquisite balance. The intention is a careful dance between sweetness and rich, buttery notes. Historically, this flavor has origins in 19th-century Britain, made from brown sugar and butter—ingredients that create a deep, caramel-like profile. The addition of vanilla only intensifies its taste, making it a timeless favorite. Scientifically, the Maillard reaction from heating sugar and butter produces complex flavors and a fragrant aroma, captivating dessert aficionados worldwide.

## Tips and Tricks for the Perfect Pie
To ensure success in your butterscotch pudding pie endeavors, keep these pointers in mind:

– Ensure the pudding thickens adequately; patience is key.
– Opt for quality ingredients to enrich flavor depth.
– Experiment with creative garnishing: nuts, shavings of dark chocolate, or caramel drizzles can elevate the pie’s visual and flavor profile.

## FAQs About Butterscotch Pudding Pie

### Common Questions Answered

– **How can I make my own graham cracker crust?**
– Crush graham crackers finely, mix with melted butter, and press into your pie pan for an easy homemade crust.
– **Can I use homemade pudding instead of instant?**
– Absolutely! Simply adjust by adding more setting time and ensuring the pudding achieves a similar consistency before filling the crust.
– **How long can the pie be stored in the fridge?**
– Keep it fresh by storing in the refrigerator for up to three days, preferably in a well-sealed container to maintain flavor and texture.

## Conclusion
Dive into the world of indulgence with this deeply flavored butterscotch pudding pie. Perfect for celebrations, family gatherings, or a personal treat, this pie encapsulates nostalgia and comfort. Try it today, and invite the familiar warmth into your home, one slice at a time. We’d love to hear how your dessert experience was, so feel free to share your culinary journey with us in the comments!

Delicious Make-Ahead Cornbread Stuffing Recipe for Perfect Holiday Dinners

## The Ultimate Make-Ahead Cornbread Stuffing Recipe: A Savory Delight for Your Holiday Table

### Introduction: Embrace the Ease of Make-Ahead Dishes

During the whirl and twirl of holiday cooking, imagine a dish that not only fills your home with the scent of nostalgia but also clears up your frantic schedule. Allow us to introduce you to the make-ahead cornbread stuffing recipe—a symphony of flavor, simplicity, and tradition. This is no ordinary recipe; it is a cherished culinary tradition that transforms your holiday meal into an unforgettable experience. Let every forkful serve as a connection to loved ones and the epitome of culinary ease at your Thanksgiving feast.

### Key Ingredients for Success

Before immersing yourself in this culinary journey, ensure you have all the necessary components. Below is a quick checklist of what you’ll need to craft this perfect make-ahead cornbread stuffing.

#### Essential Ingredients

| Ingredient | Quantity |
|———————–|—————-|
| Cornbread mix | 1 package |
| Butter | 1/2 cup |
| Onion, diced | 1 |
| Celery, diced | 2 stalks |
| Garlic, minced | 2 cloves |
| Dried sage | 1 teaspoon |
| Dried thyme | 1 teaspoon |
| Chicken broth | 2 cups |
| Salt and pepper | To taste |

Pro Tip: Don’t hesitate to elevate your stuffing with personalized touches by using homemade cornbread or adding a mix of spices fit for your palate.

### Let’s Get Cooking: Step-by-Step Directions

Crafting this timeless dish is a journey that begins with preparing the cornbread base and culminates in a beautifully baked masterpiece.

#### Creating the Cornbread Foundation

1. **Mix and Bake**: Prepare the cornbread mix according to its instructions. Once baked, allow it to cool completely for easy handling.
2. **Cubing the Bread**: When cooled, slice the cornbread into bite-sized, uniform cubes to ensure even distribution of ingredients later on.

#### Sauté those Aromatics

– **Butter Melt and Sauté**: In a skillet, melt butter over medium heat. This will serve as the base for your aromatic vegetables.
– **Infuse and Cook**: Toss in the diced onions, celery, minced garlic, and sprinkle the dried sage and thyme. Sauté until the vegetables become tender and their fragrance warms the room.

#### Combine and Cool

– **Merge Flavors**: In a large bowl, carefully blend the sautéed veggie mix with your prepared cornbread cubes.
– **Broth and Season**: Pour the chicken broth over the cornbread mixture, gently stirring to combine. Add salt and pepper to taste.
– **Refrigerate**: Spoon the stuffing into a greased baking dish, cover with foil, and allow it to chill overnight in the fridge, permitting the flavors to develop fully.

#### The Final Bake

1. **Preheat Your Oven**: When you’re ready, preheat the oven to 350°F.
2. **Initial Bake**: With foil still on, bake the stuffing for 30 minutes.
3. **Golden Finish**: Remove the foil and bake for an additional 15 minutes, until the surface becomes golden-brown and slightly crisp.

### Savoring the Moment

When the time comes to share this tasty creation, know that you are not just offering another dish, but an extension of comfort and joy that resonates with those around your table. The make-ahead cornbread stuffing is more than a side; it is a gateway to making memories, sharing stories, and relishing the love that surrounds the holiday season.

### Frequently Asked Questions

**Q: Can I use homemade cornbread for this recipe?**
Absolutely! Utilizing homemade cornbread elevates the flavor of this stuffing, adding a personal touch.

**Q: Is it possible to freeze the stuffing for future use?**
Indeed, it can be frozen. Ensure it is baked first and cooled completely before placing it in the freezer.

**Q: How can I make this recipe vegetarian-friendly?**
Simple swap: Use vegetable broth in place of chicken broth to create a delicious vegetarian option.

**Q: What additional ingredients can enhance this stuffing?**
For added texture and depth, consider incorporating dried cranberries, sautéed sausage, or toasted nuts.

### Conclusion: Your Call to Action

Armed with this trusted recipe, it’s time to take action. Dive into your kitchen, embrace the simplicity of make-ahead meals, and provide your loved ones with a masterpiece that epitomizes tradition and taste. Reflect on the ease—not worrying about last-minute cooking—and revel in the pure delight of a make-ahead cornbread stuffing that is sure to be a huge hit. Share the experience online, discuss your personal tweaks, and invite others to enjoy the comforting embrace of this incredible dish. Your holiday feast deserves nothing less.

Irresistible Peanut Butter Jam Thumbprint Cookies for Your Sweet Tooth

# Delight in These Peanut Butter Jam Thumbprints: A Sweet and Nostalgic Treat

**Introduction: A Bite of Nostalgia**

Let’s embark on a journey back to times when life felt slower, kitchens felt warmer, and baking was an act of love. Few things are more comforting than the aroma of freshly baked cookies wafting through the house, evoking images of simpler days. Peanut butter jam thumbprints are a delightful way to recreate those cherished moments and bring a smile to anyone’s face. So, whether you’re pulling out a handed-down family recipe or trying your hand at something new, these cookies promise to bring joy, nostalgia, and deliciousness to your homemade treats.

## Ingredients Overview: The Essentials for Perfect Thumbprints

Before you dive into baking these delightful cookies, let’s gather everything you’ll need for this scrumptious endeavor. The following table will ensure you have all your ingredients organized for a seamless cooking experience.

### Table of Ingredients

| Ingredient | Quantity |
|————————|————————|
| All-purpose flour | 1 cup |
| Unsalted butter | 1/2 cup, softened |
| Granulated sugar | 1/4 cup |
| Brown sugar | 1/4 cup |
| Creamy peanut butter | 1/2 cup |
| Jam (your choice) | 1/4 cup |
| Salt | 1/4 tsp |

## Step-by-Step Recipe: Creating Your Peanut Butter Jam Thumbprints

Follow this guide to craft the perfect peanut butter jam thumbprints, each step meticulously described to ensure your baking adventure is as smooth as the cookies themselves.

### Preparing the Oven and Baking Sheet

Firstly, preheat your oven to 350°F (180°C), ensuring it reaches the perfect temperature for baking your cookies to golden perfection. Prepare your baking sheet by lining it with parchment paper to prevent sticking, making for easy cookie removal and minimal cleanup.

### Mixing the Ingredients

Start by creaming together the softened butter, granulated sugar, brown sugar, and creamy peanut butter. Aim for a smooth, well-blended mixture. Gradually fold in the all-purpose flour and a pinch of salt, and mix until you have a cohesive dough ready for shaping.

### Shaping the Cookies

Roll the dough into small, even-sized balls, ensuring uniformity for consistent baking. Gently press your thumb into the center of each dough ball to create an indentation—a signature feature of these cookies.

### Adding the Jam

Now comes the fun part! Select your favorite jam and fill each indentation with a modest dollop. This is where you can get creative with flavors and tailor your cookies to your preferences.

### Baking to Perfection

Slide your prepared cookies into the preheated oven and bake for about 12 to 15 minutes, watching for edges that are just turning golden. Allow them to cool slightly on the baking sheet before gently transferring them to a wire rack to cool completely.

## Baking Tips and Tricks: Ensuring Cookie Perfection

Enhance your cookie-baking experience with these expert tips, offering insights for achieving optimal taste and texture.

### Choosing the Right Jam

The beauty of these cookies lies in their versatility. Experiment with various jam flavors—maybe a tart raspberry, a sweet strawberry, or a seasonal option like apple cinnamon—to tailor your cookies to any occasion or mood.

### Perfecting the Cookie Dough

For a smooth mixing process and perfect texture, ensure your butter is adequately softened before blending with other ingredients. A well-prepared dough guarantees soft, melt-in-your-mouth cookies.

### Cookie Storage

To keep your cookies as fresh as the day they were made, store them in an airtight container. They’ll maintain their delectable quality for up to a week, though good luck keeping them around that long!

## Conclusion: Relish the Deliciousness

Now that you’ve mastered the art of peanut butter jam thumbprints, it’s time to savor both the process and the product. These cookies aren’t just a treat for the taste buds but a warm hug from the past, evoking fond memories with every bite. Perfect for sharing with loved ones or enjoying by yourself as a delightful indulgence, they combine the simplicity and warmth of homemade comfort food with a touch of nostalgic joy.

## Frequently Asked Questions: Peanut Butter Jam Thumbprints Guide

**Can I use crunchy peanut butter instead of creamy?**
Absolutely. While it will alter the cookie texture slightly, it brings a delightful crunch. This is a great opportunity to experiment and discover your preferred consistency.

**What type of jam works best?**
The choice of jam is entirely up to you. Select your favorite flavor or try a combination of jams for a unique taste. Each option brings a different note to the cookie’s flavor profile.

**Can I freeze these cookies?**
Yes! Peanut butter jam thumbprints freeze beautifully. Store them in a freezer-safe container, and they’ll be good for up to three months, ready to be enjoyed anytime you need a sweet bite of nostalgia.

Now armed with this knowledge, it’s time for you to gather your ingredients, preheat that oven, and enjoy the delightful journey of baking these nostalgic treats. Engage with your loved ones over a hot cup of tea and these cookies, or inspire a friend by sharing this recipe. Let these peanut butter jam thumbprints become a staple in your home, offering happiness and nostalgia one cookie at a time.

Indulge in a Rich Butterscotch Pudding Pie Recipe Delight

“`html
Jump to Recipe

Deeply Flavored Butterscotch Pudding Pie: A Sweet Symphony

Imagine slicing into a chilled piece of Deeply Flavored Butterscotch Pudding Pie, where the velvety butterscotch filling meets a crunchy graham cracker crust, topped with clouds of whipped cream. This dessert encapsulates comfort, sweetness, and nostalgia, all in one bite. It’s a truly easy and rewarding treat that’s perfect for any occasion and impresses with its rich flavor profile and delightful textures.

Why You’ll Love This Recipe

This recipe is perfect for anyone who loves a quick and satisfying dessert without compromising flavor. The ease of using a pre-made crust and instant pudding mix means you spend less time preparing and more time savoring. The creamy butterscotch pudding is subtly sophisticated, making it a favorite among both kids and adults.

Each bite offers a luxurious mouthfeel that might bring to mind memories of homemade treats from childhood. Plus, it’s versatile – ideal for a family gathering, a casual potluck, or an elegant dinner finishing touch.

You’ll appreciate the balance it strikes between creamy and crunchy, sweet yet nuanced. The indulgence is real, yet with the added benefit of being relatively simple to put together. This delightful dessert caters to those spontaneous sweet cravings with minimal effort and maximum pleasure.

Personal Story/Connection

I remember the first time I tasted this pie; it was at a family reunion where desserts were abundant, yet this pie stood out. My grandmother’s recipe involved making each component from scratch. While that was beautiful, modern life needs shortcuts, and hence this version was born—a perfect blend of nostalgia and practicality.

Context/Background

Butterscotch is a timeless classic, originating from 19th-century England. Known for its buttery, brown sugar flavor, butterscotch has found its way into various sweets, including this beloved pudding pie.

Evolution of cooking techniques has brought convenience into homes without losing the essence of traditional flavors. This pie exudes that evolution, merging classic tastes with modern-day ease.

Tips for Perfect Deeply Flavored Butterscotch Pudding Pie

  • Ensure your milk is cold; warmer temperatures affect how the pudding sets.
  • Whisk the pudding mix thoroughly to avoid lumps.
  • For added flavor, sprinkle a pinch of sea salt into the finished pudding before setting it.
  • Garnish doesn’t have to stop at butterscotch chips. Consider adding nuts for a crunchy texture.
  • Let the pie sit at room temperature for a few minutes before slicing for prettier pieces.

Serving Suggestions

This pie is delightful on its own but can be elevated with some creative additions. Serve each slice with a scoop of vanilla ice cream for an extra creamy contrast. A drizzle of caramel sauce over the whipped cream layer adds another flavor dimension.

If you’re looking for a festive presentation, sprinkle toasted coconut flakes over the top. This pie also pairs beautifully with a warm cup of coffee or a smooth glass of dessert wine. For a casual setting, serve as part of a pie buffet with assorted flavors, letting this butterscotch delight be a standout.

Storage and Leftovers

Store any leftover slices in an airtight container in the refrigerator. They remain fresh for up to three days, keeping their delicious texture.

Worried about waste? Transform leftovers into a parfait by layering pieces of the pie with yogurt or ice cream and extra butterscotch chips.

Recipe Variations and Substitutions

For a gluten-free version, substitute the graham cracker crust with a gluten-free alternative. Experiment with flavors by swapping instant butterscotch pudding for caramel or vanilla varieties.

To add a seasonal twist, consider incorporating pumpkin spice into the pudding mix for an autumn-inspired pie. You can also adapt the pie to be vegan by using almond milk and a coconut whipped topping.

FAQ

Can I make this ahead of time? Yes, you can make the pie a day in advance to let the flavors meld beautifully.

What substitutions can I use for whipped cream? Coconut or almond whipped topping are great for a dairy-free option.

How do I make this gluten-free? Use a gluten-free crust and check that your pudding mix is certified gluten-free.

Optional Nutritional Information

  • Approximate calories per serving: 250
  • Fat: 15g
  • Sugar: 20g
  • Protein: 3g

Final Thoughts

Deeply Flavored Butterscotch Pudding Pie is a testament to how simplicity doesn’t have to sacrifice taste. This dessert invites you to enjoy life’s sweet moments, enhancing everyday dinners or special occasions. Share your variations or questions in the comments; I’d love to hear how you make this recipe your own.

Recipe Section

Serves: 8 | Prep Time: 10 minutes | Cook Time: 0 minutes | Total Time: 2 hours 10 minutes (including chilling)

  • 1 pre-made graham cracker crust
  • 1 package instant butterscotch pudding mix
  • 2 cups cold milk
  • 1 cup whipped cream
  • Butterscotch chips (for garnish)
  1. Prepare the butterscotch pudding mix according to package instructions, using 2 cups of cold milk.
  2. Pour the pudding into the pre-made graham cracker crust and smooth out the top.
  3. Refrigerate for at least 2 hours or until the pudding has set.
  4. Once set, spread a layer of whipped cream on top of the pudding.
  5. Garnish with butterscotch chips for an extra touch of sweetness.
  6. Slice and serve chilled for a delicious and deeply flavored butterscotch pudding pie experience.

“`

Quick and Simple No Yeast Bread Recipe for Busy Bakers

**Discover the Delight of This Easy and Convenient No Yeast Bread Recipe**

**Bringing Homemade Comfort to Your Table**

The smell of freshly baked bread wafting through your home creates a sense of warmth and comfort that’s second to none. If you’ve ever savored the crispy crust and soft interior of homemade bread, you know it’s more than just food—it’s an experience. Baking bread is a tradition that has brought families together for generations. But what if you could enjoy this homemade goodness without the need for yeast, hours of waiting, or complicated techniques? Welcome to the world of no yeast bread, where simplicity meets deliciousness.

**Why Choose No Yeast Bread? Convenience at Its Finest**

In today’s fast-paced world, convenience is key. No yeast bread offers a quick and easy alternative to traditional bread recipes, making it perfect for spontaneous baking sessions. Whether you’re dealing with a yeast shortage, addressing dietary needs, or just in a hurry, this bread fits the bill. Plus, with no yeast to worry about, you’ll sidestep the lengthy rising process, getting straight to baking in a fraction of the time.

**Essential Ingredients for No Yeast Bread**

Ready to craft your loaf? Keep this table handy for a quick reference to the core ingredients you’ll need:

| Ingredient | Amount |
|——————|——————|
| All-purpose flour| 2 cups |
| Baking powder | 1 tablespoon |
| Salt | 1 teaspoon |
| Milk | 1 cup |
| Honey | 2 tablespoons |
| Melted butter | 3 tablespoons |

**Step-by-Step Directions for Perfect No Yeast Bread**

1. **Preheat and Prepare:**
– Set your oven to a cozy 375°F and grease a baking sheet to ensure your bread doesn’t stick.

2. **Mix the Dry Ingredients:**
– In a mixing bowl, combine the flour, baking powder, and salt, mixing until well blended.

3. **Incorporate the Wet Ingredients:**
– Slowly add milk, honey, and melted butter to the dry mixture, stirring until a sticky dough forms.

4. **Knead the Dough:**
– Dust a surface with flour and knead the dough lightly, just until it becomes smooth.

5. **Shape and Score:**
– Mould the dough into a round loaf and score the top with an “X” to help it bake evenly.

6. **Bake to Perfection:**
– Place your bread in the oven for about 30-35 minutes, checking for a golden crust and a hollow sound when tapped.

7. **Cool and Serve:**
– Once baked, let it cool slightly on a rack. Serve warm for the best taste.

**Tips and Tricks for Baking Success**

– **Precision Is Key:** Measure ingredients accurately to ensure the perfect dough consistency.
– **Texture Matters:** Aim for a dough that’s firm but not too sticky; adjust with flour as needed.
– **Flavor Variations:** Experiment with herbs, cheese, or spices to give your bread a personal twist.

**Serving Suggestions for Your Homemade No Yeast Bread**

Consider pairing your freshly baked bread with savory soups, rich stews, or simply slather it with butter and jam. For storage, wrap it tightly in foil or place it in an airtight container to retain its freshness for a few days.

**Common Questions About No Yeast Bread**

**FAQ:**

– *What is no yeast bread?*
No yeast bread—forgoing fermentation—relies on baking powder as a raising agent, offering simplicity without sacrificing taste.

– *Can I use whole wheat flour instead?*
Yes, you can. Keep in mind it might alter the bread’s texture, making it a bit denser.

– *What can I add for extra flavor?*
Infuse your bread with ingredients like roasted garlic, chopped nuts, or fresh rosemary for depth and complexity.

– *How long does no yeast bread stay fresh?*
Your loaf will stay fresh for about 2-3 days if stored properly. For longer storage, consider freezing.

**The Joy of Baking Without the Wait**

Embark on a culinary journey where baking simplicity meets sheer delight. No yeast bread makes it possible for even the busiest or least experienced baker to enjoy the satisfaction of homemade bread. So why wait? The chance to whip up a delectable loaf in under an hour is yours for the taking.

**Join Our Community of Home Bakers**

Inspired? We’d love to hear your baking stories and creative twists. Share your experiences and photos with us—let’s celebrate the art of no yeast bread together. Connect with us on social media for more simple, delightful recipes that will warm your heart and home.

This article not only guides you in baking no yeast bread but also enriches the experience by addressing possible inquiries and providing useful tips, making it an invaluable resource for bread enthusiasts of all skill levels.

Explore Unique Recipes and Creative Home and Style Ideas

# Walking Taco Bake Recipe: A Cheesy Delight for Family Dinner Nights 🌮🧀
Imagine this: you’re gathered around the table, the heartwarming aroma of melted cheese blending with savory beef wafting through the air. Laughter resonates as lively conversations flow smoothly. Welcome to the world of the Walking Taco Bake, a meal that does more than just delight your palate—it paves the way for creating cherished memories and moments of togetherness. Planning a family dinner or a casual hangout? This cozy dish promises warmth and happiness with every bite, transporting you to that wonderful place called home.

## What is a Walking Taco Bake?
The Walking Taco Bake is an inventive twist on a classic favorite that combines the flavors of a taco with the comforting essence of a casserole. This delicious dish brings all the elements of a taco into an oven-baked form, infusing every bite with warmth. From the irresistible blend of crunchy chips to the gooey layers of cheese, it’s a culinary adventure waiting to unfold in your kitchen.

### Origins of the Walking Taco Bake
The Walking Taco Bake draws its inspiration from the street food classic, the walking taco. Originating from fairs and festivals, walking tacos traditionally involve a bag of chips topped with all your favorite taco ingredients—perfect for eating while on the move. Over time, this concept evolved, finding its place as a staple casserole dish in homes across America. Its adaptability and simplicity have made it a beloved addition to family dinner nights everywhere.

### The Perfect Combination of Ingredients
What makes the Walking Taco Bake irresistible is its ideal mix of flavors and textures. Think crunchy, cheesy, and perfectly seasoned! You’ve got the hearty ground beef seasoned with zesty taco spices. Then there’s the satisfying crunch from the Chili Cheese Fritos, and let’s not forget the oozing layers of melted mozzarella and cheddar cheese soup. Each element is cleverly combined to create a dish that not only tantalizes your taste buds but also brings true comfort to the soul.

## Ingredients Needed for Walking Taco Bake
Before diving into the cooking, let’s gather the essentials. The charm of this dish lies in its simplicity, using everyday ingredients that pack a punch of flavor.

### Core Ingredients

| Ingredient | Quantity |
|—————————-|———–|
| Ground Beef | 1 lb |
| Taco Seasoning | 1 package |
| Water | 2/3 cup |
| Chili Cheese Fritos | As needed |
| Cheddar Cheese Soup | 1 can |
| Milk | 1/2 cup |
| Shredded Mozzarella Cheese | 1 cup |

With your ingredients ready, it’s time to roll up those sleeves and create a meal that’s both hearty and heavenly.

## Step-by-Step Guide to Making Walking Taco Bake
Creating this delightful dish is straightforward and rewarding, combining ease and flair to enhance your cooking experience.

### Preparing the Meat
1. Start by browning your ground beef in a skillet over medium heat.
2. Once browned, remove excess fat, ensuring the beef remains flavorful without being greasy.
3. Stir in the taco seasoning, along with 2/3 cup of water. Allow the mixture to simmer until it thickens, enveloping the beef in zesty goodness.

### Layering for Perfection
1. Preheat your oven to 350°F (175°C).
2. In a baking dish, spread a layer of Chili Cheese Fritos at the bottom.
3. Top with an even layer of your seasoned beef, ensuring each chip gets a taste of the savory mixture.
4. Pour over the cheddar cheese soup evenly, allowing it to seep into the meat and chips.
5. Sprinkle shredded mozzarella cheese generously over the top, creating a blanket of cheesy delight.
6. Add another layer of Fritos for an extra crunch.

### The Cheesy Finish
1. In a small saucepan, combine the cheddar cheese soup and milk. Heat over low heat, stirring until smooth and creamy.
2. Pour evenly over your assembled layers, letting it cascade into every nook and cranny.

### The Baking Process
1. Place your dish in the preheated oven and bake for 20-25 minutes, or until the top is golden and bubbly.
2. For a perfectly golden finish, switch to broil for the last couple of minutes, keeping a close eye to prevent burning.

## Tips for Personalizing Your Walking Taco Bake
The Walking Taco Bake is a canvas for culinary creativity. Personalize it to suit your taste preferences or dietary needs.

### Add Your Twist
Consider enhancing your bake with:
– Sliced jalapeños for a spicy kick
– A dollop of sour cream for creaminess
– Fresh guacamole for a burst of freshness
– Diced tomatoes or onions for added zest

### Making it Healthier
– Swap in lean ground beef or turkey to cut down on fat.
– Use reduced-fat cheese or soups without sacrificing flavor.
– Incorporate more veggies, such as bell peppers or corn, for added nutrients.

## Serving Suggestions for Walking Taco Bake
Elevate your meal with enticing pairings and consider the perfect sides and beverages to complement your dish.

### Perfect Pairings
– Serve your Walking Taco Bake with a simple tossed salad, balancing the richness with crisp greens.
– Pair with a refreshing glass of lemonade or iced tea.
– A bowl of salsa or pico de gallo can add a bit of zest to each plate.

## FAQ About Walking Taco Bake

### Can I Make Walking Taco Bake in Advance?
Absolutely! Assemble your dish and refrigerate for up to 24 hours before baking. When ready to serve, simply bake until heated through and golden on top.

### What are Some Alternative Chips to Use?
Feel adventurous? Try swapping Chili Cheese Fritos with nacho cheese Doritos or classic tortilla chips for different flavor twists.

### How Do I Store Leftovers?
Store leftovers in airtight containers in the fridge for up to three days. Reheat in the oven or microwave, ensuring it’s piping hot before serving.

## Conclusion
Incorporate the Walking Taco Bake into your meal rotation and watch it become a family favorite. This recipe not only pleases taste buds but also brings comfort and delight to your dining experience. Whether it’s for taco night or a festive occasion, this cheesy creation is sure to be a hit, bringing joy and satisfaction to everyone gathered around the table.

Now that you’re armed with all the tips and tricks, it’s your turn to create this cheesy masterpiece. Share the joy and warmth by serving it at your next gathering, and don’t forget to savor each moment, one bite at a time!

Make-Ahead Cornbread Stuffing Recipe for an Early Thanksgiving Dinner

“`html
Jump to Recipe

Make-Ahead Cornbread Stuffing: A Delicious Twist for Thanksgiving Dinner

Prepare your taste buds for a Thanksgiving feast with our make-ahead cornbread stuffing. This savory dish combines the buttery richness of golden brown cornbread with the aromatic blend of herbs like sage, thyme, and rosemary, offering a symphony of flavors that dance on your palate. The texture is perfectly balanced, with crisp edges and a moist center, creating a dish that is not only delicious but also easy to prepare, making your holiday meal effortlessly unforgettable.

Why You’ll Love This Recipe

This make-ahead cornbread stuffing is the epitome of Thanksgiving comfort food. Its appeal lies in its simplicity and the depth of flavor imparted by fresh herbs and aromatic vegetables. The buttery cornbread cubes soak up the savory chicken broth, creating an irresistible moist texture that’s rich and satiating. Not only is it a flavorful addition to any holiday table, but it also evokes cherished memories of family gatherings, making it a dish that resonates emotionally. Moreover, its versatility allows for various adaptations, catering to different dietary needs without losing its comforting essence.

With health-conscious ingredients like fresh parsley that brings a burst of color and nutrients, and the wholesome feel of homemade cornbread, this stuffing doesn’t just nourish the body, it also comforts the soul. Its preparation is a breeze, providing a stress-free cooking experience that even a kitchen novice can master.

You’ll love the nostalgia it brings, reminiscent of festive dinners spent with loved ones. This recipe is not just food; it’s a cherished tradition, a way to connect past and present with a dish that’s rich in flavor and memory.

Personal Story/Connection

I remember the first time I helped my grandmother make this cornbread stuffing. The kitchen was filled with laughter and the fragrant scent of herbs toasting in butter. Each step was like a page in our family storybook, binding us together in the warmth of shared tradition. This recipe was always the star of our Thanksgiving meal, a simple yet profound dish that united us, year after year.

Even now, recreating this stuffing makes me feel closer to my roots. It’s more than just a recipe; it’s a homage to family, gratitude, and the timeless joy of gathering around a communal table.

Context/Background

Cornbread stuffing, or “dressing” as it’s often called in the Southern United States, has a rich cultural history. Originally a way to use up stale bread, it has evolved into a beloved Thanksgiving staple. The use of cornbread distinguishes it from other types of stuffing, reflecting the indigenous ingredients found in American cooking.

Over the years, this dish has become a canvas for culinary creativity, showcasing regional variations and personal tweaks. From oyster stuffing popular in coastal areas to sausage-infused recipes in the Midwest, each version tells a unique story about the place and people from which it originates.

Tips for Perfect Make-Ahead Cornbread Stuffing

  • Use Stale Cornbread: For the best texture, use cornbread that’s at least a day old. It holds up better without getting mushy.
  • Adjust the Broth: If you prefer a drier stuffing, reduce the chicken broth to 1.5 cups.
  • Herb Variations: Fresh herbs can be used if desired. Just double the quantity required for dried herbs.
  • Avoid Overmixing: Stir just until combined to prevent the stuffing from becoming too dense.
  • Sauté First: Always cook the aromatics until tender for deeper flavor development.

Serving Suggestions

Cornbread stuffing pairs perfectly with classic Thanksgiving turkey, complementing the meat’s richness with its herbaceous notes. Serve it alongside cranberry sauce for a tart contrast or integrate nuts and dried fruits for added texture and sweetness. For a creative presentation, consider stuffing it inside bell peppers for a colorful and individual serving option.

You can garnish with fresh sage leaves for a sophisticated touch or drizzle with a light gravy to enhance its savory profile. Ideal for potlucks or festive gatherings, this make-ahead dish saves you time, allowing you to enjoy stress-free hosting.

Storage and Leftovers

To ensure freshness, store leftovers in an airtight container in the refrigerator for up to four days. When reheating, cover with foil to prevent drying out and warm in an oven preheated to 325°F. If you’re unable to use it all within this time, freeze the stuffing for up to two months.

Get creative with leftovers by incorporating them into soups or using them as a topping for shepherd’s pie. This dish transforms with each use, making it an essential ingredient in post-holiday meals.

Recipe Variations and Substitutions

For a gluten-free version, substitute cornbread with gluten-free bread cubes. Looking for a vegetarian option? Swap chicken broth with vegetable broth. Enhance the flavor profile by adding cooked sausage or apples for a seasonal twist, or experiment with nuts like pecans or walnuts for extra crunch. These simple swaps can tailor the stuffing to suit everyone’s taste preferences while maintaining its classic appeal.

FAQ

Can I make this ahead of time? Yes, prepare the stuffing up to the point of baking, then refrigerate overnight. Bake as directed when ready to serve.

What substitutions can I use for butter? You can use olive oil or coconut oil for a healthier alternative or a vegan spread if needed.

How do I make this gluten-free or vegan? Use gluten-free cornbread and substitute vegetable broth for the chicken broth. Omit the eggs or use a flax egg for a vegan version.

Optional Nutritional Information

  • Calories: 180 per serving
  • Fat: 10g
  • Carbohydrates: 20g
  • Protein: 4g

Final Thoughts

This make-ahead cornbread stuffing promises to be a standout on your Thanksgiving table. Its blend of traditional flavors, ease of preparation, and adaptability to personal preferences make it a must-try for any holiday celebration. As you explore this recipe, feel free to share your experience or culinary creations in the comments. We’d love to hear how you made it uniquely yours.

Recipe Section

Serves: 8. Prep Time: 20 minutes. Cook Time: 45 minutes. Total Time: 1 hour 5 minutes.

  • 1/2 cup (1 stick) unsalted butter
  • 1 large onion, chopped
  • 3 stalks celery, chopped
  • 2 cloves garlic, minced
  • 1 teaspoon dried sage
  • 1 teaspoon dried thyme
  • 1/2 teaspoon dried rosemary
  • Salt and pepper to taste
  • 1/4 cup chopped fresh parsley
  • 8 cups cornbread cubes
  • 2 cups chicken broth
  • 2 eggs, beaten
  1. Preheat oven to 350°F.
  2. In a large skillet, melt the butter over medium heat. Add onions, celery, and garlic. Cook until tender, about 5-7 minutes.
  3. Stir in sage, thyme, rosemary, salt, and pepper. Cook for another 1-2 minutes.
  4. In a large bowl, combine the cornbread cubes, onion mixture, and parsley. Mix well.
  5. Pour in chicken broth and beaten eggs. Stir until everything is well combined.
  6. Transfer the mixture into a greased baking dish.
  7. Cover with foil and bake for 30 minutes. Remove foil and bake for an additional 15 minutes until golden brown.
  8. Let it cool before serving. Enjoy this delicious make-ahead cornbread stuffing!

“`