Irresistible Raspberry Chocolate Crinkle Cookies for Your Sweet Tooth

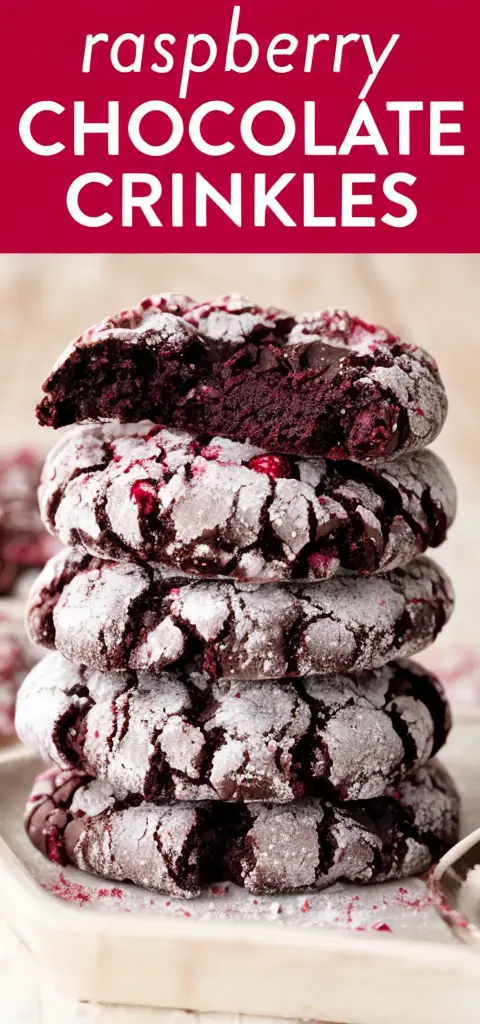
# Delight Your Taste Buds with Raspberry Chocolate Crinkle Cookies: A Perfect Homemade Treat

## Introduction

Picture this: the aroma of freshly baked cookies wafting through your home, wrapping you in warmth and love. That’s the magic of a homemade treat—more so when it’s raspberry chocolate crinkle cookies. These are not just any cookies; they’re the delightful offspring of rich cocoa and tangy raspberry, bound to elevate any gathering or quiet evening with their balance of sweet and tart. If you’re searching for a treat that hits all the right notes, look no further. Let’s embark on this flavorful journey together and create a cookie experience that’s forever memorable.

## The Magic of Raspberry Chocolate Crinkle Cookies

### What Makes These Cookies Special?

Have you ever stumbled across a flavor combination that just sings? That’s what happens when the deep, rich cocoa in these cookies meets the tangy brightness of raspberries. Here’s why they stand out:

– **Rich Cocoa Meets Tangy Raspberry**: Each bite is a dance of flavors, a finely tuned harmony that surprises and delights.

– **Perfectly Balanced**: These cookies strike a perfect balance between sweet chocolate and the refreshing tartness of raspberry, making them irresistible to those with a discerning palate.

– **Versatility for Every Occasion**: From festive holidays to simple coffee breaks, there’s no occasion where these cookies feel out of place.

### The Inspiration Behind the Recipe

Crinkle cookies have long been a staple in the world of baking, praised for their soft centers and sugar-dusted exteriors. The concept of crinkle cookies may trace back to a desire for something comforting yet visually engaging—the kind of cookie that catches the eye before wooing the palate.

– **Crinkle Cookie Origins**: Traditionally, these cookies found their roots in family kitchens across the globe, each region adding its unique spin.

– **Stories from Your Kitchen**: Perhaps you’ve created these for a loved one’s birthday or as a sweet ending to a dinner party. Share your own crinkle cookie tales; every cookie has its story.

## Gather Your Ingredients

### Ingredient Table

Cooking begins with great ingredients. Here’s what you’ll need to craft these delightful cookies:

| Ingredient | Quantity |
|————————-|—————–|
| All-purpose flour | 1 cup |
| Unsweetened cocoa powder| 1/2 cup |
| Baking powder | 1 teaspoon |
| Salt | 1/4 teaspoon |
| Unsalted butter | 1/2 cup, softened|
| Granulated sugar | 1 cup |
| Large eggs | 2 |
| Vanilla extract | 1 teaspoon |
| Raspberry jam | 1/2 cup |
| Powdered sugar | 1/2 cup |

### Essential Tools

Before diving in, ensure your kitchen is ready with these essential tools:

– **Mixing Bowls and Whisk**: For blending your ingredients seamlessly.
– **Baking Sheet and Parchment Paper**: To provide the ideal surface for your cookies to bake.
– **Optional Electric Mixer**: If you’re aiming for that ultra-smooth butter and sugar creaminess.

## Step-by-Step Baking Directions

### Preparation Steps

1. **Preheat the Oven**: Set your oven to 350°F (175°C) and line a baking sheet with parchment paper—this ensures perfect baking and easy cleanup.

2. **Mix Dry Ingredients**: In one of your mixing bowls, combine the all-purpose flour, unsweetened cocoa powder, baking powder, and salt. Ensure they’re well blended for an even dough.

### Mixing and Forming the Dough

– **Creaming Butter and Sugar**: Using your mixer or a sturdy whisk, blend the softened butter with granulated sugar until the mixture is light, fluffy, and thoroughly combined.

– **Incorporate Eggs and Vanilla**: Add the eggs one at a time, mixing after each addition. Then, pour in the vanilla extract, allowing its aroma to weave into the fabric of your dough.

– **Forming Dough Balls**: Gradually introduce the dry ingredients, mixing until a dough forms. Shape this dough into small balls and give them a gentle press to slightly flatten them—this is the base for your raspberry magic.

### Adding the Raspberry Touch

– **Infusing with Raspberry Jam**: With the back of a spoon, create small indentations in each dough ball. Carefully fill these with raspberry jam, letting it serve as a flavorful surprise at the center.

– **Baking to Perfection**: Slide your tray into the oven. Allow your cookies to bake for 10-12 minutes, or until they yield slightly to the touch while maintaining a soft center.

– **Finishing Flourish**: Once they’ve cooled, dust your cookies with powdered sugar. Watch as their crinkle tops emerge, inviting you to indulge.

## Tips to Perfect Your Cookies

### Common Baking Challenges and Solutions

– **Preventing Dryness**: Ensure your dough is adequately moist. If it feels dry, introduce a splash of milk to achieve the desired consistency.

– **The Perfect Crinkle Effect**: For best results, make sure the dough is chilled before baking—this helps achieve those delightful crinkles that are the cookie’s hallmark.

### Storage and Serving Suggestions

– **Keeping Freshness Intact**: Store in an airtight container at room temperature to enjoy them at their freshest, or freeze them for a future treat.

– **Perfect Pairings**: These cookies make a delightful companion to a hot cup of coffee or tea, their sweetness enhancing your beverage of choice.

## Conclusion

Raspberry chocolate crinkle cookies are more than just a sweet delight; they are a moment of warmth, a touch of care, and a reflection of your love for baking. Whether experienced in the kitchen or beginning your journey, these cookies invite you to indulge in a symphony of flavors that are bound to bring happiness with every bite. It’s not just about making cookies; it’s about crafting experiences, one batch at a time.

## FAQs

### Can I substitute raspberry jam with another flavor?
Certainly! While raspberry offers a unique tartness pairing exceptionally well with chocolate, feel free to explore with strawberry, apricot, or even blackberry jam for distinct flavor profiles.

### How do I store these cookies for maximum freshness?
Place them in an airtight container at room temperature, where they’ll remain delightful for up to a week. For prolonged freshness, consider freezing the cookies.

### Can I make the dough ahead of time?
Absolutely. Prepare your dough up to 48 hours in advance and store it in the refrigerator. Just remember to let it reach room temperature before baking to ensure even cooking and optimal texture.

**Call to Action:** Unleash the baker within you! Gather your ingredients, follow this guide, and share the magic of raspberry chocolate crinkle cookies with friends and loved ones. Your delicious creation is just a cookie sheet away from bringing smiles and making memories.

Master Pinterest: How to Discover and Save Your Own Pins

# Discover (and Save!) Your Own Pins on Pinterest: A Delicious Caprese Chicken Salad Recipe

## Introduction: Unlock the Flavors with Pinterest

Picture yourself scrolling through Pinterest on a lazy afternoon, the clock ticking slowly, and your mind eagerly seeking fresh inspiration. Amidst the colorful pins, one particularly delightful recipe catches your eye—a Caprese Chicken Salad. This isn’t just another dish; it’s a culinary adventure ready to transport you to the sun-drenched fields of Italy, right from the comfort of your kitchen.

Remember the delight of finding that perfect recipe that added vibrancy to your family dinners? There was a time, a leisurely Sunday afternoon, when a pinned recipe transformed into a warm, hearty meal on your table. Just like that moment, today’s recipe offers you the chance to embrace fresh ingredients and explore your creativity in the kitchen.

## Ingredient Prep for Your Caprese Chicken Salad

### Gathering Your Fresh Ingredients

The secret to crafting a memorable dish lies in the ingredients. Freshness is key, ensuring that every bite bursts with flavor. Selecting high-quality chicken and vibrant produce not only enhances taste but elevates the entire dining experience.

#### Required Ingredients

To help you prepare, here’s a handy table of what you’ll need:

| Ingredient | Quantity |
|———————|————————|
| Chicken breasts | 1 lb, boneless, skinless|
| Olive oil | 1/4 cup |
| Balsamic vinegar | 1/4 cup |
| Garlic powder | 1 tsp |
| Cherry tomatoes | 1 cup, halved |
| Fresh basil | 1/2 cup, chopped |
| Fresh mozzarella | 1/2 cup, diced |
| Balsamic glaze | For drizzling |

## Step-by-Step Cooking Instructions

### Marination Magic

The journey of a thousand flavors begins with the perfect marinade. By infusing your chicken with the essence of olive oil, balsamic vinegar, garlic, salt, and pepper, you lay the path for a juicy, flavorful chicken that tantalizes your taste buds.

– **Combine** all marinade ingredients in a bowl.
– **Add** chicken and marinate for at least 30 minutes, allowing it to soak up the rich flavors.

### Grilling to Perfection

Once marinated, it’s time to grill. Picture the sizzle as the chicken meets the hot grill, achieving that perfect sear. Cook until it’s tender on the inside yet slightly crisp on the outside—a bite that’s juicy and flavorful.

### Assembling the Salad

Now, for the fun part—assembly.

1. **Slice the chicken** after allowing it to rest post-grilling.
2. **Combine** it in a bowl with cherry tomatoes, fresh basil, and creamy mozzarella.
3. Finish off with a **drizzle** of balsamic glaze, elevating the dish with its tangy sweetness.

## Serving and Enjoyment Tips

### Presentation Matters

Presentation isn’t just for photos—it heightens the entire meal experience. Arrange the salad artfully on a platter, letting the vibrant colors shine through. A salad that’s not just delicious, but dre amily Instagram-worthy.

### Pairing Suggestions

Complement your dish with perfect pairings. Try a chilled glass of white wine or a refreshing homemade lemonade, enhancing the flavors without overpowering the delicate notes of your salad.

## FAQs: Your Caprese Chicken Salad Queries Answered

### Can I Prepare This Recipe Ahead of Time?

Certainly! You can prepare the ingredients in advance. Marinate the chicken, slice the tomatoes, and even chop the basil. Simply assemble the salad before serving for maximum freshness.

### What Substitutes Can Be Used for Mozzarella?

If you’re looking to switch things up or catering to dietary needs, consider using feta or goat cheese. Each offers its unique twist, maintaining that creamy texture.

### How Can I Make It Vegan?

For a plant-based version, substitute chicken with grilled tofu or tempeh and swap mozzarella with a dairy-free alternative. This way, everyone can enjoy the delightful flavors of this salad.

## Conclusion: Share the Joy, Share the Taste

In your quest to explore new flavors on Pinterest, you stumbled upon a gem—a Caprese Chicken Salad that’s more than just a meal. It’s a celebration of fresh ingredients, a tribute to culinary creativity, and a journey to taste the vibrant joys of summer.

As you relish this delight, consider sharing your creation. Pin it on your boards and use hashtags like #CapreseChickenSalad and #PinterestInspired to join a community of fellow food lovers. Your next meal discovery could be waiting to inspire someone else. Enjoy the culinary adventure, and happy pinning!

How to Discover and Save Unique Pins on Pinterest

# Discover (and Save!) Your Own Pins on Pinterest: An Irresistible Walking Taco Bake Recipe

## Engage Your Taste Buds and Your Pinterest Board

### A Taste of Family Memories

Picture this: a bustling kitchen with laughter, the aroma of sizzling ground beef wafting through the air, and the anticipation of a delightful meal shared with family. Do you remember those fun, memorable taco nights? There’s something special about discovering a recipe that’s not only delicious but also easy to recreate. The Walking Taco Bake is precisely that—a warm, cheesy delight designed to gather loved ones around the table, creating moments that you’ll cherish forever.

### An Invitation to Cheesy Comfort

Imagine indulging in layers of crunchy Chili cheese Fritos, perfectly seasoned beef, and a luscious cheese blend, all baked to bubbly perfection. This recipe isn’t just about satisfying your taste buds; it’s about creating a comforting experience that invites everyone to linger at the table and share stories. And what’s equally exciting? You can save this gem to your Pinterest board, ensuring it’s always at your fingertips.

## Why Pinterest is Your Best Recipe Companion

### A Culinary Wonderland at Your Fingertips

In today’s digital age, Pinterest has emerged as a go-to platform for culinary inspiration. With endless options for meal planning, Pinterest empowers you to explore global flavors, discover new cooking techniques, and organize your collection of favorite recipes. It’s like having a personal cookbook that continually expands with delicious ideas.

**Tips for Maximizing Pinterest Potential:**

– Create specific boards for different cuisines or meal types.
– Use Pinterest’s search function to explore new ingredients or cooking trends.
– Regularly update your boards, adding notes or ratings to remember your favorites.

Leveraging Pinterest’s organizational tools ensures that your kitchen adventures remain as effortless and enjoyable as your Taco Bake nights.

## Ingredients for the Perfect Walking Taco Bake

### Key Ingredients You’ll Need

| Ingredient | Quantity |
|————————–|——————-|
| Ground beef | 1 lb |
| Taco seasoning package | 1 |
| Water | 2/3 cup |
| Chili cheese Fritos | 2 cups |
| Cheddar cheese soup | 1 can |
| Milk | 1/2 cup |
| Shredded mozzarella cheese| 1 cup |

**Ingredient Descriptions and Alternatives:**

– **Ground Beef:** Opt for beef with balanced fat content for flavor without excessive greasiness. Substitute with ground turkey or plant-based alternatives for a healthier twist.
– **Taco Seasoning:** A pre-made package adds convenience. Feel free to mix your own blend using cumin, chili powder, and garlic.
– **Chili Cheese Fritos:** These add a satisfying crunch; substitute with regular corn chips if preferred.
– **Cheddar Cheese Soup:** For a creamy texture, but a homemade cheese sauce can be an excellent alternative.
– **Milk & Shredded Cheese:** Essential for a rich cheese layer, switch out mozzarella for Monterey Jack or pepper jack for variety.

## Step-by-Step Guide to Making Walking Taco Bake

### Preparing the Beef Mixture

1. **Brown the Beef:** In a skillet, brown 1 lb of ground beef over medium heat. Ensure it’s cooked through and crumbly.
2. **Season with Spice:** Sprinkle in the taco seasoning package and pour 2/3 cup of water. Simmer until the mixture thickens, stirring occasionally. **Tip:** Taste and adjust the seasoning to suit your flavor preference, adding a pinch of salt if necessary.

### Assembling Your Taco Bake

1. **Layer the Base:** Preheat your oven to 350°F (175°C). Spread 2 cups of Chili cheese Fritos at the bottom of a baking dish.
2. **Add the Beef:** Spoon the seasoned beef mixture evenly over the Fritos.
3. **Cheese It Up:** In a saucepan, heat 1 can of cheddar cheese soup mixed with 1/2 cup of milk, stirring until smooth. Pour over the beef layer.
4. **Finish with Mozzarella:** Sprinkle 1 cup of shredded mozzarella cheese on top for extra gooeyness.

*Visual Aid Suggestion:* Document each step with photos, from browning the beef to sprinkling the final cheese layer.

### Bake and Finish

1. **Baking Time:** Place in the oven and bake for 20-25 minutes, or until the cheese is bubbly and golden. **Tip:** For an irresistible golden crust, broil your dish for the last 2 minutes—watch closely to prevent burning!
2. **Cooling Time:** Let the bake stand for a few minutes before serving, allowing the layers to meld together seamlessly.

## Serving Suggestions and Pairings

### Perfect Complements for Your Taco Bake

1. **Sides:** Consider a fresh tomato and avocado salad to balance the richness. A bowl of black bean soup can add heartiness to the meal.
2. **Beverages:** A cold, citrusy margarita pairs exceptionally well, or opt for a zesty lemonade for a non-alcoholic choice.
3. **Occasions:** Ideal for a casual weeknight dinner or a vibrant party gathering. When entertaining, serve bite-sized portions in ramekins for easy handling.

## Frequently Asked Questions (FAQ) About Walking Taco Bake

### Can I Customize the Ingredients?

**Absolutely!** Feel free to experiment with different cheese varieties—sharp cheddar or Colby jack work beautifully. For a veggie boost, incorporate bell peppers or corn into the beef mixture.

### How Can I Store Leftovers?

**Storage:** Refrigerate in an airtight container for up to three days. To reheat, use an oven at 350°F until heated through, which helps retain texture and flavor.

### What Other Dishes Can I Make with These Ingredients?

– **Taco Salad:** Use leftover beef over a bed of greens with your choice of toppings.
– **Quesadillas:** Sandwich beef and mozzarella between tortillas, grill until golden.
– **Nachos:** Layer Fritos with beef and cheese, broiling quickly for a snackable delight.

## Rediscover Your Love for Cooking with Pinterest and Walking Taco Bake

In conclusion, the Walking Taco Bake isn’t just a recipe; it’s an experience that effortlessly brings together flavor and fun. Its simplicity allows you to enjoy creating a meal without stress, and its scrumptiousness guarantees smiles at the dinner table. So why not share this blissful creation on Pinterest? Inspire others to embark on this delicious journey while rediscovering your own passion for cooking.

### Your Turn!

**Pin It, Share It, Love It:** As you bring your Walking Taco Bake to life, don’t forget to photograph your masterpiece and pin it to your boards. Become part of the community that makes cooking an exciting adventure. Let this recipe be the beginning of endless culinary exploration on Pinterest—where every pin is a step towards delicious new memories.

By following these guidelines, you not only create a well-rounded article optimized for SEO but also provide substantial value to culinary enthusiasts looking to enrich their Pinterest boards with delightful recipes.

How to Discover and Save Your Unique Pins on Pinterest

# Discover (and Save!) Your Comfort Food Pins on Pinterest: A Cheesy Taco Delight

## Introduction: A Taste of Comfort and Creativity

Remember the satisfaction of your favorite childhood meal? The savory aroma, the warm flavors, and how it filled your spirit with joy—that’s the magic we’re aiming to capture in this mouthwatering Pinterest recipe. As we explore the cheesy taco casserole treat, allow nostalgia to lead your taste buds toward new tastes and experiences. Whether you’re new to the kitchen or a seasoned home cook, this dish offers a creative and comforting culinary adventure.

## Section 1: Why Pinterest is Your Gateway to Culinary Creativity

### Exploring Culinary Inspirations on Pinterest

In today’s digital age, Pinterest stands as a beacon for anyone seeking culinary inspiration. Unlike traditional search engines, Pinterest operates as a visual discovery tool, where every pin acts as a gateway to a world of ideas. Whether you’re gathering ideas for a weeknight dinner or planning a festive gathering, Pinterest provides endless culinary possibilities at your fingertips.

Pinterest isn’t just about discovering new recipes; it’s about community. You can engage with fellow food enthusiasts, share ideas, and create boards that cater to your unique tastes. This digital platform makes it seamless to save and share diverse recipes, marking it as a go-to destination for home cooks everywhere. The ability to visually organize these recipes means that inspiration is always just a few clicks away.

## Section 2: The Cheesy Taco Delight Recipe

### Ingredients You’ll Need (Presented in a Table Format for Clarity)

| **Ingredient** | **Quantity** |
|—————————–|—————–|
| Ground Beef | 1 lb |
| Taco Seasoning | 1 package |
| Water | 2/3 cup |
| Chili Cheese Fritos | 2 cups |
| Cheddar Cheese Soup | 1 can |
| Milk | 1/2 cup |
| Shredded Mozzarella Cheese | 1 cup |

### Step-by-Step Cooking Directions

1. **Brown the Meat:** Start by browning your ground beef in a skillet over medium-high heat until it’s no longer pink. Drain the excess fat for a healthier dish.

2. **Season and Simmer:** Stir in your taco seasoning with 2/3 cup of water. Let it simmer until the liquid is absorbed, allowing the flavors to meld with the meat.

3. **Layer with Crunch:** In an 8×8 baking dish, spread out a layer of Chili Cheese Fritos. Evenly distribute the seasoned beef over this crunchy base.

4. **Cheese Sauce Magic:** In a small pot, heat the cheddar cheese soup and milk until you achieve a smooth consistency. Pour this creamy mixture over your meat.

5. **Top with Cheese:** Generously sprinkle shredded mozzarella over the entire dish. This will create a deliciously gooey top layer.

6. **Bake to Perfection:** Preheat your oven to 350°F and bake for 12-14 minutes, or until the cheese is bubbly and golden. Serve hot and enjoy every cheesy, flavorful bite!

## Section 3: Customizing Your Taco Delight

### Make It Your Own: Substitutions and Additions

The beauty of this cheesy taco delight lies in its adaptability. Here are some ways to tailor it to your preferences:

– **Protein Alternatives:** Swap out ground beef for ground chicken or turkey for a lighter version.
– **Vegan Adaptations:** Use plant-based meat and dairy-free cheese alternatives to create a vegan-friendly casserole.
– **Add Some Heat:** If you love spicy food, consider adding sliced jalapeños or a dash of hot sauce to the mix for an extra kick.

## Section 4: The Perfect Occasion for Your Cheesy Creation

### When to Enjoy Your Cheesy Taco Delight

This creamy casserole is versatile enough for numerous occasions:

– **Taco Tuesdays:** Add a new favorite to your weekly taco night.
– **Casual Gatherings:** It’s ideal for potlucks or casual get-togethers with friends and family.
– **Cozy Nights In:** Perfect comfort food for a relaxing evening at home.
– **Balanced Pairings:** Complement your dish with a fresh salad or avocado slices for a complete meal.

## FAQs: Your Queries Answered

### Frequently Asked Questions About Pinterest Recipes

– **What makes Pinterest recipes unique compared to traditional cookbook recipes?**
Pinterest offers a visually engaging platform, complete with community interaction, allowing you to easily customize and share recipes tailored to your taste.

– **How can I save and organize my favorite recipe pins?**
Create Pinterest boards to categorize and save recipes according to themes, ingredients, or occasions, making future meal planning effortless.

– **Can I adjust the Cheesy Taco Delight recipe for dietary restrictions?**
Absolutely! This recipe is highly customizable with options for plant-based ingredients or spicier versions to match your dietary preferences and flavor cravings.

## Conclusion: Embrace the Flavorful Journey

### Savoring New Culinary Traditions through Pinterest

As you enjoy each cheesy bite of this taco delight, remember the potential of every dish to become a new tradition. Pinterest isn’t just a recipe book—it’s a canvas for your culinary creativity. Engage with it to save, share, and savor your delicious discoveries with friends and family. So go ahead, dive into the world of Pinterest recipes and let your kitchen creativity run wild!

**Call to Action:** Share this cheesy taco delight with your friends on Pinterest, and start your own board of comfort foods. Delight in the joy of sharing amazing meals and let others relish in your culinary prowess!

Maximizing Pinterest: Discover and Save Your Favorite Pins Effortlessly

# Discover & Save Your Own Pins on Pinterest: A Delicious Chicken Stir-Fry Recipe 📌🍽️

## Engaging Introduction

Picture this: It’s a lazy Sunday afternoon, and while browsing through Pinterest, a vibrant image of a chicken stir-fry captures your attention. It’s one of those pictures that seems to pull you in with its vivid colors and promise of flavor. With just a few taps, you save this recipe pin, imagining the tantalizing aroma filling your kitchen. The thrill of turning digital inspiration into a real, mouthwatering dish brings your culinary creativity to life. Cooking the Pinterest way just became your new, delicious reality. It’s amazing how easy it is to make something so delightful, right in your kitchen, with just a few ingredients gathered from that well-stocked pantry.

## Embrace the Pinterest Inspiration

### The Power of Pinterest for Food Lovers

For all culinary adventurers, Pinterest is more than just a social media platform; it’s a vast library brimming with innovative recipes and delightful culinary trends. Foodies find inspiration in the creative dishes that others have generously shared, ranging from simple weeknight dinners to elaborate gourmet experiences. The true power of Pinterest lies in its ability to connect like-minded food enthusiasts, offer diverse cuisines, and provide endless potential to discover something exciting every time you log in.

### Joy of Creative Experimentation

What sets Pinterest apart as a culinary hub is its inherent encouragement for experimentation. It’s designed to make you want to try something new — be it an unfamiliar ingredient or a different cooking technique. Imagine the possibilities: swapping red bell peppers for exotic black ones or trying your hand at incorporating aromatic herbs into classic dishes. Each pin is a doorway to discovery, transforming your kitchen into a playground of flavors.

## Ingredients & Preparation Made Simple

To turn your pinned inspiration into a savory reality, you’ll need a streamlined list of ingredients. Below, you’ll find everything you need to recreate this tantalizing chicken stir-fry.

| Ingredient | Quantity |
|——————————-|—————|
| Boneless, skinless chicken breasts | 1 lb |
| Soy sauce | 1/4 cup |
| Honey | 2 tbsp |
| Garlic, minced | 2 cloves |
| Ginger, minced | 1 tsp |
| Crushed red pepper flakes | 1/2 tsp |
| Salt and pepper | To taste |
| Red bell pepper, sliced | 1 |
| Green bell pepper, sliced | 1 |
| Yellow bell pepper, sliced | 1 |
| Red onion, sliced | 1 |
| Vegetable oil | 1 tbsp |
| Cooked white rice | For serving |
| Sesame seeds | For garnish |
| Green onions, chopped | For garnish |

## Step-by-Step Cooking Directions

### Marinating the Chicken

Start by assembling the marinade. In a mixing bowl, combine soy sauce, honey, minced garlic, ginger, red pepper flakes, and a pinch of salt and pepper. Mix these ingredients until they harmonize into a uniform liquid marinade. Submerge your chicken breasts in this flavorful concoction, ensuring each piece is well-coated. Leave the chicken to soak in these aromatic flavors for a minimum of 30 minutes, allowing it to absorb the rich, savory notes. This step is crucial as it lays the foundation for a truly indulgent stir-fry.

### Cooking the Chicken

Once marinated adequately, heat your skillet over medium-high heat with a dash of vegetable oil. Place the chicken breasts into the hot skillet, allowing them to sizzle and develop a golden brown crust. Turn occasionally to ensure even cooking. It should take around 6-7 minutes per side, depending on thickness. Once cooked through, transfer the chicken to a cutting board and let it rest. This resting period will lock in the succulent juices, making your chicken tender and delightful.

### Sautéing the Vegetables

In the same skillet, toss in your sliced bell peppers and red onion, taking advantage of any residual marinade left behind. Adjust the heat to medium, stirring occasionally. Aim to maintain the vegetables’ vibrancy while achieving a slight crunch. This process should take about 5 minutes; you want them slightly tender, yet not too soft, to add a satisfying texture to your dish.

### Combining and Serving

With the chicken rested, slice it into thin, bite-sized strips. Reintroduce these slices to the skillet with your sautéed vegetables. Allow these components to mingle, absorbing each other’s flavors over a gentle heat for a couple of minutes. Serve the medley over a bed of warm white rice, and don’t forget to decorate with sesame seeds and green onions for an extra touch of flavor and visual appeal.

## The Nutritional Benefits of Homemade Cooking

### Balanced Meal

Crafting this chicken stir-fry ensures you’re serving a well-balanced plate filled with essential nutrients. You have lean protein from the chicken, a rainbow of vitamins from your assortment of vibrant vegetables, and carbohydrates from the rice. Each bite offers a taste of health and satisfaction, combining to provide an energizing dinner option that’s as nutritious as it is delicious.

### Customization Options

Feel free to tailor this recipe to meet your dietary needs or personal preferences. Consider swapping out traditional soy sauce for a gluten-free alternative or exchanging honey with agave nectar if you’re seeking a vegan-friendly sweetener. Vegetables can also be interchanged to reflect what’s in your fridge or your current cravings. Maybe you want to add broccoli or try out some snap peas for a different crunch – the choice is yours!

## Tips for Perfecting Your Pinterest Inspired Dish

### Cooking Tips

Navigating the world of stir-fry can be tricky, but with these insights, you’ve got a clear path to culinary success. Avoid overcooking the chicken by keeping an eye on the clock and checking for doneness with a gentle poke or slicing to see if juices run clear. Taste as you go; under-seasoning can make a vibrant dish fall flat, so ensure each component is flavorful and well-seasoned.

### Presentation Ideas

The first bite is taken with the eyes, and you’ll want to make your dish visually inviting. Garnish generously; sprinkle sesame seeds to add a gentle crunch and scatter freshly chopped green onions for an aromatic finish. Consider serving on a wide, white platter to enhance the colors of the dish, making each portion stand out.

## Conclusion

### Summarize the Recipe Journey

Reimagining a pin from Pinterest into a delicious chicken stir-fry is more than cooking; it’s an adventure. The joy of recreating something that once lived only on your screen mirrors the excitement of discovery. Each step, from marinating to serving, is a testament to the power of digital inspiration and personal creativity, offering both indulgence and fulfillment.

### Encourage Reader Engagement

And now, it’s your turn. Embrace your own Pinterest culinary adventures and see where they take you. Did you make any tweaks or additions? Share your creations and variations on this dish in the comments or on social media. Your journey—from pin to plate—inspires others, just as someone once inspired you.

## FAQ Section

**Q: What makes Pinterest a great platform for finding recipes?**
A: Pinterest is a gateway to a world of diverse culinary traditions and innovative ideas, with its simple search features and visually-driven format making it easy to explore and save enticing recipes from around the globe.

**Q: How can I ensure my chicken stir-fry is full of flavor?**
A: Generous marination time is key. Make sure your chicken absorbs as much flavor as possible and cook evenly to ensure every bite is seasoned to perfection.

**Q: Can I substitute the vegetables in this recipe?**
A: Absolutely! This recipe is adaptable; feel free to use whatever vegetables you love or have on hand — from crunchy broccoli florets to sweet snap peas and colorful carrots.

By weaving optimization techniques naturally throughout this article, you ensure it does more than just speak to the heart of readers; it appeals to search engines too. Creating a symphony between narrative inspiration and methodical precision broadens the reach of this recipe, inviting a wide audience to enjoy not just a dish, but an experience.

Start Your Day Right with Wholesome Morning Glory Muffins

# The Ultimate Guide to Baking Wholesome Morning Glory Muffins

## Introduction

*Imagine waking up to the comforting aroma of freshly baked muffins wafting through your kitchen.* Morning glory muffins aren’t just a treat; they stand as a hearty and wholesome way to start your day with love and nourishment. Reflecting on those lazy Sunday mornings, I remember my grandmother baking these delightful treasures, filling our home with warmth and delightful scents—an enduring family tradition that symbolizes comfort and health.

## What Makes Morning Glory Muffins Special?

Morning Glory Muffins are unique in their ability to offer both taste and nutrition in every bite. But what truly makes them stand out?

### Nutritious Ingredients

– **Packed with Fiber**: The inclusion of fiber-rich grated carrots and apples promotes digestive health and keeps you feeling full longer.
– **Healthy Fats**: With walnuts and coconut, these muffins pack heart-friendly fats providing energy and enhancing the flavor.
– **Natural Sweetness**: Raisins and orange juice bring natural sweetness and a pleasant tang without the excessive need for refined sugars.

### Versatile and Customizable

One of the greatest attributes of morning glory muffins is their adaptability:
– Change up the ingredients to accommodate dietary needs.
– Options abound for gluten-free and vegan variations, ensuring everyone can enjoy these delightful treats.

## Ingredients and Their Benefits

Each ingredient in your morning glory muffins brings something special to the table. Here’s a glance at what you’ll need and why:

| Ingredient | Amount | Benefit |
|———————|——–|——————————————-|
| All-purpose flour | 2 cups | Provides structure |
| Sugar | 1 cup | Sweetening agent |
| Baking Soda | 2 tsp | Helps in leavening |
| Ground Cinnamon | 2 tsp | Adds warmth and flavor |
| Salt | 1/2 tsp| Enhances flavors |
| Grated Carrots | 2 cups | Adds moisture, flavor, and nutrients |
| Shredded Coconut | 1/2 cup| Provides texture and healthy fats |
| Raisins | 1/2 cup| Natural sweetness and chewy texture |
| Chopped Walnuts | 1/2 cup| Crunch and healthy fats |
| Apple, peeled | 1 | Provides flavor and additional moisture |
| Eggs | 3 | Binds ingredients, adds richness |
| Vegetable Oil | 1/2 cup| Offers moisture and richness |
| Orange Juice | 1/4 cup| Adds a citrusy zing and natural sweetness |
| Vanilla Extract | 2 tsp | Enhances overall flavor |

## Step-by-Step Baking Instructions

Creating your own batch of morning glory muffins isn’t just rewarding; it’s straightforward with the right approach. Let’s dive into the process step-by-step so you can bake with confidence.

### Preparing Your Workspace

– Begin by preheating your oven to 350°F.
– Next, line a muffin tin with paper liners—this makes cleanup easier and keeps your muffins neatly contained.

### Mixing Dry Ingredients

– In a large bowl, combine all-purpose flour, sugar, baking soda, ground cinnamon, and salt.
– Use a whisk to ensure these dry elements harmonize evenly, setting up a beautifully blended base.

### Incorporating the Add-ins

– Add in your grated carrots, shredded coconut, raisins, chopped walnuts, and the apple.
– Stir with care to ensure each piece is fully integrated, coating these add-ins thoroughly with the flour mix.

### Whisking Wet Ingredients

– In another bowl, whisk together the eggs, vegetable oil, orange juice, and vanilla extract.
– These liquids form the wet component of your batter, introducing moisture and depth of flavor.

### Combining and Baking

– Gradually pour the wet mixture into the dry mix. Stir gently until they just come together; over mixing can lead to tougher muffins.
– Use a spoon to fill each muffin cup ¾ full, allowing room for rising as they bake.
– Place in the oven for 20-25 minutes. Test their doneness with a toothpick—if it comes out clean, they are ready to enjoy.

## Serving and Enjoyment Tips

### Serving Suggestions

– Morning glory muffins are best savored when still warm, perhaps with a small pat of butter melting into them or a dollop of creamy yogurt on the side.
– These muffins make for an ideal breakfast, a midday snack, or a delightful addition to lunchboxes.

## Frequently Asked Questions

### Can I make these morning glory muffins vegan or gluten-free?

Absolutely! Swap out the eggs for flax eggs (1 tablespoon flaxseed meal + 2.5 tablespoons water per egg) to make them vegan. Use a reputable gluten-free flour blend if you need to avoid gluten.

### How should I store these muffins?

To keep them fresh, store in an airtight container at room temperature for up to three days or freeze them for up to a month. This ensures they stay delicious whenever you need them.

### Can I replace the sugar with a healthier option?

Indeed, you can substitute sugar with alternatives like honey, maple syrup, or coconut sugar. These options provide sweetness but with additional health benefits and complex flavors.

## Conclusion

Crafting a batch of wholesome morning glory muffins is more than just a means to indulge a sweet craving—it’s an opportunity to embrace a lifestyle centered on healthy, nutritious eating. Whether you’re a seasoned baker or a novice venturing into the kitchen, these muffins offer simplicity combined with profound, rewarding flavors. So go ahead, bake them with love, share them with those you cherish, and transform these moments into memories that will last a lifetime.

Hopefully, this guide not only answers your questions but enriches your morning routine. Try your hand at baking these muffins today and let your kitchen be filled with the joy and warmth of homemade goodness. Don’t forget to share your results with family and friends, and encourage them to experience the delicious journey themselves. #MorningGloryMuffins #HealthyBreakfast #BakeWithLove

Irresistible Tarte Tatin Recipe: Master the Classic French Dessert

# Discovering the Delicious Tarte Tatin: A Sweet French Classic

## Introduction to Tarte Tatin: A Journey to French Indulgence

Imagine a kitchen filled with the irresistible aroma of caramelized apples and buttery pastry. That’s precisely the sensation I experienced the first time I encountered Tarte Tatin. During a chilly evening in Paris, I stumbled upon a quaint café where this illustrious dessert was the star. The warmth of the candlelit tables paired perfectly with the dessert’s sticky sweetness, taking me on a sensory journey through lush French orchards. As you delve into the art of making or savoring a Tarte Tatin, allow yourself to be whisked away to the romantic landscape of France. Let’s immerse in this indulgent culinary masterpiece that offers you a little taste of French tradition right at home.

## What is Tarte Tatin? Unveiling the Magic

### The History of Tarte Tatin

Stepping back in time, Tarte Tatin traces its origins to the late 19th century in France. Legend has it that this delicious mistake-turned-masterpiece was crafted by the Tatin sisters, Caroline and Stéphanie, at their hotel in Lamotte-Beuvron. Initially experimenting with an apple pie, their delightful error led to the caramelized marvel known today—a dessert now renowned beyond the borders of France.

### Why Tarte Tatin?

So, what makes Tarte Tatin unique among a pantheon of sweet treats? Let’s explore the reasons:

– **Exquisite Caramelization**: The hallmark of Tarte Tatin is its sublimely caramelized apples, achieved through a meticulous cooking process that infuses deep flavor.

– **A Symphony of Flavors and Textures**: The dessert masterfully combines the tender yet slightly crisp apples with a buttery, flaky puff pastry, creating an unforgettable mouthfeel and taste.

## Gathering Ingredients: A Ready-to-Bake Recipe

When preparing your Tarte Tatin, the quality of your ingredients is crucial. Here’s a handy table to guide you:

| Ingredient | Quantity |
|———————–|————-|
| Apples | 6-8 |
| Granulated sugar | 1 cup |
| Unsalted butter | 1/2 cup |
| Puff pastry (thawed) | 1 sheet |
| Vanilla ice cream | Optional |

### Highlight Key Ingredient

Choosing the right apples sets the stage for the perfect Tarte Tatin. Opt for firm varieties such as Granny Smith, Honeycrisp, or Golden Delicious. Their ability to hold shape under heat while balancing sweet and tart flavors makes them ideal candidates for this culinary excursion.

## Step-by-Step Guide: Making the Perfect Tarte Tatin

### Preparing the Apples

The foundation of your Tarte Tatin lies in apple preparation. Begin by peeling and coring your apples, then slicing them uniformly to ensure even cooking. Uniform slices not only cook consistently but also contribute to the dessert’s stunning visual appeal.

### Caramelizing Sugar and Butter

Caramelization is the magical step where sugar meets butter to create a rich, golden syrup. In a well-seasoned cast-iron skillet, melt the butter over medium heat. Add sugar evenly, allowing it to melt undisturbed until it transforms into an amber hue. This step requires careful attention—you’re aiming for perfection, not burnt sugar. Once achieved, remove from heat to prevent overcooking.

### Assembly and Baking

Arrange your prepped apple slices meticulously in the skillet atop your caramel, layering them tightly for a beautiful presentation. Cover with the thawed puff pastry, tucking the edges around the apples. Bake in a preheated oven at 375°F (190°C) for 30-40 minutes, until your pastry emerges golden and fragrant.

### The Grand Finale: Flipping and Serving

Here comes the thrilling step: flipping the Tarte Tatin. Allow it to rest for a few minutes before placing a serving plate over the skillet and flipping it swiftly yet carefully. For an authentic finish, serve warm with a scoop of vanilla ice cream. Watch as it melts slightly over the top, enhancing the flavors and bringing an elegant touch to your creation.

## Tips and Tricks for a Flawless Tarte Tatin

Crafting a flawless Tarte Tatin is an art, and these tips will guide you:

– **Do**:
– Utilize a well-seasoned cast-iron skillet for even heat distribution.
– Ensure your oven is properly preheated to achieve an even bake.

– **Don’t**:
– Overcrowd the apples, which can hinder proper caramelization.
– Allow the caramel to burn; watch closely to maintain the ideal flavor profile.

## Common Mistakes and How to Avoid Them

Creating Tarte Tatin can pose challenges. Let’s tackle common pitfalls:

– **Pitfall**: Caramelization gone awry.
**Solution**: Resist the urge to stir sugar as it melts; simply swirl the skillet for even cooking.

– **Pitfall**: Soggy pastry.
**Solution**: Thoroughly drain any excess juice from apples before arranging them for baking.

## Conclusion: The Sweet Satisfaction of Homemade Tarte Tatin

As the final bite of homemade Tarte Tatin melts in your mouth, savor the sweet satisfaction of having crafted an iconic French dessert. Remember, this experience goes beyond taste—it’s your gateway to creativity. Venture further by incorporating other fruits, like pears or peaches, into your Tarte Tatin variations. Allow each creation to tell its own delicious story.

## FAQ Section About Tarte Tatin

**What is Tarte Tatin traditionally served with?**

A classic pairing includes vanilla ice cream or crème fraîche. These accompaniments complement the tart’s richness and balance the flavors beautifully.

**Can I make Tarte Tatin ahead of time?**

Absolutely! Store your tarte in a covered container at room temperature for up to 24 hours. For reheating, place it briefly in an oven to regain its warmth and revive the textures.

**What type of apples are best for Tarte Tatin?**

Select firm, tart apples like Granny Smith or Golden Delicious. Their structure and flavor profile make them your best allies for this delightfully caramelized dessert.

Embark on this delightful journey of crafting Tarte Tatin, relishing the magic of French culinary tradition with each delicious bite. Feel inspired to share this masterpiece with loved ones, bringing a slice of France into your kitchen. Bon appétit!

Indulge in Decadent Sweet and Creamy Homemade Cinnamon Butter

# Sweet and Creamy Homemade Cinnamon Butter: Elevate Your Culinary Experience

## Introduction: Discover the Magic of Homemade Delights

In a fast-paced world, finding genuine comfort can often feel elusive. Imagine a serene Sunday morning graced by the irresistible scent of warm, toasted bread spread generously with sweet and creamy homemade cinnamon butter. This is no mere spread; it is an invitation to indulgence, a celebration of tradition, and the secret to starting your day on a truly delightful note. Let’s explore why crafting this delicious cinnamon butter at home can inject a dose of happiness into your breakfast ritual and elevate your culinary repertoire.

## The Benefits of Crafting Your Own Cinnamon Butter

### The Homemade Edge: Why Go Beyond Store Brands

– **Burst of Freshness**: Homemade spreads capture the essence of fresh ingredients, offering a richness and purity often lacking in commercial versions.
– **Healthier Choices**: By taking control of the ingredients, you limit preservatives and additives, aligning more closely with a wholesome lifestyle.
– **Unleashing Creativity**: Personalize your spread to cater precisely to your taste, ensuring a unique culinary masterpiece every time.

## Gathering Ingredients: What You Need

### The Perfect Ensemble for Your Cinnamon Butter

| Ingredient | Amount |
|———————|——————-|
| Unsalted butter | 1 cup (softened) |
| Powdered sugar | 1/4 cup |
| Ground cinnamon | 2 tsp |
| Vanilla extract | 1/4 tsp |
| Pinch of salt | – |

### A Closer Look: Understanding Each Component

– **Unsalted Butter**: The creamy backbone that melds all flavors together seamlessly.
– **Powdered Sugar**: Contributes sweetness and a silky smooth texture.
– **Ground Cinnamon**: Infuses warmth and its signature spice.
– **Vanilla Extract**: Adds an aromatic depth.
– **Salt**: Offers balance to the sweetness, enhancing the overall flavor profile.

## Creating Your Cinnamon Butter: Step-by-Step Guide

### Follow These Simple Instructions

1. **Begin with a Fluff**: Cream the softened butter and powdered sugar together in a mixing bowl until light and fluffy.
2. **Infuse with Flavor**: Gradually mix in the ground cinnamon, vanilla extract, and a pinch of salt, ensuring a smooth blend.
3. **Chill and Blend**: Transfer your concoction into a small dish and refrigerate for at least 30 minutes to allow the flavors to meld beautifully.
4. **Serve and Savor**: Relish this creamy delight over warm toast, fluffy pancakes, or golden biscuits.

### Tips for the Ultimate Spread

– **Optimal Softness**: Leave your butter at room temperature for effortless mixing.
– **Ensure Uniformity**: Thoroughly blend the elements for a consistent texture.

## Savor Every Spoonful: Creative Uses for Cinnamon Butter

### Versatile Uses to Fulfill Your Culinary Desires

– **Morning Enhancements**: Enhance muffins, scones, or waffles with a rich spread.
– **Baking Marvel**: Incorporate as a tantalizing filling for homemade cinnamon rolls.
– **Gift of Flavor**: Delight loved ones with thoughtful gifts of homemade butter.

## FAQ: Mastering Your Homemade Cinnamon Butter

### Answering Your Pressing Queries

1. **Can I swap for salted butter?**
– Yes! Simply skip the pinch of salt to prevent overpowering the flavors.
2. **How long can I store cinnamon butter?**
– Keep it refrigerated for up to two weeks in an airtight container for freshness.
3. **Is freezing an option?**
– Indeed! Pack in small containers and freeze for up to three months. Just thaw before use.

## Wrap-Up: Embrace Simplicity, Relish Excellence

Crafting your own sweet and creamy cinnamon butter is about far more than the end product—it’s a celebration of life’s simple joys and sharing love through homemade goodness. Whether recreating nostalgic memories or crafting new traditions, this delightful spread is your gateway to a world of flavor and warmth. So, go ahead, let each bite transport you to a realm of comfort and delight. Engage with us by sharing your own cinnamon butter creations and stories in the comments below. Unleash the magic of homemade!

Irresistibly Gooey Hot Fudge Pie: The Ultimate Chocolate Dessert Treat

“`html

Hot Fudge Pie Recipe: Gooey Chocolate Dessert Treat

Indulge in the ultimate chocolate experience with our Hot Fudge Pie Recipe – a gooey, rich dessert treat that promises to be the star of any meal. This pie is a chocolate lover’s dream, delivering decadent flavors and a texture that’s irresistibly soft and fudgy. Whether you’re hosting a dinner party or seeking a cozy night in with a sweet treat, this hot fudge pie is sure to satisfy your cravings.

Why You’ll Love This Recipe

This Hot Fudge Pie is incredibly easy to make, requiring just a handful of ingredients that you might already have in your pantry. The combination of a crisp outer layer with a gooey, molten center brings a delightful surprise in every bite. Its rich chocolate flavor makes it a perfect match for celebrations, special occasions, or simply when you need a moment of indulgence.

The flexibility of this dessert is another reason to love it. It can be dressed up with toppings like whipped cream or ice cream for an elegant presentation, or enjoyed as-is for a more laid-back affair. The warmth of the pie paired with your favorite cold toppings makes it a harmonious blend of temperatures and textures.

Context/Background

Hot Fudge Pie traces its roots to the Southern United States, where desserts boasting rich flavors and comforting textures are a culinary staple. The technique of combining simple baking ingredients to produce a pie that offers both a crunchy top and a gooey center is what makes this dish classic yet unique. The traditional recipe has been passed down through generations, with each adding their own twist, resulting in a dessert that’s both nostalgic and versatile.

Recipe Details

Serves: 8

Prep Time: 15 minutes

Cook Time: 30 minutes

Total Time: 45 minutes

Ingredients

  • 1 cup of granulated sugar
  • 1/2 cup of all-purpose flour
  • 1/3 cup of unsweetened cocoa powder
  • 1/2 cup of melted butter
  • 2 large eggs
  • 1 teaspoon of vanilla extract
  • 1/4 teaspoon of salt

Directions

  1. Preheat your oven to 350°F (175°C).
  2. In a medium bowl, mix together the sugar, flour, cocoa powder, and salt.
  3. Add in the melted butter, eggs, and vanilla extract. Stir until well combined.
  4. Pour the mixture into a greased 9-inch pie pan.
  5. Bake for 30 minutes or until the outer edges are set but the center remains slightly gooey.
  6. Allow the pie to cool slightly before serving.

Tips for Perfect Hot Fudge Pie

  • Use high-quality cocoa powder for the richest chocolate flavor.
  • Do not over-bake the pie to maintain its gooey center.
  • Let the pie cool for about 10 minutes before slicing to help it set.
  • Serve with a scoop of vanilla ice cream for extra indulgence.

Serving Suggestions

Dollop with freshly whipped cream or add a scoop of your favorite ice cream. For a more sophisticated touch, drizzle with chocolate syrup or top with fresh berries.

Storage and Leftovers

Store any leftover hot fudge pie covered in the refrigerator for up to 3 days. To enjoy, reheat the pie in the microwave for about 15-20 seconds for that freshly-baked gooey texture.

Final Thoughts

If you’re on the hunt for an easy yet impressive dessert, this Hot Fudge Pie is a must-try. Its simplicity and indulgence make it a versatile treat that works both as an everyday sweet and a special occasion centerpiece. Give it a whirl and savor the rich chocolate notes that are bound to become a family favorite.

Recipe Notes

  • For a nutty twist, add a handful of chopped pecans or walnuts to the batter.
  • Consider using a dark chocolate cocoa powder for a more intense flavor.
  • Experiment with adding a teaspoon of espresso powder to enhance the chocolate taste.

“`

Irresistibly Sweet and Creamy Cinnamon Butter You Can Make at Home

# Sweet and Creamy Homemade Cinnamon Butter: A Delightful Spread for Every Occasion

## Connect with Your Senses

Imagine waking up to the comforting scent of cinnamon wafting through your home, inviting you to start your day with a smile. This is precisely what homemade sweet and creamy cinnamon butter offers—a simple addition to your breakfast table that turns ordinary meals into extraordinary experiences. This delightful spread isn’t just about flavor; it embodies a touch of warmth and a hint of luxury that can brighten your morning or elevate any snack time.

## Understanding Cinnamon Butter: A Deliciously Addictive Spread

So, what exactly is cinnamon butter? At its core, it is an indulgent blend of rich, creamy butter, sweet powdered sugar, and the aromatic allure of ground cinnamon. But its magic lies in its versatility. Whether slathered on freshly baked bread, draped over fluffy pancakes, or complementing warm muffins, cinnamon butter fits seamlessly into any meal or occasion. Its adaptability makes it perfect not just for breakfast but also as a sweet treat at any time of the day.

### Versatile Uses:

– Perfect on toasted bread for a heavenly breakfast.
– Drizzle over piping hot pancakes or waffles.
– Add to muffins straight from the oven for a comforting snack.
– Serve alongside desserts for an extra touch of sweetness.

## Ingredients Needed for Sweet and Creamy Homemade Cinnamon Butter

Before you embark on this culinary journey, gather your essentials. Having all ingredients laid out and measured ensures a smooth cooking process and guarantees delightful results.

| Ingredient | Quantity |
|———————–|————–|
| Unsalted butter | 1 cup |
| Powdered sugar | 1/2 cup |
| Ground cinnamon | 2 tsp |
| Vanilla extract | 1/4 tsp |
| Salt | Pinch |

### Ingredient Insights

– **Unsalted Butter**: The creamy foundation of your spread, allowing complete control over seasoning.
– **Powdered Sugar**: Provides sweetness while maintaining a smooth texture.
– **Ground Cinnamon**: The star of the show, delivering warmth and depth of flavor.
– **Vanilla Extract**: Elevates the overall taste with its subtle nuance.
– **Salt**: Just a pinch to balance the sweetness and enhance flavors.

## Step-by-Step Guide to Making Cinnamon Butter

Creating your sweet and creamy cinnamon butter is easier than you think. Follow these simple steps to achieve perfection every time.

### Step 1: Combine Ingredients

Begin by placing softened unsalted butter in a mixing bowl. Add in the powdered sugar, ground cinnamon, vanilla extract, and a pinch of salt. The use of softened butter is crucial for an easy blending process.

### Step 2: Mix Thoroughly

Using a hand mixer or a sturdy whisk, beat the mixture until it becomes smooth and creamy. The aim is to achieve a consistent blend where all ingredients are well-incorporated, resulting in a homogeneous texture.

### Step 3: Chill for Best Results

Transfer your cinnamon butter into a serving dish. For enhanced flavor and better spreadability, refrigerate the mixture until you’re ready to serve.

### Step 4: Serve and Savor

Now, the moment you’ve been waiting for—spread your cinnamon butter on warm bread, pancakes, waffles, or muffins and indulge in its sweet, aromatic delight.

## Tips for Perfect Cinnamon Butter

Crafting the perfect cinnamon butter requires attention to detail. Here are key tips to ensure your spread is nothing short of delightful:

– **Use High-Quality Butter**: Opt for premium butter as it significantly affects the taste.
– **Customize Sweetness and Spice**: Adjust the cinnamon and sugar levels to suit your palate.
– **Ensure Butter is Softened**: This facilitates easier mixing and smoother texture.

## Why Homemade Cinnamon Butter is Better

Choosing to make your own cinnamon butter offers numerous advantages, not just in flavor but also in nutritional value and personal satisfaction.

### Nutritional Insights and Benefits

– **Quality and Freshness**: Take full control over the ingredients, ensuring premium quality and freshness.
– **No Preservatives or Artificial Additives**: Enjoy a natural product without unnecessary chemicals.
– **Customizable**: Adapt the recipe to meet your dietary preferences, including sugar-free or vegan options.

## FAQ: Sweet and Creamy Homemade Cinnamon Butter

### What do I use cinnamon butter for?

Cinnamon butter is an extraordinary spread with versatile applications, perfect for enhancing breads, pancakes, waffles, and muffins. It pairs well with breakfast items and adds a touch of sweetness to snacks and desserts.

### How long does homemade cinnamon butter last?

When stored in an airtight container in the refrigerator, homemade cinnamon butter can last up to two weeks, making it a convenient go-to for daily spreads.

### Can I use salted butter?

Certainly! If you opt for salted butter, simply omit the extra pinch of salt to keep the flavors balanced and harmonious.

## Conclusion: Elevating Your Culinary Experience

Bring a touch of magic to your breakfast table with sweet and creamy homemade cinnamon butter. Easy to make and versatile enough to accompany various dishes, this spread promises to warm your heart and please your palate. Embrace the delightful comfort and flavor of this beloved recipe, sharing warmth and joy with every bite. Now, it’s your turn to craft this delightful spread—perfect your mornings and elevate your meals with this simple yet sophisticated addition to your culinary repertoire.

### Call to Action

Ready to transform your mornings? Gather your ingredients, follow these easy steps, and create your batch of sweet and creamy cinnamon butter today. Share your delightful creations with friends and family, and let us know your unique twist by tagging us on social media. Your journey to breakfast bliss begins now!