Irresistible Baked Pumpkin Hand Pies for Your Autumn Delights

“`html
Jump to Recipe

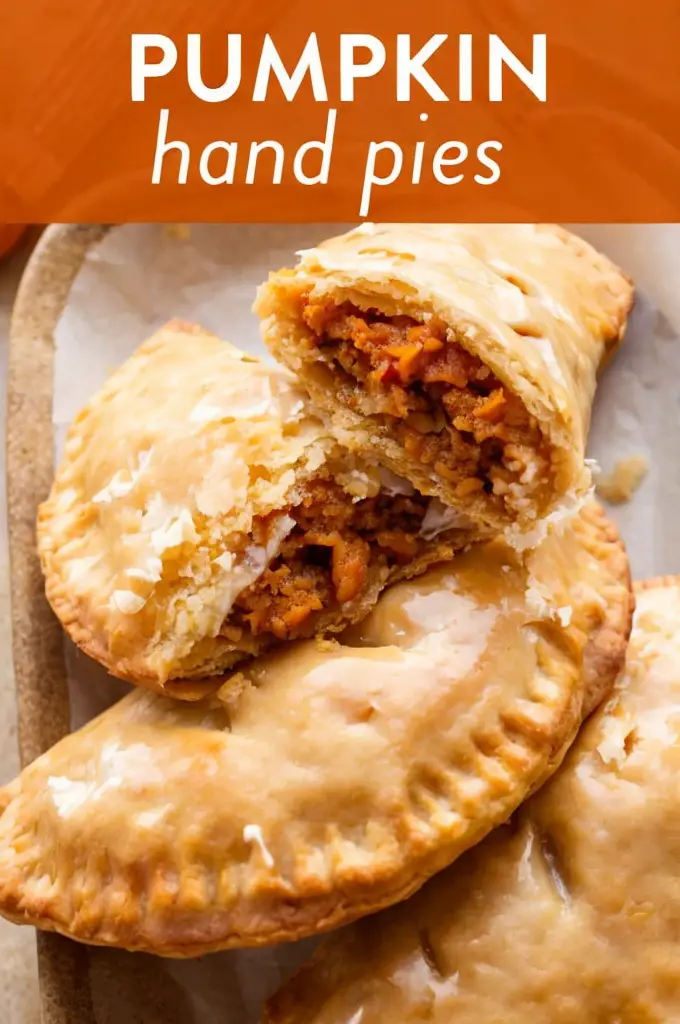
Baked Pumpkin Hand Pies: A Delightful Fall Treat

Imagine the aroma of cinnamon, nutmeg, and cloves wafting through your kitchen as you bake a batch of Baked Pumpkin Hand Pies. These delightful pastries boast a golden, flaky crust encasing a warm, spiced pumpkin filling. A perfect treat for the fall season, they offer an irresistible blend of sweetness and spice that’s sure to evoke feelings of cozy autumn nights and festive gatherings. Discover why these hand pies are a must-try for any pumpkin lover!

Why You’ll Love This Recipe

Baked Pumpkin Hand Pies bring the warmth and flavors of fall right to your table. With each bite, you experience the comforting taste of pumpkin complemented by the rich spices of cinnamon, nutmeg, ginger, and cloves. These hand pies are the epitome of convenience and indulgence, making them perfect for gatherings or solo indulgences.

The recipe is incredibly easy to prepare, making it accessible even for those with limited baking experience. Using refrigerated pie crusts eliminates the hassle of creating dough from scratch, allowing you to focus on crafting the perfect pumpkin filling. Plus, their portable nature makes them an ideal snack for on-the-go enjoyment.

Not only are these pies delicious, but they also can evoke fond memories of fall festivities and family gatherings, imbuing each bite with nostalgia and warmth. They are customizable, allowing you to express your creativity by experimenting with different flavors and spices.

Personal Story/Connection

My love affair with Baked Pumpkin Hand Pies began during a chilly October when I first attempted to recreate a childhood favorite dessert. The joy of sharing these warm, spiced pies with my family on a crisp fall afternoon quickly turned them into a seasonal staple in our household. Watching the delight on loved ones’ faces as they bit into the golden crust and savored the spiced pumpkin filling is a treasured memory that adds a personal touch to every batch I bake.

Context/Background

Hand pies have a storied history as a beloved treat across various cultures, known by many names such as pasties, empanadas, or turnovers. These portable pastries were traditionally a convenient meal option for workers who needed to eat on the go. The pumpkin hand pie, however, finds its roots in the American tradition of celebrating the fall harvest and Thanksgiving feasts.

Pumpkin, a quintessential symbol of autumn, has been a favored ingredient in American desserts for centuries. Its incorporation into pies and pastries reflects the seasonal abundance and the desire to enjoy the fruits of the harvest in delightful, comforting ways. Over the years, the humble pumpkin hand pie has evolved to become a cherished autumn treat.

Tips for Perfect Baked Pumpkin Hand Pies

  • Sealing the Edges: Ensure a tight seal by crimping the edges with a fork. This prevents the filling from leaking during baking.
  • Chill Before Baking: For extra flaky crusts, refrigerate the assembled pies for 15 minutes before baking.
  • Customize the Spices: Adjust the spice levels to your liking. Add a pinch more cinnamon or a dash of cardamom for a unique twist.
  • Don’t Overfill: Use about a tablespoon of filling to ensure the pies close properly and bake evenly.
  • Ventilation: Don’t forget to cut a small slit on top of each pie to allow steam to escape and prevent soggy crusts.

Serving Suggestions

Baked Pumpkin Hand Pies are versatile and can be served in a variety of delightful ways. Enjoy them warm with a scoop of vanilla ice cream for a classic pairing that accentuates the spices and sweetness. For a more decadent touch, drizzle the pies with a caramel or maple glaze.

If you’re serving these at a fall gathering, consider presenting them on a platter alongside other autumn-themed treats like apple cider donuts or spiced cookies. Their compact size also makes them perfect for packing in lunchboxes or as a thoughtful gift for friends and family during the holiday season.

For an elegant presentation, dust them with powdered sugar just before serving, or offer a dollop of freshly whipped cream on the side. Whatever your serving style, these pies are sure to impress and satisfy.

Storage and Leftovers

Store leftover Baked Pumpkin Hand Pies in an airtight container at room temperature for up to three days. For longer storage, refrigerate them to extend their freshness. Simply reheat in a preheated oven at 350°F for 5-7 minutes to restore their warmth and crispness.

If you find yourself with extra pies, consider repurposing them into a breakfast treat by topping with yogurt and granola for a delicious pie parfait. Alternatively, crumble them over oatmeal or use as a filling for a fall-flavored smoothie bowl.

Recipe Variations and Substitutions

Explore these delightful variations to tailor the Baked Pumpkin Hand Pies to your taste or dietary needs:

  • Gluten-Free: Substitute the pie crusts with a gluten-free alternative for a celiac-friendly version.
  • Vegan Option: Use a vegan pie crust and replace the egg wash with a plant-based milk wash.
  • Add a Kick: Stir in a pinch of cayenne pepper or hot chili powder to the filling for a spicy surprise.
  • Mix-In Ideas: Fold in chopped pecans, chocolate chips, or dried cranberries to add texture and flavor to the filling.

FAQ

Can I make this ahead of time?

Yes! You can prepare the pies and store them in the refrigerator up to a day in advance before baking. Alternatively, freeze assembled unbaked pies for up to a month and bake from frozen, adding a few extra minutes to the baking time.

What substitutions can I use for brown sugar?

You can use coconut sugar or granulated sugar in equal amounts. For a unique flavor, try maple syrup or honey, although you’ll need to reduce the added liquid slightly.

How do I make this gluten-free or vegan?

For gluten-free pies, use a gluten-free pie crust. To make them vegan, select a vegan pie crust and brush the tops with a mix of non-dairy milk and maple syrup instead of egg wash.

Optional Nutritional Information

  • Calories: Approx. 198 per pie
  • Protein: 3g
  • Carbohydrates: 22g
  • Fat: 11g
  • Fiber: 2g
  • Sugar: 6g

Final Thoughts

Baked Pumpkin Hand Pies capture the essence of fall with their warm, spiced flavors and flaky crust. They are a versatile, delightful dessert perfect for any occasion, from family gatherings to cozy evenings at home. Whether you enjoy them fresh from the oven with a scoop of ice cream or as a quick snack on the go, these hand pies are sure to satisfy. Give them a try and share your experiences; we’d love to hear how they elevate your fall season!

Recipe Section

Serves: 10 | Prep Time: 20 minutes | Cook Time: 20 minutes | Total Time: 40 minutes

  • 1 1/2 cups pumpkin puree
  • 1/3 cup brown sugar
  • 1 tsp cinnamon
  • 1/2 tsp nutmeg
  • 1/4 tsp ginger
  • 1/4 tsp cloves
  • 1/4 tsp salt
  • 1 package refrigerated pie crusts (2 crusts)
  • 1 egg, beaten
  • 1 tbsp water
  • 1 tbsp sugar
  1. Preheat oven to 375°F and line a baking sheet with parchment paper.
  2. In a mixing bowl, combine pumpkin puree, brown sugar, cinnamon, nutmeg, ginger, cloves, and salt. Mix well and set aside.
  3. Roll out the pie crusts and use a round cutter to cut out circles.
  4. Spoon a tablespoon of the pumpkin filling onto half of the circles.
  5. Place the remaining circles on top of the filled ones and crimp the edges with a fork to seal.
  6. Mix the beaten egg and water to make an egg wash. Brush the tops of the pies with the egg wash.
  7. Sprinkle the pies with sugar and cut a small slit in the top for ventilation.
  8. Bake for 18-20 minutes or until golden brown.
  9. Let cool slightly before serving.

“`

Delightful Christmas Sugar Cookies Recipe with Simple Icing Guide

“`html
Jump to Recipe

Christmas Sugar Cookies with Easy Icing: A Holiday Delight

Imagine biting into a delightful Christmas sugar cookie, its buttery crumbly texture melting in your mouth, with a burst of sweet icing dancing on your taste buds. The beauty of these cookies lies not just in their enchanting appearance, adorned with vibrant Christmas sprinkles, but in their irresistible taste—a festive favorite perfect for celebrating the holiday spirit.

Why You’ll Love This Recipe

These Christmas sugar cookies with easy icing are the quintessential holiday treat. Their versatility allows you to shape and decorate them however you like, becoming a creative outlet for festive cheer. Their simplicity makes them accessible to all bakers, from novices to seasoned pros, with the reward being both the process and the delightful finished product. Whether you’re making memories with family in the kitchen or preparing a sweet gift for friends, these cookies never fail to impress.

Not only are they simple to prepare, but they also fill your home with the delightful aroma of vanilla and freshly baked goods. The pop of color from sprinkles and icing brings joy to any table, making them a visual delight too. With straightforward ingredients and steps, this recipe is both hassle-free and doubly rewarding when you see the smiles they bring.

Personal Story/Connection

Every year, as soon as the holiday season arrives, I find myself reaching for this beloved sugar cookie recipe. It takes me back to my childhood, where my siblings and I gathered around the kitchen table, faces smeared with flour and hands sticky with dough. There was an unparalleled joy in decorating each cookie differently, our imaginations running wild with icing and sprinkles. It’s a tradition that I’ve carried on with my children, and watching them experience the same magic warms my heart.

Context/Background

Sugar cookies have a storied history, believed to have originated in the mid-1700s with the German settlers of Pennsylvania. Typically enjoyed during festive seasons, this simple dough was often shaped to fit the dictate of celebratory occasions, a tradition that is robustly carried on today.

Over the years, sugar cookies have evolved significantly. Originally a simple confection, various adaptations and fusions with other ingredients have given rise to what we now associate with these colorful, decorated treats. The addition of easy icing has turned these cookies into an edible canvas, making them a staple in holiday baking.

Tips for Perfect Christmas Sugar Cookies

  • Ensure the butter is soft, but not melted, for best creaming results with sugar.
  • Chill the dough if it becomes too soft to ensure clear cookie cutter shapes.
  • Mix the icing just before use to maintain its consistency.
  • For more vibrant icing, use gel food coloring instead of liquid.
  • Let cookies cool completely before icing to prevent melting.

Serving Suggestions

These sugar cookies make for a delightful gift when neatly packaged in cellophane with a festive ribbon. Place them as a centerpiece on your holiday dessert table, paired with hot cocoa or mulled wine to complement the sweet flavors.

For a fun twist, create a cookie decorating station at your next holiday gathering, allowing guests to personalize their treats. Pair them with other holiday classics like gingerbread or shortbread for a diverse cookie platter.

Storage and Leftovers

Store these cookies in an airtight container at room temperature, where they remain fresh for up to a week. If you’ve made a larger batch, consider freezing them; they freeze wonderfully without icing for up to three months. Thaw at room temperature before decorating fresh with icing.

Leftover cookies can be crumbled over ice cream for an indulgent dessert or used to create a sweet crumb base for festive desserts like trifles or parfaits.

Recipe Variations and Substitutions

  • For a citrus twist, add a teaspoon of lemon or orange zest to the dough.
  • Try almond extract instead of vanilla for a nutty flavor.
  • Make them gluten-free by substituting equal parts gluten-free all-purpose flour.
  • To make vegan cookies, use a plant-based butter and a flax egg.

FAQ

Can I make this ahead of time? Yes, you can prepare the dough in advance and refrigerate it for up to 48 hours before baking.

What substitutions can I use for butter? You can use margarine or a vegan butter substitute for a dairy-free option.

How do I make this gluten-free or vegan? To make the recipe gluten-free, use a gluten-free flour blend. For a vegan version, substitute the egg with a flax egg and use plant-based butter.

Optional Nutritional Information

  • Calories per cookie: Approximately 150
  • Carbohydrates: 20g
  • Protein: 2g
  • Fat: 7g

Final Thoughts

These Christmas sugar cookies with easy icing are not just a recipe; they’re an experience—a way to bring loved ones together, to create moments and memories. Perfect for a holiday gathering or just a cozy family night in, they promise pure joy with every bite. Give them a try and share the warmth and sweetness of the season with those you cherish. Have you tried this recipe? Share your creations and stories in the comments below!

Recipe Section

Serves: Approximately 24 cookies

Prep Time: 20 minutes

Cook Time: 8-10 minutes

Total Time: 30 minutes

  • 1 cup unsalted butter, softened
  • 1 cup granulated sugar
  • 1 large egg
  • 1 tsp vanilla extract
  • 3 cups all-purpose flour
  • 1 tsp baking powder
  • 1/2 tsp salt
  • Christmas sprinkles
  • Easy icing (powdered sugar, milk, and food coloring)
  1. Preheat your oven to 350°F (180°C) and line a baking sheet with parchment paper.
  2. In a large mixing bowl, cream together the butter and sugar until light and fluffy.
  3. Add in the egg and vanilla extract, mixing until well combined.
  4. In a separate bowl, whisk together the flour, baking powder, and salt.
  5. Slowly incorporate the dry ingredients into the wet ingredients until a dough forms.
  6. Roll out the dough on a floured surface and cut into desired shapes using cookie cutters.
  7. Place the cookies on the prepared baking sheet and bake for 8-10 minutes, or until the edges are lightly golden.
  8. Allow the cookies to cool completely before decorating with the easy icing and Christmas sprinkles.
  9. To make the easy icing, mix powdered sugar with a bit of milk until you reach your desired consistency. Add food coloring if desired.
  10. Decorate your cookies as desired with the icing and sprinkles, then let them set before enjoying!

“`

Make sure to add appropriate images and links if needed for better visual appeal and user engagement on your WordPress blog post.

Delicious Peach Caprese Salad for a Refreshing Summer Bite

“`html
Jump to Recipe

Peach Caprese Salad: A Refreshing Summer Delight

Imagine biting into a sunset-inspired dish that sings summer with each vibrant mouthful. Our Peach Caprese Salad is a celebration of ripe peaches, juicy cherry tomatoes, and creamy mozzarella, punctuated by the aromatic basil and the tangy sweetness of balsamic glaze. This salad is a feast for the eyes and a joy for the taste buds, offering a unique twist on a classic Italian favorite that is absolutely worth trying.

Why You’ll Love This Recipe

This Peach Caprese Salad is the embodiment of summer, capturing the season’s essence in each bite. It’s not just its stunning appearance that makes it special; the blend of ripe peaches with savory mozzarella creates a delightful contrast you won’t find elsewhere. The salad’s effortless preparation suits any lifestyle, requiring only fresh ingredients and minimal time.

Versatility is another hallmark of this dish. Whether it’s a solo lunch on a sunny afternoon or a dynamic duo accompanying grilled meats at a barbecue, this salad shines in any setting. Not to mention the nostalgic vibes it brings, with each flavor echoing carefree summers past.

Health-conscious eaters will appreciate its nutritional benefits too. With peaches rich in vitamins and antioxidants, tomatoes providing a dose of lycopene, and mozzarella offering calcium and protein, it’s a flavorful way to nourish the body.

Personal Story/Connection

Growing up, summers were synonymous with family picnics and fresh produce. My grandmother would gather tomatoes from her garden while we’d venture to local farmers’ markets for juicy peaches. Together, we’d create this salad, and it quickly became a staple at our family gatherings. To this day, every taste takes me back to those sunlit afternoons filled with laughter and love.

Context/Background

The Caprese salad, originating from the beautiful Island of Capri, is a symbol of simple and authentic Italian cuisine. Traditionally featuring just tomatoes, mozzarella, and basil, this version celebrates the beloved Italian concept of using seasonal fresh ingredients by introducing peaches into the mix.

Peaches aren’t typically part of traditional Italian fare, making this an innovative cultural fusion. The addition brings a new dimension to the dish, allowing it to align perfectly with summer’s peak produce and flavors.

Tips for Perfect Peach Caprese Salad

  • Choose ripe but firm peaches for the best texture.
  • Use high-quality fresh mozzarella for a creamier, more authentic taste.
  • For a more intense flavor, let the salad marinate for 10 minutes before serving.
  • Consider adding a dash of extra virgin olive oil for extra richness.
  • Season with freshly cracked pepper for a subtle heat kick.
  • For a presentation win, alternate slices for a colorful and appealing display.

Serving Suggestions

Perfect on its own, this Peach Caprese Salad also pairs beautifully with grilled chicken or fish, lending its refreshing flavors as a complement to hearty mains. For a creative presentation, serve it in individual mason jars at garden parties or share it as an appetizer on a large wooden board for buffet-style dining.

You can also explore themed dining with this salad, such as pairing with a crisp white wine or a gentle rosé to enhance the fruitiness of the peaches. When hosting, consider adding warm ciabatta or focaccia on the side to soak up every delicious drop of balsamic glaze.

Storage and Leftovers

While this salad is best enjoyed fresh, you can store leftovers in an airtight container in the fridge for up to two days. If you plan on storing it, keep the peaches and balsamic glaze separate to maintain their freshness and prevent sogginess.

Reinvent leftovers by tossing them into cooked pasta or mixing them with leafy greens and quinoa for a more substantial meal. Leftover salad can also double as a surprising bruschetta topping — simply spoon onto toasted baguette slices and serve.

Recipe Variations and Substitutions

For those adhering to dietary preferences or exploring new flavors, there are numerous ways to tailor this salad:

  • Vegan: Substitute mozzarella with vegan cheese or simply omit it and load up on extra tomatoes and peaches.
  • Herbal Twist: Swap basil for mint or arugula for an intriguing flavor switch.
  • Nutty Addition: Sprinkle with toasted pine nuts or almonds for a crunchy texture contrast.
  • Seasonal Play: In the fall, replace peaches with sliced figs or pears for an autumnal version.

FAQ

Can I make this ahead of time?

Yes, you can prep the ingredients in advance but assemble and drizzle with balsamic glaze just before serving to avoid sogginess.

What substitutions can I use for mozzarella?

Consider using feta for a tangy twist or burrata for creamier depth.

How do I make this gluten-free or vegan?

The salad is naturally gluten-free. For a vegan version, simply use plant-based cheese alternatives.

Optional Nutritional Information

  • Calories: Approximately 250 per serving
  • Protein: 12g
  • Carbohydrates: 24g
  • Fat: 14g

Final Thoughts

Our Peach Caprese Salad is a whimsical yet sophisticated dish that brings a burst of sunshine to any table. Its balance of flavors and blissful simplicity make it a recipe worth adding to your culinary repertoire. Whether you’re hosting or enjoying a quiet meal, this salad promises to elevate the experience. Try it, and don’t forget to share your thoughts and creative twists in the comments!

Recipe Section (Final Element)

Serves: 4 | Prep Time: 10 minutes | Total Time: 10 minutes

  • 2 ripe peaches, sliced
  • 1 pint cherry tomatoes, halved
  • 8 oz fresh mozzarella, sliced
  • 1/4 cup fresh basil leaves
  • 2 tbsp balsamic glaze
  • Salt and pepper to taste
  1. Start by arranging the sliced peaches, cherry tomatoes, and fresh mozzarella on a serving platter in a visually appealing pattern.
  2. Tear the basil leaves and scatter them over the top of the salad.
  3. Drizzle the balsamic glaze over the salad.
  4. Season with salt and pepper to taste.
  5. Serve immediately and enjoy the fresh flavors of this Peach Caprese Salad.

“`

Irresistible Spritz Cookies Recipe: My Favorite Holiday Treat

“`html
Jump to Recipe

Delightful Spritz Cookies: A Festive Tradition to Cherish

Imagine biting into a perfectly buttery and melt-in-your-mouth spritz cookie, with its delicate almond aroma and a hint of vanilla. These cookies aren’t just about sweetness, they are an experience—crisp edges with a tender middle, adorned with colorful sprinkles that hint at the joy they bring. This festive classic is not only visually captivating but embodies the spirit of holiday baking cherished across generations.

Why You’ll Love This Recipe

Spritz cookies are the epitome of simplicity and pleasure in baking. Their uncomplicated recipe, requiring minimal ingredients, makes them magically accessible for bakers at any level. These cookies are incredibly versatile; you can tint them with food coloring to match any occasion, adding a fun and creative twist to your cookie platter.

Beyond their festive appearance, these cookies elicit nostalgia, evoking warm memories and the joy of holiday gatherings. The joy of pressing cookies with a cookie press, a tool often passed down through generations, connects us to family traditions, making each batch feel special.

If you’re looking for something budget-friendly yet delightful, spritz cookies are a fantastic choice. Their simplicity means you can whip them up whenever the craving hits, or when you’re in need of a quick homemade gift.

Personal Story/Connection

I vividly remember spending snowy afternoons with my grandmother, crafting these delicate spritz cookies in her cozy kitchen. The sweet scent of almond and vanilla swirling through the air marked the unofficial start of the holiday season. Each year, as we pressed shapes onto the cookie sheet, she would recount stories of her childhood, entwining the present with cherished memories of her past. Spritz cookies became a symbol of our bond and a tradition I now lovingly pass on to my children.

Context/Background

Originating from Scandinavia, the word ‘spritz’ comes from the German word “spritzen,” meaning “to squirt,” highlighting the simple yet ingenious technique used in creating these cookies. Traditionally prepared during festive occasions, spritz cookies are known for their intricate designs, using a cookie press to mold the dough into delightful shapes.

Over time, these cookies have found a permanent place in holiday baking across the world, evolving with varied flavored twists and vibrant decorations, reflecting the creativity and diversity in culinary traditions.

Tips for Perfect Spritz Cookies

  • Ensure your butter is softened but not melted for the ideal cookie texture.
  • Use a cookie press to achieve those classic, beautiful shapes.
  • If your dough is too sticky, chill it slightly for more precise pressing.
  • Avoid overly greased baking sheets to ensure the dough grips and shapes hold.
  • Experiment with different extract flavors, such as lemon or hazelnut, to personalize your cookies.

Serving Suggestions

Spritz cookies are wonderfully versatile, perfect for serving solo or as part of an elaborate dessert spread. Pair them with a warm cup of chai or hot cocoa for a comforting snack on chilly days. These cookies can also beautifully accompany a light dessert wine, making them a sophisticated treat at your next gathering.

For a festive flair, serve spritz cookies in a tiered arrangement at holiday parties. You might even consider wrapping a few in cellophane bags with a festive bow—ideal for gift-giving to friends and loved ones.

Storage and Leftovers

To maintain freshness, store your spritz cookies in an airtight container at room temperature, where they’ll remain delightful for up to one week. For extended storage, consider freezing them in a single layer to prevent sticking, transferring them to a freezer-safe bag once frozen solid.

Leftovers easily transform into scrumptious toppings for ice cream sundaes, or crumble them to sprinkle over yogurt for a crunchy, sweet breakfast addition.

Recipe Variations and Substitutions

For those exploring dietary needs or flavor preferences, there are plenty of spritz cookie adaptations. Replace all-purpose flour with a gluten-free blend to ensure everyone can enjoy them. Swap almond extract for peppermint during the winter holidays, or use lemon extract and a touch of zest for a springtime variation.

FAQ

  • Can I make this ahead of time?
    Yes, you can prepare the dough ahead and refrigerate it for up to 3 days. Freeze shaped cookies before baking and extend the time slightly when ready to bake.
  • What substitutions can I use for butter?
    If you require a dairy-free version, use margarine or a high-quality vegan butter substitute with similar fat content.
  • How do I make this gluten-free?
    Replace the all-purpose flour with a 1:1 gluten-free baking blend for delicious gluten-free spritz cookies.

Final Thoughts

These delightful spritz cookies are more than just a simple baking project; they’re a celebration of tradition, bringing warmth and joy to your table. Whether you’re creating new family memories or preserving cherished ones, try this recipe and experience the nostalgia and festive spirit it offers. We’d love to hear about your batch! What creative designs did you press, or what flavors did you try? Share your experiences and tips in the comments below.

Spritz Cookies Recipe

Serves: About 50 Cookies

Prep Time: 15 minutes

Cook Time: 8-10 minutes

Total Time: 25 minutes

  • 1 cup unsalted butter, softened
  • 3/4 cup granulated sugar
  • 1 egg
  • 1 teaspoon vanilla extract
  • 2 1/4 cups all-purpose flour
  • 1/4 teaspoon salt
  • 1/4 teaspoon almond extract
  • Food coloring (optional)
  • Sprinkles (optional)
  1. Preheat the oven to 375°F (190°C) and line baking sheets with parchment paper.
  2. In a mixing bowl, cream together the butter and sugar until light and fluffy.
  3. Beat in the egg, vanilla extract, and almond extract.
  4. Gradually add the flour and salt, mixing until well combined. If desired, add food coloring for a fun touch.
  5. Fill a cookie press with the dough and press cookies onto the prepared baking sheets. Decorate with sprinkles if desired.
  6. Bake in the preheated oven for 8-10 minutes or until the edges are lightly golden.
  7. Allow the cookies to cool on the baking sheets for a few minutes before transferring to a wire rack to cool completely.

Enjoy these delightful spritz cookies with a cup of tea or coffee!

“`

Delicious Raspberry Chocolate Crinkle Cookies Recipe for December 2024

“`html
Jump to Recipe

Raspberry Chocolate Crinkle Cookies: A Delightful Fusion of Flavor

Imagine biting into a cookie that combines rich chocolate and luscious raspberry preserves, all dusted with a snowy coating of powdered sugar. Raspberry Chocolate Crinkle Cookies are as beautiful as they are delicious – perfect for your holiday baking spree. Their unique crinkle appearance coupled with the contrasting flavors makes these cookies an irresistible treat worth trying!

Why You’ll Love This Recipe

Raspberry Chocolate Crinkle Cookies are not your average holiday cookies. The deep, chocolatey base pairs perfectly with the vibrant raspberry filling, creating a taste sensation that’s both nostalgic and exciting.

These cookies are incredibly versatile. They’re excellent for both festive gatherings and cozy family nights. They are not only easy to make but also employ simple, readily available ingredients.

For those who love indulging without guilt, this recipe uses less fat with the richness purely coming from cocoa and preserves, offering a healthier alternative to traditional festive treats.

The act of rolling dough balls, creating thumbprint indentations, and dusting them with sugar can evoke sweet memories of baking with loved ones, making this experience as enjoyable as the finalized cookie itself.

Personal Story/Connection

Every December, my kitchen transforms into a cookie-making haven, filled with scents of vanilla and chocolate. Among all family favorites, Raspberry Chocolate Crinkle Cookies hold a special place. I remember my first attempt creating thumbprints and being mesmerized by how the powdered sugar works its magic in the oven, revealing beautiful crinkles. Sharing these with loved ones during the holidays is a cherished tradition I look forward to every year.

Context/Background

Crinkle cookies have long been a beloved holiday staple, originating from traditional European recipes that have traveled worldwide. What sets these Raspberry Chocolate Crinkle Cookies apart is their unique filling. The introduction of raspberry preserves is a modern twist, adding an extra layer of flavor reminiscent of the classic chocolate and fruit combinations found in many European desserts.

The idea of using preserves adds not only to the taste but creates a visually striking and delightfully surprising pop of color, reminiscent of festive holiday decorations.

Tips for Perfect Raspberry Chocolate Crinkle Cookies

  • Soften your butter ahead of time for easier creaming and smoother dough.
  • Chill the dough briefly if it’s too sticky to handle when shaping into balls.
  • Use high-quality cocoa and raspberry preserves to enhance the flavor profile.
  • Ensure your baking powder is fresh for optimal dough rise and consistency.
  • Experiment with filling varieties, like strawberry or apricot preserves, for different flavor twists.

Serving Suggestions

Beyond being a delectable snack on their own, serve these cookies with a hot cup of coffee or cocoa for a comforting cold-weather treat. They make an elegant accompaniment to a brunch spread, adding a sweet contrast to savory dishes.

For a festive touch at holiday parties, arrange these cookies on a platter with fresh raspberries and a dusting of edible gold flakes or glitter for extra sparkle.

Consider pairing these cookies alongside a cheese board—their sweetness beautifully complements a variety of cheeses, offering a sophisticated ending to any dining experience.

Storage and Leftovers

Store these cookies in an airtight container for up to a week to maintain their soft texture. If you need to prepare them in advance, these cookies freeze well; layer them between sheets of wax paper to prevent sticking.

To repurpose leftovers creatively, crumble them over ice cream for a dynamic dessert or use them as a crust base for a raspberry cheesecake bar.

Recipe Variations and Substitutions

  • For a vegan version, substitute eggs with flax seeds and butter with a plant-based alternative.
  • Swap raspberry preserves for blackberry or mixed berry for a different fruit flavor.
  • Experiment with adding chopped nuts to the dough for extra crunch.
  • Sift matcha powder into the powdered sugar for a unique flavor and presentation twist.

FAQ

Can I make this ahead of time?
Yes, you can prepare the dough in advance and refrigerate it. When ready to bake, simply shape and coat the cookies as directed.

What substitutions can I use for raspberry preserves?
Try using strawberry or apricot preserves for a different flavor profile, or use a sugar-free option to reduce sugar content.

How do I make this gluten-free or vegan?
For gluten-free cookies, substitute the all-purpose flour with a 1:1 gluten-free flour blend. For a vegan version, replace eggs with flax eggs and butter with a plant-based alternative.

Optional Nutritional Information

  • Calories per cookie: approximately 120
  • Fat: 4g
  • Carbohydrates: 18g
  • Protein: 2g

Final Thoughts

Raspberry Chocolate Crinkle Cookies are a delightful addition to any cookie repertoire – balancing rich chocolate with the fresh zing of raspberry. They’re more than just a sweet treat; they are a conversation starter, a nostalgic bite, and a warm memory in the making. Try this recipe today, and watch it become a new favorite among your holiday baking traditions. I can’t wait to hear about your baking adventures, so please feel free to share your experiences or ask questions in the comments!

Recipe Section

Serves: 24 cookies | Prep Time: 15 minutes | Cook Time: 10-12 minutes | Total Time: 30 minutes

  • 1 cup all-purpose flour
  • 1/4 cup unsweetened cocoa powder
  • 1 tsp baking powder
  • 1/4 tsp salt
  • 1/4 cup unsalted butter, softened
  • 1 cup granulated sugar
  • 2 large eggs
  • 1 tsp vanilla extract
  • 1/2 cup raspberry preserves
  • 1/2 cup powdered sugar
  1. Preheat oven to 350°F and line a baking sheet with parchment paper.
  2. In a medium bowl, whisk together flour, cocoa powder, baking powder, and salt. Set aside.
  3. In a large mixing bowl, cream together butter and sugar until light and fluffy.
  4. Beat in eggs, one at a time, then add vanilla extract.
  5. Gradually add the dry ingredients to the wet ingredients and mix until well combined.
  6. Roll dough into 1-inch balls, then make an indentation in the center of each with your thumb.
  7. Fill each indentation with raspberry preserves.
  8. Roll the cookies in powdered sugar until coated.
  9. Place cookies on the prepared baking sheet and bake for 10-12 minutes, or until set.
  10. Allow cookies to cool on the baking sheet for 5 minutes before transferring to a wire rack to cool completely.

Enjoy your delicious Raspberry Chocolate Crinkle Cookies!

“`

Make Ahead Cornbread Stuffing Recipe for Perfect Holiday Feasts

“`html
Jump to Recipe

Make Ahead Cornbread Stuffing: A Savory and Comforting Classic

With its golden crust and moist, flavorful interior, this Make Ahead Cornbread Stuffing is the quintessential dish that brings warmth and comfort to any holiday table. Imagine biting into a forkful of fluffy cornbread mingling with aromatic herbs and tender vegetables. This recipe is not just a side dish; it’s a celebration of flavors and textures that come together to create a memorable culinary experience.

Why You’ll Love This Recipe

Cornbread stuffing is a beloved holiday classic that appeals to all the senses. Its delightful combination of crisp cornbread edges and soft, juicy insides will instantly win over hearts and taste buds. This make-ahead version is perfect for busy hosts and offers a stress-free cooking experience, allowing you more time to focus on other holiday festivities or just spend quality time with loved ones.

The richness of the melted butter and chicken broth complements the rustic charm of cornbread, creating a deliciously moist base that’s infused with the earthy flavors of sage and thyme. The simplicity of the ingredients showcases how a few elements can transform into something extraordinary, making it a favorite for gatherings large and small.

This cornbread stuffing is versatile, as it pairs beautifully with roasted meats, hearty vegetables, or can even stand alone as a comforting vegetarian dish. Whether you’re hosting a traditional holiday feast or simply want to indulge in comfort food, this recipe hits all the right notes.

Personal Story/Connection

The first time I made this Make Ahead Cornbread Stuffing was for a holiday dinner with my extended family. The moment the aromatic scent wafted through the kitchen, it instantly brought back memories of childhood Thanksgivings at my grandmother’s house. Her kitchen was filled with the laughter of family and the promise of a hearty meal. This recipe not only honors those precious memories but creates new ones each time it graces our table.

Context/Background

Cornbread stuffing, often referred to as dressing in the Southern United States, has its roots in traditional Southern cooking. Historically, stuffing was a practical dish designed to use up stale bread and whatever herbs and vegetables were available, reflecting the resourcefulness of home cooks.

Over time, cornbread became a staple in many stuffing recipes, especially in the South, where it adds a unique flavor and texture that sets it apart from the more common bread-based versions. Its versatility and hearty essence have made it a beloved part of holiday meals across the country.

Tips for Perfect Make Ahead Cornbread Stuffing

  • Let the cornbread cool completely before crumbling to prevent it from becoming mushy.
  • Use low-sodium chicken broth to control the seasoning and avoid a salty dish.
  • Allow the stuffing to refrigerate overnight for the best blend of flavors.
  • For a crispy top, remove the foil during the last 10 minutes of baking.
  • Fresh herbs can be used in place of dried for a more vibrant flavor.

Serving Suggestions

This cornbread stuffing is a versatile side that pairs beautifully with roasted turkey, chicken, or pork. Elevate its presentation by using a rustic baking dish and garnishing with fresh herbs like parsley or sage before serving.

For a vegetarian spread, pair it with a hearty salad and roasted seasonal vegetables. It also works wonderfully alongside a bowl of warm, creamy soup, making it suitable for cozy meals beyond the holiday season.

Consider using it as a base for a delicious casserole by adding cooked sausage or mushrooms, providing a delightful variation that’s sure to impress your guests.

Storage and Leftovers

Store leftover cornbread stuffing in an airtight container in the refrigerator for up to three days. To reheat, place portions in the oven at 350°F (175°C) until warmed through, or use a microwave for quicker reheating.

If you have ample leftovers, transform them into a new dish by spooning into muffin pans to create individual stuffing muffins. These are perfect for a next-day brunch or convenient on-the-go snacks.

Recipe Variations and Substitutions

For a gluten-free version, use a gluten-free cornbread mix, ensuring all ingredients are certified gluten-free. Vegans can substitute chicken broth with vegetable broth and melted butter with a plant-based alternative for a delightful plant-based side dish.

Give your stuffing a seasonal twist by adding dried cranberries and chopped pecans for a hint of sweetness and crunch. For spice lovers, incorporate a pinch of cayenne pepper or chopped jalapeños to add a subtle heat to the dish.

FAQ

Can I make this ahead of time? Yes, the flavors improve if made ahead. Prepare as directed and refrigerate overnight.

What substitutions can I use for celery? You can replace celery with fennel or omit it if preferred, adjusting seasoning to taste.

How do I make this gluten-free or vegan? For gluten-free, use a certified gluten-free cornbread mix. For vegan, substitute chicken broth and butter with vegan alternatives.

Final Thoughts

Embark on a culinary adventure with this Make Ahead Cornbread Stuffing and elevate your holiday dining experience to new heights. Its comforting flavors and delightful textures will make it a staple on your festive table, bringing joy and warmth to every gathering. We invite you to try this recipe and share your unique twists or experiences in the comments below!

Recipe Section

Serves: 8
Prep Time: 15 mins
Cook Time: 45 mins (plus 4 hours chilling)
Total Time: 5 hours

  • 1 package cornbread mix
  • 1/2 cup diced celery
  • 1/2 cup diced onion
  • 1/2 cup diced carrots
  • 1/2 cup chicken broth
  • 1/2 cup melted butter
  • 1 tsp dried sage
  • 1/2 tsp dried thyme
  • Salt and pepper to taste
  1. Preheat your oven to 375°F (190°C) and prepare the cornbread mix according to package instructions. Allow it to cool completely.
  2. In a large bowl, crumble the cornbread into small pieces.
  3. Add in the diced celery, onion, carrots, chicken broth, melted butter, sage, thyme, salt, and pepper. Mix well to combine.
  4. Transfer the mixture to a greased baking dish and cover with foil.
  5. Refrigerate for at least 4 hours or overnight to allow the flavors to meld together.
  6. When ready to serve, bake the stuffing in the preheated oven for 30-35 minutes, or until heated through.
  7. Enjoy this delicious and comforting cornbread stuffing alongside your favorite holiday meal!

“`

Irresistible Gingerbread Muffins with Sweet Lemon Glaze Delight

“`html
Jump to Recipe

Delicious Gingerbread Muffins: A Sweet Treat with a Tangy Lemon Glaze

Imagine the warming aroma of ginger, cinnamon, and cloves filling your kitchen, signaling the start of a baking adventure that ends with a batch of incredibly moist and flavorful gingerbread muffins. Topped with a zesty lemon glaze, these muffins offer a symphony of festive spices perfectly balanced with a citrus tang. Whether you’re sipping hot cocoa beside a roaring fire or catching up with friends over coffee, these muffins are a delightful addition to any gathering.

Why You’ll Love This Recipe

These gingerbread muffins are a seasonal sensation that you’ll want to bake all year round. Their appeal lies in the harmony of spices that evoke warmth and comfort, highlighted by a sweet lemon glaze that adds a refreshing twist. These muffins are not only flavorful but also versatile enough to serve as a breakfast delight or an afternoon snack. With each bite, you’ll find the balance of textures—soft, fluffy muffin crowned with a sticky, sweet-tart glaze—a perfect pairing for any mood.

The gingerbread muffin base is a rich tapestry of spice notes that create a satisfying depth of flavor. The moist crumb comes from a combination of yogurt and milk, while the molasses imbues the muffins with a natural sweetness and a hint of earthiness. Whether you’re a seasoned baker or trying your hand for the first time, this recipe guides you through simple steps to achieve bakery-quality results.

Personal Story/Connection

These gingerbread muffins hold a special place in my heart, reminding me of cozy afternoons in my grandmother’s kitchen. I remember helping her sift flour and sneakily licking the lemon glaze spoon when she wasn’t looking. Every year during the holidays, we’d bake these muffins together, and they’d become a heartwarming symbol of family tradition. Whenever I bake them now, I’m flooded with those cherished memories, making each batch a nostalgic trip back in time.

Context/Background

The tradition of gingerbread dates back to the 16th century, with roots in European culinary history. Initially a preserved delicacy, gingerbread evolved, finding its way into various forms—from cookies to cakes to muffins. Its enduring popularity comes from its spicy profile, which was once thought to have medicinal properties. Adding a lemon glaze is a modern twist that offers a lighter, citrus counterpoint to the deep, spicy flavors of gingerbread.

Tips for Perfect Gingerbread Muffins

  • Use fresh spices: For the best flavor, make sure your ginger, cinnamon, nutmeg, and cloves are fresh.
  • Cream thoroughly: Cream the butter and sugar until light and fluffy to ensure a good rise.
  • Avoid over-mixing: Mix the dry and wet ingredients until just combined to keep the muffins tender.
  • Muffin test: Use a toothpick to check for doneness; it should come out clean.
  • Cool before glazing: Ensure muffins are completely cooled before glazing to prevent the glaze from melting off.

Serving Suggestions

Enjoy these gingerbread muffins warm or at room temperature for the best flavor. Pair them with a hot cup of tea or coffee for a classic combination. If you’re hosting a holiday brunch, consider serving them alongside a fruit salad or a platter of assorted cheeses for a delightful spread. For a personalized touch, top each muffin with a sprinkle of lemon zest or a candied ginger piece as a garnish.

For special occasions, arrange the muffins on a tiered cake stand, with slices of fresh lemon for decoration. This presentation not only looks elegant but also invites guests to savor the muffins with their eyes before taking a bite.

Storage and Leftovers

To keep your gingerbread muffins fresh, store them in an airtight container at room temperature for up to three days. If you’d like to enjoy them over a longer period, consider freezing them in a freezer-safe ziplock bag for up to three months. When ready to eat, thaw them at room temperature or reheat them gently in the oven for that freshly-baked texture.

Leftover muffins can also be reinvented as a delicious bread pudding. Simply cube the muffins, mix with milk and eggs, and bake until set for a cozy dessert.

Recipe Variations and Substitutions

For a gluten-free option, substitute all-purpose flour with a gluten-free baking mix. If you’re seeking a dairy-free version, replace the butter with coconut oil or a vegan butter substitute, and use almond milk instead of dairy milk.

Boost the flavor by adding dried cranberries or finely chopped candied ginger to the batter. For a fall-inspired twist, incorporate a dash of pumpkin spice blend along with the standard spices.

FAQ

Can I make this ahead of time? Yes, you can prepare the batter in advance and refrigerate it for up to a day before baking.

What substitutions can I use for molasses? Dark corn syrup or maple syrup can work in place of molasses, though the flavor will be slightly different.

How do I make this gluten-free or vegan? For gluten-free, use a suitable baking mix; for vegan, replace dairy products with plant-based alternatives and use a flax egg (1 tablespoon of flaxseed meal mixed with 2.5 tablespoons of water) instead.

Optional Nutritional Information

  • Calories: Approximately 220 per muffin
  • Fat: 9g
  • Carbohydrates: 32g
  • Protein: 3g

Final Thoughts

Get ready to embrace the cozy, heartwarming flavors of gingerbread with these delightful muffins, made even more enchanting with a bright lemon glaze. Perfect for any occasion, they bring joy and aroma to your kitchen and your guests. Try them out and immerse yourself in the festive charm they offer. Don’t forget to leave a comment or share your twist on the recipe below!

Recipe Section

Serves: 12 muffins | Prep Time: 15 minutes | Cook Time: 18-20 minutes | Total Time: 35 minutes

  • 1 1/2 cups all-purpose flour
  • 1 tsp baking powder
  • 1/2 tsp baking soda
  • 1/4 tsp salt
  • 1 tsp ground ginger
  • 1 tsp ground cinnamon
  • 1/4 tsp ground nutmeg
  • 1/4 tsp ground cloves
  • 1/2 cup unsalted butter, softened
  • 1/2 cup brown sugar
  • 1/4 cup molasses
  • 1 egg
  • 1/2 cup plain yogurt
  • 1/4 cup milk
  • Zest of 1 lemon
  • For the lemon glaze:
  • 1 cup powdered sugar
  • 2-3 tbsp fresh lemon juice
  1. Preheat the oven to 375°F and line a muffin tin with paper liners.
  2. In a medium bowl, whisk together the flour, baking powder, baking soda, salt, ginger, cinnamon, nutmeg, and cloves.
  3. In a separate large bowl, cream the butter and brown sugar together until light and fluffy.
  4. Beat in the molasses, egg, yogurt, milk, and lemon zest until well combined.
  5. Gradually add the dry ingredients to the wet ingredients, mixing until just combined.
  6. Divide the batter evenly among the muffin cups and bake for 18-20 minutes, or until a toothpick inserted into the center comes out clean.
  7. Allow the muffins to cool slightly in the pan before transferring to a wire rack to cool completely.
  8. In a small bowl, whisk together the powdered sugar and lemon juice until smooth.
  9. Drizzle the lemon glaze over the cooled muffins.
  10. Enjoy these delicious gingerbread muffins with a tangy lemon glaze!

“`

Ultimate Guide to Baking Irresistibly Giant Chocolate Chip Cookies

“`html
Jump to Recipe

Giant Chocolate Chip Cookies: The Ultimate Indulgence

Biting into these giant chocolate chip cookies is an experience that will delight your senses. Picture the perfect balance of crispy edges with a soft, chewy interior, melting pools of rich, semisweet chocolate offering a decadent indulgence with every bite. These cookies are not just about their remarkable size—they bring a unique texture and flavor that’s hard to resist. Whether you’re a seasoned baker or trying out a new recipe, these cookies promise an unforgettable delight.

Why You’ll Love This Recipe

These giant chocolate chip cookies are more than just a treat; they are a celebration of classic comfort. Perfect for sharing, or not, due to their generous size, they remind us of carefree childhood days, invoking that nostalgic warmth with every bite. The recipe is effortlessly straightforward, making it a go-to for those sudden cookie cravings.

The use of both granulated and brown sugar offers a tender crumb and depth of flavor, while the vanilla enhances their sweetness without overpowering the chocolate’s richness. Not only are they delicious, but these cookies also provide a canvas for creativity—add nuts, dried fruit, or a dash of cinnamon to make them your own.

Personal Story/Connection

My love affair with these giant chocolate chip cookies began in my grandmother’s kitchen, where the aroma of freshly baked treats was a permanent fixture. Watching her portion the dough with her expert hands, I was fascinated by the transformation of simple ingredients into happiness. Over time, these cookies became more than a baking activity; they are a treasured tradition I now share with my kids.

Context/Background

The classic chocolate chip cookie dates back to the 1930s, courtesy of Ruth Wakefield of the Toll House Inn, Massachusetts. It was a serendipitous invention that quickly captured the hearts of cookie lovers worldwide. Over time, this beloved treat has been adapted into various sizes and flavors, but its warm, comforting nature remains a constant.

As baking cultures evolved, the giant chocolate chip cookie became a symbol of indulgence and generosity—more cookie, more joy! Whether enjoyed alone or with family and friends, these cookies are a testament to the enduring appeal of simple pleasures.

Tips for Perfect Giant Chocolate Chip Cookies

  • Ensure your butter is properly softened to achieve the right consistency for creaming with sugars.
  • Use room temperature eggs; they incorporate more evenly into the dough.
  • To deepen the flavor, let your cookie dough chill for at least 30 minutes before baking.
  • Experiment with different chocolate chips or chunks for varying textures and flavors.
  • Keep an eye on them in the final minutes of baking—pull them out when the edges are just golden for a chewy center.

Serving Suggestions

These cookies shine brightest straight from the oven with a briskly cold glass of milk, offering the ultimate balance of warm, gooey interiors with a refreshing chill. For a gourmet touch, consider plating them with a scoop of vanilla ice cream or a dollop of freshly whipped cream.

These giant cookies also make a fantastic base for ice cream sandwiches, creating a delightful handheld dessert for summer gatherings. Pair them with coffee or hot chocolate for an indulgent evening treat, or set them out as a dessert offering at picnics and barbecues, where their oversized appeal will charm guests.

Storage and Leftovers

Store these cookies in an airtight container at room temperature for up to a week to maintain their freshness. If you prefer a warm cookie, reheating them in the microwave for a few seconds will restore their gooey goodness.

Leftover cookies can be crumbled over ice cream or yogurt, or even blended into a milkshake for a sweet twist. You might also consider chopping them into chunks for delicious cookie bars or scattering over brownies for added texture.

Recipe Variations and Substitutions

For a festive variation, swap out half of the chocolate chips for white chocolate and cranberries. If dietary restrictions are a concern, try using a gluten-free flour blend instead of regular flour or substitute eggs with flaxseed meal for a vegan version.

Spice enthusiasts can add a teaspoon of cinnamon or nutmeg for a warm, aromatic twist. You can also replace some of the semisweet chocolate chips with dark chocolate for a sharper taste, appealing to those who enjoy a richer cocoa flavor.

FAQ

Can I make this ahead of time? Yes, you can prepare the dough and refrigerate it for up to 48 hours or freeze it for future baking sessions.

What substitutions can I use for butter? You can use margarine or any dairy-free butter alternatives but expect a slight difference in flavor.

How do I make this gluten-free or vegan? Use a gluten-free flour mix and replace eggs with flax eggs (1 tablespoon flaxseed meal + 3 tablespoons water per egg).

Optional Nutritional Information

  • Calories: Approximately 300 per cookie
  • Fat: 15g
  • Carbohydrates: 40g
  • Protein: 3g

Final Thoughts

From their giant size to the satisfying bite of chocolate in every mouthful, these cookies are a testament to why homemade treats are simply the best. Perfect for families, gifts, or personal indulgence, these giant chocolate chip cookies are sure to become a beloved addition to your baking repertoire. Share your cookie creations and experiences in the comments below, and feel free to ask any questions you might have.

Recipe Section (Final Element)

Serves: 12-15 giant cookies | Prep Time: 20 minutes | Cook Time: 12-15 minutes | Total Time: 45 minutes

  • 1 cup (2 sticks) unsalted butter, softened
  • 1 cup granulated sugar
  • 1 cup packed light brown sugar
  • 2 large eggs
  • 1 teaspoon vanilla extract
  • 3 cups all-purpose flour
  • 1 teaspoon baking soda
  • 1/2 teaspoon salt
  • 2 cups semisweet chocolate chips
  1. Preheat oven to 350°F and line baking sheets with parchment paper.
  2. In a mixing bowl, cream together butter, granulated sugar, and brown sugar until light and fluffy.
  3. Beat in eggs one at a time, then stir in vanilla extract.
  4. In a separate bowl, whisk together flour, baking soda, and salt. Gradually add dry ingredients to wet ingredients until well combined.
  5. Fold in chocolate chips until evenly distributed throughout the dough.
  6. Use an ice cream scoop to portion out dough onto prepared baking sheets, leaving enough space between each cookie.
  7. Bake for 12-15 minutes or until the edges are golden brown.
  8. Allow cookies to cool on the baking sheet for a few minutes before transferring to a wire rack to cool completely.
  9. Enjoy these giant chocolate chip cookies with a glass of cold milk!

“`

Create and Save Your Perfect Pinterest Pins: A Step-by-Step Guide

“`html
Jump to Recipe

Hot Dog Pinwheels: A Fun and Delicious Twist on a Classic Snack

Imagine biting into a perfectly golden, flaky crescent roll that gently wraps around a juicy hot dog, with melted cheddar cheese adding an extra layer of savory delight. These Hot Dog Pinwheels encapsulate all that is scrumptious and fun in a snack, making them a must-try for gatherings, parties, or even cozy family nights at home.

Why You’ll Love This Recipe

Hot Dog Pinwheels are the epitome of comfort food with a creative twist. They’re incredibly easy to prepare, making them excellent for quick meals or when you need a reliable appetizer for unexpected guests. The combination of the buttery crescent rolls with the flavorful hot dogs is irresistible, reminding many of cherished childhood memories.

The recipe’s versatility means it can cater to various occasions—serve them as a party snack, in a kids’ lunchbox, or when watching your favorite TV show. What’s more, the melted cheddar cheese on top adds a delicious richness that pairs perfectly with your choice of dipping sauces such as tangy ketchup or spicy mustard.

For health-conscious individuals, using lean hot dogs or turkey franks can make this treat a little lighter without compromising the taste. Additionally, these pinwheels are a fantastic project for young chefs to assist with, fostering kitchen confidence and fun.

Personal Story/Connection

The first time I made Hot Dog Pinwheels was for a family picnic. Watching my kids’ faces light up with each bite was priceless. They loved the way the buttery dough complemented the savory hot dogs, and since then, it’s become a family tradition to make them for picnics, game nights, and whenever we need a bit of tasty comfort.

Context/Background

Hot Dog Pinwheels are a creative evolution of the classic pigs in a blanket, a longstanding favorite in American cuisine. The original version dates back decades, often seen at festive occasions due to their easy preparation and crowd-pleasing nature. Over the years, cooks have added their spins, including the incorporation of cheeses, which add both flavor and texture.

The adaptability of pinwheels isn’t confined to just American kitchens. Around the world, similar dishes exist, showcasing how different cultures blend dough with meats and cheeses in harmonious bites.

Tips for Perfect Hot Dog Pinwheels

  • Ensure the crescent roll dough is refrigerated until you’re ready to use it to maintain its flakiness.
  • Experiment with different cheeses like pepper jack for a spicy kick or mozzarella for a milder flavor.
  • Brush the tops of the pinwheels with melted butter or egg wash before baking for a glossy finish.
  • If you find the dough getting sticky, dust your work surface lightly with flour.
  • For a crisper texture, bake the pinwheels on a wire rack placed on the baking sheet.

Serving Suggestions

Serve Hot Dog Pinwheels warm from the oven with an array of dipping sauces such as barbeque sauce, honey mustard, or a creamy cheese dip for added indulgence. They’re perfect as a finger food at parties, paired with a crisp salad for a more substantial meal, or as a novel addition to a charcuterie board.

For a themed gathering, consider skewering a few pinwheels onto cocktail sticks for a playful presentation. At kid-friendly events, allow the young ones to customize their own pinwheels with different toppings and dip choices.

Storage and Leftovers

Store any leftover Hot Dog Pinwheels in an airtight container in the refrigerator for up to three days. To reheat, gently warm them in a preheated oven at 350°F for about 5-7 minutes to revive their crispness without making them tough.

Leftovers can be creatively repurposed. Dice them up and toss them in a salad for added protein and flavor, or include them in an omelet for a hearty breakfast. They also make excellent packed lunches for school or work when warmed slightly.

Recipe Variations and Substitutions

If you’re catering to dietary preferences, try these variations:

  • Vegetarian: Swap the hot dogs for vegetarian sausages or roasted vegetables like bell peppers and zucchini.
  • Spicy: Add sliced jalapeños or sprinkle chili flakes onto the cheese before baking for a fiery version.
  • Sweet and Savory: Incorporate a layer of caramelized onions for a depth of flavor that complements the cheese.
  • Seasonal Twist: Use pumpkin or squash when autumn arrives for a hearty, seasonal feel.

FAQ

Can I make this ahead of time? Yes, prepare the pinwheels and refrigerate them on the baking sheet covered with plastic wrap for up to 8 hours before baking.

What substitutions can I use for crescent roll dough? Puff pastry or homemade biscuit dough can substitute crescent rolls, adjusting baking time as needed.

How do I make this gluten-free? Use a store-bought gluten-free crescent roll dough or create your own using gluten-free flour blends.

Optional Nutritional Information

  • Calories per serving: Approximately 210 kcal
  • Total Fat: 12g
  • Protein: 7g
  • Carbohydrates: 18g

Final Thoughts

Hot Dog Pinwheels are more than just a meal; they’re an experience that brings fun and flavor to any occasion. Easy to make and incredibly satisfying, these pinwheels are sure to become a staple in your recipe collection. Try them out, and add your twists, because cooking is all about creating joy and delicious memories!

Recipe Section (Final Element)

Serves: 8
Prep Time: 10 minutes
Cook Time: 12-15 minutes
Total Time: 25 minutes

  • 1 package refrigerated crescent roll dough
  • 8 hot dogs, cut in half
  • 1/2 cup shredded cheddar cheese
  • Ketchup and mustard, for serving
  1. Preheat your oven to 375°F and line a baking sheet with parchment paper.
  2. Roll out the crescent roll dough and separate into triangles.
  3. Cut each hot dog in half and place one half on the wide end of a crescent roll triangle. Roll up the hot dog in the dough.
  4. Place the wrapped hot dogs on the baking sheet and sprinkle shredded cheddar cheese on top.
  5. Bake in the preheated oven for 12-15 minutes, or until the crescent dough is golden brown and the cheese is melted.
  6. Serve with ketchup and mustard for dipping.
  7. Enjoy your delicious and fun hot dog pinwheels!

“`

Irresistible Gingerbread Latte Cookies Recipe Perfect for the Holidays

“`html
Jump to Recipe

Gingerbread Latte Cookies: A Cozy Baking Delight

The warm, spicy aroma of Gingerbread Latte Cookies wafting from the oven is a sure sign that comfort baking season has arrived. These cookies meld the enticing flavors of ginger, cinnamon, and nutmeg with a delightful coffee twist, offering a treat that’s as layered in complexity as it is bursting with festive charm. Perfect for cozying up by the fire or sharing with friends over a cup of coffee, this recipe is a new holiday favorite you won’t want to miss.

Why You’ll Love This Recipe

Gingerbread Latte Cookies capture the essence of a cozy winter afternoon, making each bite a trip down memory lane with their classic, nostalgic flavors. The addition of coffee gives these cookies a modern twist, elevating the traditional gingerbread to a sophisticated treat. Not only are they a great accompaniment to a morning latte or an afternoon tea, but their delightful textures and flavors can also stand alone as the perfect after-dinner dessert.

The recipe is wonderfully versatile, allowing you to experiment with different spices or add-ins, ensuring that each baker makes it their own. For those looking for a simple baking project, these cookies are straightforward and require no special equipment, making them accessible to all skill levels.

Whether you’re making them for a holiday gathering or a quiet evening at home, their spicy warmth and tender crumb will evoke feelings of comfort and joy. Plus, they make for an excellent handmade gift to show your loved ones you care.

Personal Story/Connection

I remember the first time I made Gingerbread Latte Cookies. It was a chilly winter evening, and I wanted to surprise my family with something new yet familiar. As I pulled the cookies out of the oven, the aromatic blend of spices filled our home, bringing everyone to the kitchen. These cookies transported us to our favorite café, but from the comfort of our own living room. They quickly became a holiday staple, not just for their taste but for the warmth they brought into our hearts.

Context/Background

Gingerbread, with its rich history, dates back to medieval times. Initially a preserved treat for royal courts, it’s come a long way to become a beloved part of holiday traditions worldwide. Combining it with coffee pays homage to the centuries-old tradition of pairing sweets with the much-loved beverage, adding a contemporary twist to its timeless appeal.

Espresso and strong-brewed coffee are relatively new introductions to the gingerbread family, infusing this classic treat with the same energy that has fueled countless coffee-lovers throughout history. This evolving recipe is a delightful example of how traditional recipes can be adapted to modern tastes, keeping the memories alive for generations to come.

Tips for Perfect Gingerbread Latte Cookies

  • Use freshly ground spices for a more intense flavor profile.
  • Ensure your butter is properly softened for easier creaming with sugar, resulting in a lighter texture.
  • Roll the dough evenly to ensure uniform baking. Using a cookie scoop can help with this.
  • Chill the dough if it becomes too sticky; it will make rolling easier.
  • Let the cookies cool on the baking sheet to prevent them from falling apart when transferring.

Serving Suggestions

For an indulgent experience, serve these Gingerbread Latte Cookies alongside a homemade hot chocolate or an aromatic chai latte. Their spiced flavors enhance the richness of a creamy beverage, creating a lovely contrast that delights the senses.

They’re a perfect choice for a holiday cookie exchange, where their unique twist on classic gingerbread will make them stand out. For a dinner party, consider serving them with a dollop of freshly whipped cream or a scoop of vanilla bean ice cream to round off the meal.

If you’re feeling extra creative, use them as bases for ice cream sandwiches or crumble over a rich coffee-flavored cake for a texture contrast that’s both surprising and satisfying.

Storage and Leftovers

To keep your Gingerbread Latte Cookies fresh, store them in an airtight container at room temperature for up to a week. For longer storage, you can freeze them; just ensure they are well-wrapped to protect against freezer burn.

These cookies are just as delightful when reheated slightly to bring back their freshly baked aroma. They can be microwaved for a few seconds or warmed in an oven for a couple of minutes at a low temperature.

Leftover cookies can be crumbled and used as an ice cream topping or mixed into a spiced parfait for a new and exciting dessert option.

Recipe Variations and Substitutions

  • Gluten-Free: Substitute the all-purpose flour with a high-quality gluten-free flour blend to accommodate dietary preferences.
  • Vegan Option: Replace the butter with a plant-based alternative and use flax eggs (1 tablespoon ground flaxseed mixed with 3 tablespoons water per egg).
  • Spicy Variation: Add a pinch of allspice or clove for an extra kick of holiday spices.
  • Sweet Swaps: Substitute brown sugar with coconut sugar for a different caramelized sweetness.

FAQ

Can I make these ahead of time?
Yes, the dough can be prepared a day in advance and chilled overnight. This can enhance the flavors and make handling easier.

What can I substitute for espresso?
If you don’t have espresso, strong brewed coffee should work fine, or you can use instant coffee dissolved in hot water for concentrated flavor.

How do I make this gluten-free or vegan?
Refer to the Recipe Variations section for detailed substitutions for both gluten-free and vegan adaptations.

Nutritional Information (Approximation)

  • Calories per serving: 180
  • Fat: 9g
  • Carbohydrates: 22g
  • Protein: 2g
  • Sugar: 10g

Final Thoughts

Gingerbread Latte Cookies are more than just a sweet treat; they’re a celebration of flavors and traditions. Whether you’re sharing them with loved ones or savoring a peaceful moment alone, these cookies bring a dash of warmth and joy into every bite. I invite you to bake, enjoy, and share your thoughts or questions below—because great recipes become even better with a personal touch!

Recipe Section

Yield: Approximately 24 Cookies | Prep Time: 15 minutes | Cook Time: 12 minutes | Total Time: 27 minutes

  • 1 cup unsalted butter, softened
  • 1 cup granulated sugar
  • 1/2 cup brown sugar
  • 2 eggs
  • 1 teaspoon vanilla extract
  • 3 cups all-purpose flour
  • 2 teaspoons ground ginger
  • 1 teaspoon ground cinnamon
  • 1/2 teaspoon ground nutmeg
  • 1/2 teaspoon salt
  • 1/4 cup espresso or strong brewed coffee
  • 1/4 cup molasses
  • 1 teaspoon baking soda
  1. Preheat the oven to 350°F and line a baking sheet with parchment paper.
  2. In a large mixing bowl, cream together the butter, granulated sugar, and brown sugar until light and fluffy.
  3. Add in the eggs and vanilla extract, mixing well.
  4. In a separate bowl, whisk together the flour, ginger, cinnamon, nutmeg, and salt.
  5. In a small bowl, combine the espresso or coffee with the molasses and baking soda.
  6. Gradually add the dry ingredients to the wet ingredients, alternating with the coffee mixture, until a dough forms.
  7. Roll the dough into balls and place them on the prepared baking sheet, flattening slightly.
  8. Bake for 10-12 minutes, or until the edges are set.
  9. Allow the cookies to cool on the baking sheet for a few minutes before transferring to a wire rack to cool completely.

Enjoy these delicious Gingerbread Latte Cookies with a warm cup of coffee or latte!

“`