Master the Art of Homemade Chocolate Ganache: A Complete Guide

“`html
Jump to Recipe

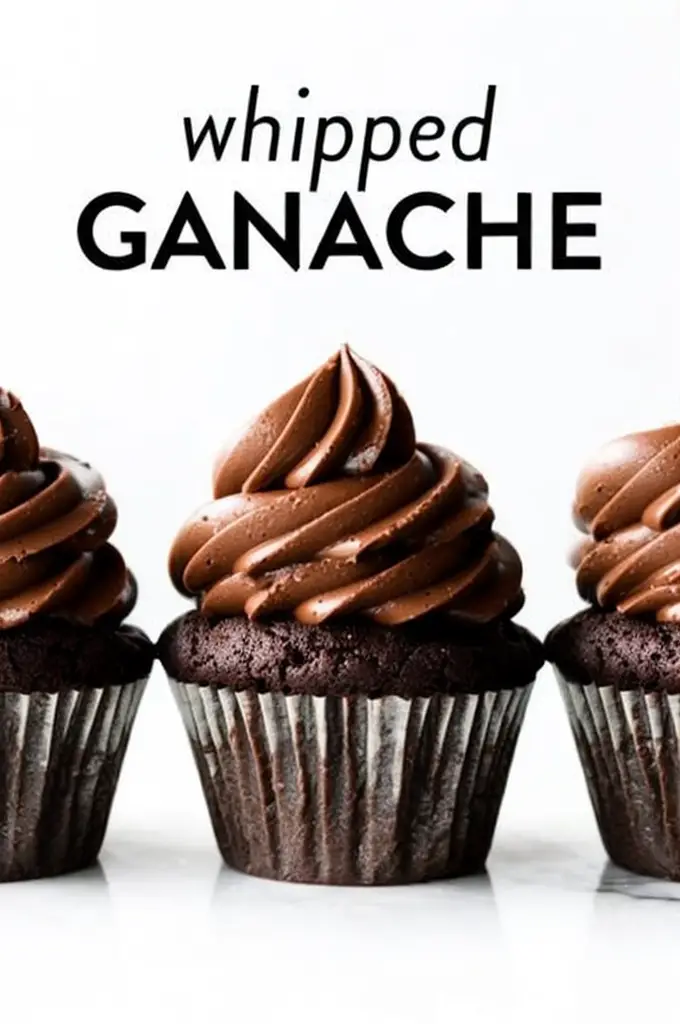
Homemade Chocolate Ganache: A Rich and Decadent Delight

Indulge in the lusciousness of our Homemade Chocolate Ganache, a heavenly blend of semi-sweet chocolate and creamy richness that will elevate your desserts to gourmet heights. Imagine a velvety coating over your favorite cake, the silky drizzle on ice cream, or a sumptuous dip that makes every cookie a celebration. This ganache is surprisingly simple yet extraordinary, making it a must-try for every chocolate lover.

Why You’ll Love This Recipe

This Homemade Chocolate Ganache recipe is a versatile wonder in the dessert world. With just two ingredients—and minimal effort—you can create an array of decadent dishes that evoke warmth and comfort. The rich texture and smooth finish bring a professional touch to home baking. It’s a perfect choice for both novice cooks and seasoned chefs seeking ease without compromising on flavor. This ganache captures the essence of indulgent treats, promising satisfaction with every bite.

Picture this: the fragrant aroma of melted chocolate mingling with creamy notes, transforming ordinary sweets into memorable delights. Thanks to its simplicity and flexibility, this ganache adapts to various themes and occasions, from elegant dinner parties to cozy family gatherings.

The best part? It offers some antioxidant benefits from the chocolate, making it a slightly healthier choice for those inevitable sweet cravings. Whether you’re gifting it or savoring it yourself, this recipe is all about spreading joy through food.

Personal Story/Connection

I vividly remember the first time I made chocolate ganache. It was for my sister’s birthday cake, and the delight on her face when she tasted it was unforgettable. The glossy ganache added a touch of magic to the cake, making it the highlight of the evening. Ever since, it has been a staple in our family celebrations, bringing everyone together over shared love and laughter. Knowing that something so simple could generate such happiness is truly wonderful.

Context/Background

Ganache, a term of French origin, first appeared in culinary circles in the 19th century. While the exact beginnings are a bit of a mystery, it’s believed that ganache was a delightful accident—a chocolatier’s apprentice accidentally invented it, leading to its name, which loosely translates to “fool” or “blunder.” Despite its humble origins, ganache has since become a staple in patisseries around the globe.

Traditionally, ganache was used by elite European chocolatiers, but its simple ingredients quickly made it popular for home bakers as well. Over time, various cultures have embraced it and added their own delicious twists, from mint-infused variants to spicy chili chocolate versions.

Tips for Perfect Homemade Chocolate Ganache

  • Use high-quality chocolate for the best flavor and texture. Avoid chocolate chips, as they contain stabilizers that can affect the smoothness.
  • Ensure the chocolate is finely chopped to allow for even melting.
  • Let the hot cream sit on the chocolate for a few minutes before stirring to help it melt thoroughly and evenly.
  • Stir gently to avoid incorporating air bubbles, which can affect the ganache’s texture.
  • If the ganache breaks (separates), a splash of cold milk can help bring it back together.

Serving Suggestions

This ganache is a versatile companion to many desserts. Use it to glaze a Bundt cake, creating a stunningly glossy finish that catches the eye. For a more intimate gathering, serve it as a fondue, offering fruits and marshmallows as dippers that your guests can enjoy. Drizzle it over homemade ice cream for the perfect finishing touch, or spread it between layers of sponge cake for a decadent torte.

A sprinkle of sea salt can enhance its rich flavor profile, while a dash of vanilla or espresso adds depth. For a special occasion, consider topping it with nuts or vibrant fruits for a striking contrast in texture and taste.

Embrace creativity and make this ganache the star of your party, prepared with love and attention.

Storage and Leftovers

To store leftover ganache, cover it well and refrigerate it for up to a week. Before using, gently reheat it in short bursts in the microwave, stirring between intervals, or warm slowly over a double boiler to regain its creamy consistency.

If you find yourself with extra ganache, get creative! Whip it into a fluffy mousse, use it as a filling for pastries, or thin it with extra cream to make a decadent sauce for pancakes or waffles.

Recipe Variations and Substitutions

  • To make it vegan, substitute heavy cream with coconut cream or a suitable plant-based alternative.
  • Add a bold twist by infusing the cream with lavender or orange zest before pouring it over the chocolate.
  • For a spicier version, add a pinch of cayenne or chili powder for a delightful contrast to the sweetness.

FAQ

Can I make this ahead of time? Yes, you can prepare the ganache in advance and store it in the refrigerator for up to a week. Reheat gently before using.

What substitutions can I use for cream? You can use full-fat coconut milk or other non-dairy creams for a lactose-free version.

How do I make this gluten-free or vegan? This recipe is naturally gluten-free. For a vegan option, use plant-based cream substitutes and ensure your chocolate is dairy-free.

Optional Nutritional Information

  • Calories per serving: approximately 120
  • Total fat: 8g
  • Sugar: 10g

Final Thoughts

If you’re looking to elevate your dessert repertoire with minimal effort, this Homemade Chocolate Ganache is your go-to recipe. Its smooth and rich texture will appeal to any chocolate enthusiast, ensuring your creations stand out at every occasion. Unleash your culinary creativity, delight your senses, and connect with loved ones over this sweet indulgence. Don’t forget to share your unique takes or ask questions in the comments below—we’d love to hear from you!

Recipe Section

Serves: 8 | Prep Time: 5 minutes | Cook Time: 5 minutes | Total Time: 10 minutes

  • 8 oz semisweet chocolate, finely chopped
  • 1 cup heavy cream
  1. Place the chopped chocolate in a heatproof bowl.
  2. In a saucepan, heat the heavy cream over medium heat until it just begins to simmer.
  3. Pour the hot cream over the chopped chocolate and let it sit for 2-3 minutes.
  4. Gently stir the mixture with a spatula until smooth and shiny.
  5. Let the ganache cool slightly before using to glaze cakes, dip cookies, or drizzle on desserts.

Chocolate Ganache

#ChocolateGanache #HomemadeTreats #SweetIndulgence #DessertTime

“`

Ensure to replace `[Buffer Link]` with the actual URL for the image when you integrate this content into your WordPress site.

Delicious Holiday Recipe for December 5, 2024 Festivities

“`html
Jump to Recipe

Walking Taco Bake: A Cheesy Twist on Taco Night

Imagine sinking your fork into a dish that perfectly marries the crunchy, cheesy delight of a taco with the comforting warmth of a casserole. The Walking Taco Bake is an easy, delightful meal that bursts with bold flavors and a variety of textures that will have everyone at your table asking for seconds. Experience a culinary adventure with this unique twist on traditional tacos, where Chili cheese Fritos create a crunchy base, topped with seasoned beef and a gooey layer of cheese. This dish promises an explosion of flavors and a delightful crunch with every bite, making it a must-try for your next family dinner or gathering.

Why You’ll Love This Recipe

The Walking Taco Bake is the ultimate comfort food that combines familiar taco flavors with a playful twist. It’s not only delicious but also incredibly versatile, allowing you to tailor it to suit any preference or occasion. The recipe’s straightforward preparation means it’s perfect for those busy weeknights when you desire something hearty without spending hours in the kitchen. Moreover, the combination of Chili cheese Fritos and cheese layers creates a rich and indulgent flavor profile, making this dish a hit with both adults and kids alike.

This taco bake isn’t just about indulgence; it also captures the spirit of communal eating and sharing, making it a wonderful option for family gatherings and parties. The convenience of a one-dish meal minimizes cleanup, and the option to customize ingredients means everyone can enjoy it to their liking. It’s an excellent dish that brings people together, evoking memories of casual Friday taco nights and joyful family mealtimes.

Personal Story/Connection

This recipe brings back fond memories of childhood gatherings in our family kitchen, where the tantalizing aroma of tacos cooking on the stove would fill the air. My mother always made the best taco bake—a dish that quickly became a family favorite due to its simplicity and crowd-pleasing quality. It was my brother’s request every birthday and a dish we all looked forward to sharing after long days at school or work. Crafting this Walking Taco Bake takes me back to those cherished times, where every spoonful was packed with flavor and familial nostalgia.

Context/Background

Walking Taco Bake is inspired by the classic walking taco concept, where you enjoy crunchy tacos on the go, typically served in a Fritos bag topped with your favorite taco ingredients. This dish captures that spirit, combining convenience and flavor in a baked format. Originating from American roadside fairs and sporting events, the walking taco has evolved, bringing the joy of eating tacos with minimal mess to a multitude of variations, this bake being one of them.

Despite its casual origins, Walking Taco Bake has found its way into kitchens everywhere due to its adaptability and comforting essence. It ushers a party atmosphere to any dining table and exemplifies how hybrid dishes can transcend culinary boundaries to create new favorites.

Tips for Perfect Walking Taco Bake

  • Browning the Beef: Ensure your beef is thoroughly browned before adding the seasoning to maximize flavor.
  • Layering Fritos: Evenly distribute Fritos as the base to maintain a consistent crunch throughout the dish.
  • Cheese Choices: Feel free to experiment with different cheeses, like sharp cheddar or pepper jack, to suit your taste preferences.
  • Preventing Burnt Fritos: Cover with foil for the first half of baking if you find your Fritos are browning too quickly.
  • Resting Time: Allow your dish to rest for a few minutes post-bake; this helps the layers set for easier serving.

Serving Suggestions

Walking Taco Bake shines as a standalone dish, yet it pairs seamlessly with a range of side dishes. Consider serving it alongside a fresh guacamole salad or a tangy slaw to balance the richness with some zesty freshness. For a complete taco night experience, you could also include a side of refried beans or Mexican rice.

Garnishing options are endless; sprinkle chopped cilantro, green onions, or diced tomatoes over the top post-bake to enhance its appeal with a splash of color and freshness. For a party-ready presentation, serve this bake family-style at the center of your table, letting everyone scoop their portions. It’s perfect for casual gatherings or can be elevated with stylish serving ware for special occasions.

Storage and Leftovers

If you have leftovers, Walking Taco Bake can be refrigerated for up to 3 days. Store it in an airtight container to maintain its freshness. Reheating can be done in the oven at 300°F until warmed through, or for a quicker option, use the microwave with a splash of milk to keep the cheese creamy.

Get creative with leftovers: use them as filling for burritos or enchiladas, or mix into a scramble for a hearty breakfast. This way, you can extend the enjoyment of this dish beyond its initial meal, keeping your taste buds entertained with delightful variations.

Recipe Variations and Substitutions

For those seeking a vegetarian version, swap the ground beef with a plant-based mince or sautéed mushrooms for an umami punch. If you’re looking to ramp up the spice, consider adding jalapeños or use a spicier taco seasoning blend.

To make it gluten-free, simply use gluten-free Fritos and ensure your taco seasoning and soup don’t contain any gluten derivatives. For a different take, try adding black beans or corn for additional texture and flavor.

FAQ

Can I make this ahead of time? Absolutely! Prepare the dish, cover it with foil, and refrigerate. When ready to serve, bake as directed, adding additional bake time if it’s going straight from the refrigerator.

What substitutions can I use for cheese soup? You can substitute cheddar cheese soup with a homemade cheese sauce using butter, milk, flour, and a cup of grated cheddar cheese.

How do I make this gluten-free or vegan? Use gluten-free corn chips and cheese alternatives for a vegan version. For gluten-free, ensure all components (taco seasoning, soup, etc.) are certified gluten-free.

Optional Nutritional Information

  • Calories: Approx. 450 per serving
  • Proteins: 20g
  • Carbohydrates: 35g
  • Fats: 25g

Final Thoughts

Walking Taco Bake isn’t just a meal; it’s an experience that transforms taco night into an epic flavor fest. Easy to prepare and adaptable, this dish promises to satisfy even the pickiest of eaters. Whether for a quiet family dinner or a lively gathering, this bake serves as a comfort food blank canvas ready for your own creative touches. Give it a try and let it work its magic at your next meal, and don’t forget to share your thoughts or variations in the comments below!

Recipe

Serves: 4
Prep Time: 15 minutes
Cook Time: 20 minutes
Total Time: 35 minutes

  • 1 lb ground beef
  • 1 package taco seasoning
  • 2/3 cup water
  • 2 cups Chili cheese Fritos
  • 1 can cheddar cheese soup
  • 1/2 cup milk
  • 1 cup shredded mozzarella cheese
  1. Preheat your oven to 350°F.
  2. Brown the ground beef in a skillet over medium-high heat until no longer pink. Drain any excess fat.
  3. Add taco seasoning and water to the skillet. Simmer for about 5 minutes until the liquid is absorbed.
  4. Layer Chili cheese Fritos in an 8×8 baking dish. Spread the seasoned meat evenly on top.
  5. In a separate saucepan, heat cheddar cheese soup and milk over low heat until creamy.
  6. Pour the cheese sauce over the meat and Fritos layer in the baking dish.
  7. Sprinkle shredded mozzarella cheese on top.
  8. Bake in the oven for 12-14 minutes until the cheese is bubbly and golden.
  9. Scoop and serve this cheesy delight!

“`

Irresistible Cranberry Orange Muffins: A Tangy-Sweet and Moist Delight

“`html
Jump to Recipe

Tangy-Sweet Cranberry Orange Muffins: A Zesty Treat for Every Occasion

Imagine biting into a warm, fluffy muffin with a perfect balance of tangy cranberries and sweet, citrusy orange zest. These Cranberry Orange Muffins are a delightful combination of moist texture and vibrant flavor, making them an irresistible addition to any breakfast spread or afternoon tea. Whether you enjoy them fresh out of the oven or as a grab-and-go snack, these muffins offer a unique taste that’s worth experiencing.

Why You’ll Love This Recipe

The beauty of Cranberry Orange Muffins lies in their simplicity and versatility. With a straightforward list of ingredients, this recipe is perfect for bakers of all skill levels. The combination of fresh cranberries and orange zest creates a refreshing burst of flavor that is both comforting and invigorating. The muffins are moist yet light, providing a satisfying bite without being overly dense.

These muffins are not just delicious, but they also have certain health benefits. Cranberries are known for their antioxidant properties, while the freshness of orange zest adds a dose of vitamin C. This recipe is also adaptable, allowing for variations to suit dietary preferences, making it a staple you can enjoy year-round.

Personal Story/Connection

These Cranberry Orange Muffins hold a special place in my heart, as they remind me of cozy winter mornings spent baking with my family. The aroma of citrus and berries wafting through the house brings back cherished memories of laughter and warmth. Sharing these muffins with loved ones has always been a way to bring a piece of comfort and joy to any gathering.

Context/Background

Cranberry Orange Muffins have long been a beloved treat, especially during the holiday season. Originating from traditional breakfast pastries, these muffins have evolved over time to become a staple in many households. The use of cranberries and oranges dates back centuries, symbolizing abundance and prosperity, making these muffins a perfect complement to festive occasions.

Tips for Perfect Cranberry Orange Muffins

  • For a more intense orange flavor, add a little extra zest or use orange extract.
  • If using frozen cranberries, do not thaw them before adding to the batter to prevent excessive moisture.
  • Avoid overmixing the batter to maintain a light and fluffy texture.
  • If you prefer a sweeter muffin, consider sprinkling some sugar on top before baking for a crunchy topping.
  • Experiment with other citrus fruits like lemon or lime for a different twist.

Serving Suggestions

Serve these muffins warm, straight from the oven, paired with a steaming cup of coffee or a refreshing iced tea. For a brunch gathering, arrange them on a tiered stand alongside scones and fresh fruit. These muffins also make a delightful snack when cut in half and spread with a light layer of cream cheese or butter.

For a more indulgent treat, consider drizzling a simple glaze made from powdered sugar and orange juice over the cooled muffins. Their vibrant fruity flavor also complements savory dishes, making them a great addition to a charcuterie board.

Storage and Leftovers

Store these muffins in an airtight container at room temperature for up to three days, ensuring they remain moist and delicious. For longer storage, freeze them in a sealed bag, and simply warm them in the oven at a low temperature when ready to enjoy.

Leftovers can be creatively repurposed into a delightful bread pudding or crumbled over yogurt for a quick and nutritious breakfast option.

Recipe Variations and Substitutions

For a gluten-free version, substitute all-purpose flour with a gluten-free flour blend. Vegans can replace the egg with a flax egg (1 tablespoon flaxseed meal mixed with 2.5 tablespoons water) and use a plant-based milk substitute as needed.

To change things up, try adding different berries like blueberries or raspberries. For a seasonal twist, mix in warming spices such as cinnamon or nutmeg.

FAQ

Can I make this ahead of time? Yes, these muffins can be made a day ahead. Store them in an airtight container to maintain freshness.

What substitutions can I use for vegetable oil? You can use melted coconut oil or unsweetened applesauce as healthier alternatives.

How do I make this gluten-free or vegan? Use gluten-free flour for a gluten-free option, and substitute with a flax egg and plant-based milk for a vegan version.

Final Thoughts

These Tangy-Sweet Cranberry Orange Muffins are not just a treat for your taste buds but also a comfort to your soul. Their harmonious blend of flavors and ease of preparation makes them a must-try recipe. We invite you to experience their delightful charm and share your creations with us. Feel free to leave comments or ask questions as you embark on this baking journey.

Recipe Section

Serves: 12 | Prep Time: 15 minutes | Cook Time: 20-25 minutes | Total Time: 40 minutes

  • 1 1/2 cups all-purpose flour
  • 1/2 cup granulated sugar
  • 2 tsp baking powder
  • 1/2 tsp salt
  • 1/2 cup orange juice
  • 1/4 cup vegetable oil
  • 1 egg
  • 1 cup fresh or frozen cranberries, chopped
  • Zest of one orange
  1. Preheat oven to 400°F and line a muffin tin with liners.
  2. In a large mixing bowl, combine flour, sugar, baking powder, and salt.
  3. In a separate bowl, whisk together orange juice, vegetable oil, and egg.
  4. Pour wet ingredients into dry ingredients and mix until just combined.
  5. Gently fold in chopped cranberries and orange zest.
  6. Divide batter evenly among muffin cups.
  7. Bake for 20-25 minutes or until a toothpick inserted into the center comes out clean.
  8. Let muffins cool in the pan for 5 minutes before transferring to a wire rack to cool completely.

“`

Create and Share Memorable Content: Your Guide to Success Online

“`html
Jump to Recipe

Walking Taco Bake: A Cheesy Comfort Delight

Imagine the satisfying crunch of Chili cheese Fritos mingling with savory, well-seasoned ground beef, all embraced by a luscious layer of creamy cheddar cheese soup, and topped with melted mozzarella bliss. This Walking Taco Bake is more than just a meal; it’s a flavor explosion that takes your taste buds on a delightful culinary journey. A true tribute to taco night, reimagined for those who love a twist on traditional flavors.

Why You’ll Love This Recipe

This Walking Taco Bake is a fusion of textures and tastes—crispy, cheesy, and comforting—all in one bite. Perfect for any taco night or when the craving for something indulgent hits. Its simplicity in preparation makes it an ideal choice for busy weeknights while still offering a palette of intense flavors anyone would fall in love with.

Beyond its delightful taste, this dish is versatile. It appeals to kids and adults alike, making it an excellent choice for family gatherings. Additionally, it brings tacos to a new level, with a baked twist that’s effortlessly shareable and joyfully delicious.

Heartily comforting yet simple to make, this Walking Taco Bake strikes the right balance between hearty and convenience. It’s perfect for those who enjoy their meals with love but not the laborious effort.

Personal Story/Connection

My first encounter with this Walking Taco Bake came during a casual family dinner. As the aroma of cheese and spices filled the kitchen, I watched my family gather around eagerly. This dish became a staple not only for its delightful taste but for the warmth and togetherness it inspired. Even now, the mere mention of it brings up cherished memories of laughter-filled evenings and satisfied smiles.

Context/Background

Walking Tacos, a concept born from Midwest fairs, where crispy chips are loaded with taco toppings for easy snacking. Transforming this on-the-go treat into a bake, however, elevates it, providing a more communal and hearty dining experience. By baking, it allows flavors to meld while introducing an irresistible, cheesy layer over the mix.

The Taco Bake has evolved, influenced by American interpretations of tacos, becoming a symbol of culinary innovation by combining ease of preparation with full-bodied flavors that everyone appreciates.

Tips for Perfect Walking Taco Bake

  • Ensure the oven is fully preheated to 350°F for even baking.
  • Brown the beef until no pink remains to enhance flavor and texture.
  • Customize the spice level by adjusting the taco seasoning mix.
  • Mix milk into the cheese soup slowly for a smooth consistency.
  • Consider using a mix of cheeses for a more complex flavor.

Serving Suggestions

Serve this Walking Taco Bake with a side of fresh guacamole or a simple green salad to add some contrast and freshness. It is a showstopper at a potluck, and you can even pair it with a refreshing lime-infused drink to bring the flavors full circle.

For casual get-togethers, present it with an array of toppings like diced tomatoes, chopped cilantro, or sliced jalapeños. This not only adds to the dish’s aesthetic appeal but also allows guests to personalize their portions.

Storage and Leftovers

Leftovers can be stored in an airtight container in the refrigerator for up to 3 days. Reheat portions in the oven to maintain the crunchy texture of the Fritos or microwave for a quick meal.

Repurpose leftovers by incorporating them into a taco salad, or use them as a filling for burritos or enchiladas, bringing a twist to standard leftovers.

Recipe Variations and Substitutions

For a gluten-free version, opt for gluten-free chips and seasoning. Swap out beef with ground turkey or chicken for a lighter option. Vegetarians can skip the meat entirely and introduce beans for protein.

Looking to add more heat? Incorporate spicy taco seasoning and jalapeños. For a seasonal twist, mix in some roasted corn or diced peppers to the beef mixture.

FAQ

Can I make this ahead of time?
Yes, you can assemble the dish and refrigerate it before baking. Bake it just before serving for best results.

What substitutions can I use for cheddar cheese soup?
You can use nacho cheese sauce or create a homemade cheese sauce with cheddar and heavy cream for a fresh alternative.

How do I make this gluten-free?
Use a gluten-free taco seasoning mix and check that your chips are gluten-free certified.

Optional Nutritional Information

  • Calories: Approximately 650 per serving
  • Protein: 30g
  • Carbohydrates: 45g
  • Fat: 38g

Final Thoughts

I’m excited for you to try this Walking Taco Bake, a dish that promises satisfaction with every bite. With easy preparation and rich, comforting flavors, it’s a guaranteed favorite at any meal. Don’t forget to share your experiences or any customizations when you make this scrumptious delight!

Recipe Section

Serves: 4 | Prep Time: 10 mins | Cook Time: 20 mins | Total Time: 30 mins

  • 1 lb ground beef
  • 1 package taco seasoning
  • 2/3 cup water
  • 2 cups Chili cheese Fritos
  • 1 can cheddar cheese soup
  • 1/2 cup milk
  • 1 cup shredded mozzarella cheese
  1. In a skillet, brown the ground beef over medium-high heat until no longer pink. Drain any excess fat.
  2. Add taco seasoning and water to the beef. Simmer for about 5 minutes until the liquid is absorbed.
  3. Preheat oven to 350°F.
  4. Layer Chili cheese Fritos in a baking dish.
  5. Spread the seasoned meat evenly on top of the Fritos.
  6. In a saucepan, heat cheddar cheese soup and milk over low heat until creamy. Pour over the meat layer.
  7. Sprinkle shredded mozzarella cheese on top.
  8. Bake in the preheated oven for 12-14 minutes, or until bubbly and golden.
  9. Serve hot and enjoy this cheesy delight!

“`

Elevate Fall Flavors with Cranberry-Glazed Roasted Butternut Squash Salad

“`html

Cranberry-Glazed Roasted Butternut Squash Salad: A Perfect Fall Delight

The Cranberry-Glazed Roasted Butternut Squash Salad is a seasonal dish that embraces the vibrant flavors of autumn. With its sweet and tangy cranberry glaze and roasted butternut squash, this salad is not only visually appealing but also a delight to your taste buds. Perfect for Thanksgiving, this salad is an ideal side dish or a light main course option that highlights the best of fall produce.

Why You’ll Love This Recipe

This Cranberry-Glazed Roasted Butternut Squash Salad offers a harmony of flavors that is truly satisfying. The natural sweetness of the squash paired with the tartness of the cranberries creates a balanced and flavorful dish. Additionally, the colorful presentation makes it an attractive addition to any table, perfect for impressing guests during holiday gatherings or dinner parties.

The recipe is not only tasty but also packed with nutritional benefits. Both butternut squash and cranberries are known for their antioxidant properties and are high in fiber, making this salad both a healthy and delicious choice.

Context/Background

The use of butternut squash in dishes dates back to the Native Americans, who cultivated squash for its nutritional value and storage longevity. Cranberries, native to North America, have been used historically in various traditional dishes. This Cranberry-Glazed Roasted Butternut Squash Salad combines these two classic ingredients to celebrate the spirit of American culinary heritage with a modern twist.

Recipe Details

Serves: 4

Prep Time: 15 minutes

Cook Time: 30 minutes

Total Time: 45 minutes

Ingredients

  • 1 medium butternut squash, peeled and cubed
  • 2 tablespoons olive oil
  • Salt and pepper to taste
  • 1/2 cup dried cranberries
  • 1/4 cup cranberry jelly
  • 2 tablespoons balsamic vinegar
  • 4 cups mixed salad greens
  • 1/4 cup crumbled feta cheese
  • 1/4 cup pecan halves, toasted

Directions

  1. Preheat your oven to 400°F (200°C). Line a baking sheet with parchment paper.
  2. Toss the cubed butternut squash with olive oil, salt, and pepper. Spread in a single layer on the prepared baking sheet.
  3. Roast in the oven for 25-30 minutes, turning halfway, until the squash is tender and golden brown.
  4. While the squash is roasting, prepare the cranberry glaze. In a small saucepan over medium heat, combine cranberry jelly and balsamic vinegar. Stir until the jelly melts and the glaze thickens slightly.
  5. Remove squash from the oven and drizzle with half of the cranberry glaze.
  6. In a large serving bowl, combine the mixed greens, glazed squash, dried cranberries, feta cheese, and toasted pecans.
  7. Drizzle the remaining cranberry glaze over the salad and toss gently to combine.
  8. Serve immediately and enjoy!

Tips for Perfect Cranberry-Glazed Roasted Butternut Squash Salad

  • Cut the butternut squash into even-sized pieces to ensure even roasting.
  • Taste and adjust the seasoning of the salad right before serving for the best flavor.
  • For added flavor, try using a mix of salad greens such as arugula, spinach, and romaine.
  • Make sure the pecans are thoroughly toasted for a richer taste.

Serving Suggestions

This salad pairs beautifully with roasted chicken or turkey and is an excellent accompaniment to hearty soups. For a full meal, add grilled chicken or quinoa for protein.

Storage and Leftovers

Store any leftovers in an airtight container in the refrigerator for up to 2 days. Note that the salad greens might become slightly wilted with time, so it’s best enjoyed fresh.

Final Thoughts

This Cranberry-Glazed Roasted Butternut Squash Salad is a must-try recipe this fall. With its delightful combination of flavors and textures, it’s a dish that will impress family and friends alike. Easy to prepare and irresistibly delicious, it’s a recipe you’ll find yourself coming back to year after year.

Recipe Notes

  • Feel free to substitute goat cheese for feta if desired.
  • For a vegan version, omit the cheese or use a dairy-free alternative.
  • Maple syrup can be used instead of cranberry jelly for a different glaze flavor.

“`

Easy Homemade Vanilla Extract Recipe with Just Two Ingredients

“`html
Jump to Recipe

Homemade Vanilla Extract: A Timeless DIY Delight!

Experience the rich and intoxicating aroma of pure vanilla with our homemade vanilla extract recipe. This simple yet elegant infusion provides an unparalleled depth of flavor that transforms your culinary creations into something special. With just two ingredients, you’re not only saving money but also savoring the authentic taste of genuine vanilla, making it a treasured component in your kitchen.

Why You’ll Love This Recipe

The allure of homemade vanilla extract lies in its purity and simplicity. Not only is it a cost-effective alternative, but it’s also free from preservatives and artificial flavors often found in store-bought versions. This versatile staple elevates desserts, pastries, and even savory dishes with its complex aroma. Plus, the joy and satisfaction of making your own is an experience that enriches your cooking journey. Moreover, vanilla is known for its antioxidants and calming properties, adding subtle health benefits to its culinary appeal.

Personal Story/Connection

The first time I made homemade vanilla extract, I was flooded with nostalgia, recalling the irresistible scent of my grandmother’s kitchen during the holidays. She had bottles of her cherished vanilla extract, each with a handwritten label and a date. It was her secret to everything—a dash in cookies, a splash in cakes. As our family gathered, the familiar aroma was a comfort, infusing love into every dish. Now, each time I prepare a jar, I’m connected to those cherished family moments, gifted by the simple pairing of vanilla beans and vodka.

Context/Background

Vanilla extract has a storied past, originating from the orchids of the Vanilla genus that are native to Mexico. The Totonac people of the region are credited with its discovery and used the vanilla pods long before the world market recognized their value. Eventually, it became a beloved flavoring in Europe and America. Over the years, vanilla’s reputation has evolved from a classic ingredient in confectionaries to a hallmark of gourmet cooking, celebrated globally for its complex and aromatic profile.

Tips for Perfect Homemade Vanilla Extract

  • Opt for high-quality vanilla beans for the richest flavor. Madagascar, Tahitian, or Mexican beans are popular choices.
  • Make sure the jar you use is clean and completely dry before adding the beans and vodka to prevent bacterial growth.
  • Allow the extract to mature for at least 8 weeks, but for deeper flavor, consider waiting up to 6 months.
  • Shake the jar weekly to maximize the infusion process.
  • Once your vanilla extract is ready, you can leave the beans in, top off with more vodka, and reuse them multiple times.

Serving Suggestions

This homemade vanilla extract is perfect for enhancing desserts like pancakes, waffles, and French toast, adding a fragrant twist to morning indulgences. It’s a delightful addition to coffee and hot chocolate, offering a hint of luxury. Creativity has no bounds here—try a splash in your homemade whipped cream or yogurt. It’s also a thoughtful gift; pour into small bottles, add a personalized label or ribbon, and share with loved ones for special occasions.

Storage and Leftovers

Store your homemade vanilla extract in a cool, dark place such as a pantry or cupboard. Ensure the jar is tightly sealed to preserve its quality. Properly stored, vanilla extract can last indefinitely and only intensifies in flavor over time. If you find yourself with extra extract, consider using it in marinades or as an aromatic in bath products for a luxurious touch.

Recipe Variations and Substitutions

For a unique flavor twist, consider adding a dried cinnamon stick or a few cracked cardamom pods to the jar for a spiced vanilla extract. To cater to dietary preferences, replace vodka with rum, bourbon, or brandy for a different flavor profile. For those avoiding alcohol, glycerin can be used as a base, although it will yield a different texture and taste.

FAQ

Can I make this ahead of time? Yes, in fact, it’s encouraged! The longer the beans steep, the more robust the flavor becomes.

What substitutions can I use for vodka? Rum, bourbon, or brandy are great alternatives, each imparting a unique flavor to the extract.

How do I make this gluten-free or vegan? This recipe is naturally gluten-free. To make it vegan, ensure your vodka or chosen alcohol is plant-based.

Optional Nutritional Information

  • Calories: Approximately 25 per tablespoon
  • Alcohol content will cook off in most recipes, leaving minimal residual.
  • Made from natural ingredients with no additives.

Final Thoughts

Homemade vanilla extract is a heartfelt way to enhance your culinary creations with authenticity and depth. Its simplicity and elegance make it an essential staple in any kitchen. Whether gifting it or keeping it for personal use, this homemade treasure is bound to transform your recipes and create memories worth savoring. Share your kitchen adventures below or ask any questions if you need guidance. Happy cooking!

Recipe Section

Serves: Multiple | Prep Time: 10 minutes | Total Time: 8 weeks

  • 6-8 whole vanilla beans
  • 1 cup vodka
  1. Using a sharp knife, split the vanilla beans lengthwise to expose the seeds.
  2. Place the split vanilla beans in a clean jar, then pour the vodka over them.
  3. Seal the jar tightly and give it a good shake.
  4. Store the jar in a cool, dark place for at least 8 weeks, shaking it every week.
  5. After 8 weeks, your homemade vanilla extract is ready to use!

“`

Wholesome Morning Glory Muffins: A Healthy Start to Your Day

“`html
Jump to Recipe

Wholesome Morning Glory Muffins: A Delightful Start to Your Day

Imagine waking up to the irresistible scent of freshly baked morning glory muffins wafting through your kitchen. These muffins are a harmonious blend of sweetness and spice, with a medley of textures from moist shredded carrots, crisp apples, and the subtle chew of raisins. Perfectly golden brown with a hint of coconut and crunch from walnuts, these treats are not just your regular muffins—they’re a wholesome, flavorful way to start your day.

Why You’ll Love This Recipe

You’ll find these morning glory muffins to be a delightful blend of flavors and textures that offer something for everyone at the breakfast table. With their rich blend of caramel sweetness from brown sugar and honey, these muffins pack the perfect punch to fuel your morning. Not only are they delicious, but they are also packed with nutritious ingredients like carrots, apples, and walnuts, adding a balance of health and taste.

Additionally, these muffins are incredibly versatile. Whether you’re grabbing one on-the-go or serving them as part of a cozy brunch, they fit perfectly. The ease of preparation makes them an ideal baking project for novice and experienced bakers alike. Plus, their unique combination of ingredients evokes comforting memories, like family gatherings or quiet mornings on the porch.

Personal Story/Connection

These morning glory muffins hold a special place in my heart. I remember the first time my grandmother baked them for a lazy weekend breakfast. The warmth, the inviting aroma, and the excitement of trying something different made that morning unforgettable. Ever since, these muffins have been a staple at family brunches, symbolizing love and togetherness in every bite.

Context/Background

The morning glory muffin, with its eclectic mix of ingredients, has a fascinating history. It first gained popularity in the late 1970s at the Morning Glory Cafe on Nantucket Island. Since then, it’s been cherished for its adaptable nature and ability to incorporate whatever fresh produce you have on hand. This adaptability reflects the spirit of the muffins: humble, comforting, and ever-so-pleasing.

Over the years, these muffins have become a popular choice for those seeking a nutritious, satisfying start to the day. Their evolution includes various twists and substitutions, making them a beloved choice in many households for breakfast or a snack.

Tips for Perfect Morning Glory Muffins

  • Ensure ingredients are at room temperature for a smooth batter.
  • Do not overmix the batter for the fluffiest texture.
  • Drain the crushed pineapple well to avoid excess moisture.
  • Use fresh, high-quality produce for the best flavor.
  • Consider toasting the walnuts for an extra depth of flavor.

Serving Suggestions

Serve these muffins warm with a pat of butter for ultimate indulgence. They also pair beautifully with a dollop of Greek yogurt or cream cheese for added richness. For a refreshing balance, consider enjoying them with a side of fresh fruit or a smoothie. Hosting a brunch? Add a sprinkle of powdered sugar or a drizzle of honey before serving to impress your guests.

Storage and Leftovers

To store these muffins, ensure they are completely cooled before placing them in an airtight container. They will stay fresh for up to three days at room temperature. For longer storage, freeze them in a zip-lock bag and thaw at room temperature or warm slightly in the oven when ready to enjoy again.

Repurpose leftover muffins by crumbling them over yogurt or turning them into a delightful bread pudding. Their moist and crumbly texture lends itself well to such imaginative revamps.

Recipe Variations and Substitutions

For a gluten-free version, use a 1:1 gluten-free flour blend as a substitute. Swap walnuts for pecans or almonds if desired. To make the recipe vegan, use flax eggs and coconut oil instead of eggs and vegetable oil. Experiment with seasonal fruits like zucchini or berries for a unique twist on this classic recipe.

FAQ

Can I make this ahead of time? Yes, these muffins are perfect for meal prep. Prepare them in advance and enjoy throughout the week.

What substitutions can I use for coconut? If you’re not a fan of coconut, consider using extra shredded carrots or oats for added texture.

How do I make this gluten-free or vegan? Use gluten-free flour for a gluten-free version, and swap eggs and oil for flax eggs and coconut oil to make it vegan-friendly.

Optional Nutritional Information

  • Calories: Approximately 220 per muffin
  • Protein: 4g
  • Carbohydrates: 28g
  • Fiber: 2g
  • Sugar: 15g
  • Fat: 11g

Final Thoughts

These wholesome morning glory muffins are a delightful way to start your day or brighten any moment. With their balanced blend of flavors and satisfying textures, they’re sure to become a beloved staple in your home. Give them a try, and feel free to experiment and make them your own. We’d love to hear your adaptations and experiences, so don’t hesitate to share!

Recipe

Serves: 12 muffins

Prep Time: 15 minutes

Cook Time: 18-20 minutes

Total Time: 35 minutes

  • 1 1/2 cups all-purpose flour
  • 1/2 cup whole wheat flour
  • 1 tsp baking soda
  • 1 tsp baking powder
  • 1/2 tsp salt
  • 1/2 cup brown sugar
  • 1/4 cup honey
  • 1/2 cup vegetable oil
  • 3 eggs
  • 1 tsp vanilla extract
  • 1/2 cup shredded carrots
  • 1/2 cup shredded apple
  • 1/2 cup crushed pineapple, drained
  • 1/3 cup chopped walnuts
  • 1/3 cup shredded coconut
  • 1/4 cup raisins
  1. Preheat oven to 350°F and line a muffin tin with paper liners.
  2. In a large bowl, whisk together flours, baking soda, baking powder, and salt.
  3. In a separate bowl, mix together brown sugar, honey, oil, eggs, and vanilla extract.
  4. Gradually add wet ingredients to dry ingredients and stir until just combined.
  5. Fold in carrots, apple, pineapple, walnuts, coconut, and raisins.
  6. Divide batter evenly among muffin cups.
  7. Bake for 18-20 minutes or until a toothpick inserted into the center comes out clean.
  8. Allow muffins to cool before serving.

“`
Make sure to replace `[Buffer]` with an appropriate image URL if needed.

Master the Iconic Tarte Tatin with This Easy Recipe

“`html
Jump to Recipe

Tarte Tatin: A Classic French Dessert Delight

Indulge your senses with a slice of Tarte Tatin, where the rich, golden caramel melds flawlessly with tender, sweet apples, all cradled by a crisp, buttery puff pastry. This upside-down dessert offers both a visual feast and an explosion of flavors, making it an irresistible treat for any occasion. The juxtaposition of warm caramelized apples with a cool scoop of vanilla ice cream is pure magic, creating a dessert worth savoring till the last bite.

Why You’ll Love This Recipe

There’s something profoundly comforting about a Tarte Tatin. It’s a dessert that not only satisfies the sweet tooth but also evokes a sense of warmth and togetherness. This dish’s versatility is another reason to love it. Whether you’re a skilled chef or a kitchen novice, this recipe is an approachable yet impressive addition to your repertoire. The health-conscious can appreciate the natural sweetness of the apples, complemented by the moderate indulgence of caramel and pastry.

This Tarte Tatin brings a slice of French elegance to your table without the requisite trip to Paris. Its ease of preparation allows you to enjoy hosting rather than stressing over dessert. Moreover, the beautiful layers of fruit and pastry make it a visual delight, ideal for festive gatherings or a cozy family meal.

Personal Story/Connection

Growing up, my love for Tarte Tatin was cemented on a family trip to France. I vividly remember stumbling into a quaint countryside café where the aroma of buttery pastry and sweet apples welcomed us in. Sharing a slice with my loved ones remains a cherished memory, and ever since, this dessert has been a staple in my kitchen, weaving joy and connection with every bake.

Context/Background

Originating from the heart of France in the 19th century, Tarte Tatin was a serendipitous creation of the Tatin sisters, Caroline and Stéphanie. Legend has it that the dessert was born from a baking mishap that resulted in a deliciously caramelized tart. This culinary miracle quickly gained fame and has since graced both humble homes and esteemed dining rooms worldwide.

Traditionally made with apples, this tart’s unique flipped presentation showcases glistening caramel-coated fruit, paying homage to the sisters’ ingenuity. Over time, it has evolved with various fruit and pastry adaptations, but the classic apple and puff pastry combination remains a beloved standard.

Tips for Perfect Tarte Tatin

  • Choose firm apples like Granny Smith or Honeycrisp for the best texture post-caramelization.
  • Ensure the puff pastry fully covers the apples to lock in moisture during baking.
  • If the caramel becomes too hard when cooled, briefly reheat it on low to soften it before the flip.
  • Use an oven-safe skillet with high sides to prevent caramel from spilling over.
  • For a more intense flavor, add a pinch of cinnamon or nutmeg to the sugar-butter mix.

Serving Suggestions

Tarte Tatin pairs beautifully with vanilla ice cream or a dollop of crème fraîche, each offering a perfect balance to the rich flavors of the tart. For more elaborate occasions, consider serving it with a sprinkle of toasted nuts or a drizzle of caramel sauce, adding complexity and texture.

To elevate casual meals, enjoy a generous slice with your afternoon tea or coffee. For festive events, consider a pairing with a light dessert wine, enhancing the apple’s natural sweetness.

Storage and Leftovers

Leftover Tarte Tatin can be a delightful surprise for your next meal. Store it in an airtight container in the refrigerator, where it can keep for up to three days. To reheat, gently warm in the oven to re-crisp the pastry without drying out the fruit.

For a creative spin on leftovers, consider transforming this dessert into a decadent breakfast, served alongside pancakes or waffles. Alternatively, use it as a unique topping for yogurt or oatmeal, infusing your mornings with a sweet touch.

Recipe Variations and Substitutions

Experiment with seasonal fruits like pears, peaches, or even plums for an exciting variation of this classic dessert. Infuse a savory twist by introducing herbs such as rosemary or thyme into the caramelization process.

For dietary adaptations, opt for a gluten-free puff pastry or a vegan butter alternative. These swaps ensure that everyone at your table can enjoy a slice of indulgence without compromise.

FAQ

Can I make this ahead of time?

Yes, you can prepare the dish a day in advance. Simply caramelize the apples and assemble the tart, then bake it fresh when ready to serve.

What substitutions can I use for puff pastry?

If puff pastry isn’t available, a pie crust or phyllo dough can be used, though they will yield different textures.

How do I make this gluten-free or vegan?

Use a gluten-free puff pastry for a gluten-free version, and substitute butter with a plant-based alternative for a vegan-friendly tarte.

Optional Nutritional Information

  • Calories per serving: Approximately 450
  • Carbohydrates: 66g
  • Fat: 20g
  • Protein: 3g

Final Thoughts

Embrace the allure of Tarte Tatin as a centerpiece that delights both the eyes and the palate. Its simple preparation belies the sophisticated flavors that unfold with every bite. As you share this dessert with others, remember that it’s more than just a dish—it’s a testament to the joy of culinary exploration and shared experiences. Don’t hesitate to leave a comment or question, and share your own Tarte Tatin journey!

Recipe Section

Serves: 8 | Prep Time: 15 mins | Cook Time: 45 mins | Total Time: 1 hour

  • 1 sheet of puff pastry
  • 6-8 apples, peeled, cored, and halved
  • 1 cup granulated sugar
  • 1/2 cup unsalted butter
  • Vanilla ice cream, for serving
  1. Preheat the oven to 375°F.
  2. In a 9-inch oven-safe skillet, melt the butter over medium heat. Add in the sugar and stir until combined.
  3. Place the apple halves in the skillet, round side down, fitting them snugly together.
  4. Cook the apples in the sugar and butter mixture for about 15-20 minutes, until they are caramelized and tender.
  5. Lay the puff pastry over the apples, tucking in the edges.
  6. Bake in the oven for 25-30 minutes, until the pastry is golden brown and crispy.
  7. Remove from the oven and let it cool for 5 minutes.
  8. Place a large plate over the skillet and carefully flip the Tarte Tatin onto the plate.
  9. Serve warm with a scoop of vanilla ice cream on top.
  10. Enjoy this decadent French dessert!

#TarteTatin #FrenchDessert #CaramelizedApples #PuffPastry

“`

Indulge in Delicious German Chocolate Pecan Pound Cake Recipe

“`html

Delicious German Chocolate Pecan Pound Cake: A Decadent Delight

Indulge your senses with this mouth-watering German Chocolate Pecan Pound Cake, bursting with rich flavors and a delightful texture. This cake perfectly blends the classic, creamy chocolate taste with the nutty richness of pecans, creating a dessert that is both timeless and irresistible.

Why You’ll Love This Recipe

This German Chocolate Pecan Pound Cake will become a staple for its delightful combination of textures and flavors—smooth chocolate meets the crunch of pecans. Perfect for family gatherings, holidays, or as a luxuriant treat for yourself, this cake offers a simple yet sophisticated flair that makes any occasion special.

The recipe is straightforward, yet it yields a cake that delivers gourmet results, impressing everyone with its rich, moist crumb and savory-sweet topping. Plus, it can be made ahead of time, making it a convenient option for busy hosts and chefs alike.

Context/Background

German Chocolate Cake has a fascinating history that stems not from Germany, but from an American named Samuel German, who developed a style of dark-baking chocolate. Over the years, the cake has evolved, and our pound cake variation adds a dense, buttery richness typical of Southern baking influences.

This variation warms up traditional German Chocolate Cake by infusing it with a Southern twist through the use of pecans—a staple nut in Southern recipes—perfectly complementing the chocolate, creating a universally beloved dessert.

Recipe Details

Serves: 10-12

Prep Time: 20 minutes

Cook Time: 1 hour 20 minutes

Total Time: 1 hour 40 minutes

Ingredients

  • 1 cup butter, softened
  • 2 cups sugar
  • 4 large eggs
  • 1 cup sour cream
  • 3 cups all-purpose flour
  • 1/2 teaspoon baking powder
  • 1/2 teaspoon baking soda
  • 1/4 teaspoon salt
  • 1 cup German chocolate, melted and cooled
  • 1 teaspoon vanilla extract
  • 1 cup pecans, finely chopped

Directions

  1. Preheat your oven to 325°F (165°C). Grease and flour a bundt pan.
  2. Cream together the butter and sugar until light and fluffy. Add the eggs, one at a time, beating well after each addition.
  3. Mix in the sour cream until smooth.
  4. In another bowl, whisk together the flour, baking powder, baking soda, and salt. Gradually add the dry ingredients to the creamed mixture, beating until combined.
  5. Stir in the melted chocolate and vanilla extract until the batter is just combined.
  6. Fold in the chopped pecans.
  7. Pour the batter into the prepared bundt pan and spread evenly.
  8. Bake for 1 hour and 20 minutes, or until a toothpick inserted into the center comes out clean.
  9. Remove from oven and let cool in the pan for 10 minutes, then turn out onto a wire rack to cool completely.

Tips for Perfect German Chocolate Pecan Pound Cake

  • Ensure the butter is properly softened to blend seamlessly with the sugar.
  • Don’t overmix the batter; this helps keep the cake light and tender.
  • Use high-quality German chocolate for the best flavor.
  • Allow the cake to cool completely before slicing to prevent crumbling.

Serving Suggestions

This cake is delightful on its own, but you can serve it with a dollop of whipped cream or a scoop of vanilla ice cream for an extra treat. Pairing it with a fresh fruit compote also enhances its deliciousness.

Storage and Leftovers

Store the cake in an airtight container at room temperature for up to three days. If you wish to keep it longer, refrigerate it for up to a week. For optimal freshness, allow the cake to come to room temperature before serving.

Final Thoughts

This German Chocolate Pecan Pound Cake is a sumptuous blend of flavors that is both nostalgic and innovative. Whether you’re new to baking or a seasoned pro, this is a recipe worth making and sharing with loved ones. The efforts yield a truly memorable dessert that celebrates the richness of chocolate and pecans.

Recipe Notes

  • You can substitute walnuts for pecans for a slightly different flavor profile.
  • For a richer chocolate flavor, consider using bittersweet chocolate.
  • If you prefer a lighter cake, sift the flour before measuring.

“`

Irresistible Sweet and Creamy Cinnamon Butter Recipe for All Occasions

“`html
Jump to Recipe

Sweet and Creamy Homemade Cinnamon Butter: A Delicious Breakfast Delight

Imagine the warm, inviting aroma of cinnamon wafting through the air, mingling with buttery sweetness. Sweet and Creamy Homemade Cinnamon Butter is your ticket to transforming ordinary breakfasts into extraordinary experiences. This smooth, dreamy spread boasts a blend of rich butter, a hint of vanilla, and the sweetness of honey and powdered sugar, all topped with a cozy cinnamon finish. It’s a simple pleasure worth savoring.

Why You’ll Love This Recipe

Sweet and Creamy Homemade Cinnamon Butter is a versatile treat that brings joy to every meal. Its creamy texture and delightful flavor enhance everything from simple toast to elaborate pastries. Not only is it incredibly easy to prepare, but it also adds a touch of gourmet indulgence to any breakfast or brunch spread.

This recipe is perfect for creating cherished memories with loved ones as you gather around the table. It offers that comforting, homemade touch that evokes feelings of warmth and nostalgia. Plus, with the use of natural ingredients like honey and cinnamon, it’s a more wholesome choice for those looking to cut back on processed spreads.

Whether you’re looking to impress guests or just enjoying a quiet morning at home, Sweet and Creamy Homemade Cinnamon Butter is the perfect touch of decadence. It’s an effortless way to infuse your day with a little sweetness and comfort, making it an essential addition to your culinary repertoire.

Personal Story/Connection

As a child, my weekends often began with the comforting scent of cinnamon filling the house. My grandmother, a wizard in the kitchen, would prepare her signature cinnamon butter, a recipe passed down through generations. I remember eagerly watching her mix the ingredients, the anticipation building for that first delightful bite. Today, making this cinnamon butter allows me to relive those cherished moments and share them with my own family.

Context/Background

Cinnamon butter, a beloved spread known in various cultures, has a rich history, associated with comfort and warmth. Cinnamon itself has been cherished for centuries, valued as a spice, a currency, and even a status symbol. In many cultures, butter flavored with spices and sweeteners has been a traditional accompaniment for bread, symbolizing abundance and generosity.

Over time, this humble yet delightful combination has evolved, with recipes varying by region and individual taste, but always retaining its status as a comfort food staple. Today’s versions, like Sweet and Creamy Homemade Cinnamon Butter, continue this tradition, providing a modern twist on a timeless treat.

Tips for Perfect Sweet and Creamy Homemade Cinnamon Butter

  • Ensure the butter is softened to room temperature for easy mixing and a smooth consistency.
  • For a lighter, whipped texture, use an electric mixer instead of a spoon or spatula.
  • Experiment with the sweetness by adjusting the amount of powdered sugar and honey to your liking.
  • If you prefer a stronger cinnamon flavor, feel free to add an extra pinch.
  • Use high-quality butter and honey for the best taste.
  • Consider adding a pinch of salt to balance the flavors if you’re using unsalted butter.

Serving Suggestions

The uses for Sweet and Creamy Homemade Cinnamon Butter are limited only by your imagination. Its luscious spreadability makes it ideal for slathering on warm, crusty toast or freshly baked pastries. For a breakfast indulgence, try it melted over pancakes or waffles, where it can melt gloriously into all those little nooks and crannies.

At brunch, serve it alongside a selection of muffins, croissants, or scones to elevate your meal to a gourmet level. It’s also a splendid addition to a cheese and fruit platter, providing a sweet counterpoint to savory and tangy flavors.

If you’re hosting a dinner party, use it as a unique topping for roasted sweet potatoes or as a dip for baked apple slices. For a creative twist, incorporate it into your dessert recipes, like a filling for layer cakes or a swirl in a bread pudding.

Storage and Leftovers

Store Sweet and Creamy Homemade Cinnamon Butter in an airtight container in the refrigerator, where it will keep well for up to two weeks. Ensure the container is well-sealed to maintain its fresh flavors and creamy texture.

If you’re planning ahead, this butter can be frozen for up to three months. Divide it into portions and wrap each in plastic wrap before placing in a freezer-safe container. To use, simply thaw in the refrigerator overnight.

Leftover cinnamon butter is perfect for making French toast or adding to cookie dough for an extra burst of flavor. It also makes a delightful addition to mashed sweet potatoes or oatmeal.

Recipe Variations and Substitutions

  • Vegan Version: Replace butter with a plant-based alternative and use agave syrup instead of honey.
  • Spiced Up: Add a pinch of nutmeg or a dash of allspice for a more complex flavor profile.
  • Savory Twist: Reduce the powdered sugar and add a pinch of sea salt and a sprinkle of chopped fresh rosemary.
  • Nutty Delight: Stir in finely chopped toasted nuts like pecans or walnuts for a crunchy texture.

FAQ

Can I make this ahead of time? Yes, you can make this cinnamon butter in advance and store it in the refrigerator or freezer as detailed in the storage section.

What substitutions can I use for butter? A plant-based butter substitute can be used for a vegan version, maintaining the recipe’s flavor and texture.

How do I make this gluten-free? This recipe is naturally gluten-free, but be sure to pair it with gluten-free bread or pastries if necessary.

Optional Nutritional Information

  • Calories: Approximately 100 calories per tablespoon
  • Fat: 11g
  • Sugar: 3g

Final Thoughts

Sweet and Creamy Homemade Cinnamon Butter is more than just a spread; it’s a celebration of flavors and memories that adds warmth and joy to any meal. Its simplicity and versatility make it a must-try recipe for food lovers of all ages. I encourage you to bring a little sweetness into your mornings and share this heartwarming treat with your loved ones.

Try this recipe and let us know your thoughts. We’d love to hear how you make Sweet and Creamy Homemade Cinnamon Butter your own. Feel free to leave a comment or ask any questions – happy cooking!

Recipe

Serves: 8 | Prep Time: 5 mins | Cook Time: 0 mins | Total Time: 5 mins

  • 1 cup unsalted butter, softened
  • 1/4 cup powdered sugar
  • 2 tbsp honey
  • 1 tsp cinnamon
  • 1/2 tsp vanilla extract
  1. In a mixing bowl, combine softened butter, powdered sugar, honey, cinnamon, and vanilla extract.
  2. Mix all ingredients together until smooth and well combined.
  3. Transfer the cinnamon butter to a serving bowl or roll it into a log using plastic wrap for a fancier presentation.
  4. Serve this sweet and creamy homemade cinnamon butter on warm toast, pancakes, waffles, or muffins for a delightful treat.

“`