Indulge in Heavenly No-Bake Mini Key Lime Pies Today

“`html

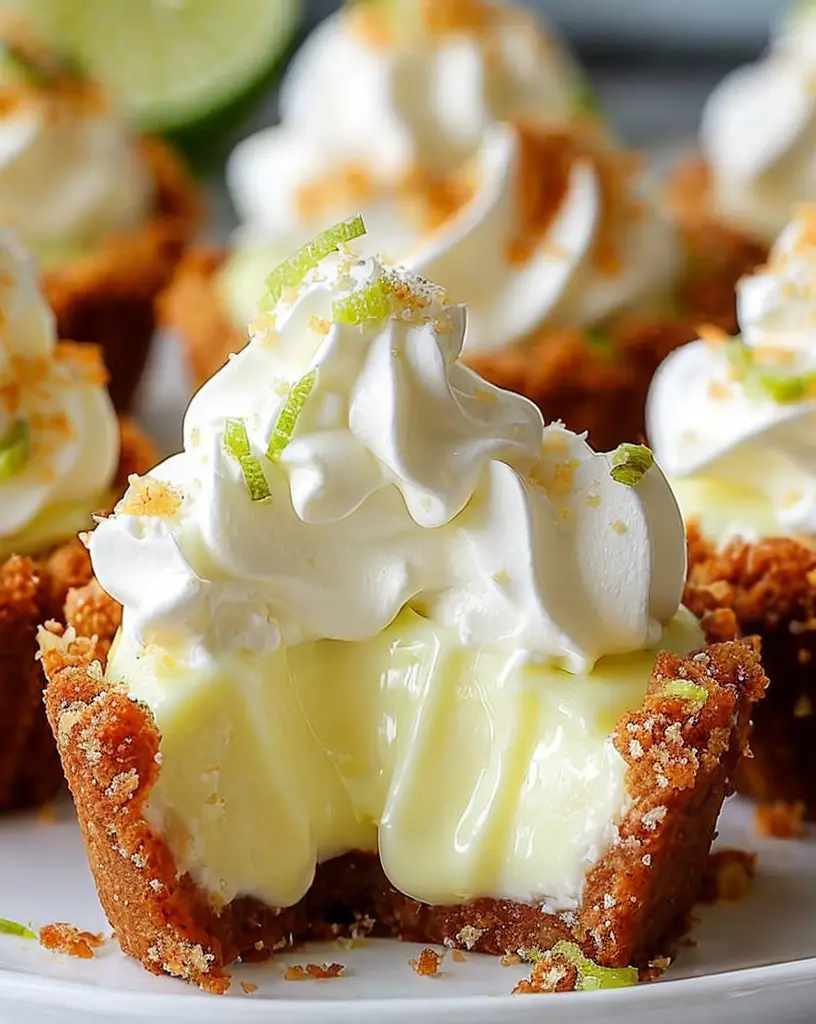
Heavenly No-Bake Mini Key Lime Pies: A Tropical Delight

Indulge in a taste of the tropics with these Heavenly No-Bake Mini Key Lime Pies. This refreshing dessert packs a zesty punch with the perfect blend of sweet and tangy flavors. Quick and easy to make, these pies will become your favorite go-to treat.

Why You’ll Love This Recipe

These no-bake delights are the epitome of convenience and flavor. With no need to heat up your kitchen, they are perfect for warm days or when you’re in a rush. The smooth and creamy texture paired with a graham cracker crust creates an irresistible combination. Whether it’s a summer gathering or an impromptu treat, these mini key lime pies will always impress.

The zing of fresh key lime juice in these pies offers a burst of flavor that is both exhilarating and satisfying. Compact and individually portioned, they are ideal for serving at parties and picnics, making dessert simple and stylish.

Context/Background

The key lime pie has its origins in the Florida Keys, where key limes are a staple ingredient. Traditionally, this dessert was popularized for its sweet-tangy taste and simplistic method of preparation with pantry staples. Over time, this classic pie has evolved into an easy, no-bake version that retains its beloved flavor profile while catering to modern-day convenience.

This no-bake mini version captures all the essence of the original dessert while allowing effortless preparation. It’s a modern twist that holds a nostalgic charm.

Recipe Details

Serves: 8

Prep Time: 15 minutes

Cook Time: None

Total Time: 15 minutes

Ingredients

  • 1 cup graham cracker crumbs
  • 1/4 cup melted butter
  • 1/4 cup sugar
  • 1 can (14 oz) sweetened condensed milk
  • 1/2 cup fresh key lime juice
  • 1 tablespoon lime zest
  • 1 cup heavy whipping cream
  • 8 key lime slices for garnish (optional)

Directions

  1. In a bowl, combine graham cracker crumbs, melted butter, and sugar. Mix well until the texture resembles wet sand.
  2. Divide the crumb mixture evenly among 8 mini tart pans, pressing firmly into the bottom to form a crust. Set aside.
  3. In another bowl, blend sweetened condensed milk, key lime juice, and lime zest until smooth and creamy.
  4. In a separate bowl, whip the heavy cream until stiff peaks form, then gently fold it into the lime mixture.
  5. Pour the filling evenly into the prepared crusts. Smooth the tops with a spatula.
  6. Refrigerate for at least 2 hours or until set. Top with lime slices if desired before serving.

Tips for Perfect Heavenly No-Bake Mini Key Lime Pies

  • Use fresh key lime juice for the best flavor; bottled juice may taste less vibrant.
  • Let the pies chill thoroughly to ensure they are perfectly set before serving.
  • Adjust the sugar in the graham cracker crust according to your sweetness preference.
  • For a firmer filling, allow chilling overnight.

Serving Suggestions

These mini pies make an excellent dessert for a barbecue or picnic. Pair them with fresh berries or a dollop of whipped cream for an extra indulgent touch. They also serve beautifully at a brunch or afternoon tea.

Storage and Leftovers

Store leftover mini pies in an airtight container in the refrigerator for up to three days. To keep them looking fresh, add any garnishes just before serving.

Final Thoughts

These Heavenly No-Bake Mini Key Lime Pies are sure to brighten up any menu with their zesty richness and creamy texture. Give them a try and enjoy the straightforward process and delicious results. Your guests will appreciate the elegant yet uncomplicated dessert that captures the essence of summer in every bite.

Recipe Notes

  • Substitute regular limes if key limes are unavailable; adjust the quantity to match the desired intensity of tanginess.
  • For a nutty twist, replace some of the graham cracker crumbs with ground almonds or pecans.
  • Use dairy-free whipped topping as a substitute for heavy cream for a lighter option.

“`

Master Saving Pinterest Pins: Your Ultimate Guide to Discovery

“`html
Jump to Recipe

Walking Taco Bake: A Cheesy Fiesta in Every Bite

Imagine the bold flavors of a taco tangled with the cheesy allure of a casserole; that’s Walking Taco Bake for you. With the crunch of Chili cheese Fritos and the ooey-gooey richness of cheddar soup and mozzarella cheese, this dish promises a flavor explosion that’s unique and mouthwateringly satisfying. It’s not just a meal, it’s a scrumptious journey inspired by classic taco flavors interwoven with layers of cheesy goodness.

Why You’ll Love This Recipe

This Walking Taco Bake is the ultimate comfort food, blending traditional taco essentials with a novel twist. Whether you’re a busy parent or hosting a casual get-together, this dish brings convenience and delight. The easiest part? It’s a one-dish wonder, minimizing clean-up. Plus, its playful use of Chili cheese Fritos adds a nostalgic snack-time fun, making it irresistible for both kids and adults alike.

Beyond its ease, this recipe invites creativity. Mix and match ingredients to cater to everyone’s taste. It’s versatile enough to accommodate pickier palates and can even be customized for health-conscious eaters. Rich in flavor and texture, it’s a dish that evokes happiness, reminiscent of family game nights or sunny picnics.

Not to mention, the Walking Taco Bake includes a robust protein source from the ground beef, ensuring a hearty, fulfilling meal. By tweaking the types of cheese or adding veggies, you can sneak in some nutritious benefits without sacrificing any flavor.

It’s not just a recipe; it’s an experience packed with warmth, excitement, and love ready to be shared with those around your table.

Personal Story/Connection

My first encounter with the Walking Taco Bake was a serendipitous discovery during a summer family reunion. Amidst the chatter and laughter, this dish stood out for its aroma and presentation. Watching my family eagerly dig into the meal and swap stories, I realized it was more than just food. Every layer of cheese and crumb of Fritos brought us closer, evoking shared memories and creating new ones. Now, it’s a staple during every family gathering, a culinary staple that bonds us.

Context/Background

The concept of a ‘walking taco’—a portable, snack-sized taco traditionally served in a bag of chips—originates from the Midwestern United States, particularly enjoying popularity at fairs and sporting events. Evolving from street food convenience, it has found its way into kitchens, giving birth to delightful variations like the Walking Taco Bake.

This baked version marries American convenience with Mexican flavors, infusing everything loved in tacos into a homely casserole. The adaptation reflects the ever-evolving fusion of culinary traditions, showcasing how beloved dishes can transform and adapt, celebrating diversity in flavors and origins.

Tips for Perfect Walking Taco Bake

  • Quality Beef: Use lean ground beef for a healthier option with less grease.
  • Taco Seasoning: Experiment with homemade taco seasonings for a personalized touch.
  • Cheese Variations: Try pepper jack or Colby cheese for a different flavor profile.
  • Frito Layering: Lay the Fritos thick for a satisfying crunch.
  • Bake Until Golden: Ensure the cheese is bubbly and golden to maximize flavor.
  • Let it Rest: Allow the casserole to sit for a few minutes before serving for easier slicing.

Serving Suggestions

This dish is perfect on its own, but adding a side of guacamole or fresh salsa can elevate its flavor. Pair it with a refreshing lemonade or a spicy margarita to complete the fiesta. For a festive spread, serve alongside other Mexican-inspired favorites like cilantro lime rice or a zesty corn salad.

Consider transforming this dish into a fun, interactive meal. Let your guests customize their toppings with options like diced tomatoes, jalapenos, or sour cream, ensuring a personal touch with every serving. This Walking Taco Bake isn’t just a meal; it’s a vibrant fiesta that brings joy with each flavorful layer.

Storage and Leftovers

Store any leftovers in an airtight container in the refrigerator for up to three days. When you’re ready to enjoy it again, reheat in the oven at 350°F until warmed through to maintain its crispy texture.

This dish can be repurposed into an exciting next-day meal by wrapping portions in a tortilla with fresh lettuce and salsa, creating an appetizing burrito. Or, mix with scrambled eggs for a hearty breakfast option, making the most of every bite.

Recipe Variations and Substitutions

For a healthier spin, substitute ground turkey or chicken in place of beef. Vegetarians can replace meat with black beans or lentils, maintaining protein content while enjoying plant-based nourishment. Incorporate bell peppers or corn for extra crunch and nutritional value.

Those seeking a gluten-free option can opt for gluten-free taco seasoning and ensure the corn chips meet dietary requirements. To create a vegan version, use plant-based cheese alternatives and swap the cheddar cheese soup for a vegan cheese sauce.

FAQ

Can I make this ahead of time? Yes, prepare the components separately and assemble just before baking to keep flavors fresh.

What substitutions can I use for ground beef? Alternatives include ground turkey, chicken, or a plant-based meat substitute.

How do I make this gluten-free or vegan? Utilize gluten-free chips and dairy-free cheese options, ensuring all seasoning is gluten-free.

Optional Nutritional Information

  • Calories per serving: Approximately 400
  • Total Fat: 25g
  • Protein: 20g

Final Thoughts

This Walking Taco Bake is a dish worth exploring, providing warmth and delight in every bite. It turns ordinary meal times into special occasions, fostering moments of joy and community. So go ahead, dive into this cheesy paradise and share your version with family and friends. We invite you to experiment, adapt, and make it your own, and don’t forget to share your adventures with this taco-inspired marvel in the comments below!

Recipe Section

Serves: 4 | Prep Time: 10 mins | Cook Time: 20 mins | Total Time: 30 mins

  • 1 lb ground beef
  • 1 package taco seasoning
  • 2/3 cup water
  • 1 bag Chili cheese Fritos
  • 1 can cheddar cheese soup
  • 1/2 cup milk
  • 1 cup mozzarella cheese
  1. Start by browning the ground beef in a skillet over medium-high heat until it’s no longer pink. Drain any excess fat.
  2. Add taco seasoning and water. Simmer for about 5 minutes until the liquid is absorbed.
  3. Layer Chili cheese Fritos in an 8×8 baking dish. Spread the seasoned meat evenly on top.
  4. Heat cheddar cheese soup and milk over low heat until creamy, then pour over the meat layer.
  5. Sprinkle mozzarella cheese on top and bake at 350°F for 12-14 minutes until bubbly and golden.
  6. Scoop and enjoy this cheesy delight!

“`

Master Homemade Creamy Green Bean Casserole for Dec 2024 Dinner

“`html

Jump to Recipe

Creamy Green Bean Casserole: A Comforting Classic for Any Occasion

Imagine biting into a warm, creamy, and savory delight that brings a sense of nostalgia with every forkful. Our Creamy Green Bean Casserole is a must-try dish that combines fresh green beans, velvety cream of mushroom soup, and crispy fried onions. Each bite is a harmonious blend of flavors and textures that make it an instant crowd-pleaser for family gatherings and holiday feasts alike.

Why You’ll Love This Recipe

There’s something incredibly comforting about the classic flavors in a green bean casserole. This recipe is not only delicious and easy to prepare but also versatile enough to adapt for various dietary needs. Whether you’re making it for a special occasion or a casual weeknight dinner, it respects the tradition while allowing for personal creativity.

The creamy mushroom sauce envelops the vibrant green beans while the crispy fried onions add a contrasting crunch, creating a delightful textural experience. Packed with natural goodness, green beans are a great source of fiber and vitamins. This dish is a healthier take on a beloved classic, inviting everyone to indulge guilt-free.

Emotional ties to this dish abound, as it often graces holiday tables and family events. Its presence can evoke memories of festive gatherings, creating new traditions and joyful moments each time it’s shared.

Personal Story: A Taste of Home

For me, green bean casserole is not just a side dish; it’s a tradition. I remember the first time I tasted its creamy goodness at a Thanksgiving dinner surrounded by family. Over the years, it has become a staple in our holiday menu, cherished not only for its taste but the warm memories it rekindles with each serving.

Context and Background

The green bean casserole, a quintessential American dish, was first conceived by the Campbell Soup Company in the 1950s. Its purpose was to create a quick, delicious recipe that utilized their cream of mushroom soup. Over time, it has evolved, encompassing a wide variety of adaptations while remaining true to its roots.

This dish holds a special place in many hearts, symbolizing comfort and tradition. Whether it’s served during Thanksgiving or as a nostalgic comfort food, it has made its mark as a beloved American classic.

Tips for Perfect Green Bean Casserole

  • Choose fresh green beans for a vibrant color and snap. You can also use frozen if fresh aren’t available.
  • Blanch the green beans to achieve the perfect tender-crisp texture.
  • Experiment with different spices or herbs like garlic powder or thyme for an added depth of flavor.
  • For a creamier dish, substitute half-and-half for the milk.
  • If you love a bit of spice, add a pinch of cayenne pepper to the mushroom soup mix.
  • Ensure fried onions stay crispy by adding them just before serving or during the last few minutes of baking.

Serving Suggestions

Our Creamy Green Bean Casserole pairs wonderfully with a variety of main dishes, making it an ideal side dish for turkey, roast beef, or grilled chicken. Consider serving it alongside a fresh garden salad or roasted potatoes for a well-rounded meal.

For a festive touch, garnish the casserole with chopped fresh parsley or sliced almonds for added crunch and elegance. It also complements a spread of diverse dishes for a buffet-style meal or holiday gathering.

Dress up your dining experience by serving individual portions in ramekins, adding a personal touch to each serving.

Storage and Leftovers

To store leftovers, cover the casserole with foil or transfer it to an airtight container to keep it fresh. Refrigerate for up to 3-4 days and reheat in the oven at 350°F for 10-15 minutes to restore its creamy texture and crisp topping. Avoid microwaving to prevent sogginess.

Get creative with leftovers by incorporating them into omelets, using them as a filling for savory crepes, or stirring them into a pasta salad for a delightful twist.

Recipe Variations and Substitutions

For those looking to make a gluten-free version, use gluten-free fried onions and soup. You can also substitute dairy-free milk and mushroom soup for a vegan take on this classic.

To add a touch of indulgence, incorporate shredded cheese into the mixture for a cheesy green bean casserole variation. Alternatively, switch up the vegetable with broccoli or cauliflower for a seasonal twist.

For a heartier casserole, include cooked bacon pieces or chopped, sautéed mushrooms.

FAQ

Can I make this ahead of time? Yes, prepare the casserole up to the baking step, cover, and store it in the fridge for up to 24 hours before baking.

What substitutions can I use for cream of mushroom soup? You can use cream of chicken or cream of celery soup for different flavors or a homemade roux-based sauce.

How do I make this gluten-free or vegan? Use gluten-free fried onions and soup for gluten-free. Swap for dairy-free milk and soup for a vegan version.

Optional Nutritional Information

  • Calories: Approx. 200 per serving
  • Carbohydrates: 15g
  • Protein: 4g
  • Fat: 12g
  • Fiber: 4g

Final Thoughts

This Creamy Green Bean Casserole is a celebration of flavors, perfect for any occasion. Its adaptable nature makes it an inclusive dish that can be enjoyed by all, no matter the dietary restrictions. We hope you delight in every comforting bite and create lasting memories with family and friends.

Don’t forget to share your experience in the comments below, or ask any questions you might have. Happy cooking!

Recipe Section

Serves: 6 | Prep Time: 10 mins | Cook Time: 30 mins | Total Time: 40 mins

  • 2 cups fresh green beans, trimmed
  • 1 can cream of mushroom soup
  • 1/2 cup milk
  • 1/2 cup fried onions
  • Salt and pepper to taste
  1. Preheat the oven to 350°F and grease a baking dish.
  2. In a pot of boiling water, blanch the green beans for 2-3 minutes. Drain and set aside.
  3. In a mixing bowl, combine cream of mushroom soup, milk, salt, and pepper.
  4. Fold in the blanched green beans and half of the fried onions.
  5. Pour the mixture into the prepared baking dish and top with the remaining fried onions.
  6. Bake for 25-30 minutes until the casserole is bubbly and the top is golden brown.
  7. Serve hot and enjoy this creamy and savory green bean casserole!

“`

Elevate Your Dinner with Creamy Green Bean Casserole Delight

“`html

Jump to Recipe

Creamy Green Bean Casserole: The Perfect Holiday Comfort Food

Welcome to a dish that epitomizes comfort and joy—the Creamy Green Bean Casserole. This delightful recipe brings together tender green beans enveloped in a rich, savory cream of mushroom soup, enhanced by the crispiness of French fried onions. Experience a symphony of textures and flavors that make this casserole a beloved staple on holiday tables across the country.

Why You’ll Love This Recipe

The Creamy Green Bean Casserole is a true crowd-pleaser, adored for its comforting flavors and simplicity. Whether it’s for a Thanksgiving feast or a casual family dinner, this dish never disappoints. Its creamy base complements the crisp fried onions, creating a satisfying crunch with every bite.

Not only is this casserole incredibly delicious, but it’s also relatively easy to prepare. With a handful of ingredients and minimal prep time, you can whip up a dish that tastes as if you’ve spent hours in the kitchen.

This recipe is versatile, allowing you to customize it to suit your family’s tastes or dietary needs. It can evoke cherished memories of holiday gatherings, bringing people together through the joy of shared meals.

The mix of creaminess and earthiness from the mushrooms provides not only comfort but also a subtle depth that elevates the humble green bean to a star ingredient in this dish.

Personal Story

Growing up, the Creamy Green Bean Casserole was my grandmother’s signature dish every holiday. As soon as the tantalizing aroma wafted from the kitchen, we knew it was time to gather around the table. This dish holds a special place in my heart, reminding me of festive dinners and laughter echoing through the family room.

Context and Background

The Green Bean Casserole was first introduced in the 1950s by Dorcas Reilly at the Campbell Soup Company. Its simplicity and use of pantry staples made it an instant classic, quickly becoming a popular dish for holiday gatherings.

Over the years, it has evolved with different variations, but the classic combination of green beans with a creamy, mushroom-based sauce remains a favorite. It embodies the mid-20th century American culinary tradition of convenience and comfort.

Tips for Perfect Creamy Green Bean Casserole

  • For richer flavor, use fresh green beans instead of canned or frozen.
  • Try adding a sprinkle of nutmeg or garlic powder to the creamy mixture for extra depth.
  • Ensure the green beans are thoroughly cooked before combining them with the sauce.
  • If you prefer a smoother sauce, whisk the soup mixture until it’s completely homogenous.
  • Consider using a high-quality soy sauce for a slight umami boost.
  • Bake the casserole uncovered to achieve a perfectly crispy onion topping.

Serving Suggestions

This Creamy Green Bean Casserole pairs beautifully with traditional holiday roasts. Consider serving it alongside roasted turkey, glazed ham, or prime rib.

For a touch of brightness, garnish with freshly chopped parsley or a sprinkle of grated Parmesan cheese before serving.

If you’re hosting a vegetarian feast, serve this casserole with herbed stuffing or a vibrant cranberry relish to bring out the casserole’s earthy flavors.

Storage and Leftovers

Store any leftovers in an airtight container in the refrigerator for up to three days. To reheat, place the casserole in a preheated oven at 350°F until warmed through. For a quicker option, use a microwave, but be aware that the onions may lose some of their crispiness.

Repurpose leftovers by mixing them into a pot of creamy soup for a delicious lunch or as a filling for savory crepes or turnovers.

Recipe Variations and Substitutions

  • Gluten-Free: Use gluten-free cream of mushroom soup and onion topping.
  • Vegan: Replace the soup with a vegan cream sauce, and use nutritional yeast for flavor.
  • Cheesy Variation: Add a cup of shredded cheddar or mozzarella for added richness.
  • Spicy Twist: Stir in some crushed red pepper flakes for a subtle heat.

FAQ

Can I make this ahead of time? Yes, prepare the mixture and assemble it in the casserole dish without the final onion topping. Cover and refrigerate for up to 24 hours. Add the onions just before baking.

What substitutions can I use for soy sauce? Tamari or coconut aminos are excellent alternatives for those avoiding soy.

How do I make this gluten-free? Simply use gluten-free versions of the ingredients like cream of mushroom soup and French fried onions.

Optional Nutritional Information

  • Calories per serving: Approx. 250
  • Fat: 15g
  • Carbohydrates: 20g
  • Protein: 5g

Final Thoughts

The Creamy Green Bean Casserole is truly a delight to both prepare and savor. Its nostalgic charm and delectable taste make it a must-try for any gathering, instantly elevating the meal with its presence. I invite you to make this casserole part of your family tradition and share its joy with those around you.

Recipe

Serves: 6-8
Prep Time: 15 minutes
Cook Time: 30 minutes
Total Time: 45 minutes

  • 2 (10.75 oz) cans cream of mushroom soup
  • 1 cup milk
  • 1 tsp soy sauce
  • ½ tsp black pepper
  • 6 cups cooked green beans
  • 2 cups French fried onions
  1. Preheat your oven to 350°F.
  2. In a large mixing bowl, combine cream of mushroom soup, milk, soy sauce, and black pepper.
  3. Add in cooked green beans and 1 cup of French fried onions, then mix well.
  4. Pour the mixture into a casserole dish and spread evenly.
  5. Top with the remaining French fried onions.
  6. Bake for 25-30 minutes, or until bubbly and golden brown.
  7. Serve hot and enjoy the creamy goodness!

“`

Christmas Countdown Delight: Festive Recipe for December 9, 2024

“`html
Jump to Recipe

Walking Taco Bake: A Cheesy Delight for Every Occasion

Imagine a dish that combines the bold flavors of a classic taco with the comforting, cheesy crunch of a casserole. The Walking Taco Bake is just that—a sumptuous blend of savory ground beef, chili cheese Fritos, and gooey cheddar cheese that will tantalize your taste buds with every bite. This dish delivers not only on flavor but also on excitement, turning any meal into a full-fledged taco fiesta.

Why You’ll Love This Recipe

The Walking Taco Bake is a recipe you’ll find yourself reaching for again and again. It combines the ease of a one-pan meal with the vibrant flavors of a taco night. Its simplicity belies its deliciousness—ground beef melds perfectly with taco seasoning, creating a mouthwatering base that’s elevated by a layer of crunchy Fritos. On top, a creamy cheese sauce and melted mozzarella create a textural symphony that is hard to resist.

Not only is it incredibly easy to prepare, but it also brings joy and satisfaction to dinner tables of all sizes. Whether you’re feeding a family, hosting a casual game night, or indulging in a solo treat, the Walking Taco Bake is versatile enough to be your go-to solution. Plus, it’s a great way to introduce little ones to the joy of cooking, with simple steps they can help with.

The emotional connection it fosters, reminiscent of carefree taco nights, is unmistakable. It’s a dish that juxtaposes comfort with a touch of indulgence, providing warmth on a winter evening or enhancing the laid-back vibe of a summer gathering. Its preparation is effortless, its ingredients are straightforward, and its appeal is universal.

Personal Story/Connection

This recipe holds a special place in my heart as a staple from my childhood. I still remember the first time my mom made this dish—it was a Friday night after a long week of school and sports practice. The aroma wafting from the oven promised a comforting escape, and the first bite delivered a burst of flavor so memorable that it became a regular feature in our kitchen. Even now, it’s a favorite request when family gathers, synonymous with good times and full bellies.

Context/Background

The Walking Taco Bake is an ingenious twist on the beloved walking taco concept, which traditionally involves serving taco components in a portable bag of chips. Its origins can be traced back to fairs, sporting events, and informal gatherings where convenience and taste come together. The bake able rendition of this classic allows for a communal dining experience, encouraging shared bites and family bonding.

This dish embodies the creativity inherent in American cuisine—taking a cherished hand-held snack and transforming it into a hearty meal. Its evolution from street food to a versatile home dish is a testament to its growing popularity and the inventive ways home cooks seek to adapt time-tested favorites.

Tips for Perfect Walking Taco Bake

  • For a spicier kick, add chopped jalapeños or crushed red pepper flakes to the ground beef.
  • Consider using ground turkey or chicken as a leaner alternative to beef.
  • If the cheddar cheese soup is too thick, add a bit more milk to achieve a pourable consistency.
  • Ensure even layering of the ingredients for consistent flavor in every bite.
  • For extra crunch, reserve some Fritos to sprinkle on top before baking.

Serving Suggestions

The Walking Taco Bake is a delightful dish on its own, but it can be elevated with creative sides and garnishes. Try serving it with a fresh salad topped with avocado slices and lime vinaigrette to complement the hearty richness of the bake. Corn on the cob, brushed with lime and cotija cheese, makes for a vibrant side that pairs beautifully with the robust flavors of the bake.

Turn your meal into a fiesta by setting up a taco-inspired spread, with sides of fresh pico de gallo, sour cream, and sliced green onions for added zest. For a casual gathering, serve directly from the baking dish, encouraging guests to scoop hearty portions or transform the bake into individual servings neatly plated for a dinner party ambiance.

Storage and Leftovers

Leftovers of the Walking Taco Bake store beautifully, making it a great choice for meal prepping or quick lunches during the week. Simply cover and refrigerate any remaining portions, consuming them within 2-3 days for the most flavor retention.

To reheat, consider using an oven or toaster oven to restore the crunch of the Fritos, warming it at 350°F for about 10 minutes. Alternatively, microwaving individual portions at medium power will suffice if you’re in a rush. Leftover bake also transforms wonderfully into a filling for burritos or a topping for a steaming bowl of nachos.

Recipe Variations and Substitutions

Adapt this versatile recipe to suit any dietary needs or flavor preferences. For a vegetarian version, replace the ground beef with plant-based crumbles or black beans for a protein-packed alternative. To incorporate seasonal flavors, add roasted bell peppers or sweet corn for added freshness and color.

Consider a southwestern twist by using pepper jack cheese instead of mozzarella or swapping regular Fritos for a spicier variety. Creating a Mediterranean flare is also an option, substituting taco seasoning with a Greek spice blend and incorporating feta cheese and olives.

FAQ

Can I make this ahead of time?

Yes, you can prepare the meat and cheese sauce in advance. Store them separately, and when ready to serve, assemble and bake as directed.

What substitutions can I use for the cheddar cheese soup?

For a homemade option, create a roux using butter, flour, and milk, then melt in cheddar cheese for a similar creamy effect.

How do I make this gluten-free?

Opt for gluten-free corn chips instead of Fritos, and use a gluten-free version of taco seasoning. Ensure all other products are certified gluten-free.

Optional Nutritional Information

  • Calories: Approximately 450 per serving
  • Fat: 25g
  • Carbohydrates: 35g
  • Protein: 20g

Final Thoughts

Whether you’re a taco lover looking for a new favorite or seeking a comforting dish to bring your family together, the Walking Taco Bake is a must-try. Its rich flavors and perfect blend of textures make it a standout dish worthy of any table. Give it a whirl and discover why it’s celebrated in kitchens everywhere. We welcome your feedback and look forward to hearing how it brings joy to your meals!

Recipe Section

Serves: 4-6

Prep Time: 10 minutes

Cook Time: 20 minutes

Total Time: 30 minutes

  • 1 lb ground beef
  • 1 package taco seasoning
  • 2/3 cup water
  • 2 cups Chili cheese Fritos
  • 1 can cheddar cheese soup
  • 1/2 cup milk
  • 1 cup shredded mozzarella cheese
  1. Brown the ground beef in a skillet over medium-high heat until it’s no longer pink. Drain any excess fat.
  2. Add taco seasoning and water. Simmer for about 5 minutes until the liquid is absorbed.
  3. Layer Chili cheese Fritos in an 8×8 baking dish. Spread the seasoned meat evenly on top.
  4. Heat cheddar cheese soup and milk over low heat until creamy, then pour over the meat layer.
  5. Sprinkle mozzarella cheese on top and bake at 350°F for 12-14 minutes until bubbly and golden.
  6. Scoop and enjoy this cheesy delight!

“`

Irresistible Chocolate Chip Cookies with Almonds and Coconut Recipe

“`html
Jump to Recipe

Crispy and Chewy Chocolate Chip Cookies with Almonds and Coconut: A Cookie Lover’s Dream

Imagine biting into a cookie that combines the best of both worlds: lusciously crispy on the edges yet sumptuously soft and chewy inside. These Chocolate Chip Cookies with Almonds and Shredded Coconut are the ultimate treat for cookie enthusiasts. Each bite is a medley of warm, gooey chocolate, crunchy almonds, and a hint of tropical coconut, creating a symphony of flavors and textures that will leave you craving more.

Why You’ll Love This Recipe

There’s something incredibly comforting about a freshly baked chocolate chip cookie, but this recipe elevates the classic treat with a delightful twist. The sliced almonds add a satisfying crunch, while the shredded coconut provides a subtle sweetness that complements the chocolate chips beautifully. Not only are these cookies indulgent and delicious, but they’re also incredibly easy to make.

Perfect for any occasion, these cookies can transform a simple gathering into a festive celebration. Whether you’re enjoying a quiet evening at home or hosting a lively get-together, these cookies are sure to be a hit. Additionally, the natural ingredients such as nuts and coconut might resonate with those looking to incorporate healthier elements into their treats.

Emotionally, these cookies might remind you of your grandmother’s kitchen or evoke feelings of nostalgia with every bite. The blend of traditional and modern flavors can take you back to cherished childhood memories, while also creating new ones with your loved ones.

Personal Story/Connection

I first stumbled upon this delightful combination of flavors during a family baking session at my aunt’s house. With the aroma of cookies baking in the oven filling the air, the kitchen felt like the heart of our family gathering. My aunt, known for experimenting with different ingredients, suggested adding almonds and coconut to the classic chocolate chip cookie. The result was a unanimous hit, and since then, this recipe has become a staple in our family’s cookie repertoire, always associated with laughter and love.

Context/Background

Chocolate chip cookies have long been a favorite in American culture, dating back to the 1930s when Ruth Wakefield of the Toll House Inn invented them. Over the decades, this beloved cookie has undergone countless variations, each bringing something unique to the table. Adding almonds and coconut not only enriches the flavor profile but also adds a touch of global influence, reminiscent of European and tropical desserts.

Coconut has been used in various culinary traditions around the world, known for its versatility and nutritional benefits. Combined with almonds, another ingredient revered for its health benefits, this recipe represents a beautiful fusion of classic and innovative baking.

Tips for Perfect Crispy and Chewy Chocolate Chip Cookies

  • Ensure your butter is softened – this helps create the perfect texture when creamed with sugar.
  • For a richer flavor, use a mix of semi-sweet and dark chocolate chips.
  • Don’t skimp on chilling the dough if you prefer thicker cookies; a quick 30-minute chill can make a difference.
  • Make sure to leave space between the cookies on the baking sheet as they spread during baking.
  • For an extra crispy edge, slightly underbake the cookies and let them cool on the baking sheet.
  • If you love coconut, feel free to toast it lightly before adding for an enhanced flavor.

Serving Suggestions

These cookies are best enjoyed warm, fresh out of the oven, with a tall glass of milk or a steaming cup of coffee. For a touch of elegance, serve them on a decorative platter alongside fresh fruits or a dollop of whipped cream for a delightful dessert platter.

If you’re planning a cozy afternoon tea, these cookies are perfect accompaniments to various teas, from classic Earl Grey to fragrant chamomile. The flavors also make them an excellent option for holiday cookie exchanges or as thoughtful homemade gifts.

For your next party, consider incorporating these cookies into a dessert buffet, paired with mini cupcakes and truffles, allowing guests to indulge in a little bit of everything sweet.

Storage and Leftovers

Store any leftover cookies in an airtight container at room temperature for up to a week to retain their freshness. To keep them soft, you can add a slice of bread to the container; the moisture from the bread helps maintain the cookies’ texture.

If you’re planning to make these ahead of time, the dough can be frozen for up to two months. Simply scoop the dough onto a baking sheet, freeze until solid, then transfer to a freezer bag. Bake them as needed for freshly baked cookies anytime.

These cookies can also be transformed into delectable ice cream sandwiches. Just take two cookies and sandwich your favorite ice cream in between for a homemade treat that’s perfect for warm days.

Recipe Variations and Substitutions

  • For a gluten-free version, substitute the all-purpose flour with a 1:1 gluten-free baking blend.
  • To make these cookies vegan, replace the butter with a plant-based alternative and use flax eggs instead of regular eggs.
  • For a nut-free option, simply omit the almonds or replace with additional chocolate chips or dried cranberries.
  • Customize the flavor by adding a teaspoon of cinnamon or a pinch of nutmeg to the dry ingredients.

FAQ

Can I make this ahead of time?

Yes, the cookie dough can be made and refrigerated for up to 24 hours or frozen for up to two months.

What substitutions can I use for almonds?

You can use chopped walnuts, pecans, or simply leave out the nuts if desired.

How do I make this gluten-free or vegan?

Use a gluten-free flour blend and replace butter and eggs with vegan alternatives as mentioned in the recipe variations.

Optional Nutritional Information

  • Calories: Approximately 200 per cookie
  • Fat: 10g per cookie
  • Carbohydrates: 25g per cookie
  • Protein: 2g per cookie

Final Thoughts

These Crispy and Chewy Chocolate Chip Cookies with Almonds and Coconut are more than just a treat—they’re a way to bring joy and warmth to any occasion. Perfect for sharing and made with love, they are sure to become a cherished favorite in your home. Give them a try and let the delightful flavors speak for themselves. Feel free to leave a comment below sharing your experience or any questions you might have!

Recipe Section (Final Element)

Serves: 24 cookies / Prep Time: 15 minutes / Cook Time: 12 minutes / Total Time: 27 minutes

  • 1 cup butter, softened
  • 1 cup brown sugar
  • 1/2 cup white sugar
  • 2 eggs
  • 2 tsp vanilla extract
  • 2 1/2 cups all-purpose flour
  • 1 tsp baking soda
  • 1/2 tsp salt
  • 1 cup chocolate chips
  • 1/2 cup sliced almonds
  • 1/2 cup shredded coconut
  1. Preheat the oven to 350°F (175°C) and line a baking sheet with parchment paper.
  2. In a large mixing bowl, cream together the butter, brown sugar, and white sugar until smooth.
  3. Beat in the eggs one at a time, then stir in the vanilla extract.
  4. In a separate bowl, combine the flour, baking soda, and salt. Gradually add this mixture to the wet ingredients and mix until well combined.
  5. Fold in the chocolate chips, sliced almonds, and shredded coconut until evenly distributed.
  6. Use a cookie scoop to place dough onto the prepared baking sheet, leaving space between each cookie.
  7. Bake in the preheated oven for 10-12 minutes, or until the edges are golden brown.
  8. Allow the cookies to cool on the baking sheet for a few minutes before transferring to a wire rack to cool completely.

Enjoy these deliciously crispy, chewy chocolate chip cookies with almonds and shredded coconut!

“`

Irresistible Baked Pears with Feta Honey and Cranberries Recipe

“`html

Baked Pears with Feta, Honey, and Cranberries: A Delightful Autumn Treat

If you’re searching for a dish that combines sweet, savory, and tangy flavors, our Baked Pears with Feta, Honey, and Cranberries recipe is a must-try. This simple yet elegant recipe captures the essence of autumn and makes for an exquisite dessert or side dish you’ll return to time and time again.

Why You’ll Love This Recipe

These Baked Pears with Feta, Honey, and Cranberries are not only visually stunning but also a perfect blend of unique flavors and textures. The sweetness of the baked pears is complemented by the creamy, salty feta, with honey adding a rich sweetness and cranberries providing a tart burst. This dish is ideal for fall gatherings or a cozy night in.

Moreover, this recipe is exceptionally easy to prepare, requiring only a handful of ingredients and minimal prep time. It’s a perfect way to impress guests with minimal effort.

Whether you serve it as a dessert or a creative side dish, these baked pears will always stand out with their delightful and unexpected combination of flavors.

Context/Background

Baking fruits such as pears becomes a cherished tradition when fall rolls around, offering warmth and temptations on cooler days. This dish draws inspiration from both classic European and modern fusion cuisines, where savory elements are often paired with sweet produce to amazing effect.

The technique of combining cheese with fruits is centuries old, providing both nutritional balance and a decadent flavor experience that transcends cultures and eras.

Recipe Details

Serves: 4

Prep Time: 10 minutes

Cook Time: 30 minutes

Total Time: 40 minutes

Ingredients

  • 4 ripe pears, halved and cored
  • 1/2 cup crumbled feta cheese
  • 1/4 cup honey
  • 1/4 cup dried cranberries
  • 1/4 cup chopped pecans (optional)
  • 1 teaspoon ground cinnamon
  • 1 tablespoon lemon juice

Directions

  1. Preheat your oven to 350°F (175°C).
  2. Place the pear halves in a baking dish, cut side up. Drizzle with lemon juice to prevent browning.
  3. Evenly distribute the crumbled feta cheese into the cavity of each pear half.
  4. Sprinkle dried cranberries and chopped pecans over the pears.
  5. Drizzle honey over the top, followed by a sprinkle of ground cinnamon.
  6. Bake for 30 minutes, or until the pears are tender and the cheese is slightly browned.
  7. Remove from the oven and allow to cool slightly before serving.

Tips for Perfect Baked Pears with Feta, Honey, and Cranberries

  • Choose ripe, but firm pears for baking to maintain their shape.
  • Feel free to adjust the amount of honey to your taste preference.
  • Try adding a pinch of nutmeg for an extra depth of flavor.
  • If feta isn’t available, try substituting with goat cheese for a similar texture and taste.

Serving Suggestions

These baked pears are delightful when served warm, topped with a scoop of vanilla ice cream or a dollop of Greek yogurt. They also pair well with a simple green salad for a unique appetizer or side dish.

Storage and Leftovers

Store any leftovers in an airtight container in the refrigerator for up to 3 days. Reheat gently in the oven before serving to restore their delectable texture.

Final Thoughts

With their delightful balance of flavors, these Baked Pears with Feta, Honey, and Cranberries are bound to become one of your favorite go-to fall recipes. Try them out the next time you’re in the mood for something comforting yet sophisticated—it’s a combination that truly celebrates the season’s best offerings.

Recipe Notes

  • Substitute cranberries with raisins or chopped dried apricots for a different flavor profile.
  • Pears can be prepped in advance, making this recipe perfect for entertaining.
  • If you prefer a sweeter dish, consider adding a drizzle of caramel sauce just before serving.

“`

Irresistible Chocolate Chip Cookies with Almonds and Coconut Delight

“`html
Jump to Recipe

Chocolate Chip Cookies with Almonds and Shredded Coconut: The Ultimate Crispy and Chewy Delight

Indulge in the heavenly experience of biting into these Chocolate Chip Cookies with Almonds and Shredded Coconut. Imagine the perfect cookie—crispy on the edges, yet irresistibly soft and chewy on the inside. The delightful combination of rich chocolate chips, crunchy almonds, and the sweet surprise of shredded coconut makes each bite a unique experience. These cookies are not just a treat for the taste buds but a true sensory indulgence worth savoring.

Why You’ll Love This Recipe

These cookies offer the ultimate combination of flavors and textures, making them an instant crowd-pleaser. Whether you’re a fan of classic chocolate chip cookies or looking to try something new, the addition of almonds and coconut provides a modern twist that is both delightful and unexpected. Their ease of preparation makes them perfect for both seasoned bakers and novices alike.

Aside from their delicious taste, these cookies are incredibly versatile. The mix of ingredients offers a balanced treat that caters to various dietary preferences—if you wish to add your personal touch, the possibilities are endless. Baking these cookies can evoke fond memories of one’s grandmother’s kitchen or inspire new traditions in your family’s culinary story.

Personal Story/Connection

Growing up, the combination of coconut and almonds was always a favorite in our family. I remember the first time my grandmother baked these cookies; the house was filled with the sweet aroma of coconut mingling with chocolate. It was love at first bite, as the crunch of almonds and the chewy coconut gave a new life to the classic chocolate chip cookie. Since then, this recipe has become a staple at all family gatherings, always prompting nostalgic smiles and craving for another bite.

Context/Background

Chocolate chip cookies have an illustrious history, dating back to the 1930s when Ruth Wakefield added chopped-up bits from a Nestle chocolate bar into her cookie dough. This delightful twist with almonds and coconut elevates the classic cookie recipe, nodding to the tropical flavors cherished worldwide. While the basic chocolate chip cookie has undergone many transformations, this version stands out for its delightful fusion of textures and flavors, appealing to adventurous palates and traditionalists alike.

Tips for Perfect Chocolate Chip Cookies with Almonds and Shredded Coconut

  • Ensure the butter is softened to room temperature for a smoother blend.
  • Cream the butter and sugars until light and fluffy to achieve that desired chewy texture.
  • Preferably use high-quality chocolate chips for a richer taste.
  • Gently fold in almonds and coconut to maintain their integrity in the baking process.
  • Bake the cookies until edges are golden for the perfect balance between crispy and chewy.

Serving Suggestions

These cookies are perfect as an anytime snack or a decadent dessert. Pair them with a glass of cold milk or a steaming cup of coffee for an indulgent break. Serve them warm from the oven with a scoop of vanilla ice cream for a delectable dessert, or present them on a beautiful platter at your next party or gathering. Their versatility makes these cookies a hit at any event or simple get-togethers.

Storage and Leftovers

To keep these cookies fresh, store them in an airtight container at room temperature for up to a week. If you plan to enjoy them later, you can freeze the dough before baking, ensuring freshly baked cookies at your convenience. Simply form into balls and freeze on a baking sheet before transferring to a container.

Leftover cookies can also be repurposed as a base for other desserts. Crumble over a parfait, integrate into a cookie crust for pies, or even make cookie ice cream sandwiches.

Recipe Variations and Substitutions

  • For a nut-free version, omit the almonds and add more chocolate chips or dried fruits.
  • Use gluten-free flour as a substitute to make the recipe gluten-free.
  • Substitute regular butter with vegan butter and choose plant-based chocolate chips for a vegan-friendly treat.
  • Add zest of an orange for a citrusy twist that complements the chocolate and coconut.

FAQ

Can I make this ahead of time? Yes, you can prepare the dough ahead of time and refrigerate it for up to 3 days before baking.

What substitutions can I use for butter? You can use vegan butter or coconut oil for a dairy-free option.

How do I make this gluten-free? Substitute the all-purpose flour with a gluten-free flour blend for a gluten-free version of the recipe.

Optional Nutritional Information

Approximate nutritional information per cookie:

  • Calories: 210
  • Fat: 11g
  • Saturated Fat: 7g
  • Carbs: 25g
  • Protein: 3g
  • Fiber: 1g
  • Sugar: 15g

Final Thoughts

These delicious Chocolate Chip Cookies with Almonds and Shredded Coconut truly offer a scrumptious combination of flavors and textures that are hard to resist. Whether you’re baking for a special occasion or simply looking to satisfy a sweet craving, these cookies are sure to delight. I encourage you to try this recipe and let it become a cherished addition to your baking repertoire. Feel free to share your experiences or ask any questions—I’m excited to hear how your cookies turn out!

Recipe Section

Serves: Approximately 24 cookies

Prep Time: 15 minutes

Cook Time: 10-12 minutes

Total Time: 27 minutes

  • 1 cup unsalted butter, softened
  • 1 cup granulated sugar
  • 1 cup brown sugar
  • 2 large eggs
  • 1 tsp vanilla extract
  • 3 cups all-purpose flour
  • 1 tsp baking soda
  • 1/2 tsp salt
  • 1 cup chocolate chips
  • 1/2 cup sliced almonds
  • 1/2 cup shredded coconut
  1. Preheat oven to 350°F and line a baking sheet with parchment paper.
  2. In a large bowl, cream together the butter, granulated sugar, and brown sugar until light and fluffy.
  3. Beat in the eggs one at a time, then stir in the vanilla extract.
  4. In a separate bowl, whisk together the flour, baking soda, and salt.
  5. Gradually mix the dry ingredients into the wet ingredients until well combined.
  6. Fold in the chocolate chips, sliced almonds, and shredded coconut.
  7. Scoop cookie dough onto the prepared baking sheet, leaving space between each cookie.
  8. Bake for 10-12 minutes, or until the edges are golden brown.
  9. Let cool on the baking sheet for 5 minutes before transferring to a wire rack to cool completely.
  10. Enjoy your crispy, chewy chocolate chip cookies with almonds and shredded coconut!

“`

Indulge in Decadent Chocolate Maraschino Cherry Coconut Truffles Recipe

“`html

Chocolate Maraschino Cherry Coconut Truffles: A Decadent Delight

Indulge in the rich, luscious flavors of Chocolate Maraschino Cherry Coconut Truffles, a treat that’s perfect for any occasion. These truffles combine the sweet and tangy taste of maraschino cherries with rich chocolate and the tropical hint of coconut, creating a heavenly bite that will leave you craving more.

Why You’ll Love This Recipe

These Chocolate Maraschino Cherry Coconut Truffles are a delightful treat for chocolate lovers and cherry enthusiasts alike. The combination of smooth chocolate, sweet coconut, and tangy maraschino cherries makes every truffle burst with flavor. They are perfect for special occasions, holiday gatherings, or as a luxurious gift for loved ones.

You’ll appreciate how easy these truffles are to make, with no baking required and simple ingredients you likely have on hand. The contrast between the creamy truffle interior and the crispy outer chocolate shell makes for an exquisite texture that’s hard to resist.

Context/Background

Truffles have a storied history, tracing back to the early 19th century when they were first created in France. Traditionally, truffles are made with a ganache center and coated in chocolate or cocoa powder. Our version adds a modern twist with maraschino cherries and coconut, inspired by tropical flavors and the classic combination of chocolate and cherry.

Recipe Details

Serves: 24 truffles

Prep Time: 30 minutes

Cook Time: 0 minutes

Total Time: 30 minutes

Ingredients

  • 1 cup semi-sweet chocolate chips
  • 1/2 cup heavy cream
  • 1/2 cup finely chopped maraschino cherries
  • 1/2 cup shredded coconut
  • 1 teaspoon vanilla extract
  • Pinch of salt
  • 1/4 cup cocoa powder (optional, for rolling)

Directions

  1. In a medium saucepan, heat the heavy cream over medium heat until it just begins to simmer.
  2. Remove from heat and add the chocolate chips, letting them sit for a minute to melt before stirring until smooth.
  3. Stir in the vanilla extract, salt, chopped maraschino cherries, and shredded coconut until well combined.
  4. Transfer the mixture to a bowl, cover, and refrigerate for about 2 hours, or until firm enough to scoop.
  5. Using a small cookie scoop or teaspoon, portion out the mixture and roll it into balls.
  6. Roll each ball in cocoa powder if desired, or leave plain.
  7. Return the truffles to the refrigerator for another 30 minutes to firm up before serving.

Tips for Perfect Chocolate Maraschino Cherry Coconut Truffles

  • Use good quality chocolate chips for the best flavor and texture.
  • Ensure the truffle mixture is thoroughly chilled before rolling to prevent sticking.
  • If the mixture is too soft, chill it for longer or add more coconut for firmness.
  • Your hands can warm up the truffles while rolling – cool them with cold water between batches if necessary.

Serving Suggestions

Serve Chocolate Maraschino Cherry Coconut Truffles chilled for a refreshing treat during the summer, or at room temperature to let the flavors fully develop. Pair them with a cup of freshly brewed coffee or a glass of red wine for the ultimate indulgence.

Storage and Leftovers

Store these truffles in an airtight container in the refrigerator for up to one week. For longer storage, you can freeze the truffles for up to three months. Thaw them in the refrigerator before serving.

Final Thoughts

Chocolate Maraschino Cherry Coconut Truffles are a simple yet luxurious treat that anyone can enjoy. Whether you’re making them for a festive gathering or as a sweet personal indulgence, these truffles promise to please with their rich, decadent flavor and delightful texture. Give this recipe a try and experience a truly delicious confection.

Recipe Notes

  • Feel free to experiment with dark or milk chocolate chips based on your preference.
  • For a nutty twist, add finely chopped toasted nuts to the mixture.
  • You can substitute almond extract for vanilla extract for a different flavor profile.

“`

Irresistible Cherry Chocolate Bonbons for Sweet Tooth Satisfying Treats

“`html

Cherry Chocolate Bonbons: Sweet Indulgence with a Cherry Twist

Indulge in the rich, decadent flavors of Cherry Chocolate Bonbons—a luxurious treat that combines the tartness of cherries with the smooth, velvety texture of chocolate. Perfect for satisfying your sweet tooth and impressing guests at any gathering, these bonbons are a true delight.

Why You’ll Love This Recipe

The juxtaposition of the tart cherries and rich chocolate creates a balanced flavor that’s both sophisticated and satisfying. These bonbons make for an elegant dessert, ideal for special occasions or a personal treat.

This recipe is easy to follow yet produces results that look and taste like they came from a gourmet chocolatier. The blend of textures and flavors makes these bonbons a favorite among dessert aficionados. Whether you’re an experienced baker or a beginner, you’ll find joy in making and sharing these delightful treats.

Context/Background

Bonbons, originating from the French word for “good-good,” have a storied history as a confectionery delight. The addition of cherries to this classic treat not only enhances the flavor profile but adds a touch of elegance that’s reminiscent of European patisseries.

The artistry of crafting bonbons involves skillfully blending rich ingredients into bite-sized masterpieces. This cherry chocolate variation pays homage to traditional techniques while inviting innovative flavors.

Recipe Details

Serves: 12

Prep Time: 30 minutes

Cook Time: 10 minutes

Total Time: 40 minutes

Ingredients

  • 1 cup dark chocolate chips
  • 1/2 cup heavy cream
  • 1/4 cup cherry preserves
  • 1 teaspoon vanilla extract
  • 12 maraschino cherries
  • Cocoa powder for dusting

Directions

  1. In a saucepan, heat the heavy cream over medium heat until it just begins to simmer.
  2. Remove from heat and pour over the dark chocolate chips in a bowl. Let it sit for 5 minutes, then stir until smooth.
  3. Stir in the cherry preserves and vanilla extract until well combined.
  4. Refrigerate the mixture for 15 minutes until it’s firm enough to handle.
  5. Scoop small amounts of the chocolate mixture and flatten it slightly in your hand. Place a maraschino cherry in the center and form into a ball, ensuring the cherry is covered.
  6. Roll each bonbon in cocoa powder to coat.
  7. Refrigerate the bonbons for at least 10 minutes before serving.

Tips for Perfect Cherry Chocolate Bonbons

  • Ensure the chocolate and cream mixture is thoroughly mixed to avoid lumps.
  • Chill the mixture adequately to make handling easier.
  • For a different flavor, try adding a splash of cherry liqueur to the chocolate mixture.

Serving Suggestions

Serve these Cherry Chocolate Bonbons at room temperature as part of a dessert platter. Pair them with a glass of red wine or a cup of espresso to enhance the tasting experience.

Storage and Leftovers

Store bonbons in an airtight container in the refrigerator for up to one week. If you need to keep them longer, freeze for up to three months and thaw before serving.

Final Thoughts

These Cherry Chocolate Bonbons are not only easy to prepare but also provide a delightful sensory experience that’s worth the effort. Whether for a special occasion or a simple indulgence, they are guaranteed to impress.

Recipe Notes

  • For a vegan version, substitute the heavy cream with coconut cream and use dairy-free chocolate chips.
  • Experiment with different nuts or seeds inside the bonbons for an added texture.

“`