Festive Christmas Cherry Pistachio Cheesecake Bars Recipe for Holiday Joy

“`html

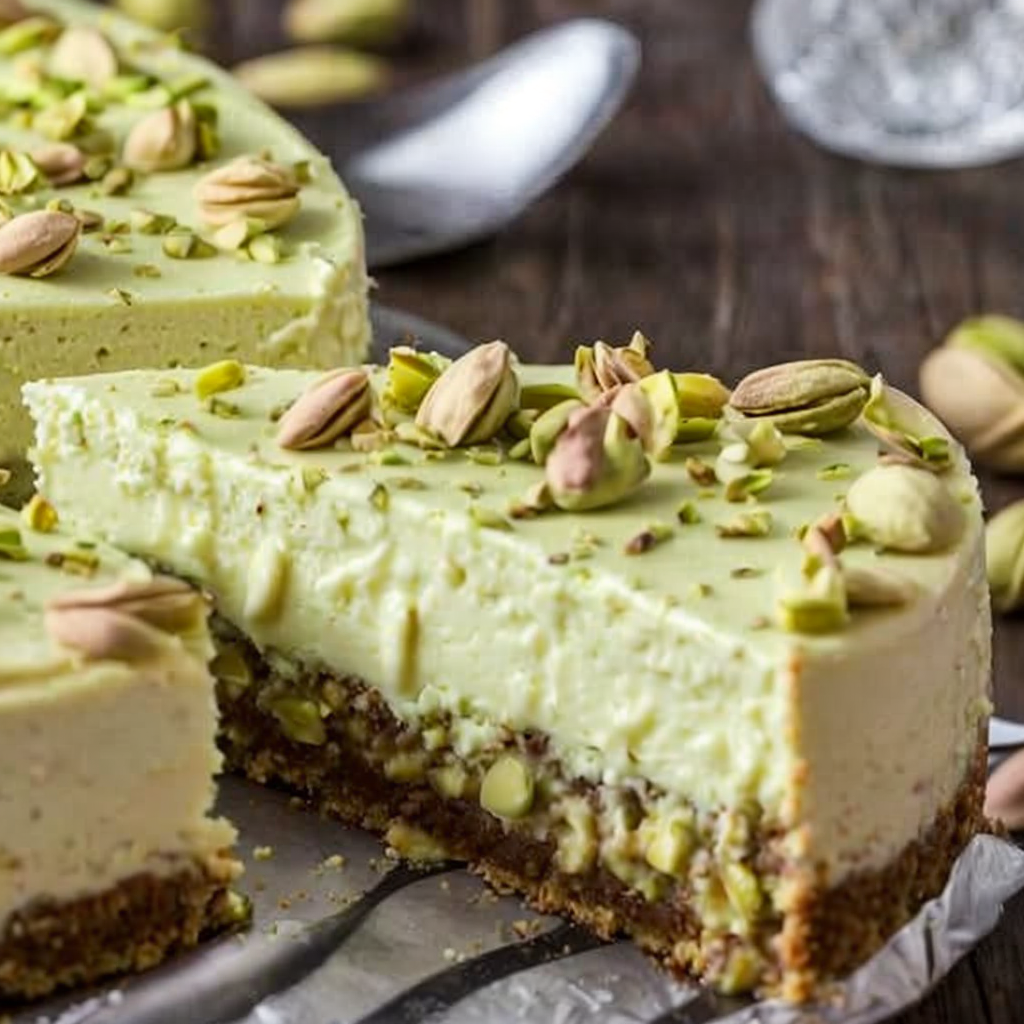
Christmas Cherry Pistachio Cheesecake Bars: Festive and Flavorful Holiday Treats 🎄💚🍒

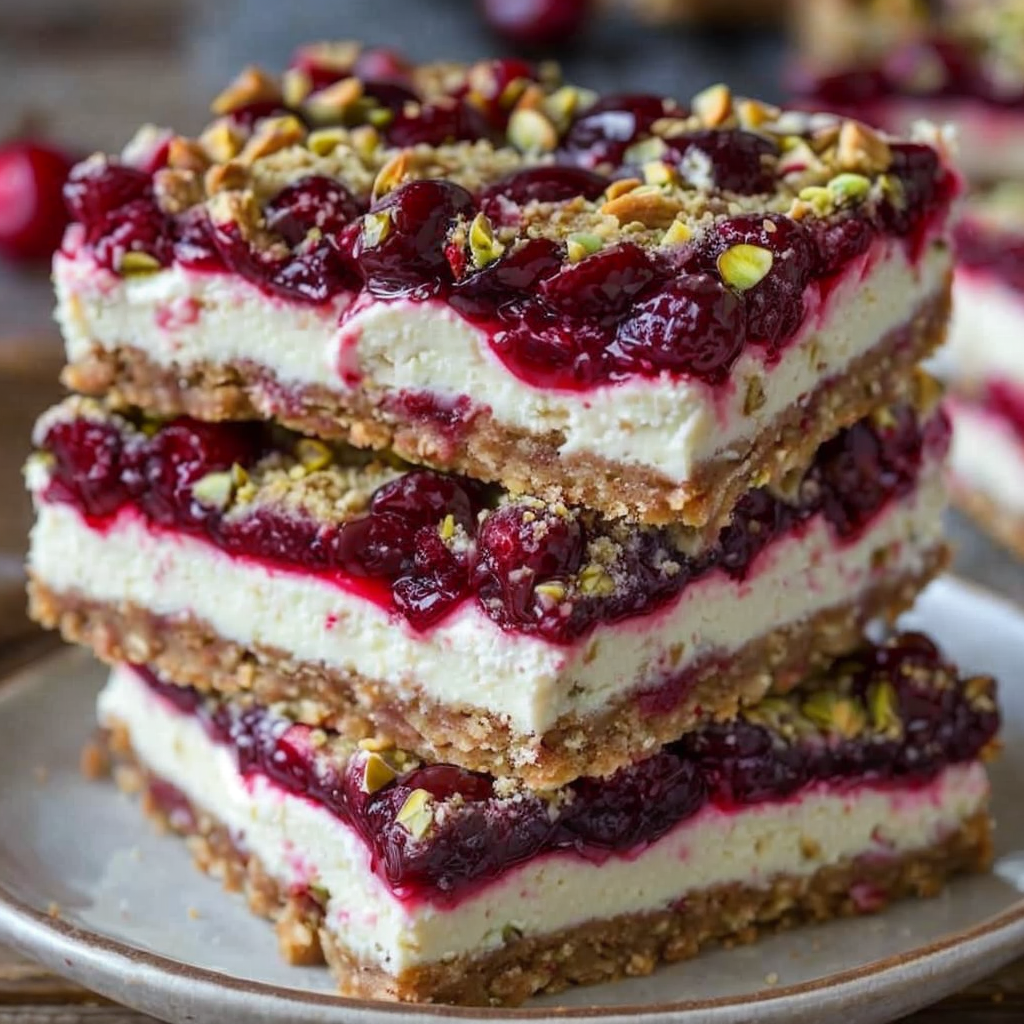
Celebrate the holiday season with these beautiful and delicious Christmas Cherry Pistachio Cheesecake Bars. The perfect combination of tart cherries and crunchy pistachios in a creamy cheesecake base makes these bars a delightful festive treat. Not only are they visually stunning, but their decadent flavors and textures are sure to impress your friends and family. Make this recipe a new holiday tradition with its vibrant colors and irresistible taste!

Why You’ll Love This Recipe

This recipe for Christmas Cherry Pistachio Cheesecake Bars is perfect for holiday gatherings or cozy nights at home. The contrasting flavors of tart cherries and salty pistachios create a complex taste sensation in every bite. The rich, creamy cheesecake layer elegantly ties these flavors together, ensuring that each mouthful is pure bliss.

These cheesecake bars are not only delicious but also easy to make, allowing you to spend more time enjoying the holidays and less time in the kitchen. The festive colors make them a stunning addition to any dessert table, and they are sure to be a conversation starter with their unique flavor profile.

Christmas cherry pistachio cheesecake bars are perfect for gift-giving too! Consider wrapping them up in festive packaging for a thoughtful homemade gift that will surely delight the recipient.

Context/Background

The tradition of making cheesecake during the holiday season is cherished in many cultures worldwide. The addition of cherries and pistachios gives this classic dessert a modern twist while adding festive colors reminiscent of Christmas. Cherries have long been associated with the abundance and celebration of the holiday season, while pistachios offer a unique savory note to this sweet dish.

The blending of these distinct ingredients in a cheesecake recipe showcases the innovation and adaptability of traditional holiday desserts. This fusion results in a dish that stays true to its roots while offering a new and exciting flavor experience.

Recipe Details

Serves: 12
Prep Time: 20 minutes
Cook Time: 35 minutes
Total Time: 55 minutes

Ingredients

  • 1 cup graham cracker crumbs
  • 1/2 cup unsalted butter, melted
  • 2 tablespoons sugar
  • 2 (8-ounce) packages cream cheese, softened
  • 1/2 cup granulated sugar
  • 2 large eggs
  • 1 teaspoon vanilla extract
  • 1/2 cup chopped pistachios
  • 1 cup canned cherry pie filling

Directions

  1. Preheat the oven to 325°F (163°C). Line an 8×8-inch baking dish with parchment paper.
  2. In a bowl, mix graham cracker crumbs, melted butter, and 2 tablespoons of sugar until combined. Press the mixture firmly into the bottom of the prepared dish.
  3. In a separate bowl, beat the cream cheese and sugar with an electric mixer until smooth and creamy. Add eggs one at a time, mixing well after each addition. Stir in vanilla extract.
  4. Pour the cream cheese mixture over the graham cracker crust, spreading evenly.
  5. Drop spoonfuls of the cherry pie filling over the cheesecake layer. Use a knife to gently swirl the cherries into the cheesecake mixture.
  6. Sprinkle chopped pistachios evenly over the top.
  7. Bake for 35 minutes or until the edges are set, and the center is slightly jiggly.
  8. Allow to cool at room temperature, then refrigerate for at least 2 hours before serving.

Tips for Perfect Christmas Cherry Pistachio Cheesecake Bars

  • Ensure cream cheese is softened for a smooth cheesecake mixture.
  • Swirl the cherry pie filling gently for a marbled effect.
  • Refrigerate the bars thoroughly for easy slicing.
  • Use fresh, high-quality pistachios for the best flavor.

Serving Suggestions

Serve these Christmas Cherry Pistachio Cheesecake Bars chilled, either as a stand-alone dessert or alongside other holiday treats. Pair with a cup of hot cocoa or mulled wine for a truly cozy Christmas experience.

Storage and Leftovers

Store the cheesecake bars in an airtight container in the refrigerator for up to five days. For longer storage, they can be frozen for up to a month. To freeze, wrap individual bars in plastic wrap and place them in a freezer-safe bag. Thaw in the refrigerator before serving.

Final Thoughts

This holiday season, treat yourself and loved ones to the irresistible flavors of Christmas Cherry Pistachio Cheesecake Bars. Their blend of sweet, tart, and savory elements is perfect for creating festive memories around the table. Easy to make yet full of flavor, this recipe is worth trying and will surely become a cherished part of your holiday dessert lineup.

Recipe Notes

  • Substitute graham cracker crust with gingerbread cookies for a spiced twist.
  • Use fresh cherries instead of canned for a more natural taste.
  • Add a dash of almond extract to complement the cherry flavor.

“`

Irresistible Pumpkin Honey Bun Cake Recipe for Autumn Delights

Pumpkin Honey Bun Cake: A Delightful Fall Treat

If you’re searching for the perfect autumn dessert, look no further than our Pumpkin Honey Bun Cake. This delectable cake combines the warm, comforting flavors of pumpkin and spices with a sweet honey glaze that is sure to impress. Ideal for holiday gatherings or a cozy night in, this pumpkin cake will quickly become a seasonal favorite.

Why You’ll Love This Recipe

The Pumpkin Honey Bun Cake is an irresistible blend of seasonal spices and the natural sweetness of honey, making it a standout dish for fall desserts. The moist, tender crumb is complemented perfectly by the rich, sugary glaze, creating a delightful contrast in textures. Whether you’re hosting a Thanksgiving dinner or looking for a sweet indulgence with your pumpkin spice latte, this cake is sure to be a hit.

Another reason to love this cake is its versatility. You can serve it as a breakfast treat alongside coffee, a dessert with a scoop of vanilla ice cream, or a potluck centerpiece. The aroma alone will have everyone asking for a slice!

Context/Background

Honey Bun Cake has been a Southern staple for generations, traditionally highlighting the flavors of cinnamon and sugar. With the addition of pumpkin, this version embraces the fall season and adds a twist to the classic. Pumpkins have a long history as a beloved fall ingredient, originating from Central America and becoming a hallmark of American fall cuisine.

The technique of swirling the honey and brown sugar glaze into the cake batter is what gives this cake its signature “honey bun” flavor profile, resulting in a dessert that is as beautiful to look at as it is delicious to eat.

Recipe Details

Serves: 12
Prep Time: 15 minutes
Cook Time: 40 minutes
Total Time: 55 minutes

Ingredients

  • 1 box of yellow cake mix
  • 1 cup canned pumpkin puree
  • 4 large eggs
  • 1/2 cup vegetable oil
  • 2/3 cup honey
  • 1/4 cup packed brown sugar
  • 1 tablespoon ground cinnamon
  • 2 teaspoons pumpkin pie spice
  • 1/4 cup milk
  • 1 teaspoon vanilla extract

Directions

  1. Preheat your oven to 350°F (175°C). Grease a 9×13-inch baking dish.
  2. In a large bowl, combine the yellow cake mix, pumpkin puree, eggs, vegetable oil, milk, and vanilla extract. Mix until well combined.
  3. Pour half of the batter into the prepared baking dish and spread evenly.
  4. In a small bowl, mix together the honey, brown sugar, cinnamon, and pumpkin pie spice.
  5. Drizzle half of the honey mixture over the batter in the baking dish.
  6. Pour the remaining cake batter over and spread evenly. Drizzle with the remaining honey mixture.
  7. Swirl the batter gently with a knife to create a marbled effect.
  8. Bake for 40 minutes, or until a toothpick inserted into the center comes out clean.
  9. Allow the cake to cool before slicing and serving.

Tips for Perfect Pumpkin Honey Bun Cake

  • For an even more intense pumpkin flavor, consider adding a tablespoon of pure pumpkin extract.
  • Ensure the cake is cooked through by checking with a toothpick; it should come out clean.
  • Let the cake cool completely before cutting to maintain its structure.
  • Experiment with different spice blends if you like a stronger or milder spice profile.

Serving Suggestions

This cake pairs wonderfully with a scoop of vanilla ice cream or a dollop of fresh whipped cream. Serve it with warm apple cider or a spiced chai tea for a complete fall-themed dessert experience.

Storage and Leftovers

Store leftovers in an airtight container at room temperature for up to 3 days. To extend freshness, store in the refrigerator for up to a week. Reheat slices in the microwave for a few seconds to enjoy warm.

Final Thoughts

The Pumpkin Honey Bun Cake is a dessert that captures the essence of fall in each bite. Its rich flavors and inviting aroma make it a must-try for any pumpkin lover. Give this recipe a try, and you’ll see why it’s a favorite for gatherings and quiet evenings alike.

Recipe Notes

  • If you can’t find pumpkin pie spice, use a mix of ground nutmeg, ginger, cloves, and cinnamon.
  • Substitute the yellow cake mix with a gluten-free mix for those with dietary restrictions.
  • Feel free to add chopped nuts or raisins for extra texture.

Irresistible Crème Brûlée Cookies: Quick and Easy Dessert Recipe

“`html

Best Easy Crème Brûlée Cookies Recipe ❤️ Quick Dessert

Indulge in the rich, creamy goodness of our Best Easy Crème Brûlée Cookies Recipe. These cookies capture the essence of the classic French dessert, combining a buttery base with a caramelized sugar topping that melts in your mouth. Perfect for those craving a quick dessert fix!

Why You’ll Love This Recipe

This Crème Brûlée Cookies recipe is a game-changer for dessert lovers. With its simple ingredients and quick preparation, it’s perfect for last-minute gatherings or a cozy night in. The buttery texture combined with the sugar crust offers a delightful contrast that’s hard to resist.

Whether you’re an experienced baker or a novice, this recipe’s straightforward steps make it accessible to everyone. Its elegant appearance makes it ideal for special occasions without the fuss of a traditional crème brûlée.

Context/Background

Crème Brûlée, a classic French dessert, is known for its creamy custard base and caramelized sugar crust. Our Crème Brûlée Cookies bring this sophisticated treat into a new format, allowing you to enjoy the beloved flavors in snackable bites.

The technique of caramelizing sugar is maintained, giving these cookies their distinctive look and taste. This fusion of textures and aromas pays homage to the original dessert while offering a modern twist.

Recipe Details

Serves: 24 cookies

Prep Time: 15 minutes

Cook Time: 10 minutes

Total Time: 25 minutes

Ingredients

  • 1 cup unsalted butter, softened
  • 1 cup granulated sugar, divided
  • 2 large egg yolks
  • 1 teaspoon vanilla extract
  • 2 cups all-purpose flour
  • 1/4 teaspoon salt
  • 1/4 cup brown sugar

Directions

  1. Preheat your oven to 350°F (175°C) and line a baking sheet with parchment paper.
  2. Cream together the butter and 3/4 cup of granulated sugar in a large bowl until light and fluffy.
  3. Beat in the egg yolks and vanilla extract until well combined.
  4. Gradually add the flour and salt, mixing until a dough forms.
  5. Roll tablespoons of dough into balls and place on the prepared baking sheet.
  6. Flatten each ball slightly with the palm of your hand.
  7. Sprinkle the tops with remaining granulated sugar and brown sugar.
  8. Bake for 8-10 minutes or until the edges are golden brown.
  9. Allow cookies to cool on a wire rack before serving.

Tips for Perfect Crème Brûlée Cookies

  • Ensure the butter is at room temperature for easy creaming.
  • Do not overbake; the cookies should be slightly soft when removed from the oven.
  • For additional flavor, consider adding a dash of cinnamon to the sugar topping.
  • Use a kitchen torch for caramelizing for a traditional crème brûlée effect.

Serving Suggestions

Serve these Crème Brûlée Cookies warm with a scoop of vanilla ice cream for a decadent dessert. They also pair wonderfully with a cup of coffee or tea as an afternoon treat.

Storage and Leftovers

Store leftover cookies in an airtight container at room temperature for up to 5 days. For longer storage, freeze the cookies for up to 2 months and thaw at room temperature before serving.

Final Thoughts

We hope you enjoy making and savoring these Best Easy Crème Brûlée Cookies as much as we do. They’re a delightful twist on a beloved classic that’s sure to impress family and friends alike. Give these cookies a try, and they may just become your new go-to dessert!

Recipe Notes

  • Substitute the all-purpose flour with gluten-free flour for a gluten-free version.
  • For a richer flavor, use European-style butter.
  • If you prefer, raw sugar can replace brown sugar for the topping.

“`

Indulge in the Creamy Delight of Pistachio Dream Cheesecake

“`html

Pistachio Dream Cheesecake: A Luxurious Delight for Your Taste Buds

Indulge in the creamy, nutty, and utterly irresistible Pistachio Dream Cheesecake, a dessert that captures the essence of elegance and flavor in each bite. This pistachio cheesecake is not just a treat; it’s an experience that brings together a rich pistachio flavor with a smooth cream cheese base, perfect for any celebration or simply a sweet indulgence.

Why You’ll Love This Recipe

The Pistachio Dream Cheesecake stands out with its unique and rich flavors, making it a dessert that’s both memorable and satisfying. The creamy texture paired with the nutty pistachio flavor is a match made in heaven. Whether it’s a festive occasion or a casual gathering, this cheesecake will become your go-to dessert to impress your family and friends.

This cheesecake is not only visually appealing but also boasts a perfect balance between sweet and savory. The subtle green hue from the pistachios adds a sophisticated touch that complements any table setting. If you’re a fan of pistachios, this cheesecake will surpass your flavor expectations with its nut-infused crust and delightful filling.

Context/Background

Cheesecakes have been a beloved dessert across many cultures, with origins tracing back to ancient Greece. The modern cheesecake has evolved, inspired by various regional flavors, including the vibrant pistachio. The Pistachio Dream Cheesecake takes these traditional techniques and adds a contemporary twist that highlights the cherished pistachio nut, which is celebrated for its distinct flavor and texture.

The incorporation of pistachios into this cheesecake offers a nod to Middle Eastern desserts, where the nut is often a staple ingredient. By blending pistachio into the cheesecake, this recipe pays tribute to its rich history while providing an innovative approach to a classic indulgence.

Recipe Details

Serves: 8-10

Prep Time: 25 minutes

Cook Time: 50 minutes

Total Time: 1 hour 15 minutes

Ingredients

  • 1 cup crushed graham crackers
  • 1/2 cup finely chopped pistachios
  • 1/4 cup melted butter
  • 3 (8 oz) packages cream cheese, softened
  • 1 cup granulated sugar
  • 3 large eggs
  • 1 cup sour cream
  • 2 teaspoons vanilla extract
  • 1/2 cup pistachio paste
  • Whipped cream, for topping (optional)
  • Chopped pistachios, for garnish

Directions

  1. Preheat your oven to 325°F (163°C). Grease a 9-inch springform pan.
  2. Mix the graham cracker crumbs, chopped pistachios, and melted butter in a bowl. Press the mixture evenly into the bottom of the prepared pan.
  3. In a large bowl, beat the cream cheese and sugar until smooth. Add the eggs one at a time, mixing well after each addition.
  4. Blend in the sour cream, vanilla extract, and pistachio paste until the mixture is smooth and creamy.
  5. Pour the filling over the crust, spreading it evenly.
  6. Bake in the preheated oven for 50 minutes or until the center is set.
  7. Turn off the oven and let the cheesecake sit inside for another hour with the door closed.
  8. Remove from the oven and cool completely before refrigerating for at least 4 hours or overnight.
  9. Before serving, top with whipped cream and garnish with chopped pistachios if desired.

Tips for Perfect Pistachio Dream Cheesecake

  • Ensure all ingredients are at room temperature to ensure smooth blending.
  • Do not over-mix the batter to avoid cracking during baking.
  • Bake the cheesecake in a water bath to keep it moist and prevent cracks.
  • Chill the cheesecake fully for the best texture and flavor development.

Serving Suggestions

Serve the Pistachio Dream Cheesecake chilled, adorned with fresh whipped cream and additional chopped pistachios for an elegant finish. Pair with a cup of espresso or a dessert wine to elevate the experience.

Storage and Leftovers

Store leftover cheesecake in an airtight container in the refrigerator for up to 5 days. For longer storage, wrap individual slices in plastic wrap and place in a freezer-safe bag for up to 2 months.

Final Thoughts

The Pistachio Dream Cheesecake is a must-try for any dessert lover. Its inviting nutty richness and silky texture make it an unforgettable treat. Whether you’re celebrating a special occasion or just craving something indulgently delicious, this cheesecake is sure to impress and satisfy.

Recipe Notes

  • For a gluten-free option, substitute graham crackers with gluten-free alternatives.
  • Use roasted unsalted pistachios for best results.
  • Adjust the sugar level in the filling according to your sweetness preference.
  • Experiment with different flavored toppings, such as chocolate ganache or berry compote, for variation.

“`

Indulgently Decadent Gooey Caramel Chocolate Pie Recipe for Dessert Lovers

“`html

Gooey Caramel Chocolate Pie Recipe: A Sinful Delight for Any Occasion

Indulge in the rich, decadent flavors of our Gooey Caramel Chocolate Pie Recipe, a truly irresistible dessert that combines smooth caramel with luscious chocolate in a crispy, buttery crust. This tantalizing treat is perfect for special gatherings or to satisfy your everyday sweet tooth cravings.

Why You’ll Love This Gooey Caramel Chocolate Pie Recipe

This pie is a dream come true for chocolate and caramel lovers. The rich, gooey texture perfectly complements the flaky crust, creating a dessert that’s both satisfying and sophisticated. Whether you need a show-stopping pie for a holiday feast or a comforting dessert on a cozy night in, this Gooey Caramel Chocolate Pie will not disappoint.

The blend of chocolate and caramel is a timeless classic, delivering a delightful balance of sweetness that makes every bite heavenly. Plus, it’s surprisingly easy to make, ensuring you can whip it up without spending hours in the kitchen.

This dessert is versatile and can cater to a wide range of palates. Whether you serve it with a dollop of whipped cream or a scoop of vanilla ice cream, it’s bound to be a crowd-pleaser.

Context/Background

The combination of chocolate and caramel has roots in various culinary traditions, celebrated for its harmony of flavors. Caramel, often enjoyed for its rich, buttery taste, pairs beautifully with chocolate, enhancing and complementing its bold notes. This particular recipe takes inspiration from traditional American pies, adding a deliciously gooey twist.

Throughout history, pies have been a staple dessert in many cultures, evolving from simple, savory versions to the sweet, elaborate versions we enjoy today. Our Gooey Caramel Chocolate Pie brings together these beloved ingredients in a modern, indulgent format that’s sure to please.

Recipe Details

Serves: 8-10

Prep Time: 20 minutes

Cook Time: 40 minutes

Total Time: 60 minutes

Ingredients

  • 1 pre-made pie crust
  • 1 cup semi-sweet chocolate chips
  • 1 cup caramel sauce
  • 1/2 cup unsalted butter, melted
  • 3/4 cup brown sugar
  • 3 large eggs
  • 1 teaspoon vanilla extract
  • 1/2 teaspoon salt
  • Whipped cream, for serving (optional)

Directions

  1. Preheat your oven to 350°F (175°C). Place the pie crust in a 9-inch pie pan and set aside.
  2. Melt the chocolate chips in a microwave or using a double boiler, stirring until smooth.
  3. In a large bowl, combine the melted butter, brown sugar, and vanilla extract. Mix in the eggs one at a time, followed by the melted chocolate.
  4. Pour the caramel sauce into the bottom of the prepared pie crust. Carefully pour the chocolate mixture over the caramel.
  5. Bake the pie for 40 minutes, or until the center is set. Let it cool for at least 1 hour before serving.
  6. Serve with whipped cream if desired, and enjoy!

Tips for Perfect Gooey Caramel Chocolate Pie

  • Ensure all ingredients are at room temperature before beginning to help them combine smoothly.
  • Use high-quality chocolate and caramel for the best flavor.
  • Let the pie cool completely before slicing to ensure the layers set properly.
  • If you like a touch of salt, sprinkle a little sea salt over the caramel before adding the chocolate layer.

Serving Suggestions

This Gooey Caramel Chocolate Pie is delightful on its own, but you can elevate it by serving with a scoop of vanilla ice cream or a dollop of whipped cream. A sprinkle of chopped nuts can add a nice crunch as well.

Storage and Leftovers

Store any leftovers in an airtight container in the refrigerator for up to 5 days. The pie can also be frozen for up to 3 months; thaw overnight in the fridge before serving. To enjoy warm, reheat individual slices in the microwave for about 15 seconds.

Final Thoughts

Our Gooey Caramel Chocolate Pie Recipe is a must-try for dessert enthusiasts and a testament to the perfect marriage of chocolate and caramel. Its simplicity yet indulgence make it a fantastic choice for anyone wanting to impress or simply indulge in a moment of sweetness. Try it today and experience its rich, melt-in-your-mouth flavors.

Recipe Notes

  • For a gluten-free version, use a gluten-free pie crust and ensure all other ingredients are gluten-free.
  • Consider adding a teaspoon of espresso powder to enhance the chocolate flavor.
  • If you prefer homemade caramel, you can make your own with butter, brown sugar, and cream.

“`

Indulge in Irresistible Strawberry Crunch Cheesecake Stuffed Cookies Today

“`html

Strawberry Crunch Cheesecake Stuffed Cookies: Irresistible Indulgence in Every Bite

Welcome to the world of decadence with our Strawberry Crunch Cheesecake Stuffed Cookies! Imagine the delightful combination of sweet strawberries, creamy cheesecake, and a crunchy outer layer all packed into a single cookie. These cookies are not just a treat—they’re an experience that you wouldn’t want to miss.

Why You’ll Love This Recipe

These Strawberry Crunch Cheesecake Stuffed Cookies are a game-changer for any dessert lover. With their unique combination of flavors, they’re perfect for impressing guests or just indulging yourself. The creamy cheesecake center provides a luscious contrast to the crunchy crumb coating, while the strawberry flavor adds a refreshing twist.

Whether you’re hosting a summer garden party or looking for a sweet escape during the colder months, these cookies are versatile enough to fit any occasion. Their visually appealing layers make them Instagram-worthy, adding to their charm and allure.

Context/Background

The inspiration for these cookies comes from the popular strawberry crunch cake and the beloved cheesecake, bringing together the best of both worlds. By combining these classic desserts, we’ve created a modern twist that pays homage to traditional flavors while offering something new and exciting.

This recipe uses a technique borrowed from stuffed cookie recipes, merging creamy and crunchy textures into each bite, ensuring every cookie provides a balanced taste experience.

Recipe Details

Serves: 12
Prep Time: 20 minutes
Cook Time: 15 minutes
Total Time: 35 minutes

Ingredients

  • 1 cup all-purpose flour
  • 1/2 teaspoon baking soda
  • 1/4 teaspoon salt
  • 1/2 cup unsalted butter, softened
  • 1/2 cup sugar
  • 1 egg
  • 1 teaspoon vanilla extract
  • 1/2 cup crushed freeze-dried strawberries
  • 1/2 cup graham cracker crumbs
  • 1 cup cream cheese, softened
  • 1/4 cup powdered sugar

Directions

  1. Preheat the oven to 350°F (175°C) and line a baking sheet with parchment paper.
  2. In a medium bowl, whisk together flour, baking soda, and salt.
  3. In a large bowl, cream together butter and sugar until light and fluffy. Add egg and vanilla, mix until combined.
  4. Gradually add the dry ingredients to the wet mixture. Stir in the freeze-dried strawberries.
  5. In a separate bowl, mix cream cheese and powdered sugar until smooth.
  6. Roll dough into small balls, flatten slightly, place a dollop of cream cheese mixture in the center, and fold the dough around to seal.
  7. Roll the stuffed dough balls in graham cracker crumbs and place on the baking sheet.
  8. Bake for 12-15 minutes or until edges are golden brown. Cool on a wire rack before serving.

Tips for Perfect Strawberry Crunch Cheesecake Stuffed Cookies

  • Ensure the cream cheese filling is well-chilled to make stuffing easier.
  • Use a small cookie scoop to evenly portion the dough and filling.
  • Crush the freeze-dried strawberries into small pieces for even distribution.
  • Avoid over-baking to keep the cookies soft and gooey inside.

Serving Suggestions

These cookies pair beautifully with a cold glass of milk or a scoop of vanilla ice cream. They also make a delightful addition to a dessert platter for parties or gatherings.

Storage and Leftovers

Store any leftovers in an airtight container in the refrigerator for up to a week. To enjoy warm cookies later, reheat them in the oven at a low temperature for a few minutes.

Final Thoughts

Don’t miss out on these Strawberry Crunch Cheesecake Stuffed Cookies, as they are sure to become a favorite in your household. Their delightful textures and flavors are perfect for any occasion, and they offer a twist on classic dessert flavors that everyone will love.

Recipe Notes

  • Swap freeze-dried strawberries for fresh ones for a softer texture.
  • Add a pinch of cinnamon to the graham cracker crumbs for extra flavor.
  • Experiment with other fruit flavors like blueberries or raspberries for a different variation.

“`

Decadent Peanut Butter Truffles: Easy Homemade Treats You’ll Love

“`html

Peanut Butter Truffles Recipe: Easy Homemade Treats

Indulge in the rich and creamy delight of peanut butter truffles, the perfect homemade treat for peanut butter lovers everywhere. This simple yet decadent recipe is bound to become your go-to for any occasion. With just a handful of ingredients, you can create these irresistibly smooth peanut butter truffles that are sure to impress.

Why You’ll Love This Recipe

What makes these peanut butter truffles so irresistible? For starters, they offer the perfect balance of sweet and salty, enhanced by the creamy texture of quality peanut butter. These truffles are not only easy to make but also require no baking, making them a convenient option for quick sweet treats. Perfect for special occasions or as a mid-week indulgence, these truffles can be dressed up with coatings or toppings to suit any event.

Transform these delicious bites with various coatings like chocolate, nuts, or coconut flakes to add layers of flavor and texture. Whether you’re a novice cook or an experienced baker, mastering these truffles will easily add a touch of elegance to your dessert repertoire.

Context/Background

The art of creating truffles is believed to have originated in France as a luxury treat for the affluent. Inspired by the delicate chocolate truffles of European gastronomy, these peanut butter versions bring an American twist to the classic truffle, swapping out the traditional ganache with creamy peanut butter goodness. This method preserves the rich allure of truffles while adding a comfortingly familiar flavor that appeals to a wide range of palates.

An intriguing combination of simplicity and sophistication, peanut butter truffles tapped into America’s love for peanut confections, quickly becoming a favorite for holidays, gatherings, or as everyday indulgence.

Recipe Details

Serves: 12

Prep Time: 15 minutes

Cook Time: 45 minutes (chill time)

Total Time: 1 hour

Ingredients

  • 1 cup creamy peanut butter
  • 1/4 cup unsalted butter, softened
  • 1 teaspoon vanilla extract
  • 2 cups powdered sugar
  • 8 oz semi-sweet chocolate chips
  • Optional coating: chopped nuts, sprinkles, or shredded coconut

Directions

  1. In a medium bowl, beat together the peanut butter, unsalted butter, and vanilla extract until smooth and creamy.
  2. Gradually add the powdered sugar, mixing until fully incorporated to form a soft dough.
  3. Roll the mixture into 1-inch balls and place them on a baking sheet lined with parchment paper. Chill in the refrigerator for 30 minutes.
  4. While the balls are chilling, melt the semi-sweet chocolate chips in a microwave-safe bowl, in 30-second increments, stirring until smooth.
  5. Dip each chilled peanut butter ball into the melted chocolate, using a fork to coat evenly. Allow excess chocolate to drip off before returning the truffle to the baking sheet.
  6. If desired, sprinkle with chopped nuts, sprinkles, or coconut before the chocolate sets. Chill in the refrigerator for another 15 minutes or until the chocolate is firm.

Tips for Perfect Peanut Butter Truffles

  • Ensure the butter is fully softened for easy mixing.
  • Chill the balls well to make coating with chocolate easier and cleaner.
  • Experiment with different chocolate types, such as dark or white, for varied flavors.
  • Use a toothpick or skewer for easy handling when dipping truffles in chocolate.

Serving Suggestions

Serve these delightful peanut butter truffles chilled with a warm cup of coffee or a glass of cold milk. They are also perfect as a gift, neatly arranged in a decorative box or tin for friends and family to enjoy.

Storage and Leftovers

Store truffles in an airtight container in the refrigerator for up to two weeks. For longer storage, freeze the truffles in a freezer-safe container for up to three months, allowing them to thaw in the refrigerator before serving.

Final Thoughts

With their rich, creamy texture and enticing flavor, these peanut butter truffles are a must-try for anyone looking to savor homemade indulgence. Whether shared with loved ones or enjoyed as a personal treat, they’re bound to become a beloved recipe in your collection.

Recipe Notes

  • For a healthier option, consider using natural peanut butter with no added sugar.
  • Swap semi-sweet chocolate with your favorite variety for personalized flavor.
  • Add a pinch of sea salt to the chocolate coating for a gourmet touch.

“`

Irresistible Peanut Butter Truffles: Easy Homemade Treats Recipe

“`html

Peanut Butter Truffles Recipe: Easy Homemade Treats

Indulge in the rich, nutty flavors of this Peanut Butter Truffles Recipe – a delightful homemade treat that’s both easy to make and incredibly satisfying. Perfect for peanut butter lovers, these truffles are a simple yet delicious way to enjoy the classic combination of peanut butter and chocolate.

Why You’ll Love This Recipe

These Peanut Butter Truffles are a dream come true for anyone who loves the mix of creamy peanut butter and smooth chocolate. Not only are they easy to make with just a few ingredients, but they also require no baking – making them a quick go-to when you’re short on time. Their bite-sized nature makes them ideal for sharing at parties or as a sweet gift.

Another benefit of these truffles is their versatility. You can roll them in cocoa powder, chopped nuts, or even shredded coconut for different textures and flavors. Meanwhile, their rich taste and smooth texture make them a luxurious treat that can be enjoyed on any occasion.

Context/Background

Truffles, traditionally a luxurious chocolate treat, originated in France in the late 19th century. They were named after the truffle fungi due to their physical resemblance. This Peanut Butter Truffles Recipe introduces a modern twist by incorporating peanut butter, a beloved staple in American kitchens.

Peanut butter has a history dating back to the Aztecs, who ground peanuts into a paste. Today, it’s used globally for its creamy texture and deep flavor, making it a perfect addition to truffles.

Recipe Details

Serves: 24 truffles

Prep Time: 15 minutes

Cook Time: 0 minutes

Total Time: 15 minutes

Ingredients

  • 1 cup creamy peanut butter
  • 2 cups powdered sugar
  • 2 cups semi-sweet chocolate chips
  • 1/4 cup unsalted butter
  • 1 teaspoon vanilla extract
  • Pinch of salt

Directions

  1. In a mixing bowl, combine peanut butter, powdered sugar, vanilla extract, and salt. Mix until smooth.
  2. Roll the mixture into 1-inch balls and place them on a baking sheet lined with parchment paper.
  3. Freeze the peanut butter balls for about 20 minutes to firm them up.
  4. Melt chocolate chips and butter in a microwave-safe bowl in 30-second intervals, stirring until smooth.
  5. Using a fork or a toothpick, dip each peanut butter ball into the melted chocolate, ensuring it’s fully coated.
  6. Place the coated truffles back on the parchment paper and refrigerate until the chocolate sets.

Tips for Perfect Peanut Butter Truffles

  • Ensure the peanut butter mixture is firm before dipping to maintain shape.
  • Use high-quality chocolate for a smoother finish.
  • For an extra crunchy texture, use crunchy peanut butter or add finely chopped nuts.
  • Let the truffles set completely before transferring to avoid chocolate smudges.

Serving Suggestions

Serve these Peanut Butter Truffles chilled as a dessert after dinner, or include them in a selection of treats at your next gathering. They pair wonderfully with coffee or a glass of milk.

Storage and Leftovers

Store the Peanut Butter Truffles in an airtight container in the refrigerator for up to two weeks. They can also be frozen for up to three months. Allow them to thaw slightly before serving.

Final Thoughts

Don’t miss out on the opportunity to delight your taste buds with this easy Peanut Butter Truffles Recipe. It’s a delightful treat that combines the nutty richness of peanut butter with the lusciousness of chocolate – a match made in heaven!

Recipe Notes

  • For a dairy-free version, use vegan chocolate chips and coconut oil instead of butter.
  • Add a sprinkle of sea salt on top for a savory contrast.
  • Experiment with different coatings like crushed pretzels or sprinkles for a personalized touch.

“`

Spice Up Your Meal with Jalapeño Cornbread Muffins Recipe

“`html

Jalapeño Cornbread Muffins with Cream Cheese Filling: A Flavorful Twist on a Classic

Experience the perfect blend of spicy jalapeños, sweet cornmeal, and creamy cheese with our Jalapeño Cornbread Muffins with Cream Cheese Filling. This recipe is the perfect way to add a kick to your classic cornbread, making it an irresistible treat for any occasion.

Why You’ll Love This Recipe

These jalapeño cornbread muffins are packed with unique flavors that will tantalize your taste buds. The creamy cheese filling contrasts beautifully with the spicy jalapeños, while the sweet hints of cornmeal add a comforting balance. These muffins are ideal for gatherings, barbecues, or as a spicy side to your favorite dishes.

Not only are these muffins delicious, but they are also effortless to make. Whether you’re an experienced baker or a beginner, you’ll find that these muffins come together quickly with simple ingredients you likely already have in your pantry.

Plus, these muffins can easily complement a variety of meals, turning any ordinary dinner into something special with their rich flavor and texture.

Context/Background

Cornbread has a storied history in Southern cuisine, often seen as a staple on family tables and during celebrations. Originally crafted by Native Americans, cornbread took on new flavors and forms as different cultures adopted it. With the addition of jalapeños and cream cheese, this version pays homage to this traditional dish while introducing a modern, spicy twist.

The technique of incorporating fillings adds an extra layer of flavor and surprise, keeping the classic charm while bringing new excitement to the table. Such variations are common in Southern home cooking, where personal touches and regional ingredients tell a story all their own.

Recipe Details

Serves: 12

Prep Time: 15 minutes

Cook Time: 20 minutes

Total Time: 35 minutes

Ingredients

  • 1 cup cornmeal
  • 1 cup all-purpose flour
  • 1/4 cup sugar
  • 1 tablespoon baking powder
  • 1/2 teaspoon baking soda
  • 1/2 teaspoon salt
  • 1 cup buttermilk
  • 1/4 cup melted butter
  • 2 large eggs
  • 1 cup corn kernels, fresh or frozen
  • 2 jalapeños, seeded and minced
  • 1/2 cup cream cheese, softened

Directions

  1. Preheat your oven to 400°F (200°C) and line a muffin tin with paper liners.
  2. In a large bowl, whisk together cornmeal, flour, sugar, baking powder, baking soda, and salt.
  3. In another bowl, combine buttermilk, melted butter, and eggs; mix until well blended.
  4. Pour the wet ingredients into the dry ingredients and stir until just combined. Fold in the corn kernels and minced jalapeños.
  5. Spoon a small amount of batter into each muffin cup, enough to cover the bottom.
  6. Add a teaspoon of softened cream cheese onto the center of each one and cover with additional batter, filling the cups about three-quarters full.
  7. Bake for 18-20 minutes or until a toothpick inserted into the center comes out clean.
  8. Let cool in the pan for a few minutes before transferring to a wire rack to cool completely.

Tips for Perfect Jalapeño Cornbread Muffins with Cream Cheese Filling

  • Ensure cream cheese is at room temperature for easier spreading.
  • If you prefer less heat, use only one jalapeño or remove all seeds.
  • Fresh corn kernels will give the best flavor, but frozen works in a pinch.
  • Don’t overmix the batter to keep the muffins fluffy and light.

Serving Suggestions

Serve these muffins warm straight from the oven, or pair them with a hearty chili or a steaming bowl of soup. They also make a delightful addition to breakfast spread or a delicious snack on their own.

Storage and Leftovers

Store leftover muffins in an airtight container at room temperature for up to 2 days. For best freshness, refrigerate them in a sealed bag for up to a week, or freeze for up to 2 months. Reheat in the oven for a few minutes to enjoy them warm again.

Final Thoughts

These Jalapeño Cornbread Muffins with Cream Cheese Filling are a must-try if you’re looking to spice up a traditional favorite. Their unique flavor combinations and ease of preparation make them an exciting and rewarding baking project. Give them a try, and you’re sure to wow your family and friends!

Recipe Notes

  • If buttermilk is unavailable, substitute with a mixture of milk and lemon juice or vinegar.
  • To make them extra cheesy, sprinkle shredded cheddar into the batter or on top before baking.
  • Feel free to add cooked bacon bits for an additional layer of flavor.

“`

Irresistible No Bake Pecan Coconut Praline Cookies Recipe

“`html

No Bake Pecan Coconut Praline Cookies 🍪🥥 – Easy & Delicious 😍

If you’re on the hunt for a sweet treat that’s both simple and satisfying, these No Bake Pecan Coconut Praline Cookies are the perfect solution. Packed with the rich, nutty flavor of pecans and the tropical sweetness of coconut, these cookies are bound to become a household favorite. The best part? No oven required!

Why You’ll Love This Recipe

This delightful no bake recipe combines the convenience of easy preparation with the decadence of praline flavors. It’s perfect for those moments when you crave something sweet but don’t want to spend hours in the kitchen. Plus, these cookies are great for sharing at gatherings or as a gift to a loved one.

They offer a satisfying blend of crunchy pecans and chewy coconut that provides a texture contrast you’ll inevitably fall in love with. The ingredients are simple, natural, and packed with flavors that will remind you of a Southern treat.

Whether it’s for a family dessert, a holiday treat, or just to enjoy with your afternoon coffee, these cookies are perfect for any occasion where a sweet delight is warranted.

Context/Background

The inspiration for these No Bake Pecan Coconut Praline Cookies comes from classic Southern pralines, a traditional confection often enjoyed in the southern United States, particularly in Louisiana. By combining similar flavors and adding coconut, these cookies pay homage to praline’s roots while offering their own unique twist.

No bake desserts have become increasingly popular for their simplicity and quick preparation time. This recipe draws on that trend, delivering nutty, sweet flavors without the hassle of baking.

Recipe Details

Serves: 12

Prep Time: 15 minutes

Cook Time: None

Total Time: 15 minutes

Ingredients

  • 1 cup chopped pecans
  • 1 cup shredded sweetened coconut
  • 1 cup granulated sugar
  • 1/2 cup unsalted butter
  • 1/4 cup milk
  • 1 teaspoon vanilla extract
  • Pinch of salt

Directions

  1. In a medium saucepan, combine sugar, butter, milk, and a pinch of salt. Bring to a boil over medium heat, stirring frequently.
  2. Boil for 3 minutes without stirring, ensuring everything melts and combines smoothly.
  3. Remove from heat and quickly stir in the vanilla extract, chopped pecans, and shredded coconut.
  4. Drop spoonfuls of the mixture onto wax paper or a parchment-lined baking sheet.
  5. Allow the cookies to cool and set, about 30 minutes at room temperature.

Tips for Perfect No Bake Pecan Coconut Praline Cookies

  • Ensure the pecans are finely chopped for a better texture blend in the cookies.
  • Use sweetened coconut for the best flavor balance.
  • Work quickly once the mixture is prepared, as it will start to harden as it cools.
  • Feel free to toast the pecans beforehand for an added depth of flavor.

Serving Suggestions

These cookies make an excellent dessert but are equally delightful as an afternoon snack. Pair them with a cup of coffee or a glass of milk for a cozy treat. They also make a beautiful addition to any dessert platter when hosting guests.

Storage and Leftovers

Store these no bake cookies in an airtight container at room temperature for up to a week. For longer storage, place them in the refrigerator where they will keep for about two weeks. Make sure they are completely cooled before sealing to prevent condensation.

Final Thoughts

These No Bake Pecan Coconut Praline Cookies are a delightful blend of nutty and sweet flavors that will have you reaching for seconds. Perfect for any level of cooking expertise, this recipe is a quick and easy way to satisfy your sweet tooth without the fuss. Give it a try and delight in the delicious results!

Recipe Notes

  • Substitute walnuts for pecans if desired for a different nutty profile.
  • Consider adding a sprinkle of sea salt on top for a sweet and salty combination.
  • For a vegan version, replace butter with coconut oil and use a dairy-free milk alternative.

“`