Irresistibly Gooey Salted Caramel Cream Cheese Cupcakes Recipe

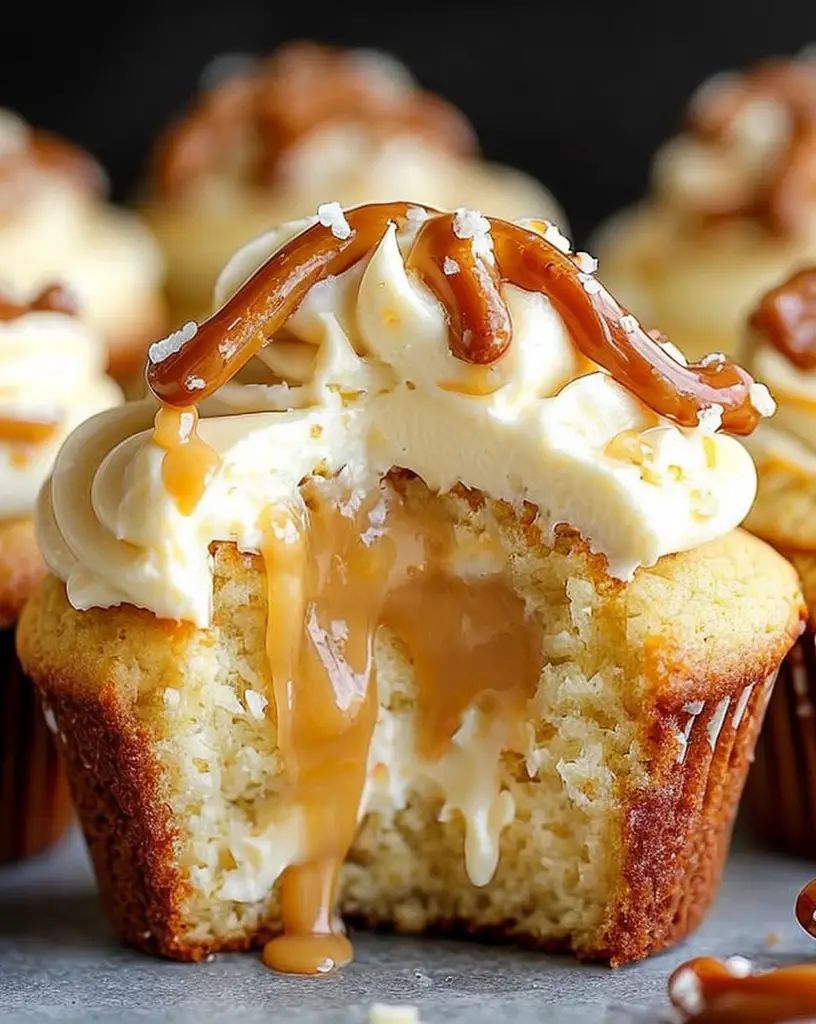
Gooey Salted Caramel Cream Cheese Cupcakes: A Decadent Delight

Indulge in the rich and irresistible flavors of Gooey Salted Caramel Cream Cheese Cupcakes, a dessert that perfectly combines creamy texture with sweet and salty notes. These cupcakes are a sumptuous treat that will satisfy even the most discerning sweet tooth.

Why You’ll Love This Recipe

These Gooey Salted Caramel Cream Cheese Cupcakes are a showstopper at any event, offering a unique blend of creamy cheese and deep caramel flavors that are sure to impress. The balance of sweet and salty makes them a versatile dessert choice suitable for any occasion, be it birthdays, parties, or a simple at-home treat.

The incorporation of cream cheese into the batter creates a moist, tender crumb that melts in your mouth. Paired with a gooey salted caramel center, each bite is an explosion of flavor. This recipe makes it easy to recreate a bakery-quality dessert in the comfort of your own kitchen.

Context/Background

The fusion of salted caramel and cream cheese is a modern twist on classic flavors, combining traditional baking elements with contemporary taste preferences. This recipe draws inspiration from the rising popularity of salted caramel in the culinary world, and pairs it impeccably with cream cheese for added richness.

Originating as a culinary trend in the early 2000s, salted caramel has since become a staple in dessert recipes, favored for its ability to elevate sweet dishes. When combined with the smoothness of cream cheese, it offers a sophisticated taste that appeals to both classic and modern palates.

Recipe Details

Serves: 12
Prep Time: 20 minutes
Cook Time: 25 minutes
Total Time: 45 minutes

Ingredients

  • 1 cup all-purpose flour
  • 1/2 cup granulated sugar
  • 1/4 teaspoon baking soda
  • 1/4 teaspoon salt
  • 1/2 cup unsalted butter, softened
  • 4 ounces cream cheese, softened
  • 1 large egg
  • 1 teaspoon vanilla extract
  • 1/2 cup salted caramel sauce, plus extra for drizzling
  • Flaky sea salt, for topping

Directions

  1. Preheat your oven to 350°F (175°C) and line a muffin tin with cupcake liners.
  2. In a medium bowl, whisk together the flour, sugar, baking soda, and salt. Set aside.
  3. In a large bowl, beat the unsalted butter and cream cheese until creamy and smooth.
  4. Add the egg and vanilla extract to the butter mixture and beat until fully combined.
  5. Gradually add the dry ingredients to the wet ingredients, mixing until just combined.
  6. Spoon batter into cupcake liners, filling each about halfway.
  7. Place a teaspoon of salted caramel sauce in the center of each cupcake, then top with more batter to cover.
  8. Bake in the preheated oven for 20-25 minutes, or until a toothpick inserted into the cake part comes out clean.
  9. Let the cupcakes cool completely before drizzling with additional caramel sauce and a sprinkle of flaky sea salt.

Tips for Perfect Gooey Salted Caramel Cream Cheese Cupcakes

  • Ensure all ingredients are at room temperature before starting for a smooth batter.
  • Do not overfill the cupcake liners to prevent overflowing during baking.
  • Use high-quality salted caramel sauce for the best flavor.
  • Allow the cupcakes to cool completely before adding the final drizzle to maintain texture.

Serving Suggestions

Serve these Gooey Salted Caramel Cream Cheese Cupcakes as a delightful dessert after dinner or as a sweet treat during afternoon tea. Pair them with a hot cup of coffee or a glass of cold milk for an indulgent pairing.

Storage and Leftovers

These cupcakes can be stored in an airtight container at room temperature for up to two days. For longer storage, keep them in the refrigerator for up to a week. Bring them to room temperature before serving to enjoy their full flavor.

Final Thoughts

These Gooey Salted Caramel Cream Cheese Cupcakes are worth every bite, offering a perfect blend of sweetness and creaminess. Whether you’re baking for a special occasion or simply to satisfy a sweet craving, this recipe is sure to become a favorite in your home. Try it out and experience the delightful combination of salted caramel and cream cheese!

Recipe Notes

  • Experiment with different toppings like crushed nuts or chocolate shavings for added texture.
  • For a more intense caramel flavor, swirl additional salted caramel sauce into the batter.
  • Consider using a piping bag for a neater cupcake finish when adding the caramel drizzle.

Irresistible Cheesy Beef Taco Pasta: Quick and Delicious Weeknight Dinner

“`html

Cheesy Beef Taco Pasta Recipe: A Flavorful Fusion Delight

Meet your new favorite weeknight dinner: the Cheesy Beef Taco Pasta Recipe. Combining the savory flavors of classic beef tacos with the comforting cheese-laden goodness of pasta, this dish will quickly become a family staple. Dive into a meal that’s as deliciously easy to prepare as it is to devour.

Why You’ll Love This Cheesy Beef Taco Pasta Recipe

This recipe brings together two beloved dishes—beef tacos and pasta—into one irresistible culinary creation. The combination of seasoned beef, tender pasta, and gooey cheese melds into a symphony of flavors that’s sure to delight. It’s perfect for busy weeknights, offering a quick yet satisfying meal that doesn’t skimp on flavor.

Not only is this cheesy taco pasta incredibly easy to make, but it’s also versatile enough for any occasion. Whether you’re feeding a hungry family or hosting friends, this dish is designed to please. Plus, its rich, creamy texture makes it a hit with kids and adults alike.

Context/Background

The fusion of taco flavors into a pasta dish is a modern culinary trend that exemplifies comfort and innovation. While traditional Italian pasta has roots in centuries of cultural evolution, this dish plays with flavors from Mexican cuisine, creating a delightful twist that celebrates culinary diversity. The ability to infuse taco spices into familiar pasta embodies the adventurous spirit of home chefs worldwide.

Recipe Details

Serves: 4

Prep Time: 10 minutes

Cook Time: 20 minutes

Total Time: 30 minutes

Ingredients

  • 8 oz elbow macaroni
  • 1 lb ground beef
  • 1 packet taco seasoning
  • 1 cup salsa
  • 1 cup shredded cheddar cheese
  • ½ cup sour cream
  • 1 cup beef broth
  • Salt and pepper, to taste

Directions

  1. Cook the macaroni according to package instructions, then drain and set aside.
  2. In a large skillet, cook the ground beef over medium heat until browned. Drain any excess fat.
  3. Add taco seasoning to the beef, followed by the salsa and beef broth. Stir well and cook for 5 minutes.
  4. Add the cooked macaroni to the skillet and mix until well combined.
  5. Reduce heat to low, then stir in the cheddar cheese and sour cream until the cheese is melted and creamy.
  6. Season with salt and pepper to taste, then remove from heat.

Tips for Perfect Cheesy Beef Taco Pasta Recipe

  • For a spicier version, use a hot salsa or add a diced jalapeño when cooking the beef.
  • Make sure to fully drain the pasta to avoid a watery sauce.
  • Stir in the cheese slowly on low heat to ensure it melts smoothly into the pasta.
  • Consider cooking pasta a minute under al dente if you plan to reheat, to avoid overcooking.

Serving Suggestions

Serve this cheesy beef taco pasta with a side of tortilla chips and guacamole for a complete Tex-Mex experience. A fresh green salad can offer a refreshing contrast to the rich, cheesy flavors. Top with chopped cilantro or green onions for added freshness and color.

Storage and Leftovers

Store leftover cheesy beef taco pasta in an airtight container in the refrigerator for up to 3 days. Reheat in a skillet over low heat, adding a splash of beef broth or milk to regain the creamy consistency. Avoid freezing, as the texture of the pasta may be altered.

Final Thoughts

If you’re in search of a comforting, flavorful dish that’s easy to whip up, look no further. This Cheesy Beef Taco Pasta Recipe combines convenience with taste, providing a delightful meal that everyone will love. Perfect for family dinners or a cozy night in, it’s certainly worth adding to your culinary repertoire.

Recipe Notes

  • Substitute ground turkey or chicken for beef for a lighter version.
  • Try adding black beans or corn for extra texture and flavor.
  • For a gluten-free option, use gluten-free pasta and confirm your taco seasoning is gluten-free.

“`

Indulge in the Ultimate Luxurious German Chocolate Poke Cake Recipe

“`html

Luxurious German Chocolate Poke Cake: A Decadent Delight

Indulge in the rich flavors of the Luxurious German Chocolate Poke Cake, a dessert that combines a moist chocolate cake with the gooey goodness of caramel and a coconut-pecan topping. Perfect for any occasion, this cake is sure to impress with its decadent layers and irresistible taste.

Why You’ll Love This Recipe

This Luxurious German Chocolate Poke Cake is a chocoholic’s dream. The combination of rich chocolate cake infused with sweet caramel and topped with a crunchy coconut-pecan frosting makes it a truly unique treat. It’s perfect for birthdays, holidays, or any celebration where you want to amaze your guests with a show-stopping dessert.

Not only is this cake incredibly delicious, but it’s also easy to make! With just a few simple steps, you can create a dessert that looks and tastes like it took hours to prepare. The poke cake technique ensures that every bite is filled with caramel goodness, making it absolutely irresistible.

Context/Background

The German Chocolate Cake has its roots in America, named after an Englishman named Samuel German who developed a type of dark-baking chocolate for the Baker’s Chocolate Company in 1852. Over time, the cake evolved into a beloved classic featuring layers of chocolate cake, coconut, and pecans – a true celebration of flavors.

This poke cake variation adds another layer of decadence by incorporating sweetened condensed milk and caramel into the cake batter, ensuring a moist and flavorful dessert that enhances the traditional elements we love about the classic.

Recipe Details

Serves: 12

Prep Time: 30 minutes

Cook Time: 35 minutes

Total Time: 1 hour 5 minutes

Ingredients

  • 1 package German chocolate cake mix
  • 1 1/3 cups water
  • 1/2 cup vegetable oil
  • 3 large eggs
  • 1 can (14 oz) sweetened condensed milk
  • 1 jar (12 oz) caramel topping
  • 1 1/4 cups toasted coconut flakes
  • 1 cup chopped pecans
  • 1 tub (8 oz) Cool Whip, thawed

Directions

  1. Preheat your oven to 350°F (175°C) and grease a 9×13 inch baking dish.
  2. In a large bowl, combine the cake mix, water, oil, and eggs until well blended. Pour the batter into the prepared baking dish.
  3. Bake in the preheated oven for 30-35 minutes, or until a toothpick inserted into the center comes out clean.
  4. While the cake is still warm, use the handle of a wooden spoon to poke holes throughout the cake.
  5. In a small bowl, mix the sweetened condensed milk and caramel topping. Pour evenly over the cake, allowing the mixture to soak into the holes.
  6. Let the cake cool completely, then spread the Cool Whip over the top.
  7. Sprinkle with toasted coconut and pecans. Refrigerate for at least 2 hours before serving.

Tips for Perfect Luxurious German Chocolate Poke Cake

  • For a deeper flavor, toast the pecans before using them in the recipe.
  • Ensure the cake is warm but not too hot before pouring the caramel mixture on top, for optimal absorption.
  • Use full-fat sweetened condensed milk for the richest texture.
  • Customize your toppings with chocolate chips or drizzles of extra caramel for added indulgence.

Serving Suggestions

This Luxurious German Chocolate Poke Cake pairs perfectly with a scoop of vanilla ice cream or a dollop of whipped cream. Serve it chilled for the best flavor and texture experience, and watch it disappear at your next gathering.

Storage and Leftovers

Store any leftovers covered in the refrigerator for up to 5 days. This cake can also be frozen—simply wrap individual slices in plastic wrap and aluminum foil before freezing. Thaw in the refrigerator overnight.

Final Thoughts

If you’re looking for a show-stopping dessert that combines classic flavors with a modern twist, this Luxurious German Chocolate Poke Cake is a must-try. Each bite delivers a perfect blend of textures and tastes, proving that indulging in dessert can be both easy and extraordinary.

Recipe Notes

  • Feel free to substitute the Cool Whip with homemade whipped cream for a fresher topping.
  • Add a pinch of sea salt to the caramel mixture for a salted caramel variation that enhances the flavors.
  • Experiment with different types of nuts like walnuts or almonds if pecans aren’t available.

“`

Irresistible Cheesy Garlic Chicken Wraps for Delicious Dinner Bliss

“`html

Cheesy Garlic Chicken Wraps: A Flavorful Handheld Delight

Indulge in these Cheesy Garlic Chicken Wraps for a delicious meal that combines tender chicken, aromatic garlic, and gooey cheese, all wrapped in a soft tortilla. Perfect for quick lunches or cozy dinners, this dish is sure to satisfy your taste buds while offering the convenience of a hand-held meal.

Why You’ll Love This Recipe

These Cheesy Garlic Chicken Wraps are a cheesy delight that’s perfect for every occasion. The magical combination of garlic and cheese creates a flavorful explosion in every bite. Whether you’re looking for a quick lunch option or a satisfying snack, these wraps are an excellent choice.

Quick to make and packed with flavor, this recipe is perfect for busy weeknights. The inclusion of cheesy goodness not only enhances the taste but also provides a creamy texture that elevates the entire experience.

Suitable for a wide range of occasions, from picnic outings to family dinners, these Cheesy Garlic Chicken Wraps are sure to be a hit with both kids and adults alike.

Context/Background

The Cheesy Garlic Chicken Wrap has become a favorite in contemporary cuisine, merging easy-to-find ingredients with bold flavors. Originating from the concept of mobile street food, wraps offer convenience without sacrificing taste. The combination of garlic with chicken and cheese is reminiscent of Mediterranean flavor palettes, blending tradition with modern accessibility.

Recipe Details

Serves: 4

Prep Time: 15 minutes

Cook Time: 10 minutes

Total Time: 25 minutes

Ingredients

  • 2 cups cooked chicken breast, shredded
  • 4 large flour tortillas
  • 1 cup shredded mozzarella cheese
  • 2 tablespoons minced garlic
  • 1 tablespoon olive oil
  • Salt and pepper to taste
  • 1/4 cup chopped parsley (optional)

Directions

  1. In a large skillet, heat olive oil over medium heat. Add minced garlic and sauté until golden, approximately 2 minutes.
  2. Add shredded chicken to the skillet, stirring to combine with the garlic. Season with salt and pepper to taste.
  3. Remove the chicken mixture from heat and stir in shredded mozzarella cheese until evenly distributed and melted.
  4. Lay a flour tortilla flat and place a quarter of the chicken mixture into the center. Fold the sides and roll up the tortilla to enclose the filling.
  5. Repeat with the remaining tortillas and chicken mixture.
  6. Heat an additional nonstick skillet over medium heat. Place each wrap seam side down and cook until golden brown on each side, around 2-3 minutes per side.
  7. Remove from heat and let cool slightly before serving.

Tips for Perfect Cheesy Garlic Chicken Wraps

  • Ensure the tortillas are warm before filling to prevent cracking.
  • Use a toothpick to secure wraps while cooking, if necessary, to prevent unraveling.
  • Switching mozzarella for your favorite cheese blend can add a unique flavor twist.
  • Cooking wraps on medium heat prevents burning and ensures even cheese melting.

Serving Suggestions

These wraps pair wonderfully with a side of fresh salad or crunchy potato chips. Consider serving alongside a light soup for a fuller meal. Additionally, they make a great addition to any picnic spread or casual gathering.

Storage and Leftovers

Store any leftover Cheesy Garlic Chicken Wraps in an airtight container in the refrigerator for up to 3 days. Reheat wraps in a skillet over low heat to retain their crispiness, or warm for a few seconds in the microwave for a quicker option.

Final Thoughts

Dive into the delicious comfort of Cheesy Garlic Chicken Wraps – a simple yet flavorful dish that’s bound to impress. Perfectly suitable for those looking for a quick meal without compromising on taste, this recipe is an absolute must-try.

Recipe Notes

  • For a spicy kick, consider adding red pepper flakes to the chicken mixture.
  • Substitute parsley with cilantro for a different flavor profile.
  • Experiment with herb-infused wraps to enhance the dish’s flavor further.

“`

Delicious Ravioli with Fresh Tomatoes, Asparagus, Garlic, and Herbs

“`html

Delicious Ravioli with Tomatoes, Asparagus, Garlic, and Herbs: A Garden-Fresh Delight

Indulge in this exquisite Ravioli with Tomatoes, Asparagus, Garlic, and Herbs that brings the true essence of Mediterranean flavors straight to your table. The combination of fresh tomatoes, tender asparagus, aromatic garlic, and a fragrant mix of herbs makes this dish both delicious and visually stunning. Get ready to experience an irresistible blend of textures and tastes that will leave your taste buds craving more.

Why You’ll Love This Recipe

This recipe for Ravioli with Tomatoes, Asparagus, Garlic, and Herbs is a celebration of fresh ingredients and vibrant flavors. It’s incredibly easy to prepare, making it perfect for both weeknight dinners and special occasions. The juicy tomatoes and crisp asparagus provide a fresh contrast to the soft ravioli, while the garlic and herbs infuse the dish with aromatic goodness.

You’ll love how versatile this dish is – it pairs beautifully with a variety of wines and can be adapted to include seasonal vegetables you have on hand. Furthermore, the elegant presentation is sure to impress your family or guests, making it a go-to recipe in your culinary repertoire.

Context/Background

Ravioli is a classic Italian dish with a rich history, originating from the Mediterranean region. Traditionally, these pasta parcels are filled with a variety of ingredients, often including cheese, vegetables, or meats, and served with a light sauce. The combination of seasonal vegetables and herbs in this recipe adds a modern twist to the traditional presentation, making it both a homage to its origins and a fresh culinary creation.

Recipe Details

Serves: 4
Prep Time: 15 minutes
Cook Time: 20 minutes
Total Time: 35 minutes

Ingredients

  • 400g fresh ravioli
  • 200g cherry tomatoes, halved
  • 150g asparagus, trimmed and cut into 2-inch pieces
  • 3 cloves garlic, minced
  • 3 tbsp olive oil
  • 1 tsp dried oregano
  • 1 tsp dried basil
  • Salt and pepper to taste
  • Fresh basil leaves for garnish
  • Grated Parmesan cheese (optional)

Directions

  1. Bring a large pot of salted water to a boil, add the ravioli, and cook according to package instructions until al dente. Drain and set aside.
  2. In a large skillet, heat olive oil over medium heat. Add minced garlic and sauté for about 1 minute until fragrant.
  3. Add the asparagus to the skillet and cook for 3-4 minutes until it begins to soften.
  4. Stir in the cherry tomatoes, oregano, and basil. Cook for another 2-3 minutes until the tomatoes start to blister.
  5. Gently fold in the cooked ravioli, ensuring it’s well-coated with the sauce. Season with salt and pepper to taste.
  6. Serve hot, garnished with fresh basil leaves and topped with grated Parmesan cheese, if desired.

Tips for Perfect Ravioli with Tomatoes, Asparagus, Garlic, and Herbs

  • Use the freshest vegetables available for the best flavor.
  • If using dried ravioli, adjust cooking times as needed.
  • Add a splash of white wine to the sauce for extra depth of flavor.
  • Customize the herb mix to suit your taste preferences.

Serving Suggestions

This delightful ravioli dish pairs wonderfully with a crisp white wine such as a Sauvignon Blanc or a Chablis. Serve it with a side salad of mixed greens and a crusty artisan bread to soak up the delicious sauce.

Storage and Leftovers

Store any leftovers in an airtight container in the refrigerator for up to 3 days. Reheat gently on the stove with a splash of water to prevent the pasta from drying out.

Final Thoughts

This Ravioli with Tomatoes, Asparagus, Garlic, and Herbs is a must-try for anyone who appreciates fresh and vibrant flavors. Easy to prepare and utterly satisfying, it’s undoubtedly a dish that will earn a regular place on your dining table. Give it a try and experience a taste of the Mediterranean in your own home!

Recipe Notes

  • If asparagus is not in season, substitute with tender green beans or snap peas.
  • For a vegan version, opt for vegan ravioli and omit the Parmesan cheese.
  • Feel free to add crushed red pepper flakes for a hint of spice.

“`

Indulge in Our Irresistible Caramel Coffee Buttercream Cake Recipe

“`html

Irresistible Caramel Coffee Buttercream Cake: A Heavenly Delight

Discover the ultimate dessert indulgence with our Irresistible Caramel Coffee Buttercream Cake recipe. Dive into the rich flavors of caramel and coffee fused into a moist cake, topped with a smooth and creamy buttercream that will leave you craving for more. This delectable treat is perfect for any occasion, guaranteed to enchant your taste buds.

Why You’ll Love This Recipe

This Irresistible Caramel Coffee Buttercream Cake is a dream for all dessert lovers. The combination of caramel and coffee provides a delightful balance of sweetness and bitterness, making it an unforgettable flavor experience. Moreover, this cake is perfect for celebrations, family gatherings, or as a sophisticated dessert at dinner parties.

The texture of this cake is another reason to love it. Each layer is perfectly moist, complemented by a buttery frosting that practically melts in your mouth. It’s a show-stopper that tastes as good as it looks.

Context/Background

The marriage of caramel and coffee has long been celebrated, particularly in European and Latin American dessert traditions. The caramel coffee buttercream cake is a modern take, inspired by classic flavors and contemporary pastry techniques. By incorporating buttercream, a staple in French patisserie, we elevate this cake to a level of gourmet indulgence that’s accessible to home bakers.

Recipe Details

Serves: 10
Prep Time: 25 minutes
Cook Time: 30 minutes
Total Time: 55 minutes

Ingredients

  • 1 cup unsalted butter, softened
  • 2 cups granulated sugar
  • 4 large eggs
  • 3 cups all-purpose flour
  • 1 tablespoon baking powder
  • 1/2 teaspoon salt
  • 1 cup whole milk
  • 2 teaspoons vanilla extract
  • 1 cup brewed coffee, cooled
  • 1 cup caramel sauce, divided
  • 3 cups powdered sugar
  • 2 tablespoons heavy cream

Directions

  1. Preheat your oven to 350°F (175°C). Grease and flour two 9-inch round cake pans.
  2. In a large bowl, cream together the butter and sugar until light and fluffy.
  3. Add the eggs one at a time, beating well after each addition. Stir in the vanilla.
  4. Combine the flour, baking powder, and salt; add to the creamed mixture alternately with the milk and coffee, beating well with each addition.
  5. Pour batter evenly into the prepared pans. Bake for 25-30 minutes, or until a toothpick inserted into the center comes out clean.
  6. Let cakes cool in the pans for 10 minutes, then turn out onto wire racks to cool completely.
  7. To make the buttercream, beat together remaining butter, powdered sugar, heavy cream, and 1/2 cup caramel sauce until smooth and fluffy.
  8. Assemble the cake by spreading a layer of caramel buttercream between the cakes. Frost the top and sides with the remaining buttercream.
  9. Drizzle the remaining caramel sauce over the top for decoration if desired.

Tips for Perfect Caramel Coffee Buttercream Cake

  • Make sure ingredients are at room temperature for better mixing.
  • Brew strong coffee to enhance the coffee flavor.
  • Use a serrated knife to level the cakes for even layering.
  • Chill the cake between frosting layers to keep the structure intact.

Serving Suggestions

Serve this Caramel Coffee Buttercream Cake with a hot cup of coffee or an espresso to complement the flavors. A scoop of vanilla ice cream on the side also adds a delightful touch.

Storage and Leftovers

Store the cake in an airtight container at room temperature for up to 3 days. For longer storage, refrigerate for up to a week. Bring to room temperature before serving to enjoy the buttercream’s full flavor.

Final Thoughts

This Irresistible Caramel Coffee Buttercream Cake is a must-try for those who appreciate the perfect blend of coffee and caramel. Easy to make, yet sophisticated in taste, this cake will surely become a favorite. Indulge in its luscious textures and flavors — a truly rewarding bake.

Recipe Notes

  • For a mocha twist, add 2 tablespoons of cocoa powder to the buttercream.
  • Substitute whole milk with almond milk for a lactose-free option.
  • Use store-bought caramel sauce for convenience, or make your own for a personal touch.

“`

Irresistible Lemon Custard Cake Recipe for Delightful Desserts

“`html

Lemon Custard Cake Recipe: A Delightful Citrus-Induced Treat

Experience the refreshing explosion of flavors with this Lemon Custard Cake recipe. It’s a perfect fusion of tangy lemon and creamy custard that will tantalize your taste buds and leave you craving for more. This easy-to-make dessert is not only a family favorite but also a showstopper at dinner parties.

Why You’ll Love This Lemon Custard Cake

This Lemon Custard Cake is the perfect combination of zesty and sweet, offering a refreshing dessert option for any occasion. The luscious, velvety texture of the custard complements the slightly crunchy cake layer. Whether you’re hosting a brunch or seeking a delightful dessert for a family gathering, this cake will leave an indelible mark on your guests.

The ease of preparation makes it a go-to recipe for anyone looking to impress without spending hours in the kitchen. The natural citrus aroma adds an uplifting essence to your meal, making it a feast for both the senses and the palate.

Context/Background

Lemon Custard Cake is derived from age-old European recipes celebrated for their simple yet effective techniques in dessert making. The custard cake’s roots trace back to traditional British and French recipes, which are known for their rich custard-based pastries. This modern twist brings a refreshing lemon flavor to the table, capturing the essence of sunny orchards.

Recipe Details

Serves: 8

Prep Time: 20 minutes

Cook Time: 45 minutes

Total Time: 1 hour 5 minutes

Ingredients

  • 1 cup all-purpose flour
  • 1 cup granulated sugar
  • 1/2 cup unsalted butter, melted
  • 4 large eggs, separated
  • 2 cups milk
  • 1 tablespoon lemon zest
  • 1/2 cup fresh lemon juice
  • 1/4 teaspoon salt
  • Powdered sugar for dusting

Directions

  1. Preheat the oven to 325°F (165°C). Grease a 9×9 inch baking dish.
  2. In a large bowl, beat the egg whites with a mixer until stiff peaks form. Set aside.
  3. In another bowl, whisk together the egg yolks and sugar until pale and creamy.
  4. Add melted butter and lemon zest to the yolk mixture and whisk to combine.
  5. Gradually add flour and salt to the yolk mixture, mixing until fully incorporated.
  6. Squeeze in the fresh lemon juice and beat until smooth.
  7. Gently fold in the beaten egg whites to the lemon mixture, being careful not to deflate them.
  8. Pour the batter into the prepared baking dish and bake for 45 minutes, or until the top is golden brown.
  9. Let the cake cool completely before dusting with powdered sugar.

Tips for Perfect Lemon Custard Cake

  • Ensure egg whites are beaten to stiff peaks for a fluffy texture.
  • Use fresh lemon juice for the best flavor and aroma.
  • Allow the cake to cool fully before cutting to maintain its structure.
  • For best results, use a glass baking dish to prevent uneven cooking.

Serving Suggestions

Serve the Lemon Custard Cake slightly chilled with a dollop of whipped cream or a scoop of vanilla ice cream. It also pairs well with afternoon tea or coffee.

Storage and Leftovers

Store leftover Lemon Custard Cake in an airtight container in the refrigerator for up to 3 days. Enjoy cold or bring to room temperature before serving.

Final Thoughts

This Lemon Custard Cake is a delightful treat that perfectly balances zest and sweetness. Its creamy custard layer and tangy lemon appeal make it an irresistible dessert that everyone will adore. Give this recipe a try and watch it become a new favorite in your dessert repertoire!

Recipe Notes

  • For a gluten-free version, substitute all-purpose flour with almond flour.
  • Adjust the sugar quantity if you prefer a less sweet dessert.
  • Garnish with lemon slices or mint leaves for an elegant presentation.

“`

Irresistible Lemon Cream Roll Cake: Zesty Glaze Delight Recipe

“`html

Luscious Lemon Cream Roll Cake Recipe: A Citrus Delight with Lemon Glaze

Experience the ultimate lemon indulgence with our Luscious Lemon Cream Roll Cake Recipe. This refreshing dessert features a soft, fluffy cake infused with zesty lemon cream and topped with a tangy lemon glaze. A must-try for any lemon lover, this cake packs a punch of flavor in every bite.

Why You’ll Love This Recipe

This Luscious Lemon Cream Roll Cake is a citrus lover’s dream. The balance of sweet, creamy filling and the tart lemon glaze creates an irresistible combination that tantalizes your taste buds. Perfect for a summer gathering or as a refreshing end to any meal, this dessert is sure to be a crowd-pleaser.

Aside from its vibrant flavor, the presentation of this roll cake makes it ideal for special occasions. Its elegant appearance will dazzle guests, making it a stunning centerpiece for any dessert table.

Unlike other complicated desserts, this recipe is straightforward and easy to follow, ensuring you achieve a professional finish every time.

Context/Background

Roll cakes, also known as Swiss roll cakes, have a long-standing tradition in European pastry-making. Their origins can be traced back to Central Europe, where they have been enjoyed for centuries. Known for their light and airy texture, roll cakes have evolved over time to incorporate various flavors and fillings.

Our Luscious Lemon version draws inspiration from classic lemon desserts while giving a modern twist with its creamy filling and glaze. Ideal for those looking to explore traditional recipes with a contemporary flair.

Recipe Details

Serves: 8-10

Prep Time: 20 minutes

Cook Time: 15 minutes

Total Time: 35 minutes

Ingredients

  • 1 cup all-purpose flour
  • 1 teaspoon baking powder
  • 1/4 teaspoon salt
  • 4 large eggs
  • 1 cup granulated sugar
  • 2 tablespoons vegetable oil
  • 1 teaspoon vanilla extract
  • 1/4 cup fresh lemon juice
  • Zest of 2 lemons
  • 1 cup heavy cream
  • 1/2 cup powdered sugar
  • For Glaze: 1 cup powdered sugar, 2 tablespoons lemon juice

Directions

  1. Preheat your oven to 350°F (175°C) and line a 15×10-inch baking sheet with parchment paper.
  2. In a medium bowl, whisk together flour, baking powder, and salt. Set aside.
  3. In a large bowl, beat eggs and granulated sugar until thick and pale. Gradually whisk in oil, vanilla extract, lemon juice, and zest.
  4. Gently fold in the dry ingredients until just combined. Pour batter evenly into the prepared baking sheet.
  5. Bake for 12-15 minutes, or until the cake springs back when lightly pressed. Remove from oven and let cool.
  6. For the filling, whip heavy cream and powdered sugar in a mixer until stiff peaks form.
  7. Once the cake is cool, spread the whipped cream evenly over the top. Carefully roll the cake from the short end, using the parchment paper to assist in the process.
  8. For the glaze, mix powdered sugar and lemon juice until smooth. Drizzle over the rolled cake.
  9. Refrigerate for at least one hour before serving.

Tips for Perfect Luscious Lemon Cream Roll Cake

  • Ensure eggs are at room temperature for better volume.
  • Roll the cake while it’s still slightly warm to prevent cracks.
  • Chill the whipped cream for a more stable filling.
  • Use a serrated knife when slicing for cleaner cuts.

Serving Suggestions

Serve slices of this lemon cream roll cake with a dollop of whipped cream or a scoop of vanilla ice cream. For added flair, garnish with fresh berries or a sprig of mint.

Storage and Leftovers

Store the cake in an airtight container in the refrigerator for up to three days. For longer storage, wrap the cake tightly and freeze for up to a month. Thaw in the refrigerator before serving.

Final Thoughts

Our Luscious Lemon Cream Roll Cake Recipe is a delightful blend of sweet and tart flavors that will brighten any occasion. Its irresistible taste and elegant presentation make it a must-try for bakers of all levels. Treat yourself and your loved ones to this citrusy delight today!

Recipe Notes

  • For a tangier filling, incorporate more lemon zest into the whipped cream.
  • Substitute lime juice and zest for a unique twist on this classic cake.
  • Consider adding a layer of lemon curd for extra lemony goodness.

“`

Indulge in Raspberry-Filled Almond Snow Cookies for Festive Treats

“`html

Raspberry-Filled Almond Snow Cookies: A Festive Delight

Indulge in the sweet and delightful Raspberry-Filled Almond Snow Cookies, a perfect treat for the holiday season or any special occasion. These cookies combine the rich, nutty flavor of almonds with the vibrant and tangy sweetness of raspberries. Whether you’re a seasoned baker or a novice in the kitchen, these cookies are both delicious and visually appealing, with a snowy finish that brings winter magic to your dessert table.

Why You’ll Love This Recipe

Raspberry-Filled Almond Snow Cookies are not only tasty but also versatile, making them a great addition to any dessert lineup. The combination of almond dough with a luscious raspberry filling creates a flavor profile that is both sophisticated and comforting. These cookies are perfect for holiday gatherings, tea parties, or as a sweet surprise during any celebration.

The crisp outer layer dusted with powdered sugar contrasts beautifully with the soft, gooey center. Their bite-sized form makes them easy to serve and enjoy, while their elegant appearance adds a touch of class to your dessert spread.

Context/Background

These delicate cookies draw inspiration from traditional European holiday treats, where fruit and nut combinations are a staple. Almonds have long been a favored ingredient in baking, beloved for their rich taste and texture. By incorporating raspberry jam into the center, these cookies pay homage to the classic Linzer cookie, offering a fruity burst with every bite.

Recipe Details

Serves: 24

Prep Time: 20 minutes

Cook Time: 15 minutes

Total Time: 35 minutes

Ingredients

  • 1 cup unsalted butter, softened
  • 1/2 cup granulated sugar
  • 1 teaspoon vanilla extract
  • 2 cups all-purpose flour
  • 1 cup almond flour
  • 1/2 cup raspberry jam
  • 1/4 cup powdered sugar, for dusting
  • 1/4 teaspoon salt

Directions

  1. Preheat your oven to 350°F (175°C) and line a baking sheet with parchment paper.
  2. Cream together the butter and granulated sugar until light and fluffy. Stir in the vanilla extract.
  3. Gradually add the all-purpose flour, almond flour, and salt, mixing until a soft dough forms.
  4. Roll the dough into 1-inch balls and place them on the prepared baking sheet. Using your thumb, make an indentation in the center of each ball.
  5. Fill each indentation with a small spoonful of raspberry jam.
  6. Bake in the preheated oven for 12-15 minutes, or until the edges are lightly golden.
  7. Allow cookies to cool on the baking sheet for 5 minutes before transferring to a wire rack.
  8. Once fully cooled, dust with powdered sugar before serving.

Tips for Perfect Raspberry-Filled Almond Snow Cookies

  • Ensure the butter is fully softened for easier creaming and a smoother dough.
  • Use a piping bag for the jam to easily fill the indentations without overfilling.
  • Chill the dough briefly if it’s too soft to hold its shape.
  • Adjust the sugar dusting based on the sweetness of your raspberry jam.

Serving Suggestions

Raspberry-Filled Almond Snow Cookies are best enjoyed fresh with a warm cup of tea or coffee. Pair them with a light dessert wine or a scoop of vanilla ice cream for an elevated dessert experience.

Storage and Leftovers

Store these cookies in an airtight container at room temperature for up to 5 days. They can also be frozen for up to a month; simply thaw at room temperature before serving. Avoid dusting with powdered sugar until you’re ready to serve, as it can absorb moisture if stored for a long time.

Final Thoughts

Raspberry-Filled Almond Snow Cookies are a delightful treat that brings together sweet and nutty flavors with a festive touch. Whether baking for a holiday gathering or simply indulging in a homemade sweet, these cookies are sure to impress with their unique taste and elegant presentation. Try this recipe today and add a little magic to your dessert collection!

Recipe Notes

  • For a nut-free version, substitute almond flour with additional all-purpose flour, though flavor will vary.
  • Experiment with different jams or preserves for an interesting twist on the original recipe.
  • The dough can be prepared a day in advance and stored in the refrigerator, just make sure to bring it to room temperature before shaping and baking.

“`

Deliciously Soft Christmas Peppermints: Easy Old-Fashioned Butter Mints Recipe

“`html

Soft Christmas Peppermints: A Sweet Holiday Treat

Whip up a batch of Soft Christmas Peppermints, also known as Old-Fashioned Butter Mints, to delight your taste buds this holiday season. These creamy, melt-in-your-mouth sweets are the perfect festive indulgence, bringing a nostalgic flair to any celebration. The rich buttery flavor coupled with a hint of peppermint is sure to evoke cherished childhood memories and spread holiday cheer.

Why You’ll Love This Recipe

These Soft Christmas Peppermints are incredibly easy to make and only require a few ingredients you might already have in your pantry. Their soft texture and classic peppermint flavor make them irresistible for both kids and adults alike. Serve these mints at holiday parties, include them in gift baskets, or enjoy them as an after-dinner treat.

Perfect for the Christmas season, these butter mints can be colored in festive hues to match any holiday decor. They are also gluten-free, allowing everyone to enjoy them without concern.

Context/Background

Old-Fashioned Butter Mints have a rich history as a traditional candy made primarily in the United States. Often made for weddings, baby showers, and holidays, their simplicity and delightful taste have made them a staple in many homes, especially during Christmas. This timeless recipe is a nod to simpler times, where home confectionery was a cherished holiday activity.

Recipe Details

Serves: 6-8

Prep Time: 20 minutes

Cook Time: 0 minutes (no cook)

Total Time: 2 hours (including chill time)

Ingredients

  • 1/2 cup unsalted butter, softened
  • 2 cups powdered sugar
  • 1 tablespoon heavy cream
  • 1 teaspoon peppermint extract
  • Food coloring (optional)

Directions

  1. In a large bowl, beat the softened butter using an electric mixer until light and fluffy.
  2. Gradually add the powdered sugar, beating until smooth.
  3. Mix in the heavy cream and peppermint extract until well combined.
  4. If desired, divide the mixture into separate bowls and add a few drops of food coloring to each, stirring until the color is evenly distributed.
  5. Transfer the mixture into a piping bag and pipe small mints onto a parchment-lined baking sheet.
  6. Allow the mints to dry at room temperature for at least 2 hours or until they harden.

Tips for Perfect Soft Christmas Peppermints

  • Ensure butter is softened to blend smoothly with sugar.
  • Avoid adding too much food coloring to prevent affecting the flavor.
  • Let the mints dry completely to achieve a melt-in-your-mouth texture.
  • Store mints in an airtight container to maintain freshness.

Serving Suggestions

Serve these Soft Christmas Peppermints at your holiday gatherings alongside other festive treats. They make a delightful addition to cookie platters and pair wonderfully with a warm cup of cocoa or eggnog. Also, consider wrapping them in decorative bags as thoughtful homemade gifts for friends and family.

Storage and Leftovers

Keep your soft peppermint butter mints in an airtight container at room temperature for up to two weeks. Ensure they are entirely dry before storing to prevent them from sticking together. If gifting, wrap them individually in wax paper or cellophane for easy handling and freshness.

Final Thoughts

These Soft Christmas Peppermints are a tradition worth continuing, offering a blend of ease and elegance. With their creamy texture and delightful flavor, they are sure to become a staple in your holiday baking repertoire. Whether sharing with loved ones or enjoying alone, these butter mints are a testament to the joy of holiday confections.

Recipe Notes

  • Substitute peppermint extract with vanilla extract for a different flavor profile.
  • Add a pinch of salt to enhance the sweetness.
  • Experiment with different food colorings to match various holiday themes.

“`