Decadent Raspberry Rose Chocolate Truffles: Elegant Homemade Treats You’ll Adore

“`html

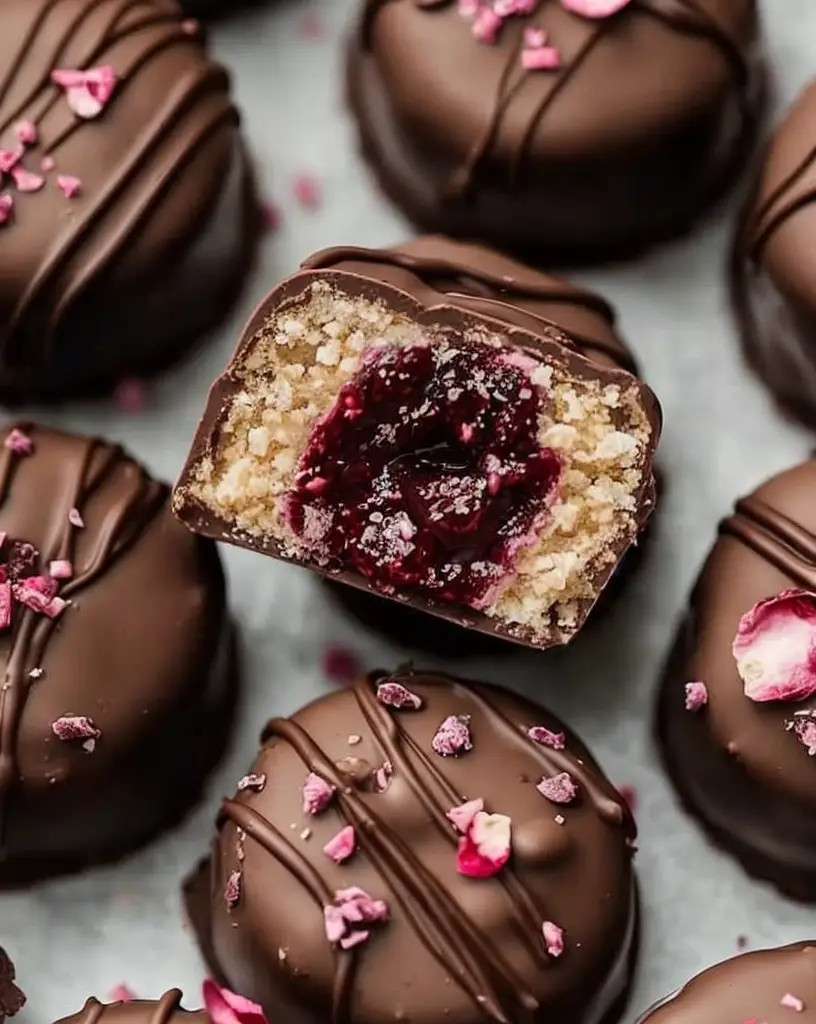
Raspberry Rose Chocolate Truffles Recipe 🍫💖 – Elegant Treats You’ll Love!

Indulge in the luxurious flavors of our Raspberry Rose Chocolate Truffles, where the tartness of raspberry meets the romantic essence of rose and rich chocolate. This elegant treat is perfect for special occasions or whenever you crave something extraordinary. Discover the delight these truffles bring to your taste buds.

Why You’ll Love This Raspberry Rose Chocolate Truffles Recipe

These Raspberry Rose Chocolate Truffles are a perfect balance of sweetness and elegance. The smooth and creamy texture of the chocolate perfectly complements the subtle floral notes of rose, while the raspberries add a fresh and fruity twist. Whether you’re hosting a dinner party, celebrating a romantic evening, or simply indulging in a self-care treat, these truffles make every moment special.

Not only do these truffles taste divine, but they also make an eye-catching addition to any dessert table. Their sophisticated flavor profile and beautiful presentation make them a delightful choice for gifting, impressing friends, or treating yourself to a gourmet experience at home.

Context/Background

Chocolate truffles have their origins in the kitchens of France, celebrated for their rich, decadent texture and intense chocolate flavor. Our version adds a modern twist with the infusion of raspberry and rose, a combination often found in fine patisseries across Europe. The floral and fruity elements bring a level of sophistication and freshness to the classic truffle.

The technique used in making these truffles involves careful blending of high-quality chocolate with cream, flavoring, and a touch of creativity. Mastering this recipe will provide you not only an indulgent treat but also a culinary skill to share and enjoy.

Recipe Details

Serves: 12

Prep Time: 20 minutes

Cook Time: 10 minutes

Total Time: 2 hours 30 minutes (includes chilling time)

Ingredients

  • 200g high-quality dark chocolate, chopped
  • 100ml heavy cream
  • 2 tablespoons raspberry preserves
  • 1 teaspoon rose water
  • 50g freeze-dried raspberries, crushed
  • Cocoa powder for dusting

Directions

  1. In a saucepan, heat the cream over low heat until it just begins to simmer. Remove from heat.
  2. Add the chopped dark chocolate to the cream, whisking until the chocolate is completely melted and the mixture is smooth.
  3. Stir in the raspberry preserves and rose water until fully incorporated.
  4. Let the mixture cool slightly, then refrigerate for about 1-2 hours until firm.
  5. Using a small scoop or spoon, form the chilled mixture into small balls.
  6. Roll each truffle in the crushed freeze-dried raspberries or cocoa powder to coat.
  7. Transfer the finished truffles to a lined tray and refrigerate until set.

Tips for Perfect Raspberry Rose Chocolate Truffles

  • Use the highest quality chocolate you can find for the best flavor and texture.
  • Be careful not to overheat the cream as it can affect the texture of the chocolate.
  • For a stronger rose flavor, adjust the amount of rose water cautiously; a little goes a long way.
  • Allow truffle mixture to chill adequately for easier shaping and handling.

Serving Suggestions

Serve these truffles at room temperature for the best flavor experience. Pair them with a glass of sparkling wine or a cup of aromatic tea to enhance their elegant taste. They also make a perfect accompaniment to a dessert platter featuring fresh berries and other delicate pastries.

Storage and Leftovers

Store the Raspberry Rose Chocolate Truffles in an airtight container in the refrigerator for up to two weeks. For maximum freshness, bring to room temperature before serving. These truffles can also be frozen for longer storage; simply thaw in the refrigerator before enjoying.

Final Thoughts

These Raspberry Rose Chocolate Truffles are a testament to how simple ingredients can create an extraordinary dessert. Their unique flavor profile and luxurious texture make them a treat worth trying, perfect for both seasoned chefs and kitchen newcomers. We hope you enjoy making and sharing these delightful truffles!

Recipe Notes

  • Substitute raspberry preserves with fresh raspberries for a more intense fruit flavor.
  • For a vegan version, use coconut cream and vegan chocolate.
  • Add a pinch of sea salt to the chocolate mixture for a salted truffle variation.

“`

Irresistible Pineapple Coconut Dream Cake Recipe for Dessert Lovers

“`html

Pineapple Coconut Dream Cake: A Tropical Delight

Experience the ultimate tropical indulgence with a Pineapple Coconut Dream Cake. This delectable cake brings together the sweet tanginess of pineapple with the creamy richness of coconut, creating a dessert that’s as much a feast for the palate as it is for the eyes. Whether you’re reminiscing about a tropical vacation or simply craving a unique dessert, this cake won’t disappoint!

Why You’ll Love This Pineapple Coconut Dream Cake

This Pineapple Coconut Dream Cake is the perfect dessert for those looking to escape to the tropics through their taste buds. Its moist and fluffy texture, combined with the fresh flavors of pineapple and coconut, makes it a standout at any gathering. Whether you’re celebrating a birthday, a special occasion, or just looking to treat yourself, this cake is sure to impress. Plus, it’s a breeze to prepare!

Another reason to love this cake is its versatility. You can dress it up with a tangy cream cheese frosting or keep it light with a simple dusting of grated coconut—it shines either way. The natural sweetness and tropical aroma make it an instant favorite for both kids and adults alike.

Context and Background

The combination of pineapple and coconut is a classic pairing in tropical desserts, often seen in dishes across the Caribbean and Pacific islands. The Pineapple Coconut Dream Cake draws inspiration from these vibrant regions, where the ingredients are staples in both traditional and modern culinary creations.

Historically, pineapples have symbolized hospitality and warmth, making this cake not only a delight to eat but also a meaningful offering at any social gathering. Meanwhile, coconut adds a unique texture and flavor, often used in festive and celebratory dishes in tropical cultures.

Recipe Details

Serves: 8-10
Prep Time: 20 minutes
Cook Time: 30 minutes
Total Time: 50 minutes

Ingredients

  • 1 cup all-purpose flour
  • 1 cup sugar
  • 1/2 cup unsalted butter, softened
  • 3 large eggs
  • 1 cup crushed pineapple, drained
  • 1 cup shredded coconut
  • 1 tsp baking powder
  • 1/2 tsp salt
  • 1/2 cup coconut milk
  • 1 tsp vanilla extract

Directions

  1. Preheat your oven to 350°F (175°C). Grease and flour a 9-inch round cake pan.
  2. In a large bowl, cream together the butter and sugar until light and fluffy.
  3. Add eggs one at a time, beating well after each addition.
  4. Stir in the vanilla extract, then add the flour, baking powder, and salt. Mix until just combined.
  5. Fold in the pineapple and coconut, followed by the coconut milk, mixing until smooth.
  6. Pour the batter into the prepared cake pan.
  7. Bake for 30 minutes or until a toothpick inserted into the center comes out clean.
  8. Allow the cake to cool in the pan for 10 minutes before transferring to a wire rack to cool completely.

Tips for Perfect Pineapple Coconut Dream Cake

  • Ensure all ingredients are at room temperature for a smoother batter and even baking.
  • Drain the crushed pineapple well to prevent excess moisture in the cake.
  • If you prefer a more pronounced coconut flavor, toast the shredded coconut before adding it to the batter.
  • For added texture, consider adding some chopped macadamia nuts to the mix.

Serving Suggestions

Serve your Pineapple Coconut Dream Cake topped with fresh whipped cream and a sprinkle of toasted coconut flakes for an extra touch of indulgence. Alternatively, add a scoop of vanilla ice cream on the side for a truly decadent treat.

Storage and Leftovers

Store any leftovers in an airtight container at room temperature for up to two days, or in the refrigerator for up to five days. For longer storage, wrap the cake tightly in plastic wrap and aluminum foil, then freeze for up to three months. Thaw in the refrigerator before serving.

Final Thoughts

If you’re in search of a dessert that exudes warmth and sunshine, look no further than the Pineapple Coconut Dream Cake. Not only is it a breeze to make, but it also transports you to a tropical paradise with every bite. So why wait? Gather your ingredients and get baking for a delightful treat you won’t soon forget!

Recipe Notes

  • For a tangier flavor, add some finely grated lime zest to the batter.
  • Substitute almond milk or regular milk for coconut milk if desired.
  • To make it gluten-free, replace all-purpose flour with a gluten-free flour blend.

“`

Indulge in Decadent Coffee Swirled Marbled Chocolate Cream Cheese Cookies

“`html

Coffee Swirled Marbled Chocolate Cream Cheese Cookies: A Decadent Treat

Get ready to indulge in the ultimate cookie experience with these Coffee Swirled Marbled Chocolate Cream Cheese Cookies. This flavorful blend of rich chocolate, creamy cheese, and a hint of coffee will mesmerize your taste buds and have you coming back for more.

Why You’ll Love This Recipe

These Coffee Swirled Marbled Chocolate Cream Cheese Cookies are a dream for any dessert lover. The cookies offer a delicious combination of flavors, with the boldness of coffee enhancing the richness of chocolate and cream cheese. They are perfect for any occasion, from a luxurious tea time snack to a charming gift for loved ones.

The marbled pattern not only makes these cookies visually stunning but also ensures a balanced taste in every bite. With each mouthful, you’ll discover a new layer of flavor, making them irresistible.

Easy to prepare yet looking sophisticated, these cookies are sure to impress guests and satisfy cravings for something sweet and caffeinated.

Context/Background

These cookies draw inspiration from the classic marbled cake, combining sweet and creamy elements with the vibrancy of coffee. This creative fusion of flavors originates from the desire to elevate the traditional chocolate cookie by adding an intriguing twist.

The technique of marbling is borrowed from pastry arts, bringing the best of both aesthetics and taste to your baking repertoire.

Recipe Details

Serves: 24 cookies

Prep Time: 15 minutes

Cook Time: 12 minutes

Total Time: 27 minutes

Ingredients

  • 1 cup all-purpose flour
  • 1/2 cup unsweetened cocoa powder
  • 1/2 teaspoon baking soda
  • 1/4 teaspoon salt
  • 1/2 cup unsalted butter, softened
  • 1/2 cup granulated sugar
  • 1/2 cup brown sugar
  • 1 teaspoon vanilla extract
  • 1 large egg
  • 4 ounces cream cheese, softened
  • 1/4 cup powdered sugar
  • 2 teaspoons instant coffee granules
  • 1 tablespoon hot water

Directions

  1. Preheat your oven to 350°F (175°C) and line baking sheets with parchment paper.
  2. In a bowl, whisk together flour, cocoa powder, baking soda, and salt.
  3. In a large mixing bowl, beat butter, granulated sugar, and brown sugar until fluffy. Mix in the egg and vanilla extract.
  4. Gradually add the flour mixture to the wet ingredients, mixing until combined.
  5. In a separate bowl, beat the cream cheese and powdered sugar until smooth. Dissolve instant coffee in hot water and stir it into the cream cheese mixture.
  6. Gently fold the cream cheese mixture into the chocolate cookie dough, creating a marbled effect by swirling with a spatula.
  7. Drop tablespoon-sized portions of the dough onto prepared baking sheets, spacing them about 2 inches apart.
  8. Bake for 10-12 minutes, or until the cookies are set. Allow to cool on the baking sheets for 5 minutes before transferring to wire racks.

Tips for Perfect Coffee Swirled Marbled Chocolate Cream Cheese Cookies

  • Ensure cream cheese is at room temperature for easy blending.
  • Do not overmix to maintain distinct marbling.
  • Chill the dough if it becomes too sticky to handle.
  • Use a cookie scoop for evenly-sized cookies.

Serving Suggestions

These cookies pair well with a tall glass of milk or a hot cup of brewed coffee. Enjoy them as a delightful dessert after dinner or a satisfying snack between meals.

Storage and Leftovers

Store cookies in an airtight container at room temperature for up to a week. For longer storage, freeze the cookies in a single layer wrapped in parchment paper and then in a plastic bag.

Final Thoughts

If you’re searching for a cookie that combines rich flavors with an elegant presentation, look no further than Coffee Swirled Marbled Chocolate Cream Cheese Cookies. Their unique taste profile and beautiful marbled appearance make them a must-try for any cookie aficionado.

Recipe Notes

  • For an extra coffee kick, add another teaspoon of instant coffee to the cream cheese mixture.
  • Try substituting half of the cocoa powder with dark cocoa for a deeper chocolate flavor.
  • Experiment with adding chopped nuts or chocolate chips for added texture.

“`

Indulge in Irresistible Peppermint Chocolate Chunk Cookies This Holiday Season

“`html

Peppermint Chocolate Chunk Cookies: A Minty Delight for Cookie Lovers

Experience the ultimate holiday treat with these Peppermint Chocolate Chunk Cookies. Combining the rich, indulgent flavors of dark chocolate with the refreshing zing of peppermint, these cookies are a delightful twist on the classic chocolate chip cookie. Perfect for your festive gatherings or a cozy night in with a cup of hot cocoa.

Why You’ll Love This Recipe

These Peppermint Chocolate Chunk Cookies are a holiday season favorite for a reason. The combination of creamy chocolate and cool peppermint makes them a refreshing yet indulgent dessert. The chunks of chocolate are melty and smooth, creating a decadent texture that pairs perfectly with the crisp hint of peppermint.

Not only are they delicious, but they’re also incredibly easy to make. Whether you’re a seasoned baker or a beginner, you’ll find these cookies straightforward and foolproof. They’re ideal for baking in large batches for parties or for giving as homemade gifts during the holidays.

Perfectly festive and bursting with seasonal flavors, these cookies will quickly become a staple in your holiday baking lineup.

Context/Background

Peppermint and chocolate is a classic combination that gains popularity during the holiday season. Peppermint adds a refreshing twist to the rich and creamy chocolate, a duo that has been enjoyed in various desserts for centuries. The tradition of combining mint and chocolate dates back to the late 19th century, with peppermint candies and chocolate treats becoming a staple in Christmas celebrations.

These cookies are influenced by this cherished flavor profile, capturing the spirit of festive gatherings and making them a nostalgic treat for many.

Recipe Details

Serves: 24 cookies

Prep Time: 15 minutes

Cook Time: 10 minutes

Total Time: 25 minutes

Ingredients

  • 1 cup unsalted butter, softened
  • 1 cup granulated sugar
  • 1 cup brown sugar, packed
  • 2 large eggs
  • 1 teaspoon vanilla extract
  • 1 teaspoon peppermint extract
  • 3 cups all-purpose flour
  • 1 teaspoon baking soda
  • 1/2 teaspoon salt
  • 2 cups semi-sweet chocolate chunks

Directions

  1. Preheat your oven to 350°F (175°C) and line two baking sheets with parchment paper.
  2. In a large mixing bowl, cream together the butter, granulated sugar, and brown sugar until light and fluffy.
  3. Add the eggs one at a time, beating well after each addition. Stir in the vanilla and peppermint extracts.
  4. In a separate bowl, whisk together the flour, baking soda, and salt. Gradually add the dry ingredients to the wet ingredients, mixing until just combined.
  5. Fold in the chocolate chunks.
  6. Scoop tablespoon-sized dough balls onto the prepared baking sheets, spacing them about 2 inches apart.
  7. Bake for 10-12 minutes or until the edges are golden brown and the centers are set.
  8. Allow to cool on the baking sheets for 5 minutes before transferring to a wire rack to cool completely.

Tips for Perfect Peppermint Chocolate Chunk Cookies

  • Use room-temperature butter for a smoother batter and better cookie texture.
  • Chill the dough for an hour if softer cookies are desired.
  • Sprinkle some crushed peppermint candy on top for extra festive flair.
  • Avoid overbaking to ensure the cookies remain chewy in the center.

Serving Suggestions

These cookies are a perfect pairing with a mug of steaming hot cocoa or a glass of cold milk. For a gourmet touch, serve warm cookies with a scoop of vanilla ice cream.

Storage and Leftovers

Store any leftover cookies in an airtight container at room temperature for up to one week. You can also freeze the dough balls and bake directly from frozen, adding an extra minute or two to the bake time.

Final Thoughts

These Peppermint Chocolate Chunk Cookies are a festive treat that will add cheer to any holiday event or quiet evening at home. Their unique flavor profile and classic appeal make them a beloved choice for anyone with a sweet tooth. Try them out this holiday season, and watch as they quickly disappear from the cookie jar!

Recipe Notes

  • For a nutty twist, add half a cup of chopped walnuts to the dough.
  • If you prefer a softer peppermint flavor, reduce the peppermint extract to half a teaspoon.
  • Experiment with dark chocolate chunks for a more intense chocolate experience.

“`

Master Pinterest: Tips to Discover and Save Perfect Pins

“`html
Jump to Recipe

Sweet and Spicy Chicken Stir-Fry: A Vibrant Asian-Inspired Delight

Imagine tender, juicy chicken pieces bathed in a luscious blend of sweet and spicy flavors, paired with vibrant, crispy vegetables, and crunchy cashews. This Sweet and Spicy Chicken Stir-Fry tantalizes your taste buds with every bite, offering a symphony of textures and a burst of flavors that’s both comforting and exhilarating. A dish that’s easy to prepare and promises to be the star of your dinner table, inviting you to savor the harmonious balance of Eastern culinary artistry in every forkful.

Why You’ll Love This Recipe

Dive into a world of culinary delight with our Sweet and Spicy Chicken Stir-Fry. This Asian-inspired dish captivates with its rich, tangy, and sweet flavors, ensuring every meal becomes an experience to remember. It’s perfect for busy weeknights when you crave something healthy, hearty, and fast. The medley of chicken, broccoli, and red bell pepper offers not only visual appeal but also a nutritional punch, making it a hit for both the cook and diners who adore a balanced plate. Unleash your creative culinary spirit as you transform simple ingredients into a masterpiece of flavors.

Personal Story/Connection

This recipe holds a dear place in my heart, reminding me of the joyful summer evenings when my family would gather around our backyard grill. It was on those evenings, amidst laughter and stories, that I first experimented with a sweet and spicy marinade, striving to recreate the enchanting taste of a dish I had savored at a local Asian eatery. Watching my family relish each bite, the recipe evolved into more than just a meal—it became a tradition, sparking joy and connection with each cherished gathering.

Context/Background

The art of stir-frying, a quick cooking technique that seals in flavors while preserving nutrients, hails from ancient China. Traditionally, this method was employed to maximize fuel efficiency while harnessing intense heat to create delectable dishes. Over time, stir-frying transcended cultural boundaries, infusing global kitchens with its dynamic sensibilities. Today, it’s cherished worldwide for its adaptability and capacity to transform humble ingredients into sensational culinary creations, celebrating the simplicity and diversity of flavors.

Tips for Perfect Sweet and Spicy Chicken Stir-Fry

  • Ensure the chicken is well-marinated to infuse maximum flavor.
  • Stir-fry vegetables on high heat for a perfect tender-crisp texture.
  • Use fresh garlic for a more robust flavor profile.
  • Experiment with the marinade by adjusting spice levels or adding ginger.
  • Utilize a cast-iron skillet for even heating and flavor enhancement.
  • Toast the cashews beforehand for added depth and aroma.

Serving Suggestions

To elevate this delectable dish, present it over a bed of perfectly steamed jasmine rice—a classic that complements the stir-fry’s rich flavors. For a touch of elegance, garnish with thinly sliced green onions and a sprinkle of sesame seeds, adding both flair and flavor. During festive occasions, serve alongside a refreshing cucumber salad or vibrant pickled vegetables to offer a contrast of textures and a cooling sensation to balance the dish’s warmth.

Storage and Leftovers

Store any leftovers in an airtight container in your refrigerator, where they can be savored for up to three days. For reheating, gently warm it over a stovetop to maintain the dish’s texture and aromas. Get creative with leftovers by rolling them into rice paper wraps for a delightful lunch or tossing them into a salad for a quick, nutritious dinner.

Recipe Variations and Substitutions

  • For a vegetarian version, substitute the chicken with firm tofu or tempeh.
  • Add variety by incorporating seasonal vegetables such as snap peas or carrot slices.
  • Enhance the nutty flavor by including toasted sesame seeds alongside cashews.
  • For a gluten-free option, replace soy sauce with tamari or coconut aminos.

FAQ

  • Can I make this ahead of time? Yes, the marinade can be prepared and refrigerated a day in advance. Cooked stir-fry can also be stored and reheated when needed.
  • What substitutions can I use for soy sauce? Tamari or coconut aminos are excellent gluten-free alternatives without compromising on flavor.
  • How do I make this gluten-free or vegan? Use gluten-free soy sauce and replace chicken with tofu or tempeh for a vegan variety.

Final Thoughts

This Sweet and Spicy Chicken Stir-Fry not only promises to be a delightful addition to your meal repertoire but also offers a canvas for culinary creativity and exploration. Its enticing flavors and vibrant colors not only elevate your dining experience but also add a heartwarming touch to every shared occasion. Try it, and let it become a new tradition in your kitchen that brings joy and satisfaction with every mouthful. We’d love to hear your experiences and any personal twists you bring to this cherished recipe. Happy cooking!

Recipe Section

Serves: 4
Prep Time: 15 minutes
Cook Time: 15 minutes
Total Time: 30 minutes

  • 1 lb boneless, skinless chicken breasts
  • 1/4 cup soy sauce
  • 2 tbsp honey
  • 1 tbsp sriracha
  • 1 tbsp minced garlic
  • 1 tbsp sesame oil
  • 2 cups broccoli florets
  • 1 red bell pepper, sliced
  • 1/4 cup cashews
  • Cooked white rice, for serving
  • Green onions, for garnish
  1. In a bowl, whisk together soy sauce, honey, sriracha, garlic, and sesame oil.
  2. Cut chicken into bite-sized pieces and place in a shallow dish. Pour the marinade over the chicken and let it marinate for at least 30 minutes.
  3. Heat a large skillet over medium-high heat and add marinated chicken. Cook until no longer pink.
  4. Add broccoli, bell pepper, and cashews to the skillet. Cook until vegetables are tender-crisp.
  5. Serve the chicken stir-fry over cooked white rice and garnish with green onions.
  6. Enjoy this flavorful and colorful dish inspired by Pinterest!

“`

Top Tips for Discovering and Saving Pins on Pinterest

“`html
Jump to Recipe

Ultimate Chicken Stir-Fry: A Flavorful Weeknight Delight

Imagine the sizzle of tender chicken breast hitting a hot skillet, the sweet aroma of honey mingling with savory soy sauce, and the vibrant colors of fresh bell peppers coming to life. This Ultimate Chicken Stir-Fry is a feast for the senses, delivering a harmonious blend of flavors and textures with every bite. It’s a dish that’s as colorful as it is delicious, making it a must-try for anyone looking to spice up their weeknight dinners.

Why You’ll Love This Recipe

This chicken stir-fry is not just about good looks—it’s the perfect blend of convenience, nutrition, and taste. Quick and easy to prepare, this dish fits effortlessly into busy schedules without compromising on flavor. The combination of honey-sweetened soy sauce with the kick of fresh ginger and red pepper flakes creates a deliciously balanced sauce that complements the crisp-tender vegetables and juicy chicken.

Not only is this recipe versatile, but it also allows for endless customization. Whether you want to adjust the heat level or swap out ingredients based on what’s in your fridge, this dish is forgiving yet delicious every single time. And if health is a priority, rejoice in the nutrient-rich bell peppers and lean chicken, which offer a satisfying meal without guilt.

Personal Story/Connection

Growing up, stir-fries were a staple in our household—a quick, delicious way to use up any vegetables we had on hand. This Ultimate Chicken Stir-Fry reminds me of family dinners, bursting with vibrant colors and laughter echoing through the kitchen. It’s become a favorite go-to recipe that pleases everyone from picky teens to adventurous eaters, perfect for bringing people together around the table.

Context/Background

The art of stir-frying originated in China and quickly spread throughout Asia, becoming a popular technique for its quick cooking time and ability to preserve flavors. Traditionally cooked in a wok, stir-frying allows for high-temperature cooking that hugs the ingredients in aromatic spices while keeping their intrinsic flavors intact. This method has evolved in many households and cultures, offering a canvas for creativity and adaptation.

Today, stir-fries are enjoyed globally, appreciated for their simplicity, and efficiency, and enjoyed across kitchens of every proficiency level. This recipe draws inspiration from those classic techniques, emphasizing fresh ingredients and bold taste.

Tips for Perfect Chicken Stir-Fry

  • Marinate right: Ensure the chicken absorbs maximum flavor by letting it marinate for at least 30 minutes.
  • High heat: A hot skillet prevents the chicken and vegetables from becoming soggy, resulting in perfectly tender textures.
  • Don’t overcrowd: Cook in batches if necessary to ensure even cooking and to avoid steaming the ingredients.
  • Customize your veggies: Feel free to swap or include additional vegetables like broccoli or snap peas.
  • Balance flavors: Adjust sweetness and spiciness to your taste by adding more honey or chili flakes.
  • Use fresh ingredients: Fresh garlic and ginger are key to achieving deep flavors in the dish.

Serving Suggestions

While this stir-fry is delicious on its own, serving it over a bed of fluffy white rice transforms it into a satisfying meal. For a healthier twist, consider pairing it with quinoa or cauliflower rice. Sprinkle fresh green onions on top for an added pop of color and freshness.

This dish is perfect for any occasion, whether you’re hosting a casual family dinner or looking for a quick weekday night solution. Pair it with a side of spring rolls or miso soup for an Asian-inspired feast that’s bound to impress your guests.

Storage and Leftovers

Leftovers can be stored in an airtight container in the refrigerator for up to 3 days. When reheating, use a skillet over medium heat to bring back the flavors without drying out the chicken. This stir-fry also shines as a lunch option; simply reheat it in a microwave and enjoy it with a side salad for a quick and nutritious meal.

Transform leftovers into a fresh wrap by adding the stir-fry to a tortilla with lettuce and cucumber slices, making for a delightful next-day meal!

Recipe Variations and Substitutions

For those following a gluten-free diet, tamari or a gluten-free soy sauce alternative can replace standard soy sauce. Vegans can swap the chicken for tofu or tempeh for a plant-based twist, or try using a variety of colorful vegetables to keep the dish visually appealing.

Looking for seasonality? Incorporate what’s fresh at the market, such as asparagus in spring or zucchini in summer. The recipe welcomes creativity; don’t hesitate to experiment with herbs like cilantro or basil for added flair.

FAQ

  • Can I make this ahead of time? Yes, prepare the chicken and vegetables ahead, but cook them just before serving to preserve crisp textures.
  • What substitutions can I use for honey? Maple syrup or agave nectar can substitute if you prefer alternative sweeteners.
  • How do I make this gluten-free or vegan? Use tamari for a gluten-free option and tofu for a vegan version.

Optional Nutritional Information

  • Serves: 4
  • Calories: Approximately 400 per serving
  • Protein: 30g
  • Carbohydrates: 40g
  • Fat: 12g

Final Thoughts

Our Ultimate Chicken Stir-Fry is more than a meal—it’s an invitation to explore bold flavors and enjoy the innovation that comes with cooking. Easy enough for beginners yet sophisticated enough to impress, this recipe is your ticket to a deliciously satisfying dining experience. Don’t forget to share your creations and delight in the reactions of your loved ones.

Recipe Section

Serves: 4 | Prep Time: 40 minutes | Cook Time: 20 minutes | Total Time: 1 hour

  • 1 lb boneless, skinless chicken breasts
  • 1/4 cup soy sauce (use tamari for gluten-free)
  • 2 tbsp honey
  • 2 cloves garlic, minced
  • 1 tsp fresh ginger, grated
  • 1/2 tsp red pepper flakes
  • 1 tbsp vegetable oil
  • 1 red bell pepper, sliced
  • 1 yellow bell pepper, sliced
  • 1 green bell pepper, sliced
  • 1 onion, sliced
  • Salt and pepper, to taste
  • Cooked white rice, for serving
  • Green onions, sliced for garnish
  1. In a small bowl, whisk together the soy sauce, honey, garlic, ginger, and red pepper flakes. Pour the marinade over the chicken breasts and refrigerate for at least 30 minutes.
  2. In a large skillet, heat the vegetable oil over medium-high heat. Add the marinated chicken breasts and cook until browned on both sides and cooked through. Remove from the skillet and set aside.
  3. In the same skillet, add the sliced bell peppers and onion. Season with salt and pepper. Cook until the vegetables are tender-crisp.
  4. Slice the cooked chicken breasts and return them to the skillet with the vegetables. Stir to combine and heat through.
  5. Serve the stir-fry over cooked white rice and garnish with sliced green onions.
  6. Enjoy this flavorful and colorful dish that you can easily save on Pinterest!

“`

Unlock the Secret to Saving Pins on Pinterest Effortlessly

“`html
Jump to Recipe

Grilled Cheesy Barbecue Chicken: A Smoky Delight Worth Every Bite

Imagine biting into a tender, juicy chicken breast that’s been lovingly grilled to perfection, its smoky flavor complemented by the sweetness of barbecue sauce and crowned with a generous layer of melted cheddar. This Grilled Cheesy Barbecue Chicken is not just a meal; it’s an experience filled with savory satisfaction and creamy, cheesy goodness. The aroma of the smoky paprika melds with the pleasing char of grilled chicken, creating a mouthwatering allure that’s perfect for any occasion.

Why You’ll Love This Recipe

This recipe is a crowd-pleaser, perfect for summer cookouts, family dinners, or when you’re simply in the mood for something incredibly satisfying. It’s remarkably easy to prepare, making it accessible even to novice cooks. This dish’s flavor profile is versatile, appealing to a wide range of palates with the comforting combination of barbecue and cheese. Beyond its taste, the Grilled Cheesy Barbecue Chicken holds the secret to a healthier lifestyle, using lean chicken breast and wholesome ingredients like olive oil.

The emotional comfort this dish provides is unparalleled. It evokes memories of joyful family gatherings and long summer evenings. It’s a recipe that invites creativity, allowing you to add your own twist with different spice blends or topping it with your favorite cheese variety.

Personal Story/Connection

This recipe brings back fond memories of warm summer days spent with family. Growing up, weekends were often marked by the smell of grilled chicken wafting through the backyard. My mom would prepare her special barbecue sauce, and we’d eagerly anticipate the moment the gooey, melted cheese touched our plates. It’s more than just food; it’s a reminder of sun-drenched days and shared laughter, a tradition I now pass on to my own children.

Context/Background

Grilled chicken recipes have been a staple in American cuisine, especially in regions known for their barbecue traditions. This adaptation brings a unique twist with the addition of cheddar cheese, offering a nod to dishes that combine rich flavors with simplicity in preparation. Historically, the combination of smoky and sweet flavors has been associated with comfort and indulgence, a tradition that continues to bring people together around the grill.

This recipe captures the essence of American summer cuisine, where creativity knows no bounds, and flavors are deeply celebrated.

Tips for Perfect Grilled Cheesy Barbecue Chicken

  • To ensure chicken remains juicy, use a meat thermometer to check that the internal temperature reaches 165°F.
  • Let the chicken rest for a few minutes after grilling before slicing to retain juices.
  • Experiment with different types of barbecue sauce for varied flavor profiles.
  • If you prefer a smokier taste, add a touch of liquid smoke to the marinade.
  • For a spicy kick, sprinkle some cayenne pepper into the oil mixture.

Serving Suggestions

Serve this delicious dish alongside a fresh green salad or coleslaw to balance the rich flavors. For a more adventurous pairing, consider a side of grilled corn on the cob, seasoned with lime juice and cilantro. This chicken dish pairs beautifully with both casual and formal settings, making it suitable for barbecue weekends or celebratory dinners.

Consider garnishing with additional toppings like crispy bacon bits or jalapeños for an extra flavor dimension. When presenting at gatherings, arrange the chicken on a platter with a bed of leafy greens for a stunning visual impact.

Storage and Leftovers

To store leftovers, place them in an airtight container and refrigerate for up to three days. When reheating, ensure the cheese is melted gradually by using a low heat setting on your stovetop or microwave.

Leftover chicken can be repurposed into wraps or sandwiches the next day. Simply slice the chicken and layer it with fresh vegetables in a tortilla or between slices of hearty bread for a quick, delicious meal.

Recipe Variations and Substitutions

  • For a gluten-free option, ensure your barbecue sauce is gluten-free or make your own at home.
  • Swap cheddar cheese with mozzarella or pepper jack for varying the taste and spice level.
  • For a vegetarian twist, replace chicken with large portobello mushrooms, brushing with the same oil mixture.
  • Adjust the sweetness of the recipe by experimenting with honey barbecue sauce or tangy mustard-based alternatives.

FAQ

Can I make this ahead of time? Yes, you can marinate the chicken in the olive oil mixture up to 24 hours in advance for a deeper flavor. Grill right before serving to ensure freshness.

What substitutions can I use for olive oil? You can use avocado oil or sunflower oil if you prefer. Both provide a mild flavor that complements the chicken well.

How do I make this gluten-free or vegan? Use gluten-free barbecue sauce and dairy-free cheddar cheese alternative for a vegan twist.

Optional Nutritional Information

  • Calories: Approximately 450 per serving
  • Protein: 42g
  • Carbohydrates: 8g
  • Fat: 28g

Final Thoughts

This Grilled Cheesy Barbecue Chicken is more than just a dish; it’s a bridge between traditional flavors and personal creativity. It’s easy to make, a joy to eat, and it will no doubt become a beloved favorite in your household. I invite you to share your experiences or ask any questions you may have—I love hearing how others bring this delightful dish to life in their kitchens.

Recipe Section (Final Element)

Serves: 4 | Prep Time: 10 mins | Cook Time: 15 mins | Total Time: 25 mins

  • 1 lb boneless, skinless chicken breasts
  • 1/4 cup olive oil
  • 1 tsp garlic powder
  • 1 tsp onion powder
  • 1 tsp paprika
  • Salt and pepper, to taste
  • 1 cup barbecue sauce
  • 1 cup shredded cheddar cheese
  • Green onions, sliced (for garnish)
  1. Preheat the grill to medium-high heat.
  2. In a small bowl, mix together the olive oil, garlic powder, onion powder, paprika, salt, and pepper.
  3. Brush the chicken breasts with the olive oil mixture.
  4. Grill the chicken for 5-7 minutes on each side, or until fully cooked through.
  5. Brush the chicken with barbecue sauce and top with shredded cheddar cheese.
  6. Continue grilling for another 2-3 minutes, or until the cheese is melted and bubbly.
  7. Remove from the grill and let it rest for a few minutes before slicing.
  8. Garnish with sliced green onions and serve hot.
  9. Enjoy your delicious and flavorful barbecue chicken!

#GrilledChicken #Barbecue #CheesyGoodness #EasyRecipes

“`

How to Discover and Save Your Own Pins on Pinterest

“`html
Jump to Recipe

Chicken Stir-Fry: A Burst of Flavor in Every Bite

Picture this: sizzling chicken pieces, vibrant veggies, sweet pineapple, and the subtle crunch of cashews come together in a savory stir-fry that dances on your taste buds. This Chicken Stir-Fry is a delightful blend of flavors and textures, making for a meal that’s as visually appealing as it is delicious. Perfect for a quick weeknight dinner, this dish combines healthful ingredients with the convenience of a one-pan meal.

Why You’ll Love This Recipe

This Chicken Stir-Fry is not just another dinner option—it’s an experience. It’s incredibly versatile, allowing you to adjust the ingredients to fit your taste and dietary needs. With a harmonious blend of sweet, savory, and umami flavors, it’s bound to evoke pleasant emotions and memories of shared meals with loved ones.

Health-conscious cooks will appreciate its low-fat content and nutrient-rich vegetables. It’s also a great way to introduce vibrant, fresh flavors into your meal rotation. Additionally, the ease of preparation makes it ideal for busy individuals seeking a flavorful but straightforward meal.

The colorful mix of carrots, snap peas, and bell peppers ensures you’re cooking with a variety of nutrients, while pineapple adds a sweet twist that kids and adults alike will enjoy. Whether serving at a family gathering or a quiet dinner at home, this dish is sure to captivate your palate.

Personal Story/Connection

Growing up, stir-fries were a staple in my household. The vibrant scent of garlic and ginger sizzling in sesame oil would fill the air, signaling that dinner was almost ready. This Chicken Stir-Fry recipe, inspired by those cherished family meals, brings me back to simpler times when meals were moments of pure joy shared with my family. Even now, preparing this dish feels like a comforting ritual, a way to connect with my roots and share that comfort with my loved ones.

Context/Background

Stir-frying, a key cooking technique of Chinese origin, has been adopted worldwide for its efficiency and flavorful results. Over the years, stir-fries have evolved to incorporate local ingredients, providing a canvas for culinary creativity. This Chicken Stir-Fry exemplifies this evolution, blending Eastern techniques with Western flavors to create a dish that’s uniquely delicious.

Originally a method to make quick work of cooking small pieces of food over high heat, stir-frying today offers limitless possibilities for flavor combinations and adaptations. This rich culinary history has birthed endless variations, yet the core principle remains centered around fresh ingredients and balanced tastes.

Tips for Perfect Chicken Stir-Fry

  • For even cooking, cut chicken into uniform, bite-sized pieces.
  • Allow the chicken to marinate for at least 30 minutes to maximize flavor absorption.
  • Ensure your skillet is hot before adding chicken to achieve a nice sear.
  • Stir fry veggies until tender-crisp to maintain their nutritional value and color.
  • Add cashews at the end to preserve their crunch and enhance the dish’s texture.
  • If using lower-sodium soy sauce, adjust the seasoning accordingly to suit your taste.

Serving Suggestions

Serve this Chicken Stir-Fry proudly atop a bed of hot, steamed jasmine rice for a traditional touch. For a healthier option, swap in brown rice or quinoa. This dish also pairs beautifully with a side of fresh salad or steamed dumplings for a more elaborate meal.

If you’re entertaining, consider serving the stir-fry buffet-style alongside other Asian-inspired dishes like spring rolls and miso soup. Alternatively, create a stir-fry bar with a selection of toppings and sauces, allowing guests to customize their experience.

For a more casual setting, simply serve the stir-fry in a beautiful large dish, allowing everyone to help themselves at the table. Don’t forget to garnish with fresh herbs like cilantro or scallions for an added burst of flavor.

Storage and Leftovers

Leftovers can be stored in an airtight container in the refrigerator for up to three days. When reheating, use a skillet or microwave until heated through. Be careful not to overcook, as this can lead to rubbery chicken.

Repurpose leftovers into a completely new meal by turning them into a stir-fry wrap. Simply add the mixture to a tortilla with some lettuce and enjoy a delicious wrap on-the-go.

You can also chop up any remaining stir-fry and use it as a tasty filling for a homemade fried rice dish, incorporating fresh eggs and additional veggies for variety.

Recipe Variations and Substitutions

To make this recipe gluten-free, substitute tamari for soy sauce. If you’re looking for a vegetarian option, swap the chicken for tofu or tempeh. For a low-carb twist, replace white rice with cauliflower rice.

Switch things up based on seasonal produce—try zucchini or asparagus in the spring, or add pumpkin and broccoli in the fall. For a spicier version, include a dash of chili flakes or serve with a side of kimchi.

Experiment with flavor profiles by adding a splash of coconut milk for a creamy twist or sprinkling some sesame seeds for an extra nutty flavor.

FAQ

Can I make this ahead of time?

Yes, you can prep the ingredients and marinade the chicken in advance. For best results, stir-fry just before serving to retain freshness.

What substitutions can I use for chicken?

Feel free to substitute chicken with options like tofu, tempeh, or shrimp for a different protein source.

How do I make this gluten-free?

Replace soy sauce with tamari or any gluten-free soy sauce alternative, and ensure any other ingredients you use are gluten-free.

Optional Nutritional Information

  • Calories: Approximately 450 per serving
  • Protein: 30g
  • Carbohydrates: 55g
  • Fat: 12g
  • Fiber: 4g

Final Thoughts

This Chicken Stir-Fry is more than just a meal—it’s a gateway to a world of flavors and a reflection of cherished memories. With its vibrant ingredients and easy preparation, it’s sure to become a beloved addition to your culinary repertoire. Give it a try and watch it become a staple at your dinner table. We invite you to share your variations and thoughts below!

Recipe Section

Serves: 4 | Prep Time: 35 minutes | Cook Time: 15 minutes | Total Time: 50 minutes

  • 1 lb boneless, skinless chicken breasts
  • 1/4 cup soy sauce
  • 2 tbsp honey
  • 1 tbsp sesame oil
  • 1 tsp minced garlic
  • 1 tsp grated ginger
  • 1/2 cup sliced carrots
  • 1/2 cup snap peas
  • 1/2 cup sliced bell peppers
  • 1/2 cup sliced pineapple
  • 1/4 cup cashews
  • Cooked white rice
  1. In a bowl, mix together soy sauce, honey, sesame oil, minced garlic, and grated ginger.
  2. Cut chicken breasts into bite-sized pieces and marinate in the sauce for at least 30 minutes.
  3. Heat a large skillet over medium-high heat and add the marinated chicken. Cook until no longer pink.
  4. Add carrots, snap peas, bell peppers, and pineapple to the skillet. Stir fry until veggies are tender-crisp.
  5. Toss in cashews and cook for an additional minute.
  6. Serve the chicken stir-fry over cooked white rice.
  7. Enjoy this flavorful and colorful meal!

“`

How to Save and Discover Unique Pins on Pinterest

“`html
Jump to Recipe

Walking Taco Bake: A Cheesy Delight for Every Occasion

Imagine the satisfying crunch of Chili cheese Fritos combined with savory, well-seasoned ground beef, all crowned with a golden, bubbly layer of mozzarella cheese. Welcome to the ultimate comfort food: Walking Taco Bake. This dish is an exciting twist on traditional tacos, transforming everyday ingredients into a mouthwatering, cheesy casserole that’s sure to be a crowd-pleaser. Perfect for Taco Night, this bake is a symphony of flavors and textures, making it a must-try.

Why You’ll Love This Recipe

This Walking Taco Bake is a delightful twist on the classic taco, bringing together the fun of a taco night with the ease and simplicity of a casserole. It’s versatile enough to serve on diverse occasions, whether it’s a quick family dinner or a gathering with friends. The recipe is straightforward, using pantry staples that you likely already have, and it’s incredibly forgiving – perfect for cooks of all levels.

The convenience of this recipe cannot be overstated. It’s a one-dish wonder that reduces cleanup time, which is always a bonus. The hearty ingredients provide a filling meal that satisfies both kids and adults alike. Plus, who can resist the appeal of gooey melted cheese?

Beyond its simplicity and great taste, the dish also evokes nostalgia for many, often reminding us of childhood meals shared with family. It’s comfort food at its finest, guaranteed to warm your heart as well as your stomach.

Personal Story/Connection

Growing up, Taco Night was always a highlight in our household. My mom would try different variations of tacos week after week, and one day, she stumbled upon this idea of a Walking Taco Bake. It was an instant hit! The simplicity of tossing everything into a baking dish felt like a revelation, saving her time and effort while still delivering all the flavors we loved. To this day, every bite takes me back to those cherished family dinners around the table.

Context/Background

The Walking Taco is a fun twist on the traditional taco experience—believed to have originated from the Midwest as a practical party food that could be made with minimal fuss. Over time, creative cooks have pushed its boundaries beyond just a simple nacho bag, leading to creations like the Walking Taco Bake we know and love today.

Interestingly, this approach resonates with the convenience-driven lifestyle of many modern families. As people sought ways to enjoy favorite meals with less time spent in the kitchen, recipes like this became increasingly popular. It captures the essence of fusion cuisine by combining Mexican-inspired flavors with American cooking techniques.

Tips for Perfect Walking Taco Bake

  • Even Browning: Ensure the ground beef is evenly browned by stirring frequently. This will enhance the flavorful base.
  • Consistent Cheese Layer: For even melting, spread the mozzarella cheese uniformly over the top before baking.
  • Advance Prep: Prepare the beef mixture a day ahead to let the flavors meld together. Just assemble and bake when ready to serve.
  • Crisp Fritos Layer: If you prefer a crisper base, consider briefly baking the Fritos layer before adding the beef.
  • Adjust Seasoning: Feel free to tweak the spice level by adding more or less taco seasoning according to taste.
  • Dairy Alternatives: Use lactose-free milk for a dairy-sensitive option without compromising on creaminess.

Serving Suggestions

Walking Taco Bake serves as a fantastic main course, but it opens up plenty of serving possibilities for those who love to get creative. Consider topping each serving with fresh cilantro, diced tomatoes, or shredded lettuce to add a fresh crunch and vibrant color. For a spicy kick, a drizzle of hot sauce or a side of jalapeños works wonders.

This dish pairs wonderfully with a simple side salad adorned with a tangy lime vinaigrette, balancing out the rich flavors of the bake. Or, for a more indulgent spread, offer it alongside refried beans or a Mexican rice dish to create a truly hearty meal.

Planning for a party? Walking Taco Bake can be an enticing centerpiece on a buffet table. Dress it up with different bowls of toppings and let guests customize their plates to their liking—a guaranteed crowd pleaser.

Storage and Leftovers

Store any leftovers in an airtight container in the refrigerator for up to three days. For best results, reheat portions in the oven at 350°F to preserve the texture, or use a microwave for convenience.

Transform leftover Walking Taco Bake into a new dish by stuffing it into tortillas for delicious taco wraps or mixing it with scrambled eggs for a power-packed breakfast. You can even blend it with a bit of broth to create a cheesy, hearty soup.

Recipe Variations and Substitutions

Here are some creative variations to make this dish your own:

  • Vegetarian Option: Substitute ground beef with sautéed mushrooms or crumbled tofu for a plant-based version.
  • Spicy Twist: Add pickled jalapeños or a dash of cayenne pepper to bring extra heat via the taco seasoning.
  • Diverse Toppings: Top with slices of avocado or a dollop of sour cream before serving for added richness and complexity.
  • Seasonal Produce: Incorporate seasonal vegetables like corn or bell peppers to incorporate additional flavor layers and texture.

FAQ

Can I make this ahead of time? Yes! Assemble the bake up to step 4, cover and refrigerate. Bake just before serving.

What substitutions can I use for ground beef? Try using ground turkey or chicken for a leaner alternative, adjusting seasonings as per taste.

How do I make this gluten-free or vegan? Use gluten-free Fritos and a vegan cheese alternative to accommodate dietary restrictions. Ensure all seasonings and soup are gluten-free.

Optional Nutritional Information

  • Calories per serving: Approximately 340
  • Protein: 22g
  • Carbohydrates: 22g
  • Fat: 20g
  • Sugar: 4g

Final Thoughts

If you’re looking for a dish that’s both comforting and exciting, give Walking Taco Bake a try. It’s not only a beautiful blend of flavors but also a versatile meal that caters to a variety of tastes and dietary needs. Whether served as a solo dinner or part of a festive spread, this dish has the potential to steal the spotlight. We hope you’re inspired to make it a family favorite and share your delightful experiences with us afterwards.

Recipe Section

Serves: 4 | Prep Time: 10 minutes | Cook Time: 25 minutes | Total Time: 35 minutes

  • 1 lb ground beef
  • 1 package taco seasoning
  • 2/3 cup water
  • 2 cups Chili cheese Fritos
  • 1 can cheddar cheese soup
  • 1/2 cup milk
  • 1 cup mozzarella cheese
  1. Start by browning the ground beef in a skillet over medium-high heat until it’s no longer pink. Drain any excess fat.
  2. Add taco seasoning and water. Simmer for about 5 minutes until the liquid is absorbed.
  3. Layer Chili cheese Fritos in an 8×8 baking dish. Spread the seasoned meat evenly on top.
  4. Heat cheddar cheese soup and milk over low heat until creamy, then pour over the meat layer.
  5. Sprinkle mozzarella cheese on top and bake at 350°F for 12-14 minutes until bubbly and golden.
  6. Scoop and enjoy this cheesy delight!

“`

Master Pinterest: Create and Save Your Own Unique Pins

“`html
Jump to Recipe

Sweet & Savory Chicken Stir-Fry: A Flavorful One-Pan Wonder

Imagine tender, juicy bites of chicken enveloped in a lusciously sweet and savory sauce, nestled alongside vibrant bell peppers and bursts of tropical pineapple. This delightful Sweet & Savory Chicken Stir-Fry is a feast for the senses—crunchy, juicy, and aromatic with each bite. It’s a dish that brings a tantalizing contrast of flavors and textures, perfect for any night of the week or a quick yet impressive dish for guests. This stir-fry recipe is your gateway to a world of culinary delight, capturing hearts with every forkful.

Why You’ll Love This Recipe

This Sweet & Savory Chicken Stir-Fry is not just a dish; it’s an experience that blends simplicity with profound taste. Its appeal lies in its versatility—perfect for busy weeknights yet elegant enough for entertaining. The sweet honey pairs harmoniously with the umami-rich soy sauce, while garlic and ginger impart a warming spice and depth of flavor.

The colorful medley of red, green, and yellow bell peppers not only adds a visual feast but provides a boost of nutrition. Adding pineapple brings a refreshing sweetness that complements the dish wonderfully. With just one pan and minimal prep, you’ll enjoy stress-free cooking that doesn’t skimp on flavor.

This recipe evokes memories of joyful gatherings and cozy family dinners. It’s nutritious, easy to prepare, and leaves everyone satisfied. Plus, it’s an excellent way to increase your vegetable intake while enjoying a delectable meal.

Personal Story/Connection

Ever since I first discovered this recipe, it became an instant favorite in our household. I recall the first time I prepared it, the aroma filled our home, drawing everyone to the kitchen with eager anticipation. Gathered around the table, we shared stories and laughter, a delicious thread weaving our family together. It’s moments like these that elevate this dish from a simple meal to a cherished tradition in our home.

Context/Background

Stir-fry cuisine has deep roots in Asian culinary traditions, celebrated for its quick cooking method that retains the freshness and nutritional integrity of ingredients. This particular Sweet & Savory Chicken Stir-Fry draws inspiration from classic Asian flavors, yet embraces a modern twist with the inclusion of pineapple, a beloved ingredient in many Asian Pacific dishes.

Originating as a practical solution to save time and fuel in ancient Chinese cooking, stir-frying has evolved across cultures, adopting local ingredients and flavors while maintaining its core identity—a quick and flavorful way to bring meals to the table.

Tips for Perfect Sweet & Savory Chicken Stir-Fry

  • Marinate the chicken longer for deeper flavor absorption—up to 4 hours in the fridge, if possible.
  • For a thicker sauce, dissolve a teaspoon of cornstarch in cold water and add to the sauce.
  • Use fresh pineapple if possible; it offers better texture and flavor than canned.
  • Cook over high heat to ensure quick searing and caramelization of the chicken and vegetables.
  • For a smokier flavor, grill the chicken before adding to the stir-fry.

Serving Suggestions

Serve this Sweet & Savory Chicken Stir-Fry over a bed of fluffy jasmine rice to soak up the delicious sauce. It also pairs well with quinoa or cauliflower rice for a lower carb option. For a more indulgent meal, serve it with a side of crispy spring rolls or a fresh Asian salad for added crunch.

If you’re hosting a dinner party, present the stir-fry in an elegant serving dish with a sprinkle of sesame seeds and freshly chopped green onions for a burst of color and flavor. This dish also pairs beautifully with a chilled glass of Sauvignon Blanc or a light-bodied beer.

Storage and Leftovers

Store any leftovers in an airtight container in the refrigerator for up to three days. Reheat in a skillet over medium heat to retain the texture of the ingredients, or microwave for a quick meal on the go.

Consider transforming leftovers into a hearty stir-fry wrap with a bit of extra soy sauce or incorporate them into an omelette for a delightful brunch twist.

Recipe Variations and Substitutions

For a vegetarian version, substitute the chicken with firm tofu or tempeh, marinated the same way for flavor. Want to add more vegetables? Broccoli florets, sugar snap peas, or carrots would make excellent additions.

If you’re avoiding soy, swap the soy sauce with tamari or coconut aminos. For a seasonal twist, incorporate mango or papaya chunks during summer months for an additional layer of sweetness.

FAQ

Can I make this ahead of time?
Yes, you can prepare the components and marinate the chicken up to a day in advance. Cook it fresh for the best texture and flavor.

What substitutions can I use for soy sauce?
Tamari or coconut aminos are excellent gluten-free and soy-free alternatives.

How do I make this gluten-free or vegan?
Use tamari instead of soy sauce and replace chicken with tofu for a vegan-friendly dish.

Optional Nutritional Information

  • Calories per serving: Approximately 450 kcal
  • Protein: 34g
  • Carbohydrates: 50g
  • Fat: 14g
  • Saturated Fat: 2g
  • Sodium: 700mg

Final Thoughts

Embark on a culinary journey with this Sweet & Savory Chicken Stir-Fry that transforms simple ingredients into something truly special. It’s a recipe that not only satisfies your palate but also brings people together around the dinner table. With its ease of preparation and delightful taste, new memories are waiting to be created, one delicious bite at a time. Share your creations or questions in the comments below—we’d love to connect!

Recipe Section

Serves: 4 | Prep Time: 20 minutes | Cook Time: 15 minutes | Total Time: 35 minutes

  • 1 lb chicken breasts, cut into bite-sized pieces
  • 1/4 cup soy sauce
  • 2 tbsp honey
  • 2 cloves garlic, minced
  • 1 tsp ginger, minced
  • 1/2 tsp red pepper flakes
  • 1 red bell pepper, sliced
  • 1 green bell pepper, sliced
  • 1 yellow bell pepper, sliced
  • 1/2 cup pineapple chunks
  • 2 tbsp olive oil
  • Salt and pepper, to taste
  • Cooked rice, for serving
  • Sesame seeds and green onions, for garnish
  1. In a bowl, mix together soy sauce, honey, garlic, ginger, and red pepper flakes. Add chicken pieces and marinate for at least 15 minutes.
  2. Heat olive oil in a large skillet over medium-high heat. Add chicken and cook until browned on all sides.
  3. Add sliced bell peppers and pineapple to the skillet. Cook for another 5-7 minutes until peppers are tender.
  4. Season with salt and pepper to taste.
  5. Serve over cooked rice and garnish with sesame seeds and green onions.
  6. Enjoy this sweet and savory stir-fry!

“`