Deliciously Easy Maple Dijon Roasted Carrots Recipe for Fall

“`html

Jump to Recipe

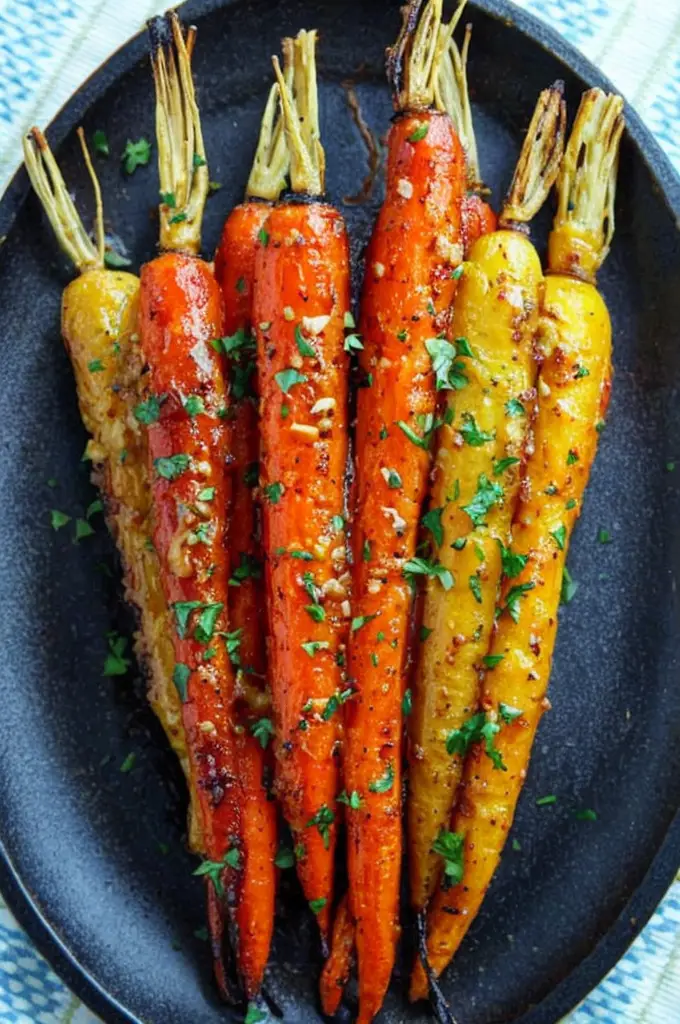
Maple Dijon Roasted Carrots: A Sweet and Savory Delight

Imagine the aroma of sweet maple syrup mingling with the tang of Dijon mustard as your taste buds anticipate the delightful harmony of flavors in these Maple Dijon Roasted Carrots. With caramelized edges and a hint of earthy sweetness, this dish transforms the humble carrot into a gourmet treat that’s both delicious and nutritious. The glossy finish of these carrots shimmering with olive oil makes them a show-stopping side that’s sure to impress every palate.

Why You’ll Love This Recipe

This Maple Dijon Roasted Carrots recipe is the perfect blend of sweet and savory, making it an ideal side dish for any meal. Whether you’re planning a holiday feast or a simple weekday dinner, these carrots add a burst of color and flavor that complements a variety of cuisines. The ease of preparation is a major plus, requiring only a handful of ingredients that you likely already have in your pantry.

These roasted carrots are not just about taste; they’re a nutritional powerhouse. Carrots are rich in beta-carotene, fiber, and antioxidants, supporting vision and overall health. Meanwhile, the maple syrup offers a natural sweetness without any refined sugars, and Dijon mustard infuses a sophisticated sharpness, preventing the dish from becoming overly saccharine.

Embrace the simplicity of this recipe, as it doesn’t confine you to follow it to the letter. Feel free to adjust ingredients to your taste or dietary needs. With its vivid appearance and robust taste, it has the power to evoke fond memories of family meals and create new ones on your dining table.

Personal Story/Connection

Every winter, when the cold breeze whispered through the pine trees, my grandmother would roast batches of Maple Dijon Roasted Carrots for our family gatherings. The kitchen would be filled with a warm, comforting aroma that promised good food and laughter. It was her signature dish that brought us together, a tradition that I have proudly continued, sharing the same warmth and aroma with my own family. These carrots are more than just a side dish; they are a connection to cherished memories and familial bliss.

Context/Background

The pairing of maple syrup and mustard has long been a culinary tradition in various cultures, blending the natural sweetness of the syrup with the punchy zest of mustard to elevate simple ingredients. Historically, carrots have been a staple in many diets due to their availability and nutritional value. From humble origins in wild ancestors to vibrant varieties we enjoy today, they’re a testament to culinary evolution.

Roasting vegetables became a culinary trend in the 20th century, highlighting their natural flavors without losing nutrients, which was a significant shift from boiling or steaming methods. This Maple Dijon Roasted Carrots recipe pays homage to that evolution, offering a modern take on a timeless technique.

Tips for Perfect Maple Dijon Roasted Carrots

  • Choose fresh, firm carrots to ensure they roast evenly and taste sweet.
  • Cut carrots into uniform slices to promote even roasting.
  • Use real maple syrup, not pancake syrup, for a richer flavor.
  • Toss the carrots well to ensure each piece is thoroughly coated with the sauce.
  • Spread the carrots in a single layer on the baking sheet to prevent steaming.
  • Bake until just fork-tender for the best texture.

Serving Suggestions

Maple Dijon Roasted Carrots are versatile and can be served alongside roasted meats, grilled tofu, or as part of a vegetarian spread. Pair them with a creamy mashed potato dish or a light salad to balance the robust flavors.

For a festive touch, garnish with toasted pecans or cranberries, enhancing the holiday spirit. As a canapé, place small servings on toasted bread slices with a smear of goat cheese for an elegant appetizer. They are perfect for both formal dinners and casual brunches.

Storage and Leftovers

To store, transfer leftovers to an airtight container and refrigerate for up to three days. Reheat gently in the oven at 300°F to restore their texture and flavor without drying them out. Avoid microwaving as it can make the carrots soggy.

If you find yourself with more than you can consume, consider repurposing them into a vibrant carrot salad by tossing with fresh greens and a balsamic dressing. Alternatively, blend them into a rich soup or stew for an added layer of sweetness and texture.

Recipe Variations and Substitutions

If you’re looking for a different twist, consider these variations:

  • Spicy Kick: Add a pinch of cayenne pepper to the maple Dijon mix for some heat.
  • Herbaceous Touch: Incorporate fresh rosemary or thyme for a savory aroma.
  • Vegan Option: Ensure your Dijon mustard is vegan-friendly, as some contain non-vegan ingredients.
  • Seasonal Swap: Use parsnips or sweet potatoes in place of carrots for a fall-inspired dish.

FAQ

Can I make this ahead of time?
Yes, you can prepare the maple Dijon glaze and slice the carrots in advance. Store them separately and combine just before roasting.

What substitutions can I use for Dijon mustard?
Yellow mustard or whole grain mustard can be used, but the flavor profile will change slightly.

How do I make this gluten-free or vegan?
This recipe is naturally gluten-free and can be vegan if the Dijon mustard used is certified vegan.

Optional Nutritional Information

Approximate nutritional details per serving (assuming 4 servings):

  • Calories: 170
  • Total Fat: 9g
  • Carbohydrates: 22g
  • Protein: 1g
  • Fiber: 4g
  • Sugar: 10g

Final Thoughts

Maple Dijon Roasted Carrots are more than a simple side dish; they are a vibrant symphony of flavors that bring joy and warmth to every meal they accompany. This recipe’s delightful flavors and ease of preparation make it a must-try for both novice cooks and seasoned chefs. We hope this dish brings the same happiness and connection to your table that it has brought to ours. We’d love to hear your experiences and any twists you add to make this recipe your own. Happy cooking!

Recipe Section

Serves: 4 | Prep Time: 10 mins | Cook Time: 25 mins | Total Time: 35 mins

  • 1 lb carrots, peeled and sliced into thin strips
  • 2 tbsp maple syrup
  • 1 tbsp Dijon mustard
  • 2 tbsp olive oil
  • Salt and pepper, to taste
  • Fresh parsley, chopped (for garnish)
  1. Preheat the oven to 400°F and line a baking sheet with parchment paper.
  2. In a small bowl, whisk together maple syrup, Dijon mustard, olive oil, salt, and pepper.
  3. Place the sliced carrots in a large bowl and pour the maple Dijon mixture over them. Toss until well coated.
  4. Spread the carrots in a single layer on the prepared baking sheet.
  5. Roast in the preheated oven for 20-25 minutes, or until the carrots are tender and slightly caramelized.
  6. Remove from the oven, sprinkle with fresh parsley, and serve hot.

We hope you enjoy this dish as much as we do! Let us know your thoughts and personal twists in the comments below or tag us on social media using #MapleDijonCarrots #RoastedCarrots #HealthyEating #VegetarianFare.

“`

Pinterest Secrets: Discover and Save Unique Pins Effortlessly

“`html
Jump to Recipe

Classic Vanilla Loaf: A Delectable Delight for Any Occasion

Imagine biting into a soft, buttery slice of freshly baked Vanilla Loaf, its tender crumb melting in your mouth with each delightful bite. This classic recipe combines the simple yet rich flavors of vanilla and butter, creating a harmonious symphony that is as comforting as it is delicious. Whether served at breakfast with a cup of coffee or as a sumptuous teatime treat, this loaf offers a delightful experience that’s hard to resist. Explore why this scrumptious vanilla bread is a must-try, and how it brings a touch of homemade warmth to every gathering.

Why You’ll Love This Recipe

This Vanilla Loaf recipe shines in its simplicity and versatility, making it a perennial favorite for both novice bakers and seasoned pros. Using a handful of pantry staples, it transforms into a sweet, moist, and satisfying delight. Perfectly balanced in flavor, it’s neither too sweet nor too bland, allowing the vanilla to take center stage.

Whether you’re preparing it for a family get-together or as a surprise for neighbors, its easy preparation means less time in the kitchen and more time enjoying the company of loved ones. For those who love to experiment, it’s a fantastic base to start adding your favorite mix-ins, such as nuts or chocolate chips, elevating it to the next level.

There’s also an emotional connection tied to this loaf, as its aroma reminds many of kitchens filled with laughter, and the cozy comfort of homemade treats that make every day feel special. Furthermore, its adaptable nature means it can easily respond to dietary adjustments without losing any of its charm.

Personal Story/Connection

Every Sunday morning, my family would gather around for a late breakfast, the air filled with the irresistible aroma of vanilla mingling with fresh coffee. This Vanilla Loaf was always at the center of these gatherings, a recipe lovingly passed down from my grandmother. Her baking was always an expression of her love, a tradition that I now carry on with each loaf I bake. Seeing the joy it brings to my family, the warm smiles as they take that first bite, reminds me why this recipe is so special. It’s not just food; it’s a connection to fond memories and the comfort of family traditions.

Context/Background

The humble loaf cake traces its origins to traditional European baking, a staple in homes for centuries. As a vehicle for basic ingredients like flour, butter, and eggs, its simplicity made it a canvas for countless variations. In Victorian England, it was common in high tea settings.

Over time, this classic cake has evolved, embracing local ingredients and regional flavors worldwide. Vanilla, a different luxury product in its time, became a popular addition as its demand and availability grew. Today, this classic vanilla loaf remains a beloved comfort food, weaving through cultural celebrations and family gatherings.

Tips for Perfect Vanilla Loaf

  • Room Temperature Ingredients: Ensure butter, eggs, and other ingredients are at room temperature for easier mixing and a better rise.
  • Don’t Overmix: Mix until just combined to avoid a dense loaf.
  • Check While Baking: Oven temperatures vary. Check the loaf a few minutes before the minimum bake time.
  • Cooling It Right: Let the loaf cool in the pan for about 10 minutes; this helps the loaf settle.
  • Troubleshooting: If the loaf is browning too quickly, loosely cover it with foil halfway through baking.

Serving Suggestions

There’s nothing like a slice of Vanilla Loaf with your morning coffee or tea. For a breakfast treat, lightly toast the slices and serve with a pat of butter or a dollop of homemade jam. For an indulgent dessert, pair it with fresh berries and a scoop of vanilla ice cream, or drizzle it with a simple glaze made of powdered sugar and lemon juice.

This loaf can also be an elegant addition to a brunch spread. Arrange slices on a platter with assorted fresh fruits and cheeses. It’s perfect for showers, picnics, or an afternoon tea gathering with friends.

For a unique serving idea, try making tiny sandwiches by pairing slices with a creamy filling like sweetened mascarpone or Nutella, creating a delightful finger food for parties.

Storage and Leftovers

To keep your Vanilla Loaf fresh, wrap it tightly in plastic wrap or store it in an airtight container. It remains fresh at room temperature for up to three days. For longer storage, freeze individual slices in a ziplock bag, allowing you to thaw and enjoy a slice any time you wish.

When reheating, a quick pop in the toaster brings it back to life, renewing its soft, moist texture. Make the most of leftovers by transforming slices into a delicious French toast, simply dipping them in a basic custard mixture before pan-frying to golden perfection.

Recipe Variations and Substitutions

Tweaking this Vanilla Loaf to fit your diet or taste has never been easier. Swap out regular flour for a gluten-free blend to cater to dietary restrictions. To make it dairy-free, use plant-based butter and a nut milk option.

For a citrus twist, add the zest of a lemon or orange to the batter, elevating the vibrant flavors. Alternatively, mix in half a cup of white chocolate chips and some chopped nuts for a nutty, gooey texture that pleases every palate.

Embrace the seasons by incorporating fresh fruits like blueberries or raspberries for a delightful summer variation. As the fall approaches, adding a teaspoon of cinnamon to the batter brings warm, cozy aromas to your bake.

FAQ

Can I make this ahead of time? Absolutely! The loaf can be made a day in advance and freshened up with a quick reheat.

What substitutions can I use for butter? Consider using coconut oil or margarine for a dairy-free alternative, though it might slightly change the flavor profile.

How do I make this gluten-free or vegan? Use a gluten-free all-purpose flour to make it gluten-free. For a vegan version, substitute eggs with flaxseed eggs and use plant-based butter.

Final Thoughts

This Classic Vanilla Loaf is more than just a recipe; it’s a celebration of simple pleasures and a tribute to timeless baking traditions. Its approachable nature and mouthwatering taste make it a joy to prepare and share with others. So, whether you’re a seasoned baker or someone trying it out for the first time, this loaf is sure to win hearts and excite taste buds. Don’t forget to share your baking journey in the comments or share photos of your delicious creations!

Recipe Section (Final Element)

Serves: 8-10 slices

Prep Time: 15 minutes

Cook Time: 50-60 minutes

Total Time: 1 hour 15 minutes

  • 2 cups all-purpose flour
  • 1 tsp baking powder
  • 1/2 tsp salt
  • 1/2 cup unsalted butter, softened
  • 1 cup sugar
  • 2 large eggs
  • 1 tsp vanilla extract
  1. Preheat oven to 350°F and grease a loaf pan.
  2. In a bowl, whisk together flour, baking powder, and salt.
  3. In a separate bowl, cream together butter and sugar until light and fluffy.
  4. Beat in eggs, one at a time, then stir in vanilla.
  5. Gradually add dry ingredients to wet ingredients and mix until just combined.
  6. Pour batter into loaf pan and smooth the top.
  7. Bake for 50-60 minutes, or until a toothpick inserted into the center comes out clean.
  8. Let cool in the pan for 10 minutes, then transfer to a wire rack to cool completely.

“`

How to Discover and Save Creative Pins on Pinterest

“`html
Jump to Recipe

Cheesy Frito Taco Bake: A Crispy, Gooey Delight

Imagine diving into a warm, savory dish that combines the crunchy texture of Chili cheese Fritos with the creamy, gooey goodness of cheese and seasoned beef. This Cheesy Frito Taco Bake is a mouthwatering blend of flavors and textures that will captivate your taste buds and have everyone coming back for seconds. With its irresistible aroma and perfect combination of cheesy and crunchy elements, this dish is an absolute must-try!

Why You’ll Love This Recipe

This recipe not only tantalizes your palate but also inspires creativity in the kitchen. It’s a versatile dish that can be customized to suit different tastes and dietary needs. Whether you’re looking for a quick family meal or something to impress guests, this bake offers hearty, satisfying comfort with minimal fuss.

The Cheesy Frito Taco Bake evokes nostalgic notes, reminiscent of family taco nights but with a fun, modern twist. It’s the perfect combination of comfort food staples combined in a delightful new way. From its simplicity to its potential for customization, this dish is guaranteed to capture hearts and appetites alike.

Rich in flavor but easy on the effort, this dish is perfect for busy weeknights. The ingredients meld perfectly, creating a harmonious blend that bursts with cheesy, taco-flavored goodness in every bite.

With easy substitutions and variations available, it’s a recipe that invites experimentation. So, gather your loved ones, share the joy of cooking, and create treasured memories over this delectable bake.

Personal Story/Connection

This recipe is a cherished family favorite that brings back fond memories of casual Sunday dinners spent with loved ones. I remember the first time I whipped up this dish — the smiles around the table were unforgettable. It became a staple when my kids requested it week after week, often helping to crush the Fritos or sprinkle the cheese. Such moments are what define home cooking, and this dish is at the heart of it all.

Context/Background

While traditional Mexican flavors of tacos have been beloved for generations, this particular variation incorporates the humble Frito to create a uniquely American twist on a classic. Originating as a creative take on nachos, the Cheesy Frito Taco Bake combines elements of Taco Tuesday with a baked casserole format that’s both inventive and indulgent.

Some say Frito pie has deep roots in Texas cuisine, and this recipe takes inspiration from the Frito pie while leaning into the melty, gooey appeal of a casserole dish. Over time, this delightful bake has evolved to become a family-friendly comfort food that entertains and nourishes all at once.

Tips for Perfect Cheesy Frito Taco Bake

  • For added crunch, top the finished dish with a few more crushed Fritos just before serving.
  • Use lean ground beef to reduce excess grease, or substitute with ground turkey for a lighter option.
  • Enhance flavors by adding finely chopped onions or bell peppers while browning the beef.
  • Customize the level of spice by selecting mild or spicy taco seasoning and adapting the cheese soup flavor.
  • Ensure that the cheese sauce is smooth by stirring continuously while heating.
  • Baking time may vary, so check for a bubbly and golden top before removing from the oven.

Serving Suggestions

The Cheesy Frito Taco Bake is incredibly versatile when it comes to serving options. Pair it with a fresh garden salad or a side of Mexican rice to complete the meal. A dollop of sour cream or guacamole on top adds extra creaminess and tang, while fresh cilantro can offer a pop of color and freshness.

For a festive touch, consider topping individual servings with jalapeños or a squeeze of lime to add zest and spice. The dish works well for casual gatherings — simply portion it into bowls for easy, delightful servings that are perfect for game day or a potluck.

This bake also shines when prepared as the main feature of a taco-themed dinner party, with guests enjoying both the process of creating and the result of a shared meal!

Storage and Leftovers

Store any leftovers in an airtight container in the refrigerator for up to three days. To reheat, simply place portions in the microwave for a few minutes until warmed through, or cover and bake in the oven at 350°F until heated.

This dish retains its wonderful flavors even after a day or two, making it perfect for meal prep or enjoying at your leisure. Plus, the flavors tend to meld further, creating an even richer taste.

Transform leftovers into a delicious wrap by scooping some of the Cheesy Frito Taco Bake into a tortilla, adding fresh lettuce, and rolling it up for a quick lunch or snack.

Recipe Variations and Substitutions

  • Vegetarian Twist: Substitute ground beef with textured vegetable protein or black beans for a plant-based version.
  • Spicy Kick: Add chopped jalapeños or hot sauce to the beef mixture for those who like extra heat.
  • Cheese Variations: Experiment with different types of cheese such as cheddar or Monterrey Jack to alter the flavor profile.
  • Seasonal Swap: Try incorporating roasted vegetables like corn or zucchini for a seasonal variation.

FAQ

Can I make this ahead of time? Absolutely! Prepare the dish up to the baking step, cover, and refrigerate. When ready, bake it for a few extra minutes until heated through and bubbly.

What substitutions can I use for the ground beef? Ground turkey or chicken are great alternatives that offer a leaner dish. For a vegetarian option, consider lentils or a medley of chopped mushrooms.

How do I make this gluten-free? Simply ensure that your taco seasoning and cheddar cheese soup are labeled gluten-free, and substitute the Fritos with a gluten-free corn chip alternative.

Optional Nutritional Information

  • Calories per serving: Approximately 450
  • Protein: 20g
  • Carbohydrates: 35g
  • Fat: 25g
  • Sodium: 800mg

Final Thoughts

The Cheesy Frito Taco Bake is an irresistibly delicious dish that combines the best of crunchy and cheesy elements to create a flavorful, comforting meal. It’s a recipe that promises smiles and satisfaction and encourages creativity with its flexibility. I hope you’ll enjoy creating and savoring this delightful bake with your family and friends. Don’t hesitate to share your experiences or ask questions — happy cooking!

Recipe

Serves: 4-6
Prep Time: 15 minutes
Cook Time: 15 minutes
Total Time: 30 minutes

  • 1 lb ground beef
  • 1 package taco seasoning
  • 2/3 cup water
  • Chili cheese Fritos
  • 1 can cheddar cheese soup
  • 1/2 cup milk
  • 1 cup shredded mozzarella cheese
  1. Browning ground beef in a skillet over medium-high heat until it’s no longer pink. Drain any excess fat.
  2. Add taco seasoning and water. Simmer for about 5 minutes until the liquid is absorbed.
  3. Layer Chili cheese Fritos in an 8×8 baking dish. Spread the seasoned meat evenly on top.
  4. Heat cheddar cheese soup and milk over low heat until creamy, then pour over the meat layer.
  5. Sprinkle mozzarella cheese on top and bake at 350°F for 12-14 minutes until bubbly and golden.
  6. Scoop and enjoy this cheesy delight!

“`

Unlock Creative Inspiration by Discovering and Saving Pins on Pinterest

Sure, here’s a detailed recipe blog post optimized for SEO and ready for WordPress:

Jump to Recipe

Walking Taco Bake: A Flavorful Cheesy Delight!

Imagine biting into a dish that brings together crispy, cheesy, and savory notes all in one delightful package. Walking Taco Bake is that dream come true, offering the perfect blend of seasoned beef, gooey cheese, and crunchy chili-flavored Fritos. This fun and easy recipe is a sure-fire winner for taco nights and any cozy family gathering!

Why You’ll Love This Recipe

The Walking Taco Bake is an irresistible recipe for those who love to dive into cheesy comfort food. This dish not only brings the joy of tacos in a bake form but also comes together effortlessly in under 30 minutes, making it ideal for busy weeknights. Its crunchy layers and creamy cheese sauce may take you on a delightful texture journey, making it a favorite among kids and adults alike.

This dish also offers versatility — whether you’re serving it at football watch parties or enjoying as a casual dinner, it’s bound to evoke smiles and compliments.

It’s about the experience too; one dish, many flavors! Imagine the fusion of spicy taco seasoning and the creamy cheddar cheese soup that perfectly balances each bite. Walking Taco Bake is a culinary experience you’ll want to share at the dinner table often.

Personal Story/Connection

I first stumbled across this recipe during a camping trip with friends where one evening we craved a meal that felt like a hug in a bowl. Enter the Walking Taco Bake — a dish that was not only easy to prepare over a portable stove but also brought all the comfort and flavor we were longing for in the wilderness. From that trip forward, this recipe has been a staple in my family’s meal rotation, bringing back memories of laughter and camaraderie shared around a campfire.

Context/Background

The phenomenon of the “walking taco” originates from the traditional easy-to-eat taco meals served in a bag, loved for their convenience and flavor punch. Over time, this concept evolved, and creative home chefs brought the concept indoors, transforming it into heartwarming bakes perfect for family settings.

This recipe leverages popular snack chips — Chili Cheese Fritos — adding a modern twist to the traditional taco flavors and providing a satisfying crunch to the comfort food classic.

Tips for Perfect Walking Taco Bake

  • Ensure the ground beef is well-drained to avoid a greasy bake.
  • Customize taco seasoning or make your own for a unique flavor profile.
  • Layer the Fritos evenly to ensure consistent crunch throughout.
  • For a crispier top, broil for the last few minutes — keep an eye on it!
  • Allow the bake to cool for a few minutes before serving to let the layers set.

Serving Suggestions

This Walking Taco Bake can be transformed into a feast with simple additions. Serve with a side of fresh guacamole or spicy salsa for an extra kick. You can also set up a topping bar with diced tomatoes, sour cream, or sliced jalapeños for a fully customizable experience.

If you’re planning a themed party, complement this dish with Mexican street corn or refreshing margaritas to create a fiesta-worthy spread.

For a workweek lunch, pack a portion with a simple side salad — you’ll have colleagues envious at the office!

Storage and Leftovers

Store any leftovers in an airtight container in the refrigerator for up to 3 days. When reheating, use an oven or toaster oven for a few minutes to maintain the crispy texture of the Fritos. Avoid the microwave as it can make the chips soggy.

Transform leftovers into a taco salad! Just mix with lettuce, add some salsa, and you’ve got a refreshing new dish.

Recipe Variations and Substitutions

  • Dietary Adaptations: Use ground turkey or chicken as a lighter option.
  • Cheese Swaps: Try pepper jack or a Mexican blend for a spicier twist.
  • Seasonal Twists: Add sautéed bell peppers or corn kernels for extra flavor.
  • Low-sodium Variation: Opt for reduced-sodium cheese soup and chips to control salt intake.

FAQ

Can I make this ahead of time? Yes, prepare the meat and cheese layers ahead, store separately, and assemble just before baking.

What substitutions can I use for ground beef? Ground turkey or black beans as a vegetarian option work perfectly.

How do I make this gluten-free? Use gluten-free chips and ensure your seasoning mix is gluten-free.

Optional Nutritional Information

  • Calories: Approximately 560 calories per serving
  • Protein: 25g
  • Carbohydrates: 45g
  • Fat: 33g

Final Thoughts

The Walking Taco Bake is not just a meal; it’s an invitation to savor each moment with loved ones, relishing the gooey cheese and crunchy layers that turn simple ingredients into an extraordinary experience. Try this recipe at your next gathering and watch as it becomes a fast favorite. Share your experience in the comments below – we’d love to hear how you make it your own!

Recipe

Serves: 4-6 | Prep Time: 10 mins | Cook Time: 14 mins | Total Time: 24 mins

  • 1 lb ground beef
  • 1 package taco seasoning
  • 2/3 cup water
  • 1 bag of Chili cheese Fritos
  • 1 can cheddar cheese soup
  • 1/2 cup milk
  • 1 cup shredded mozzarella cheese
  1. Preheat your oven to 350°F.
  2. In a skillet, brown the ground beef over medium-high heat until no longer pink. Drain any excess fat.
  3. Add taco seasoning and water to the skillet. Simmer for about 5 minutes until the liquid is absorbed.
  4. In an 8×8 baking dish, layer the Chili cheese Fritos.
  5. Spread the seasoned meat evenly on top of the Fritos.
  6. In a saucepan, heat the cheddar cheese soup and milk over low heat until creamy. Pour over the meat layer in the baking dish.
  7. Sprinkle the shredded mozzarella cheese on top.
  8. Bake in the preheated oven for 12-14 minutes, or until the cheese is bubbly and golden.
  9. Serve and enjoy this cheesy delight!

This content is organized for easy integration into WordPress, focusing on SEO while offering rich, engaging storytelling to inspire readers.

Irresistible No-Bake Chocolate Peanut Butter Bars: Simple 5-Ingredient Recipe

“`html
Jump to Recipe

No Bake Chocolate Peanut Butter Bars: A Decadent Delight Made Easy

Imagine biting into a rich, velvety layer of chocolate paired effortlessly with the nutty depth of peanut butter, all resting atop a buttery graham cracker base. These No Bake Chocolate Peanut Butter Bars are a sensory delight, offering a perfect balance of sweet and savory flavors with a melt-in-your-mouth texture. This simple yet indulgent treat is a must-try for anyone seeking a quick dessert fix that’s both satisfying and easy to make.

Why You’ll Love This Recipe

This recipe is a treasure for several reasons. Firstly, its simplicity is unmatched, requiring just five basic ingredients that you likely already have in your pantry. It’s also a versatile dessert that can be dressed up for an elegant dinner party or enjoyed casually at home. The no-bake aspect makes it an all-season favorite—you won’t need to worry about heating up the oven during warm summer months.

In addition to its ease, these bars are a nostalgic nod to classic flavor pairings that many of us grew up loving. There’s something universally comforting about peanut butter and chocolate together, which taps into sweet memories of childhood snacks and family gatherings. Moreover, the use of graham cracker crumbs not only adds structure but a hint of honey warmth balancing the recipe’s richness.

Nutritionally, while these bars aren’t a low-calorie option, they provide a long-lasting energy boost, perfect for those midday cravings or as a power-packed snack for busy schedules. The natural protein from peanut butter adds a slightly healthier twist to this indulgent dessert.

Personal Story/Connection

Every time I make these bars, I am taken back to the winters spent in my grandmother’s kitchen. She believed in the power of simple delights—treats that could bond family and friends over laughter and stories. Her no-bake chocolate peanut butter bars were always on the table, and they were the first dessert I learned to make. Now, I pass on this tradition, sharing these delightful bars with my own family, keeping her legacy alive through taste and time.

Context/Background

The combination of chocolate and peanut butter has long been a favorite in American cuisine, seen in everything from candies to cookies. This pairing first gained significant popularity in the early 20th century, as peanut butter became a widely accessible ingredient. Over time, the effortless marriage of flavors became a staple in homes across the country.

No-bake desserts have an interesting history as well, rising in popularity during the 30s and 40s when economical and easy recipes were in high demand. These recipes allowed families to create satisfying desserts without consuming additional energy or time, a principle that still holds immense appeal today.

Tips for Perfect No Bake Chocolate Peanut Butter Bars

  • Room Temperature Peanut Butter: Ensure your peanut butter is at room temperature for easier mixing.
  • Consistent Crumb Mixture: Mix thoroughly until every crumb is coated for an even base texture.
  • Microwave Chocolate Chips: If melting in the microwave, stir every 30 seconds to prevent burning.
  • Pressing the Base: Use a flat-bottomed glass or spatula to evenly press the crumb mixture.
  • Chill Time: Be patient and allow full refrigeration time for optimal bar firmness and neat cuts.

Serving Suggestions

These delightful bars are stunning on their own but can be elevated for special occasions. Try sprinkling a touch of sea salt over the melted chocolate for a gourmet twist that accentuates the flavors beautifully. Alternatively, consider topping with a sprinkle of crushed peanuts or a drizzle of white chocolate for aesthetic appeal.

Pair these bars with a cold glass of milk for the classic experience, or serve alongside hot coffee for a delicious afternoon pick-me-up. For a playful presentation at parties, cut the bars into small squares and serve on a dessert platter with fresh berries for a pop of color and freshness.

Storage and Leftovers

Store these bars in an airtight container in the refrigerator for up to a week. If you’ve made a large batch or want to save some for later, they freeze exceptionally well. Simply layer them with parchment paper in a freezer-safe container, and they will last up to two months.

To enjoy from frozen, let them thaw at room temperature for about 20 minutes. You can also repurpose leftover bars into a decadent base for a sundae by adding them to ice cream with caramel sauce and nuts.

Recipe Variations and Substitutions

For a gluten-free version, replace graham cracker crumbs with gluten-free alternatives or almond flour. If you’re looking to make a vegan version, swap the butter for coconut oil and use dairy-free chocolate chips. For those with peanut allergies, almond or cashew butter serves as a delicious alternative.

You can further experiment by adding a hint of vanilla extract or a spoonful of honey for additional sweet depth. Adjust chocolate intensity by mixing in dark chocolate chips or even white chocolate for a contrasting flavor profile.

FAQ

Can I make this ahead of time?
Absolutely! These bars can be made 1-2 days in advance and stored in the refrigerator.

What substitutions can I use for peanut butter?
Almond or cashew butter are great substitutes for flavor variation or allergy accommodation.

How do I make this gluten-free or vegan?
Use gluten-free graham cracker crumbs or almond flour for gluten-free, and coconut oil with dairy-free chocolate chips for a vegan version.

Optional Nutritional Information

Approximate nutritional details per serving:

  • Calories: 310
  • Carbohydrates: 32g
  • Protein: 5g
  • Fat: 20g
  • Sugar: 19g

Final Thoughts

These No Bake Chocolate Peanut Butter Bars are truly a delightful treat that blends simplicity with indulgence. They are perfect for any occasion, whether you’re looking to whip up something quickly for a weeknight dessert or impress guests at a dinner gathering. Inviting the sweet-savory tang of peanut butter and chocolate into your home will surely create memorable moments shared over delectable bites. Give this recipe a try, and let us know your experience or any creative twists you’ve made!

Recipe

Serves: 12
Prep Time: 15 minutes
Cook Time: 0 minutes
Total Time: 2 hours 15 minutes

  • 1 1/2 cups graham cracker crumbs
  • 1 cup creamy peanut butter
  • 1 cup powdered sugar
  • 1 cup chocolate chips
  • 1/2 cup melted butter
  1. In a bowl, mix graham cracker crumbs, peanut butter, powdered sugar, and melted butter until well combined.
  2. Press the mixture into an even layer at the bottom of a lined 9×9 inch baking pan.
  3. Melt chocolate chips in the microwave or on the stovetop, then spread evenly over the peanut butter layer.
  4. Refrigerate for at least 2 hours, or until the chocolate has set.
  5. Once set, cut into bars and serve.

Enjoy these delicious and easy no bake chocolate peanut butter bars!

“`

Easy No-Bake Chocolate Peanut Butter Bars with 5 Ingredients

“`html
Jump to Recipe

No Bake Chocolate Peanut Butter Bars: A Sweet Symphony of Flavors

Imagine biting into a luscious bar that melds the creamy indulgence of peanut butter with the rich, velvety smoothness of chocolate. These No Bake Chocolate Peanut Butter Bars are not just treats; they’re an experience that tantalizes your senses with every bite. With just five simple ingredients, this easy dessert combines the natural sweetness of honey with the wholesome texture of oats, offering a delicious contrast with each chew. Perfect for any occasion, this no-fuss recipe is a true delight for peanut butter and chocolate lovers alike.

Why You’ll Love This Recipe

These No Bake Chocolate Peanut Butter Bars are a game-changer, catering to both refined palates and those seeking comfort in simplicity. They are perfect for a quick energy boost, thanks to the robust combination of peanut butter and oats, making them an excellent option for breakfast on the go or a midday snack.

Moreover, the ease of preparation is unmatched. Without needing an oven, you can whip up these sumptuous bars in no time, making them ideal for hot summer days or when you want a dessert without the hassle.

The harmony of textures is another draw: the creamy peanut butter base, the soft chocolate topping, and the crunchy chopped peanuts create a dance of flavors and textures that’s hard to resist.

Not to mention the health benefits. Peanut butter is a great source of protein and healthy fats, while honey offers natural sweetness without the refined sugars, ensuring you indulge without guilt.

Personal Story/Connection

These bars remind me of family gatherings during my childhood. My mother would make these for every summer picnic. The cooling delight of biting into one of these bars under the sun set the perfect backdrop for laughter and joy. To this day, whenever I make them, it instills a sense of warmth and nostalgia, making it a cherished favorite for both me and my loved ones.

Context/Background

The combination of chocolate and peanut butter is a classic pairing that has stood the test of time. This dynamic duo originated as a popular American treat, known for its unique fusion of sweet and salty flavors. Though the exact origin of chocolate peanut butter bars is hard to pinpoint, they gained massive popularity in the mid-20th century, becoming a staple in homemade desserts.

No-bake desserts, like this one, gained their claim to fame due to their simplicity and convenience. They became especially favored in households looking to avoid heating up the kitchen, offering a cool yet comfortable option for delightful indulgence.

Tips for Perfect No Bake Chocolate Peanut Butter Bars

  • Ensure your peanut butter is at room temperature for easier mixing.
  • Use quick cooking oats for the best texture, as they blend well without soaking up too much moisture.
  • If your honey is too thick, gently warm it to make it easier to mix thoroughly.
  • When melting chocolate chips, ensure you stir between intervals to prevent burning.
  • Allow the bars to refrigerate for the full two hours to ensure they are fully set before cutting.

Serving Suggestions

These bars are versatile in presentation and can easily adapt to your serving needs. For an elegant touch, cut the bars into small squares and serve them on a decorative platter, ideal for parties or dessert tables where guests can help themselves.

For a casual occasion, pair them with fresh berries or a scoop of vanilla ice cream to create a more rounded dessert experience.

If you’re a fan of contrasts, serve the bars alongside a strong cup of coffee or a chilled glass of milk, as the richness of the bars pairs wonderfully with these beverages.

Storage and Leftovers

Store these bars in an airtight container in the refrigerator to keep them fresh for up to a week. If you plan on keeping them longer, they freeze beautifully. Simply wrap each bar individually in plastic wrap and store in a freezer-safe bag for up to three months.

When you’re ready to enjoy them again, just thaw the bars at room temperature or in the fridge overnight. No bake bars are also wonderful as mix-ins for ice cream or crumbled over yogurt.

Recipe Variations and Substitutions

For those seeking a vegan option, consider swapping honey with maple syrup or agave nectar. Both provide a delightful sweetness without compromising the texture.

If you’re a fan of an ultra-rich chocolate experience, consider adding a sprinkle of sea salt on top, enhancing the sweet-salty flavor profile.

For a seasonal twist, mix in some dried cranberries or raisins with the oats to add a fruity element that complements the chocolate and peanut butter perfectly.

FAQ

Can I make this ahead of time? Absolutely! These bars are perfect for making ahead, just store them properly to maintain their texture.

What substitutions can I use for oats? Rolled oats work as well, though they may alter the texture slightly, making the bars chewier.

How do I make this gluten-free? Use certified gluten-free oats, and you’ll have a delicious gluten-free treat!

Optional Nutritional Information

  • Calories per serving: Approximately 350
  • Protein: 6g
  • Carbohydrates: 39g
  • Fat: 18g

Final Thoughts

These No Bake Chocolate Peanut Butter Bars are more than just a dessert; they’re a testament to how simple, quality ingredients can harmonize into something extraordinary. Whether you’re making them as a quick treat or preparing to impress guests, these bars are sure to delight. I invite you to try this recipe, share your creations, and let it sweeten the lives of those you love most.

Recipe Section

Serves: 12-16 bars | Prep Time: 15 mins | Cook Time: 0 mins | Total Time: 2 hrs 15 mins

  • 2 cups creamy peanut butter
  • 1 cup honey
  • 3 cups quick cooking oats
  • 1 cup chocolate chips
  • 1/2 cup chopped peanuts
  1. In a large mixing bowl, combine creamy peanut butter and honey until well mixed.
  2. Gradually stir in quick cooking oats until fully incorporated.
  3. Press the mixture evenly into a parchment-lined 9×13 baking pan.
  4. In a microwave-safe bowl, melt chocolate chips in 30-second intervals, stirring in between.
  5. Pour melted chocolate over the peanut butter mixture and spread evenly.
  6. Sprinkle chopped peanuts on top.
  7. Refrigerate for at least 2 hours or until firm.
  8. Cut into bars and serve.

“`

Master the Art of Discovering and Saving Pinterest Pins Today

“`html
Jump to Recipe

Strawberry Basil Salad: A Refreshing Summer Delight

Imagine a dish where the sweetness of ripe strawberries mingles with the earthy aroma of fresh basil, accented by a subtle tang of balsamic vinegar and a whisper of honey. Add crumbled feta for a touch of creaminess, and you’ve got a salad that’s not only a feast for the taste buds but also a visual delight. This Strawberry Basil Salad is an irresistible addition to any summer table, guaranteed to impress with its vibrant colors and unique taste.

Why You’ll Love This Strawberry Basil Salad

There’s something effortlessly charming about the combination of sweet and savory in this salad. The marriage of fresh strawberries and chopped basil creates an unparalleled flavor profile that’s both refreshing and delightful. With ingredients that are as wholesome as they are flavorful, this dish captures the essence of summer.

This recipe offers versatility and ease, making it perfect for those who seek to impress without extensive kitchen time. Whether you’re preparing for a family picnic or a sophisticated dinner party, this salad fits seamlessly into any culinary theme.

Health-wise, it’s a powerful source of antioxidants and vitamins from the strawberries and basil. The inclusion of feta provides a good source of protein, adding nutritional balance to the dish.

Moreover, the salad’s unique combination of ingredients can invoke pleasant memories of leisurely summer days, making it not just a dish but an experience of taste and nostalgia.

Personal Connection

Growing up, summers meant fresh strawberries from the local farmers’ market. This salad became a family favorite when we discovered bowls of strawberries languishing in our kitchen one summer day. With basil growing abundantly in our garden, we decided to combine the two. Since then, this salad has graced many barbecues and family gatherings, always a hit with both the young and old.

Context and Background

Strawberries and basil may seem like an unconventional pairing, but their marriage is deeply rooted in culinary tradition, enhancing both savory and sweet dishes. The use of balsamic vinegar adds an Italian twist, as it’s known for its robust flavor in salads. Over time, chefs and home cooks have experimented, refining this exquisite blend of flavors into popular summer fare.

The addition of feta cheese introduces a Mediterranean flair, bringing together a fusion of aromas and tastes from various cultures, creating a beloved modern classic.

Tips for Perfect Strawberry Basil Salad

  • Choose Ripe Strawberries: Use strawberries that are bright red and fragrant for the best flavor.
  • Fresh Basil: Always pick fresh basil for that crisp aroma. Dried basil won’t impart the same vibrant flavor.
  • Balsamic Vinegar Quality: Opt for high-quality balsamic vinegar to prevent overpowering acidity.
  • Chill Time: Allow the salad at least 30 minutes in the fridge before serving to let flavors meld together.
  • Don’t Overmix: Be gentle when folding in feta, to avoid mashing the strawberries.

Serving Suggestions

This Strawberry Basil Salad pairs beautifully with grilled meats, especially chicken or fish, creating a balanced and refreshing meal. For a vegetarian twist, serve it with quinoa or couscous.

Consider presenting the salad on a large platter for a colorful centerpiece at your meal table. Sprinkling additional feta and basil leaves on top before serving can add an extra visual appeal.

If you’re hosting a gathering, this salad serves well in individual cups, providing a pretty and mess-free dish that’s easy to serve and enjoy.

Storage and Leftovers

To store leftovers, keep the salad in an airtight container in the fridge, but consume within a day for the best texture and taste. Strawberries tend to release water over time, which can affect the salad’s appeal.

Leftovers can be creatively repurposed by blending them into a smoothie, creating a unique flavor twist that’ll start your morning right.

Recipe Variations and Substitutions

  • Make it Vegan: Replace feta with almond-based or coconut-based cheese alternatives.
  • Add Nuts: Include toasted almonds or walnuts for a crunchy texture.
  • Seasonal Twist: Swap strawberries with peaches or raspberries when in season.
  • Extra Herb Kick: Introduce mint or cilantro for additional herbal flavors.

FAQ

Can I make this ahead of time? Yes, you can prepare it a few hours ahead, but add the feta just before serving to maintain its texture.

What substitutions can I use for balsamic vinegar? Try apple cider vinegar or lemon juice for a different tangy profile.

How do I make this gluten-free? The salad is naturally gluten-free, just ensure any added garnishes are also free from gluten.

Nutritional Information (Approximate)

  • Calories: 120 per serving
  • Fat: 5g
  • Protein: 3g
  • Carbohydrates: 18g
  • Fiber: 3g

Final Thoughts

This Strawberry Basil Salad is more than just a side dish; it’s a testament to the beauty of simple, fresh ingredients coming together to create culinary magic. An easy yet sophisticated salad, it’s perfect for elevating everyday meals or impressing guests at special occasions. Give it a try and let its delightful flavors bring a taste of summer to your table. I’d love to hear about your experiences with this recipe—please share your thoughts and variations below!

Strawberry Basil Salad Recipe

Serves: 4 | Prep Time: 10 minutes | Cook Time: 0 minutes | Total Time: 40 minutes (including chilling)

  • 2 cups fresh strawberries, hulled and sliced
  • 1 tablespoon honey
  • 1 tablespoon balsamic vinegar
  • 1/4 cup fresh basil, chopped
  • 1/4 cup crumbled feta cheese
  • Salt and pepper to taste
  1. In a bowl, combine the sliced strawberries, honey, balsamic vinegar, and chopped basil. Mix well to evenly coat the strawberries.
  2. Season with salt and pepper to taste, adjusting according to your preferences.
  3. Gently fold in the crumbled feta cheese, being careful not to mash the strawberries.
  4. Let the flavors meld together in the refrigerator for at least 30 minutes before serving.
  5. Serve chilled as a refreshing and flavorful salad or side dish.

“`

This content is structured for easy integration into a WordPress blog post, designed to engage readers with a rich, descriptive narrative, and optimized for SEO.

Create and Save Your Best Pins with Pinterest Recipes

“`html
Jump to Recipe

Decadent Chocolate Delight: A Cake to Remember

Imagine biting into a rich, moist chocolate cake where the deep, dark flavors of cocoa tantalize your taste buds with every morsel. This isn’t just a chocolate cake; it’s a celebration in dessert form. Its aroma fills your home, conjuring memories of warmth and joy. Such a treat isn’t just a feast for the palate but an ode to classic baking traditions that promise pleasure and indulgence. Whether you’re a chocolate aficionado or just in need of a culinary hug, this cake is your perfect choice.

Why You’ll Love This Recipe

This chocolate cake is the epitome of baking simplicity meeting gourmet delight. Featuring a rich blend of ingredients that are pantry staples, it makes baking stress-free while delivering an unforgettable taste. Imagine enjoying this cake during a cozy afternoon tea or as a sweet ending to a romantic dinner.

The combination of cocoa and hot coffee enhances the depth of chocolate flavor, creating a sophisticated taste profile that’s equally appealing to kids and adults. It’s a versatile recipe that accommodates personalized frosting choices, making it customizable for any event or personal taste.

The use of buttermilk introduces a slight tang, balancing the sweetness and creating a tender crumb that melts in your mouth. Plus, the quick preparation time means you can whip it up for both spontaneous celebrations and planned occasions alike.

Personal Story/Connection

Growing up, weekends at my grandmother’s house were synonymous with the irresistible scent of fresh chocolate cake wafting from the kitchen. This cake recipe is reminiscent of those delightful weekends, embodying the joy and love felt when family gathered to share something truly special. Over time, it has become a staple at every family gathering, a tradition that bridges generations.

Context/Background

The origins of chocolate cake can be traced back to the late 19th century when the modern process of pressing cocoa butter led to the creation of more refined chocolate. Since then, chocolate cake has evolved through countless variations, each culture adding its unique twist.

This particular recipe, with the inclusion of coffee, finds its roots in European traditions, often designed to highlight the richness of cocoa. Over years, it has become a beloved classic, loved for its simplicity yet decadent taste.

Tips for Perfect Chocolate Delight

  • Ensure all ingredients are at room temperature before mixing for a smoother batter.
  • Use high-quality cocoa powder for the best flavor intensity.
  • Mix wet ingredients with dry ingredients just until combined to avoid a dense cake.
  • If buttermilk isn’t available, use a milk and vinegar mixture as a substitute.
  • Allow the hot coffee to cool slightly before adding to avoid cooking the eggs.

Serving Suggestions

This decadent cake can be served simply with a dusting of powdered sugar for a minimalist approach, or it can be dressed up with a rich ganache or buttercream frosting for more lavish occasions.

Pair it with a scoop of vanilla ice cream or a dollop of whipped cream to elevate the indulgence. For a special touch, consider adding fresh berries or edible flowers on top as a garnish.

Whether served at a chic dinner party, a casual brunch, or as a delightful bundle at a picnic, this chocolate cake adapts beautifully to the ambiance, ensuring it’s always the star of the show.

Storage and Leftovers

Once cooled, cover the cake with plastic wrap or store it in an airtight container. It will stay fresh at room temperature for up to three days. For longer storage, refrigerate it for up to a week or freeze slices for up to three months.

Leftover cake can be revitalized by warming slices in a microwave for a few seconds to restore moisture. Consider using crumbled leftovers as an ice cream topping or layered in a parfait for a quick dessert twist.

Recipe Variations and Substitutions

For a healthier variation, replace half the oil with applesauce and reduce the sugar slightly. This maintains the cake’s moisture while cutting down on calories.

Vegetarians can enjoy this cake by replacing eggs with flaxseed or chia seed “eggs,” and gluten-free enthusiasts can substitute flour with a 1-to-1 gluten-free baking mix.

Enhance the flavor by adding a teaspoon of instant espresso powder for an intensified coffee-chocolate combination or introduce a hint of spice with cinnamon or chili powder for a unique twist.

FAQ

Can I make this ahead of time? Yes, this cake can be made a day in advance. Wrap it tightly in plastic to maintain freshness.

What substitutions can I use for buttermilk? Mix 1 cup of milk with 1 tablespoon of vinegar or lemon juice and let it sit for 5 minutes.

How do I make this gluten-free? Substitute the all-purpose flour with a gluten-free 1-to-1 baking flour blend.

Optional Nutritional Information

  • Approximate Calories per Serving: 280
  • Total Fat: 13g
  • Carbohydrates: 38g
  • Protein: 4g

Final Thoughts

This Decadent Chocolate Delight is more than just a dessert; it’s an experience that brings people together. Whether you’re sharing it as a thoughtful gift or indulging in a comfort moment, it promises delight in every bite. I invite you to try this recipe, share your experiences, and bring a piece of joy into your kitchen.

The Recipe: Decadent Chocolate Delight

Serves: 8 | Prep Time: 15 minutes | Cook Time: 35 minutes | Total Time: 50 minutes

  • 2 cups all-purpose flour
  • 1 cup sugar
  • 1/2 cup cocoa powder
  • 1 tsp baking soda
  • 1/2 tsp salt
  • 1 cup buttermilk
  • 1/2 cup vegetable oil
  • 2 large eggs
  • 1 tsp vanilla extract
  • 1 cup hot coffee
  1. Preheat your oven to 350°F and grease a 9-inch round cake pan.
  2. In a large bowl, whisk together the flour, sugar, cocoa powder, baking soda, and salt.
  3. In a separate bowl, mix together the buttermilk, vegetable oil, eggs, and vanilla extract.
  4. Combine the wet and dry ingredients until just incorporated, then stir in the hot coffee.
  5. Pour the batter into the prepared cake pan and bake for 30-35 minutes, or until a toothpick inserted in the center comes out clean.
  6. Allow the cake to cool completely before frosting with your favorite frosting or ganache.
  7. Slice, serve, and enjoy this delicious chocolate cake recipe!

“`

Pinterest Tips: Discover and Save Your Favorite Pins Effortlessly

“`html
Jump to Recipe

BBQ Chicken Pinwheels: A Perfect Blend of Flavors!

Get ready to tantalize your taste buds with our BBQ Chicken Pinwheels – a delightful fusion of smoky, tangy, and creamy flavors all rolled into one irresistible bite. Imagine the savory mix of grilled chicken, crispy bacon, and gooey mozzarella, wrapped up in a warm tortilla blanket. It’s a recipe that promises to whisk you away on a culinary adventure!

Why You’ll Love This Recipe

There’s something incredibly satisfying about sinking your teeth into these BBQ Chicken Pinwheels. They offer an explosion of flavors and textures that will leave you wanting more. The charred, savory taste of grilled chicken combined with the sweet and smoky hints of BBQ sauce creates a mouthwatering sensation. As you savor each bite, crispy bacon bits add a delightful crunch, giving this dish its irresistible charm.

These pinwheels are incredibly versatile, perfect as a snack, an appetizer for parties, or even a quick lunch option. Health enthusiasts will appreciate the use of lean chicken breast and veggies, while those short on time will love how easy and fast it is to prepare. Whether you’re hosting a summer BBQ or needing a quick meal fix, this recipe is sure to be a crowd-pleaser.

Personal Story/Connection

This recipe brings me back to sunny family gatherings where food was always the star of the show. I remember the first time I made these BBQ Chicken Pinwheels for a weekend cookout. It was an instant hit, and the plate was cleared in moments. The smiles and compliments from my family truly made it a recipe I hold dear to my heart. It’s not just food; it’s a joyous memory roll cooked to perfection!

Context/Background

BBQ Chicken is a classic favorite, rooted deeply in American culinary traditions, especially during the grilling season. As outdoor meals began to evolve, so did the innovative ways to enjoy familiar flavors. The concept of pinwheels probably emerged from the creative need to make food portable, presentable, and enjoyable for everyone at social gatherings.

This recipe embodies the spirit of bringing people together with its simplicity and delectable taste. Over time, variations of the pinwheel have surfaced, adopting different fillings and cultural twists, yet the BBQ Chicken version remains a cherished staple loved by many.

Tips for Perfect BBQ Chicken Pinwheels

  • Ensure the chicken is fully cooked by checking its internal temperature with a meat thermometer.
  • Use freshly grated mozzarella for the best melt and texture.
  • Crisp the bacon beforehand to maintain its crunchiness in the pinwheels.
  • For added flavor, marinate the chicken in BBQ sauce for at least an hour before grilling.
  • Use toothpicks to secure the roll if needed before slicing into pinwheels.
  • Experiment with different BBQ sauce flavors for unique taste profiles.

Serving Suggestions

These BBQ Chicken Pinwheels are perfect for any occasion. Serve them warm as appetizers at your next party or casual get-together. Pair them with a fresh garden salad for a complete meal that’s both light and fulfilling. If you’re looking to impress guests, arrange them on a platter with dipping bowls of extra BBQ sauce and ranch dressing for that gourmet touch.

For a family movie night, these pinwheels make for easy-handling snacks. Add a side of spicy coleslaw or corn on the cob to enhance your barbecue experience. They are also wonderful as part of a brunch spread, offering a savory option alongside other morning fare.

Storage and Leftovers

In the rare case you have leftovers, storing these pinwheels is a breeze. Simply place them in an airtight container and refrigerate for up to three days. When you’re ready to enjoy them again, reheat in an oven to retain their crispiness, or use a microwave for a quick fix (though the latter may affect the crunch).

If you’re looking to get creative with leftovers, chop them up and toss them in a Caesar salad or use them as a loaded topping on a cheese pizza. The possibilities are as vast as your culinary imagination!

Recipe Variations and Substitutions

There are numerous ways to tweak this recipe to suit your dietary needs or flavor preferences. If you’re looking for a healthier version, swap out the bacon for turkey bacon or use whole wheat tortillas. For a spicy twist, add jalapeño slices or a dash of hot sauce inside the wraps.

If you’re catering to a vegetarian crowd, substitute the chicken and bacon with grilled portobello mushrooms and add a smoky BBQ tempeh for that meaty texture. Finally, for a summer spin, interchange regular BBQ sauce with a fruity, peach-infused version for sweet undertones.

FAQ

Can I make this ahead of time? Yes! Prepare the components and refrigerate separately. Assemble and cook the pinwheels just before serving for best results.

What substitutions can I use for chicken? You can replace chicken with cooked turkey or seitan for a plant-based option.

How do I make this gluten-free or vegan? Use gluten-free tortillas and replace the cheese with a plant-based alternative to make this recipe vegan and friendly to gluten-sensitive diets.

Optional Nutritional Information

  • Calories per serving: 350
  • Total Fat: 18g
  • Protein: 24g
  • Carbohydrates: 24g

Final Thoughts

These BBQ Chicken Pinwheels are a delightful addition to any meal plan, providing a burst of flavor and satisfaction in every bite. Whether you’re looking to impress your guests or enjoy a personal treat, this recipe offers joyous moments that are hard to resist. Try it out, and don’t hesitate to share your experiences or ask questions in the comments. Happy cooking!

Recipe Section

Serves: 4 | Prep Time: 15 mins | Cook Time: 15 mins | Total Time: 30 mins

  • 1 lb boneless, skinless chicken breast
  • 1/4 cup BBQ sauce
  • 1/4 cup shredded mozzarella cheese
  • 1/4 cup diced red onion
  • 1/4 cup diced bell pepper
  • 4 slices bacon
  • 1/4 cup ranch dressing
  • 2 large flour tortillas
  1. Preheat your grill to medium-high heat. Season the chicken with salt and pepper, then grill for 6-7 minutes per side, or until cooked through.
  2. Remove the chicken from the grill and brush with BBQ sauce. Set aside.
  3. In a skillet, cook the bacon until crispy. Remove from the skillet and chop into pieces.
  4. In the same skillet, sauté the red onion and bell pepper until softened.
  5. Slice the grilled chicken into thin strips and set aside.
  6. Lay out the flour tortillas and spread ranch dressing on each.
  7. Divide the mozzarella cheese, grilled chicken, bacon, sautéed vegetables, and remaining BBQ sauce between the two tortillas.
  8. Roll up the tortillas, tucking in the sides as you go.
  9. Heat a large skillet over medium heat and place the wraps seam-side down. Cook for 2-3 minutes, then flip and cook for another 2-3 minutes until golden brown and crispy.
  10. Slice the wraps into pinwheels and serve hot.

Enjoy these delicious BBQ Chicken Pinwheels! #BBQChicken #Pinwheels #GrillingSeason #EasyRecipes

“`

Irresistibly Juicy Pineapple Cake Recipe for Tropical Dessert Lovers

“`html

Juicy Pineapple Cake: A Tropical Delight for Your Taste Buds

Experience the tropical allure with this Juicy Pineapple Cake recipe that promises a burst of flavor in every bite. Perfect for any occasion, this cake combines the rich sweetness of pineapple with a moist texture that’s sure to please your palate. Whether you’re hosting a summer party or simply enjoying dessert at home, this pineapple cake is a must-try treat.

Why You’ll Love This Juicy Pineapple Cake Recipe

This Juicy Pineapple Cake is not just another dessert; it’s a tropical paradise on your plate. The fresh, juicy pineapple chunks create an unparalleled flavor, while the moist cake base makes it hard to resist. It’s versatile enough to serve at birthdays, festive gatherings, or as a delightful everyday treat. Everyone will fall in love with its natural sweetness and delightful texture.

The combination of fresh pineapples with a buttery cake base makes it a standout recipe that’s easily scalable for larger groups. The cake’s tropical essence adds a refreshing twist, making it a year-round favorite that breaks the monotony of typical dessert choices.

Context and Background

The pineapple cake has roots in tropical cuisines where the fruit is king. Originating from regions abundant with pineapples, this cake has evolved over time, integrating various flavors and techniques. The art of creating a perfect pineapple cake lies in balancing its sweet and tangy profile, a characteristic trait of many traditional tropical desserts.

Through exploration and experimentation, the Juicy Pineapple Cake recipe has been perfected to offer a harmonious blend of texture and flavor. This rendition ensures the fruit’s essence shines throughout, hugging each crumb with its rich juiciness.

Recipe Details

Serves: 8

Prep Time: 20 minutes

Cook Time: 35 minutes

Total Time: 55 minutes

Ingredients

  • 1 cup crushed pineapple, with juice
  • 2 cups all-purpose flour
  • 1 1/2 cups sugar
  • 2 eggs
  • 1/2 cup vegetable oil
  • 1 teaspoon baking powder
  • 1/2 teaspoon baking soda
  • 1/2 teaspoon salt
  • 1 teaspoon vanilla extract

Directions

  1. Preheat your oven to 350°F (175°C). Grease and flour a 9×13 inch baking pan.
  2. In a large bowl, combine flour, sugar, baking powder, baking soda, and salt.
  3. In another bowl, mix the eggs, oil, vanilla extract, and crushed pineapple with its juice.
  4. Pour the wet ingredients into the dry ingredients and stir until just combined.
  5. Pour the batter into the prepared baking pan.
  6. Bake in the preheated oven for 35 minutes or until a toothpick inserted into the center comes out clean.
  7. Let cool before serving or frosting as desired.

Tips for Perfect Juicy Pineapple Cake

  • Use fresh pineapple for best results, but canned works in a pinch.
  • Ensure your pineapple mixture isn’t too wet; drain excess juice if necessary.
  • Gently fold the wet into the dry ingredients to keep the cake fluffy.
  • Avoid overbaking to maintain the cake’s moist texture.

Serving Suggestions

Serve your Juicy Pineapple Cake with a scoop of vanilla ice cream or a dollop of whipped cream for an added layer of deliciousness. For a tropical flair, garnish with fresh pineapple slices and a sprinkle of shredded coconut.

Storage and Leftovers

Store the cake in an airtight container at room temperature for up to 3 days. For prolonged freshness, refrigerate for up to a week. To enjoy leftover slices, allow them to return to room temperature or give them a quick warm-up in the microwave.

Final Thoughts

This Juicy Pineapple Cake is a delightful experience that brings the tropics into your kitchen. Its easy preparation and luscious taste make it a favorite for many. Don’t miss out on creating this slice of paradise and watch as it becomes a staple in your dessert repertoire.

Recipe Notes

  • Substitute half of the vegetable oil with applesauce for a healthier alternative.
  • Add a teaspoon of cinnamon or nutmeg for an extra warm spice flavor.
  • Top with cream cheese frosting for a more indulgent dessert.

“`