Delicious No Bake Caramel Crunch Butterfinger Truffles Recipe

“`html

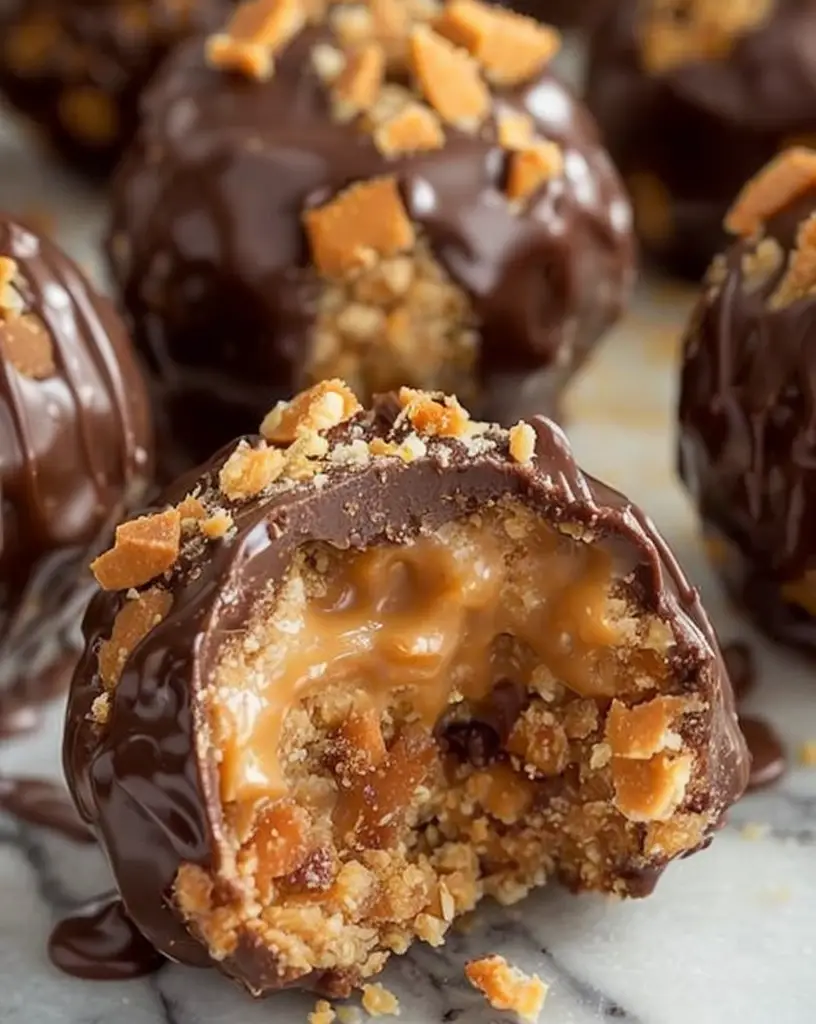
No Bake Caramel Crunch Butterfinger Truffles Recipe: Decadent Delights

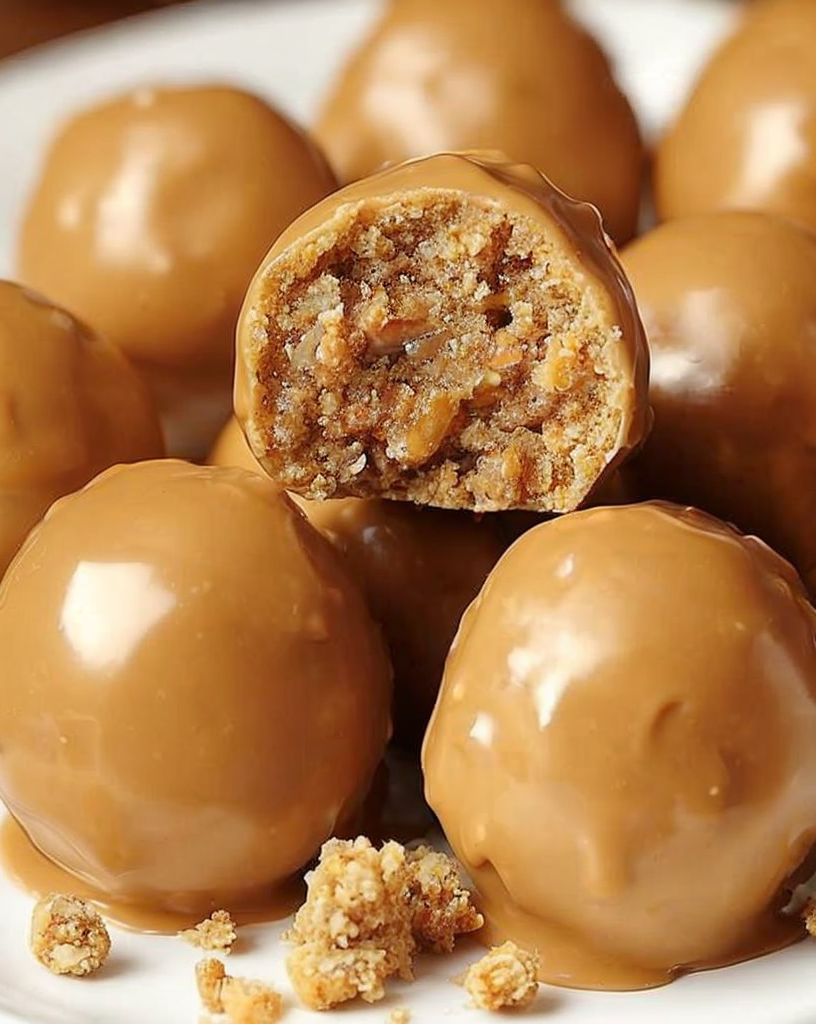
Welcome to a world of indulgence with our No Bake Caramel Crunch Butterfinger Truffles recipe! These mouthwatering truffles are the perfect blend of creamy caramel, crunchy Butterfinger bars, and rich chocolate, making them a delightful treat for any occasion.

Why You’ll Love This Recipe

These No Bake Caramel Crunch Butterfinger Truffles are an effortless way to satisfy your sweet tooth. With their no-bake preparation, they are incredibly easy to make, meaning you’ll spend less time in the kitchen and more time enjoying these heavenly bites. The contrasting textures and flavors, with creamy caramel perfectly complementing the crunchy Butterfinger pieces, make every bite a blissful experience.

These truffles are perfect for sharing at parties, festive gatherings, or simply as an indulgent treat to enjoy at home. Their rich taste and eye-catching appearance ensure they’re a favorite wherever they’re served.

Context/Background

Truffles have long been a favorite confection, originating in the kitchens of France. Traditionally, they consist of a chocolate ganache center, but modern variations like our No Bake Caramel Crunch Butterfinger Truffles bring exciting new twists to this classic treat. The addition of Butterfinger candy bars offers a nostalgic American twist, delivering both crunch and a unique flavor profile.

Recipe Details

Serves: 12

Prep Time: 15 minutes

Chill Time: 30 minutes

Total Time: 45 minutes

Ingredients

  • 1 cup creamy peanut butter
  • 1/2 cup caramel sauce
  • 3/4 cup crushed Butterfinger bars
  • 2 cups semi-sweet chocolate chips
  • 1 tablespoon coconut oil

Directions

  1. In a large bowl, mix together peanut butter and caramel sauce until smooth and well combined.
  2. Fold in the crushed Butterfinger bars to the peanut butter mixture.
  3. Shape the mixture into 1-inch balls and place them on a baking sheet lined with parchment paper.
  4. Chill the truffles in the refrigerator for about 30 minutes to firm up.
  5. In a microwave-safe bowl, combine the chocolate chips and coconut oil. Melt in the microwave in 30-second intervals, stirring in between until smooth.
  6. Dip the chilled truffles into the melted chocolate, ensuring they’re fully coated. Place them back on the parchment paper.
  7. Allow the chocolate to set for about 10 minutes at room temperature, then transfer to the refrigerator to fully harden.

Tips for Perfect No Bake Caramel Crunch Butterfinger Truffles

  • Ensure your peanut butter is at room temperature for easy mixing.
  • Chill the truffle mixture before dipping to prevent melting in the chocolate.
  • Use a fork to help dip the truffles in chocolate for a smoother coating.
  • Experiment with different chocolate types for varied flavor.

Serving Suggestions

Serve these truffles on a decorative platter for a stunning dessert presentation. They pair beautifully with coffee or a glass of milk and can be garnished with a sprinkle of sea salt for an extra flavor kick.

Storage and Leftovers

Store your No Bake Caramel Crunch Butterfinger Truffles in an airtight container in the refrigerator for up to one week. For longer storage, freeze them in a single layer and transfer to a ziplock bag. Thaw in the fridge before serving.

Final Thoughts

These No Bake Caramel Crunch Butterfinger Truffles are the perfect combination of simplicity and indulgence. Their rich flavor and easy preparation make them a must-try for any dessert lover. Enjoy making and sharing these delectable treats!

Recipe Notes

  • For a nut-free version, substitute peanut butter with sunbutter.
  • Adjust the caramel amount to suit your sweetness preference.
  • Try using dark chocolate for a more intense flavor.

“`

Irresistible Butterfinger Balls Recipe: A Sweet Treat for Any Occasion

“`html

Butterfinger Balls: Irresistible Bite-Sized Treats

If you’re a fan of the classic candy bar, this Butterfinger Balls recipe is a must-try. These delightful, bite-sized treats encapsulate all the flavors of Butterfinger bars in a fun and easy-to-make form. With their sweet and crunchy texture, Butterfinger Balls are a perfect indulgence for any occasion.

Why You’ll Love This Recipe

These Butterfinger Balls are a delight for both kids and adults alike. The combination of peanut butter, graham crackers, and crushed Butterfinger bars creates a deliciously crunchy and creamy texture. Not only are they incredibly scrumptious, but they’re also simple to prepare with just a handful of ingredients. Whether it’s a holiday gathering or a simple family snack, these balls are sure to steal the show.

Another reason to love this recipe is its versatility. Need a quick dessert for a potluck? Butterfinger Balls are your answer. They are easy to transport and can be made ahead of time, ensuring a stress-free dessert experience. Plus, with minimal mess and no need for an oven, even the kids can join in on the fun.

Context/Background

The Butterfinger bar has been a staple of American confectionery since the 1920s, known for its flaky and crunchy peanut butter core. This recipe takes inspiration from the candy’s iconic flavor, turning it into a bite-sized treat that’s perfect for any Butterfinger enthusiast. By using crushed bars in the mixture, these balls maintain the essence of the original candy while offering a unique spin.

Techniques for creating truffle-like desserts have been passed down through generations, but modern variations like Butterfinger Balls offer a fresh take on a classic method, combining traditional confectionery techniques with new, imaginative ingredients.

Recipe Details

Serves: 24
Prep Time: 20 minutes
Cook Time: 0 minutes
Total Time: 20 minutes

Ingredients

  • 1 cup creamy peanut butter
  • 1/2 cup unsalted butter, softened
  • 2 cups powdered sugar
  • 3 cups graham cracker crumbs
  • 5 Butterfinger candy bars, crushed
  • 12 oz chocolate coating or candy melts

Directions

  1. In a large mixing bowl, beat together the peanut butter and softened butter until smooth and creamy.
  2. Gradually add the powdered sugar and graham cracker crumbs, mixing until fully incorporated.
  3. Fold in the crushed Butterfinger bars, ensuring the pieces are evenly distributed.
  4. Roll the mixture into 1-inch balls and place them on a baking sheet lined with parchment paper.
  5. Chill the balls in the refrigerator for about 30 minutes or until firm.
  6. While the balls are chilling, melt the chocolate coating as per the package instructions.
  7. Dip each ball into the melted chocolate, ensuring it is fully coated. Place them back on the parchment paper.
  8. Let them set in the refrigerator until the chocolate is hardened. Serve and enjoy!

Tips for Perfect Butterfinger Balls

  • Ensure that the peanut butter and butter are at room temperature for easy mixing.
  • If the mixture is too crumbly, add a little more peanut butter to reach your desired consistency.
  • For a smoother finish, use a fork or candy dipper to coat the balls in chocolate.
  • Chill the balls before dipping in chocolate to ensure they maintain their shape.

Serving Suggestions

Butterfinger Balls are delightful as an after-dinner dessert alongside coffee or tea. They also pair well with a scoop of vanilla ice cream, offering a cool contrast to their crunchy texture.

Storage and Leftovers

Store the Butterfinger Balls in an airtight container in the refrigerator for up to a week. For longer storage, freeze them in a single layer on a baking sheet, then transfer them to a freezer-safe container for up to two months. Thaw in the refrigerator before serving.

Final Thoughts

These Butterfinger Balls are a fantastically quick and easy treat that captures the beloved flavor of the classic candy bar. They’re sure to become a favorite in your home as they deliver a perfect balance of sweetness and crunch in every bite. Try them once, and you’ll find yourself making them time and time again.

Recipe Notes

  • For a nut-free version, substitute sunflower seed butter for peanut butter.
  • You can add a drizzle of melted white chocolate for a decorative touch.
  • If you prefer a less sweet treat, reduce the amount of powdered sugar by 1/2 cup.

“`

Bake Perfect Winter Wonderland Chocolate Chip Christmas Cookies for Joy

“`html

Winter Wonderland Chocolate Chip Christmas Cookies: A Festive Delight

Bring the magic of the holiday season into your kitchen with these Winter Wonderland Chocolate Chip Christmas Cookies. With a delightful blend of rich chocolate chips, warm spices, and a hint of minty goodness, these cookies are sure to become a family favorite and the perfect addition to your holiday cookie platter.

Why You’ll Love This Recipe

The Winter Wonderland Chocolate Chip Christmas Cookies are not your average chocolate chip cookies. Infused with seasonal flavors, these cookies offer a unique twist with a touch of peppermint. They are soft, chewy, and packed with chocolate chunks, making them irresistible for any sweet tooth. Not only are they delicious, but they also add a festive touch to any holiday gathering with their beautiful presentation.

Perfect for holiday parties or as a gift, this cookie recipe is versatile and easy to make. Whether you’re baking for a crowd or enjoying a cozy night in by the fire, these cookies are a delightful treat that embodies the spirit of Christmas.

Context/Background

Chocolate chip cookies have been a beloved treat since the 1930s when they were created by Ruth Wakefield. This festive variation, the Winter Wonderland Chocolate Chip Christmas Cookies, draws inspiration from classic holiday flavors, incorporating peppermint and warm spices to elevate the traditional cookie into a seasonal favorite.

Throughout the years, chocolate chip cookies have seen countless adaptations, but this winter-themed version brings something uniquely magical to the table. By merging timeless classics with holiday cheer, these cookies are a testament to the ever-evolving nature of baking traditions.

Recipe Details

Serves: 24 cookies

Prep Time: 15 minutes

Cook Time: 10 minutes

Total Time: 25 minutes

Ingredients

  • 1 cup unsalted butter, softened
  • 1 cup brown sugar, packed
  • 1/2 cup granulated sugar
  • 2 large eggs
  • 1 teaspoon vanilla extract
  • 1 teaspoon peppermint extract
  • 2 1/4 cups all-purpose flour
  • 1 teaspoon baking soda
  • 1/2 teaspoon salt
  • 1 cup semi-sweet chocolate chips
  • 1/2 cup white chocolate chips
  • 1 teaspoon ground cinnamon
  • Crushed candy canes for garnish

Directions

  1. Preheat your oven to 350°F (175°C) and line a baking sheet with parchment paper.
  2. In a large mixing bowl, cream together the butter, brown sugar, and granulated sugar until light and fluffy.
  3. Add the eggs one at a time, beating well after each addition, then mix in the vanilla and peppermint extracts.
  4. In a separate bowl, whisk together the flour, baking soda, salt, and ground cinnamon.
  5. Gradually add the dry ingredients to the wet ingredients, mixing until just combined.
  6. Fold in the semi-sweet and white chocolate chips.
  7. Drop rounded tablespoons of dough onto the prepared baking sheet and sprinkle with crushed candy canes.
  8. Bake for 9-11 minutes or until the edges are golden brown.
  9. Allow cookies to cool on the baking sheet for a few minutes before transferring to a wire rack to cool completely.

Tips for Perfect Winter Wonderland Chocolate Chip Christmas Cookies

  • Chill the dough for at least 30 minutes for thicker cookies.
  • Use high-quality chocolate chips for the best flavor.
  • Ensure butter is at room temperature for better creaming.
  • Bake one sheet at a time for even baking.

Serving Suggestions

Serve these cookies with a glass of cold milk, a mug of hot cocoa, or alongside your favorite Christmas desserts for a delightful holiday experience.

Storage and Leftovers

Store the cooled Winter Wonderland Chocolate Chip Christmas Cookies in an airtight container at room temperature for up to five days. For longer storage, you can freeze the baked cookies for up to three months. Ensure cookies are cool before freezing and thaw at room temperature when ready to serve.

Final Thoughts

Get ready to wow your family and friends with these Winter Wonderland Chocolate Chip Christmas Cookies. Perfecting the balance of festive flavors, these cookies are a must-have for your holiday baking list. Enjoy every morsel of these cherished treats as you create memorable moments this Christmas season.

Recipe Notes

  • For a nutty version, you can add 1/2 cup of chopped nuts.
  • Use mint-flavored chocolate chips for an extra minty kick.
  • Experiment with different chocolate varieties for a personalized touch.

“`

Decadent Cheesecake Stuffed Chocolate Chip Cookies for Dessert Lovers

“`html

Cheesecake Stuffed Chocolate Chip Cookies: The Ultimate Indulgence

If you’re looking to satisfy your sweet tooth with a delightful treat, look no further than Cheesecake Stuffed Chocolate Chip Cookies. Imagine the irresistible combination of creamy cheesecake nestled within a classic, gooey chocolate chip cookie. These decadent treats are not only delicious but also a show-stopper for any occasion!

Why You’ll Love This Recipe

These cheesecake stuffed chocolate chip cookies are the perfect fusion of two beloved desserts. The rich, creamy cheesecake center complements the warm, melty chocolate chips, creating a sensory delight with every bite. They are an excellent choice for parties, special occasions, or any time you need a bit of indulgence. The recipe is also customizable, allowing you to adapt the flavors to your liking with ease.

Aside from their incredible taste, these cookies are relatively easy to make, requiring only a few extra steps beyond a standard chocolate chip cookie recipe. This ensures that your friends and family will be amazed, thinking you spent much more time in the kitchen than you actually did!

Context/Background

The combination of cheesecake and cookies is not entirely new, with hybrid pastries gaining popularity over the past few decades. This recipe takes these two classic desserts and merges them into one delectable snack, offering a unique twist on traditional flavors. Cheesecake itself has a long, rich history, dating back to ancient Greece, while chocolate chip cookies debuted in the 1930s. Together, they make a modern masterpiece beloved by dessert enthusiasts.

Recipe Details

Serves: 16

Prep Time: 20 minutes

Cook Time: 15 minutes

Total Time: 35 minutes

Ingredients

  • 1 cup (2 sticks) unsalted butter, room temperature
  • 3/4 cup packed brown sugar
  • 1/4 cup granulated sugar
  • 2 large eggs
  • 1 teaspoon vanilla extract
  • 2 1/4 cups all-purpose flour
  • 1 teaspoon baking soda
  • 1 teaspoon salt
  • 2 cups semi-sweet chocolate chips
  • 8 ounces cream cheese, softened
  • 1/2 cup powdered sugar
  • 1 teaspoon vanilla extract (for filling)

Directions

  1. Preheat your oven to 350°F (175°C) and line a baking sheet with parchment paper.
  2. In a large bowl, cream together the butter, brown sugar, and granulated sugar until light and fluffy.
  3. Add in eggs and vanilla extract, mixing until combined.
  4. In a separate bowl, whisk together flour, baking soda, and salt. Gradually add to the wet ingredients, stirring until just combined.
  5. Fold in chocolate chips, ensuring they are evenly distributed.
  6. In another bowl, mix softened cream cheese, powdered sugar, and vanilla extract until smooth to make the filling.
  7. Scoop out tablespoon-sized portions of the cookie dough. Flatten them and spoon about 1 teaspoon of the cheesecake filling into the center.
  8. Wrap the dough around the filling, sealing edges completely, and place on the prepared baking sheet.
  9. Bake for 12-15 minutes, or until edges are golden. Allow to cool on the tray for a few minutes before transferring to a wire rack to cool completely.

Tips for Perfect Cheesecake Stuffed Chocolate Chip Cookies

  • Chill the dough for at least an hour to prevent cookies from spreading too much.
  • Ensure cream cheese is fully softened to achieve a smooth filling.
  • Do not overbake to maintain a soft, gooey interior.
  • Use parchment paper for easy removal and cleanup.

Serving Suggestions

Serve these cookies slightly warm with a glass of cold milk or a scoop of vanilla ice cream. They also pair wonderfully with a cup of hot coffee or tea, making for a perfect afternoon treat.

Storage and Leftovers

Store leftover cookies in an airtight container in the refrigerator for up to five days. For longer storage, freeze them in a single layer on a baking sheet before transferring to a freezer bag for up to three months. Thaw in the refrigerator before serving.

Final Thoughts

Cheesecake Stuffed Chocolate Chip Cookies are a delightful twist on the classic chocolate chip cookie that you and your family will love. They are easy to make, visually impressive, and taste incredible. Whether for a family gathering or a solo indulgence, these cookies are sure to satisfy your dessert cravings!

Recipe Notes

  • For a different flavor, substitute white chocolate chips or add chopped nuts.
  • Experiment with flavored cream cheese fillings for a unique taste.
  • If you prefer a stronger vanilla flavor, add an extra teaspoon to the cookie dough.

“`

Irresistible Limoncello Raspberry Cookies: The Ultimate Easy Dessert Recipe

“`html

Limoncello Raspberry Cookies: A Zesty Delight

Welcome to an irresistible treat experience with our Limoncello Raspberry Cookies, a delightful blend of tangy limoncello and sweet raspberries. These cookies are the perfect balance of citrusy zest and fruity sweetness, ideal for any dessert lover looking for an easy yet impressive recipe.

Why You’ll Love This Recipe

These Limoncello Raspberry Cookies are not just cookies—they’re bites of sunshine. The bright flavor of limoncello pairs perfectly with fresh raspberries, creating a unique dessert that’s both refreshing and indulgent. Whether you’re preparing for a garden party or a cozy afternoon with friends, these cookies cater to all occasions. Plus, the ease of preparation makes them a go-to recipe for busy bakers.

These cookies are also a sensory delight, with a chewy center and crispy edges that enhance their flavor profile. With just a handful of ingredients, they are perfect for a quick dessert solution without sacrificing taste.

Context/Background

Limoncello, a cherished Italian liqueur, brings a touch of authenticity and zest to these cookies. Traditionally enjoyed as a digestif, limoncello has found its way into various culinary applications, offering a bright citrus flavor. When combined with the perennial favorite raspberry, these cookies pay homage to the blend of Italian flair and seasonal fruit freshness, making them a modern classic.

Recipe Details

Serves: 24 cookies

Prep Time: 15 minutes

Cook Time: 15 minutes

Total Time: 30 minutes

Ingredients

  • 1/2 cup unsalted butter, room temperature
  • 3/4 cup granulated sugar
  • 1 large egg
  • 1 tablespoon limoncello
  • 1 teaspoon vanilla extract
  • 1 1/2 cups all-purpose flour
  • 1/2 teaspoon baking powder
  • 1/4 teaspoon salt
  • 1/2 cup fresh raspberries
  • Zest of 1 lemon

Directions

  1. Preheat your oven to 350°F (175°C) and line a baking sheet with parchment paper.
  2. In a large bowl, cream together the butter and sugar until light and fluffy.
  3. Beat in the egg, then add the limoncello and vanilla extract, mixing well.
  4. In another bowl, whisk together the flour, baking powder, and salt.
  5. Gradually add the dry ingredients to the wet ingredients, mixing just until combined.
  6. Gently fold in the raspberries and lemon zest.
  7. Drop tablespoon-sized amounts of dough onto the prepared baking sheet, spacing them about 2 inches apart.
  8. Bake for 12-15 minutes or until the edges are lightly golden.
  9. Allow the cookies to cool on the baking sheet for 5 minutes before transferring them to a wire rack to cool completely.

Tips for Perfect Limoncello Raspberry Cookies

  • Ensure the butter is at room temperature for easier creaming.
  • Avoid over-mixing the dough to keep the cookies tender.
  • Use fresh raspberries for the best flavor and texture.
  • Lemon zest can be adjusted based on your citrus preference.

Serving Suggestions

These cookies pair wonderfully with a cup of tea or a glass of chilled limoncello. They are also delightful when served with a dollop of whipped cream or a scoop of vanilla ice cream.

Storage and Leftovers

Store the cookies in an airtight container at room temperature for up to 3 days. For longer storage, freeze the cookies in a single layer and transfer them to a freezer-safe bag for up to 1 month.

Final Thoughts

Limoncello Raspberry Cookies are a must-try for anyone who loves the combination of fruity and citrus flavors. Their easy preparation and delectable taste make them a standout dessert option. Give them a try, and let these cookies bring a touch of brightness to your dessert table.

Recipe Notes

  • If you don’t have limoncello, a combination of lemon juice and zest can substitute for a non-alcoholic version.
  • Try adding white chocolate chips for an extra layer of sweetness.
  • Dried raspberries can be used if fresh ones are unavailable, although they may alter the texture slightly.

“`

Master Pinterest: Discover and Save Your Favorite Pins Effortlessly

“`html
Jump to Recipe

Buffalo Chicken Crescent Bake: A Cheesy, Spicy Delight

Picture this: a bubbly, cheesy Buffalo Chicken Crescent Bake that perfectly marries the zing of buffalo sauce with the creamy goodness of ranch. This delightful dish is crowned by a layer of molten mozzarella and a sprinkle of crisp green onions, creating a sensory experience you won’t soon forget. But why settle for just imagining it when you can recreate it in your own kitchen? Let’s dive into this easy yet sophisticated recipe that’s bound to become a favorite!

Why You’ll Love This Recipe

There’s something particularly comforting about Buffalo Chicken Crescent Bake. Whether it’s the irresistible combination of spicy and creamy flavors or its ability to transform a simple weeknight dinner into a culinary treat, this dish has a special kind of magic. It’s an indulgence you can feel good about — the lean ground chicken provides a healthy base, while the whole concoction bakes effortlessly without any fuss.

Enjoy the versatility of this dish, suitable for casual family dinners or as a standout at your next game night gathering. The ease of preparation means more time to enjoy with loved ones, and the delicious aroma alone is enough to draw everyone to the table. The buffalo sauce adds a bold burst of flavor, ensuring that each bite is packed with excitement.

Beyond the rush of flavors, nostalgia and warmth often accompany a dish like this. With the promise of a golden-brown crescent crust and a gooey cheese topping, every forkful offers a taste of comfort and homemade joy.

Personal Story/Connection

One snowy evening, a close friend dropped by unexpectedly. With not much in my pantry and the desire to provide something warm and hearty, we discovered this delightful combo. The Buffalo Chicken Crescent Bake was more than a meal—it became a tradition, warming cold evenings and sparking laughter around the table. The joyful memory of that evening always inspires me to recreate this dish, knowing it brings warmth and smiles.

Context/Background

The buffalo chicken concept traces its roots back to Buffalo, New York, where the iconic buffalo wing was born. This bake takes those beloved flavors and wraps them in a comforting crust, reflecting a modern reinterpretation of a classic American staple. Crescent rolls, meanwhile, add a touch of nostalgic charm, bringing the familiar and the innovative together in a single dish.

Over time, variations of the buffalo chicken bake have evolved, each introducing new layers of taste while staying true to its spicy, tangy roots. It’s become a mainstay in many kitchens, known for its ability to please palates and evoke happiness.

Tips for Perfect Buffalo Chicken Crescent Bake

  • Ensure the dough is evenly spread by gently pressing it into place; this creates a uniform crust.
  • Use freshly shredded mozzarella for optimal meltiness and flavor.
  • Adjust the level of buffalo sauce to suit your spice preference.
  • For an extra crispy crust, pre-bake the crescent crust for 5 minutes before adding toppings.
  • If the edges start to brown too quickly, cover them with foil while baking.

Serving Suggestions

While the bake is delightful on its own, serving it alongside a refreshing side salad can provide a nice balance. Consider a crisp romaine salad with a tangy apple cider vinaigrette or a classic Caesar for added texture and flavor.

If hosting a gathering, cut this bake into smaller squares to make perfect finger-sized portions. Pair it with a lineup of dips like blue cheese or extra ranch, offering guests a customizable experience.

For a touch of elegance, plate with a sprinkle of additional green onions or a drizzle of a balsamic glaze, elevating its presentation from everyday to impressive effortlessly.

Storage and Leftovers

To store leftovers, cover the baking dish with foil or transfer pieces into an airtight container, refrigerating for up to three days. This keeps the crust from drying out and retains the flavors beautifully.

Reheat in an oven preheated to 350°F until warmed through, ensuring that the crust remains crispy. For a quicker option, a microwave works, though the crust might lose some of its texture.

Leftovers are also easily converted into next-day heros by sliding them into a ciabatta or between slices of toasted sourdough bread. Add a dollop of mayo and extra greens for a sandwich with a kick!

Recipe Variations and Substitutions

For a lighter version, swap the buffalo sauce with a mild salsa or marinara sauce, creating a new twist on this classic.

Veganize the bake by replacing ground chicken with crumbled tofu or chickpeas and using a plant-based cheese and dressing substitutes—ideal for those looking to cut out animal products.

Gluten-free crescent dough options are available at most grocery stores, ensuring this dish remains accessible to all diners.

For a seasonal spin, consider adding roasted vegetables such as bell peppers or roasted corn, introducing more layers of flavor and color to the mix.

FAQ

Can I make this ahead of time? Yes, you can prepare the chicken mixture and refrigerate it overnight. When ready to bake, allow it to come to room temperature before assembling the bake.

What substitutions can I use for mozzarella cheese? Try cheddar, Monterey Jack, or a cheese blend for a slightly different flavor profile.

How do I make this gluten-free or vegan? Use gluten-free crescent roll dough and plant-based cheese and dressing alternatives for a dietary-friendly variation.

Optional Nutritional Information

  • Calories per serving: Approximately 320
  • Total fat: 18g
  • Protein: 21g
  • Carbohydrates: 18g

Final Thoughts

Buffalo Chicken Crescent Bake isn’t just a meal; it’s a sensation that brings people together over shared enjoyment. The rich flavors, ease of preparation, and versatility make it a must-try for any home cook. Whether you’re hosting friends or savoring a cozy night in, this dish delivers, creating a memorable experience every time. Be sure to share your takes and improvements in the comments below!

Recipe Section (Final Element)

Serves: 4-6 | Prep Time: 10 minutes | Cook Time: 25 minutes | Total Time: 35 minutes

  • 1 lb ground chicken
  • 1 packet ranch seasoning mix
  • 1/2 cup buffalo sauce
  • 1 cup shredded mozzarella cheese
  • 1/4 cup chopped green onions
  • 1/4 cup ranch dressing
  • 1 can refrigerated crescent dough
  1. Preheat the oven to 375°F and grease a 9×13 baking dish.
  2. In a skillet, cook the ground chicken over medium heat until no longer pink.
  3. Stir in ranch seasoning mix and buffalo sauce, simmer for 5 minutes.
  4. Roll out the crescent dough and press it into the baking dish forming a crust.
  5. Spread the cooked chicken mixture over the crust, then sprinkle with shredded mozzarella cheese.
  6. Bake for 15-20 minutes or until the crust is golden brown and cheese is melted.
  7. Drizzle ranch dressing over the top and garnish with chopped green onions.
  8. Slice into squares and serve hot. Enjoy!

#PinterestRecipes #BuffaloChicken #CheesyGoodness #WeeknightDinner

“`

Irresistible Gingerbread Cupcakes with Decadent Creamy Cinnamon Frosting

“`html

Gingerbread Cupcakes with Creamy Cinnamon Frosting: Irresistible Holiday Treat

Indulge in the delightful flavors of the holiday season with our Gingerbread Cupcakes with Creamy Cinnamon Frosting. These moist and spiced cupcakes, topped with a smooth and rich cinnamon-infused frosting, will bring festive cheer to any gathering. Whether you’re hosting a holiday party or simply craving a sweet treat, this recipe is sure to impress and satisfy.

Why You’ll Love This Recipe

These Gingerbread Cupcakes are a perfect blend of warm spices like ginger, cinnamon, and nutmeg, creating a cozy and nostalgic flavor profile. The creamy cinnamon frosting adds a layer of sweetness and richness that’s hard to resist. Perfect for holiday celebrations, this recipe brings the classic gingerbread flavor in a fun and portable cupcake form.

Not only do these cupcakes taste heavenly, but they also fill your kitchen with the enticing aroma of spices, setting the perfect holiday mood. They’re an excellent choice for gifting, parties, or just a cozy night in with family.

Context/Background

Gingerbread has a rich history dating back to the 15th century, originally popularized in Europe. It’s traditionally associated with winter and holiday festivities, thanks to its warm spices. The adaptation into cupcake form allows for individual servings that are both convenient and delightful.

Over the years, gingerbread has evolved from simple cookies and breads to include a variety of baked goods. These cupcakes are a modern take, adding a luxurious touch with creamy cinnamon frosting.

Recipe Details

Serves: 12 cupcakes

Prep Time: 15 minutes

Cook Time: 20 minutes

Total Time: 35 minutes

Ingredients

  • 1 1/4 cups all-purpose flour
  • 1 teaspoon ground ginger
  • 1 teaspoon ground cinnamon
  • 1/2 teaspoon ground nutmeg
  • 1/4 teaspoon ground cloves
  • 1/4 teaspoon baking soda
  • 1/4 teaspoon salt
  • 1/2 cup unsalted butter, softened
  • 1/2 cup brown sugar, packed
  • 1/2 cup molasses
  • 1 egg
  • 1/2 cup buttermilk
  • For the frosting:
  • 1/2 cup unsalted butter, softened
  • 2 cups powdered sugar
  • 1 teaspoon ground cinnamon
  • 2 tablespoons milk
  • 1 teaspoon vanilla extract

Directions

  1. Preheat your oven to 350°F (175°C) and line a cupcake pan with paper liners.
  2. In a bowl, whisk together flour, ginger, cinnamon, nutmeg, cloves, baking soda, and salt.
  3. In a separate large bowl, beat together butter and brown sugar until creamy. Add molasses and egg, mixing well.
  4. Alternately add the flour mixture and buttermilk to the butter mixture, starting and ending with the flour. Mix until smooth.
  5. Divide the batter evenly among the cupcake liners, filling each about two-thirds full.
  6. Bake for 18-20 minutes or until a toothpick inserted into the center comes out clean. Allow to cool.
  7. For the frosting, beat butter until creamy. Gradually add powdered sugar, cinnamon, milk, and vanilla, and continue beating until smooth and fluffy.
  8. Once cupcakes are completely cool, frost them generously with the creamy cinnamon frosting.

Tips for Perfect Gingerbread Cupcakes with Creamy Cinnamon Frosting

  • Ensure all ingredients are at room temperature for even mixing.
  • Don’t overfill the cupcake liners to prevent overflowing during baking.
  • For a smoother frosting, sift the powdered sugar before mixing.
  • Chill the frosting slightly if it becomes too soft before piping.

Serving Suggestions

Serve these cupcakes with a hot cup of spiced tea or coffee for the perfect winter treat. They also pair wonderfully with eggnog or a light dessert wine.

Storage and Leftovers

Store unfrosted cupcakes in an airtight container at room temperature for up to 3 days. Frosted cupcakes should be kept in the refrigerator and can last for up to 1 week. For future enjoyment, freeze the cupcakes without frosting, then thaw and frost as needed.

Final Thoughts

These Gingerbread Cupcakes with Creamy Cinnamon Frosting are a must-try for anyone who loves the festive flavors of the season. Easy to prepare and deliciously satisfying, they’re a delightful addition to holiday gatherings and will surely bring a smile to anyone’s face. Give this recipe a try, and enjoy a taste of holiday magic!

Recipe Notes

  • For a dairy-free version, substitute with almond milk and vegan butter.
  • Add a pinch of allspice for extra warmth and depth of flavor.
  • Consider garnishing with a light sprinkle of cinnamon or ginger powder for presentation.

“`

Delicious Cranberry-Glazed Butternut Squash Salad Recipe for Autumn

“`html

Cranberry-Glazed Roasted Butternut Squash Salad: A Festive Delight

Welcome to the ultimate holiday side dish – the Cranberry-Glazed Roasted Butternut Squash Salad. This beautifully vibrant salad combines the sweet and tart flavor of cranberries with the savory taste of roasted butternut squash, making it the perfect addition to any festive feast.

Why You’ll Love This Recipe

This Cranberry-Glazed Roasted Butternut Squash Salad is a unique twist on traditional salads, offering a burst of colors and flavors on your plate. The combination of sweet roasted squash and tangy cranberry glaze makes this dish irresistibly delicious. It’s a versatile recipe that’s perfect for Thanksgiving, Christmas, or any fall gathering.

Not only is it delicious, but it’s also nutritious. Packed with antioxidants from the cranberries and vitamins from the butternut squash, this salad is a healthy choice that doesn’t compromise on taste. Plus, it’s vegan and gluten-free, making it suitable for various dietary needs.

Context/Background

The Cranberry-Glazed Roasted Butternut Squash Salad is inspired by the classic fall flavors. Butternut squash, a staple in autumn cuisine, pairs wonderfully with cranberries, which have been used in North American cooking for centuries. This recipe pays homage to these ingredients, celebrating their wholesome, earthy notes.

Roasting the squash enhances its natural sweetness, while the cranberry glaze adds a modern twist, bringing a delightful tartness to the palate. This technique has become popular for adding depth to vegetable dishes.

Recipe Details

Serves: 4

Prep Time: 15 minutes

Cook Time: 30 minutes

Total Time: 45 minutes

Ingredients

  • 1 medium butternut squash, peeled and cubed
  • 2 tablespoons olive oil
  • Salt and pepper to taste
  • 1 cup cranberries, fresh or frozen
  • 1/4 cup maple syrup
  • 2 tablespoons balsamic vinegar
  • 1/4 cup chopped pecans
  • 3 cups mixed greens
  • 1/4 cup crumbled goat cheese (optional)

Directions

  1. Preheat your oven to 400°F (200°C).
  2. Toss the butternut squash cubes with olive oil, salt, and pepper. Spread on a baking sheet and roast for 25-30 minutes, or until tender and slightly caramelized.
  3. Meanwhile, in a small saucepan, combine cranberries, maple syrup, and balsamic vinegar. Cook over medium heat until the cranberries burst and the mixture thickens to form a glaze, about 10 minutes.
  4. In a large bowl, combine roasted squash, mixed greens, and pecans.
  5. Pour the cranberry glaze over the salad and toss gently to coat.
  6. Top with crumbled goat cheese if using, and serve immediately.

Tips for Perfect Cranberry-Glazed Roasted Butternut Squash Salad

  • Use a sharp knife to easily peel and cube the butternut squash.
  • Roast the squash until it’s tender for the best texture.
  • Adjust the sweetness of the cranberry glaze by adding more maple syrup if desired.
  • Toast the pecans before adding to enhance their flavor and crunch.

Serving Suggestions

This salad makes a fantastic side for roasted turkey, ham, or chicken. It can also be served as a main dish for a light lunch when paired with crusty bread.

Storage and Leftovers

Store any leftovers in an airtight container in the refrigerator for up to 3 days. For best results, store the glaze separately and combine just before serving to maintain the freshness of the greens.

Final Thoughts

This Cranberry-Glazed Roasted Butternut Squash Salad is a must-try for any food lover. Its unique blend of flavors and textures will have your guests coming back for seconds. Enjoy the festive flair it brings to your dining table!

Recipe Notes

  • Substitute maple syrup with honey for a different flavor profile.
  • Add dried cranberries for extra texture.
  • For a nut-free version, replace pecans with sunflower seeds.

“`

Indulge in Autumn Bliss with This Creamy Pumpkin Flan Recipe

“`html

Pumpkin Flan Recipe: Creamy Caramel Delight

Discover the decadence of our Pumpkin Flan Recipe – Creamy Caramel Delight, a dessert that blends the rich flavors of pumpkin with the sweetness of caramel for a treat that’s as pleasing to the eye as it is to the palate. Indulge in this velvety smooth flan that balances sweetness with spice, making it the perfect dessert for any festive occasion or a cozy night in.

Why You’ll Love This Recipe

This Pumpkin Flan is a must-try for any dessert lover. It’s a unique twist on the traditional flan, infused with warm autumn spices and creamy pumpkin, making it an ideal dessert for Thanksgiving and holiday gatherings. The layers of silky caramel and luscious pumpkin custard create a harmonious dance of flavors that are both comforting and inviting.

This recipe is incredibly easy to make, yet results in a dessert that looks and tastes like it took hours to prepare. The creamy texture combined with the smooth caramel topping is a showstopper that leaves a lasting impression on anyone who tastes it.

Context/Background

Pumpkin flan finds its roots in traditional Latin American cuisine, where flan is a staple dessert, cherished for its simplicity and elegance. By incorporating pumpkin, often associated with autumnal flavors, this version of flan seamlessly blends cultures and seasons, offering a modern twist on a classic recipe.

Recipe Details

Serves: 8
Prep Time: 20 minutes
Cook Time: 1 hour
Total Time: 1 hour 20 minutes

Ingredients

  • 1 cup granulated sugar
  • 1 cup pumpkin puree
  • 5 large eggs
  • 1 can (14 ounces) sweetened condensed milk
  • 1 can (12 ounces) evaporated milk
  • 1 teaspoon vanilla extract
  • 1 teaspoon ground cinnamon
  • 1/2 teaspoon ground nutmeg
  • 1/4 teaspoon ground cloves
  • 1/4 teaspoon salt

Directions

  1. Preheat your oven to 350°F (175°C). Place an 8-inch round baking dish inside a larger baking pan.
  2. In a medium saucepan over medium heat, melt the sugar until fully caramelized and golden brown. Immediately pour the caramel into the prepared baking dish, tilting to cover the bottom evenly. Set aside.
  3. In a large bowl, whisk together pumpkin puree, eggs, sweetened condensed milk, evaporated milk, vanilla, cinnamon, nutmeg, cloves, and salt until smooth and well combined.
  4. Carefully pour the pumpkin mixture over the cooled caramel layer in the baking dish.
  5. Place the large baking pan in the oven and fill with hot water halfway up the sides of the baking dish to create a water bath.
  6. Bake for 1 hour or until the flan is set in the center. Remove from the oven and let cool in the water bath for 30 minutes.
  7. Refrigerate for at least 4 hours, preferably overnight.
  8. To serve, run a knife around the edges of the flan, place a serving plate on top, and invert the dish to release the flan.

Tips for Perfect Pumpkin Flan

  • Use a water bath to ensure even cooking and prevent the flan from cracking.
  • Allow enough chilling time to ensure the flan sets properly and develops its flavors.
  • Preheat your oven to the correct temperature for consistent results.
  • Use pure pumpkin puree for the best flavor and texture.

Serving Suggestions

Serve your Pumpkin Flan chilled, topped with a dollop of whipped cream and a sprinkle of cinnamon for an extra touch of elegance. Pair it with a hot cup of coffee or a soothing tea to enhance its delicious flavors.

Storage and Leftovers

Store any leftover flan covered in the refrigerator for up to 3 days. Ensure that the flan is well-chilled before serving again. It’s best enjoyed fresh, but storing in an airtight container can keep it from absorbing other flavors in the fridge.

Final Thoughts

Our Pumpkin Flan Recipe – Creamy Caramel Delight is a dessert that harmoniously marries flavor and texture, offering an unforgettable taste experience. If you’re looking for a dessert that stands out and delights, this pumpkin flan is undoubtedly worth making. Try it today and enjoy a sweet symphony of caramel and pumpkin.

Recipe Notes

  • For a lower sugar version, opt for a reduced sugar condensed milk.
  • Spice it up by adding ginger or allspice to the mix.
  • For a fun twist, try using a pumpkin spice blend instead of individual spices.

“`

Create and Save Your Own Pinterest Pins on December 5, 2024

“`html
Jump to Recipe

Walking Taco Bake: A Cheesy Delight for Every Occasion

Imagine biting into a dish that encapsulates the essence of a classic taco, only to discover layers of melty cheese and crunchy chips seamlessly melding into a comforting bake. This Walking Taco Bake is an irresistible blend of textures, offering savory ground beef, zesty taco spices, and a cheesy sauce that bubbles with excitement. It’s not just a meal–it’s a conversation starter and a testament to the playful side of your culinary repertoire.

Why You’ll Love This Recipe

This Walking Taco Bake is everything you love about tacos, reimagined in a warm, cohesive dish that’s perfect for sharing. Its hearty nature lends itself to a satisfying dinner that brings everyone to the table. The best part? It’s a versatile dish that evokes nostalgia and creates new memories with every serving.

Quick and easy to prepare, this recipe doesn’t require extensive cooking skills, making it accessible for beginner chefs and busy families alike. Simply layer ingredients and let the oven do the work. It’s also an excellent way to involve kids in cooking–they’ll love helping to sprinkle cheese and arrange the Fritos.

Besides, who can resist a dish where cheese soup transforms into a rich, creamy layer of deliciousness? Whether it’s a chilled weeknight or an impromptu gathering, this bake exudes comfort.

Personal Story/Connection

The first time I made this dish was on a cool autumn evening. We had a few friends over, and it was meant to be a casual get-together. I wanted something easy but memorable, so I thought, why not combine tacos and a casserole? The rave reviews from that night made it a staple in our dinner rotations. It’s more than just food; it’s a means to foster connections and share joy.

Context/Background

The Walking Taco, also known as a Frito pie, has roots in Tex-Mex cuisine. Traditionally, it involves stuffing a bag of chips with taco fillings, making it a favorite at fairs and gatherings. This bake variation offers a family-friendly spin, eliminating the need for chip bags while enhancing the overall flavor with a cheesy bake.

Over the years, creative cooks have adopted and adapted the Walking Taco to various forms, including this baked version which provides warmth and a more structured meal as opposed to its more casual counterpart. Every bite remains a homage to its on-the-go roots while embracing the comforts of home cooking.

Tips for Perfect Walking Taco Bake

  • Quality Meat: Opt for lean ground beef to minimize fat content without compromising flavor.
  • Taco Seasoning: Customize your seasoning mix for a personal touch. Add a pinch of cayenne if you prefer extra spice.
  • Cheesy Delight: Ensure the cheddar cheese soup is well-blended with milk for a smooth pour.
  • Baking Dish: Use an 8×8 dish for the best layering and optimal cheese bubbling.
  • Crunch Factor: Add extra Fritos before serving for a mix of soft and crunchy textures.

Serving Suggestions

This Walking Taco Bake is a standalone star, but you can enhance the experience with a variety of accompaniments. Serve alongside a simple green salad or coleslaw to add freshness and color. A side of guacamole or sour cream can provide a delightful contrast to the rich, cheesy flavors.

Consider serving it as a crowd-pleaser at gatherings, using smaller ramekins for individual portions. This not only delivers a personal touch but also instantly elevates the dining experience. For an authentic taco night, complement with traditional salsa or Mexican street corn.

Storage and Leftovers

Storing the Walking Taco Bake is effortless. Simply cover the baking dish with foil or transfer leftovers to an airtight container and refrigerate for up to three days. Reheat in the oven at 325°F to revive the cheesy integrity and ensure even warming throughout.

To breathe new life into leftovers, consider creating a taco salad by serving cold portions over fresh greens or using as a filling for burritos. Transform the bake into nachos by layering over chips with an additional sprinkle of cheese before a quick oven session.

Recipe Variations and Substitutions

For a lighter twist, use ground turkey or chicken instead of beef. Vegetarians can substitute meat with black beans or lentils, and vegan-friendly cheese and soup create a plant-based alternative without losing that creamy texture.

Feel like experimenting? Swap out Chili cheese Fritos for regular corn chips or nacho-flavored ones. Add vegetables like diced bell peppers or olives to increase the nutritional profile and introduce bursts of color.

FAQ

Can I make this ahead of time? Yes, you can prepare the meat layer a day in advance and store it in the refrigerator until you’re ready to assemble and bake.

What substitutions can I use for cheddar cheese soup? A homemade cheese sauce with melted cheddar and cream can replace canned soup for a fresher taste.

How do I make this gluten-free or vegan? Opt for gluten-free taco seasoning and chips, and choose a plant-based cheese alternative to ensure a vegan version.

Optional Nutritional Information

Per serving: Approx. 450 calories, 30g fat, 25g carbohydrates, 20g protein

Final Thoughts

This Walking Taco Bake promises more than a meal; it’s an expression of warmth and friendship in edible form. Whether you’re seeking comfort on a cold evening or an engaging dish for a festive night, it delivers on all fronts. Easy to prepare, with endless variations, it’s destined to become a beloved addition to your recipe collection. Share your experiences, feelings, or twist on this classic hack in the comments below—we’d love to hear from you!

Recipe Section

Serves: 4-6 | Prep Time: 15 minutes | Cook Time: 30 minutes | Total Time: 45 minutes

  • 1 lb ground beef
  • 1 package taco seasoning
  • 2/3 cup water
  • 2 cups Chili cheese Fritos
  • 1 can cheddar cheese soup
  • 1/2 cup milk
  • 1 cup shredded mozzarella cheese
  1. Begin by browning the ground beef in a skillet over medium-high heat until it’s no longer pink. Drain any excess fat.
  2. Add taco seasoning and water. Simmer for about 5 minutes until the liquid is absorbed.
  3. Layer Chili cheese Fritos in an 8×8 baking dish. Spread the seasoned meat evenly on top.
  4. Heat cheddar cheese soup and milk over low heat until creamy, then pour over the meat layer.
  5. Sprinkle mozzarella cheese on top and bake at 350°F for 12-14 minutes until bubbly and golden.
  6. Scoop and enjoy this cheesy delight!

“`