Spice Up Dinner with Cheese-Stuffed Jalapeño Meatballs Recipe

“`html
Jump to Recipe

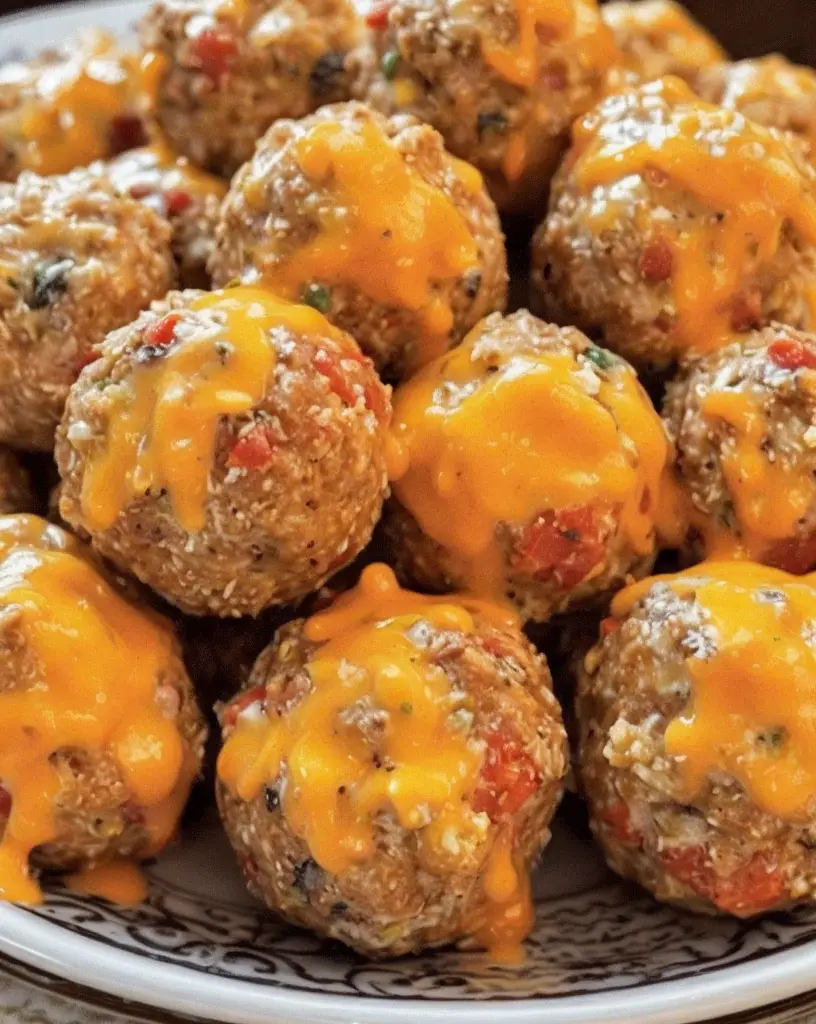
Cheese-Stuffed Jalapeño Meatballs: A Spicy and Cheesy Delight

Imagine biting into a juicy meatball, only to be met with a delightful burst of creamy cheese and the perfect hint of spice—this is the magic of Cheese-Stuffed Jalapeño Meatballs. The combination of tender beef, aromatic spices, and a creamy jalapeño center creates a flavor explosion that’s sure to become a favorite. With their crispy exterior and gooey interior, these meatballs are more than just a side dish; they’re a party in your mouth.

Why You’ll Love This Recipe

If you’re a fan of bold flavors and impressive dishes, these Cheese-Stuffed Jalapeño Meatballs are a must-try. Their spicy, cheesy allure makes them ideal for game day snacking or as a standalone feature at a dinner party. Not only are they simple to prepare, but their versatility in serving options means they can fit any mealtime. Plus, incorporating jalapeños adds a boost of vitamins and metabolism-enhancing benefits, delivering a dish that’s as nourishing as it is flavorful. Whether you’re cheering on your favorite team or just crafting an elegant appetizer, these meatballs evoke feelings of warmth, joy, and satisfyingly spicy indulgence.

Personal Story/Connection

Growing up in a family that adored spicy food, these Cheese-Stuffed Jalapeño Meatballs were a staple at every gathering. I vividly remember my grandmother teaching us how to perfect the cheese-stuffing technique, urging us to be generous with the cream cheese for a surprise burst with every bite. Over the years, this recipe has not only filled our home with irresistible aromas but also united our family through shared expertise and laughter in the kitchen. It’s a recipe with a piece of my heart, reminding me of family bonds and traditions.

Context/Background

This recipe takes inspiration from the ever-popular jalapeño popper, a classic appetizer loved for its spicy, cheesy combination. The idea of combining these flavors into meatballs likely originated in Texas, where jalapeño-stuffed creations are a culinary staple. Over time, adaptations of this recipe have emerged, incorporating various cheeses and spices, each offering a unique taste profile while maintaining the beloved spicy-cheesy essence. As with many cherished dishes, it remains a canvas for creativity, encouraging cooks to experiment with flavors and textures.

Tips for Perfect Cheese-Stuffed Jalapeño Meatballs

  • Choose Fresh Jalapeños: Opt for firm and bright green jalapeños for optimum flavor and spice.
  • Avoid Overcrowding the Baking Tray: Ensure meatballs are evenly spaced to allow for even cooking.
  • Adjust Spice Level: For less heat, soak jalapeño slices in water before using.
  • Experiment with Cheese: Consider using different cheeses like gouda or cheddar for a distinct flavor.
  • Test Meatball Size: Consider the size in relation to the cream cheese filling for a well-balanced bite.
  • Freezing for Efficiency: Make a larger batch and freeze half for quick future meals.

Serving Suggestions

While Cheese-Stuffed Jalapeño Meatballs shine on their own, they’re equally delightful served alongside complementary dishes. Create a mouthwatering spread by pairing them with a crisp, green salad or buttery garlic bread for contrast. For a more decadent feast, consider serving on a platter with toothpicks, nestled amongst fresh veggies and olives for a vibrant appetizer display. Hosting a party? Place them in a crockpot full of marinara sauce to keep warm, allowing guests to help themselves to this irresistible delight throughout the event.

Storage and Leftovers

To keep your Cheese-Stuffed Jalapeño Meatballs fresh, allow them to cool completely before storing. Place them in an airtight container and refrigerate for up to three days. When ready to reheat, use an oven preheated to 350°F to restore their oven-fresh taste. For longer storage, flash-freeze the meatballs on a baking sheet, then transfer them to a sealed freezer bag. They can be stored for up to three months in the freezer, ready to be reheated whenever cravings hit.

Recipe Variations and Substitutions

To suit various dietary preferences, explore these tantalizing variations:

  • Gluten-Free: Replace bread crumbs with almond flour or gluten-free oats.
  • Vegan Option: Substitute ground beef with plant-based meat and use dairy-free cream cheese.
  • Low-Carb: Omit bread crumbs altogether and rely on Parmesan to bind the ingredients.
  • Herb Infusion: Enhance the freshness by adding chopped mint or basil alongside cilantro.

FAQ

Can I make this ahead of time?
Yes, prepare the meatballs in advance and store covered in the fridge. Bake them fresh when needed.

What substitutions can I use for breadcrumbs?
You can use crushed crackers, oatmeal, or chopped nuts as a substitute for breadcrumbs.

How do I make this gluten-free or vegan?
Opt for gluten-free breadcrumbs and plant-based ingredients like dairy-free cheese and meat alternatives.

Optional Nutritional Information

Approximate nutritional details per serving:

  • Calories: 210
  • Protein: 14g
  • Fat: 16g
  • Carbohydrates: 4g

Final Thoughts

Cheese-Stuffed Jalapeño Meatballs bring excitement to any table, with their blend of spices, creamy centers, and juicy meat. They’re a crowd-pleaser that promises to elevate your culinary repertoire. Whether you’re a fan of intense flavors or innovative cooking, these meatballs offer something special. Give them a try at your next gathering, and share the experience with family and friends. Let us know your thoughts or questions below!

Recipe Section (Final Element)

Serves: 4 | Prep Time: 15 minutes | Cook Time: 25 minutes | Total Time: 40 minutes

  • 1 lb ground beef
  • 1/2 cup bread crumbs
  • 1/4 cup grated Parmesan cheese
  • 2 cloves garlic, minced
  • 1/4 cup chopped cilantro
  • 1/2 tsp salt
  • 1/2 tsp pepper
  • 4 oz cream cheese, cut into small cubes
  • 4 jalapeños, sliced and deseeded
  • Marinara sauce, for serving
  1. Preheat the oven to 375°F and line a baking sheet with parchment paper.
  2. In a large bowl, combine ground beef, bread crumbs, Parmesan cheese, garlic, cilantro, salt, and pepper. Mix until combined.
  3. Take a small amount of the meat mixture and flatten it in your hand. Place a cube of cream cheese and a slice of jalapeño in the center, then shape it into a meatball around the filling.
  4. Place the stuffed meatballs on the prepared baking sheet and bake for 20-25 minutes, or until cooked through.
  5. Serve the cheese-stuffed jalapeño meatballs with marinara sauce for dipping.
  6. Enjoy the spicy and cheesy goodness!

“`

Irresistible Cream Cheese Corn Casserole for a Cozy Comfort Meal

“`html
Jump to Recipe

Cream Cheese Corn Casserole: A Delicious Twist on a Classic Side Dish

Picture this: a bubbling dish of creamy, cheesy goodness that tantalizes your taste buds with its rich textures and flavors. Cream Cheese Corn Casserole promises to be the centerpiece of your next meal, capturing hearts with every bite. This delectable dish combines the sweetness of corn with the smooth, savory notes of cream cheese, offering a unique twist on traditional corn casseroles. It’s a must-try recipe that brings comfort and happiness to any table.

Why You’ll Love This Recipe

This Cream Cheese Corn Casserole stands out for its simplicity and mouthwatering flavor. It’s a versatile dish that shines as a comforting side or even as a main course for those cozy, quiet dinners. Its easy-to-follow recipe makes it perfect for both novice and seasoned cooks alike. The blend of cream cheese and cheddar elevates the corn to a gourmet level, while the buttery cracker topping adds a delightful crunch.

Beyond its delicious taste, this casserole offers a sense of nostalgia, reminiscent of family gatherings and festive occasions. Its warm and inviting nature makes it an ideal choice for holidays, potlucks, or any rise in demand for comfort food. Plus, its ingredients are easily accessible and budget-friendly, making it an attractive option any time of the year.

Personal Story/Connection

Growing up, Cream Cheese Corn Casserole was a staple at our family gatherings. My grandmother would prepare it for every holiday meal, and the aroma alone seemed to signal the beginning of festivities. Watching her in the kitchen, I learned that food was more than sustenance; it was an expression of love. This dish carries those cherished memories and brings an irreplaceable joy that connects past and present with every spoonful.

Context/Background

The origins of corn casseroles trace back to native cuisine, where corn has been a staple for centuries. Over the years, the dish has taken on various forms and ingredients, evolving with different cultural influences. The addition of cream cheese and cheddar in this version introduces a contemporary twist, balancing traditional flavors with modern culinary trends.

Corn casseroles have become synonymous with comfort and home-cooked goodness in American households. They’ve adapted over time to include ingredients that enhance their rich textures and flavors, such as local cheeses and spices, making each recipe unique to its creator.

Tips for Perfect Cream Cheese Corn Casserole

  • Ensure the cream cheese is at room temperature for easy mixing.
  • You can use fresh corn when in season for an even sweeter taste.
  • Experiment with different cheese varieties, like Monterey Jack or Colby, for a new flavor profile.
  • Add a dash of cayenne pepper for a subtle kick.
  • Try using a food processor to crush the Ritz crackers into even crumbs for the perfect topping.

Serving Suggestions

This casserole shines when paired with a range of dishes. Serve it alongside roasted chicken, grilled steak, or a hearty salad for a well-rounded meal. Its creamy texture and bold flavors complement savory main courses, enhancing the entire dining experience.

For a vibrant presentation, garnish with fresh herbs like chopped chives or parsley before serving. The pops of green not only elevate the visual appeal but also add freshness to each bite. Consider serving it in individual ramekins for an elegant twist at dinner parties, allowing guests to savor their own miniature portions.

Storage and Leftovers

To store leftovers, cover the casserole dish tightly with aluminum foil or transfer the contents to an airtight container. Refrigerate for up to three days. When you’re ready to enjoy it again, reheat in a 350°F oven until warmed through, maintaining its delightful texture and flavor.

Leftovers can be transformed into delightful next-day meals. Spoon some over toasted bread for a quick open-faced sandwich, or fold it into omelets for a decadent breakfast. With a touch of culinary creativity, leftovers turn into exciting new dishes.

Recipe Variations and Substitutions

Customize your Cream Cheese Corn Casserole with these variations:

  • For a spicier version, mix in diced jalapeños or a sprinkle of red pepper flakes.
  • Make it gluten-free by using gluten-free crackers as a topping.
  • Add diced red bell peppers or green chilies for a pop of color and flavor.
  • For a vegan twist, substitute cream cheese and cheddar with plant-based alternatives.

FAQ

Can I make this ahead of time? Yes, you can assemble the casserole a day in advance. Store it in the refrigerator and bake just before serving.

What substitutions can I use for butter? You can replace butter with margarine or olive oil for a slightly healthier version.

How do I make this dish gluten-free? Opt for gluten-free crackers in place of Ritz crackers to create a delicious gluten-free casserole.

Optional Nutritional Information

  • Calories: 320 per serving
  • Total Fat: 20g
  • Saturated Fat: 12g
  • Cholesterol: 60mg
  • Sodium: 350mg
  • Carbohydrates: 28g
  • Dietary Fiber: 2g
  • Sugars: 8g
  • Protein: 5g

Final Thoughts

Cream Cheese Corn Casserole is a delightful dish that’s sure to become a favorite in your home. Its rich, creamy textures and balanced flavors make it a perfect addition to any meal, whether you’re hosting a special occasion or enjoying a simple dinner with loved ones. Give this recipe a try and experience the comfort and joy it brings. We invite you to share your thoughts or reach out with any questions—happy cooking!

Recipe Section

Serves: 6 | Prep Time: 10 minutes | Cook Time: 25-30 minutes | Total Time: 40 minutes

  • 2 (15 oz) cans of whole kernel corn, drained
  • 1 (8 oz) package of cream cheese, softened
  • 1/2 cup unsalted butter, melted
  • 1/4 cup sugar
  • 1/2 teaspoon salt
  • 1/4 teaspoon pepper
  • 1/2 cup shredded cheddar cheese
  • 1/2 cup crushed Ritz crackers
  1. Preheat the oven to 350°F and grease a baking dish.
  2. In a large bowl, mix together the corn, cream cheese, butter, sugar, salt, and pepper until well combined.
  3. Spread the corn mixture into the prepared baking dish.
  4. Sprinkle the shredded cheddar cheese on top, followed by the crushed Ritz crackers.
  5. Bake for 25-30 minutes, or until the casserole is bubbly and the top is golden brown.
  6. Let it cool slightly before serving.
  7. Enjoy this creamy and cheesy corn casserole as a delicious side dish!

“`

Mouth-Watering Mozzarella Cheese Sticks: A Recipe You Can’t Resist

“`html
Jump to Recipe

Mouthwatering Mozzarella Cheese Sticks: The Perfect Gooey Delight

Discover the irresistible allure of homemade Mozzarella Cheese Sticks that are perfectly crispy on the outside and deliciously gooey on the inside. This easy-to-follow recipe will leave your taste buds craving every last bite. Perfect for any occasion, these cheesy delights are a surefire hit with both kids and adults alike!

Why You’ll Love This Recipe

Our Mozzarella Cheese Sticks are a symphony of textures and flavors, with a crunchy breadcrumb coating and a melty cheese center that promises a delightful culinary experience. They’re versatile enough to serve as a party appetizer, a game day snack, or a fun treat for family nights. These snacks are not only easy to prepare but also provide a creative twist on a classic favorite.

Enjoy the freedom to customize the seasoning mix to suit your mood – whether you prefer a spicy kick or a herbaceous undertone, crafting these cheese sticks is as exciting as devouring them. There’s a certain warmth and nostalgia associated with biting into a perfectly cooked mozzarella stick, one that is bound to evoke fond memories or create new ones!

Not forgetting the nutritional benefits that come from indulging in cheese. Beyond mere taste, mozzarella is a source of high-quality protein and essential minerals – pair these benefits with the control of homemade cooking and you have a snack both delicious and rewarding.

Personal Story/Connection

The first time I made Mozzarella Cheese Sticks was an experience filled with shared laughter and joy. Preparing these cheesy delights reminded me of family gatherings at my grandmother’s house, where cheese sticks were always a centerpiece. The joy of crafting each stick, combined with the anticipation of that first cheesy pull, brings a warm sense of nostalgia every time I fry up a batch.

Context/Background

Cheese sticks are believed to have originated in the late 1970s as a fun twist on the classic Italian fried cheese dishes. Over time, these cheesy, crunchy treats have evolved into a beloved appetizer across the globe. Often associated with parties and festive gatherings, these sticks combine the rich heritage of Italian cuisine with a universally loved comfort food appeal.

Interestingly, variations of fried cheese can be found in multiple cultures, each adding their own unique touch, making cheese sticks a truly international delight.

Tips for Perfect Mozzarella Cheese Sticks

  • Ensure the mozzarella cheese sticks are well-chilled or partially frozen before cooking to prevent over-melting.
  • For a thicker crust, double coat by repeating the flour, egg, and breadcrumb steps.
  • Experiment with crust flavors by adding grated parmesan or herbs to the breadcrumb mixture.
  • Maintain the oil temperature at 350°F for evenly cooked, crisp sticks.
  • For lighter, less oily sticks, use panko breadcrumbs which absorb less oil.
  • To avoid sticking, fry in batches and ensure plenty of space between each stick in the fryer.

Serving Suggestions

Mozzarella Cheese Sticks are best served hot and fresh, paired with a tangy marinara sauce for dipping. For a gourmet twist, try a creamy garlic aioli or a spicy sriracha mayo. Serve them as part of a party platter with assorted snacks or as a start to an Italian-themed dinner night.

For casual gatherings, present these cheese sticks in a fun basket lined with parchment paper or stack them creatively on a rustic wooden board. Consider garnishing with a sprinkle of fresh parsley or a touch of grated parmesan to enhance the visual appeal.

Storage and Leftovers

Store any leftover Mozzarella Cheese Sticks in an airtight container in the refrigerator for up to three days. To reheat, place them in an oven preheated to 375°F for about 10 minutes until warm and crispy.

Leftovers can also be placed in the freezer for longer storage. Simply thaw and reheat in the oven as needed. Avoid microwaving as it may make them soggy.

Recipe Variations and Substitutions

For a healthier, baked version, place the coated sticks on a baking sheet and bake in a 425°F oven for 10-12 minutes, turning halfway through.

For a gluten-free option, substitute traditional flour and breadcrumbs with your preferred gluten-free alternatives.

To make it vegan, opt for dairy-free mozzarella and plant-based egg substitutes, and choose a vegan breadcrumb option. Spice lovers can add a dash of cayenne or hot sauce to the egg mixture for an added kick.

FAQ

Can I make this ahead of time?

Yes, you can prepare and freeze the mozzarella sticks on a baking sheet. Simply transfer frozen sticks to airtight containers and fry when ready.

What substitutions can I use for breadcrumbs?

Panko breadcrumbs or crushed cornflakes can provide a different texture. For a gluten-free substitute, use rice flour or a gluten-free breadcrumb mix.

How do I make this gluten-free or vegan?

Use gluten-free flour and breadcrumbs for a gluten-free version. Opt for vegan cheese and egg substitutes for a vegan-friendly recipe.

Optional Nutritional Information

  • Calories per serving (5-6 sticks): Approximately 400
  • Total Fat: 25g
  • Protein: 20g
  • Carbohydrates: 30g
  • Sodium: 500mg

Final Thoughts

If you’re looking to impress your guests or simply indulge in a comforting snack, Mozzarella Cheese Sticks are a delectable choice. Simple to prepare and always a crowd-pleaser, these cheesy delights are sure to become a staple in your kitchen repertoire. Don’t forget to share your experiences in the comments below or ask any questions you might have.

Recipe Section (Final Element)

Serves: 4 | Prep Time: 10 mins | Cook Time: 15 mins | Total Time: 25 mins + 1 hour freezing

  • 1 lb mozzarella cheese, cut into sticks
  • 1 cup all-purpose flour
  • 2 eggs, beaten
  • 1 cup breadcrumbs
  • 1/2 tsp garlic powder
  • 1/2 tsp paprika
  • Salt and pepper to taste
  • Vegetable oil for frying
  • Marinara sauce for dipping
  1. In a bowl, mix together breadcrumbs, garlic powder, paprika, salt, and pepper.
  2. Dredge each mozzarella stick in flour, dip in beaten eggs, then coat with breadcrumb mixture.
  3. Place coated mozzarella sticks on a baking sheet and freeze for at least 1 hour.
  4. Heat vegetable oil in a deep fryer or large pot to 350°F.
  5. Fry the mozzarella sticks in batches for about 1-2 minutes or until golden brown.
  6. Remove from oil and drain on paper towels.
  7. Serve hot with marinara sauce for dipping and enjoy the gooey goodness!

“`

Irresistible Rotel Cream Cheese Sausage Balls for Any Occasion

“`html
Jump to Recipe

Rotel Cream Cheese Sausage Balls: A Flavor-Packed Party Appetizer

Imagine biting into a warm, savory ball of goodness, where the spicy zing of Rotel mingles with creamy cheese and hearty sausage. Rotel Cream Cheese Sausage Balls offer a burst of flavor in every bite, making them the ultimate crowd-pleaser for any gathering. The combination of ingredients brings a rich, savory taste with just the right amount of spice. This appetizer is not only delicious but also incredibly easy to make, and sure to be a hit at any event!

Why You’ll Love This Recipe

These sausage balls bring everything you love about comfort foods into one delicious bite. The magic lies in their simplicity and the powerful flavor combination of sausage and cheese with the spicy twist from Rotel. They’re perfect for game days, holiday gatherings, or casual family get-togethers. Plus, they’re as easy to make as they are to eat, with no specialized culinary skills required.

Prepare them ahead of time and simply bake when guests arrive for a fuss-free hosting experience. Whether served as appetizers or snacks during festivities, these sausage balls always deliver feelings of warmth and nostalgia. Not to mention, they’re a versatile dish that can adapt to the ingredients on hand.

Personal Story/Connection

Growing up, my family often gathered around the kitchen while these sausage balls were baking in the oven. The aroma that filled our home signaled the start of holiday festivities, bringing everyone together with laughter and shared stories. It’s a recipe passed down from my grandmother, cherished for its simplicity and the happiness it brings. Every bite takes me back to those cherished family moments and the love that binds us all.

Context/Background

The origin of sausage balls dates back to southern cooking traditions, where easy-to-make, hearty bites were a staple on the party table. With creative spins like the addition of Rotel tomatoes and chilies, these sausage balls have been elevated to modern-day favorites. They symbolize the fusion of convenience and culinary creativity, making them ideal for the busy host who seeks to deliver deliciousness without the hassle.

Through the years, recipes like these have been adapted to household staples across America, reflecting regional influences and personal tastes. From early American kitchens to contemporary tables, the evolution of this dish showcases the joy of adapting traditional favorites.

Tips for Perfect Rotel Cream Cheese Sausage Balls

  • Ensure the cream cheese is softened for easier mixing.
  • Use a cookie scoop for uniform-sized balls, ensuring even cooking.
  • Don’t overmix; combine just until ingredients are evenly distributed.
  • Try adding a pinch of garlic powder or jalapeños for an extra kick.
  • Test bake a few balls first to check seasoning and baking time.

Serving Suggestions

Rotel Cream Cheese Sausage Balls are versatile and can be served in various ways. Stack them up on a platter with toothpicks for easy grabbing during parties. For a delightful presentation, arrange them around a central dip, such as ranch or spicy mayo, to complement their flavors.

Consider adding them to a grazing board with different cheeses, pickles, and crackers for a sophisticated spin. They’re also perfect alongside scrambled eggs for a hearty breakfast or brunch option. The balance of spiciness and creaminess makes them adaptable to any dining occasion.

Storage and Leftovers

Store any leftover sausage balls in an airtight container in the refrigerator for up to three days. When ready to enjoy again, gently reheat them in an oven set to 350°F for about 10 minutes to regain their crispy exterior and warm center.

Leftovers can also be repurposed into new dishes; consider crumbling them into scrambled eggs or using them as a topping for pizzas and salads. Their spicy, savory notes can instantly elevate and diversify everyday meals.

Recipe Variations and Substitutions

  • Gluten-Free: Substitute Bisquick mix with a gluten-free baking mix.
  • Dairy-Free: Use a vegan cream cheese and dairy-free cheddar for a lactose-friendly version.
  • Spice Level: Add finely chopped fresh jalapeños or a dash of cayenne for extra heat.
  • Seasonal Twist: Incorporate seasonal herbs like rosemary or sage during fall and winter months.

FAQ

Can I make this ahead of time?
Yes! Prepare the sausage balls up to a day in advance, place them on a baking sheet, cover, and refrigerate until ready to bake.

What substitutions can I use for sausage?
Ground turkey or chicken can be a lighter alternative, though you may need to add extra seasoning to maintain flavor.

How do I make this gluten-free or vegan?
Opt for gluten-free Bisquick and use plant-based sausage and cheeses for dietary preferences.

Optional Nutritional Information

  • Calories per serving: 150
  • Protein: 6g
  • Carbohydrates: 10g
  • Fat: 10g
  • Cholesterol: 25mg

Final Thoughts

Rotel Cream Cheese Sausage Balls are a delightful fusion of flavors and ease, perfect for any gathering or casual meal. Their bold taste and comforting texture make them irresistible to both kids and adults alike. Try them for yourself, and see how they can become a beloved tradition in your home, too. We encourage you to share your experience or any creative twists you try with this versatile dish!

Recipe Section (Final Element)

Serves: 24
Prep Time: 15 minutes
Cook Time: 25 minutes
Total Time: 40 minutes

  • 1 lb pork sausage
  • 1 (8 oz) package cream cheese, softened
  • 1 can (10 oz) Rotel diced tomatoes and green chilies, drained
  • 1 1/2 cups shredded cheddar cheese
  • 2 cups Bisquick mix
  1. Preheat the oven to 375°F and line a baking sheet with parchment paper.
  2. In a mixing bowl, combine pork sausage, cream cheese, Rotel, cheddar cheese, and Bisquick mix.
  3. Use your hands to mix everything together until well combined and roll the mixture into small balls.
  4. Place the sausage balls on the prepared baking sheet and bake for 20-25 minutes, or until golden brown and cooked through.
  5. Serve hot and enjoy as a delicious appetizer or snack!

“`

Easy One-Pot Philly Cheesesteak Pasta Recipe for Busy Nights

“`html
Jump to Recipe

Philly Cheesesteak Pasta: A Savory Twist on a Classic Favorite

Picture this: tender slices of juicy flank steak intermingling with perfectly cooked pasta, enveloped in a rich, creamy cheese sauce, and accented by the subtle sweetness of sautéed onions and bell peppers. This Philly Cheesesteak Pasta combines the heartwarming flavors of a beloved sandwich with the comforting allure of pasta. It’s a dish that’s more than just a meal; it’s an experience worth savoring and sharing with loved ones.

Why You’ll Love This Recipe

This Philly Cheesesteak Pasta marries the classic taste of Philly’s iconic sandwich with the comfort of creamy pasta. It’s a delight for both pasta lovers and steak enthusiasts. The recipe shines in its versatility—adjust the ingredients to cater to a variety of taste preferences or dietary needs without compromising on flavor. It’s an easy dinner that requires minimal effort while delivering maximum satisfaction. Whether for a quick weeknight meal or a special gathering, this dish promises to evoke comforting memories and culinary joy.

Personal Story/Connection

One summer evening, after a day spent exploring bustling city streets, I stumbled upon a Philly cheesesteak shop that forever changed my approach to comfort food. The indulgent combination of flavors stayed with me, and I knew it had to be shared. Back home, I decided to create a pasta version, merging my love for hearty sandwiches and warm pasta dishes. Each time I prepare this Philly Cheesesteak Pasta, I’m transported back to that sunshine-filled day, bringing joy to the friends and family I share it with.

Context/Background

The Philly cheesesteak sandwich, originally from Philadelphia, gained popularity in the early 20th century. Traditionally made with thinly sliced beef, onions, and melted cheese, its reputation as a comfort food favorite has only grown over time. As culinary trends evolved, creative adaptations like this pasta version emerged, offering a fresh perspective on a classic. This dish not only celebrates the original’s rich flavors but also showcases how simple yet transformative it can be when melded with pasta.

Tips for Perfect Philly Cheesesteak Pasta

  • Ensure the steak is thinly sliced to quickly cook and maintain tenderness.
  • Opt for a well-seasoned cast-iron skillet to achieve a nice sear on the steak.
  • Use freshly shredded provolone for the best melt and flavor.
  • If available, substitute with colored bell peppers for a sweeter flavor profile.
  • For extra richness, choose heavy cream over milk.
  • Taste and adjust seasonings as you layer ingredients to ensure optimal flavor balance.

Serving Suggestions

This Philly Cheesesteak Pasta pairs wonderfully with a crisp salad or steamed vegetables, offering a refreshing contrast to the creamy and rich main dish. For an added touch, sprinkle with freshly chopped parsley or chives just before serving to enhance both flavor and presentation. If you’re hosting a casual dinner party, serve it alongside crusty bread to soak up any extra sauce. For an indulgent twist, consider topping each serving with a drizzle of balsamic glaze or a pinch of red pepper flakes for added depth and heat.

Storage and Leftovers

To store leftovers, transfer the pasta into an airtight container and refrigerate for up to three days. When reheating, add a splash of milk or cream to help revive the creamy sauce without drying out the pasta. For a quick transformation, consider turning leftovers into a cheesy pasta bake. Simply transfer to a baking dish, top with additional cheese, and bake until bubbly and golden. This approach not only extends the life of your dish but also makes for an exciting new meal the next day.

Recipe Variations and Substitutions

For a lighter version, use a leaner protein like chicken or turkey breast in place of steak. Vegetarians can substitute the flank steak with thick slices of portobello mushrooms for a similar meaty texture. To make the dish gluten-free, opt for your favorite gluten-free pasta variety. Additionally, for a lactose-free option, swap out regular cheese and cream with dairy-free alternatives like cashew cream and vegan cheese shreds. Feel free to experiment and make this dish uniquely yours.

FAQ

Can I make this ahead of time? Yes, you can prepare the steak and sauce in advance, then reheat and combine with freshly cooked pasta just before serving.

What substitutions can I use for cream? Half-and-half or a thickened plant-based milk can act as creamy substitutes. Adjust the seasoning as needed.

How do I make this gluten-free? Simply use gluten-free pasta and ensure any additional sauces or ingredients are certified gluten-free.

Optional Nutritional Information

Calories per serving: Approximately 600 cal

Fat: 28g, Carbohydrates: 45g, Protein: 36g

Final Thoughts

Bringing together the comforting tastes of a Philly cheesesteak and the hearty satisfaction of pasta, this recipe is sure to become a cherished favorite. It’s an easy yet impressive meal that elevates any occasion, inviting you to savor each bite and the memories it creates. I invite you to try this recipe and share your experiences or questions in the comments. Happy cooking!

Philly Cheesesteak Pasta Recipe

Serves: 4 | Prep Time: 10 mins | Cook Time: 15 mins | Total Time: 25 mins

  • 1 lb flank steak, thinly sliced
  • 2 tbsp olive oil
  • 1 onion, thinly sliced
  • 1 green bell pepper, thinly sliced
  • 8 oz cooked pasta (such as fettuccine or penne)
  • 1 cup beef broth
  • 1/2 cup cream or milk
  • 1 cup shredded provolone cheese
  • Salt and pepper to taste
  1. In a large skillet, heat olive oil over medium-high heat. Add the thinly sliced flank steak and cook until browned, about 4-5 minutes.
  2. Add in the sliced onion and green bell pepper, cooking until softened, about 3-4 minutes.
  3. Pour in the beef broth and cream or milk, stirring to combine. Season with salt and pepper to taste.
  4. Add the cooked pasta to the skillet, tossing to coat in the creamy sauce.
  5. Sprinkle the shredded provolone cheese on top and cover with a lid to melt the cheese, about 2-3 minutes.
  6. Serve hot and enjoy the savory flavors of this Philly Cheesesteak Pasta!

“`

Spice Up Your BBQ: Bacon Wrapped Jalapeno Popper Hot Dogs

“`html
Jump to Recipe

Bacon Wrapped Jalapeno Popper Hot Dogs: A Fiery Delight for Your Taste Buds

Imagine biting into a hot dog that’s more than just a bun and a sausage. Envision a juicy hot dog wrapped snugly in crispy bacon, topped with a cheesy, spicy jalapeno popper. This Bacon Wrapped Jalapeno Popper Hot Dog promises an explosive combination of rich flavors and textures, making it a must-try for anyone who loves a little heat and a lot of taste in their meals.

Why You’ll Love This Recipe

The Bacon Wrapped Jalapeno Popper Hot Dog isn’t just a feast for your taste buds; it’s a multisensory experience that brings joy and excitement to any meal. Perfect for gatherings, BBQs, or a weeknight treat, this recipe is versatile enough to please a crowd yet simple enough to whip up in no time.

The combination of creamy cheeses, spicy jalapenos, and savory bacon wrapped around a traditional hot dog elevates this dish beyond a typical BBQ staple. It satisfies cravings while delivering a balance of textures: the crunch of bacon, the softness of bun, and the gooey, melty center.

Health-wise, opting for quality ingredients such as nitrate-free bacon or whole grain buns can make this dish a little more guilt-free. You’re not only getting protein but also a serving of happiness with every bite.

Personal Story/Connection

This recipe is a favorite in my household, especially during those warm summer nights spent grilling with family. The first time I made these, it was a spontaneous twist on a classic cookout menu item, inspired by a love for both bacon and jalapeno poppers. The smiles on everyone’s faces and the repeated requests for seconds told me this was a keeper. It has become a family tradition that brings us together, and each time the grill comes out, so does the anticipation of this savory delight.

Context/Background

The love for hot dogs spans cultures and continents, but adding a fiery twist transforms it into a standout star. Jalapeno poppers have been a beloved appetizer in American cuisine, known for their perfect blend of spice and creaminess. By marrying the two favorites, this recipe became a fusion of flavors with a nod to Tex-Mex influences, which is evident in the use of jalapenos and cheese.

Throughout time, the hot dog has evolved from its simple origins in Germany to being a canvas for culinary creativity, which this recipe epitomizes. It’s the essence of comfort food, modernized for those who love experimenting with bold flavors.

Tips for Perfect Bacon Wrapped Jalapeno Popper Hot Dogs

  • Ensure the bacon wraps tightly around the hot dog to not unravel while grilling.
  • Use toothpicks to secure the bacon and remove them before serving to avoid accidents.
  • Adjust the cream cheese mixture’s spiciness by adding more or fewer jalapeno seeds.
  • Par-cook the bacon in a pan before wrapping to ensure it gets crispy while grilling.
  • For even cooking, rotate the hot dogs frequently on the grill.
  • Experiment with different cheeses for unique flavor profiles.

Serving Suggestions

These hot dogs are versatile enough to be served on any occasion. For a backyard BBQ, pair them with a tangy coleslaw or a fresh corn salad to balance the richness. If you’re hosting a game day party, serve them alongside potato wedges or crispy fries for the ultimate game-time snack.

For an elevated presentation, consider slicing them into bite-sized pieces and serving them as appetizers with assorted dipping sauces. This makes them perfect for sharing at picnics or party buffets.

Don’t forget to sprinkle some fresh cilantro or a drizzle of honey mustard over the top for an added burst of flavor and visual appeal.

Storage and Leftovers

These hot dogs are best enjoyed fresh off the grill, but storing extras is simple. Wrap each hot dog individually in aluminum foil and place them in an airtight container in the fridge for up to 3 days.

To reheat, unwrap the foil and warm the hot dogs in an oven preheated to 350°F until heated through, ensuring the bacon remains crispy. Alternatively, a quick grill reheat will bring them back to life and maintain their signature crunch.

Recipe Variations and Substitutions

  • Spicier Option: Add diced habaneros to the cheese mixture for a serious kick.
  • Dairy-Free: Substitute the cheeses with dairy-free alternatives available at most health food stores.
  • Vegetarian: Use a plant-based hot dog and bacon. Stuff the jalapenos with a mixture of vegan cream cheese and smoked paprika.
  • Seasonal Twist: In the fall, try adding a touch of smoked paprika to the cream cheese mix for a slightly smoky flavor.

FAQ

Can I make this ahead of time?
Yes, prepare the jalapenos and wrap the hot dogs in bacon the night before. Store them in the fridge and grill them when ready to serve.

What substitutions can I use for the cream cheese?
Ricotta or goat cheese can be substituted, both offering a creamy but distinct flavor that complements the jalapenos.

How do I make this gluten-free?
Use gluten-free buns and verify that your hot dogs and bacon are gluten-free, which most naturally are.

Optional Nutritional Information

Approximate nutritional details per serving:

  • Calories: 400
  • Protein: 18g
  • Carbohydrates: 15g
  • Fat: 30g

Final Thoughts

If you’re a fan of bold flavors and innovative culinary combinations, this Bacon Wrapped Jalapeno Popper Hot Dog is the dish for you. Perfect for any occasion, it’s guaranteed to impress guests and satisfy those taste buds craving something extraordinary. Try it today, and don’t forget to share your own twist on this recipe in the comments below or tag #BaconWrappedDog on social media!

Recipe Section

Serves: 4
Prep Time: 15 minutes
Cook Time: 10 minutes
Total Time: 25 minutes

  • 4 hot dogs
  • 4 slices of bacon
  • 4 jalapenos
  • 4 slices of cheddar cheese
  • 4 hot dog buns
  • 1/4 cup cream cheese
  • 1/4 cup shredded pepper jack cheese
  • 1/4 tsp garlic powder
  • Toothpicks
  1. Preheat your grill to medium-high heat.
  2. Cut a slit in each jalapeno and remove the seeds. Mix cream cheese, shredded pepper jack cheese, and garlic powder together. Stuff each jalapeno with the cream cheese mixture.
  3. Place a slice of cheddar cheese on each hot dog, then wrap a slice of bacon around each hot dog, securing it with toothpicks.
  4. Grill the hot dogs and wrapped jalapenos for about 8-10 minutes, turning occasionally, until the bacon is crispy and the hot dogs are heated through.
  5. Toast the hot dog buns on the grill for a minute or two.
  6. Place a hot dog in each bun, top with a bacon-wrapped jalapeno, and enjoy!

“`

This post is structured for optimal readability and engagement, ready to be seamlessly integrated into WordPress with clean HTML formatting.

Spice Up Your Snacks with Green Chili Stuffed Onion Rings

“`html
Jump to Recipe

Green Chili Stuffed Onion Rings: A Spicy Twist on a Classic Delight

Imagine the satisfying crunch of a golden-brown onion ring, its outside perfectly crisp, giving way to a savory and gooey middle filled with flavorful green chilies and melted cheddar cheese. These Green Chili Stuffed Onion Rings bring a fiery twist to an all-time favorite, ensuring that each bite is a harmonious blend of texture and flavor. This recipe is an exciting adventure for your taste buds, perfect for those looking to spice up their appetizer game.

Why You’ll Love This Recipe

These Green Chili Stuffed Onion Rings are not just your average onion rings. Their unique flavor profile, combining the natural sweetness of onions with the kick of green chilies, will leave you craving more. Perfect for spice lovers, this dish offers just the right balance, appealing to all palates looking for something exciting yet comforting. Easy to prepare, these rings boast a crispy exterior while keeping the stuffing inside melty and delightful. Not only is this recipe a delightful treat for the taste buds, but it’s also a fantastic way to get creative with a classic dish.

Personal Story/Connection

This recipe takes me back to a summer BBQ night with family and friends. We were looking for something different to bring to the table, and that’s when the idea of combining rich, melted cheese and spicy chilies inside crispy onion rings was born. The joy and lip-smacking approval from everyone were unforgettable. Since then, these stuffed onion rings have become a staple for our gatherings, loved by both children and adults alike.

Context/Background

Onion rings have long been a beloved snack in various cultures, with roots tracing back to the United Kingdom. Traditionally a simple dish, they’ve undergone numerous adaptations. The inclusion of spicy elements like green chilies showcases a modern twist that reflects the global palate’s evolving cravings for bold flavors. The fusion of rich cheddar cheese and chilies takes inspiration from Southwestern culinary traditions, highlighting the innovative spirit of combining traditional flavors with contemporary textures.

Tips for Perfect Green Chili Stuffed Onion Rings

  • Choose fresh and firm white onions for the best structure and flavor.
  • For a milder taste, use mild green chilies and increase cheese content.
  • Ensure onion rings are large enough to hold the stuffing well.
  • Use a kitchen thermometer to maintain the oil temperature at 350°F for consistent frying results.
  • Experiment with different cheeses for varied flavor profiles, such as pepper jack or gouda.
  • For added crunch, use Panko breadcrumbs instead of regular ones.

Serving Suggestions

These Green Chili Stuffed Onion Rings are versatile and can be served as a standalone appetizer or paired with a tangy dip like aioli or ranch dressing. They make a fantastic addition to any party platter, bringing in a burst of flavor that complements cold beverages and grilled delights. For a full Southwestern-themed meal, serve these rings alongside grilled corn, tacos, or a fresh avocado salad, ensuring a delightful dining experience that guests won’t forget.

Storage and Leftovers

Any leftover onion rings can be stored in an airtight container in the refrigerator for up to two days. To reheat, place them in an oven preheated to 350°F for about 10 minutes, or until heated through and crispy. Avoid using the microwave, as it might make the rings soggy. These storied goodies can also transform into a unique addition to a breakfast hash or a creative topping for burgers, enhancing your leftovers in the most delicious ways.

Recipe Variations and Substitutions

For those looking to dial down the spice, try using poblano peppers instead of green chilies. Vegans can enjoy this dish by substituting cheese with a vegan alternative and using flax eggs for binding. To make a gluten-free version, simply swap regular breadcrumbs with gluten-free breadcrumbs. You can also experiment with different stuffing, such as adding cooked bacon bits or sautéed mushrooms, for a unique twist.

FAQ

Can I make this ahead of time?
Yes, you can prepare the onion rings and refrigerate them overnight before frying. Just ensure they’re not breaded too early to keep them from getting soggy.

What substitutions can I use for cheese?
Feel free to use any cheese that melts well, such as mozzarella or Monterey Jack, depending on your taste preferences.

How do I make this gluten-free or vegan?
Use gluten-free breadcrumbs and replace the eggs with flax eggs for a vegan version. Substitute cheddar with vegan cheese.

Optional Nutritional Information

  • Calories per serving: Approx. 250
  • Protein: 8g
  • Carbohydrates: 20g
  • Fat: 15g

Final Thoughts

The allure of Green Chili Stuffed Onion Rings lies in their extraordinary blend of textures and flavors. They’re more than just for snack time; they can elevate any meal with their bold and vibrant presence. We invite you to try this recipe and share your experiences or variations with us. Let us know how these stuffed beauties spice up your next gathering!

Recipe

Serves: 4-6 | Prep Time: 15 minutes | Cook Time: 30 minutes | Total Time: 45 minutes

  • 5 large white onions
  • 1/2 cup diced green chilies
  • 1 cup shredded cheddar cheese
  • 1/2 cup breadcrumbs
  • 2 eggs
  • Salt and pepper to taste
  • Vegetable oil for frying
  1. Preheat the oven to 375°F.
  2. Cut off the tops and bottoms of the onions, then carefully peel the skin off. Cut each onion into 1-inch thick rings and separate the rings.
  3. In a bowl, mix together the diced green chilies, shredded cheddar cheese, breadcrumbs, salt, and pepper.
  4. Fill each onion ring with the green chili and cheese mixture.
  5. Place the stuffed onion rings on a baking sheet lined with parchment paper and bake for 20-25 minutes, until the cheese is melted and bubbly.
  6. In a separate bowl, whisk the eggs. Dip each baked stuffed onion ring into the egg wash, then coat with breadcrumbs.
  7. Heat vegetable oil in a deep fryer or large skillet to 350°F.
  8. Fry the onion rings in batches for 2-3 minutes, until golden brown and crispy.
  9. Remove the fried onion rings with a slotted spoon and place on a paper towel-lined plate to drain excess oil.
  10. Serve hot and enjoy the delicious Green Chili Stuffed Onion Rings!

“`

Savor the Warmth of Creamy Chicken Poblano Pepper Soup

“`html
Jump to Recipe

Creamy Chicken Poblano Pepper Soup: A Comforting Delight

Imagine dipping your spoon into a steaming bowl of Creamy Chicken Poblano Pepper Soup, where each bite reveals a tantalizing harmony of flavors and textures. This dish combines the smoky sweetness of roasted poblano peppers with tender shredded chicken, all embraced by a luscious, creamy broth. It’s a soul-soothing experience perfect for chilly nights or whenever you need a comforting meal.

Why You’ll Love This Recipe

There’s something utterly irresistible about this soup. Its simplicity makes it an easy-to-cook marvel, yet the depth of flavor provides a gourmet experience. The poblano peppers offer a mild touch of heat, balancing beautifully with the creaminess that coats every morsel of tender chicken. This recipe is versatile, fitting into a family dinner or an upscale gathering with equal grace.

For those seeking a healthier comfort food option, this is a stellar choice, as it’s rich in protein from the chicken and loaded with antioxidants from the peppers. Plus, it requires minimal preparation and cooking time, making it a practical choice for busy evenings without compromising on taste.

Furthermore, it’s a dish that evokes nostalgia and warmth. The aroma of onions and garlic sizzling in olive oil is enough to draw everyone to the kitchen, eager for what’s to come. Whether you’re new to cooking or an experienced home chef, this recipe is a guaranteed hit.

Personal Story/Connection

My first encounter with Creamy Chicken Poblano Pepper Soup was during a family vacation in Santa Fe. We stumbled upon a tiny, homely restaurant nestled in the heart of the city, where the chef recommended this dish. Its deliciousness left an indelible mark, leading me to recreate it back home. Now, it’s a family favorite and a symbol of those warm, joyous memories shared together.

Context/Background

The poblano pepper hails from Mexico and is celebrated for its mild spice and robust flavor, making it a favorite in many traditional dishes. Roasting poblano peppers enhances their sweetness and adds a smoky depth, a technique that’s been cherished in Mexican cuisine for centuries.

This soup captures the essence of Mexican comfort food, where simple ingredients come together to create something extraordinary. Traditionally, meals like this were crafted to provide warmth and sustenance, embodying a culture that prizes both flavor and hospitality.

Tips for Perfect Creamy Chicken Poblano Pepper Soup

  • Roasting Tips: Roast peppers until the skin blisters and chars slightly for that smoky flavor.
  • Chicken Preparation: Use leftover rotisserie chicken to save time and enhance flavor.
  • Cream Consistency: For a thicker soup, reduce the amount of chicken broth or simmer longer.
  • Spice Level: Add a pinch of cayenne pepper for those who prefer more heat.
  • Freshness: Always use fresh cilantro for garnishing to add a burst of color and zesty finish.

Serving Suggestions

This soup is a versatile canvas for multiple dining experiences. Serve it with crusty bread for a simple, satisfying weekday dinner. To elevate the presentation for a dinner party, consider adding a dollop of sour cream and a sprinkle of smoked paprika.

It also pairs wonderfully with avocado slices or a simple cheese quesadilla on the side. For a refreshing contrast, serve alongside a crisp green salad with a lemon vinaigrette.

Storage and Leftovers

Leftover soup can be stored in an airtight container in the refrigerator for up to 3 days. When reheating, do so gently over low heat to preserve the creaminess without curdling. Add a splash of broth or cream to restore the desired consistency if it thickens too much.

The flavors tend to deepen with time, making leftovers just as delightful. Alternatively, use leftovers as a filling base for a hearty chicken casserole by adding cooked rice or pasta and baking it with cheese on top.

Recipe Variations and Substitutions

This adaptable recipe allows for plenty of creativity. For a dairy-free version, replace heavy cream with coconut milk or a plant-based cream alternative. Vegetarians can replace chicken with beans for added protein.

During summer, swap out the poblano peppers for sweet corn to create a seasonal twist. Additionally, incorporating smoked chipotle peppers adds a deliciously complex kick for those extra adventurous.

FAQ

Can I make this ahead of time? Yes, prepare the soup a day in advance, allowing the flavors to meld even further. Reheat gently before serving.

What substitutions can I use for heavy cream? You can substitute with coconut milk for a dairy-free option or use half-and-half for a lighter version.

How do I make this gluten-free? This recipe is naturally gluten-free. Ensure all packaged ingredients, like chicken broth, are certified gluten-free.

Optional Nutritional Information

  • Calories: Approximately 350 per serving
  • Protein: 28g
  • Carbs: 15g
  • Fat: 22g

Final Thoughts

This Creamy Chicken Poblano Pepper Soup is more than just a meal; it’s a flavor-packed experience that’s comforting, satisfying, and easy to prepare. Give it a try and discover why it’s the perfect dish for any occasion. We’d love to hear your feedback or any creative spins you’ve added in the comments below!

Recipe Section

Serves: 4 | Prep Time: 15 minutes | Cook Time: 25 minutes | Total Time: 40 minutes

  • 1 tbsp olive oil
  • 1 onion, chopped
  • 2 cloves garlic, minced
  • 2 large poblano peppers, roasted, peeled, and diced
  • 1 lb boneless, skinless chicken breast, cooked and shredded
  • 4 cups chicken broth
  • 1 cup heavy cream
  • 1 tsp cumin
  • 1/2 tsp oregano
  • Salt and pepper to taste
  • Fresh cilantro, chopped, for garnish
  1. In a large pot, heat olive oil over medium heat. Add onions and garlic, cooking until translucent.
  2. Add roasted poblano peppers and shredded chicken to the pot, stirring to combine.
  3. Pour in chicken broth, heavy cream, cumin, oregano, salt, and pepper. Stir well.
  4. Bring the soup to a simmer and let it cook for 15-20 minutes to allow flavors to meld.
  5. Adjust seasoning as needed, then ladle the soup into bowls.
  6. Garnish with fresh cilantro before serving.

#CreamyChickenPepperSoup #ComfortFood #SoupLovers #PoblanoPeppers

“`

Spice Up Your Snack Game with Jalapeño Bottle Caps

“`html
Jump to Recipe

Jalapeño Bottle Caps: A Spicy and Cheesy Delight!

Imagine biting into a crispy, golden-brown jalapeño snack that offers the perfect balance of creamy cheese, savory bacon, and a gentle spice kick. These Jalapeño Bottle Caps are more than just a treat; they’re an explosion of flavors destined to become a favorite appetizer at any gathering. The crunchy breadcrumb topping coupled with the melty cheese filling makes this dish an irresistible must-try!

Why You’ll Love This Recipe

If you’re a fan of bold flavors and textures, you’ll adore these Jalapeño Bottle Caps. This recipe is versatile, offering a delightful combination of spicy, cheesy, and crunchy elements that can be adapted to suit your taste preferences. With each bite, you’ll enjoy the perfect blend of creamy cheddar and cream cheese with the savory goodness of bacon, all encased in the spicy embrace of jalapeño peppers. Not only are they a crowd-pleaser, but they’re also simple to make, requiring minimal ingredients and time. Whether you’re hosting a game day, potluck, or simply craving a flavorful snack, these jalapeños are sure to satisfy.

Personal Story/Connection

When I first stumbled upon this Jalapeño Bottle Caps recipe at a friend’s barbecue, it was love at first bite. The spicy and cheesy aroma drew me in, and the taste was nothing short of spectacular. I remember laughing with friends, everyone reaching for more as the tray quickly emptied. This recipe has since become a staple in our household, often evoking cherished memories of summer gatherings and laughter.

Context/Background

The concept of stuffed jalapeños has a long history, often credited to the American Southwest where peppers and spices are celebrated in cuisine. Over the years, creative spins like adding cheese and bacon have elevated these bites to gourmet standards, yet they remain a simple dish to prepare. Known commonly as jalapeño poppers, these spiced snacks have evolved to include numerous versions across different cultures, incorporating unique flavors that cater to various palates.

Tips for Perfect Jalapeño Bottle Caps

  • Choose jalapeños that are firm and fresh for best results, ensuring they hold the filling well during baking.
  • For less spice, ensure all seeds and membranes are removed, as these contain the most heat.
  • Experiment with different cheese combinations for varied taste experiences—monterey jack or pepper jack can add a new dimension.
  • If you prefer a smokier flavor, use smoked bacon or add a hint of smoked paprika to the filling.
  • To make them gluten-free, substitute regular breadcrumbs with gluten-free ones.

Serving Suggestions

Jalapeño Bottle Caps make an excellent appetizer, breakfast treat, or snack item, served hot alongside a cool, creamy dip like ranch or blue cheese dressing to balance the heat. At your next backyard barbecue, pair them with grilled meats and roasted vegetables for a delightful spread. For an elegant touch, garnish with fresh herbs like parsley or cilantro before serving. They also make a fantastic finger food at parties, easily shared and enjoyed with a chilled beverage.

Storage and Leftovers

Store leftover Jalapeño Bottle Caps in an airtight container in the refrigerator for up to three days. To reheat, place them on a baking sheet and bake in a preheated oven at 350°F until heated through, maintaining their crispiness. Leftovers can be creatively repurposed by chopping them up and adding them to scrambled eggs, taco fillings, or atop a salad for a spicy kick.

Recipe Variations and Substitutions

Feel free to experiment with the filling by adding diced onions or bell peppers for added flavor and texture. For a vegetarian version, simply omit the bacon and consider adding diced mushrooms or sun-dried tomatoes. Those seeking a lower-fat option might use turkey bacon and low-fat cheese, while keeping the enjoyment intact. For a seasonal twist, incorporate pumpkin or sweet potato puree in the fall for a unique sweet-spicy blend.

FAQ

Can I make this ahead of time? Absolutely! Prepare the jalapeños a day ahead, fill them, cover tightly with plastic wrap, and store in the refrigerator until ready to bake.

What substitutions can I use for bacon? You can use turkey bacon, pancetta, or even omit it for a vegetarian version.

How do I make this gluten-free? Substitute regular breadcrumbs with gluten-free breadcrumbs to enjoy a gluten-free version.

Optional Nutritional Information

  • Calories (per piece): Approximately 120
  • Protein: 4g
  • Fat: 9g
  • Carbohydrates: 3g

Final Thoughts

If you’re eager to impress your guests or simply enjoy a flavorful attempt, these Jalapeño Bottle Caps are worth every moment of preparation. Packed with irresistible flavors and textures, they’re guaranteed to elevate any meal or occasion. We invite you to try this recipe and share your experiences or any creative variations you come up with in the comments below.

Recipe Section

Serves: 4-6 | Prep Time: 15 mins | Cook Time: 20 mins | Total Time: 35 mins

  • 10-12 jalapeño peppers
  • 8 oz cream cheese, softened
  • 1 cup shredded cheddar cheese
  • 1/2 cup cooked and crumbled bacon
  • 1/2 tsp garlic powder
  • 1/2 tsp onion powder
  • Salt and pepper to taste
  • 1/2 cup breadcrumbs
  • 1/4 cup grated Parmesan cheese
  • Cooking spray
  1. Preheat your oven to 375°F and line a baking sheet with parchment paper.
  2. Cut jalapeños in half lengthwise and remove the seeds and membranes. Place them on the prepared baking sheet.
  3. In a bowl, combine cream cheese, cheddar cheese, bacon, garlic powder, onion powder, salt, and pepper. Mix well.
  4. Fill each jalapeño half with the cream cheese mixture.
  5. In another bowl, mix breadcrumbs and Parmesan cheese. Sprinkle this mixture over the filled jalapeños.
  6. Lightly spray the jalapeños with cooking spray.
  7. Bake in the preheated oven for about 15-20 minutes, or until the filling is bubbly and the tops are golden brown.
  8. Serve hot and enjoy the spicy and cheesy goodness!

“`

Spice Up Your Snack Game with Jalapeño Popper Pigs in a Blanket

“`html

Jump to Recipe

Jalapeño Popper Pigs in a Blanket: A Spicy Delight for Any Occasion!

Imagine biting into a warm, golden-brown snack, where the buttery crescent dough wraps around a juicy mini hot dog smothered in a creamy, cheesy jalapeño filling. These Jalapeño Popper Pigs in a Blanket combine the beloved flavors of jalapeño poppers with the party-favorite pigs in a blanket, creating a taste explosion that’s both spicy and savory. Perfect for game day, parties, or just a fun snack, this dish is irresistible and guaranteed to be a crowd-pleaser.

Why You’ll Love This Recipe

This recipe is a game-changer for several reasons. First, the combination of spicy jalapeños and creamy cheese offers a perfect blend of heat and richness — a match made in flavor heaven. Additionally, the ease of preparation makes it an ideal choice for busy hosts; with minimal prep and a quick bake time, you can have an impressive appetizer ready in no time.

Moreover, these Jalapeño Popper Pigs in a Blanket are highly versatile. Serve them at a casual family gathering or as a centerpiece snack during a tailgate party. They evoke nostalgia and comfort, bringing back memories of carefree afternoons spent enjoying simple, delicious finger foods.

From a health perspective, the use of real cheese in the recipe provides a good source of calcium and protein, while jalapeños offer a dose of vitamins and antioxidants. The balance of flavors and textures keeps even the pickiest eaters coming back for more.

Personal Story/Connection

I still remember the first time we served these delightful bites at a family gathering. My sister, who is usually apprehensive about spicy foods, ended up loving them and asked for the recipe! It has since become a staple at our family events, often evoking laughter and fun-filled conversations. The joy these snacks bring is unmatched, offering warmth and connection with every bite.

Context/Background

While the origin of pigs in a blanket dates back many centuries, popularizing in Europe as a simple snack, the addition of jalapeño popper flavors is a modern twist. This hybrid snack reflects the growing desire for fusion foods that marry global inspirations, giving us the best of both worlds.

Jalapeño poppers themselves originated in Texas, merging Mexican and American flavors. Adding the spicy kick of jalapeños to an already loved classic such as pigs in a blanket only elevates this timeless treat.

Tips for Perfect Jalapeño Popper Pigs in a Blanket

  • For a spicier kick, leave some of the jalapeño seeds in the filling.
  • Use pre-shredded cheddar for convenience, but grating your own can enhance flavor and texture.
  • Ensure your cream cheese is fully softened to blend seamlessly with the other ingredients.
  • Space the pigs in a blanket on the baking sheet to promote even cooking and a crispy finish.
  • Customize your garnish: try a sprinkle of cilantro or a drizzle of hot sauce for added zing.

Serving Suggestions

These Jalapeño Popper Pigs in a Blanket are sensational on their own but can be elevated with a few creative serving ideas. Pair them with a refreshing cucumber salad to balance the spice, or serve alongside a cool ranch or blue cheese dip to complement their bold flavors.

For parties, arrange them on a large serving platter with a variety of sauces and textured garnishes. They make excellent additions to a buffet-style spread where guests can help themselves, enhancing a casual and relaxed atmosphere.

The vibrant garnishes like jalapeño slices not only add to their visual appeal but also provide a fresh, crunchy contrast to the richness of the dish.

Storage and Leftovers

Store any leftover pigs in a blanket in an airtight container in the refrigerator for up to three days. Reheat them in a preheated oven at 350°F for about 5 minutes to regain their crispy exterior.

Transform leftovers into a hearty morning meal by dicing them up and adding to a breakfast omelet or scramble. You can also turn them into a quick snack by topping with a dollop of sour cream and fresh herbs.

Recipe Variations and Substitutions

For a gluten-free version, use gluten-free crescent dough available at specialty stores. To make it vegetarian, swap mini hot dogs for veggie sausages or omit them altogether and double the cheesy filling.

If you’re a fan of smoky flavors, try incorporating a bit of smoked paprika into the cheese mixture or wrapping each dog with a slice of bacon before baking. For a seasonal twist, add a touch of pumpkin puree to the cheese mixture for an autumnal spin.

FAQ

Can I make this ahead of time? Yes, prepare the jalapeño cheese mixture and crescent rolls a day ahead. Store them separately and assemble right before baking.

What substitutions can I use for jalapeño? For a milder version, swap jalapeños for bell peppers or omit them. Add hot sauce for heat without texture.

How do I make this gluten-free or vegan? Use gluten-free crescent rolls and replace mini hot dogs with vegan sausages. Opt for dairy-free cream cheese and cheddar.

Optional Nutritional Information

  • Approximate Calories per Serving: 220
  • Protein: 6g
  • Fat: 16g
  • Carbohydrates: 14g

Final Thoughts

If you’re looking for a flavorful, crowd-pleasing treat, these Jalapeño Popper Pigs in a Blanket are a must-try. They’re sure to bring joy and excitement to any gathering with their tantalizing flavors and perfect balance of spice and creaminess. Share your creations and experiences in the comments — we’d love to hear from you!

Recipe Section

Serves: 8 | Prep Time: 15 minutes | Cook Time: 15 minutes | Total Time: 30 minutes

  • 1 can (8 count) refrigerated crescent dough
  • 8 mini hot dogs
  • 4 oz cream cheese, softened
  • 1/4 cup shredded cheddar cheese
  • 1 jalapeño, seeded and finely chopped
  • 1/4 tsp garlic powder
  • 1/4 tsp onion powder
  • Salt and pepper, to taste
  • 1 egg, beaten
  • Jalapeño slices for garnish
  1. Preheat the oven to 375°F and line a baking sheet with parchment paper.
  2. In a mixing bowl, combine cream cheese, cheddar cheese, chopped jalapeño, garlic powder, onion powder, salt, and pepper until well mixed.
  3. Roll out the crescent dough and separate into triangles. Spread a generous amount of the cream cheese mixture on each triangle.
  4. Place a mini hot dog at the wide end of each triangle and roll up to form a pig in a blanket. Brush with beaten egg for a golden finish.
  5. Arrange the pigs in a blanket on the prepared baking sheet and bake for 12-15 minutes, or until the dough is golden brown and crispy.
  6. Garnish with jalapeño slices and serve warm.

Enjoy the spicy and cheesy goodness of these Jalapeño Popper Pigs in a Blanket! #JalapenoPoppers #PigsInABlanket #SpicySnacks #PartyFood

“`