Spice Up Your Appetizers with Jalapeño Popper Mushrooms

“`html
Jump to Recipe

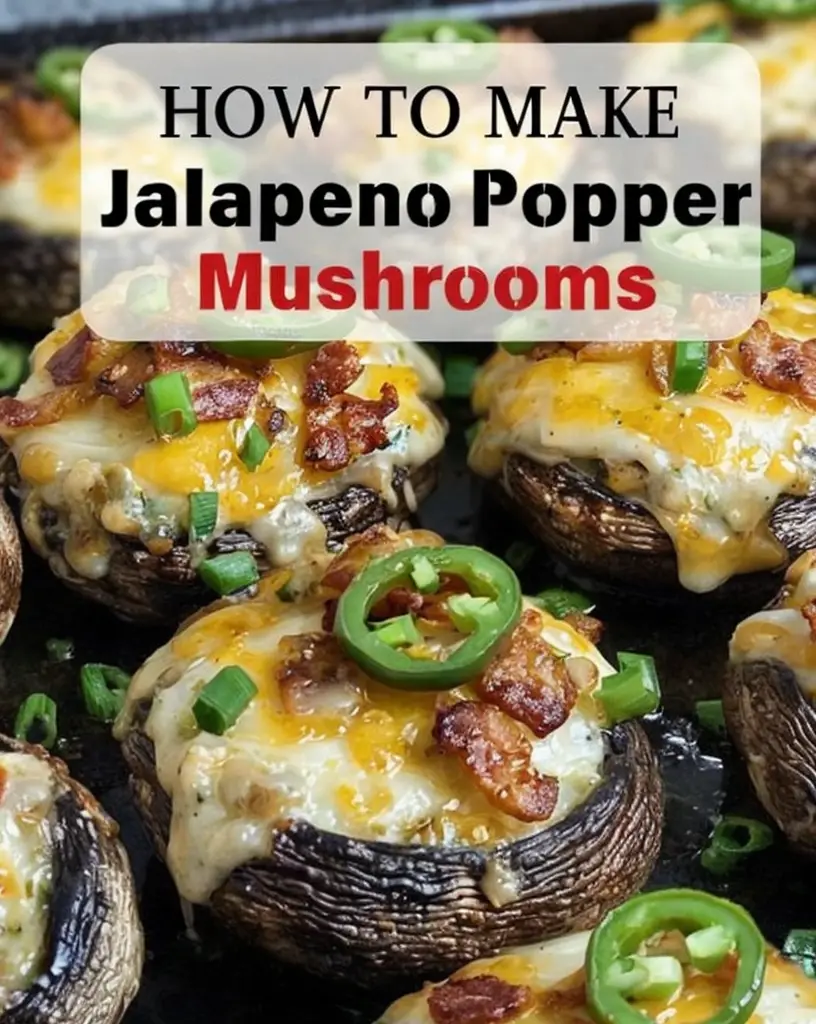
Jalapeño Popper Mushrooms: A Spicy, Creamy Delight

Imagine biting into a sizzling, golden-brown mushroom, only to be met with a wave of creamy cheese, spiced up with fiery jalapeños. These Jalapeño Popper Mushrooms are a unique twist on the classic appetizer, offering a burst of flavor with every bite. Perfect as a side dish or a standout starter, this recipe is destined to become a favorite in your culinary repertoire.

Why You’ll Love This Recipe

Not only is this recipe incredibly flavorful, but it’s also wonderfully versatile. Whether you’re hosting a dinner party or looking for a quick snack, Jalapeño Popper Mushrooms are sure to impress. The combination of cream cheese and cheddar provides a richness that pairs seamlessly with the spicy kick of jalapeños. You’ll love how easily this dish comes together, ideal for cooks of all skill levels.

The health-conscious will appreciate the low-carb nature of mushrooms paired with nutritional benefits from jalapeños and cheese. Each bite evokes comfort and warmth, perfect for gatherings or a cozy night in.

Personal Story/Connection

This recipe brings back memories of family gatherings, where stuffed mushrooms were a staple appetizer. Once, I decided to add a twist by including jalapeños, and it was an instant hit! Ever since, these spicy delights have been a must-have at holidays, carrying a sense of nostalgia with each delicious bite.

Context/Background

Stuffed mushrooms have a rich history, with origins tracing back to the ancient Roman era where they were a symbol of luxury. Over time, they have become a beloved appetizer worldwide, with various regions adding their own unique twists. The fusion of peppers and cheese in our recipe brings a modern spin to this classic dish, showcasing culinary evolution at its finest.

Tips for Perfect Jalapeño Popper Mushrooms

  • Choose large, firm mushrooms to hold the filling well.
  • Soften cream cheese to ensure easy mixing with other ingredients.
  • To reduce the spiciness, remove the seeds from jalapeños before dicing.
  • Add a dash of garlic powder for an extra flavor dimension.
  • Use panko bread crumbs for a crispier topping.
  • Experiment with different cheeses like gouda or mozzarella for variety.

Serving Suggestions

These Jalapeño Popper Mushrooms can be served on a rustic wooden board alongside fresh greens for a gourmet presentation. Pair them with a cool, creamy avocado dip to balance the heat. For a party, consider a combination platter with assorted stuffed mushrooms to offer guests a diverse taste experience.

Alternatively, enhance your burger night by serving these as a spicy, cheesy side dish. Guests will love the innovative take, making any meal exceptional with minimal effort.

Storage and Leftovers

To store leftovers, place them in an airtight container in the refrigerator for up to three days. When ready to enjoy again, reheat in the oven at 350°F until warmed through to retain the original texture.

Transform leftovers into a delicious breakfast by cutting them into quarters and adding to omelets or breakfast burritos. The flavors blend seamlessly, creating a delightful way to start the day.

Recipe Variations and Substitutions

For a vegetarian twist, replace the cream cheese with a plant-based alternative. You can also substitute spicy jalapeños with milder peppers to adjust the heat to your liking.

Create a festive version by adding diced red bell pepper for a splash of color. Seasonal herbs like chives or basil can provide a fresh finish to these delicious bites.

FAQ

Can I make this ahead of time?

Yes, you can prepare and stuff the mushrooms a day in advance. Store in the fridge and bake when ready to serve.

What substitutions can I use for cream cheese?

A soft goat cheese or ricotta can work well as substitutes, providing a different flavor profile.

How do I make this gluten-free?

Use gluten-free bread crumbs to ensure the dish meets dietary needs without compromising on taste.

Optional Nutritional Information

  • Calories: Approximately 120 per serving
  • Protein: 6g
  • Carbohydrates: 4g
  • Fat: 10g

Final Thoughts

These Jalapeño Popper Mushrooms are a must-try for anyone who loves bold, vibrant flavors. Simple to prepare yet impressive on the plate, they’re sure to elevate any meal. I invite you to try this recipe and share your experiences or adjustments. Bon appétit!

Recipe Section

Serves: 4 | Prep Time: 15 mins | Cook Time: 25 mins | Total Time: 40 mins

  • 12 large white mushrooms, stems removed
  • 4 oz cream cheese, softened
  • 1/2 cup shredded cheddar cheese
  • 2 jalapeños, diced
  • 1/4 cup bread crumbs
  • 1/4 cup grated parmesan cheese
  • Salt and pepper to taste
  • Fresh parsley for garnish
  1. Preheat the oven to 375°F and line a baking sheet with parchment paper.
  2. In a mixing bowl, combine cream cheese, cheddar cheese, diced jalapeños, salt, and pepper.
  3. Fill each mushroom cap with the cream cheese mixture and place on the prepared baking sheet.
  4. In a small bowl, mix bread crumbs and grated parmesan cheese. Sprinkle the mixture over the stuffed mushrooms.
  5. Bake in the preheated oven for 20-25 minutes, or until the mushrooms are tender and the topping is golden brown.
  6. Garnish with fresh parsley before serving.

“`

Delicious Monterey Chicken Spaghetti: A Flavorful Weeknight Dinner Recipe

“`html
Jump to Recipe

Monterey Chicken Spaghetti: A Cheesy Comfort Delight

Imagine twirling a forkful of creamy, cheesy spaghetti mixed with tender shredded chicken, which, with each bite, offers a delightful burst of flavors thanks to the zesty green chilies and fresh cilantro. Monterey Chicken Spaghetti is exactly that—a heartwarming dish that combines the rich, gooey taste of Monterey Jack cheese with comforting pasta. This is one recipe you’ll want to try for its unique twist on traditional spaghetti and its crowd-pleasing appeal!

Why You’ll Love This Recipe

Monterey Chicken Spaghetti is more than just a meal; it’s an experience. Whether you’re looking for a cozy supper for your family or a dish that impresses guests, this recipe is versatile, appealing, and unforgettable.

You’ll love how easily it comes together, making it perfect for busy weeknights or effortless entertaining. Despite its simplicity, it bursts with flavor, bringing together comfort and creativity in one dish.

There’s a healthful dose of protein from the chicken, and if you opt for whole grain pasta, even a boost of fiber. Additionally, Monterey Jack cheese adds a creamy richness without being overwhelming.

Beyond flavor and nutrition, this recipe can evoke warm memories of family gatherings or create new traditions. Its creamy and spicy profile is just the right balance, ensuring every bite is savored.

Personal Story/Connection

I first encountered Monterey Chicken Spaghetti at a neighborhood potluck, where it quickly became the most sought-after dish. I remember watching as my children, picky eaters at the best of times, devoured their plates with wide smiles. That’s when I knew I had to recreate it for our family dinners.

Making this dish now feels like connecting with those cherished memories. It’s that blend of food and family that makes it so dear to us.

Context/Background

The classic Monterey Chicken dish, often grilled and served with cheese and chilies, hails originally from Texas. Its fusion of Tex-Mex flavors has long been a favorite. Transforming this into a pasta dish is a creative evolution that beautifully marries comfort food with regional flair.

Spaghetti itself has Italian roots, but when combined with the creamy and spicy elements of Monterey Chicken, it becomes a delightful melting pot of culinary traditions. This recipe brings together the comforting warmth of Southern cooking with the pasta elegance of Italian cuisine.

Tips for Perfect Monterey Chicken Spaghetti

  • Use pre-cooked rotisserie chicken for speed and extra flavor.
  • If you prefer a spicier kick, add a dash of cayenne pepper or diced jalapeños.
  • Grate cheese fresh from the block to ensure it melts smoothly.
  • Cook your spaghetti until just al dente to avoid a mushy texture in the bake.
  • Consider adding a squeeze of lime over the finished dish for a fresh contrast.

Serving Suggestions

Monterey Chicken Spaghetti is delicious served alone, but if you’re hosting a dinner, consider pairing it with a crisp green salad dressed with a light vinaigrette. The acidity of the salad beautifully balances the rich creaminess of the dish.

For a more Tex-Mex inspired meal, serve alongside a plate of warm tortilla chips and salsa. This adds a crunchy texture to complement the softness of the spaghetti.

Garnish generously with chopped cilantro and green onions for color and that fresh herbaceous finish. For a special occasion, a sprinkling of toasted breadcrumbs or crushed tortilla chips adds a delightful crunch.

Storage and Leftovers

Store any leftovers in an airtight container in the refrigerator for up to 3 days. Reheat in the oven at 350°F until warmed through, or microwave individual servings for convenience.

If you find yourself with extra servings, consider transforming it into a new meal by adding more vegetables or a dollop of salsa before reheating. Ingredients like spinach or bell peppers can refresh and enhance the flavors for round two.

Recipe Variations and Substitutions

Looking to switch things up? Swap out spaghetti for another pasta like penne or rotini. These pasta shapes hold the sauce well and offer a different texture.

For a lower-calorie option, use Greek yogurt instead of sour cream. It will maintain a creamy consistency but with less fat.

Gluten intolerant? Substitute with a gluten-free pasta and ensure all canned ingredients are gluten-free certified for a celiac-friendly dish.

FAQ

Can I make this ahead of time? Absolutely! Prepare the dish through step four, cover, and refrigerate for up to 24 hours. Then, bake as directed.

What substitutions can I use for sour cream? Greek yogurt or crème fraîche are excellent replacements, maintaining creaminess without compromising on taste.

How do I make this gluten-free? Use gluten-free pasta and verify that all other packaged ingredients are gluten-free. This keeps all the flavor without any gluten.

Optional Nutritional Information

  • Calories: Approximately 450 per serving
  • Protein: 28g
  • Carbohydrates: 42g
  • Fat: 18g (cheese and sour cream based)

Final Thoughts

Monterey Chicken Spaghetti is a dish that deserves a spot on your dinner table. Its blend of comforting and bold flavors makes for an enticing meal that’s sure to become a family favorite. I invite you to try this recipe, delight in its deliciousness, and share your experience. Happiness is served with every cheesy forkful!

Recipe Section

Serves: 4-6 | Prep Time: 15 mins | Cook Time: 25 mins | Total Time: 40 mins

  • 8 oz spaghetti
  • 2 chicken breasts, cooked and shredded
  • 1 can cream of chicken soup
  • 1 cup shredded Monterey Jack cheese
  • 1/2 cup sour cream
  • 1/2 cup chopped green chilies
  • 1/4 cup chopped cilantro
  • Salt and pepper to taste
  • Chopped tomatoes and green onions for garnish
  1. Cook spaghetti according to package instructions, then drain and set aside.
  2. In a large mixing bowl, combine the cooked and shredded chicken, cream of chicken soup, Monterey Jack cheese, sour cream, green chilies, cilantro, salt, and pepper.
  3. Mix in the cooked spaghetti until evenly coated.
  4. Transfer the mixture to a greased baking dish and spread evenly.
  5. Bake at 350°F for 20-25 minutes until bubbly and golden.
  6. Garnish with chopped tomatoes and green onions before serving.

“`

Savory Green Chili Cheese Bites: A Spicy Snack Delight

Jump to Recipe

Green Chili Cheese Bites: A Spicy, Cheesy Delight

If you are a fan of bold flavors and cheesy delights, these Green Chili Cheese Bites are a must-try. Imagine biting into a golden, crispy snack that melts in your mouth, with the perfect balance of creaminess, spice, and a hint of saltiness. These bites are not just any appetizer; they are a statement on your plate, promising warmth and unforgettable flavor at every gathering.

Why You’ll Love This Recipe

These Green Chili Cheese Bites are a perfect blend of creamy, spicy, and savory all in one bite-size snack. Whether you’re hosting a game day party or simply looking for a crowd-pleasing appetizer, these bites offer convenience and a taste of indulgence. The ease of preparation means you can enjoy more time with your guests and less time in the kitchen. Plus, the vibrant green chilies introduce a mild heat that invites even those wary of spice to indulge.

The nutritional profile of these cheese bites is surprisingly beneficial, with cheese providing a good source of calcium and protein. Whether you’re aiming for comfort food or a sophisticated appetizer, these bites can elevate any menu.

Personal Story/Connection

These Green Chili Cheese Bites are a staple in my household, predominantly because they remind me of my grandmother’s kitchen. I remember the first time she pulled a batch out of the oven, the kitchen filled with the aroma of melted cheese and toasted breadcrumbs. The joy of biting into those crispy, cheesy snacks is a memory that brings warmth and happiness, and they have since become a family tradition at our gatherings.

Context/Background

The concept of cheese bites is believed to have originated from Western appetizers but has evolved to incorporate a variety of flavors and cultural influences. The inclusion of green chilies adds a Southwestern twist, celebrating the love for spicy food that’s prevalent in many culinary traditions. Over the years, the recipe has been adapted to suit different palates, introducing ingredients like jalapeños or even bacon for a more robust flavor.

Tips for Perfect Green Chili Cheese Bites

  • Ensure the cream cheese is softened for easy mixing and a smooth texture.
  • For added crunch, consider toasting the breadcrumbs before combining them into the mixture.
  • Adjust the heat by adding more or less green chilies according to preference.
  • If the mixture feels too thick, a splash of milk can help bind the ingredients smoothly.
  • Use a non-stick mini muffin tin to ensure the bites come out easily.

Serving Suggestions

Serve these Green Chili Cheese Bites on a decorative platter with a side of salsa or sour cream for dipping. They pair beautifully with a crisp white wine or a light beer, making them ideal for cocktail parties. For a more colorful presentation, garnish with chopped fresh herbs, such as cilantro or parsley, to enhance their visual appeal.

These bites are also great for brunches or as an afternoon snack, providing a cheesy and savory alternative to sweet pastries. Arrange them alongside a fresh garden salad or roasted vegetables to create a balanced meal option.

Storage and Leftovers

Store any leftover Green Chili Cheese Bites in an airtight container in the refrigerator for up to three days. To reheat, place them in a preheated oven at 350°F for about 10 minutes to maintain their crispy texture.

If you prefer freezing, arrange them in a single layer on a baking sheet until frozen, then transfer to a freezer-safe bag. Thaw completely before reheating to enjoy the best texture and flavor.

Recipe Variations and Substitutions

For a gluten-free version, substitute the breadcrumbs with gluten-free breadcrumbs or crushed cornflakes. To make these bites vegetarian-friendly, ensure the cheese used contains no animal rennet.

Consider adding diced cooked bacon or chorizo for a heartier snack. For a sharper flavor, swap regular cheddar with sharp cheddar or Monterey Jack cheese.

FAQ

Can I make this ahead of time? Yes, you can prepare the mixture ahead of time and store it in the refrigerator for up to 24 hours before baking.

What substitutions can I use for breadcrumbs? You can replace breadcrumbs with crushed tortilla chips or panko for a different texture.

How do I make this gluten-free or vegan? Use gluten-free breadcrumbs for a gluten-free version and swap cream cheese and cheddar cheese with vegan alternatives for a vegan option.

Optional Nutritional Information

  • Calories: 80 per bite
  • Protein: 3g per bite
  • Carbohydrates: 5g per bite
  • Fat: 6g per bite

Final Thoughts

These Green Chili Cheese Bites are more than just an appetizer; they are a gateway to flavor and indulgence. Whether you’re an experienced cook or a beginner, this recipe is nearly foolproof and guaranteed to impress. Creating happy, memorable moments at your table has never been easier. Don’t forget to share your experiences in the comments below and let us know how these cheese bites added delight to your gathering.

Recipe Section

Serves: 12 | Prep Time: 10 minutes | Cook Time: 20 minutes | Total Time: 30 minutes

  • 1 can green chilies, chopped
  • 1/2 cup cream cheese, softened
  • 1 cup shredded cheddar cheese
  • 1/2 cup breadcrumbs
  • 1/4 cup grated parmesan cheese
  • Salt and pepper, to taste
  1. Preheat the oven to 350°F and grease a mini muffin tin.
  2. In a mixing bowl, combine the green chilies, cream cheese, cheddar cheese, breadcrumbs, parmesan cheese, salt, and pepper. Mix until well combined.
  3. Scoop the mixture into the mini muffin tin, filling each cup about 3/4 full.
  4. Bake for 15-20 minutes, or until the bites are golden brown and bubbly.
  5. Let cool slightly before removing from the tin and serving.

Delicious Crockpot Cream Cheese Chicken Chili: Easy Comfort Food Recipe

“`html
Jump to Recipe

Crockpot Cream Cheese Chicken Chili: A Cozy, Flavorful Delight

Imagine coming home after a long day to the inviting aroma of a hearty, creamy chicken chili simmering to perfection. With its tender pieces of chicken, creamy base, and a symphony of spices that dance on your taste buds, this Crockpot Cream Cheese Chicken Chili is a recipe that promises warmth and comfort in every bite. Its ease of preparation and the delightful balance of flavors make it a must-try for anyone seeking a cozy meal.

Why You’ll Love This Recipe

This Crockpot Cream Cheese Chicken Chili is a masterclass in comfort food, combining the rich, creamy texture of softened cream cheese with the robust flavors of cumin, chili powder, and paprika. The addition of black beans and corn delivers a satisfying bite, while the ranch seasoning adds a unique twist. Whether you’re a busy parent or a culinary enthusiast, this dish offers simplicity and satisfaction.

The recipe’s versatility is unmatched—tailor it to your preferences or dietary needs. It evokes memories of family dinners and warm conversations around the table, making it not just a meal, but an experience. Furthermore, its wholesome ingredients ensure that you’re feeding your loved ones something nutritious without skimping on taste.

Personal Story/Connection

Every time I prepare this Cream Cheese Chicken Chili, I’m reminded of winter afternoons spent with my family. The crockpot would hum gently in the corner, while its fragrant promise of dinner wafted through the house. It became a favorite due to its ease, allowing more time for stories and less time in the kitchen—a recipe of love shared among those closest to me.

Context/Background

Chili is a staple in many cultures, known for its variety and adaptability. Originating in the American Southwest, it has taken on countless forms—each with its unique flair. This creamy variation brings a contemporary twist to traditional chili, incorporating the art of slow cooking that allows flavors to meld and deepen over time.

Throughout history, chili has been a dish that unites and comforts. This Cream Cheese Chicken Chili extends this legacy, adding a modern, creamy element that makes it both innovative and cherished.

Tips for Perfect Crockpot Cream Cheese Chicken Chili

  • Use boneless, skinless chicken breasts for ease of shredding.
  • Cube the cream cheese before adding—it melts more evenly.
  • For a bit of heat, include a diced jalapeño or a pinch of cayenne pepper.
  • If pressed for time, you can use pre-shredded rotisserie chicken—adjust cooking time accordingly.
  • Consider using homemade ranch seasoning for a personalized touch.
  • Always taste before serving, adjusting seasoning to your preference.

Serving Suggestions

This Crockpot Cream Cheese Chicken Chili shines as a solo act, but it’s also fantastic paired with fluffy cornbread or warm tortillas. Serve it atop a bed of rice for a heartier meal, or alongside a crisp, green salad for a balanced menu. Topping it with chopped cilantro adds freshness and a pop of color.

For a festive touch, serve it with a dollop of sour cream or a sprinkle of shredded cheese. Whether it’s a casual family dinner or a cozy evening with friends, this chili is your ticket to flavorful satisfaction.

Storage and Leftovers

Store any leftover chili in an airtight container in the refrigerator for up to 4 days. This dish also freezes beautifully; portion it into freezer-safe containers for an easy, ready-made meal.

To reheat, simply thaw overnight in the fridge and warm on the stove over medium heat, stirring occasionally. The flavors often deepen, making day-two chili an extra special treat.

Recipe Variations and Substitutions

  • For a lighter version, replace cream cheese with Greek yogurt.
  • Vary the beans—try kidney or pinto beans for a different texture.
  • To make it vegetarian, swap chicken for hearty vegetables like zucchini or sweet potatoes.
  • Add seasonal vegetables such as butternut squash for autumn flair.

FAQ

Can I make this ahead of time?

Absolutely! Prepare everything and store it in the fridge overnight. Start the crockpot in the morning for a stress-free meal.

What substitutions can I use for ingredients?

Feel free to experiment with beans or use a different cheese for a new flavor profile. Check out our variations section for more ideas.

How do I make this gluten-free or vegan?

It’s naturally gluten-free, just ensure your ranch seasoning is, too. For a vegan version, replace chicken with tofu and cream cheese with a vegan cheese alternative.

Optional Nutritional Information

  • Calories per serving: Approximately 300
  • Protein: 25g
  • Fats: 18g
  • Carbohydrates: 15g

Final Thoughts

This Cream Cheese Chicken Chili is more than just a meal—it’s an embrace in a bowl, perfect for those moments you seek comfort and warmth. Invite this recipe into your kitchen, and watch it become a beloved staple. Share your experiences, and don’t hesitate to leave your questions or comments—we’re here to make your culinary journey delightful and delicious!

Recipe Section

Serves: 6 Prep Time: 10 minutes Cook Time: 6-8 hours Total Time: 6-8 hours

  • 1 lb chicken breasts
  • 1 can black beans, drained and rinsed
  • 1 can corn, drained
  • 1 can diced tomatoes
  • 1 packet ranch seasoning mix
  • 1 tsp cumin
  • 1 tsp chili powder
  • 1/2 tsp onion powder
  • 1/2 tsp garlic powder
  • 1/2 tsp paprika
  • 8 oz cream cheese, softened
  • 1/4 cup chopped cilantro (optional)
  • Salt and pepper to taste
  1. Place chicken breasts at the bottom of the crockpot.
  2. Add black beans, corn, diced tomatoes, ranch seasoning mix, cumin, chili powder, onion powder, garlic powder, and paprika to the crockpot.
  3. Cut cream cheese into cubes and place on top of the mixture.
  4. Cover and cook on low for 6-8 hours or on high for 4-6 hours, until chicken is cooked through and easy to shred.
  5. Shred the chicken and stir in the cream cheese until well combined.
  6. Season with salt and pepper to taste.
  7. Top with chopped cilantro before serving if desired.
  8. Enjoy this creamy and flavorful chicken chili straight from the crockpot!

“`

Spice Up Your Meal with Brunswick Stew and Jalapeño Cornbread

Sure, here’s a detailed and SEO-optimized blog post for Brunswick Stew with Jalapeño Cheddar Cornbread that is ready for WordPress integration.

“`html
Jump to Recipe

Brunswick Stew with Jalapeño Cheddar Cornbread: A Comforting Delight

Experience the heartwarming embrace of Brunswick Stew, a scrumptious medley of tender chicken, vibrant vegetables, and savory flavors that seamlessly blend into a bowl of pure comfort. Paired with the perfect sidekick—Jalapeño Cheddar Cornbread—this meal promises a delightful contrast of spiciness and cheesy goodness, making every bite a cherished memory waiting to happen.

Why You’ll Love This Recipe

The magic of Brunswick Stew lies in its universal appeal—it’s a dish that speaks to the soul. With its wholesome ingredients, this stew offers a kaleidoscope of colors and nutrients. As the rich aroma fills the kitchen, it creates a sense of warmth and nostalgia, ideal for chilly evenings or family gatherings. Furthermore, the Jalapeño Cheddar Cornbread adds an exciting twist, offering a burst of flavor in every crumb, making it an unmissable combination.

This recipe is versatile enough to cater to varying tastes while maintaining its essence. Health-conscious eaters will appreciate its rich array of vegetables, while busy chefs will love its ease of preparation. You can simmer the stew while attending to other tasks, letting the flavors blend effortlessly, and the cornbread comes together in a breeze.

Personal Story/Connection

I vividly recall my first encounter with Brunswick Stew during a family trip to the southern states. The enticing aroma wafting from the kitchen drew me in, and one spoonful was all it took to capture my heart. Paired with my grandmother’s signature Jalapeño Cheddar Cornbread, it was a match made in culinary heaven. Now, every time I prepare this dish, it transports me back to those cherished memories, surrounded by laughter and love.

Context/Background

Brunswick Stew is steeped in history, with origins claimed by both Brunswick County, Virginia, and Brunswick, Georgia. This historical stew, dating back to the early 19th century, was traditionally made with game meat, but has evolved to the comforting chicken-based variation we love today. A true staple of Southern cuisine, it serves as a testament to the resourceful and community-centered spirit of its creators.

The Jalapeño Cheddar Cornbread, on the other hand, brings a modern twist to the classic Southern cornbread. The spicy kick from jalapeños blends harmoniously with the creamy cheddar, crafting a side that’s both familiar and refreshingly bold.

Tips for Perfect Brunswick Stew with Jalapeño Cheddar Cornbread

  • Choose High-Quality Chicken: Opt for organic or free-range chicken for the best flavor and texture.
  • Simmer Slowly: Let the stew simmer slowly to develop deep, robust flavors.
  • Balance the Heat: Adjust the number of jalapeños based on your spice tolerance.
  • Rest the Cornbread: Allow the cornbread to rest before slicing for a cleaner cut and better texture.
  • Vegetable Variations: Feel free to add or swap vegetables based on seasonality and preference.
  • Storage: The stew tastes even better the next day, so don’t hesitate to make it in advance!

Serving Suggestions

This dish excels in versatility, making it suitable for myriad occasions. Enjoy a simple yet fulfilling family dinner with a piping hot bowl of Brunswick Stew paired with warm cornbread straight from the oven. For an elevated dining experience, garnish with fresh herbs or a dollop of sour cream, adding a touch of elegance to the presentation.

Hosting a gathering? Turn it into a feast with a Southern theme, serving the stew alongside grilled veggies, coleslaw, and an assortment of pickled vegetables. The vibrant colors and flavors will captivate your guests, leaving them raving about the meal long after the event.

Storage and Leftovers

Brunswick Stew makes excellent leftovers, as the flavors continue to meld over time. Store any cooled stew in an airtight container in the refrigerator for up to four days. For longer storage, consider freezing individual portions for quick and satisfying meals on busy days.

To reheat, gently warm the stew on the stove over low heat, stirring occasionally to maintain its texture. Rejuvenate leftover cornbread by wrapping it in foil and warming it in the oven at a low temperature until heated through.

Recipe Variations and Substitutions

For a vegetarian twist, replace the chicken with your choice of hearty mushrooms or tofu and swap the chicken broth for vegetable broth. To add an extra layer of flavor, consider incorporating smoked paprika or a hint of cayenne pepper.

For gluten-free needs, use gluten-free flour in the cornbread. If you’re looking to make a dairy-free version, replace buttermilk with almond milk and cheddar with a dairy-free cheese alternative.

FAQ

Can I make this ahead of time? Absolutely! This stew develops richer flavors when made ahead, making it perfect for meal prep or stress-free entertaining.

What substitutions can I use for potatoes? Sweet potatoes or parsnips make excellent alternatives, offering slightly different flavors and nutritional profiles.

How do I make this gluten-free or vegan? Follow the variations mentioned above, such as using vegetable broth and swapping cornmeal for a gluten-free version if necessary.

Optional Nutritional Information

  • Calories per serving (with cornbread): Approximately 420
  • Total Fat: 20g
  • Protein: 22g
  • Carbohydrates: 40g

Final Thoughts

If you’re seeking a dish that offers warmth, comfort, and an explosion of flavors, Brunswick Stew with Jalapeño Cheddar Cornbread should be at the top of your list. Whether recreating fond memories, embarking on a culinary adventure, or simply enjoying a cozy night in, this recipe promises satisfaction with every spoonful. We invite you to try it and share your experiences, memories, and variations in the comments below.

Recipe Section

Serves: 6-8 | Prep Time: 30 minutes | Cook Time: 2 hours | Total Time: 2 hours 30 minutes

  • 2 cups shredded cooked chicken
  • 1 cup diced potatoes
  • 1 cup diced onions
  • 1 cup diced carrots
  • 1 cup diced celery
  • 1 cup corn kernels
  • 1 cup lima beans
  • 1 cup diced tomatoes
  • 4 cups chicken broth
  • 1/2 cup ketchup
  • 1/4 cup barbecue sauce
  • 1 tablespoon Worcestershire sauce
  • Salt and pepper to taste

For Jalapeño Cheddar Cornbread:

  • 1 cup cornmeal
  • 1 cup all-purpose flour
  • 1/4 cup sugar
  • 1 tablespoon baking powder
  • 1/2 teaspoon salt
  • 1 cup shredded cheddar cheese
  • 1/4 cup diced jalapeños
  • 1 cup buttermilk
  • 1/4 cup vegetable oil
  • 1 egg
  1. In a large pot, combine shredded chicken, potatoes, onions, carrots, celery, corn, lima beans, diced tomatoes, chicken broth, ketchup, barbecue sauce, Worcestershire sauce, salt, and pepper. Bring to a boil, then reduce heat and simmer for 1-2 hours.
  2. Preheat oven to 375°F.
  3. In a mixing bowl, combine cornmeal, flour, sugar, baking powder, salt, cheddar cheese, and diced jalapeños.
  4. In a separate bowl, whisk together buttermilk, vegetable oil, and egg. Pour into the dry ingredients and mix until just combined.
  5. Pour the cornbread batter into a greased baking dish and bake for 20-25 minutes until golden brown.
  6. Serve the Brunswick Stew hot with a side of Jalapeño Cheddar Cornbread.
  7. Enjoy the comforting and flavorful meal!

“`

This post is designed to engage readers, provide valuable information, and ensure optimum SEO performance.

Irresistible Loaded Baked Potato Soup: Perfect Comfort Food Recipe

“`html
Jump to Recipe

Loaded Baked Potato Soup: A Creamy Dream Come True

Imagine a bowl brimming with creamy, velvety goodness, infused with the savory richness of cheddar cheese, and topped with crispy bacon bits. This Loaded Baked Potato Soup is a symphony of flavors and textures—a comforting embrace on a chilly day. Its unique blend of simple ingredients transforms into something extraordinary, making it a must-try for home cooks and soup enthusiasts alike.

Why You’ll Love This Recipe

This Loaded Baked Potato Soup is more than just a meal; it’s an experience. The creamy texture, perfectly balanced by the sharpness of cheese and the smoky crunch of bacon bits, makes it irresistibly hearty and satisfying. Whether you’re looking for comfort food to soothe your soul or a dish that pleases a crowd, this soup delivers. It’s versatile enough to begin as a light lunch or the centerpiece of a cozy dinner.

Many find joy in the ease of preparation—it’s straightforward enough for midweek dinners yet special enough for a weekend feast. The simple ingredients, mostly staples in the kitchen, ensure that you can whip up a heartwarming bowl whenever the craving strikes. And let’s not forget its potential nutritional perks: potatoes are a great source of potassium and fiber, while cheddar offers protein and calcium.

This soup not only warms but also invites creativity. Personalize it with different toppings to suit your whimsy or dietary needs. Truly, it’s the kind of recipe that evokes nostalgia and creates new memories around the dining table.

Personal Story/Connection

Growing up, my family always gathered on Sunday nights for soup and storytelling. The Loaded Baked Potato Soup quickly became a family favorite, probably due to its sheer deliciousness and the way it fostered smiles around the table. I recall my mom’s gleeful anticipation as she layered the toppings, turning a simple soup into her masterpiece. It’s no surprise that it has become a tradition, one that we proudly pass down to friends and loved ones who join us.

Context/Background

Originally, the concept of loaded baked potato soup likely stems from the classic American loaded baked potato. This hearty dish, dressed with cheese, sour cream, and bacon, has been a staple in diner culture for decades. The soup version captures this essence, reimagining those beloved flavors in a warming, liquid form.

Over the years, this dish has evolved, with countless variations popping up across home kitchens and restaurants, each adding new twists—like jalapeños for spice or different cheese varieties for distinct textures. It embodies the spirit of innovation while paying homage to its humble beginnings.

Tips for Perfect Loaded Baked Potato Soup

  • Bake potatoes thoroughly for a fluffier texture that mashes smoothly into the broth.
  • Create a lump-free roux by whisking constantly while adding milk to ensure a smooth, creamy base.
  • Choose high-quality cheddar for optimal flavor; sharp varieties bring out the best in the soup.
  • Season gradually with salt and pepper, tasting as you go to avoid over-seasoning.
  • Toppings are key; be generous with bacon and green onions to enhance each bowl.

Serving Suggestions

This soup is lovely served with a side of crusty bread—perfect for dipping and swabbing up every last drop of goodness. Elevate it by serving alongside a fresh green salad drizzled with a tangy vinaigrette, which contrasts nicely with the soup’s creaminess.

For a heartier meal, consider pairing the soup with a grilled cheese sandwich; a classic combination that’ll transport you straight back to childhood. Consider garnishing each bowl with additional bacon, a sprinkle of cayenne for heat, or a dollop of extra sour cream for an even richer finish.

It’s also a brilliant option for casual entertaining. Serve in large mugs for a delightful, informal gathering, allowing guests to customize their toppings directly from a toppings bar you provide.

Storage and Leftovers

Store any leftover soup in an airtight container in the refrigerator for up to three days. Reheat it gently on the stove over low heat, stirring occasionally, until it’s warmed through—add a splash of milk or broth if the soup becomes too thick.

Transform leftovers into a new creation by using it as a sauce for pasta or adding vegetables like broccoli or peas for extra nutrition. Alternatively, you can use it as a base for a casserole, mixing it with cooked chicken or ham and topping with cheese before baking.

Recipe Variations and Substitutions

  • For a gluten-free version, substitute cornstarch for flour in the roux.
  • To make it vegetarian, omit bacon and enhance flavor with smoked paprika or roasted red peppers.
  • Switch cheddar for Swiss or Gouda cheese for a different flavor profile.
  • Consider adding sautéed garlic or minced leeks to the roux for an aromatic twist.
  • Experiment with seasonal vegetables like corn or asparagus mixed in with the potatoes.

FAQ

Can I make this ahead of time?
Yes, prepare the soup and store in the refrigerator. Reheat on the stove when ready to serve, adding milk to adjust consistency.

What substitutions can I use for russet potatoes?
Gold potatoes or Yukon potatoes can work, offering a slightly different texture and flavor.

How do I make this gluten-free or vegan?
Use gluten-free flour or cornstarch for the roux, and replace milk and sour cream with plant-based alternatives. Substitute cheese with vegan cheese varieties.

Optional Nutritional Information

  • Calories: Approx. 450 per serving
  • Protein: 15g
  • Carbohydrates: 45g
  • Fat: 25g

Final Thoughts

This Loaded Baked Potato Soup is an embodiment of comfort dining—rich, soothing, and favorably indulgent. It’s a recipe that not only warms your body but uplifts your spirit, making every spoonful a cherished moment. I invite you to try this wonderful recipe and start your own family tradition. Drop your comments below or share your own variations; I’d love to hear how this soup graces your table!

Recipe Section

Serves: 6 | Prep Time: 15 minutes | Cook Time: 1 hour | Total Time: 1 hour 15 minutes

  • 4 large russet potatoes, washed and dried
  • 1/2 cup butter
  • 1/2 cup all-purpose flour
  • 6 cups whole milk
  • 1 cup sour cream
  • 2 cups shredded cheddar cheese
  • Salt and pepper to taste
  • Toppings: bacon bits, sliced green onions, more shredded cheddar cheese
  1. Preheat oven to 400°F. Pierce the potatoes with a fork and bake for about 1 hour until tender. Allow to cool slightly.
  2. In a large pot, melt butter over medium heat. Whisk in flour to make a roux, then gradually whisk in milk until smooth.
  3. Bring the mixture to a simmer, stirring constantly until it thickens.
  4. Cut potatoes in half lengthwise, scoop out the insides, and mash. Add mashed potatoes to the pot.
  5. Stir in sour cream and cheddar cheese until melted and smooth. Season with salt and pepper.
  6. Ladle soup into bowls and top with bacon bits, green onions, and more shredded cheddar cheese.

“`

Flavorful Bourbon Bacon Pecan Salmon Recipe for Gourmet Home Cooking

“`html
Jump to Recipe

Bourbon Bacon Pecan Salmon: A Symphony of Flavors

Experience the delectable union of rich, savory flavors with this Bourbon Bacon Pecan Salmon recipe. Perfectly baked salmon fillets are elevated with a luscious glaze made from bourbon, soy sauce, and maple syrup, while the crispy bacon and nutty pecans add a delightful crunch. Each bite promises a medley of savory and sweet components, offering a unique dish that’s sure to impress your palate and any dinner guest.

Why You’ll Love This Recipe

This Bourbon Bacon Pecan Salmon is a captivating dish that brings warmth and comfort to your dining table. One of the reasons you’ll love this dish is its perfect balance of flavors. The smoky, sweet glaze complements the natural richness of the salmon, while the bacon and pecans offer a satisfying texture.

Beyond its irresistible taste, this recipe boasts versatility and ease of preparation. Whether you’re a seasoned chef or a home cook, this dish can be whipped up effortlessly, making it ideal for weeknight dinners or special occasions.

This recipe has underlying health benefits too. Salmon is packed with omega-3 fatty acids, which are great for heart health. Paired with pecans, a good source of healthy fats and antioxidants, you’re looking at a nutritious meal full of flavor.

Finally, this recipe evokes emotions and memories of cozy gatherings and joyful toasts, making it not only a meal but an experience, a feast for both body and soul.

Personal Story/Connection

Bourbon Bacon Pecan Salmon holds a special place in my family’s heart. It all started one festive evening a few winters ago. While brainstorming over a bottle of bourbon, we decided to infuse these beloved ingredients into our salmon dinner, creating what would become an unexpected tradition. Every bite brings back echoes of laughter and clinking glasses—a tangible reminder of the love and joy shared around our dining table.

Context/Background

Salmon dishes have always been a staple in various cuisines around the world due to the fish’s widespread availability and wonderful adaptability to flavors. This particular take on salmon unites popular Southern ingredients like bourbon and pecans, offering a gourmet twist with its bacon inclusion.

The idea of glazing meats with bourbon derives from Southern American culinary traditions, known for combining bold, flavorful ingredients. Paired with the crunch of pecans, another Southern staple, this dish embodies a modern take on traditional flavors.

Tips for Perfect Bourbon Bacon Pecan Salmon

  • Choose fresh, high-quality salmon fillets for the best flavor and texture.
  • Ensure the bourbon glaze is well mixed before applying to evenly distribute the flavors.
  • Keep an eye on the baking time – salmon should be cooked just until it flakes easily to maintain moisture.
  • For enhanced flavor, marinate the salmon in the bourbon glaze for 30 minutes before cooking.
  • Use thick-cut bacon for a more pronounced, crispy crunch.
  • Toast the pecans lightly to bring out their natural oils and enhance their nuttiness.

Serving Suggestions

When serving this Bourbon Bacon Pecan Salmon, consider pairing it with a side of roasted Brussels sprouts or creamy mashed potatoes to complement the savory-sweet notes of the dish. For a lighter option, a crisp, green salad with a citrusy vinaigrette will balance the richness.

This dish also shines when paired with a bold red wine, such as a pinot noir, or a bourbon-based cocktail, which enhances the flavors of the glaze and adds sophistication to the meal.

For a special occasion or dinner party, present the dish on a platter garnished with fresh parsley and lemon slices. It will add a pop of color and a hint of freshness.

Storage and Leftovers

To store any leftovers, place the cooled salmon in an airtight container and refrigerate for up to two days. When reheating, consider using the oven to maintain the texture and original flavors. Preheat the oven to 300°F, wrap the salmon in foil, and warm for about 10-15 minutes.

Transform leftovers into a flavorful salad by flaking the salmon over mixed greens, adding leftover bacon and pecans, and drizzling with a balsamic glaze for a balanced lunch option.

Recipe Variations and Substitutions

If you’re looking to tweak this recipe, consider substituting honey for maple syrup for a different kind of sweetness or using walnuts instead of pecans for a milder nutty flavor.

For a gluten-free option, ensure the soy sauce used is gluten-free or replace it with tamari. To make the dish dairy-free, simply make sure the bacon doesn’t contain any added milk ingredients.

Want to add zest? Incorporate a teaspoon of freshly grated ginger into the glaze for a hint of spice.

FAQ

Can I make this ahead of time? Yes, you can prepare the glaze and marinate the salmon in advance. Cook the dish just before serving for the best taste.

What substitutions can I use for bourbon? If you prefer not to use alcohol, substitute with a mixture of apple juice and a teaspoon of vanilla extract for a similar depth of flavor.

How do I make this gluten-free or vegan? For gluten-free, use tamari in place of soy sauce. For vegan, replace salmon with a hearty vegetable like zucchini and use coconut bacon instead of bacon strips.

Optional Nutritional Information

  • Calories per serving: Approximately 450
  • Protein: 24g
  • Fat: 26g
  • Carbohydrates: 15g
  • Sodium: 670mg

Final Thoughts

This Bourbon Bacon Pecan Salmon is more than a meal—it is an experience that marries tradition with contemporary flair. Give it a try and bring a touch of gourmet joy to your table. Whether for a weeknight meal or a holiday gathering, this dish is bound to captivate both friends and family. Don’t forget to share your creations or drop any questions in the comments!

Recipe Section

Serves: 4 | Prep Time: 10 minutes | Cook Time: 15 minutes | Total Time: 25 minutes

  • 4 salmon fillets
  • 1/4 cup bourbon
  • 1/4 cup soy sauce
  • 1/4 cup maple syrup
  • 4 slices of bacon, cooked and crumbled
  • 1/2 cup pecans, chopped
  • Salt and pepper, to taste
  • Fresh parsley, for garnish
  1. Preheat your oven to 375°F and line a baking sheet with foil.
  2. In a small bowl, whisk together bourbon, soy sauce, and maple syrup.
  3. Season salmon fillets with salt and pepper, then place them on the prepared baking sheet.
  4. Brush the bourbon mixture over the salmon fillets, then sprinkle with bacon and pecans.
  5. Bake in the preheated oven for 12-15 minutes, or until the salmon is cooked through and flakes easily with a fork.
  6. Garnish with fresh parsley before serving.

“`

Deliciously Creamy Velveeta Rotel Chicken Rotini Recipe Unveiled

“`html
Jump to Recipe

Velveeta Rotel Chicken Rotini: A Creamy, Cheesy Delight

Welcome to a world where comfort food meets a burst of flavor. Velveeta Rotel Chicken Rotini is a dish that oozes cheesy goodness, with tender chicken pieces and the warmth of perfectly spiced Rotel tomatoes. Imagine swirling your fork into a plate filled with rotini pasta drenched in a creamy, melty Velveeta sauce—a symphony of flavors wrapped in a single bite. It’s the ultimate comfort food that satisfies not just the stomach but also the soul.

Why You’ll Love This Recipe

Velveeta Rotel Chicken Rotini hits all the marks for a satisfying meal that’s easy to make and even easier to love. Whether you’re feeding a hungry family on a busy weeknight or serving up something special for a casual gathering, this recipe is versatile enough to suit any occasion. The combination of smooth, creamy Velveeta with the zesty kick of Rotel tomatoes creates a delightful balance that’s both comforting and exciting.

The recipe is straightforward, making it perfect for novice cooks or those who adore quick meal solutions. Despite its simplicity, the flavors are rich and full-bodied, leaving an impression reminiscent of cherished home-cooked meals. Plus, the use of Velveeta cheese ensures a smooth and creamy sauce that clings lovingly to every piece of pasta.

Nutritionally, this dish provides a good source of protein from the chicken and the option to sneak in some extra vegetables for added nutrition. It’s an all-around crowd-pleaser that might just become a beloved staple in your household.

Personal Story/Connection

This recipe takes me back to the time I stumbled upon it on a spontaneous evening. I was in need of a quick dinner fix after a long day, and I found solace in my pantry staples—which included Velveeta cheese and Rotel tomatoes. As I took my first bite, I knew this was a creation to be remembered. It’s since become a go-to dish that lights up weeknights and delights friends at gatherings.

Context/Background

The delightful union of Velveeta cheese and Rotel tomatoes is a staple in many Southern kitchens, often forming the base of famous cheese dips served at tailgates and family get-togethers. This recipe brings that well-loved combination to your dinner table in an inventive way, pairing it with chicken and pasta for a hearty meal.

Over time, dishes like this have evolved from simple crowd-pleasers to beloved family favorites, maintaining their place in our culinary repertoire. The fusion of rich, creamy cheese with spicy tomatoes captures the essence of Southern comfort food, celebrated for its ability to bring people together around the table.

Tips for Perfect Velveeta Rotel Chicken Rotini

  • Select Quality Chicken: Use fresh, high-quality chicken breasts for the best flavor and texture.
  • Evenly Cube Velveeta: Cubing the cheese ensures it melts quickly and evenly within the sauce.
  • Mind Your Heat: Once added, keep the heat low to prevent the cheese from burning or separating.
  • Cook Pasta Just Right: Cook rotini al dente, as it will continue to cook slightly in the sauce.
  • Season to Taste: Adjust salt and pepper while the dish simmers, as the flavors intensify.

Serving Suggestions

This Velveeta Rotel Chicken Rotini is a standalone star, but pairing it with a fresh green salad introduces a refreshing contrast that complements its rich flavors. Consider serving it alongside crusty garlic bread to sop up every bit of cheesy goodness left on your plate.

For casual gatherings, serve it straight from the skillet for a relaxed vibe that encourages seconds. Want to impress? Serve it in individual ramekins, garnished with a sprinkle of fresh parsley, to elevate its presentation for a dinner party setting.

Storage and Leftovers

Store any leftovers in an airtight container, and it will keep for up to three days in the refrigerator. When reheating, add a splash of chicken broth or milk to restore its creamy texture and heat it gently on the stove or microwave.

If you’re looking to reinvent leftovers, consider using them as a filling for stuffed bell peppers or as a topping for a baked potato. The sauce’s rich flavors make it a versatile starting point for various culinary experiments.

Recipe Variations and Substitutions

  • Spicier Kick: Add cayenne pepper or chopped jalapeños for heat enthusiasts.
  • Vegetarian Option: Replace chicken with roasted vegetables like zucchini, mushrooms, and bell peppers.
  • Gluten-Free Version: Substitute regular rotini with gluten-free pasta to accommodate dietary needs.
  • Cheese Substitute: Use Monterey Jack or cheddar cheese for a different flavor profile.

FAQ

Can I make this ahead of time? Yes, you can prepare the sauce a day in advance and simply cook the pasta fresh before serving.

What substitutions can I use for Velveeta? Substitute with creamy cheeses like cheddar or Colby-Jack, though texture and melting behavior may vary.

How do I make this gluten-free? Use gluten-free rotini and ensure all other ingredients, such as canned soup, are certified gluten-free.

Optional Nutritional Information

  • Calories: Approximately 450 per serving
  • Protein: 25g
  • Carbohydrates: 40g
  • Total Fat: 22g

Final Thoughts

In the world of quick and delicious meals, Velveeta Rotel Chicken Rotini stands out as a top choice that combines ease, flavor, and satisfaction. It’s a recipe that resonates with warmth and comfort, perfect for carrying the weight of the day away. I invite you to give it a try and share the joy it brings to your table. Feel free to leave a comment with your experiences or reach out if you have any questions.

Recipe Section

Serves: 4
Prep Time: 10 minutes
Cook Time: 20 minutes
Total Time: 30 minutes

  • 2 cups rotini pasta
  • 1 lb chicken breasts, diced
  • 1 can (10 oz) Rotel tomatoes
  • 1 can (10 oz) cream of chicken soup
  • 1/2 cup Velveeta cheese, cubed
  • 1/2 cup chicken broth
  • 1 tsp garlic powder
  • Salt and pepper to taste
  • Fresh parsley for garnish
  1. Cook rotini pasta according to package instructions. Drain and set aside.
  2. In a large skillet, cook chicken until no longer pink.
  3. Add Rotel tomatoes, cream of chicken soup, Velveeta cheese, chicken broth, garlic powder, salt, and pepper. Stir until cheese is melted and sauce is combined.
  4. Add the cooked rotini pasta to the skillet and toss until well coated.
  5. Let simmer for a few minutes on low heat to allow flavors to meld together.
  6. Garnish with fresh parsley before serving.
  7. Enjoy this delicious and creamy Velveeta Rotel Chicken Rotini!

“`

Irresistible Smoked Jalapeño Popper Chicken Bombs Everyone Will Love

“`html
Jump to Recipe

Smoked Jalapeño Popper Chicken Bombs: A Flavor Explosion You Can’t Resist

Imagine tantalizing smoke swirling around succulent chicken breasts, infused with the fiery essence of jalapeños and the smooth creaminess of cheese. Meet the Smoked Jalapeño Popper Chicken Bombs, a culinary creation that redefines indulgence with every bite. Wrapped in crispy bacon and brushed with robust BBQ sauce, this dish is an all-time favorite for grill enthusiasts and spice lovers alike. Whether you’re hosting a backyard barbecue or craving something special, these chicken bombs promise unforgettable flavors.

Why You’ll Love This Recipe

If you’re searching for a dish that combines both simplicity and sophistication, the Smoked Jalapeño Popper Chicken Bombs are your answer. The balance between the smoky grilling tones and the spicy jalapeño bite creates an irresistible flavor profile that’s easy to achieve but complex in taste.

This recipe allows for creative freedom; it’s adaptable for both casual weeknight dinners and extraordinary celebrations. The health-conscious among us will appreciate the high protein content from the chicken and bacon, while food adventurers will relish the combination of bold spices and cheeses, making every bite a discovery of taste and texture.

The memories it evokes are not only striking because of its taste but also the convivial atmosphere it creates. Whether you’re enjoying it with friends, family, or solo with a favorite Netflix series, these chicken bombs promise warmth and camaraderie in just one dish.

Personal Story/Connection

My love affair with Smoked Jalapeño Popper Chicken Bombs began at a summer family gathering. The recipe was passed down from my uncle, a seasoned grill master. It wasn’t just about the explosion of flavors, but the laughter and stories shared around the grill as the aroma of smoked paprika and bacon wafted through the air. Each time I prepare these, I’m reminded of those cherished moments surrounded by loved ones, making each bite more than just a culinary experience but a nostalgic journey back to a place of happiness.

Context/Background

Tracing back to Tex-Mex roots, jalapeño poppers have always been a beloved appetizer, known for their kick and creamy filling. This dish evolves that classic by integrating it into a complete meal – wrapped within juicy chicken and bacon, it brings Southern BBQ flair to the traditional heat of jalapeños.

What began as a regional favorite quickly gained fans nationwide, with different versions popping up (pun intended!) in cookbooks and home kitchens. The infusion of smoke in the recipe adds a modern twist, enhancing the rustic authenticity that speaks to barbecue tradition while appealing to contemporary palates.

Tips for Perfect Smoked Jalapeño Popper Chicken Bombs

  • Use fresh jalapeños: Ensure your peppers are vibrant and firm to maintain shape and add a fresh bite.
  • Cheese blend: Experiment with cheeses like Monterey Jack or even add a dash of blue cheese for depth.
  • Bacon wrap: Use thin slices to allow them to cook evenly and crisp perfectly.
  • Secure tightly: Use enough toothpicks to hold everything together while cooking.
  • Monitor the grill: Keep a close eye to prevent burning and ensure even cooking, especially if larger chicken breasts are used.

Serving Suggestions

These chicken bombs are versatile, making them great for both formal and informal settings. Try serving them on a wooden platter to amplify their rustic appeal. Pair them with a crisp, cold beer or a refreshing margarita to complement the smoky and spicy notes.

For side dishes, go traditional with corn on the cob or a vibrant coleslaw. Looking to impress? Serve alongside a tangy cranberry salsa or grilled peaches to add a sweet contrast, bringing out the heat from the jalapeños.

Storage and Leftovers

Storage: If you happen to have leftovers, fear not! Store them in an airtight container in the refrigerator for up to 3 days. They retain their flavor well and can easily be reheated.

Reheating: To maintain juiciness, reheat the chicken bombs in the oven at 350°F until warmed through. This method helps keep the bacon crispy while avoiding a microwave’s tendency to dry out the chicken.

Recipe Variations and Substitutions

  • Spice level: Tweak the heat by using milder peppers like poblanos or opting for spicier ones such as serranos.
  • Keto-friendly: Skip the BBQ sauce or substitute with a low-sugar option.
  • Vegetarian option: Consider using large portobello mushroom caps to hold the stuffing, wrapping in a vegetarian bacon substitute.
  • Additional flavors: Add a layer of sliced avocado or a drizzle of lime for a fresh twist.

FAQ

Can I make this ahead of time? Yes, you can prep the chicken bombs a day in advance. Store them covered in the fridge and grill them when ready to eat.

What substitutions can I use for cheese? Any soft, melty cheese works. Consider using pepper jack for added spice or gouda for a smoky undertone.

How do I make this gluten-free? Ensure your BBQ sauce and any additional seasonings are certified gluten-free, and you’re good to go!

Optional Nutritional Information

  • Calories: Approximately 450 per serving
  • Protein: 35g
  • Fat: 28g
  • Carbohydrates: 7g

Final Thoughts

The Smoked Jalapeño Popper Chicken Bombs are a testament to how food can be both simple to prepare and grand in flavor. They make a striking center dish that embodies the spirit of sharing and togetherness. Whether you’re a seasoned cook or a novice griller, this recipe invites you to explore the exciting world of flavors it has to offer.

Try it for your next meal, and let your taste buds embark on this delightful adventure. We’d love to hear about your experience, so feel free to comment below with how your cooking journey went!

Recipe Section (Final Element)

Serves: 4 | Prep Time: 20 minutes | Cook Time: 35 minutes | Total Time: 55 minutes

  • 4 boneless, skinless chicken breasts
  • 8 jalapeños, halved and seeded
  • 8 oz cream cheese, softened
  • 1 cup shredded cheddar cheese
  • 1 tsp garlic powder
  • 1 tsp onion powder
  • 1 tsp smoked paprika
  • Salt and pepper, to taste
  • 8 slices bacon
  • BBQ sauce, for brushing
  1. Preheat your grill or smoker to 375°F.
  2. In a bowl, mix together cream cheese, cheddar cheese, garlic powder, onion powder, smoked paprika, salt, and pepper.
  3. Stuff each jalapeño half with the cream cheese mixture.
  4. Butterfly each chicken breast and place 2 stuffed jalapeño halves inside, then secure with toothpicks.
  5. Wrap each chicken breast with 2 slices of bacon, securing with toothpicks.
  6. Place the chicken bombs on the grill and cook for about 25-30 minutes, or until the chicken reaches an internal temperature of 165°F, turning occasionally.
  7. Brush each chicken bomb with BBQ sauce and continue cooking for another 5 minutes.
  8. Remove from the grill and let rest for a few minutes before serving.

Enjoy these delicious Smoked Jalapeño Popper Chicken Bombs!

“`

Delicious and Hearty Chicken Chili Soup Recipe for Cozy Nights

“`html
Jump to Recipe

Hearty Chicken Chili Soup: A Bowl of Warm Comfort

Imagine savoring a spoonful of steaming, flavorful Chicken Chili Soup. The aroma of tender chicken mingling with spices, fresh vegetables, and beans captivates your senses. This hearty soup promises to deliver warmth, comfort, and nutritional goodness in every bite. An ideal choice for chilly evenings or anytime you crave a soulful, satisfying meal. Its uniqueness lies in its simplicity and robust flavor profile, making it a must-try dish for your next culinary adventure.

Why You’ll Love This Recipe

Chicken Chili Soup offers a delightful combination of flavors and textures. Its versatility allows you to enjoy it as a wholesome dinner or a light lunch. The addition of fresh vegetables and lean chicken makes it a nutritious choice, packed with essential vitamins and proteins. The spices bring warmth and depth without overwhelming the natural flavors, creating a balanced and delightful tasting experience.

This recipe is straightforward and beginner-friendly, requiring minimal preparation and effort. It’s also a budget-friendly meal, making it accessible to everyone. Whether you’re feeding a large family or entertaining guests, its large batch nature ensures nobody leaves the table hungry.

The emotions tied to a bowl of homemade Chicken Chili Soup are priceless. It evokes memories of cozy nights with loved ones, laughter shared over a table of wholesome food, and the pure joy of nourishing your body and soul. This delightful dish can become a staple in your kitchen.

Personal Story/Connection

Every winter, as the temperatures dipped, my grandmother would prepare a large pot of her signature Chicken Chili Soup. Its aroma filled the house, promising warmth and comfort against the harsh cold outside. Gathering around the table with bowls brimming with steaming soup, we shared stories and laughter. This tradition of Chicken Chili Soup has been passed down, and every spoonful reminds me of those cherished family moments. It’s more than just a meal; it’s a heartwarming memory-maker.

Context/Background

Chicken Chili Soup originated as a fusion of traditional chili and hearty soups, gaining popularity for its ability to combine robust flavors with nourishing ingredients. The marriage of chicken, black beans, corn, and a medley of spices creates a dish inspired by Southwest cuisine, celebrated for its rich, comforting qualities.

Over time, this soup has evolved, embracing various ingredients based on regional availability and personal preferences. Its adaptability makes it a beloved dish worldwide, continuing to evolve while retaining its roots. Chicken Chili Soup not only fills your belly but also invites you to partake in a culinary tradition celebrated globally.

Tips for Perfect Chicken Chili Soup

  • For richer flavor, use homemade chicken broth if available.
  • Ensure the chicken is browned nicely to add a depth of flavor to the soup.
  • Experiment with spices by adding a pinch of cayenne for an extra kick.
  • For a creamier texture, blend half the soup and stir it back into the pot.
  • Feel free to adjust seasoning according to taste, gradually incorporating salt and pepper.
  • For added smoky flavor, roast the bell pepper before adding it to the soup.

Serving Suggestions

Serve Chicken Chili Soup accompanied by a side of warm, crusty bread to soak up the delicious broth. A wedge of lime on the side adds a refreshing zest, enhancing the soup’s flavors.

This soup pairs wonderfully with a fresh salad or sliced avocado drizzled with lime juice. For an elegant presentation at a dinner party, serve the soup in individual bread bowls, topped with a dollop of sour cream, a sprinkle of cheese, and chopped cilantro.

For casual nights, present it buffet-style with an array of toppings, allowing guests to customize their bowls. Options could include jalapeños, tortilla strips, and additional cheese, creating an interactive dining experience.

Storage and Leftovers

To store leftovers, let the soup cool completely before transferring it to an airtight container. It can be refrigerated for up to 3 days, making it a convenient meal for busy weeks.

Reheat gently on the stove over medium heat, stirring occasionally to ensure even heating. If the soup thickens upon refrigeration, add a splash of broth to reach your desired consistency.

Leftover Chicken Chili Soup can be transformed into a filling for tacos or a topping for nachos, offering a creative twist to your meals and minimizing waste.

Recipe Variations and Substitutions

For a vegetarian version, omit the chicken and replace the broth with vegetable stock. Add additional beans or paneer for protein.

Swap black beans with chickpeas or kidney beans for a different texture and flavor. For a seasonal twist, incorporate diced pumpkin or sweet potatoes during the fall months.

To make it spicier, include jalapeños or a dash of hot sauce. Alternatively, tone down the heat by reducing chili powder and cumin.

FAQ

Can I make this ahead of time?

Absolutely! You can prepare the soup a day in advance. The flavors deepen with time, making it even more delicious.

What substitutions can I use for chicken?

Turkey or tofu are great alternatives, offering a different yet delightful flavor profile.

How do I make this gluten-free?

This recipe is naturally gluten-free. Ensure packaged ingredients like broth are certified gluten-free to meet dietary needs.

Final Thoughts

Chicken Chili Soup is a versatile, comforting dish perfect for every occasion, from busy weeknight dinners to relaxed weekend lunches. Its rich, savory profile ensures satisfaction, leaving you feeling warm and content. Dive into this flavorful adventure, relish every bite, and perhaps, like many others, let it become a cherished tradition in your home.

Recipe Section

Serves: 4-6 | Prep Time: 15 mins | Cook Time: 30 mins | Total Time: 45 mins

  • 1 lb boneless, skinless chicken breast, diced
  • 1 onion, chopped
  • 2 cloves garlic, minced
  • 1 red bell pepper, diced
  • 1 can of black beans, drained and rinsed
  • 1 can of diced tomatoes
  • 1 cup frozen corn
  • 4 cups chicken broth
  • 1 tbsp chili powder
  • 1 tsp cumin
  • Salt and pepper, to taste
  • Garnish: fresh cilantro, shredded cheese, sour cream, avocado
  1. In a large pot, sauté the onion, garlic, and bell pepper until softened.
  2. Add in the diced chicken breast and cook until browned.
  3. Stir in the black beans, diced tomatoes, corn, chicken broth, chili powder, cumin, salt, and pepper.
  4. Bring the soup to a boil, then reduce heat and let it simmer for 20-30 minutes.
  5. Serve hot, garnished with fresh cilantro, shredded cheese, a dollop of sour cream, and sliced avocado.
  6. Enjoy this flavorful and hearty Chicken Chili Soup!

“`