Irresistible Smoked Jalapeño Popper Chicken Bombs Everyone Will Love

“`html
Jump to Recipe

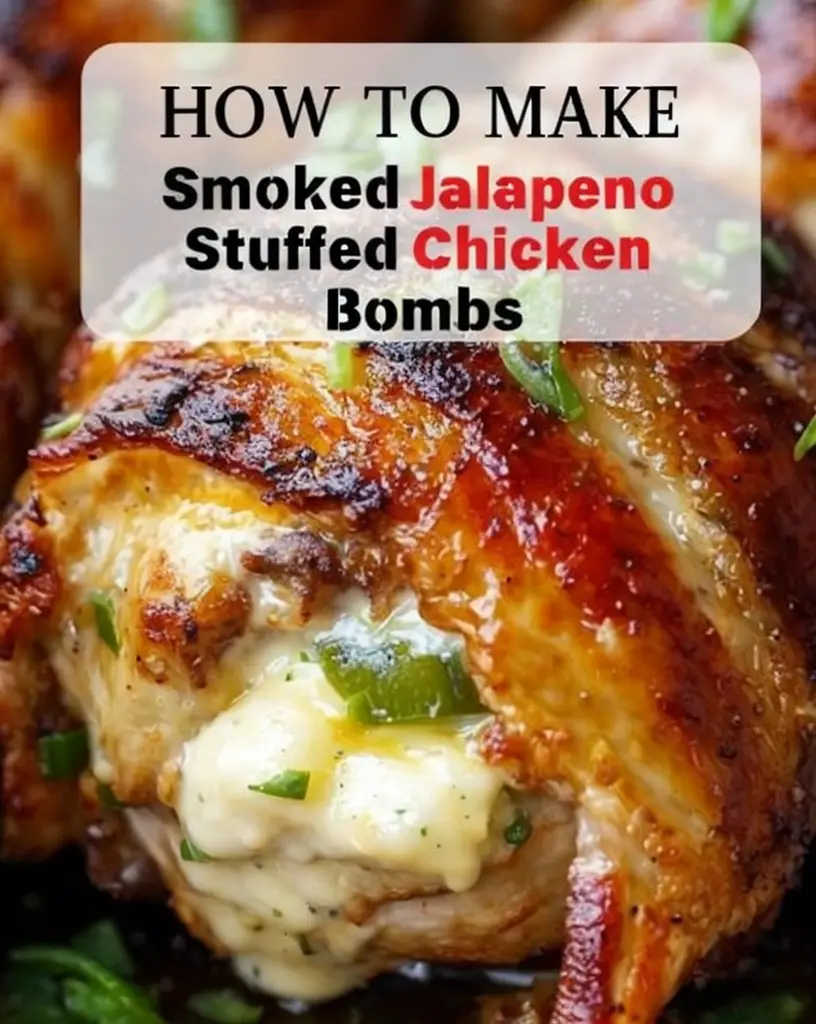
Smoked Jalapeño Popper Chicken Bombs: A Flavor Explosion You Can’t Resist

Imagine tantalizing smoke swirling around succulent chicken breasts, infused with the fiery essence of jalapeños and the smooth creaminess of cheese. Meet the Smoked Jalapeño Popper Chicken Bombs, a culinary creation that redefines indulgence with every bite. Wrapped in crispy bacon and brushed with robust BBQ sauce, this dish is an all-time favorite for grill enthusiasts and spice lovers alike. Whether you’re hosting a backyard barbecue or craving something special, these chicken bombs promise unforgettable flavors.

Why You’ll Love This Recipe

If you’re searching for a dish that combines both simplicity and sophistication, the Smoked Jalapeño Popper Chicken Bombs are your answer. The balance between the smoky grilling tones and the spicy jalapeño bite creates an irresistible flavor profile that’s easy to achieve but complex in taste.

This recipe allows for creative freedom; it’s adaptable for both casual weeknight dinners and extraordinary celebrations. The health-conscious among us will appreciate the high protein content from the chicken and bacon, while food adventurers will relish the combination of bold spices and cheeses, making every bite a discovery of taste and texture.

The memories it evokes are not only striking because of its taste but also the convivial atmosphere it creates. Whether you’re enjoying it with friends, family, or solo with a favorite Netflix series, these chicken bombs promise warmth and camaraderie in just one dish.

Personal Story/Connection

My love affair with Smoked Jalapeño Popper Chicken Bombs began at a summer family gathering. The recipe was passed down from my uncle, a seasoned grill master. It wasn’t just about the explosion of flavors, but the laughter and stories shared around the grill as the aroma of smoked paprika and bacon wafted through the air. Each time I prepare these, I’m reminded of those cherished moments surrounded by loved ones, making each bite more than just a culinary experience but a nostalgic journey back to a place of happiness.

Context/Background

Tracing back to Tex-Mex roots, jalapeño poppers have always been a beloved appetizer, known for their kick and creamy filling. This dish evolves that classic by integrating it into a complete meal – wrapped within juicy chicken and bacon, it brings Southern BBQ flair to the traditional heat of jalapeños.

What began as a regional favorite quickly gained fans nationwide, with different versions popping up (pun intended!) in cookbooks and home kitchens. The infusion of smoke in the recipe adds a modern twist, enhancing the rustic authenticity that speaks to barbecue tradition while appealing to contemporary palates.

Tips for Perfect Smoked Jalapeño Popper Chicken Bombs

  • Use fresh jalapeños: Ensure your peppers are vibrant and firm to maintain shape and add a fresh bite.
  • Cheese blend: Experiment with cheeses like Monterey Jack or even add a dash of blue cheese for depth.
  • Bacon wrap: Use thin slices to allow them to cook evenly and crisp perfectly.
  • Secure tightly: Use enough toothpicks to hold everything together while cooking.
  • Monitor the grill: Keep a close eye to prevent burning and ensure even cooking, especially if larger chicken breasts are used.

Serving Suggestions

These chicken bombs are versatile, making them great for both formal and informal settings. Try serving them on a wooden platter to amplify their rustic appeal. Pair them with a crisp, cold beer or a refreshing margarita to complement the smoky and spicy notes.

For side dishes, go traditional with corn on the cob or a vibrant coleslaw. Looking to impress? Serve alongside a tangy cranberry salsa or grilled peaches to add a sweet contrast, bringing out the heat from the jalapeños.

Storage and Leftovers

Storage: If you happen to have leftovers, fear not! Store them in an airtight container in the refrigerator for up to 3 days. They retain their flavor well and can easily be reheated.

Reheating: To maintain juiciness, reheat the chicken bombs in the oven at 350°F until warmed through. This method helps keep the bacon crispy while avoiding a microwave’s tendency to dry out the chicken.

Recipe Variations and Substitutions

  • Spice level: Tweak the heat by using milder peppers like poblanos or opting for spicier ones such as serranos.
  • Keto-friendly: Skip the BBQ sauce or substitute with a low-sugar option.
  • Vegetarian option: Consider using large portobello mushroom caps to hold the stuffing, wrapping in a vegetarian bacon substitute.
  • Additional flavors: Add a layer of sliced avocado or a drizzle of lime for a fresh twist.

FAQ

Can I make this ahead of time? Yes, you can prep the chicken bombs a day in advance. Store them covered in the fridge and grill them when ready to eat.

What substitutions can I use for cheese? Any soft, melty cheese works. Consider using pepper jack for added spice or gouda for a smoky undertone.

How do I make this gluten-free? Ensure your BBQ sauce and any additional seasonings are certified gluten-free, and you’re good to go!

Optional Nutritional Information

  • Calories: Approximately 450 per serving
  • Protein: 35g
  • Fat: 28g
  • Carbohydrates: 7g

Final Thoughts

The Smoked Jalapeño Popper Chicken Bombs are a testament to how food can be both simple to prepare and grand in flavor. They make a striking center dish that embodies the spirit of sharing and togetherness. Whether you’re a seasoned cook or a novice griller, this recipe invites you to explore the exciting world of flavors it has to offer.

Try it for your next meal, and let your taste buds embark on this delightful adventure. We’d love to hear about your experience, so feel free to comment below with how your cooking journey went!

Recipe Section (Final Element)

Serves: 4 | Prep Time: 20 minutes | Cook Time: 35 minutes | Total Time: 55 minutes

  • 4 boneless, skinless chicken breasts
  • 8 jalapeños, halved and seeded
  • 8 oz cream cheese, softened
  • 1 cup shredded cheddar cheese
  • 1 tsp garlic powder
  • 1 tsp onion powder
  • 1 tsp smoked paprika
  • Salt and pepper, to taste
  • 8 slices bacon
  • BBQ sauce, for brushing
  1. Preheat your grill or smoker to 375°F.
  2. In a bowl, mix together cream cheese, cheddar cheese, garlic powder, onion powder, smoked paprika, salt, and pepper.
  3. Stuff each jalapeño half with the cream cheese mixture.
  4. Butterfly each chicken breast and place 2 stuffed jalapeño halves inside, then secure with toothpicks.
  5. Wrap each chicken breast with 2 slices of bacon, securing with toothpicks.
  6. Place the chicken bombs on the grill and cook for about 25-30 minutes, or until the chicken reaches an internal temperature of 165°F, turning occasionally.
  7. Brush each chicken bomb with BBQ sauce and continue cooking for another 5 minutes.
  8. Remove from the grill and let rest for a few minutes before serving.

Enjoy these delicious Smoked Jalapeño Popper Chicken Bombs!

“`

Delicious and Hearty Chicken Chili Soup Recipe for Cozy Nights

“`html
Jump to Recipe

Hearty Chicken Chili Soup: A Bowl of Warm Comfort

Imagine savoring a spoonful of steaming, flavorful Chicken Chili Soup. The aroma of tender chicken mingling with spices, fresh vegetables, and beans captivates your senses. This hearty soup promises to deliver warmth, comfort, and nutritional goodness in every bite. An ideal choice for chilly evenings or anytime you crave a soulful, satisfying meal. Its uniqueness lies in its simplicity and robust flavor profile, making it a must-try dish for your next culinary adventure.

Why You’ll Love This Recipe

Chicken Chili Soup offers a delightful combination of flavors and textures. Its versatility allows you to enjoy it as a wholesome dinner or a light lunch. The addition of fresh vegetables and lean chicken makes it a nutritious choice, packed with essential vitamins and proteins. The spices bring warmth and depth without overwhelming the natural flavors, creating a balanced and delightful tasting experience.

This recipe is straightforward and beginner-friendly, requiring minimal preparation and effort. It’s also a budget-friendly meal, making it accessible to everyone. Whether you’re feeding a large family or entertaining guests, its large batch nature ensures nobody leaves the table hungry.

The emotions tied to a bowl of homemade Chicken Chili Soup are priceless. It evokes memories of cozy nights with loved ones, laughter shared over a table of wholesome food, and the pure joy of nourishing your body and soul. This delightful dish can become a staple in your kitchen.

Personal Story/Connection

Every winter, as the temperatures dipped, my grandmother would prepare a large pot of her signature Chicken Chili Soup. Its aroma filled the house, promising warmth and comfort against the harsh cold outside. Gathering around the table with bowls brimming with steaming soup, we shared stories and laughter. This tradition of Chicken Chili Soup has been passed down, and every spoonful reminds me of those cherished family moments. It’s more than just a meal; it’s a heartwarming memory-maker.

Context/Background

Chicken Chili Soup originated as a fusion of traditional chili and hearty soups, gaining popularity for its ability to combine robust flavors with nourishing ingredients. The marriage of chicken, black beans, corn, and a medley of spices creates a dish inspired by Southwest cuisine, celebrated for its rich, comforting qualities.

Over time, this soup has evolved, embracing various ingredients based on regional availability and personal preferences. Its adaptability makes it a beloved dish worldwide, continuing to evolve while retaining its roots. Chicken Chili Soup not only fills your belly but also invites you to partake in a culinary tradition celebrated globally.

Tips for Perfect Chicken Chili Soup

  • For richer flavor, use homemade chicken broth if available.
  • Ensure the chicken is browned nicely to add a depth of flavor to the soup.
  • Experiment with spices by adding a pinch of cayenne for an extra kick.
  • For a creamier texture, blend half the soup and stir it back into the pot.
  • Feel free to adjust seasoning according to taste, gradually incorporating salt and pepper.
  • For added smoky flavor, roast the bell pepper before adding it to the soup.

Serving Suggestions

Serve Chicken Chili Soup accompanied by a side of warm, crusty bread to soak up the delicious broth. A wedge of lime on the side adds a refreshing zest, enhancing the soup’s flavors.

This soup pairs wonderfully with a fresh salad or sliced avocado drizzled with lime juice. For an elegant presentation at a dinner party, serve the soup in individual bread bowls, topped with a dollop of sour cream, a sprinkle of cheese, and chopped cilantro.

For casual nights, present it buffet-style with an array of toppings, allowing guests to customize their bowls. Options could include jalapeños, tortilla strips, and additional cheese, creating an interactive dining experience.

Storage and Leftovers

To store leftovers, let the soup cool completely before transferring it to an airtight container. It can be refrigerated for up to 3 days, making it a convenient meal for busy weeks.

Reheat gently on the stove over medium heat, stirring occasionally to ensure even heating. If the soup thickens upon refrigeration, add a splash of broth to reach your desired consistency.

Leftover Chicken Chili Soup can be transformed into a filling for tacos or a topping for nachos, offering a creative twist to your meals and minimizing waste.

Recipe Variations and Substitutions

For a vegetarian version, omit the chicken and replace the broth with vegetable stock. Add additional beans or paneer for protein.

Swap black beans with chickpeas or kidney beans for a different texture and flavor. For a seasonal twist, incorporate diced pumpkin or sweet potatoes during the fall months.

To make it spicier, include jalapeños or a dash of hot sauce. Alternatively, tone down the heat by reducing chili powder and cumin.

FAQ

Can I make this ahead of time?

Absolutely! You can prepare the soup a day in advance. The flavors deepen with time, making it even more delicious.

What substitutions can I use for chicken?

Turkey or tofu are great alternatives, offering a different yet delightful flavor profile.

How do I make this gluten-free?

This recipe is naturally gluten-free. Ensure packaged ingredients like broth are certified gluten-free to meet dietary needs.

Final Thoughts

Chicken Chili Soup is a versatile, comforting dish perfect for every occasion, from busy weeknight dinners to relaxed weekend lunches. Its rich, savory profile ensures satisfaction, leaving you feeling warm and content. Dive into this flavorful adventure, relish every bite, and perhaps, like many others, let it become a cherished tradition in your home.

Recipe Section

Serves: 4-6 | Prep Time: 15 mins | Cook Time: 30 mins | Total Time: 45 mins

  • 1 lb boneless, skinless chicken breast, diced
  • 1 onion, chopped
  • 2 cloves garlic, minced
  • 1 red bell pepper, diced
  • 1 can of black beans, drained and rinsed
  • 1 can of diced tomatoes
  • 1 cup frozen corn
  • 4 cups chicken broth
  • 1 tbsp chili powder
  • 1 tsp cumin
  • Salt and pepper, to taste
  • Garnish: fresh cilantro, shredded cheese, sour cream, avocado
  1. In a large pot, sauté the onion, garlic, and bell pepper until softened.
  2. Add in the diced chicken breast and cook until browned.
  3. Stir in the black beans, diced tomatoes, corn, chicken broth, chili powder, cumin, salt, and pepper.
  4. Bring the soup to a boil, then reduce heat and let it simmer for 20-30 minutes.
  5. Serve hot, garnished with fresh cilantro, shredded cheese, a dollop of sour cream, and sliced avocado.
  6. Enjoy this flavorful and hearty Chicken Chili Soup!

“`

Irresistibly Delicious Corn Queso Dip Recipe Perfect for Parties

“`html
Jump to Recipe

Corn Queso Dip: The Ultimate Cheesy Delight

Imagine dipping a perfectly crisp tortilla chip into a bowl of luscious, creamy, and flavorful Corn Queso Dip. The melted cheddar cheese blends harmoniously with the subtle heat of diced green chilies, while the sweetness of corn provides a delightful contrast. This dish is a party favorite, ideal for any gathering. Prepare to be enveloped in a world of comforting tastes and textures, all encapsulated in one irresistible dip.

Why You’ll Love This Recipe

The allure of Corn Queso Dip lies not only in its cheesy decadence but also in its versatility. Whether it’s a cozy night in or a lively party, this dip has you covered. This recipe is quick to prepare and perfect for any occasion, showcasing the robustness of cheddar cheese with a surprising twist from green chilies. It’s a match made in heaven, ready to offer a delicious escape.

Health-wise, this dip is a step above your regular cheese dips due to the inclusion of corn, providing fiber and a dash of vitamins. Meanwhile, the chilies add a mild heat without overwhelming the palate, making it approachable for all spice levels. It’s also an easily customizable dish where creativity can run wild. Simply alter the cheeses or spice level to fit your preference.

Children and adults alike will find this dish irresistible. It’s a surefire hit that invokes feelings of warmth and joy, reminiscent of gatherings full of laughter and shared moments. It becomes not just a dish but a centerpiece of fond memories, marking the highlight of your culinary experiences.

Personal Story/Connection

Every family get-together is incomplete without my famous Corn Queso Dip. It’s a recipe passed down from my grandmother, tweaked over the years but retaining its essence. I remember vividly how my siblings and I would eagerly surround the kitchen, waiting to dip our first chip into the steaming queso. It’s a dish that bonds us together, filled with nostalgia and love.

Context/Background

The concept of queso dip has origins rooted deeply in Mexican cuisine, a delightful blend of melted cheese and seasonings. Traditionally, queso dips are served as an appetizer or side, offering a creamy complement to many dishes. Over the years, numerous variations have emerged, each adding a unique twist to the classic recipe.

Corn and chilies bring a regional flair to this Corn Queso Dip, inspired by southwestern cooking traditions. The use of cheddar cheese, which originated in the English village of Cheddar, adds an international touch, symbolizing a fusion of flavor profiles across cultures.

Tips for Perfect Corn Queso Dip

  • Use fresh corn for a sweeter, more vibrant flavor if available.
  • Opt for full-fat cheeses for a richer, creamier texture.
  • Gradually add the milk to control the consistency of the dip.
  • Keep the heat low to prevent the cheese from curdling.
  • If the dip becomes too thick, add a splash more milk to reach your desired consistency.

Serving Suggestions

This Corn Queso Dip can be more than your go-to party starter. It pairs beautifully with a variety of dishes. Serve it as a topping for grilled chicken or steak to add a cheesy twist. Or perhaps as a saucy infusion in a burrito for a gourmet touch that could elevate a casual meal.

Garnish your dip with fresh cilantro, diced tomatoes, or jalapeños for an aesthetic pop of color. For a luxurious brunch, drizzle this dip over scrambled eggs and avocados. The possibilities are endless and guaranteed to impress your guests!

Storage and Leftovers

Store leftover Corn Queso Dip in an airtight container in the refrigerator for up to 3 days. To reheat, simply warm it over low heat on the stove, stirring frequently until heated through. Add a bit more milk if the dip appears too thick after chilling.

You can repurpose leftovers into creative dishes like cheesy corn quesadillas or even as a base for a creamy pasta sauce, turning a simple leftover into a new meal adventure.

Recipe Variations and Substitutions

  • For a smoky flavor, add roasted red peppers or smoked paprika.
  • If dairy-free, substitute with coconut milk and vegan cheese alternatives.
  • Enhance the spiciness with diced jalapeños or a splash of hot sauce.
  • For a protein boost, fold in cooked, shredded chicken or crumbled bacon.

FAQ

Can I make this ahead of time? Absolutely! Prepare it a day in advance, store it in the fridge, and reheat it just before serving for maximum flavor.

What substitutions can I use for cream cheese? Neufchâtel or mascarpone cheese can work as substitutes, offering a different yet delightful texture.

How do I make this gluten-free? This dish is naturally gluten-free, but ensure all packaged ingredients, like corn or cheese, are labeled gluten-free.

Nutritional Information (Per Serving)

Calories: 180 | Protein: 6g | Carbohydrates: 8g | Fat: 14g | Fiber: 1g

Final Thoughts

Corn Queso Dip is more than just a dish; it’s an experience worth relishing. Whether you’re introducing it at a party or cherishing it at home, this dip promises to deliver satisfying flavors and create lasting memories. I hope you enjoy making this dip as much as I do. Don’t hesitate to share your creations or leave any questions in the comments!

Recipe Section

Serves: 4 Prep Time: 10 minutes Cook Time: 15 minutes Total Time: 25 minutes

  • 1 cup frozen corn
  • 1 can diced green chilies
  • 1/2 cup cream cheese
  • 1 cup shredded cheddar cheese
  • 1/4 cup milk
  • Salt and pepper to taste
  • Tortilla chips for dipping
  1. In a medium saucepan, combine frozen corn and diced green chilies. Cook over medium heat until warmed through.
  2. Add cream cheese, cheddar cheese, and milk. Stir until cheeses are melted and the mixture is smooth.
  3. Season with salt and pepper, adjusting to taste.
  4. Transfer the queso dip to a serving bowl and garnish with extra shredded cheddar cheese, if desired.
  5. Serve warm with tortilla chips for dipping. Enjoy!

“`

Irresistible Rotel Sausage and Cream Cheese Crescents Recipe

“`html
Jump to Recipe

Rotel Sausage & Cream Cheese Crescents: Creamy, Savory Delight

Imagine biting into a golden-brown crescent roll, where every crumbly layer is infused with a creamy, spicy filling that immediately melts in your mouth. The Rotel Sausage & Cream Cheese Crescents recipe offers just that—a delectable blend of flavors that makes it an irresistible treat. Perfect as a starter or a snack, this dish combines the creamy richness of cream cheese with the savory taste of sausage, all wrapped up in the buttery goodness of crescent rolls. It’s a warm hug in pastry form, and a recipe worth trying!

Why You’ll Love This Recipe

There are countless reasons to love these Rotel Sausage & Cream Cheese Crescents. Firstly, they’re incredibly easy to prepare, making them a perfect choice for last-minute guests or busy weeknight dinners. The combination of cream cheese and sausage provides a rich source of flavor without being overwhelming, while Rotel tomatoes add a zesty kick that delights the palate.

Each bite of these crescents evokes comfort and satisfaction, whether you’re enjoying them alone or sharing them with family and friends. The aroma alone will draw everyone to the kitchen, creating an inviting atmosphere filled with warm spices and savories.

Beyond their delicious taste, these crescents also appeal with their versatility. They are well-suited for game nights, birthday parties, or as a cozy addition to a brunch spread. The recipe is uncomplicated yet elegant, promising to be a crowd-pleaser every time.

Additionally, these crescents strike an excellent balance between indulgence and simplicity, with their creamy filling juxtaposed against the flaky, tender crescent exterior. And on top of all, it’s an adaptable recipe that can easily become a staple in your culinary repertoire.

Personal Story/Connection

This Rotel Sausage & Cream Cheese Crescents recipe holds a special place in my heart, particularly reminding me of weekend family brunches. Each bite transports me back to mornings filled with laughter, where everyone gathered around the kitchen table, eagerly waiting for these pastries to come out of the oven. My mom used to make them, and watching the crescents disappear quickly became a cherished memory—a testament to their deliciousness and family appeal.

Context/Background

These savory crescents have a delightful culinary background, pulling inspiration from American comfort food traditions. The use of crescent rolls, a staple in many households, offers a convenient base to deliver various fillings and flavors. Rotel tomatoes add a Southwestern twist, bringing in a component of Tex-Mex cuisine known for its bold and vibrant flavors.

Crescent rolls have been a part of American cooking since the mid-20th century, celebrated for their quick-prep and versatility. Pairing them with sausage and cream cheese elevates this dish into a modern classic, embraced by busy home chefs and culinary experimenters alike.

Tips for Perfect Rotel Sausage & Cream Cheese Crescents

  • Use high-quality sausage to enhance flavor; consider spicy sausage for an extra kick.
  • Ensure the cream cheese is fully softened to mix smoothly with other ingredients.
  • Don’t overfill the crescent triangles to prevent the filling from oozing out during baking.
  • Seal the edges of the crescents well to keep the filling intact.
  • For an extra crispy exterior, brush the tops of the crescents with a beaten egg before baking.
  • Experiment with different Rotel varieties, such as mild or hot, to suit your taste preference.

Serving Suggestions

These crescents are a versatile dish that can be creatively served and styled to fit various occasions. As an appetizer, pair them with a fresh salad or a side of roasted vegetables to create a well-rounded starter. They are also perfect for game day platters, matched with spicy salsa or a creamy ranch dip to accentuate the flavors.

For a cozy brunch gathering, serve the crescents alongside freshly brewed coffee or a refreshing mimosa. Their comforting warmth works well as a complement to other brunch favorites like scrambled eggs or fresh fruit salad.

If you’re hosting a casual meal, try pairing these crescents with a hearty soup or stew. The flaky pastry can be a delightful counterpart to a rich, savory bowl, making for a comforting dining experience.

Storage and Leftovers

Store any leftover crescents in an airtight container in the refrigerator for up to 3 days. To reheat, place them in a preheated oven at 350°F for about 5-7 minutes, or until warmed through. This will help maintain the pastry’s crispiness.

Want to give a second life to your leftovers? Chop them up and toss them into a mixed greens salad for added texture and flavor. Alternatively, use them as a filling for a savory breakfast casserole or alongside scrambled eggs for a quick morning meal.

Recipe Variations and Substitutions

Consider making these crescents vegetarian by swapping the sausage with sautéed mushrooms or a meat substitute. You can also add a twist by including shredded cheese in the filling for extra creaminess.

If you’re looking for a gluten-free option, use gluten-free crescent roll dough available at many grocery stores. For those with a lactose intolerance, you might try using dairy-free cream cheese.

For a seasonal change, incorporate ingredients like chopped spinach or roasted red peppers to highlight fresh produce in line with the changing seasons. These adaptations not only accommodate differing dietary needs but also allow you to enjoy these crescents year-round with different flavor profiles.

FAQ

Can I make this ahead of time? Yes, prepare and refrigerate the filled crescents ahead of time, then bake fresh when you’re ready to serve.

What substitutions can I use for cream cheese? You can use a lactose-free cream cheese or even a soft goat cheese for a tangy twist.

How do I make this recipe gluten-free? Simply replace the crescent rolls with a gluten-free alternative available in most supermarkets.

Optional Nutritional Information

  • Calories: Approximately 200 per serving
  • Protein: 8g per serving
  • Fat: 15g per serving
  • Carbohydrates: 10g per serving

Final Thoughts

The Rotel Sausage & Cream Cheese Crescents are a dish that embodies the spirit of easy entertaining and comfort casual dining. With their combination of rich flavors, simple preparation, and universal appeal, they are guaranteed to elevate any meal. I encourage you to try these delightful crescents, and experience the joy they bring to any table. Feel free to share your experience or any questions you might have in the comments below!

Recipe Section

Servings: 8 crescents

Prep Time: 10 minutes

Cook Time: 12-15 minutes

Total Time: 25 minutes

  • 1 tube crescent rolls
  • 1 can Rotel tomatoes, drained
  • 8 oz cream cheese, softened
  • 1 lb sausage, cooked and crumbled
  1. Preheat the oven to 375°F and line a baking sheet with parchment paper.
  2. Roll out the crescent rolls and separate them into triangles.
  3. In a bowl, mix together the drained Rotel tomatoes, softened cream cheese, and cooked sausage.
  4. Place a spoonful of the filling mixture onto each crescent triangle and roll up, tucking the sides in.
  5. Arrange the filled crescents on the prepared baking sheet.
  6. Bake for 12-15 minutes, or until the crescents are golden brown and cooked through.
  7. Serve warm and enjoy these delicious Rotel Sausage & Cream Cheese Crescents!

“`

Discover the Flavors of Mile High Green Chili Delight

“`html
Jump to Recipe

Mile High Green Chili: A Spicy Comfort in Every Spoonful

Mile High Green Chili is a delightful blend of savory goodness with a kick of heat that tantalizes your taste buds. Imagine a warm, hearty bowl filled with tender ground pork, vibrant onions, and a medley of aromatic spices, each spoonful enriched by the fiery warmth of diced green chilies and the wholesome comfort of tomatoes and broth. Topped with creamy Monterey Jack cheese and fresh cilantro, this chili is more than just a meal—it’s an experience. Dive into the crave-worthy flavors that make this dish a staple in any kitchen.

Why You’ll Love This Recipe

Mile High Green Chili isn’t just a dish; it’s an homage to comfort foods from our childhoods, loved ones, and those cozy evenings in. This recipe promises versatility; whether you’re looking for a quick weeknight dinner or something to impress at a gathering, it adapts effortlessly. The use of ground pork gives it a savory depth that’s rich yet gentle on the palate, while green chilies offer that irresistible spice. Not only is this dish mouth-wateringly delicious, but it’s also straightforward and can be made in under an hour. Its harmony of flavors makes it a crowd-pleaser, ensuring smiles with every bowl.

Personal Story/Connection

I remember the first time I made Mile High Green Chili for my friends. It was a chilly evening, and we were gathered for a movie night. Everyone loved its warmth and comfort. My dear friend, who grew up in New Mexico, mentioned how it reminded her of family dinners and made her feel right at home. It quickly became a tradition, and now, whenever the temperatures drop, we come together to enjoy this chili and relive cherished memories.

Context/Background

The origins of green chili are deeply rooted in Southwestern cuisine, known for its unique blend of spices and fresh ingredients. Green chilies, a staple in New Mexico, have been used in traditional dishes for generations, often celebrated for their heat and bold flavor. This recipe draws inspiration from those authentic roots while offering a modern twist that emphasizes ease without sacrificing taste. Over the years, its popularity has flourished, becoming a beloved comfort food across states- especially in Colorado, which gave rise to the “Mile High” variation.

Tips for Perfect Mile High Green Chili

  • Meat Selection: Use ground pork for optimal flavor, but ground turkey or beef can be great substitutes.
  • Chili Spice: Adjust the amount of chili powder based on your heat preference. Add more or fewer chilies to suit your taste.
  • Simmering: Letting the chili simmer longer than 30 minutes can intensify its flavors further.
  • Cheese Melting: Add cheese at the end to prevent it from over-melting and losing its creamy texture.
  • Herb Freshness: Use fresh cilantro and sour cream just before serving to preserve their flavor and vibrancy.

Serving Suggestions

Transforming this Mile High Green Chili into a festive offering is as easy as presenting it with an array of toppings. Serve with a side of warm cornbread or tortilla chips for added crunch and comfort. This chili also shines as a taco filling; spoon it into soft tortillas for an impromptu taco night. For potlucks or casual gatherings, consider a chili bar, complete with various toppings such as sliced jalapeños, diced avocados, and lime wedges, allowing guests to customize their bowls to their liking.

Storage and Leftovers

Chili leftovers are a blessing in disguise, as the flavors deepen and become more pronounced after a day in the fridge. Store any leftover chili in an airtight container and refrigerate for up to 4 days. Reheat gently on the stovetop or microwave, adding a splash of water or broth if it becomes too thick. Leftovers also make excellent chili-topped baked potatoes or can add a gourmet twist to simple nachos.

Recipe Variations and Substitutions

  • Vegetarian Version: Swap the ground pork for a mix of kidney beans and black beans for a hearty plant-based alternative.
  • Extra Hearty: Incorporate diced potatoes or sweet corn for added texture and flavor complexity.
  • Vegan Adaptation: Use vegetable broth instead of chicken broth and replace cheese with a vegan cheese option.
  • Spice it Up: For a smokier aroma, try adding smoked paprika or chipotle peppers into the mix.

FAQ

Can I make this ahead of time? Absolutely! This chili tastes even better the next day. Prepare it a day prior and store it in the fridge until you’re ready to reheat and serve.

What substitutions can I use for ground pork? Ground turkey or beef works splendidly! You can also use tofu crumbles for a lighter option.

How do I make this gluten-free or vegan? Ensure your broth is labeled gluten-free and use dairy-free cheese and sour cream substitutes for a vegan version.

Optional Nutritional Information

  • Calories per serving: Approximately 320
  • Protein: 22g
  • Carbohydrates: 15g
  • Fat: 21g

Final Thoughts

If there’s a dish that can wrap around you like a blanket on a cold night, it’s the Mile High Green Chili. Its inviting aroma, rich flavor, and heartwarming essence make it a must-try recipe that’s bound to become a family favorite. Whether served for a bustling get-together or a quiet night in, this chili brings comfort to the table. Dive in, savor each bite, and don’t forget to share your creations or ask questions in the comments—I’d love to hear about your chili journey!

Recipe Section

Serves: 4-6
Prep Time: 10 minutes
Cook Time: 40 minutes
Total Time: 50 minutes

  • 1 lb ground pork
  • 1 onion, diced
  • 2 cloves garlic, minced
  • 2 cans diced green chilies
  • 1 can diced tomatoes
  • 1 can chicken broth
  • 1 tsp cumin
  • 1 tsp chili powder
  • Salt and pepper to taste
  • 1 cup shredded Monterey Jack cheese
  • Sour cream and fresh cilantro for garnish
  1. In a large pot, brown the ground pork with onions and garlic until the meat is cooked through.
  2. Add in green chilies, diced tomatoes, chicken broth, cumin, chili powder, salt, and pepper. Stir to combine.
  3. Let the chili simmer for about 30 minutes, allowing the flavors to meld together.
  4. Serve the chili in bowls, topped with shredded Monterey Jack cheese, a dollop of sour cream, and fresh cilantro.
  5. Enjoy this hearty and flavorful Mile High Green Chili!

“`

Delicious Cheesy Taco Veggie Casserole: A Quick Weeknight Dinner Idea

“`html
Jump to Recipe

Cheesy Taco Veggie Casserole: A Flavor Fiesta for Family Dinners 🌮🥦

Imagine a hearty casserole bursting with the zesty flavors of your favorite taco, all wrapped up in a comforting bake. The Cheesy Taco Veggie Casserole not only delivers the satisfying taste of your taco night favorites but also brims with colorful, nutrient-packed vegetables. It’s the epitome of a weeknight wonder: simple to make, irresistibly cheesy, and utterly delicious!

Why You’ll Love This Recipe

This Cheesy Taco Veggie Casserole isn’t just another dinner—it’s an experience, a joyful celebration of flavors and textures that dance on your palate. With the richness of ground turkey seasoned with spicy taco goodness, the dish satisfies heartily while remaining relatively lean. The vibrant mix of healthy vegetables—zucchini, bell peppers, corn—adds color, crunch, and a wealth of essential nutrients, making it a wholesome choice.

Another winning feature? It’s kid-friendly! The gooey cheddar cheese melts perfectly on top, inviting even the pickiest eaters to dig in. It’s an ideal recipe for busy families as it comes together in no time and leaves everyone at the table full and happy. Plus, there’s a comforting nostalgia to the meal, reminiscent of favorite family gatherings centered around food and laughter.

Personal Story/Connection

Every time I prepare this Cheesy Taco Veggie Casserole, I’m taken back to Sunday dinners when my family gathered after a long week. It was this very dish that brought smiles, not only for its taste but the shared sense of togetherness it encouraged. Even now, it’s the recipe I turn to, whether I’m hosting friends or just want a comforting meal for myself.

Context/Background

While casseroles have a rich history, tracing back to the French who conceived “cassoulet,” this particular creation is a modern twist with a Mexican flair. Tacos, central to Mexican cuisine, offer a tantalizing base—a combination of spices and ingredients that excite the taste buds immediately.

This casserole is a reinvention, combining the taco’s beloved components into a cohesive dish that celebrates both international flavor and everyday practicality. It’s evolved from simple homes in Mexico to tables worldwide, adapting to include local trends like ground turkey and an assortment of vegetables, making it a cross-cultural culinary delight.

Tips for Perfect Cheesy Taco Veggie Casserole

  • Use freshly shredded cheddar cheese for the smoothest melt and richest flavor.
  • If possible, defrost frozen corn before adding it to ensure even cooking and prevent excess moisture.
  • Feel free to add extra heat with a pinch of red chili flakes or a dash of hot sauce if you prefer a spicier casserole.
  • Experiment with different salsas—chunky, spicy, or mild—to add a personalized kick to your dish.
  • Need a meat-free version? Just substitute extra beans or a meat alternative for the turkey.

Serving Suggestions

This casserole is a canvas for creativity when it comes to serving. Try surrounding it with an array of toppings like chopped avocados, jalapeños, or a dollop of sour cream to let diners craft their perfect bite. Pair it with a crisp green salad for a refreshing contrast to the casserole’s cheesy richness.

For a themed dinner, consider complementing it with cornbread or homemade tortilla chips. Its inviting nature also makes it an excellent centerpiece at potlucks or family gatherings, where it can be served in small ramekins for individual portions.

Storage and Leftovers

To store leftovers, cover the casserole tightly in the fridge for up to three days. Reheat servings in the oven at 350°F until warmed through; this helps retain the pleasant texture unlike microwave reheating.

Thinking of using leftovers differently? Wrap portions of the casserole in tortillas for a quick taco or burrito, or top with an egg for a satisfying breakfast skillet.

Recipe Variations and Substitutions

  • Vegetarian Version: Swap the ground turkey with more beans or a meat substitute for an equally delicious plant-based casserole.
  • Spicy Twist: Add jalapeños or poblano peppers for a spicier kick.
  • Gluten-Free Option: Ensure your taco seasoning does not contain gluten. Many options in the market now cater to gluten-free diets.
  • Cheese Variations: Try a blend of cheeses or monterey jack to add more complexity to the cheese layer.

FAQ

Can I make this ahead of time? Yes, prepare the casserole up to step 4, cool, and refrigerate. Bake as directed when ready to serve.

What substitutions can I use for cilantro? If cilantro isn’t your preference, parsley or a sprinkle of green onions can add freshness in its place.

How do I make this gluten-free or vegan? Use a gluten-free taco seasoning and for a vegan version, substitute cheese with a plant-based option and add more beans instead of turkey.

Optional Nutritional Information

  • Calories: Approx. 400 per serving
  • Protein: 28g
  • Carbs: 35g
  • Fat: 20g

Final Thoughts

Cheesy Taco Veggie Casserole is more than a meal—it’s an expression of warmth, flavor, and family. A versatile, delightful dish that’s as much fun to make as it is to eat, it’s sure to become a staple in your recipe collection. We’d love to hear how yours turns out, so please share your experiences or any creative tweaks you’ve made!

Recipe Section

Serves: 6 | Prep Time: 15 mins | Cook Time: 30 mins | Total Time: 45 mins.

  • 1 lb ground turkey
  • 1 packet taco seasoning
  • 1 cup salsa
  • 1 can black beans, drained and rinsed
  • 1 cup frozen corn
  • 1 red bell pepper, diced
  • 1 green bell pepper, diced
  • 1 zucchini, diced
  • 2 cups shredded cheddar cheese
  • 1/4 cup chopped fresh cilantro
  1. Preheat oven to 375°F.
  2. In a large skillet, brown the ground turkey over medium-high heat until cooked through.
  3. Add taco seasoning, salsa, black beans, corn, bell peppers, and zucchini. Cook for about 5 minutes until vegetables are tender.
  4. Pour the mixture into a 9×13 baking dish and sprinkle cheddar cheese on top.
  5. Cover with foil and bake for 20 minutes. Remove foil and bake for an additional 10 minutes until cheese is melted and bubbly.
  6. Garnish with chopped cilantro before serving.

“`

Delicious One Pot Mexican Rice Casserole Recipe for Easy Dinners

“`html
Jump to Recipe

One Pot Mexican Rice Casserole: A Flavorsome Fiesta in a Pot

Experience a delightful symphony of flavors with our One Pot Mexican Rice Casserole. This dish infuses the rich aroma of cumin and chili powder with the satisfying heartiness of black beans and corn. Each spoonful is a vibrant celebration of authentic Mexican cuisine, offering a tantalizing blend of textures from melted cheddar cheese to the zesty burst of fresh cilantro. It’s an effortless meal that brings comfort, taste, and happiness to your dining table.

Why You’ll Love This Recipe

This One Pot Mexican Rice Casserole is a true game-changer in the realm of comfort food. Ideal for busy weeknights, you’ll appreciate the minimal cleanup and the way it brings families together around the table. The recipe is incredibly versatile—serve it as a side dish or the main event. Its vegetarian nature means everyone can enjoy it without compromise. Plus, the inclusion of whole ingredients makes it a nutritious choice.

With just one dish to clean, mealtime never felt so easy or satisfying! Imagine curling up with a warm, aromatic bowl and letting the vibrant colors and flavors transform an ordinary evening into a cozy, culinary experience. Whether you’re feeding a crowd or enjoying a personal fiesta, this casserole evokes warmth and joy.

Personal Story/Connection

The first time I made this casserole, I was drawn in by the idea of a complete meal in one pot. It was a chilly winter night, and I wanted something that would be both comforting and exciting. As the inviting aroma filled my kitchen, it brought back memories of bustling Mexican markets, full of color and life. Sharing this meal with my loved ones reminded me of past travels and ignited excitement for future adventures. This dish has since become a household favorite, inducing smiles and satisfaction every time it’s served.

Context/Background

Mexican rice, or “arroz a la Mexicana,” is a staple in Mexican cuisine, commonly served alongside classic dishes like enchiladas and tacos. This savory side has evolved from a humble addition to a flavorful meal in its own right, celebrated for its versatility and ease of preparation. The melding of rice with tomatoes and spices can be traced back to Spanish influences on Mexican cooking, with variations found across different regions.

Over the years, this casserole version has gained popularity for its simplicity and all-in-one nature. It’s a nod to the layered richness of traditional Mexican flavors while allowing room for creativity and convenience in modern kitchens.

Tips for Perfect One Pot Mexican Rice Casserole

  • Use quality long grain white rice for a fluffy texture and even cooking.
  • Drain and rinse the black beans to avoid excess starch or salty residues.
  • Experiment with different types of cheese to find your favored melting point and flavor profile.
  • If you prefer a bit of heat, add a chopped jalapeño when sautéing the vegetables.
  • Allow the casserole to rest covered after adding cheese for the best melt.
  • Use fresh tomatoes or homemade broth for more natural flavors in place of canned.

Serving Suggestions

While this One Pot Mexican Rice Casserole stands beautifully on its own, it also pairs exceptionally well with some fresh sides. Consider serving it with a simple green salad or a citrusy guacamole for contrasting flavors. For a heartier meal, enjoy alongside grilled chicken or shrimp skewers. A side of warm tortillas can also be a delightful addition.

For parties or gatherings, present the casserole in a vibrant, oven-safe dish and let guests indulge buffet-style. Garnish with lime wedges, extra cilantro, and perhaps a dollop of sour cream or Greek yogurt for a creamy twist.

Storage and Leftovers

Store any leftover casserole in an airtight container in the refrigerator, where it will stay fresh for up to three days. To reheat, simply microwave portions on medium power, stirring occasionally, until heated through. A splash of vegetable broth can help rehydrate the leftovers if they seem dry.

Leftovers can also be transformed into tasty burrito fillings or added to scrambled eggs for a delicious breakfast scramble. The rich flavors continue to develop, making them even more delicious the next day!

Recipe Variations and Substitutions

  • For a vegan version, simply omit the cheddar cheese or use a plant-based alternative.
  • Swap out black beans for pinto or kidney beans for variation.
  • Add cooked chicken breast or ground turkey to make it a meat-lover’s delight.
  • Include seasonal vegetables like zucchini or avocado for additional flavors and textures.

FAQ

Can I make this ahead of time? Absolutely! Prepare the casserole up until the cheese step and refrigerate. When ready to serve, reheat on the stove and melt the cheese before garnishing with cilantro.

What substitutions can I use for the rice? Brown rice, quinoa, or cauliflower rice can be used as healthy alternatives, but cooking times and liquid amounts may need adjustment.

How do I make this gluten-free? Ensure the vegetable broth and other packaged ingredients are certified gluten-free to cater to dietary needs without any compromise on flavor.

Optional Nutritional Information

  • Calories: Approximately 350 calories per serving (without additional toppings).
  • Protein: 14g
  • Carbohydrates: 40g
  • Fat: 12g
  • Fiber: 12g

Final Thoughts

This One Pot Mexican Rice Casserole is a delightful dish worthy of becoming a regular in your meal rotation. By blending simplicity with vibrant flavors, it transforms ordinary moments into culinary adventures. Try it yourself and discover why this dish continues to win hearts and taste buds. Let us know how it turned out or share your twist on this classic favorite!

Recipe

Serves: 4 | Prep Time: 10 minutes | Cook Time: 25 minutes | Total Time: 35 minutes

  • 1 cup long grain white rice
  • 1 can (14 oz) diced tomatoes
  • 1 can (15 oz) black beans, drained and rinsed
  • 1 cup corn kernels
  • 1 bell pepper, diced
  • 1 onion, diced
  • 2 cloves garlic, minced
  • 1 cup vegetable broth
  • 1 tsp chili powder
  • 1 tsp cumin
  • Salt and pepper, to taste
  • 1 cup shredded cheddar cheese
  • Fresh cilantro, for garnish
  1. In a large pot, combine rice, diced tomatoes, black beans, corn, bell pepper, onion, garlic, vegetable broth, chili powder, cumin, salt, and pepper.
  2. Bring the mixture to a boil, then reduce heat to low. Cover and simmer for 20-25 minutes, or until rice is cooked through and liquid is absorbed.
  3. Remove from heat and fluff rice with a fork. Sprinkle cheddar cheese on top and cover until melted.
  4. Garnish with fresh cilantro before serving.

Enjoy this flavorful One Pot Mexican Rice Casserole with your favorite Mexican toppings!

“`

Deliciously Crispy Chicken Wonton Tacos You Need to Try

Jump to Recipe

Crispy Chicken Wonton Tacos: A Fusion Delight

Experience the vibrant flavors and irresistible crunch of Crispy Chicken Wonton Tacos, a fusion masterpiece that marries savory Asian-inspired ingredients with the fun and familiar shape of tacos. Each bite offers a tantalizing contrast of crispy wonton shells, tender marinated chicken, and refreshing slaw, all brought together by a drizzle of sweet chili sauce. This creative dish is perfect for those who love exploring new tastes and textures, offering a unique twist that’s sure to impress.

Why You’ll Love This Recipe

These Crispy Chicken Wonton Tacos are more than just a meal; they’re an experience. The recipe is incredibly versatile, making it suitable for weeknight dinners or as a standout appetizer at your next dinner party. Their delightful crunch is matched by the succulent chicken, ensuring every bite is loaded with flavor. Not only are they fun to eat, but they also bring the sophistication of Asian cuisine to your table in a way that feels both indulgent and healthy.

Moreover, this dish allows for creativity. Whether you’re a seasoned cook or just starting out, you’ll find that these wonton tacos are a breeze to prepare. Beyond their culinary flair, they are also a visual feast, making them not just a meal, but a centerpiece.

Personal Story/Connection

I first discovered the magic of Crispy Chicken Wonton Tacos during a food festival. The intriguing combination of cultures in a single dish immediately caught my attention, and one bite later, I was hooked. Since then, it’s become a family favorite, especially during festive gatherings. Each taco seems to evoke cherished memories of laughter and shared joy, solidifying its spot as a beloved household ritual.

Context/Background

Crispy Chicken Wonton Tacos beautifully embody the spirit of fusion cuisine, where culinary traditions blend to create something wonderfully new. This dish pays homage to Asian flavors while embracing the Mexican tradition of tacos. Over time, such fusion recipes have gained popularity for their ability to deliver familiar excitement and adventurous palates in every bite.

What’s extraordinary about this dish is how its simple ingredients transform into something extraordinary. The innovation of using wonton wrappers as taco shells is a testament to culinary ingenuity, highlighting how cross-cultural influences can inspire unique dining experiences.

Tips for Perfect Crispy Chicken Wonton Tacos

  • Use fresh wonton wrappers to ensure the crispiest texture; check the expiration date for best results.
  • Marinate the chicken for at least 30 minutes to allow the flavors to infuse deeply into the meat.
  • Consider using a toothpick to secure the taco shape as it bakes, ensuring it holds its form perfectly.
  • Spray cooking oil lightly but evenly over the assembled tacos to achieve a uniform golden crispness.
  • For added flavor, try mixing a dash of lime juice into the cabbage slaw before filling the tacos.
  • If you prefer a spicier kick, mix in some sriracha with the sweet chili sauce before drizzling.

Serving Suggestions

These Crispy Chicken Wonton Tacos make an impressive starter for any gathering, offering a delightful contrast to more traditional appetizers. Pair them with a refreshing cucumber salad or an Asian-inspired coleslaw to round out the dish. For an extra touch of elegance, garnish each taco with toasted sesame seeds or fresh cilantro leaves before serving.

If you’re planning a themed dinner, consider serving these tacos alongside a sweet and spicy mango salsa to complement the savory flavors. Whether for a casual meal or a festive occasion, they are bound to become a talking point at the table.

Storage and Leftovers

Store any leftover tacos in an airtight container in the fridge for up to two days. To reheat, bake them in the oven at 350°F for about 8-10 minutes to regain some of their original crispiness. Avoid microwaving, as it’ll soften the crispy shells.

Leftover chicken can be repurposed into a stir-fry or added to a refreshing salad for an easy next-day meal. The possibilities are as endless as your creativity allows!

Recipe Variations and Substitutions

If you’re catering to dietary restrictions or simply want to experiment, consider these variations:

  • Vegetarian Version: Substitute chicken with firm tofu or chickpeas marinated in the same sauce mix.
  • Gluten-Free Alternative: Use gluten-free wonton wrappers or lettuce leaves instead of regular wrappers.
  • Seasonal Twist: Incorporate seasonal veggies like julienned bell peppers or radishes into the slaw.
  • Herbal Enhance: Add fresh basil or mint to the slaw for a refreshing aromatic twist.

FAQ

Can I make this ahead of time? Yes, you can prepare the chicken and slaw ahead of time, but assemble and bake the tacos just before serving for the best texture.

What substitutions can I use for soy sauce? Tamari or coconut aminos are great alternatives to soy sauce and cater well to gluten-free diets.

How do I make this gluten-free or vegan? Use gluten-free wrappers and replace chicken with tofu or vegetables to accommodate both dietary needs.

Optional Nutritional Information

  • Calories per serving: Approximately 150
  • Protein: 12g
  • Carbohydrates: 18g
  • Fat: 4g

Final Thoughts

Crispy Chicken Wonton Tacos are more than just a dish; they’re an adventure into the art of fusion cuisine. Whether you’re looking to elevate a family dinner or impress guests at your next gathering, this recipe promises flavor, texture, and elegance. Give it a try and let it bring the world of culinary creativity into your kitchen. Don’t forget to share your experiences or any tweaks you make to the recipe!

Recipe Section

Serves: 4 | Prep Time: 25 mins | Cook Time: 15 mins | Total Time: 40 mins

  • 1 lb boneless, skinless chicken breast
  • 2 tbsp soy sauce
  • 1 tsp garlic powder
  • 1 tsp onion powder
  • 1/2 tsp ground ginger
  • 1/4 tsp black pepper
  • 1 package wonton wrappers
  • Cooking spray
  • 1 cup shredded cabbage
  • 1/2 cup shredded carrots
  • 1/4 cup chopped green onions
  • Sweet chili sauce, for serving
  1. Preheat the oven to 375°F and line a baking sheet with parchment paper.
  2. In a bowl, combine soy sauce, garlic powder, onion powder, ground ginger, and black pepper. Slice the chicken breast into small strips and toss in the marinade until well coated.
  3. Lay out the wonton wrappers on a flat surface and place a piece of marinated chicken in the center of each wrapper.
  4. Fold the corners of the wrappers to create a taco shape, securing with a toothpick if needed.
  5. Place the assembled wonton tacos on the prepared baking sheet and lightly spray with cooking spray.
  6. Bake in the preheated oven for 12-15 minutes, or until the wonton wrappers are crispy and the chicken is cooked through.
  7. In a bowl, mix shredded cabbage, carrots, and green onions.
  8. Once the tacos are done, remove toothpicks and fill each with the cabbage slaw.
  9. Drizzle with sweet chili sauce before serving.

Enjoy these crispy chicken wonton tacos as a delicious appetizer or main dish!

Spice Up Your Meals with Authentic Caldillo de Chile Stew

“`html
Jump to Recipe

Caldillo de Chile: A Spicy Warmth in Every Bite

Imagine a stew that tantalizes your taste buds with layers of flavor, a combination of savory and spicy, enveloping you in warmth with each mouthful. Caldillo de Chile, or Spicy Chile Stew, is a dish that promises to be an explosion of taste — tender beef cubes slow-cooked in a fusion of fragrant spices and roasted chilies. The complex flavors are mellowed with tomatoes and broth, resulting in a hearty, enticing stew, perfect for those chilly evenings or whenever you’re craving comfort in a bowl.

Why You’ll Love This Recipe

Caldillo de Chile is more than just a dish; it’s an experience. The aromatic blend of cumin and oregano transports you to vibrant Mexican landscapes, while the spicy kick from the jalapeños is guaranteed to awaken your senses. It’s a versatile recipe, easily adjustable to your heat preference by adding more or fewer chilies. This stew isn’t just delicious — it’s nourishing, providing protein-rich beef and antioxidant-packed spices that align perfectly with your health goals. Prepare this dish with ease; its straightforward process and minimal ingredients make it a favorite even on the busiest of days.

Personal Story/Connection

My love affair with Caldillo de Chile began during a family visit to Mexico. It was a cool evening, and my grandmother served this robust stew that warmed more than just our bodies — it filled the room with laughter and stories. Every time I prepare Caldillo de Chile, I’m reminded of those cherished moments around that dining table, of how food can bring people together in such a comforting way.

Context/Background

Caldillo de Chile finds its roots in Mexican culinary traditions, where it has been favored for centuries. It is said to have originated from the northern regions of Mexico, where hearty dishes are a staple to offer sustenance against the elements. Historically, it was considered a humble dish, often prepared with whatever ingredients were available, showcasing the resourcefulness and creativity of local cooks. Over time, Caldillo de Chile has evolved, yet retained its core rustic charm, continuing to bring warmth across dinner tables worldwide.

Tips for Perfect Caldillo de Chile

  • Choose the right beef cut: Opt for beef chuck, as its marbling and tenderness come through beautifully when slow-cooked.
  • Roasting your chilies: Enhance flavor by roasting Anaheim chilies until their skins blister. This step adds a wonderful smoky depth.
  • Layer flavors gradually: Brown the beef deeply before adding spices to build a robust flavor base.
  • Adjust the heat: If you prefer less spice, reduce the number of jalapeños, or for more heat, include seeds and veins.
  • Simmer patiently: The stew reaches its optimal flavor and tenderness with slow, gentle simmering.

Serving Suggestions

This spicy stew sings on chilly nights but is just as welcome in summer, perhaps enjoyed outside with a crisp side salad. Pair it with warm tortillas, perfect for scooping or soaking up the savory broth. For a festive occasion, serve it at the center of your table, accompanied by hearty Mexican rice and a medley of grilled vegetables. Garnish generously with fresh cilantro for a burst of color and an added layer of flavor, adding a sprinkle of chopped scallions if you desire an extra crunch.

Storage and Leftovers

Caldillo de Chile, like most stews, tends to develop deeper flavors the next day. Store any leftovers in an airtight container, and it will keep in the refrigerator for up to three days. When ready to enjoy again, gently reheat it on the stove, adding a splash of broth if needed to maintain its delightful consistency. You can freeze portions for up to three months for an easy weekday meal that requires only reheating.

Recipe Variations and Substitutions

If you’re looking to adapt Caldillo de Chile for vegetarian diners, substitute the beef with hearty mushrooms and add extra beans for a protein boost. For a gluten-free version, ensure the beef broth is gluten-free, or make a homemade variant to suit your dietary needs. To vary the flavor, swap the Anaheim chilies for smoked chipotles, infusing the stew with a rich, smoky essence.

FAQ

Can I make this ahead of time? Absolutely! The flavors deepen as it sits, making it even better the next day.

What substitutions can I use for the beef chuck? You can use lamb or chicken thighs; however, cooking times may vary slightly.

How do I make this gluten-free or vegan? Use gluten-free broth and swap beef for mushrooms and chickpeas.

Final Thoughts

If you seek a dish that wraps you in flavorsome warmth, Caldillo de Chile is your answer. Its robust nature and gentle heat are bound to make it a staple in your culinary repertoire. I invite you to prepare it, allowing this savory stew to forge its place in your kitchen, creating memories as cherished as the ones I’ve shared from my family’s table. Don’t forget to leave your thoughts or questions below — I’d love to hear about your experiences!

Recipe Section

Serves: 6

Prep Time: 15 minutes

Cook Time: 2 hours

Total Time: 2 hours 15 minutes

  • 2 lbs beef chuck, cubed
  • 2 tablespoons vegetable oil
  • 1 onion, chopped
  • 2 cloves garlic, minced
  • 2 tomatoes, chopped
  • 2 Anaheim chilies, roasted, peeled, and chopped
  • 2 jalapeno chilies, chopped
  • 1 tablespoon ground cumin
  • 1 tablespoon dried oregano
  • 4 cups beef broth
  • Salt and pepper to taste
  • Fresh cilantro, chopped for garnish
  1. Heat the vegetable oil in a large pot over medium-high heat. Add the beef cubes and brown on all sides.
  2. Add the chopped onion and garlic, sauté until fragrant.
  3. Stir in the tomatoes, roasted Anaheim chilies, jalapeno chilies, cumin, and oregano. Cook for another 5 minutes.
  4. Pour in the beef broth and bring to a simmer. Cover and cook for about 1.5 to 2 hours until the beef is tender.
  5. Season with salt and pepper to taste.
  6. Serve hot, garnished with fresh cilantro.
  7. Enjoy this warm and spicy chile stew!

“`

Easy Mexican White Trash Casserole: A Flavorful Family Favorite

“`html
Jump to Recipe

Mexican White Trash Casserole: A Comforting Cheesy Delight

Experience the irresistible flavors of the Mexican White Trash Casserole, a dish that combines savory spices with creamy textures and a delightful crunch. This casserole bursts with robust ground beef, fresh cheeses, and vibrant veggies, making it a perfect comfort food for any occasion. Whether you’re gathering with family or simply craving something hearty, this recipe is a must-try for its unique blend of flavors and ease of preparation.

Why You’ll Love This Recipe

This Mexican White Trash Casserole offers a wonderful medley of textures and tastes that are bound to please everyone around your table. With its gooey cheese and savory beef, it captures the essence of comfort food at its best. You’ll love its versatility; serve it as a main dish or a flavorful appetizer at gatherings. It brings together a fiesta of colors and flavors with minimal effort, making it perfect for busy weeknights. Plus, you can feel good about the wholesome ingredients, like beans and tomatoes, which offer added nutritional value.

Personal Story/Connection

This casserole quickly became a family favorite after the first time I made it for a potluck dinner. The oohs and ahhs that ensued from my friends as they savored every bite were pure joy. Now, it’s not just a recipe; it’s a cherished memory, taking center stage at New Year’s Eve parties and casual get-togethers alike. Every time I make it, I’m reminded of those warm, laughter-filled nights with loved ones.

Context/Background

The Mexican White Trash Casserole might not boast an age-old history, but it’s a modern twist on classic Mexican comfort food. Combining traditional Mexican flavors with easy, accessible preparation methods, it epitomizes the fusion of convenience and taste. This dish is a testament to how culinary creativity can transform everyday ingredients into something truly special. Over time, it’s become a beloved staple for those who appreciate a bit of flair in their weeknight dinners.

Tips for Perfect Mexican White Trash Casserole

  • Use fresh shredded cheese for the best melt and flavor.
  • Ground turkey or chicken can be substituted for beef if preferred.
  • Let the meat mixture cool slightly before adding the cheese layer to prevent separating.
  • If you prefer more heat, choose a spicier salsa or add chopped jalapeños.
  • To prevent soggy chips, add more or less tortilla chips based on your texture preference.

Serving Suggestions

This casserole is a versatile dish that can be served with a side of Mexican rice or a fresh garden salad for a balanced meal. Add a dollop of guacamole and a sprinkle of cilantro for a delightful presentation. For a fun twist, crumble some extra tortilla chips on top before serving to add crunch. Pair with a refreshing margarita or a cool iced tea to complete the experience.

Storage and Leftovers

For the best results, store any leftover casserole in an airtight container in the refrigerator for up to three days. Reheat in the oven at 350°F until warmed through to retain its crispiness. If reheating in the microwave, cover the dish to retain moisture and prevent splatters. Repurpose leftovers by using them as a filling for soft tacos or burritos, giving new life to this delicious dish.

Recipe Variations and Substitutions

Adapt this casserole to suit your dietary preferences or explore new flavors:

  • Make it vegetarian by swapping meat for additional beans or plant-based crumbles.
  • Use low-fat cheese and sour cream for a lighter version.
  • Try adding roasted bell peppers or zucchini for additional veggie goodness.
  • Spice it up with different types of cheese like pepper jack or gouda.

FAQ

Can I make this ahead of time?

Yes! You can prepare the casserole up to the baking step and refrigerate it for up to 24 hours. Simply bake when ready.

What substitutions can I use for sour cream?

You can use Greek yogurt as a healthier, equally creamy alternative.

How do I make this gluten-free?

Ensure the tortilla chips are certified gluten-free and verify that the taco seasoning does not contain gluten.

Optional Nutritional Information

  • Approximate Calories per serving: 400
  • Protein: 20g
  • Carbohydrates: 38g
  • Fat: 22g

Final Thoughts

Dive into the cheesy, savory world of the Mexican White Trash Casserole, a dish that’s sure to become a family staple. Its easy preparation and delightful flavors make it a go-to recipe for any occasion, offering not just sustenance but a bit of edible excitement. We invite you to try this recipe and share your experience in the comments below or tag us on social media as you partake in this mouthwatering adventure. Bon appétit!

Mexican White Trash Casserole Recipe

Serves: 4-6
Prep Time: 15 minutes
Cook Time: 25 minutes
Total Time: 40 minutes

  • 1 lb ground beef
  • 1 onion, diced
  • 1 can of corn, drained
  • 1 can of black beans, drained and rinsed
  • 1 can of diced tomatoes
  • 1 cup of sour cream
  • 1 cup of cheddar cheese, shredded
  • 1 cup of monterey jack cheese, shredded
  • 1 package of taco seasoning
  • 1/2 cup of salsa
  • 1/4 cup of sliced black olives
  • 1/4 cup of green onions, diced
  • Tortilla chips
  1. Preheat the oven to 350°F.
  2. In a skillet, cook the ground beef and onion over medium heat until the beef is no longer pink. Drain any excess fat.
  3. Add the taco seasoning, corn, black beans, diced tomatoes, and salsa. Stir well and let simmer for 5 minutes.
  4. Layer the bottom of a baking dish with tortilla chips.
  5. Spread the meat mixture over the chips evenly.
  6. In a bowl, mix together the sour cream, cheddar cheese, and monterey jack cheese. Spread this mixture over the meat.
  7. Top with black olives and green onions.
  8. Bake in the oven for 20-25 minutes or until bubbly and golden.
  9. Serve hot and enjoy this comforting casserole!

“`