Delicious Reuben Bake Recipe: Corned Beef, Sauerkraut, Swiss Cheese Layers

Jump to Recipe

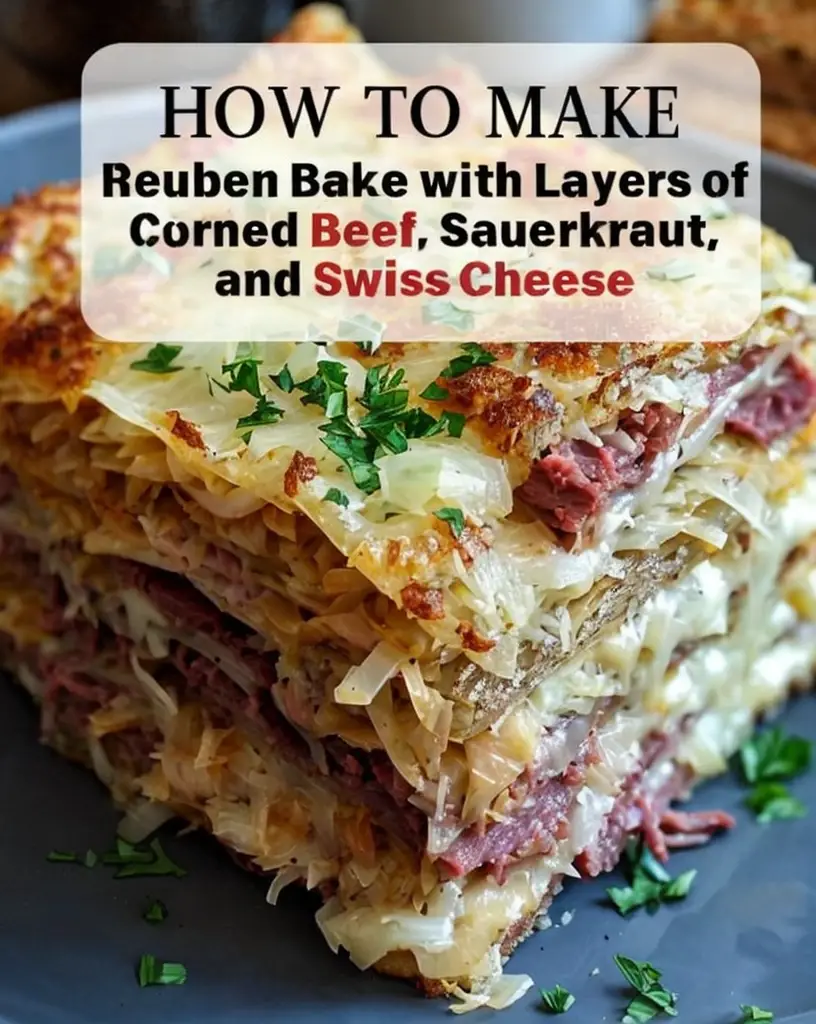
Reuben Bake: A Delectably Layered Irish Delight

Experience the hearty and comforting flavors of Ireland with the Reuben Bake, a delightful casserole that combines the savory richness of corned beef, the tangy zing of sauerkraut, and the creamy goodness of Swiss cheese. Each layer offers a symphony of textures and tastes that make this dish an irresistible and satisfying meal. Imagine biting into a perfectly baked slice, with every mouthful bringing you closer to the culinary warmth of a traditional Irish kitchen.

Why You’ll Love This Recipe

The Reuben Bake is a versatile dish that appeals to both novice cooks and seasoned chefs. It’s an easy-to-prepare casserole that brings the joy of a classic Reuben sandwich into a shareable form, perfect for gatherings or a cozy family dinner at home. Its balanced flavor profile—salty, savory, and tangy—is sure to please a range of palates. Whether you’re looking for a comforting meal or a nostalgic taste that reminds you of home, this dish delivers on all fronts.

This recipe’s ease of preparation means you can spend more time enjoying the company of loved ones and less time worrying in the kitchen. With minimal cleanup and readily available ingredients, the Reuben Bake is perfect for all occasions, from casual family meals to festive celebrations. Additionally, it’s a great way to introduce kids and picky eaters to the distinct flavors of corned beef and sauerkraut.

Personal Story/Connection

Growing up, I remember the excitement of family gatherings, where food was the centerpiece of our joyful reunions. Among the numerous dishes, the Reuben Bake always stood out, not only for its delicious taste but for the heartwarming memories it created. I fondly recall my grandmother, with her apron dusted in flour, assembling this dish with love and care. Sharing it with my family brought smiles and laughter, making the Reuben Bake more than just a meal—it was a cherished tradition.

Context/Background

The Reuben Bake draws its roots from the iconic Reuben sandwich, a staple in Irish-American cuisine. Traditionally, the sandwich originated in the early 20th century, perhaps unsurprisingly in either New York or Omaha, with its rich tapestry of flavors captivating diners ever since. Transitioning from a sandwich to a baked casserole, this adaptation holds onto the essence of its roots while providing a fresh approach to serving this classic combination.

Over the years, the Reuben has evolved, with chefs and home cooks alike exploring new forms and flavors. Our version, the Reuben Bake, honors that tradition by capturing the core ingredients that made the sandwich beloved—corned beef, Swiss cheese, sauerkraut, and rye bread—while also ensuring its cultural heritage is celebrated in a novel way.

Tips for Perfect Reuben Bake

  • Choose Quality Ingredients: Opt for fresh corned beef from your local deli for optimal taste.
  • Sauerkraut Prep: Ensure your sauerkraut is well-drained to prevent excess moisture in the bake.
  • Even Layering: Distribute ingredients evenly to ensure every bite is balanced with flavor.
  • Cheese Melting Tip: Feel free to grate the Swiss cheese instead of slicing for an even melt.
  • Rest Before Serving: Allow the bake to cool slightly for easier cutting and enhanced flavor release.

Serving Suggestions

Serve the Reuben Bake alongside a light, crisp salad drizzled with vinaigrette to complement the rich flavors of the casserole. This dish pairs excellently with a cold Irish beer or a glass of white wine, such as a chilled Riesling, to enhance the dining experience. For a splash of color, garnish each piece with chopped parsley or chives just before serving.

Hosting a themed dinner party? Present the Reuben Bake as the centerpiece of an Irish-inspired meal, accompanied by colcannon or potato salad, completing the feast with a classic Irish dessert like Bailey’s cheesecake. For casual meals, it can be served in smaller portions as a midday snack or as a hearty addition to a brunch spread.

Storage and Leftovers

To store any leftovers, place portions of the Reuben Bake in an airtight container and refrigerate for up to three days. For best results when reheating, place a slice in the oven at 350°F for 10-15 minutes, ensuring it’s thoroughly warmed without drying out the ingredients.

Repurpose leftovers by chopping the Reuben Bake and using it as a filling for savory pastries or mixing it with scrambled eggs for a robust breakfast option. These creative adaptations ensure no delicious crumb goes to waste.

Recipe Variations and Substitutions

  • Vegetarian Twist: Substitute corned beef with thick slices of roasted portobello mushrooms or tempeh for a vegetarian version.
  • Gluten-Free Adaptation: Use gluten-free bread cubes to make this dish suitable for those with gluten sensitivities.
  • Spicy Kick: Add a layer of jalapeño slices for a spicy variation that complements the dish’s savory notes.
  • Seasonal Swap: Experiment with seasonal cheeses like Gruyère in place of Swiss for an autumn-inspired take.

FAQ

Can I make this ahead of time?

Yes, absolutely! Assemble the Reuben Bake the night before, cover it, and refrigerate. When ready to enjoy, bake it as directed, ensuring ample time for cooking.

What substitutions can I use for sauerkraut?

If you’re not a fan of sauerkraut, try using pickled red cabbage or lightly sautéed shredded Brussels sprouts for a different flavor experience.

How do I make this gluten-free or vegan?

To make this dish gluten-free, swap the rye bread with a gluten-free variety. For a vegan version, use plant-based cheese and tempeh bacon, and replace the Thousand Island dressing with a vegan-friendly alternative.

Optional Nutritional Information

  • Calories per serving: 450
  • Total Fat: 28g
  • Saturated Fat: 13g
  • Cholesterol: 90mg
  • Sodium: 1250mg
  • Carbohydrates: 32g
  • Protein: 21g

Final Thoughts

The Reuben Bake captures the heart of comfort food with its rich flavors and inviting aromas. It’s a delightful dish that bridges the gap between classic tradition and innovative homecooking. Whether you’re marking a special occasion or simply yearning for a taste of nostalgia, this casserole is sure to warm both your heart and home. I encourage you to try out this recipe, let it spark joy in your kitchen, and become a treasured part of your family’s culinary traditions. Share your experiences or ask questions in the comments below. Let’s create, share, and savor delicious memories together!

Recipe Section

Serves: 8

Prep Time: 15 minutes

Cook Time: 45 minutes

Total Time: 1 hour

  • 1 lb corned beef, thinly sliced
  • 1 32 oz jar sauerkraut, drained
  • 8 slices Swiss cheese
  • 1 cup Thousand Island dressing
  • 1 16 oz loaf rye bread, cut into cubes
  1. Preheat oven to 350°F and grease a 9×13 baking dish.
  2. Layer half of the rye bread cubes on the bottom of the dish.
  3. Top with half of the corned beef, sauerkraut, Swiss cheese slices, and drizzle with half of the Thousand Island dressing.
  4. Repeat the layers with the remaining ingredients.
  5. Cover with foil and bake for 30 minutes.
  6. Remove foil and bake for an additional 15 minutes until cheese is melted and bubbly.
  7. Let it cool slightly before serving.

Indulge in Comfort with Crock Pot Creamy Chicken Parmesan Soup

“`html

Jump to Recipe

Crafting Comfort: A Crock Pot Creamy Chicken Parmesan Soup Experience

Imagine diving into a bowl of rich, creamy Chicken Parmesan Soup, where tender shreds of chicken meld with the savory aromas of basil and oregano, surrounded by the comforting embrace of a velvety broth. This Crock Pot Creamy Chicken Parmesan Soup is not just a meal; it’s a sensory journey into warmth and flavor, a culinary hug that’s perfect for any occasion. Discover the magic of crock pot cooking as it transforms simple ingredients into a masterpiece of taste and texture.

Why You’ll Love This Recipe

This Crock Pot Creamy Chicken Parmesan Soup is the epitome of comfort food, offering both the convenience of a slow cooker and the satisfaction of a home-cooked meal. Its creamy texture and savory flavors are versatile, making it a staple for weeknight dinners or a showstopper at gatherings. The blend of chicken, vegetables, and rich cheeses creates a symphony that resonates with layers of delightful taste.

For the health-conscious, this soup provides a hearty option without compromising on flavor. Lean chicken breasts and fresh vegetables come together in a nutrient-rich broth, offering a wholesome dish that feels indulgent.

The simplicity of its preparation means that even the busiest of cooks can create a dish that would impress any guest. Plus, variations allow for creative twists catering to different palates, ensuring everyone at the table is satisfied.

Embracing the feelings of nostalgia, this soup could remind you of cozy dinners with family, bringing warmth and joy to your dining experience. It’s a dish that comforts the soul while delighting the senses.

Personal Story/Connection

I still remember the first time I concocted this soup; it was a chilly autumn evening. The scent wafted through my kitchen, an olfactory blanket that promised comfort as I waited in anticipation. Sharing it with family around the dinner table, I watched as smiles bloomed on their faces with every spoonful—a testament to the joy and warmth a single bowl could bring.

Context/Background

The Chicken Parmesan dish has Italian roots, traditionally featuring breaded chicken, marinara sauce, and melted cheese. This soup version captures the essence of Chicken Parmesan but as a nod to American culinary creativity, it transforms it into a delightful, nourishing soup.

Slow cooker soups like this have risen in popularity thanks to their ease and depth of flavor. The method of slow cooking allows ingredients to fully intermingle, enhancing the depth and richness with minimal effort—a testament to how culinary traditions evolve to fit modern lifestyles.

Tips for Perfect Crock Pot Creamy Chicken Parmesan Soup

  • Choose Quality Ingredients: Use fresh vegetables and high-quality chicken to maximize flavor.
  • Adjust Creaminess: Feel free to modify the amount of heavy cream to suit your desired level of creaminess.
  • Cheese Variations: Consider experimenting with different cheeses for added depth—Asiago or fontina makes great substitutions.
  • Check the Seasoning: Taste the soup before serving to ensure seasoning is to your liking, as flavors develop over time.
  • Time Your Cooking: If under a time crunch, utilize the high setting for a quicker but equally flavorful result.

Serving Suggestions

Serve this comforting soup with a side of crusty garlic bread to soak up the creamy goodness. A fresh green salad with a light vinaigrette can complement the richness, offering a refreshing contrast to the soup’s decadent texture.

Garnish each bowl with fresh basil or shredded Parmesan for an extra touch of elegance. Or, for a heartier meal, pair the soup with a light pasta, making it the centerpiece of a festive gathering.

This soup shines whether served casually on a weeknight or as part of a cozy dinner party. Its adaptable nature ensures it suits a spectrum of occasions, from intimate dinners to jovial celebrations.

Storage and Leftovers

Store leftovers in an airtight container in the refrigerator for up to three days. When reheating, do so gently over low heat to maintain the creaminess without curdling. Add a splash of chicken broth if the soup thickens too much.

Transform leftovers into a new dish by using it as a sauce over pasta or incorporating it as a filling in a chicken pot pie. The possibilities are endless with a little creativity!

Recipe Variations and Substitutions

  • Dairy-Free: Substitute coconut milk for heavy cream, and use nutritional yeast in place of Parmesan cheese for a dairy-free alternative.
  • Vegetable Variant: Add spinach or kale for extra nutrients and a pop of color.
  • Spicier Version: Incorporate red pepper flakes or a dash of hot sauce for an added kick.

FAQ

Can I make this ahead of time? Yes, this soup reheats well and can be made up to two days in advance.

What substitutions can I use for heavy cream? You can use half-and-half or coconut milk for a lighter option.

How do I make this gluten-free or vegan? To make it gluten-free, ensure all your added ingredients such as broth and spices are certified gluten-free. For a vegan version, substitute plant-based proteins and use coconut milk, along with vegan cheeses.

Optional Nutritional Information

Calories: Approximately 320 per serving

Proteins: 25g | Carbohydrates: 12g | Fats: 20g

Final Thoughts

Indulge in the rich, soul-soothing flavors of this Crock Pot Creamy Chicken Parmesan Soup, and experience why it’s quickly becoming a beloved staple for many. Perfect for warming up chilly nights or bringing a touch of culinary elegance to any meal, this soup is a delightful addition to your recipe repertoire. Don’t forget to share your own twists and experiences in the comments below. Happy cooking!

Recipe Section

Serves: 4-6 | Prep Time: 15 mins | Cook Time: 6-8 hours on low or 3-4 hours on high | Total Time: 6.5-8.5 hours

  • 1 lb boneless, skinless chicken breasts
  • 3 cups chicken broth
  • 1 can diced tomatoes
  • 1 cup chopped onion
  • 1 cup chopped carrots
  • 1 cup chopped celery
  • 3 cloves garlic, minced
  • 1 tsp dried basil
  • 1/2 tsp dried oregano
  • 1/2 tsp salt
  • 1/4 tsp black pepper
  • 1 cup heavy cream
  • 1/2 cup grated Parmesan cheese
  • 1 cup shredded mozzarella cheese
  1. Place chicken breasts in the bottom of the crock pot.
  2. Add chicken broth, diced tomatoes, onion, carrots, celery, garlic, basil, oregano, salt, and pepper.
  3. Cover and cook on low for 6-8 hours or high for 3-4 hours until chicken is cooked through and vegetables are tender.
  4. Remove chicken from the crock pot and shred using two forks. Return shredded chicken to the crock pot.
  5. Stir in heavy cream and Parmesan cheese. Continue cooking for an additional 30 minutes.
  6. Serve hot, topped with shredded mozzarella cheese.
  7. Enjoy this creamy and comforting Chicken Parmesan Soup!

“`

Crispy Oven-Baked Chicken Wings Recipe for Ultimate Flavor

“`html
Jump to Recipe

Oven-Baked Chicken Wings: Perfectly Crispy, Irresistibly Flavorful

Imagine sinking your teeth into a crispy, golden-brown chicken wing, the smoky aroma of BBQ sauce wafting in the air, biting into tender, juicy meat perfectly seasoned with a blend of garlic, onion, and paprika. Oven-Baked Chicken Wings are a classic favorite, offering a deliciously simple way to enjoy this beloved dish. Their crispy skin and succulent insides make every bite an experience. Whether you’re hosting a game day party or looking for a satisfying appetizer, these wings pack a flavor punch that will keep everyone coming back for more.

Why You’ll Love This Recipe

These Oven-Baked Chicken Wings are not only scrumptious but also versatile, fitting effortlessly into any occasion. They strike the perfect balance between ease and taste, making them a go-to option when you crave something flavorful without a fuss. The simplicity of baking allows you more time to focus on entertaining your guests or enjoying the game. Plus, they’re cooked without the need for excess oil, giving you a healthier alternative to traditional fried wings. The smoky hint of paprika enhances the BBQ sauce’s robust richness, creating a sensory delight with every bite.

Personal Story/Connection

For me, these Oven-Baked Chicken Wings have always been synonymous with cozy Sunday afternoons spent with family. I vividly remember the first time I made them; the kitchen was filled with laughter and the tantalizing smell of wings crisping up in the oven. As soon as the first batch emerged, there was an eager crowd, ready to dive in. These wings quickly became a family favorite, symbolizing warmth, togetherness, and the simple joys of home-cooked meals shared with loved ones.

Context/Background

The history of chicken wings as a culinary staple dates back to the 1960s in Buffalo, New York, where the original buffalo wing was born. Since then, wings have become a mainstay in kitchens worldwide, continually evolving with diverse flavors and cooking methods. The oven-baked variation elevates this classic by providing a healthier, less greasy alternative while maintaining all the flavor that makes wings so beloved. Their adaptability means they’ve found a home in various cuisines and cultures, each adding their unique spin.

Tips for Perfect Oven-Baked Chicken Wings

  • Pat the chicken wings dry with paper towels before seasoning to ensure maximum crispiness.
  • Use a wire rack over the baking sheet to allow air to circulate under the wings, promoting even cooking.
  • For extra crispiness, increase the oven temperature to 425°F for the last few minutes of baking.
  • Experiment with different seasoning blends like Cajun spice or lemon-pepper for a flavor twist.
  • If time allows, marinate the wings in the spice blend overnight for deeper flavor penetration.

Serving Suggestions

These wings are incredibly versatile, making them ideal for various serving options. Serve them with a side of celery sticks and a creamy ranch dip for a classic pairing. For a more upscale approach, plate them on a large serving dish garnished with fresh parsley and lime wedges. Hosting a game day? Arrange them in a large bowl on the coffee table, alongside an array of sauces and dips, encouraging guests to mix and match flavors. They also pair excellently as a part of a hearty buffet, nestled among other finger foods for easy grazing.

Storage and Leftovers

If you have leftovers, these wings are perfect for quick meals the next day. Store them in an airtight container in the refrigerator, where they’ll stay fresh for up to three days. To reheat, place them in a preheated oven at 375°F for about 10-15 minutes, ensuring they stay crispy. Alternatively, reinvigorate any leftover wings by tossing them into salads, or use them as a topping for a homemade pizza, adding a smoky depth of flavor to each dish.

Recipe Variations and Substitutions

Explore new flavors and dietary adaptations with these variations. For a spicy kick, mix a teaspoon of cayenne pepper into the seasoning. Want a sweet-savory profile? Add a tablespoon of honey to your BBQ sauce before brushing it on the wings. For a gluten-free version, ensure your BBQ sauce is gluten-free or make your own by combining tomato sauce, vinegar, and honey. Vegetarians can join the fun by substituting cauliflower florets for chicken, following the same seasoning and baking instructions for a delightful alternative.

FAQ

Can I make this ahead of time? Yes, you can season the wings and keep them in the refrigerator for up to 24 hours. Bake them just before serving for the best texture.

What substitutions can I use for olive oil? You can substitute olive oil with avocado oil or melted coconut oil, which work well for baking while adding their unique flavors.

How do I make this gluten-free or vegan? Ensure your BBQ sauce is gluten-free, or replace the chicken with cauliflower to make this delicious recipe vegan-friendly.

Optional Nutritional Information

  • Calories per serving: Approximately 250
  • Protein: 23g
  • Fat: 18g
  • Carbohydrates: 7g
  • Sugar: 6g

Final Thoughts

These Oven-Baked Chicken Wings are not just another dish—they’re a celebration of flavor, simplicity, and shared moments. Whether you’re a seasoned kitchen veteran or a novice cook, this recipe promises success with every bake. It’s a dish that’s sure to impress and delight your guests, leaving them with fond memories and satisfied appetites. Try them once, and you’ll find them making a regular appearance in your culinary repertoire. Don’t hesitate to share your own unique variations or ask questions below—we’d love to hear from you!

Oven-Baked Chicken Wings Recipe

Serves: 4 Prep Time: 10 minutes Cook Time: 50 minutes Total Time: 1 hour

  • 2 lbs chicken wings
  • 2 tbsp olive oil
  • 1 tsp garlic powder
  • 1 tsp onion powder
  • 1 tsp paprika
  • Salt and pepper, to taste
  • 1/2 cup BBQ sauce
  1. Preheat your oven to 400°F and line a baking sheet with foil.
  2. In a large bowl, toss the chicken wings with olive oil, garlic powder, onion powder, paprika, salt, and pepper until evenly coated.
  3. Place the seasoned wings on the prepared baking sheet in a single layer.
  4. Bake in the oven for 30 minutes, then flip the wings and bake for an additional 15-20 minutes until crispy and cooked through.
  5. Remove from the oven and brush the wings with BBQ sauce.
  6. Serve hot and enjoy the delicious, crispy oven-baked chicken wings!

“`

Irresistible Peppermint Cheesecake Cookies: The Ultimate Holiday Dessert Recipe

“`html
Jump to Recipe

Peppermint Cheesecake Cookies: A Festive Treat for Holiday Delight

Imagine biting into a cookie that combines the creamy richness of cheesecake with the refreshing, cool burst of peppermint. These Peppermint Cheesecake Cookies are a holiday delight that brings together the crunch of candy canes and the smoothness of cream cheese, making them a must-try for any seasonal gathering. Their unique texture and flavor profile make them a standout on any dessert table.

Why You’ll Love This Recipe

This recipe is beloved for its perfect balance of flavors and delightful textures. The creaminess of the cheesecake layer contrasts beautifully with the crisp, peppermint-infused cookie, offering a taste and texture experience that is both nostalgic and novel. Whether you’re preparing for a holiday party or simply indulging in a festive baking session, these cookies are a crowd-pleaser.

Peppermint adds not just flavor but a touch of freshness that makes these cookies feel light, despite their luscious richness. These cookies evoke fond memories of holiday seasons past, blending nostalgia with indulgence. Plus, they’re incredibly versatile—the ideal addition to a festive dessert platter or as a gourmet gift.

The ease of preparation is another appeal, perfect for bakers of all levels. With a straightforward process and simple ingredients, the recipe ensures that you can create something special without spending hours in the kitchen.

Personal Story/Connection

Every holiday season, our kitchen fills with laughter and the delightful aroma of baking cookies. The tradition of making these Peppermint Cheesecake Cookies started with my grandmother, who loved experimenting with flavors. Watching her, I learned the joy of creating something that brings people together. Today, these cookies remind me of those cherished family moments, and I’m thrilled to share this recipe with you.

Context/Background

Peppermint has long been a symbol of the holiday season, with its history rooted in winter festivities. Combining peppermint with cream cheese creates a harmonious blend that has evolved over time into soothing holiday desserts. The candy cane, a staple of holiday decorations, adds both flavor and a delightful pop of color to these cookies, ensuring they capture the essence of festive cheer.

Cheesecake, a beloved dessert worldwide, takes on a festive twist in this recipe. Transforming the classic cheesecake into bite-sized cookie form not only makes it accessible for gatherings but also lets you enjoy your favorite dessert anytime.

Tips for Perfect Peppermint Cheesecake Cookies

  • Ensure the butter and cream cheese are fully softened to avoid lumps in your dough and cheesecake mixture.
  • Use a food processor to crush the candy canes for uniform pieces that incorporate easily into the dough.
  • Chill the cookies as instructed to let the cream cheese topping set properly.
  • If desired, add a drop of red or green food coloring to the cream cheese mixture for a more festive look.
  • For a slightly crunchy texture, bake the cookies for an additional minute, watching closely to prevent burning.

Serving Suggestions

These cookies shine on a holiday cookie platter, alongside classics like chocolate chip and gingerbread. For an impressive presentation, arrange them on a festive plate lined with a doily or seasonal decor. They pair wonderfully with hot cocoa or minted tea, enhancing the peppermint flavor in the cookies.

For a truly indulgent treat, serve these cookies alongside your favorite cheesecake or as the sweet finish to a holiday dinner. Their vibrant appearance and inviting aroma make them an ideal addition to any festive spread, inviting guests to reach for more.

Storage and Leftovers

Store these cookies in an airtight container in the refrigerator for up to a week. They taste even better after the flavors have had a chance to meld. Before serving, allow them to come to room temperature for optimum texture and flavor.

If you find yourself with leftovers, crumble them over a scoop of vanilla ice cream for an instant dessert, or use them as the base for a holiday-themed icebox cake.

Recipe Variations and Substitutions

For a gluten-free version, substitute the all-purpose flour with a gluten-free baking blend. To make these cookies vegan, replace the butter with a dairy-free alternative, the cream cheese with vegan cream cheese, and use an egg replacer for the eggs.

For a softer flavor, swap the peppermint extract for almond extract, offering a nutty counterpart to this holiday treat. Additionally, consider using dark chocolate chips in place of white chocolate chips for a richer, more indulgent spin on the classic cookie.

FAQ

Can I make this ahead of time?
Yes, you can prepare the dough and cream cheese mixture a day in advance. Store them separately in the refrigerator until ready to bake and assemble.

What substitutions can I use for candy canes?
If candy canes aren’t available, use peppermint candies. Just be sure to crush them into small pieces for even distribution.

How do I make this gluten-free or vegan?
Use a gluten-free flour blend for the dough, replace butter with a non-dairy alternative, cream cheese with vegan cream cheese, and eggs with an appropriate egg substitute.

Optional Nutritional Information

  • Calories per cookie: Approximately 150
  • Fat: 7g
  • Carbohydrates: 19g
  • Protein: 2g

Final Thoughts

These Peppermint Cheesecake Cookies are a delightful addition to any holiday celebration, offering a unique blend of flavors that capture the spirit of the season. Their easy preparation and impressive payoff make them perfect for both beginner bakers and seasoned pros. Try them this holiday season and let these cookies become a new family favorite, evoking smiles and spreading cheer. We’d love to hear about your experience in recreating this recipe—share your thoughts or ask questions in the comments below!

Peppermint Cheesecake Cookies Recipe

Serves: 24 cookies

Prep Time: 20 minutes

Cook Time: 12 minutes

Total Time: 1 hour (including chilling)

  • 1 cup unsalted butter, softened
  • 1 cup granulated sugar
  • 2 large eggs
  • 1 teaspoon vanilla extract
  • 3 cups all-purpose flour
  • 1 teaspoon baking powder
  • 1/2 teaspoon salt
  • 1/2 teaspoon peppermint extract
  • 1 cup crushed candy canes
  • 8 oz cream cheese, softened
  • 1/2 cup powdered sugar
  • 1/2 teaspoon peppermint extract
  • 1/2 cup white chocolate chips
  1. Preheat oven to 350°F and line a baking sheet with parchment paper.
  2. In a large bowl, cream together butter and sugar until light and fluffy. Add eggs one at a time, then mix in vanilla extract.
  3. In a separate bowl, whisk together flour, baking powder, and salt. Gradually add dry ingredients to wet mixture.
  4. Stir in peppermint extract and crushed candy canes.
  5. Roll dough into 1-inch balls and place on prepared baking sheet. Flatten slightly with the bottom of a glass.
  6. Bake for 10-12 minutes, until edges are lightly golden. Allow to cool on baking sheet for 5 minutes before transferring to wire rack.
  7. In a mixing bowl, beat cream cheese, powdered sugar, and peppermint extract until smooth.
  8. Spread a dollop of cream cheese mixture on each cookie and sprinkle with white chocolate chips.
  9. Chill cookies in the refrigerator for 30 minutes to set.
  10. Serve and enjoy these festive Peppermint Cheesecake Cookies!

“`

Quick and Easy One-Pot Chicken Parmesan Pasta Recipe

“`html

Jump to Recipe

One-Pot Chicken Parmesan Pasta: A Comforting Italian Classic Reinvented

Imagine savoring a warm bowl of flavorful pasta that combines the heartiness of chicken Parmesan with the convenience of a one-pot meal. Our One-Pot Chicken Parmesan Pasta delivers just that – a symphony of tastes, from tender chicken and al dente pasta, to rich, melting cheeses and aromatic herbs, all enveloped in a tangy marinara sauce. This dish is a testament to culinary artistry, bringing together delightful textures and a burst of Italian flavors, perfect for a comforting night in.

Why You’ll Love This Recipe

This One-Pot Chicken Parmesan Pasta is the kind of recipe that wins you over with its simplicity and depth of flavor. The recipe is incredibly versatile, making it a perfect mid-week dinner or a dish for entertaining guests. You’ll feel like a seasoned chef as you combine classic Italian flavors effortlessly.

Not only is this dish easy to prepare, but it’s also a feast for the senses. You’ll enjoy the aromas of basil and oregano wafting through your kitchen, evoking memories of traditional Italian bistros. Plus, the nutritional value of lean chicken and the option to use whole grain pasta make this a health-friendly choice.

Moreover, it’s a perfect recipe to whip up during a busy week – minimal cleanup, maximum flavor. The use of a single pot to cook everything means less time scrubbing, and more time enjoying the meal with family and friends.

Personal Story/Connection

This recipe holds a special place in my heart. It reminds me of every Sunday spent at my grandmother’s house, where the aroma of garlic and basil filled the air. Her kitchen was always a hub of warmth and laughter, much like how this dish brings people together. It’s been a family favorite ever since, offering joy and satisfaction with each bite.

Context/Background

The love affair between chicken and Parmesan cheese has deep roots in Italian-American cuisine. Traditionally, Chicken Parmesan, or ‘Pollo alla Parmigiana,’ features breaded chicken cutlets topped with cheese and tomato sauce. Over time, creative cooks have adapted the recipe, leading to the creation of this one-pot wonder that combines pasta into the mix for a comforting, all-in-one meal.

The dish embodies the spirit of Italian cooking – simplicity, quality ingredients, and flavors that speak for themselves. This particular version adds the ease and convenience of modern cooking techniques, while still honoring its rich, flavorful heritage.

Tips for Perfect One-Pot Chicken Parmesan Pasta

  • Use fresh garlic and herbs for a more authentic flavor.
  • Ensure the chicken is browned well to add depth to the flavor profile.
  • Stir the pasta frequently while it cooks to prevent sticking.
  • If you prefer a spicier dish, add a pinch of red pepper flakes while simmering.
  • Feel free to experiment with different types of pasta, like fusilli or rigatoni.

Serving Suggestions

This dish is a star on its own, but you can elevate its appeal with thoughtful pairings. Consider serving it alongside a crisp arugula salad with a light lemon vinaigrette to balance the richness of the pasta.

For a full Italian dinner experience, serve with a rustic bread to mop up the delicious sauce. A glass of Chianti or a buttery Chardonnay can also complement the meal beautifully, enhancing the flavors of basil and oregano.

Looking to impress guests? Serve it in individual pasta bowls, topped with extra Parmesan and a sprinkle of fresh basil. Add a drizzle of balsamic glaze for an elegant finish.

Storage and Leftovers

If you have leftovers, store them in an airtight container in the refrigerator for up to three days. The flavors will meld even more, making it a delectable dish to enjoy later.

Reheat gently in a pot over low heat, adding a splash of chicken broth to bring back the saucy consistency. Alternatively, microwaving in short intervals on medium power will work.

Leftover pasta can be repurposed as a tasty filling for stuffed bell peppers or as the base for a pasta bake by adding breadcrumbs and baking until golden.

Recipe Variations and Substitutions

Make this dish vegetarian by omitting the chicken and adding sautéed mushrooms or eggplants for a meaty texture. For a gluten-free version, substitute penne with your favorite gluten-free pasta brand.

Love seafood? Incorporate shrimp instead of chicken for a delicious alternative. Add them into the pot during the last 5 minutes of cooking to prevent overcooking.

During fall and winter, add seasonal vegetables such as spinach or kale for an extra nutritional boost and a pop of color.

FAQ

Can I make this ahead of time?

Yes, you can prepare the chicken and sauce, sans pasta, a day ahead. When ready to serve, reheat and add the pasta to cook.

What substitutions can I use for chicken broth?

You can use vegetable broth or water with a dash of extra herbs for a similar effect.

How do I make this gluten-free or vegan?

Swap regular pasta with gluten-free pasta for a celiac-friendly meal. For a vegan version, use plant-based cheese and replace chicken with tofu or mushrooms.

Optional Nutritional Information

  • Calories per serving: Approx. 450
  • Protein: 32g
  • Carbohydrates: 45g
  • Fat: 15g

Final Thoughts

This One-Pot Chicken Parmesan Pasta is a must-try for anyone seeking a heartwarming, foolproof recipe. It perfectly marries tradition with contemporary cooking simplicity, offering both comfort and satisfaction. I invite you to try this dish, engage with the flavors, and perhaps, make it a cherished part of your family’s dining traditions. Feel free to share your experiences or ask any questions in the comments below!

Recipe Section

Serves: 4 | Prep Time: 10 minutes | Cook Time: 30 minutes | Total Time: 40 minutes

  • 1 lb boneless, skinless chicken breasts, cut into bite-sized pieces
  • 2 cloves garlic, minced
  • 1 onion, diced
  • 1 tsp dried basil
  • 1 tsp dried oregano
  • 1 (24 oz) jar marinara sauce
  • 3 cups chicken broth
  • 12 oz penne pasta
  • 1 cup shredded mozzarella cheese
  • 1/2 cup grated Parmesan cheese
  • Salt and pepper, to taste
  • Fresh basil, for garnish
  1. In a large pot or dutch oven, sauté chicken pieces until browned on all sides.
  2. Add garlic and onion, cooking until softened and fragrant.
  3. Stir in dried basil and oregano, then pour in marinara sauce and chicken broth.
  4. Bring the mixture to a boil, then add the penne pasta. Stir well to combine.
  5. Reduce heat to a simmer, cover, and cook for about 15-20 minutes or until pasta is tender.
  6. Remove from heat and stir in mozzarella and Parmesan cheeses until melted and creamy.
  7. Season with salt and pepper to taste.
  8. Garnish with fresh basil before serving.

“`

Irresistible Bacon Brown Sugar Chicken Tenders for a Flavorful Feast

“`html
Jump to Recipe

Bacon Brown Sugar Chicken Tenders: A Sweet and Savory Delight

Imagine biting into a juicy chicken tender encased in crispy bacon with a caramelized glaze of brown sugar and spice. The delightfully sweet and savory taste of Bacon Brown Sugar Chicken Tenders is unmatched, perfect for those who crave something unique in their meals. This dish marries the boldness of bacon with the warmth of spices like paprika and garlic powder, creating a flavor explosion that is both comforting and exhilarating. Whether for a weekday dinner or a casual gathering, these tenders will captivate your taste buds and win over hearts in an instant.

Why You’ll Love This Recipe

There are countless reasons to adore Bacon Brown Sugar Chicken Tenders. For starters, their flavor profile is wonderfully versatile, satisfying both sweet and savory cravings. The combination of tender chicken and crispy bacon enveloped in a sweet, spiced glaze makes it a crowd-pleaser for all ages.

This recipe is exceptionally easy to prepare, making it perfect for busy weeknights or when unexpected guests arrive. With minimal ingredients and a straightforward process, you can have these delightful tenders ready in no time.

Emotionally, this dish evokes warmth and joy, often reminding one of gatherings with loved ones. The aroma that fills your kitchen while these bake will inevitably draw family and friends to the table, eager to taste the deliciousness.

Health-wise, you can easily adjust the ingredients to suit dietary preferences, ensuring everyone can enjoy this flavorful treat. From lean protein to the inclusion of sweet and spicy seasonings, this dish strikes a nutritious balance.

Personal Story/Connection

This recipe takes me back to a summer barbecue at my family’s backyard. It was then that my cousin introduced us to these bacon-wrapped chicken wonders. The moment I took my first bite, I was hooked. The simplicity of the ingredients combined with the depth of flavors made it an instant favorite. I’ve since made countless variations for friends and family, but the original recipe always holds a special place in my heart. Whether it’s a casual movie night snack or a centerpiece dish for a gathering, these chicken tenders unfailingly bring smiles and gratitude from everyone.

Context/Background

Bacon-wrapped foods have long been a staple in various cuisines around the world, celebrated for their rich flavors and delightful textures. In Western cooking, the combination of sweet and savory has been embraced for centuries, evident in dishes like maple-glazed bacon or honey-roasted meats.

Chicken tenders add to this tradition, providing a perfect canvas for bold and diverse flavors. The blend of bacon and brown sugar adds a touch of modern culinary innovation, updating a classic for today’s palate. Over the years, this dish has become synonymous with indulgent gatherings and special occasions, loved for its ease of preparation and irresistible taste.

Tips for Perfect Bacon Brown Sugar Chicken Tenders

  • Select Quality Bacon: Opt for a thicker cut of bacon to ensure it crisps nicely without overcooking.
  • Even Slicing: Ensure each bacon slice wraps evenly around the chicken for consistent cooking.
  • Secure with Toothpicks: Use toothpicks if needed to hold the bacon in place while baking.
  • Adjust for Sweetness: Add or reduce brown sugar to match your preferred level of sweetness.
  • Overnight Marination: For deeper flavor, consider marinating the chicken in spices overnight.
  • Use a Rack: Place a wire rack on the baking sheet to allow air circulation and even baking.

Serving Suggestions

These tenders are wonderfully versatile, perfect for any occasion. Serve them as a main dish alongside a fresh salad or coleslaw to balance the richness. For more elaborate meals, accompany them with creamy mashed potatoes or grilled vegetables.

For entertaining, present them as appetizers at a party or gathering. Arrange the tenders on a platter with a variety of dipping sauces, such as ranch, honey mustard, or spicy sriracha mayo, for guests to explore different flavor combinations.

Consider elevating the presentation by garnishing with fresh herbs like parsley or cilantro, adding a pop of color and freshness to your plate. These simple yet elegant touches can make your dish the star of any meal.

Storage and Leftovers

To store any leftovers, place the cooled chicken tenders in an airtight container and refrigerate for up to 3 days. When ready to enjoy them again, reheat in the oven at 350°F until warmed through to maintain their crispiness.

Leftovers can be creatively repurposed for new meals. Chop the tenders to top off salads, create an indulgent sandwich, or mix with pasta for a delightful twist. These innovative ways ensure your tasty creation doesn’t go to waste.

Recipe Variations and Substitutions

  • Gluten-Free Version: Ensure your spices are gluten-free verified.
  • Sweet Chili Glaze: Swap brown sugar with sweet chili sauce for a spicy kick.
  • Maple Bacon Twist: Use maple syrup instead of brown sugar for a richer, deeper sweetness.
  • Vegan Option: Substitute chicken with firm tofu and bacon with vegan bacon strips.

FAQ

Can I make this ahead of time? Yes, you can prepare these the day before and store them in the refrigerator. Bake just before serving for the best texture.

What substitutions can I use for bacon? If you’re not a fan of bacon, use turkey bacon or prosciutto for a lighter option.

How do I make this gluten-free? Ensure all seasoning ingredients are certified gluten-free, as spices can sometimes contain gluten in anti-caking agents.

Optional Nutritional Information

  • Calories: Approximately 320 per serving
  • Protein: 26g
  • Carbohydrates: 20g
  • Fat: 17g

Final Thoughts

Bacon Brown Sugar Chicken Tenders are a delectable fusion of savory and sweet that will quickly become a staple in your recipe collection. Not only are they easy to make, but they also offer the kind of flavor that elevates any meal. Whether you’re cooking for yourself or a group, these tenders are sure to impress. Give this recipe a try, and feel free to share your experiences or ask questions in the comments below. Your feedback is always appreciated!

Recipe Section

Serves: 4 | Prep Time: 15 minutes | Cook Time: 25-30 minutes | Total Time: 40-45 minutes

  • 1 lb chicken tenders
  • 6 slices of bacon
  • 1/2 cup brown sugar
  • 1/4 tsp salt
  • 1/4 tsp black pepper
  • 1/4 tsp garlic powder
  • 1/4 tsp paprika
  • 1/4 tsp onion powder
  1. Preheat your oven to 375°F.
  2. Wrap each chicken tender with a slice of bacon and place them on a baking sheet lined with parchment paper.
  3. In a small bowl, mix together brown sugar, salt, pepper, garlic powder, paprika, and onion powder.
  4. Sprinkle the brown sugar mixture over the bacon-wrapped chicken tenders.
  5. Bake in the oven for 25-30 minutes, or until the chicken is cooked through and the bacon is crispy.
  6. Serve hot and enjoy the sweet and savory flavors!

#BaconBrownSugarChickenTenders #SweetAndSavory #ChickenRecipes #BaconLovers

Bacon Brown Sugar Chicken Tenders
“`

Irresistible Sausage, Egg, and Cream Cheese Hashbrown Casserole Recipe

“`html
Jump to Recipe

Sausage, Egg, and Cream Cheese Hashbrown Casserole: A Cozy Brunch Delight

Imagine waking up to the irresistible aroma of sizzling sausage, creamy eggs, and melted cheddar cheese enveloped in a bed of golden hashbrowns. This Sausage, Egg, and Cream Cheese Hashbrown Casserole is a comforting and hearty meal that delights your senses and warms your heart. Perfect for breakfast or brunch, it offers a savory combination of flavors and textures that will have you coming back for seconds.

Why You’ll Love This Recipe

This casserole is the epitome of comfort food, combining familiar ingredients to create a dish that’s both soothing and satisfying. Its convenience lies in the one-pan simplicity, saving time on both preparation and clean-up. Whether you’re a busy parent looking for a quick breakfast solution, or someone who loves brunch gatherings, this casserole is a fantastic option. Not only is it perfect for feeding a crowd, but its hearty ingredients also ensure everyone leaves the table happy and full.

The versatility of this dish is another reason it’s a star in the kitchen. You can easily customize it to suit your tastes or dietary needs. The balance of protein from the sausage and eggs, creaminess from the cheese, and carbohydrates from the hashbrowns make it a well-rounded meal, offering sustained energy throughout the morning.

This recipe doesn’t just fit into busy weekdays but is also a showstopper for special occasions. The delightful aroma wafting from the oven will welcome guests with warmth and comfort, making everyone feel at home.

Personal Story/Connection

This dish has become a staple at our family gatherings, especially during the holidays. It was my grandmother’s special recipe, and she used to prepare it for our annual brunch tradition. As the youngest in the family, I was her little helper, eagerly shredding cheese and cracking eggs. Each time I bake this casserole, I am reminded of those cherished moments spent in her cozy kitchen, surrounded by love and laughter.

Context/Background

The origins of breakfast casseroles are rooted in bringing families together to share hearty, satisfying meals. Traditionally popular in the Midwest, these dishes evolved from simple egg bakes to more complex casseroles featuring regional ingredients. Hashbrown casseroles, particularly, gained popularity for their convenience and flexibility, allowing home cooks to utilize pantry staples creatively.

Our Sausage, Egg, and Cream Cheese Hashbrown Casserole carries forward this tradition, embodying the essence of comfort and ingenuity. Over time, it has incorporated modern twists, such as the addition of cream cheese, which enhances its creamy texture and rich flavor.

Tips for Perfect Sausage, Egg, and Cream Cheese Hashbrown Casserole

  • Ensure your cream cheese is well-softened to blend smoothly with the eggs for an even texture.
  • If you’re using fresh hashbrowns, ensure they’re well-drained to avoid a watery casserole.
  • Browning the sausage beforehand not only enhances flavor but also ensures even cooking.
  • Use a silicone spatula to combine the egg and cream cheese mixture, preventing lumps.
  • For a golden crust, broil the casserole for an additional 2-3 minutes, monitoring closely to avoid burning.

Serving Suggestions

Serve this casserole alongside a fresh fruit salad for a balanced meal. Its rich flavors pair beautifully with refreshing elements like berries, melons, or citrus. For a touch of elegance at brunch gatherings, consider complementing it with a mimosa or freshly brewed coffee.

To add a rustic charm, serve directly from the baking dish placed on a wooden board, allowing guests to help themselves. Adding garnishes such as chopped parsley or basil not only enhances the presentation but also adds a burst of color and freshness to each serving.

Storage and Leftovers

This casserole is the gift that keeps on giving. Once cooled, store leftovers in an airtight container and refrigerate for up to 3 days. To reheat, cover with foil to retain moisture and bake at 350°F until heated through.

Leftover casserole can be repurposed into a breakfast burrito. Simply wrap portions in a tortilla, adding a splash of hot sauce or salsa for an easy grab-and-go meal.

Recipe Variations and Substitutions

For a vegetarian twist, replace sausage with mushrooms and spinach, sautéing them for texture and flavor. Cheese enthusiasts can experiment by swapping cheddar with mozzarella or pepper jack for different flavor profiles.

Looking for a seasonal spin? Incorporate roasted bell peppers and zucchini in the summer, or add some diced butternut squash and sage during fall. These substitutions not only keep the dish fresh but also cater to personal preferences and dietary needs.

FAQ

Can I make this ahead of time? Absolutely! Prepare the casserole the night before, refrigerating it covered. Simply pop it in the oven the morning of, adding 10-15 minutes to baking time if needed.

What substitutions can I use for cream cheese? Cottage cheese or ricotta can be used for a lighter texture while maintaining creaminess.

How do I make this gluten-free? Ensure the hashbrowns are gluten-free certified, as some may contain additives. All other ingredients are naturally gluten-free.

Optional Nutritional Information

  • Calories per serving: Approximately 400
  • Protein: 20g
  • Carbohydrates: 20g
  • Fat: 28g

Final Thoughts

This Sausage, Egg, and Cream Cheese Hashbrown Casserole is more than just a meal—it’s an invitation to share tradition, warmth, and love with those around you. Whether for a casual morning or a celebratory brunch, this dish is sure to become a beloved staple. We invite you to try it and share your experience with us!

Recipe

Serves: 8 | Prep Time: 15 minutes | Cook Time: 30 minutes | Total Time: 45 minutes

  • 1 lb breakfast sausage
  • 6 eggs
  • 1 cup cream cheese, softened
  • 1 package frozen hashbrowns
  • 1 cup shredded cheddar cheese
  • Salt and pepper to taste
  • Chopped green onions for garnish
  1. Preheat your oven to 350°F and grease a 9×13 baking dish.
  2. In a skillet, cook the breakfast sausage over medium heat until browned and crumbled. Drain any excess fat.
  3. In a mixing bowl, whisk together the eggs and softened cream cheese until smooth. Season with salt and pepper.
  4. Spread the frozen hashbrowns evenly in the prepared baking dish.
  5. Pour the egg and cream cheese mixture over the hashbrowns, then sprinkle the cooked sausage on top.
  6. Sprinkle shredded cheddar cheese over the casserole.
  7. Bake in the preheated oven for 25-30 minutes, or until the eggs are set and the cheese is melted and bubbly.
  8. Garnish with chopped green onions before serving.

“`

Delicious Sausage Egg and Cream Cheese Hashbrown Casserole Recipe

“`html
Jump to Recipe

Sausage, Egg, and Cream Cheese Hashbrown Casserole: A Breakfast Delight

Imagine the aroma of crispy hashbrowns mingling with savory morning sausage, all embraced by the creamy richness of eggs and cheese, gently baking to perfection. This Sausage, Egg, and Cream Cheese Hashbrown Casserole is not just a breakfast dish; it’s an experience, offering warmth and comfort with every bite. Whether you enjoy it for a lazy weekend brunch or a festive breakfast gathering, this unique casserole is bound to be a favorite at your table.

Why You’ll Love This Recipe

There are countless reasons to fall in love with this Sausage, Egg, and Cream Cheese Hashbrown Casserole. Firstly, it’s incredibly versatile, fitting seamlessly into any meal plan as a hearty breakfast or a comforting brunch item. The creamy blend of eggs and cream cheese gives it a luxurious texture, while the sausage adds a flavorful depth that’s hard to resist. This dish is a true crowd-pleaser, evoking a sense of home and warmth, making it perfect for family gatherings or holiday breakfasts.

The combination of protein-rich eggs and savory sausage ensures you start your day with a sustained energy boost. It’s easy to prepare, requiring minimal effort for maximum reward. Plus, it offers a delightful way to include a variety of textures—from crispy hashbrowns to gooey cheese—in one harmonious casserole.

For those who appreciate creativity in the kitchen, this casserole provides a blank canvas for culinary innovation. Experiment with different types of cheeses or add vegetables for a twist. Embrace the simplicity or explore the possibilities; either way, this dish promises satisfaction.

Personal Story/Connection

Growing up, weekend mornings meant gathering in the kitchen for a special breakfast family ritual. My mom’s breakfast casseroles were legendary, and this Sausage, Egg, and Cream Cheese Hashbrown Casserole soon became a staple. Each spoonful carries not just flavor, but memories of laughter and bonding over shared meals. It’s a dish that reconnects me to my roots and fills my kitchen with a nostalgic warmth every time.

Context/Background

The origin of breakfast casseroles is deeply rooted in practicality—transforming humble ingredients into something extraordinary. Historically, casseroles were designed to satisfy hunger using readily available components. This particular version harnesses the classic trio of eggs, cheese, and sausage, staples in any American breakfast.

Over the years, breakfast casseroles have evolved, becoming symbols of hospitality and comfort. Each family tends to have its twist on the classic, contributing to its rich tapestry of variations. Today, such casseroles often feature in holiday brunches and gatherings, showcasing how tradition and creativity blend in the kitchen.

Tips for Perfect Sausage, Egg, and Cream Cheese Hashbrown Casserole

  • Use cooked, well-drained sausage to prevent sogginess.
  • For a firmer casserole, let it rest for 5-10 minutes after baking.
  • Experiment with different cheese blends for added flavor.
  • Add chopped vegetables like bell peppers or spinach for extra nutrition.
  • Substitute cream cheese with Greek yogurt for a tangy taste and lighter texture.
  • Season generously with herbs like thyme or rosemary for an aromatic twist.

Serving Suggestions

This Sausage, Egg, and Cream Cheese Hashbrown Casserole is a star on its own, but with a little creativity, it can be elevated to new heights. Serve it alongside fresh fruit salad and a mimosa bar for an indulgent brunch spread. For a cozy breakfast, pair it with warm, buttered toast or flaky croissants.

Each slice can be garnished with freshly chopped green onions, which not only add color but also enhance the flavors with their subtle sharpness. If hosting a larger gathering, consider serving it in mini portions using muffin tins for easy, mess-free enjoyment.

For holiday feasts or celebratory meals, this casserole can be the centerpiece, complemented by sides like roasted potatoes or a fresh garden salad. It’s versatile enough to shine at a casual breakfast or star at a festive brunch table.

Storage and Leftovers

Storing leftovers is easy and ensures you have a delicious meal ready for later. Once cooled, cover the casserole with plastic wrap or transfer to an airtight container. It can be refrigerated for up to 3 days. Reheat single portions in the microwave or warm the entire dish in an oven at 325°F until heated through.

For an innovative use of leftovers, consider slicing the casserole and tucking it into breakfast sandwiches or wraps for a quick, on-the-go meal. Its flavors only become more developed after a day, making it a delightful lunchbox option.

Recipe Variations and Substitutions

This casserole is adaptable to various dietary needs and preferences:

  • Vegetarian Option: Replace sausage with a vegetarian sausage alternative or sautéed mushrooms for added depth.
  • Spicy Kick: Add chopped jalapeños or a sprinkle of cayenne pepper for a hint of spice.
  • Cheese Variations: Substitute cheddar with pepper jack or mozzarella for a different flavor profile.
  • Gluten-Free: Ensure the sausage is gluten-free, and you’re all set, as this recipe naturally avoids gluten.

FAQ

Can I make this ahead of time? Yes, prepare the casserole the night before, cover it, and refrigerate. Bake fresh in the morning for optimal taste and texture.

What substitutions can I use for cream cheese? Greek yogurt or ricotta cheese can be used for a lighter alternative.

How do I make this gluten-free or vegan? For a gluten-free version, ensure all ingredients, especially processed ones like sausage, are gluten-free. To make it vegan, substitute eggs and sausage with plant-based alternatives, and use vegan cheese and cream cheese.

Optional Nutritional Information

  • Calories: Approximately 320 per serving
  • Protein: 18g
  • Carbs: 22g
  • Fat: 18g

Final Thoughts

This Sausage, Egg, and Cream Cheese Hashbrown Casserole is more than just a recipe; it’s an invitation to create cherished memories and traditions. Perfect for any occasion, it brings people together with its comforting flavors and delightful aroma. Whether you’re a seasoned cook or a kitchen novice, this dish promises satisfaction for all. Give it a try, and discover the joy of sharing something delicious with your loved ones.

Recipe Section

Serves: 8

Prep Time: 15 minutes

Cook Time: 45 minutes

Total Time: 1 hour

  • 1 lb breakfast sausage
  • 6 large eggs
  • 1/2 cup cream cheese, softened
  • 1 bag frozen hashbrowns
  • 1 cup shredded cheddar cheese
  • Salt and pepper, to taste
  • Chopped green onions, for garnish
  1. Preheat the oven to 375°F and grease a 9×13 baking dish.
  2. Cook the breakfast sausage in a skillet over medium heat until browned and crumbled. Drain any excess fat.
  3. In a large bowl, whisk together the eggs, cream cheese, salt, and pepper until smooth.
  4. Add the cooked sausage, hashbrowns, and cheddar cheese to the egg mixture. Mix until well combined.
  5. Pour the mixture into the prepared baking dish and spread it out evenly.
  6. Bake for 40-45 minutes, or until the casserole is set and golden brown.
  7. Remove from the oven and let it cool for a few minutes before serving.
  8. Garnish with chopped green onions before serving.

Enjoy this savory and satisfying breakfast casserole with family and friends!

“`

Delicious Sausage Egg and Cream Cheese Hashbrown Casserole Recipe

“`html
Jump to Recipe

Sausage, Egg and Cream Cheese Hashbrown Casserole: A Comforting Breakfast Delight

Imagine waking up to the aroma of savory sausage sizzling in the oven, mingling with creamy, rich notes of tender cream cheese and golden hashbrowns. Our Sausage, Egg and Cream Cheese Hashbrown Casserole is the ultimate comfort food, perfect for a hearty breakfast or a leisurely brunch with family and friends. This casserole combines a variety of textures and flavors, creating a dish that’s both satisfying and irresistible.

Why You’ll Love This Recipe

This hashbrown casserole is sure to become a staple in your recipe repertoire. Its simplicity is matched by its incredible taste, making it a versatile dish for various occasions. The combination of sausage and eggs ensures a protein-rich meal, while the cream cheese adds a delightful creamy texture, balancing the crispy hashbrowns. Easy to prepare and perfect for meal prepping, this casserole can also be tweaked to cater to personal preferences or dietary needs.

Beyond its taste, this dish evokes a sense of nostalgia and warmth. It’s reminiscent of lazy Sunday brunches, holiday breakfasts, and those moments when you crave something homemade and heartwarming. Whether you’re hosting a crowd or preparing a weekday breakfast, this casserole will not disappoint.

Personal Story/Connection

Growing up, weekends were a special time for family breakfasts. My mom would often prepare this sausage and hashbrown casserole, filling the kitchen with its mouthwatering aroma. It quickly became a family favorite, and now, I carry on this tradition with my own loved ones. There’s something so comforting about serving a dish that’s been passed down, evoking memories of family gatherings and shared joy.

Context/Background

The hashbrown casserole has its roots in Southern cuisine, known for its comforting and hearty dishes. The combination of potatoes, cheese, and meat has long been a staple in various forms across different cultures. Today, the sausage, egg, and hashbrown casserole has become a widely appreciated dish, bringing together classic breakfast elements in a single, delightful meal.

Traditionally enjoyed during holiday gatherings or as a convenient breakfast option, casseroles like this one have evolved. They are now a popular choice for both casual and special occasions.

Tips for Perfect Sausage, Egg and Cream Cheese Hashbrown Casserole

  • Use a high-quality sausage for the best flavor—consider opting for a spicy or flavored variety for a twist.
  • Soften the cream cheese at room temperature for easier blending.
  • Ensure the hashbrowns are evenly spread to achieve a consistent texture throughout the casserole.
  • Let the casserole cool for a few minutes before serving to allow the flavors to meld and set.
  • Add a sprinkle of your favorite herbs, like thyme or rosemary, for an extra layer of flavor.

Serving Suggestions

This Sausage, Egg and Cream Cheese Hashbrown Casserole pairs beautifully with a fresh fruit salad, providing a refreshing contrast to its hearty flavors. Alternatively, serve it alongside a crisp green salad or steamed vegetables for a balanced meal. For special occasions, consider presenting it with a selection of pastries or a mimosa bar to elevate your brunch gathering.

The casserole’s versatility means it’s equally at home on a holiday buffet as it is on a simple weekday breakfast table. Serve it straight from the oven for best results, and watch as your guests are drawn to its tantalizing aroma and golden, bubbling top.

Storage and Leftovers

To store leftovers, allow the casserole to cool completely before transferring it to an airtight container. It can be stored in the refrigerator for up to 3 days. For reheating, cover with foil to retain moisture and warm in an oven preheated to 350°F until heated through.

If you need to repurpose leftovers, consider transforming portions into breakfast burritos or using them as a filling for savory crepes. This will provide exciting new meals while minimizing waste.

Recipe Variations and Substitutions

If you’re catering to specific dietary needs, there are plenty of variations to explore:

  • Vegetarian Version: Substitute the sausage with sautéed mushrooms or bell peppers for a meat-free option.
  • Gluten-Free: Ensure all ingredients, especially processed ones like sausage, are certified gluten-free.
  • Spicy Twist: Add chopped jalapeños or a sprinkle of cayenne pepper to the mixture for a kick of heat.
  • Seasonal Flavors: Incorporate roasted butternut squash in the fall or fresh asparagus in the spring for seasonal variety.

FAQ

Can I make this ahead of time? Yes, you can assemble the casserole the night before, store it in the refrigerator, and bake it the next morning.

What substitutions can I use for the sausage? Use bacon, ham, or a plant-based sausage alternative to suit your preferences.

How do I make this gluten-free or vegan? Ensure all ingredients used are gluten-free. For a vegan version, swap eggs with an egg replacer, cream cheese with vegan cream cheese, and use plant-based sausage.

Optional Nutritional Information

  • Calories per serving: Approximately 450
  • Protein: 20g
  • Carbohydrates: 25g
  • Fat: 30g

Final Thoughts

Our Sausage, Egg and Cream Cheese Hashbrown Casserole is more than just a meal; it’s an experience of warmth, comfort, and shared moments. Whether you’re making it for an everyday breakfast or a special brunch, its rich flavors and ease of preparation make it an invaluable addition to any home cook’s collection. We invite you to try this recipe and discover the joy it brings to your table. Don’t hesitate to share your variations or ask questions in the comments below!

Recipe Section

Serves: 6-8 | Prep Time: 15 minutes | Cook Time: 45-50 minutes | Total Time: 1 hour 5 minutes

  • 1 lb ground sausage
  • 6 eggs
  • 8 oz cream cheese, softened
  • 1/2 cup milk
  • 1 package frozen hashbrowns
  • 1 cup shredded cheddar cheese
  • Salt and pepper, to taste
  • Chopped parsley, for garnish
  1. Preheat oven to 375°F and grease a 9×13 baking dish.
  2. In a skillet, cook the ground sausage until browned and cooked through. Drain any excess fat.
  3. In a mixing bowl, beat the eggs, then add the softened cream cheese and milk. Mix until smooth.
  4. Stir in the cooked sausage, frozen hashbrowns, shredded cheddar cheese, salt, and pepper.
  5. Pour the mixture into the prepared baking dish and spread evenly.
  6. Bake for 45-50 minutes, or until the casserole is set and golden brown on top.
  7. Garnish with chopped parsley before serving.

Enjoy this hearty and flavorful Sausage, Egg and Cream Cheese Hashbrown Casserole for breakfast or brunch!

“`

Delicious Walking Taco Casserole Recipe for Busy Weeknights

“`html
Jump to Recipe

Walking Taco Casserole: A Cheesy Delight You Can’t Resist

Imagine a sizzling pan of seasoned beef melding perfectly with the rich, cheesy goodness of corn chips and melted mozzarella. This Walking Taco Casserole is a delightful symphony of flavors and textures—a perfect dish that captures the essence of taco night while delivering a hearty, comforting meal. With its layers of Chili cheese Fritos, creamy cheddar cheese sauce, and tender taco-flavored beef, this casserole is an unapologetic indulgence that brings joy to every bite.

Why You’ll Love This Recipe

This Walking Taco Casserole provides the ultimate comfort food experience. Its simplicity is enhanced by bold flavors, making it a go-to recipe for busy weeknights or casual family gatherings. The combination of savory beef and rich cheese brings a satisfying and mouth-watering harmony that appeals to both kids and adults. The dish is also incredibly versatile, allowing you to add your favorite toppings or adjust the seasoning to suit your personal taste, making each serving uniquely yours.

Besides its irresistible taste, this casserole is a breeze to prepare. With minimal prep work and a quick bake time, you’ll have dinner on the table in just under an hour. The idea of a walking taco transformed into a warm, cheesy casserole evokes nostalgia and brings back memories of fun fair days or spirited tailgate parties.

Personal Story/Connection

The first time I made Walking Taco Casserole was for a family movie night. I wanted something easy yet special, a dish that would make everyone gather around the dining table eagerly. The moment I placed the casserole on the table and saw the delight on everyone’s faces, I knew this was going to be a staple in our home. Bringing loved ones together over a delicious meal is a tradition I cherish, and this casserole has a special place in those moments.

Context/Background

The Walking Taco, also known as a Taco in a Bag, became popular at fairs and sporting events due to its convenient, no-fuss nature. Essentials like seasoned ground beef, cheese, and salsa are tossed into a bag of corn chips for a portable snack. Transforming this beloved street food into a casserole is a clever way to enjoy the same flavors in a more substantial, family-style dish.

Cooks everywhere have put their own spins on this dish over time, making it an adaptable favorite for any occasion. The Walking Taco Casserole represents a fun blend of practicality and creativity, showing how tradition can be effortlessly baked into new interpretations.

Tips for Perfect Walking Taco Casserole

  • Brown the beef thoroughly to build flavor, and be sure to drain excess fat to prevent a greasy end product.
  • When adding the taco seasoning, you can adjust spices for more heat or less as per preference.
  • For a creamier sauce, blend cheddar cheese soup and milk until fully smooth before topping the beef and Fritos.
  • Press the Fritos slightly into the bottom of the dish to form a crunchier base layer.
  • For a golden, crispy cheese topping, consider broiling the casserole for the last 2-3 minutes.

Serving Suggestions

This Walking Taco Casserole can be served as a stand-alone meal, bursting with enough flavor to satisfy any hunger. However, you can easily elevate your dining experience with playful and creative accompaniments. Top your casserole with diced tomatoes, shredded lettuce, or a dollop of sour cream for added freshness and color. Consider pairing it with a side of Mexican rice or a vibrant avocado salad for a more complete meal.

For a party or potluck, present the casserole with a toppings bar. Include bowls of guacamole, jalapeños, and salsa, allowing each guest to customize their serving. The vibrant variety makes for an exciting and interactive meal setup that’s perfect for casual gatherings.

Storage and Leftovers

For storing leftovers, cover the remaining casserole tightly with aluminum foil or transfer it to an airtight container. It can be refrigerated for up to 3 days. When reheating, use an oven preheated to 350°F, covering the dish with foil to prevent burning and maintaining moisture.

If you find yourself with an abundance of leftovers, consider repurposing them into tasty walking taco wraps. Simply scoop the casserole into flour tortillas, wrap them up, and enjoy with your favorite salsa or hot sauce drizzled on top.

Recipe Variations and Substitutions

For a healthier twist, substitute ground turkey or chicken for the beef. The lighter meat will pair perfectly with the bold flavors of the taco seasoning.

To make this dish vegetarian-friendly, replace the beef with a mix of black beans and corn. Add diced bell peppers for additional flavor and texture.

To create a spicier version, incorporate a can of diced green chilies or a dash of hot sauce into the cheese mixture for an added kick. Seasoning with smoked paprika can introduce a pleasant, smoky aroma.

FAQ

Can I make this ahead of time?
Absolutely! Prepare the casserole up to the baking step, cover, and refrigerate for up to a day. Bake it just before serving for fresh melty cheese.

What substitutions can I use for Chili cheese Fritos?
You can swap Fritos with any variety of flavored tortilla chips that you prefer, or even corn tostadas for a slightly different texture.

How do I make this gluten-free?
Ensure that your taco seasoning is gluten-free, and opt for gluten-free corn chips to convert the dish accordingly.

Optional Nutritional Information

  • Calories: Approximately 480 per serving
  • Protein: 25g
  • Carbohydrates: 35g
  • Fat: 28g

Final Thoughts

This Walking Taco Casserole is more than just a meal; it’s a blend of fun, flavor, and family-favorite vibes all in one dish. Whether it’s a lazy evening at home or a potluck with friends, this casserole stands out as a delightful and easy-to-make treat. Embrace the cheesy goodness and invite your loved ones to share in the joy this dish brings to the table. Don’t forget to let us know how it turns out and any creative twists you tried!

Recipe Section

Servings: 6 | Prep Time: 10 minutes | Cook Time: 30 minutes | Total Time: 40 minutes

  • 1 lb ground beef
  • 1 package taco seasoning
  • 2/3 cup water
  • 1 bag Chili cheese Fritos
  • 1 can cheddar cheese soup
  • 1/2 cup milk
  • 1 cup shredded mozzarella cheese
  1. Preheat the oven to 350°F.
  2. In a skillet over medium-high heat, cook the ground beef until browned. Drain any excess fat.
  3. Add taco seasoning and water to the skillet with the beef. Simmer for 5 minutes until the liquid is absorbed.
  4. In a 9×13 baking dish, layer Chili cheese Fritos on the bottom.
  5. Spread the cooked beef mixture evenly over the Fritos.
  6. In a small saucepan, heat the cheddar cheese soup and milk until creamy.
  7. Pour the cheese sauce over the beef and Fritos in the baking dish.
  8. Sprinkle mozzarella cheese on top.
  9. Bake in the preheated oven for 15-20 minutes, until the cheese is melted and bubbly.
  10. Serve hot and enjoy the delicious flavors!

#WalkingTacoCasserole #TacoNight #FamilyDinner #CheesyDelights

“`