“`html
Table of Contents
- Introduction to Chocolate Snowball Cookies
- Ingredients for Chocolate Snowball Cookies
- Timing is Everything
- How to Make Chocolate Snowball Cookies
- Nutritional Information for Chocolate Snowball Cookies
- Healthier Alternatives for Chocolate Snowball Cookies
- Serving Suggestions
- Common Mistakes to Avoid
- Storing Your Chocolate Snowballs
- Frequently Asked Questions About Chocolate Snowball Cookies
Chocolate Snowball Cookies: Your Go-To Holiday Treat!
Did you know that the average person consumes over 3 pounds of cookies during the holiday season? If you’re looking to add a decadent yet delightfully simple treat to your festive baking repertoire, you’ve landed in the right place! These Chocolate Snowball Cookies are poised to become your new holiday obsession. Infused with rich cocoa and a melt-in-your-mouth texture, they’re surprisingly easy to whip up, making them ideal for both seasoned bakers and kitchen novices.
Introduction to Chocolate Snowball Cookies
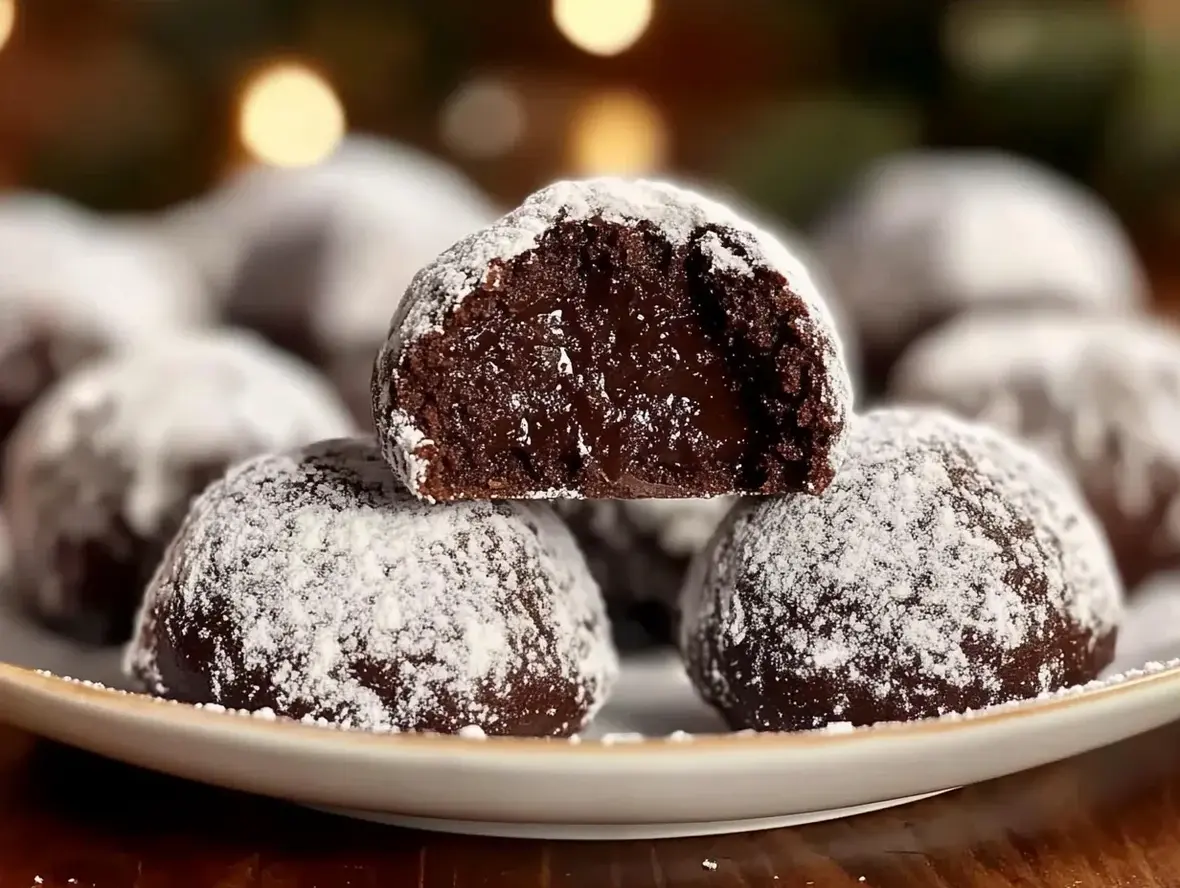
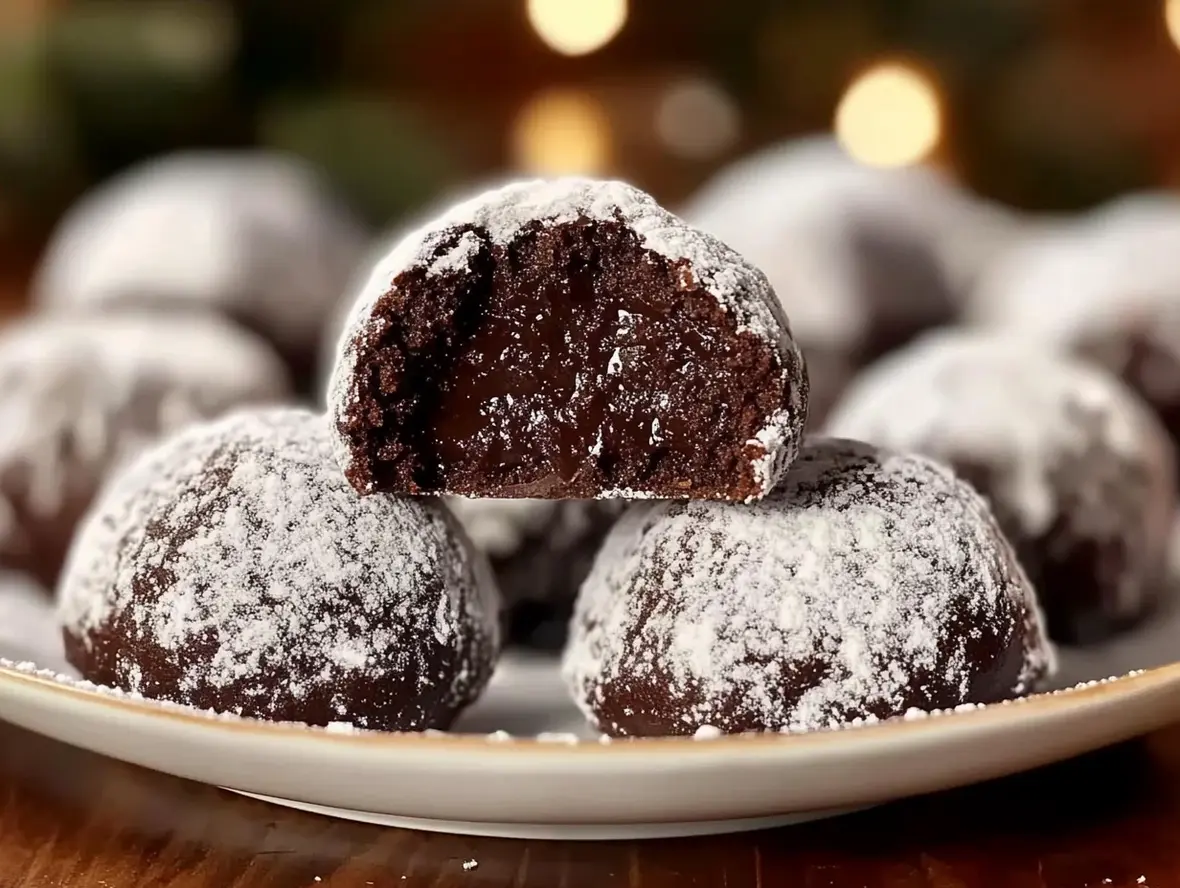
There’s something undeniably magical about holiday baking. The aroma of spices, the warmth of the oven, and, of course, the joy of sharing delicious homemade treats. Among the pantheon of festive cookies, the Chocolate Snowball Cookie stands out as a quiet, yet impactful, star. These aren’t your average crumbly cookies; they boast a unique tender texture, a deep chocolate flavor, and that signature dusted appearance that evokes freshly fallen snow. Perfect for cookie platters, edible gifts, or simply enjoying with a warm mug of cocoa, these cookies are designed to spread cheer effortlessly. Get ready to impress your guests and your family with this foolproof recipe that promises delightful results every single time. Let’s dive into creating these little gems of holiday joy!
Ingredients for Chocolate Snowball Cookies
The beauty of these Chocolate Snowball Cookies lies in their simplicity and the quality of ingredients you use. We’re aiming for a tender, slightly crumbly texture that melts in your mouth, complemented by a rich chocolate flavor. Here’s what you’ll need:
- 2 cups (250g) All-Purpose Flour: The backbone of our cookie. This provides structure. Substitution: You can use a gluten-free all-purpose flour blend, ensuring it contains xanthan gum for binding.
- 1/2 cup (45g) Unsweetened Cocoa Powder: For that deep, glorious chocolate flavor. Opt for a good quality cocoa for the best results, something that smells rich and intensely chocolatey. Substitution: Dutch-processed cocoa will yield a darker color and smoother flavor, but natural cocoa works beautifully too.
- 1/2 teaspoon Baking Soda: Our leavening agent, ensuring a slight lift without making the cookies cakey.
- 1/4 teaspoon Salt: A pinch of salt enhances all the flavors, especially the chocolate, and balances the sweetness.
- 1 cup (227g) Unsalted Butter, softened: Crucial for that melt-in-your-mouth texture. Make sure it’s truly softened to room temperature – yielding to the touch but not greasy. Substitution: You can use salted butter, but reduce the added salt to 1/8 teaspoon. For a dairy-free option, use a good quality vegan butter stick.
- 3/4 cup (150g) Granulated Sugar: Provides sweetness and contributes to the cookie’s tender structure.
- 1 teaspoon Vanilla Extract: Vanilla rounds out the chocolate flavor and adds a subtle aromatic complexity. Use pure vanilla extract for the best flavor.
- 1 Large Egg Yolk: Adds richness and helps bind the dough.
- 1/2 cup (60g) Powdered Sugar: For dusting the cooled cookies, giving them their iconic “snowball” look. Ensure it’s finely sifted for a smooth coating.
Timing is Everything
Compared to the average cookie recipe that often requires longer chilling or baking times, these Chocolate Snowball Cookies are delightfully quick. Most cookie recipes can take anywhere from 45 minutes to over an hour when factoring in chilling and baking multiple batches. Our speedy preparation and baking ensure you can have a batch ready with minimal fuss, leaving more time for festive preparations and enjoyment!
How to Make Chocolate Snowball Cookies
Ready to create some magic? Follow these simple steps for irresistibly delicious Chocolate Snowball Cookies:
Step 1: Cream the Butter and Sugar
In a large mixing bowl, beat the softened unsalted butter and granulated sugar together using an electric mixer on medium speed until light and fluffy. This typically takes about 2-3 minutes. The mixture should be pale yellow and visibly airy. This step is crucial for creating a tender cookie.
Step 2: Add the Wet Ingredients
Beat in the vanilla extract and the egg yolk until well combined. Scrape down the sides of the bowl as needed to ensure everything is incorporated. The mixture might look slightly curdled, which is perfectly normal.
Step 3: Combine the Dry Ingredients
In a separate medium bowl, whisk together the all-purpose flour, unsweetened cocoa powder, baking soda, and salt. Whisking them together ensures that the leavening agent and salt are evenly distributed, preventing pockets of bitterness or uneven rising.
Step 4: Form the Snowballs
Gradually add the dry ingredients to the wet ingredients, mixing on low speed until just combined. Be careful not to overmix, as this can lead to tough cookies. The dough will be thick and slightly sticky. Using a tablespoon or a small cookie scoop, scoop out portions of dough and roll them into balls, about 1 inch in diameter. Place these balls about 2 inches apart on parchment-lined baking sheets.
Step 5: Bake to Perfection
Preheat your oven to 350°F (175°C). Bake the cookie balls for 10-12 minutes, or until the edges are set and the centers appear slightly soft. They shouldn’t spread too much. They will continue to cook slightly from residual heat after being removed from the oven. Let them cool on the baking sheets for 5 minutes before transferring them to a wire rack to cool completely.
Step 6: The Final Dusting
Once the cookies are completely cool – this is important so the powdered sugar doesn’t melt – place the powdered sugar in a shallow bowl. Gently roll each cooled cookie in the powdered sugar until evenly coated. For an extra snowy effect, you can roll them a second time.
Nutritional Information for Chocolate Snowball Cookies
Please note that nutritional information is an estimate and can vary based on specific ingredients and portion sizes. This estimation is per cookie, assuming 24 cookies per batch.
- Calories: Approximately 120-150 kcal
- Fat: Approximately 7-9g
- Saturated Fat: Approximately 4-5g
- Carbohydrates: Approximately 15-18g
- Sugar: Approximately 10-12g
- Protein: Approximately 1-2g
- Fiber: Approximately 1g
Healthier Alternatives for Chocolate Snowball Cookies
Looking to make these treats a bit lighter without sacrificing flavor? Here are a few swaps:
- Flour: Substitute half of the all-purpose flour with whole wheat pastry flour for added fiber and nutrients.
- Sweetener: Reduce the granulated sugar slightly and consider using a touch of maple syrup or coconut sugar for a different flavor profile and potentially a lower glycemic impact.
- Fat: While butter is key to texture, you could experiment with using a portion of unsweetened applesauce or mashed ripe banana to replace some of the butter, though this will alter the texture and flavor slightly.
- Dusting: For a less sweet dusting, you can mix a bit of unsweetened cocoa powder with your powdered sugar, or use a very light dusting of the powdered sugar.
Serving Suggestions
These Chocolate Snowball Cookies are incredibly versatile. They are:
- Perfect alongside a steaming mug of hot chocolate or coffee.
- A delightful addition to any holiday cookie platter alongside gingerbread, sugar cookies, and shortbread.
- Wonderful as a sweet treat after a holiday dinner.
- Packaged in festive tins or cellophane bags as thoughtful edible gifts for friends, family, or neighbors.
Common Mistakes to Avoid
Even simple recipes have small pitfalls. Here’s how to steer clear:
- Overmixing the Dough: Overworking the flour develops gluten, leading to tough, chewy cookies instead of tender ones. Mix until just combined.
- Not Softening Butter Properly: Cold butter won’t cream well, resulting in a dense cookie. Melted butter will make them spread too much. Use room-temperature butter that yields to gentle pressure.
- Baking Too Long: These cookies are meant to be slightly soft in the center. Overbaking will result in dry, hard cookies. Watch them closely.
- Dusting While Warm: Powdered sugar will melt and create a sticky mess if applied to warm cookies. Ensure they are completely cool.
Storing Your Chocolate Snowballs
Proper storage is key to maintaining their delightful texture and appearance:
- Store completely cooled cookies in an airtight container at room temperature.
- Place parchment paper between layers of cookies to prevent them from sticking, especially if they’re still slightly powdery from the dusting.
- They generally stay fresh for about 4-5 days. For longer storage, you can freeze them in an airtight container for up to 2-3 months.
Frequently Asked Questions About Chocolate Snowball Cookies
***Can I add chocolate chips to these cookies?***
While you could add chocolate chips, it would change the classic texture and chocolate flavor profile of a snowball cookie. The idea is for the cookie dough itself to be chocolatey and then coated in powder, not to have chunks of chocolate. If you want chocolate chips, a different cookie recipe might be more suitable.
***Why are my snowball cookies spreading too much?***
Spreading can be caused by several factors: the butter being too soft or melted, too much sugar, or not enough flour. Ensure your butter is at room temperature but not greasy, and measure your flour accurately (spoon and level it into the cup, don’t scoop directly with the measuring cup).
***Can I make these cookies dairy-free?***
Yes, you can make them dairy-free by using a high-quality vegan butter stick in place of unsalted butter. Ensure your other ingredients like cocoa powder are also dairy-free.
***How do I get that perfect snowball shape?***
Using a cookie scoop or a tablespoon to portion the dough and then gently rolling it between your palms helps create uniform, round shapes. Don’t overwork the dough when rolling, as it can make them tough.
***Can I skip the egg yolk?***
The egg yolk adds richness and tenderness. Skipping it might result in a slightly drier, less decadent cookie. If you need to omit it, you might try adding an extra tablespoon of softened butter, but the texture will likely change.
There you have it – the ultimate guide to creating delightful Chocolate Snowball Cookies! They are a testament to how simple ingredients can come together to create something truly special, especially during the festive season. Whether you’re a seasoned baker or just starting out, this recipe is designed for success and guaranteed to bring smiles.
Don’t wait for the holidays to roll around! Whip up a batch this weekend and experience the joy. And if you try this recipe, we’d love to hear about it! Share your creations in the comments below or tag us on social media. Happy baking!
Print
Chocolate Snowball Cookies
Description
TheseChocolate Snowball Cookiesare buttery, melt-in-your-mouth treats with a rich cocoa flavor and a snowy powdered sugar coating. Perfect for the holidays or any occasion, these cookies are easy to make and customizable for gluten-free or nut-free diets.
Ingredients
- 1 cupunsalted butter, softened½ cuppowdered sugar (plus extra for rolling)1 teaspoonvanilla extract2 cupsall-purpose flour¼ cupcocoa powder½ teaspoonsalt1 cupfinely chopped nuts (optional, such as pecans or walnuts)
- ½ cuppowdered sugar (plus extra for rolling)1 teaspoonvanilla extract2 cupsall-purpose flour¼ cupcocoa powder½ teaspoonsalt1 cupfinely chopped nuts (optional, such as pecans or walnuts)
- 1 teaspoonvanilla extract2 cupsall-purpose flour¼ cupcocoa powder½ teaspoonsalt1 cupfinely chopped nuts (optional, such as pecans or walnuts)
- 2 cupsall-purpose flour¼ cupcocoa powder½ teaspoonsalt1 cupfinely chopped nuts (optional, such as pecans or walnuts)
- ¼ cupcocoa powder½ teaspoonsalt1 cupfinely chopped nuts (optional, such as pecans or walnuts)
- ½ teaspoonsalt1 cupfinely chopped nuts (optional, such as pecans or walnuts)
- 1 cupfinely chopped nuts (optional, such as pecans or walnuts)
Instructions
- 1️⃣Prepare the Oven and Baking Sheet:Preheat your oven to 350°F (175°C). Line a baking sheet with parchment paper.2️⃣Mix the Dough:In a large mixing bowl, cream the softened butter and powdered sugar together until light and fluffy. Mix in the vanilla extract.3️⃣Add Dry Ingredients:Gradually sift in the flour, cocoa powder, and salt. Mix until the dough is smooth and fully combined.4️⃣Fold in Nuts (Optional):If using nuts, gently fold them into the dough until evenly distributed.5️⃣Shape the Cookies:Roll the dough into 1-inch balls and place them on the prepared baking sheet, leaving about 1 inch of space between each cookie.6️⃣Bake the Cookies:Bake in the preheated oven for 12–15 minutes, or until the edges are set. Allow the cookies to cool on the baking sheet for 5 minutes.7️⃣Add the “Snow” Coating:While the cookies are still warm, roll them in powdered sugar for the first snowy coating. Once cooled, roll them again in powdered sugar for a festive, snowball-like finish.
- 2️⃣Mix the Dough:In a large mixing bowl, cream the softened butter and powdered sugar together until light and fluffy. Mix in the vanilla extract.
- 3️⃣Add Dry Ingredients:Gradually sift in the flour, cocoa powder, and salt. Mix until the dough is smooth and fully combined.4️⃣Fold in Nuts (Optional):If using nuts, gently fold them into the dough until evenly distributed.5️⃣Shape the Cookies:Roll the dough into 1-inch balls and place them on the prepared baking sheet, leaving about 1 inch of space between each cookie.6️⃣Bake the Cookies:Bake in the preheated oven for 12–15 minutes, or until the edges are set. Allow the cookies to cool on the baking sheet for 5 minutes.7️⃣Add the “Snow” Coating:While the cookies are still warm, roll them in powdered sugar for the first snowy coating. Once cooled, roll them again in powdered sugar for a festive, snowball-like finish.
- 4️⃣Fold in Nuts (Optional):If using nuts, gently fold them into the dough until evenly distributed.5️⃣Shape the Cookies:Roll the dough into 1-inch balls and place them on the prepared baking sheet, leaving about 1 inch of space between each cookie.6️⃣Bake the Cookies:Bake in the preheated oven for 12–15 minutes, or until the edges are set. Allow the cookies to cool on the baking sheet for 5 minutes.7️⃣Add the “Snow” Coating:While the cookies are still warm, roll them in powdered sugar for the first snowy coating. Once cooled, roll them again in powdered sugar for a festive, snowball-like finish.
- 5️⃣Shape the Cookies:Roll the dough into 1-inch balls and place them on the prepared baking sheet, leaving about 1 inch of space between each cookie.
- 6️⃣Bake the Cookies:Bake in the preheated oven for 12–15 minutes, or until the edges are set. Allow the cookies to cool on the baking sheet for 5 minutes.7️⃣Add the “Snow” Coating:While the cookies are still warm, roll them in powdered sugar for the first snowy coating. Once cooled, roll them again in powdered sugar for a festive, snowball-like finish.
- 7️⃣Add the “Snow” Coating:While the cookies are still warm, roll them in powdered sugar for the first snowy coating. Once cooled, roll them again in powdered sugar for a festive, snowball-like finish.
Notes
For a festive twist, add a pinch of cinnamon or peppermint extract to the dough.Store the cookies in an airtight container for up to a week or freeze for longer storage.
Store the cookies in an airtight container for up to a week or freeze for longer storage.
“`
