“`html
Table of Contents
Decadent Black Velvet Cake – Your Next Easy Dessert Obsession!
Introduction
Welcome, dessert lovers! Are you on the hunt for a dessert that’s as visually stunning as it is delicious? Many home bakers find themselves searching for a show-stopping cake recipe that’s surprisingly easy to make, especially for special occasions. If you’re nodding along, then get ready to have your dessert dreams come true with this Luxurious Black Velvet Cake! This recipe is the perfect fusion of a rich, deeply chocolatey cake and a breathtaking visual appeal, creating a dessert that’s sure to be the star of any gathering, from intimate dinner parties to grand celebrations. Forget complicated techniques; we’re diving into a masterpiece that’s accessible to bakers of all levels. Let’s dive into this irresistible concoction and unlock the secrets to its deep, dark allure and unbelievably tender crumb!
Ingredients List
Crafting this cake is an indulgence in itself, with ingredients that promise a symphony of rich flavors and a divinely tender texture. Gather these treasures to begin your baking adventure:
- All-Purpose Flour: 2 cups, sifted. This provides the cake’s tender structure. If you prefer a lighter crumb, consider cake flour.
- Granulated Sugar: 1 ¾ cups. For that perfect sweetness and moisture.
- Unsweetened Cocoa Powder: ¾ cup. Use a good quality Dutch-processed cocoa for the deepest, darkest color and a smooth, rich chocolate flavor.
- Baking Soda: 1 ½ teaspoons. This is our leavening agent, working with the acidic components to give the cake its lift.
- Salt: 1 teaspoon. Enhances all the flavors and balances the sweetness.
- Balsamic Vinegar: 2 teaspoons. Don’t be alarmed! It reacts with the baking soda to create a uniquely tender crumb and subtle depth of flavor, without tasting like vinegar.
- Vanilla Extract: 2 teaspoons. A classic flavor enhancer that complements chocolate beautifully.
- Vegetable Oil: ½ cup. For incredible moisture and a tender crumb. Canola or a neutral-flavored oil works too.
- Buttermilk: 1 cup, at room temperature. The acidity of buttermilk reacts with baking soda for tenderness and moisture. If you don’t have buttermilk, simply add 1 tablespoon of lemon juice or white vinegar to 1 cup of milk and let it sit for 5-10 minutes.
- Food Coloring (Black Gel): 1-2 tablespoons, or to desired shade. This is key for the “Black” velvet effect. Gel coloring is concentrated and won’t dilute the batter.
- Eggs: 2 large, at room temperature. They bind the ingredients and add richness.
- Hot Coffee or Hot Water: 1 cup. This blooms the cocoa powder, intensifying its flavor and aroma, and creates a super moist cake.
Timing
On average, a standard layer cake recipe can take around 1 hour to 1 hour 30 minutes from start to finish. Our Black Velvet Cake is designed for efficiency, coming in at under an hour, making it perfect for those spontaneous dessert cravings or when you’re short on time!
Step-by-Step Instructions
Step 1: Preheat and Prepare
First things first, let’s get our oven ready. Preheat it to 350°F (175°C). Grease and flour two 8-inch or 9-inch round cake pans. For an extra layer of non-stick insurance and easier release, you can also line the bottoms of the pans with parchment paper circles.
Step 2: The Dry Ingredients
In a large mixing bowl, whisk together the sifted all-purpose flour, granulated sugar, unsweetened cocoa powder, baking soda, and salt. Whisking thoroughly ensures that all the leavening agents and cocoa are evenly distributed throughout the flour, preventing any pockets of bitterness or uneven rise.
Step 3: The Wet Ingredients
In a separate medium bowl, whisk together the eggs and vanilla extract until well combined. Then, gradually whisk in the vegetable oil, buttermilk, balsamic vinegar, and the black gel food coloring until the mixture is smooth and a uniform, deep black hue. Don’t worry if the color seems intensely dark; it will bake to a perfect velvety black.
Step 4: Combining the Magic
Pour the wet ingredients into the bowl with the dry ingredients. Mix on low speed (or by hand) until just combined. Be careful not to overmix at this stage – overmixing can develop the gluten in the flour, leading to a tougher cake.
Step 5: The Secret to Velvet Texture
Now comes the special ingredient for that signature moistness and deep flavor: the hot coffee (or hot water). Gradually pour the hot liquid into the batter while mixing on low speed. The batter will become quite thin – this is perfectly normal! It’s what contributes to the cake’s incredibly tender and moist crumb. Whisk until everything is smoothly incorporated.
Step 6: Baking to Perfection
Divide the thin batter evenly between the two prepared cake pans. Bake for 30-35 minutes, or until a wooden skewer or toothpick inserted into the center of the cakes comes out clean. Keep an eye on it towards the end of the baking time, as ovens can vary.
Step 7: Cooling and Finishing Touches
Once baked, let the cakes cool in their pans for about 10-15 minutes before inverting them onto a wire rack to cool completely. Ensure they are fully cooled before frosting; warm cakes will melt your frosting!
Nutritional Information
While this cake is a decadent treat, it’s good to have an idea of what you’re indulging in. Please note that these are approximate values and can vary based on exact ingredients and portion size. Frosting and toppings will significantly alter these numbers.
- Calories: Approx. 350-400 per serving (without frosting)
- Fat: Approx. 15-20g
- Carbohydrates: Approx. 50-60g
- Protein: Approx. 4-6g
- Sugar: Approx. 30-40g
Healthier Alternatives
Looking to lighten up this luxurious treat without sacrificing its signature flavor and texture? Here are a few swaps:
- Reduced Sugar: Try reducing the granulated sugar by ¼ cup. The cake will still be delicious, though slightly less sweet.
- Whole Wheat Pastry Flour: Substitute half of the all-purpose flour with whole wheat pastry flour for added fiber.
- Unsweetened Applesauce: Replace half of the oil with unsweetened applesauce for a lower-fat, moist cake.
- Plant-Based Milk & Vinegar: Use a dairy-free milk (like almond or soy) and a vegan butter substitute or oil for a dairy-free version.
- Natural Food Coloring: For a less intense black, you can try using natural black food coloring derived from vegetable sources, though the color may not be as dramatic.
Serving Suggestions
The Black Velvet Cake is a canvas ready for your creativity! Here are some ideas to make it even more spectacular:
- Classic Cream Cheese Frosting: This is the traditional pairing and for good reason! The tangy cream cheese frosting is the perfect counterpoint to the rich chocolate cake.
- Whipped Cream with Berries: For a lighter touch, a dollop of fresh whipped cream and a scattering of vibrant raspberries or strawberries adds freshness and color.
- Chocolate Ganache: For the ultimate chocolate lover, a rich, dark chocolate ganache poured over the cooled cake is pure bliss.
- Edible Glitter or Sprinkles: For celebrations, a dusting of edible glitter or some festive sprinkles can add a touch of magic.
- Serve with Coffee or Liqueur: A strong cup of coffee or a small glass of Kahlua or Baileys makes for an elegant after-dinner pairing.
Common Mistakes to Avoid
Even the simplest recipes can have a few pitfalls. Here’s how to ensure your Black Velvet Cake is always a triumph:
- Overmixing the Batter: Once the wet and dry ingredients are combined, mix only until just incorporated. Overmixing develops gluten, leading to a tough cake.
- Using Room Temperature Ingredients: Ensure your eggs and buttermilk are at room temperature. This helps them emulsify better with the other ingredients for a smoother batter and a more consistent bake.
- Not Using Gel Food Coloring: Liquid food coloring can alter the batter’s consistency and dilute the color. Gel or paste food coloring is concentrated and ideal for rich, vibrant hues.
- Opening the Oven Door Too Soon: Resist the urge to check on the cake within the first 20-25 minutes. Opening the oven door can cause the cake to sink.
- Frosting a Warm Cake: Patience is key! Ensure your cakes are completely cool before frosting to prevent a melty, messy disaster.
Storing Tips
To keep your beautiful Black Velvet Cake at its best:
- At Room Temperature: If unfrosted or frosted with a buttercream or ganache that doesn’t require refrigeration, store the cake in an airtight container at room temperature for up to 3 days.
- Refrigerated: If using cream cheese frosting or if your kitchen is particularly warm, it’s best to store the cake in the refrigerator. Let it come to room temperature for about 20-30 minutes before serving for optimal flavor and texture.
- Freezing: The unfrosted cake layers can be individually wrapped tightly in plastic wrap and then foil, and frozen for up to 2-3 months. Thaw overnight in the refrigerator, then bring to room temperature before frosting.
FAQs
***What makes it “Black Velvet”?***
The term “Black Velvet” refers to the cake’s extremely dark, almost black color, achieved through the use of a significant amount of cocoa powder and black gel food coloring, combined with its incredibly smooth, tender, and moist texture, reminiscent of velvet.
***Can I use natural cocoa powder instead of Dutch-processed?***
Yes, you can, but Dutch-processed cocoa powder will yield a darker color and a smoother, less bitter chocolate flavor. Natural cocoa powder is more acidic and will react differently with the baking soda, potentially affecting the lift and color slightly.
***My batter seems very thin. Is this normal?***
Absolutely! The thinness of the batter is intentional. The hot liquid (coffee or water) “blooms” the cocoa, intensifies the chocolate flavor, and contributes to the cake’s signature moist and velvety texture. Don’t be alarmed by its consistency.
***Can I make cupcakes with this recipe?***
Yes, this recipe makes excellent Black Velvet cupcakes! Line muffin tins with cupcake liners and fill them about two-thirds full. Baking time will be shorter, typically 18-22 minutes. Test for doneness with a toothpick.
***How do I get my Black Velvet cake to be truly black?***
The key is using a high-quality black gel food coloring. Apply it gradually until you achieve your desired deep hue. Remember that the cocoa powder also contributes to the dark color. Natural food colorings might not achieve the same intensity.
Conclusion
There you have it – a show-stopping, incredibly moist, and deeply flavorful Black Velvet Cake that’s surprisingly easy to master. This recipe is more than just a dessert; it’s an experience. It’s perfect for making any occasion feel extra special, or simply for treating yourself to something truly decadent. We hope you fall in love with its rich complexity and velvety texture. So, go ahead, preheat your oven, gather your ingredients, and prepare to impress yourself and your loved ones with this magnificent creation. Your kitchen is about to fill with the irresistible aroma of pure chocolate bliss, and your taste buds are in for an unforgettable journey. Happy baking!
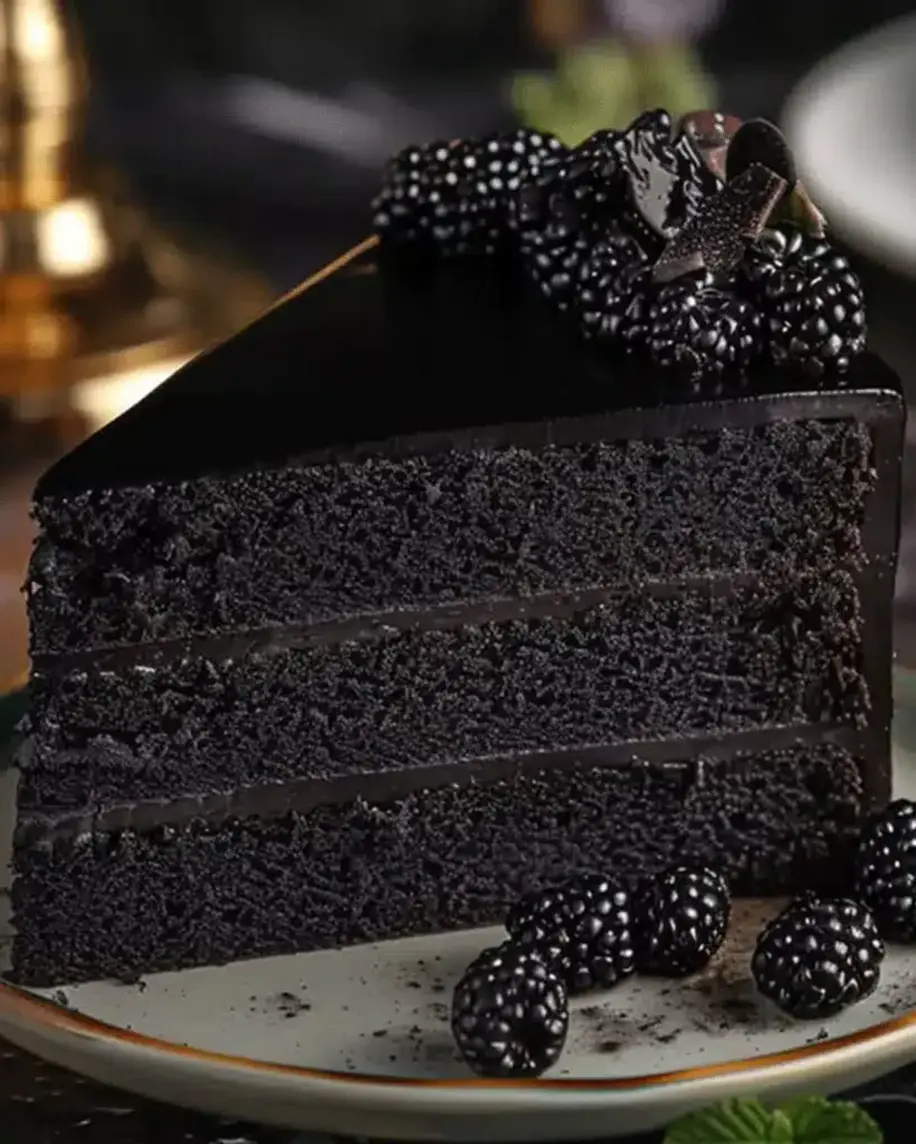
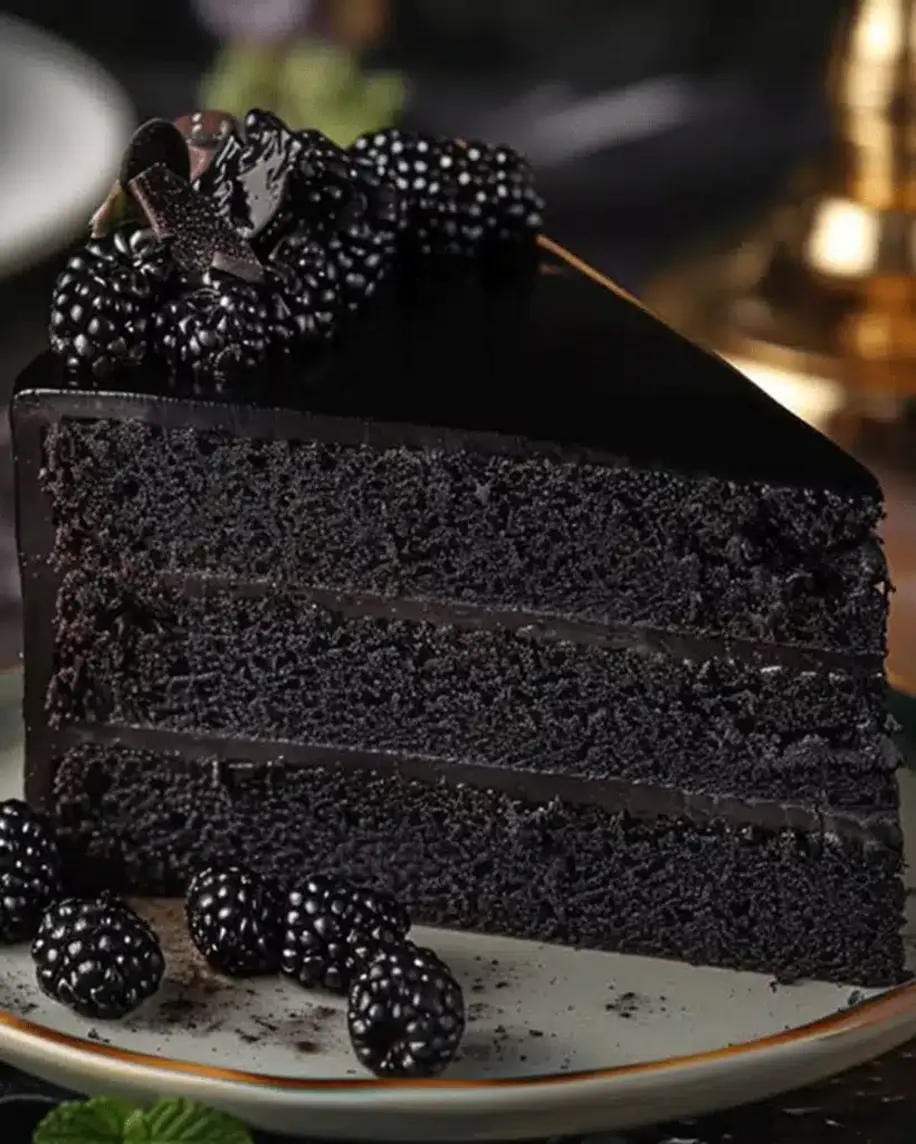
Luxurious Black Velvet Cake – Easy Dessert Recipe
Description
Welcome, dessert lovers! Are you ready to indulge in the elegance and decadence of a Luxurious Black Velvet Cake? This recipe is the perfect fusion of a rich chocolate cake and a stunning visual appeal, making it a standout choice for celebrations or a cozy dinner party. Let’s dive into this irresistible masterpiece!
Ingredients
- 2 cupsall-purpose flour
- 2 cupsgranulated sugar
- 1 cupunsweetened cocoa powder
- 2 teaspoonsbaking powder
- 1 1/2 teaspoonsbaking soda
- 1 teaspoonsalt
- 1 cupbuttermilk (room temperature)
- 1/2 cupvegetable oil
- 2large eggs (room temperature)
- 2 teaspoonsvanilla extract
- 1 cupboiling water
- 1/2 cupblack food coloring gel
- 1 cupunsalted butter (softened)
- 4 cupspowdered sugar
- 1/2 cupunsweetened cocoa powder
- 1/4 cupheavy cream
- 2 teaspoonsvanilla extract
- 1/2 cupblackberry preserves
- Fresh blackberries
- Dark chocolate shavings
- Fresh mint leaves
Instructions
- Preheat your oven to 350°F (175°C). Grease and flour three 8-inch round cake pans.
- In a large mixing bowl, sift together the flour, sugar, cocoa powder, baking powder, baking soda, and salt.
- In another bowl, whisk buttermilk, vegetable oil, eggs, and vanilla extract. Gradually combine the wet mixture with the dry ingredients.
- Slowly mix in the boiling water and black food coloring gel until the batter is smooth.
- Divide the batter evenly among the prepared pans. Bake for 30-35 minutes or until a toothpick inserted in the center comes out clean. Let the cakes cool for 10 minutes before transferring them to wire racks.
- Beat the butter until creamy. Gradually add powdered sugar, cocoa powder, heavy cream, and vanilla extract. Continue beating until light and fluffy.
- Spread a layer of blackberry preserves between each cake layer. Frost the top and sides with the chocolate frosting.
- Decorate with fresh blackberries, dark chocolate shavings, and mint leaves.
Notes
Use room-temperature ingredients for a smoother batter.
Sift cocoa powder to avoid lumps in the cake and frosting.
For an extra moist cake, wrap each layer in plastic wrap and refrigerate overnight before frosting.
“`
