Table of Contents
- Luscious Lemon-Lime Cherry Pistachio Cheesecake: The Only Recipe You’ll Ever Need
- Why This Luscious Lemon-Lime Cherry Pistachio Cheesecake Recipe is a Game-Changer
- Ingredient Spotlight: Quality Makes the Difference
-
Step-by-Step Instructions
- Step 1: Preparing the Graham Cracker Crust Base
- Step 2: Creating the Luscious Cheesecake Filling
- Step 3: Incorporating Flavor and Richness
- Step 4: Folding in the Fruity and Nutty Goodness
- Step 5: Baking the Cheesecake to Perfection
- Step 6: The Crucial Cooling Process
- Step 7: Chilling for Ultimate Texture and Flavor
- Serving & Presentation
- Make-Ahead & Storage Solutions
-
Frequently Asked Questions (FAQ)
- How do I prevent my cheesecake from cracking when baking?
- What’s the best way to de-glaze the pan after baking the crust?
- Can I use a different type of nut instead of pistachios in this cheesecake?
- What’s a good alternative to cream cheese for a dairy-free version?
- How do I get a super smooth cheesecake texture?
- Can I make this a no-bake cheesecake?
- What is the role of zest vs. juice in this cheesecake?
Luscious Lemon-Lime Cherry Pistachio Cheesecake: The Only Recipe You’ll Ever Need
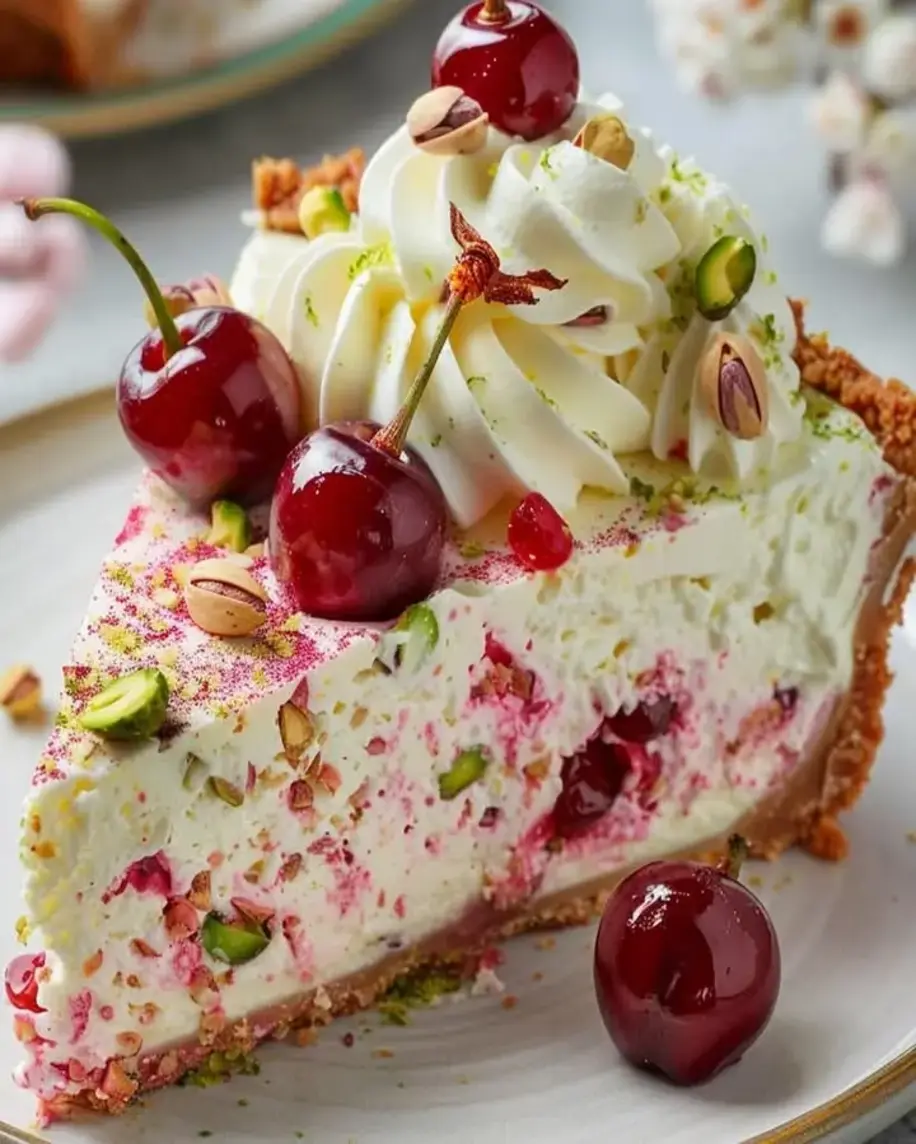
If you’ve ever dreamed of a dessert that sings with bright, zesty citrus, bursts with the sweet tang of cherries, and offers delightful crunch from nutty pistachios, then prepare yourself for pure bliss. The Lemon Lime Cherry Pistachio Cheesecake is here to steal the show! Forget dry, bland cheesecakes; this masterpiece is designed to be your go-to for any occasion, from casual gatherings to elegant celebrations. We’ve perfected every element to ensure a symphony of flavors and textures that will leave your guests begging for the recipe. This isn’t just another cheesecake; it’s a vibrant, refreshing, and utterly addictive culinary creation that truly stands out.
Imagine the silken smooth, decadently rich cheesecake filling, infused with the invigorating zest and juice of fresh lemon and lime. It’s a perfect dance of tartness that cuts through the creaminess, preventing it from becoming too heavy. Then, the sweet, jewel-toned cherries add bursts of fruity sweetness, while the emerald green pistachios offer a satisfying, subtle crunch and an earthy depth. The crushed graham cracker crust, baked to golden perfection, provides the ideal foundation, creating a textural contrast that makes every single bite an adventure. This is a dessert that tantalizes the taste buds and delights the senses with every forkful.
At cookingwithemy.com, we believe in empowering home cooks with recipes that are not only delicious but also achievable. This Lemon Lime Cherry Pistachio Cheesecake recipe has been meticulously tested to guarantee stunning results, even for novice bakers. We’re revealing Chef Sally’s secret for an unbelievably creamy texture and a perfectly set cheesecake every single time. Get ready to impress yourself and everyone you share this with. You’ll learn not just how to make this incredible cheesecake, but also invaluable tips and tricks that will elevate your baking game for good. This is your ultimate guide to the perfect fruit and nutty cheesecake experience.
Why This Luscious Lemon-Lime Cherry Pistachio Cheesecake Recipe is a Game-Changer
The Chef’s Secret: The Power of Balanced Citrus and Ultra-Creamy Filling
The truly magical element that elevates this Lemon Lime Cherry Pistachio Cheesecake from merely good to absolutely divine is the brilliant, balanced use of fresh lemon and lime juices and zests. This isn’t just about adding a hint of flavor; it’s about creating a deeply integrated citrus profile that cuts through the richness of the cream cheese, preventing the cheesecake from feeling overwhelmingly decadent. We achieve an unparalleled creaminess by ensuring the cream cheese is perfectly softened and by adding the sour cream at the right stage, which contributes a subtle tang and moisture. The key is the gentle folding in of the cherries and pistachios after the batter is smooth, ensuring they are beautifully distributed without compromising the velvety texture of the cheesecake itself. This thoughtful approach to flavor and texture is our “Chef’s Secret” to a truly unforgettable cheesecake experience.
Unbeatable Texture: The Science Behind the Silky Smoothness
The sublime, velvety texture of this cheesecake is no accident. We rely on the magic of softened cream cheese beating with sugar until it’s incredibly smooth. Softened cream cheese allows for proper aeration and emulsification, creating a base that is less prone to lumps. Adding the eggs one at a time ensures they are fully incorporated without overmixing, which can lead to a tougher texture. Sour cream is crucial here; its higher fat content and acidity contribute to a denser, richer mouthfeel and also help tenderize the cheesecake. The precise baking time and the crucial resting period in the oven are designed to cook the cheesecake gently, setting the protein in the eggs without curdling them, leading to that signature, melt-in-your-mouth, incredibly creamy interior. This careful combination guarantees a smooth, luxurious texture that delights with every bite.
Foolproof for a Reason: Tested for Guaranteed Deliciousness
We understand that cheesecake can sometimes seem intimidating, but this recipe is designed for success, every single time. It has undergone rigorous testing in the cookingwithemy kitchens to ensure that the instructions are clear, precise, and lead to a beautiful, delicious outcome for cooks of all skill levels. From the perfectly pressed graham cracker crust to the beautifully set, crack-free filling, we’ve ironed out all the potential pitfalls. You’ll find our detailed instructions and pro tips, like the importance of softened cream cheese and gentle oven cooling, are your roadmap to a confident bake. This is more than just a recipe; it’s a promise of a delightful, stress-free cheesecake-making experience that you can rely on for any gathering.
Ingredient Spotlight: Quality Makes the Difference
Graham Cracker Crumbs
These form the golden foundation of our cheesecake. For the best flavor and binding, use finely ground graham cracker crumbs. You can buy them pre-made or easily make your own by pulsing about 10-12 whole graham crackers in a food processor until they form fine crumbs. The quality of your graham crackers will directly impact the sweetness and texture of your crust, so opt for good quality ones. If you’re looking for a gluten-free option, simply substitute gluten-free graham crackers or digestive biscuits.
Unsalted Butter
Melted butter is the glue that holds our graham cracker crust together, providing richness and helping it crisp up beautifully. Unsalted butter is preferred because it allows you to control the saltiness of the recipe. For a truly exceptional crust with even more depth, consider browning your butter slightly before melting it. This adds a wonderful nutty aroma and flavor that complements the cheesecake filling perfectly. Ensure the butter is fully melted and slightly cooled before mixing with the crumbs to avoid making them greasy.
Cream Cheese
The star of any cheesecake! For an ultra-creamy and smooth filling, it is absolutely crucial to use full-fat block cream cheese that has been softened to room temperature. This ensures it creams beautifully with the sugar, without lumps. Avoid using reduced-fat cream cheese or spreadable cream cheese from a tub, as they contain more water and stabilizers that can affect the texture and setting of your cheesecake. Always let your cream cheese sit out for at least 1-2 hours to soften properly.
Granulated Sugar
Sugar not only sweetens the cheesecake but also plays a vital role in its texture. It helps to create a tender crumb and contributes to the overall smooth consistency by tenderizing the cream cheese. Use standard granulated white sugar for this recipe. While you can experiment with other sugars for variations, for this specific recipe, granulated sugar ensures the ideal balance of sweetness and texture without interfering with the bright citrus notes or the delicate flavors of the fruit and nuts.
Large Eggs
Eggs are essential binders in cheesecake, providing structure and richness. They contribute to the creamy texture and help the cheesecake set as it bakes. It’s important to use large eggs as this is the standard size measured in most recipes. For the best incorporation and to prevent the batter from curdling, add them one at a time and beat until just combined after each addition. Using room temperature eggs will also help them blend more smoothly into the cream cheese mixture.
Sour Cream
Sour cream is a secret weapon for achieving that signature ultra-creamy, almost luscious texture in cheesecakes. Its tanginess also beautifully balances the sweetness and complements the bright citrus flavors. Use full-fat sour cream for the best results. If you don’t have sour cream on hand, full-fat plain Greek yogurt is an excellent substitute, offering a similar tang and creamy consistency. Ensure it’s at room temperature to meld seamlessly with the other ingredients.
Fresh Lemon Juice & Zest
This is where the “Luscious” in our cheesecake truly shines! Fresh lemon juice provides a bright, zesty tartness that cuts through the richness of the cream cheese. The zest, containing the aromatic oils from the peel, adds an intense, fragrant lemon flavor that is far superior to juice alone. Always use fresh lemons for the best flavor. The combination of juice and zest ensures a vibrant, authentic citrus punch that is integral to this recipe’s refreshing profile.
Fresh Lime Juice & Zest
Complementing the lemon, fresh lime juice adds another layer of vibrant, zesty flavor, offering a slightly different, more tropical tartness. Like the lemon, lime zest contributes aromatic oils that amplify the citrus notes, creating a complex and invigorating flavor profile. Using both lemon and lime is key to achieving the unique, refreshing taste of this particular cheesecake. Again, fresh is best; bottled juices can lack the brightness and can sometimes taste artificial, detracting from the overall quality.
Pitted Cherries, Chopped
Sweet cherries add delightful bursts of fruity flavor and a beautiful pop of color throughout the cheesecake. For the best results, use fresh, ripe cherries and pit them yourself. If fresh cherries are out of season, you can use good quality frozen cherries (thawed and well-drained to remove excess moisture) or even maraschino cherries for a sweeter, more classic taste, though fresh offers a more natural sweetness. Ensure they are chopped into manageable pieces so you get them in every bite.
Pistachios, Chopped
Chopped pistachios provide a delightful textural contrast with their subtle crunch and a lovely, mild, nutty flavor that pairs wonderfully with the citrus and cherry. For the best visual appeal and flavor, use unsalted, shelled pistachios that are lightly toasted. Toasting them brings out their natural oils and enhances their taste. Raw pistachios can be used, but toasting makes a noticeable difference. If you have a pistachio allergy or simply want a different nutty flavor, slivered almonds or chopped pecans would also work well.
Step-by-Step Instructions
Step 1: Preparing the Graham Cracker Crust Base
In a medium bowl, combine the graham cracker crumbs with 1/4 cup of granulated sugar. Pour in the melted unsalted butter and stir until the crumbs are evenly moistened and resemble wet sand. This mixture is the foundation of your cheesecake, so ensure it’s well combined. Press this mixture firmly and evenly into the bottom of your prepared 9-inch springform pan. Using the flat bottom of a glass or a measuring cup can help you create a compact and even layer. This even distribution is key to a stable crust that won’t crumble.
Pro Tip: Bake the crust for 10 minutes at 325°F (163°C) before filling. This pre-baking step toasts the crumbs slightly, making the crust firmer, more flavorful, and less likely to get soggy from the cheesecake batter. Let it cool completely before adding the filling.
Step 2: Creating the Luscious Cheesecake Filling
In a large mixing bowl, beat the softened cream cheese and 1 cup of granulated sugar with an electric mixer on medium speed until the mixture is completely smooth and creamy, with no lumps. This step is crucial for a silky-smooth cheesecake texture. Scrape down the sides of the bowl frequently to ensure everything is incorporated evenly.
Common Mistake to Avoid: Overmixing the batter after adding eggs. Once the eggs are in, mix on low speed until just combined. Overbeating can incorporate too much air, which can lead to cracks in your cheesecake as it bakes and cools.
Step 3: Incorporating Flavor and Richness
Add the large eggs one at a time to the cream cheese mixture, beating on low speed just until each egg is incorporated before adding the next. Next, gently mix in the sour cream, fresh lemon juice, fresh lime juice, lemon zest, and lime zest. Continue to mix on low speed until all ingredients are just blended. The mixture should be smooth and luxurious. Be careful not to overmix at this stage; you want a cohesive batter that will set beautifully.
Pro Tip: Ensure all your dairy ingredients (cream cheese, sour cream) are at room temperature. This helps them emulsify properly, preventing a lumpy batter and ensuring a consistently creamy cheesecake.
Step 4: Folding in the Fruity and Nutty Goodness
Now for the star additions! Gently fold the chopped cherries and chopped pistachios into the cheesecake batter using a rubber spatula. Fold just until they are evenly distributed throughout the mixture. This step adds delightful bursts of flavor and texture to every slice. Be careful not to overmix, as you want to maintain the smooth consistency of the batter while ensuring the cherries and nuts are well distributed.
Common Mistake to Avoid: Adding the fruit and nuts too aggressively or folding them into an overmixed batter. This can cause them to sink to the bottom or break down, affecting the texture. A gentle, even fold is key.
Step 5: Baking the Cheesecake to Perfection
Pour the prepared batter evenly over the cooled graham cracker crust in the springform pan. Smooth the top with your spatula to ensure an even surface. Place the springform pan on a baking sheet (this will catch any potential drips and make it easier to transfer). Bake in a preheated oven at 325°F (163°C) for 55-60 minutes, or until the edges are set and the center is still slightly jiggly when gently shaken. This slight jiggle is perfectly normal and indicates a creamy interior.
Pro Tip: For even baking and to prevent the edges from overcooking, you can wrap the bottom and sides of your springform pan securely with heavy-duty aluminum foil before placing it on the baking sheet. This acts as a water bath for the cheesecake, promoting gentle cooking and minimizing the risk of cracks.
Step 6: The Crucial Cooling Process
This is perhaps the most critical step for a perfectly set, crack-free cheesecake. Once the baking time is up, turn off the oven but leave the cheesecake inside. Prop the oven door open slightly with a wooden spoon. Let the cheesecake cool in the oven for 1 hour. This gradual cooling process prevents a sudden temperature change that can cause cracking. After the hour, carefully remove the cheesecake from the oven and let it cool completely on a wire rack at room temperature before proceeding to refrigerate it.
Common Mistake to Avoid: Removing the cheesecake from the oven too soon or from the hot oven directly to a cold surface. This rapid temperature fluctuation is the primary cause of cheesecake cracking. Patience during the cooling phase is key!
Step 7: Chilling for Ultimate Texture and Flavor
Once the cheesecake has cooled to room temperature, cover it loosely with plastic wrap (avoid touching the surface directly, to prevent condensation marks) and refrigerate for at least 4 hours, or preferably overnight. This chilling period is essential for the cheesecake to fully set, allowing the flavors to meld and deepen, and for its texture to become firm and creamy. The longer it chills, the better the flavor and texture will be.
Pro Tip: For the best flavor and texture, chill overnight. This allows the dairy to fully firm up and the citrus and fruit flavors to permeate the cheesecake.
Serving & Presentation
To serve this magnificent Luscious Lemon-Lime Cherry Pistachio Cheesecake, carefully release the sides of the springform pan. For a truly elegant presentation, use a long, thin knife dipped in hot water and wiped dry between each cut to ensure clean slices. You can serve it as is, showcasing the beautiful marbling of cherries and pistachios, or elevate it further. A dollop of freshly whipped cream, a few extra chopped pistachios sprinkled on top, or a scattering of fresh mint leaves can add a professional touch.
Consider garnishing with a few extra fresh cherries or a whisper of lemon zest. For accompanying flavors, this cheesecake pairs beautifully with a light dessert wine or a sparkling citrus beverage. If serving as part of a larger meal, its vibrant flavors make it a perfect endnote after a rich main course, or a delightful centerpiece for a summer picnic or a holiday dessert spread. The bright, fresh notes also mean it doesn’t need heavy accompaniments; its own complexity is its greatest strength.
Make-Ahead & Storage Solutions
Make-Ahead Strategy: This cheesecake is an ideal make-ahead dessert! You can prepare and bake the cheesecake up to two days in advance. Once it’s fully baked and completely cooled after the initial hour in the turned-off oven, cover it tightly (but not directly on the surface) with plastic wrap and refrigerate for at least 4 hours. For best results and optimal flavor development, chill it overnight. This allows the flavors to meld and the cheesecake to firm up perfectly.
Storing Leftovers: Leftover cheesecake should be stored in the refrigerator. Keep it covered tightly with plastic wrap or transfer it to an airtight container to prevent it from drying out or absorbing odors from other foods in the fridge. Properly stored, cheesecake will last for about 3-4 days. For longer storage, you can freeze slices. Wrap individual slices tightly in plastic wrap, then in foil, and store them in a freezer-safe container or bag for up to 1-2 months. Thaw frozen slices in the refrigerator overnight.
The Best Way to Reheat: Cheesecake is best served chilled, so no traditional reheating is necessary beyond bringing it back to refrigerator temperature. However, if you’ve frozen slices, allow them to thaw slowly in the refrigerator. This gradual thawing helps maintain the cheesecake’s texture and prevents it from becoming watery. Avoid microwaving cheesecake, as this will likely result in an undesirable, mushy texture.
Frequently Asked Questions (FAQ)
How do I prevent my cheesecake from cracking when baking?
Cheesecake cracking is usually caused by overbaking or rapid temperature changes. To prevent it: ensure your cream cheese and eggs are at room temperature for smooth mixing, avoid overbeating the batter after adding eggs, bake at a moderate temperature (325°F/163°C is ideal), and crucially, let the cheesecake cool gradually. This means turning off the oven and leaving the cheesecake inside with the door ajar for an hour before removing it to cool completely on a wire rack. Sudden cooling is the enemy of a smooth cheesecake.
What’s the best way to de-glaze the pan after baking the crust?
You don’t typically need to de-glaze the pan (springform pan) after baking a cheesecake crust in it. The “de-glazing” process, which involves adding liquid to scrape up browned bits, is usually done after searing meat or sautéing vegetables. For a cheesecake crust, you simply press the crumb mixture into the pan, bake it, and let it cool. If there are any minor browned bits left from the crust, they can often be gently brushed or scraped away with a paper towel if desired, but they generally don’t impact the flavor or texture of the cheesecake itself and can often be left as is.
Can I use a different type of nut instead of pistachios in this cheesecake?
Absolutely! Pistachios offer a lovely flavor and color, but you can easily substitute them with other nuts. Toasted slivered almonds or chopped pecans would be excellent choices, offering a complementary nutty flavor and textural crunch. Walnuts would also work. Ensure the nuts are lightly toasted to bring out their best flavor and chopped to a size that’s enjoyable in each bite. The exact quantity can remain similar, but adjust to your preference.
What’s a good alternative to cream cheese for a dairy-free version?
Creating a dairy-free cheesecake is possible, but it will significantly alter the texture and flavor profile. A common approach is to use a blend of soaked cashews (for creaminess) and firm silken tofu or dairy-free cream cheese alternatives (like those made from coconut or soy). You’ll also need to use dairy-free butter for the crust and potentially a dairy-free sour cream substitute or a bit more liquid such as plant-based milk or lemon/lime juice to achieve the right consistency. It requires experimentation, as dairy-free versions often have a softer set.
How do I get a super smooth cheesecake texture?
Achieving a super smooth cheesecake texture relies on several factors: ensuring your cream cheese is fully softened to room temperature to prevent lumps, beating the cream cheese and sugar until completely smooth before adding other ingredients, adding eggs one at a time and mixing on low speed just until combined, and avoiding overmixing the batter once the eggs are in. Gentle mixing and proper cooling techniques (as described in the FAQ about cracking) also contribute significantly to a velvety smooth finish.
Can I make this a no-bake cheesecake?
While this recipe is designed as a baked cheesecake for optimal texture and flavor with the citrus infusion, you could adapt it to a no-bake version. For a no-bake crust, you’d simply mix the graham crackers, sugar, and melted butter and press it into the pan without baking. For the filling, you’d likely need to incorporate gelatin or a stabilizer to help it set without baking. You might also adjust the liquid ratio slightly. However, for the intended luscious, creamy, and perfectly set result from this specific recipe, baking is recommended.
What is the role of zest vs. juice in this cheesecake?
Zest and juice play distinct but equally important roles. The juice provides the primary tartness and liquid component of the citrus flavor, carrying the bright, acidic notes that cut through the richness of the cheesecake. The zest, however, contains the essential oils of the citrus peel, and it delivers the fragrant, aromatic, and more concentrated “essence” of the fruit. Using both ensures a full-bodied, complex citrus flavor that is both zesty and deeply aromatic, making the cheesecake much more vibrant and satisfying.
Tried This Recipe? Leave a Comment!
Did you make this recipe? I’d love to hear how it turned out! Please leave a comment and a rating below. Your feedback helps other home cooks and supports cookingwithemy!
For more delicious inspiration, follow me on Pinterest!
.
Print
Luscious Lemon-Lime Cherry Pistachio Cheesecake
- Total Time: 5 hours
- Yield: 12 1x
Description
A refreshing cheesecake combining the tartness of lemon and lime with sweet cherries and crunchy pistachios, perfect for a summer dessert.
Ingredients
- 1 1/2 cups graham cracker crumbs
- 1/4 cup granulated sugar
- 1/2 cup unsalted butter, melted
- 24 oz cream cheese, softened
- 1 cup granulated sugar
- 3 large eggs
- 1/2 cup sour cream
- 1/4 cup fresh lemon juice
- 1/4 cup fresh lime juice
- 1 cup pitted cherries, chopped
- 1/2 cup pistachios, chopped
- Zest of 1 lemon
- Zest of 1 lime
Instructions
- Preheat oven to 325°F (163°C) and grease a 9-inch springform pan.
- In a bowl, mix graham cracker crumbs, 1/4 cup sugar, and melted butter until combined. Press into the bottom of the pan.
- Bake the crust for 10 minutes, then let it cool.
- In a large bowl, beat cream cheese and 1 cup sugar until smooth.
- Add eggs one at a time, beating after each addition.
- Mix in sour cream, lemon juice, lime juice, lemon zest, and lime zest.
- Fold in chopped cherries and pistachios.
- Pour the batter over the cooled crust and smooth the top.
- Bake for 55-60 minutes or until the center is set.
- Turn off the oven and let the cheesecake cool inside for 1 hour.
- Refrigerate for at least 4 hours before serving.
Notes
For the best flavor, use fresh fruits and nuts. Chill overnight for optimal texture.
- Prep Time: 20 minutes
- Cook Time: 60 minutes
- Method: Dessert
- Cuisine: American
Nutrition
- Calories: 450
- Sugar: 25g
- Fat: 32g
- Carbohydrates: 35g
- Protein: 7g
