Table of Contents
Classic Peanut Butter Cookies: The Only Recipe You’ll Ever Need
If you’re craving the ultimate comfort dessert that brings back memories of childhood bake sales and cozy family gatherings, look no further than Classic Peanut Butter Cookies. These timeless treats combine the rich, nutty flavor of peanut butter with a perfectly chewy texture that’s hard to resist. Whether you’re a seasoned baker or a beginner, this recipe for Classic Peanut Butter Cookies is designed for easy success, making it the go-to choice for anyone seeking that nostalgic, homemade taste. In just a few simple steps, you’ll create cookies that are soft on the inside, slightly crisp on the edges, and utterly addictive—proving why Classic Peanut Butter Cookies remain a staple in kitchens worldwide.
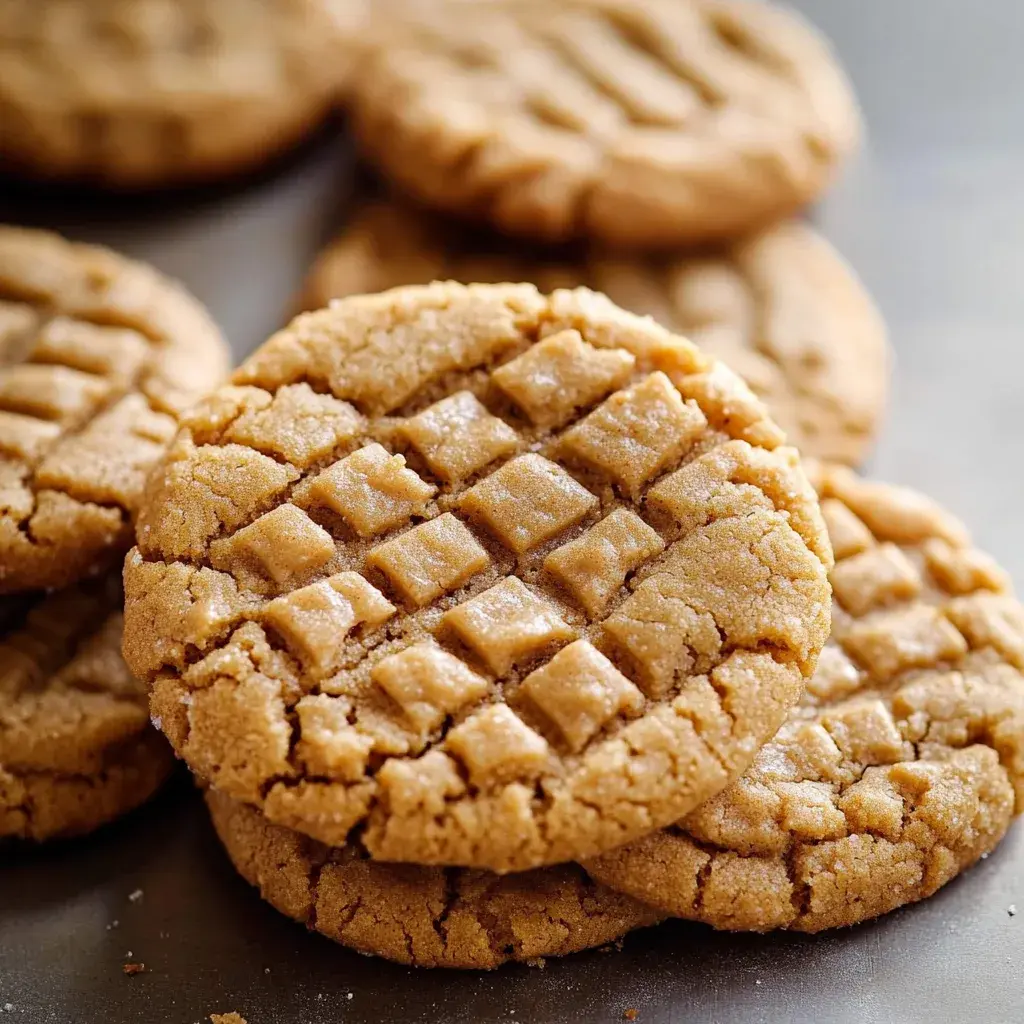
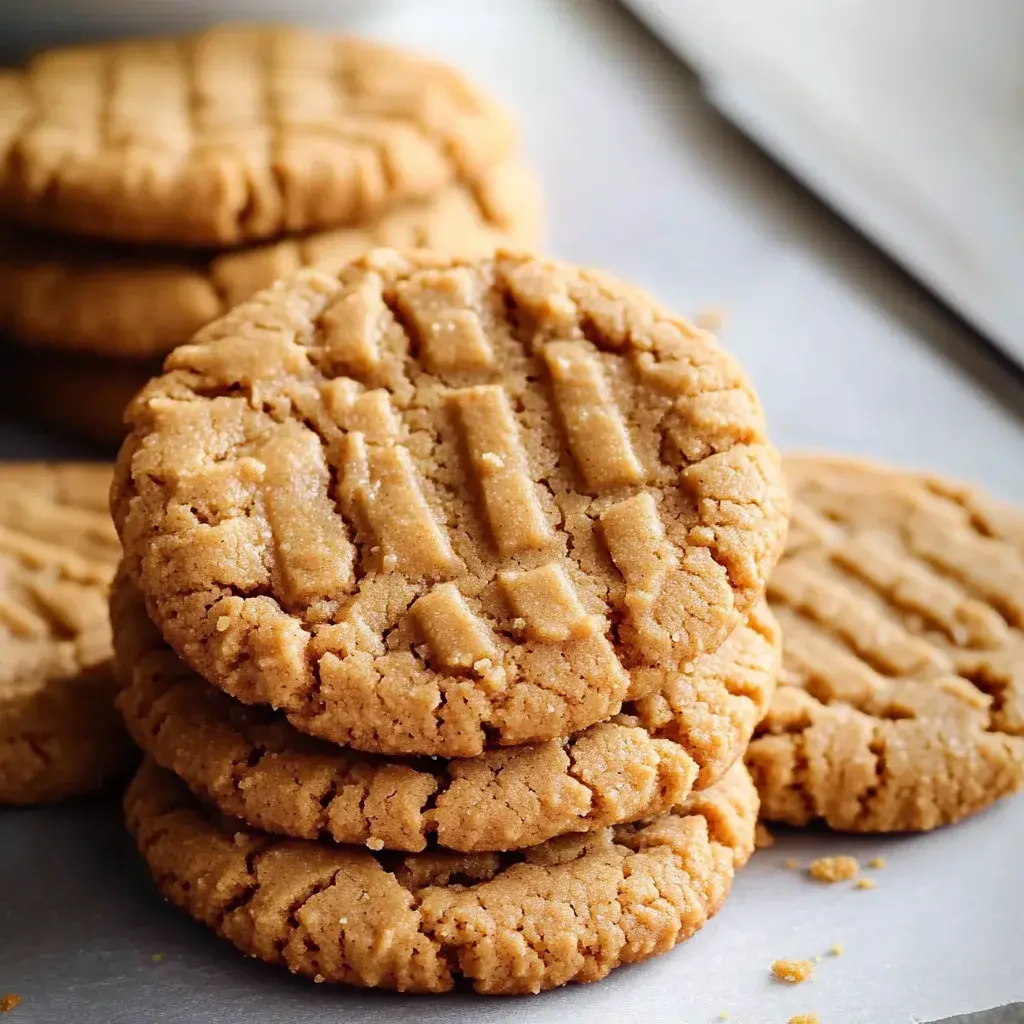
Imagine biting into a warm Classic Peanut Butter Cookies fresh from the oven: the creamy peanut butter melds with hints of vanilla and brown sugar, delivering a symphony of flavors that dance on your tongue. The texture is spot-on—chewy in the center with a golden, satisfying crunch around the edges, thanks to the careful balance of ingredients. The aroma alone, a warm blend of roasted peanuts and sweet caramel notes from the brown sugar, will fill your kitchen and draw everyone in. Each cookie offers that signature crisscross pattern, not just for looks but to ensure even baking, making every batch of Classic Peanut Butter Cookies a textural delight that elevates your baking game.
What sets this Classic Peanut Butter Cookies recipe apart on cookingwithemy.com is our commitment to making it the most reliable and foolproof version you’ll find online. Drawing from years of testing and tweaking, we’ve incorporated a “Chef’s Secret” that guarantees those perfectly chewy centers without any guesswork. You’ll learn expert tips for ingredient swaps, common pitfalls to avoid, and ways to customize for dietary needs, all while building your confidence in the kitchen. Stick around for detailed breakdowns, from ingredient spotlights to storage hacks, ensuring your Classic Peanut Butter Cookies turn out exceptional every single time.
Why This Classic Peanut Butter Cookies Recipe is a Game-Changer
The Chef’s Secret to our Classic Peanut Butter Cookies lies in the precise resting of the dough for just 10 minutes after mixing, which allows the peanut butter’s natural oils to integrate fully with the sugars and butter. This simple technique creates an unbeatable, perfectly chewy texture that sets these cookies apart from ordinary recipes, ensuring they stay soft and moist for days. By letting the dough rest, we’re enhancing the flavor profile and preventing over-spreading during baking, a trick that professional bakers swear by for that ideal balance of chewiness and structure.
Unbeatable Texture: The science behind this Classic Peanut Butter Cookies recipe involves the role of brown sugar, which retains more moisture than granulated sugar, leading to a chewy consistency. Combined with the baking soda’s reaction, it creates air pockets that make the cookies tender yet sturdy—perfect for that satisfying bite without crumbling.
Foolproof for a Reason: We’ve tested this Classic Peanut Butter Cookies recipe over a dozen times to ensure consistent results, even in varying kitchen conditions. From precise measurements to step-by-step guidance, it’s designed for home cooks to succeed on the first try, minimizing errors like overbaking or uneven mixing.
Ingredient Spotlight: Quality Makes the Difference
All-purpose flour is the foundation of these Classic Peanut Butter Cookies, providing the structure that holds everything together without making the cookies tough. Opt for unbleached, high-quality flour to avoid any chemical aftertastes—it’s essential for that light, airy crumb. A common substitution is whole wheat flour, but use it in a 1:1 ratio and expect a slightly nuttier flavor; however, this might make the cookies denser, so stick to all-purpose for the truest classic taste.
Baking soda acts as the leavening agent in Classic Peanut Butter Cookies, reacting with the acidic brown sugar to create lift and that signature chewy texture. Always use fresh baking soda to ensure it works effectively—stale versions can lead to flat cookies. If you’re out, you can substitute with an equal amount of baking powder, but this will alter the texture slightly, making them less chewy and more cakey.
Salt enhances the flavors in Classic Peanut Butter Cookies, balancing the sweetness and bringing out the nutty notes of the peanut butter. Choose fine sea salt for even distribution; it prevents the cookies from tasting bland. For a low-sodium option, reduce the amount by half, but be aware that this might make the overall flavor less pronounced.
Unsalted butter, softened to room temperature, is crucial for creaming with sugars in Classic Peanut Butter Cookies, creating a fluffy base that locks in moisture for that perfect chew. High-fat butter is best to avoid greasy results—go for European-style if possible. A substitute could be coconut oil for a dairy-free version, but use it in the same quantity and chill the dough beforehand to maintain the texture.
Granulated sugar adds sweetness and helps with browning in Classic Peanut Butter Cookies, contributing to the crisp edges. Use pure cane sugar for the best results, as it dissolves evenly. If you’re watching sugar intake, swap with a natural alternative like coconut sugar, but note that it may darken the cookies and add a caramel undertone.
Brown sugar is what gives Classic Peanut Butter Cookies their moist, chewy interior, thanks to its molasses content. Fresh, packed brown sugar is key—stale sugar can dry out the dough. For a refined-sugar-free option, try date sugar in a 1:1 ratio, which will keep the chewiness while adding a subtle fruitiness.
Peanut butter, whether creamy or crunchy, is the star of Classic Peanut Butter Cookies, infusing rich, nutty flavor and moisture. Always choose natural peanut butter without added oils for authentic taste—brands with stabilizers can make the cookies greasy. For nut allergies, substitute with sunflower seed butter, maintaining the same quantity to preserve the texture and flavor profile.
Vanilla extract adds depth and warmth to Classic Peanut Butter Cookies, enhancing the overall aroma. Pure vanilla is superior to imitation for a more robust flavor. If you’re out, almond extract can replace it in a 1:2 ratio, but it will introduce a different nutty note that complements the peanut butter.
The large egg binds the ingredients in Classic Peanut Butter Cookies, providing structure and richness. Fresh, room-temperature eggs work best for even incorporation. For a vegan twist, use a flax egg (1 tablespoon ground flaxseed mixed with 3 tablespoons water), which will keep the cookies chewy but might make them denser.
Step-by-Step Instructions
Step 1: Preheating the Oven and Preparing Baking Sheets
Start by preheating your oven to 350°F (175°C) and lining your baking sheets with parchment paper to prevent sticking and ensure even heat distribution. This step is crucial for achieving that perfectly chewy texture in your Classic Peanut Butter Cookies.
Pro Tip: Use high-quality parchment paper to avoid any grease spots, which can affect the cookies’ browning and keep them chewy longer.
Step 2: Mixing the Dry Ingredients
In a medium bowl, whisk together 1 cup all-purpose flour, 1/2 teaspoon baking soda, and 1/4 teaspoon salt until fully combined. This ensures the dry ingredients are evenly distributed, which is key for consistent baking in your Classic Peanut Butter Cookies.
Common Mistake to Avoid: Don’t over-whisk the dry ingredients, as this can activate the baking soda prematurely and lead to tougher cookies—mix just until blended.
Step 3: Creaming the Wet Ingredients
In a large bowl, use a hand mixer or stand mixer to cream together 1/2 cup softened unsalted butter, 1/2 cup granulated sugar, 1/2 cup brown sugar, and 1 teaspoon vanilla extract until the mixture is light and fluffy, about 2-3 minutes. This incorporates air for the perfect chewy texture in Classic Peanut Butter Cookies.
Pro Tip: Ensure the butter is at room temperature for easier creaming; cold butter can result in a grainy texture.
Step 4: Adding the Egg and Peanut Butter
Beat in 1 large egg and 1 cup peanut butter until smooth and well incorporated, scraping down the sides of the bowl as needed. This step binds the dough together for that signature chewiness in your Classic Peanut Butter Cookies.
Common Mistake to Avoid: Over-beating at this stage can make the dough too sticky—mix just until combined to prevent flat cookies.
Step 5: Combining Dry and Wet Mixtures
Gradually add the dry ingredients to the wet mixture, mixing on low speed until just combined. Be careful not to overmix, as this maintains the tender texture of your Classic Peanut Butter Cookies.
Pro Tip: Let the dough rest for 10 minutes after mixing to enhance flavor and chewiness, our Chef’s Secret for superior results.
Step 6: Scooping and Baking the Dough
Using a cookie scoop, portion the dough onto the prepared baking sheets, placing scoops about two inches apart to allow for spreading. Bake for 10-12 minutes, or until the edges are golden brown while the centers remain soft.
Common Mistake to Avoid: Crowding the baking sheet can cause uneven baking—give each cookie space to expand for even, chewy results.
Step 7: Cooling the Cookies
Remove the baking sheets from the oven and let the Classic Peanut Butter Cookies cool on the pan for a few minutes before transferring to wire racks to cool completely. This helps them set without becoming too crisp.
Pro Tip: Cooling on the pan locks in that perfect chewy center, so don’t rush this step for the best texture.
Serving & Presentation
For serving Classic Peanut Butter Cookies, arrange them on a rustic platter with a light dusting of powdered sugar for an elegant touch, enhancing their golden hue and chewy appeal. Pair them with a cold glass of milk or a hot cup of coffee to complement the nutty flavors, making it a versatile treat for breakfast, dessert, or snacks. To impress, add a sprinkle of sea salt on top for a sweet-salty contrast that elevates the experience. These cookies shine alongside fresh fruit like sliced bananas or berries, or even as part of a dessert board with chocolate dips, turning a simple bake into a showstopper.
Make-Ahead & Storage Solutions
Make-Ahead Strategy: Prepare the dough up to 3 days in advance by mixing all ingredients, shaping into balls, and storing them in an airtight container in the refrigerator. When ready to bake, let the dough sit at room temperature for 10 minutes for that perfect chewy texture.
Storing Leftovers: Store cooled Classic Peanut Butter Cookies in an airtight container at room temperature for up to 5 days to maintain freshness and chewiness. For longer storage, freeze the cookies in a freezer-safe bag for up to 3 months, separating layers with parchment paper to prevent sticking.
The Best Way to Reheat: To restore the original chewy texture, reheat frozen or stored cookies in a 300°F oven for 5 minutes or microwave for 10-15 seconds, ensuring they don’t overheat and become dry.
Frequently Asked Questions (FAQ)
How do you make fluffy pancakes from scratch?
While this is about Classic Peanut Butter Cookies, if you’re asking about fluffy pancakes, start by whisking together 1 cup flour, 2 tablespoons sugar, 1 tablespoon baking powder, and a pinch of salt. In another bowl, mix 1 cup milk, 1 egg, and 2 tablespoons melted butter, then combine the wet and dry ingredients gently. Cook on a medium-heated griddle for 2-3 minutes per side. For fluffier results, don’t overmix the batter to keep air pockets intact.
Can I substitute flour with almond flour in a pancake recipe?
Although we’re focused on Classic Peanut Butter Cookies, for pancakes, yes, you can substitute all-purpose flour with almond flour, but use a 1:1 ratio and add an extra egg for binding, as almond flour is more absorbent. This will make the pancakes denser and nuttier, so adjust cooking time to avoid burning the edges.
How long does it take to cook pancakes on a griddle?
For context with Classic Peanut Butter Cookies, cooking pancakes on a griddle typically takes 2-4 minutes per side on medium heat. Flip when bubbles form and the edges set, ensuring they’re golden brown for the best texture—similar to monitoring bake time for even cookie results.
What are the best toppings for serving pancakes at breakfast?
While our recipe is for Classic Peanut Butter Cookies, great pancake toppings include fresh fruits like strawberries, a drizzle of maple syrup, whipped cream, or chopped nuts for added crunch. For a peanut butter twist, try adding peanut butter syrup to echo the flavors in your cookies.
Can I add chocolate chips to Classic Peanut Butter Cookies?
Absolutely! Stir in 1/2 cup of chocolate chips to the dough for a delicious variation, which enhances the chewy texture and adds a sweet contrast to the nutty flavor.
What’s the best way to store homemade cookies?
For Classic Peanut Butter Cookies, store them in an airtight container at room temperature. To keep them chewy, add a slice of bread to the container, which helps maintain moisture for up to a week.
Can I make this recipe gluten-free?
Yes, to make Classic Peanut Butter Cookies gluten-free, substitute the all-purpose flour with a 1:1 gluten-free flour blend. Ensure it’s a reliable brand with xanthan gum for the right texture, and the cookies will remain perfectly chewy.
Tried This Recipe? Leave a Comment!
Did you make this recipe? I’d love to hear how it turned out! Please leave a comment and a rating below. Your feedback helps other home cooks and supports cookingwithemy!
For more delicious inspiration, follow me on Pinterest!

Classic Peanut Butter Cookies
Description
Classic Peanut Butter Cookies are a nostalgic treat, combining creamy peanut butter with a soft, chewy texture. Perfect for sharing or enjoying with your favorite beverage!
Ingredients
- 1 cupall-purpose flour
- 1/2 teaspoonbaking soda
- 1/4 teaspoonsalt
- 1/2 cupunsalted butter (softened)
- 1/2 cupgranulated sugar
- 1/2 cupbrown sugar
- 1 cupcreamy or crunchy peanut butter
- 1 teaspoonvanilla extract
- 1large egg
Instructions
- Preheat your oven to 350°F (175°C) and prepare baking sheets with parchment paper.
- In a bowl, whisk together flour, baking soda, and salt.
- In another bowl, cream together softened butter, granulated sugar, brown sugar, and vanilla until fluffy.
- Beat in the egg and peanut butter until well combined.
- Gradually mix in the dry ingredients until just combined.
- Scoop dough onto prepared sheets, placing them two inches apart.
- Bake for 10-12 minutes or until edges are golden brown; centers should remain soft.
- Cool on the pan for a few minutes before transferring to wire racks.
Nutrition
- Calories: 150
- Sugar: 9g
- Fat: 8g
- Carbohydrates: 16g
- Protein: 3g
Conclusion
In summary, this spring roll recipe offers a crispy, savory delight that’s perfect for quick appetizers or light meals, combining fresh ingredients for a burst of flavor that everyone will enjoy. Whether you’re hosting a gathering or preparing a simple snack, its versatility makes it an easy go-to option in the kitchen. For a fun variation, try experimenting with different fillings like shrimp or tofu to suit your preferences. If you love crispy treats, be sure to check out our Crispy Air Fryer Spring Rolls or Easy Chicken Spring Rolls for more inspired ideas.
