Table of Contents
Lattice Apple Pie – Foolproof Thanksgiving Recipe
Thanksgiving at my table always starts with the same request: “Bring your lattice apple pie, emy.” And honestly, I never mind. This 100% foolproof lattice apple pie recipe is the one I turn to year after year, the one that silences the kitchen with its first slice. It’s not just another apple pie — it’s a mountain of perfectly tender, flavorful apples enveloped in a caramel-like sauce that never turns runny, with a golden, never-soggy crust that shatters at the touch of a fork. I learned the lattice weave technique at a patisserie in Paris, where precision and patience were everything. But here, I’ve made it easy for any home baker in the US to master. This is the pie you bring to Thanksgiving with absolute confidence.
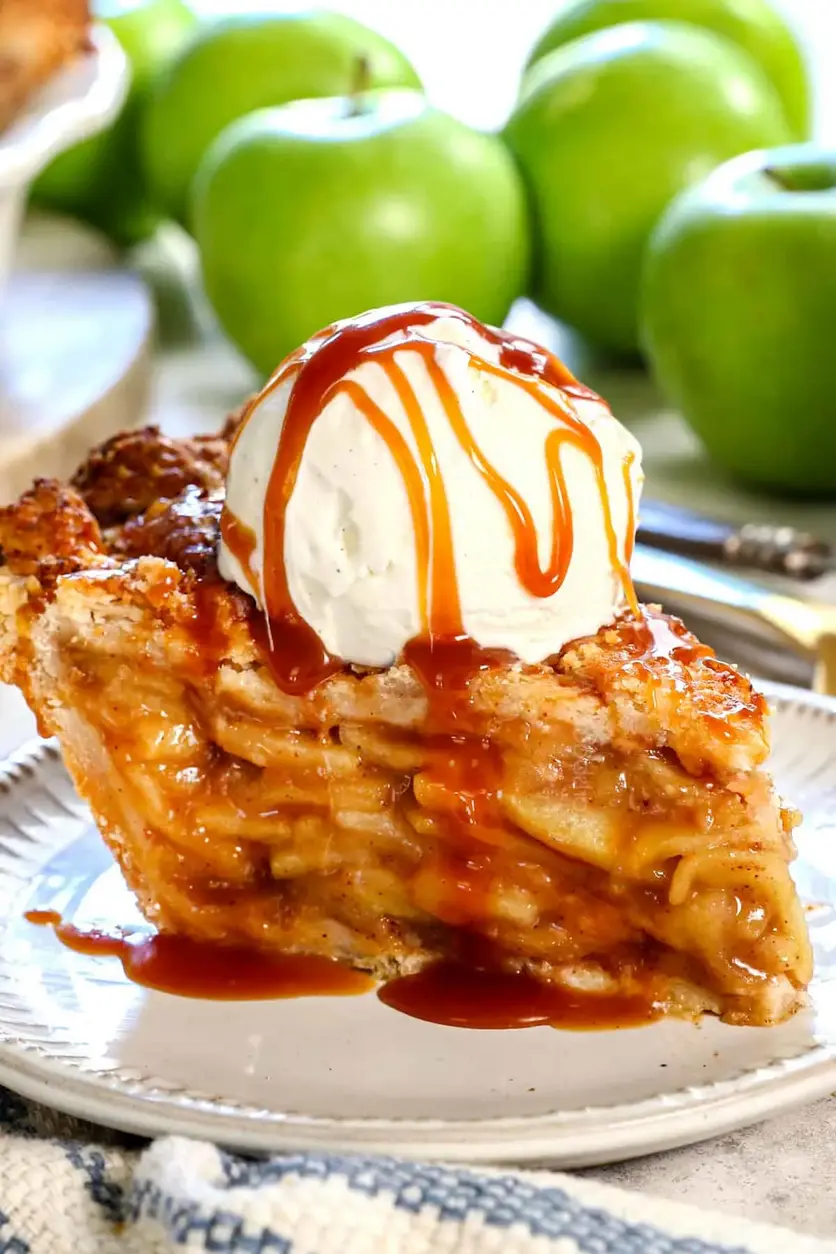
Picture this: you pull the pie from the oven, the lattice top glistening with egg wash and a sprinkle of coarse sugar. Steam escapes through the gaps, carrying the scent of cinnamon, ginger, and nutmeg — warm, autumnal, intoxicating. The first forkful reveals tender apples that still hold their shape, suspended in a sauce that’s thick, rich, and deeply caramelized. There’s no gummy texture, no soupy bottom crust. Just pure, concentrated apple flavor with a hint of lemon brightness. This is the pie that tastes like comfort — a little like my mother’s kitchen in Morocco, where she’d fold phyllo into pastries, and a little like the bakeries I fell in love with in New York City.
What makes this recipe truly foolproof is the technique: I precook the apples on the stovetop before they ever touch the oven. This simple step — inspired by classic French fruit tarte techniques — controls the moisture and ensures perfect tenderness every time. You won’t need cornstarch or gelatin. As a trained chef, I’ve tested every variable so you don’t have to. 💡 emy’s Pro Tip: Don’t skip chilling the lattice strips — it makes weaving so much easier. And avoid the common mistake of baking the pie straight from a glass pan into a hot oven without reading the note — we’ll get to that.
Why This Lattice Apple Pie Recipe Is the Best
The Flavor Secret: I use a blend of Honeycrisp and Granny Smith apples — the Honeycrisp bring natural sweetness and structure, while the Granny Smith add a tart edge that prevents the pie from becoming cloying. Growing up in Morocco, my mother always balanced sweet and sour in her tagines — that same principle applies here. The caramelized sauce develops depth from the combination of brown and white sugars, plus a touch of vanilla and lemon juice to lift all the flavors.
Perfected Texture: Unlike traditional recipes that bake the pie with raw apples, I precook the filling on the stovetop. This ensures the apples are tender before they go in the oven, so they won’t release excess water during baking. The flour used in the filling thickens the juices into a beautiful, luscious sauce that coats every slice. The lattice top, made from my homemade pie crust dough, bakes to a golden, flaky perfection — never soggy, always crisp.
Foolproof & Fast: This recipe is designed for home bakers of all levels. The steps are clear, with visual cues and timing guides. Even the lattice weaving — often feared — becomes a breeze when you follow my method of chilling the strips. I’ve included pro tips for every step, plus common mistakes to avoid. Whether you’re a seasoned baker or a first-timer, this lattice apple pie will make you look like a pro.
Lattice Apple Pie Ingredients
I source my apples from the Union Square Greenmarket in NYC when they’re in season — the Honeycrisp from upstate New York are unbeatable. For the crust, I use European-style butter for its higher fat content and better flavor. A little trick I picked up in Paris: cold butter and ice water make the flakiest dough.
Ingredients List
- 2 recipes Homemade Pie Crust ((1 for bottom crust and 1 for lattice top))
- Egg wash: 1 egg beaten with 1 TB heavy cream ((may sub milk))
- Optional: Coarse raw sugar for sprinkling on lattice topping
- 3 1/2 pounds Honeycrisp apples
- 1 1/2 pounds Granny Smith apples
- 2/3 cup packed light brown sugar
- 1/2 cup granulated sugar
- 1/3 cup + 1 TB all-purpose flour
- 2 tablespoons lemon juice, (divided)
- 1 1/2 teaspoons ground cinnamon
- 1/2 tsp EACH ground ginger, ground nutmeg, allspice
- 1/8 teaspoon salt
- 1 teaspoon vanilla extract
Ingredient Spotlight
Honeycrisp apples: These are the sweetheart of the fall apple world, known for their crisp texture and balanced sweetness. They hold their shape beautifully during precooking and don’t turn mushy. Look for firm apples without soft spots. You can substitute Jonagold or Braeburn for a similar effect.
Granny Smith apples: The tartness is essential for contrast. Their firm flesh ensures the filling has structure. If you can’t find Granny Smith, use Pink Lady or Empire — they offer good acidity and hold up well.
Light brown sugar: This adds a deeper caramel flavor than granulated sugar alone. Make sure it’s packed tightly. Dark brown sugar can be substituted, but it will give a slightly more molasses-forward taste. For a less intense version, use all granulated.
Lemon juice: Because it’s divided, use fresh lemon juice for brightness. The first tablespoon goes into the filling to prevent browning; the second add later brightens the flavor after cooking. Bottled lemon juice works in a pinch but lacks that fresh zing.
| Original Ingredient | Best Substitution | Flavor / Texture Impact |
|---|---|---|
| Honeycrisp apples | Jonagold or Braeburn | Similar sweetness and texture; apples may be slightly softer. |
| Granny Smith apples | Pink Lady or Empire | Good tartness, but slightly less firm; will still hold shape. |
| Light brown sugar | Dark brown sugar or all granulated | Dark brown gives more molasses flavor; all granulated reduces caramel depth. |
| Lemon juice (fresh) | Bottled lemon juice | Less bright, but acidity is still present; use 1 ½ tsp for same effect. |
How to Make Lattice Apple Pie — Step-by-Step
Don’t let the steps intimidate you! I’ve broken down every stage so you can work through it calmly. Start with your pie dough ready and your apples prepped — then follow along, and you’ll have a stunning pie that will wow everyone.
Step 1: Make the Pie Dough
Prepare one full batch of my Homemade Pie Crust recipe through step 6 under Make Dough. Then prepare the second batch through step 2 under Roll Dough, using a standard 9-10-inch pie pan that’s 1 1/2 inches deep. You’ll have one crust in the pan and one disc ready to roll.
💡 emy’s Pro Tip: For the flakiest crust, keep the butter and water very cold — I even chill my flour bowl in the freezer for 10 minutes before starting.
Step 2: Egg Wash the Bottom Crust
Lightly brush the bottom and sides of the crust in the pan (not the edges that will be fluted) with the egg wash. Reserve the remaining egg wash in the refrigerator. I find it easiest to add the egg wash after the pie dough has firmed up a bit, so I place the pie in the freezer for 20 minutes. After brushing, cover the pie and refrigerate it while you prep the rest — at least 45 minutes up to 5 days.
⚠️ Common Mistake to Avoid: Do not skip the egg wash — it creates a barrier that keeps the crust from absorbing the apple juices, preventing a soggy bottom.
Step 3: Roll Out and Cut Lattice Strips
Place a large piece of parchment paper on a baking sheet and generously dust with flour. Roll the remaining dough disc into a rough 11×11-inch rectangle on the parchment paper. Cover and freeze the dough on the baking sheet for 20-30 minutes for easier, cleaner slices. Then use a ruler and a pizza cutter to cut 1-inch-wide strips. Cover with plastic wrap and freeze for 30 minutes or refrigerate for up to 24 hours.
💡 emy’s Pro Tip: Chilling the strips is the game-changer. Cold strips are much easier to weave and less likely to stick or stretch out of shape.
Step 4: Slice and Cook the Apples
Peel the apples and make 4 slices around the core to remove it. Lay the apple segments cut side down on a cutting board and slice into 1/8-inch thick slices. Transfer to a large Dutch oven. Add the sugars, flour, 1 tablespoon lemon juice, and spices. Set over medium heat, gently stirring until evenly coated. Cover and cook for 15-20 minutes, stirring every couple of minutes and replacing the lid. The apples are done when they reach your desired tenderness — they should be fork-tender but still hold their shape. They will not become more tender in the oven.
⚠️ Common Mistake to Avoid: Don’t overcook the apples to mush — they only need to be tender enough to bite through without resistance. They’ll continue to soften slightly as they cool.
Step 5: Cool the Apple Filling
Line a rimmed baking sheet with parchment paper. Transfer the apples and their caramel juices to the sheet. Pop the pan in the fridge or freezer to cool to room temperature — about 25 minutes. Stir in the remaining 1 tablespoon lemon juice and vanilla after cooling.
💡 emy’s Pro Tip: For the most intense apple flavor, let the filling sit at room temperature for 15 minutes after cooling — the sugars continue to meld and deepen.
Step 6: Assemble and Weave the Lattice
Transfer the cooled apples and sauce to the chilled pie shell, arranging and layering them horizontally to compact. If the strips have become too stiff to work with, let them rest on the counter for 10 minutes. Start by laying five horizontal strips evenly spaced over the pie — center the middle strip. Fold the first, third, and fifth strips back, and place a vertical strip on the left side. Unfold the strips, then fold the second and fourth strips back and add another vertical strip. Repeat for a total of ten strips. Press the edges of the strips into the pie crust to seal. Flute or crimp the edges as you prefer. Brush the edges and lattice top with egg wash and sprinkle with coarse sugar if using.
💡 emy’s Pro Tip: If a strip breaks, don’t panic — just press it gently back together. The egg wash and sugar will hide any small cracks after baking.
Step 7: Chill and Bake
Chill the unbaked pie for 30 minutes. Do not skip this step — it will help the crust not shrink unless you are using a glass pie pan (see note below). Meanwhile, place a baking sheet on the bottom rack of your oven and preheat to 425°F. Transfer the chilled pie to the sheet, bake for 25 minutes, then reduce heat to 375°F and bake for 35-45 more minutes, until the filling is bubbling around the edges. Cover edges with a pie shield if browning too quickly.
⚠️ Common Mistake to Avoid: If using a glass pie pan, do NOT chill the pie before baking — the cold pan could shatter in the hot oven. Bake immediately after assembling.
Step 8: Cool and Serve
Transfer the pie to a cooling rack and let it rest for 4 hours to cool to room temperature so the filling can set. You can pop it in the fridge or freezer to speed things up. The pie can stay at room temperature for up to 2 days or be refrigerated for up to 5. For serving warm, tent with foil and warm in a 375°F oven for 10-15 minutes after cooling.
| Step | Action | Duration | Key Visual Cue |
|---|---|---|---|
| 1 | Make Pie Dough | 15 mins | Dough is smooth and holds together |
| 2 | Egg Wash Bottom Crust | 5 mins | Even coating, no puddles |
| 3 | Cut Lattice Strips | 10 mins | Uniform 1-inch strips, firm |
| 4 | Cook Apples | 15-20 mins | Fork-tender, not mushy |
| 5 | Cool Filling | 25 mins | Room temperature, no steam |
| 6 | Weave Lattice | 10 mins | Evenly spaced, strips not broken |
| 7 | Chill & Bake | 60-70 mins | Golden crust, bubbling edges |
| 8 | Cool & Serve | 4 hours | Set filling, crust is firm |
Serving & Presentation
The beauty of this lattice apple pie is that it’s a showstopper all on its own. Let it rest those 4 hours so the filling sets absolutely — this ensures clean, beautiful slices that hold their shape. Serve at room temperature for the purest texture and flavor. For a warm slice, follow the reheating instructions.
At my Thanksgiving table in New York City, I always serve it with a dollop of lightly sweetened whipped cream or a scoop of vanilla bean ice cream. The cold creaminess against the warm spiced apples is perfection. When I’m feeling a little Moroccan twist, I sprinkle a pinch of cinnamon-sugar over the whipped cream and add a few toasted almonds.
💡 emy’s Pro Tip: For a bakery-style presentation, let the pie cool completely, then dust
Print
Lattice Apple Pie
Description
This is the BEST 100% foolproof Apple Pie recipe, so bring it to Thanksgiving with confidence! By following my technique, you and your guests will sink your teeth into a mountain of perfectly tender, flavorful apples enveloped in a caramel-like sauce that is never runny, the right balance of sweet and tart, and a golden, never-soggy crust. See the post for step-by-step photos and helpful tips and tricks.
Ingredients
- 2 recipes Homemade Pie Crust ((1 for bottom crust and 1 for lattice top))
- Egg wash: 1 egg beaten with 1 TB heavy cream ((may sub milk))
- Optional: Coarse raw sugar for sprinkling on lattice topping
- 3 1/2 pounds Honeycrisp apples
- 1 1/2 pounds Granny Smith apples
- 2/3 cup packed light brown sugar
- 1/2 cup granulated sugar
- 1/3 cup + 1 TB all-purpose flour
- 2 tablespoons lemon juice, (divided)
- 1 1/2 teaspoons ground cinnamon
- 1/2 tsp EACH ground ginger, ground nutmeg, allspice
- 1/8 teaspoon salt
- 1 teaspoon vanilla extract
Instructions
- Note: The Apple Pie Filling can be made at any time and refrigerated until ready to add to the pie pan. See Note/Warning if using a glass pie pan before you begin.
- Make the Pie Dough: Prepare one pie crust recipe through step 6 under Make Dough (click HERE for the recipe.) Prepare the second pie crust through step 2 under Roll Dough using a standard 9-10-inch pie pan (1 1/2-inches deep).
- Make the Bottom Pie Crust: Lightly brush the bottom and sides of the crust in the pan (not edges that will be fluted) with the egg wash. Reserve the egg wash in the refrigerator for later. Tip: I find it easiest to add the egg wash after the pie dough has firmed up a bit, so I place the pie in the freezer for 20 minutes. After adding the egg wash, immediately cover the pie and refrigerate it while you prep the rest of the recipe (at least 45 minutes up to 5 days before baking).
- Roll Out the Dough for the Lattice Top: Place a large piece of parchment paper on a baking sheet and generously dust with flour. Roll the dough disc into a rough 11×11-inch rectangle on the parchment paper. At this point, I cover and freeze the dough (on the baking sheet) for 20-30 minutes for easier/cleaner slices.
- Make the Lattice Strips: After chilling, use a ruler and a pizza cutter, pastry wheel, or sharp knife to cut the dough into 1-inch-wide strips. Cover with plastic wrap and freeze for 30 minutes or refrigerate for up to 24 hours for MUCH easier-to-handle lattices. When you're ready to use the lattices, make the apple pie filling first:
- Slice the apples: Peel the apples and make 4 slices around the core to remove it. Lay the 4 remaining apple segments, cut side down, on a cutting board, and slice into 1/8-inch slices. Transfer the apples to a large Dutch oven as you go to keep the workspace clean.
- Apple pie filling: Add the sugars, flour, 1 tablespoon of lemon juice, and spices to the sliced apples and set over medium heat. Gently stir until evenly coated. Cover and cook for 15-20 minutes, stirring every couple minutes and replacing the lid. The apples are done when they reach YOUR desired apple pie tenderness they will not become more tender in the oven. They should be fork-tender but still hold their shape. (They will not become mushy when baked; see the science behind it in the post.) Once tender, stir in the remaining 1 tablespoon of lemon juice and the vanilla.
- Cool the Apples: Line a rimmed baking sheet with parchment paper or a silicone baking mat for easy cleanup. Transfer the apples and their caramel juices to the baking sheet. Pop the pan in the fridge or freezer to cool to room temperature for about 25 minutes.
- Assemble: Once the apples have cooled, transfer them and the sauce to the chilled pie shell, rearranging and layering them horizontally to compact.
- Weave the Lattice Top (See Post for Photos): If the strips become too stiff to work with, let them rest on the counter for 10 minutes. Start by laying five horizontal strips evenly spaced over the pie (center the middle strip). Fold the first, third, and fifth horizontal strips back and place a vertical strip on the left side. Unfold the first, third, and fifth strips over the perpendicular strip and fold the second and fourth strips back. Add a second vertical strip, then unfold the second and fourth strip. Repeat the process for a total of ten strips, five running in each direction.
- Make the Edges: Press the edges of the strips into the edges of the crust to seal. Flute, crimp, or create whatever edge design you prefer. Lightly brush the edges and the lattice top with the egg wash. Sprinkle the lattice top (avoid the edges) with coarse sugar if using.
- Refrigerate: Chill the unbaked pie for 30 minutes. Dont skip this stepit will help the crust not shrink unless you have a glass pie pan. Then, bake without chilling, or the pan can shatter (see Notes).
- Preheat the Oven: Immediately after transferring the pie to the fridge, place a baking sheet on the bottom rack of your oven and preheat the oven to 425 degrees F so the baking sheet can get very hot.
- Bake: Transfer the chilled pie to the rimmed baking sheet. Bake at 425 degrees F for 25 minutes (keep an eye on the crust so it doesn't become too brown). Reduce the heat to 375 degrees F and continue to bake for 35-45 minutes or until the filling is bubbling around the edges (if you dont wait for it to bubble, your filling will be runny). Cover the edges with a pie shield or the top with foil if they are browning too quickly.
- Cool: Transfer the pie to a cooling rack and let it rest for 4 hours to cool to room temperature so the filling can set. You can pop the pie in the fridge or freezer to speed up the cooling process. The pie can rest at room temperature for up to 2 days or be refrigerated for up to 5.
- Reheat: After the pie has cooled, you can reheat/refresh it in the oven. Tent the pie with foil and place it in a cold oven. Turn the oven to 375 degrees F, and when the preheat bell dings, leave the pie in for another 10-15 minutes or until warmed.
