Table of Contents
Traditional Italian Tiramisu – Baked with Egg‑White Meringue for Extra Airiness – A Creamy Twist on the Classic Italian Dessert
Growing up in a Moroccan kitchen, the scent of cardamom and fresh mint would rise whenever my mother pulled a pot of tagine onto the stove. When I moved to Paris for culinary school, I learned that the heart of French cuisine is all about balance, and the delicate layers of a tiramisu felt like an elegant extension of that philosophy. Today, living in New York, I love to bring those Mediterranean aromas and Parisian precision to my followers, especially when I add a twist that turns a classic Italian treat into something airy and surprising.
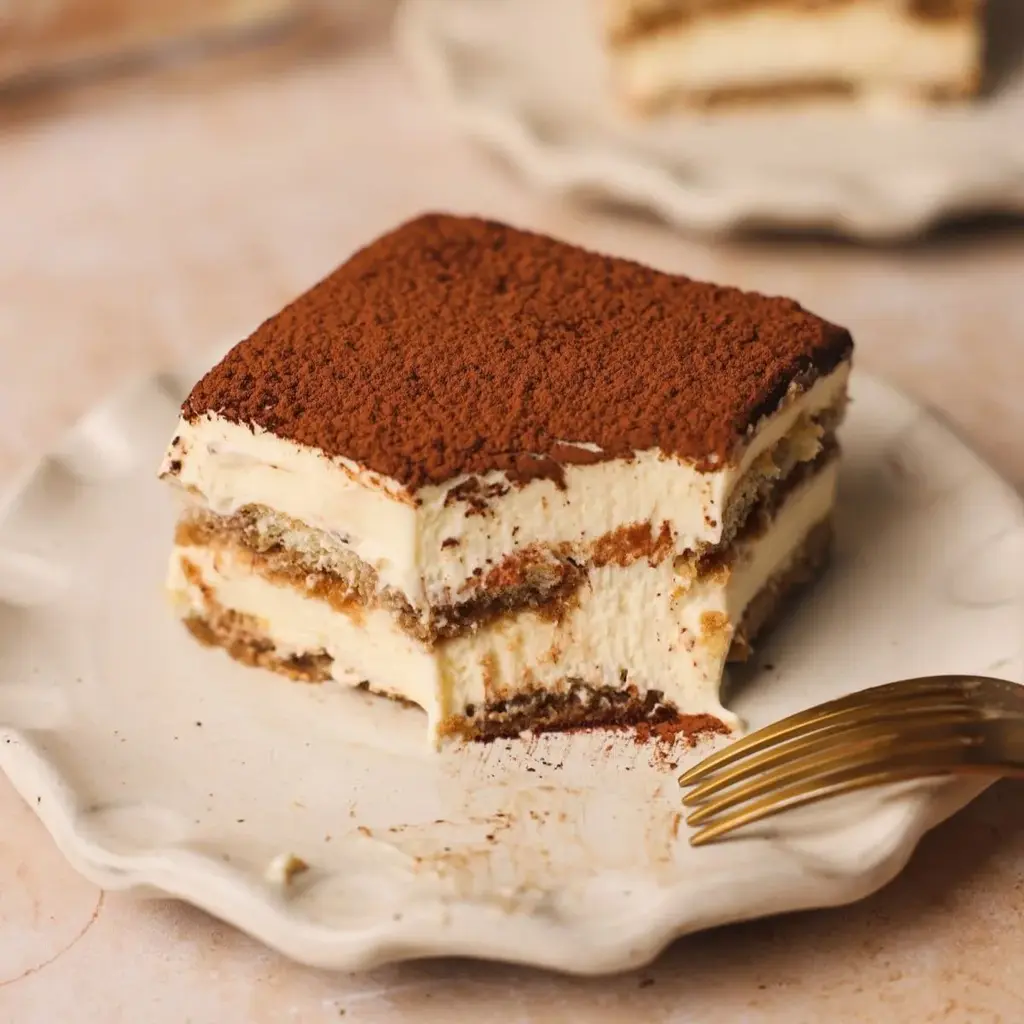
Picture a light, cloud‑like mousse that melts on the tongue, interlaced with the robust bitterness of espresso and a whisper of cocoa. The ladyfingers, soaked just long enough to stay crisp yet flavorful, give a gentle crunch that contrasts the creamy layers. The addition of egg‑white meringue lifts the entire dessert, making it almost cake‑like, while the cocoa dust on top provides a subtle, bittersweet finish that keeps you coming back for more.
I’ve spent years perfecting this recipe because the classic tiramisu often feels either too heavy or too sweet. By folding a stiff meringue into the mascarpone base, I create a texture that feels both indulgent and airy—like a cloud that’s been kissed by espresso. The secret to success? Keep the mascarpone cold, avoid over‑whisking, and use a good quality espresso or strong coffee. Below, I’ll walk you through each step, and I’ll point out the key technique that ensures a flawless finish.
Why This Traditional Italian Tiramisu Recipe Is the Best
The secret lies in the double‑layered cream: the first layer of cold mascarpone provides depth and richness, while the second layer of airy meringue turns the dessert into a light, cloud‑like experience. My background in French pastry gives me the confidence to fold in meringue without deflating the mixture, ensuring a silky finish that still holds its shape.
The technique I use is borrowed from a pastry chef I apprenticed under in Paris, who taught me that whisking the mascarpone on medium speed for exactly 30–60 seconds creates the ideal micro‑foam. This step is crucial for a stable base that won’t separate when the meringue is folded in.
Even beginners will find this recipe approachable because all the steps are straightforward and the ingredients are pantry staples. The key is to keep everything chilled and to follow the order of operations carefully—especially when folding the meringue, which can be a common pitfall for novices.
Classic Italian Tiramisu Ingredients
I source my mascarpone from a local dairy on the Upper West Side, the freshest eggs from Brooklyn farmers, and the ladyfingers from a boutique bakery in the East Village. The result is a dessert that carries the flavors of Italy, the precision of French technique, and the convenience of an NYC grocery aisle.
Ingredients List
- 16 oz Mascarpone cheese (cold, 450 g, e.g., Galbani)
- 4 egg yolks
- 2/3 cup granulated sugar (133 g)
- 1 tsp vanilla extract
- 1/4 tsp salt
- 1 1/2 cup heavy cream, chilled (360 g)
- 4 egg whites (or 30–36 ladyfingers)
- 1 1/2 cup strong black coffee, room temperature (360 g)
- 2 Tbsp cocoa powder, for dusting
Ingredient Spotlight
Mascarpone is the backbone of tiramisu; choose a brand with a high fat content for a richer mouthfeel. In the U.S., look for “Italian cream cheese” labels; if unavailable, a low‑fat ricotta can substitute but will alter the silky texture.
Egg Yolk brings depth; use free‑range for a fuller flavor. If you’re allergic, replace with 1 Tbsp mascarpone plus 1 Tbsp Greek yogurt for a lighter base.
Heavy Cream must stay cold; chilling it in the fridge for at least an hour ensures it whips to medium stiff peaks. Substitute with 2 Tbsp cold butter + 1 Tbsp milk to mimic richness if you’re lactose intolerant.
| Original Ingredient | Best Substitution | Flavor / Texture Impact |
|---|---|---|
| Mascarpone | Ricotta (low‑fat) | Less creamy, slightly granular |
| Egg Yolk | Mascarpone + Greek yogurt | Lightens body, adds tang |
| Heavy Cream | Cold butter + milk | Similar richness, slightly firmer |
How to Make Traditional Italian Tiramisu — Step-by-Step
Let’s dive into a step‑by‑step guide that ensures your tiramisu turns out silky, airy, and irresistibly coffee‑flavored.
Step 1: Whisk Mascarpone
Place the cold mascarpone in a chilled bowl. Whisk on medium speed for 30–60 seconds until it becomes light and creamy. Scrape the bowl to make sure all lumps are removed. This micro‑foam will serve as the base for your airy mousse.
💡 emy’s Pro Tip: Keep the bowl chilled throughout the process to prevent the mascarpone from softening too quickly.
Step 2: Double‑Boiler Yolk & Sugar
In a heat‑proof bowl, combine egg yolks with 2/3 cup sugar. Set the bowl over a saucepan with 1–2 in. simmering water (double boiler). Whisk on medium‑high for exactly 2 minutes until the mixture turns light and fluffy. Remove from heat immediately.
⚠️ Common Mistake to Avoid: Over‑whisking can cause the yolks to separate, resulting in a grainy texture.
Step 3: Combine Yolk Mixture with Mascarpone
Pour the warm yolk mixture into the mascarpone bowl. Add salt and vanilla, whisking on medium until just combined. Scrape the sides halfway to incorporate air but avoid over‑mixing.
💡 emy’s Pro Tip: Gently fold with a rubber spatula to maintain the lightness of the base.
Step 4: Whip Heavy Cream
Place the chilled heavy cream in a cold bowl. Whip on medium until medium stiff peaks form—just enough to hold shape without being over‑whipped.
⚠️ Common Mistake to Avoid: Whipping too long can lead to butter separation.
Step 5: Fold Whipped Cream into Mascarpone
Add the whipped cream to the mascarpone mixture in two or three gentle additions. Fold each addition with a spatula, turning the mixture clockwise to keep the air trapped.
💡 emy’s Pro Tip: Fold until the mixture just reaches a uniform, silky consistency.
Step 6: Whip Egg Whites into Meringue
Place the remaining egg whites in a clean bowl. Using a clean whisk, whisk over a saucepan with hot water (double boiler) until the mixture reaches 160 °F (5–8 min). Keep whisking until it becomes a glossy, stiff meringue.
⚠️ Common Mistake to Avoid: Mixing egg whites with a dirty whisk can introduce grease and ruin the meringue.
Step 7: Fold Meringue into Cream
Add the meringue to the mascarpone‑cream base in two or three gentle folds. Fold clockwise with a spatula, taking care not to deflate the airy mixture.
💡 emy’s Pro Tip: The final fold should make the mixture glossy and light, like a cloud.
Step 8: Prepare Coffee
Pour 1 1/2 cups of strong black coffee into a wide bowl. Make sure the coffee is at room temperature; hot coffee will cook the ladyfingers.
⚠️ Common Mistake to Avoid: Using espresso shots that are too hot can soften ladyfingers unevenly.
Step 9: Dip Ladyfingers
Quickly dip each ladyfinger on both sides into the coffee for 2–3 seconds. Do not soak; you want a quick soak to keep the fingers crisp yet moist.
💡 emy’s Pro Tip: Dip the ladyfingers from the back to avoid excess coffee on the front.
Step 10: Layer the Tiramisu
Arrange a layer of soaked ladyfingers on the bottom of an 8×9.5” dish. Spread half of the mascarpone‑meringue mixture evenly over the fingers. Repeat with another layer of soaked ladyfingers, then top with the remaining cream.
⚠️ Common Mistake to Avoid: Over‑packing the layers can make the dessert difficult to slice cleanly.
Step 11: Refrigerate
Cover the dish with plastic wrap and refrigerate for at least 6 hours—overnight is ideal—to allow the flavors to meld and the texture to set.
💡 emy’s Pro Tip: If you’re short on time, a 3‑hour chill will still give you a delightful texture.
Step 12: Dust Cocoa & Serve
Just before serving, sift 2 Tbsp cocoa powder evenly over the top. Slice into portions with a serrated knife, and enjoy the silky, airy, coffee‑laden layers.
⚠️ Common Mistake to Avoid: Over‑sifting cocoa can result in clumpy dust that ruins the finish.
| Step | Action | Duration | Key Visual Cue |
|---|---|---|---|
| 1 | Whisk Mascarpone | 30–60 s | Creamy, light consistency |
| 2 | Double‑Boiler Yolk | 2 min | Light, fluffy white |
| 3 | Combine Mixture | 1 min | Even, glossy base |
| 4 | Whip Cream | ~3 min | Medium stiff peaks |
| 5 | Fold Cream | 2 min | Uniform, silky texture |
| 6 | Whip Meringue | 5–8 min | Glossy, stiff peaks |
| 7 | Fold Meringue | 2 min | Airy, glossy finish |
| 8 | Prepare Coffee | 1 min | Room‑temp coffee |
| 9 | Dip Ladyfingers | 30 s | Moist, firm fingers |
| 10 | Layer Dessert | 5 min | Even layers |
| 11 | Refrigerate | 6–12 hrs | Set texture |
| 12 | Dust Cocoa & Serve | 1 min | Smooth, even dust |
Serving & Presentation
When I plate tiramisu, I slice it into clean, straight wedges that showcase the layered structure. I pair it with a small side of fresh berries—like blueberries or blackberries—to add a pop of color and a subtle fruitiness that cuts through the coffee richness. A drizzle of dark chocolate ganache over the top offers a glossy finish and extra depth of flavor, reminiscent of the café culture in Paris.
In the city that never sleeps, I often serve this dessert at evening gatherings, letting guests sip a glass of chilled espresso or a sparkling rosé that pairs beautifully with the creamy layers. The contrast between the cool, airy mousse and the warm coffee notes makes this dessert feel both comforting and sophisticated.
The garnish I love is a sprig of fresh mint—its green hue brings a lively contrast, and its aroma adds a refreshing finish. A dusting of cocoa on the rim of the serving glass gives a subtle visual cue that this is a decadent treat waiting to be enjoyed.
| Pairing Type | Suggestions | Why It Works |
|---|---|---|
| Side Dish | Fresh berries, citrus zest | Bright acidity cuts richness. |
| Sauce / Dip | Dark chocolate ganache | Adds depth and glossy finish. |
| Beverage | Espresso, chilled espresso, sparkling rosé | Complements coffee notes and cool texture. |
| Garnish | Mint sprig, cocoa dust, citrus peel | Adds aroma and visual appeal. |
Make-Ahead, Storage & Reheating
I love prepping tiramisu in advance because it frees up time for my late‑night New York brunches. I assemble the layers and refrigerate for at least six hours, then let it sit at room temperature for 20 minutes before serving to ensure the mousse is perfectly airy.
| Method | Container | Duration | Reheating Tip |
|---|---|---|---|
| Refrigerator | Sealed glass dish | 6–12 hrs | Let sit 20 min before serving. |
| Freezer | Air‑tight zip bag | 3 months | Thaw in fridge overnight, then chill 2 hrs. |
| Make‑Ahead | Refrigerated dish | 2 days in advance | Assemble before baking, refrigerate. |
When reheating from frozen, I gently warm the tiramisu in a low oven (150 °F) for 15 minutes, then let it rest to regain its airy texture. If you’re short on time, simply let the dessert sit at room temperature for 30 minutes after refrigeration; the coffee and cream will relax enough to provide the same mouthfeel.
Variations & Easy Swaps
| Variation | Key Change | Best For | Difficulty Impact |
|---|---|---|---|
| Savory Tiramisu | Add grated parmesan to mascarpone, use espresso with a splash of balsamic. | Coffee lovers. | Medium. |
| Gluten‑Free | Use gluten‑free ladyfingers or crushed almond biscuits. | Dietary restrictions. | Easy. |
| Seasonal Twist | Swap cocoa dust with grated citrus zest, add fresh berries. | Spring & summer. | Easy. |
Savory Tiramisu
I once paired parmesan into the mascarpone for a savory twist that echoes the rich cheeses of my Moroccan heritage. Adding a splash of balsamic to the coffee deepens the flavor profile, turning the dessert into a sophisticated palate cleanser for a dinner party.
Gluten‑Free Tiramisu — Dairy‑Free Alternative
For those who need a gluten‑free option, I replace ladyfingers with almond biscotti or a crumble of coconut flour cookies. The result is a slightly firmer base but retains the airy, creamy interior that defines tiramisu.
Seasonal Tiramisu — Citrus & Berry Edition
During the spring, I brighten the dessert with a dusting of orange zest and top it with fresh strawberries. The citrus cuts the sweetness while the berries add a juicy burst that transports you straight to a sunny New York rooftop garden.
How long does tiramisu need to chill?
Tiramisu benefits from a minimum of six hours in the refrigerator, but for the best flavor and texture, let it chill overnight. The extended time allows the mascarpone to set and the espresso to infuse fully, giving you a silky, cohesive dessert that holds its shape when sliced.
Can I use instant coffee instead of espresso?
Yes, you can substitute a strong instant coffee for espresso, but the flavor profile will be slightly lighter. To maintain depth, brew the instant coffee double strength, then cool it to room temperature before dipping the ladyfingers. The resulting tiramisu will still be creamy and flavorful, though it will lack the subtle espresso bitterness.
Is it safe to use raw eggs in tiramisu?
Traditional tiramisu recipes use raw eggs, but for safety you can use pasteurized eggs or a beaten egg yolk paste made with a double boiler to reduce the risk of salmonella. The double‑boiler method gently cooks the yolks while maintaining a silky consistency, ensuring a safe and delicious dessert.
Can I freeze tiramisu?
Yes, tiramisu can be frozen, but it’s best to freeze the assembled dessert in an airtight container for up to three months. When ready to serve, thaw it in the refrigerator for 6–8 hours, then allow it to come to room temperature for 20 minutes to restore its airy texture and full flavor.
What’s the best type of ladyfingers to use?
Choose light, airy ladyfingers that are not overly stiff. In NYC, I favor the brand “Ladyfingers of San Lorenzo” because they stay crisp after soaking and have a subtle vanilla flavor that complements the espresso. Avoid overly sweet or dense cookies, as they can alter the classic balance of textures.
Is tiramisu safe for children?
While tiramisu is a delightful dessert, it does contain raw eggs and dairy, which some parents may worry about. If you’re serving children, consider using pasteurized eggs or a safe egg substitute, and ensure all dairy is fully pasteurized. Alternatively, prepare a smaller portion with a lower coffee intensity for younger palates.
Can I make tiramisu ahead of time?
Absolutely! The best approach is to assemble the layers and refrigerate the tiramisu for at least six hours or overnight. The dessert will keep in the refrigerator for up to 3 days. For longer storage, freeze the assembled dessert, then thaw and chill before serving to maintain the airy texture and flavor integrity.
What is the key difference between traditional tiramisu and this egg‑white version?
The main difference lies in texture: the traditional recipe uses only mascarpone and cream, resulting in a denser mousse. By incorporating a stiff egg‑white meringue, I create an airy, almost soufflé‑like layer that feels light on the tongue, making the dessert feel less heavy and more like a dessert that could be enjoyed at any time of day.
Can I substitute mascarpone with ricotta?
Yes, ricotta can replace mascarpone, but you’ll need to blend it with a tablespoon of heavy cream to smooth out its grainy texture. The substitution will produce a slightly lighter and less rich dessert, but it still delivers the creamy base essential to a classic tiramisu.
What coffee should I use for tiramisu?
Use a strong, dark roast espresso or a French press coffee with a robust flavor. Avoid light, fruity coffees, as they will dilute the traditional bitter depth of tiramisu. In New York’s coffee shops, I often pick a single‑origin espresso with notes of chocolate and caramel, which balances the sweet cream and the cocoa dust on top.
Share Your Version!
I’d love to hear how you tweak this recipe! Drop a star rating and a comment below so we can swap tips. Snap a photo of your tiramisu and share it on Instagram or Pinterest, tagging @cookingwithemi. Tell me, which ingredient do you think could be swapped for a new flavor adventure?
From my NYC kitchen to yours — I hope this recipe brings as much warmth to your table as it does to mine. — emy 🧡
Love This Recipe? Save It to Pinterest!
If you enjoyed this Traditional Italian Tiramisu recipe, don’t let it get lost in your browser tabs! 😄 Pin it now so you can find it again anytime — and explore hundreds more tried‑and‑tested recipes waiting for you on my Pinterest boards.
👉 Follow emy on Pinterest @exorecipe
📌 Pin this recipe · 🔁 Re-pin your favorites · 💬 Tag me when you make it — I love seeing your creations!
Love sharing recipes?
Leave a comment, give a star rating, and let me know your favorite twist on this tiramisu! I’d love to see your photos—share them on Instagram or Pinterest and tag @cookingwithemi.
BEST Classic Italian Tiramisu Recipe
Description
A complete guide for making classic Italian tiramisu: creamy and light with the perfect level of sweetness which lets the coffee flavor shine
Ingredients
- 16 oz Mascarpone cheese (450g), cold from the fridge – I recommend Galbani
- 4 egg yolks
- 2/3 cup granulated or caster sugar (133g)* – if using egg whites, divide into 2 portions of 1/3 cup and 1/3 cup
- 1 tsp vanilla
- 1/4 tsp salt
- 1 1/2 cup heavy cream, chilled (360g) OR 4 egg whites
- 30–36 ladyfingers*
- 1 1/2 cup strong black coffee, room temperature (360g)*
- 2 tbsp cocoa powder to dust
Instructions
- Whisk the mascarpone cheese on medium speed for 30-60 seconds until creamy. Scrape the bowl and set aside
- In a separate heat-proof bowl, add the egg yolks and 2/3 cup sugar. Boil 1-2" of water in a saucepan and reduce heat to the lowest setting. Place the bowl with egg yolks and sugar on top of the saucepan such that the water does not touch the bottom of the bowl. This is a double boiler. Whisk on medium-high speed for exactly 2 minutes, then remove from heat. The mixture will be light and fluffy. Do not overmix or overheat as it can become grainy*
- Pour the egg yolk and sugar mixture onto the mascarpone cheese. Add salt and vanilla, then whisk on medium speed just until combined, scraping the bowl halfway (do not overmix as the mixture can become grainy)
- In a separate bowl, whip the cold heavy cream until it reaches medium stiff peaks (just starts to hold shape). Do not overmix
- Add the whipped cream to the mascarpone mixture in 2-3 additions, folding gently with a rubber spatula and taking care not to knock out the air. You will have a creamy, light mixture
- Whisk the mascarpone cheese on medium speed for 30-60 seconds until creamy. Scrape the bowl and set aside
- In a separate heat-proof bowl, add the egg yolks and 1/3 cup sugar. Boil 1-2" of water in a saucepan and reduce heat to the lowest setting. Place the bowl with egg yolks and sugar on top of the saucepan such that the water does not touch the bottom of the bowl. This is a double boiler. Whisk on medium-high speed for exactly 2 minutes, then remove from heat. The mixture will be light and fluffy. Do not overmix or overheat as it can become grainy*
- Pour the egg yolk and sugar mixture onto the mascarpone cheese. Add salt and vanilla, then whisk on medium speed just until combined, scraping the bowl halfway (do not overmix as the mixture can become grainy)
- In a separate clean bowl, add the egg whites and remaining 1/3 cup sugar. Place on the saucepan with boiling water again, and whisk on medium-high speed with a clean whisk until the mixture reaches 160F (5-8 minutes). Remove from heat and keep whisking until a glossy, stiff meringue forms*
- Add the meringue to the mascarpone mixture in 2-3 additions, folding gently with a rubber spatula and taking care not to knock out the air. You will have an airy, light mixture
- Pour the coffee into a wide bowl, and make sure it is not hot. Dip each ladyfinger quickly into the coffee (I do a quick dip on each side)* and add a layer of soaked ladyfingers in the bottom of a 8×9.5" rectangular dish*
- Spread on half of the mascarpone cream evenly
- Repeat with another layer of soaked ladyfingers
- Top with the remaining mascarpone cream
- Cover and refrigerate for at least 6 hours, or ideally overnight
- When ready to serve, sift the cocoa powder evenly on top of the tiramisu. Cut into slices and serve!
