Table of Contents
Ice Cream Sandwiches Recipe – The Perfect Summer Treat
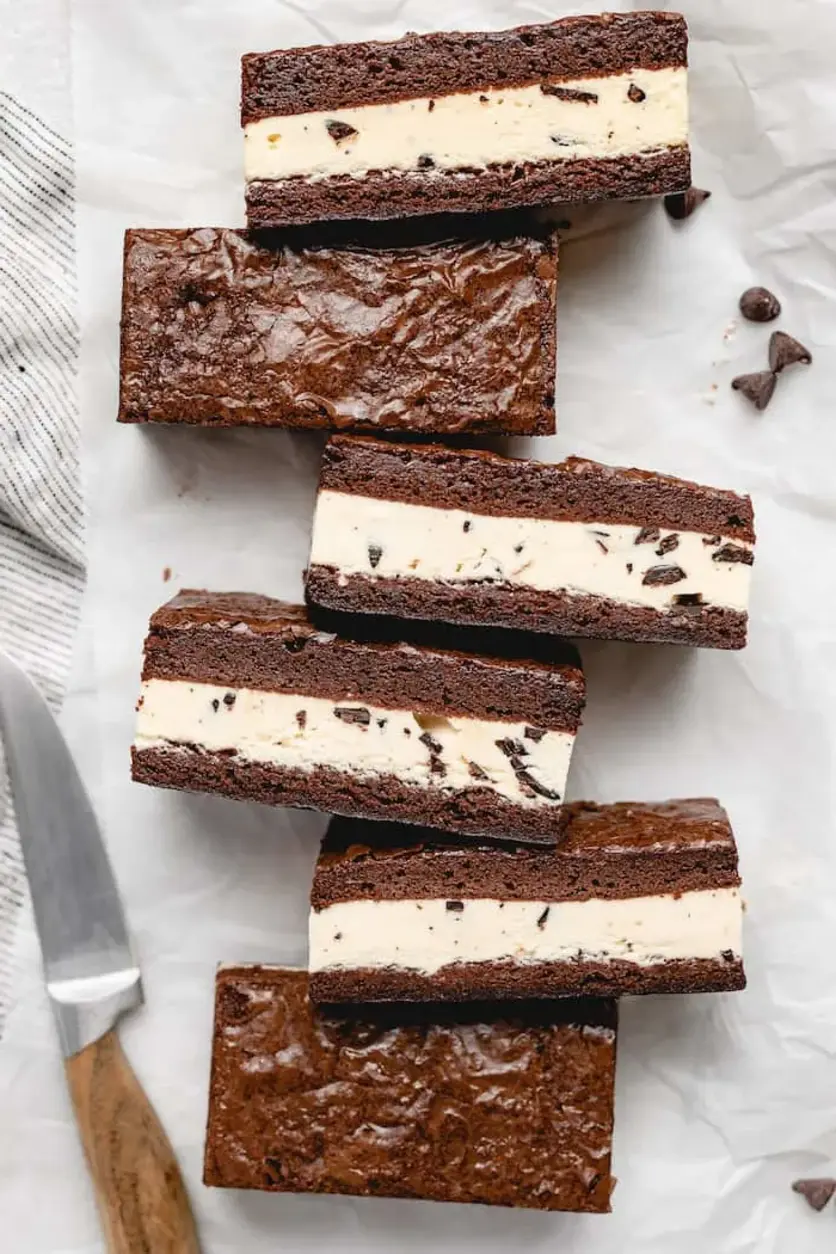
Let me tell you a little secret: the best Ice Cream Sandwiches are made with a brownie that’s both fudgy and firm enough to hold up to a generous scoop of your favorite ice cream. I learned this lesson early on, right in my mother’s kitchen in Morocco, where we’d make a simple version with melted chocolate and warm spices. But it wasn’t until I trained in pastry in Paris that I perfected the technique. Now, here in NYC, I’ve combined those world-class skills with the bold flavors of my childhood to create Ice Cream Sandwiches that are truly something special. This recipe uses a rich, crackly-topped fudge brownie as the base, creating a perfect sandwich that won’t fall apart.
Imagine this: you take one bite and your teeth first meet a delicate, crackled brownie top. Next comes the soft, dense, fudgy interior that’s rich with deep cocoa and buttery vanilla notes. Then the cold, creamy, melting ice cream blends in—creating a moment of pure, cool bliss. The brownie isn’t dry or cakey; it’s dense and moist, providing a perfect contrast to the ice cream. My version uses a double-brownie technique for a full, generous sandwich that delivers an unforgettable texture in every bite—crackly, fudgy, and perfectly chilled.
Growing up, I watched my mother use simple, honest ingredients to create magic. That same philosophy drives me today, but I’ve added French pastry precision—like the exact mixing method for a crackled top—to make this recipe foolproof. I want you to skip the trial and error and get straight to enjoying the perfect Ice Cream Sandwiches. That’s why I’m sharing my tested tips for avoiding a soggy brownie, ensuring the ice cream spreads evenly, and cutting clean, beautiful squares. Trust me, these brownie-based ice cream sandwiches are a game-changer for any Summer dessert spread.
Why This Ice Cream Sandwiches Recipe Is the Best
The Flavor Secret: The real magic lies in the brownie itself. I use a high ratio of butter and brown sugar, creating an intensely rich, fudgy base that’s reminiscent of the best Moroccan pastries. The crackled top is achieved by properly creaming the eggs and sugar, a technique I mastered in Paris. The result is a brownie that’s deeply chocolatey, with a salty edge that perfectly complements any sweet ice cream flavor—whether you prefer classic vanilla bean, rich chocolate, or a fruity strawberry.
Perfected Texture: Many homemade ice cream sandwiches fail because the brownie gets too hard or too crumbly after freezing. My recipe avoids this through a crucial step: using melted butter instead of solid fat and adding a touch of vegetable oil for extra tenderness. The brownies are baked until just barely set in the center, ensuring they remain soft and pliable even after hours in the freezer. This means no more cracked, messy sandwiches—just beautiful, perfect squares.
Foolproof & Fast: This recipe is designed for busy home cooks. The brownie batter comes together in under 15 minutes with a hand mixer, and the hands-off baking time is just 30-40 minutes. The hardest part is waiting for the sandwiches to freeze! I’ve streamlined the assembly by baking the brownies in two separate 8×8 pans, eliminating the need to cut a single slab in half—it’s a little hack I use in my own NYC kitchen to save time and ensure even layers.
Ice Cream Sandwiches Ingredients
Every ingredient here has a purpose. When I go to my local farmers market in NYC, I always look for high-quality unsalted butter and fresh eggs—the foundation of a great fudgy brownie. These are simple, pantry-friendly ingredients that you can find at any American grocery store.
Ingredients List
- 1 1/2 cups unsalted butter (melted)
- 2 1/4 cups granulated sugar
- 1 1/2 cups light brown sugar (packed)
- 6 large eggs (room temperature)
- 3 tbsp vegetable oil
- 2 tbsp pure vanilla extract
- 2 1/4 cups all purpose flour
- 1 1/2 cups cocoa powder
- 1 1/2 tsps salt
- 1.5 qts favorite ice cream flavor (you can use less, about 3/4 of this is usually enough)
Ingredient Spotlight
Unsalted Butter: This provides the rich fat content that makes the brownies fudgy. I prefer it melted for a denser, chewier texture. In a pinch, you can use salted butter, but reduce the added salt to 1/2 teaspoon. The flavor will be slightly saltier, which works well with chocolate and caramel ice creams.
Cocoa Powder: I use natural unsweetened cocoa powder for its deep, slightly acidic flavor that reacts with the baking soda (not used here) or simply gives a classic brownie taste. You can substitute Dutch-process cocoa for a more mellow, dark chocolate flavor, but the texture will be slightly less fudgy. My favorite brand is Scharffen Berger, which I buy at the Union Square Greenmarket.
Large Eggs: Room-temperature eggs are non-negotiable here. They emulsify better with the butter and sugar, creating that beautiful crackled top. If you forget to take them out of the fridge, place them in a bowl of warm water for 5-10 minutes. This is a simple trick I learned in pastry school in Paris.
| Original Ingredient | Best Substitution | Flavor / Texture Impact |
|---|---|---|
| Unsalted Butter | Salted Butter (reduce added salt) | Slightly saltier, enhances chocolate flavor |
| Cocoa Powder (natural) | Dutch-process cocoa | Milder, darker flavor; slightly less fudgy |
| Large Eggs | Flax eggs (1 tbsp flax + 3 tbsp water per egg) | Denser, less crackly top; vegan option |
| All-Purpose Flour | Gluten-free 1:1 Baking Flour | Slightly crumblier; still delicious |
How to Make Ice Cream Sandwiches — Step-by-Step
Follow these steps closely, and you’ll be rewarded with beautiful, delicious Ice Cream Sandwiches that rival any store-bought version. I’ll guide you through each part with my best tips!
Step 1: Preheat and Prep Pans
Preheat your oven to 350°F (175°C). Grease two 8×8 inch pans generously with butter or baking spray. Line the bottom of each pan with a strip of parchment paper, leaving about 4-6 inches of paper hanging over the sides. This paper will be your life-saver later when you need to lift the brownies out.
💡 emy’s Pro Tip: Use a double layer of parchment paper for extra strength—it slides out easier and won’t tear under the weight of the brownie.
Step 2: Mix Wet Ingredients
In a medium-sized bowl, add the melted butter, granulated sugar, and light brown sugar. Mix using a hand mixer on medium speed until well combined—about 1-2 minutes. The mixture should look glossy and slightly thickened.
Step 3: Add Eggs and Flavor
Add the eggs one at a time, mixing on medium speed after each addition until fully incorporated. This step is crucial for creating that beautiful, crackled top. Mix well! After adding all eggs, the batter should be smooth and emulsified. Then, mix in the vegetable oil and vanilla extract.
⚠️ Common Mistake to Avoid: Don’t rush adding the eggs. If you dump them all in at once, the batter can separate and you’ll lose the crackled effect.
Step 4: Combine Dry Ingredients
In a separate bowl, whisk together the all-purpose flour, cocoa powder, and salt. Reduce the speed of your mixer to low. In intervals, gradually add the dry mixture to the wet mixture, mixing until just combined. Do not overmix—stop as soon as the flour disappears.
💡 emy’s Pro Tip: A few streaks of flour left in the batter are okay. Overmixing develops gluten and results in tough, cakey brownies. We want them fudgy!
Step 5: Bake and Cool
Divide the batter evenly between your two prepared pans (about 2 cups per pan). Use a rubber spatula to gently spread it into an even layer. Bake for 30-40 minutes, or until a toothpick inserted into the center comes out with a few moist crumbs—just barely clean. Do not overbake. Remove from the oven and allow the brownies to cool in the pans for exactly 10 minutes.
⚠️ Common Mistake to Avoid: Overbaking is the #1 mistake. The residual heat will continue cooking the brownies after you pull them out, so err on the side of a slightly underbaked center for the best fudgy texture.
Step 6: Assemble and Freeze
Use the parchment paper to carefully lift one brownie half out onto a cooling rack. Only peel the parchment paper off one of the halves (the one you just lifted out). Let both halves cool completely to room temperature. While that happens, thaw your ice cream at room temperature for 5-10 minutes until it’s spreadable but not melted. Place the parchment-lined brownie half back into its pan. Use a large spoon or rubber spatula to spread the softened ice cream evenly over the top. Use about 3/4 of the ice cream, then add more if you like a thick layer. Invert the second brownie half (the one with the parchment paper still on) and place it over the ice cream, top-side down. Cover tightly with aluminum foil or plastic wrap and freeze for at least 6 hours, but overnight is best for clean cuts.
| Step | Action | Duration | Key Visual Cue |
|---|---|---|---|
| 1 | Preheat oven and prep pans | 5 mins | Parchment paper hangs over sides |
| 2 | Mix wet ingredients | 3 mins | Glossy and thickened |
| 3 | Add eggs and flavor | 4 mins | Smooth, emulsified batter |
| 4 | Combine dry ingredients | 2 mins | Just combined, no dry streaks |
| 5 | Bake and cool | 30-40 mins + 10 mins | Toothpick with moist crumbs |
| 6 | Assemble and freeze | 6+ hours | Firm, solid block |
Serving & Presentation
When you’re ready to serve, remove the assembled block from the freezer and let it sit at room temperature for exactly 5-10 minutes. This softens the edges just enough to make cutting clean and easy. Use the parchment paper to lift the entire block out of the pan onto a cutting board. With a sharp, large chef’s knife, cut into 8 even squares. For the best presentation, wipe the knife clean between cuts. I love serving these on a rustic wooden board—it reminds me of the food markets in Marrakech.
For a show-stopping dessert, drizzle the sandwiches with warm homemade hot fudge sauce and a sprinkle of flaky sea salt. You can also roll the edges in sprinkles, mini chocolate chips, or crushed nuts before serving for a fun, festive look. My children love them for birthday parties, and I often pair them with a strong espresso for a grown-up treat.

| Pairing Type | Suggestions | Why It Works |
|---|---|---|
| Side Dish | Fresh berries, whipped cream | Bright acidity cuts through richness |
| Sauce / Dip | Hot fudge, caramel sauce, chocolate magic shell | Adds extra decadence and texture |