Indulge your sweet tooth with our delicious and irresistible dessert recipes! Whether you’re craving decadent chocolate treats, fruity delights, or creamy, dreamy confections, we have something for every occasion.
From classic cakes and homemade cookies to no-bake desserts, rich cheesecakes, and festive holiday treats, our recipes are perfect for special celebrations or everyday sweet cravings.
Need something quick? Try our easy, fuss-free desserts that come together in no time. Whether you love warm baked goods, refreshing frozen sweets, or nostalgic comfort desserts, these recipes are sure to bring a little extra joy to your day! 🍰🍫🍪
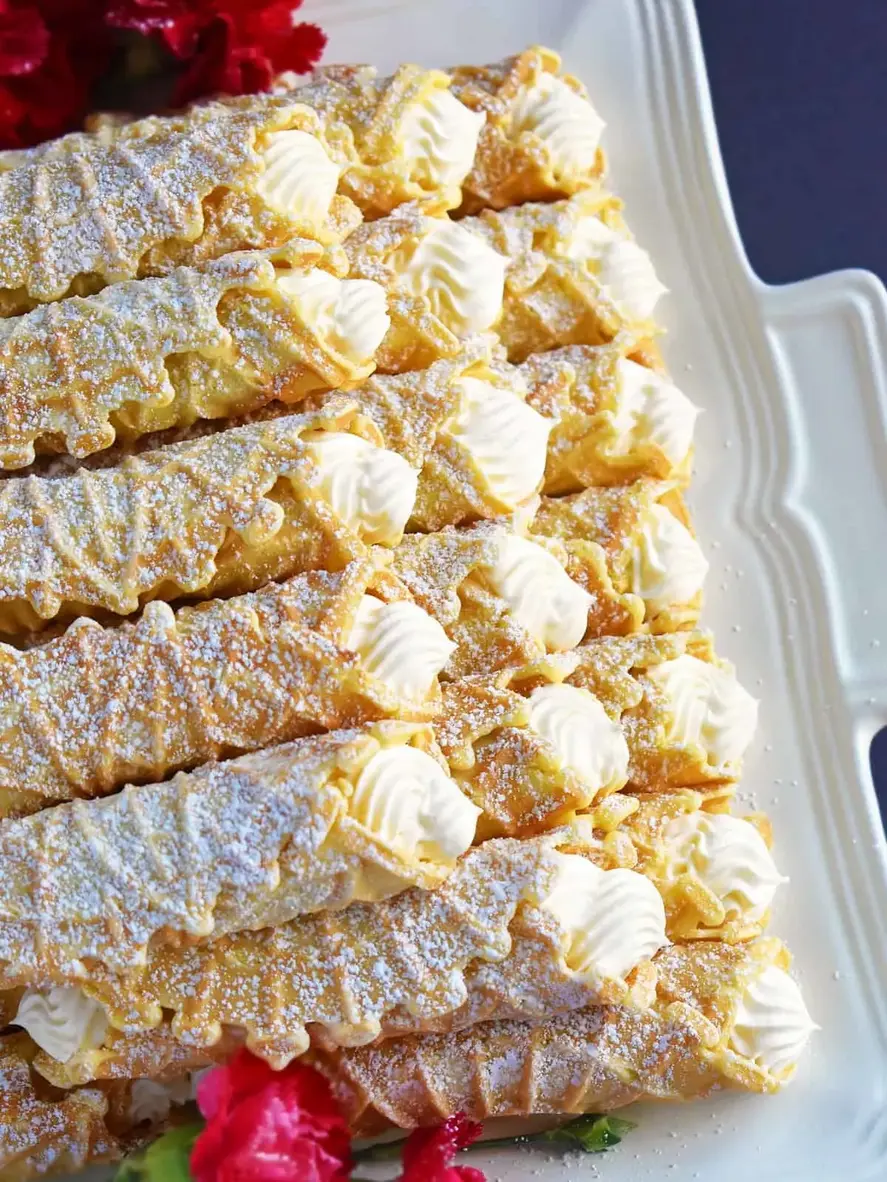
Cream Filled Pizzelles (trubochki)
Creamy, elegant and beautifully shaped waffle-like pastry filled with the best condensed milk filling. These are very popular during holidays, weddings and all kinds of special events. #olgainthekitchen #pizzelles #trubochki #dessert #pastry #creamhorns #cannoli #recipes
Creamy, elegant and beautifully shaped waffle-like pastry filled with the best condensed milk filling. These are very popular during holidays, weddings and all kinds of special events. They will become a staple in your home!
Ingredients
Scale
4 large eggs – room temperature
1/4 cup granulated sugar
1/4 teaspoon fine salt
2 tablespoons grapeseed oil , (vegetable ok too – use melted cooled butter for crispier results)
1/2 teaspoon vanilla extract
1 cup all-purpose flour , – sifted
Instructions
Preheat pizzelle maker while you make the batter. In a medium bowl, with an electric mixer, beat 4 eggs, 1/4 cup granulated sugar and 1/4 tsp salt on high speed until eggs are lightened in color and sugar is dissolved (about 2 minutes).
Add the rest ingredients: 2 tbsp oil, 1/2 tsp vanilla extract and 1 cup sifted all-purpose flour. Beat everything together until flour is all mixed in, on low for about 1 min.
With help of 1 tbsp measuring spoon, spoon batter onto each pizzelle design, close the lid, bake for 18-20 seconds or until dark golden (I count slowly to 18) and quickly but gently take baked pizzelles off using disposable fork. Different pizzelle makers might take as long as 60 seconds to bake each pizzelle. Working quickly, wrap the hot pizzelles around the wooden stick that comes with pizzelle maker. (You have to work fast, otherwise the pizzelles will cool and break when you try to make cylinder shape). Repeat with remaining batter. Single-layer on a baking sheet or tray to cool and dry. (Do not stack these in more than 1 layer while drying. They will become soggy and get squeezed, losing the round shape).
To make the filling: In a medium bowl, with an electric mixer, beat 8 oz cream cheese on high speed (about 1 min). Add in 1/3 cup sweetened condensed milk and 1/4 tsp vanilla extract and beat for 1 minute. Lastly, add 8 oz frozen cool whip and continue beating until filling becomes thick and smooth (2-3 minutes on high). Fill a piping bag with cream and fully pipe each pizzelle (both ends). For final touch, dust with 1 tbsp powdered sugar. Refrigerate until ready to serve.
Notes
Avoid soggy pizzelles: Use melted unsalted butter instead of oil in batter ingredients to make them not as soft. (Oil tends to keep baked goods more on the softer side). Single-layer baked pizzelles and cover on top (to protect from lint) with paper towel or napkin until pizzelles are dry (4-5 hrs). These can be baked ahead of time and filled days later. *If you want the pizzelles to stay crispy until serving, I would suggest filling them just before serving. Like all cakes, when you fill these ahead of time, especially with heavy cream filling, they will become moist and soggy over time.
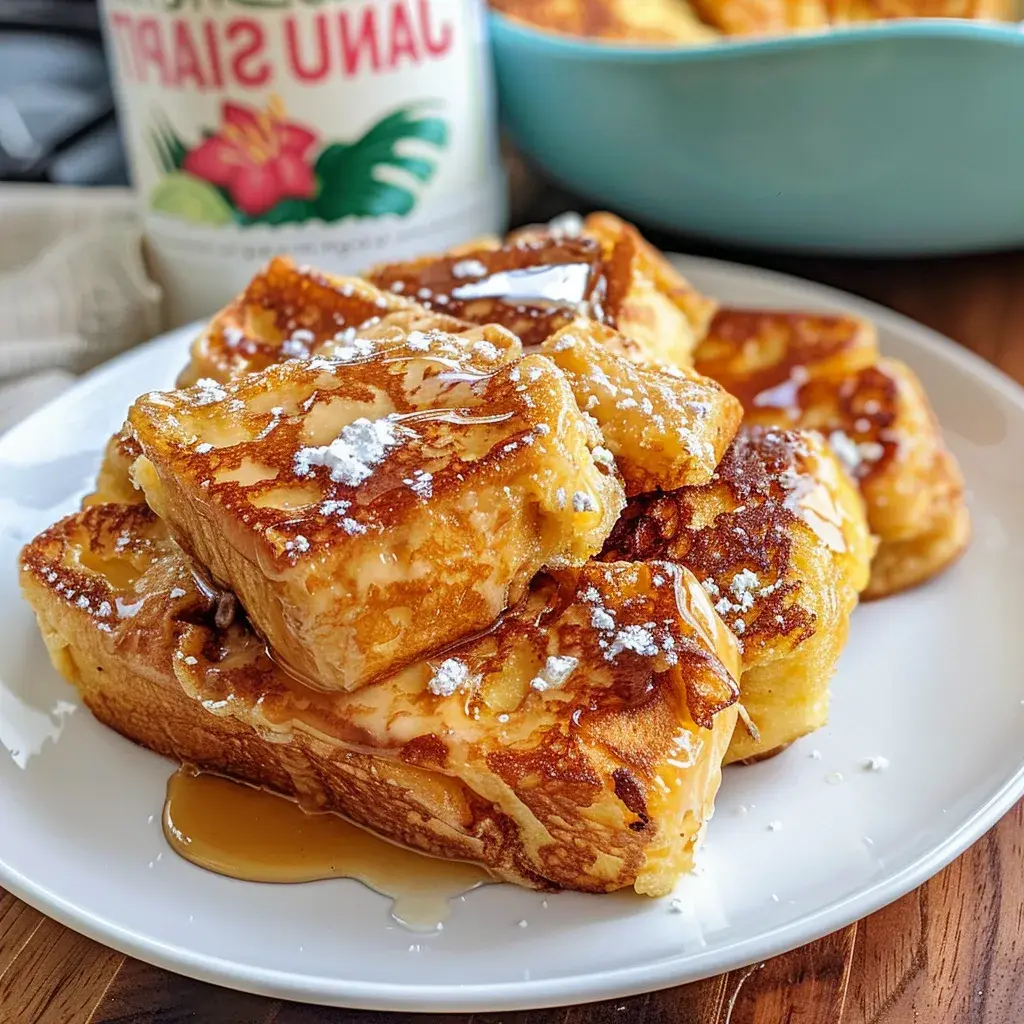
Oh friends, have I got a treat for you today! This Hawaiian Roll French Toast is, hands down, one of the most delicious breakfast creations Ive ever sunk my teeth into. Were talking sweet, pillowy clouds of cinnamon-sugar bliss that practically melt in your mouth.
Ingredients
Scale
1 12 pack Kings Hawaiian Rolls
3 large eggs
3/4 cup half and half or whole milk
1 tablespoon vanilla extract
1 teaspoon ground cinnamon
2 tablespoons brown sugar
Pinch of salt
4 tablespoons butter for cooking
Powdered sugar fresh fruit, maple syrup for serving
Instructions
In a large bowl, whisk together the eggs and half and half until fully combined.
Whisk in the vanilla, cinnamon, brown sugar, and salt until incorporated.
Use a toothpick or skewer to poke several holes in the bottom of each roll so the custard can soak in.
Working in batches, dip the rolls into the custard mixture and let soak for 30 seconds, turning to coat all sides. Dont soak longer or theyll get soggy.
Melt 2 tablespoons of butter in a nonstick skillet or griddle over medium-low heat.
Cook the soaked rolls for 30-60 seconds per side until golden brown, turning carefully with a spatula to get all sides crispy.
Serve the hawaiian roll french toast warm, dusted with powdered sugar and topped with fresh berries and maple syrup if desired.
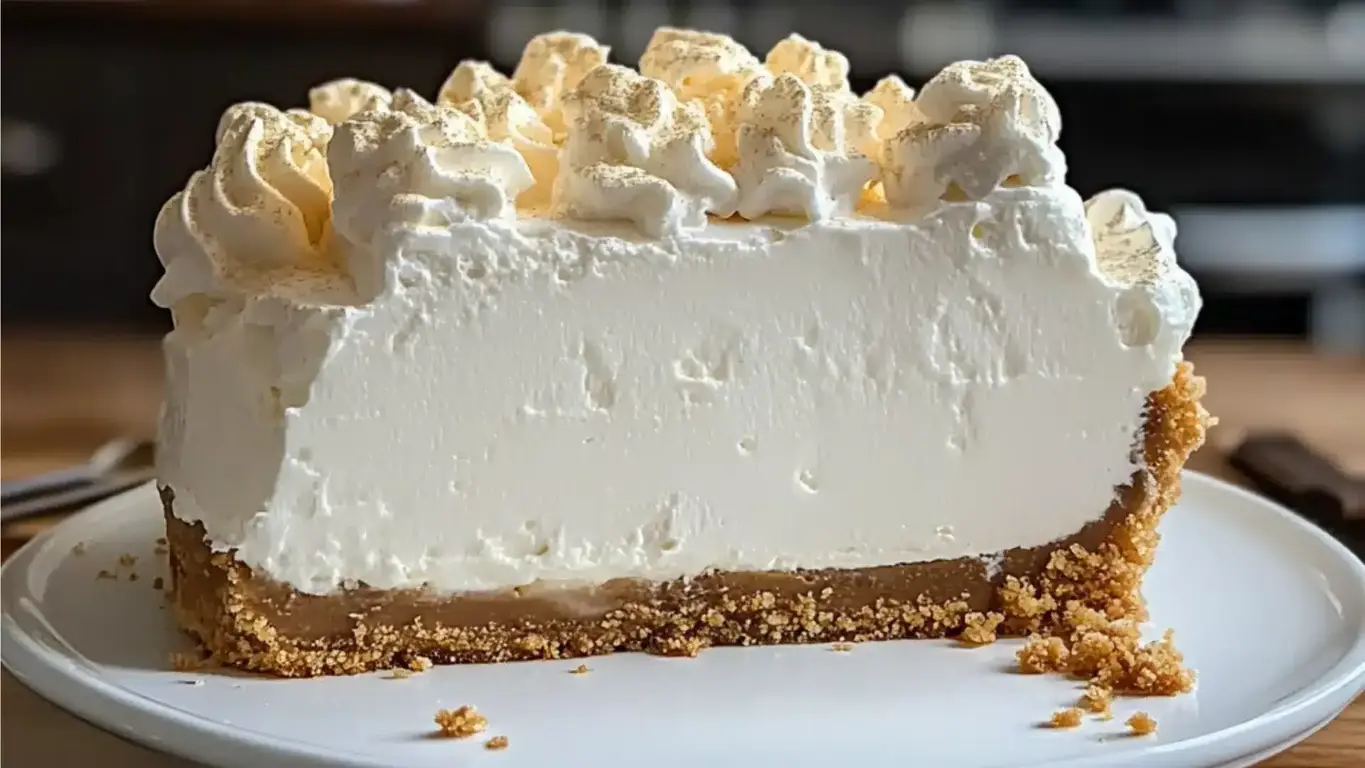
Easy Marshmallow Cheesecake – A Whipped Cream Cheese Delight
This whipped marshmallow cheesecake is a perfect dessert for no bake pies lovers and anyone who craves light, sweet indulgence. #MarshmallowWhipCheesecake #CreamCheeseDesserts #DeliciousPies #EasyCheesecakeRecipes
Crust swaps: Try chocolate wafer cookies or crushed Oreos for a different base Flavor twists: Add lemon zest to the filling for a citrusy note, or swirl in raspberry jam before chilling Make it mini: Use a muffin tin and cupcake liners to create individual cheesecakes
Nutrition
Calories:310 kcal
Protein:1g
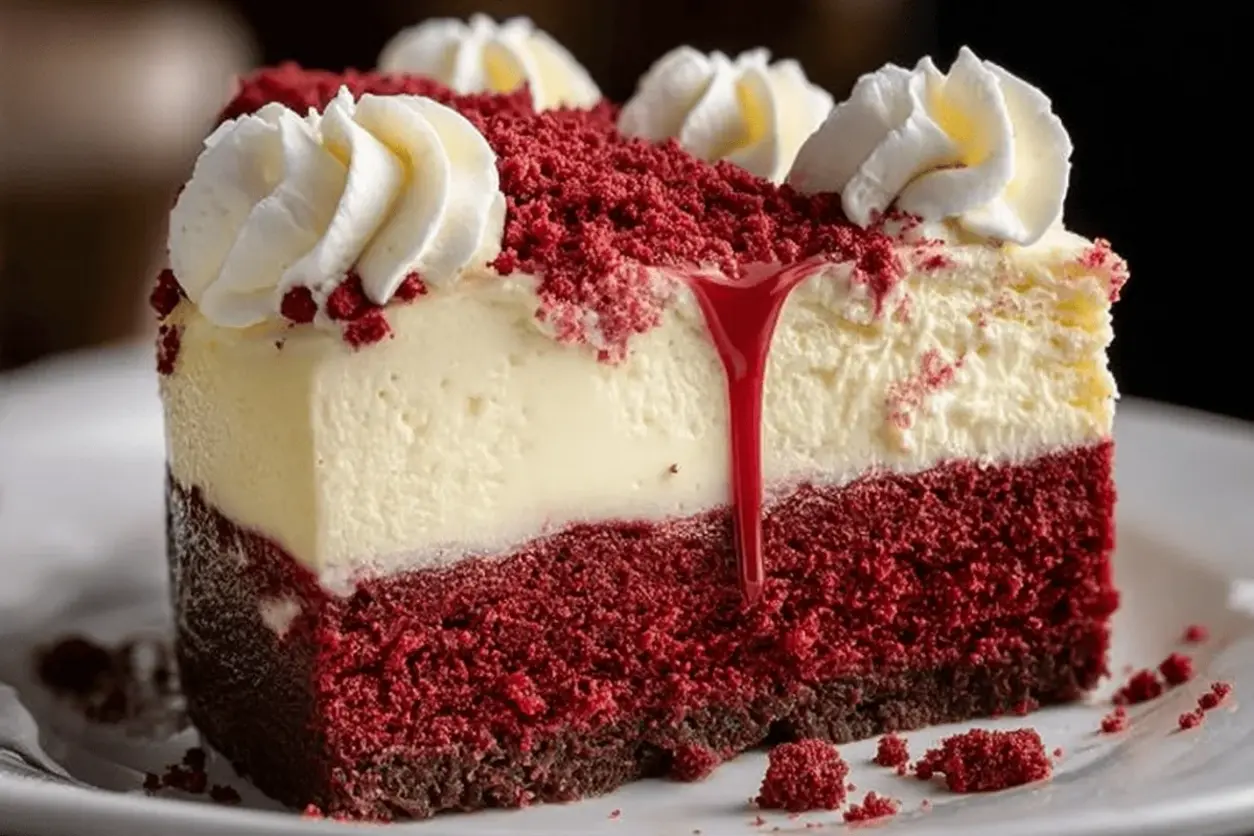
Knock You Naked Red Velvet Cheesecake 🍰❤️ | A Bold, Beautiful Layered Dessert That Turns Heads
Bold in color and unforgettable in flavor, this Knock You Naked Red Velvet Cheesecake combines the richness of red velvet cake with a silky vanilla cheesecake layer and fluffy whipped topping. With dramatic presentation and decadent texture, this showstopping dessert is perfect for holidays, birthdays, or any occasion that calls for a wow-worthy sweet. Ingredients For the Red Velvet Cake Base: • 1 box red velvet cake mix (plus eggs, oil, and water as directed) • 9″ springform pan, greased For the Cheesecake Layer: • 16 oz cream cheese, softened • ⅔ cup granulated sugar For the Whipped Topping: • 2 cups heavy whipping cream • 4 tbsp powdered sugar 📌 Save this ultra-decadent layered cheesecake for celebrations, date nights, or pure indulgence! #RedVelvetCheesecake #KnockYouNakedDessert
A luscious red velvet cake base topped with silky smooth cheesecake and finished with clouds of whipped vanilla cream this layered dessert is everything rich, romantic, and irresistible. Whether youre impressing dinner guests or treating yourself, this is the kind of cheesecake that truly lives up to its name.
Ingredients
For the Red Velvet Cake Base: 1 box red velvet cake mix (plus eggs, oil, and water as directed) 9 springform pan, greased
For the Cheesecake Layer: 16 oz cream cheese, softened cup granulated sugar 2 large eggs cup sour cream 1 tbsp all-purpose flour 1 tsp vanilla extract ¼ tsp salt
For the Whipped Topping: 2 cups heavy whipping cream 4 tbsp powdered sugar 2 tsp vanilla extract Optional: red velvet cake crumbs for garnish
Instructions
Notes
Make Ahead: This dessert is ideal for preparing the day before. It needs at least 4 hours to chill, but overnight chilling makes it even easier to slice and enhances flavor fusion.
Cake Mix Tip: Dont overmix your red velvet cake batter; blend just until combined to keep the crumb light and tender.
Clean Slicing Trick: Dip your knife in hot water and wipe it clean between cuts to achieve bakery-style slices.
Mini Cheesecake Variation: Use a muffin tin lined with cupcake papers to create individual servingsgreat for parties and portion control.
Flavor Twist: Add a teaspoon of espresso powder to the cake mix to deepen the chocolate flavor, or fold in crushed Oreos for added texture.
Cookie Butter No Bake Cheesecake | Practically Homemade
Cookie butter is elevated to the next level when added to this no bake cheesecake. With a cookie crust and crushed cookies in the filling, this cheesecake can’t be beat.
Ingredients
Scale
1– 8.8 ounce pkg. Biscoff cookies
½ cup butter , {melted}
Instructions
Combine Biscoff cookie crumbs {that you have pulsed in a food processor} and melted butter in a bowl. Mix together until everything is nicely incorporated. Pour into a ungreased spring form pan. Press crumbs firmly into the bottom and slightly up the sides of the spring form pan. Refrigerate until filling is ready.
Mix together cream cheese and sweetened condensed milk until creamy using a hand held {or stand mixer}. Add the whipped topping and fold into the cream cheese mixture until combined. Stir in the crushed Biscoff cookies so that they are evenly distributed.
Pour Biscoff cheesecake filling into the crust and spread out into an even layer. Drizzle melted cookie butter over the top of the cheesecake in a circular motion. Using a toothpick {or skewer} swirl the cookie butter into the filling. Refrigerate for 2-4 hours or until set up.
When ready to serve, top with whipped topping around the edge of the cheesecake {I like to use a piping bag} and Biscoff Cookies that have been halved. Store leftovers in refrigerator for up to 4 days.
Nutrition
Calories:844kcal
Sugar:57g
Protein:11g
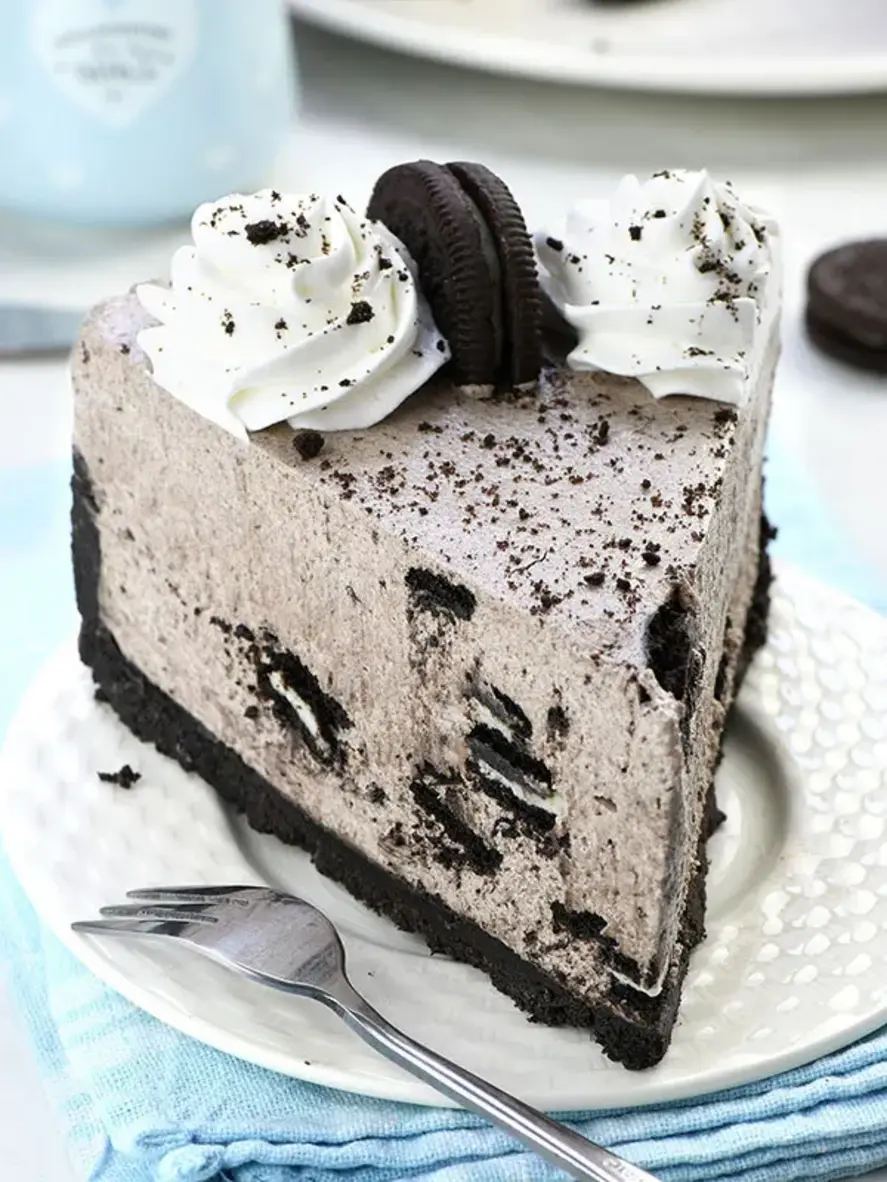
No Bake Oreo Cheesecake
No-Bake Oreo Cheesecake is the ultimate indulgent dessert! This creamy, rich cheesecake with an Oreo cookie crust is quick, easy, and perfect for any occasion. No oven needed for this crowd-pleasing treat! Save this pin for your next party or family gathering. #NoBakeCheesecake #OreoDessert #EasyCheesecakeRecipe #OreoCheesecake #NoBakeDessert
Oreo crumbs from 18 Oreos (it is about 1 1/2 cups; reserve 1 Tablespoons crumbs for decoration)
10 Oreos-chopped
3/4 cup heavy whipping cream
1/3 cup powdered sugar
1/2 tsp vanilla extract
12 Tablespoon Oreo crumbs
6 Oreos, cut in half
Instructions
Line the bottom of a 9-inch springform pan with parchment paper and grease the sides.
Ground whole Oreo cookies with the filling in a food processor to make the fine crumbs.
Add melted butter and whisk with the fork until all crumbs are evenly moistened.
Press the mixture into the bottom and about 1 inch up the sides of the springform pan. Place in the fridge or freezer to firm while you make the filling.
Mix heavy whipping cream until soft peaks form, Add powder sugar and mix until very stiff peaks form, and set aside.
In another large bowl, beat the cream cheese, sugar, and vanilla extract until well combined and smooth.
Fold the whipped cream into the cream cheese mixture in two or three additions until evenly combined.
Then, gently fold in Oreo crumbs, to combine evenly, then, fold in chopped Oreos into the filling.
Spread Oreo cheesecake filling over the firmed crust smooth the top and chill in the fridge until firm, at least 5-6 hours or preferably overnight.
Mix heavy whipping cream, powdered sugar, and vanilla extract until stiff peaks form.
Lose the ring from the springform pan, remove it carefully, and transfer the cheesecake to a serving plate.
Pipe the whipped cream around the rim of the cheesecake place Oreo halves between each swirl and sprinkle with Oreo crumbs.
Store the cheesecake in the fridge for 5-6 days, and for longer storage keep it in the freezer.
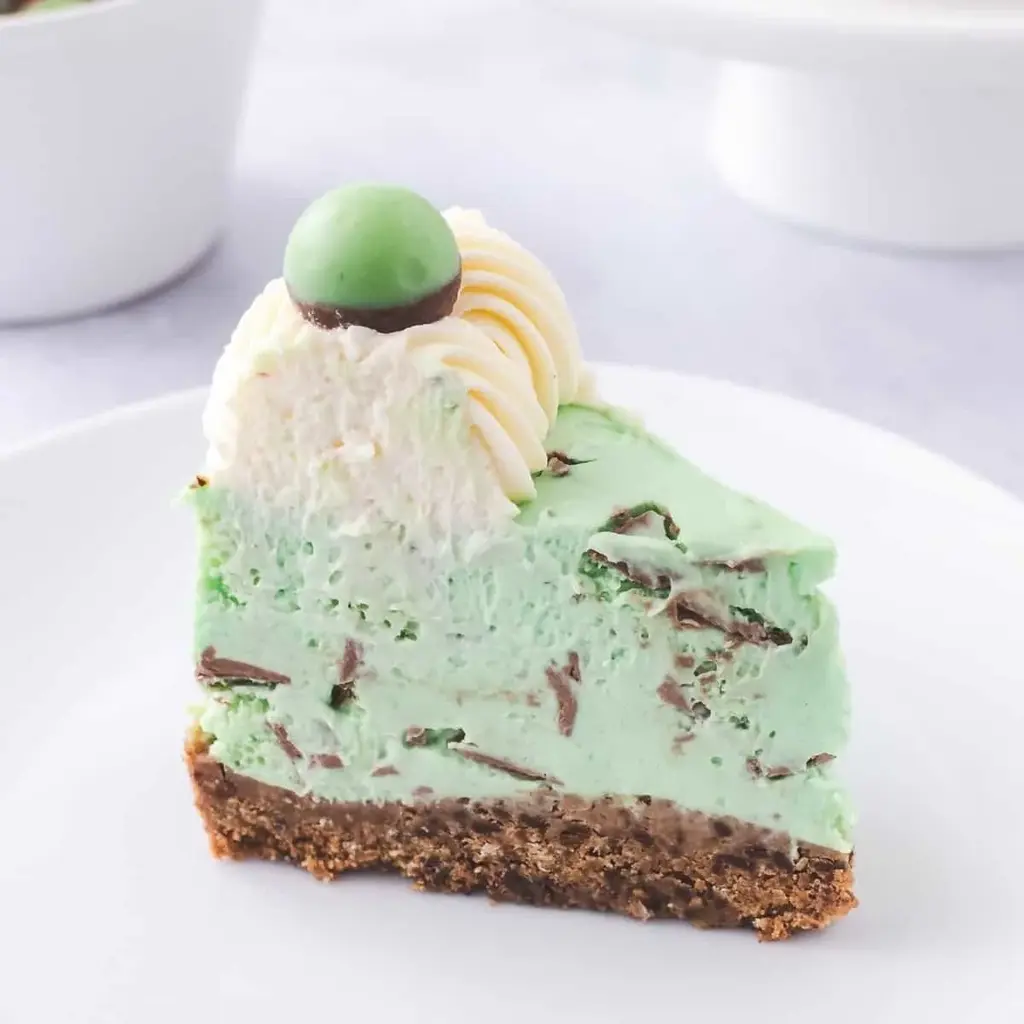
Quick and easy no-bake Mint Aero cheesecake with a velvety peppermint cheesecake filling full of Mint Aero chunks, on top of a dark chocolate Digestive biscuit crust.
Ingredients
Scale
250 g Dark Chocolate Digestive Biscuits or Oreo Cookies
60 g Butter Unsalted, Melted
500 g Cream Cheese Full Fat
75 g Icing Sugar or Powdered Sugar
300 ml Double Cream or Heavy Cream
1 tsp Peppermint Extract
200 g Mint Aero Chocolate or Mint Chocolate
Green Food Colouring Gel
Instructions
Make the biscuit base Add the biscuits into a food processor, and blitz until they form a crumb, then add to a large mixing bowl. Make a well in the centre of the biscuit crumbs, and pour in the melted butter.
Mix together until well combined, and then pour into an 8 inch springform tin. Press down onto the biscuit base and smooth out to the edges. Chill in the fridge for at least 1 hour.
Make the cheesecake filling Using a stand mixer with the paddle attachment, beat the icing sugar, cream cheese, peppermint extract and double cream together. Alternatively, you can make the cheesecake filling, in a large mixing bowl, by hand or with an electric hand whisk. Add green food colour gel to give a green colour.
Taste test the filling and if required add extra peppermint extract a drop at a time. Be careful not to add too much in one go, as the flavour can be overpowering.
Chop the Mint Aero chocolate in small chunks and addnto the cheesecake filling, and gently fold together, using a spoon or spatula, until well combined.
Assemble the cheesecake Pour the cheesecake filling over the top of the chilled biscuit base, then smooth over and level with an offset spatula. Chill the cheesecake in the fridge for at least 6 hours or overnight.
Decorate the cheesecake When ready to serve, whip up the remaining double/ heavy cream with the icing sugar and pipe on top of the cheesecake. Decorate with Mint Aero bubbles.
Notes
Read my Top Tips in the post above for some really helpful hints and tips to make this recipe successfully.
Nutrition
Calories:527kcal
Sugar:22g
Protein:6g
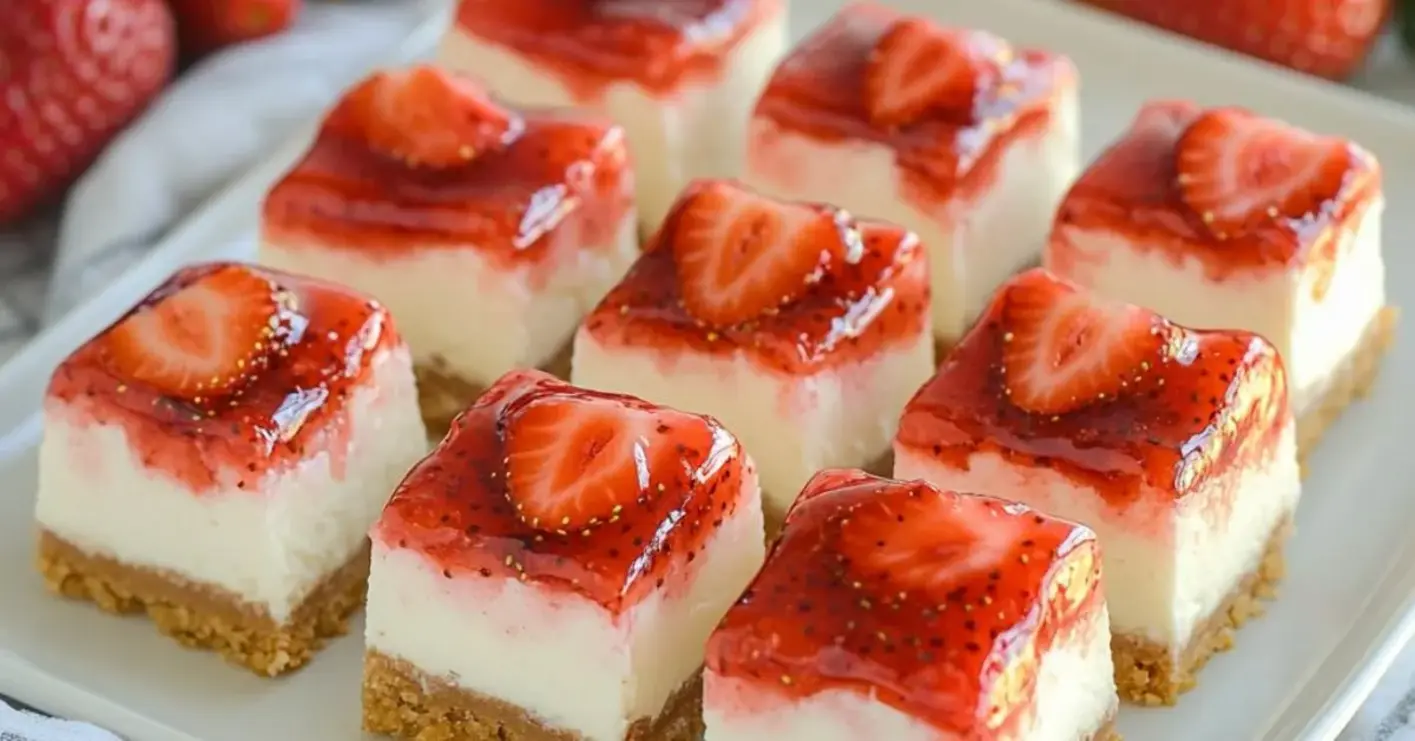
The Best No-Bake Strawberry Cheesecake Bars
These no-bake strawberry cheesecake bars are the perfect balance of creamy and fruity, with a smooth cheesecake layer and fresh strawberries on top. If you’re looking for a no-bake dessert that’s both simple and indulgent, this easy recipe will quickly become a favorite. Perfect for any occasion, these strawberry cheesecake bars offer a refreshing and delicious no-bake dessert option.
These No-Bake Strawberry Cheesecake Bars are the perfect creamy and refreshing treat! With a buttery graham cracker crust, a luscious cheesecake filling, and a sweet strawberry topping, theyre ideal for any occasion.
Instructions
No-Bake Cheesecake Recipe – cookingwithtina.com
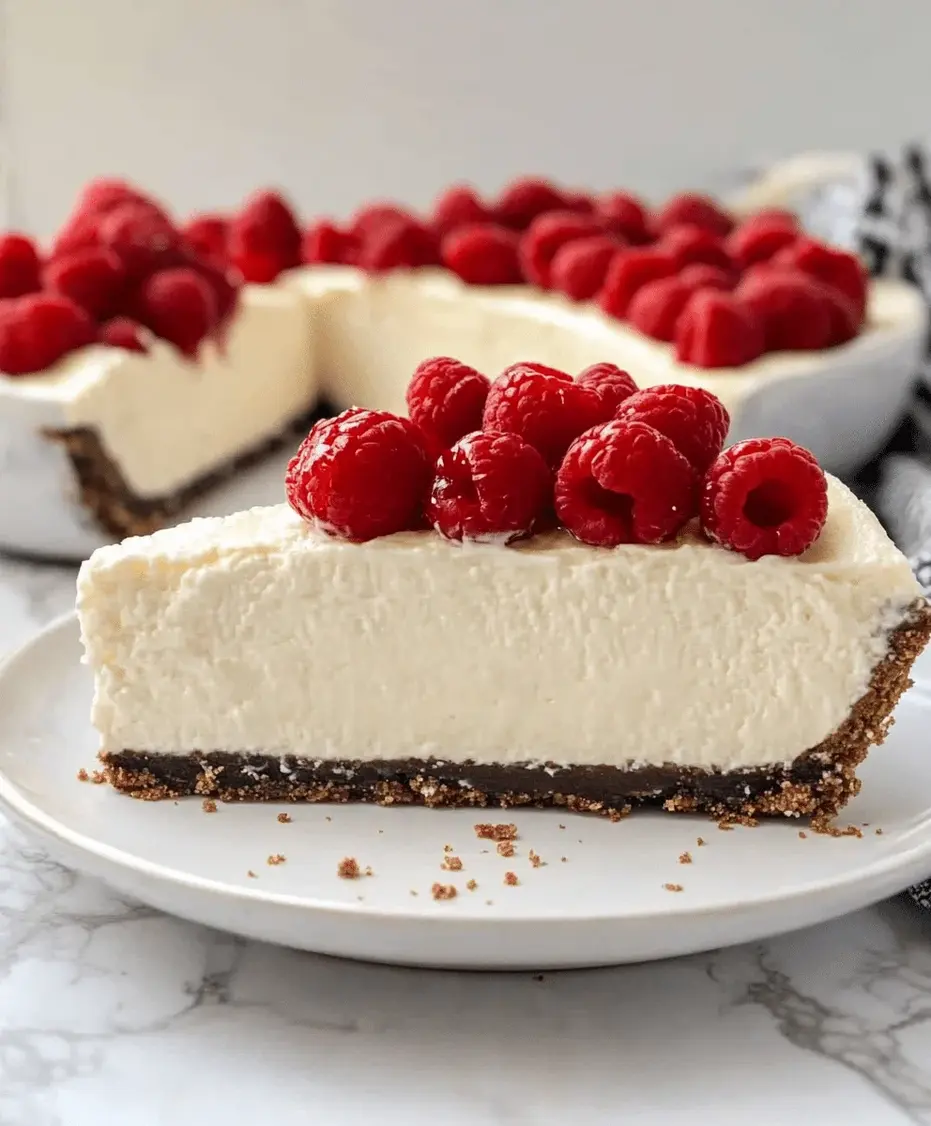
Looking for a delightful dessert that requires no baking? This No-Bake Cheesecake Recipe is incredibly easy to make, showcasing creamy flavors that will impress your family during any gathering or special occasion.
Refrigeration is key for setting the cheesecake; allow at least 4 hours or overnight for best results.
Add fruit toppings or chocolate for extra flavor.
Nutrition
Calories:380 kcal
Sugar:18g
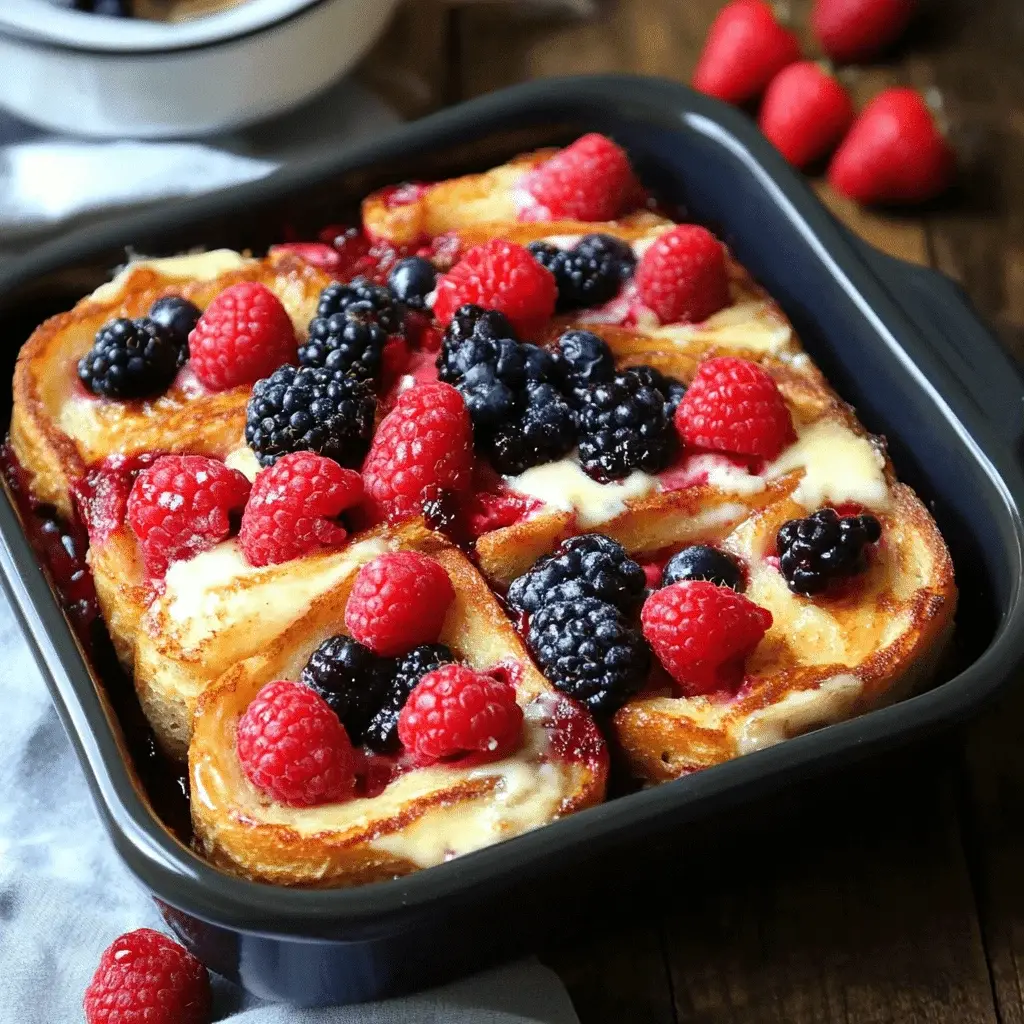
Summer Berry Stuffed French Toast Casserole Bake Recipe
Summer Berry Stuffed French Toast Casserole Bake Recipe
Introduction
Did you know that brunch searches spike by over 60% during the summer months? If you’re looking for the ultimate make-ahead dish to impress your guests without spending the morning in the kitchen, this Summer Berry Stuffed French Toast Casserole Bake is your answer. Forget the fuss of flipping individual slices; this recipe transforms the classic French toast into a decadent, shareable bake. Imagine layers of buttery brioche, pockets of sweet-tart berry compote, and a luscious, creamy filling, all soaked in a rich custard and baked until golden. It’s the perfect centerpiece for a leisurely weekend gathering, a holiday breakfast, or a special treat that feels indulgent yet is surprisingly simple to prepare. The magic happens overnight, allowing the flavors to meld into a symphony of summer sweetness.
Ingredients List
Gather these fresh, high-quality ingredients for the best flavor and texture. Sensory notes are included to help you understand the role of each component.
For the Casserole Base:
1 (14-16 oz) loaf Brioche bread – Day-old is perfect! Its rich, buttery flavor and soft, pillowy texture are ideal for soaking up the custard without falling apart. Substitution: Challah, French bread, or croissants for a different richness.
8 oz full-fat cream cheese, softened – Provides a tangy, luxurious creaminess. Substitution: Mascarpone for an ultra-decadent, less tangy filling, or Neufchâtel for a slightly lighter option.
1/4 cup powdered sugar – Sweetens the cream cheese filling without graininess.
1 teaspoon pure vanilla extract – Adds a warm, aromatic depth. Use the real stuff!
Zest of 1 lemon – Brightens the entire dish and cuts through the richness.
For the Berry Layer:
2 cups mixed fresh summer berries (strawberries, blueberries, raspberries, blackberries) – The star of the show! Their juicy burst and vibrant color are essential. Substitution: Frozen berries (do not thaw) work perfectly in a pinch and often release more juice.
2 tablespoons granulated sugar – Macerates the berries slightly, drawing out their natural juices.
1 tablespoon cornstarch – Thickens the berry juices during baking, preventing a soggy bottom.
For the Custard:
6 large eggs – The backbone of the custard, providing structure and richness.
2 cups whole milk – Creates a creamy, tender soak. Substitution: Half-and-half or a 50/50 mix of milk and heavy cream for an even richer result.
1/3 cup pure maple syrup or honey – Sweetens the custard with nuanced flavor. Maple adds a wonderful warmth.
1 teaspoon ground cinnamon – A classic, comforting spice.
1/4 teaspoon ground nutmeg – Adds a subtle, warm complexity.
Pinch of salt – Balances all the sweetness and enhances flavor.
For Serving (Optional):
Powdered sugar for dusting
Fresh berries
Maple syrup
Whipped cream
Timing
Prep Time 25 minutes
Cook Time 50-60 minutes
Resting Time 8 hours (overnight)
Total Time 9 hours 15 minutes (mostly hands-off)
While the total time may seem long, 8+ hours of that is completely hands-off refrigeration. Compared to traditional stovetop French toast, which requires constant attention for 30+ minutes to cook batches, this casserole method is far more efficient for feeding a crowd. The active prep time of 25 minutes is a fantastic trade-off for a stress-free morning.
Visual cue: The golden, puffed top of the casserole with berries peeking through promises a delightful texture contrast.
Step-by-Step Instructions
Step 1: Prepare the Bread and Cream Cheese Filling
Start by cutting your brioche loaf into 1-inch cubes. Don’t worry about perfection—rustic chunks are perfect. Spread them out on a baking sheet and let them sit out for 15-20 minutes to stale slightly; this helps them absorb the custard without turning to mush. Meanwhile, in a medium bowl, beat the softened cream cheese with an electric mixer or by hand until smooth and creamy. Beat in the powdered sugar, vanilla extract, and lemon zest until fully combined and fluffy. This filling should be spreadable but not runny.
Step 2: Assemble the Casserole
Grease a 9×13 inch baking dish thoroughly with butter or non-stick spray. Spread half of the brioche cubes evenly in the bottom of the dish. Now, take small dollops (about 1/2 teaspoon each) of the cream cheese mixture and dot them all over the bread layer. You don’t need to spread it—these little pockets of cream cheese will create wonderful surprises. In a separate bowl, gently toss the fresh berries with the sugar and cornstarch until evenly coated. Scatter about two-thirds of this berry mixture over the bread and cream cheese layer. Top with the remaining bread cubes, then finish with the last third of the berries.
Step 3: Create and Pour the Egg Custard
In a large bowl or large measuring jug, whisk the eggs vigorously until uniform and slightly frothy. Add the milk, maple syrup, cinnamon, nutmeg, and salt. Whisk until everything is completely blended and the mixture is smooth. Slowly and evenly pour this custard over the entire assembled casserole. Use a spatula or your hands to gently press down on the top layer of bread, ensuring every cube gets moistened and starts to soak up the liquid.
Step 4: The Overnight Rest
This is the non-negotiable secret to success! Tightly cover the baking dish with plastic wrap, pressing it directly onto the surface of the bread to prevent drying. Refrigerate for at least 4 hours, but ideally 8-12 hours (overnight). This resting period allows the bread to fully absorb the custard, resulting in a uniformly tender, pudding-like interior without any dry spots.
Step 5: Bake to Perfection
Preheat your oven to 350°F (175°C). Take the casserole from the fridge, remove the plastic wrap, and let it sit on the counter while the oven heats (about 20-30 minutes). This takes the chill off for more even baking. Bake in the preheated oven for 50-60 minutes. You’re looking for a beautifully puffed, deep golden-brown top, and a center that is set (a knife inserted should come out clean, not wet with custard). If the top is browning too quickly, tent it loosely with aluminum foil for the last 15 minutes of baking.
Let the casserole rest for 10-15 minutes after pulling it from the oven. It will deflate slightly, making it easier to slice and allowing the juices to settle.
Nutritional Information
Estimated per serving (based on 8 servings):
Calories: ~420 kcal
Total Fat: 22g
Saturated Fat: 12g
Cholesterol: 215mg
Sodium: 320mg
Total Carbohydrates: 45g
Dietary Fiber: 2g
Sugars: 25g
Protein: 11g
Healthier Alternatives
You can lighten this dish without sacrificing its soul-satisfying flavor:
Bread: Use whole-wheat brioche or a hearty whole-grain bread for added fiber.
Cream Cheese: Swap full-fat for reduced-fat or a whipped cream cheese variant. The texture will be slightly less rich but still creamy.
Custard: Use 1% or 2% milk instead of whole milk. You can also replace 2 of the whole eggs with 4 egg whites for lower cholesterol and fat.
Sweetener: Reduce the sugar in the berry layer by half or omit it if using very ripe berries. In the custard, use a sugar-free maple syrup alternative or a natural sweetener like monk fruit blend.
Boost Nutrition: Add 1/4 cup of ground flaxseed or chia seeds to the custard mixture for omega-3s and fiber—they’ll blend right in.
Serving Suggestions
Classic Brunch Spread: Serve alongside crispy bacon or savory breakfast sausage, a fresh fruit salad, and a pot of strong coffee.
Elevated Dessert: Serve warm squares à la mode with a scoop of vanilla bean ice cream or a dollop of freshly whipped cream.
Sauce it Up: Offer warm maple syrup, a berry compote, or a simple dusting of powdered sugar for guests to customize.
Beverage Pairings: A mimosa bar, cold-brew coffee, or a sparkling berry lemonade complement the sweet flavors perfectly.
Common Mistakes
Using Fresh, Soft Bread: This leads to a mushy, soggy texture. Always use day-old or slightly stale bread.
Skipping the Overnight Soak: Baking immediately results in dry bread on top and soggy, uncooked custard underneath. Patience is key.
Overmixing the Custard: Whisk gently to combine; you don’t want to incorporate too much air, which can create bubbles.
Underseasoning: Don’t forget the salt and spices! They are crucial for balancing the sweetness and adding depth.
Hi I'm Emy
I’m passionate about sharing a diverse collection of sweet and savory recipes that I’ve meticulously tested and perfected in my own kitchen.