The Best Homemade Eggnog Recipe: A Festive Delight
Indulge in the rich and creamy delight of the best homemade eggnog recipe, a traditional festive beverage that captures the essence of the holiday season. With its velvety texture and comforting spices, this eggnog promises to be the star of your gatherings. Whether you’re hosting a Christmas party or looking for a special treat, this recipe delivers an unbeatable homemade flavor that will leave your guests asking for more.
Quick Recipe Highlights
- Flavor Profile: Enjoy a symphony of flavors with the creamy richness of eggs and milk, nuanced by the warmth of cinnamon and nutmeg.
- Texture: Silky and smooth, this eggnog boasts a luscious mouthfeel that is both comforting and indulgent.
- Aroma: Inviting scents of holiday spices like cinnamon and nutmeg evoke warm and cozy gatherings.
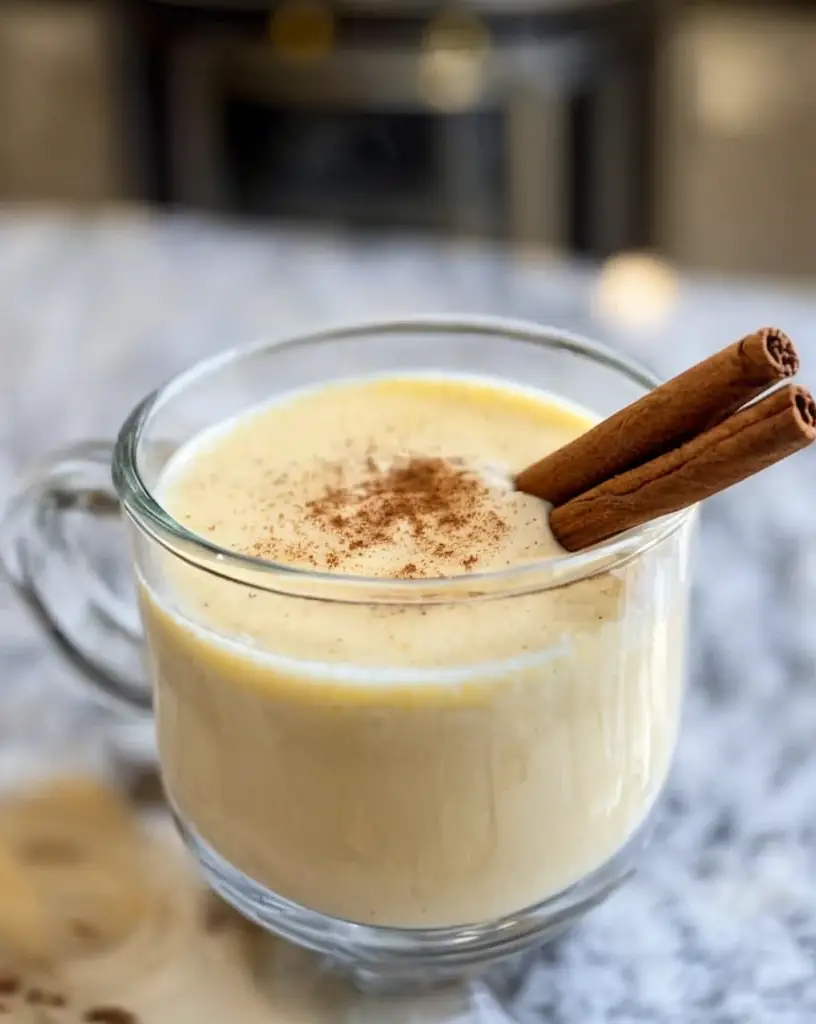
- Visual Appeal: A beautiful golden hue enhanced by a dusting of fragrant spices makes each glass a visually delightful treat.
- Skill Level Needed: With moderate difficulty, this recipe is approachable for those comfortable with basic cooking techniques.
- Special Equipment: A blender and whisk are essential tools to achieve the perfect consistency.
Recipe Overview
- Difficulty Level: Classified as medium due to the need for precise temperature control during cooking and whisking eggs to perfection.
- Category: This recipe falls within the beverage category, specifically a festive holiday drink.
- Cuisine: Rooted in English culinary tradition, eggnog has become a holiday staple across many Western cuisines.
- Cost: With easily accessible ingredients, the cost is moderate, ensuring you don’t break the bank while enjoying this festive favorite.
- Season: Although perfect for winter festivities, this drink can be enjoyed throughout the colder months for its heartwarming qualities.
- Occasion: Ideal for holiday gatherings, Christmas parties, and New Year’s Eve celebrations.
Why You’ll Love This Recipe
Dive into the luscious taste and texture of this homemade eggnog, where each sip offers a deliciously creamy sensation balanced by the perfect blend of warm spices. Enjoy the convenience of preparing it in just 30 minutes, making it a hassle-free choice for holiday festivities. Beyond its delightful taste, the recipe includes quality ingredients that offer a source of calcium and protein, perfect for keeping indulgence health-conscious. Share the joy by serving it at parties or as a cozy treat by the fireplace, making it a social centerpiece. Plus, with most ingredients being common household staples, this eggnog is both cost-effective and accessible for all levels of home cooks.
Historical Background and Cultural Significance
Eggnog’s origins can be traced back to Medieval Britain, with a lineage that intertwines with posset, a warm milky ale drink. Its transition from a luxury enjoyed by the elite to a popular holiday beverage in America highlights its cultural journey and adaptation. Over time, eggnog has become synonymous with festive celebrations, often featuring in Christmas traditions and toasts to the New Year. As the recipe spread globally, regional variations began to emerge, each adding local flavors and adjustments. For example, Puerto Rican coquito and Mexican rompope demonstrate how eggnog has woven itself into diverse cultural tapestries, each with its unique twist.
Ingredient Deep Dive
Eggs are pivotal in providing the rich base of this eggnog, contributing to its signature creamy texture. Historically considered a symbol of fertility and renewal, eggs are packed with essential nutrients like proteins, choline, and B vitamins. Opt for free-range eggs to ensure the best taste and ethical sourcing, keeping them refrigerated to maintain freshness. If you’re avoiding raw eggs, consider gently cooking them with the milk to a safe temperature.
Dairy milk lends its plush texture and subtle sweetness to the recipe, harmonizing beautifully with the other ingredients. Known for its calcium content, milk is integral for bone health and adds to the recipe’s nutritional profile. Choose whole or reduced-fat milk based on your dietary preferences; remember to store it in a cool environment to avoid spoilage. For those seeking dairy-free alternatives, almond or coconut milk can be suitable substitutes, offering different flavor dimensions.
Common Mistakes to Avoid
- Avoid overheating the egg mixture to prevent curdling; maintain a gentle heat and constant stirring.
- Do not skip tempering the eggs, which helps integrate them smoothly without scrambling.
- Be cautious with spice seasoning; too much can overpower the drink’s delicate balance.
- Avoid using low-fat milk if a creamy texture is desired, as fat content significantly impacts mouthfeel.
- Ensure all ingredients are fresh, especially dairy and eggs, to prevent spoilage and off-flavors.
- Avoid omitting alcohol if longevity is a concern, as it’s a natural preservative that extends shelf life.
- Refrain from adding hot milk too quickly to eggs, risking a negative reaction.
- Don’t underestimate the power of a good whisk; under-whisking can leave a flat drink lacking body.
Essential Techniques
Tempering eggs is crucial for smoothly integrating them into the warm milk without cooking them into solid bits. Begin by slowly whisking a small amount of warm liquid into the eggs, gradually adjusting them to temperature increases. This step ensures a cohesive mixture and prevents the eggs from curdling.
Strong whisking is necessary for aerating the eggnog, incorporating air, and softening the flavors. Aim for a consistent, swift motion to achieve a light, frothy texture that enhances each sip. Avoid over-mixing, as the eggnog might become overly thick.
Pro Tips for Perfect The Best Homemade Eggnog Recipe
1. Consider aging your eggnog for a couple of days in the fridge for intensified flavor depth.
2. Use freshly grated nutmeg for an aromatic burst that eclipses pre-ground spice mixes.
3. Chill all components adequately before serving for a refreshing, satisfying sip.
4. Gently fold whipped cream into the mixture prior to serving for an elevated creaminess.
5. Balance sugar to taste after chilling; sweetness can mellow over time in the fridge.
6. Incorporate a dash of vanilla for a harmonious rounding off of flavors, adding warmth and familiarity.
Variations and Adaptations
Regional variations abound, from Puerto Rico’s coquito with coconut and rum to Mexico’s rompope, marked by its unique spice blends. Each version carries cultural flair, offering alternative tastes to traditional norms. Seasonal adaptations can involve infusions of autumnal spices or lighter spring variations. Dietary modifications can be approached with almond milk or plant substitutes for a vegan option, ensuring inclusivity. To explore new flavor profiles, infuse with chocolate or go spicy with chili for a daring twist. For textural interest, try blending in fresh fruit puree or a crisp meringue topping.
Serving and Presentation Guide
Elegant glassware elevates eggnog’s visual appeal—consider using tall glasses or dessert cups for a sophisticated touch. Garnish with a sprinkle of nutmeg or cinnamon sticks for a traditional aura and aromatic warmth. Pair with gingerbread cookies or fruitcake to balance the eggnog’s creaminess with texture contrasts. Modern serving suggestions include offering small flights with varied infusions, echoing cocktail culture’s playful presentation. Keep in mind that serving eggnog slightly chilled enhances its refreshing qualities. Portion control is advised due to its rich nature, typically 5-6 oz servings suffice.
Wine and Beverage Pairing
Pairing eggnog with bold reds or sparkling wines complements the drink’s creaminess, with rich-bodied wines like Cabernet offering a balancing tartness. Non-alcoholic alternatives might include spiced apple cider, echoing warm, festive notes. Coffee pairing, such as an espresso or cappuccino, introduces robust flavors that contrast eggnog’s creaminess. For best results, serve eggnog slightly chilled, ensuring an optimal taste experience. Drinking from a small, chilled glass heightens both aromatic and taste senses, sparking holiday joy.
Storage and Shelf Life
Safely store eggnog in an airtight container in the refrigerator to maintain freshness for up to three days. Consistent refrigeration of below 40°F is essential to inhibit bacterial growth. Avoid metal containers that may react with ingredients, opting instead for glass or plastic. Look out for signs of spoilage, such as separation or off odors, and discard if encountered. For reheating, a gentle method in a double boiler can reintegrate any separation. While freezing is not recommended due to textural changes, if needed, an egg-free version can withstand freezing.
Make Ahead Strategies
Efficiently prepare the eggnog base up to three days ahead, allowing flavors to meld and marry over time. Store it securely in the refrigerator, shaking occasionally. The fresh components, such as cream or any garnishes, can be added prior to serving to maintain freshness. For quality assurance, prepare each stage as close to the intended serving time as possible, preserving intended flavors. When reheating, employ low and slow techniques to avoid texture deterioration. Incorporating fresh elements, such as a new dusting of spices, revives the drink and maintains its serving appeal.
Scaling Instructions
Halving the recipe demands attentiveness to maintaining the ratios, specifically with egg amounts. When doubling or tripling, consider employing a large pot and bowl for whisking to accommodate increased volume. Adjust cooking times to avoid overwhelming the saucepan’s heating capacity and maintain even results. Store larger batches in multiple smaller containers to distribute chilling, avoiding hot pockets inside large volumes. Use this same rule for smaller quantities in reverse, ensuring adherence to proportionate ingredient use and timing considerations.
Nutritional Deep Dive
Eggnog boasts a mix of proteins from eggs and milk, contributing to its caloric density. These proteins offer essential amino acids necessary for muscle repair and function. B vitamins and essential fats within eggnog support energy metabolism and bodily function. Be mindful of its sugar content, balancing indulgence with dietary guidelines. With calcium-rich ingredients, each serving aids in maintaining bone health. Portion control is paramount in incorporating eggnog within balanced meals, keeping track of its relatively high caloric and sugar content.
Dietary Adaptations
Eggnog’s traditional dairy and egg base can be transformed into a composite fitting diverse diets. For gluten-free, ensure all spices and mix-ins are clear of cross-contamination. Dairy-free methodologies advocate almond milk or oat milk, paired with coconut cream. Craft a vegan adaptation by utilizing plant-based creamers and egg substitutes, like aquafaba for frothing. For low-carb or keto, switch to sugar substitutes such as erythritol or stevia, moderating impact on carbohydrate intake. Specific storage and balancing seasonal fruits reflect Paleo dietary requirements.
Troubleshooting Guide
Combat textural thickness by adjusting milk type, opting for a lighter fat version should heaviness persist. Balance flavor with acidity or sweetness alterations when necessary, such as adding a citrus splash or honey variant. Avoid improper temperature storage leading to separation by maintaining consistent chilling post-preparation. Equipment woes such as blender clogging are circumvented by ensuring a well-integrated mix before final blitzing. Delay ingredient introduction until necessary stages to prevent component attachment to mixer sides, ensuring full incorporation.
Recipe Success Stories
Readers have delighted in customizing eggnog to their heart’s delight, integrating spirits such as bourbon for a cheeky adult twist. Many have enjoyed infusing eggnog days prior to special events, enhancing each unique flavor footprint. Testimonials frequently mention adapting the recipe to include various milk alternatives, serving a well-spanned audience with dietary considerations. Readers have successfully adapted non-dairy options, promoting festive joy within allergen concerns, each adjustment met with warm commendation and delight. Nonetheless, creativity reigns through community engagement, encouraging new twists and flavor explorations.
Frequently Asked Questions
While not ideal due to potential texture change, freezing is possible. Remove eggs or dairy to improve results.
How can I create a non-alcoholic version?
Simply omit alcohol, and adjust sweetness and spices for bolder taste without spirits.
Is there a way to thicken eggnog?
Yes, allow chilling to naturally thicken, ensuring correct ingredient ratios for balanced texture.
Can I use a dairy alternative?
Absolutely, options like almond or coconut mimic creaminess while aligning with dietary preferences.
What are the signs of spoilage?
Issues include off smells, curdling, or an unusual hue, all indicators of eggnog gone over its prime.
How should leftover eggnog be reheated?
Employ gentle reheating methods avoiding separation, such as slow saucepan warming.
Why is alcohol included in eggnog?
Beyond flavor, alcohol serves as a preservative, extending the beverage’s refrigerated life.
Can eggnog be served warm?
Yes, gently reheating can offer a comforting warm variant, especially suited for festive gatherings.
Is it safe to consume raw eggs in eggnog?
Traditional recipes use them, but cooking the mixture to 160°F ensures safety without compromising taste.
How do I prevent curdling?
Slow and steady tempering and mixing avoids abrupt temperature shifts that lead to egg coagulation.
What’s a quick way to chill eggnog?
Submerge sealed containers in an ice bath, stirring occasionally for rapid crisping.
What’s the best serving strategy for large parties?
Pre-batch eggnog in pitchers or punch bowls enables self-service, maintaining freshness and simplicity.
Additional Resources
Explore related recipes like the creamy coquito or spiced rompope, diversifying holiday drink options. Delve into technique guides focusing on egg tempering and milk-infusing, pivotal in eggnog mastery. Ingredient spotlights on spices like cinnamon and nutmeg provide educational insights into each component’s contribution. Equipment recommendations showcase the best appliances for frothy and smooth results, promising consistency. Seasonal variations, adapted by climate and tradition, offer fresh perspectives upon foundational eggnog.
Join the Conversation
Join our vibrant community by sharing your eggnog creations across social media, contributing and drawing inspiration from fellow enthusiasts. Engage with a trove of photography tips to capture your eggnog efforts beautifully, whether it’s frosted glass or artistic garnishing. Your feedback enriches the recipe’s evolution—leave reviews and tweaks that might resonate with future readers. Communal sharing of adaptations, from bourbon blitzes to vanilla warmth, sustains an interactive and evolving festive tradition.
The Recipe
The Best Homemade Eggnog
Serves: 6-8
Prep Time: 15 mins
Cook Time: 15 mins
Total Time: 30 mins
Kitchen Equipment Needed
- Blender
- Saucepan
- Whisk
- Refrigerator storage container
- Glasses for serving
Ingredients
- 4 large eggs
- 3/4 cup granulated sugar
- 2 cups whole milk
- 1 cup heavy cream
- 1/2 cup bourbon (optional)
- 1 teaspoon vanilla extract
- 1 teaspoon ground nutmeg
- 1/2 teaspoon ground cinnamon
- Pinch of salt
Directions
- In a large bowl, whisk the eggs and sugar together until integrated and smooth.
- In a saucepan, heat milk, cream, vanilla, nutmeg, and cinnamon till just simmering.
- Temper eggs by slowly adding a small amount of hot milk while constantly whisking.
- Combine the tempered eggs with the remaining milk mixture in the saucepan.
- Gently heat, stirring continuously, until the mixture thickens slightly but does not boil.
- Remove from heat, add bourbon if using, and allow to cool slightly.
- Refrigerate to chill, ideally overnight, to let flavors blend and settle.
- Serve cold, garnished with extra nutmeg or cinnamon as desired.
Recipe Notes
- For a non-alcoholic version, simply omit the bourbon.
- Adjust spices according to personal taste preferences.
- Aged variations may result in a deeper flavor profile, enhancing each note.