“`html
Table of Contents
- Indulge in Decadence
- The Symphony of Flavors: Ingredients
- Mastering the Sweet Science: Timing
- Crafting Your Caramel Chocolate Cheesecake
- Nutritional Snapshot
- Healthier Indulgence: Smart Swaps
- Serving Suggestions to Elevate Your Dessert
- Avoiding Dessert Disasters: Common Mistakes
- Keeping the Sweetness Alive: Storing Your Cheesecake
- Frequently Asked Questions
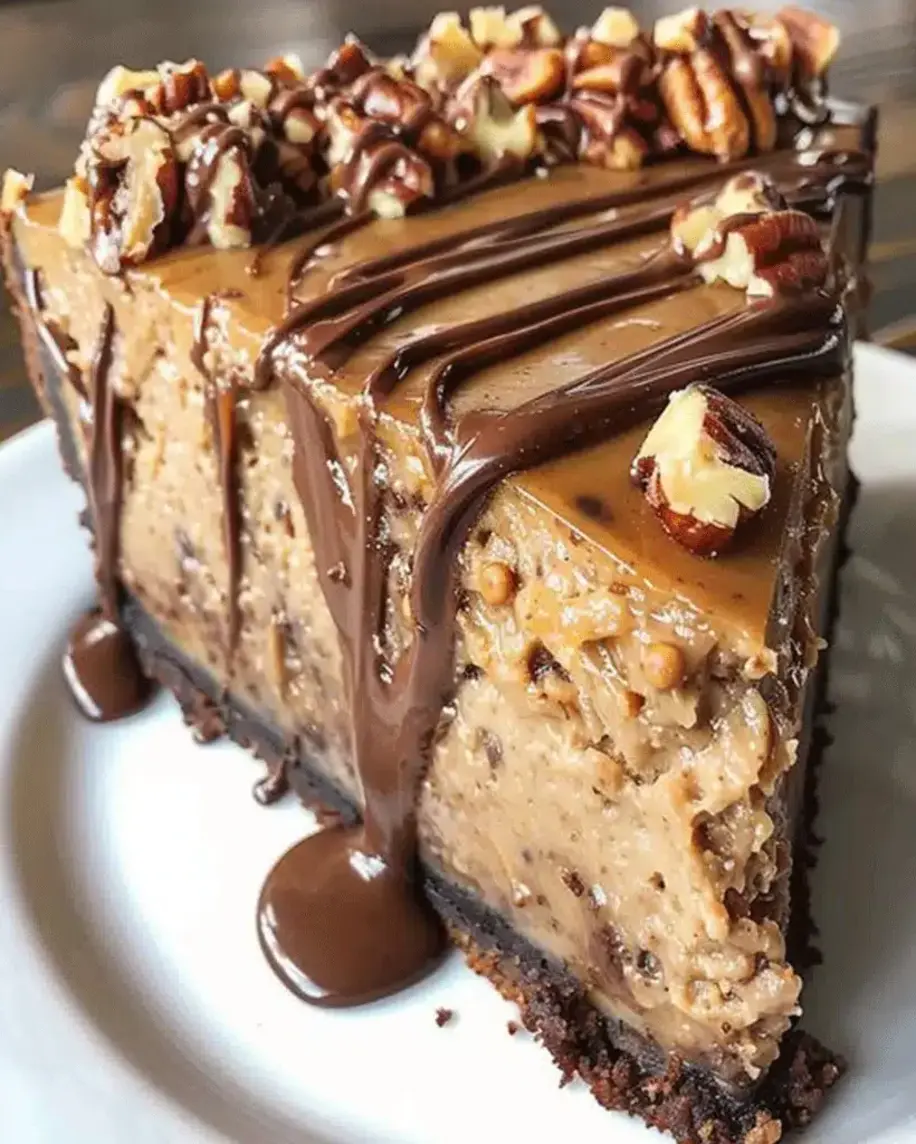
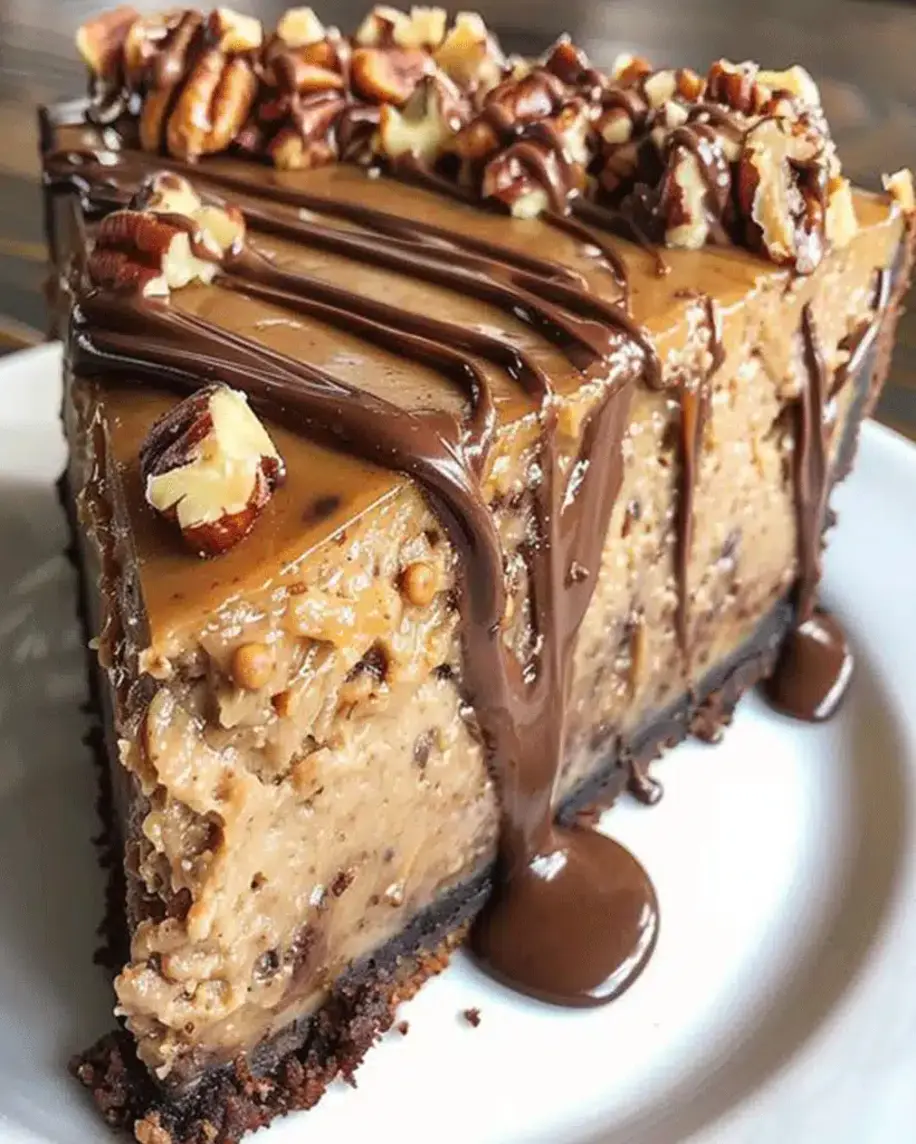
Easy Caramel Chocolate Cheesecake Recipe – The Ultimate Dessert!
Hello, dessert lovers! If you’re looking to indulge in a sweet treat that will satisfy your cravings for both rich chocolate and creamy cheesecake, you’ve come to the right place! This Ultimate Caramel Chocolate Cheesecake, also known as the Decadent Caramel Pecan Delight, is a show-stopping dessert that’s perfect for any occasion. Whether you’re hosting a dinner party, celebrating a special event, or simply treating yourself to something extraordinary, this cheesecake will steal the spotlight. With a luscious chocolate cookie crust, a velvety cream cheese filling, and a rich caramel topping crowned with toasted pecans, each bite is an irresistible blend of textures and flavors. Ready to impress your guests and elevate your dessert game? Let’s dive into the recipe for this indulgent cheesecake that combines the best of caramel, chocolate, and cheesecake into one unforgettable dessert.
Indulge in Decadence
Are you craving a dessert that boasts the perfect harmony of deep chocolate, luxurious caramel, and creamy cheesecake? According to culinary trends, the demand for decadent, multi-layered desserts that offer a variety of textures and rich flavors continues to soar. This Easy Caramel Chocolate Cheesecake recipe delivers exactly that, hitting all the right notes for a truly unforgettable treat. It’s not just a dessert; it’s an experience, a delightful symphony of sweetness that promises to be the star of any gathering or a comforting solo indulgence.
The Symphony of Flavors: Ingredients
Gathering your ingredients is the first step towards dessert bliss. This recipe calls for a few key components that work together to create that spectacular flavor and texture. Don’t worry if you don’t have an exact ingredient; we’ll explore some fantastic substitutions below!
For the Chocolate Cookie Crust
- 2 cups chocolate cookie crumbs (about 24-30 chocolate sandwich cookies like Oreos, finely crushed): These crumbs form the dark, rich foundation, offering a delightful crunchy contrast to the smooth filling. Substitution: Use graham cracker crumbs and add 2 tablespoons of cocoa powder for a similar flavor.
- 1/4 cup granulated sugar: A touch of sweetness to bind the crumbs and enhance their flavor.
- 6 tablespoons unsalted butter, melted: The essential element that brings the crumbs together into a cohesive, pressable crust. Substitution: Use margarine or coconut oil if preferred.
For the Creamy Cheesecake Filling
- 3 (8-ounce) packages cream cheese, softened: The heart of any cheesecake, ensuring that signature velvety smooth texture. Make sure it’s at room temperature for a lump-free batter. Substitution: Use Neufchâtel cheese for a slightly lighter taste.
- 1 1/4 cups granulated sugar: Balances the tang of the cream cheese and adds sweetness.
- 1/4 cup all-purpose flour: Helps to prevent cracking and stabilizes the filling.
- 1 teaspoon vanilla extract: Enhances all the other flavors with its warm, aromatic essence.
- 4 large eggs, room temperature: Act as binders, creating the rich, custardy texture. Substitution: For fewer eggs, you might need to adjust baking time and temperature.
- 1/2 cup sour cream: Adds moisture and a subtle tang, contributing to that incredibly creamy mouthfeel. Substitution: Use plain Greek yogurt for a similar effect.
For the Caramel Topping and Pecans
- 1 cup packed light brown sugar: The foundation for our rich, luscious caramel sauce.
- 1/2 cup unsalted butter: Provides richness and a smooth consistency to the caramel.
- 1/2 cup heavy cream: Creates that luxurious, pourable caramel texture.
- 1 teaspoon vanilla extract: Rounds out the sweet caramel flavor.
- 1 cup pecan halves, toasted: For that delightful nutty crunch and complementary flavor. Substitution: Walnuts or even almonds can be used.
Mastering the Sweet Science: Timing
Compared to an average cheesecake recipe requiring similar components, this Easy Caramel Chocolate Cheesecake recipe is quite comparable in timing. The preparation is straightforward, and the baking time is standard for a cheesecake of this size. The crucial element is the chilling time, which allows the flavors to meld and the cheesecake to set to perfection. Patience here is key to achieving that ultimate dessert experience!
Crafting Your Caramel Chocolate Cheesecake
Let’s get baking! Follow these steps to create your masterpiece.
Step 1: Crafting the Irresistible Chocolate Cookie Crust
Preheat your oven to 350°F (175°C). In a medium bowl, combine the chocolate cookie crumbs, granulated sugar, and melted butter. Stir until the crumbs are evenly moistened, resembling wet sand. Press this mixture firmly and evenly into the bottom and slightly up the sides of a 9-inch springform pan. Use the bottom of a glass or a measuring cup to get a compact and even layer. Bake the crust for 8-10 minutes until it’s fragrant and slightly set. Remove from the oven and let it cool while you prepare the filling. This pre-baking step helps to prevent a soggy crust!
Step 2: Whipping Up the Velvety Cheesecake Filling
In a large bowl, beat the softened cream cheese with an electric mixer on medium speed until it’s completely smooth and creamy, ensuring no lumps remain. Gradually add the granulated sugar and flour, beating until just combined and smooth. Don’t overmix at this stage, as too much air can lead to cracks. Beat in the vanilla extract. Add the eggs one at a time, beating on low speed after each addition until just incorporated. Finally, gently stir in the sour cream until the batter is uniform and glossy. Be careful not to overbeat the eggs; this can toughen the cheesecake.
Step 3: The Art of Assembly and Baking
Carefully pour the cheesecake filling over the prepared cookie crust in the springform pan. Smooth the top with a spatula. To ensure even baking and prevent cracks, you can create a water bath. Wrap the outside of the springform pan tightly with several layers of heavy-duty aluminum foil. Place the foil-wrapped pan into a larger roasting pan. Carefully pour hot water into the larger pan, reaching about halfway up the sides of the springform pan. Bake in the preheated oven for 70-80 minutes, or until the edges are set but the center still has a slight jiggle when gently shaken. Let the cheesecake cool in the water bath for about 1 hour.
Step 4: Perfecting the Luscious Caramel Topping
While the cheesecake is cooling, prepare the caramel. In a medium saucepan over medium heat, combine the brown sugar, butter, and heavy cream. Stir constantly until the butter is melted and the sugar has dissolved. Bring the mixture to a gentle boil and let it simmer for 3-5 minutes, stirring occasionally, until it has slightly thickened and reached a syrupy consistency. Remove from heat and stir in the vanilla extract. Let the caramel cool slightly; it will thicken further as it cools.
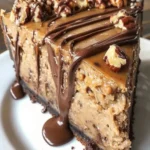
Step 5: The Grand Finale – Topping and Chilling
Once the cheesecake has cooled in the water bath for an hour, carefully remove the springform pan from the water bath and discard the foil. Place the cheesecake on a wire rack and let it cool completely to room temperature. Once cooled, you can begin to decorate. Drizzle the slightly cooled caramel sauce generously over the top of the cheesecake. Sprinkle the toasted pecan halves over the caramel. Cover the cheesecake loosely and refrigerate for at least 4 hours, but preferably overnight, to allow it to set completely and the flavors to meld beautifully. This chilling period is crucial for the best texture and taste.
Nutritional Snapshot
While specific values can vary based on exact ingredients and portion sizes, a typical slice of this rich caramel chocolate cheesecake is high in calories, fat, and sugar, offering a decadent treat. We estimate:
- Calories: 500-700 kcal per slice
- Fat: 35-50g
- Carbohydrates: 45-60g
- Protein: 10-15g
Note: This is an estimate and can vary. For precise nutritional information, you would need to use a recipe calculator.
Healthier Indulgence: Smart Swaps
Craving a lighter version without sacrificing too much of that amazing flavor and texture? Here are some thoughtful swaps:
- Crust: Use whole wheat graham crackers or a blend of almond flour and cocoa powder for the crust. Reduce the butter slightly and add a tablespoon of Greek yogurt for extra binding.
- Sweeteners: Opt for natural sweeteners like maple syrup or honey in moderation for the caramel and filling, though this will alter the flavor profile. Sugar-free sweeteners can also be explored, but be mindful of their conversion rates.
- Dairy: Use reduced-fat cream cheese or Neufchâtel cheese. Replace sour cream with plain non-fat Greek yogurt.
- Topping: Reduce the sugar in the caramel or use a lighter brown sugar. Piles of fresh berries or a light drizzle of sugar-free chocolate sauce can be delightful alternatives to a heavy caramel topping.
- Nuts: While pecans add healthy fats, control portions and consider toasting them lightly without added oil or sugar.
Serving Suggestions to Elevate Your Dessert
This cheesecake is already a showstopper, but here are a few ideas to make it even more special:
- Fresh Berries: A scattering of fresh raspberries or strawberries provides a beautiful color contrast and a burst of freshness that cuts through the richness.
- Whipped Cream: A dollop of lightly sweetened whipped cream is a classic accompaniment that adds an airy, creamy layer.
- Chocolate Drizzle: A drizzle of melted dark chocolate can enhance the chocolate flavor even further.
- Coffee or Espresso: Serve with a cup of coffee or a shot of espresso to complement the deep chocolate notes.
Avoiding Dessert Disasters: Common Mistakes
Even the best bakers can encounter cheesecake challenges. Here’s how to avoid them:
- Overmixing the Filling: This incorporates too much air, leading to cracks. Mix just until combined, especially after adding eggs.
- Using Cold Cream Cheese: Always ensure cream cheese is at room temperature for a smooth, lump-free batter.
- Not Using a Water Bath: A water bath (bain-marie) provides gentle, even heat, crucial for preventing cracks and ensuring a creamy texture.
- Opening the Oven Door Too Soon: Avoid frequent opening of the oven door during baking, as temperature fluctuations can cause the cheesecake to crack or sink.
- Cutting Too Soon: Always allow the cheesecake to chill completely. Cutting it while warm will result in a messy, unset slice.
Keeping the Sweetness Alive: Storing Your Cheesecake
Proper storage is essential to maintain the delightful texture and flavor of your cheesecake.
- Refrigeration: Once completely cooled and chilled, cover the cheesecake tightly with plastic wrap or aluminum foil, or place it in an airtight container. It will keep well in the refrigerator for up to 3-5 days.
- Freezing: Cheesecake freezes exceptionally well. Ensure it’s fully chilled. Wrap it tightly in plastic wrap, then in a layer of aluminum foil, and finally place it in a freezer-safe bag or container. It can be stored in the freezer for up to 1-2 months. Thaw overnight in the refrigerator before serving. Note that the caramel topping may soften slightly upon thawing; you can re-chill it uncovered or add a fresh dollop.
Frequently Asked Questions
***Can I make this cheesecake without a springform pan?***
While a springform pan is ideal for easy removal, you can attempt this in a regular 9-inch round cake pan. However, it will be much harder to extract without damaging the layers. Lining the pan with parchment paper extending above the edges can help.
***Why did my cheesecake crack?***
Cracking is usually caused by overmixing, overheating, or rapid temperature changes. Using a water bath, avoiding overmixing, and allowing the cheesecake to cool gradually in the oven and then at room temperature are key to preventing cracks.
***How do I get a smooth caramel sauce that isn’t grainy?***
When making caramel, ensure your sugar is fully dissolved before it starts to boil. Avoid stirring vigorously once it begins to caramelize. If it does get slightly grainy, a touch of corn syrup can help re-emulsify it. For this recipe, simply dissolving the sugar well in the butter and cream before it boils is usually sufficient.
***Can I use a different type of cookie for the crust?***
Absolutely! Chocolate wafers, shortbread cookies, or even biscoff cookies can make a delicious crust. Adjust the sugar and butter as needed based on the sweetness and fat content of the cookie.
***How long does a cheesecake need to chill before serving?***
For the best texture and flavor, a minimum of 4 hours is recommended, but chilling overnight is ideal. This allows the cheesecake to fully set and the flavors to meld.
The Sweetest Ending
There you have it – an Easy Caramel Chocolate Cheesecake that’s as impressive as it is delicious. This recipe is a testament to how simple ingredients can be transformed into something truly extraordinary. The combination of a crisp chocolate crust, a luxuriously smooth cheesecake filling, and a decadent caramel-pecan topping is simply irresistible. Whether you’re a seasoned baker or just starting, this cheesecake is sure to impress. So, gather your loved ones, preheat your ovens, and get ready to experience the ultimate dessert indulgence. Happy baking!
Ultimate Caramel Chocolate Cheesecake – Best Dessert Recipe
Description
Hello, dessert lovers! If you’re looking to indulge in a sweet treat that will satisfy your cravings for both rich chocolate and creamy cheesecake, you’ve come to the right place! This Ultimate Caramel Chocolate Cheesecake, also known as the Decadent Caramel Pecan Delight, is a show-stopping dessert that’s perfect for any occasion. Whether you’re hosting a dinner party, celebrating a special event, or simply treating yourself to something extraordinary, this cheesecake will steal the spotlight.With a luscious chocolate cookie crust, a velvety cream cheese filling, and a rich caramel topping crowned with toasted pecans, each bite is an irresistible blend of textures and flavors. Ready to impress your guests and elevate your dessert game? Let’s dive into the recipe for this indulgent cheesecake that combines the best of caramel, chocolate, and cheesecake into one unforgettable dessert.
Ingredients
- For theCrust:
- For theCheesecake Filling:
- For theCaramel Topping:
- For theChocolate Drizzle:
- Substitutions & Dietary Notes:
Instructions
- Preheat your oven to 325°F (160°C). Grease a 9-inch springform pan and line the bottom with parchment paper to ensure the cheesecake comes out easily.
- In a mixing bowl, combine the chocolate cookie crumbs and melted butter. Stir until the mixture is evenly moist. Press the crumb mixture firmly into the bottom of the prepared pan. Bake the crust in the preheated oven for 10 minutes, then remove it from the oven and set it aside to cool completely.
- While the crust cools, prepare the cheesecake filling. In a large bowl, beat the softened cream cheese and granulated sugar together until smooth and creamy. Add the eggs one at a time, mixing well after each addition. Stir in the vanilla extract, heavy cream, and finely chopped pecans.
- Pour the cheesecake batter over the cooled chocolate crust, spreading it evenly.
- Place the pan in the oven and bake for 55-60 minutes, or until the center is just set but still slightly jiggly. Turn off the oven and crack the oven door slightly. Allow the cheesecake to cool in the oven for 1 hour. This helps prevent cracking.
- Once cooled, transfer the cheesecake to the refrigerator and chill for at least 4 hours, or overnight for the best results.
- After the cheesecake has chilled, it’s time to add the caramel topping. Pour the caramel sauce over the top of the cheesecake, spreading it evenly to cover the surface. Sprinkle the toasted pecans generously over the caramel layer for added flavor and crunch.
- In a microwave-safe bowl, combine the semi-sweet chocolate chips and coconut oil (or butter). Microwave in 30-second intervals, stirring each time, until the mixture is smooth and melted.
- Drizzle the melted chocolate over the caramel and pecans in an elegant swirl pattern. Allow the chocolate drizzle to set for a few minutes before slicing and serving.
Notes
Softening the Cream Cheese: To achieve a smooth, lump-free cheesecake filling, ensure the cream cheese is softened to room temperature before mixing. This will help it blend more easily with the sugar and eggs.
Caramel Sauce: If you prefer homemade caramel sauce, you can make it using sugar, butter, and heavy cream. It adds a personal touch and a richer flavor to the cheesecake.
Pecan Toasting: Toasting the pecans enhances their natural flavor and brings out their crunch. Be sure to toast them in a dry skillet over medium heat for 5-7 minutes, stirring frequently to avoid burning.
Chill Time: The cheesecake needs to chill in the fridge for at least 4 hours, but overnight is even better. This will allow the flavors to meld and the cheesecake to firm up to the perfect consistency.
“`