Lemon Blueberry Cheesecake Cake Recipe | OMG Chocolate Desserts

Lemon Blueberry Cheesecake

Print

clock clock iconcutlery cutlery iconflag flag iconfolder folder iconinstagram instagram iconpinterest pinterest iconfacebook facebook iconprint print iconsquares squares iconheart heart iconheart solid heart solid icon

Lemon Blueberry Cheesecake Cake


  • Author: Chef Emy

Description

Lemon Blueberry Cheesecake Cake the perfect blueberry dessert for spring and summer! Made with a moist lemon cake dotted with juicy blueberries, blueberry cheesecake and sweet and tangy lemon cream cheese frosting.


Ingredients

Scale
  • ¾ cup fresh blueberries
  • 16 oz. cream cheese- room temperature
  • 1/2 cup granulated sugar
  • 2 Tablespoons all-purpose flour
  • 1 ½ teaspoons vanilla
  • 2 eggs + 1 egg yolk- room temperature
  • 1/4 cup sour cream
  • 1/4 cup heavy cream
  • 2 cups all-purpose flour
  • 2 Tablespoons corn starch
  • ¼ teaspoon salt
  • 2 teaspoons baking powder
  • 2/3 cup unsalted butter-room temperature
  • 1 and 1/3 cups granulated sugar
  • 2 eggs + 1 egg white
  • 1 ½ teaspoons vanilla extract
  • 2 teaspoons lemon zest
  • ½ cup milk
  • 3 Tablespoons lemon juice
  • 1 ½ cups blueberries- fresh (if use frozen do not thaw)
  • 34 teaspoons of flour- to toss the blueberries
  • 12 oz. full-fat brick style cream cheese- softened
  • 1 cup unsalted butter-softened
  • ¼ teaspoon salt
  • 3 ½4 ½ cups powdered sugar
  • 2 teaspoons vanilla extract
  • 1 Tablespoon lemon zest
  • lemon wedges
  • fresh blueberries

Instructions

  1. Preheat the oven to 350 F. Lightly grease 8-inch springform pan and line the bottom with parchment paper. Wrap springform pan in double layer of heavy-duty aluminum foil to prevent water from leaking in during the baking in a water bath.
  2. To make the cheesecake pulse blueberries and cream cheese in a food processor, then transfer the mixture in a mixing bowl.
  3. Add sugar and flour and beat until smooth and creamy. Mix in vanilla.
  4. Add eggs, one at the time mixing after each addition just to combine, do not over mix.
  5. Finally mix in sour cream and heavy cream. Pour the batter into springform pan and smooth the top, then place in a roasting pan. Pour boiling water in roasting pan halfway up the side of the springform pan and make sure no water drip on the batter and bake 40-45 minutes or until the center has set.
  6. Remove springform pan from water bath, then run a thin knife around the cake and cool to a room temperature, then place in the fridge for a few hours or overnight to cool completely.
  7. Preheat oven to 350 F, butter and lightly flour two 8-inches round cake pans and line the bottoms with parchment paper circles.
  8. Sift together 2 cups flour, corn starch, baking powder and salt and set aside.
  9. Stir together milk and lemon juice and set aside to curdle.
  10. Beat butter and sugar on medium-high until pale and fluffy, about 4 minutes.
  11. With the mixer running on low, add eggs one at a time and mix after each addition.
  12. Add vanilla extract and lemon zest and mix to combine.
  13. First add 1/3 of the flour mixture, then add half of the milk mixture, then 1/3 of the flour mixture, then remaining milk mixture milk, and finish with the flour mixture. Mix to combine after each addition, but do not over mix.
  14. In a small bowl, gently toss blueberries with flour to coat, then gently fold blueberries into batter, being careful not to break the berries.
  15. Divide batter evenly between pans, smooth the top and bake for 30-35 minutes, until toothpick inserted into center comes out clean. Cool the cakes in the pans for 10 to 15 minutes, then remove to wire rack to finish cooling.
  16. Mix the butter and cream cheese on medium speed until no lumps remain. Do not over beat before the sugar was added or may end up with a runny frosting.
  17. Add vanilla, salt and lemon zest and mix until combined.
  18. Gradually add powdered sugar until desired sweetness and thickness is reached. Scrape down the sides of the bowl and beat until smooth.
  19. Place one layer of cake onto serving plate and top with thin layer of lemon cream cheese frosting. Place blueberry cheesecake layer and top with thin layer of frosting. Finally, top with second cake layer and frost cake with remaining frosting. Decorate with lemon wedges and fresh blueberries if desired. Refrigerate for at least 45 minutes before cutting or else the cake may fall apart as you cut.
  20. Store in the fridge.

Mini Lemon Cakes With Lavender Glaze

These mini lemon cakes with lavender glaze are fragrant spring desserts that taste like sunshine! Bright lemon bundt cakes infused with fresh lemon zest, then glazed with lavender-honey icing and garnished with fresh lavender sprigs create elegant individual desserts perfect for Easter brunch, Mother’s Day tea, or spring garden parties. The floral lavender complements the bright citrus beautifully without being overwhelming or soapy when used in the right proportion. These make-ahead mini cakes look sophisticated but are surprisingly simple to prepare. Save these spring beauties and click for the culinary lavender measurement guide and lemon soaking syrup recipe!

Print

clock clock iconcutlery cutlery iconflag flag iconfolder folder iconinstagram instagram iconpinterest pinterest iconfacebook facebook iconprint print iconsquares squares iconheart heart iconheart solid heart solid icon

Mini Lemon Cakes With Lavender Glaze


  • Author: Chef Emy

Description

These elegant Mini Lemon Cakes are incredibly moist and tender, bursting with bright lemon flavor. They’re topped with a simple but sophisticated glaze infused with the beautiful floral fragrance of lavender. The perfect impressive dessert for any brunch or tea party.


Ingredients

Scale
  • 1 1/3 cups all-purpose flour
  • 1/2 tsp. kosher salt
  • 1/8 tsp. baking soda
  • 1/2 cup unsalted butter, softened
  • 2/3 cup granulated sugar
  • 1/3 cup packed light brown sugar
  • 1 Tbsp. grated lemon zest (from 2 lemons)
  • 2 large eggs, at room temperature
  • 1/4 cup sour cream, at room temperature
  • 1/4 cup whole milk, at room temperature
  • 1 tsp. vanilla extract
  • 1/4 cup whole milk
  • 1/2 tsp. culinary lavender
  • 1 1/2 cups powdered sugar
  • 1/4 tsp. kosher salt
  • 1/8 tsp. vanilla extract
  • as needed Edible flowers and lemon zest (for garnish)

Instructions

  1. Preheat oven to 325°F. Thoroughly coat 2 (6-cup) mini cake trays with baking spray. Whisk together flour, salt, and baking soda.
  2. In a stand mixer, beat butter, sugars, and lemon zest on medium speed until light and fluffy, about 3 minutes. Add eggs, 1 at a time, beating well after each.
  3. In a small bowl, whisk together sour cream, milk, and vanilla. With the mixer on low, gradually add the flour mixture and sour cream mixture in alternating batches, beginning and ending with flour. Mix just until combined.
  4. Divide batter evenly among prepared trays. Tap trays on the counter to release air bubbles. Bake for 18 to 20 minutes, until a wooden pick comes out clean.
  5. Let cool in trays for 10 minutes, then invert onto a wire rack to cool completely, about 1 hour.
  6. When cakes are cool, microwave 1/4 cup milk for 1 minute until hot. Add lavender and let steep for 10 minutes. Strain the milk through a fine mesh strainer, discarding the lavender.
  7. In a medium bowl, combine powdered sugar, salt, and vanilla. Gradually stir in the steeped milk, 1 teaspoon at a time, until you have a smooth, pourable glaze.
  8. Drizzle the cooled cakes with the lavender glaze. Garnish with additional lemon zest and edible flowers, if desired.

Mini Lemon Cakes With Lavender Glaze

These mini lemon cakes with lavender glaze are fragrant spring desserts that taste like sunshine! Bright lemon bundt cakes infused with fresh lemon zest, then glazed with lavender-honey icing and garnished with fresh lavender sprigs create elegant individual desserts perfect for Easter brunch, Mother’s Day tea, or spring garden parties. The floral lavender complements the bright citrus beautifully without being overwhelming or soapy when used in the right proportion. These make-ahead mini cakes look sophisticated but are surprisingly simple to prepare. Save these spring beauties and click for the culinary lavender measurement guide and lemon soaking syrup recipe!

Print

clock clock iconcutlery cutlery iconflag flag iconfolder folder iconinstagram instagram iconpinterest pinterest iconfacebook facebook iconprint print iconsquares squares iconheart heart iconheart solid heart solid icon

Mini Lemon Cakes With Lavender Glaze


  • Author: Chef Emy

Description

These elegant Mini Lemon Cakes are incredibly moist and tender, bursting with bright lemon flavor. They’re topped with a simple but sophisticated glaze infused with the beautiful floral fragrance of lavender. The perfect impressive dessert for any brunch or tea party.


Ingredients

Scale
  • 1 1/3 cups all-purpose flour
  • 1/2 tsp. kosher salt
  • 1/8 tsp. baking soda
  • 1/2 cup unsalted butter, softened
  • 2/3 cup granulated sugar
  • 1/3 cup packed light brown sugar
  • 1 Tbsp. grated lemon zest (from 2 lemons)
  • 2 large eggs, at room temperature
  • 1/4 cup sour cream, at room temperature
  • 1/4 cup whole milk, at room temperature
  • 1 tsp. vanilla extract
  • 1/4 cup whole milk
  • 1/2 tsp. culinary lavender
  • 1 1/2 cups powdered sugar
  • 1/4 tsp. kosher salt
  • 1/8 tsp. vanilla extract
  • as needed Edible flowers and lemon zest (for garnish)

Instructions

  1. Preheat oven to 325°F. Thoroughly coat 2 (6-cup) mini cake trays with baking spray. Whisk together flour, salt, and baking soda.
  2. In a stand mixer, beat butter, sugars, and lemon zest on medium speed until light and fluffy, about 3 minutes. Add eggs, 1 at a time, beating well after each.
  3. In a small bowl, whisk together sour cream, milk, and vanilla. With the mixer on low, gradually add the flour mixture and sour cream mixture in alternating batches, beginning and ending with flour. Mix just until combined.
  4. Divide batter evenly among prepared trays. Tap trays on the counter to release air bubbles. Bake for 18 to 20 minutes, until a wooden pick comes out clean.
  5. Let cool in trays for 10 minutes, then invert onto a wire rack to cool completely, about 1 hour.
  6. When cakes are cool, microwave 1/4 cup milk for 1 minute until hot. Add lavender and let steep for 10 minutes. Strain the milk through a fine mesh strainer, discarding the lavender.
  7. In a medium bowl, combine powdered sugar, salt, and vanilla. Gradually stir in the steeped milk, 1 teaspoon at a time, until you have a smooth, pourable glaze.
  8. Drizzle the cooled cakes with the lavender glaze. Garnish with additional lemon zest and edible flowers, if desired.

Lemon Blueberry Cake

Don’t miss out on this lemon dessert! Your Easter dessert ideas won’t be complete without the BEST Lemon Blueberry Cake. Loaded with fruit and layered with lemon curd and mascarpone frosting, this lemon cake is an easy spring recipe you’ll want to make again and again!

Print

clock clock iconcutlery cutlery iconflag flag iconfolder folder iconinstagram instagram iconpinterest pinterest iconfacebook facebook iconprint print iconsquares squares iconheart heart iconheart solid heart solid icon

Lemon Blueberry Cake


  • Author: Chef Emy

Description

This easy Lemon Blueberry Cake is a moist lemon cake loaded with sweet blueberries and topped with lemony mascarpone frosting! Between each layer of cake is mascarpone whipped cream and a tangy lemon curd. A moist oil-based cake that’s fluffy and is truly the best blueberry cake ever!


Ingredients

Scale
  • 2 cups (380g) granulated sugar
  • ½ cup (118 ml) vegetable oil
  • 3 large eggs
  • 2 lemons- zested and juiced (see below)
  • 1 teaspoon (5ml) Lemon (or vanilla) extract
  • ½ cup (118 ml) light sour cream
  • 2 ½ cups (350 g) all-purpose flour
  • 3 teaspoons (11.2 g) baking powder
  • 1 teaspoon (5 g) salt
  • 1 cup buttermilk (236 ml) (or milk)
  • 1/4 cup (59ml) fresh lemon juice
  • 9 ounces fresh blueberries, washed and dried
  • 2 tablespoons (15.6g) all-purpose flour
  • 2 ¼ cups (532ml) heavy whipping cream
  • 1 cup (130g) powdered sugar
  • 1 teaspoon (5ml) pure vanilla extract
  • 16 ounces mascarpone cheese, cold
  • 1 jar (10 ounces) lemon Curd

Instructions

  1. Preheat the oven to 350°F. Prepare three 8-inch round baking pans, line the bottom with parchment paper and grease the sides. Prepare your bake even stripes if desired.
  2. In a large mixing bowl, combine the sugar, vegetable oil, eggs, and lemon extract. Beat on medium speed until the eggs and oil are well incorporated and the batter is lighter in color, about 2 minutes. Scrape down the bowl as needed.
  3. Next, zest 2 lemons into the batter and then juice the lemons to get 1/4 cup of lemon juice. Add the lemon zest, lemon juice, and sour cream to the batter and beat until well combined.
  4. Combine the dry ingredients in a separate bowl then add half the dry ingredients to the batter, beat on low speed while pouring in half of the buttermilk, and mix just until the flour starts to incorporate.
  5. Finally, add the remaining dry ingredients and remaining buttermilk and beating until all of the ingredients are well combined.
  6. Use a spatula to scrape down the sides of the bowl and stir the batter from the bottom to the top to ensure its well mixed.
  7. Toss the blueberries with 2 tablespoons of flour. Then gently fold the blueberries into the batter, saving a small handful to drop on top of the cake batter.
  8. Divide the batter evenly between the three pans, about 1 2/3 cups of batter per pan. Drop the remaining blueberries on top. Bake at 350°F for 20-23 minutes. Rotate your pans in the oven halfway through baking.
  9. Test the cake for doneness by inserting a toothpick into the center of the cake. If the toothpick comes out clean, you cake is done. Remove from the oven and allow to cool completely.
  10. Place the mixing bowl and whisk attachment in the freezer for 5 to 10 minutes to chill.
  11. Spoon the cold mascarpone whipped cream into your bowl and beat on a medium-low speed (speed 3 on your stand mixer). Slowly pour in the heavy cream, allowing the mascarpone cheese to turn to a liquid consistency.
  12. Then increase the mixing speed to high (speed 8-10) and beat it until soft peaks form.
  13. Next, add the powdered sugar and vanilla extract, beating on low until sugar is incorporated. Then continue beating at high speed until stiff peaks form.
  14. Use a cake leveler to cut the domes off the top of the cake. Place a dollop of frosting on your cake board and place the bottom layer of cake on top of that.
  15. Place half of the whipped cream in a large piping bag fitted with a large open round tip, or simply cut off the end of the piping bag. Pipe a layer of frosting and spread evenly. Then spread half of the lemon curd over the mascarpone filling.
  16. Add the second layer of cake and repeat the above steps using all of the remaining lemon curd. Next, add the final layer of cake on top.
  17. Use your piping bag to fill in any gaps between your layers and to create a crumb coat. Using an offset spatula or icing smoother, wipe away the excess frosting, leaving you just enough to coat the outside of the cake. Do not mix your crumb coating frosting back into your icing if it has cake debris in it.
  18. Proceed to frost the top and sides of the cake using your offset spatula. Once the sides of the cake are covered, use an icing smoother to remove any excess frosting. You can take the end of your offset spatula and gently place them against the sides of the cake as your rotate your cake to add a little texture.
  19. Use remaining frosting to pipe the florets on the top of the cake using an Ateco 809 tip (large open round). Garnish with lemon slices and leftover blueberries. This cake must be refrigerated.

Lemon Blueberry Cake

This lemon blueberry cake is the perfect reicpe for spring. It’s moist and tender with a delicious lemon flavor and tons of sweet blueberries. Topped with cream cheese frosting – it’s not too sweet and absolutely delicious #bleberry #lemon #cake #creamcheesefrosting #spring #dessert #easter

Print

clock clock iconcutlery cutlery iconflag flag iconfolder folder iconinstagram instagram iconpinterest pinterest iconfacebook facebook iconprint print iconsquares squares iconheart heart iconheart solid heart solid icon

Lemon Blueberry Cake


  • Author: Chef Emy

Description

This lemon blueberry cake starts with a moist & tender lemon cake that’s dotted with juicy blueberries. Then it’s topped with cream cheese frosting that has just a hint of lemon.


Ingredients

Scale
  • 3 cups cake flour (360 grams)
  • 2 teaspoons baking powder
  • 1/2 teaspoon baking soda
  • 1/2 teaspoon salt
  • 3/4 cup buttermilk (180 ml) (room temperature)
  • 1/3 cup lemon juice (80 ml) (freshly squeezed)
  • 1 cup unsalted butter (226 grams) (softened to room temperature)
  • 1 3/4 cups granulated sugar (350 grams)
  • 2 tablespoons lemon zest
  • 2 teaspoos vanilla extract
  • 4 large eggs (room temperature)
  • 2 cups blueberries (I recommend using fresh)
  • 2 teaspoons cake flour (or all-purpose flour)
  • 1/2 cup unsalted butter (112 grams) (softened)
  • 8 oz brick-style cream cheese (226 grams)
  • 1 teaspoon lemon juice (freshly squeezed)
  • 34 cups powdered sugar (330440 grams) (sifted)
  • 1 tablespoon whipping cream (as needed)
  • 3/4 cup unsalted butter (168 grams) (softened)
  • 12 ounces brick-style cream cheese (340 grams) (full fat)
  • 1 1/2 teaspoons lemon juice (freshly squeezed)
  • 4 1/25 1/2 cups powdered sugar (495605 grams) (sifted)
  • 12 tablespoon whipping cream (as needed)

Instructions

  1. Preheat the oven to 350F (180C) degrees. Grease and flour a 9×13 inch cake pan. For a layer cake, line the bottom of the cake tins with rounds of parchment paper. Then grease and flour the sides of the pans.
  2. In a medium bowl sift together the flour, baking powder, baking soda and salt. Whisk together and set aside.
  3. Combine the buttermilk and freshly squeezed lemon juice. Whisk with a fork and set aside.
  4. In a large bowl beat together the butter, sugar and lemon zest until fluffy. (About 2-3 minutes).
  5. Add in the vanilla extract and beat in the eggs 1 at a time. Turn off the mixer and scrape down the sides of the bowl after each addition.
  6. With the mixer on low speed, beat about 1/3 of the flour mixture into the butter mixture. Then mix in about 1/2 of the milk and lemon juice mixture. Turn off the mixer and scrape down the sides and bottom of the bowl. Repeat the process – beat in about 1/3 of the flour mixture, followed by the rest of the milk and lemon juice mixture. Lasty, beat in the last 1/3 of the flour mixture. Do not overmix.
  7. Toss the blueberries with the 2 teaspoons of flour, then gently fold into the batter with a spatula or rubber spoon.
  8. Pour the batter into the prepared pan/pans. Bake for 30-35 minutes for a 9×13 inch pan, or about 25-30 minutes for layer cakes. When done baking, the top should look set and an inserted toothpick comes out clean. If you gently press on the top of the cake it should feel firm and slightly springy to the touch, but not gooey.
  9. Cool the cakes in the pan. If making a layer cake, be very, very careful when inserting the pans. Do not try to invert the cake pans while they are still hot.
  10. Beat the butter until soft, then mix in the cream cheese.
  11. Add in the lemon juice and mix in 3 cups of the powdered sugar, starting with the mixer on low speed and then turning up to medium as it starts to combine.
  12. Beat in the rest of the powdered sugar about 1/2 cup at a time until the desired sweetness and thickness is reached. If the frosting seems too thick, beat in 1 tablespoon whipping cream.
  13. For a 9×13 inch cake, frost the cooled cake and optionally decorate with blueberries and lemon slices.
  14. For a layer cake, ensure that the layers are fully cooled first. (I recommend wrapping in plastic and refrigerating so that the layers are slightly firm). If the tops are domed, use a serrated knife or cake leveler to gently cut off the rounded top. Place one cake layer on the plate or cake stand that you plan to serve it on. Frost the top with about 3/4 cup frosting. Place the second cake layer on top and frost the top with another 3/4 cup of frosting. Then place the third cake layer on top. Frost the sides of the cake with a thin layer of frosting – the crumb coat – and place in the fridge for about 20-30 minutes. Once the thin layer of frosting has hardened, frost the sides and top of the cake with swirls of frosting. Optionally, decorate with blueberries.
  15. Slice with a thin, sharp knife.

Lemon Blueberry Cake

This Lemon Blueberry Cake is tangy, sweet, super moist, and creamy. It’s a delicious and beautiful cake. It comes with soft lemon cake layers, a sweet blueberry filling, and an ultra creamy lemon cream cheese frosting. Detailed step-by-step photos and video.

Print

clock clock iconcutlery cutlery iconflag flag iconfolder folder iconinstagram instagram iconpinterest pinterest iconfacebook facebook iconprint print iconsquares squares iconheart heart iconheart solid heart solid icon

Lemon Blueberry Cake Recipe


  • Author: Chef Emy

Description

This Lemon Blueberry Cake is tangy, sweet, super moist, and creamy. It’s a delicious and beautiful cake. It comes with soft lemon cake layers, a sweet blueberry filling, and an ultra creamy lemon cream cheese frosting. Detailed step-by-step photos and video.


Ingredients

Scale
  • 4 heaping cups blueberries, fresh or thawed
  • 1 cup granulated white sugar
  • juice of 2 lemons
  • 3 cups all-purpose flour, spooned and leveled
  • 1 tbsp baking powder
  • ½ tsp salt
  • ½ cup unsalted butter, at room temperature
  • ½ cup vegetable oil
  • 1 ¾ cups granulated white sugar
  • 3 large eggs
  • 1 cup milk
  • ½ cup freshly squeezed lemon juice
  • 2 tsp vanilla extract
  • 1 tbsp lemon zest
  • 1 cup unsalted butter, at room temperature
  • 8 oz cream cheese, softened
  • 2 cups powdered sugar, sifted
  • 12 tbsp freshly squeezed lemon juice

Instructions

  1. In a medium saucepan, combine all ingredients and bring to a simmer over medium heat. Cook until the blueberries are soft and the sauce has thickened up and is reduced by 1/3, about 5-10 minutes. Stir constantly.
  2. Remove from heat and let cool to room temperature. It will thicken as it cools.
  3. Preheat oven to 350°F / 175°C. Line the bottom and the sides of two 8" (20cm) baking pans with parchment paper. Set aside.
  4. In a medium bowl combine flour, baking powder, and salt and stir to combine. Set aside.
  5. In a large mixing bowl with a stand or handheld mixer fitted with a whisk or paddle attachment, beat butter, oil, and sugar on medium speed until creamy for about 2 minutes. Add 1 egg at a time and mix until fully incorporated.
  6. Alternately add dry ingredients, milk, dry ingredients, lemon juice, and end with dry ingredients. Stir just until combined. Add vanilla and lemon zest and stir to combine.
  7. Divide batter into the two prepared baking pans equally. Bake for 28-32 minutes or until a toothpick in the center comes out clean. Don't overbake or the cake will be dry. Let cool to room temperature.
  8. In a large mixing bowl, using a handheld or stand mixer fitted with a paddle attachment, whisk butter on medium speed until creamy. Add cream cheese and whisk until smooth and combined.
  9. Sift in powdered sugar and stir until well combined and creamy. Add 1 tbsp lemon juice at a time and stir until smooth and creamy.
  10. NOTE: The frosting should be creamy but firm enough to frost the cake with an offset spatula. If the frosting is too soft, add more powdered sugar. If the frosting is too firm, add more lemon juice. Watch the video and the pictures above to see the consistency of the frosting.
  11. Cut a thin layer off the tops of your cakes to create a flat surface if needed. Then cut each cake in half horizontally.
  12. Place one cake layer on a cake stand or serving plate. Spread 1/4 of the frosting over the cake. The frosting should be higher around the edges that it holds the blueberry filling inside the cake (watch the video and the step-by-step photos for better understanding).
  13. Layer with 1/3 of the blueberry filling (where the frosting is lower). Repeat two more times.
  14. Place last cake layer on top and lightly frost the outside and the sides of the cake with the remaining frosting.
  15. Chill 4 hours in the fridge. Store leftovers in an airtight container in the fridge up to 4 days.

Easy To Make: Cinnamon Roll Granola Clusters (Vegan)

Easy To Make: Cinnamon Roll Granola Clusters (Vegan) – Your Crunchy, Gooey Breakfast Dream

Prep Time Cook Time Total Time Servings Difficulty
10 minutes 25 minutes 1 hour 35 minutes (includes cooling) About 4 cups (8 snack-sized servings) Easy

Why This Granola is Your New Breakfast Obsession

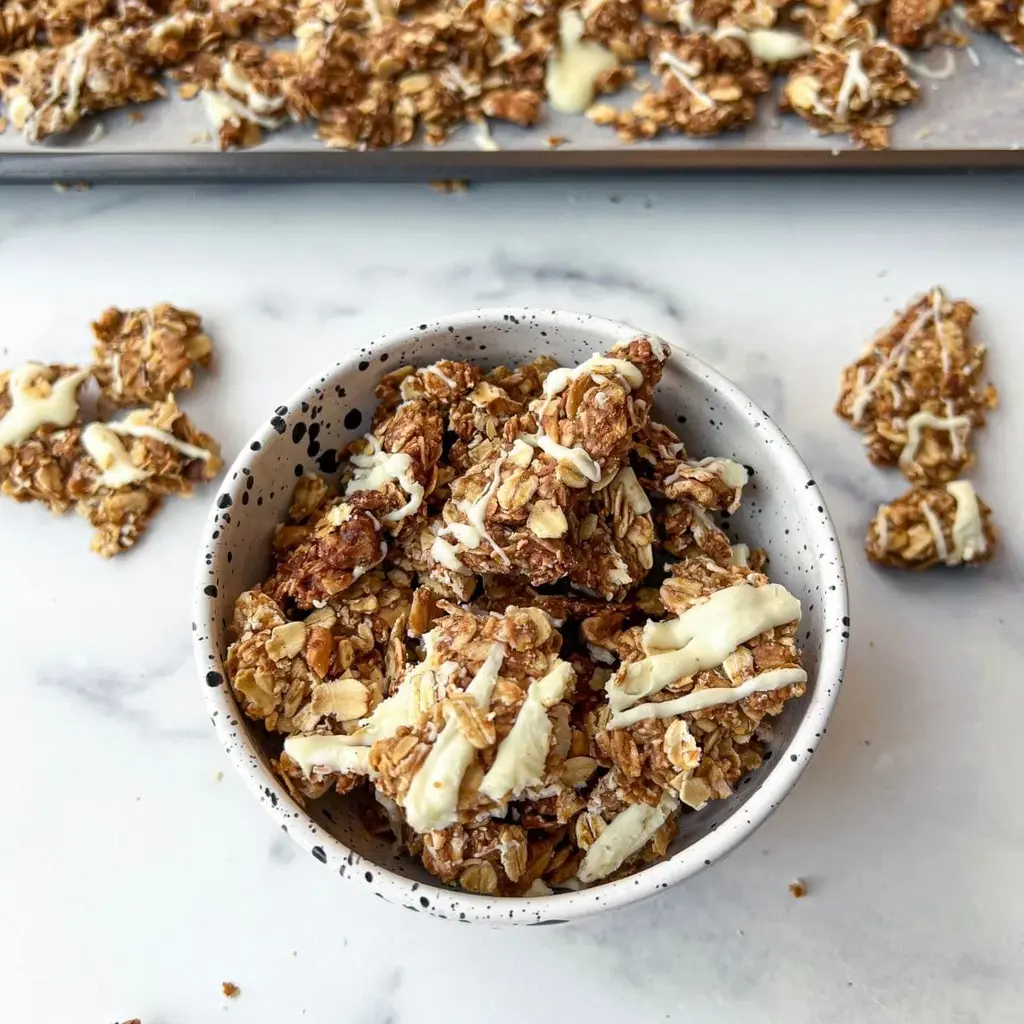
Imagine the warm, gooey, cinnamon-spiced heart of a freshly baked cinnamon roll. Now, picture that irresistible flavor transformed into a crunchy, clustery, snackable granola you can eat straight from the jar. That’s exactly what you get with this Easy To Make: Cinnamon Roll Granola Clusters (Vegan). This recipe is a game-changer for anyone who loves a sweet treat but wants a wholesome, plant-based start to their day. Gone are the days of sad, dry granola bits. We’re creating big, satisfying clusters that are ultra-crispy, perfectly sweetened with maple syrup, and finished with a dreamy white chocolate drizzle that mimics classic cinnamon roll icing.

As The Kitchen Team at CookingWithEmy.com, we’ve tested countless granola recipes to find the perfect balance of crispiness, flavor, and ease. This vegan granola recipe requires just one bowl, simple pantry staples, and about 10 minutes of hands-on prep. It’s the ultimate make-ahead solution for busy mornings, a lunchbox superstar, and a healthy-ish dessert that feels decadent. Whether you sprinkle it over creamy vegan yogurt, pour plant-based milk over it, or simply grab a handful for a mid-afternoon pick-me-up, this granola delivers the comforting taste of a bakery treat in a much more nutritious package.

Why This is the Best Vegan Cinnamon Roll Granola Recipe

Not all granola recipes are created equal. Many result in loose oats or a hard, brittle sheet that’s impossible to break into nice chunks. Our method guarantees those highly sought-after clusters every single time. The secret lies in two key steps: using a binding agent like cashew butter and, most importantly, pressing the mixture firmly onto the baking sheet before it goes into the oven. This encourages the oats to stick together as they bake. The slow, low-temperature bake at 325°F then crisps everything evenly without burning the sugars.

Furthermore, this recipe is inherently vegan and easily adaptable to other dietary needs. The natural sweetness comes purely from maple syrup, and the richness from nut butter, creating a depth of flavor that refined sugars can’t match. We also emphasize the crucial cooling period. Letting the baked granola cool completely for about an hour is non-negotiable—this is when the magic happens and the granola transforms from soft and hot to supremely crispy and crunchy.

💡 The Kitchen Team’s Pro Tip: For the absolute best, bakery-style clusters, use a second piece of parchment paper to press the granola mixture down *extra* firmly before baking. Apply even pressure across the entire pan. The more compact it is going in, the better the clusters will be coming out.

Ingredients & Simple Swaps

This recipe celebrates simple, whole-food ingredients. Here’s what you’ll need and how you can customize it based on what’s in your pantry.

Ingredient Quantity Purpose & Best Swaps
Rolled Oats (Old-Fashioned) 2 cups The base. Use certified gluten-free oats if needed. Do not use quick oats or steel-cut.
Cashew Butter 1/3 cup Binds clusters and adds richness. Swap with almond butter, peanut butter, or sunflower seed butter for nut-free.
Pure Maple Syrup 1/3 cup Adds sweetness and helps with crispiness. Agave nectar or brown rice syrup are good vegan alternatives.
Chopped Walnuts 1/2 cup For crunch and healthy fats. Pecans, almonds, or pumpkin seeds work wonderfully.
Ground Cinnamon 2 teaspoons The star spice! For extra warmth, add a pinch of nutmeg or cardamom.
Pure Vanilla Extract 1 teaspoon Enhances the sweet, bakery flavor. Use the real stuff, not imitation.
Salt 1/4 teaspoon Balances and heightens all the flavors. Use fine sea salt.
Vegan White Chocolate Chips 1/4 cup (for drizzling) Creates the “icing.” Look for brands like King David or Make It Dairy Free. Or use a simple powdered sugar glaze.

Step-by-Step Instructions for Perfect Clusters

Follow these simple steps for foolproof, clustery granola every time.

Step 1: Prep & Preheat

Preheat your oven to 325°F (163°C). This lower temperature is crucial for even cooking without burning. Line a large, rimmed baking sheet with parchment paper. Do not grease the pan or use wax paper—parchment is essential for easy removal and cleanup.

Step 2: Combine Dry Ingredients

In a large mixing bowl, add the 2 cups of rolled oats, 1/2 cup of chopped walnuts, 2 teaspoons of cinnamon, and 1/4 teaspoon of salt. Whisk these together until evenly distributed. This ensures every bite is perfectly spiced.

Step 3: Mix Wet Ingredients

In a separate, medium-sized bowl, combine 1/3 cup of cashew butter, 1/3 cup of maple syrup, and 1 teaspoon of vanilla extract. Stir vigorously until the mixture is completely smooth and emulsified. If your nut butter is very thick, you can gently warm the mixture for 15 seconds in the microwave to make it easier to mix.

💡 The Kitchen Team’s Pro Tip: For ultimate cluster cohesion, make sure your nut butter and maple syrup are at room temperature before mixing. This creates a smoother, more blendable liquid that coats every oat evenly.

Step 4: Combine Wet & Dry

Pour the wet mixture over the dry ingredients. Using a sturdy spatula or a wooden spoon, fold and stir until every single oat and walnut piece is thoroughly coated. The mixture will be thick and sticky—this is exactly what you want!

Step 5: Press & Bake

Transfer the granola mixture to your prepared baking sheet. Spread it out into a rough rectangle or square, about 1/4-inch thick. Now, here’s the cluster-making secret: take your spatula or the bottom of a flat measuring cup and PRESS down firmly and evenly across the entire surface. Compress the granola tightly. Bake on the center rack for 22-27 minutes, or until the edges are a deep, golden brown. The center may look slightly soft—it will crisp up as it cools.

Step 6: The Crucial Cool

Remove the pan from the oven and place it on a wire cooling rack. Do not stir or touch the granola! Let it cool completely, undisturbed, for at least 1 hour. This patience is rewarded with maximum crispiness and solid clusters.

Step 7: Drizzle & Set

Once the granola slab is completely cool, melt your vegan white chocolate chips according to package instructions. Using a spoon or a piping bag, drizzle the chocolate back and forth over the granola. For faster setting, place the entire tray in the refrigerator for 15-20 minutes until the chocolate is firm.

Step 8: Break & Enjoy

Lift the giant, crispy granola slab off the parchment paper. Use your hands to break it into beautiful, irregular clusters of all sizes. Now it’s ready to eat, store, or share!

Serving Suggestions: Beyond the Bowl

This Cinnamon Roll Granola is incredibly versatile. Here are our favorite ways to enjoy it:

  • The Classic Bowl: Serve over thick coconut yogurt or vanilla oat milk yogurt with fresh berries.
  • As Cereal: Pour your favorite plant-based milk (oat or almond are perfect) over a bowl of clusters.
  • Dessert Topping: Sprinkle over dairy-free ice cream or apple crisp for an incredible crunch.
  • Straight from the Jar: The ultimate grab-and-go snack. Portion into small bags for hiking or road trips.
  • On-the-Go Parfait: Layer granola, yogurt, and fruit in a mason jar for a portable breakfast.

Storage & Keeping It Crispy

To maintain that perfect crunch, store your completely cooled granola clusters in an airtight container at room temperature. A glass mason jar with a tight-sealing lid is ideal. Place it in a cool, dark pantry. Properly stored, it will stay fresh and crispy for up to 2 weeks. For the white chocolate drizzle, if your kitchen is very warm, you may prefer to store the container in the refrigerator to prevent any melting. The granola can also be frozen for up to 3 months in a freezer-safe bag or container. Thaw at room temperature before serving.

Creative Variations to Try

Once you’ve mastered the base recipe, make it your own with these fun twists:

  • Apple Pie: Add 1/2 cup of finely chopped dried apples and a pinch of nutmeg to the dry mix.
  • Double Chocolate: Add 2 tablespoons of cocoa powder to the dry ingredients and use vegan dark chocolate chips for drizzling.
  • Gingerbread Spice: Replace cinnamon with a blend of 1 tsp ginger, 1 tsp cinnamon, and 1/4 tsp cloves.
  • Protein-Packed: Stir 2 scoops of vanilla vegan protein powder into the wet ingredients (you may need a splash of plant milk to adjust consistency).
  • Tropical: Swap walnuts for macadamia nuts and add 1/3 cup of chopped dried pineapple and coconut flakes after baking.

Your Granola Questions, Answered (FAQ)

Can I make this recipe nut-free?

Absolutely! To make it nut-free, replace the cashew butter with sunflower seed butter or tahini (though tahini will add a distinct flavor). Omit the walnuts and use seeds instead, like pumpkin seeds or sunflower seeds.

Why didn’t my granola form clusters?

The most common reasons are not pressing the mixture firmly enough before baking, stirring it while it’s still warm, or using too much liquid. Ensure you press it down compactly and let it cool completely without disturbing it.

Can I use quick oats instead of rolled oats?

We do not recommend it. Quick oats are cut smaller and absorb moisture differently, often resulting in a mushy or powdery texture rather than distinct, crunchy clusters. Stick with old-fashioned rolled oats.

How can I make this recipe oil-free?

This recipe is naturally oil-free as written! The fat comes from the nut butter, which is a whole food. Just ensure your nut butter doesn’t have added oils.

My granola burned on the edges. What happened?

Your oven may run hot, or the granola may have been spread too thin at the edges. Use an oven thermometer to check accuracy. Next time, shape the granola into a tighter, more centered rectangle, keeping it about an inch from the pan’s edges.

Can I double this recipe?

Yes, but bake it on two separate sheets placed on the upper and lower middle racks. Switch and rotate the pans halfway through baking to ensure even cooking. Do not overcrowd one pan.

What’s the best way to melt vegan white chocolate for drizzling?

Use a double boiler or microwave in 15-second intervals, stirring well between each, until just melted. Overheating can cause it to seize. Adding a tiny drop of coconut oil can help smooth it for drizzling.

Is this granola gluten-free?

It can be! Oats are naturally gluten-free but are often cross-contaminated. To ensure the recipe is gluten-free, use certified gluten-free rolled oats.

Did you make this recipe? We love seeing your creations! Share a photo on Instagram and tag @cookingwithemy — we can’t wait to see your beautiful cinnamon roll granola clusters!

Love This Recipe? Save It For Later!

Pin the image below to your Pinterest boards to save this Easy To Make: Cinnamon Roll Granola Clusters (Vegan) recipe. Find more delicious inspiration at Pinterest.com/cookingwithemy.

[Image Placeholder: A beautiful, high-quality vertical photo of the granola clusters in a jar, with some spilled out next to a bowl of yogurt and berries.]
Alt Text: Vegan cinnamon roll granola clusters with white chocolate drizzle in a glass jar, served with yogurt.