“`html
Table of Contents
Pina Colada Milkshakes Recipe
Introduction
Did you know that searches for “tropical drink recipes” spike by over 200% during the summer months? It’s clear we’re all craving a taste of paradise, and what better way to satisfy that craving than with a Pina Colada Milkshake? This isn’t just any milkshake; it’s a creamy, dreamy portal to a sun-drenched beach, blending the nostalgic flavors of a classic cocktail with the indulgent comfort of a frosty dessert. Whether you’re hosting a summer BBQ, need a refreshing poolside treat, or simply want to brighten a regular Tuesday, this recipe is your ticket. Forget the complicated bar tools and expensive ingredients—our version uses simple components to create a symphony of vanilla, pineapple, and coconut that’s utterly irresistible. Let’s dive into how you can whip up this crowd-pleaser in minutes and bring a tropical vacation to your kitchen.
Ingredients List
Gather these simple ingredients for the perfect tropical blend. For the best flavor and texture, I recommend using full-fat versions, but substitutions are provided.
- Vanilla Ice Cream (3 cups): The creamy foundation. Use a high-quality, dense vanilla bean ice cream for the richest flavor and thickest shake. Substitution: For a dairy-free version, use an equal amount of coconut milk or almond milk-based vanilla ice cream.
- Crushed Pineapple (1 cup, with juice): This provides the essential tangy, sweet “pina” flavor and natural fiber. The juice adds necessary liquid. Substitution: Fresh pineapple chunks (about 1 ¼ cups) blended until smooth with a tablespoon of water or pineapple juice.
- Coconut Milk (¾ cup): Use canned, full-fat coconut milk for that luxurious, creamy “colada” taste and mouthfeel. Shake the can well before using. Substitution: Light coconut milk or cream of coconut (adjust sweetness accordingly).
- Optional: White Rum (2-3 oz): For an authentic adult twist. Adds a warm, botanical note that complements the tropical fruits. Substitution: ½ teaspoon of rum extract mixed into the blend, or simply omit for a kid-friendly version.
- For Garnish:
- Whipped Cream
- Maraschino Cherries
- Toasted Coconut Flakes
- Pineapple Wedge or Spear
Timing
This recipe is remarkably fast. Compared to the average milkshake or smoothie recipe that might take 5 minutes, we allocate a few extra minutes for proper garnishing and texture adjustment, ensuring a professional, restaurant-quality result every time. The no-cook aspect makes it an instant gratification treat.
Step-by-Step Instructions
Step 1: Prepare Your Ingredients
This is the secret to a seamless blending experience. Take your vanilla ice cream out of the freezer and let it sit on the counter for 5-7 minutes. You want it slightly softened so it blends easily without straining your blender motor, but not melted. Open your can of coconut milk and give it a vigorous shake to reincorporate any separated cream and liquid. Have your crushed pineapple and measuring cups ready. If you’re using rum, measure it out now. This “mise en place” ensures you won’t be scrambling mid-blend.
Step 2: Blend the Base
In a high-powered blender, combine the softened vanilla ice cream, crushed pineapple (with all its juicy goodness), and the coconut milk. If you’re making the adult version, add the rum now. Secure the lid tightly. Start blending on low speed for 10 seconds to combine the ingredients, then gradually increase to high speed. Blend for 45-60 seconds, or until the mixture is completely smooth, creamy, and has a uniform pale yellow color. You should hear the motor sound change to a consistent, smooth hum when it’s ready.
Step 3: Adjust and Perfect
Stop the blender and use a spatula to scrape down the sides. This is your chance to perfect the texture. Is it too thick, like soft-serve? Add a tablespoon of coconut milk or pineapple juice and blend for another 10 seconds. Is it too thin? Add another small scoop of ice cream and blend again. Taste it! This is the best part. Does it need more pineapple tang or coconut richness? Adjust now. The perfect Pina Colada Milkshake should be luxuriously thick but still pourable.
Step 4: Serve and Garnish
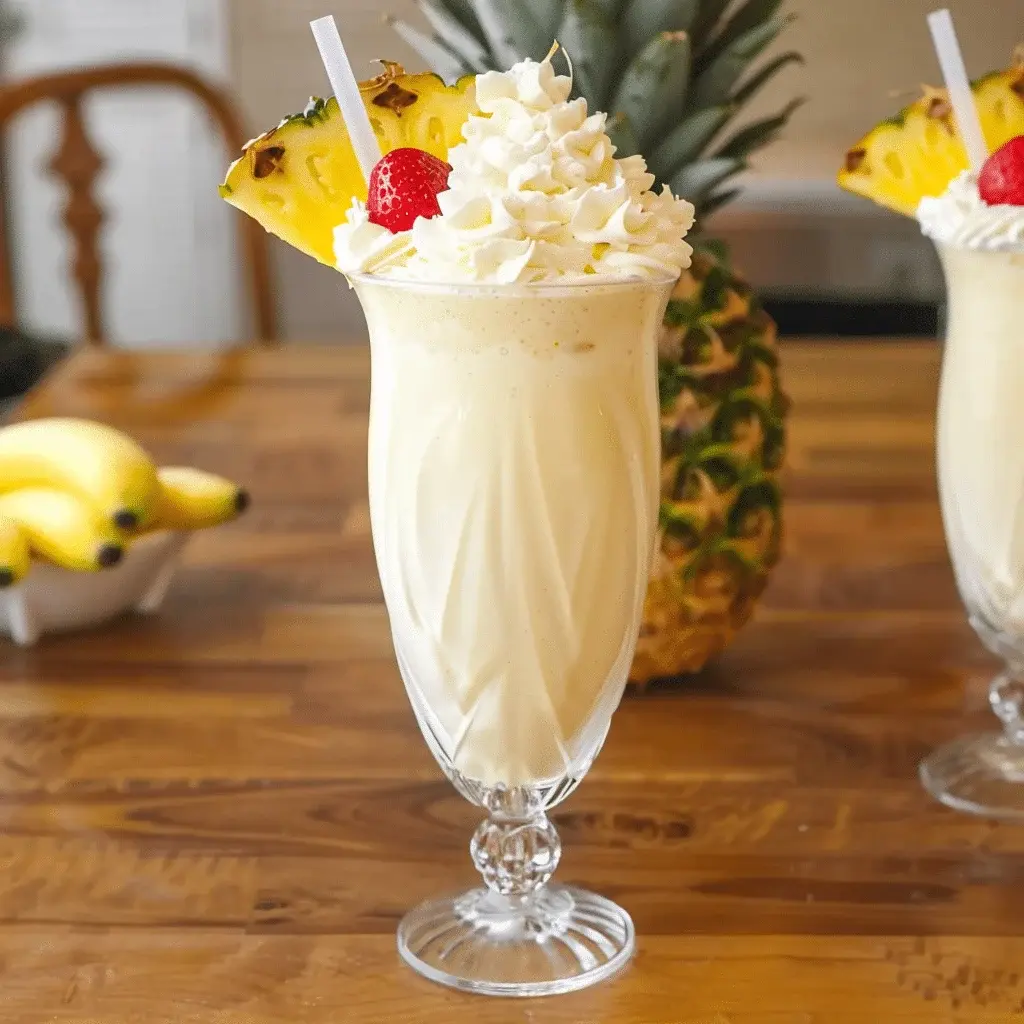
Immediately pour the milkshake into chilled glasses—tall hurricane or Collins glasses are ideal for the tropical vibe. Don’t wait, as it will begin to melt. Top each glass with a generous swirl of whipped cream. For the final, iconic touch, place a maraschino cherry on top of the whipped cream. For extra flair, sprinkle a pinch of toasted coconut flakes on the whipped cream and slide a small pineapple wedge onto the rim of the glass. Serve immediately with a straw and a long spoon.
Nutritional Information
(Per serving, recipe makes 2 large shakes, without optional rum or extra garnish.)
- Calories: ~580 kcal
- Total Fat: 32g (Saturated Fat: 25g)
- Cholesterol: 90mg
- Sodium: 120mg
- Total Carbohydrates: 68g (Dietary Fiber: 3g, Sugars: 58g)
- Protein: 8g
Note: These are estimates. Values can vary based on specific brands of ice cream and coconut milk used.
Healthier Alternatives
You can enjoy this tropical treat with a lighter footprint without sacrificing the core flavors:
- Ice Cream Swap: Use a light or “slow-churned” vanilla ice cream, or frozen vanilla Greek yogurt. The Greek yogurt adds a protein boost and tang that pairs well with the pineapple.
- Sweetener Control: Opt for crushed pineapple packed in 100% juice (not heavy syrup) to reduce added sugars. You can also use fresh pineapple exclusively.
- Lighter Coconut: Substitute full-fat coconut milk with “light” canned coconut milk. The flavor will be slightly less rich but still distinctly coconutty.
- Boost It: Add a handful of spinach (you won’t taste it, I promise!) for greens, or a scoop of unflavored protein powder to make it more of a meal replacement.
Serving Suggestions
- Tropical Brunch: Serve alongside coconut French toast or banana pancakes.
- Dessert Flight: Offer mini “shot glass” portions alongside grilled pineapple skewers and coconut macaroons for a dessert tasting.
- Pool Party Perfect: Double or triple the batch and serve from a drink dispenser with a “Rum Optional” sign. Provide all the garnishes in separate bowls for a DIY garnish bar.
- Adult Upgrade: For the rum version, rim the glasses with toasted coconut or a cinnamon-sugar blend before pouring.
Common Mistakes
- Using Rock-Hard Ice Cream: This leads to uneven blending and can damage your blender. Always soften slightly.
- Over-blending: Blending for too long after the mixture is smooth incorporates too much air and can cause it to melt faster, becoming watery.
- Skipping the Garnish: The whipped cream and cherry aren’t just pretty—they add contrasting texture and a burst of sweet flavor that completes the experience.
- Using Pineapple Juice Instead of Crushed: Juice alone misses the vital pulp and fiber that gives the milkshake its authentic, substantial pineapple body and flavor.
Storing Tips
Milkshakes are best enjoyed immediately. However, if you have leftovers:
- Short-Term: Pour into an airtight container and freeze for up to 2 hours. Re-blend for 20 seconds before serving. It may be slightly icier.
- Make-Ahead Base: You can pre-measure the ice cream, pineapple, and coconut milk into a freezer-safe bag or container and freeze. When ready, dump the frozen contents into the blender, let sit for 5 minutes, then blend.
- Do Not Refrigerate: Refrigeration will cause the shake to separate and become a grainy, unappetizing texture.

Conclusion
This Pina Colada Milkshake recipe is more than just a drink; it’s a mini-vacation in a glass. With its foolproof method, customizable options for all ages, and stunning presentation, it’s guaranteed to become your go-to treat for making ordinary moments feel extraordinary. The blend of creamy vanilla, tangy pineapple, and rich coconut is simply timeless. So, grab your blender, put on some island tunes, and treat yourself to a taste of paradise. Don’t forget to share your creations with us—tag #SpiceMingleTropicalTreat on social media so we can see your beautiful shakes!
Made this recipe? We’d love to see your tropical creation! Share a photo in the comments below or on Instagram and tell us your favorite way to enjoy it. Your feedback helps other readers and inspires our next recipe!
FAQs
***Can I make this a vegan Pina Colada Milkshake?***
Absolutely! Use a high-quality vegan vanilla ice cream (coconut or nut-based) and ensure your coconut milk and garnishes are vegan-friendly. The result is just as creamy and delicious.
***My milkshake is too thin. How can I fix it?***
The easiest fix is to add more ice cream. Blend in another ½ cup of slightly softened vanilla ice cream until incorporated. For future batches, reduce the initial coconut milk by 2-3 tablespoons.
***Can I use frozen pineapple instead of crushed?***
Yes, but you’ll need to adjust the liquid. Use 1 cup of frozen pineapple chunks and increase the coconut milk to 1 cup to help blend the harder frozen fruit. The shake will be thicker and icier, similar to a smoothie.
***What’s the best rum to use for the adult version?***