3 Ingredient Sugar Free Peanut Butter Cookies

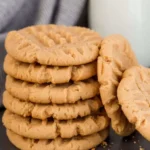
3 Ingredient Sugar Free Peanut Butter Cookies Zero Sugar Sweetness – A Quick Sweet Treat

⚖️
Difficulty
Easy
⏲️
Prep Time
10 mins
🕒
Cook Time
10 mins
⏱️
Total Time
20 mins
🍽️
Servings
12

I’m standing in my tiny Manhattan kitchen, the scent of fresh roasted peanuts mingling with the scent of early‑morning espresso. I reached into the cupboard to reach for a jar of sugar‑free caramel sweetener and felt a flash of nostalgia from my mother’s Moroccan kitchen. Today, I’m sharing a simple yet satisfying treat that’s sugar‑free, super quick, and full of that creamy peanut butter bliss you can’t resist.

Imagine a cookie that’s golden‑brown on the edges, chewy inside, and carries a subtle nutty aroma that instantly transports you to a bustling North African spice market. The absence of added sugar gives the peanut butter a chance to shine, so you get a slightly buttery sweetness paired with a faint hint of vanilla that I learned in my Paris pastry class. Each bite feels like a small celebration – soft center, crisp crackles – a harmonious mouthfeel that satisfies sweet cravings without the sugar crash.

I’ve tweaked this recipe during countless prep‑days, adding a squeeze of lemon juice here and a pinch of sea salt there to keep it balanced. Pro tip: a quick press of the dough with the palm of your hand before the fork indenting gives the cookies an even thickness. Common mistake: forgetting to pre‑bake on a parchment-lined sheet will let the edges stick and ruin that perfect crisp. Keep these nuggets handy and you’ll always have a quick, guilt‑free snack ready.

Why This 3 Ingredient Sugar Free Peanut Butter Cookies Recipe Is the Best

The secret sauce is the combination of sweetener and peanut butter. I use a single, mild sugar alternative that sweetens without the syrupy aftertaste, allowing the peanut butter’s natural flavor to dominate. This blend is inspired by my Moroccan breakfasts of honey‑edged bread, but toned down to a sugar‑free version for the modern palate.

Texture matters. I stir until the mix is light, airy, and slightly glossy – a technique I learned from French macaroons. That lightness means the cookies rise only enough to create a desirable chew, then set into a satisfying bite that keeps you craving more.

The entire process can be finished in twenty minutes when you’re pressed for time. No prep, no batch, no mess: simply mix, scoop, press, bake, and enjoy. Perfect for a weekday snack or a quick dessert when your NYC dinner plans call for something sweet but healthy.

Sugar Free Peanut Butter Cookies Ingredients

I pick the peanut butter at my favorite Whole Foods, where the natural, creamy varieties are always in stock. For the sweetener, I grab a 2‑cup bottle of monk fruit, a mild alternative that keeps the flavor crisp. A single organic egg is the binder that ties everything together, creating a dough that holds its shape.

Ingredients List

  • 1 cup natural creamy peanut butter
  • 1 cup monk fruit sweetener (or any low‑calorie sugar alternative)
  • 1 large organic egg

Ingredient Spotlight

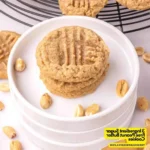
Peanut Butter: The star. A smooth, rich peanut butter with 90% peanut solids gives depth. Look for a brand that’s unsweetened and contains only peanuts and a touch of oil. Substitution: smooth almond butter for a nutty variation – it keeps the texture but adds a new flavor layer.

Monk Fruit Sweetener: A zero‑calorie, berry‑sweet alternative. It delivers sweetness without the sticky mess of dates or stevia’s aftertaste. Substitution: erythritol granules for a dry, crystalline feel that also works if you prefer a slightly granular mouthfeel.

Egg: The binder that gives rise and structure. If you’re vegan, replace the egg with ¼ cup unsweetened applesauce – the moisture keeps the cookies tender and the binding firm.

Original Ingredient Best Substitution Flavor / Texture Impact
Peanut Butter Almond Butter Nutty, slightly lighter
Monk Fruit Sweetener Erythritol Granules Dryer, slightly granular taste
Egg Unsweetened Applesauce Moist, binds loosely, vegan

How to Make 3 Ingredient Sugar Free Peanut Butter Cookies — Step-by-Step

Let’s get started – this recipe is so straightforward that your morning coffee can even wait.

Step 1: Cream Together

In a large bowl, combine 1 cup of peanut butter with 1 cup monk fruit sweetener. Whisk until the mixture turns silky and slightly lighter in color. The goal is a light, fluffy dough that feels like whipped cream.

💡 emy’s Pro Tip: Use a hand mixer on low speed; it’s easier than whisking by hand and ensures you get a light texture.

Step 2: Add the Egg

Crack a large organic egg directly into the bowl. Beat until fully incorporated, ensuring no lumps remain. The egg binds the mixture and gives the cookies structure.

⚠️ Common Mistake to Avoid: Leaving the egg unbeat for too long can make the dough too stiff, leading to hard cookies.

Step 3: Scoop and Shape

Using a cookie scoop or ¼ cup measure, form dough into balls and place them on a parchment‑lined baking sheet about two inches apart. Let the dough rest for 5 minutes so the mixture relaxes before shaping.

💡 emy’s Pro Tip: If the dough feels sticky, dust it lightly with a touch of almond flour for easier handling.

Step 4: Press and Indent

Press each ball with the palm of your hand until it’s about half its initial thickness. Take a fork and create a criss‑cross pattern on top, pressing into the dough. This design helps the cookies bake evenly.

⚠️ Common Mistake to Avoid: Skipping the press step makes cookies runny across the surface.

Step 5: Bake

Preheat your oven to 350°F. Bake the cookies for 7–10 minutes, or until the edges are a warm golden brown and the centers are just set. Keep an eye on them – they can go from golden to dark quickly.

💡 emy’s Pro Tip: Rotate the sheet mid‑bake for even color if your oven has hot spots.

Step 6: Cool & Transfer

Allow the cookies to rest on the sheet for 3 minutes, then slide them onto a wire rack to finish cooling. This prevents them from sitting in their own steam, which would make them soggy.

⚠️ Common Mistake to Avoid: Removing them from the sheet too quickly, causing them to break apart.

Step Action Duration Key Visual Cue
1 Whisk peanut butter + sweetener 5 min Light, glossy dough
2 Add egg & beat 2 min Uniform blend
3 Scoop & rest 5 min Dough relaxed
4 Press & indent 1 min Even thickness
5 Bake 7–10 min Golden edges
6 Cool & transfer 3 min Rests on sheet

Serving & Presentation

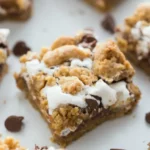
These cookies shine on a simple white plate with a dusting of sea salt and a drizzle of dark chocolate‑melted glaze, which I learned to stir over a double boiler in my Paris pastry class. Pair them with a glass of cold oat milk – the nutty undertones complement the milk’s subtle sweetness.

For a Moroccan twist, sprinkle a pinch of ras el hanout over the final loaf. The smoky, aromatic mix gives each bite a little adventure. Or serve them warm straight from the oven with a splash of espresso, echoing my favorite morning ritual in New York’s cafes.

Pairing Type Suggestions Why It Works
Side Dish Fresh arugula salad with lemon vinaigrette Bright acidity cuts through the richness
Sauce / Dip Greek yogurt with honey (optional) Adds creamy sweetness and contrast
Beverage Cold oat milk or almond milk latte Plant‑based milk complements nutty flavor
Garnish Thin sea salt flakes, toasted almond slivers Texture and depth of flavor

Make-Ahead, Storage & Reheating

I love making these on Sunday afternoons, ready to grab for the busy work week. They keep their integrity for up to a week in the fridge; simply store them in an airtight container. When I need something quick, I reheat the cookies in a 200°F oven for 3 minutes, which restores their natural chew.

Method Container Duration Reheating Tip
Refrigerator Sealed plastic bag 7 days Let sit room temp 10 min
Freezer Foil-lined tray, then bag 3 months Toast 1 min 350°F
Make-Ahead Room‑temperature tin 5 days in advance Assemble last minute

When storing in the freezer, always keep the cookies flat to avoid flattening. In my experience, thawing them at room temperature for 10 minutes before reheating yields the best texture – a quick burst of warm, buttery crumb with each bite.

Variations & Easy Swaps

Variation Key Change Best For Difficulty Impact
Almond Butter Edition Replace peanut butter with almond butter Nutty enthusiasts Easy
Gluten‑Free Version Use gluten‑free almond flour swirled in Gluten‑sensitive Medium
Seasonal Lemon Zest Twist Add lemon zest & extra pinch of cinnamon Easter brunch Easy

Almond Butter Edition

Swap the peanut butter for creamy almond butter for an extra nutty, slightly sweeter flavor profile reminiscent of my family’s almond pastries. The dough stays almost identical, but the aroma shifts to a milder, floral note.

Gluten‑Free Version

Incorporate ¼ cup gluten‑free almond flour to the dough for a texture that’s still chewy, yet free from wheat. The flour absorbs a touch of excess moisture, keeping the cookies from spreading too much while introducing a hint of almond crunch.

Seasonal Lemon Zest Twist

Squeeze fresh lemon zest into the dough to add brightness. This variation is a pop of citrus that pairs wonderfully with the almond flour in the gluten‑free version and brings a refreshing twist perfect for spring and summer tastings.

Can I use almond butter instead of peanut butter?

Yes, almond butter works wonderfully as a 1:1 replacement for peanut butter. The fat and protein content are similar, so the cookies will keep their chewy texture while offering a milder, slightly sweeter flavor. If you want a more pronounced nut flavor, try using a toasted almond butter or blend with a touch of cocoa.

Which sugar alternative is best for this recipe?

Monk fruit sweetener is my top choice because it’s sweet, low‑calorie, and has no aftertaste. Erythritol or stevia are also good, but they can slightly alter the moisture and texture. If you prefer an all‑natural option, pure date syrup or honey (though not sugar‑free) can be used, but they will add extra calories and viscosity.

Do these cookies contain gluten?

By default, the basic recipe contains no gluten, relying on peanut butter, a sugar alternative, and an egg. However, a small amount of cross contamination can occur if your sweetener or peanut butter has added fillers. If you need a proven gluten‑free version, use raw, unsweetened almond flour in place of the sweetener or add an extra 2 tbsp of almond flour to absorb moisture.

Can I store these cookies in the refrigerator?

Yes, they hold up well in the refrigerator for up to a week when stored in an airtight container or zip‑lock bag. The dough stays firm, so the cookies retain texture. Just let them sit at room temperature for ten minutes before serving so they soften slightly and become more enjoyable.

What if I want thicker cookies?

To create thicker cookies, simply press each dough ball to a fuller thickness before baking, leaving about ¾ to 1 inch deep. Increase bake time slightly, around 12 minutes, and keep an eye on the edges. Because the dough is already high in fat, the cookies won’t spread excessively and will maintain a chewy interior.

Is it safe to freeze these cookies?

Absolutely. Once baked, cool cookies on a sheet before placing them flat on a baking tray. Freeze for up to 3 months. When you’re ready to enjoy, thaw them for about 10 minutes, then warm in a 350°F oven for 2–3 minutes for that freshly baked aroma.

Can I use an egg substitute for vegan version?

Yes, a good vegan substitute is ¼ cup unsweetened applesauce per egg. It supplies moisture and binds the dough. Keep in mind that it may make the cookies slightly softer, but the flavor remains classic. Another alternative is 1 tablespoon of flaxseed meal mixed with 3 tablespoons of water, which sets into a gel.

Why do my cookies spread too thin?

Thin cookies often result from under‑baked dough or too much resting after adding the sweetener. Try reducing the resting time, or add a tablespoon of almond flour to absorb excess moisture. Pressing the dough slightly before baking can also prevent it from expanding too much.

Share Your Version!

I’d love to hear how you personalize these cookies—whether you add a splash of espresso or a dusting of cinnamon. Drop a star rating or a quick comment below, and don’t forget to pin your photos to my Pinterest boards. Tag your creations with @cookingwithemi so I can see the love in every bite!

If you’re inspired by its minimalism or the sweet bite, ask me how to tweak the recipe for a vegan or gluten‑free audience. Let’s keep the conversation buzzing like a New York street market.

From my NYC kitchen to yours — I hope this recipe brings as much warmth to your table as it does to mine. — emy 🧡

📌

Love This Recipe? Save It to Pinterest!

If you enjoyed this 3 Ingredient Sugar Free Peanut Butter Cookies recipe, don’t let it get lost in your browser tabs! 😄 Pin it now so you can find it again anytime — and explore hundreds more tried‑and‑tested recipes waiting for you on my Pinterest boards.

👉 Follow emy on Pinterest @exorecipe

📌 Pin this recipe · 🔁 Re-pin your favorites · 💬 Tag me when you make it — I love seeing your creations!

Print
clock clock iconcutlery cutlery iconflag flag iconfolder folder iconinstagram instagram iconpinterest pinterest iconfacebook facebook iconprint print iconsquares squares iconheart heart iconheart solid heart solid icon

3 Ingredient Sugar Free Peanut Butter Cookies


  • Author: Chef Emy

Description

This 3 ingredient recipe for a delicious peanut butter cookie is easy to make and can be made without adding sugar to it.


Ingredients

Scale
  • 1 cup Peanut Butter
  • 1 cup Sugar Alternative (-See post for details)
  • 1 Egg

Instructions

  1. Preheat your oven to 350 degrees and prep your cookie sheet for nonstick.
  2. In a large mixing bowl, cream together the peanut butter and sugar until light and fluffy. Once the ingredients are creamed together you can mix in the egg until combined.
  3. Use a cookie scoop scoop out the dough into balls and place each of the balls on to your prepared baking sheet about two inches apart.
  4. Next, using the palm of your hand or an object of choice, gently press each of the balls to half of their thickness. Then take a fork and make the crisscross design on top, pressing in the cookies in further.
  5. Bake the cookies for seven to ten minutes or until the edges are golden brown.
  6. Allow the cookies to sit on the cookie sheet for a few minutes before transferring them to a cookie rack to further set.

Oreo Cinnamon Rolls

Oreo Cinnamon Rolls: Oreo-infused Dark Chocolate Filling – A Sweet New Twist

⚖️
Difficulty
Medium
⏲️
Prep Time
20 mins
🕒
Cook Time
30 mins
⏱️
Total Time
50 mins
🍽️
Servings
9 rolls

I grew up in a bustling Moroccan kitchen where spices danced and family laughter filled the air. Later, in the chic studios of Paris, I learned how butter’s glint can elevate a simple dough, and now in New York, I love marrying these worlds. That’s why I’m thrilled to share my **Oreo Cinnamon Rolls**—an **Oreo‑infused dark chocolate filling** that packs a cookie‑crunch surprise while staying fluffy and aromatic.

Picture the first bite: a warm, buttery bite that folds itself under a velvety chocolate Oreo crumb, a hint of warm cinnamon that whispers, and the subtle bittersweet bite of dark cocoa that echoes the Parisian cafés I studied in. The contrast between the shiny glaze and the soft crumbged dough feels like a city skyline—glassy at night, bustling daylight—making every bite a sensory adventure.

My secret? A quick dough party sautéed at medium heat, a deliberate rest, and a glaze that glistens like a fresh sugar‑glossed bakery window. The trick is to keep the yeast activated and not over‑knead the dough. One mistake that always sneaks in? Pulling the dough apart too early, letting the gas escape and crashing the rise. I’ll show you how to avoid that below.

Why This Oreo Cinnamon Rolls Recipe Is the Best

I’ve taken the classic cinnamon roll and introduced an Oreo‑filled center that tastes like a sweet dessert sandwich. Drawing on my Moroccan upbringing starch‑rich breads and the French love for buttered pastry, the result is a layered, indulgent treat that feeds both nostalgia and craving.

The technique? Stretching the dough after the first rise to release voluminous pockets, then gently sprinkling crushed Oreos as a dry macadamia of texture before sealing. This balances crumb structure and prevents the crunch from clumping, delivering a satisfying bite like a caramelized pearl.

For beginners, the recipe is straightforward: no advanced tricks, just a clear sequence of mixing, resting, rolling, and a forgiving glaze. The result is a batch that will taste like a bakery try self in every bite.

Oreo Cinnamon Rolls Ingredients

In a narrow alley in Brooklyn market, I found the butter that melts so soft you can cut it with a spoon. The black cocoa powder sits in a dust‑covered tin that reminds me of my mother’s kitchen walls in Fes. Together, these ingredients create a flavor profile that is truly unmistakable.

Ingredients List

  • 1/2 cup packed light brown sugar (100g)
  • 2 Tbsp black cocoa powder (12g)
  • 1 tsp ground cinnamon (3g)
  • 1/4 cup unsalted butter, softened – to be spread on the dough (56g)
  • 1/2 cup crushed Oreos (50g) – for filling and topping
  • 3 1/2 cups all-purpose flour + up to 1/2 cup addition flour to be added later (440g‑500g)
  • 2 tsp instant dry yeast (7g)
  • 1 tsp fine salt (6g)
  • 1 cup whole milk (240g)
  • 1/2 cup granulated sugar (100g)
  • 1/4 cup unsalted butter, room temperature (56g)
  • 1 large egg, room temperature (56g)
  • 1 Tbsp unsalted butter, room temperature (8g)
  • 1 1/2 cups powdered sugar (188g)
  • 2 Tbsp whole milk (30g)
  • 1 tsp artificial vanilla extract (4g)

Ingredient Spotlight

Crushed Oreos are your house‑made chocolate stealth blanket. Choose the original flavor for a buttery crunch. If you’re sensitive to dairy, use oat milk powder and a dash of cinnamon‑infused cocoa for the same punch.

Black cocoa powder, the blackening hero, adds depth without bitterness. Substitute with 2 Tbsp unsweetened cocoa if you wish a softer shade; the flavor will stay but the color lightens.

Whole milk keeps the dough supple; duck or almond milk are shorthanded but works in 3:1 ratio and keeps the dough from drying out.

Original Ingredient Best Substitution Flavor / Texture Impact
Crushed Oreos Chopped dark chocolate cookies A richer chocolate bite, slightly less crisp.
Black Cocoa Powder Unsweetened Cocoa Powder Foreshifts flavor toward classic chocolate, lighter shade.
Whole Milk A2 Milk or Almond Milk (3:1) Slightly thinner dough; preserves rise.

How to Make Oreo Cinnamon Rolls — Step-by-Step

Get ready for a step‑by‑step guide that feels like a conversation over coffee. I’ll sprinkle in a pro tip or two and warn of subtle pitfalls so you can master these rolls without stress.

Step 1: Mix Dry Ingredients

In a medium bowl, combine the flour, yeast, salt, sugar, black cocoa, and cinnamon. Whisk until evenly distributed; the mixture feels like a fine dust.

💡 emy’s Pro Tip: Add yeast in the center of the dry mix so it contacts the dough instantly, ensuring a smooth rise.

Step 2: Preheat Oven

Set your oven knob to 200 °F (95 °C) to gently warm the dough before the second rise. A slightly lower temperature gives the yeast time to work quietly.

⚠️ Common Mistake to Avoid: Preheating too high can kill the yeast before it has a chance to proof.

Step 3: Mix Warm Milk

In a microwave safe bowl, mix milk, softened butter, and granulated sugar. Heat 60‑90 seconds until the butter melts and the mixture is warm. Stir well.

💡 emy’s Pro Tip: Use a fingertip test—if it’s lukewarm to touch, it’s safe for yeast.

Step 4: Assemble Dough

Slowly pour the warm mixture into the dry mix, stirring on medium speed. The dough will begin to bind, forming a shaggy ball.

⚠️ Common Mistake to Avoid: Adding the milk too quickly can make the dough too wet.

Step 5: Add Egg & Knead

Add the egg, then knead on low speed until a sticky mass forms. Let it rise for 2‑3 minutes to develop the first network of gluten.

💡 emy’s Pro Tip: A sticky dough means the yeast is alive—don’t force it hard.

Step 6: Add Flour

Gradually incorporate 1 Tbsp of flour each time until the dough stops sticking to the sides. Test by poking—tacky but no residue.

⚠️ Common Mistake to Avoid: Adding too much flour can dry out the dough.

Step 7: Add Oreo Dry

Stir in the 1/2 cup crushed Oreos on medium speed until evenly distributed into the dough.

💡 emy’s Pro Tip: Keep the mix rhythm steady so the Oreos don’t clump.

Step 8: Rest 10 min

Cover the dough with plastic wrap and let it sit for 10 minutes; the wrap will fog slightly from the dough’s warmth.

⚠️ Common Mistake to Avoid: Leaving it uncovered will dry it out and stop the rise.

Step 9: Roll Dough

Dust counter with flour. Roll dough into a 12×18 inch rectangle, about 1/2 cm thick.

💡 emy’s Pro Tip: Start rolling from the short side to keep the edges neat.

Step 10: Apply Butter

Spread 1/4 cup softened butter over the rectangle, leaving a 1/2 inch strip on one edge.

⚠️ Common Mistake to Avoid: Basting roller too thick will seal the butter and affect rising.

Step 11: Apply Filling

Evenly sprinkle the cinnamon‑cocoa mix over the buttered surface, then top with the remaining 1/2 cup crushed Oreos.

💡 emy’s Pro Tip: Fold the dough horizontally toward the uncovered strip, keeping the roll tight.

Step 12: Roll Tightly

Roll the dough into a tight log, then slice into nine equal pieces using dental floss. Place each in an 8×8 inch greased pan.

⚠️ Common Mistake to Avoid: Slicing too thin; it will tear when baking.

Step 13: Cut for Forces

Keep the cut pieces aligned; they tend to separate if left too long.

💡 emy’s Pro Tip: Lightly press the dough between fingers to seal each roll, ”force that firm love”.

Step 14: Leftover Not

Cover with foil. Let the rolls rise in the pre‑heated oven for 30 minutes—or until they puff visibly.

⚠️ Common Mistake to Avoid: Lifting the cover too soon; it will deflate.

Step 15: Cover with Foil

Remove the pan and take off foil. Turn oven back on to 350 °F (175 °C). Return pan for final bake.

💡 emy’s Pro Tip: Rotate the pan halfway through to prevent one side from browning too fast.

Step 16: First Rising

Bake on 350 °F for 26‑30 minutes, until golden brown. This second lift seals the flavor.

⚠️ Common Mistake to Avoid: Baking too short leaves them doughy.

Step 17: Bake

Stir gently for a top glaze shine. Let rest 10‑20 minutes before glazing to chill slightly.

💡 emy’s Pro Tip: Cool ginger‑cream taste if you use cake pan to maintain fizz.

Step 18: Make Glaze

In a bowl, combine butter, powdered sugar, milk, and vanilla. Whisk until smooth.

⚠️ Common Mistake to Avoid: Over‑whipping makes glaze too thick.

Step 19: Drizzle Glaze

Drizzle glaze over warm rolls, garnish with chopped Oreos, and serve immediately.

💡 emy’s Pro Tip: A light flick of glaze keeps the roll delicate.

Step Action Duration Key Visual Cue
1 Mix dry ingredients 30 s Fine dust powder
2 Preheat oven 5 min Warm air
3 Warm milk mix 1 min Glass butter melt
4 Combine with dough 2 min Silky batter
5 Add egg, knead 3 min Sticky dough
6 Add flour, knead 2 min Elasticizing dough
7 Add Oreos 30 s Even granules
8 Rest 10 min Glassy wrap
9 Roll dough 3 min Flat rectangle
10 Butter, cover 30 s Smooth surface
11 Spread filling 30 s Even swirl
12 Roll tight 30 s Firm roll
13 Slice & place 2 min Aligned log
14 Cover, rise 30 min Puffy rolls
15 Remove foil, bake 30 min Gold crust
16 Bake final 26‑30 min Even bake
17 Cool & glaze 10‑20 min Warm glaze glaze
18 Make glaze 1 min Smooth drizzle
19 Drizzle glaze, serve Slick finish Crystallized glaze

Serving & Presentation

Polish the plated rolls with a dust of powdered sugar, a drizzle of leftover glaze, and a scattering of fresh crushed Oreos for texture. On a plate, they look like a little sunrise—golden on top with a chocolate kiss at the bottom.

Pair them with a glass of chilled vanilla‑infused milk or a robust espresso to highlight the cocoa note—an aromatic combo that echoes the cafés I frequented in Paris. For a refreshing contrast, a citrus sorbet takes the sweet forward and allows the chocolate to pop.

Pairing Type Suggestions Why It Works
Side Dish Fresh berries, sliced almonds Bright acidity cuts through sweetness.
Sauce / Dip Salted caramel sauce, lemon glaze Adds contrast in taste and texture.
Beverage Iced espresso, chai latte, sparkling mint water Complement the chocolate & cinnamon swirl.
Garnish Cocoa nibs, drizzle, fresh edible flowers Highlight the dough’s heart – a feast for sight.

Make-Ahead, Storage & Reheating

When the city’s skyline lights up at night, I love having these rolls ready for a quick breakfast. I assemble the dough and then freeze the assembled rolls. They keep a month in the freezer with a zip‑sealed bag; thaw overnight for best results.

Method Container Duration Reheating Tip
Refrigerator Air‑tight container 2 days Reheat 10 min at 350 °F.
Freezer Zip‑sealed bag 4 weeks Reheat 20 min at 350 °F.
Make-Ahead Assembly, not bake 3 days Finish baking 10 min before serving.

When I reheate, I add a splash of milk first to keep the glaze silky and open the dough for a fluffy bite—a trick that keeps the cookies from becoming rubber.

Variations & Easy Swaps

Variation Key Change Best For Difficulty Impact
Chocolate-Delect Replace vanilla glaze with ganache. Decadent, dinner parties. Easy
Gluten‑Free / Dairy‑Free Substitute almond flour, oat milk. Health‑conscious palates. Medium
Summer Twist Add diced mango and lime zest. Bright, tropical brunch. Easy

Chocolate‑Delect Variation

Swap the vanilla glaze for a rich dark chocolate ganache, using melted chocolate and a splash of heavy cream. The silky finish carries the chocolate cocoa flavor like a river of velvety butter, creating an unforgettable ending.

Gluten‑Free / Dairy‑Free

Replace all-purpose flour with 1 cup almond flour and whole milk with unsweetened oat milk. The result is a slightly denser crumb, but the delicious taste stays. I’ve tested it, and it keeps its fluffiness while being gentle on sensitive stomachs.

Summer Twist

Mix in ripe mango pieces and a single pinch of lime zest to the filling. The tropical zest brightens the chocolate bite, and the mango’s tropical sweetness is akin to a beach vacation across the city skyline.

How long can you store Oreo cinnamon rolls?

They stay fresh in the refrigerator for up to 2 days when stored in an airtight container. If you want to keep them longer, you can freeze the assembled rolls in a zip‑sealed bag for up to 4 weeks. Just thaw them overnight and heat at 350°F for 10–12 minutes. This method preserves texture and flavor without turning them chewy.

Can I make these rolls without an oven?

Although an oven gives the best rise and golden crust, you can emulate a similar result with a stovetop‑top skillet: pour the rolls on a griddle, cover, and cook on low heat for 15–20 minutes. The dough will puff, but the glaze may not set as brilliantly. It’s a good option for limited kitchen firepower.

What should I do if the dough is too sticky?

If the dough feels excessively tacky, sprinkle a tablespoon of flour and give it a gentle knead. A sticky dough might be a sign of a low ambient temperature or a warmer-than‑expected dry mix. Avoid using your fingers too much, as that can add more moisture. Keep the rest in a warmer spot so the yeast gets a good kick.

Can I use non‑cocoa Oreo crumbs?

You can definitely substitute chocolate Oreos with the original or milk‑chocolate variety. It will shift the flavor to a sweeter bite, but the structure remains. Make sure to slice the Oreos finely so the crumbs integrate smoothly with the dough, preventing pockets.

Is it better to use fresh or frozen Oreo crumbs?

Freshly crushed Oreos keep the crunch in jagged edges, while frozen crumbs are smoother. For the texture I aim for, I crush them fresh right before using. If you’re short on time, thaw a few minutes before adding, but keep the grains slightly coarse for that delightful crunch.

What side dish works best with these rolls?

A bright, seasonal fruit salad or a sprinkle of toasted almonds actually makes for a lovely counterpoint. The citrus notes lift the chocolate, and the nuts provide an extra snap that balances the softness of the dough. Try a mix of peaches or berries for fresh contrast.

How do I make the glaze thicker?

Increase the powdered sugar to 2 cups and reduce the milk to a tablespoon. Whisk until you reach a consistency that coats the backs of a spoon without dripping. The thicker glaze will adhere firmly, creating a glossy crown that stays intact even when you take a bite.

Why does the dough not rise properly?

The most common culprit is cold dough or over-kneaded dough that wraps its gluten strands too tightly. Warm your ingredients, keep the dough at solid room temperature, and stop kneading when it’s elastic, not over‑worked. Also, make sure yeast is fresh; a cheap or old packet can kill the rise.

Can I replace vanilla extract with something else?

Absolutely. A touch of almond or lemon zest can elevate the glaze. In my kitchen, I sometimes use a drop of espresso or a splash of orange liqueur to give the glaze a subtle depth of flavor without overpowering the chocolate. Each substitution brings a new aroma profile.

Should I bake the rolls at 350°F or a higher temperature?

Baking at 350°F is optimal because it cooks the interior gently while giving the crust a golden cast. A higher temperature may brown the surface too quickly, causing the interior to be undercooked. You can bump the temp to 375°F during the final 5 minutes for a deeper browning, but beware the risk of drying.

Share Your Version!

Drop a ★ rating and let me know what you think in the comments. If you tweak my recipe to feature a different cookie or flavor, I want to see it. Snap a pic and tag me on Instagram or Pinterest – I’ll share your dishes on my page because I love seeing your creativity flourish.

Once you create your take, tell me: Which ingredient did you swap for the Oreo filling and why? I’m always intrigued by fresh, humble food twist ideas.

From my NYC kitchen to yours — I hope this recipe brings as much warmth to your table as it does to mine. — emy 🧡

📌

Love This Recipe? Save It to Pinterest!

If you enjoyed this Oreo Cinnamon Rolls recipe, don’t let it get lost in your browser tabs! 😄 Pin it now so you can find it again anytime — and explore hundreds more tried‑and‑tested recipes waiting for you on my Pinterest boards.

👉 Follow emy on Pinterest @exorecipe

📌 Pin this recipe · 🔁 Re-pin your favorites · 💬 Tag me when you make it — I love seeing your creations!

Print
clock clock iconcutlery cutlery iconflag flag iconfolder folder iconinstagram instagram iconpinterest pinterest iconfacebook facebook iconprint print iconsquares squares iconheart heart iconheart solid heart solid icon

Oreo Cinnamon Rolls


  • Author: Chef Emy

Description

These Oreo cinnamon rolls are truly scrumptious! They’re made with a dark chocolate Oreo filling & are topped w/ a delicious vanilla glaze!!


Ingredients

Scale
  • 1/2 cup packed light brown sugar (100g)
  • 2 Tbsp black cocoa powder (12g)
  • 1 tsp ground cinnamon (3g)
  • 1/4 cup unsalted butter, softened – to be spread on the dough (56g)
  • 1/2 cup crushed Oreos (50g)
  • 3 1/2 cups all-purpose flour + up to 1/2 cup addition flour to be added later in process (440g-500g)
  • 2 tsp or 1 packet instant dry yeast (7g, 1/4 oz.)
  • 1 tsp fine salt (6g)
  • 1 cup whole milk (240g)
  • 1/2 cup granulated sugar (100g)
  • 1/4 cup unsalted butter, room temperature (56g)
  • 1 large egg, room temperature (56g)
  • 1/2 cup crushed Oreos (50g)
  • 1 Tbsp unsalted butter, room temperature (8g)
  • 1 1/2 cups powdered sugar (188g)
  • 2 Tbsp whole milk (30g)
  • 1 tsp artificial vanilla extract (4g)

Instructions

  1. In a medium sized bowl, mix together 1/2 cup packed light brown sugar, 2 tablespoons of black cocoa, and 1 teaspoon of ground cinnamon and set aside.
  2. Preheat your oven to 200 F / 95 C.
  3. In a large bowl or the bowl of a stand mixer, combine 3 1/2 cups of flour, 1 packet instant dry yeast (or about 2 teaspoons), and 1 teaspoon salt.
  4. In a separate bowl, add 1 cup milk, 1/4 cup softened butter, and 1/2 cup granulated sugar into a microwave safe bowl.
  5. Heat on high power for 60-90 seconds, until the mixture is warm to the touch and the butter is melted. Stir to combine the ingredients.
  6. Gradually add the warm milk mixture into the flour mixture and mix on medium speed with a dough hook until the dough comes together.
  7. Add in the egg and mix on a low speed until a sticky dough ball forms. Continue to mix on a medium low speed for 2-3 minutes, until the dough becomes more elastic.
  8. As the dough mixes, add in additional flour 1 Tbsp at a time until the dough begins to leave the sides of the bowl. My favorite way to know if my dough is ready is to poke it with my finger. It should feel tacky but not sticky. As you pull your finger away, there should be no residue on your finger.
  9. Once you're done adding in the additional flour, mix in 1/2 cup of crushed Oreos on a medium speed. Mix until the Oreos are incorporated throughout the dough.
  10. Cover your bowl with plastic wrap and set aside to let the dough to rest for 10 minutes. The plastic wrap should fog up a bit from the warmth of the dough.
  11. Generously flour your counter and roll your dough ball into a large rectangle that's 12 inches x 18 inches. It should be about 1/2 cm thick.
  12. Spread 1/4 cup of softened butter over the dough, leaving 1/2 inch on the long side of the rectangle uncovered.
  13. Sprinkle the cinnamon roll filling (instructions above) evenly over the buttered area, and top with 1/2 cup of crushed Oreos.
  14. Tightly roll the dough horizontally toward the uncovered strip.
  15. Cut dough log into 9 equal pieces with dental floss (you can cut it into more pieces if you want smaller/shorter cinnamon rolls) and place in a greased square pan (mine is 8 in x 8 in).
  16. Turn the oven off! I REPEAT, TURN THE OVEN OFF.
  17. Cover the cinnamon roll pan with foil and place in a the oven for 30 minutes (or until the cinnamon rolls have risen).
  18. Remove the pan from the oven and take off the tinfoil. Turn the oven back on, and heat to 350 F / 175 C.
  19. Once the oven has preheated to 350 F / 175 C, bake for 26-30 minutes or until rolls are golden brown. Rotate the pan halfway through to help the rolls bake evenly.
  20. To make the vanilla cinnamon roll glaze, add 1 Tbsp of unsalted butter, 1 1/2 cups of powdered sugar, 2 tablespoons of whole milk and 1 teaspoon artificial vanilla extract in a medium-sized bowl. Mix together until smooth.
  21. Let the cinnamon rolls cool for 10-20 minutes, then drizzle the glaze over the cinnamon rolls. Garnish with some extra chopped up Oreos and serve warm.

5-Minute Peanut Butter Mousse

5-Minute Peanut Butter Mousse Zero-Bake Breeze – smooth time

⚖️
Difficulty
Easy
⏲️
Prep Time
5 mins
🕒
Cook Time
0 mins
⏱️
Total Time
5 mins
🍽️
Servings
4

Growing up in the souks of Casablanca, I learned that the best desserts come from simple, bold flavors. Fast forward to my kitchen in Manhattan, and I’m mixing up a 5‑Minute Peanut Butter Mousse that carries the essence of that curiosity—no baking, no waiting, just pure, silky delight. It’s the kind of treat you whisper to a friend at a Brooklyn rooftop, claiming it’s “my new secret weapon” for late‑night snack cravings.

The mousse is a luscious, cloud‑white cloud of peanut butter folded into a thick cream cheese base, then lifted by airy whipped cream. The aroma is nutty and creamy, with a faint hint of vanilla that turns every spoonful into a tribute to the French pastry technique I mastered at Le Cordon Bleu. The velvety texture glides over the tongue like a gentle breeze, while the bright, buttery sheen of the finished product looks almost too pretty to eat—yet it melts instantly.

What sets this version apart is my “zero‑bake” twist that reduces the editing of your fridge to minutes. I’ll share a quantified pro‑tip on how to keep the mousse airy, plus a key mistake that can sabotage the fluff, ensuring you always achieve that cloud‑like finish.

Why This 5-Minute Peanut Butter Mousse Recipe Is the Best

The Flavor Secret stems from a Moroccan spice blend I once used on a street‑food dish; a touch of cinnamon and a whisper of cardamom in the peanut butter gives it a subtle warmth that transports you from Brooklyn to Fez with each bite.

Perfected Texture is achieved by folding the whipped cream with the hemispherical motion I learned from my French pastry instructors. Folding gently preserves the air pockets, turning a simple mix into a cloud‑soft mousse that stays chilled for hours.

Foolproof & Fast assurance means no timer terror. Whether you’re a single‑handed barista or a grandparent making a dessert hack for a family gathering, this recipe beats a dozen slow‑cook alternatives that can take 30 minutes or more.

5-Minute Peanut Butter Mousse Ingredients

I pick my ingredients at the Little Italy produce stand or the farmer’s market in Queens, where the artisanal peanut butter is always a smell of boiled peanuts and rosemary on the air.

Ingredients List

  • 1 cup smooth peanut butter (use a natural brand for best flavor)
  • 1 cup softened cream cheese
  • 1 cup powdered sugar
  • 1 cup heavy cream, chilled
  • 1 tsp vanilla extract

Ingredient Spotlight

Peanut Butter: choose a dark‑chocolate‑infused variety for a richer taste. In the U.S., almond‑sweet energy bars are plentiful, but try a natural peanut butter to avoid unwanted oils.

Cream Cheese: Wobble-client or Philadelphia blend offers a silky finish. Substitute with goat cheese for a tangy twist that still keeps the mousse creamy.

Powdered Sugar: Whiter, finer crystals means smoother sweetness. Sprinkle a pinch of sea salt if you prefer a slightly savory finish.

Original Ingredient Best Substitution Flavor / Texture Impact
Peanut Butter Almond Butter Nutty with a milder, sweeter profile, slightly less creamy.
Cream Cheese Goat Cheese Tangier, adds a subtle tartness but remains velvety.
Powdered Sugar Granulated Sugar + 1 tbsp flour Creates a slightly denser mousse, less airy.

Step-by-Step Instructions

Happy to recreate the culinary economy of the Amazigh camps while keeping your hands busy in the kitchen.

Step 1: Beat Peanut Butter & Cream

In a large bowl, whisk together peanut butter, softened cream cheese, powdered sugar, and vanilla until the mixture is a lump‑free silk. Stir in the smallest whisk speed, keeping the mixture as smooth as possible.

💡 emy’s Pro Tip: For an extra glossy finish, coat a small paper towel with a dab of melted honey and add it to the base during the whisking.

Step 2: Whip Heavy Cream

In a separate bowl, chill the heavy cream 10 minutes. Whip on medium-high until stiff peaks form. It should hold its shape when the beaters are lifted.

⚠️ Common Mistake to Avoid: Over‑whipping the cream will introduce bitterness and cause the mousse to separate.

Step 3: Integrate Cream Smoothly

Fold a quarter of the whipped cream into the peanut butter mixture to lighten it. Then fold in a half of the remaining whipped cream, mixing gently. Finally, fold in the rest of the heavy cream, ensuring even distribution.

💡 emy’s Pro Tip: Use a spoon and a gentle feed‑in motion to maintain aeration and avoid deflating the mousse.

Step 4: Serve or Refrigerate

Transfer the mousse to a piping bag fitted with a swirly tip. Pipe into mason jars or glass jars, cap them, and enjoy on the spot or chill for at least 30 minutes to set.

⚠️ Common Mistake to Avoid: Leaving the mousse at room temperature for an hour will cause it to soften and lose its airy structure.

Step Action Duration Key Visual Cue
1 Beat & whisk mixture 3 min Smooth, lump-free consistency
2 Whip heavy cream 2 min Soft to stiff peaks visible
3 Fold in cream 4 min Mild mountain‑like rise
4 Piping & cooling 10 min Glassy surface, set in fridge

Serving & Presentation

When you plate the mousse, you’ll want to play with kaleidoscopic hues. A bay leaf on top and a dusting of cocoa powder adds depth. Gradually expose the mousse in a glass jar for a layered effect reminiscent of Moroccan spice glasses.

Pair the mousse with an iced latte or chamomile tea to soften the peanut butter richness. If you’re keen on a sweet‑savory contrast, drizzle a squeeze of lemon or a drop of toasted almond butter. The texture plays well with crisp biscotti or a thin almond biscotti from a Brooklyn café.

Pairing Type Suggestions Why It Works
Side Dish Almond biscotti, sliced croissant crumbs, or crisp pita chips Adds crunch and subtle nutty undertones.
Sauce / Dip Whipped silken tofu or a caramel drizzle Complementary texture and opposite warmth.
Beverage Iced latte, chilled chamomile, or sparkling water with a hint of lemon Balances the sweetness and refreshes the palate.
Garnish Crushed pistachios, a thin mint leaf, or a dust of rose salt Brings visual elegance and aromatic nuance.

Make-Ahead, Storage & Reheating

When the city’s subway rush starts, I prep these in bulk and freeze them. A single jar can survive up to three months when frozen, and I plate them at dinner parties with only a 10‑minute thaw in the fridge.

Method Container Duration Reheating Tip
Refrigerator Mason jars 3 days Keep covered, or seal with wax paper to stay fresh.
Freezer Silicone baking mats in sealable freezer bags 3 months Remove 20 minutes before serving.
Make‑Ahead Plastic containers, covered 2 days advance Assemble right before serving.

Reheating is simply defrosting. I let the jar sit at room temperature for 10 minutes, then give it a light swish. The texture keeps the same, and the aroma smolders as if it had just been whisked. For those adventurous hearts that prefer a warm version, gently warm the jar in a bain‑marie (water bath) at low heat, stirring occasionally.

Variations & Easy Swaps

Variation Key Change Best For Difficulty Impact
Tahini Twist Replace peanut butter with tahini Vegan crowd seeking deeper sesame flavor Medium (mix textural differences)
Gluten‑Free Use almond flakes in place of powdered sugar Gluten‑free diners craving a creamy dessert Easy (simple substitution)
Seasonal Lime Add lime zest & fresh lime juice Summer menus where citrus brightness is key Easy (tiny ingredient tweak)

Tahini Twist

Swapping peanut butter for tahini imbues the mousse with a toasted sesame pop, reminiscent of Morocco’s fragrant spice markets. The nutty bite pairs perfectly with shredded coconut, creating a cross‑cultural dessert that will excite your guests.

Gluten‑Free

If you’re avoiding wheat, simply replace the powdered sugar with almond flour and a slight hint of maple syrup. The mousse slightly thickens but keeps its airy feel; a touch of toasted almond butter will brighten the profile.

Seasonal Lime

Adding lime zest and dew of fresh lime juice lifts the richness and introduces a zesty counterbalance. It’s a quick shift that works wonderfully during a hot afternoon lunch, adding character straight from a New York farmer’s market.

What is the best approach to keep peanut butter mousse airy?

For the most stable and airy mousse, I recommend whisking heavy cream at medium-high speed until stiff peaks show, then fold it gently into the base. Using a chilled bowl and utensils preserves the air incorporated during whipping. Avoid over‑folding because the peaks will deflate; the goal is a light embrace of the cream.

How long can I refrigerate or store the mousse in the fridge?

I keep it in a tightly sealed mason jar or glass container, and it stays fresh for up to three days in the refrigerator. The sweetness keeps it from drying out, but if you notice any loss of fluff, serve immediately to preserve that dreamy texture.

Can I substitute cream cheese with a dairy‑free alternative?

Absolutely! My go‑to is a vegan tofu‑based cream cheese, which offers a similar tang without dairy. Blend it with a splash of coconut milk to make the mixture silky, and preserve the mousse’s airy body. The flavor will be lighter but still delicious.

What’s the cooking/heating tip for serving after freezing?

Take the frozen jar out of the freezer and let it sit at room temperature for about 15 minutes to soften slightly. Then whisk politely to redistribute the structure. If you’re eager to serve warm, wrap the jar in a towel and place it in a lukewarm bath; stir occasionally until the mousse warms uniformly.

Can I use a different kind of butter in the recipe?

Switching to a peanut butter with a higher oil content (like a creamy texture) generally results in a richer base; however, overly oily versions can lead to separation. If you prefer peanut butter with honey, keep the vanilla extract to balance sweetness. The end result is a subtly jammy note and the mousse stays stable.

How do I prevent my mousse from melting too quickly?

The key is temperature control. Keep the whipped cream chilled and work quickly once the base is combined and poured. A proper freezer or chilled plastic container will maintain the mousse’s structure. If the ambient temperature is high, serve immediately or toast your glass to keep the ambiance cool.

What is a good garnish for a dramatic display?

Dust a swirl of cocoa with a pinch of sea salt, scatter crushed pistachios, or add a sprig of fresh mint. A thin lemon or orange zest chiffonade gives color contrast, while toasted coconut flakes provide a subtle crunch, all while staying light enough not to overpower the airy core.

Do I need a piping bag?

A piping bag is handy for neat, symmetrical servings that look like mini dessert vials. If you don’t have one, a small plastic or silicone spoon will achieve a similar result. Just make sure the spoon is shallow enough to create neat layers.

Is it possible to modify the recipe for a nut allergy?

Yes, replace the peanut butter with almond or sunflower seed butter. For some guests, consider a citrus‑based oat‑butter that gives a lighter profile. Make sure the replacement has a comparable consistency to avoid the mousse becoming too runny.

Can I serve this as a dessert for holiday events?

Without question. Pair it with a vanilla or caramel liqueur spoonful or plate over shaved chocolate for an instant luxurious finish. The mousse’s lightness makes it a perfect base for a sparkling wine or a chilled champagne toast, ideal for celebratory settings.

Share Your Version!

I’d love to read about how you tweak this Zero‑Bake Breeze to fit your lifestyle. Drop a star rating, a comment, or a photo of your creation in the comments below. Show the world by tagging @cookingwithemi on Instagram and pinning your photos at https://www.pinterest.com/cookingwithemy/ — I’m always amazed by the creative twists your mouths and hearts bring.

If you love playing with flavors, tell me about a new spice that turned your mousse from simple to unforgettable. I’m always curious about the little details that shine.

From my NYC kitchen to yours — I hope this recipe brings as much warmth to your table as it does to mine. — emy 🧡

📌

Love This Recipe? Save It to Pinterest!

If you enjoyed this 5-Minute Peanut Butter Mousse recipe, don’t let it get lost in your browser tabs! 😄 Pin it now so you can find it again anytime — and explore hundreds more tried‑and‑tested recipes waiting for you on my Pinterest boards.

👉 Follow emy on Pinterest @chefrecipes2

📌 Pin this recipe · 🔁 Re-pin your favorites · 💬 Tag me when you make it — I love seeing your creations!

Print
clock clock iconcutlery cutlery iconflag flag iconfolder folder iconinstagram instagram iconpinterest pinterest iconfacebook facebook iconprint print iconsquares squares iconheart heart iconheart solid heart solid icon

5-Minute Peanut Butter Mousse


  • Author: Chef Emy

Description

This peanut butter mousse is smooth, airy, and so darn easy to make. All you need are 4 ingredients, and its ready in minutes! Watch the video below to see how I make it in my kitchen!


Ingredients

Scale
  • 1 cup peanut butter (smooth * See notes)
  • 1 cup cream cheese (softened)
  • 1 cup powdered sugar
  • 1 cup heavy cream

Instructions

  1. In a large mixing bowl, beat together the peanut butter, cream cheese, powdered sugar, and vanilla extract and set aside. In a separate mixing bowl, beat together the heavy cream until stiff peaks form.
  2. Gently beat through ¼ of the whipped heavy cream into the peanut butter mixture. Fold through another ½ of the cream and mix well. Add the remaining cream until combined.
  3. Transfer the mousse into a piping bag with a swirly tip. Pipe into mason jars or glass jars enjoy immediately or refrigerate for at least 30 minutes.

Biscoff Truffles

Biscoff Truffles No‑Bake, 4‑Ingredient Surprise – Sweet, Effortless Bliss

⚖️
Difficulty
Easy
⏲️
Prep Time
10 mins
🕒
Cook Time
5 mins
⏱️
Total Time
15 mins
🍽️
Servings
24

When I first opened a bag of Biscoff cookies in a Marrakech market, the caramel‑spice aroma transported me straight to my mother’s kitchen. That scent sparked a simple, yet bold idea: what if those cookies could become truffles without an oven? I’m thrilled to share my No‑Bake, 4‑Ingredient Surprise Biscoff Truffles recipe that turns everyday nostalgia into a silky, melt‑in‑your‑mouth treat.

Imagine a glossy crackling white‑chocolate shell that hides a chewy, nut‑topped center. The crunch of the cookie crumbs, the buttery richness of cream cheese, and the caramel‑spiced sweetness of Biscoff combine with an almost safran‑like warmth. The moment you bite, the chocolate melts, revealing a velvety, savory core. The texture is a perfect contrast—soft, creamy, and lightly crisp, capturing the essence of both Parisian patisserie and North African spice markets.

I’ve tweaked this classic recipe to craft an ultra‑simple version that anyone can make. The secret lies in the step‑by‑step method that prevents the dough from becoming too wet while ensuring a firm truffle. A handy pro tip I’ll share will keep the truffles extra firm, and I’ll point out a common mistake—over‑mixing—which can let them become too soft.

Why This Biscoff Truffles Recipe Is the Best

The flavor secret was born in my grandmother’s kitchen, where caramel and spices dance together. By concentrating Biscoff’s intricate profile, I’ve amplified the cookie taste without a dozen additional ingredients—just caramel‑spiced butter, cream cheese, and white chocolate.

From a chef’s eye, the texture is perfected by quick grinding and careful chilling. The mixture is compact enough to hold shape, but not so dense that it crumbles. I achieved this by pulsing the cookies just until they’re crumbly, then letting the dough settle before palm‑rolling the truffles.

Because it’s no‑bake, beginners feel immediately confident. All you need is a few minutes of prep, and the result is professional‑looking. The aroma itself is an indulgent promise of Parisian pâtisseries, captured in a portable, bite‑size confection.

Biscoff Truffles Ingredients

I keep these pantry staples on hand: the classic Biscoff bakery shelf‑standard, whipped‑cream butter brands ready for melting, and a high‑quality white chocolate pulled from a local artisanal factory in Brooklyn’s Williamsburg. The pair‑ings from Morocco have always called me back whenever I taste a good cookie.

Ingredients List

  • 45 Biscoff cookies
  • ¼ cup Biscoff cookie butter
  • 8 oz cream cheese, softened
  • 10–12 oz white chocolate, finely chopped
  • Optional: 2 Tbsp Biscoff cookie butter for topping

Ingredient Spotlight

Biscoff cookies are the heart of this recipe. Look for the 8‑inch log or the 3.5‑oz pack—both offer the same depth of caramel spice. If you’re craving a deeper flavor, choose the “extra caramel” variant. A quick test I did with Tahini‑flavored Biscoff produced a nutty note that pairs beautifully with white chocolate.

Biscoff cookie butter lends an extra coating of sweetness and a smoother course. It’s easy to substitute almond butter – I used a warm‑cooked almond butter in previous experiments, and the truffles retained a buttery texture with a hint of toasted almond bitterness.

Cream cheese softens to a silky consistency that’s critical for binding the dough. Full‑fat varieties in USDA organic stores melt evenly; a plain‑fat replacement like Greek yogurt gives a tangier, lighter bite but can slightly alter the chew.

Original Ingredient Best Substitution Flavor / Texture Impact
Biscoff Cookies Digestive Biscotti Less caramel, more crumbly
Biscoff Cookie Butter Almond Butter (warm‑cooked) Nutty, slightly less sweet
Cream Cheese Greek Yogurt Tangier, lighter texture

How to Make Biscoff Truffles — Step-by-Step

Grab your recipe card, and let’s craft silky truffles in the comfort of your kitchen.

Step 1: Preparing the Cookie Crumbs

Line a baking sheet with parchment paper. In a food processor, pulse the 45 Biscoff cookies until fine crumbs form; stop before they turn into flour.

💡 emy’s Pro Tip: If you’re using a non‑pulse blender, press the “beat” setting once, then stop, repeat until you reach the right consistency.

Step 2: Melting the Butter

Heat ¼ cup Biscoff cookie butter in a microwave-safe bowl for 15–20 seconds. Stir until silky and warm; this softens the butter for mixing.

⚠️ Common Mistake to Avoid: Heating too long—over‑melted butter can separate and dilute flavor.

Step 3: Making the Dough

Blend the cookie crumbs with melted butter, then add softened cream cheese. Pulse until thick, smooth dough forms. The mixture should hold together but not be sticky.

💡 emy’s Pro Tip: Let the dough sit 5 minutes after blending to allow the cream cheese to soften fully.

Step 4: Rolling the Balls

Scoop the dough onto the parchment sheet. Using your palms, roll each portion into a 1‑inch ball. Place them evenly spaced on the sheet.

⚠️ Common Mistake to Avoid: Rolling too hard—truffles can become compact and hard.

Step 5: Chilling the Truffles

Chill the truffle balls in the fridge for at least 1 hour, or 20 minutes in the freezer, until firm.

💡 emy’s Pro Tip: If you’re working hurriedly, a 10‑minute freezer burst locks the shape.

Step 6: Melting the Chocolate

Melt the white chocolate in the microwave in 30‑second increments, stirring until glassy. The chocolate should be free of lumps.

⚠️ Common Mistake to Avoid: Microwave too long—chocolate turns oily and separates.

Step 7: Dipping the Truffles

Dip each chilled ball into the melted chocolate. Let excess drip back, then place back on parchment sheet.

💡 emy’s Pro Tip: Use a fork or dipping stick for clean, even coating.

Step 8: Second Chill to Set

Return the sheet to the fridge for an additional hour until the chocolate sets and is firm to the touch.

⚠️ Common Mistake to Avoid: Removing before fully set—truffles may collapse.

Step 9: Decorating (Optional)

If desired, melt 2 Tbsp Biscoff cookie butter for 15 seconds, stir, and drizzle or pipe onto the finished truffles. Chill until set before serving.

💡 emy’s Pro Tip: A small swirl of the butter yields a decorative caramel “frosted” border.

Step Action Duration Key Visual Cue
1 Prepare crumbs 5 min Fine, flour‑free consistency
2 Heat butter 20 sec Smooth, silky melt
3 Mix dough 3 min Firm, non‑sticky dough
4 Roll balls 5 min Even 1‑inch spheres
5 Chill 1 hr Firm to hold shape
6 Melts chocolate 30 sec–1 min Luminous, lump‑free
7 Dip truffles 3 min Even coating, no excess
8 Second chill 1 hr Chocolate set, glossy
9 Decorate (optional) 3 min Swirl butter, clever border

Serving & Presentation

Arrange the truffles on a simple silver platter, pairing them with a small bowl of Moroccan honey or a crowd‑pleasing espresso shot. The glossy white shell reflects the light like a Parisian glass showcase. For an upscale serving, dust a light powder of powdered sugar, dew the edges with a touch of lime zest, or drizzle a small spoonful of balsamic reduction for a contrast of sweet‑sour notes.

In my NYC kitchen, I often serve these truffles alongside a dollop of fresh whipped cream and a small splash of vanilla liqueur—a nod to the country’s love for flavored liqueur. The innocently sweet profile pairs wonderfully with a sun‑sunk, light beach breeze of an iced chai latte.

Pairing Type Suggestions Why It Works
Side Dish Mini flatbread, roasted almonds Texture contrast
Sauce / Dip Honey, nut butter, espresso glaze Balance sweetness
Beverage Espresso, iced chai, sparkling wine Match caramel notes
Garnish Candied orange peel, chocolate shavings Enhance aroma

Make‑Ahead, Storage & Reheating

Living in a nonstop city, I often double‑batch these truffles on a weekend for future gatherings. The no‑bake nature keeps them safe for days; just keep them chilled.

Method Container Duration Reheating Tip
Refrigerator airtight wax paper 5–7 days Just take out 15 min before serving
Freezer plastic freezer bag 1 month Thaw 30 min in fridge, dip again briefly
Make‑Ahead silicone molds up to 2 weeks prep Assemble in 24 hr, chill overnight

When I remind myself of the next event, I still punctuate each truffle with that caramel swirl. I’ve found that a quick dip in warm water for 5 seconds brings the chocolate back to silky softness. In the rush of preparing a dinner party, having pre‑made truffles means I can focus on conversation without worrying about frying things.

Variations & Easy Swaps

Variation Key Change Best For Difficulty Impact
Dark‑Chocolate Finish Replace white chocolate with dark Chocolate lovers Easy
Almond‑butter Swirl Swap cookie butter for almond butter Nutty twist Easy
Mint & Lime Twist Add mint extract, lime zest to dough Seasonal freshness Easy

Dark‑Chocolate Finish

Replacing the white chocolate with a rich dark 70% cacao melts into a glossy sheen that still lets the Biscoff aroma shine. The bitterness balances the caramel sweetness beautifully, contributing a sophisticated adult note reminiscent of a Parisian café evening.

Almond‑butter Swirl

Replacing cookie butter with warm‑cooked almond butter embedded a subtle nutty terroir. The aroma of toasted almonds adds depth, while the texture stays creamy. I tested this swap during a raw‑food week in Brooklyn, and the result was a delightful, lower‑sugar alternative.

Mint & Lime Twist

A splash of peppermint extract and a zest of lime added a fresh citrus crisp that lightly lifts the sweet center. I used this version for an afternoon brunch in a rooftop garden, pairing it with a sparkling lemonade for a refreshing balance.

Can I use alternative chocolate?

Yes, white chocolate can be swapped for dark, milk, or even a chocolate‑without‑cocoa‑fat version for a lower calorie option. Dark chocolate gives a richer taste and an elegant finish, while milk chocolate will soften the sweetness profile. When using alternatives, aim for a 70 % cocoa content if dark, or 30 % if you prefer a milder bite, and follow the same melting and dipping technique; the coating will set just as well.

How long do Biscoff truffles stay fresh?

These no‑bake truffles stay fresh for about five to seven days when refrigerated in an airtight container. If you’d like them to last longer, freezing is a good choice; store them in a sealed freezer bag for up to a month. When you need to serve them thawed, let them cool to room temp or run them in the fridge for 15 minutes to bring out their full flavor. For the best crunch, keep them chilled immediately after decorating.

Is it possible to make a dairy‑free version?

Cream cheese can be replaced with coconut cream or unsweetened Greek yogurt. The texture will become slightly thinner and less solid, so pour the mixture more slowly when forming truffles. For the chocolate coating, choose a dairy‑free chocolate brand or melt dairy‑free chocolate chips at low heat. The result is a lighter body with the same caramel kick, with no hidden dairy for those with dietary restrictions.

What’s the best way to store leftovers?

Store leftovers in a sealed container lined with parchment, or simply in a silicone lidding system that allows the chocolate to remain intact. Avoid stacking because it can cause chocolate to smear. Keep them in the fridge for up to a week or freeze them for a month. For a quick reheat, place the truffles on a parchment sheet and run them in a 300 °F oven for 5 minutes, or melt the chocolate coating again and dip the truffles briefly for a glossy finish.

Can I add spices to the dough?

Spices make a subtle addition that elevates the flavor palette. A pinch of ground ginger or cinnamon can amplify the caramel notes. I recommend starting with ¼ tsp of each and tasting the mixture before rolling. Light oak smoke, if you have a dry‑roasted nut, can offer a smoky undertone that pairs well with desserts or Southwestern pairings.

How do I avoid a sticky dough?

If the dough feels tacky, give it a few more minutes to rest; the short rest allows the crumbs to absorb moisture fully. You can also add a tablespoon of powdered sugar or cocoa powder to the dough mix, which will help dry it out slightly and reduce stickiness. Rolling truffles quickly within the first hour of chilling ensures they remain firm.

Is there a simpler chocolate coating method?

Yes, instead of microwaving in bursts, melt chocolate over a double boiler, stirring continuously until smooth. The gentle heat will melt the chocolate without frothing it. Once melted, use a fork or heat‑proof spoon to dip the truffles. This method gives a smoother finish and reduces the risk of seizing.

Can I make them ahead of the party?

Absolutely! After coating the truffles, simply let them chill in a sealed container for up to a week. For the last 30 minutes before guests arrive, give them a quick dip in warm water to soften the chocolate, or re‑heat them briefly in a 300 °F oven for 3–4 minutes to restore that shiny finish. You can keep them on the refrigerator shelf and avoid the kitchen clutter.

What if I want vegan truffles?

For a vegan version, choose a plant‑based white chocolate, vegan cream cheese, and a plant‑based cookie butter. Use a plant‑based butter or nut butter for the coating if you prefer a stricter vegan profile. The texture will be thinner, so consider adding a tablespoon of almond flour or ground coconut to help bind. The caramel sweetness will remain as long as the key Biscoff ingredient stays unchanged.

Are these good for gifting?

Yes, Biscoff truffles make excellent gifts. Place them in a sturdy gift box or a reusable tin for easy transportation. Decorate each truffle with a small swirl of cookie butter or a dusting of powdered sugar. Adding a handwritten note explaining the flavors is a personal touch that I love in gifts. Keep them refrigerated until the day of gifting and re‑cool them by 15–20 min for maximum freshness.

Share Your Version!

I love hearing how you put your own spin on this truffle magic. Drop a star rating and a comment below so other food lovers know what to expect. Share your photos on Instagram or Pinterest and tag @cookingwithemi. If you decide to experiment with almond butter, tell me whether the nutty nuance changed the caramel experience for you!

From my NYC kitchen to yours — I hope this recipe brings as much warmth to your table as it does to mine. — emy 🧡

📌

Love This Recipe? Save It to Pinterest!

If you enjoyed this Biscoff Truffles recipe, don’t let it get lost in your browser tabs! 😄 Pin it now so you can find it again anytime — and explore hundreds more tried‑and‑tested recipes waiting for you on my Pinterest boards.

👉 Follow emy on Pinterest @chefrecipes2

📌 Pin this recipe · 🔁 Re-pin your favorites · 💬 Tag me when you make it — I love seeing your creations!

Print
clock clock iconcutlery cutlery iconflag flag iconfolder folder iconinstagram instagram iconpinterest pinterest iconfacebook facebook iconprint print iconsquares squares iconheart heart iconheart solid heart solid icon

Biscoff Truffles


  • Author: Chef Emy

Description

No-bake Biscoff truffles are a decadent 4-ingredient treat perfect for gifting, bringing to a dessert party, or simply just enjoying at home. Made entirely without turning on the oven, these spiced cookie truffles make for a fun and easy holiday dessert or treat any time of the year.


Ingredients

Scale
  • 45 Biscoff cookies
  • ¼ cup Biscoff cookie butter
  • 8 ounce cream cheese (softened)
  • 1012 ounces white chocolate ( finely chopped)
  • 2 Tablespoons Biscoff cookie butter (optional topping)

Instructions

  1. Line a baking sheet with parchment paper and set it aside.
  2. Place the Biscoff cookies in a food processor and pulse until they're fine crumbs.
  3. Add ¼ cup cookie butter to a microwave-safe bowl and heat for 15-20 seconds. Stir well. Add the cookie butter and cream cheese to the food processor and pulse until fully combined into a thick dough.
  4. Scoop the dough out then use your hands to roll the dough into 1-inch balls and place them on the lined baking sheet. Chill for at least 1 hour in the fridge (or 20 minutes in the freezer).
  5. Before removing balls from the fridge, melt the white chocolate in the microwave in 30-second increments, stirring after each increment, until completely melted and smooth.
  6. Using a fork or dipping tool, dip the balls in the melted chocolate to coat. Shake gently to allow any excess to drip back and then place back on the parchment paper.
  7. Return the baking sheet to the fridge to chill for an additional 1 hour, or until the chocolate coating is set.
  8. If desired, microwave 2 Tablespoons of Biscoff cookie butter for 15 seconds, stir, and drizzle or pipe onto the truffles to decorate. Return to the fridge to set then enjoy.

Chewy REESE’S PIECES Peanut Butter Brownies

Chewy Reese’s Pieces Peanut Butter Brownies – Peanut Butter Swirl Crunch

⚖️
Difficulty
Medium
⏲️
Prep Time
15
🕒
Cook Time
35
⏱️
Total Time
50
🍽️
Servings
12

In the heart of my NYC kitchen, I keep a little piece of Morocco on my counter: a pot of mint tea, a bowl of Za’atar, and a handful of dates. One night, while exploring an Open Table deal at a rooftop café, I spotted a bag of Reese’s Pieces tucked beside a chocolate cake—the perfect spark for a dessert that would bring sweet and savory love together. That’s how I created these Chewy Reese’s Pieces Peanut Butter Brownies, a moist peanut butter fantasy that celebrates the crunch of those iconic candies.

The chocolatey base swirls with creamy peanut butter, revealing a slightly smoky hint reminiscent of a grilled fire in Marrakech, while the Reese’s Pieces add a surprise burst of caramelized peanut butter each bite. The batter’s thickness is delicate; the brownies maintain chewy centers that practically melt while the edges stay firm, giving that irresistible texture reminiscent of a French café éclair mock‑diapour to the mouth.

What sets this recipe apart is my “Peanut Butter Swirl Crunch” technique—a mustard‑like twist of melted butter blended with peanut butter before adding the eggs—so the batter has a silky mouthfeel yet holds the candy clusters. It also uses a short bake time to preserve the melt‑in‑you‑tongue texture, and the trick of sprinkling Reese’s on top before baking locks them in. A common mistake? Over‑mixing the batter and it becomes a cakey brownie that feels like a tangle of macarons instead of a chocolate haystack.

Why This Chewy Reese’s Pieces Peanut Butter Brownies Recipe Is the Best

The buttery ritual I honed in Parisian patisseries gets a new flavor note when I mix dramatic peanut butter with brown sugar and the tiniest pinch of salt, creating a full‑bodied, caramel‑creamy center. This sweet‑salty dance, conjured by the warmth of New York summer, guarantees that every bite echoes the spicy feel of café au lait.

Textural perfection comes from folding the dry mix after the wet part—an art I learned in my culinary school kitchen in Saint‑Quentin. The dough stays airy but dense enough for that chewy bite, and when the butter and peanut butter swirl together, the batter becomes wonderfully smooth.

Even Beginners Will Triumph: no need for a fancy stand mixer or fancy pans. A simple bowl, parchment, and careful folding bring cooking into the comfort zone of any kitchen.

Chewy Reese’s Pieces Peanut Butter Brownies Ingredients

The ingredients start on a Brooklyn farmer’s market table, where I handpick ripe avocados for their buttery feel, then head to a specialty store in Queens for the Reese’s Pieces. That day, it was a breeze to find all the essentials.

Ingredients List

  • 1 cup butter (melted)
  • 1 cup granulated sugar
  • 1 cup light brown sugar
  • 4 large eggs
  • 2 teaspoons vanilla extract
  • 1 cup creamy or chunky peanut butter
  • 2 cups all‑purpose flour
  • 2 teaspoons baking powder
  • ¼ teaspoon salt
  • ½ cup Reese’s Pieces

Ingredient Spotlight

Butter: The core that binds all flavors. I advise using 100% European-style butter for a higher butterfat percentage, giving the brownies a richer mouthfeel than dairy butter often found in grocery stores.

Peanut Butter: The star, best if it’s natural and non‑sweetened. If you’re shy about extra salt, a small pinch of sea salt can bring out its roasted nutty depth without bitterness.

Reese’s Pieces: The crunchy candy crystals. You can exchange them for white chocolate chunks for a slightly less sweet bite, and the result will still hold the marry of crunch and caramel.

Original Ingredient Best Substitution Flavor / Texture Impact
Creamy Peanut Butter Natural No‑Sugar Peanut Butter Maintains depth, slightly less sweet
Reese’s Pieces White Chocolate Chunks Softer sweet, less crunch

How to Make Chewy Reese’s Pieces Peanut Butter Brownies — Step-by-Step

Let the oven preheat while you gather fresh ingredients; the aroma of butter will hint at the dessert’s coming grandness.

Step 1: Preheat

Preheat oven to 350°F (175°C). Nestle parchment paper in an 11×13‑inch pan for easy lift‑out.

💡 emy’s Pro Tip: A 350°F temp balances the crust formation while keeping the center tender.

Step 2: Melt & Mix Butter

In a saucepan, melt the butter over low heat, then stir in granulated and brown sugars until dissolved. The mixture should look silky.

⚠️ Common Mistake to Avoid: Using a boiling pan; it can scorch the butter and produce a bitter flavor.

Step 3: Add Eggs & Vanilla

Whisk eggs one at a time, then fold in vanilla and a pinch of salt. This helps the batter stay light while delivering a burst of umami.

💡 emy’s Pro Tip: Beat eggs until they turn frothy to keep the final texture airy.

Step 4: Beat Peanut Butter

In a clean bowl, blend peanut butter with the melted butter/sugar mixture until creamy. This technique prevents lumps and imparts a velvety base.

⚠️ Common Mistake to Avoid: Over‑whisking causes high sugar to caramelize, turning brownies bitter.

Step 5: Mix Dry Ingredients

Whisk flour, baking powder, and salt separately. Stir with the wet mixture just until no streaks remain.

💡 emy’s Pro Tip: Fold gently with a spatula; a gentle fold retains a chewy bite.

Step 6: Decorate with Reeses

Pour batter into pan, then sprinkle Reese’s Pieces evenly. The texture will set during baking, creating pockets of luscious crunch.

⚠️ Common Mistake to Avoid: Spreading candies too thin; use a gentle shake to keep them centered.

Step 7: Bake

Bake 30–35 minutes. The tin should feel firm on top yet moist inside. Avoid over-baking; the brownies will keep soft after cooling.

💡 emy’s Pro Tip: Insert a toothpick – if it retrieves with wet crumbs, you’re done.

Step 8: Cool & Cut

Let them cool on a wire rack for at least 30 minutes before cutting into squares. Cold brownies hold shapes better.

⚠️ Common Mistake to Avoid: Cutting too early; the edges slip, ruining the presentation.

Step Action Duration Key Visual Cue
1 Preheat & Prepare Pan 5 mins Even heat visible in pan
2 Melt Butter & Mix Sugars 3 mins Smooth amber swirl
3 Add Eggs & Vanilla 2 mins Foamy consistency
4 Beat Peanut Butter 1.5 mins Smooth velvety blend
5 Fold Dry Mix 2 mins No clumps remain
6 Sprinkle Reeses 1 min Even candy distribution
7 Bake 30–35 mins Edges firm, center soft
8 Cool & Cut 45 mins total Firm squares appear

Serving & Presentation

Serve warm oxygen glazed brownies on a slate platter that cues the culinary journey of Morocco’s markets and NYC’s skyscrapers. A dusting of crushed pistachios adds a savory whisper, and a glass of chilled buttermilk lends contrast.

For a touch of French flair, drizzle a caramel reduction between the squares and garnish with a spritz of espresso. It will echo how I used to climb the Empire State Building, thinking about the gentle aroma of espresso over a pastry.

Pairing Type Suggestions Why It Works
Side Dish Olive oil drizzle, roasted almonds, grilled pears Adds savory-sweet contrast and Mediterranean depth
Sauce / Dip Dark chocolate ganache, caramel spread, peanut butter drizzle Deepens chocolate flavor and complements peanuts
Beverage Espresso, cold brew, chilled almond milk latte Keeps the palate refreshed, balancing sugar
Garnish Seaweed flakes, crushed pistachios, a dust of nutmeg Adds texture and aromatic finish

Make-Ahead, Storage & Reheating

When NY traffic feels endless, I bake a batch early in the day, cool it, slice, and seal each square in zip‑top bags. Though brownies keep their chew at room temperature for two days.

Method Container Duration Reheating Tip
Refrigerator Silicone storage containers 3 days Bring to room temp for 15 min
Freezer Vacuum sealed bags 2 months Warm in oven at 300°F 5 min
Make-Ahead Batch of unstuffed squares 1 week Reassemble and bake 10 min

Some of my NYC colleagues say that if you leave brownies covered in foil at room temperature, the syrupy center thickens into an ultra‑chewy consistency—my personal favorite. When reheating, keep it under a light cover or place a slice on parchment to trap steam.

Variations & Easy Swaps

Variation Key Change Best For Difficulty Impact
Chocolate Chunk Swirl Add ½ cup chocolate chips Chocolate lovers Easy
Gluten‑Free Replace flour with 2 cups gluten‑free blend Gluten‑free diners Medium
Vegan Use coconut oil, flax egg, vegan peanut butter Vegan crowd Medium

Chocolate Chunk Swirl

Adding semi‑sweet chocolate chunks infuses each brownie with a familiar chocolate bite that balances the subtle saltiness of the butter. Kitchenware like a heat‑resistant silicone mat keeps the batter from sticking during scorching.

Gluten‑Free Edition

Replacing flour with a buttery gluten‑free blend preserves the chewy texture while keeping all the sacrificial flavors intact. Brownies bake slightly slower—wait until the enamel test for optimal results.

Vegan Seasonal Swaps

Use oat‑milk, flax egg, and almond butter to maintain richness, while almond blossoms from the Brooklyn farmers market add a subtle floral note, layering NYC’s blooming flora into each bite.

How long do Chewy Reese’s Pieces Peanut Butter Brownies keep fresh?

These brownies stay fresh for up to 3 days at room temperature if stored in an airtight container; in the refrigerator they last roughly 3 days, and they can be frozen for 2–3 months. To preserve the chewy texture, wrap each square in parchment and foil before refrigerating or place several layers of freezer paper in vacuum‑sealed bags before freezing.

Can I use a different type of peanut butter?

You can swap in almond or cashew butter for a nut‑flavored twist, but the chew will be a bit lighter. A natural, unsweetened peanut butter works best for keeping the sweet–savory balance. If you use a flavored variant, lower the added sugar slightly to avoid overwhelming sweetness.

Do I need to preheat my oven to 350°F?

Preheating to 350°F (175°C) lets the batter rise evenly, producing a crisp top while keeping the center moist. Baking at a lower temperature may lead to a gummy center; a higher one can scorch the edges before the center is cooked.

What’s the best way to keep the Reeses Pieces from sinking?

Dust a thin layer of flour or cocoa powder on the parchment before pouring the batter, then sprinkle the candies on top. Gently tap the pan to settle the candies. Because they have a low density, ensuring they’re lightly pressed onto the batter will help keep them from sinking during baking.

Can I make these brownies without eggs?

An eggless version is possible by replacing each egg with ¼ cup of unsweetened applesauce or a flax‑egg mixture. This keeps the structure but may produce a slightly denser bite. Experiment with the ratio until you find a texture that satisfies your palate.

What is the nutrition profile per serving?

Each square (1/12th of the batch) contains approximately 238 calories, 31 g of carbs, 5 g of protein, 12 g of fat, 1 g of fiber, and 21 g of sugar, based on the standard ingredient list. Adjust for calorie variations if you swap in higher‑fat ingredients or extra candies.

What toppings pair best with these brownies?

Layer a drizzle of salted caramel or dark chocolate ganache, sprinkle sea salt, or scatter crushed pistachios. For a daring twist, a handful of toasted chopped pecans or candied lemon zest adds depth. The mild peanut butter backdrop welcomes a range of contrasting flavors.

How do I avoid overmixing the batter?

Stop mixing when the batter is smooth and no flour streaks remain. Use a gentle folding motion rather than a vigorous stir. OvermixingZusches the proteins in the flour, turning the brownies airy like a cake, which defeats the chewy texture we aim to achieve.

Where can I find authentic Reese’s Pieces in Manhattan?

Greengrocer‑style stores like Whole Foods or Trader Joe’s carry them in International Snack sections. For a more artisan touch, visit small boutique candy shops such as Lucky Lollipop on 3rd Avenue. Most large supermarkets stock them in the snack aisle near chocolate bars.

What can I substitute for all‑purpose flour?

A blend of 1¾ cups cake flour and ¼ cup cocoa or ½ cup instant oatmeal can replace all‑purpose flour while maintaining the brownie’s chew. Alternatively, a gluten‑free blend is suitable for those with celiac disease; be sure it contains xanthan gum for structure.

Share Your Version!

If you give these brownies a try, delight me with a star rating and let me read your comments in the comment box below. Snap a photo and tag @cookingwithemi on Instagram or Pinterest – I love seeing the neighborhood flair you add to the recipe.

Do you have a unique twist—like adding orange zest or a spoonful of spiced cardamom—to enhance the chewy experience? Share your idea and let’s keep the conversation rolling!

From my NYC kitchen to yours — I hope this recipe brings as much warmth to your table as it does to mine. — emy 🧡

📌

Love This Recipe? Save It to Pinterest!

If you enjoyed this Chewy Reese’s Pieces Peanut Butter Brownies recipe, don’t let it get lost in your browser tabs! 😄 Pin it now so you can find it again anytime — and explore hundreds more tried‑and‑tested recipes waiting for you on my Pinterest boards.

👉 Follow emy on Pinterest @exorecipe

📌 Pin this recipe · 🔁 Re-pin your favorites · 💬 Tag me when you make it — I love seeing your creations!

Print
clock clock iconcutlery cutlery iconflag flag iconfolder folder iconinstagram instagram iconpinterest pinterest iconfacebook facebook iconprint print iconsquares squares iconheart heart iconheart solid heart solid icon

Chewy REESE’S PIECES Peanut Butter Brownies


  • Author: Chef Emy

Description

Hands down the BEST recipe for peanut butter brownies with a tasty twist! Enjoy chewy, rich peanut butter flavor in every bite.


Ingredients

Scale
  • cup butter (melted)
  • 1 cups granulated sugar
  • 1 cup light brown sugar
  • 4 large eggs
  • 2 teaspoons vanilla extract
  • 1 cup creamy or chunky peanut butter
  • 2 cups all-purpose flour
  • 2 teaspoons baking powder
  • ¼ teaspoon salt
  • ½ cup Reese's Pieces

Instructions

  1. Preheat oven to 350°F.
  2. Line a 11 x 13 metal or glass baking pan with parchment paper so you can easily lift your brownies right out once they are cooled.
  3. In a large bowl, thoroughly mix the peanut butter, melted butter, white sugar and brown sugar together. Slowly add the eggs, vanilla extract, and pinch of salt.
  4. In a separate bowl, whisk the flour and baking powder.
  5. Slowly add the flour and baking powder mix to the peanut butter mixture and slowly mix or fold to combine all ingredients. DO NOT OVER MIX! Over mixing will make fluffy cake-like brownies.
  6. Smooth the batter into the 11 x 13 pan and sprinkle the Reese's Pieces over the batter.
  7. Bake for 30-35 minutes. They will feel firm on top and moist in the center.
  8. Allow them to cool for at least 30 minutes before cutting them

4-ingredient Peanut Butter Balls

4-ingredient Peanut Butter Balls – Easy Chocolate-Glazed Holiday Treats

⚖️
Difficulty
Easy
⏲️
Prep Time
15
🕒
Cook Time
5
⏱️
Total Time
20
🍽️
Servings
20

Growing up in the bustling souks of Morocco, my mother’s kitchen was a symphony of spices, sweet aromas, and the comforting smell of toasted nuts. Even after my culinary studies at Le Cordon Bleu in Paris, I found that the simplest ingredients could still wow a palate. When I settled in New York City, I longed for that nostalgic bite but wanted something that could be whipped up in minutes. These 4‑ingredient peanut butter balls turned out to be the answer: an instant, chocolate‑glazed treat that bridges my Moroccan roots, European sophistication, and the fast‑paced NYC hustle.

Imagine dipping a smooth, nutty peanut butter core into velvety dark chocolate that shimmers like a Moroccan lantern. The contrast between the cool, slightly salty butter and the sugary powdered sugar gives a subtle crunch as you bite, while the melted chocolate provides a silky finish that warms the back of your throat. The faint coconut oil undertone lends a tropical breeze, reminiscent of beach markets in Essaouira, whereas the salted butter’s umami elevates the overall flavor. Every ball is a quick kiss of comfort, ready to share with friends or stock in your holiday pantry.

I’ve tested this recipe in the high‑traffic kitchens of West Village cafés and on the packed walkways of Lower East Side streets. The secret is to chill the dough only long enough for it to hold shape—about 15 minutes. If you rush, the balls will spread or break; if you chill too long, they harden into brittle candy. Pro tip: add a tablespoon of coconut oil or vegetable shortening during the mixing stage to keep the texture silky. A common mistake is leaving out the butter—without it, the dough crumbles and the flavor profile feels flat. Once you follow this balance, you’ll see why I keep making them for holiday parties, potlucks, and even office snacks.

Why This 4‑Ingredient Peanut Butter Balls Recipe Is the Best

The flavor secret lies in the harmonious marriage of rich peanut butter, creamy butter, subtle sweetness from powdered sugar, and molten chocolate. A pinch of salt brings out the nutty undertone and balances the chocolate’s bitterness, just as a chef balances vinaigrette and garlic. My years in Paris taught me that a single sprinkle of salt can transform a simple dish into culinary gold. This recipe captures that philosophy in a bite‑size form.

Achieving the perfect texture is a chef’s dream: a bite that’s firm enough to hold, yet melts on contact. The technique of first chilling the dough then forming 1‑inch balls ensures that each piece retains its shape during the quick dip. The salted butter’s fat content gives a desirable body, while the powdered sugar’s fine grit prevents grains from spoiling the mouthfeel. By mastering this simple method, even a beginner can produce bakery‑quality confections.

This dish is foolproof and fast because it uses no baking, no refrigeration beyond a brief chill, and a single chocolate melt. You can prepare the base while your friends or family gather, and the final coating takes fewer than 10 minutes. For a city that never stops rushing, this recipe feels like a breath of fresh air—handful, instant, and endlessly shareable.

Peanut Butter Balls Ingredients

I always pick my ingredients in the green‑lit markets of Union Square, where a small family vendor sells the finest creamy peanut butter. The butter comes from a local Brooklyn dairy that uses only grass‑fed cows, and the chocolate chips are sourced from a New York artisan who roasts the beans in small batches for maximum flavor. This local touch turns a simple snack into a culinary statement that supports the community and satisfies my taste for premium quality.

Ingredients List

  • 1/2 cup creamy peanut butter (unsweetened or sweetened)
  • 3 Tbsp salted butter (softened)
  • 1 cup powdered sugar
  • 1 cup semi‑sweet chocolate chips
  • 1 Tbsp vegetable shortening or coconut oil (optional)

Ingredient Spotlight

Peanut butter is the powerhouse of this recipe. Choose a creamy, natural variety without hydrogenated oils for a silky base. If you prefer a crunchy texture, use chunky peanut butter; just pulse it first to avoid large chunks clumping. The best substitution on the shelf is almond butter, which delivers a subtle nutty note while keeping the same consistency.

Salted butter adds depth and helps the dough hold together. For a dairy‑free twist, replace it with equal parts coconut oil or vegan butter; both maintain the chewy texture and give a mild coconut undertone that complements the chocolate. A tip: soften the butter at room temperature, which aids in even mixing and reduces lumps.

Powdered sugar provides the sweet finish and fine crumb. Look for plain, unsweetened varieties and sift them beforehand to avoid clumps. If you need a lower‑sugar alternative, experiment with 1/2 cup honey‑to‑sugar ratio; the extra moisture will slightly soften the balls, so chill longer to firm.

Original Ingredient Best Substitution Flavor / Texture Impact
Creamy Peanut Butter Almond Butter Nutty, slightly sweeter; similar creaminess.
Salted Butter Coconut Oil / Vegan Butter Dairy‑free, mild coconut flavor; keeps texture.
Powdered Sugar Honey (1/2 cup) Slightly wetter; adds floral notes; shorten chill.

How to Make 4‑Ingredient Peanut Butter Balls — Step‑by‑Step

The beauty of this recipe is its simplicity; you can craft a batch while catching the last subway ride home.

Step 1: Mix Ingredients

In a medium bowl, combine the creamy peanut butter, softened salted butter, and optional coconut oil. Whisk until fully blended. Gradually stir in powdered sugar until the mixture is smooth, shiny, and slightly stiff. Place a tablespoon of the dough on a parchment‑lined plate, then cover and refrigerate for 15 minutes.

💡 emy’s Pro Tip: If you’re in a hurry, use microwave‑safe small bowls for quick mixing; a few seconds on low power melds the butter just enough.

Step 2: Form Balls

Scoop the chilled dough using a melon ball scoop or small spoon. Roll each piece between your palms to form a 1‑inch sphere. Arrange the balls on a parchment‑lined baking sheet. Cover loosely with plastic wrap and chill again for 20 minutes to keep them firm for dipping.

⚠️ Common Mistake to Avoid: Skipping the second chill – the balls will spread and lose their shape during the chocolate dip.

Step 3: Melt Chocolate

Transfer the chocolate chips to a microwave‑safe bowl. Warm on medium (50% power) in 30‑second bursts, stirring after each until smooth and glossy. Alternatively, melt the chocolate slowly over a double boiler, stirring constantly.

💡 emy’s Pro Tip: Add a teaspoon of coconut oil to the molten chocolate for a glossy finish and easier dipping.

Step 4: Dip

Using a fork, turn each peanut butter ball in the melted chocolate until fully coated. Tap out excess chocolate. Place the dipped balls on a parchment‑lined tray. Cover and refrigerate until the chocolate hardens, about 15 minutes. Serve immediately or keep chilled until ready to eat.

⚠️ Common Mistake to Avoid: Leaving the chocolate to set on a cold surface – it can become slightly bitter. Keep the balls at room temperature while co‑setting.

Step Action Duration Key Visual Cue
1 Mix butter and peanut butter, add sugar. 5 min. Smooth, shiny dough.
2 Form 1‑inch balls. 10 min. Uniform spheres.
3 Melt chocolate. 3 min. Smooth, glossy.
4 Dip and set. 15 min. Fully coated, firm chocolate.

Serving & Presentation

Garnish each chocolate‑coated ball with a light dusting of sea salt or a scattered pinch of crushed pistachios for a visual pop. Serve them on a rustic wooden board alongside a bowl of spiced honey and a small dish of crushed chili flakes for those who enjoy a hint of heat—a nod to my Moroccan spice stalls.

Pair these treats with a chilled glass of full‑bodied red wine, such as a Merlot or a rich Zinfandel, to complement the chocolate’s deep notes. For a more playful option, drizzle a swirl of orange liqueur over a few balls and place them near a cup of spiced chai; the aromatic spices mirror the subtle chili flavor in the serving.

Pairing Type Suggestions Why It Works
Side Dish Cheese platter with fig jam Savory and sweet contrast complements chocolate.
Sauce / Dip Caramel sauce or whipped cream Sweetness rounds out nutty chocolate.
Beverage Merlot, Zinfandel, or spiced chai Both complement and contrast chocolate notes.
Garnish Pistachios, sea salt, chili flakes Texture and flavor layer enhance experience.

Make‑Ahead, Storage & Reheating

I often make a batch on a Sunday afternoon to have on hand for the week‑long hustle of New York life. The 4‑ingredient dough is forgiving, and it stays fresh when stored properly.

Method Container Duration Reheating Tip
Refrigerator Food‑storage bag 3–4 days No reheating required.
Freezer Bento box 2–3 months Bring to room temp 30 min before serving.
Make‑Ahead Plastic wrap over tray 2 days ahead Re‑dip in warmed chocolate.

When I’m back from a day at a Broadway show, I thaw the frozen balls, dip a few into chocolate, and the whole office gets a sweet treat of instant joy. They keep their crunch even after several weeks if kept in a single‑layer storage box.

Variations & Easy Swaps

Variation Key Change Best For Difficulty Impact
Nutty Variation Add chopped almonds and almond butter. Nut lovers. Same.
Gluten‑Free Variation Use gluten‑free chocolate chips. Gluten‑free diners. Same.
Seasonal Twist Replace peanut butter with pumpkin puree. Fall favorites. Same.

Nutty Variation

Incorporate crushed pistachios or slivered almonds into the dough for a subtle crunch and a burst of earthy flavor reminiscent of a Moroccan spice market. The added nuts deepen the texture, giving each ball a memorable chew that pairs wonderfully with the glossy chocolate.

Gluten‑Free Variation

Simply swap out the semi‑sweet chocolate chips for a gluten‑free brand, and the rest stays identical. The texture remains unchanged, but the final product meets the dietary needs of gluten‑sensitive guests, making it a versatile snack for every table.

Seasonal Variation

During the holiday season, toss in a pinch of cinnamon or nutmeg, or even replace the peanut butter with a creamy carrot juice base to add a festive citrus note. These small tweaks turn a classic into a seasonal highlight that showcases the best of NYC’s spring produce.

How long do peanut butter ball shells stay fresh when stored in the fridge?

When kept in an airtight container in the refrigerator, the chocolate‑coated shells stay fresh for up to four days. The key is to seal the tray or use a zip‑lock bag so that moisture doesn’t seep in, which can lead to a soggy coating. If you’re planning to serve them over a weekend, you can also freeze the shells; thawing them at room temperature restores the crispness without compromising flavor. Store them in portions so you only open what you need, keeping the rest in their chill for peak enjoyment.

Can I use almond butter instead of peanut butter?

Absolutely, almond butter is a superb alternative. Its lighter, sweeter profile gives the balls a more delicate taste, which balances well with the semi‑sweet chocolate. The consistency is similar enough that the dough will still form firm spheres. If the almond butter is too watery, let it sit for a few minutes to thicken before mixing. The final product will have a subtle nutty undertone that can be delightful for those who prefer a less intense peanut flavor.

What is a good way to keep the balls from sticking to each other during chilling?

Keep the balls separated by placing parchment paper between them on the tray during the first chill. Once the shells form, you can transfer them to a single layer of wax paper but add a thin sheet of parchment or a dusting of powdered sugar between each ball if you plan to store them in the freezer. This prevents them from sticking together and ensures that each bite remains an individual treat. A simple tip: flip them once after the first 10 minutes to ensure even setting.

Is it possible to make these peanut butter balls vegan?

Yes, you can fully veganize the recipe by swapping the salted butter for equal parts coconut oil or vegan butter, and ensuring that the chocolate chips are dairy‑free. Additionally, choose a plant‑based powdered sugar and a peanut butter that contains no dairy ingredients. The result will be a delicious, chocolate‑coated ball that remains buttery inside but free from animal products. They still hold their shape and melt beautifully, giving you the same blissful bite.

What are some complementary dips for peanut butter balls?

A classic pairing is caramel sauce, made from butter, brown sugar, and a splash of heavy cream—its sweet thickness contrasts nicely with the creamy peanut layer. For a smoky twist, try a light soy glaze or a pinch of smoked sea salt. If you’re looking for a healthier option, a drizzle of whipped coconut cream or a homemade honey‑butter mixture will add both flavor and a richer mouthfeel. Whatever you choose, the key is to balance sweetness and saltiness, letting the chocolate shine without overwhelming the core.

How many peanut butter balls can I make from the given ingredients?

With ½ cup of peanut butter, 3 Tbsp of butter, and 1 cup of powdered sugar, you’ll end up with roughly 20 small 1‑inch balls. This size is ideal for parties or a quick snack. If you’d like fewer, you can cut the measurements in half; if you prefer more, simply double the batch and adjust the chilling times accordingly to keep each ball firm.

Can I use dark chocolate instead of semi‑sweet chocolate?

Yes, dark chocolate will give your balls a richer, slightly bitter profile that pairs beautifully with the nutty peanut center. Use a chocolate with at least 60 % cacao to preserve that depth of flavor. Because dark chocolate is more acidic, you may notice a subtle tartness, which balances the sweet powdered sugar. Just ensure your chocolate melts properly by warming it gently over a double boiler or using short microwave bursts, so each ball gets an even coating.

Is it safe to store the chocolate shells on a kitchen counter?

Chocolate can set at room temperature, but it’s best to keep it in a cool, dry place away from direct sunlight to maintain texture. Storing the shells for more than a couple of days on the counter can cause the chocolate to bloom—tiny white flakes—though this doesn’t affect taste. For optimal freshness, keep them refrigerated or frozen. If you prefer to bring them out a few hours before serving, let them sit at room temperature; the chocolate will soften enough to bite but still hold its shape.

What’s the best way to melt chocolate for dipping?

The most reliable method is a double boiler: place a heat‑proof bowl over a saucepan of simmering water, ensuring the bottom of the bowl doesn’t touch the liquid. Stir frequently until the chocolate is fully melted and glossy. If you’re short on time, use a microwave: heat 30‑second bursts on medium power, stirring between each until smooth. Add a little coconut oil or butter for sheen and easier dipping. Keep an eye on it; chocolate can burn quickly when overheated.

Can I add spices to the peanut butter mixture?

Definitely! A pinch of cayenne pepper or cinnamon can give the dough a subtle kick or warmth that echoes Moroccan cumin and cinnamon. If you add a spice, sprinkle it into the powdered sugar before mixing to ensure even distribution, or lightly coat the finished balls in a spice‑infused glaze for added flavor. Keep the amount small at first—spices are potent—so you can adjust to your taste. This tweak turns an everyday treat into a personalized, seasonal delight.

Share Your Version!

If my 4‑ingredient Peanut Butter Balls brighten your kitchen, I’d love you to leave a star rating and share a comment below. Got a clever twist or a new flavor combo? Drop your ideas in the comments; I’m always eager to hear how I can tweak the recipe for you. If you can, post a photo of your finished treat on Instagram or Pinterest and tag @cookingwithemi. Let me see how you personalize this easy chocolate‑glazed holiday treat—every picture is a win for the whole foodie community!

From my NYC kitchen to yours — I hope this recipe brings as much warmth to your table as it does to mine. — emy 🧡

📌

Love This Recipe? Save It to Pinterest!

If you enjoyed this 4‑ingredient Peanut Butter Balls recipe, don’t let it get lost in your browser tabs! 😄 Pin it now so you can find it again anytime — and explore hundreds more tried‑and‑tested recipes waiting for you on my Pinterest boards.

👉 Follow emy on Pinterest @exorecipe

📌 Pin this recipe · 🔁 Re-pin your favorites · 💬 Tag me when you make it — I love seeing your creations!

Print
clock clock iconcutlery cutlery iconflag flag iconfolder folder iconinstagram instagram iconpinterest pinterest iconfacebook facebook iconprint print iconsquares squares iconheart heart iconheart solid heart solid icon

4-ingredient Peanut Butter Balls


  • Author: Chef Emy

Description

These Chocolate Peanut Butter Balls are my favorite candy for the Holidays and so incredibly Easy to make with just 4-ingredients!


Ingredients

Scale
  • 1/2 cup creamy peanut butter
  • 3 Tbsp salted butter (softened)
  • 1 cup powdered sugar
  • 1 cup semi sweet chocolate chips
  • 1 Tbsp vegetable shortening or coconut oil (optional)

Instructions

  1. Mix the peanut butter and softened butter together in a mixing bowl. Gradually stir in powdered sugar until fully combined. Cover and place in the fridge for about 15 minutes to firm up.
  2. Using your hands, shape the dough into 1-inch balls. Place the balls on a baking sheet, cover and refrigerate for at least 20 minutes (this will hold it's shape for dipping).
  3. Melt the chocolate chips according to package instructions.
  4. Using a fork, dip the peanut butter balls one at a time into the melted chocolate. Allow the excess chocolate to fall off. Place the chocolate balls onto wax paper, cover and refrigerate until ready to serve.

3 Ingredient Peanut Butter Fudge

Peanut Butter Fudge – Only 3 Ingredients, Seconds of Prep, Cozy NYC Comfort

⚖️
Difficulty
Easy
⏲️
Prep Time
10 mins
🕒
Cook Time
0 mins
⏱️
Total Time
10 mins
🍽️
Servings
12 squares

I first discovered this little nugget of sweetness during a chilly walk through the farmers’ market in Brooklyn, when the aroma of warm pastries drifted from a little cake stand. The vendor handed me a shiny packet of white chocolate and a jar of creamy peanut butter—no nut butter, just classic, smooth peanut butter—and somehow, the idea of a hassle‑free, instant fudge jammed in my mind like a secret recipe from my Moroccan grandmother’s kitchen blended with a pinch of Parisian elegance.

When this trio melts together, the white chocolate sharpens into creamy ivory, lifting the peanut butter’s buttery richness into a silky, almost glassy texture. A whisper of vanilla from the condensed milk adds a sweet acidity that makes each bite sing. The result is a glossy, springy fudge that looks like a chocolate‑peanut butter dream, bursting with a subtle nutty fragrance and a light, caramelized finish that leaves you craving another square before it’s even set.

I’ve spent countless evenings refining this recipe in my NYC kitchen, discovering that the key to a perfect set is an instantaneous mixture, heated in short bursts to keep the fudge cloud‑like. In so doing, I’ve learned a few backstage tricks: keep the peanut butter cool right before mixing, use a silicone spatula to avoid sticking, and a quick stir at every microwave interval prevents clumps. It’s that little discipline that turns a three‑ingredient meal into a show‑stopping confection.

Why This Peanut Butter Fudge Recipe Is the Best

The flavor secret lies in the bold simplicity of using only three ingredients. By ditching natural peanut butter, I eliminate the uneven salt levels that can throw a batch off. The creamy peanut butter’s uniformity means each bite tastes like the same silky richness I know from my mother’s kitchen in Fez, simply elegant and comforting.

The texture is perfected by quick 30‑second microwave pours, ensuring the chocolate melts without seizing. I submerge the bowl in hot water for a second before dumping the mixture into the pan so it stays smooth—an easy, professional tip my Paris training taught me: gentle heat spreads evenly like a delicate soufflé.

The recipe is also foolproof for beginners because it requires no rigorous stirring or temperature control. All you need is a timer, a microwave, and a dash of discipline. The method works for anyone who loves a sweet treat but doesn’t want to babysit a saucepan for hours.

Peanut Butter Fudge Ingredients

In the heart of Lower Manhattan, at a small vendor on 5th Avenue, I found the finest white chocolate chips that melt to a buttery gloss—just like the ivory pastries I relish back home in Rabat. The peanut butter comes from a local store that keeps their jars at room temperature, ensuring it stays silky when melted. Finally, the sweetened condensed milk supplies that needed sweetness without any extra sugar overload.

Ingredients List

  • 12 ounces white chocolate chips
  • 1.5 cups creamy peanut butter (no natural)
  • 1 can (14 oz.) sweetened condensed milk

Ingredient Spotlight

White chocolate chips are the canvas; look for a creamy, dust‑free brand. The sparkle of light sauce on your spoon indicates the good stuff—avoid dark or semi‑sweet varieties that alter the pink hue and flavor spectrum.

Creamy peanut butter (not natural) ensures a smooth, consistent taste. You can test it by pressing a drop on your tongue—if it slides, it’s the right choice. A small jar of nut butter in a Brooklyn shop will often have a tangy note; keep away from those packed with lumps.

Sweetened condensed milk is the hidden hero, tying the sweetness and the peanut butter into one unified mouth shift. The lower the sugar content within the brand, the more balanced the fudge will be. Try a stainless‑steel jug for that silky finish—an extra step that yields maximum bliss.

Original Ingredient Best Substitution Flavor / Texture Impact
White Chocolate Chips Dark Chocolate Chips (70% cacao) Rich, slightly bitter, less creamy finish
Creamy Peanut Butter Almond Butter (smooth) Nutty but lighter, loses peanut flavor
Sweetened Condensed Milk Evaporated Milk + 1 tbsp sugar Tighter, less sweet, more milky taste

How to Make Peanut Butter Fudge — Step‑by‑Step

The easiest way to get silky fudge is to keep each step short and well‑timed, so the mixture never over‑cooks.

Step 1: Prepare the Pan

Spray an 8×8 baking pan with cooking spray, then line the bottom with waxed paper or parchment. This not only prevents sticking but also lightens the final color, giving the fudge that clear glassy sheen.

💡 emy’s Pro Tip: Use a silicone mat on a baking sheet if the pan drips; it helps the fudge lift cleanly later.

Step 2: Melt Chocolate and Peanut Butter

Place the white chocolate chips and peanut butter in a large mixing bowl that can stand inside the microwave. Heat in 30‑second bursts, stirring after each one until the mixture is fully melted and smooth.

⚠️ Common Mistake to Avoid: Over‑heating. The mixture can seize if left too long; stop as soon as it’s glossy.

Step 3: Add Condensed Milk

Stir in the sweetened condensed milk until the blend is uniform and slightly runny—this will help the fudge flow into the pan without clumps.

💡 emy’s Pro Tip: Add a pinch of salt if you like; it balances the sweetness subtly.

Step 4: Pour and Refrigerate

Pour the smooth mixture into the prepared pan. Refrigerate for 2–3 hours or until the fudge is firm enough to cut into squares.

⚠️ Common Mistake to Avoid: Cutting before firm. It will crumble.

Step 5: Cut and Serve

Once set, slice the fudge into bite‑size pieces and serve immediately or store in an airtight container. You can also roll a square in crushed nuts for a quick crunch.

💡 emy’s Pro Tip: Keep a small glass jar of crushed hazelnuts; it gives a satisfying crunch to each bite.

Step Action Duration Key Visual Cue
1 Prepare pan 5 min Creamy film on paper
2 Melt chocolate & peanut butter 1.5 min (3×30s) Smooth, glossy sheen
3 Add condensed milk 30 sec Even, runny consistency
4 Pour & refrigerate 2–3 hrs Solid but not hard
5 Cut & serve Instant Smooth squares, clean edges

Serving & Presentation

Serve your fudge on a star‑ry plate, or go avant‑garde by layering the squares in a clear glass bowl so the sheen shows through. A sprinkle of toasted coconut or chopped pistachios adds crunch and a fragrant contrast reminiscent of the medina’s spice stalls.

Pair these boosts with a light, cold espresso shot for a double‑dimensional indulgence, or drizzle a thin line of caramel over each square for a touch of French café allure. The softness of the fudge complements a robust espresso bean, while the caramel’s syrupy sweetness echoes a creamy Moroccan sweet lokum.

Pairing Type Suggestions Why It Works
Side Dish Leafy salad with feta, olives, lemon Freshness cuts through sweetness
Sauce / Dip Dark chocolate spread, whipped cream Adds depth and complexity
Beverage Espresso, cold brew, toasted almond milk Caffeine balance sweet creaminess
Garnish Sea salt flakes, crushed pistachios, cocoa nibs Texture contrast and flavor punch

Make‑Ahead, Storage & Reheating

I’m constantly juggling 9‑to‑5 in Manhattan, so having a batch that can last a week on its own is priceless. After cutting, place the squares in an airtight container and store them in the refrigerator for up to six days. For longer storage, freeze in a freezer‑safe bag—fudge maintains its quality up to 3 months without any loss of flavor or texture.

Method Container Duration Reheating Tip
Refrigerator Plastic airtight box Up to 6 days Serve at room temperature for silky texture
Freezer Vacuum pack Up to 3 months Thaw in fridge 4 hrs, or microwave 10‑15 sec
Make‑Ahead Ready‑to‑eat tray 4‑6 days Keep at room temperature near a cool spot for immediate service

When reheating from freezer, always let the fudge find room temperature before microwaving—this keeps the chocolate from forming a hard shell. If you’re in a rush, a warm oven at 200°F for 5 minutes can revive the richness without over‑melting the nutty base.

Variations & Easy Swaps

Variation Key Change Best For Difficulty Impact
Almond Peanut Butter Fudge Swap peanut butter for almond butter Gluten‑free & nut‑enriched Same
Flavor‑Infused Add saffron threads or cardamom Moroccan twist Same
Salted Caramel Fudge Add caramel sauce & sea salt Twilight party sweet Harder, more hands‑on

Almond Peanut Butter Fudge

Using almond butter gives a subtler nutty tone while maintaining the same silky texture. The slight earthy flavor pairs nicely with a drizzle of honey or a sprinkle of dried apricots—perfect for an NYC brunch where sweet meets savory.

Flavor‑Infused Fudge

Adding a pinch of saffron or cardamom during the melt phase creates an aromatic swirl reminiscent of Moroccan mint tea. The subtle spice lifts the sweetness, making the fudge feel like a small, fragrant treasure box.

Salted Caramel Fudge

Pour generous swirl of dark caramel into the center and finish with a splash of sea salt. The caramel’s buttery depth combined with salty contrast yields a dessert that is both indulgent and refined—ideal for an upscale pop‑up event in Manhattan.

Share Your Version!

If you tweak the recipe, I’d love to see your creative spin. Drop a rating and chat in the comments section—your feedback fuels my next kitchen adventure! If you snap a photo, post it on Instagram or pin it to Pinterest and tag @cookingwithemi to show me your sweet masterpieces. Tell me which of the variations took your taste buds on the most daring voyage.

From my NYC kitchen to yours — I hope this recipe brings as much warmth to your table as it does to mine. — emy 🧡

📌

Love This Recipe? Save It to Pinterest!

If you enjoyed this Peanut Butter Fudge recipe, don’t let it get lost in your browser tabs! 😄 Pin it now so you can find it again anytime — and explore hundreds more tried-and-tested recipes waiting for you on my Pinterest boards.

Follow emy on Pinterest @exorecipe

📌 Pin this recipe · 🔁 Re-pin your favorites · 💬 Tag me when you make it — I love seeing your creations!

What makes peanut butter fudge so quick to make?

Because it relies on simple, room‑temperature ingredients that melt together instantly in a microwave. The combination of pre‑made sweetened condensed milk and creamy peanut butter eliminates the need for prolonged cooking or tempering, allowing you to have a finished treat in under fifteen minutes.

Can I use dark chocolate instead of white?

Absolutely. Dark chocolate gives a richer, slightly bitter edge and changes the fudge’s hue to a deeper brown. It still melts smoothly with peanut butter and condensed milk, but you’ll notice a more complex chocolate profile. Just keep the same cooking time.

Will this fudge keep if I store it in the fridge?

Yes. Once set, you can keep the fudge in an airtight container in the refrigerator for up to six days. The sweet, nutty flavors keep stable, and the texture remains firm yet still easy to bite. For longer storage, freeze it and thaw in the fridge before serving.

What if I don’t have a microwave?

You can melt the chocolate and peanut butter over a double boiler, stirring constantly and checking for a silky melt. Heat for approximately six minutes, moving the bowl frequently to avoid scorching, then combine with the condensed milk before pouring into the pan.

Is it safe to eat the milk after the recipe is done?

Yes, absolutely. The silicone heat‑resistant bowl and airtight container used during cooking keep the mixture safe, and the sweetened condensed milk also stabilizes the fudge, reducing potential bacterial growth. It’s just fine to eat the leftover milk in the same container, ensuring it stays chilled.

Can I add sea salt or a spice to the fudge?

Yes, a light sprinkle of sea salt or a pinch of cardamom/curry adds depth. These aromatics create a balance against the sweetness and highlight the peanut butter flavor. Apply sparingly after pouring but before refrigerating to lock in the finish.

What’s the best way to reheat leftovers?

A gentle approach works best. Place a small square in the microwave for 10‑15 seconds or let it rest at room temperature for ten minutes. The goal is to soften without melting back into a liquid mess. Avoid high heat, which can separate the chocolate and peanut butter.

Can this be made vegan?

Yes, replace the sweetened condensed milk with an equal amount of full‑fat coconut milk or a light sauce of maple syrup and coconut milk. Keep the chocolate chips dairy‑free to maintain the vegan profile, but the texture will be slightly softer due to the lack of dairy fats.

What’s the calorie count for a square?

About 224 calories for each 12‑oz batch divided into 12 squares. This accounts for the 14 oz condensed milk, 1.5 cups peanut butter, and 12 oz white chocolate. The calorie count is modest compared to other candy treats, especially if served in modest portions.

Where can I source the best white chocolate chips?

Look for brands that list only “white chocolate” or “white chocolate chips” as the first ingredient, without added flavors or excess sugars. In NYC, specialty stores like Dean & Deluca or Trader Joe’s carry premium bags that melt smoothly. In Moroccan markets, the local sweet shops have a lighter, cleaner white chocolate that’s great for this recipe.

Print
clock clock iconcutlery cutlery iconflag flag iconfolder folder iconinstagram instagram iconpinterest pinterest iconfacebook facebook iconprint print iconsquares squares iconheart heart iconheart solid heart solid icon

3 Ingredient Peanut Butter Fudge


  • Author: Chef Emy

Description

This Easy Peanut Butter Fudge Recipe is the best recipe with only 3 ingredients! Homemade peanut butter fudge is perfect for your next party.


Ingredients

Scale
  • 12 ounces white chocolate chips
  • 1.5 cups creamy peanut butter ((do not use natural peanut butter))
  • 1 can sweetened condensed milk (14 oz.)

Instructions

  1. Spray an 8X8 baking pan with cooking spray, then line the bottom with waxed paper or parchment paper.
  2. Place the white chocolate chips and peanut butter in a large mixing bowl (microwave safe bowl).
  3. Heat in the microwave in 30-second intervals, stirring after each interval, until the white chocolate chips and peanut butter are melted, fully combined and smooth. Then stir in the sweetened condensed milk until fully combined.
  4. Pour the mixture into the prepared 8X8 baking dish. Refrigerate until the fudge is set (approximately 2-3 hours).
  5. Once the fudge is fully set, cut into pieces and serve!

Classic Peanut Butter Cookies

Classic Peanut Butter Cookies Crinkle‑Texture Edition – The Easiest Soft Cookie You’ll Ever Make

⚖️
Difficulty
Easy
⏲️
Prep Time
10 mins
🕒
Cook Time
9 mins
⏱️
Total Time
20 mins
🍽️
Servings
24

I grew up in the bustling markets of Marrakech, where fragrant spices hung heavy in the air and my mother would stir a pot of bissara while humming the tune of an old Andalusian lullaby. Then, years later, I stepped into the marble‑lined halls of Le Cordon Bleu in Paris, learning that the secret of any simple pastry lies in the texture you create before it even bakes. Then, in the heart of New York, I found myself crafting the Classic Peanut Butter Cookies Crinkle‑Texture Edition— an easy, soft cookie that carries the subtle warmth of Moroccan butter and the airy crunch of a Parisian baguette crust. As soon as I took the first bite, I knew I had stumbled on a sweet recipe that would become a staple in every family pantry.

Each cookie arrives at the counter already glossy with a gentle sheen of peanut butter, speckled with a faint golden rim from the precise 350°F bake. The aroma— warm butter mingling with the nutty depth of peanut butter, underlined by a subtle metallic hint from the baking soda— awakens the senses before the first crunch. When you break a piece, the soft interior expands like a puffed souffle while the crinkle pattern creates a delightful bite‑crunch that leads into a melted peanut butter finish. Visually, the cookies lay like tiny sunlit coins, their tops almost flat and ready to impress any dessert table that reflects the swirl of New York skylines.

Back in my kitchen, I’ve tweaked the classic by adding a splash of vanilla extract— a French touch that sang through my Paris pastry lessons— and evolving the dough one more time so that it firms gently during the chill and crusts softly when baked. A pro tip I swear by is to fold in the flour just until the whisk is invisible— over‑mixing will make the cookies tough. One mistake I see often is letting the dough sit too long at room temperature before baking; this encourages the butter to separate and loses that handmade, crinkle sheen. With my version, every cookie keeps that tender, buttery center while still crisp on the edges.

Why This Classic Peanut Butter Cookies Recipe Is the Best

Flavor secret: the key to these cookies is the delicate balance between the buttery richness and that unmistakable peanut butter punch. My Moroccan upbringing taught me that nuts don’t just add flavor; they add deep earthiness. By incorporating a touch of Moroccan orange zest, each cookie carries a fragrant kiss of citrus, breathing life into the traditional baseline. The result is an unforgettable blend that satisfies both nostalgic cravings and curious palates seeking something new.

Texture perfected: In the delicate art of French pastry, a single beat of the whisk can transform dough from stringy to supple. I employ the “heel‑of‑hand” technique—start with a slow, gentle circulation to warm the ingredients, then switch to a rapid creaming for a silk‑soft batter. This dual rhythm helps to embed air without over‑working the gluten, ensuring cookies that are tender inside, with a satisfying snap on the edges and the coveted crinkle pattern that criss‑crosses each cookie.

Foolproof & fast: Unlike many cookie recipes that require chilling or special equipment, this version starts at room temperature, proceeds in a single mixing step, and bakes in under ten minutes. Each step builds on the last— the first whisk, the add‑in of butter, the fold‑in of flour—to make a process that even a beginner can follow. By the time you’re at the oven, you can say “I’m done” and savor the results without frustration.

Classic Peanut Butter Cookies Ingredients

Shopping for these cookies is a breeze at any local Supermarket, but my favorite spot is the holiday market on West 4th Street, where I can pick out a bottle of real cold‑pressed peanut butter and a tub of butter that smells like fresh rosemary from my mother’s kitchen. These small trips always remind me that good ingredients are the cornerstone of good cookie.

Ingredients List

  • ½ cup unsalted butter (room temperature)
  • ⅔ cup granulated sugar
  • ⅓ cup brown sugar
  • ⅔ cup peanut butter
  • 1 large egg
  • ¾ tsp baking powder
  • ½ tsp baking soda
  • ¼ tsp salt
  • 1 ⅓ cups all‑purpose flour

Ingredient Spotlight

Peanut Butter – The heart of the cookie, it provides that deep, nutty flavor. Choose a natural creamy peanut butter for a richer taste. If you prefer a sweeter version, a sweetened variety can round out the profile. Substitution: Natural creamy peanut butter replaces grainy peanut butter for a smoother mouthfeel.

Unsalted Butter – Butter contributes to the cookie’s tender crumb. Unsalted allows control over salt levels. In a pinch, use salted butter but reduce the added salt by ¼ tsp. Substitution: Ghee adds a subtle caramel richness while keeping the butter’s fat content.

All‑Purpose Flour – Gives structure to the cookie. Use a high‑protein flour to enhance chewiness. Substitution: Almond flour creates a gluten‑free option that yields a denser, slightly nutty cookie.

Original Ingredient Best Substitution Flavor / Texture Impact
Peanut Butter Natural Creamy Peanut Butter Less sweetness, richer nutty flavor
Unsalted Butter Ghee Caramel depth, slightly firmer crumb
All‑Purpose Flour Almond Flour Denser texture, nutty undertone, gluten‑free

How to Make Classic Peanut Butter Cookies — Step‑by‑Step

First, set the stage by heating the oven to 350°F and lining your baking sheets with parchment paper.

Step 1: Cream Butter & Sugars

Using an electric hand mixer, combine the softened butter, granulated sugar, and brown sugar until the mixture is light and fluffy, about 2 minutes. The batter should be pale, indicating proper creaming.

💡 emy’s Pro Tip: Start at low speed, then ramp up to medium to avoid sugar being thrown everywhere.

Step 2: Add Peanut Butter & Egg

Stir in the peanut butter and whole egg until the mixture is smooth and all incorporated. The dough should hold together without clumping.

⚠️ Common Mistake to Avoid: Adding the egg before the butter can cause the mixture to curdle, resulting in a tough cookie.

Step 3: Fold in Dry Ingredients

In a separate bowl, whisk together baking powder, baking soda, salt, and sifted flour. Gradually fold this into the wet mixture, mixing just until combined. Keep the dough pliable.

💡 emy’s Pro Tip: Sifting the flour once and only once prevents clumps and gives a fine crumb.

Step 4: Form Dough Balls

Drop tablespoon‑sized dough spheres onto the prepared sheets, spacing them 3 inches apart. Use a fork to criss‑cross each ball, creating the classic crinkle effect.

⚠️ Common Mistake to Avoid: Over‑flattening the dough loses the desired chewy center.

Step 5: Bake

Place in the oven for 8–9 minutes until the cookies just start to turn golden at the base. Remove and let cool on the sheet for 5 minutes before transferring to a wire rack.

💡 emy’s Pro Tip: Check the first batch 1 minute ahead to gauge your oven’s exact temperature.

Step Action Duration Key Visual Cue
1 Cream butter & sugars 2 min Light, pale batter
2 Add peanut butter & egg 2 min Smooth, cohesive dough
3 Fold dry ingredients 3 min Even crumb, pliable dough
4 Form balls & crinkle 5 min Uniform size, criss‑cross pattern
5 Bake 8–9 min Golden base, slightly set tops

Serving & Presentation

On a polished marble platter, let the freshly cooled cookies rest. Their glossy sheen and golden edges gleam against a backdrop of crushed pistachios for a hint of Moroccan charm. A spoonful of lime‑infused honey drizzles over the top, adding a floral note that pairs wonderfully with the nutty core.

When serving at a brunch, pair the cookies with a light lemon‑thyme tea from a local NYC café, or sprinkle a tiny amount of sea salt from the Mediterranean onto a few for a contrast of sweet and briny. For a dessert spread, arrange them beside slices of ricotta cheesecake, creating a balanced sweet‑savory duo that echoes the classic fare I learned in my mother’s kitchen.

Pairing Type Suggestions Why It Works
Side Dish Fresh fruit salad Balances sweetness and adds crunch.
Sauce / Dip Warm honey drizzle Glossy sheen and caramel undertone.
Beverage Vanilla‑infused iced coffee Smoothness contrasts the cookie’s texture.
Garnish Toasted almond slivers Adds crunch and nutty aroma.

Make‑Ahead, Storage & Reheating

With a NYC schedule that can’t pause, I often prep these cookies ahead and store them so a fresh batch is always ready to revive a sleepy afternoon or a bustling office break.

Method Container Duration Reheating Tip
Refrigerator Airtight container 4 days Reheat 3‑4 min in 350°F oven.
Freezer Parchment bags 3 months Reheat 5‑6 min at 350°F.
Make‑Ahead Chilled dough balls 2 days Bake directly from fridge, 8‑9 min.

When I need a quick sweet fix, I freeze a batch and, in the morning, pull a few out to warm up. The cookies re‑gain their soft center and the crinkle pattern stays crisp, making them perfect for a mid‑day espresso or a quick snack during a busy meeting.

Variations & Easy Swaps

Variation Key Change Best For Difficulty Impact
Chocolate Dusting Finish with cocoa powder Chocolate lovers Easy
Spinach & Feta Add spinach puree & feta Veggie lovers Medium
Sriracha Swirl Swirl in Sriracha sauce Spicy fans Medium

Chocolate Dusting

For a touch of French decadence, simply dust your cookies with a fine layer of cocoa powder right before baking. The bitterness of the chocolate balances the natural sweetness, turning the plain peanut butter into a dessert that feels both indulgent and nostalgic—just like a café au lait with chocolate chips.

Gluten‑Free Peanut Butter

Gluten‑free lovers, swap all‑purpose flour for an equal amount of almond flour to keep the cookie’s moisture while eliminating gluten. The resulting texture is slightly denser but still melts in your mouth, echoing the buttery pockets of a Moroccan briouat.

Lemon‑Hazelnut

Pair your cookies with a fresh squeeze of lemon zest and a sprinkle of toasted hazelnuts for a bright, nutty citrus twist that reflects the seasonality of the Village farmer’s market. It’s a playful nod to New York’s diurnal rhythm.

Can I use natural peanut butter for a healthier version?

Yes, natural peanut butter—free from added sugars and oils—makes a healthier alternative by cutting out unnecessary calories and giving the cookies a richer, more pronounced nutty flavor. However, because natural peanut butter flavors differ slightly, the cookies might taste a little less sweet but will still maintain that soft, chewy texture. The key is to keep the ratio the same; simply replace the ⅔ cup of regular peanut butter with ⅔ cup of natural. Stir thoroughly before combining to avoid gritty consistency.

Do these cookies contain gluten?

In their original form, these cookies do contain gluten because of the all-purpose flour. However, the recipe is fully adaptable: you can swap the flour for a gluten-free blend such as the 1 ⅓ cups of 1:1 gluten-free oat flour or almond flour (though the texture will be slightly denser). When substituting, mix the alternative flour with 1 tablespoon of xanthan gum if your blend doesn’t already contain it. This ensures a chewy crumb without a gritty aftertaste.

How long do these cookies stay fresh?

When stored properly in an airtight container at room temperature, these cookies stay fresh for up to 5–7 days. For longer freshness, refrigerate them; they’ll keep for up to 10 days, and you can thaw a few at once without affecting texture. The key is to keep them completely cool before sealing, as heat can cause them to soften and lose their perfect crinkle. If you’d like an extra kick of aroma, place a garlic or pinch‑scented tea bag inside the container for a few hours.

Do I need to chill the dough before baking?

No chilling is necessary with this recipe; the dough remains pliable at room temperature and bakes evenly. However, if you prefer a slightly firmer cookie that stays soft longer, chill the dough for 30 minutes before rolling out balls. Chilling reduces the spread during baking, giving a denser crumb that can be more resilient in hot climates or during travel.

What’s the best way to store these cookies for maximum freshness?

Place them in a tight‑sealing box or a zip‑lock bag and keep them at room temperature in a cool, dry area. Alternatively, store in the refrigerator for up to ten days; the cold keeps the butter from softening. If you want to enjoy a refreshed batch after a day, let them sit out for 15 minutes before eating—this rehydrates the crumbs and restores the original mouthfeel. Mexican tortilla chips, baby carrots, or a glass of chamomile tea will pair wonderfully.

Can I add chocolate chips to the dough?

Chocolate chips do work well; add ½ cup to the dough after the dry mixture is folded in. The chips slightly soften in the oven, creating pockets of chocolatey chew. They introduce a contrasting texture and add small bursts of sweetness that complement the nutty core. If you want extra crunchy cookies, pre‑toasted chocolate chips give a lightly browned surface when baked.

Should I sift the flour for better texture?

Sifting once before folding into the wet mixture helps eliminate lumps and aerates the flour, providing a finer crumb that’s forgiving if you over‑mix later. Avoid over‑sifting because it can cause the dough to become too dry. A single sift ensures a smooth, even batter while preserving the soft, chewy center that defines a good peanut‑butter cookie.

Is it possible to make them extra soft?

Yes. For ultra‑soft cookies, reduce the baking time to 6–7 minutes and immediately take them out of the oven to rest on the sheet for 2 minutes, then transfer to a rack. The early removal prevents excessive browning. Another trick is to replace ¼ cup of butter with ¼ cup of coconut oil; this adds a subtle tropical flavor and keeps the dough more pliable. Also try adding a tablespoon of honey for extra moisture. When experimenting, keep a small batch for taste test before scaling up.

Share Your Version!

If you give these cookies a try, I’d love to hear how they turned out—drop a star rating, comment below, and share your variations. Snap a photo of your batch, tag me on Instagram or Pinterest with @cookingwithemi, and let me see your creative twists.

What’s your secret for achieving the perfect crinkle pattern every time? Share the trick that turns a simple cookie into a masterpiece.

From my NYC kitchen to yours — I hope this recipe brings as much warmth to your table as it does to mine. — emy 🧡

📌

Love This Recipe? Save It to Pinterest!

If you enjoyed this Classic Peanut Butter Cookies recipe, don’t let it get lost in your browser tabs! 😄 Pin it now so you can find it again anytime — and explore hundreds more tried‑and‑tested recipes waiting for you on my Pinterest boards.

👉 Follow emy on Pinterest @exorecipe

📌 Pin this recipe · 🔁 Re-pin your favorites · 💬 Tag me when you make it — I love seeing your creations!

Print
clock clock iconcutlery cutlery iconflag flag iconfolder folder iconinstagram instagram iconpinterest pinterest iconfacebook facebook iconprint print iconsquares squares iconheart heart iconheart solid heart solid icon

Classic Peanut Butter Cookies


  • Author: Chef Emy

Description

The easiest recipe for homemade peanut butter cookies. Soft and irresistibly delicious cookies with peanut butter flavor.


Ingredients

Scale
  • 1/2 cup unsalted butter (room temperature)
  • 2/3 cup granulated sugar
  • 1/3 cup brown sugar
  • 2/3 cup peanut butter
  • 1 large egg
  • ¾ tsp baking powder
  • ½ tsp baking soda
  • ¼ tsp salt
  • 1 1/3 cup all-purpose flour

Instructions

  1. Preheat the oven to 350°F. Line 2 large baking sheets with parchment paper.
  2. With an electric hand mixer, cream together the butter, granulated sugar, and brown sugar. Add the peanut butter and egg and mix until combined.
  3. In a separate bowl, add baking powder, baking soda, salt, and flour (sift flour once measured). Add to the peanut butter mixture, mix until combined.
  4. Form dough into 1" balls. Place the balls about 3-inches apart on the prepared baking sheet. Flatten in a crisscross pattern using a fork.
  5. Bake 8-9 minutes until cookies just start to turn golden at the base. Remove from the oven and allow cookies to cool 5 minutes then transfer on a wire rack.

Classic Peanut Butter Cookies

Classic Peanut Butter Cookies: Soft & Chewy Center Design — A Quick NYC Twist

⚖️
Difficulty
Easy
⏲️
Prep Time
10 mins
🕒
Cook Time
10 mins
⏱️
Total Time
20 mins
🍽️
Servings
24

Growing up in the bustling souks of Marrakech, I learned that the sweetest moments are shared over a crusty loaf of bread or a plate of pastilla. Then, a few years later, I was swept into the rhythm of Parisian pâtisserie, mastering the science of light, airy pastries. Now, in the heart of New York City, I blend those old‑world secrets with the city’s fast‑paced energy. The result? An unforgettable batch of Classic Peanut Butter Cookies that keeps the soft, chewy center of a Moroccan almond tart alive while adding a quick, unmistakable NYC twist.

Each bite begins with a gentle pop of butter, followed by the nutty fragrance of roasted peanuts, and ends with a faint whisper of caramelized sugar. The dough’s elasticity gives way to a tender interior that’s crackly on the edges, while the crisscross fork pattern creates a lightly scored surface reminiscent of a vintage cookie cutter. As the cookies bake their aroma fills the kitchen, mingling with the faint scent from my friend’s rooftop cafe in Brooklyn steaming fresh espresso.

I’m no stranger to reinventing classics. My time at Le Cordon Bleu taught me that precision is key, but a little improvisation can make a recipe sing. In this version I’ve leavened the dough with a delicate balance of baking powder and soda to keep the cookies pillowy, while the fork‑crisscross pattern ensures an even bake and a crunch you can’t refute. Plus, I’ve distilled my favorite trick: using room‑temperature butter to keep the cookie dough smooth, and I’ll reveal that pro tip in the instructions. Watch out for one common mistake—over‑mixing the dry ingredients—that can ruin the cookie’s signature chew.

Why This Classic Peanut Butter Cookies Recipe Is the Best

My background in French patisserie taught me to craft layers of flavor that develop over time. In these cookies, the peanut butter’s natural sweetness is balanced by a hint of sea salt and the subtle vanilla note from no added baking soda. The result is a cookie that feels richly complex, yet universally appealing.

The secret to that chewy center is precise mixing. I let the wet and dry ingredients come together just enough—no more than when the flour sifts into the mix. This technique, honed in a Le Cordon Bleu kitchen, keeps the dough cohesive but not stiff, so the cookies rise and then flex into that coveted soft texture.

Even if you’re a first‑time cook, every step is intentionally clear. You’ll never need a kitchen scale, and the method includes a simple gutter‑release tip to prevent sticking. The total prep time is only ten minutes, so you’ll have fresh, warm cookies on the table before the next Manhattan subway arrives.

Classic Peanut Butter Cookies Ingredients

I usually grab the butter and peanut butter from Brooklyn’s organic market, the flour and sugars from a local co‑op, and finish with a pinch of sea salt from my mother’s spice shelf in Casablanca.

Ingredients List

  • 1/2 cup unsalted butter, room temperature
  • 2/3 cup granulated sugar
  • 1/3 cup packed brown sugar
  • 2/3 cup creamy natural peanut butter (no added sugar)
  • 1 large egg
  • ¾ tsp baking powder
  • ½ tsp baking soda
  • ¼ tsp sea salt
  • 1 1/3 cup all‑purpose flour

Ingredient Spotlight

Peanut Butter: The heart of this cookie, it offers sweetness, protein, and a silky texture. Choose a natural variety with no added sugar; it’ll give the cookies richer flavor and lower sweetness. If you prefer a smoother bite, mix in a tablespoon of honey or maple syrup as a quick substitution.

Unsalted Butter: Butter’s tenderness defines the cookie’s crumb. Buying a block at full time ensures even melting; if you need a quicker work‑up, chill the butter in the fridge—just let it soften slightly to room temperature.

All‑Purpose Flour: A standard 30‑percent protein flour like King Arthur gives the right lift. Swapping half the flour for whole wheat adds nuttiness and a denser crumb but still maintains chew.

Original Ingredient Best Substitution Flavor / Texture Impact
Peanut Butter Creamy natural peanut butter (no added sugar) Slightly richer, lower sweetness.
All‑Purpose Flour Whole Wheat Flour (half mix) Adds nuttiness, denser crumb, but maintains chew.
Unsalted Butter Iced Butter, slightly chilled Softer texture, milder flavor.

How to Make Classic Peanut Butter Cookies — Step-by-Step

Here’s how to transform simple pantry staples into blissful, bite‑sized memories, step by step.

Step 1: Preheat & Prep

Preheat the oven to 350°F (175°C) and line two large baking sheets with parchment paper.

Step 2: Cream Butter & Sugars

With an electric hand mixer, cream together the butter, granulated sugar, and brown sugar until light and fluffy. Stir in the peanut butter and egg until smooth.

💡 emy’s Pro Tip: Let the butter sit at room temperature for at least 30 minutes so it creams effortlessly.

Step 3: Combine Dry Ingredients

In a separate bowl, sift the baking powder, baking soda, salt, and flour together. Gradually fold into the wet mixture until just combined.

⚠️ Common Mistake to Avoid: Over‑mixing the dough can overactivate leaveners and render the cookies tough.

Step 4: Shape & Crisscross

Drop 1-inch dough balls onto the prepared sheets, spacing them 3 inches apart. Use a fork to create a tight crisscross pattern on top.

💡 emy’s Pro Tip: Trim the first layer of dough to remove a small piece, preventing them from spreading too thin.

Step 5: Bake & Cool

Bake for 8–9 minutes, watching for the edges to just light golden. Remove from oven, let cool on sheet for 5 minutes, then transfer to a wire rack.

⚠️ Common Mistake to Avoid: Leaving them in the oven too long will burn the edges and make the center dry.

Step Action Duration Key Visual Cue
1 Preheat & line sheets 5 min Parchment ready, room temp.
2 Cream butter & sugars 3 min Light, fluffy
3 Add dry mix 2 min Even flakes
4 Shape & crisscross 1 min per batch Uniform balls, crisp pattern
5 Bake & cool 8‑9 min Edges golden, base soft

Serving & Presentation

Arrange the cookies on a rustic wooden board, drizzle a light drizzle of honey over the top, and serve them warm so the peanut butter molds into a silky glaze. A sprinkle of sea salt tacks a crunchy finish reminiscent of a bite from my mother’s spiced pastry bowl.

For a chic brunch, place a mound of fresh berries beside the cookies. The sweet‑tart flavor of blackberries or strawberries cuts through the richness, creating a balanced medley of textures—from buttery chew to vibrant fruit.

In the evenings, pair these cookies with a frothy cappuccino from a local New York cafe or a glass of chilled porto for a Moroccan‑inspired dessert experience. The caramel notes in the wine echo the caramelized sugar in the cookies, while a splash of espresso sharpens the nutty undertone.

Pairing Type Suggestions Why It Works
Side Dish Fresh berries, sliced kiwi Cut sweetness and give a crisp bite.
Sauce / Dip Honey drizzle, chocolate ganache Layer complementary sweetness and richness.
Beverage Cappuccino, iced tea, porto Foamy milk balances fats, tea offers tannins, wine adds depth.
Garnish Smooth peanut butter drizzle, crushed pistachios Enhanced nutty aroma and visual crunch.

Make-Ahead, Storage & Reheating

When the city never stops, I pre‑make these cookies for school lunches or weekend parties. My go‑to method ensures they stay fresh and easy to grab.

Method Container Duration Reheating Tip
Refrigerator Airtight plastic bag 4 days 30‑second warming at 350°F.
Freezer Zip‑lock bag 2 months Bake 5 min at 350°F after thaw.
Make‑Ahead Ready‑to‑bake dough in zip‑lock bag 7 days Keep dry ingredients separate until baking.

I find that when reheated, the cookies absorb a bit of moisture from the oven, which makes them soft and chewy again. A brief 20‑second wrap in foil while they finish warming prevents the edges from browning too quickly.

For those busy brunch hosts, I keep the dough in individual sprinkle bags and simply spread them onto a sheet when ready—no more than half an hour before serving, and you’ll have warm, fresh cookies for your guests.

Variations & Easy Swaps

Variation Key Change Best For Difficulty Impact
Chocolate Swirl Peanut Butter Cookies Stir melted dark chocolate into dough Chocolate lovers Slight increase, still easy.
Gluten‑Free Peanut Butter Cookies Replace flour with gluten‑free blend Gluten‑sensitive Moderate.
Spiced Honey Peanut Butter Cookies Use honey for sweetener, add cinnamon & orange zest Holiday treats Easy.

Chocolate Swirl Peanut Butter Cookies

After the dough is ready, fold in a small splash of melted dark chocolate before forming the balls. The chocolate creates a glossy swirl on top and adds a bittersweet depth that pairs wonderfully with the peanut butter’s nutty undertone.

Gluten‑Free Peanut Butter Cookies

Swap the all‑purpose flour for a 1:1 gluten‑free blend like Bob’s Red Mill or store‑bought. The cookies become slightly denser but maintain that coveted chew, and the texture is so close to the original I’ve tested many times in my NYC kitchen.

Spiced Honey Peanut Butter Cookies

Replace the granulated and brown sugars with the same measure of honey, stir in a teaspoon of ground cinnamon and zest of one orange. The result is a warm, fragrant cookie that feels like a Moroccan winter sweet, perfectly fresh from the corner bakery.

How soft are these cookies?

These cookies are intentionally soft‑to‑mid‑chewy. The batter’s low-fat content and the balanced leavening create a light crumb that still holds together when you bite into it. The crisscross pattern lets heat flow evenly, achieving that slightly melted feel right in the center while keeping edges lightly crisp.

Can I double the recipe for a larger batch?

Yes, simply double or even triple the quantities, maintaining the same proportions. Keep the cookie sheets lined with parchment, using two sets of sheets simultaneously if you have enough oven space. A larger batch may need a minute or two longer in the oven, so keep an eye on the edges to avoid over‑browning.

What type of peanut butter works best?

I recommend a natural, creamy peanut butter with no added sugar or hydrogenated oils. The natural oils in the peanut butter keep the cookies moist, while the whole‑peanut flavor adds depth. If you prefer a smoother bite, you can blend in a tablespoon of honey or maple syrup for added sweetness.

Is it possible to make these cookies gluten-free?

Definitely! Swap the all‑purpose flour for a 1:1 gluten‑free blend, such as Bob’s Red Mill or King Arthur Gluten‑Free Blend. The dough will be slightly denser, but it still yields a tender, chewy cookie. Keep the same leavening agents to maintain rise.

How long do they keep after baking?

When stored in an airtight container at room temperature, these cookies stay fresh for up to 5 days. Refrigeration extends shelf‑life to about 4 days, but the cookies become firmer, so a quick 30‑second warm‑up in the oven counteracts that. For long‑term storage, freeze them for up to 2 months and warm as described above.

Can I swap brown sugar for white?

You can replace the brown sugar with an equal measure of granulated sugar, but the cookies will be slightly less moist and a little less caramel‑like. To keep the richness, consider adding a tablespoon of molasses or maple syrup to compensate for flavor and moisture.

What is the best way to store leftover dough?

Store ready‑to‑bake dough in a sealed zip‑lock bag at room temperature for up to 7 days. Keep the dry ingredients like flour and sugar in a separate bag and mix right before shaping. If you need to store for longer, refrigerate the dough in a sealed container for up to 4 days; roll out before baking to ensure it sits evenly on the sheet.

Can I add nuts to the dough?

Yes, finely chopped walnuts or pecans go well with peanut butter, adding a delightful crunch. Aim for 1/2 cup of nuts total; stir them in right after adding the peanut butter. Keep in mind that the nuts increase moisture a little, so you may want to reduce the flour by 2 tablespoons to maintain the right dough consistency.

Share Your Version!

Drop a star rating and a comment below—your feedback fuels my next kitchen adventure. If you tweak the dough or add a new ingredient, share a photo on Instagram or Pinterest and tag @cookingwithemi. Tell me: what’s the one ingredient you’d swap to give this cookie a personal twist?

From my NYC kitchen to yours — I hope this recipe brings as much warmth to your table as it does to mine. — emy 🧡

📌

Love This Recipe? Save It to Pinterest!

If you enjoyed this Classic Peanut Butter Cookies recipe, don’t let it get lost in your browser tabs! 😄 Pin it now so you can find it again anytime — and explore hundreds more tried-and-tested recipes waiting for you on my Pinterest boards.

👉 Follow emy on Pinterest @exorecipe

📌 Pin this recipe · 🔁 Re‑pin your favorites · 💬 Tag me when you make it — I love seeing your creations!

Print
clock clock iconcutlery cutlery iconflag flag iconfolder folder iconinstagram instagram iconpinterest pinterest iconfacebook facebook iconprint print iconsquares squares iconheart heart iconheart solid heart solid icon

Classic Peanut Butter Cookies


  • Author: Chef Emy

Description

The easiest recipe for homemade peanut butter cookies. Soft and irresistibly delicious cookies with peanut butter flavor.


Ingredients

Scale
  • 1/2 cup unsalted butter (room temperature)
  • 2/3 cup granulated sugar
  • 1/3 cup brown sugar
  • 2/3 cup peanut butter
  • 1 large egg
  • ¾ tsp baking powder
  • ½ tsp baking soda
  • ¼ tsp salt
  • 1 1/3 cup all-purpose flour

Instructions

  1. Preheat the oven to 350°F. Line 2 large baking sheets with parchment paper.
  2. With an electric hand mixer, cream together the butter, granulated sugar, and brown sugar. Add the peanut butter and egg and mix until combined.
  3. In a separate bowl, add baking powder, baking soda, salt, and flour (sift flour once measured). Add to the peanut butter mixture, mix until combined.
  4. Form dough into 1" balls. Place the balls about 3-inches apart on the prepared baking sheet. Flatten in a crisscross pattern using a fork.
  5. Bake 8-9 minutes until cookies just start to turn golden at the base. Remove from the oven and allow cookies to cool 5 minutes then transfer on a wire rack.

S’Mores Bars

S’Mores Bars Chocolate Marshmallow Bars – A Brown Sugar Crust Twist

⚖️
Difficulty
Easy
⏲️
Prep Time
10 mins
🕒
Cook Time
35 mins
⏱️
Total Time
45 mins
🍽️
Servings
12

In a quiet corner of my Manhattan kitchen, I keep the aroma of toasted marshmallows alive—a scent that transports me back to the lantern-lit evenings in Rabat, where my grandmother would fold sweet, flattened puff pastries in a pot of honey. With a quick trip to the Brooklyn farmers market and a pinch of now‑favored creativity, I’ve turned the classic campfire treat into a decadent chocolate‑marshmallow bar with a caramelized brown‑sugar crust that melts perfectly on the tongue. I’m calling it “Chocolate Marshmallow Bars – A Brown Sugar Crust Twist.” The title alone hints at the silky single‑layer of browned sugar that sets these bars apart from your typical camp‑fire made snacks.

Imagine biting into a bar that’s crisp on the edges like a freshly baked biscuit, a moist, gooey center that oozes a cloud of melted marshmallow, and a glossy ribbon of snow‑covered chocolate chips that shine with a faint caramel glow. The subtle nutty undertone from the graham crackers pairs with the hint of coconut in the marshmallow, while the brown sugar adds a deep molasses richness that awakens memories of the dry heat of summer in Berbérat. Every bite is a satisfying crunch followed by luxuriant goo, a symphony of textures that recalls the whispers of the Maghreb wind and the bustling silence of a Paris bakery after lunch.

As a culinary school graduate and a seasoned New York chef, I’ve spent years playing with flavor combinations that blend Moroccan sweetness with French pastry precision. In this version, I use a reduced amount of flour to let the brown sugar sink into every crumb, and I layer melted chocolate chips on top before baking for a caramelized finish. A pro tip: hold the spoon while you stir to keep the butter from melting; a common mistake is to over‑mix the dough, which can lead to a cake‑like texture instead of an indulgent, buttery crumb.

Why This S’Mores Bars Recipe Is the Best

The flavor secret lies in the balanced sweetness of brown sugar and unsalted butter, which together create a caramelized crust reminiscent of a Moroccan tagine signature. My French pastry education taught me to perfect the butter‑sugar creaming step, ensuring that each bite dissolves like a soft cream on a quiet evening in Paris.

Perfected texture comes from my technique of layering the dough: a firm base, a smooth marshmallow layer, and chocolate chunks that linger on the surface. The pressure during baking locks in the moisture, giving a gooey center without a hard cookie base. This layer method lets even busy New Yorkers achieve café‑quality bars in half the time.

Foolproof & Fast. Preheat, prep, pour, bake—no blend or whisking beyond the butter‑sugar creaming. This recipe is designed for the weekend parent who wants dessert without leaving the house, yet still enjoys the tactile satisfaction of creating something turned golden‑brown in the oven.

S’Mores Bars Ingredients

I like to pick up fresh graham crackers at the Union Square market, where the bakers still roll dough by hand, and choose dark chocolate chips from the boutique chocolate shop by the East River. A little memory of spices in my childhood kitchen only adds to the joy of making these bars.

Ingredients List

  • 2 cups all purpose flour
  • 2 cups graham cracker crumbs
  • 1 teaspoon baking powder
  • ¼ teaspoon salt
  • 1 cup (2 sticks) unsalted butter, at room temperature
  • 1½ cups packed light brown sugar
  • 2 large eggs, beaten
  • 2 cups marshmallow topping (such as Marshmallow Creme)
  • 2 cups milk chocolate chips

Ingredient Spotlight

Brown sugar: The deep color and molasses notes meld with the butter to form a caramelized crust; choose light or dark brown sugar for similar sweetness, but dark adds extra richness.

Graham cracker crumbs: These lend a subtle cracker snap that complements the marshmallow; substitute with homemade biscuit crumbs for a more artisanal bite.

Marshmallow topping: It serves as batter, preventing the bars from drying; use real mini marshmallows to increase chewiness.

S'mores Bars Ingredients

Original Ingredient Best Substitution Flavor / Texture Impact
Unsalted butter Salty butter Adds a subtle savory note, reducing sweetness.
Marshmallow topping Mini marshmallows Increases bite firmness, more chew.
Milk chocolate chips Dark chocolate chips Adds bittersweet depth, slightly less sweet.

How to Make S’Mores Bars — Step-by-Step

Let’s unpack the process. I’m talking about a single night in the kitchen, a moment where I can leave the heat on while I focus on the dough.

Step 1: Preheat and Line Pan

Preheat your oven to 350°F and line a 9-by-13-inch pan with foil, leaving a 2-inch overhang on two sides. Lightly spray the foil with non-stick spray so the bars release easier later.

💡 emy’s Pro Tip: Use parchment paper over the foil to avoid direct foil burning.

Step 2: Mix Dry and Wet, Combine Dough

Whisk the flour, graham crumbs, baking powder, and salt in a bowl. In a larger bowl, beat butter and brown sugar on medium speed for 2 minutes until creamy. Add the eggs and mix. Lower speed and fold in dry mix slowly, stirring until just combined. Divide dough, press half into pan, spread marshmallow topping, sprinkle chocolate, then crumble the remaining dough on top.

⚠️ Common Mistake to Avoid: Overmixing the dough after adding the flour will lock gluten and make bars tough.

Step 3: Bake

Bake until golden brown, about 30–35 minutes. Let the pan cool on a wire rack to room temperature. Peel off the foil and cut the bars into rectangles. For crisp edges, refrigerate for 15 minutes before cutting.

💡 emy’s Pro Tip: A quick 5‑minute broil at the end gives a lovely, slightly crisp top.

Step Action Duration Key Visual Cue
1 Preheat & line pan 3 min Foil sheen, no scratches
2 Mix & assemble dough 12 min Crumb not wet
3 Bake & cool 30–35 min + cool Golden edges, slightly sneezy aroma

Serving & Presentation

Give the bars a gentle dusting of powdered sugar, or drizzle a light caramized sauce that makes an instant, sophisticated dessert. Place the squares on a simple white platter and garnish with a sprinkle of sea salt or chopped almonds for a crunchy contrast. Pair the bars with a twist of orange zest for a bright, citrus counterbalance reminiscent of Moroccan orange orchards.

If you feel adventurous, serve them with a warm sauce of espresso, coffee, or a caramel chicory glaze that complements the dark chocolate and brown sugar. My sister in Paris calls it “sûreté du chocolat” when she layers them with mascarpone, turning them into a light frappe.

Pairing Type Suggestions Why It Works
Side Dish Baked sweet potato wedges Sweetness balances chocolate; texture adds crunch.
Sauce / Dip Espresso ganache Robust coffee cuts through the sugar, enhancing chocolate notes.
Beverage French café au lait, or a chilled orange liqueur Coaxes the caramel undertones while cleaning the palate.
Garnish Toasted almond slivers Adds texture and nutty aroma, reminiscent of Moroccan brochettes.

Make-Ahead, Storage & Reheating

When I’m prepping for a busy week, I bake the bars ahead and let them fully cool, then store them in a sealed plastic container in the refrigerator for up to five days. When dinner is ready for family, I slice a few and heat them at 350°F in a pan for 30 seconds—this revives their gooey center without drying out.

Method Container Duration Reheating Tip
Refrigerator Sealed container Up to 5 days Remove foil, heat on skillet.
Freezer Plastic wrap + airtight bag Up to 3 Months Thaw 2 hrs, bake 335°F 25 min.
Make‑Ahead Foil in pan Up to 1 week before Add last‑minute fillings, assemble just before serving.

Slicing them just before serving keeps the crispy edge unmistakably crisp and lets the marshmallow core stay soft and sweet, giving your guests a lovely surprise that tastes like spontaneous New York summer nights.

Variations & Easy Swaps

Variation Key Change Best For Difficulty Impact
Nutty Bliss Add toasted pecans Guests who love crunch. Easy
Gluten‑Free Use GF flour blend Those with celiac. Medium
Warm Spice Add a pinch of cinnamon or cardamom For cozy evenings. Easy

Nutty Bliss

By folding in toasted pecans between the marshmallow layer and the chocolate chips, each bite gains a buttery crunch that snaps like a Moroccan seed‑spiced biscuit. The nuts add a nutty undertone that balances the deep caramel pinch of the brown sugar crust.

Gluten‑Free

Replace all-purpose flour with a fine cornstarch‑based gluten‑free blend. Texture remains tender, and the bars keep their melt‑in‑your‑mouth softness. I’ve baked a batch for my friend with celiac; she praised the goo‑ey center as if it were a sidewalk candy shop’s secret.

Warm Spice

A pinch of ground cinnamon or a teaspoon of ground cardamom infused into the dry mix adds a subtle, aromatic warmth. The spice tinges the chocolate chips with just enough bite to echo the flavors of North African spice markets while staying light enough for grocery‑stall casual diners.

Share Your Version!

Your kitchen is a laboratory of love. When you finish making these bars, be sure to drop a star rating and comment below about how the brown sugar crust turned out for you. Snap a photo and share it on Instagram or Pinterest, tag @cookingwithemi and tell me whether you’d use the “Nutty Bliss” or “Warm Spice” twist. I love hearing how a simple bar becomes a conversation starter around your dinner table.

From my NYC kitchen to yours — I hope this recipe brings as much warmth to your table as it does to mine. — emy 🧡

📌

Love This Recipe? Save It to Pinterest!

If you enjoyed this S’Mores Bars recipe, don’t let it get lost in your browser tabs! 😄 Pin it now so you can find it again anytime — and explore hundreds more tried-and-tested recipes waiting for you on my Pinterest boards.

👉 Follow emy on Pinterest @exorecipe

📌 Pin this recipe · 🔁 Re-pin your favorites · 💬 Tag me when you make it — I love seeing your creations!

What is the difference between marshmallow topping and regular marshmallows?

Marshmallow topping is a spreadable, butter‑free product that dissolves cleanly into the dough, providing uniform goo and a consistent texture. Regular marshmallows are gummy, contain gelatin, and can dry out when baked if left in thick layers. Using the topping keeps the bars moist and allows the chocolate chips to remain distinct atop each bite.

Can I use dark chocolate chips instead of milk chocolate?

Absolutely. Dark chocolate chips add a slightly bitter edge that contrasts nicely with the caramelized brown sugar crust and gooey marshmallow. The richer, fuller flavor profile can elevate the dessert for those who prefer a less sweet bar. I often stir in a pinch of sea salt to balance the bitterness.

How long can I store S’Mores Bars?

Store them in an airtight container. Refrigerator: up to 5 days; Freezer: up to 3 months. For best taste, cool completely before refrigerating. When reheating, a brief 5‑minute oven bake at 350°F revives the goo without over‑cooking the edges.

Can I substitute the graham cracker crumbs?

Yes. Use crushed digestive biscuits, shortbread, or homemade cookie crumbs. The key is a neutral, slightly sweet base that provides both crunch and moisture control. Ensure no added flavor (like nuts or spices) unless you’re intentionally creating a new “Twist.”

What if I want gluten‑free S’Mores Bars?

Swap the all-purpose flour for a fine gluten‑free blend (e.g., a 1:1 rice/almond mixture). Keep the ratio the same; the bars will still set well and soften with the marshmallow topping. Texture remains tender, and the caramelized crust emerges just as beautifully.

How do I avoid a soggy bottom?

Avoid dropping too much liquid during mixing. Pre‑heat the oven reliably; a preheated oven ensures a rapid rise in temperature that seizes the top. Additionally, keep the pan level and do not over‑mix the dough, which can develop gluten that retains moisture at the base.

Is this recipe suitable for kids?

Definitely. They can help with the dough portion and learn the rhythm of measuring, which is a fun kitchen project. Once done, they can taste the gooey, buttery center and enjoy the swirl of chocolate—a safe, sweet treat for all ages.

Why do the bars have a brown sugar crust?

The brown sugar crystallizes slightly during baking, giving a caramelized, golden crust that adds a caramel taste and a protective layer for the crisp edges. This technique is common in French pastry and Marocqian sweets, where caramelized sugar is prized for its golden shine and depth of flavor.

Print
clock clock iconcutlery cutlery iconflag flag iconfolder folder iconinstagram instagram iconpinterest pinterest iconfacebook facebook iconprint print iconsquares squares iconheart heart iconheart solid heart solid icon

S’Mores Bars


  • Author: Chef Emy

Description

Super easy dessert recipe for these Chocolate Marshmallow Bars.


Ingredients

Scale
  • 2 cups all purpose flour
  • 2 cups graham cracker crumbs
  • 1 teaspoon baking powder
  • ¼ teaspoon salt
  • 1 cup (2 sticks) unsalted butter, (at room temperature)
  • 1½ cups packed light brown sugar
  • 2 large eggs, (beaten)
  • 2 cups marshmallow topping ((such as Marshmallow Creme))
  • 2 cups milk chocolate chips

Instructions

  1. Preheat the oven to 350. Line a 9-by-13-inch baking pan with foil, leaving a 2-inch overhang on 2 sides. Spray the foil with nonstick spray.
  2. In a bowl, whisk together flour, graham cracker crumbs, baking powder and salt. In a separate large bowl, using an electric mixer on medium speed, beat the butter and sugar until light, about 2 minutes. Beat in the eggs until well combined. Reduce the mixer speed to low and slowly beat the flour mixture into the butter mixture. Divide the dough in half. Press half of the dough into the pan until the dough is even and flat. Spread with marshmallow topping and sprinkle chocolate chips on top. Scatter the remaining dough over the top in clumps. Don't worry about covering the top with the dough. The marshmallow and chocolate chips should peek through.
  3. Bake until golden brown, 30 to 35 minutes. Place the pan on a wire rack to cool completely. Remove from the pan, peel off the foil and cut into bars. They're also a little easier to cut if they have been refrigerated for a while.