Irresistible No-Bake Dream Dessert That Tastes Just Like Pecan Pie
| Prep Time |
Cook Time |
Total Time |
Servings |
Difficulty |
| 20 minutes |
0 minutes (No-Bake) |
4 hours 20 minutes (includes chilling) |
12-16 servings |
Easy |
Introduction
Welcome to The Kitchen Team’s most beloved dessert creation! If you love the rich, nutty flavor of pecan pie but dread the thought of turning on your oven, this irresistible no-bake dream dessert that tastes just like pecan pie is your new best friend. This layered masterpiece—often called Pecan Pie Lasagna—captures everything you adore about the classic holiday pie: the buttery crust, the gooey caramel-like filling, and the crunchy pecan topping. But here’s the twist: it’s creamy, cool, and utterly dreamy, with no baking required.
This dessert has become a sensation in our kitchen and across social media. Why? Because it delivers that nostalgic pecan pie flavor in a completely new, no-fuss format. Whether you’re hosting a summer barbecue, a holiday potluck, or just need a quick dessert for a busy weeknight, this recipe will save the day. The layers create a beautiful presentation that looks like you spent hours in the kitchen—but our secret is that it comes together in just 20 minutes of active prep time.
At cookingwithemy.com, we believe that great desserts should be accessible to everyone. That’s why we’ve perfected this no-bake method that guarantees perfect results every single time. The combination of a crunchy graham cracker crust, a silky cream cheese layer, and a rich pecan topping creates a symphony of textures that will have everyone asking for seconds. And the best part? You can make it ahead of time, making it the ultimate stress-free dessert for any gathering.
Why This Recipe is the Best
There are countless no-bake desserts out there, but this irresistible no-bake dream dessert that tastes just like pecan pie stands head and shoulders above the rest. Here’s why The Kitchen Team swears by this recipe:
- Authentic Pecan Pie Flavor: We’ve carefully balanced the sweetness of brown sugar and corn syrup with the nutty richness of toasted pecans, creating a topping that tastes exactly like the filling of a classic pecan pie. The vanilla extract and pinch of salt elevate the flavors to perfection.
- Perfect Texture Contrast: This dessert is all about the layers. You get the crunch from the graham cracker crust, the velvety smoothness of the cream cheese filling, and the chewy, nutty pecan layer on top. Every bite is an adventure in texture.
- No-Bake Convenience: No need to worry about blind baking crusts, checking oven temperatures, or dealing with a runny pie filling. This dessert sets beautifully in the refrigerator, giving you perfect results with zero oven time. It’s especially wonderful during hot summer months when you don’t want to heat up your kitchen.
- Make-Ahead Magic: This dessert actually tastes better after it has had time to set and meld flavors together. You can make it a day or two in advance, making it perfect for entertaining. Just add the pecan topping right before serving for maximum crunch.
- Customizable: We’ll share variations below, but this base recipe is incredibly versatile. You can swap the crust, change up the nuts, or add chocolate for a different twist.
💡 The Kitchen Team’s Pro Tip: For the most authentic pecan pie flavor, toast your pecans in a dry skillet over medium heat for 3-4 minutes until fragrant before chopping. This simple step intensifies their nutty flavor and adds incredible depth to the dessert.
Ingredients
| Ingredient |
Amount |
Notes |
| Graham cracker crumbs |
1½ cups |
About 12 full sheets, crushed finely |
| Granulated sugar |
¼ cup |
For the crust |
| Unsalted butter |
½ cup (1 stick) |
Melted, for crust |
| Cream cheese |
8 oz (1 block) |
Softened to room temperature |
| Powdered sugar |
1 cup |
Sifted for smoothness |
| Whipped topping |
1 cup |
Thawed if frozen (like Cool Whip) |
| Brown sugar |
1 cup |
Packed firmly |
| Light corn syrup |
½ cup |
For that classic pecan pie sweetness |
| Unsalted butter |
¼ cup (½ stick) |
For the pecan layer |
| Large eggs |
2 |
Room temperature |
| Chopped pecans |
1½ cups |
Toasted for best flavor |
| Vanilla extract |
½ teaspoon |
Pure vanilla preferred |
| Salt |
Pinch |
Enhances all flavors |
💡 The Kitchen Team’s Pro Tip: For a gluten-free version, use gluten-free graham crackers or crushed gluten-free cookies. The rest of the ingredients are naturally gluten-free, making this dessert accessible to more guests.
Step-by-Step Instructions
Step 1: Make the Crust
In a medium bowl, combine 1½ cups graham cracker crumbs with ¼ cup granulated sugar. Pour in ½ cup melted unsalted butter and stir until the mixture resembles wet sand and all crumbs are evenly coated. Press the mixture firmly into the bottom of a 9×13-inch baking dish. Use the bottom of a measuring cup to press it down evenly for a compact crust. Place in the refrigerator to chill for 10-15 minutes while you prepare the next layer.
Step 2: Prepare the Cream Cheese Layer
In a large mixing bowl, beat 8 oz of softened cream cheese with an electric mixer on medium speed until smooth and creamy, about 2 minutes. Gradually add 1 cup of sifted powdered sugar, beating until fully incorporated and no lumps remain. Gently fold in 1 cup of whipped topping using a rubber spatula until the mixture is light and fluffy. Spread this mixture evenly over the chilled crust, smoothing the top with an offset spatula. Return to the refrigerator.
Step 3: Make the Pecan Topping
In a medium saucepan over medium heat, combine 1 cup packed brown sugar, ½ cup light corn syrup, and ¼ cup unsalted butter. Stir constantly until the butter melts and the mixture is smooth, about 3-4 minutes. In a small bowl, lightly beat 2 large eggs. Slowly drizzle about ¼ cup of the hot sugar mixture into the eggs while whisking constantly to temper them. Then pour the egg mixture back into the saucepan, whisking continuously. Cook for 2-3 minutes, stirring constantly, until the mixture thickens slightly. Remove from heat and stir in 1½ cups toasted chopped pecans, ½ teaspoon vanilla extract, and a pinch of salt.
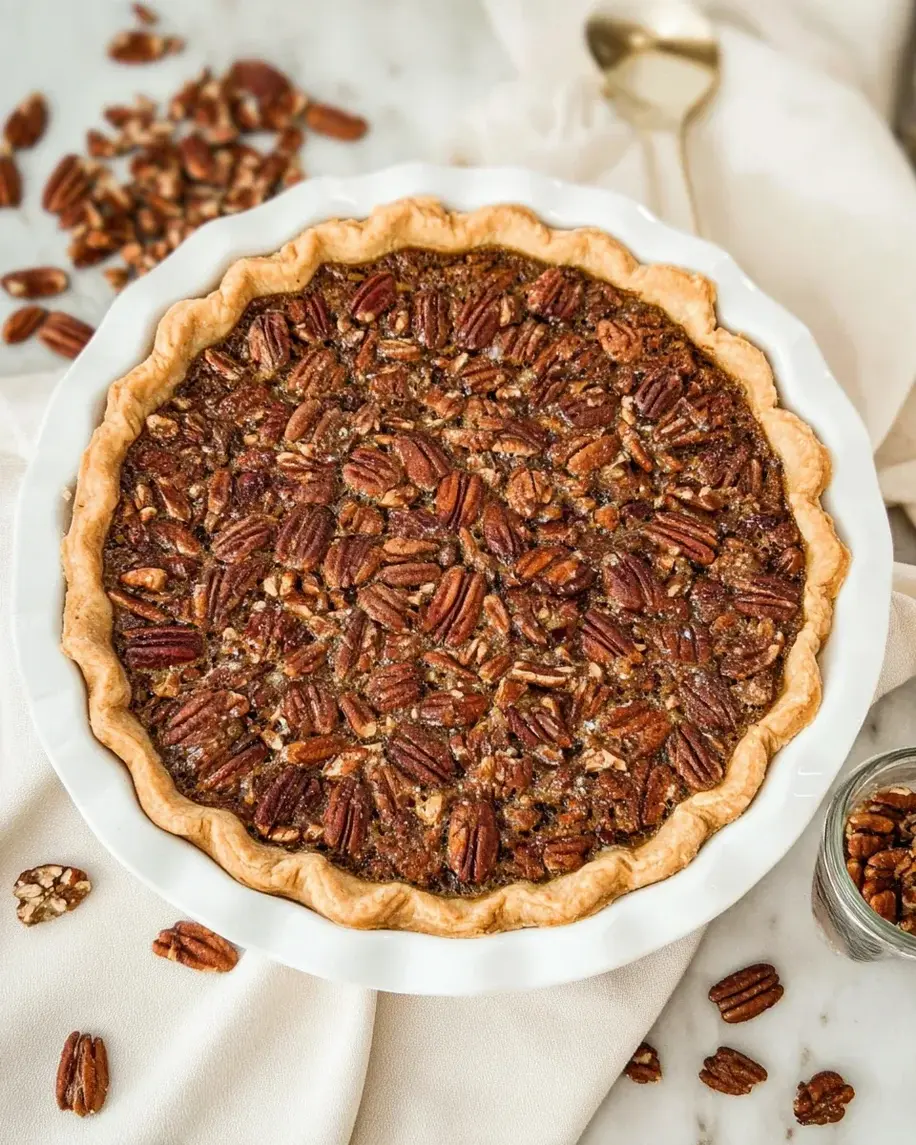
Step 4: Assemble and Chill
Remove the dish from the refrigerator. Carefully pour the pecan topping over the cream cheese layer, spreading it evenly with a spatula. Cover the dish with plastic wrap or aluminum foil and refrigerate for at least 4 hours, but preferably overnight. This allows the layers to set and the flavors to meld beautifully. The longer it chills, the cleaner your slices will be.
Step 5: Serve
When ready to serve, run a sharp knife under hot water, dry it, and slice the dessert cleanly. Wipe the knife between cuts for the neatest slices. Serve cold directly from the refrigerator. For an extra touch, add a dollop of whipped cream and a few whole pecans on top.
💡 The Kitchen Team’s Pro Tip: For the cleanest slices, chill the dessert for at least 6 hours or overnight. Use a large chef’s knife and wipe it clean between each cut. For special occasions, drizzle with caramel sauce and sprinkle with sea salt before serving.
Serving Suggestions
This irresistible no-bake dream dessert that tastes just like pecan pie is incredibly versatile when it comes to serving. Here are our favorite ways to present it:
- Classic Style: Serve chilled slices on dessert plates with a generous dollop of freshly whipped cream. The lightness of the cream balances the richness of the pecan layer perfectly.
- Holiday Platter: Cut into small squares and arrange on a platter for holiday parties. Garnish with candied pecans and a dusting of cinnamon. This makes for beautiful, bite-sized treats that disappear quickly.
- Ice Cream Pairing: Serve a slice warm (microwave for 15 seconds) alongside a scoop of vanilla bean ice cream. The contrast between the cool, creamy ice cream and the slightly warm, gooey pecan topping is absolutely divine.
- Summer Dessert: Keep it chilled and serve with fresh berries on the side. The tartness of raspberries or blackberries cuts through the sweetness and adds a pop of color.
- Brunch Addition: Cut into smaller portions and serve as part of a dessert brunch spread. It pairs wonderfully with coffee or espresso.
Storage Tips
Proper storage ensures your irresistible no-bake dream dessert that tastes just like pecan pie stays fresh and delicious for days. Follow these tips from The Kitchen Team:
| Storage Method |
Duration |
Tips |
| Refrigerator (covered) |
Up to 5 days |
Keep tightly covered with plastic wrap or in an airtight container. The crust may soften slightly after 3 days, but the flavor will still be excellent. |
| Freezer (whole dessert) |
Up to 3 months |
Wrap the entire dish in plastic wrap, then a layer of aluminum foil. Thaw overnight in the refrigerator before serving. Do not thaw at room temperature. |
| Freezer (individual slices) |
Up to 3 months |
Slice the dessert, wrap each piece individually in plastic wrap, then place in a freezer bag. Thaw individual slices in the refrigerator for about 2 hours before serving. |
💡 The Kitchen Team’s Pro Tip: This dessert actually tastes better on day two or three! The flavors continue to meld and develop in the refrigerator. If you’re making it for a special occasion, prepare it a day in advance for the best possible flavor.
Delicious Variations
One of the best things about this irresistible no-bake dream dessert that tastes just like pecan pie is how easily it adapts to different tastes and dietary needs. Here are some of our favorite variations:
- Chocolate Pecan Dream: Add ½ cup of mini chocolate chips to the cream cheese layer and drizzle melted dark chocolate over the top before serving. The chocolate and pecan combination is a classic for a reason.
- Bourbon Pecan Pie Lasagna: Add 2 tablespoons of bourbon to the pecan topping mixture along with the vanilla. The bourbon adds a warm, sophisticated depth that pairs beautifully with the pecans.
- Caramel Apple Pecan: Layer 1 cup of finely diced fresh apples (tossed with lemon juice) over the cream cheese layer before adding the pecan topping. The tart apples balance the sweetness beautifully.
- Vegan Version: Use vegan cream cheese, coconut whipped cream, and a flax egg (1 tablespoon ground flaxseed + 3 tablespoons water) in place of the eggs. Use vegan butter for the crust. The result is just as creamy and delicious.
- Nut-Free Option: Replace the pecans with toasted sunflower seeds or pumpkin seeds. The texture and flavor are different but equally delightful, and this version is safe for those with nut allergies.
- Individual Servings: Instead of a 9×13 dish, use 12-16 individual serving cups or small mason jars. Layer the components and chill. These are perfect for parties or grab-and-go desserts.
Frequently Asked Questions
1. Can I use a different crust for this no-bake dessert?
Absolutely! While graham cracker crust is classic, you can use crushed vanilla wafers, shortbread cookies, or even chocolate wafer cookies for a different flavor profile. For a gluten-free option, use gluten-free graham crackers or crushed gluten-free cookies. The ratio remains the same: 1½ cups crumbs, ¼ cup sugar, and ½ cup melted butter.
2. How do I know when the pecan topping is done cooking?
The pecan topping should be cooked until it thickens slightly and coats the back of a spoon. This usually takes about 2-3 minutes after adding the tempered eggs. It will continue to thicken as it cools and chills. If it seems too thin, cook for an additional minute while stirring constantly.
3. Can I make this dessert sugar-free?
Yes! Use sugar-free graham crackers or cookies for the crust, sugar-free powdered sugar substitute (like Swerve) for the cream cheese layer, and a sugar-free brown sugar substitute for the pecan topping. Use a sugar-free corn syrup alternative or replace it with a combination of sugar-free maple syrup and a thickener like xanthan gum. The texture may be slightly different, but it will still be delicious.
4. Why did my cream cheese layer turn out lumpy?
Lumpy cream cheese usually happens when the cream cheese is too cold. Always bring your cream cheese to room temperature before beating it. If you’re in a hurry, cut it into small cubes and let it sit for 15 minutes. Beat it on medium speed until completely smooth before adding any other ingredients. Sifting the powdered sugar also helps prevent lumps.
5. Can I use homemade whipped cream instead of whipped topping?
Absolutely! For a more natural option, whip 1 cup of heavy cream with 2 tablespoons of powdered sugar and ½ teaspoon of vanilla extract until stiff peaks form. Fold this into the cream cheese mixture instead of the store-bought whipped topping. The flavor is even better, but the dessert may be slightly less stable and should be served within 2 days.
6. How far in advance can I make this dessert?
You can make this dessert up to 2 days in advance. In fact, we recommend making it at least 24 hours ahead for the best flavor and texture. The layers need time to set and meld together. If making more than 2 days ahead, the crust may start to soften too much. Store covered in the refrigerator until ready to serve.
7. Can I double this recipe for a larger crowd?
Yes! To serve a larger crowd, double all ingredients and use a 12×17-inch sheet pan or two 9×13-inch dishes. The chilling time may need to be extended by 1-2 hours to ensure everything sets properly. For a half-sheet pan, you may need to increase the crust by 1.5 times for adequate coverage.
8. My pecan topping is too runny. What went wrong?
A runny pecan topping usually means it wasn’t cooked long enough, or the eggs weren’t properly tempered. Make sure you cook the mixture until it visibly thickens, about 2-3 minutes after adding the eggs. Also, ensure your eggs are at room temperature before tempering. If the topping is still runny after chilling, you can try mixing 1 tablespoon of cornstarch with 2 tablespoons of cold water and stirring it into the topping before pouring it over the dessert.
9. Can I add other nuts to this dessert?
Absolutely! Pecans are classic, but you can use a mix of pecans and walnuts, or try macadamia nuts, almonds, or even hazelnuts. Toast all nuts before using for the best flavor. If using salted nuts, reduce or omit the added salt in the recipe. We love a combination of pecans and toasted coconut flakes for a tropical twist.
10. How do I get clean slices without the layers smearing?
For clean, beautiful slices, follow these tips: Chill the dessert for at least 6 hours or overnight. Use a large, sharp chef’s knife. Run the knife under hot water, dry it with a towel, then make your cut. Wipe the knife clean and reheat it between each cut. This ensures each slice has clean edges and distinct layers. For the first cut, press down firmly in one smooth motion rather than sawing back and forth.
Share This Recipe
We hope you love this irresistible no-bake dream dessert that tastes just like pecan pie as much as we do! It’s become a staple in our kitchen, and we know it will be in yours too. If you make this recipe, please share your creation with us—we love seeing your beautiful desserts!
Don’t forget to save this recipe for later and share it with your friends and family. This dessert is perfect for holidays, potlucks, or anytime you need a show-stopping treat without the oven time.
For more delicious recipes, visit us at cookingwithemy.com and follow us on social media for daily inspiration.