“`html
Table of Contents
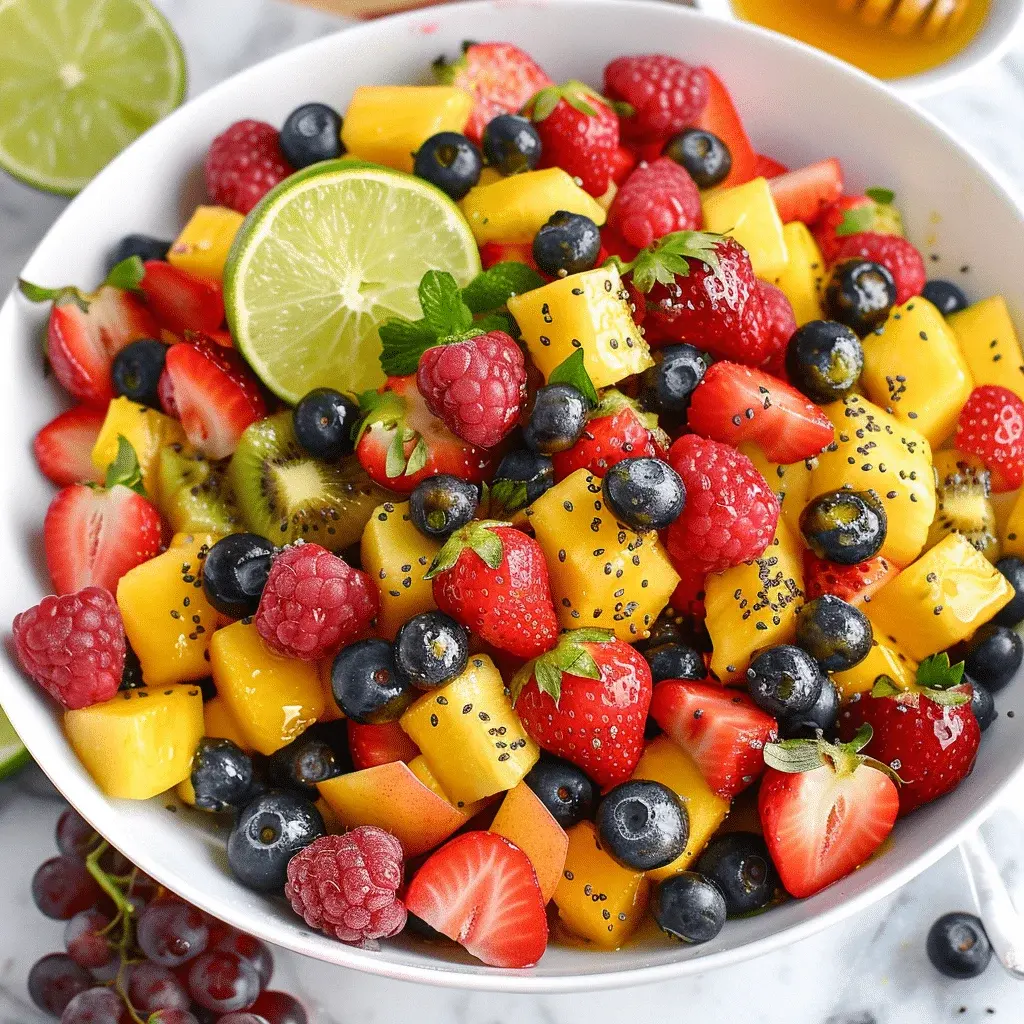
Summer Fruit Salad with Honey Lime Dressing Recipe
Introduction
Did you know that a study published in the Journal of Nutrition and Food Sciences found that individuals who consume a variety of colorful fruits daily have a 23% higher intake of essential antioxidants? This vibrant Summer Fruit Salad with Honey Lime Dressing is not just a feast for the eyes; it’s a powerhouse of nutrition designed to refresh and revitalize. As temperatures soar, our bodies crave light, hydrating, and nutrient-dense meals. This recipe answers that call perfectly, transforming simple, sun-ripened fruits into an extraordinary culinary experience. The magic lies in the homemade honey lime dressing, a zesty, sweet glaze that elevates the natural sugars and juices of the fruit without overpowering them. Whether you’re hosting a backyard barbecue, need a stunning potluck contribution, or simply want a healthy snack, this fruit salad is your ultimate summer companion. It’s more than a side dish; it’s a celebration of the season’s best produce.
Ingredients List
Gather the freshest, ripest fruits you can find for the best flavor and texture. Here’s what you’ll need:
- For the Fruit Salad:
- 4 cups cubed seedless watermelon (about ½ a medium melon) – Look for deep red, firm flesh with a satisfying crisp snap when cut. Substitution: Cantaloupe or honeydew melon for a different sweetness profile.
- 2 cups hulled and halved strawberries – They should be fragrant and uniformly red. Avoid white shoulders. Substitution: Raspberries or blackberries.
- 3 kiwis, peeled and sliced into half-moons – Choose kiwis that yield slightly to gentle pressure for that perfect balance of tart and sweet. Substitution: Green grapes or sliced mango.
- 1 cup blueberries – Seek plump berries with a dusty blue bloom, a sign of freshness. Substitution: Blackberries or pitted cherries.
- 1 cup pineapple chunks (fresh preferred) – The aroma should be sweet and tropical. Substitution: Mandarin orange segments or peach slices.
- ½ cup fresh mint leaves, roughly torn – This adds a crucial burst of cool, aromatic freshness.
- For the Honey Lime Dressing:
- ¼ cup fresh lime juice (about 2-3 limes) – Freshly squeezed is non-negotiable for that bright, tangy zing.
- 3 tablespoons honey – Use local, raw honey if possible for a more complex flavor. Substitution: Maple syrup or agave nectar for a vegan version.
- 1 teaspoon finely grated lime zest – This intensifies the lime flavor without added liquid.
- 1 pinch of sea salt – This tiny amount enhances all the other flavors dramatically.
Timing
This recipe is remarkably quick. With 20 minutes of active prep time and no cooking required, it’s over 50% faster than the average dessert or side dish recipe that requires baking or simmering. The “cook time” is effectively the chilling time, which allows the flavors to marry. You can have this stunning dish ready from chop to serve in less time than it takes to preheat an oven, making it the ultimate last-minute lifesaver for unexpected guests or spontaneous picnics.

Step-by-Step Instructions
Step 1: Prepare the Fruits
Start by washing all your fruits thoroughly under cool running water. Pat them dry with a clean kitchen towel or paper towels—excess water will dilute the dressing. Grab a large, beautiful serving bowl. Cube the watermelon into bite-sized, 1-inch pieces. Hull the strawberries and slice them in half (or quarters if they’re large). Use a spoon to scoop the kiwi flesh from the skin before slicing. If using fresh pineapple, peel, core, and chop it. Gently toss the watermelon, strawberries, kiwi, blueberries, and pineapple together in the bowl. I like to add the mint now, reserving a few pretty leaves for garnish.
Step 2: Make the Honey Lime Dressing
In a small bowl or glass measuring cup, combine the fresh lime juice and honey. Whisk vigorously until the honey is fully dissolved and the mixture is smooth. This is key—you don’t want any sticky honey globs. Using a microplane or the finest side of a box grater, zest one of the limes before juicing it. Add the vibrant green lime zest and the pinch of sea salt to the dressing. Whisk again. Taste it! The balance should be a harmonious blend of sweet and tart. Adjust with a touch more honey or lime juice to suit your preference.
Step 3: Combine and Toss
Pour about three-quarters of the dressing over the prepared fruit in the large bowl. Using a large, wide spatula or serving spoons, gently fold the fruit to coat it evenly. Be tender—you want to preserve the shape of the softer fruits like the strawberries and kiwi. The goal is a glossy, even sheen on every piece.
Step 4: Chill and Serve
Cover the bowl tightly with plastic wrap or a lid and refrigerate for at least 30 minutes. This chilling time is not optional; it’s the secret step where the magic happens. The fruits release some of their natural juices, which mingle with the dressing, creating a light, flavorful syrup at the bottom of the bowl. Just before serving, give the salad one more gentle toss, drizzle with the remaining reserved dressing for a fresh hit of flavor, and garnish with the reserved mint leaves.
Nutritional Information
(Per serving, based on 6 servings)
- Calories: ~125 kcal
- Total Carbohydrates: 32g
- Dietary Fiber: 4g
- Sugars: 24g (naturally occurring)
- Protein: 2g
- Fat: 0.5g
- Vitamin C: >100% Daily Value
- Vitamin A: 15% Daily Value
- Potassium: 10% Daily Value
Healthier Alternatives
You can easily tailor this recipe to fit various dietary needs without sacrificing an ounce of flavor:
- Lower Sugar / Keto-Friendly: Replace the honey in the dressing with a monk fruit sweetener or allulose syrup. Choose lower-sugar fruits like blackberries, raspberries, and strawberries, and increase their proportion while slightly reducing the watermelon and pineapple.
- Vegan: Swap the honey for pure maple syrup or agave nectar. The dressing will be slightly less thick but equally delicious.
- Added Protein & Healthy Fats: Transform the salad into a more substantial meal by folding in ½ cup of toasted slivered almonds or pecans and ¼ cup of crumbled goat cheese or feta after chilling. The creamy, salty cheese and crunchy nuts create an incredible contrast.
Serving Suggestions
- As a Side: It’s the perfect accompaniment to grilled chicken, fish (especially salmon), or pulled pork. The acidity cuts through rich, smoky flavors beautifully.
- As a Dessert: Serve in individual glasses topped with a dollop of vanilla Greek yogurt or a scoop of coconut sorbet.
- As a Breakfast: Spoon it over cottage cheese, oatmeal, or chia pudding for a morning vitamin boost.
- For a Crowd: Create a “Fruit Salad Bar” where guests can build their own bowls from separate containers of each fruit, with the dressing on the side.
Common Mistakes
- Using Overripe or Underripe Fruit: Overripe fruit becomes mushy and can make the salad soupy. Underripe fruit lacks sweetness and flavor. Aim for peak ripeness.
- Skipping the Chill Time: Serving immediately means the flavors won’t have melded. The 30-minute rest is crucial for depth.
- Over-mixing: Aggressive stirring will bruise soft fruits and turn your salad into a compote. Fold gently.
- Using Bottled Lime Juice: The preservatives and lack of freshness will give the dressing a harsh, artificial taste. Always use fresh limes.
Storing Tips
- Refrigeration: Store leftovers in an airtight container in the refrigerator for up to 2 days. The fruits will soften and release more juice over time, but it will still taste wonderful.
- Prepping Ahead: You can chop all the fruits (except bananas or apples, which brown) and store them separately in containers 1 day ahead. Make the dressing and keep it in a jar in the fridge. Combine and toss no more than an hour before serving for the best texture.
- Freezing is Not Recommended for the assembled salad, as the texture of the thawed fruit will be very soft. However, you can freeze the cubed watermelon or pineapple separately for smoothies.
Conclusion
This Summer Fruit Salad with Honey Lime Dressing is more than just a recipe; it’s a vibrant, edible expression of summer. It proves that healthy eating can be effortless, beautiful, and deeply satisfying. With its foolproof method, customizable ingredients, and stunning presentation, it’s destined to become a seasonal staple in your kitchen. So grab your favorite knife, select the brightest fruits at the market, and whip up a batch of this sunshine in a bowl. Don’t forget to pin this recipe or save it for your next gathering—your friends and family will be asking for the recipe!
Made this recipe? We’d love to see your creation! Tag @spicemingle on Instagram with your photos. Your version might just inspire our next community feature!
FAQs
***Can I make this fruit salad the night before?***
You can