Indulge your sweet tooth with our delicious and irresistible dessert recipes! Whether you’re craving decadent chocolate treats, fruity delights, or creamy, dreamy confections, we have something for every occasion.
From classic cakes and homemade cookies to no-bake desserts, rich cheesecakes, and festive holiday treats, our recipes are perfect for special celebrations or everyday sweet cravings.
Need something quick? Try our easy, fuss-free desserts that come together in no time. Whether you love warm baked goods, refreshing frozen sweets, or nostalgic comfort desserts, these recipes are sure to bring a little extra joy to your day! 🍰🍫🍪
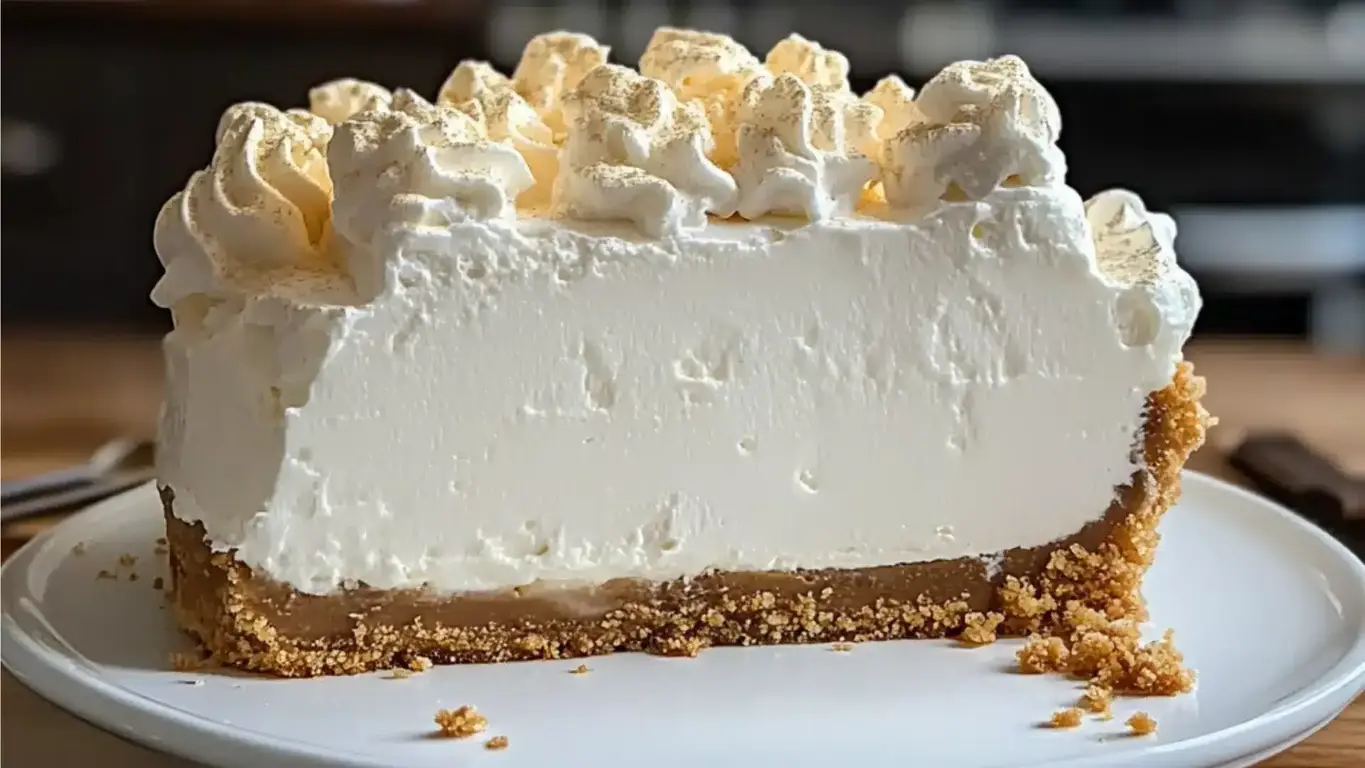
Easy Marshmallow Cheesecake – A Whipped Cream Cheese Delight
This whipped marshmallow cheesecake is a perfect dessert for no bake pies lovers and anyone who craves light, sweet indulgence. #MarshmallowWhipCheesecake #CreamCheeseDesserts #DeliciousPies #EasyCheesecakeRecipes
Crust swaps: Try chocolate wafer cookies or crushed Oreos for a different base Flavor twists: Add lemon zest to the filling for a citrusy note, or swirl in raspberry jam before chilling Make it mini: Use a muffin tin and cupcake liners to create individual cheesecakes
Nutrition
Calories:310 kcal
Protein:1g
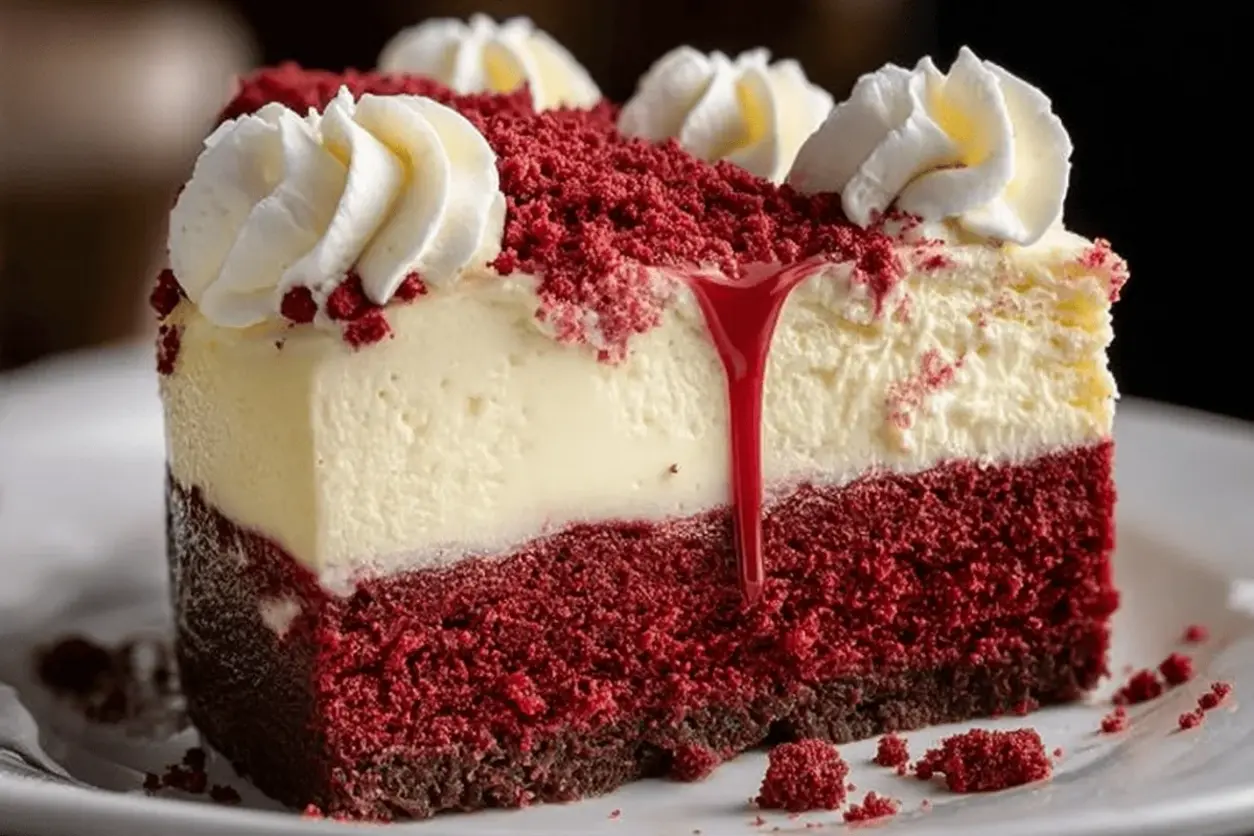
Knock You Naked Red Velvet Cheesecake 🍰❤️ | A Bold, Beautiful Layered Dessert That Turns Heads
Bold in color and unforgettable in flavor, this Knock You Naked Red Velvet Cheesecake combines the richness of red velvet cake with a silky vanilla cheesecake layer and fluffy whipped topping. With dramatic presentation and decadent texture, this showstopping dessert is perfect for holidays, birthdays, or any occasion that calls for a wow-worthy sweet. Ingredients For the Red Velvet Cake Base: • 1 box red velvet cake mix (plus eggs, oil, and water as directed) • 9″ springform pan, greased For the Cheesecake Layer: • 16 oz cream cheese, softened • ⅔ cup granulated sugar For the Whipped Topping: • 2 cups heavy whipping cream • 4 tbsp powdered sugar 📌 Save this ultra-decadent layered cheesecake for celebrations, date nights, or pure indulgence! #RedVelvetCheesecake #KnockYouNakedDessert
A luscious red velvet cake base topped with silky smooth cheesecake and finished with clouds of whipped vanilla cream this layered dessert is everything rich, romantic, and irresistible. Whether youre impressing dinner guests or treating yourself, this is the kind of cheesecake that truly lives up to its name.
Ingredients
For the Red Velvet Cake Base: 1 box red velvet cake mix (plus eggs, oil, and water as directed) 9 springform pan, greased
For the Cheesecake Layer: 16 oz cream cheese, softened cup granulated sugar 2 large eggs cup sour cream 1 tbsp all-purpose flour 1 tsp vanilla extract ¼ tsp salt
For the Whipped Topping: 2 cups heavy whipping cream 4 tbsp powdered sugar 2 tsp vanilla extract Optional: red velvet cake crumbs for garnish
Instructions
Notes
Make Ahead: This dessert is ideal for preparing the day before. It needs at least 4 hours to chill, but overnight chilling makes it even easier to slice and enhances flavor fusion.
Cake Mix Tip: Dont overmix your red velvet cake batter; blend just until combined to keep the crumb light and tender.
Clean Slicing Trick: Dip your knife in hot water and wipe it clean between cuts to achieve bakery-style slices.
Mini Cheesecake Variation: Use a muffin tin lined with cupcake papers to create individual servingsgreat for parties and portion control.
Flavor Twist: Add a teaspoon of espresso powder to the cake mix to deepen the chocolate flavor, or fold in crushed Oreos for added texture.
Cookie Butter No Bake Cheesecake | Practically Homemade
Cookie butter is elevated to the next level when added to this no bake cheesecake. With a cookie crust and crushed cookies in the filling, this cheesecake can’t be beat.
Ingredients
Scale
1– 8.8 ounce pkg. Biscoff cookies
½ cup butter , {melted}
Instructions
Combine Biscoff cookie crumbs {that you have pulsed in a food processor} and melted butter in a bowl. Mix together until everything is nicely incorporated. Pour into a ungreased spring form pan. Press crumbs firmly into the bottom and slightly up the sides of the spring form pan. Refrigerate until filling is ready.
Mix together cream cheese and sweetened condensed milk until creamy using a hand held {or stand mixer}. Add the whipped topping and fold into the cream cheese mixture until combined. Stir in the crushed Biscoff cookies so that they are evenly distributed.
Pour Biscoff cheesecake filling into the crust and spread out into an even layer. Drizzle melted cookie butter over the top of the cheesecake in a circular motion. Using a toothpick {or skewer} swirl the cookie butter into the filling. Refrigerate for 2-4 hours or until set up.
When ready to serve, top with whipped topping around the edge of the cheesecake {I like to use a piping bag} and Biscoff Cookies that have been halved. Store leftovers in refrigerator for up to 4 days.
Nutrition
Calories:844kcal
Sugar:57g
Protein:11g
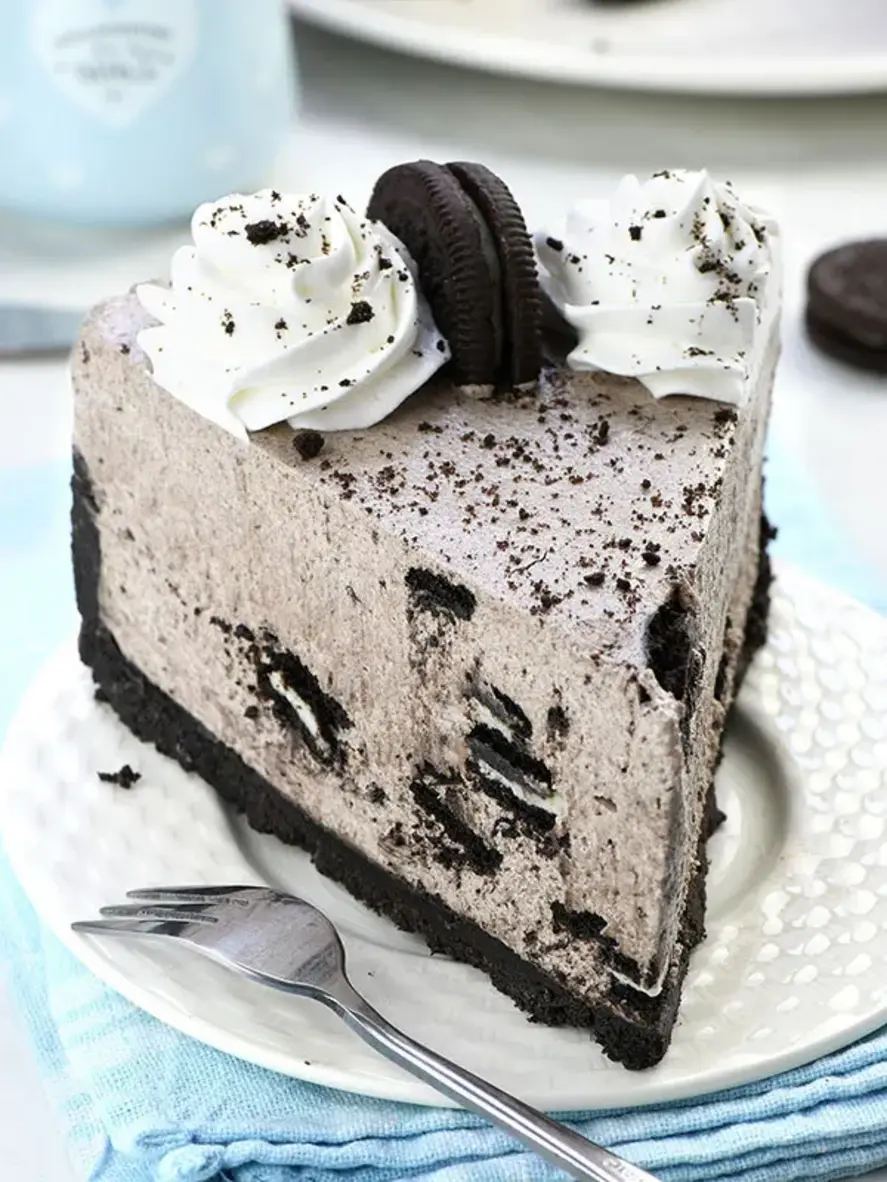
No Bake Oreo Cheesecake
No-Bake Oreo Cheesecake is the ultimate indulgent dessert! This creamy, rich cheesecake with an Oreo cookie crust is quick, easy, and perfect for any occasion. No oven needed for this crowd-pleasing treat! Save this pin for your next party or family gathering. #NoBakeCheesecake #OreoDessert #EasyCheesecakeRecipe #OreoCheesecake #NoBakeDessert
Oreo crumbs from 18 Oreos (it is about 1 1/2 cups; reserve 1 Tablespoons crumbs for decoration)
10 Oreos-chopped
3/4 cup heavy whipping cream
1/3 cup powdered sugar
1/2 tsp vanilla extract
12 Tablespoon Oreo crumbs
6 Oreos, cut in half
Instructions
Line the bottom of a 9-inch springform pan with parchment paper and grease the sides.
Ground whole Oreo cookies with the filling in a food processor to make the fine crumbs.
Add melted butter and whisk with the fork until all crumbs are evenly moistened.
Press the mixture into the bottom and about 1 inch up the sides of the springform pan. Place in the fridge or freezer to firm while you make the filling.
Mix heavy whipping cream until soft peaks form, Add powder sugar and mix until very stiff peaks form, and set aside.
In another large bowl, beat the cream cheese, sugar, and vanilla extract until well combined and smooth.
Fold the whipped cream into the cream cheese mixture in two or three additions until evenly combined.
Then, gently fold in Oreo crumbs, to combine evenly, then, fold in chopped Oreos into the filling.
Spread Oreo cheesecake filling over the firmed crust smooth the top and chill in the fridge until firm, at least 5-6 hours or preferably overnight.
Mix heavy whipping cream, powdered sugar, and vanilla extract until stiff peaks form.
Lose the ring from the springform pan, remove it carefully, and transfer the cheesecake to a serving plate.
Pipe the whipped cream around the rim of the cheesecake place Oreo halves between each swirl and sprinkle with Oreo crumbs.
Store the cheesecake in the fridge for 5-6 days, and for longer storage keep it in the freezer.
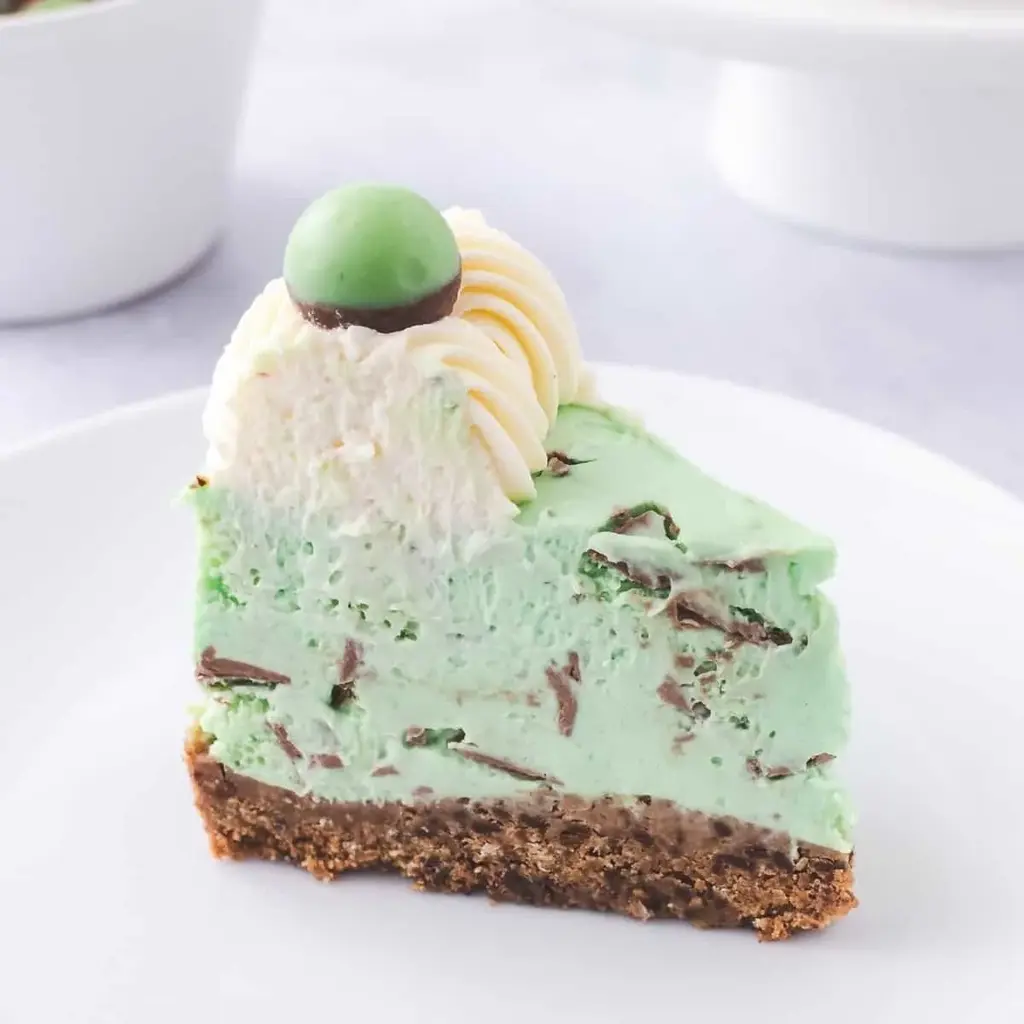
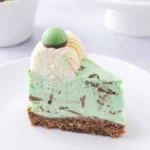
Quick and easy no-bake Mint Aero cheesecake with a velvety peppermint cheesecake filling full of Mint Aero chunks, on top of a dark chocolate Digestive biscuit crust.
Ingredients
Scale
250 g Dark Chocolate Digestive Biscuits or Oreo Cookies
60 g Butter Unsalted, Melted
500 g Cream Cheese Full Fat
75 g Icing Sugar or Powdered Sugar
300 ml Double Cream or Heavy Cream
1 tsp Peppermint Extract
200 g Mint Aero Chocolate or Mint Chocolate
Green Food Colouring Gel
Instructions
Make the biscuit base Add the biscuits into a food processor, and blitz until they form a crumb, then add to a large mixing bowl. Make a well in the centre of the biscuit crumbs, and pour in the melted butter.
Mix together until well combined, and then pour into an 8 inch springform tin. Press down onto the biscuit base and smooth out to the edges. Chill in the fridge for at least 1 hour.
Make the cheesecake filling Using a stand mixer with the paddle attachment, beat the icing sugar, cream cheese, peppermint extract and double cream together. Alternatively, you can make the cheesecake filling, in a large mixing bowl, by hand or with an electric hand whisk. Add green food colour gel to give a green colour.
Taste test the filling and if required add extra peppermint extract a drop at a time. Be careful not to add too much in one go, as the flavour can be overpowering.
Chop the Mint Aero chocolate in small chunks and addnto the cheesecake filling, and gently fold together, using a spoon or spatula, until well combined.
Assemble the cheesecake Pour the cheesecake filling over the top of the chilled biscuit base, then smooth over and level with an offset spatula. Chill the cheesecake in the fridge for at least 6 hours or overnight.
Decorate the cheesecake When ready to serve, whip up the remaining double/ heavy cream with the icing sugar and pipe on top of the cheesecake. Decorate with Mint Aero bubbles.
Notes
Read my Top Tips in the post above for some really helpful hints and tips to make this recipe successfully.
Nutrition
Calories:527kcal
Sugar:22g
Protein:6g
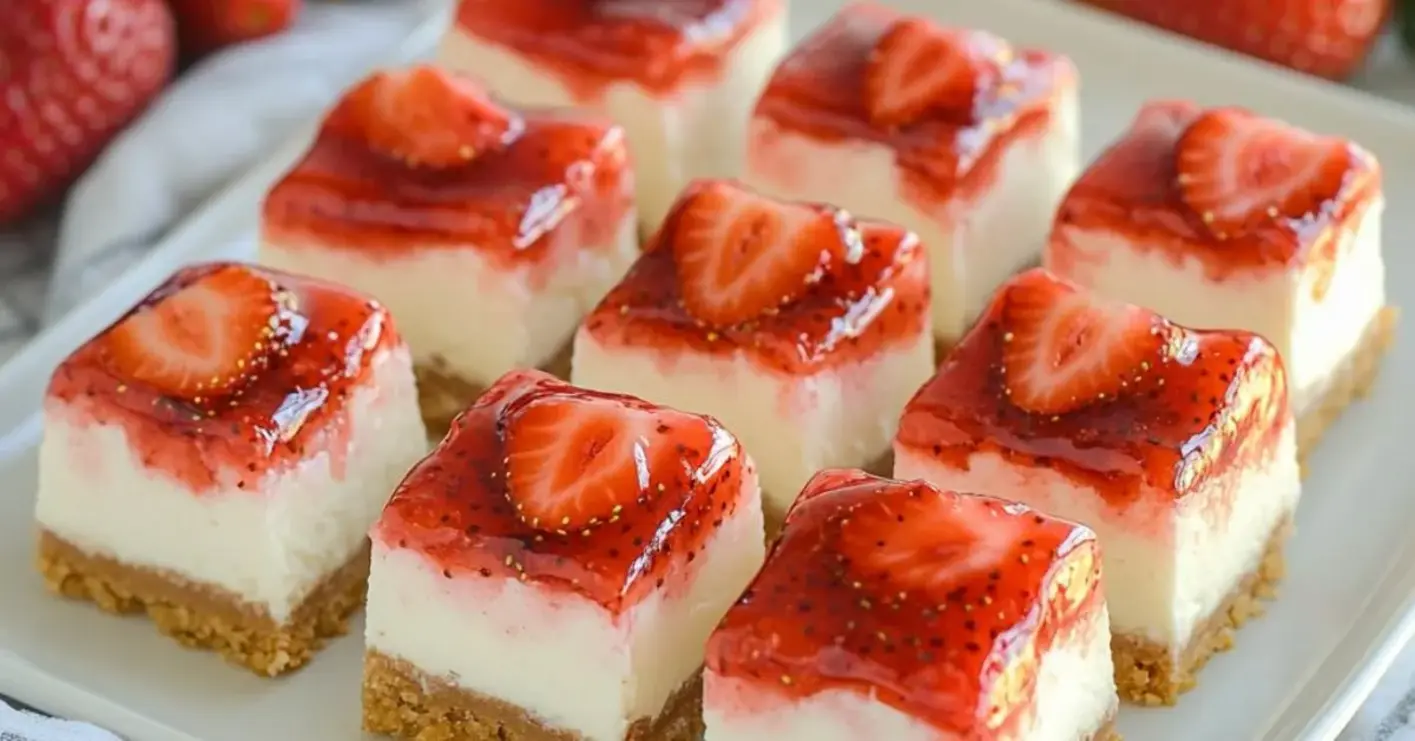
The Best No-Bake Strawberry Cheesecake Bars
These no-bake strawberry cheesecake bars are the perfect balance of creamy and fruity, with a smooth cheesecake layer and fresh strawberries on top. If you’re looking for a no-bake dessert that’s both simple and indulgent, this easy recipe will quickly become a favorite. Perfect for any occasion, these strawberry cheesecake bars offer a refreshing and delicious no-bake dessert option.
These No-Bake Strawberry Cheesecake Bars are the perfect creamy and refreshing treat! With a buttery graham cracker crust, a luscious cheesecake filling, and a sweet strawberry topping, theyre ideal for any occasion.
Instructions
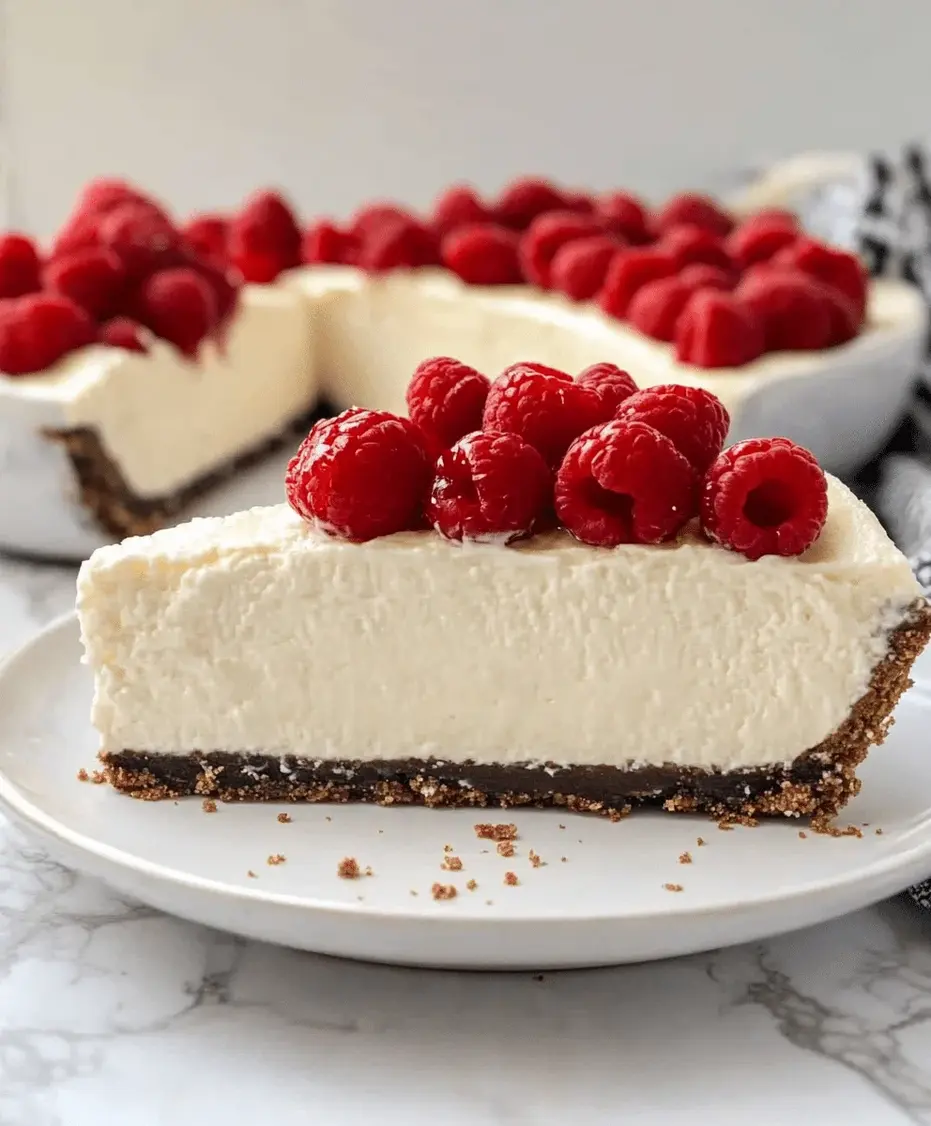
No-Bake Cheesecake Recipe – cookingwithtina.com
Looking for a delightful dessert that requires no baking? This No-Bake Cheesecake Recipe is incredibly easy to make, showcasing creamy flavors that will impress your family during any gathering or special occasion.
Refrigeration is key for setting the cheesecake; allow at least 4 hours or overnight for best results.
Add fruit toppings or chocolate for extra flavor.
Nutrition
Calories:380 kcal
Sugar:18g
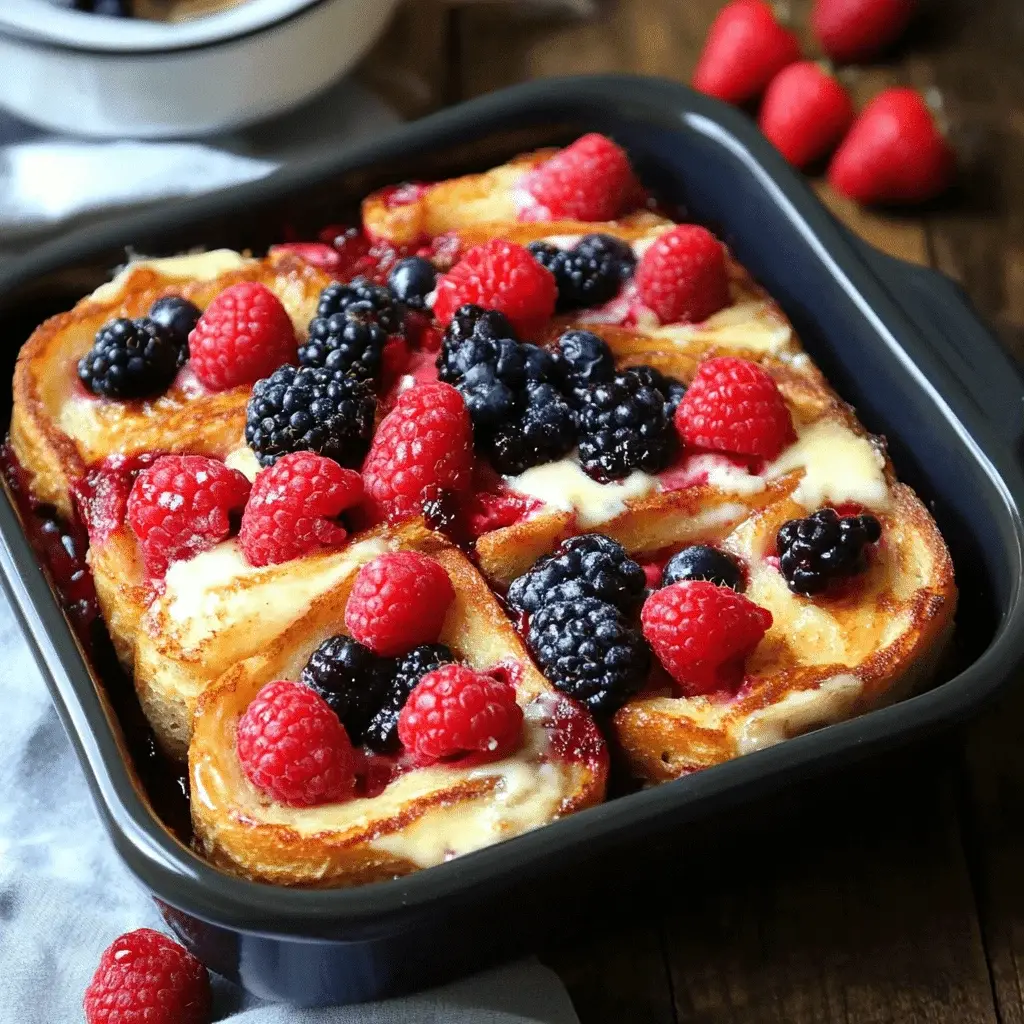
Summer Berry Stuffed French Toast Casserole Bake Recipe
Summer Berry Stuffed French Toast Casserole Bake Recipe
Introduction
Did you know that brunch searches spike by over 60% during the summer months? If you’re looking for the ultimate make-ahead dish to impress your guests without spending the morning in the kitchen, this Summer Berry Stuffed French Toast Casserole Bake is your answer. Forget the fuss of flipping individual slices; this recipe transforms the classic French toast into a decadent, shareable bake. Imagine layers of buttery brioche, pockets of sweet-tart berry compote, and a luscious, creamy filling, all soaked in a rich custard and baked until golden. It’s the perfect centerpiece for a leisurely weekend gathering, a holiday breakfast, or a special treat that feels indulgent yet is surprisingly simple to prepare. The magic happens overnight, allowing the flavors to meld into a symphony of summer sweetness.
Ingredients List
Gather these fresh, high-quality ingredients for the best flavor and texture. Sensory notes are included to help you understand the role of each component.
For the Casserole Base:
1 (14-16 oz) loaf Brioche bread – Day-old is perfect! Its rich, buttery flavor and soft, pillowy texture are ideal for soaking up the custard without falling apart. Substitution: Challah, French bread, or croissants for a different richness.
8 oz full-fat cream cheese, softened – Provides a tangy, luxurious creaminess. Substitution: Mascarpone for an ultra-decadent, less tangy filling, or Neufchâtel for a slightly lighter option.
1/4 cup powdered sugar – Sweetens the cream cheese filling without graininess.
1 teaspoon pure vanilla extract – Adds a warm, aromatic depth. Use the real stuff!
Zest of 1 lemon – Brightens the entire dish and cuts through the richness.
For the Berry Layer:
2 cups mixed fresh summer berries (strawberries, blueberries, raspberries, blackberries) – The star of the show! Their juicy burst and vibrant color are essential. Substitution: Frozen berries (do not thaw) work perfectly in a pinch and often release more juice.
2 tablespoons granulated sugar – Macerates the berries slightly, drawing out their natural juices.
1 tablespoon cornstarch – Thickens the berry juices during baking, preventing a soggy bottom.
For the Custard:
6 large eggs – The backbone of the custard, providing structure and richness.
2 cups whole milk – Creates a creamy, tender soak. Substitution: Half-and-half or a 50/50 mix of milk and heavy cream for an even richer result.
1/3 cup pure maple syrup or honey – Sweetens the custard with nuanced flavor. Maple adds a wonderful warmth.
1 teaspoon ground cinnamon – A classic, comforting spice.
1/4 teaspoon ground nutmeg – Adds a subtle, warm complexity.
Pinch of salt – Balances all the sweetness and enhances flavor.
For Serving (Optional):
Powdered sugar for dusting
Fresh berries
Maple syrup
Whipped cream
Timing
Prep Time 25 minutes
Cook Time 50-60 minutes
Resting Time 8 hours (overnight)
Total Time 9 hours 15 minutes (mostly hands-off)
While the total time may seem long, 8+ hours of that is completely hands-off refrigeration. Compared to traditional stovetop French toast, which requires constant attention for 30+ minutes to cook batches, this casserole method is far more efficient for feeding a crowd. The active prep time of 25 minutes is a fantastic trade-off for a stress-free morning.
Visual cue: The golden, puffed top of the casserole with berries peeking through promises a delightful texture contrast.
Step-by-Step Instructions
Step 1: Prepare the Bread and Cream Cheese Filling
Start by cutting your brioche loaf into 1-inch cubes. Don’t worry about perfection—rustic chunks are perfect. Spread them out on a baking sheet and let them sit out for 15-20 minutes to stale slightly; this helps them absorb the custard without turning to mush. Meanwhile, in a medium bowl, beat the softened cream cheese with an electric mixer or by hand until smooth and creamy. Beat in the powdered sugar, vanilla extract, and lemon zest until fully combined and fluffy. This filling should be spreadable but not runny.
Step 2: Assemble the Casserole
Grease a 9×13 inch baking dish thoroughly with butter or non-stick spray. Spread half of the brioche cubes evenly in the bottom of the dish. Now, take small dollops (about 1/2 teaspoon each) of the cream cheese mixture and dot them all over the bread layer. You don’t need to spread it—these little pockets of cream cheese will create wonderful surprises. In a separate bowl, gently toss the fresh berries with the sugar and cornstarch until evenly coated. Scatter about two-thirds of this berry mixture over the bread and cream cheese layer. Top with the remaining bread cubes, then finish with the last third of the berries.
Step 3: Create and Pour the Egg Custard
In a large bowl or large measuring jug, whisk the eggs vigorously until uniform and slightly frothy. Add the milk, maple syrup, cinnamon, nutmeg, and salt. Whisk until everything is completely blended and the mixture is smooth. Slowly and evenly pour this custard over the entire assembled casserole. Use a spatula or your hands to gently press down on the top layer of bread, ensuring every cube gets moistened and starts to soak up the liquid.
Step 4: The Overnight Rest
This is the non-negotiable secret to success! Tightly cover the baking dish with plastic wrap, pressing it directly onto the surface of the bread to prevent drying. Refrigerate for at least 4 hours, but ideally 8-12 hours (overnight). This resting period allows the bread to fully absorb the custard, resulting in a uniformly tender, pudding-like interior without any dry spots.
Step 5: Bake to Perfection
Preheat your oven to 350°F (175°C). Take the casserole from the fridge, remove the plastic wrap, and let it sit on the counter while the oven heats (about 20-30 minutes). This takes the chill off for more even baking. Bake in the preheated oven for 50-60 minutes. You’re looking for a beautifully puffed, deep golden-brown top, and a center that is set (a knife inserted should come out clean, not wet with custard). If the top is browning too quickly, tent it loosely with aluminum foil for the last 15 minutes of baking.
Let the casserole rest for 10-15 minutes after pulling it from the oven. It will deflate slightly, making it easier to slice and allowing the juices to settle.
Nutritional Information
Estimated per serving (based on 8 servings):
Calories: ~420 kcal
Total Fat: 22g
Saturated Fat: 12g
Cholesterol: 215mg
Sodium: 320mg
Total Carbohydrates: 45g
Dietary Fiber: 2g
Sugars: 25g
Protein: 11g
Healthier Alternatives
You can lighten this dish without sacrificing its soul-satisfying flavor:
Bread: Use whole-wheat brioche or a hearty whole-grain bread for added fiber.
Cream Cheese: Swap full-fat for reduced-fat or a whipped cream cheese variant. The texture will be slightly less rich but still creamy.
Custard: Use 1% or 2% milk instead of whole milk. You can also replace 2 of the whole eggs with 4 egg whites for lower cholesterol and fat.
Sweetener: Reduce the sugar in the berry layer by half or omit it if using very ripe berries. In the custard, use a sugar-free maple syrup alternative or a natural sweetener like monk fruit blend.
Boost Nutrition: Add 1/4 cup of ground flaxseed or chia seeds to the custard mixture for omega-3s and fiber—they’ll blend right in.
Serving Suggestions
Classic Brunch Spread: Serve alongside crispy bacon or savory breakfast sausage, a fresh fruit salad, and a pot of strong coffee.
Elevated Dessert: Serve warm squares à la mode with a scoop of vanilla bean ice cream or a dollop of freshly whipped cream.
Sauce it Up: Offer warm maple syrup, a berry compote, or a simple dusting of powdered sugar for guests to customize.
Beverage Pairings: A mimosa bar, cold-brew coffee, or a sparkling berry lemonade complement the sweet flavors perfectly.
Common Mistakes
Using Fresh, Soft Bread: This leads to a mushy, soggy texture. Always use day-old or slightly stale bread.
Skipping the Overnight Soak: Baking immediately results in dry bread on top and soggy, uncooked custard underneath. Patience is key.
Overmixing the Custard: Whisk gently to combine; you don’t want to incorporate too much air, which can create bubbles.
Underseasoning: Don’t forget the salt and spices! They are crucial for balancing the sweetness and adding depth.
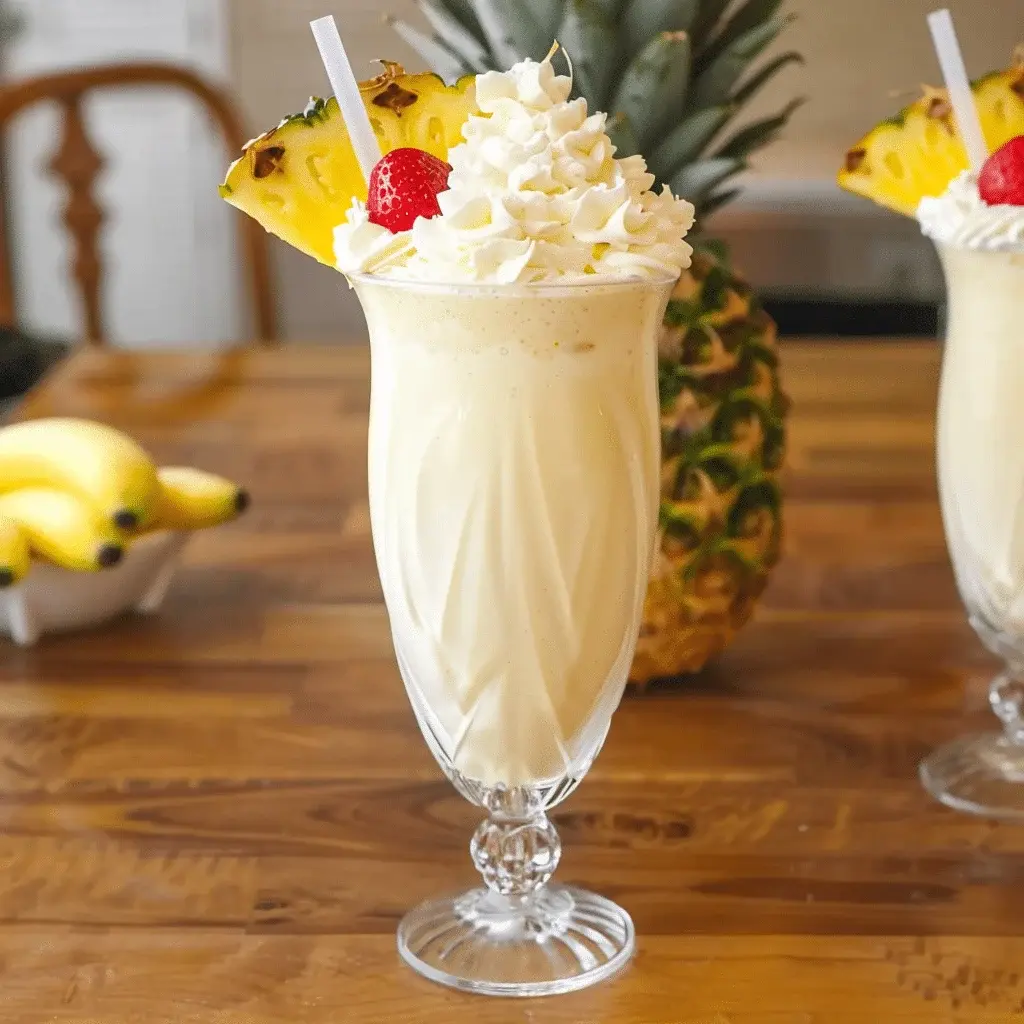
Did you know that searches for “tropical drink recipes” spike by over 200% during the summer months? It’s clear we’re all craving a taste of paradise, and what better way to satisfy that craving than with a Pina Colada Milkshake? This isn’t just any milkshake; it’s a creamy, dreamy portal to a sun-drenched beach, blending the nostalgic flavors of a classic cocktail with the indulgent comfort of a frosty dessert. Whether you’re hosting a summer BBQ, need a refreshing poolside treat, or simply want to brighten a regular Tuesday, this recipe is your ticket. Forget the complicated bar tools and expensive ingredients—our version uses simple components to create a symphony of vanilla, pineapple, and coconut that’s utterly irresistible. Let’s dive into how you can whip up this crowd-pleaser in minutes and bring a tropical vacation to your kitchen.
Ingredients List
Gather these simple ingredients for the perfect tropical blend. For the best flavor and texture, I recommend using full-fat versions, but substitutions are provided.
Vanilla Ice Cream (3 cups): The creamy foundation. Use a high-quality, dense vanilla bean ice cream for the richest flavor and thickest shake. Substitution: For a dairy-free version, use an equal amount of coconut milk or almond milk-based vanilla ice cream.
Crushed Pineapple (1 cup, with juice): This provides the essential tangy, sweet “pina” flavor and natural fiber. The juice adds necessary liquid. Substitution: Fresh pineapple chunks (about 1 ¼ cups) blended until smooth with a tablespoon of water or pineapple juice.
Coconut Milk (¾ cup): Use canned, full-fat coconut milk for that luxurious, creamy “colada” taste and mouthfeel. Shake the can well before using. Substitution: Light coconut milk or cream of coconut (adjust sweetness accordingly).
Optional: White Rum (2-3 oz): For an authentic adult twist. Adds a warm, botanical note that complements the tropical fruits. Substitution: ½ teaspoon of rum extract mixed into the blend, or simply omit for a kid-friendly version.
For Garnish:
Whipped Cream
Maraschino Cherries
Toasted Coconut Flakes
Pineapple Wedge or Spear
Timing
Prep Time 8 minutes
0 minutes
Total Time 8 minutes
This recipe is remarkably fast. Compared to the average milkshake or smoothie recipe that might take 5 minutes, we allocate a few extra minutes for proper garnishing and texture adjustment, ensuring a professional, restaurant-quality result every time. The no-cook aspect makes it an instant gratification treat.
Step-by-Step Instructions
Step 1: Prepare Your Ingredients
This is the secret to a seamless blending experience. Take your vanilla ice cream out of the freezer and let it sit on the counter for 5-7 minutes. You want it slightly softened so it blends easily without straining your blender motor, but not melted. Open your can of coconut milk and give it a vigorous shake to reincorporate any separated cream and liquid. Have your crushed pineapple and measuring cups ready. If you’re using rum, measure it out now. This “mise en place” ensures you won’t be scrambling mid-blend.
Step 2: Blend the Base
In a high-powered blender, combine the softened vanilla ice cream, crushed pineapple (with all its juicy goodness), and the coconut milk. If you’re making the adult version, add the rum now. Secure the lid tightly. Start blending on low speed for 10 seconds to combine the ingredients, then gradually increase to high speed. Blend for 45-60 seconds, or until the mixture is completely smooth, creamy, and has a uniform pale yellow color. You should hear the motor sound change to a consistent, smooth hum when it’s ready.
Step 3: Adjust and Perfect
Stop the blender and use a spatula to scrape down the sides. This is your chance to perfect the texture. Is it too thick, like soft-serve? Add a tablespoon of coconut milk or pineapple juice and blend for another 10 seconds. Is it too thin? Add another small scoop of ice cream and blend again. Taste it! This is the best part. Does it need more pineapple tang or coconut richness? Adjust now. The perfect Pina Colada Milkshake should be luxuriously thick but still pourable.
Step 4: Serve and Garnish
Immediately pour the milkshake into chilled glasses—tall hurricane or Collins glasses are ideal for the tropical vibe. Don’t wait, as it will begin to melt. Top each glass with a generous swirl of whipped cream. For the final, iconic touch, place a maraschino cherry on top of the whipped cream. For extra flair, sprinkle a pinch of toasted coconut flakes on the whipped cream and slide a small pineapple wedge onto the rim of the glass. Serve immediately with a straw and a long spoon.
Nutritional Information
(Per serving, recipe makes 2 large shakes, without optional rum or extra garnish.)
Calories: ~580 kcal
Total Fat: 32g (Saturated Fat: 25g)
Cholesterol: 90mg
Sodium: 120mg
Total Carbohydrates: 68g (Dietary Fiber: 3g, Sugars: 58g)
Protein: 8g
Note: These are estimates. Values can vary based on specific brands of ice cream and coconut milk used.
Healthier Alternatives
You can enjoy this tropical treat with a lighter footprint without sacrificing the core flavors:
Ice Cream Swap: Use a light or “slow-churned” vanilla ice cream, or frozen vanilla Greek yogurt. The Greek yogurt adds a protein boost and tang that pairs well with the pineapple.
Sweetener Control: Opt for crushed pineapple packed in 100% juice (not heavy syrup) to reduce added sugars. You can also use fresh pineapple exclusively.
Lighter Coconut: Substitute full-fat coconut milk with “light” canned coconut milk. The flavor will be slightly less rich but still distinctly coconutty.
Boost It: Add a handful of spinach (you won’t taste it, I promise!) for greens, or a scoop of unflavored protein powder to make it more of a meal replacement.
Serving Suggestions
Tropical Brunch: Serve alongside coconut French toast or banana pancakes.
Dessert Flight: Offer mini “shot glass” portions alongside grilled pineapple skewers and coconut macaroons for a dessert tasting.
Pool Party Perfect: Double or triple the batch and serve from a drink dispenser with a “Rum Optional” sign. Provide all the garnishes in separate bowls for a DIY garnish bar.
Adult Upgrade: For the rum version, rim the glasses with toasted coconut or a cinnamon-sugar blend before pouring.
Common Mistakes
Using Rock-Hard Ice Cream: This leads to uneven blending and can damage your blender. Always soften slightly.
Over-blending: Blending for too long after the mixture is smooth incorporates too much air and can cause it to melt faster, becoming watery.
Skipping the Garnish: The whipped cream and cherry aren’t just pretty—they add contrasting texture and a burst of sweet flavor that completes the experience.
Using Pineapple Juice Instead of Crushed: Juice alone misses the vital pulp and fiber that gives the milkshake its authentic, substantial pineapple body and flavor.
Storing Tips
Milkshakes are best enjoyed immediately. However, if you have leftovers:
Short-Term: Pour into an airtight container and freeze for up to 2 hours. Re-blend for 20 seconds before serving. It may be slightly icier.
Make-Ahead Base: You can pre-measure the ice cream, pineapple, and coconut milk into a freezer-safe bag or container and freeze. When ready, dump the frozen contents into the blender, let sit for 5 minutes, then blend.
Do Not Refrigerate: Refrigeration will cause the shake to separate and become a grainy, unappetizing texture.
Conclusion
This Pina Colada Milkshake recipe is more than just a drink; it’s a mini-vacation in a glass. With its foolproof method, customizable options for all ages, and stunning presentation, it’s guaranteed to become your go-to treat for making ordinary moments feel extraordinary. The blend of creamy vanilla, tangy pineapple, and rich coconut is simply timeless. So, grab your blender, put on some island tunes, and treat yourself to a taste of paradise. Don’t forget to share your creations with us—tag #SpiceMingleTropicalTreat on social media so we can see your beautiful shakes!
Made this recipe? We’d love to see your tropical creation! Share a photo in the comments below or on Instagram and tell us your favorite way to enjoy it. Your feedback helps other readers and inspires our next recipe!
FAQs
***Can I make this a vegan Pina Colada Milkshake?***
Absolutely! Use a high-quality vegan vanilla ice cream (coconut or nut-based) and ensure your coconut milk and garnishes are vegan-friendly. The result is just as creamy and delicious.
***My milkshake is too thin. How can I fix it?***
The easiest fix is to add more ice cream. Blend in another ½ cup of slightly softened vanilla ice cream until incorporated. For future batches, reduce the initial coconut milk by 2-3 tablespoons.
***Can I use frozen pineapple instead of crushed?***
Yes, but you’ll need to adjust the liquid. Use 1 cup of frozen pineapple chunks and increase the coconut milk to 1 cup to help blend the harder frozen fruit. The shake will be thicker and icier, similar to a smoothie.
***What’s the best rum to use for the adult version?***
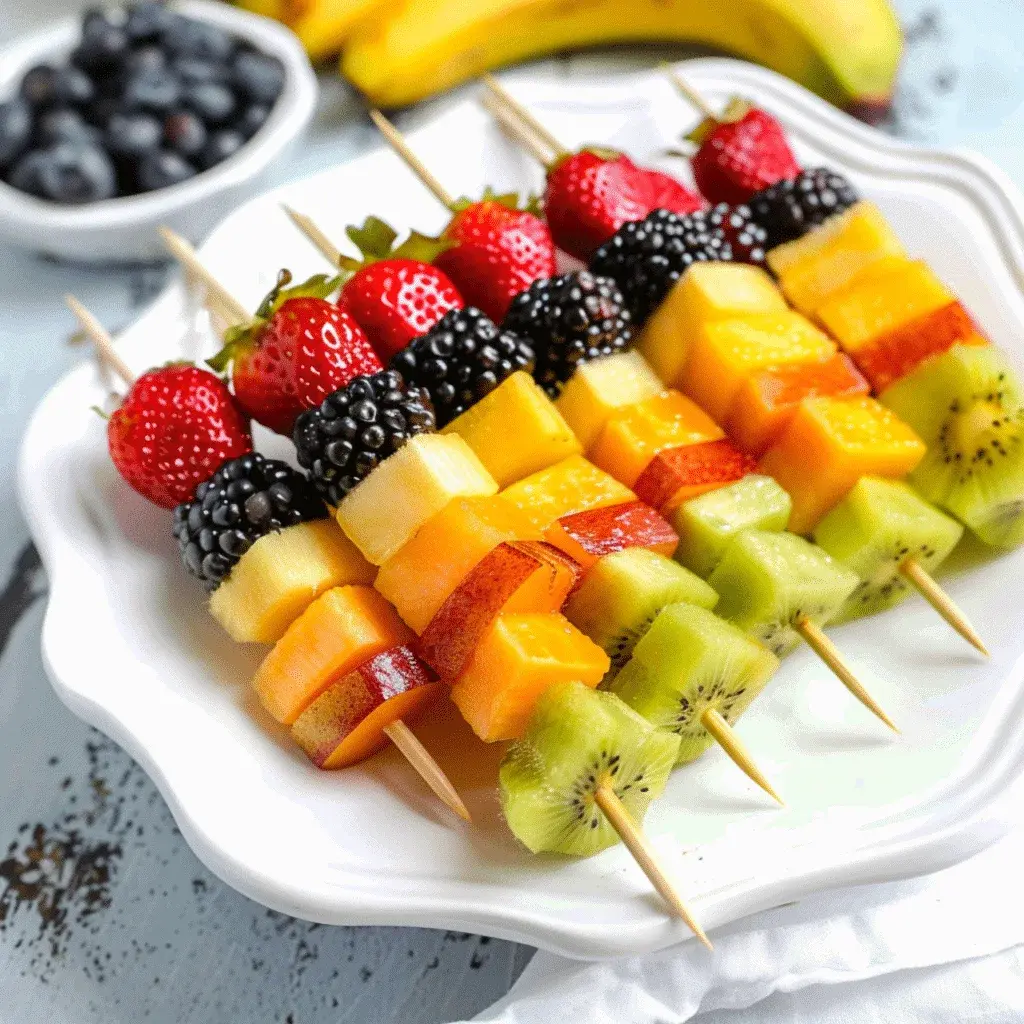
Did you know that consuming a variety of colorful fruits can increase your antioxidant intake by up to 40% compared to eating just one type? This simple fact is the delicious secret behind our vibrant Rainbow Fruit Kabobs. More than just a pretty party platter, these kabobs are a powerhouse of vitamins, fiber, and natural sweetness, designed to delight both the eyes and the palate. Whether you’re a busy parent looking for a fun, healthy snack or a host preparing for a summer gathering, this recipe transforms simple, fresh ingredients into an edible work of art. The best part? You don’t need any culinary expertise. With just a few minutes of prep, you can create a stunning, shareable treat that celebrates the natural beauty and flavor of watermelon, pineapple, cantaloupe, strawberries, mangoes, blackberries, and kiwis. Let’s dive into how you can bring this burst of color and joy to your table.
Ingredients List
Gather these fresh, colorful fruits to build your edible rainbow. The key is to choose ripe, firm fruit for the best texture and flavor.
Watermelon: 1 cup, cubed. (Look for a deep red, firm flesh with a sweet, juicy aroma. Substitution: Red grapes or pomegranate arils for a similar pop of red.)
Pineapple: 1 cup, cubed. (Choose a pineapple that smells sweet at the base and has a golden-yellow hue. Substitution: Yellow peaches or nectarines.)
Cantaloupe: 1 cup, cubed. (A ripe cantaloupe will have a sweet, musky scent and yield slightly to pressure at the blossom end. Substitution: Orange segments or papaya.)
Strawberries: 1 cup, hulled and halved if large. (Seek bright red berries with a fragrant, sweet smell. Substitution: Raspberries or red plums.)
Mango: 1 cup, cubed. (The skin should give slightly when pressed, emitting a fruity aroma at the stem. Substitution: Peaches or apricots.)
Blackberries: 1 cup. (Select plump, deeply colored berries that are dry and firm. Substitution: Blueberries or purple grapes.)
Kiwi: 2, peeled and sliced into rounds. (They should be slightly soft to the touch like a ripe peach. Substitution: Green grapes or honeydew melon.)
Bamboo or Wooden Skewers: 8-10, soaked in water for 30 minutes to prevent burning.
Optional for serving: A drizzle of honey or lime juice, a sprinkle of Tajín or chili powder, or a side of Greek yogurt dip sweetened with a touch of vanilla.
Timing
Prep Time 20 minutes
Cook Time 0 minutes
Total Time 20 minutes
This Rainbow Fruit Kabobs recipe requires zero cooking time and only 20 minutes of active preparation. Compared to the average fruit salad which takes about 15 minutes, the extra 5 minutes spent skewering pays off tenfold in presentation, portion control, and ease of serving—making it a superior choice for events and kids’ snacks.
Vibrant and fresh Rainbow Fruit Kabobs ready to brighten any table.
Step-by-Step Instructions
Step 1: Prepare Your Fruits
Wash all your fruits thoroughly under cool running water. Pat them dry with a clean kitchen towel—this is crucial for the fruit to grip the skewer and not become slippery. Now, get chopping! Cube the watermelon, pineapple, cantaloupe, and mango into roughly 1-inch pieces for uniformity. Hull the strawberries and slice larger ones in half. Peel the kiwis and slice them into ½-inch thick rounds. Keep the blackberries whole. I like to place each prepared fruit in its own small bowl, creating a colorful “paint palette” ready for assembly.
Step 2: Create Your Color Sequence
Before you start skewering, plan your rainbow. The classic ROYGBIV order is stunning: Red (Strawberry/Watermelon), Orange (Cantaloupe), Yellow (Pineapple), Green (Kiwi), Blue/Indigo/Violet (Blackberry). However, feel free to get creative! You can do a gradient effect or alternate colors. Laying out a sample sequence on your cutting board first helps visualize the final kabob and ensures a balanced distribution of flavors and colors on each stick.
Step 3: Assemble the Kabobs
Take your pre-soaked skewer (soaking prevents splintering and burning if you briefly grill them). Gently but firmly thread the fruits onto the skewer, following your planned sequence. Leave about 1.5 inches at the bottom as a handle. A pro tip: Pierce the center of softer fruits like strawberries and blackberries through the core to keep them intact, and push the skewer through the tougher skin side of melon cubes for stability. Repeat until you have 8-10 beautiful kabobs.
Step 4: Serve and Enjoy
Arrange your completed Rainbow Fruit Kabobs on a large platter. For an extra touch, you can lightly drizzle them with a bit of lime juice to enhance the flavors and prevent browning, or offer small bowls of dipping sauces on the side. They are now ready to be the star of your brunch, picnic, or snack time!
Nutritional Information
*Per serving (approx. 2 kabobs)*
Calories: ~120 kcal
Carbohydrates: 30g (Primarily natural sugars and fiber)
Fiber: 5g (Excellent for digestion)
Protein: 2g
Fat: 0.5g
Vitamin C: Over 150% of the RDI (Immune support!)
Vitamin A: 80% of the RDI (From mango and cantaloupe)
Potassium: Good source for heart health
This snack is naturally fat-free, cholesterol-free, and packed with hydration and antioxidants.
Healthier Alternatives
Want to tweak this recipe for specific dietary needs without sacrificing the rainbow appeal? Here are some smart swaps:
Lower-Sugar Option: Reduce the very sweet fruits like mango and pineapple, and increase the berry content (strawberries, blackberries) which are lower on the glycemic index while maintaining color.
For a Creamy Dip: Instead of sweetened yogurt, mix plain Greek yogurt with a dash of vanilla extract and a sprinkle of cinnamon. It adds protein and tang without refined sugar.
Citrus Zest Boost: Instead of a honey drizzle, grate a little lime or orange zest over the finished kabobs. The essential oils provide intense flavor with virtually no calories.
Serving Suggestions
Party Platter: Arrange kabobs in a sunburst pattern on a large round platter with a bowl of yogurt or chocolate dip in the center.
Kids’ Lunchbox: Pack 1-2 kabobs in a container for a fun, mess-free fruit portion that’s more exciting than a mixed cup.
Grilled Dessert: Lightly grill the assembled kabobs for 1-2 minutes per side to caramelize the natural sugars. Serve warm with a sprinkle of coconut flakes.
Brunch Board: Include these kabobs on a brunch charcuterie board alongside muffins, cheeses, and pastries for a fresh, colorful element.
Common Mistakes
Not Soaking Skewers: Dry wooden skewers can splinter and are a fire hazard if grilling. Always soak for at least 30 minutes.
Wet Fruit: Skewering wet fruit makes everything slippery and can dilute flavors. Dry your fruit thoroughly after washing.
Overcrowding: Packing fruit too tightly on the skewer makes it difficult to eat and can cause softer fruits to mush. Leave a tiny space between pieces.
Preparing Too Far Ahead: Assembling kabobs more than 2-3 hours in advance can lead to soggy fruit and color bleeding, especially from berries. Prep fruits separately and skewer just before serving.
Storing Tips
If you have leftovers or need to prep ahead:
Short-Term (Same Day): Place assembled kabobs in a single layer on a tray, cover loosely with plastic wrap, and refrigerate for up to 4 hours.
Best Practice for Make-Ahead: Chop all fruits and store them separately in airtight containers in the fridge for up to 24 hours. Assemble the kabobs right before your event.
Freezing is Not Recommended for assembled kabobs, as the texture will become mushy upon thawing. However, you can freeze individual fruit chunks (like melon and mango) for smoothies later.
A stunning party platter featuring Rainbow Fruit Kabobs with a creamy dip.
Conclusion
Creating these Rainbow Fruit Kabobs is more than just following a recipe—it’s an invitation to play with your food and celebrate nature’s candy in its most vibrant form. They prove that healthy
Hi I'm Emy
I’m passionate about sharing a diverse collection of sweet and savory recipes that I’ve meticulously tested and perfected in my own kitchen.