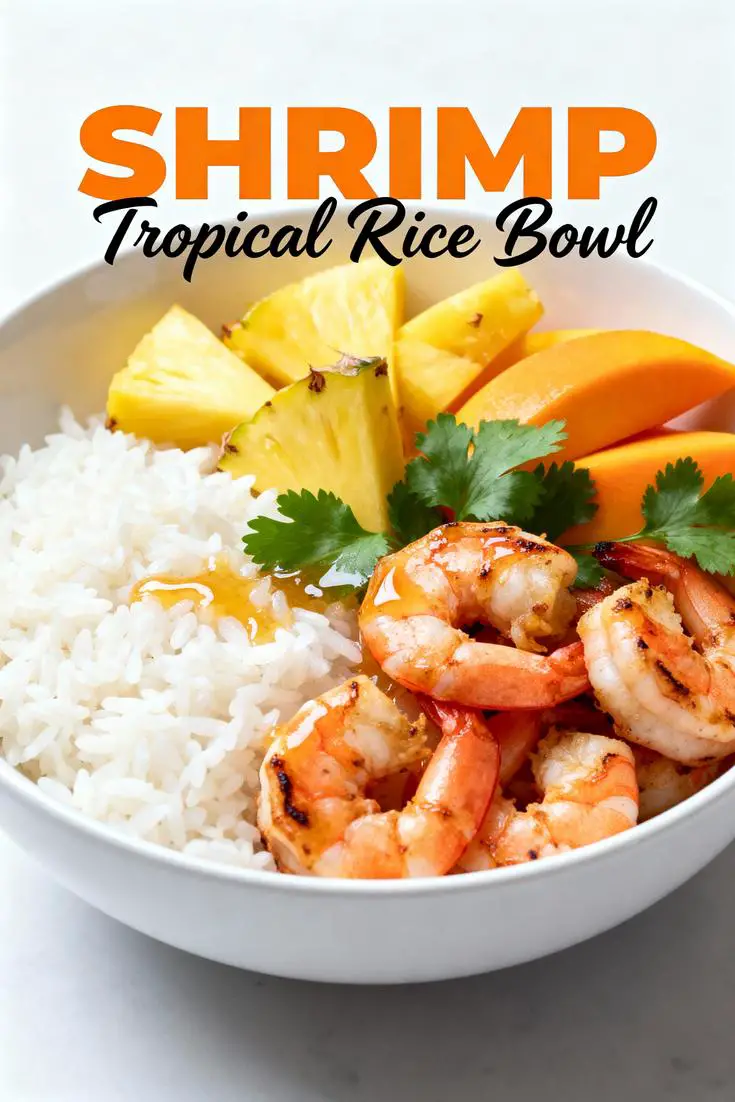
Indulge your sweet tooth with our delicious and irresistible dessert recipes! Whether you’re craving decadent chocolate treats, fruity delights, or creamy, dreamy confections, we have something for every occasion.
From classic cakes and homemade cookies to no-bake desserts, rich cheesecakes, and festive holiday treats, our recipes are perfect for special celebrations or everyday sweet cravings.
Need something quick? Try our easy, fuss-free desserts that come together in no time. Whether you love warm baked goods, refreshing frozen sweets, or nostalgic comfort desserts, these recipes are sure to bring a little extra joy to your day! 🍰🍫🍪
Imagine the delightful crunch and smooth sweetness as you bite into these Vanilla Pecan Pralines. This Easy Southern Candy recipe brings the rich, nutty flavors directly to your kitchen, evoking the cherished traditions of Southern confectionery. The aroma of toasted pecans mingled with cooked sugar will make any sweet tooth sing with joy. Whether you’re experienced in candy-making or trying it for the first time, our Vanilla Pecan Pralines provide a satisfying culinary journey with unbeatable flavors and textures.
Quick Recipe Highlights
Flavor Profile: Indulge in the harmonious balance of vanilla richness and nutty undertones, with the pecans offering a delightful, earthy taste.
Texture: Enjoy a perfect mix of creamy softness and crunchy pecan bits in each praline, achieving a melt-in-your-mouth experience.
Aroma: Revel in the warm, inviting fragrance of caramelized sugar combined with toasted pecans and a hint of vanilla.
Visual Appeal: These pralines boast a glistening golden-brown sheen, dotted with pecan pieces that make them irresistible to the eye.
Skill Level Needed: Suitable for beginners due to its straightforward preparation steps and simple ingredient list.
Special Equipment: A candy thermometer will help achieve the ideal temperature, ensuring perfect praline consistency every time.
Recipe Overview
Difficulty Level: Categorized as easy, as it requires minimal technical skill and steps are simple to follow with attention to temperature.
Category: Sweet treat or dessert, these pralines are perfect for festive occasions or as a delightful end to any meal.
Cuisine: Rooted in Southern United States culinary tradition, pralines reflect regional flavor profiles of surround ingredients like pecans and vanilla.
Cost: Affordable, with the primary investment on quality pecans and vanilla extract, making it an economical treat.
Season: Ideal for fall and winter celebrations, when warm flavors are most cherished, though enjoyed year-round.
Occasion: Perfect for gatherings, gifting, or holiday festivities, these pralines are sure to be a hit at any gathering.
Why You’ll Love This Recipe
Indulging in these Vanilla Pecan Pralines offers a unique blend of taste and texture that will satisfy any sweet tooth. The caramelized sugar envelops the pecans, bringing out their nutty flavor while providing a delightful crunch. This homemade candy recipe stands out for its convenience, requiring simple preparation steps that fit seamlessly into a busy lifestyle. Moreover, the pralines are entirely versatile, allowing for various adaptations to suit dietary needs or personal preferences.
Historically, pralines have been celebrated across cultures for their rich, sugary decadence. Originating from France and perfected in the Southern United States, pralines have been cherished for generations. They have evolved to embrace local ingredients such as pecans instead of almonds, creating a distinctly Southern treat.
Ingredient Deep Dive
Understanding the role of pecans in your pralines will enhance your cooking process. Pecans are native to the Southern United States, offering a piece of culinary history with every bite. They are known for their high levels of healthy fats, proteins, and essential vitamins, contributing to a nutritious treat when consumed in moderation. Look for plump, fresh pecans, ideally from a trusted source, to ensure a rich, natural taste that doesn’t overshadow the pralines’ sweetness.
Common Mistakes to Avoid
Overcooking the sugar mixture can lead to a burnt taste. Use a candy thermometer for accuracy.
Not stirring continuously may result in uneven texture.
Skipping the cooling time compromises praline texture; allow them to set properly.
Using low-quality vanilla extract will lessen flavor impact.
Essential Techniques
Master the art of sugar boiling: reaching the precise temperature is crucial for optimal praline texture. Consistent stirring helps achieve a smooth mixture, ensuring even caramelization and preventing the sugar from burning. Also, keeping an eye on the color change is essential, as it indicates flavor development and readiness.
Pro Tips for Perfect Vanilla Pecan Pralines
For ultra-smooth pralines, ensure your sugar is completely dissolved before bringing it to a boil. If your pecans are less fresh, toasting them lightly before use will enhance their flavor and crunch. Employing high-quality vanilla is key to achieving that rich vanilla note that sets these pralines apart.
Variations and Adaptations
For a regional spin, try using different nuts like walnuts or almonds, which add unique flavors and textures. Incorporate chocolate chips for added richness or a splash of bourbon for a more adult flavor profile. For dietary adaptations, consider using sugar substitutes such as stevia or erythritol for a lower-calorie alternative.
Serving and Presentation Guide
Place your pralines on a decorative platter to highlight their beautiful sheen. Adding a touch of sea salt on top enhances the sweetness and offers a gourmet touch. Consider packaging them in decorative boxes for a charming gift presentation.
Wine and Beverage Pairing
Pair these Vanilla Pecan Pralines with a Tawny Port or an espresso for an indulgent treat. For those preferring non-alcoholic options, a rich vanilla latte or spiced herbal tea would complement the pralines’ flavors beautifully.
Storage and Shelf Life
Store your pralines in an airtight container at room temperature to maintain their freshness and prevent them from becoming sticky. Avoid refrigeration as it can alter the praline texture. Pralines generally have a shelf life of two weeks, making them suitable for make-ahead preparations.
Make Ahead Strategies
Prepare your pralines up to a month in advance, storing them appropriately to keep them fresh. If freezing, use a sealable plastic bag to protect against moisture. Before serving, let them return to room temperature gradually.
Scaling Instructions
If preparing for a larger crowd, simply double or triple the ingredient quantities while ensuring your pot has sufficient capacity to prevent overflow. Adjust cooking times slightly to accommodate larger batches.
Nutritional Deep Dive
Each pecan praline contains a rich source of fats and sugars, offering energy and taste. The high antioxidant content of pecans provides additional health benefits, making moderation key when indulging in these treats.
Dietary Adaptations
For a gluten-free version, ensure no cross-contamination occurs with gluten-containing products. Substitute dairy milk for almond or coconut milk for a dairy-free treat. These simple swaps maintain the praline’s integrity while catering to dietary needs.
Troubleshooting Guide
Avoid prematurely hardening by monitoring sugar mixture temperature. If pralines are too chewy or hard, adjust cook time slightly based on altitude or humidity conditions.
Recipe Success Stories
Community feedback highlights these pralines as consistent favorites at holiday gatherings. Variations using bourbon or sea salt have added unique flavors, with readers praising their adaptability.
Frequently Asked Questions
Q: Can I use other nuts instead of pecans? A: Yes, walnuts and almonds are great alternatives, each providing a different flavor profile.
Q: Is a candy thermometer necessary? A: While not essential, it ensures precision in achieving the right texture for your pralines.
Q: How can I prevent my pralines from becoming too hard? A: Carefully monitor the sugar’s cooking temperature, and remove from heat promptly when it reaches the soft ball stage.
Additional Resources
Explore related recipes such as Pecan Turtles or Southern Candied Pecans for more sweet inspirations. Delve into guides on sugar boiling and caramelization techniques to refine your candy-making skills.
Join the Conversation
Share your Vanilla Pecan Pralines creations with us on social media using our dedicated hashtag. Engage with a community of sweet enthusiasts, exchange recipe variations, and become part of our candy-making family.
The Recipe
Vanilla Pecan Pralines
Serves: 20 pralines
Prep Time: 15 mins
Cook Time: 30 mins
Total Time: 45 mins
Kitchen Equipment Needed
Heavy saucepan
Candy thermometer
Baking sheet
Wooden spoon
Parchment paper
Ingredients
1 cup granulated sugar
1 cup brown sugar
1/2 cup evaporated milk
4 tablespoons unsalted butter
2 teaspoons vanilla extract
1 1/2 cups pecan halves
1/4 teaspoon salt
Directions
Line a baking sheet with parchment paper.
In a heavy saucepan, combine sugars, evaporated milk, and butter. Cook over medium heat, stirring constantly until the mixture reaches 240°F (soft-ball stage) on a candy thermometer.
Remove from heat and quickly stir in vanilla, salt, and pecans. Continue stirring until the mixture thickens slightly and begins to lose its gloss.
Drop spoonfuls of the mixture onto the prepared baking sheet, and allow them to cool completely. Once cooled, enjoy your homemade Vanilla Pecan Pralines.
Recipe Notes
Ensure accurate temperature readings to achieve the ideal praline texture.
Substitute pecans with similarly sized walnuts or hazelnuts if desired.
Store pralines in an airtight container to maintain freshness.
Irresistible No Bake Pecan Coconut Praline Cookies for Quick Treats
No Bake Pecan Coconut Praline Cookies: Sweet Indulgence Without the Oven
⚖️
Difficulty
Easy
⏲️
Prep Time
10 mins
🕒
Cook Time
15 mins
⏱️
Total Time
25 mins
🍽️
Servings
24 cookies
Imagine enjoying the sweet and nutty flavor of No Bake Pecan Coconut Praline Cookies without having to turn on your oven. These delightful treats combine the rich taste of pecans with the sweet, tropical flavor of coconut, wrapped in the creamy decadence of praline. Not only are these cookies incredibly delicious, but they’re also incredibly simple to make. Whether you’re a seasoned baker or a novice in the kitchen, you’ll find this no-fuss recipe perfect for satisfying your sweet cravings.
These cookies are perfect for any occasion, from casual get-togethers to elegant soirées. As you bite into one of these praline delights, you’ll experience a satisfying crunch followed by a melt-in-your-mouth medley of flavors. The combination of pecans and coconut provides a beautiful contrast in texture, while the praline coating adds a touch of indulgence that is sure to impress your family and friends. With no need for baking, these cookies are a quick and easy option when you need a sweet treat in a hurry.
Quick Recipe Highlights
Flavor Profile: The sweetness of praline complements the nutty pecans and aromatic coconut.
Texture: Crunchy yet soft, with a melt-in-your-mouth praline coating.
Aroma: Rich nutty and coconut fragrance with a hint of caramel.
Visual Appeal: Golden pecan and coconut clusters with a glistening praline sheen.
Skill Level Needed: Easy, perfect for all skill levels with basic kitchen tools.
Special Equipment: Only a saucepan and a spoon required.
Recipe Overview
Difficulty Level: The simplicity of the steps and minimal equipment needed classifies this as an easy recipe suitable for all cooks.
Category: Dessert or snack with a sweet and nutty profile, caterable to various palates.
Cuisine: Rooted in Southern American desserts, influenced by praline traditions.
Cost: Budget-friendly using common pantry ingredients like pecans and coconut.
Season: Great for all seasons, particularly enjoyable during the holiday season due to its festive flavors.
Occasion: Perfect for parties, potlucks, or simply as an after-dinner delight.
Why You’ll Love This Recipe
No Bake Pecan Coconut Praline Cookies are adored for their irresistible taste and delightful texture. The combination of sweet praline coating encasing crunchy pecans and shredded coconut creates a harmonious balance of flavors and the ultimate dessert experience.
The recipe is incredibly convenient since it requires no baking and utilizes ingredients that are typically found in the pantry. The quick prep and cook time make these cookies a fantastic choice for last-minute dessert needs, ensuring you can whip up a batch with minimal effort.
Nutritionally, these cookies offer a balance of healthy fats from pecans and fiber from coconut. While they are a treat, incorporating nuts and coconut provides small benefits, such as aiding in satiety.
Socially, these cookies are a hit at gatherings. They can be prepared ahead of time and presented beautifully, adding a sweet touch to any event. Friends and family will be impressed by the rich taste and delightful texture of these handheld delights.
Cost-effectiveness is another reason to love these cookies. With accessible ingredients and no need for elaborate kitchen equipment, you can enjoy delicious homemade treats without breaking the bank. The recipe’s simplicity ensures you can make a memorable dessert with ease.
Historical Background and Cultural Significance
The roots of these No Bake Pecan Coconut Praline Cookies can be traced back to Southern praline traditions, where the decadent combination of sugar and nuts has long been celebrated. Pralines, popular in Southern American cuisine, have a rich history as a sweet treat that originally included almonds.
Over time, the adaptation of pralines included pecans, a nut indigenous to North America, which became synonymous with Southern praline recipes. Pecans have been widely embraced in Southern cooking, cherished for their buttery flavor and crunchy texture.
Coconut has added a tropical twist to this traditional recipe, merging the flavors from Southern America with a hint of the islands. The addition of coconut provides a chewy texture and complements the rich nuttiness of the pecans.
As the recipe evolved, it moved beyond being merely a confection to become a beloved option for quick, no-bake cookies. Various regional variations have emerged, demonstrating the adaptability and timeless appeal of this dessert.
Ingredient Deep Dive
Pecans play a pivotal role in these cookies. They are historically significant as a native nut of North America and are renowned for their buttery and rich taste. Pecans are packed with monounsaturated fats, which are heart-healthy and promote good cholesterol levels.
When selecting pecans, look for halves that are uniform in size and free from defects. Store them in an airtight container in a cool, dry place or refrigerate for longer shelf life. Walnut is a suitable substitute if pecans are unavailable.
Coconut, the sweet partner in this recipe, brings a touch of the tropics to the cookies. Desiccated or shredded coconut is rich in fiber, supporting digestive health, and adds a chewy texture to the cookies.
Choose unsweetened coconut to control the sweetness of your cookies and store them in a sealed container to prevent drying out. If you’re looking to switch things up, try using finely chopped almonds or walnuts in place of coconut.
Common Mistakes to Avoid
Skipping the cooling period can cause cookies to lose shape. Allow enough time to set.
Overcooking the praline mixture can lead to a hard texture. Remove from heat at the right time.
Using sweetened coconut may result in overly sweet cookies. Opt for unsweetened varieties.
Not spreading cookies properly can cause sticking. Use parchment paper or a non-stick sheet.
Ignoring portion control can lead to uneven cookies. Use a spoon or scoop to portion evenly.
Incorrect ingredient measurements can alter texture. Follow the recipe for best results.
Storing improperly can lead to sogginess. Ensure cookies are fully cooled before storing.
Skipping nut checks could introduce rancid flavors. Check pecans for freshness before use.
Essential Techniques
Mastering the art of making a perfect praline coating is crucial. The key to successful praline is achieving the right consistency; it should be thick enough to coat ingredients without being too hard or runny. This can be mastered by closely monitoring the mixture’s temperature and not overcooking it beyond a rich golden brown.
Pay attention to stirring continuously while heating to prevent the mixture from burning. The aroma and color will provide visual cues—once you notice a deep caramel hue and a nutty scent, it’s time to remove it from heat.
Pro Tips for Perfect No Bake Pecan Coconut Praline Cookies
Opt for fresh, high-quality pecans for the best flavor. Their natural oils add richness to the cookies.
Use a cookie scoop for uniform portions, ensuring even setting and nice presentation.
To enhance the nutty flavor, lightly toast pecans before incorporating them into the mixture.
For a more intense coconut flavor, use coconut milk instead of regular milk in the praline mixture.
Ensure your workspace is ready with parchment-lined trays before starting; it helps in quicker setting.
Avoid handling cookies before they set fully to maintain their shape and appearance.
If you prefer a slightly firmer praline, cool the mixture for a minute before enveloping the pecans and coconut.
Add a pinch of sea salt to balance sweetness and enhance flavor depth.
Variations and Adaptations
Incorporate regional elements like fleur de sel for a gourmet twist or add cinnamon for a warm, spiced variation popular in fall.
To align with dietary trends, explore vegan alternatives by substituting dairy milk with almond or soy milk and using coconut oil instead of butter, ensuring everyone can enjoy these delectable cookies.
During warmer seasons, consider incorporating tropical fruits like mango or pineapple chunks for a refreshing adaptation, maintaining the no-bake ease while varying the flavor.
Modify flavors by adding vanilla or almond extract for a personalized touch, or experiment with different nut combinations for unique textures.
If you prefer a slightly softer texture, fold in a tablespoon of cream cheese, which also adds a slight tang and richness to the cookies.
For a sophisticated presentation, drizzle melted dark chocolate over the top before serving. This not only enhances visual appeal but also adds a luxurious finish.
Serving and Presentation Guide
For an elegant touch, serve these cookies on a tiered dessert stand at room temperature with an additional topping like grated chocolate or a dusting of coconut.
Pair with a light garnish of mint leaves for a colorful pop, or serve alongside a small bowl of unsweetened whipped cream for dipping.
Traditional accompaniments might include a side of freshly brewed coffee or a warm herbal tea to highlight the cookie’s sweetness without overpowering it.
Modern presentation could incorporate individual cookie wrappers, perfect for gifting, ensuring they maintain structure and make for a delightful package.
Maintain perfect portion control by serving cookies in pairs or threes, ideal for high tea gatherings or dessert tables.
When considering temperature, enjoy these cookies slightly chilled in warm weather or at room temperature to accentuate their aroma and texture.
Wine and Beverage Pairing
Rich dessert wines or ice wines complement the sweetness of these praline cookies, enhancing their nutty and sugary notes while balancing their flavors.
For non-alcoholic options, consider a sparkling apple cider or a refreshingly chilled vanilla almond milk, which harmonizes with the coconut and pecan flavors.
If coffee is preferred, pair these cookies with a mild roast to not overshadow their sweetness, perhaps selecting a hazelnut blend for a compatible flavor experience.
Hot or iced teas such as Darjeeling or a lightly spiced chai can complement the aromatic qualities of both praline and coconut.
For perfect temperature considerations, serve wine or cider slightly chilled to contrast the richness of the cookies, keeping your palate refreshed.
Don’t forget, serving suggestions such as using elegant glasses or teacups for beverages can further elevate the enjoyment of this classic Southern treat.
Storage and Shelf Life
Keep these cookies fresh by storing them in an airtight container, ideally lined with wax paper to separate layers and avoid sticking.
For optimal taste and texture, maintain a cool room temperature or refrigerate if necessary, especially in humid conditions, to prolong freshness.
Choose containers that provide a tight seal to keep moisture out, ensuring the cookies remain crisp and delicious, preventing the praline from becoming soggy.
Look for signs of spoilage like discoloration or off smells, especially if stored for extended periods, which indicate they are no longer suitable to consume.
If reheating is necessary, a few seconds in the microwave can soften them gently without altering their delightful chewy and crunchy mix.
Freezing guidelines suggest individually wrapping cookies before placing them in a zip-lock bag, allowing easy access and portion control while preserving them for up to a month.
Make Ahead Strategies
Planning to make these praline cookies ahead? Follow a simple prep timeline: prepare ingredients one day prior and store them in a cool place.
Maintain the quality by ensuring the praline mixture is fresh, preparing it just before combining with pecans and coconut for maximum flavor.
During assembly, work quickly to form cookies while the praline is still pliable, which ensures a smooth and even coating that looks professional.
Reheating is generally unnecessary, but should you need to refresh them, gently place them in a warm oven for a few minutes to slightly soften them while preserving their essence.
Adding fresh elements, such as a coconut garnish just before serving, can revitalize the cookies and enhance visual appeal, perfect for entertaining guests.
Scaling Instructions
Doubling ingredients to make a larger batch? Ensure even mixing by considering bowl sizes and adjusting your equipment accordingly to handle increased volumes seamlessly.
If halving the recipe, focus on precise measurements to maintain balance; a digital scale might be handy for accurately halving ingredients like butter and sugar.
Timing can vary slightly with larger quantities; keep an eye on praline consistency, which may take additional minutes to reach optimal texture without burning.
Consider additional storage considerations when scaling, ensuring you have enough containers and space, especially if freezing portions for later.
Adjust kitchen equipment, such as using larger saucepans or baking sheets, to accommodate more cookies without overcrowding, ensuring each one sets correctly.
Nutritional Deep Dive
The sweet treat with a nutty crunch offers a well-rounded macro breakdown, comprising healthy fats from pecans, which support heart health, alongside moderate carbohydrates and protein.
Micronutrient analysis highlights the beneficial aspects of copper, magnesium, and vitamin E found in pecans, which promote optimal bodily functions.
Health benefits include increased satiety offered by the combination of fiber from coconut and protein from nuts, making these cookies a more fulfilling treat.
Dietary considerations suggest they can be incorporated into balanced eating, best enjoyed in moderation due to high sugar content typical of praline desserts.
Portion analysis is key—enjoy one or two cookies for an indulgent snack without overindulging, as they can be rich in calories due to sugar and butter.
For those managing weight, pairing cookies with a balanced meal or as a single post-dinner treat keeps their nutrition aligned with fitness goals.
Dietary Adaptations
To cater to gluten-free diets, ensure all additional ingredients like flavorings or coatings are certified gluten-free, as the main components naturally lack gluten.
Dairy-free adaptations can easily be made by substituting regular butter with coconut oil or vegan margarine and using almond milk instead of dairy.
Vegan options are abundant; swap out animal products for plant-based alternatives, achieving similar texture and flavor with thoughtful selections.
Low-carb seekers should select sugar substitutes like erythritol for the praline, cautiously maintaining sweetness while decreasing overall carbohydrate load.
For keto dieters, sticking to unsweetened coconut and nuts increases healthy fat intake without adding unnecessary carbs, making these cookies a treat for ketosis.
Paleo modifications may include utilizing natural sweeteners like honey or maple syrup, which align with palaeolithic principles of wholesome ingredients.
For low-FODMAP compliance, choose dairy-free and alternative sweeteners that align with FODMAP guidelines, maintaining cookie enjoyment without digestive worries.
Other specific diets can focus on swapping problematic ingredients while keeping flavors intact, such as adjusting nut types or sweetness based on personal dietary needs.
Troubleshooting Guide
For texture issues, ensure the praline mixture is boiled to the right consistency; it should be thick enough to coat without becoming too hard too quickly.
When balancing flavors, adjust sweetness by adding more unsweetened coconut if the mix seems overly sugary, or include a hint of vanilla extract for deeper complexity.
Temperature problems may arise if the praline sets too quickly—monitor closely, and prepare pecan and coconut mixtures as soon as the mixture is ready.
Overcome equipment challenges by utilizing non-stick tools and parchment liners to handle sticky mixtures more easily, ensuring each cookie maintains shape.
Ingredient substitutions should be carefully chosen; for example, if avoiding nuts, seeds can be swapped in though the texture will vary slightly.
Tackle timing concerns by preparing in a stepwise manner: measure ingredients first and work swiftly through assembly to maintain desired texture and appearance.
Recipe Success Stories
Community feedback highlights the simplicity and deliciousness of these cookies, with many praising their versatility and ease of preparation.
Variations have seen additions of cranberries or chocolate chips, bringing delightful new depths to already popular praline profiles that have been widely embraced.
Adaptation stories share how readers have adjusted ingredients to suit dietary needs, using almond milk and coconut oil with remarkable success in maintaining texture.
Readers have suggested rolling the cookies in extra coconut not only for added flavor but also enhancing visual presentation, resulting in uniformly attractive cookies.
Photography tips include using natural lighting to highlight the sheen of praline, positioning cookies for alluring displays that capture the treat’s golden and appetizing allure.
Frequently Asked Questions
Can I use almonds instead of pecans? Yes, almonds can be used as a substitute, although the cookies will have a slightly different flavor profile.
How should I store these cookies? Store them in an airtight container in a cool, dry place or refrigerate to extend their shelf life.
Are these cookies freezer friendly? Absolutely! Wrap them individually before placing in a freezer-safe bag for up to a month.
What if my praline mixture hardens too fast? It’s key to work quickly. Prepare all ingredients beforehand and assemble immediately after boiling.
Can I add chocolate chips? Yes, chocolate chips can be a delicious addition; just incorporate them alongside the pecans and coconut.
What if I don’t have coconut? Leave it out or add other nuts or seeds; the texture and flavor will slightly adjust.
Is it possible to make them vegan? Yes, substitute coconut oil for butter and use a plant-based milk alternative.
Can I reduce the sugar content? Sure, experimenting with sugar substitutes like erythritol can reduce sugar while keeping sweetness.
Will using margarine affect the taste? Margarine can be used, though the flavor might be less rich than with butter.
How do I prevent sticking? Utilize parchment paper or a non-stick baking mat to circumvent sticking issues.
Additional Resources
Explore related recipes that incorporate no-bake techniques, offering even more dessert options without needing an oven.
Technique guides provide deeper insights into praline preparation, ensuring you can master the art of no-bake desserts with confidence.
Ingredient information includes health benefits and uses of pecans and coconuts, enhancing your knowledge of these key components.
Equip yourself with the right tools, such as quality saucepans and non-stick utensils, provided through recommendations tailored for these specific recipes.
Explore seasonal variations to adapt this recipe for special occasions, maintaining freshness and appeal with rotating ingredients or flavor enhancements.
Join the Conversation
Engage with us on social media by sharing your No Bake Pecan Coconut Praline Cookies, tagging and inspiring others to try out their variations.
Photography tips help capture the beauty of these cookies, encouraging creativity in displaying and showcasing your baking success.
Leave recipe reviews and share your personal take on the cookies, building a community of cookie lovers who appreciate the shared culinary experience.
Exchange with others in the comments section about personal tweaks or favorite moments, fostering an interactive platform for shared culinary joy.
Explore different recipe variations from around the world by joining in our monthly challenge, celebrating the diversity and creativity of homemade treats.
The Recipe
No Bake Pecan Coconut Praline Cookies
Serves: 24 cookies
Prep Time: 10 mins
Cook Time: 15 mins
Total Time: 25 mins
Kitchen Equipment Needed
Saucepan
Heat-resistant spoon
Measuring cups
Baking sheet
Parchment paper
Ingredients
1 cup pecans, chopped
1 cup shredded unsweetened coconut
1 cup brown sugar
1/2 cup butter
1/4 cup milk
1 teaspoon vanilla extract
Pinch of salt
Directions
Line a baking sheet with parchment paper and set it aside.
In a saucepan, melt butter over medium heat. Add brown sugar, milk, and salt, stirring until the sugar dissolves.
Increase the heat and bring the mixture to a gentle boil. Allow to boil for 3 minutes without stirring.
Remove the saucepan from the heat, stir in vanilla extract, pecans, and shredded coconut until evenly coated.
Drop spoonfuls of the mixture onto the prepared baking sheet, spacing evenly.
Let the cookies cool completely until they firm up, about 15 minutes.
Once cooled, enjoy the cookies or store them in airtight containers.
Recipe Notes
Ensure pecans are fresh for optimal taste.
Add a dash of cinnamon for extra warmth.
Cookies can be refrigerated for a firmer texture.
No-Bake Ferrero Rocher Cheesecake Recipe for Chocolate Lovers
No-Bake Ferrero Rocher Cheesecake: Indulge in a Decadent Delight
⚖️
Difficulty
Easy
⏲️
Prep Time
20 mins
🕒
Cook Time
0 mins
⏱️
Total Time
4 hours
🍽️
Servings
8 slices
Indulge your senses with our No-Bake Ferrero Rocher Cheesecake, a dessert that masterfully combines the rich flavors of chocolate, hazelnut, and cream cheese. Perfect for any occasion, this cheesecake is not only simple to make but also incredibly satisfying to eat. The layers of creamy filling and crunchy base create a delightful contrast, making each bite an experience to savor. Imagine treating your family and friends to a slice that tastes like candy. With this recipe, you will be their hero!
This cheesecake is ideal for those who love the unique taste of Ferrero Rocher chocolates. No baking is required; simply blend, mix, and chill! It’s perfect for hot summer days or any gathering where you want to impress your guests with a show-stopping dessert. A beautiful presentation featuring full Ferrero Rocher chocolates on top guarantees to make your cheesecake stand out on any dessert table.
Quick Recipe Highlights
Flavor Profile: This cheesecake features a harmonious blend of chocolate and hazelnut flavors complemented by the creaminess of the cheesecake.
Texture: Enjoy a smooth and creamy filling alongside a crunchy, nutty biscuit base.
Aroma: The delightful scent of chocolate mingles with the nutty aroma of hazelnuts, creating an irresistible allure.
Visual Appeal: The cheesecake is adorned with whole Ferrero Rocher chocolates, making it visually stunning with an elegant touch.
Skill Level Needed: Perfect for beginner bakers; no special techniques are required!
Special Equipment: A 9-inch springform pan and an electric mixer make preparation a breeze.
Recipe Overview
Difficulty Level: Easy enough for beginners, this no-bake cheesecake allows you to focus more on flavors rather than complex techniques.
Category: This dessert falls perfectly into the cheesecake category, loved by many for its creamy and rich texture.
Cuisine: Infused with Australian and European chocolate cultures, this dessert offers a luxurious touch often seen in café-style recipes.
Cost: Inexpensive ingredients mean you can whip this cheesecake up without breaking the bank.
Season: Great for summer since it doesn’t require an oven, but also fantastic for winter holiday celebrations!
Occasion: Perfect for birthday parties, potlucks, and festive seasons where dessert takes center stage.
Why You’ll Love This Recipe
There’s a lot to love about this No-Bake Ferrero Rocher Cheesecake. Its taste and texture are a stunning combination of sweetness and creaminess, with a rich chocolate flavor that pairs perfectly with the crunchy hazelnut-infused base. Each slice delivers a luxurious mouthfeel that makes every occasion feel extra special.
The convenience of this cheesecake cannot be overstated. With a prep time of just 20 minutes, it allows you to focus on other aspects of your celebration without worrying about baking times or oven space. Simply whip together the ingredients, pour them into the prepared crust, and let it chill in the refrigerator until set.
Nutritionally, this cheesecake can be a more moderate dessert choice if you keep portion sizes in mind. The combination of cream cheese, chocolate, and hazelnuts brings along some essential nutrients, making it a sweeter treat that isn’t completely devoid of benefits.
Socially, this cheesecake is a great conversation starter at gatherings. Sharing slices while discussing flavors and techniques creates a delightful atmosphere, making it not only a treat for the taste buds but also a way to connect with others. It’s an experience that’s perfect for sharing!
Lastly, the cost-effectiveness of this No-Bake Ferrero Rocher Cheesecake makes it an accessible treat for anyone looking to impress guests without spending a fortune. In fact, you might already have some of the ingredients at home, making it an optimal choice for spontaneous dessert making!
Historical Background and Cultural Significance
The Ferrero Rocher chocolate originated in Italy in 1982 and has since gained global recognition as a luxurious treat. The unique blend of chocolate and hazelnut is central to this iconic confection, inspiring many dessert recipes that celebrate its deliciousness. The brand, known for its sophisticated packaging, emphasizes the quality and artisan craftsmanship behind each chocolate.
Culturally, Ferrero Rocher chocolates are often associated with gift-giving, especially during holidays and special occasions. Their popularity has made them a staple in many countries, often appearing in festive boxes during celebrations. This influence has led to a rise in similar dessert recipes, capturing the essence of Ferrero while allowing for creativity in the kitchen.
The evolution of the no-bake cheesecake reflects modern culinary trends that favor convenience and flavor without sacrificing quality. The classic cheesecake recipe has been adapted over time, allowing for creative ingredients like Ferrero Rocher to shine. As a result, dessert enthusiasts have embraced this fruity, chocolatey delight that blends traditional cheesecake with contemporary tastes.
Regional variations of cheesecake can be seen across the world, with each region incorporating its local flavors and styles. In places like the United States, creamy varieties prevail, while in Italy, lighter ricotta-based versions are more common. The No-Bake Ferrero Rocher Cheesecake combines these global influences, making it accessible and loved in various cultures today.
Ingredient Deep Dive
Cream Cheese
Cream cheese is the cornerstone of any cheesecake. Its smooth texture and neutral flavor create the creamy base, essential for desserts like our No-Bake Ferrero Rocher Cheesecake. It is rich in fat, which helps build the luscious mouthfeel that is so enjoyable in desserts. When selecting cream cheese, look for a high-fat variety to achieve the best results. Always store it in the refrigerator and use it within the ‘best by’ date for optimal freshness.
Chocolate Hazelnut Spread
Chocolate hazelnut spread, the star ingredient, provides a rich, sweet flavor reminiscent of Ferrero Rocher chocolates. This indulgent spread contains sugar, vegetable oils, hazelnuts, cocoa, and milk that combine to create a unique taste sensation. These ingredients provide not only a delightful flavor but also essential nutrients like vitamin E and healthy fats from the hazelnuts. Look for spreads that contain natural or high-quality ingredients, and keep them sealed in a cool, dry place.
Digestive Biscuits
Digestive biscuits form the crunch base layer of our cheesecake, delivering both texture and flavor. Traditionally made with whole wheat flour, these biscuits are slightly sweet and crumbly, making them perfect for desserts. They are economical and widely available, so selecting good quality will make a significant difference in your cheesecake’s taste. Store in an airtight container to maintain freshness. If unavailable, graham crackers or other similar cookies can be used as a substitute.
Common Mistakes to Avoid
Using low-fat cream cheese: This can lead to a watery cheesecake. Always use full-fat cream cheese for the best texture.
Not allowing the cheesecake to set long enough in the refrigerator: A proper chilling time is essential for achieving that luscious texture.
Forgetting to finely crush the biscuits: Coarse crumbs won’t hold together properly. Aim for a sand-like consistency.
Overmixing the cream cheese: Be sure not to overwhip, which can incorporate too much air and spoil the smooth texture.
Skipping the refrigeration step after assembly: This is crucial for firming up the cheesecake before serving.
Not using a springform pan: A springform pan makes it far easier to remove the cheesecake without damaging it.
Using imitation chocolate: Real chocolate significantly enhances flavor, so opt for a good quality chocolate or spread.
Not tasting the filling: Always check the flavor of your filling before setting it; adjusting sweetness can make all the difference!
Neglecting to let ingredients reach room temperature: Ensure cream cheese and other ingredients are at room temperature for better blending.
Not storing correctly: Keep the cheesecake sealed in the refrigerator to maintain freshness for longer.
Essential Techniques
Mixing the Cheesecake Filling
Mixing the cheesecake filling is a critical step that determines the overall texture and consistency of your dessert. Proper mixing integrates all ingredients smoothly, resulting in a creamy filling. Use an electric mixer and avoid overmixing, as this can introduce too much air, making it fluffy instead of dense. A smooth and homogenous mixture should be your visual cue for success.
Prepping the Biscuit Base
The biscuit base requires fine crushing for optimal texture. A food processor saves time and ensures uniform crumbs. After mixing with melted butter, press them firmly into the bottom of your pan. This step is important as it creates a solid base that holds together well once chilled. Look for a firm foundation that doesn’t crumble easily, indicating it’s pressed correctly.
Pro Tips for Perfect No-Bake Ferrero Rocher Cheesecake
– Always use full-fat cream cheese and fresh ingredients for the best flavor and texture.
– Chill your mixing bowl and beaters before mixing to maintain a cold temperature for the cream cheese.
– Drizzle melted chocolate over the top before serving for additional richness.
– For extra crunch, chop additional hazelnuts and sprinkle them on top.
– Allow the cheesecake to come to room temperature for about 15 minutes before slicing for cleaner cuts.
– Use dental floss or a hot knife to slice the cheesecake neatly without crumbling.
– Decorate with whipped cream and Ferrero Rocher chocolates for a beautiful presentation.
– Ensure the cheesecake has set for at least 4 hours or overnight for the best results.
Variations and Adaptations
You can explore many variations of the Ferrero Rocher cheesecake to cater to different tastes and dietary needs. For those who prefer a different flavor, consider swapping the chocolate hazelnut spread with a peanut butter alternative to create a delicious peanut butter cheesecake.
If you’re looking for seasonal adaptations, adding a hint of peppermint extract during the holiday season will give your cheesecake a festive twist that evokes the spirit of winter. For a gluten-free version, substitute the digestive biscuits with gluten-free graham crackers.
Vegetarian fans can easily enjoy this treat; however, vegans can adjust by using plant-based cream cheese and a nut-based crust. Texture modifications can also create unique experiences – try blending in a layer of caramel or fresh fruit to enhance the dessert further.
Presentation alternatives include using individual dessert cups for serving, making them fun and easy for parties.
Serving and Presentation Guide
For plating your No-Bake Ferrero Rocher Cheesecake, carefully release it from the springform pan and place it on a decorative cake stand or platter. Use a sharp knife to cut neat slices and consider garnishing each slice with a dollop of whipped cream for added elegance.
Traditional accompaniments include drizzling chocolate sauce or caramel over slices for an even richer dessert experience. Modern serving suggestions suggest pairing this cheesecake with a scoop of vanilla ice cream on the side.
Temperature plays an essential role; serving it slightly chilled creates a refreshing experience. As for portion control, a generous slice is ideal for gatherings, but remember to check that guests can easily indulge without feeling overwhelmed.
Wine and Beverage Pairing
For pairing, a rich dessert wine or Port complements the chocolate notes in the cheesecake beautifully. Alternatively, an espresso or dark roast coffee works in harmony with the chocolate flavor, creating a delightful contrast with the creaminess of the dessert.
For non-alcoholic options, consider serving a chocolate chai tea that parallels the richness of the cheesecake without competing. Always serve drinks chilled if necessary and offer small servings to create an elegant, balanced finishing touch.
Storage and Shelf Life
To keep your No-Bake Ferrero Rocher Cheesecake fresh, store it in the refrigerator in an airtight container. Proper storage can preserve its flavor and texture for up to 5-7 days.
If you notice condensation forming when removing it from the fridge, allow it to rest for a few minutes before cutting into it. Signs of spoilage include an off odor or visible mold. Should you need to freeze it, wrap it tightly in plastic wrap and aluminum foil, ensuring it lasts for up to 3 months.
When reheating, thaw it overnight in the refrigerator before serving or allow it to sit out for about 30 minutes at room temperature.
Make Ahead Strategies
For those planning in advance, this No-Bake Ferrero Rocher Cheesecake is a perfect choice. You can prepare the cheesecake a day ahead of your event, allowing it time to set overnight for optimal flavor.
A prep timeline can include making the crust and filling a day before assembly, then allowing full refrigeration after that. Store the crust and filling separately if making components ahead, and assemble just before serving for the freshest taste.
Always assure key elements like toppings and sauces can be added right before serving to maintain their quality and presentation.
Scaling Instructions
If you wish to adjust the recipe yields, simply halve or double the amounts of each ingredient used, ensuring you modify the cream cheese and chocolate hazelnut spread equally to maintain flavor.
For larger gatherings, a triple batch works well; just ensure you have an appropriately sized springform pan or divide into multiple smaller pans. Watch for slight timing adjustments in setting based on the depth of your cheesecake layer.
Remember, storage considerations will also change, as larger quantities might need to be split into smaller containers.
Nutritional Deep Dive
This No-Bake Ferrero Rocher Cheesecake contains several nutritious elements; while balanced, it’s essential to check the macro breakdown per slice to manage a healthy diet.
Typical servings will yield around 300 calories, depending on ingredient quality. You can further analyze the micronutrient content, particularly appreciating the calcium from cream cheese and healthy fats from hazelnuts.
For health benefits, the antioxidant properties of chocolate give an added boost, just balance with portion control for lifestyle management efforts.
Dietary Adaptations
For those on gluten-free diets, simply replace the digestive biscuits with gluten-free alternatives. These options offer the same delicious results without the gluten.
Dairy-free adaptations can explore plant-based cream cheese varieties that hold well in dessert recipes. Vegan switches call for non-dairy chocolate spreads and alternative sweeteners to ensure everyone can enjoy this treat.
Similarly, for low-carb or keto dieters, consider substituting the crust for ground nuts mixed with low-carb sweeteners for an equally satisfying dessert. Always explore these variations thoughtfully to meet dietary restrictions while preserving flavor.
Troubleshooting Guide
If your cheesecake turns out too soft or runny, ensure your cream cheese is well combined and adequately chilled for longer periods. A firm texture comes from allowing sufficient setting time in the refrigerator.
For flavor balance issues, you can adjust sweetness levels by incorporating more melted chocolate or a touch of vanilla extract.
Temperature-related problems may arise, especially if your ingredients are cold. Allow items to reach room temperature before mixing to achieve a smoother consistency.
In case of equipment challenges, like a springform pan that isn’t sealing well, utilize parchment paper around the edges. In terms of ingredient substitutions, ensure similar components in flavors to maintain a cohesive taste profile.
Timing concerns can occur when guests arrive earlier than planned. A quick chill in the freezer can help firm up the dessert rapidly, extending its overall appeal.
Recipe Success Stories
Community feedback on the No-Bake Ferrero Rocher Cheesecake has been overwhelmingly positive, with many praising its ease of preparation and delightful taste. Readers have shared variations that include using different toppings and flavor infusions, such as raspberries or even matcha powder for an unexpected twist.
Adaptation stories reveal that some have swapped white chocolate for an extra layer of richness, while others have shared their experiences hosting gatherings where this cheesecake was the fan-favorite.
Photography tips from our community emphasize capturing the layers of this dessert, focusing on its glossy top and crunchy base to entice readers to try making their version.
Frequently Asked Questions
Can I use a different type of chocolate spread?
Yes, you can substitute chocolate hazelnut spread with other flavors like peanut butter or almond butter; however, this will alter the overall taste of your cheesecake.
How do I make this cheesecake gluten-free?
To create a gluten-free version, just replace the digestive biscuits with a gluten-free biscuit alternative while maintaining the same amount to achieve the right crust texture.
Can I use low-fat cream cheese?
While you may use low-fat cream cheese, it might affect the texture and creaminess of your cheesecake, leading to a less luscious filling.
How long does this cheesecake need to set?
It is recommended that the cheesecake sets in the refrigerator for at least 4 hours, or overnight for the best texture and flavor development.
Can I freeze leftovers?
Yes, you can freeze slices of your cheesecake; just ensure they are wrapped tightly in plastic wrap or placed in an airtight container for up to 3 months.
How do I get a clean slice of cheesecake?
For cleaner slices, dip your knife in hot water before cutting, then wipe it clean between cuts to maintain a neat appearance for serving.
What are some good accompaniments for this cheesecake?
A dollop of whipped cream, chocolate sauce, or fresh berries can be great accompaniments to enhance both flavor and presentation when serving.
How do I ensure my biscuit base holds together?
Ensure you mix the biscuit crumbs with melted butter thoroughly and press the mixture firmly into your pan to form a solid crust.
Can I add extra ingredients to the filling?
Feel free to experiment with flavors; you can incorporate melted chocolate, chopped hazelnuts, or extracts to personalize your cheesecake further.
How do I adjust for altitude when making this recipe?
At higher altitudes, desserts may require slight temperature adjustments in chilling times and baking. Opt for longer refrigeration periods here.
Additional Resources
For more scrumptious ideas, check out our collection of related recipes that explore delightful no-bake desserts, classic cheesecakes, and innovative flavor pairings. Our technique guides offer valuable advice on mastering the art of cheesecakes, which is a staple in many dessert recipes. Don’t forget to explore our ingredient information database, ensuring you choose the finest products for your culinary creations.
Lastly, look for equipment recommendations that can assist you in creating desserts and baked goods, ensuring you’re satisfied with every creation in your kitchen.
Join the Conversation
We encourage you to share your thoughts or stories about making this No-Bake Ferrero Rocher Cheesecake on social media. Use our hashtag and share your stunning photos to inspire others in their culinary endeavors. The joy of cooking and baking is often magnified with community engagement, and your reviews play a part in shaping this experience.
We love to hear how you’ve personalized this recipe! Share your variations or suggestions in the comments, sparking creativity and cooperation among fellow baking enthusiasts.
The Recipe
No-Bake Ferrero Rocher Cheesecake
Serves: 8 slices
Prep Time: 20 mins
Cook Time: 0 mins
Total Time: 4 hours (including chilling time)
Kitchen Equipment Needed
9-inch springform pan
Mixing bowl
Electric mixer
Food processor (optional)
Spatula
Ingredients
200g digestive biscuits
100g unsalted butter, melted
500g cream cheese, softened
300g chocolate hazelnut spread
100g powdered sugar
200ml heavy cream
12 Ferrero Rocher chocolates, halved for topping
Directions
In a food processor, finely crush the digestive biscuits until sandy.
Mix the crushed biscuits with the melted butter and press firmly into the base of a springform pan.
In a mixing bowl, combine cream cheese, chocolate hazelnut spread, and powdered sugar; mix until smooth.
In a separate bowl, whip the heavy cream until stiff peaks form and gently fold into the cheesecake mixture.
Spread the filling over the biscuit base evenly and smooth the top.
Chill in the refrigerator for at least 4 hours or until set.
Once set, remove from the springform pan and decorate with halved Ferrero Rocher chocolates on top.
Slice and serve chilled, enjoying this delightful dessert!
Recipe Notes
For added texture, consider mixing in chopped hazelnuts into the filling.
Feel free to customize the topping with your favorite chocolate sauce or berries for a fresh twist.
This cheesecake holds well in the fridge for up to 5-7 days.
Indulge in Homemade Chocolate-Covered Ice Cream Bars Today
Chocolate-Covered Ice Cream Bars: The Ultimate Summer Treat
⚖️
Difficulty
Easy
⏲️
Prep Time
15 mins
🕒
Cook Time
5 mins
⏱️
Total Time
20 mins
🍽️
Servings
6 bars
This Chocolate-Covered Ice Cream Bars recipe is the perfect dessert to cool down during the hot summer months. Imagine creamy vanilla ice cream encased in a hard shell of rich, velvety chocolate. With each bite, you experience the satisfying crunch followed by the smooth, melting ice cream. These bars are not only delicious but also incredibly easy to prepare, making them an ideal treat for warm weather gatherings or simply enjoying at home on a sunny afternoon.
Creating homemade chocolate-covered ice cream bars allows you to control the ingredients, and you can customize them with your favorite toppings or flavored ice creams. The satisfaction of biting into a chocolate shell that you made yourself is unbeatable. Whether you’re making them for family, friends, or just for yourself, these bars will elevate your dessert game and leave everyone wanting more.
Quick Recipe Highlights
Flavor Profile: The combination of creamy vanilla ice cream and rich chocolate creates a classic flavor pairing that is universally loved.
Texture: Enjoy the contrast of the crunchy chocolate coating with the smooth, creamy ice cream center.
Aroma: The scent of melting chocolate wafts through the kitchen, enticing everyone nearby.
Visual Appeal: Each bar is glossy and inviting, with the dark chocolate contrasting beautifully against the pale ice cream.
Skill Level Needed: This recipe is simple and perfect for beginners, requiring no special culinary skills.
Special Equipment: You will need a popsicle mold and a microwave-safe bowl for melting chocolate.
Recipe Overview
Difficulty Level: This recipe is easy enough for kids to help with, making it a fun family activity.
Category: These bars serve as a delightful dessert or a refreshing snack.
Cuisine: Ice cream bars are a popular treat worldwide, often enjoyed at fairs and summer events.
Cost: The ingredients are affordable, making this recipe a budget-friendly option for any occasion.
Season: Chocolate-Covered Ice Cream Bars are best enjoyed in the summer when everyone is looking for cool, refreshing desserts.
Occasion: Perfect for birthday parties, backyard barbecues, and family celebrations.
Why You’ll Love This Recipe
Indulging in Chocolate-Covered Ice Cream Bars offers a blissful experience that begins with the delightful crunch of the chocolate, transitioning to the creamy warmth of the ice cream within. The sweetness of the chocolate complements the rich vanilla flavor, making each bite a blissful harmony of flavors. This dessert not only satisfies sweet cravings but also delivers joy with every mouthful.
Convenience is key, and this recipe is a breeze! With only a few ingredients and minimal prep time, you can create a crowd-pleaser that’ll impress everyone from sweet-toothed kids to dessert aficionados. The ability to customize the bars with your choice of ice cream or toppings makes it easy to tailor them for any preference or dietary need.
From a nutritional standpoint, using high-quality ingredients allows for a healthier treat without the preservatives found in store-bought ice cream bars. You can choose organic or lower-fat ice cream options and even dark chocolate for a richer, antioxidant-filled coating.
Sharing these bars can turn any gathering into a memorable event. The mix of creativity in the flavor combinations and the joy of making them together is perfect for hosting friends or family. Each person can create their own version, adding their favorite toppings, making it an interactive and fun experience.
Lastly, the affordability of this recipe cannot be overlooked. With basic ingredients easily found at your local grocery store, you can whip up a batch without breaking the bank. Plus, your homemade Chocolate-Covered Ice Cream Bars will far exceed the quality of the overpriced versions found in stores.
Historical Background and Cultural Significance
The concept of ice cream dates back to ancient civilizations, but the chocolate-covered version has its origins in American culture. Originally popularized in the 1920s, these treats quickly became a staple at ice cream parlors and fairs, celebrated for their satisfying crunch and creamy indulgence. They represented the epitome of summer enjoyment and childhood nostalgia.
Chocolate and ice cream have a rich history intertwined with celebrations and culinary innovation. As chocolate became more accessible, chocolate-covered desserts started to gain popularity, ultimately leading to the creation of the chocolate-covered ice cream bar. This evolution reflects our changing tastes and the desire for unique dessert experiences.
Regional variations of chocolate-covered ice cream bars include the classic American version, which often features vanilla ice cream, while countries like Mexico have their own variations, using local flavors and spices to enhance the traditional recipe. This adaptation showcases the versatility and cultural significance of ice cream desserts globally.
Regardless of their origin, chocolate-covered ice cream bars have become a beloved treat that transcends cultural barriers. Today, they are enjoyed worldwide and fondly remembered as a quintessential part of childhood summers, evoking memories of hot days spent at the ice cream truck or local fair.
Ingredient Deep Dive
Vanilla Ice Cream: This classic flavor serves as the perfect canvas for your chocolate coating. Its creamy texture and subtle sweetness complement the rich chocolate beautifully. When selecting, look for high-quality ice cream made with natural ingredients for the best flavor. Store it in your freezer, and for optimal texture, let it soften slightly before assembling the bars.
Chocolate: Using high-quality chocolate is vital to achieving that satisfying crunch. Milk chocolate offers a sweet contrast to the ice cream, while dark chocolate provides a more decadent experience. When choosing your chocolate, opt for brands with high cocoa content for a more intense flavor. Store opened chocolate in a cool, dry place, and avoid refrigeration to maintain its quality.
Toppings (optional): Customizing your bars with toppings like nuts, sprinkles, or crushed cookies can add a delightful twist. Each topping brings its texture and flavor, allowing for personalized creations. Store your toppings separately and add them right before serving for the best crunch. Always consider allergies, especially with nut toppings, to ensure everyone can enjoy these treats.
Common Mistakes to Avoid
Using cold ice cream: Ensure your ice cream is slightly softened for easy dipping, or it may crack the chocolate coating.
Not allowing enough cooling time: Skipping the freezing step before coating can lead to mushy results.
Melting chocolate improperly: Always melt chocolate gently to avoid burning or seizing, and use a double boiler for best results.
Overheating chocolate: Chocolate should be smooth but not too hot; too high a temperature can ruin its texture.
Skipping toppings: Don’t forget to customize your bars with fun toppings for added flavor and texture.
Not using a parchment-lined tray: Ensuring your bars cool on parchment paper will prevent them from sticking.
Applying chocolate while ice cream is too soft: Make sure the ice cream is firm when coating for a smooth finish.
Failure to prep your workspace: Have all your materials and toppings ready beforehand to prevent a mess.
Essential Techniques
Dipping: Proper dipping technique is crucial for achieving a smooth coating. Use a fork or skewer to dip the ice cream bar swiftly without over-saturating it. A quick dip in the melted chocolate enhances coating while reducing melting.
Freezing: Freezing is vital in the candy-making process. Allowing the bars to solidify after coating ensures they hold their shape and flavors meld effectively. Pay attention to freezing times based on your freezer’s settings to avoid ice crystal formation.
Melt and Cool: Melt chocolate slowly over low heat or in short bursts in the microwave, stirring often. Once fully melted, allow it to cool slightly before dipping your ice cream, ensuring a glossy finish while avoiding ice cream melt.
Pro Tips for Perfect Chocolate-Covered Ice Cream Bars
Use quality ingredients for the best flavor and texture; high-quality chocolate and ice cream make all the difference.
Be mindful of temperature – work quickly during the dipping process to prevent the ice cream from softening.
Experiment with different types of chocolate, including dark, milk, or even white chocolate, for varied flavor profiles.
Add spices like cinnamon or sea salt to chocolate for a unique twist.
Tap off excess chocolate gently to avoid clumps and create a smooth coating.
Use a variety of toppings to create a visually appealing and exciting treat.
Have fun with shapes; consider using cookie cutters for themed bars during holidays.
Prepare bars ahead of time and store them in the freezer for last-minute entertaining.
Variations and Adaptations
Regional variations can include different flavors of ice cream, such as mint chocolate chip or cookies and cream, providing a fresh and distinct take on the classic recipe. Seasonal adaptations may involve using fall flavors like pumpkin or winter peppermint for the ice cream flavor.
For those with dietary restrictions, explore dairy-free or vegan ice cream options, ensuring that the chocolate remains dairy-free as well. Flavor variations can be achieved by infusing the chocolate with spices or extracts like orange or espresso.
Texture modifications can include adding a layer of crunchy toppings to give your bars a delightful crunch or swapping out the chocolate for yogurt for a lighter option. Lastly, consider presentation alternatives, such as cutting the bars into fun shapes for themed events or curling ribbons of chocolate to adorn your creations.
Serving and Presentation Guide
Plating your Chocolate-Covered Ice Cream Bars can elevate their presentation. Opt for colorful plates or parchment paper for a rustic touch. For garnishing, consider drizzling extra melted chocolate over the bars, or sprinkle with toppings before serving for added texture and color.
Traditional accompaniments could include fresh fruit or a scoop of extra ice cream beside the bars, enhancing the flavor experience. For modern serving suggestions, try stacking bars or displaying them in a tall glass for an eye-catching effect.
Temperature considerations are essential—serve the bars immediately after dipping to ensure they are at their best, and consider pre-chilling your serving plates for an extra refreshing experience. When considering portion control, cutting the bars into smaller pieces can turn them into delightful bites rather than overwhelming treats.
Wine and Beverage Pairing
Pairing your Chocolate-Covered Ice Cream Bars can bring a wonderful depth to your dessert experience. For wine lovers, consider a sweet dessert wine, such as a late harvest Riesling, which complements the richness of the chocolate and ice cream. Pairing your bars with a fruity red, like a Pinot Noir, can also enhance the chocolate flavors.
For non-alcoholic alternatives, iced coffee or rich hot chocolate can create an indulgent pairing, especially when serving the bars at a cozy gathering. Herbal teas with chocolate notes, like chai, can provide a beautiful balance of flavors.
Temperature considerations are important; ensure your beverages are served chilled to contrast the frozen dessert, enhancing the overall enjoyment. For presentation, consider serving your drinks in fun, themed glasses that fit the ambiance of your gathering.
Storage and Shelf Life
Storing your Chocolate-Covered Ice Cream Bars properly ensures they remain fresh and delicious. Wrap the bars individually in plastic wrap or parchment paper, or place them in an airtight container to prevent freezer burn. Ensure the container is sealed well, as chocolate can absorb odors from the freezer.
The bars can last up to two weeks in the freezer; however, they are best enjoyed fresh. Check for signs of spoilage like ice crystals forming or off-flavors. If you’ve got leftovers, remember that they can be enjoyed straight from the freezer without reheating.
Freezing guidelines remind you to place bars in a single layer if using a container, to maintain their shape and texture. With proper storage methods, you can keep your bars ready for an indulgent treat anytime.
Make Ahead Strategies
Planning to make Chocolate-Covered Ice Cream Bars ahead of time can save time and make entertaining easier. Prepare the bars and coat them in chocolate a day or two in advance; just ensure they remain wrapped or in an airtight container.
You can also store your chocolate separately and dip the bars right before serving to maintain the perfect texture. If you prepare the chocolate ahead, reheat gently to ensure a smooth consistency.
Quality impact can include potential changes in texture if the ice cream sits too long after dipping without being re-frozen. Assembly becomes quick and easy when you have bars pre-prepared, allowing you to add toppings right before serving for the freshest taste.
Lastly, consider adding fresh elements, like mint leaves or a drizzle of fruit sauces, right before serving to enhance flavor and presentation for your make-ahead bars.
Scaling Instructions
Halving the recipe is simple; just use the same half portions for each ingredient, maintaining the ratios throughout. This is ideal for smaller gatherings or a quick dessert fix while saving freezer space.
Doubling or tripling the recipe is also easy; ensure to use larger molds or multiple trays for the bars. Timing may need adjustment, so keep an eye on the freezing times to ensure quality.
Equipment adjustments might be necessary for larger batches, such as using larger pots for melting chocolate or multiple mixing bowls. Lastly, consider storage—the more bars you make, the more careful you need to be in ensuring they remain neatly organized in the freezer.
Nutritional Deep Dive
Analyzing the macros for Chocolate-Covered Ice Cream Bars reveals a rich treat packed with sugars and fats primarily coming from the ice cream and chocolate. Each bar’s caloric content can vary based on the type of ice cream and chocolate used, making it essential to choose brands wisely if you’re watching your intake.
Micronutrient analysis shows that while these bars are not typically rich in vitamins or minerals, using dark chocolate might provide some antioxidant benefits. Additionally, opting for lower-fat ice creams can help balance the overall nutritional profile.
Health benefits might include enjoying a treat that satisfies sweet cravings without large portions, promoting portion control. Dietary considerations should note the importance of balance in treats within a generally healthy diet.
When assessing portion sizes, splitting bars into smaller bites can help manage intake while still allowing indulgence. This can be particularly appealing when entertaining guests who may appreciate a variety of dessert options.
Dietary Adaptations
For those requiring gluten-free options, ensure that your chocolate and ice cream are certified gluten-free, as many products may contain hidden gluten. You can also choose gluten-free toppings to keep everything safe for individuals with dietary restrictions.
Dairy-free ice cream options are becoming more widely available, giving you a delicious alternative while still allowing for that rich chocolate coating. Investigate vegan chocolates to ensure a completely dairy-free experience.
For those on low-carb or keto diets, consider using sugar-free chocolate and ice cream to lower the carb count while still enjoying a sweet treat. Paleo diets might direct you to use almond milk ice creams to keep things natural.
Low-FODMAP adaptations could include lactose-free ice cream, so those with sensitivities can enjoy these bars without concern. Always check labels for hidden ingredients and consult dietary guidelines to maintain health needs.
Troubleshooting Guide
When it comes to texture issues, if the bars are too soft after dipping, allow them to freeze for a longer duration before serving. If chocolate doesn’t coat smoothly, check that the melting process was done carefully and at the right temperature.
Flavor balance becomes crucial; if your bars taste overly sweet, consider using darker chocolate next time or low-sugar ice cream options. If flavor isn’t strong enough, try adding toppings like sea salt or spices.
Temperature problems can arise during serving; if your bars have melted too quickly, try keeping them in the freezer right up until serving to ensure they last longer at room temperature. Equipment challenges might include difficulty in dipping; ensure you’re using a deep enough bowl for efficient coating.
Ingredient substitutions are feasible; if you run out of chocolate, consider yogurt or a flavored icing for a sweet glaze. Keep an eye on timing concerns to avoid softening the bars during the coating process.
Recipe Success Stories
Receiving community feedback on Chocolate-Covered Ice Cream Bars reveals numerous creative adaptations and insights. Many readers rave about the ease of the recipe, especially how family members enjoyed helping dip the bars and choosing toppings.
Variation successes include unique combinations, from peanut butter cup toppings to coconut shavings, making every batch distinctive. Readers often share photography tips, suggesting that natural light enhances the appealing hues of chocolate and ice cream during the irresistible drool-worthy shots.
Adaptation stories often include the joyful reactions of children, making these bars a highlight of birthdays and parties. The creativity involved in crafting these delectable treats brings pride and joy to those who try it.
Topics of recipe reviews mainly focus on how the bars become personalized with each family’s favorite flavors and creative toppings, reinforcing the concept that this recipe is both a classic and a canvas for innovation.
Frequently Asked Questions
Can I customize the ice cream flavors?
Absolutely! Feel free to experiment with different ice cream flavors like strawberry, mint chocolate chip, or even coffee for unique chocolate-covered bars. This flexibility allows each batch to be tailored to suit your taste or occasion.
How can I make these bars healthier?
You can utilize low-carb or sugar-free ice cream and dark chocolate for a slightly healthier version. Additionally, opting for organic ingredients may also enhance the nutritional profile without sacrificing flavor!
What if the chocolate doesn’t coat evenly?
If the chocolate layer is uneven, it can be because it was too thick or the ice cream was too soft. Ensure to dip the bars quickly and try to maintain that smooth temperature of the melted chocolate while you work.
Can I store the bars for later?
Yes! These bars can be stored in an airtight container for up to two weeks in the freezer. Just make sure they’re well-wrapped to prevent freezer burn and maintain their quality.
What toppings do you recommend?
Some popular topping choices include crushed nuts, sprinkles, coconut flakes, or even crumbled cookies for added crunch! Just make sure to apply them immediately after dipping for the best adhesion.
Can I make these ice cream bars in advance?
Yes! These bars can be made a day in advance. Just remember to store them properly in the freezer until you’re ready to serve.
What chocolate works best for coating?
For coating, high-quality milk or dark chocolate is recommended. You can also use white chocolate for a sweeter alternative, but remember that it has a shorter shelf life when compared to darker chocolates.
Can I use coconut oil to thin the chocolate?
Yes, adding a teaspoon or two of coconut oil can create a smoother melting chocolate that’s easier to work with, but don’t overdo it to maintain adherence to the ice cream.
Are there any non-dairy options available?
Absolutely! Many brands offer delicious dairy-free ice creams made from almond, coconut, or cashew milk that can suit vegan diets perfectly.
How do I know if the chocolate is melted correctly?
The ideal melted chocolate should be smooth and glossy. If it appears dull or grainy, it may be overheated—start with lower power on your microwave or use a double boiler for gentle melting.
Additional Resources
For related recipes, check out our delicious snacks like Frozen Yogurt Bark or Fruit Popsicles for healthier summertime treats. Technique guides on chocolate melting and dipping methods also provide fundamental knowledge for chocolate lovers.
For ingredient information, explore our blog section detailing the best types of chocolate and ice cream to enhance your dessert experience consistently. Equipment recommendations featuring high-quality molds and melting pots can also help elevate your home kitchen game.
When summer hits, consider checking our seasonal variations as we highlight the best ice cream flavors and toppings as they come into season. This dynamic combination of resources supports your journey to becoming a dessert-making expert!
Join the Conversation
We love hearing from our readers! Join in the conversation by sharing your creations on social media and tagging us for a chance to be featured.
Photography tips include using natural light to capture the gorgeous textures of your Chocolate-Covered Ice Cream Bars for Instagram-worthy shots. Your feedback on the recipe and any variations you’ve explored helps foster our community’s development and creativity.
With so many possibilities for these bars, feel free to share your personal twists and themes—let’s celebrate the joy of dessert-making together!
Soften the vanilla ice cream for about 5 minutes at room temperature, then scoop it into your popsicle mold and freeze for at least 4 hours, or until solid.
Melt the chocolate in a microwave-safe bowl, heating in 30-second intervals and stirring until smooth.
Remove the ice cream from molds, one at a time, and dip into the melted chocolate. Allow excess chocolate to drip back into the bowl.
If desired, sprinkle your toppings over the freshly dipped chocolate before it hardens.
Place the dipped bars on parchment paper-lined cookie sheets and return to the freezer for at least 30 minutes to firm up.
Enjoy your chocolate-covered ice cream bars fabulous in flavor and presentation!
Recipe Notes
For best results, work quickly to dip the bars before the ice cream softens too much.
Consider using flavored chocolate or adding unique toppings to create interesting variations.
These bars can be refrozen after dipping and may be consumed at any time once coated.
Indulge in Matilda’s Rich Chocolate Cake Recipe Today!
Matilda’s Rich Chocolate Cake: A Decadent Indulgence!
⚖️
Difficulty
Moderate
⏲️
Prep Time
30 mins
🕒
Cook Time
45 mins
⏱️
Total Time
1 hr 15 mins
🍽️
Servings
8-10
Introducing Matilda’s Rich Chocolate Cake—a dessert that is not just a treat, but an experience! This cake is a celebration of rich flavors and indulgent textures that promises to transport you into chocolate heaven. With its deep, intense cocoa flavor and moist crumb, each bite melts into a velvety finish that will satisfy your sweet tooth like no other. This cake is perfect for birthdays, anniversaries, or any occasion that deserves a special touch. Bring a touch of magic to your table with this simple yet elegant recipe that is sure to impress family and friends alike.
From the moment you pull Matilda’s Rich Chocolate Cake out of the oven, your kitchen will fill with an irresistible aroma that beckons like an invitation. This decadent indulgence is not just about taste; it’s about the experience it creates. Whether you’re celebrating a special occasion or simply treating yourself, this cake is a must-try. Pair it with some fresh whipped cream or a scoop of vanilla ice cream, and your dessert game will reach new heights!
Quick Recipe Highlights
Flavor Profile: Experience the deep richness of cocoa complemented by a subtle sweetness that elevates each bite.
Texture: This cake boasts a moist crumb combined with a dense, fudgy interior that is melt-in-your-mouth good.
Aroma: The intoxicating scent of freshly baked chocolate will wrap you in warmth, drawing everyone into your kitchen.
Visual Appeal: The cake’s dark, glossy finish, combined with frosting, creates a striking presentation that is simply irresistible.
Skill Level Needed: While it requires some technique, this recipe is accessible to both novice and experienced bakers.
Special Equipment: A few basic tools like mixing bowls, a whisk, and cake pans are all you need to create this masterpiece.
Recipe Overview
Difficulty Level: Preparing Matilda’s Rich Chocolate Cake is moderate; it involves layering and frosting but is manageable for most home bakers.
Category: This dessert falls under cakes, perfect for occasions such as birthdays, celebrations, or as a delightful treat.
Cuisine: Rooted in classic baking traditions, chocolate cakes have evolved over centuries, embodying rich tastes from various cultures.
Cost: With common ingredients, this cake can be made affordably without sacrificing flavor or quality, making it budget-friendly.
Season: Chocolate cakes are delightful year-round, but especially welcome during winter holidays and celebrations.
Occasion: Ideal for birthdays, holidays, or as a dinner party showstopper, this cake brings joy and satisfaction.
Why You’ll Love This Recipe
Matilda’s Rich Chocolate Cake is a dessert that truly delights the senses. The rich chocolate flavor coupled with a moist, tender crumb makes each bite a heavenly experience. This cake is perfect for chocolate lovers, offering a deep, satisfying cocoa taste with just the right amount of sweetness. The decadent frosting elevates the overall flavor, adding a creamy finish that lingers on the palate. Each slice is not just a dessert; it’s an occasion.
Convenience is another fantastic aspect of this recipe. With simple ingredients and straightforward steps, you can whip up this cake without fuss. It’s a forgiving recipe, allowing space for mistakes, so even beginner bakers can feel confident. The preparation also leaves plenty of time to relax while the cake bakes and cools, making it ideal for any busy home cook.
In terms of nutrition, chocolate does offer some benefits! The cocoa used in this cake contains antioxidants and can promote heart health in moderation. Though it’s a treat, it can certainly be enjoyed in a balanced approach to your diet. The cake’s richness means that you can savor a smaller slice, making it a thoughtful indulgence.
Socially, this cake serves as a great centerpiece for gatherings. It sparks conversations and shares joy, transcending simple dessert status. It pairs beautifully with a variety of beverages, making it perfect for elegant dinner parties or casual get-togethers with friends.
On a cost-effectiveness level, the accessibility of ingredients plays in your favor. You won’t need to visit specialty stores, and most items can be found in your pantry. Thus, you can create an impressive dessert that feels luxurious without breaking the bank.
Historical Background and Cultural Significance
The origin of chocolate cake dates back centuries, with its roots in rich cultures that valued chocolate as a luxury. Chocolate was primarily consumed as a drink, revered by the Aztecs and Mayans long before it became a dessert. The transition from drink to cake is believed to have started in the 19th century with the introduction of cocoa powder, making chocolate more accessible for baking.
Culturally, chocolate cakes have become synonymous with celebration and indulgence. They feature prominently on birthdays, weddings, and holiday festivities across various cultures, symbolizing joy and festivity. As baking technology advanced, so did the complexity of chocolate cake recipes, leading to endless variations and adaptations that showcase local ingredients and preferences.
Over time, the recipe for chocolate cake has evolved significantly. From dense, flourless variations to lighter, airy textures, bakers have experimented with techniques and ingredients to suit contemporary tastes. The popularization of boxed cake mixes in the 20th century made chocolate cake even more accessible, but homemade versions remain favored for their unmatched flavor and quality.
Regional variations of chocolate cake abound, reflecting local ingredients and traditions. For example, the German Chocolate Cake features a sweet coconut and pecan frosting, while Italian Chocolate Cake often incorporates ricotta for extra richness. Each version tells a story and connects back to the cultural significance of chocolate as a universally loved treat.
Ingredient Deep Dive
Chocolate
Chocolate has a storied cultural significance, having been revered since ancient times. Nutritionally, it contains antioxidants that promote good health; however, its benefits largely depend on the quality and quantity consumed. When selecting chocolate for baking, always opt for high-quality brands that list cocoa content on labels. Store your chocolate in a cool, dark place to preserve its integrity, and if you need to substitute it, cocoa powder can often stand in for melted chocolate at a ratio of 3 tablespoons of cocoa plus 1 tablespoon of oil for each ounce of chocolate.
Flour
Flour is a basic yet vital ingredient in baking. Its cultural significance lies in its role in global cuisines, serving as a staple in most baked goods. Different flours have unique properties; for instance, all-purpose flour gives a tender crumb while cake flour yields lighter cakes. When choosing flour, check for freshness and consider purchasing it from a bulk store to reduce costs. Store in air-tight containers to prolong shelf life, and for gluten-free variations, almond flour or coconut flour can be excellent substitutes.
Common Mistakes to Avoid
Measuring flour incorrectly can lead to a dense cake. Use a scale or the spoon-and-level method to ensure accuracy.
Overmixing the batter can introduce too much air, resulting in a tough texture. Mix just until combined.
Using cold ingredients can impact volume and texture. Always allow eggs, butter, and other dairy to sit at room temperature.
Not greasing and flouring the pans sufficiently may cause sticking. Ensure that pans are well-prepared before pouring the batter.
Skipping the cooling time before frosting can lead to melted icing. Allow the cake to cool completely for a perfect finish.
Overbaking can dry out the cake. Always check for doneness a few minutes before the recommended time.
Using low-quality chocolate can alter the flavor negatively. Invest in good chocolate for an optimal taste experience.
Not rotating the cake in the oven can lead to uneven baking. Turn the cake halfway through the cooking time for even results.
Miscalculating your baking powder or soda can affect the cake’s rise. Confirm expiration dates for leavening agents as well.
Not adjusting baking time for different pans can result in improperly baked cakes. Keep an eye on the timing if using different sizes.
Essential Techniques
Creaming Butter and Sugar
This technique is crucial for creating a light and fluffy cake. Creaming introduces air into the batter, which ensures a tender texture when baked. To master it, make sure your butter is at room temperature for optimal mixing. A common pitfall is under-creaming; aim for a pale, fluffy mixture that has increased in volume. Visual cues include a lighter color and a texture that clings slightly to the beaters.
Folding
Folding is used to incorporate delicate ingredients—like whipped cream or egg whites—into a heavier batter without deflating it. It’s important to use a gentle motion, cutting through the mixture and lifting it, rather than stirring vigorously. The ideal result is a uniform batter that retains its airy volume. Visual cues include a fully integrated mixture without large clumps of the lighter ingredient remaining.
Pro Tips for Perfect Matilda’s Rich Chocolate Cake
1. Always use room temperature ingredients to enhance combination and give a better rise to the cake.
2. For a deeper flavor, let the batter rest for 30 minutes before baking to enhance the chocolate’s complexity.
3. If using a dark baking pan, reduce the temperature by 25°F to avoid overbaking.
4. Try adding a tablespoon of espresso powder to the batter to intensify the chocolate flavor even more.
5. Use parchment paper on the bottoms of your pans for easy removal and cleaner edges.
6. Experiment with various frostings—try a raspberry ganache for a tangy contrast with the chocolate.
7. Don’t rush the cooling process; it’s integral to achieving a perfect slice.
8. For added decoration, consider dusting the cake with cocoa powder or powdered sugar before serving.
Variations and Adaptations
For a regional twist, try creating a Mexican chocolate version by incorporating cinnamon and chili powder into the batter, giving it a unique flavor profile. Seasonal adaptations could include adding pumpkin puree for a fall-inspired cake, or fresh berries during summer for a refreshing taste. If you need dietary modifications, a vegan version can be made by replacing eggs with flaxseed meal and using non-dairy milk. For flavor variations, consider infusing the frosting with peppermint extract or orange zest.
Explore texture modifications by adding chocolate chips or nuts into the batter, providing a delightful crunch that contrasts with the soft crumb. Presentation alternatives include layering the cake with fresh fruit or using edible flowers for a vibrant touch. Each variation invites creativity and personal flair, making this cake a versatile indulgent choice!
Serving and Presentation Guide
When it comes to plating Matilda’s Rich Chocolate Cake, simplicity is key. A clean, white plate enhances the cake’s rich color, drawing attention to its glossy finish. Garnish with fresh berries or mint leaves for a pop of color, creating an inviting presentation. Serve slices with a dollop of whipped cream or a scoop of vanilla ice cream to complement the chocolate flavors.
For modern serving suggestions, consider individual servings in mason jars or cupcake form for a fun twist. Keep temperature considerations in mind; serve the cake slightly warm for the ultimate indulgence or at room temperature for a denser texture. For portion control, use a sharp serrated knife for clean slices, ensuring all guests receive a beautiful piece of this decadent cake.
Wine and Beverage Pairing
Pairing Matilda’s Rich Chocolate Cake with wine can elevate the dessert experience. Look for a full-bodied red wine, such as Cabernet Sauvignon or a rich dessert wine like Port, which enhances the chocolate’s depth. For non-alcoholic alternatives, rich, dark chocolate-flavored coffees or espresso complement the cake beautifully.
If tea is your preference, opt for a chai or a strong black tea, which balances the sweetness of the cake. When serving, ensure beverages are at the right temperature—wine should be slightly chilled while coffee should be served hot for the best flavor experience.
Storage and Shelf Life
To store Matilda’s Rich Chocolate Cake, wrap it tightly in plastic wrap or store in an airtight container to maintain moisture. The cake can be kept at room temperature for up to three days, or refrigerated for up to a week. It can also be frozen for up to three months; just ensure it’s well-wrapped to prevent freezer burn.
When checking for spoilage, note any changes in smell or texture, such as a dry or hard crust. To reheat the cake, place slices in the microwave for 15-20 seconds, or in a preheated oven at 300°F until warmed through.
Make Ahead Strategies
Planning to serve Matilda’s Rich Chocolate Cake? It can be made ahead of time by baking the cake a day in advance. Store it wrapped at room temperature overnight. Assemble the cake with frosting a few hours before serving, allowing some time for the flavors to meld.
Consider freezing layers if you want to prepare even further ahead; just remember to layer parchment between pieces for protection. When it’s time to serve, allow the cake to come to room temperature, enhancing the flavors and textures for enjoyment. Incorporating fresh elements, such as whipped cream, as the last step adds vibrancy and freshness.
Scaling Instructions
Scaling Matilda’s Rich Chocolate Cake is straightforward. To halve the recipe, use a smaller pan and adjust the baking time by checking for doneness earlier. For doubling or tripling the recipe, ensure that you have the appropriate sized mixing bowl and baking tray.
Adjustments may be needed for the cooking time, as larger cakes may require additional time in the oven. Always monitor the cake closely, as different sizes will vary in baking duration. For storage, keep in mind larger quantities may take longer to cool, so patience is essential!
Nutritional Deep Dive
The nutritional breakdown of Matilda’s Rich Chocolate Cake highlights its decadent nature. With moderate carbs from sugar and flour, the cake provides energy, but it’s the rich cocoa that offers antioxidants beneficial for heart health. Nonetheless, it’s important to enjoy such indulgences in moderation.
When looking at micronutrients, dark chocolate is a source of iron and magnesium, adding some health benefits to this cake. However, portion sizes should be considered not just for health benefits but also for weight management. Enjoying a smaller slice can provide satisfaction without overindulging.
Dietary Adaptations
This wonderful Rich Chocolate Cake can be adapted for various dietary needs. For gluten-free diets, substitute all-purpose flour with almond or gluten-free all-purpose flour, ensuring a similar texture is achieved.
Dairy-free options exist as well; swap regular milk with almond or oat milk, and use vegan butter for the frosting. For those pursuing a low-carb or keto lifestyle, sugar substitutes like erythritol can take the place of sugar, offering fewer carbs while still delivering sweetness.
Vegan adaptations can substitute eggs with flaxseed meal or applesauce, yielding a similarly rich and moist cake suitable for plant-based diets. Always read labels carefully to ensure all adjustments align with dietary restrictions.
Troubleshooting Guide
Texture issues may arise from overmixing; to avoid this, mix ingredients just until combined. If the cake is dry, consider adjusting the oven temperature or checking for the correct baking time to ensure proper texture.
Flavor balance can sometimes lack sweetness; always taste the batter before baking, adjusting sugar as necessary. If the cake appears to be domed too high, this may indicate an oven temperature that is too high—calibrate your oven for accurate baking.
Ingredient substitutions can lead to unexpected outcomes; always test small variations prior to scaling up. If timing concerns arise, use toothpicks or cake testers as indicators for doneness, checking about five minutes before the suggested time.
Recipe Success Stories
Community feedback on Matilda’s Rich Chocolate Cake has been overwhelmingly positive. Readers have shared their successful adaptations, experimenting with flavors like peppermint and hazelnut, which turned out scrumptious! Many have also provided photos of their versions, with creative garnishes and improved presentation, showing how relatable this recipe can be across different tastes.
Personal anecdotes add a lovely touch to the discussion, with readers sharing memories tied to baking and serving this cake at family gatherings. The flexibility of the recipe has inspired people to try their hands at variations, leading to a rich array of unique cakes made in homes everywhere.
Frequently Asked Questions
Can I use different types of chocolate?
Absolutely! Various types of chocolate can add unique flavors. Dark chocolate will give a rich, bold flavor, while milk chocolate will make the cake sweeter.
How do I make the cake gluten-free?
Substitute all-purpose flour with gluten-free flour blends. Adjust the measuring to achieve a similar texture.
What can I use instead of eggs?
Flaxseed meal or applesauce can replace eggs effectively; use 1 tablespoon of flaxseed meal mixed with 3 tablespoons of water as a substitute for one egg.
Can I make this cake in advance?
Yes! This cake can be baked ahead and stored in the fridge or freezer. Just frost it shortly before serving for the best texture.
What’s the best way to store leftovers?
Keep leftovers in an airtight container in the fridge for up to a week or freeze for up to three months.
What frosting works best with this cake?
This cake pairs beautifully with chocolate buttercream, cream cheese frosting, or even a light ganache for an indulgent finish.
Why is my cake sinking?
A sinking cake may indicate that the batter was overmixed or was too heavy. Ensure proper mixing techniques to avoid this issue.
Can I add nuts or chocolate chips?
Certainly! Adding nuts or chips can enhance the texture and flavor profile, providing delightful surprises in each bite.
Is this cake suitable for cupcakes?
Yes! You can use this batter to make cupcakes; just decrease the baking time to around 20-25 minutes.
What if I don’t have cake pans?
Feel free to use a muffin tin or any suitable oven-safe containers. Adjust baking time as necessary.
Additional Resources
If you loved this recipe, check out our collection of related recipes, including various chocolate desserts like molten lava cakes and chocolate mousse. For technique guides, explore our resources on baking fundamentals, such as mastering the perfect buttercream or understanding flour types.
Ingredient information is vital; familiarize yourself with the benefits of baking essentials like cocoa powder or various types of sugar. Equipment recommendations can help you choose the best tools, from mixing bowls to cake pans, making your baking experience enjoyable.
Don’t forget to explore seasonal variations; during the holidays consider adding peppermint or spices for an exciting twist.
Join the Conversation
We love hearing your thoughts on our recipes! Share your experiences on social media, and don’t forget to tag us in photos of your Matilda’s Rich Chocolate Cake creations. Photography tips can help show off your beautiful bakes; natural light works wonders for capturing the cake’s delicious details.
Your feedback helps our community grow, so leave recipe reviews and suggestions for adjustments that worked for you. Let’s celebrate the joy of baking together and keep the conversation going with sharing your unique variations!
The Recipe
Matilda’s Rich Chocolate Cake
Serves: 8-10
Prep Time: 30 mins
Cook Time: 45 mins
Total Time: 1 hr 15 mins
Kitchen Equipment Needed
Mixing bowls
Whisk or electric mixer
Rubber spatula
8-inch round cake pans
Cooling rack
Offset spatula for frosting
Ingredients
1 ¾ cups all-purpose flour
1 ½ cups granulated sugar
¾ cup unsweetened cocoa powder
1 ½ teaspoons baking powder
1 ½ teaspoons baking soda
1 teaspoon salt
2 large eggs
1 cup whole milk
½ cup vegetable oil
2 teaspoons vanilla extract
1 cup boiling water
Directions
Preheat your oven to 350°F (175°C). Grease and flour your cake pans.
In a large mixing bowl, combine flour, sugar, cocoa powder, baking powder, baking soda, and salt. Mix well.
Add eggs, milk, oil, and vanilla extract to the dry ingredients. Mix on medium speed until smooth.
Carefully stir in boiling water. The batter will be thin—this is normal!
Pour the batter evenly into prepared pans and bake for 30-35 minutes, or until a toothpick comes out clean.
Allow cakes to cool in the pans for 10 minutes before transferring to wire racks to cool completely.
Once cool, frost with your favorite chocolate frosting.
Recipe Notes
For a deeper flavor, consider adding espresso powder to the dry ingredients.
Store any leftovers in an airtight container for freshness.
This cake can be frozen—just ensure it’s wrapped well to avoid freezer burn.
Delicious Boston Cream Pie Cupcakes for the Perfect Dessert Treat
Irresistible Boston Cream Pie Cupcakes: A Delightful Twist on a Classic Dessert
⚖️
Difficulty
Medium
⏲️
Prep Time
30 mins
🕒
Cook Time
20 mins
⏱️
Total Time
50 mins
🍽️
Servings
12 cupcakes
If you’re searching for a delicious dessert that combines the comfort of a classic cake with the fun of a cupcake, look no further than these Irresistible Boston Cream Pie Cupcakes! Each cupcake offers a moist vanilla cake base filled with creamy pastry custard and topped with rich chocolate ganache. The flavors harmonize beautifully, making every bite a delightful experience. Perfect for birthdays, special occasions, or simply a sweet treat to enjoy at home, these cupcakes are sure to impress.
A Boston cream pie is a beloved dessert that traditionally features a delicate sponge cake with layers of custard and a decadent chocolate glaze. By transforming this classic into a cupcake format, you’ll find that they are not only easier to serve but also more charming and portable. You’ll love how each cupcake delivers that iconic flavor and texture in a convenient, bite-sized treat that everyone will adore.
Quick Recipe Highlights
Flavor Profile: These cupcakes burst with rich vanilla flavor, complemented by smooth, creamy custard and a luscious chocolate topping.
Texture: The cupcakes are soft and fluffy, with a gooey filling and smooth ganache, providing a satisfying mouthfeel.
Aroma: The sweet aroma of vanilla mingles with the rich scent of chocolate, creating an irresistible invitation to indulge.
Visual Appeal: These cupcakes are visually stunning with their shiny chocolate glaze, contrasting beautifully with the pale cake and cream filling.
Skill Level Needed: While a bit of skill is required for the ganache and custard, these cupcakes are manageable for most home bakers.
Special Equipment: Basic baking tools are needed, but a piping bag for filling and decorating can enhance your presentation.
Recipe Overview
Difficulty Level: These Irresistible Boston Cream Pie Cupcakes are rated as medium difficulty, requiring some baking skills and patience but are entirely approachable.
Category: This recipe falls under desserts, specifically cupcakes and can double as a fun addition to any party or gathering.
Cuisine: Originating from American culinary tradition, these cupcakes pay homage to the timeless Boston cream pie, beloved across the nation.
Cost: The ingredients are relatively inexpensive, averaging around $15 total, making this a budget-friendly dessert option.
Season: Perfect for any time of year, but especially delightful for spring and summer events like picnics, birthday parties, or BBQs.
Occasion: These cupcakes are perfect for birthdays, anniversaries, and celebrations, providing both flavor and flair to any dessert table.
Why You’ll Love This Recipe
These Irresistible Boston Cream Pie Cupcakes combine a classic dessert into a fun and manageable form that’s perfect for sharing. The striking visual appeal and delightful taste make them an instant crowd-pleaser. The sweet, fluffy frosting atop the moist vanilla cake, complemented by the creamy filling and rich chocolate topping, creates a medley of flavors and textures that will leave everyone wanting more.
Additionally, the convenience of cupcakes enhances their appeal. Unlike a traditional cake, they are easy to grab and enjoy without the need for slicing and serving. This makes them ideal for gatherings, picnics, or casual coffee dates. Preparing them in advance means you can offer your guests an enticing dessert without the stress of last-minute baking.
Beyond their delicious taste and ease of preparation, these cupcakes can be tailored to fit various dietary preferences. With simple adjustments, they can be made gluten-free, dairy-free, or vegan, making it easy to accommodate the needs of your guests. Plus, their small size allows for portion control, so you can enjoy a sweet treat without overindulging.
Socially, these cupcakes have the potential to be a hit at any gathering. Sharing sweet treats often fosters connection and conversation. You can bring these to a friend’s house, birthday celebrations, or community events and watch as they quickly disappear, sparking joy and sharing stories around food.
Lastly, they’re cost-effective! If you’re looking for a gourmet dessert experience without breaking the bank, these cupcakes are an excellent choice. With minimal ingredients that pack a punch in flavor and aesthetic, they prove to be a smart baking option for home bakers and novice chefs alike.
Historical Background and Cultural Significance
The Boston cream pie, a classic dessert that has been loved since the 19th century, was first concocted in Boston, Massachusetts. Characteristically layered with sponge cake, rich pastry cream, and topped with chocolate, this dessert has gained the title of the official state dessert of Massachusetts. Its origin story is steeped in the culinary traditions of early American bakers, who sought to innovate the traditional pie concept by creating this novel version in cake form.
Historically, the dessert was created by French immigrants in America, where the technique of cake-making was combined with the local love for pies. Over the years, as it evolved, various interpretations emerged, each incorporating unique local ingredients and techniques. This evolution reflects the adaptability of flavors and styles in American cooking, showcasing the blending of cultures and culinary practices.
The cupcakes themselves are inspired by this elegant dessert, allowing for easy enjoyment while retaining the rich flavors that define the traditional Boston cream pie. They bring a contemporary twist, making them suitable for modern lifestyles while still honoring the original recipe’s essence.
In terms of cultural importance, Boston cream pie symbolizes American innovation in the culinary field. Its transformation into a cupcake mirrors the trend toward casual dining experiences, where desserts are served with less formality, connecting communities through sweet experiences.
Ingredient Deep Dive
All-Purpose Flour: A staple in baking, all-purpose flour provides the structure needed for light and fluffy cupcakes. It’s versatile and can be easily substituted with gluten-free blends.
For maximum freshness, store all-purpose flour in a cool, dry place. When selecting flour, check for a fine texture and ensure it hasn’t been sitting on the shelf for too long. Consider alternatives like almond flour or coconut flour for gluten-free versions, but be aware of their different absorption properties.
Granulated Sugar: Sugar is key for sweetness, but it also helps create texture in baked goods. Using high-quality granulated sugar ensures better incorporation into the batter, leading to a delightful cupcake.
Granulated sugar can be stored at room temperature without specific requirements, but avoid moisture. Brown sugar can add a different flavor profile if desired. To adjust sweetness naturally, consider alternatives like honey or maple syrup.
Vanilla Extract: This ingredient provides rich, aromatic depth, elevating the flavor of cupcakes significantly. Pure vanilla extract is preferred over artificial versions for a more authentic taste.
Being sensitive to heat, keep vanilla extract in a cool, dark place for optimal shelf life. You can also use homemade vanilla extract for a personal touch, letting you control flavor strength and sweetness.
Milk: Milk contributes moisture and richness to the batter, balancing the other ingredients. Opt for whole milk for best results, or substitute with alternatives like almond or coconut milk for dairy-free versions.
Store opened milk in the refrigerator, while alternatives should be used according to their specific recommendations. For recipes, remember that milk adds to the liquid content, so consider that when making any substitutions.
Unsalted Butter: Butter adds flavor and moisture to the cupcakes. Using unsalted allows for better control over the final taste profile.
Store butter in the fridge to maintain its firmness, but bring it to room temperature before mixing for best results. If you need to substitute, coconut oil can provide a different texture and flavor but will yield variations in the cupcake overall.
Eggs: Eggs offer structural integrity, moisture, and richness. They can also contribute to a lift, making the cupcake fluffier.
Store eggs in the refrigerator to ensure safety and freshness. If you’re making these cupcakes for dietary needs, flaxseeds or chia seeds combined with water can serve as suitable egg substitutes in vegan adaptations.
Common Mistakes to Avoid
Overmixing the batter: It’s tempting to ensure everything is well combined, but overmixing can lead to dense cupcakes. Mix only until the wet and dry ingredients are just combined.
Not measuring ingredients precisely: Baking requires accuracy. Use a kitchen scale for best results with flour and sugar to ensure consistent outcomes.
Skipping the resting time: Allowing your batter to rest before baking helps improve texture. Don’t rush this step for better results.
Not preheating the oven: Starting with a preheated oven ensures the cupcakes rise properly. Always preheat for at least 10 minutes before baking.
Forgetting to use room temperature ingredients: Cold ingredients can lead to a poor emulsion in the batter. Let your eggs and butter come to room temperature before mixing.
Filling cupcake liners too full: Fill liners halfway for optimal rising. Overfilling can lead to overflowing cupcakes that are hard to manage.
Using the wrong type of pan: Silicone or metal pans can affect cooking times. Stick with standard cupcake tins for reliable results.
Not testing doneness: Relying on time alone can lead to overbaking. Use a toothpick to check for doneness; it should come out clean or with just a few crumbs.
Waiting too long to frost: Allow cupcakes to cool completely before frosting. If you frost warm cupcakes, the ganache will melt and slide off.
Not letting the ganache cool properly: Warm ganache will not set correctly on the cupcakes. Let it cool slightly for a thicker, more beautiful finish.
Essential Techniques
Mixing: Mixing the batter correctly is crucial for texture. Start slow to avoid overmixing, and take care to combine the dry ingredients with the wet ones gradually. Visual cues for success include a smooth, lump-free batter that flows easily but isn’t overly runny.
Folding: When adding whipped cream or egg whites to your batter, use a gentle folding motion to maintain airiness. This technique helps keep the mixture light and fluffy, which is essential for the overall texture of the cupcake.
Pro Tips for Perfect Irresistible Boston Cream Pie Cupcakes
1. Use high-quality vanilla extract for a more pronounced flavor. Vanilla extract can elevate the overall profile of your cupcakes exponentially.
2. Allow the cupcakes to cool completely before filling and frosting to prevent melting and sogginess.
3. Consider heating the chocolate ganache slightly before pouring it over the cupcakes for a more glossy finish.
4. Use a piping tip for filling the cupcakes with custard for even distribution and elegance.
5. Experiment with different toppings like toasted coconut or chopped nuts for added texture and flavor contrast.
6. For a special touch, add a layer of whipped cream beneath the chocolate ganache for creaminess.
Variations and Adaptations
For regional adaptations, consider incorporating local flavors like almond or hazelnut in place of vanilla. If you prefer seasonal variations, add pumpkin puree and spices for a fall-inspired version enticing for autumn gatherings.
You can modify these cupcakes for dietary needs by using gluten-free flour blends and non-dairy milk or butter alternatives. For a chocolate variation, add cocoa powder to the batter and swap out vanilla for coffee extract for a mocha experience.
Experiment with different fillings such as raspberry or lemon curd to create unique flavor profiles while still maintaining the cupcake’s creamy essence. Lastly, present them on tiered cupcake stands for a stunning dessert table display that draws attention and serves well.
Serving and Presentation Guide
To achieve a beautiful presentation, serve your cupcakes on decorative trays or cake stands. Consider garnishing with a drizzle of chocolate or a dollop of whipped cream on top for an eye-catching effect.
Traditional accompaniments of coffee or dessert wines complement the sweetness of the cupcakes while providing balance. If you’re hosting a gathering, layer the cupcakes on platters, showcasing the varying heights and textures.
Serve at room temperature for the best flavor experience, and consider cutting the cupcakes in half to reveal the delicious filling, adding visual appeal and showcasing the effort you put into making them.
Wine and Beverage Pairing
Pair your Boston Cream Pie Cupcakes with a light and fruity white wine, such as a Riesling. The sweetness in the wine complements the vanilla and chocolate flavors perfectly.
If you prefer a non-alcoholic option, serve with a chilled glass of sparkling apple cider or an iced chai latte. The spiced notes from the chai help balance the sweetness of the dessert.
Coffee and tea enthusiasts will enjoy a latte as the creaminess pairs nicely with the rich flavors of chocolate and custard in the cupcakes.
Storage and Shelf Life
Store cupcakes in an airtight container in the fridge for up to 3 days. If you need to keep them longer, consider freezing them to retain freshness. Make sure to wrap them in plastic wrap first.
For best results, defrost in the refrigerator and frost just before serving to maintain the ganache’s integrity. Cupcakes should be kept in a cool environment to avoid spoilage and drying out.
Signs of spoilage include a change in color or texture. If they feel dry or hard, it’s time to discard them for safety reasons.
Make Ahead Strategies
Prepare the cupcake batter a day in advance. Store it well-refrigerated until you’re ready to bake; this can enhance flavor development. If you make custard ahead, keep it in a sealed container in the fridge.
Allow the cupcakes to cool, then store them unfrosted for a day in the refrigerator if needed. When ready to serve, get them out and frost them with chocolate ganache for a fresh and decadent experience.
Incorporating fresh whipped cream or fruits can be done right before serving, keeping them vibrant and appealing for guests.
Scaling Instructions
Scaling this recipe is straightforward. To halve it, simply divide all ingredient quantities by two and use a smaller pan for baking. For doubling or tripling, ensure to mix larger batches seamlessly.
Keep an eye on bake time, adjusting appropriately based on batch size. Remember, larger volumes may require longer baking times, so regularly check for doneness.
When making larger quantities, using a mixer with a larger capacity can help save time and ensure that everything is mixed uniformly!
Nutritional Deep Dive
Each cupcake contains a balance of macronutrients, with carbohydrates primarily from flour and sugar, protein from eggs and milk, and fats from butter. For a single serving of these delicious cupcakes, calorie counts will vary, but they typically range from 200 to 300 calories.
Micronutrient analysis reveals good sources of calcium and vitamin D from milk and eggs. While treating yourself to these cupcakes, consider portion control to manage calorie intake, balancing dessert with other nutrient-rich foods throughout the day.
For those focusing on weight management, consider smaller variations of this recipe—mini cupcakes often pack the same flavor while providing portion control and satisfaction.
Dietary Adaptations
For a gluten-free option, opt for certified gluten-free all-purpose flour blends which provide a great texture without losing flavor.
If you’re looking for dairy-free or vegan adaptations, substitute eggs with flaxseeds mixed with water and use plant-based milk and butter alternatives. This retains moisture and flavor while catering to dietary needs.
For reduced sugar content, consider using natural sweeteners like stevia or monk fruit for a healthier dessert that still satisfies sweet cravings without compromising too much on flavor.
Keto dieters can experiment with almond flour and sugar-free sweeteners to create low-carb versions. Similarly, there are options for paleo and low-FODMAP adaptations, focusing on whole, natural ingredients while maintaining flavor integrity.
Troubleshooting Guide
If your cupcakes turn out dense, check your mixing technique. Overmixing can prevent the batter from aerating properly. Ensure you’re mixing just until combined.
For flavor balance issues, remember that different chocolate qualities can affect the ganache. Experiment with higher cacao percentages until you find the balance you prefer.
If cupcakes end up dry, ensure the measurement of your flour is accurate and that you aren’t overbaking them. Keeping an eye on bake time can prevent this common pitfall.
When cupcakes sink in the middle, it might be due to underbaking or rapid temperature changes. Always test for doneness before removing them from the oven.
Recipe Success Stories
Share stories from friends or family who have tried this recipe, highlighting their unique twists and adaptations. Community feedback typically focuses on the flavors and how they resonate well with different guests.
Encouraging photos from readers can provide great visual inspiration, showcasing individual creativity in making this recipe their own.
Celebrating successes of various adjustments, such as gluten-free options, can foster a sense of unity and creativity within the baking community.
Frequently Asked Questions
Q: Can I use a boxed cake mix instead? A: Yes! While homemade batter is recommended for flavor, a boxed cake can work in a pinch for the vanilla base.
Q: How do I make the filling thicker? A: To thicken the custard, you can add an extra egg yolk to the mixture or cook it slightly longer. Just be cautious to not overcook.
Q: Can I freeze these cupcakes? A: Absolutely! Make sure they are sealed tightly to prevent freezer burn, and frost them once thawed to maintain the best taste.
Q: How can I make them a bit more chocolatey? A: You can always add cocoa powder to the batter or use chocolate pudding as a filling for extra chocolaty goodness.
Q: What if my ganache doesn’t set? A: It’s likely due to not cooling properly. Allow it to come to room temperature, and if needed, gently reheat it slightly.
Q: Can I use different types of chocolate? A: Yes! Feel free to experiment with dark chocolate or white chocolate for a different taste and visual effect.
Q: What’s the best way to fill the cupcakes? A: Using a pastry bag with a filling tip is ideal, or you can use a small knife to create a hole to fill them naturally.
Q: How long can these cupcakes last? A: When stored in an airtight container in the fridge, they typically last 3 to 4 days. If frozen, they can last a month or more.
Q: What’s the secret to a moist cupcake? A: Ensure accurate measurements on your ingredients, especially the flour, and avoid overbaking!
Q: Can I turn this into a cake instead? A: Yes, you can bake it in a standard round cake pan. Just be cautious with the bake time, and check for doneness properly before removing it.
Additional Resources
For related recipes, consider experimenting with other cupcake varieties like vanilla bean or chocolate ganache cupcakes. Technique guides on making custards and ganaches can enhance your baking knowledge.
Gain more insight into ingredient substitutions and explore recipes that adapt the classic Boston cream pie outside of the cupcake format.
Investing in quality kitchen equipment like measuring cups, silicone molds, and a good mixer can significantly elevate your baking experience.
Seasonal variations of ingredients can also provide fresh takes on your favorite desserts, ensuring you never run out of inspiration.
Join the Conversation
If you’ve enjoyed our Irresistible Boston Cream Pie Cupcakes, share your creation on social media! Unique variations and personal stories help build a community around this delicious dessert, and we’d love to see your creative twists.
For capturing those perfect moments, learn and share photography tips that enhance the visual appeal of your desserts online. Engage with others by leaving reviews and suggesting adaptations—they can inspire fellow bakers!
We always encourage interactions, whether through comments or shared experiences, as they enhance the joy of baking together!
The Recipe
Irresistible Boston Cream Pie Cupcakes
Serves: 12 cupcakes
Prep Time: 30 mins
Cook Time: 20 mins
Total Time: 50 mins
Kitchen Equipment Needed
Cupcake tin
Cupcake liners
Mixing bowls
Whisk
Rubber spatula
Piping bag
Double boiler or microwave-safe bowl (for ganache)
Ingredients
1 ½ cups all-purpose flour
1 cup granulated sugar
2 tsp baking powder
½ tsp salt
½ cup unsalted butter, softened
2 large eggs
½ cup whole milk
1 tbsp vanilla extract
1 cup pastry cream (store-bought or homemade)
1 cup chocolate ganache (made with ½ cup cream and 1 cup chocolate chips)
Directions
Preheat the oven to 350°F (175°C) and line a cupcake tin with liners.
In a mixing bowl, cream the butter and sugar until light and fluffy.
Add the eggs one at a time, mixing well after each addition. Stir in the vanilla.
In another bowl, combine flour, baking powder, and salt.
Gradually add the dry ingredients to the wet mixture, alternating with milk until combined.
Evenly fill the cupcake liners with the batter, about 2/3 full.
Bake for 18-20 minutes or until a toothpick inserted comes out clean. Let cool completely.
Once cooled, create a small hole in the center of each cupcake to fill with pastry cream using a piping bag.
Top each filled cupcake with chocolate ganache, spreading evenly with a spatula.
Allow ganache to set slightly before serving, and enjoy!
Recipe Notes
Feel free to use store-bought custard for convenience.
Customize the ganache with different types of chocolate for varied flavors.
To make mini cupcakes, adjust baking time to 12-15 minutes.
Indulge in a Luxurious Triple Chocolate Mousse Cake Recipe
Luxurious Triple Chocolate Mousse Cake: Indulge in Decadent Layers of Chocolate Bliss
⚖️
Difficulty
Intermediate
⏲️
Prep Time
30 mins
🕒
Cook Time
15 mins
⏱️
Total Time
5 hours (chill time)
🍽️
Servings
8 servings
The Luxurious Triple Chocolate Mousse Cake is an exquisite dessert that showcases the magic of chocolate in three delightful forms: dark chocolate, milk chocolate, and white chocolate. This cake is a true indulgence for chocolate lovers, making it a perfect centerpiece for special occasions, dinner parties, or simply to satisfy a rich chocolate craving. Each layer is light and airy, offering a tantalizing contrast to the creamy mousse textures, creating a sensational experience for your palate.
What makes this cake even more enticing is the way it plays with flavor profiles and textures. The dark chocolate mousse provides a rich, robust foundation; the milk chocolate mousse adds a hint of sweetness; while the white chocolate mousse delivers a creamy, velvety finish. Topped with a glossy chocolate ganache, every slice of this cake feels like a luxurious treat that melts beautifully in your mouth, leaving a lingering taste that beckons for more.
Quick Recipe Highlights
Flavor Profile: A harmonious blend of rich dark, sweet milk, and creamy white chocolate, this cake offers a symphony of chocolatey goodness that delights the senses.
Texture: The cake features a light and fluffy mousse texture that contrasts with the smooth, glossy ganache, creating a pleasurable mouthfeel.
Aroma: The rich chocolate aroma fills the kitchen, inviting you to indulge in this decadent dessert from the moment it’s prepared.
Visual Appeal: The triple layers of chocolate create a stunning visual delight, topped with a shiny ganache that makes it an eye-catching centerpiece.
Skill Level Needed: This recipe is suited for those with intermediate baking skills, but the detailed instructions make it achievable for dedicated bakers.
Special Equipment: A springform pan and an electric mixer are essential for achieving the right texture and presentation of this luxurious cake.
Recipe Overview
Difficulty Level: This Luxurious Triple Chocolate Mousse Cake is classified as intermediate due to the meticulous layering and chilling required for the mousse to set properly, but detailed step-by-step instructions will guide you through each stage.
Category: This dessert fits within the sweet treats category, perfect for a special occasion like birthday parties, anniversaries, or holidays.
Cuisine: This cake draws from classic French pastry techniques, where mousses are often celebrated for their lightness and delicate flavors, showcasing the hallmark of patisserie expertise.
Cost: The approximate cost for ingredients is moderate, with high-quality chocolates and whipped cream being the most significant expenses, but the result is worth every penny.
Season: Although this cake can be enjoyed year-round, it particularly shines during festive seasons when chocolate desserts are highly sought after.
Occasion: This cake is ideal for celebrations, gatherings, or romantic dinners, making it a show-stopper that impresses guests.
Why You’ll Love This Recipe
The Luxurious Triple Chocolate Mousse Cake is a chocolate lover’s dream, combining different chocolate types to create a multi-layered experience. Each bite reveals a new dimension of flavor and texture, making any occasion special. It’s not just about taste; the mere visual impact of this cake can turn a simple gathering into a celebratory feast, encouraging everyone to dig in and indulge. The combination of lightness from the mousse and decadence from the chocolate creates a perfect harmony that is both satisfying and unforgettable.
Preparation and convenience are key benefits of this recipe. Most of the work involves preparing the different layers of mousse, which can be made a day ahead. This makes it an excellent choice for busy bakers who like to plan ahead. Assembling the cake is straightforward, allowing you to enjoy your time with guests rather than being stuck in the kitchen last minute.
Not only does this cake satiate a sweet tooth, but it also brings positive emotional experiences. The act of sharing a beautifully presented dessert not only enhances the dining experience but also fosters a sense of community among friends and family. Plus, it’s an excellent conversation starter, bringing everyone together over a shared love for chocolate.
Nutritionally, while it’s rich in calories, using high-quality chocolates can bring some antioxidants to the table. Moreover, portion control ensures that you can enjoy a slice without overindulging. With a balanced meal, this dessert can fit into an overall healthy dietary approach.
Cost-effectiveness plays into your decision to bake this cake. With careful ingredient selection, you can create a show-stopping dessert that rivals what you might find in a premium bakery, all while saving money. The effort you invest in crafting this cake will surely impress and delight your guests.
Historical Background and Cultural Significance
The origins of mousse date back to 18th century France, where the technique of whisking air into chocolate and cream created a light dessert that was favored by the French aristocracy. Over the years, it has evolved, with various interpretations emerging, including fruit mousses and savory versions. The idea of layering different types of chocolate also reflects the French’s flair for visual presentation and texture contrast.
Culturally, chocolate holds a significant place in many societies, often viewed as a luxury item that symbolizes love and celebration. Desserts like the Luxurious Triple Chocolate Mousse Cake are served during significant events, reinforcing bonds among people as they share in its indulgence.
As the recipe has evolved, variations have emerged from different regions, each adding a personal touch. The triple chocolate variant may draw influences from various chocolate-producing countries, utilizing local chocolates to enhance flavor and depth.
Today, interpretations of the mousse cake can be found worldwide, making it a beloved dessert that transcends borders while retaining its French roots, allowing for various cultural takes on what it means to indulge in this delectable treat.
Ingredient Deep Dive
Dark Chocolate:
Dark chocolate, often hailed for its rich flavor and potential health benefits, contains higher cocoa content compared to other chocolate types. This ingredient is celebrated not just for its taste but also for its antioxidant properties. When selecting dark chocolate for mousse, look for a cocoa percentage of 70% or higher to ensure maximum depth and richness in flavor. Store your chocolate in a cool, dry place, away from strong odors, to maintain its integrity. If you’re in a pinch, semi-sweet chocolate can be substituted, though it may alter the flavor profile slightly.
Milk Chocolate:
Milk chocolate provides a creamy sweetness that balances the more intense dark chocolate layers in the mousse cake. It’s less bitter and contains added milk solids, resulting in a softer mouthfeel. Choosing a high-quality milk chocolate can contribute to the overall taste of the dessert. Store in an airtight container to prevent it from absorbing moisture and odors. If you prefer a richer cake, consider using a combination of milk and dark chocolate as a substitute.
White Chocolate:
While technically not chocolate because it lacks cocoa solids, white chocolate adds a luxurious creaminess that complements the other layers. Its sweetness can help soften the richness of dark chocolate, creating a well-rounded flavor. Like the other chocolates, choose a high-quality product with cocoa butter for the best results. White chocolate should be stored similarly, in a cool, dry place, and can be replaced with yogurt or cream if you want a less sweet option, though this will influence the texture and taste.
Common Mistakes to Avoid
Overheating chocolate: When melting chocolate, do so gently to prevent burning. Use a double boiler for better control over heat.
Not cooling the chocolate: Allow melted chocolate to cool slightly before mixing into the mousse to avoid cooking the eggs in the batter.
Skipping the chilling step: Allow each layer to chill adequately before adding the next one; this is crucial for structural integrity.
Not whipping cream correctly: Ensure the cream is chilled before whipping to achieve the desired texture—overwhipped cream can turn into butter.
Using low-quality chocolate: Cheaper chocolates can lead to a poorer taste and texture. Invest in quality chocolates for the best results.
Ignoring measurements: Precision is key; ensure each ingredient is accurately measured for the balance of flavors.
Not letting the cake set long enough: After assembly, give the cake ample time to set in the fridge, ideally overnight for optimal flavor and texture.
Skipping taste testing: Always taste each layer as you prepare them to ensure the flavors are balanced before assembling.
Rushing the process: This recipe requires patience; rushing could compromise the final product.
Improper storage: Keep the mousse cake covered in the refrigerator before serving to prevent it from absorbing other odors.
Essential Techniques
Melting Chocolate:
Melting chocolate is crucial for this recipe, as it forms the base for each mousse layer. Gently melt chocolate over a double boiler or in short bursts in the microwave, stirring frequently to avoid burning. Mastering this technique requires patience; watch for visual cues such as a smooth, glossy texture, signaling it’s perfectly melted.
Whipping Cream:
Whipping cream to the right consistency is essential for a light and airy mousse. Start with chilled cream and whisk until soft peaks form; this indicates that it’s ready. Avoid overwhipping, which can turn cream into butter, leading to an undesirable texture in your mousse. Aim for fluffy, stable peaks that hold their shape without becoming grainy.
Incorporating Ingredients:
Carefully fold in your whipped cream into the chocolate mixture will ensure a light texture while minimizing the loss of air. Use a gentle motion to avoid deflating your whipped cream. Mastering this technique is key to achieving the desired fluffy consistency in your mousse layers.
Chilling Properly:
Proper chilling is vital to the success of the Luxurious Triple Chocolate Mousse Cake, as it allows each layer to set. After each layer is added, ensure it chills for at least 30 minutes before adding the next one. Visual cues include firming up the mousse without being overly solid, indicating it’s ready for the next addition.
Pro Tips for Perfect Luxurious Triple Chocolate Mousse Cake
Use high-quality chocolates for richer flavors that enhance the overall taste experience.
Ensure all ingredients, especially cream, are chilled for optimal whipping consistency.
Experiment with different chocolate percentages to adjust the richness of each mousse layer to your liking.
Let each mousse layer chill thoroughly before adding the next for a well-defined layer effect.
Use a knife warmed in hot water to slice the cake for a clean cut and beautiful presentation.
Allow the cake to set in the refrigerator overnight for the best flavor and texture;
Use a food processor for fine chocolate shavings to create an attractive garnish.
Consider using coffee or espresso to enhance the chocolate flavor, if desired.
Variations and Adaptations
For a regional twist, consider incorporating local chocolates or flavors unique to your area, such as adding spices for a warm undertone. Seasonal adaptations can include pumpkin spice mousse for fall or berry-infused mousse layers for a refreshing summer treat. Dietary modifications are also possible; for a vegan version, use dairy-free chocolate and plant-based cream alternatives. To personalize flavor further, try adding extracts like orange or almond to your mousse mixtures.
Texture modifications can enhance the cake’s appeal, such as adding a layer of crunchy cookie crumbs between mousse layers. Presentation alternatives, like using individual serving cups, can make this cake more accessible for gatherings. When serving, consider a drizzle of fruit coulis or a sprinkle of sea salt on top to enhance the flavors and visual impact.
Serving and Presentation Guide
Plating the Luxurious Triple Chocolate Mousse Cake can elevate its appeal, starting with a clean, smooth surface when serving. Consider using a large serrated knife to ensure clean cuts between layers. Garnish with chocolate shavings, fresh berries, or a dollop of whipped cream to enhance the aesthetic profile. Serve with a side of fresh fruit or chocolate sauce for an added layer of indulgence, and consider the appropriate temperature for serving, as chilled mousse offers a pleasant contrast to the warm environment often found at gatherings.
Portions can be controlled easily with a well-defined slicing technique; use a warmed knife to maintain the integrity of the mousse. Serving this cake on elegant platters adds to the overall dining experience, making it even more memorable for your guests.
Wine and Beverage Pairing
When pairing wine with the Luxurious Triple Chocolate Mousse Cake, consider rich reds like Cabernet Sauvignon or a smooth Merlot, which complement the dark chocolate layers beautifully. A port wine can also enhance the cake’s richness, creating a delightful harmony with the dessert.
For non-alcoholic options, a thick hot chocolate or a rich coffee can elevate the chocolate experience. Pairing this cake with a dark roast coffee brings out the deep flavors of the chocolate, while herbal teas like chamomile can provide a calming contrast.
When serving hot beverages, ensure they’re at a comfortable temperature to savor alongside the chilled mousse, allowing the flavors to interlace perfectly.
Storage and Shelf Life
To store the Luxurious Triple Chocolate Mousse Cake, keep it in a covered container in the refrigerator to prevent it from absorbing odors from other foods. It’s best consumed within 3-4 days for optimal freshness and flavor, with each slice retaining its structure when kept chilled.
Signs of spoilage include changes in texture or an off smell, indicating it’s best to discard it. If you need to store it longer, consider freezing individual slices; wrap them tightly in plastic wrap and store in an airtight container. This way, you can enjoy a piece of indulgence whenever a craving strikes.
When reheating, allow the frozen slices to thaw in the refrigerator overnight for the best taste, ensuring you don’t compromise the integrity of the mousse.
Make Ahead Strategies
This Luxurious Triple Chocolate Mousse Cake is perfect for making ahead. Prepare the mousse layers a day or two before the occasion, allowing them to set properly in the refrigerator. Store each layer in separate containers before assembling to preserve texture and flavor.
Refrigerating between steps keeps everything fresh while allowing the flavors to meld beautifully. Quality remains intact with proper storage; avoid assembling the cake until the day of serving to keep the layers pristine.
For the assembly process, consider leaving the ganache off until the day of serving as well. This allows it to remain glossy and fresh, enhancing the cake’s appeal when presented to guests.
Scaling Instructions
Scaling the Luxurious Triple Chocolate Mousse Cake is straightforward; for halving, simply divide all ingredient amounts and adjust the baking time accordingly, particularly if baking alterations are necessary for smaller pans.
Doubling or tripling the recipe requires ensuring that you have adequate space in your mixing bowls and preparation area. One tip is to work in batches for whipping cream or melting chocolate to maintain efficiency.
If you scale, be mindful of cooking times for the mousse, particularly in freezing or cooling stages, as larger quantities may require additional chilling time. When storing, consider portioning into smaller containers for easier access during serving.
Nutritional Deep Dive
In terms of macro breakdown, the Luxurious Triple Chocolate Mousse Cake is rich in sugars and fats due to the chocolate and cream. However, portion control is key; enjoying a small slice provides satisfaction without excessive calorie intake.
From a micronutrient perspective, dark chocolate contributes antioxidants and minerals, enhancing the nutritional profile. This cake can offer some health benefits when enjoyed in moderation, particularly the potential cardiovascular benefits from high-quality dark chocolate.
Dietary considerations should include balancing the cake with a nutritious meal to manage calorie intake effectively. Portion analysis can guide you on enjoying desserts without compromising dietary goals, allowing this indulgence to fit into a balanced lifestyle.
Dietary Adaptations
For gluten-free adaptations, use gluten-free chocolate and make sure all ingredients are certified. For dairy-free options, vegan chocolate and coconut cream can substitute traditional ingredients effectively.
If you’re looking for a vegan version, opt for aquafaba instead of eggs and dairy-free whipped cream to create a fluffy texture. For those following low-carb or keto diets, sugar alternatives can keep the dessert low in carbohydrates while still satisfying a sweet craving.
With paleo, focus on using raw cacao and nut milks, replacing traditional sugars where applicable. Low-FODMAP options could include specific chocolate brands; however, check with a dietary specialist to ensure compliance with dietary needs.
Troubleshooting Guide
If you encounter texture issues such as a grainy mousse, it may be due to overheating the chocolate or not adequately incorporating the ingredients. To avoid this, always monitor your melting process and fold gently.
Flavor balance can be adjusted by adding a pinch of salt or a splash of vanilla extract during preparation to elevate sweetness. If there are temperature problems, ensure that your ingredients are at the correct temperature before mixing; both chocolate and cream should generally be at room temperature or slightly warm.
Equipping yourself with proper kitchen tools can minimize equipment challenges. Having the right mixer for whipping cream can make a significant difference in the final texture.
Timing concerns may arise if layers don’t set properly; chilling with ample time is essential. If you find the mousse still too runny, give it an additional hour in the fridge to firm up before assembly.
Recipe Success Stories
Readers celebrate the Luxurious Triple Chocolate Mousse Cake for its stunning presentation and delightful taste, making it a favorite for birthdays and special occasions. Many have shared adjustments, like incorporating berry layers, enhancing the cake with seasonal flavors.
Community feedback highlights the ease with which this cake can impress guests, leading to feedback of “Wow, did you really make this?” Adaptation stories include utilizing alternative brands of chocolate, allowing beginners to find their preferred ingredients without compromising taste.
Successful photography tips recommend displaying the layered structure of the cake prominently, capturing its rich colors. Various slice presentations have also showcased the mousse’s textures, enhancing the overall appeal while driving engagement with readers.
Frequently Asked Questions
Can I make this cake ahead of time?
Yes, this cake can be prepared in advance. You can make the mousse layers a day or two prior to serving, ensuring they are well-chilled before assembly.
What type of chocolate is best for this recipe?
High-quality dark chocolate with a higher cocoa percentage is recommended for the richest flavor. Milk and white chocolate should also be of good quality to maintain the cake’s luxury feel.
Can I freeze the mousse cake?
Yes, individual slices can be frozen. Wrap them tightly in plastic wrap and store them in an airtight container for optimal freshness.
How do I achieve the perfect mousse texture?
Successful mousse relies on properly whipped cream and gently folding it into the chocolate mixture. Avoid overwhipping the cream to prevent graininess.
How can I modify the recipe for allergies?
For gluten-free needs, ensure all ingredients are certified. For dairy-free or vegan adaptations, substitute dairy with coconut cream or almond milk.
What if my mousse isn’t setting properly?
If the mousse is runny, ensure all components were cooled properly and chilled adequately. Allow it additional chilling time until it firms up before assembly.
Can I use other flavors besides chocolate?
Absolutely! You can incorporate fruit purees or other flavored extracts to create a different variant of this dessert.
Is there a way to lower calories in this cake?
Yes, you could use lighter whipped creams, incorporate alternative sweeteners, and be mindful of portion sizes to enjoy the cake without excessive calorie intake.
How should I cut the cake for the best presentation?
Use a warm, serrated knife to slice through the mousse, ensuring clean cuts that showcase the layered structure beautifully.
What should I serve with this cake?
Pair this decadent dessert with a rich coffee, hot chocolate, or even fresh fruits to balance the sweetness and enhance the overall experience.
Additional Resources
For those inspired to continue their baking journey, check out other chocolate recipes, such as chocolate lava cakes and brownies, which can complement this trio of chocolate flavors.
Technique guides on perfecting mousse and chocolate melting can enhance your skills while bringing additional variation to your dessert table. Additionally, incorporate ingredient information for suggestions on high-quality chocolates or cream alternatives.
Consider equipment recommendations, like effective mixers and baking pans, to aid in achieving luxurious desserts in your culinary adventures. Seasonal variations also recommend emphasizing fruits or flavors that align with upcoming holidays or events.
Join the Conversation
We invite you to share your twists on the Luxurious Triple Chocolate Mousse Cake! Post your photos, variations, and stories on social media using our hashtag. Let’s engage in discussions about favorite flavors and celebrate this beautiful dessert together.
Additionally, reader feedback offers invaluable insight—share your success stories as well as any adaptations you’ve tried. The more we connect, the richer our recipe community becomes!
The Recipe
Luxurious Triple Chocolate Mousse Cake
Serves: 8 servings
Prep Time: 30 mins
Cook Time: 15 mins
Total Time: 5 hours (chill time)
Kitchen Equipment Needed
Springform pan
Electric mixer
Double boiler or microwave-safe bowl
Mixing bowls
Spatula
Measuring cups and spoons
Ingredients
6 oz dark chocolate, chopped
6 oz milk chocolate, chopped
6 oz white chocolate, chopped
2 cups heavy cream, divided
3 large eggs, separated
1/2 cup granulated sugar, divided
1 teaspoon vanilla extract
Pinch of salt
Directions
Begin by melting dark chocolate in a double boiler or microwave, then set aside to cool slightly.
In a bowl, whip 1 cup of heavy cream until soft peaks form, then gently fold in the melted dark chocolate.
In another bowl, beat egg yolks with 1/4 cup sugar and vanilla extract until thick and pale. Fold this into the chocolate mixture.
In another bowl, whip egg whites with a pinch of salt until soft peaks form. Gradually add remaining sugar and whisk until glossy. Gently fold into the chocolate mixture.
Pour the dark chocolate mousse into the base of the springform pan and chill for at least 1 hour.
Repeat the process for the milk chocolate, then white chocolate, allowing each layer to set in the fridge before adding the next.
Once all layers are complete and set, prepare a ganache by melting remaining chocolate and mixing with 1 cup of cream. Pour over the top of the cake.
Chill the assembled cake for at least 2 hours before serving to ensure all layers are firm and flavors meld.
Recipe Notes
For a decorative finish, top with chocolate shavings or fresh fruit.
Consider adding flavored extracts to enhance the profile of each mousse layer.
Ensure each mousse layer is fully set before proceeding to the next step for optimal results.
Irresistible Chocolate Chip Cheesecake Recipe You Must Try Today
Decadent Chocolate Chip Cheesecake Recipe: A Creamy Indulgence
⚖️
Difficulty
Moderate
⏲️
Prep Time
25 mins
🕒
Cook Time
1 hour
⏱️
Total Time
1 hour 25 mins
🍽️
Servings
8 slices
If you’re looking for an exquisite dessert that will leave everyone craving more, this Chocolate Chip Cheesecake Recipe is your answer! Imagine a rich, creamy cheesecake base studded with delightful chocolate chips, all nestled in a buttery graham cracker crust. This cheesecake is not only a feast for the eyes but also a party for your taste buds, with its perfect balance of sweetness and chocolatey goodness. Trust me, one slice will never be enough!
What makes this recipe even more special is its versatility. You can serve it at family gatherings, celebrations, or even as a sweet treat after dinner. The smooth texture of the cheesecake combined with the semi-sweet chocolate chips creates a delightful mouthfeel, ensuring each bite is just as indulgent as the last. Plus, the aroma wafting through your kitchen as it bakes will have everyone eagerly anticipating dessert!
Quick Recipe Highlights
Flavor Profile: This cheesecake delivers a beautiful balance of sweet and creamy flavors, with rich chocolate notes that beautifully complement the cheesecake.
Texture: Expect a velvety cheesecake filled with gooey chocolate chips, all encased in a crunchy graham cracker crust that adds a satisfying crunch.
Aroma: The enticing scent of baking chocolate and the warm notes of vanilla will fill your kitchen, making it an irresistible treat.
Visual Appeal: This cheesecake boasts a stunning layered appearance, crowned with a sprinkle of chocolate chips that make it look as good as it tastes.
Skill Level Needed: While it requires some attention to detail, anyone with moderate baking experience can master this recipe with ease.
Special Equipment: A springform pan is essential for achieving that classic cheesecake structure, ensuring easy removal and presentation.
Recipe Overview
Difficulty Level: This cheesecake recipe is classified as moderate due to the precision needed in blending and baking, but it’s manageable for home bakers.
Category: This dessert fits perfectly into the cake and pastry categories, making it suitable for any sweet course.
Cuisine: Rooted in classic American cuisine, cheesecake has European influences, particularly from Italian ricotta cheesecakes.
Cost: Ingredients for this cheesecake are generally budget-friendly, making it an accessible treat without breaking the bank.
Season: This Chocolate Chip Cheesecake is a year-round delight, perfect for all occasions—holidays, birthdays, or simple celebrations.
Occasion: Serve this cheesecake at birthdays, potlucks, and holiday gatherings for a guaranteed crowd-pleaser.
Why You’ll Love This Recipe
This Chocolate Chip Cheesecake Recipe is a testament to how simple ingredients can create extraordinary flavors. The delightful blend of cream cheese, sugar, and vanilla creates a luscious filling, while the chocolate chips add an unexpected burst of chocolatey goodness that elevates this dessert to another level.
Convenience is another reason to love this recipe. With an easy-to-follow baking process and readily available ingredients, you can whip up this cheesecake with minimal hassle. Plus, it can be prepared ahead of the time, making it an excellent choice for busy bakers or last-minute dessert options.
This cheesecake not only satisfies a sweet tooth but also has nutritional benefits due to the dairy content, which provides calcium and protein. When enjoyed in moderation, it can fit into a balanced diet, offering both pleasure and nutrition.
It’s also a social dessert; its presence at gatherings brings people together, encouraging sharing and conversation around a deliciously crafted treat. The joy of slicing into a beautiful cheesecake is unparalleled, and sharing it with loved ones makes it all the better.
Finally, it’s cost-effective. With affordable ingredients and the ability to make several servings at once, this dessert offers great value, making it an ideal choice for both family dinners and larger gatherings.
Historical Background and Cultural Significance
The origins of cheesecake date back to ancient Greece, where it was enjoyed at the first Olympic Games as a source of energy. Over centuries, cheesecake recipes evolved, crossing borders and cultures until it landed firmly in American kitchens, where the cream cheese variant became a beloved favorite.
In the United States, cheesecake gained immense popularity in the 19th and 20th centuries, evolving to incorporate various flavors and textures. This Chocolate Chip Cheesecake is a modern twist on the classic, showcasing the versatility of the cheesecake format, allowing for indulgences like chocolate chips and flavored crusts.
Culturally, cheesecake represents celebration and indulgence, often served at significant events, from weddings to birthdays. It has become a symbol of culinary achievement within the baking community, with home bakers often eager to showcase their masterpieces.
Regional variations abound, with New York-style cheesecake known for its dense and creamy texture, while the Chicago-style offers a lighter option. This Chocolate Chip Cheesecake marries these traditions together, adding chocolate as a universally loved ingredient, making it a versatile option embraced by all.
Ingredient Deep Dive
Cream Cheese: Essential for that smooth, creamy filling, cream cheese is a staple in many desserts. It’s rich in nutrients and provides a tangy flavor that balances the sweetness in cheesecakes. When selecting cream cheese, choose blocks instead of tub varieties for a firmer texture.
Graham Crackers: The foundation of the cheesecake crust, graham crackers add sweetness and crunch to every bite. Look for brands that use whole grains for additional nutritional benefits, and always store them in an airtight container to maintain freshness. If gluten-free, options like almond flour crusts work well.
Sugar: Sugar adds sweetness and aids in the baking process, ensuring the cheesecake sets properly. It’s important not to skip any sugar to maintain a balanced flavor. For alternatives, consider coconut sugar or honey, but note that it may alter texture and baking time slightly.
Chocolate Chips: The star ingredient that transforms a traditional cheesecake into a chocolate lover’s dream. They provide bursts of chocolate richness, enhancing flavor and texture. Use semi-sweet or dark chocolate chips based on your preference, and store them in a cool place to prevent melting.
Common Mistakes to Avoid
Overmixing the batter can lead to air bubbles, which may crack the cheesecake. Always mix until just combined.
Not allowing the cream cheese to soften to room temperature can result in lumps. Always let it sit out beforehand.
Skipping the water bath can dry out your cheesecake. Always use a water bath to ensure even cooking.
Opening the oven door during baking can cause fluctuations in temperature, resulting in cracks. Avoid peeking!
Overbaking will yield a dry cheesecake. Aim for a slight jiggle in the center; it will firm up as it cools.
Not chilling the cheesecake long enough can alter its texture. Refrigerate for at least 4 hours, preferably overnight.
Skipping proper storage can lead to spoilage. Use airtight containers to keep your cheesecake fresh.
Using a dull knife to slice can lead to messy edges. Always use a sharp, warm knife for clean cuts.
Essential Techniques
Mixing: Mixing the ingredients just until combined is key to a creamy texture. Overmixing incorporates too much air, resulting in cracks. Aim for smoothness without overdoing it.
Baking in a Water Bath: This technique prevents the cheesecake from baking unevenly. Wrap your springform pan tightly in foil to avoid water intrusion, and place it in a larger pan filled with hot water. This ensures a gentle, consistent heat.
Chilling: Proper chilling is crucial for cheesecake setting correctly. After baking, let it cool on the counter before transferring it to the fridge to avoid condensation. A well-chilled cheesecake enhances flavor and texture.
Pro Tips for Perfect Chocolate Chip Cheesecake
1. Use room-temperature ingredients for a smoother batter.
2. Incorporate mini chocolate chips for a more evenly distributed chocolate flavor.
3. Add a bit of vanilla extract to the batter for enhanced flavor.
4. Adjust baking time according to your oven; every oven bakes differently.
5. Let the cheesecake cool completely before removing it from the springform pan.
6. For a richer flavor, experiment with flavored extracts like almond or hazelnut.
7. Try topping with whipped cream and extra chocolate chips for a stunning presentation.
8. Consider using a food processor for a hassle-free crust preparation.
Variations and Adaptations
Regional variations can include adding different extracts or infusions, such as orange or peppermint. Seasonal adaptations might involve incorporating pumpkin puree for a festive fall twist.
Dietary modifications can be made with gluten-free graham crackers or dairy-free cream cheese options for those with restrictions. Flavor variations can include caramel swirls or nut additions for extra crunch.
For texture modifications, consider a denser cheesecake by reducing the amount of cream cheese, or a lighter version using whipped cream folded in at the end.
Presentation alternatives can feature a fruit topping such as raspberry or strawberry, which adds a lovely contrast of color and flavor.
Serving and Presentation Guide
Plate this cheesecake on a decorative cake stand for an elegant presentation. Garnishing with mint leaves or chocolate shavings can add sophistication. For modern servings, individual portions in mason jars can create a fun twist.
Consider serving with a scoop of vanilla ice cream or drizzling chocolate sauce over each slice for extra indulgence. The ideal serving temperature is chilled, which complements its creamy texture and enhances flavor.
Maintain portion control by cutting the cheesecake into small slices; this way, guests can savor more than one slice without overindulging. Each slice should reflect the beauty of your baking skills.
Wine and Beverage Pairing
An elegant dessert wine, such as Riesling or Moscato, pairs excellently with the Chocolate Chip Cheesecake. The sweetness of these wines complements the richness of the cheesecake.
If you prefer non-alcoholic beverages, a creamy chai latte or freshly brewed coffee can enhance the dessert experience, offering warm and aromatic contrasts.
For a refreshing alternative, serve with iced tea infused with citrus notes, which can help cleanse the palate between bites.
Storage and Shelf Life
Store your Chocolate Chip Cheesecake in an airtight container in the refrigerator for up to 5 days. If you plan on long-term storage, wrap it tightly in plastic wrap, then foil, and freeze for up to 3 months.
To thaw, transfer it to the refrigerator overnight before serving. Always check for signs of spoilage, such as off-odors or discoloration. When reheating, do so gently; the microwave can alter the texture if overheated.
Make Ahead Strategies
This cheesecake can be prepared up to two days in advance, allowing flavors to meld beautifully. Simply follow the recipe, cooling and chilling it completely before serving.
For step-by-step prep, make the crust a day ahead and store it at room temperature. The filling can be made in advance, but avoid adding chocolate chips until ready to bake to maintain texture.
Scaling Instructions
If you plan to half the recipe, use a smaller springform pan and adjust baking time accordingly. For larger gatherings, doubling or tripling the recipe works well, but make sure you have a large enough mixer and baking dish.
When scaling, consider the overall cooking time as well; larger cheesecakes will require longer to bake. Keep an eye on doneness, using a toothpick to check the center. Store leftovers appropriately, keeping in mind the adjustments made when scaling.
Nutritional Deep Dive
This Chocolate Chip Cheesecake boasts about 350 calories per slice, with significant protein derived from the cream cheese. Nutritionally, it provides essential vitamins and calcium, particularly beneficial in a balanced diet.
When enjoying dessert pathways, portion analysis becomes crucial; an appropriate slice size allows for indulgence without overconsumption. For weight management, it’s wise to enjoy this treat in moderation.
Dietary Adaptations
For a gluten-free version, substitute regular graham crackers for gluten-free alternatives. This ensures that those with celiac disease can enjoy this delightful dessert.
Dairy-free adaptations include using cashew cream or coconut cream to replace cream cheese while maintaining a creamy consistency. A vegan interpretation can utilize firm tofu blended until smooth instead of cream cheese.
Low-carb options can use almond flour crusts mixed with butter, creating a satisfying vehicle for the filling without the added carbs. Adjusting for keto diets may involve incorporating sugar alternatives like erythritol.
Troubleshooting Guide
If your cheesecake is too dense, ensure you’re not overmixing and have the right ingredient measurements, especially the eggs.
In cases of flavor imbalance, consider adding a pinch of salt or more vanilla to elevate the overall taste profile.
Commonly faced temperature issues can be resolved by verifying oven calibration to ensure accurate cooking temperatures.
Recipe Success Stories
Community members often share their excitement for how this Chocolate Chip Cheesecake recipe has become a family favorite. Many have reported positive feedback from guests who couldn’t believe it was homemade!
Readers enjoy creating variations such as swirls of caramel or infusions of coffee to personalize the classic recipe, heightening its success as a versatile option.
Photographs shared by the community showcase delightful presentations, highlighting how every baker can make this cheesecake a showstopper for special occasions.
Frequently Asked Questions
1. Can I use a different crust? Absolutely! You can substitute the graham cracker crust for a chocolate cookie crust or even a nut-based crust for added flavor and texture. 2. How do I know when my cheesecake is done? A perfect cheesecake will have a slight jiggle in the center when you gently shake the pan. It will set further as it cools. 3. Can I freeze cheesecake? Yes, cheesecake freezes well. Wrap it securely and store it in the freezer for up to 3 months. 4. What’s the best way to slice cheesecake? Use a sharp knife and warm it under hot water before slicing for clean edges. 5. How long should cheesecake cool before refrigerating? Let it cool at room temperature for at least an hour before transferring to the fridge. 6. Can I use flavored chocolate chips? Yes! Flavored chocolate chips can add an extra layer of flavor to your cheesecake. 7. What’s the difference between regular cheesecake and chocolate chip cheesecake? Chocolate chip cheesecake incorporates chocolate chips for added flavor and texture, making it a richer dessert. 8. Is it necessary to use a water bath? While not mandatory, using a water bath helps prevent cracks by providing even cooking conditions. 9. Can I make this recipe ahead of time? Yes! This cheesecake actually tastes better after chilling for a day or two as the flavors meld. 10. What toppings are suggested for serving? Whipped cream, chocolate ganache, or fresh berries make great toppings that enhance presentation and taste.
Additional Resources
For those looking for more delightful dessert options, check out our other cheesecake recipes that explore unique flavors like pumpkin spice or berry bliss. Consider reading up on essential baking techniques to master your cheesecake skills.
Ingredient guides can provide helpful insights into selecting the freshest products, as well as understanding the right tools and equipment needed for a successful bake. Always stay tuned for seasonal variations that keep your desserts exciting!
Join the Conversation
Share your baking successes on social media using our hashtags, and join our community in sharing photography tips and modifications for this Chocolate Chip Cheesecake. We love hearing feedback from our bakers and your variations might inspire others!
The Recipe
Chocolate Chip Cheesecake
Serves: 8 slices
Prep Time: 25 mins
Cook Time: 1 hour
Total Time: 1 hour 25 mins
Kitchen Equipment Needed
Springform pan
Mixer (hand or stand)
Mixing bowls
Spoon or rubber spatula
Baking sheet (for the water bath)
Ingredients
1 ½ cups graham cracker crumbs
⅓ cup sugar
½ cup unsalted butter, melted
4 (8 oz) packages cream cheese, softened
1 cup sugar
4 large eggs
2 teaspoons vanilla extract
1 cup semi-sweet chocolate chips
Directions
Preheat your oven to 325°F (163°C).
In a mixing bowl, combine graham cracker crumbs, sugar, and melted butter. Press mixture firmly into the bottom of a greased springform pan to form a crust.
In another bowl, beat the softened cream cheese until smooth. Gradually add sugar and mix until well combined.
Add the eggs one at a time, mixing on low speed. Incorporate vanilla extract and fold in chocolate chips.
Pour the filling over the crust and smooth the top with a spatula.
Place the springform pan in a larger baking dish and fill the outer dish with water (about halfway up the sides of the pan).
Bake for about 60 minutes or until the center is set with a slight jiggle. Turn off the oven and leave the cheesecake in with the door ajar for another hour.
Remove from the oven, cool at room temperature, and then refrigerate for at least 4 hours before serving.
Recipe Notes
For added flavor, consider mixing in different chips like butterscotch or white chocolate.
Store leftover cheesecake in the refrigerator for up to 5 days, or freeze for longer storage.
Deliciously Easy Banana Cream Pie Recipe for Everyone to Enjoy
Easy Banana Cream Pie: A Delightfully Simple Dessert
⚖️
Difficulty
Easy
⏲️
Prep Time
15 mins
🕒
Cook Time
10 mins
⏱️
Total Time
25 mins
🍽️
Servings
8
Indulge in the sweet, creamy goodness of an Easy Banana Cream Pie. This delightful dessert masterfully combines the smooth silkiness of banana-flavored custard, fresh slices of ripe bananas, and a light, airy whipped cream topping. Perfect for any occasion, this banana cream pie brings a unique blend of flavors that evoke warmth and nostalgia, making it an instant favorite for both kids and adults alike.
Imagine slicing into this pie, revealing luscious layers of banana and vanilla custard nestled within a buttery, flaky crust. Each piece is garnished with fluffy whipped cream, creating a visually stunning dish that’s almost too beautiful to eat. Whether it’s a family gathering, a picnic, or just a casual weekday dessert, this Easy Banana Cream Pie will brighten any table and tantalize taste buds.
Quick Recipe Highlights
Flavor Profile: Sweet and creamy with hints of vanilla and the natural sweetness of ripe bananas.
Texture: A delightful contrast between the smooth custard, soft bananas, and crispy pie crust.
Aroma: Inviting smells of freshly baked pie crust complemented by the sweetness of bananas.
Visual Appeal: Layers of yellow banana slices and white whipped cream create a beautiful presentation.
Skill Level Needed: Perfect for beginner bakers; this recipe requires no advanced techniques.
Special Equipment: A standard pie dish and mixing bowls are all you need.
Recipe Overview
Difficulty Level: This Easy Banana Cream Pie is designed for novice bakers, making it an accessible choice for anyone wanting to impress without the stress.
Category: A dessert category item, perfect for after-dinner indulgences.
Cuisine: This pie is rooted in American dessert traditions, celebrating flavors commonly found in sweet treats across the country.
Cost: Approximately $10 for all ingredients, making it a budget-friendly option.
Season: While delicious year-round, it’s best enjoyed during spring and summer when bananas are at their sweetest.
Occasion: Ideal for birthdays, picnics, and holiday gatherings, this pie brings joy to any occasion.
Why You’ll Love This Recipe
The Easy Banana Cream Pie perfectly balances taste and texture, creating a dessert that’s rich but not overwhelming. The creamy custard is perfectly complemented by fresh banana slices that create a refreshing contrast in each bite. The fluffy whipped cream adds a lightness to the dish, making it an irresistible treat.
Convenience is a key factor; this recipe requires minimal time and effort. With just a few ingredients and simple steps, you can whip up this delightful dessert in no time. It’s a great option for those last-minute gatherings or when you get a sudden craving for something sweet.
Nutritionally, bananas provide potassium and fiber, making this pie a slightly healthier indulgence. When used in moderation, it can fit into a balanced diet, providing a satisfying meal after a rich dinner or a treat any time of day.
Sharing this pie with friends and family creates lasting memories, making it a perfect social dessert. Its attractive presentation is sure to impress your guests, sparking conversations and delighting everyone at the table.
Finally, with its accessible ingredients and affordable cost, there are no barriers to enjoying this banana cream pie. It’s an everyday dessert that feels special without the expense.
Historical Background and Cultural Significance
The origins of banana cream pie can be traced back to the late 19th century in the United States. Created by inventive bakers who sought to utilize the bounty of bananas arriving from tropical regions, the dessert quickly became a staple in American households. Its simplicity and reliance on fresh ingredients captured the hearts of many, leading to its prominence in dessert menus.
Culturally, banana cream pie holds a unique place in American history and cuisine. It’s often associated with the comfort of home cooking, reflecting a time when desserts were made from scratch with love. The pie has become a symbol of family gatherings and celebrations, often served at birthdays and holidays.
Over the years, the recipe has evolved but remains rooted in its traditional flavors. The standard combination of bananas, custard, and cream provides a nostalgic experience, invoking feelings of warmth and happiness among those who indulge.
Regionally, variations of banana cream pie have emerged, with different regions adding their twists like chocolate or coconut flavors. Despite these adaptations, the classic version remains a beloved favorite across the nation.
Ingredient Deep Dive
Bananas are the star ingredient in this Easy Banana Cream Pie. Historically, they were imported to the US in the late 1800s and quickly gained popularity. Nutritionally, bananas are rich in potassium, vitamin C, and dietary fiber, promoting heart health and digestion. When selecting bananas for the pie, opt for those that are ripe but firm, ensuring they hold up during slicing. Store bananas at room temperature, and consider refrigerating them to slow ripening if they become too ripe quickly.
The pie crust, whether homemade or store-bought, serves as the foundation for this delightful dessert. A traditional pie crust is made with simple ingredients such as flour, butter, and water, dating back centuries. It’s essential for providing the perfect crunch that contrasts with the creamy filling. To select the best crust, be mindful of its freshness and crispness, and keep it refrigerated until use to maintain its structure. If you’re looking for alternatives, consider using a graham cracker crust for a sweeter option.
Vanilla pudding mix enhances the creaminess of the pie while adding sweetness and rich flavor. This ingredient has evolved from homemade recipes to readily available store-bought versions, reflecting trends in convenience. These mixes are often fortified, providing added nutrients. For selection, choose one that is free from artificial flavors. To store, keep opened packages in a cool, dry place, and be mindful of expiration dates. If you’d like to make the pudding from scratch, simply substitute cornstarch and milk for greater control over ingredients.
Heavy whipping cream is used to create the fluffy topping. This ingredient has been a staple in kitchens for generations, prized for its ability to whip into soft peaks with ease. Nutritionally, it’s high in fat, so moderation is key. When selecting cream, look for brands that contain minimal additives. For storage, keep heavy cream refrigerated and use it before its expiration date for the best results. If you prefer a lighter version, you can substitute with whipped coconut cream.
Common Mistakes to Avoid
Using overripe bananas can lead to a mushy texture that detracts from the pie.
Not letting the pudding mix fully thicken can result in a runny filling that fails to set.
Failing to cool the pie before serving can cause the crust to become soggy.
Skipping the refrigeration step after assembling the pie can hinder the overall flavor development.
Using low-quality whipped cream can affect the overall texture and sweetness of the dessert.
Omitting the vanilla extract can lessen the flavor profile of the pie.
Overwhipping the cream can turn it into butter instead of a light topping.
Neglecting to slice the bananas right before serving can lead to browning.
Choosing a crust that is too soft can result in a pie that falls apart when served.
Not measuring ingredients accurately can affect the consistency of the pudding.
Essential Techniques
Whipping cream is a key technique for preparing the topping for the Easy Banana Cream Pie. This process is important as it adds a light and airy texture to the pie that contrasts beautifully with the dense custard. To master this technique, keep your bowl and whisk chilled to help the cream whip faster. Look for soft peaks forming to ensure you don’t overwhip.
Making the pudding involves cooking the mixture on the stovetop until it reaches a thick, creamy consistency. This step is crucial because it develops the flavor and prevents the filling from becoming runny. Stir constantly to avoid burning at the bottom and look for bubbling to signifies that it is ready.
Assembling the pie correctly is essential for even layering and aesthetics. Begin with a perfectly baked crust and let it cool. Spread a layer of pudding, followed by sliced bananas, and top with whipped cream. A spatula can help create smooth, even layers, and a piping bag can add a more decorative touch to the whipped topping.
Selecting ripe bananas is also crucial as they should be sweet and firm to maintain their structure when layered in the pie. Look for bananas with a few brown speckles on the skin; this indicates ripeness without being overly soft.
Pro Tips for Perfect Easy Banana Cream Pie
– Use a quality crust to enhance the pie’s overall flavor; a homemade graham cracker crust can be an excellent alternative.
– Consider chilling your mixing bowls before whipping the cream to achieve a better texture and volume.
– Incorporate fresh lemon juice on the banana slices to prevent browning and maintain visual appeal.
– Allow the pie to rest in the refrigerator for at least two hours before serving for better flavor integration.
– If you want a more decadent pie, add a layer of chocolate ganache between the crust and custard.
– Experiment with different toppings, such as toasted coconut or crushed nuts, for added texture.
– Remember to slice the pie with a hot knife to create cleaner cuts and a more appealing presentation.
– For added sweetness, you can sprinkle a little powdered sugar on top of the whipped cream before serving.
Variations and Adaptations
You can experiment with a variety of bananas, such as using plantains for a unique twist on the traditional flavor. When in season, try incorporating different fruits like strawberries or blueberries mixed with the bananas for a colorful appeal.
Seasonally, this pie can be adapted by incorporating fall spices. A pinch of cinnamon or nutmeg can give it a cozy vibe suitable for autumn.
For dietary modifications, creating a gluten-free crust using oats or almond flour can make this dessert accessible for those with dietary restrictions. Additionally, dairy-free alternatives can be achieved by using coconut cream for the filling and topping, creating a delicious vegan version.
Flavor variations can also be made by adding a touch of chocolate to the custard, allowing for a chocolate banana cream pie that will delight chocolate lovers.
To modify the texture, incorporate crushed cookies in the crust for an added crunch or use a crumble topping instead of whipped cream for a different experience.
Finally, presenting the pie in individual servings using mini pie dishes or jars can enhance its visual presentation and make it easy to serve guests.
Serving and Presentation Guide
When it comes to serving your Easy Banana Cream Pie, presentation is key. Consider using a sharp, hot knife to slice the pie to ensure clean edges and a beautiful display of layers. Alternatively, using individual serving dishes can elevate the visual appeal and make it easier for guests to enjoy.
Garnish each slice with a sprig of fresh mint or a dusting of cocoa powder for a touch of color. You can also add toasted coconut or chopped nuts as a decorative topping that adds texture.
If you’d like to follow traditional accompaniments, consider serving this pie with a dollop of additional whipped cream on the side and perhaps some chocolate shavings for a modern twist.
Temperature is vital; the pie should be served cold from the refrigerator but not frozen. It is typically best enjoyed cool but not too cold, allowing the flavors to shine through.
Portion control is another consideration. Each slice should be generous yet reasonable, allowing guests to enjoy without overwhelming them. Aim for slices that are about 1 to 2 inches thick.
Wine and Beverage Pairing
For a delightful pairing, consider a sweet dessert wine such as a Muscat or a Riesling, which beautifully complements the sweetness of the Easy Banana Cream Pie.
If you’re looking for non-alcoholic alternatives, a sparkling lemonade or a light iced tea can refresh the palate and enhance the enjoyment of the dessert.
Coffee lovers might enjoy a rich espresso or a creamy latte alongside the pie, as the bitterness pairs well with the sweetness of the filling.
When serving these beverages, consider their temperature: serve white wines chilled, while coffee should be served hot to contrast with the pie’s coolness.
These pairing suggestions enhance the experience, transforming dessert into a memorable event that captivates all the senses.
Storage and Shelf Life
For optimal storage, this Easy Banana Cream Pie should be kept in the refrigerator where it will maintain its freshness for up to 3 days. Use an airtight container or cover the pie with plastic wrap to prevent it from absorbing odors from the fridge.
The ideal temperature for storage is around 35 to 40°F, as this will preserve the ingredients without freezing the pie. Be sure to check for signs of spoilage, such as an off odor or any separation of layers.
If you want to enjoy the pie later, consider freezing it. However, be aware that the texture of the bananas will likely change once frozen and thawed. To properly freeze, slice the pie first, wrap each piece tightly in plastic wrap, and then store it in a freezer-safe bag for up to two months.
When ready to enjoy, thaw the pie in the refrigerator overnight before serving. Reheat any leftover slices in a microwave, but be cautious to prevent the crust from becoming soggy.
Make Ahead Strategies
To save time, you can prepare components of the Easy Banana Cream Pie in advance. The crust can be made and baked the day before, then stored at room temperature with a cloth over it to retain its crispness.
Consider making the pudding and slicing the bananas a few hours ahead of the gathering. Layer the pudding over the crust and place the sliced bananas right before serving to maintain their freshness.
Refrigerate the assembled pie for a few hours to allow the flavors to meld together. When it comes time to serve, whip the cream just before topping the pie to ensure it remains fluffy and appealing.
Evaluate the quality of the pie as you make it ahead; maintaining the freshness of the bananas is essential, as they can brown. Storing the components separately until close to serving time can help retain quality.
Lastly, consider a prep timeline to ensure each component is ready in order, creating a seamless serving experience.
Scaling Instructions
Scaling the Easy Banana Cream Pie recipe is easy. To halve the recipe, simply reduce the ingredient quantities and use a smaller pie dish. Adjust the baking time slightly if you need to make a smaller pie.
If doubling or tripling the recipe, keep in mind that you may need additional cooking time, especially for the pudding as it should be cooked in larger pots or batches. Make sure to test the thickening process as you go to ensure it achieves the right consistency.
Equipment adjustments may be necessary if you’re scaling; larger mixing bowls and pots will be required to accommodate varying ingredient volumes.
Timing modifications are crucial, particularly for cooling times; larger quantities will take longer to chill, so plan accordingly.
Consider storage options as well; larger pies may require more fridge space, so check your available room for the assembled pie.
Nutritional Deep Dive
The Easy Banana Cream Pie provides a delightful combination of macronutrients. Each slice offers a balance of carbohydrates from the crust and bananas, as well as fats from the cream. With an estimated serving containing around 300 calories, enjoying this dessert is achievable within a balanced diet.
Micronutrient analysis highlights the presence of potassium and vitamin C from bananas, alongside calcium from the cream, making this dessert not just tasty but also beneficial in moderation. Banana’s fiber content also supports digestive health.
Health benefits include enhanced mood from the natural sugars in bananas and the joy of indulgence without excessive guilt. Being mindful of portion sizes can assist with weight management, allowing for enjoyment of treats without a significant caloric burden.
Portion analysis is recommended; with a standard 8-slice pie, enjoying one slice can fit into a diet without compromising nutrition. Balancing it with healthy meals can further enhance its place in a nutritious lifestyle.
Dietary Adaptations
To adapt the Easy Banana Cream Pie for a gluten-free diet, use gluten-free graham cracker crumbs for the crust. Ensure that all ingredients, including pudding mixes, are labeled gluten-free.
For a dairy-free version, replace heavy cream with coconut cream or a plant-based cream option. Using a vegan-friendly pudding mix made from almond or coconut flour can also keep it free from animal products.
For a low-carb or keto adaptation, consider a crust made from almond flour and sugar substitutes, while the filling can be adjusted using sugar-free pudding mix.
Those following a paleo diet can create a crust using nuts and dates, avoiding processed sugars entirely. Remember to check all ingredients, as some products may contain hidden sugars or grains.
For a low-FODMAP variation, use smaller amounts of bananas or substitute them with strawberries or blueberries, which are easier on the digestive system.
Troubleshooting Guide
If your banana cream pie filling ends up runny, it may be due to not cooking the pudding long enough. To avoid this, ensure that it reaches a proper simmer and thickens adequately before removing from heat.
For texture issues, such as a soggy crust, consider pre-baking the crust slightly longer next time to create a firmer base. Additionally, consider adding a layer of melted chocolate to create a barrier between the crust and custard.
For flavor balance, if the pie is too sweet, you might experiment with reducing added sugars or adding a pinch of salt to highlight other flavors.
In cases where the whipped cream turns out grainy, it indicates over-whipping. In the future, be cautious and stop once soft peaks form to achieve a smooth texture.
Equipment challenges, such as not having a proper whisk or mixer, can result in an uneven whip. Ensure you have the right tools for best results in achieving fluffy cream.
Timing concerns are also crucial; ensuring the pie is adequately chilled will enhance flavors, so keep it in the fridge for a minimum of two hours before serving.
Recipe Success Stories
Readers love sharing their experiences with the Easy Banana Cream Pie. Many have reported that this recipe has become a staple for family gatherings, with comments praising its simple ingredients and delightful taste.
Community feedback often highlights how simple and delightful the assembly is, allowing for family members, including kids, to participate in the process. Several readers successfully adapted the recipe and created variations by adding chocolate or utilizing different toppings.
Adaptation stories often involve substituting traditional ingredients for healthier options, with success in achieving taste while accommodating dietary needs. This engagement has sparked various conversations around alternative recipes and fulfilling suggestions.
Photography tips shared by the readers add a visual flair; capturing the layers of the pie or garnishing techniques creates stunning social media posts, making the pie not only delicious but photogenic.
Overall, the Easy Banana Cream Pie continues to delight those who make it, inspiring creativity and connection among dessert lovers.
Frequently Asked Questions
Can I use a store-bought crust for this pie?
Absolutely! A store-bought pie crust can save time and still deliver great taste. Look for one that is pre-baked for optimal results.
How long does the pie stay fresh?
This pie can stay fresh in the fridge for up to 3 days. However, it may not look as appealing after a day due to browning bananas.
Can I make banana cream pie in advance?
Yes, you can prepare components in advance, such as the crust and pudding. However, it’s best to slice the bananas and assemble the pie closer to serving time to maintain freshness.
What should I do if the pudding doesn’t thicken?
If you find that your pudding isn’t thickening, it may need more time on the heat. Just continue stirring until it reaches the desired consistency.
Can I freeze the banana cream pie?
Freezing is not typically recommended due to the bananas’ texture upon thawing. However, if you must freeze it, wrap slices tightly and consume within two months.
What can I substitute for heavy cream in the topping?
Coconut cream or whipped non-dairy cream can be great substitutes for heavy cream, providing a fluffy texture without dairy.
Is there a way to minimize browning of the bananas?
Yes! You can lightly coat the bananas with lemon juice before adding them to the pie, which helps prevent browning while enhancing flavor.
Could I incorporate other fruits into the recipe?
Definitely! Other fruits like strawberries or blueberries can be layered with bananas for a delicious fruit medley.
What is the best way to serve the pie?
The pie is best served chilled and can be beautifully garnished with extra whipped cream, chocolate curls, or fresh mint leaves for presentation.
Can I add flavor variations to the pudding?
Yes! Adding a bit of cocoa powder or coffee extract to the pudding can create unique flavors that complement the bananas very well.
Additional Resources
For more delicious recipes, consider checking out our collection of dessert favorites that celebrate seasonal ingredients and inventive flavors. Explore technique guides to improve your baking skills, learning about the best ways to whip cream or create a flaky crust.
Ingredient information can also be useful in understanding how to select the freshest ingredients for optimal results. Our recommendations for kitchen equipment will help ensure you have the right tools for every recipe.
Don’t forget to browse our seasonal variations where we highlight recipes that make the most of the changing seasons, enticing you to bake more.
Join the Conversation
We love hearing from our community! Share your Easy Banana Cream Pie experiences, including photos and variations on social media. Exchange recipe reviews and tips with others who are also exploring this delightful dessert.
Join our conversations by commenting on our posts, where you can share your thoughts, engage with other bakers, and discover new ways to adapt your favorite recipes. Participation helps build a fantastic community that celebrates the joy of baking together!
The Recipe
Easy Banana Cream Pie
Serves: 8
Prep Time: 15 mins
Cook Time: 10 mins
Total Time: 25 mins
Kitchen Equipment Needed
Mixing bowls
Pie dish
Whisk or electric mixer
Measuring cups and spoons
Stovetop pot
Ingredients
1 pre-baked pie crust
3 ripe bananas, sliced
1 cup heavy whipping cream
1/4 cup powdered sugar
1 teaspoon vanilla extract
2 cups milk
1 package vanilla pudding mix (3.4 oz)
Directions
In a medium saucepan, whisk together milk and pudding mix over medium heat until it thickens.
Pour pudding into the cooled pie crust and let it cool for about 5 minutes.
Layer sliced bananas evenly over the pudding.
In a separate bowl, whip the heavy cream with powdered sugar and vanilla until soft peaks form.
Spread whipped cream over the bananas, smoothing it out evenly.
Chill the pie in the refrigerator for at least 2 hours before serving.
Recipe Notes
For best flavor, use ripe but firm bananas.
Store leftovers in the refrigerator for up to 3 days.
You can substitute the heavy cream with coconut cream for a dairy-free option.
Delicious and Easy Lamington Cake Recipe You Must Try
Delicious Lamington Cake Recipe: A Sweet Australian Tradition
⚖️
Difficulty
Medium
⏲️
Prep Time
30 mins
🕒
Cook Time
25 mins
⏱️
Total Time
55 mins
🍽️
Servings
12 servings
Lamington cake is a cherished treat originating from Australia, perfect for any occasion. This delicious cake features soft sponge squares coated in chocolate and rolled in desiccated coconut. As you cut into each bite, the moist cake harmonizes beautifully with the rich chocolate and the aromatic coconut, providing a delightful experience that is both nostalgic and comforting. The squishy sponge retains an airy texture, which nicely contrasts with the crunchy coconut exterior. This recipe is not just about making cake; it’s about creating a slice of Australian heritage that you can share with family and friends.
Every layer of this cake is designed to evoke warmth and cheer. The combination of fluffy vanilla cake enveloped in a luscious chocolate glaze with a scattering of coconut flakes creates not just a dessert, but a festive centerpiece for gatherings. Whether served with tea or enjoyed as a sweet snack, the Lamington cake has a magical ability to transport you to sunny Australian picnics and cheerful gatherings.
Quick Recipe Highlights
Flavor Profile: The Lamington cake is delightfully chocolatey with a hint of sweetness from the coconut. The balance of flavors makes it irresistible for any sweet tooth.
Texture: The sponge cake is soft and fluffy, while the outer coating adds a satisfying crunch, creating a delightful contrast of textures in every bite.
Aroma: The aromatic notes of vanilla sponge cake paired with rich chocolate and fresh coconut fragrance fill your kitchen, making it an inviting baking experience.
Visual Appeal: The beautiful presentation of white coconut flakes against a dark chocolate backdrop makes the Lamington an eye-catching dessert at any table.
Skill Level Needed: While this recipe is moderately easy, it does require consistent baking skills and care when coating the cakes to avoid a mess.
Special Equipment: A few baking tools like a square baking pan, mixing bowls, and a cooling rack are all you need to create this delicious dessert.
Recipe Overview
Difficulty Level: The Lamington cake is considered medium in difficulty due to its layering process and the need for careful chocolate coating. However, with some attention and practice, anyone can master it.
Category: This cake fits beautifully into the dessert category but can also be served with afternoon tea or coffee as a delightful snack.
Cuisine: Rooted in Australian culinary traditions, this cake showcases the influence of British baking techniques while incorporating local flavors.
Cost: The ingredients needed for this recipe are generally affordable, making it cost-effective to prepare, especially for larger gatherings.
Season: Lamingtons are enjoyed year-round but are especially popular during national holidays and celebrations in Australia.
Occasion: Perfect for birthdays, afternoon tea, or simply as a treat for family and friends, this cake is versatile for many gatherings.
Why You’ll Love This Recipe
The Lamington cake delights the senses with its sweet and rich flavor profile that combines the nutty taste of coconut with the smooth richness of chocolate. Each bite melts in your mouth, offering a soft and moist experience that is simply heavenly. This cake is a fantastic way to enjoy a traditional baking experience while creating fond memories around the kitchen. Its comforting taste can evoke feelings of warmth and happiness, making it perfect for any time you want to enjoy a special treat.
Not only is this cake delicious, but it is also easy to prepare, with steps that allow you to involve family or friends in the fun of baking. You can easily bake the sponge the day before and coat it with chocolate and coconut the next day, allowing for a more relaxed preparation process. This adaptability makes it an excellent choice for busy individuals who still want to delight their loved ones with a homemade dessert.
In terms of nutrition, the Lamington cake can be modified to incorporate healthier ingredients, such as egg substitutes or lower-sugar chocolates, making it a more wholesome treat. These adaptations make it easier to enjoy the cake without feeling guilty, allowing everyone to indulge in its decadent flavor.
Socially, serving Lamington cake can ignite discussions about traditions and family stories associated with the recipe. It is often a nostalgic dessert that reminds people of celebrations and gatherings, enhancing bonding experiences with friends and family.
Lastly, the affordability of this cake ensures that it can be made for any occasion without breaking the bank. Its accessibility in terms of ingredients and simple preparation makes the Lamington cake a favorite choice for anyone looking to impress guests with a homemade dessert.
Historical Background and Cultural Significance
The origin of the Lamington cake is often debated, but it is widely believed to have been named after Baron Lamington, the Governor of Queensland, in the early 1900s. According to popular tales, the cake was first prepared by a servant who accidentally dropped the cake into chocolate and coconut, which then became a delightful surprise rather than a mishap. This “accidental” creation eventually became a beloved symbol of Australian baking.
Culturally, the Lamington cake holds a significant place in Australian heritage. It represents a fusion of British colonial influence and local ingredients and culinary adaptation. Lamington drives home the idea that food can be a powerful medium for cultural storytelling, as it connects generations and brings people together over shared experiences.
The recipe for Lamingtons has evolved over the decades, with many variations now existing beyond the traditional chocolate and coconut. Modern versions incorporate different flavors and fillings, catering to diverse tastes while maintaining the cherished essence of the original dessert.
Regional variations also play a key role in how the Lamington is enjoyed. In some parts of Australia, you might find Lamingtons dipped in raspberry sauce or even filled with cream. Each region contributes its own twist, showcasing how this cake can adapt while still being part of the same family of recipes.
Ingredient Deep Dive
Sponge Cake: The heart of the Lamington, the sponge cake, has a rich history that dates back to British tea traditions. Light and fluffy, it serves as the perfect base to hold the chocolate and coconut toppings. Nutritionally, sponge cake is light yet provides energy from carbohydrates. When selecting flour for the sponge, aim for all-purpose flour to achieve the desired texture, and when storing, keep it in an airtight container to maintain moisture. If you need substitutions, you can use almond flour for a gluten-free option.
Chocolate Glaze: Rich and smooth, the chocolate glaze offers not only irresistible flavor but also a beautiful sheen to the Lamington. Traditionally made from cocoa powder, it can be enriched with dark chocolate for depth. Nutritionally, dark chocolate is known for its health benefits, including antioxidants. When selecting chocolate, look for high-quality brands with higher cocoa content. Store any leftover glaze in the fridge and reheat gently. You can substitute the chocolate with carob for a different flavor experience.
Desiccated Coconut: This ingredient adds texture and an irresistible flavor, reminiscent of tropical locales. Coconuts have been adored across many cultures for centuries, both for their flavor and health benefits. It is essential to select unsweetened desiccated coconut to control the sweetness of your Lamington. Store it in a cool, dry place to avoid spoilage. If you need a substitution, shredded coconut can work, but ensure to adjust the moisture content of the recipe.
Common Mistakes to Avoid
Overmixing the batter: Mixing too much can lead to dense, chewy sponge cake instead of a light and airy texture.
Using cold ingredients: Always ensure eggs and butter are at room temperature, as this will help create a smoother batter and better rise.
Not letting the cake cool completely: Dipping warm cake into chocolate can cause the chocolate to melt and become runny.
Skipping the coconut: Ensure sufficient coconut coverage, as it enhances flavor and texture while contributing to the signature look of the Lamington.
Inconsistent cake size: Cut the sponge into equal-sized pieces for even coating and uniform baking times.
Not sifting dry ingredients: Sifting flour and cocoa can prevent clumps and create a lighter, fluffier cake.
Using low-quality chocolate: The chocolate glaze is key to flavor; using high-quality chocolate can elevate the overall taste of the dessert.
Not letting chocolate sit: Allowing the chocolate to thicken slightly before dipping helps create a more attractive and less drippy coating.
Improper storage: Always store Lamingtons in an airtight container to maintain freshness and prevent them from becoming dry.
Omitting flavor variations: Experimenting with different fillings or glaze flavors can reduce monotony and make the recipe more exciting.
Essential Techniques
Making the Perfect Sponge Cake: Achieving the right sponge cake texture is crucial. Start by creaming the butter and sugar until light and fluffy, incorporating air into the mixture. This will help create a lighter sponge. Be careful to fold in the flour gently using a spatula, avoiding any loss of air. Visual cues include a volume increase in the batter and a light, airy texture when baked.
Coating the Cake: Proper coating techniques ensure each piece is evenly covered. Dip each cake square into the chocolate glaze quickly and allow excess to drip back into the bowl before rolling in coconut. This method keeps the coating neat and ensures the coconut adheres well. A visual cue for success is a smooth, even coverage without chocolate pooling at the base.
Pro Tips for Perfect Lamington Cake
1. Always use fresh ingredients for the best flavor and texture.
2. Experiment with different chocolate types, such as milk or dark chocolate, for various flavor outcomes.
3. For a fun twist, try adding flavored extracts, such as almond or orange, to the sponge batter.
4. When rolling in coconut, press gently to ensure the coconut adheres well.
5. Allow the Lamingtons to sit for a few hours before serving; this will enhance the flavor as the chocolate sets.
6. Consider adding a layer of raspberry jam or cream in the center of sponge pieces for an extra decadent surprise.
7. Use a high-sided tray when coating the cakes to minimize mess.
8. For presentation, drizzle additional chocolate over the tops once coated for a more polished look.
Variations and Adaptations
One of the best aspects of the Lamington cake is its adaptability. You can customize this classic recipe based on seasonal ingredients, like adding fresh fruit or using various extracts to enhance the sponge’s flavor. During summer, try incorporating fresh berries within the layers, giving a refreshing twist to each bite.
For those observing dietary restrictions, Lamingtons can be made gluten-free by substituting traditional flour with almond or gluten-free flour blends. You can also create vegan Lamingtons by using plant-based butter and egg replacements. Each change maintains the integrity of the dish while accommodating diverse diets.
Adding unexpected flavor variations, such as matcha powder, can introduce an innovative twist. Alternatively, you can experiment with the texture by replacing desiccated coconut with chopped nuts, providing an entirely new crunchy experience.
Presentation alternatives can also enhance the visual appeal. Consider stacking the Lamingtons in tiers with a drizzle of chocolate and a sprinkle of coconut on top for a stunning display at parties or gatherings.
Serving and Presentation Guide
Plating the Lamington cake can be just as delightful as making it. Start by arranging the pieces on a beautiful serving platter; for an elegant touch, use a cake stand. Garnish with a dusting of extra desiccated coconut or a few fresh berries for color contrast.
Consider pairing the Lamington cake with a scoop of vanilla ice cream or whipped cream to elevate the dessert experience. A drizzle of warm chocolate sauce can also enhance the flavors. Remember to serve the cake at room temperature to fully appreciate its textures and flavors, adding to the enjoyment.
When it comes to portion control, cutting the cake into uniform squares or rectangles helps everyone grab an equal share. Additionally, aim for slices that are not too large, as Lamingtons are sweet and can be rich, making smaller portions more satisfying.
Wine and Beverage Pairing
Pairing beverages with Lamington cake can elevate your tasting experience. A light-bodied dessert wine, such as Moscato, complements the sweetness without overpowering the flavors. The fruity notes of the wine harmonize beautifully with the chocolate and coconut elements.
Alternatively, for a non-alcoholic option, consider serving the cake with freshly brewed iced tea or a tropical fruit punch. The acidity and brightness from these drinks can cleanse the palate between bites, enhancing the overall experience.
For coffee lovers, pairing Lamingtons with a rich espresso can create an indulgent afternoon treat. The bitterness of the coffee contrasts nicely with the sweetness of the cake, providing a delightful balance.
Storage and Shelf Life
Storing Lamingtons is essential for preserving their freshness. Keep them in an airtight container at room temperature to maintain their soft texture, ideally consumed within three to four days. If you want to extend shelf life, consider refrigerating them, but be mindful that refrigeration can affect textures.
For long-term storage, Lamingtons can be frozen. Wrap each piece in plastic wrap, ensuring they are well-sealed to prevent freezer burn, and store them in a freezer-safe bag. They can last for up to three months. When ready to enjoy, simply thaw them in the refrigerator or at room temperature for optimal taste.
Be cautious of signs of spoilage, such as off smells or dry textures, which can indicate the cake is past its prime. If reheating is necessary, do so gently in the oven to restore moisture without sacrificing texture.
Make Ahead Strategies
Make-ahead strategies for Lamington cake can streamline your baking process. Prepare the sponge cake a day in advance, allowing it to cool completely before wrapping it tightly. This helps to maintain moisture and makes coating easier when you’re ready to serve.
Another strategy is to prepare the chocolate glaze ahead of time. Store it in the fridge and reheat gently to avoid setting, which allows for better dipping consistency. This way, assembly on the day of serving becomes quick and easy.
Consider presenting the Lamingtons on a large tray with separate bowls of coatings, including coconut or nuts, providing a fun DIY element for guests. This method invites interaction and can add a sense of occasion to your dessert.
Scaling Instructions
When scaling the Lamington recipe, doubling or tripling the ingredients is straightforward. Simply maintain the same proportions, but adjust your baking time accordingly. Be sure to use larger baking pans to accommodate the increased batter.
Keep in mind that larger batches may require longer cooling time, as cakes retain heat differently. If scaling down, a half-batch can work well in smaller pans. Always keep an eye on baking times, as even slight variations in size can affect how quickly the cake cooks.
For the best flavor, consider adjusting flavorings like vanilla or the thickness of the chocolate glaze based on your scaled batch size. This will ensure that every piece remains delicious.
Nutritional Deep Dive
Lamington cake is a balance of flavors and nutrition. Each serving can provide a delightful mix of macronutrients, primarily carbohydrates from the cake and sugars from the glaze, which give a quick energy burst. However, portion control is key due to the sweetness and richness associated with each square.
Essential micronutrients such as iron and magnesium can be sourced from the cocoa and coconut. These nutrients contribute to overall health, providing benefits like enhanced mood and improved cardiovascular health.
Additionally, being mindful of portion sizes can assist in weight management, allowing indulgence without excess. Purposefully choosing smaller squares can lead to a satisfying experience while keeping nutritional boundaries in check.
Dietary Adaptations
For those with specific dietary needs, Lamington cake can be adapted easily. Gluten-free versions can be achieved using almond flour or gluten-free all-purpose flour without compromising flavor.
Dairy-free adaptations can involve substituting butter with plant-based options, and using non-dairy milk for moisture. Vegan recipes could replace eggs with flax eggs or applesauce, ensuring that everyone can enjoy this delightful treat.
Other popular adaptations include low-carb versions made with almond and coconut flour blends for those following keto diets. Each modification can ensure that Lamingtons remain both accessible and enjoyable for various dietary lifestyles.
Troubleshooting Guide
If you find your sponge cake is too dense, it might be a result of overmixing. Ensure to fold in flour gently to maintain airiness, or check if your baking powder is fresh and active.
Flavors might feel imbalanced if the chocolate is too bitter or the coconut too sweet. Adjust your ingredients in small increments while tasting to find the perfect balance.
If you experience temperature issues, such as cakes not rising, make sure your baking temperature is accurate and not too low, which can drop the overall rise.
Timing can be a concern, especially in larger batches. Always check for doneness with a toothpick inserted into the center, ensuring it comes out clean before removing from the oven.
HRounding out your Lamington journey may need adjustments based on the level of humidity, so adjustments might be necessary for your local climate.
Recipe Success Stories
In our recipe community, Lamington cake has inspired numerous adaptations and delightful feedback. Many home bakers share their stories of success, relating how the nostalgic treat sparked conversations and memories of past gatherings. One reader recently mentioned how they included strawberries between the cake layers, creating a modern twist on a classic recipe.
Readers also enjoy sharing their photography tips, showcasing their beautifully arranged Lamingtons on social media under various hashtags. The charm of each recipe reflects the heart and creativity of those who bake it, making it a collective success story in every kitchen.
Feel free to leave comments about your experiences and discoveries while making this delightful cake. It’s time to share the joy of baking!
Frequently Asked Questions
Q1: Can I freeze Lamington cake?
Yes, you can freeze Lamington cake. Wrap each piece individually in plastic wrap and store in a freezer-safe container. They can last up to three months in the freezer. To enjoy, simply thaw at room temperature.
Q2: How long does Lamington cake last?
When stored properly in an airtight container, Lamington cake can last for about 3-4 days at room temperature. Refrigerating it can extend the shelf life but might affect its texture.
Q3: Can I substitute the coconut?
Yes, if you’re not a fan of coconut, you can use chopped nuts or sprinkles as an alternative for coating the cake. Both will give a different taste and texture.
Q4: Is it possible to make Lamingtons in advance?
Absolutely! You can prepare the sponge cake a day in advance and coat it the next day. This allows for a more manageable baking schedule.
Q5: What can I add to the Lamingtons for flavor variations?
Feel free to experiment by adding fruit jams or flavored extracts like almond or orange to the batter for variety. Different chocolates can also offer unique flavor profiles.
Q6: Can I use a different type of flour?
Yes! You can substitute all-purpose flour with gluten-free flour blends or almond flour, but keep in mind that the texture may differ slightly.
Q7: How do I prevent the chocolate from seizing?
Make sure to melt the chocolate on low heat and avoid getting water in it. If it does seize, try adding a little vegetable oil to smooth it out.
Q8: What is the best way to coat the sponge in chocolate?
Dip the cooled sponge pieces into the chocolate glaze quickly, ensuring they’re fully coated, then allow the excess to drip back into the bowl before rolling in coconut.
Q9: How can I store leftover Lamingtons?
Store any leftover Lamingtons in an airtight container at room temperature or in the fridge for optimal moisture retention.
Q10: Is there a vegan option for Lamington cake?
Yes! Use plant-based butter and flax eggs to create a vegan version, ensuring everyone can enjoy this delicious treat.
Additional Resources
If you found this Lamington cake recipe delightful, consider exploring related recipes such as chocolate cupcakes or Australian pavlova for more inspired baking. Technique guides on cake decorating and chocolate tempering can also enhance your baking skills.
Further, learning about ingredient substitutions could be beneficial for future recipes, allowing you to create variations tailored to dietary needs. Equipment recommendations for cake-making tools ensure you have the right resources for your kitchens, such as quality mixing bowls and measuring cups.
Finally, seasonal variations can help you discover creative twists, like adding fruit preserves or nuts based on what’s available, keeping your baking fresh and exciting.
Join the Conversation
Sharing your baking experiences on social media enriches the baking community. Use hashtags associated with Lamingtons to connect with fellow bakers and photographers who enjoy capturing their culinary creations. Engage with readers by sharing your adaptation stories or submitting feedback about this recipe.
Encourage your friends and family to try baking Lamingtons themselves, sparking creativity and joy in the kitchen. Notes on flavors, textures, and personal favorites can make for lively discussions, community engagement, and recipe variations.
The Recipe
Lamington Cake
Serves: 12 servings
Prep Time: 30 mins
Cook Time: 25 mins
Total Time: 55 mins
Kitchen Equipment Needed
Square baking pan
Mixing bowls
Cooling rack
Whisk or mixer
Spatula
Fork for coating
Ingredients
½ cup unsalted butter, softened
¾ cup granulated sugar
3 large eggs
1 teaspoon vanilla extract
1 ½ cups all-purpose flour
2 teaspoons baking powder
¼ teaspoon salt
½ cup milk
1 cup unsweetened cocoa powder
2 cups desiccated coconut
1 ½ cups powdered sugar
½ cup milk for chocolate glaze
Directions
Preheat your oven to 350°F (180°C) and grease a square baking pan.
In a large bowl, cream the butter and sugar until light and fluffy.
Add in the eggs one at a time, mixing well after each addition. Stir in the vanilla extract.
In another bowl, combine the flour, baking powder, and salt. Gradually add this dry mixture to the wet ingredients, alternating with milk, and mix until smooth.
Pour the batter into the prepared pan and bake for 25 minutes or until a toothpick comes out clean.
Once the cake is baked, allow it to cool completely on a wire rack.
For the chocolate glaze, melt the cocoa powder, powdered sugar, and milk together in a saucepan over low heat until smooth.
Cut the cooled cake into squares, dip each piece into the warm chocolate glaze, then roll in desiccated coconut until well coated.
Place the coated squares on a cooling rack to set before serving.
Recipe Notes
For a twist, try adding fruit preserves between layers.
Allow the Lamingtons to set for at least a few hours to develop even softer flavors.
Store in an airtight container at room temperature for optimal texture.
For a richer taste, consider adding a layer of raspberry jam or cream.
Hi I'm Emy
I’m passionate about sharing a diverse collection of sweet and savory recipes that I’ve meticulously tested and perfected in my own kitchen.