“`html
Refreshing Homemade Traditional Horchata Recipe
Table of Contents
Introduction: A Cooling Tradition
Did you know that the global market for plant-based beverages is projected to reach over $38 billion by 2025? This surge highlights our collective craving for refreshing, dairy-free alternatives, and at the heart of this trend lies a timeless classic: traditional homemade horchata. More than just a drink, this creamy, cinnamon-kissed elixir is a cultural touchstone, a sweet respite from the heat, and a testament to the magic of simple ingredients. Originating from Valencia, Spain, and lovingly adopted and adapted across Latin America, particularly Mexico, horchata has quenched thirsts for centuries. This authentic Mexican drink is not just about cooling down; it’s about creating a moment of pure, creamy delight. So, why settle for store-bought versions packed with preservatives when you can craft a superior, refreshing homemade traditional horchata in your own kitchen? Let’s dive into the art of making this liquid comfort food.
Ingredients for Authentic Horchata
The beauty of this traditional homemade horchata recipe lies in its humble components. Each ingredient plays a crucial role in building its signature creamy texture and complex, soothing flavor profile.
- 1 cup long-grain white rice: The foundation. Long-grain rice like jasmine or basmati yields a lighter, less starchy horchata compared to short-grain. (Sensory: Provides the essential creamy body and neutral canvas.)
- 1 cinnamon stick (about 3 inches) + 1/2 tsp ground cinnamon (optional): The soul of the drink. A whole cinnamon stick infuses a deep, woody spice during soaking, while a dash of ground cinnamon at the end enhances aroma. (Substitution: 1 tablespoon of cinnamon bark pieces.)
- 4 cups warm water (for soaking)
- 2 cups cold water or milk*: For blending. Using all water keeps it dairy-free and traditional. Using half milk (dairy or plant-based) adds extra creaminess. (Substitutions: Almond milk for nuttiness, oat milk for sweetness, coconut milk for tropical notes.)
- 1/2 cup granulated sugar: Adjust to taste. This provides the classic sweet balance. (Sensory: Cuts through the rice’s starchiness and complements the cinnamon’s warmth.)
- 1 teaspoon pure vanilla extract: The flavor enhancer. It adds a warm, floral depth that makes the horchata taste “complete.” (Substitution: The seeds from 1/2 a vanilla bean for an ultra-premium touch.)
- Ice, for serving
- Ground cinnamon or cinnamon stick, for garnish
*Traditional Mexican horchata often uses water, while other variations incorporate milk. This recipe’s base is water, with milk as a creamy add-in option.
Timing and Preparation
Unlike many recipes that require constant stirring or heating, this authentic Mexican drink is blissfully hands-off. The key time investment is the soaking period, which is non-negotiable for achieving the right texture. Compared to “quick” recipes that blend raw rice directly, this traditional soaking method (4-8 hours, or ideally overnight) ensures a smoother, grit-free horchata and allows the cinnamon to fully permeate the liquid. The active prep time is under 15 minutes, making it an incredibly easy project with a spectacular payoff.
Step-by-Step Instructions
Step 1: Soak and Blend
In a large bowl or pitcher, combine the 1 cup of long-grain white rice and the whole cinnamon stick. Pour the 4 cups of warm (not hot) water over them. The warmth helps kickstart the soaking process. Give it a gentle stir, cover the bowl, and let it sit at room temperature for at least 4 hours, but ideally overnight (8-12 hours). You’ll know it’s ready when the rice grains are very soft and break easily between your fingers. Once soaked, discard the cinnamon stick (its flavor is now in the water). Pour the entire contents of the bowl—rice and soaking water—into a high-powered blender. Blend on high for a full 2-3 minutes until the mixture is as smooth as possible. It will look like a thick, cloudy, beige liquid.
Step 2: Strain for Smoothness
This step is critical for that signature silky texture. Place a fine-mesh strainer, nut milk bag, or several layers of cheesecloth over a large bowl or pitcher. Pour the blended rice mixture through the strainer. Use a spoon or spatula to press down on the solids to extract as much liquid as possible. You should be left with a fairly smooth, milky liquid. For an ultra-smooth horchata, strain the liquid a second time through a finer cloth. The leftover rice pulp can be composted or used in baking (it’s quite bland).
Step 3: Sweeten and Flavor
To the strained horchata liquid in your pitcher, add the 1/2 cup of granulated sugar and 1 teaspoon of pure vanilla extract. If you’re using the optional 1/2 teaspoon of ground cinnamon for extra aroma, add it now. Whisk vigorously until the sugar is completely dissolved. At this stage, taste your creation! This is your chance to adjust the sweetness or cinnamon level to your personal preference. Remember, it will be served over ice, which slightly dilutes it, so it can be a touch sweeter than perfect now.
Step 4: Chill and Serve
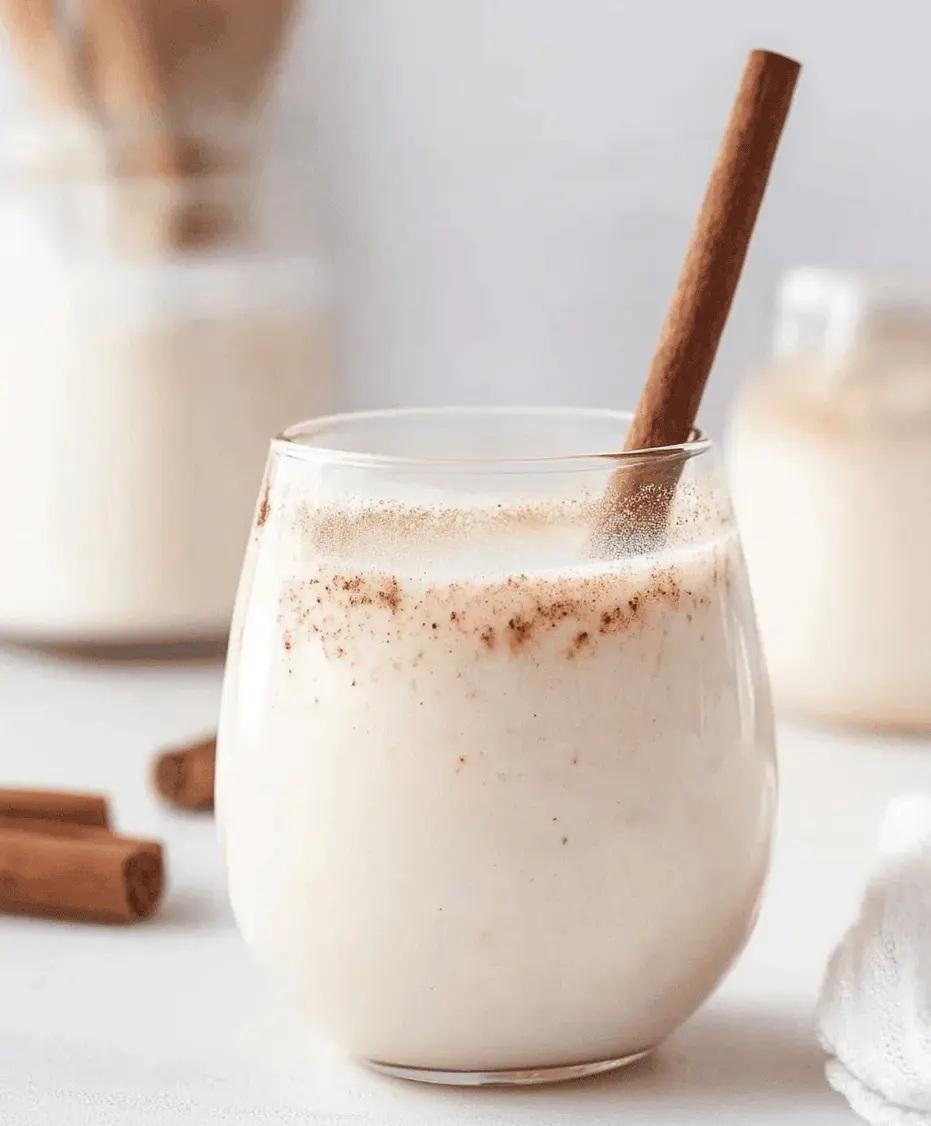
Cover your pitcher and refrigerate the horchata for at least 1-2 hours to let the flavors meld and the drink get thoroughly cold. When ready to serve, give it a good stir as some settling may occur. Fill glasses with ice, pour the chilled horchata over the top, and garnish with a light dusting of ground cinnamon or a small cinnamon stick. Serve immediately and enjoy the creamy, refreshing bliss.
Nutritional Information
(Approximate values per 8-ounce serving, using water only and 1/2 cup sugar for the entire batch.)
- Calories: ~180 kcal
- Carbohydrates: 42g (primarily from rice and sugar)
- Protein: 1g
- Fat: 0.5g
- Fiber: 0.5g
- Sugar: 22g (adjustable based on sweetener used)
Healthier Alternatives
You can easily tailor this homemade horchata recipe to fit dietary needs without sacrificing the core flavor.
- Sugar Swap: Replace granulated sugar with an equal amount of maple syrup, agave nectar, or monk fruit sweetener for a lower glycemic index. For a zero-calorie option, use liquid stevia drops to taste (start with 10-15 drops for the batch).
- Dairy-Free Creaminess: Instead of adding dairy milk, blend in 1/2 cup of raw almonds or cashews during the blending step. Strain as usual. This adds healthy fats, protein, and an incredibly rich, luxurious mouthfeel.
- Spice Boost: Add a pinch of nutmeg or allspice during soaking for an extra layer of warm, complex flavor that can make the drink feel more indulgent with less sugar.
Serving Suggestions
- The Classic Pairing: Horchata is famously the perfect partner for spicy food. Serve it alongside tacos al pastor, enchiladas rojas, or a fiery salsa to experience the magical cooling contrast.
- Dessert Transformation: Pour chilled horchata over vanilla ice cream or flan for an incredible affogato-style dessert.
- Adult Version: For a festive cocktail, mix 1 part horchata with 1 part rum, brandy, or Kahlúa over ice. Garnish with an extra cinnamon stick.
- Breakfast Treat: Use it as the liquid in your overnight oats or pour a splash into your morning coffee for a “dirty horchata” latte.
Common Mistakes to Avoid
- Skipping the Long Soak: Blending dry or briefly soaked rice results in a gritty, sandy texture. Patience is key.
- Inadequate Straining: Using a colander instead of a fine-mesh strainer or cheesecloth will leave unpleasant rice particles in your drink. Double-straining is recommended for perfectionists.
- Adding Dairy Too Early: If using milk, add it after straining the rice water. Blending dairy with raw rice can lead to spoilage during the long soak.
- Not Tasting Before Chilling: Always adjust sweetness and spice while the horchata is at room temperature for the most accurate flavor assessment.
Storing Tips
- Refrigeration: Store horchata in a sealed pitcher or jar in the refrigerator. It will keep fresh for 3-4 days. Always give it a vigorous stir or shake before serving, as natural separation occurs.
- Freezing: You can freeze horchata for up to 1 month. Pour it into ice cube trays for individual “horchata cubes” to blend into smoothies or thaw slowly in the refrigerator. Note: texture may be slightly grainy after thawing but is still delicious.
- Pre-Serving: For the best experience, serve it very cold. You