Ultimate Decadent Meltaway Brownie Cookies Recipe

ultimate-decadent-meltaway-brownie-cookies

“`html

Introduction

There’s something magical about biting into a cookie that melts on your tongue like a rich, fudgy brownie. If you’ve ever craved the perfect marriage of chewy brownies and tender cookies, these Decadent Meltaway Brownie Cookies will steal your heart. Imagine the crackly top of a brownie, the soft center of a cookie, and the intense chocolate flavor that lingers with every bite. Whether you’re baking for a special occasion or just treating yourself, this recipe delivers pure indulgence. Trust me, one bite and you’ll understand why these cookies deserve a permanent spot in your dessert rotation.

About This Recipe

Decadent Meltaway Brownie Cookies combine the best of both worlds: the dense, chocolatey richness of brownies and the delicate texture of a perfectly baked cookie. Unlike traditional cookies, these gems rely on high-quality cocoa and melted chocolate for depth, while a touch of cornstarch ensures their signature melt-in-your-mouth finish. For anyone who adores desserts with a luxurious feel but simple preparation, this recipe strikes the ideal balance. Moreover, it fits seamlessly into our blog’s focus on approachable yet impressive treats, like our Ultimate Fudgy Brownies or Classic Chocolate Chip Cookies.

What makes Decadent Meltaway Brownie Cookies stand out is their versatility. You can dress them up with sea salt, sandwich them with ganache, or enjoy them as-is for an instant mood boost. They also cater to bakers of all levels, requiring no fancy equipment or hard-to-find ingredients. Plus, the recipe adapts easily to dietary preferences—swap in gluten-free flour or dairy-free chocolate without sacrificing flavor. Ultimately, these cookies embody what we love about baking: joy, creativity, and the power of a single bite to turn an ordinary day into something extraordinary.

Why I Love This Recipe

I’ll never forget the first time I baked Decadent Meltaway Brownie Cookies. My kitchen smelled like a chocolatier’s workshop, and the cookies disappeared within minutes at a family gathering. What hooked me wasn’t just the taste, but how they brought people together—friends lingering over coffee, kids sneaking seconds, and that universal “wow” moment when someone tries one. Now, they’re my go-to for gifting, potlucks, or even solo baking therapy. Every time I pull a batch from the oven, I’m reminded why baking is more than mixing ingredients; it’s about creating little pockets of happiness.

“`

Health and Nutrition

Why it’s good for your body

Decadent Meltaway Brownie Cookies pack more than just irresistible flavor. They also offer surprising health perks. First, dark chocolate, a key ingredient, delivers antioxidants that fight inflammation. Additionally, these cookies provide a quick energy boost thanks to their balanced mix of carbs and fats. Moreover, the rich cocoa content supports heart health by improving blood flow.

Decadent Meltaway Brownie Cookies also contain essential minerals like iron and magnesium. These nutrients help maintain energy levels and muscle function. Furthermore, the recipe often includes nuts or seeds, adding healthy fats and protein. As a result, you get a satisfying treat that keeps cravings in check. Even better, the fiber content aids digestion, making them a smarter choice than typical sugary snacks.

Finally, enjoying Decadent Meltaway Brownie Cookies in moderation can boost your mood. Dark chocolate triggers the release of endorphins, which reduce stress. So while they taste indulgent, these cookies offer real benefits. Just remember to savor them mindfully for the best experience.

How it fits in a healthy lifestyle

Decadent Meltaway Brownie Cookies fit seamlessly into a balanced diet when enjoyed wisely. Pair them with a protein-rich snack like Greek yogurt to stabilize blood sugar. Alternatively, crumble them over a chia pudding for a nutrient-dense dessert. This way, you satisfy your sweet tooth without derailing your goals.

For those watching gluten intake, try using almond flour or oat flour in the recipe. These swaps keep the texture rich while making the cookies gluten-friendly. If you’re focused on heart health, opt for dark chocolate with at least 70% cocoa. You can also explore our guide to balanced snacking for more ideas. With small tweaks, Decadent Meltaway Brownie Cookies become a guilt-free part of your routine.

Print
clock clock iconcutlery cutlery iconflag flag iconfolder folder iconinstagram instagram iconpinterest pinterest iconfacebook facebook iconprint print iconsquares squares iconheart heart iconheart solid heart solid icon

Decadent Meltaway Brownie Cookies


  • Author: Chef Emy

Description

Rich, fudgy brownie-like cookies that melt in your mouth with every bite.
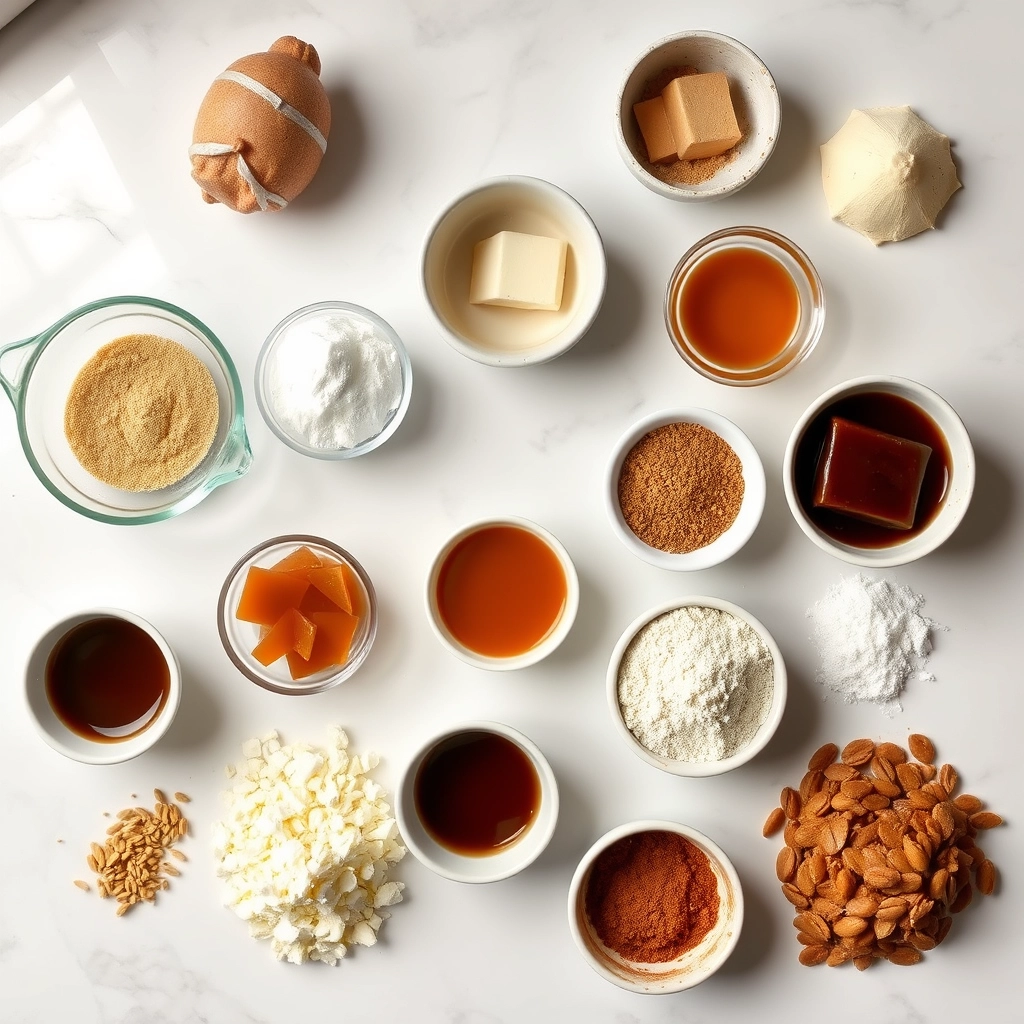

Ingredients

Scale

For the Crust:

  • 1 cup unsalted butter, softened
  • 1 1/2 cups granulated sugar
  • 2 large eggs
  • 1 tsp vanilla extract
  • 1/2 cup cocoa powder
  • 1 3/4 cups all-purpose flour
  • 1/2 tsp baking powder
  • 1/4 tsp salt
  • 1 cup semi-sweet chocolate chips

Instructions

1. Prepare the Crust:

  1. Preheat oven to 350°F (175°C) and line baking sheets with parchment paper.
  2. In a large bowl, cream together butter and sugar until light and fluffy. Beat in eggs one at a time, then stir in vanilla.
  3. Sift together cocoa powder, flour, baking powder, and salt. Gradually mix into the wet ingredients until just combined. Fold in chocolate chips.
  4. Drop tablespoon-sized dough balls onto prepared baking sheets, spacing them 2 inches apart.
  5. Bake for 10-12 minutes until edges are set but centers are still soft. Cool on baking sheets for 5 minutes before transferring to wire racks.

Notes

You can customize the seasonings to taste.

How to Prepare This Dish

Steps and time-saving tips

Start by preheating your oven to 350°F and lining a baking sheet with parchment paper. Meanwhile, melt the butter and chocolate together in a microwave-safe bowl, stirring every 20 seconds until smooth. Let it cool slightly so it doesn’t scramble the eggs. In a separate bowl, whisk the sugar and eggs until fluffy, then gently fold in the chocolate mixture. Next, sift in the flour and cocoa powder to avoid lumps, stirring just until combined—overmixing makes the Decadent Meltaway Brownie Cookies tough. For extra fudginess, chill the dough for 15 minutes, which also makes scooping easier. Use a cookie scoop for uniform portions, spacing them 2 inches apart since they’ll spread. Bake for 10-12 minutes until the edges set but the centers stay soft. Let them cool on the sheet for 5 minutes before transferring; they firm up as they cool. If you’re short on time, skip the chill step but reduce baking by 1 minute to prevent overbaking.

Mistakes I’ve made and learned from

My first batch of Decadent Meltaway Brownie Cookies spread into one giant blob because I forgot to chill the dough. Now I never skip that step—it’s the difference between chewy perfection and a flat mess. Another time, I overbaked them, losing that signature meltaway texture. A trick I learned from my baking troubleshooting guide is to pull them out when they look slightly underdone. They’ll finish setting as they cool. Also, if your cookies crack too much, your dough might be too dry. A splash of milk or an extra yolk fixes it, as I discovered after testing the tips in my cookie texture deep dive. Trust me, these small tweaks save so much frustration.

Cultural Connection and Variations

Where this recipe comes from

Decadent Meltaway Brownie Cookies blend the best of two worlds—chewy brownies and tender cookies—into one irresistible treat. While their exact origin remains a delicious mystery, many trace their roots to American home bakers who craved the fudgy richness of brownies in a portable, bite-sized form. Over time, these cookies evolved, with some families adding nuts for crunch or swirling in caramel for extra indulgence.

Around the globe, similar treats take on local twists. In Mexico, bakers might infuse Decadent Meltaway Brownie Cookies with cinnamon or a hint of chili for warmth. Meanwhile, in France, they often pair them with a dusting of sea salt to balance the sweetness. Even within the U.S., regional preferences shine. Southern bakers might swap in pecans, while Midwest kitchens could fold in peanut butter for a nostalgic touch.

For many, these cookies carry personal meaning too. Maybe they remind you of holiday baking marathons or after-school snacks with grandma. Whatever the story, their versatility ensures they fit any occasion—whether you’re serving them at a party or sneaking one straight from the cooling rack.

How it fits in today’s cooking

Today, Decadent Meltaway Brownie Cookies hold their own as a modern classic. They’re a staple at bake sales, potlucks, and even fancy dessert boards alongside gluten-free chocolate cake. Busy home cooks love how easily they adapt to dietary needs, like using almond flour or dairy-free chocolate. Plus, their quick bake time makes them perfect for last-minute cravings.

Social media has also given these cookies a fresh spotlight. Food bloggers reinvent them with matcha, espresso, or even vegan red velvet swirls. Yet, no matter how creative the twist, the soul of the recipe stays the same—a melt-in-your-mouth bite that feels like a hug. Whether you’re baking them for a holiday cookie swap or a cozy night in, these cookies prove some traditions only get better with time.

Taste and Texture

What makes it delicious

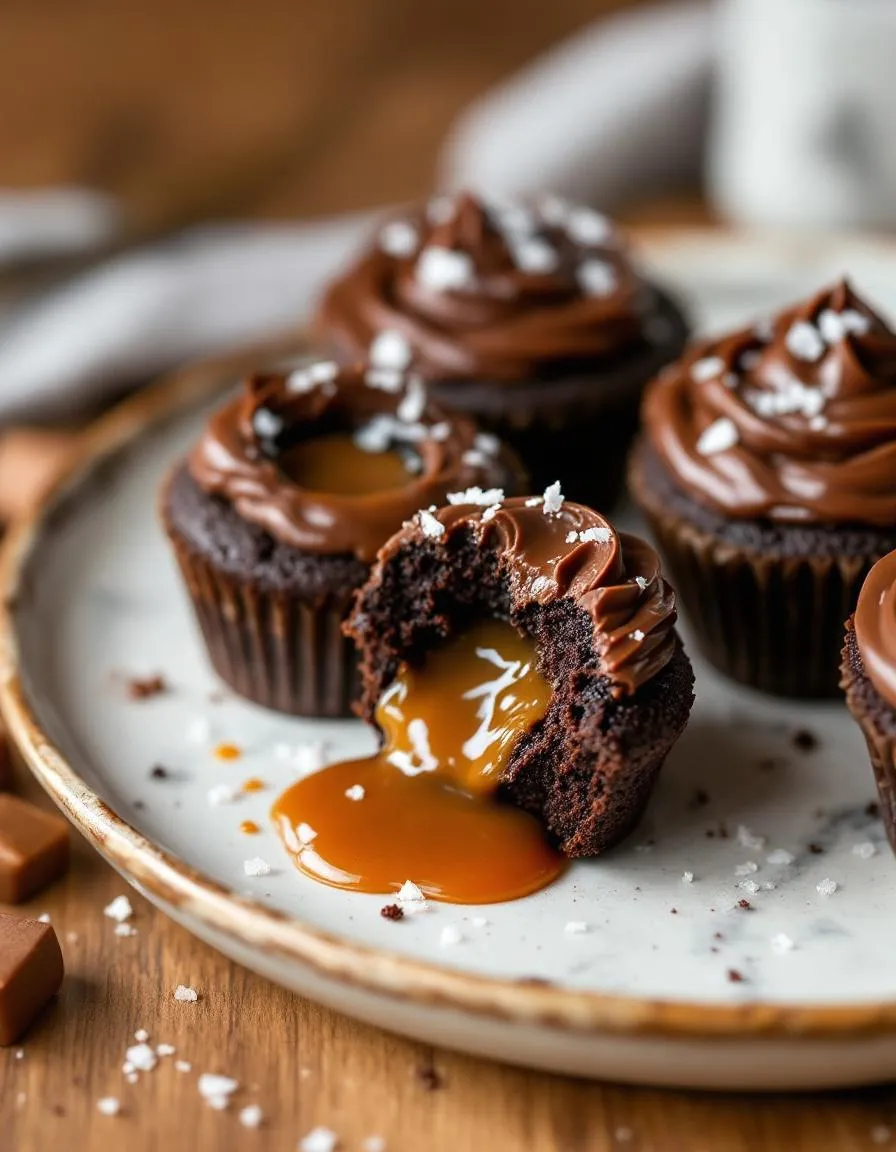
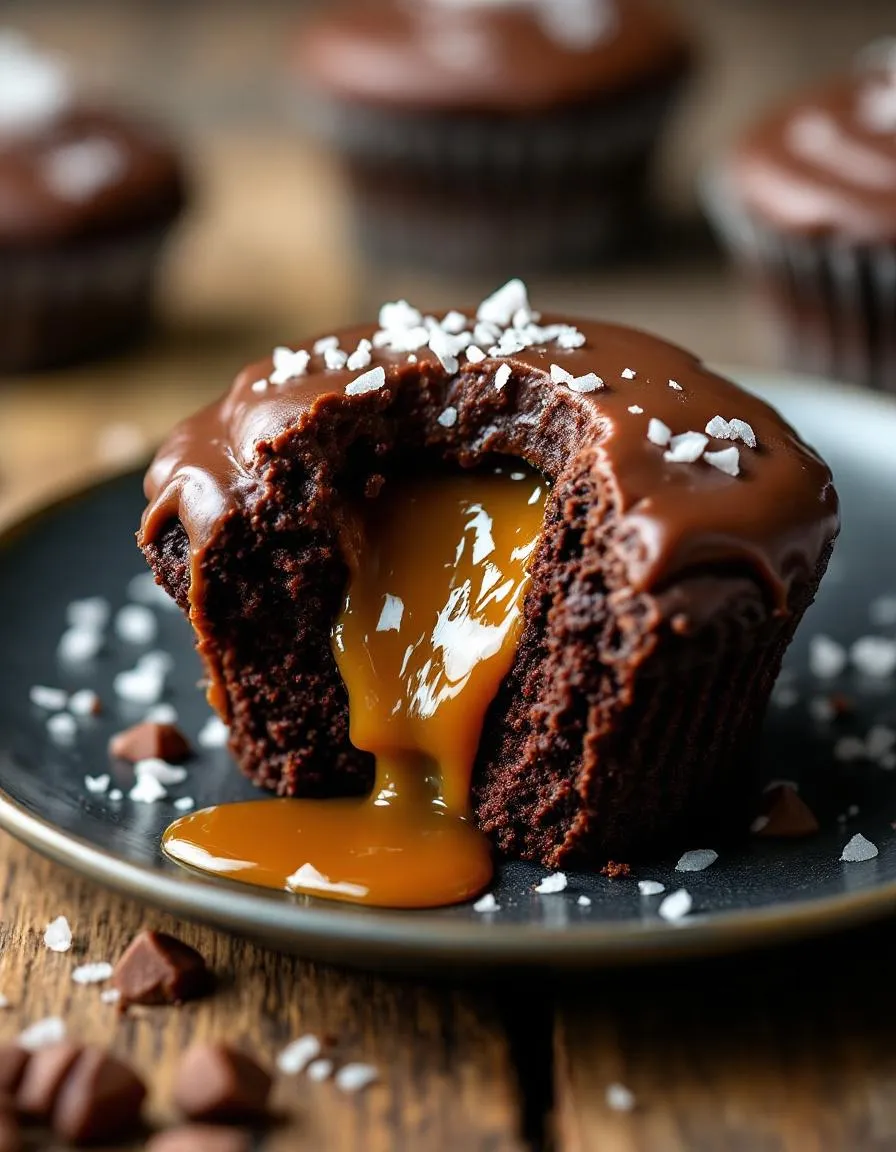
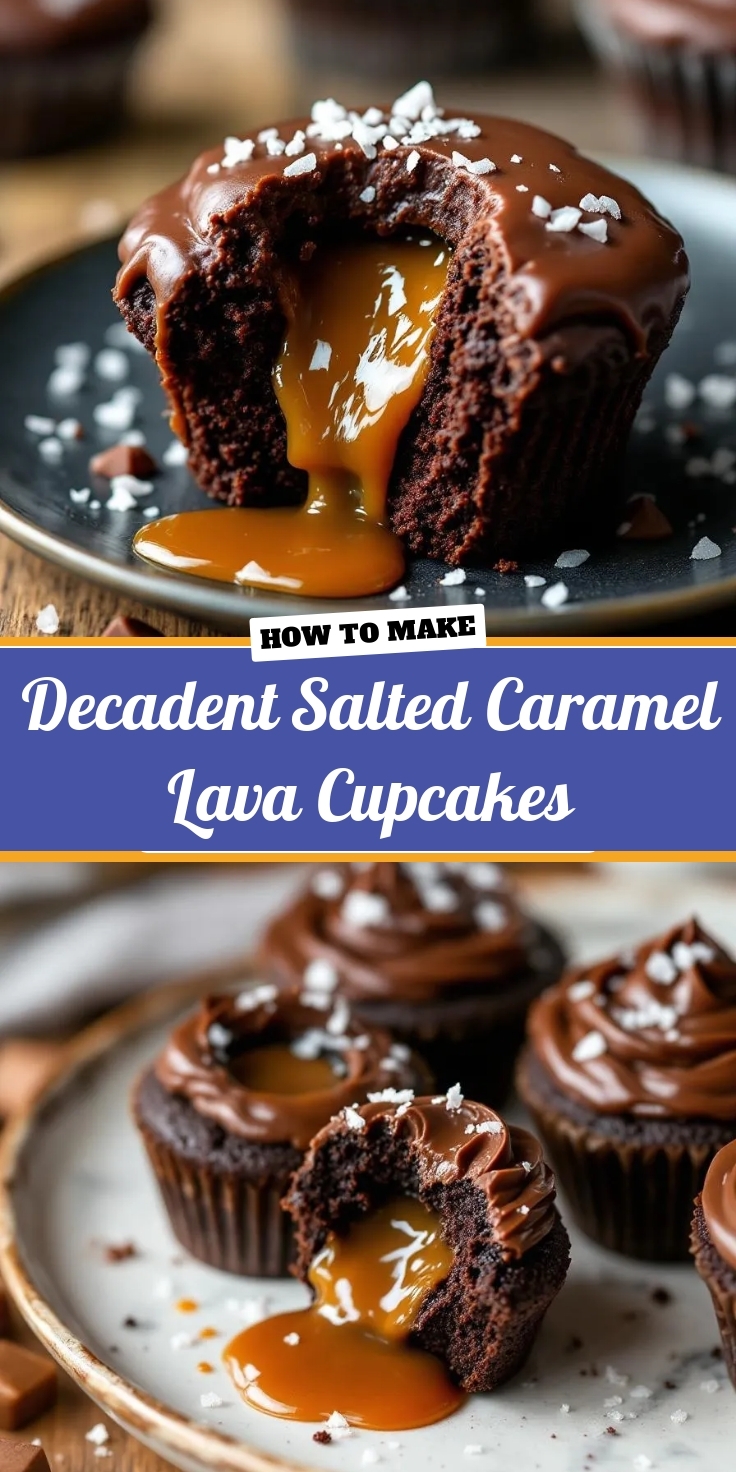
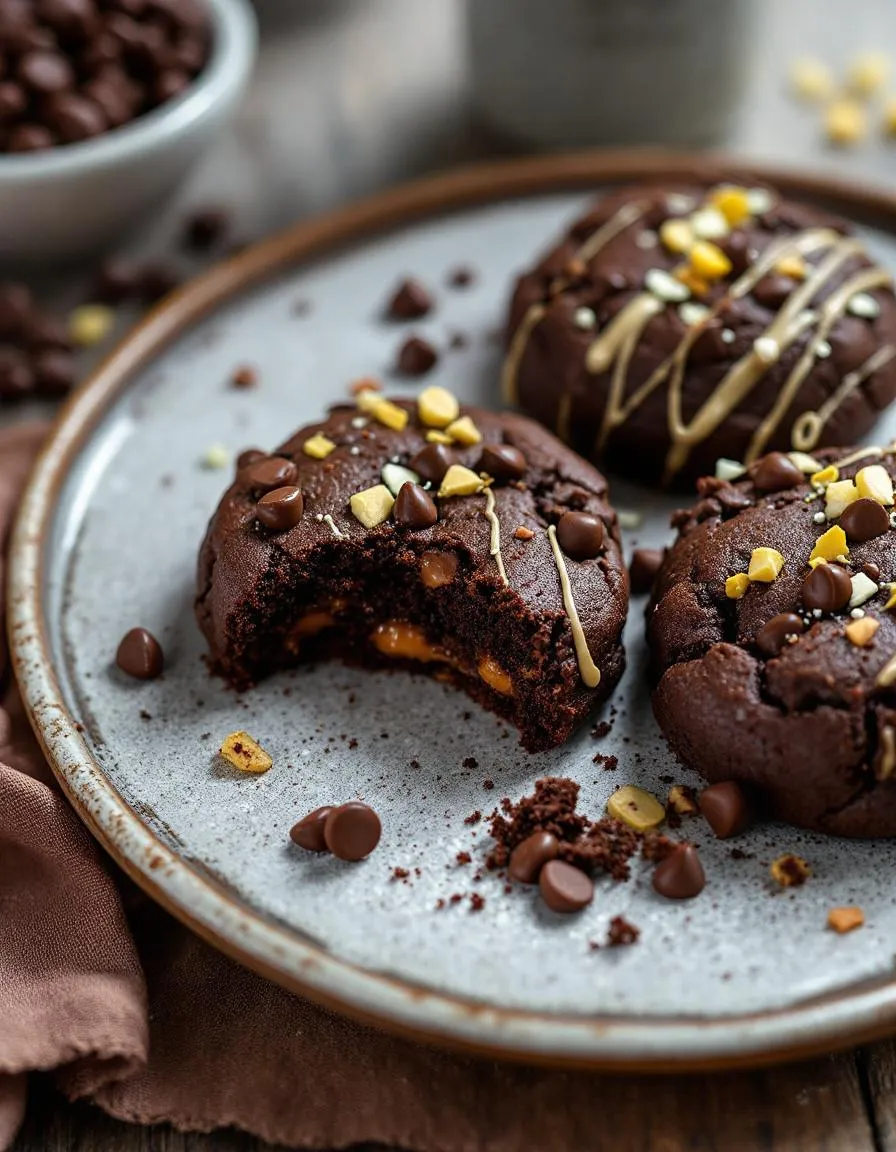
Decadent Meltaway Brownie Cookies deliver an irresistible combination of rich, fudgy flavor and a melt-in-your-mouth texture. Imagine biting into a cookie with a crisp outer shell that gives way to a soft, chewy center—almost like a brownie but with the lightness of a cookie. The deep cocoa aroma fills the air as you bake them, hinting at the indulgent experience ahead. Each bite bursts with bittersweet chocolate notes, balanced by a touch of vanilla and a hint of sea salt that lingers on your tongue. The butter and high-quality chocolate in the recipe create a creamy, velvety mouthfeel, making Decadent Meltaway Brownie Cookies impossible to resist.

Boosting the flavor

Elevate your Decadent Meltaway Brownie Cookies with a few easy tweaks. For a nutty crunch, fold in chopped toasted walnuts or pecans before baking. If you love a touch of warmth, sprinkle a pinch of cinnamon or espresso powder into the dough—it deepens the chocolate flavor beautifully. Drizzle melted homemade caramel sauce over the cooled cookies for a gooey contrast, or sandwich them with a dollop of vanilla bean whipped cream for an extra-decadent treat. These small additions transform an already delicious cookie into something truly extraordinary.

Tips for Success

Best practices for results

Always chill the dough for at least 30 minutes before baking your Decadent Meltaway Brownie Cookies. This step prevents spreading and ensures a rich, fudgy texture. Use parchment paper on your baking sheets to guarantee even browning and easy removal. For the best flavor, measure your cocoa powder precisely and opt for high-quality chocolate chunks. Additionally, let the cookies cool on the pan for 5 minutes before transferring them to a rack—this helps them set perfectly.

Mistakes to avoid

Avoid overmixing the batter, as this can make your Decadent Meltaway Brownie Cookies dense instead of tender. Instead, fold ingredients gently until just combined. Many bakers also skip checking their oven temperature, which leads to uneven baking. Use an oven thermometer to confirm accuracy, just like we recommend in our perfect baking temperatures guide. Finally, don’t overbake the cookies—they should look slightly soft in the center when you pull them out. For more troubleshooting tips, explore our cookie texture fixes post.

Serving and Pairing Suggestions

How to serve this dish

For a stunning presentation, arrange your Decadent Meltaway Brownie Cookies on a rustic wooden board or a sleek ceramic platter. Meanwhile, dust them lightly with powdered sugar or drizzle with melted chocolate for an elegant touch. These cookies shine at holiday gatherings, but they also make a delightful afternoon treat with coffee. If you’re hosting a dessert bar, pair them with mini scoops of vanilla ice cream for a playful contrast. No matter the occasion, their rich texture and fudgy center will steal the show.

What goes well with it

First, try serving Decadent Meltaway Brownie Cookies with a cold glass of milk or a creamy latte—the bitterness of coffee balances their sweetness perfectly. Alternatively, elevate your dessert spread by pairing them with our salted caramel sauce for a salty-sweet combo. For a festive twist, offer them alongside our peppermint hot chocolate, which highlights their chocolatey depth. Whether you choose a drink or a dip, each pairing enhances the cookies’ melt-in-your-mouth magic.

What makes Decadent Meltaway Brownie Cookies so soft and fudgy?

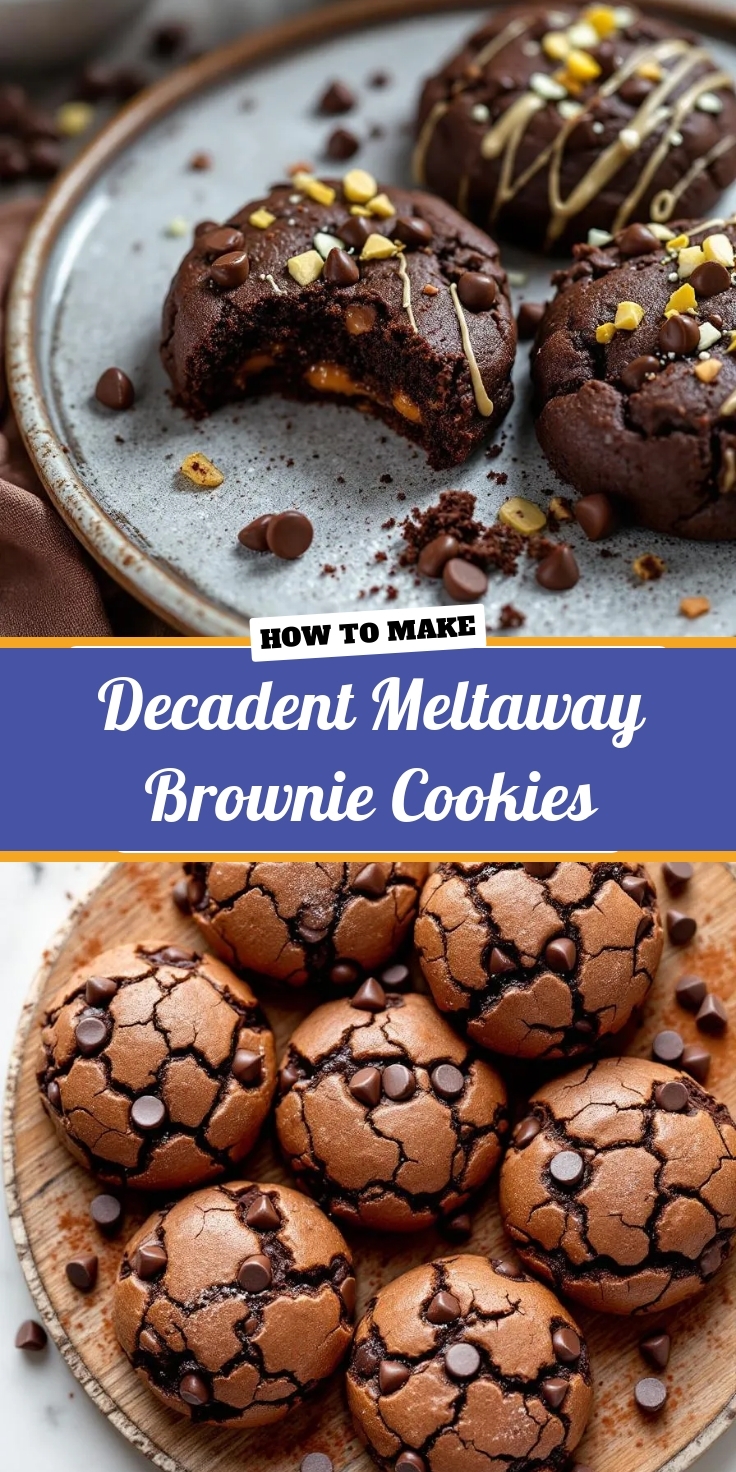
The secret lies in the perfect balance of melted chocolate, butter, and a touch of cornstarch. These Decadent Meltaway Brownie Cookies achieve their irresistible texture by using high-quality cocoa powder and slightly underbaking them for a gooey center.

Can I freeze Decadent Meltaway Brownie Cookies for later?

Absolutely! These cookies freeze beautifully for up to 3 months. Just ensure they’re completely cooled, then store them in an airtight container with parchment paper between layers to preserve their melt-in-your-mouth texture.

How do I prevent Decadent Meltaway Brownie Cookies from spreading too much?

Chill the dough for at least 30 minutes before baking and use a silicone baking mat. The cold dough helps maintain thickness, giving Decadent Meltaway Brownie Cookies their signature chewy yet tender structure.

What’s the best way to store Decadent Meltaway Brownie Cookies to keep them fresh?

Store them in an airtight container at room temperature for up to 5 days. For extra moisture, add a slice of bread to the container—it helps maintain the cookies’ decadent, meltaway quality without making them soggy.

Ultimate Salted Caramel Lava Cupcakes Recipe

ultimate-salted-caramel-lava-cupcakes

“`html

Introduction

There’s something magical about biting into a cupcake and discovering a river of warm, gooey caramel inside. Decadent Salted Caramel Lava Cupcakes deliver that perfect moment—rich chocolate cake, a molten caramel center, and just the right touch of sea salt to balance the sweetness. Whether you’re baking for a special occasion or simply treating yourself, these cupcakes promise pure indulgence. Trust me, one bite and you’ll understand why they’re worth every minute in the kitchen.

About This Recipe

Decadent Salted Caramel Lava Cupcakes combine the best of two worlds: the comfort of a moist chocolate cupcake and the thrill of a molten dessert. Unlike traditional cupcakes, these feature a hidden caramel core that oozes out with every bite, creating a showstopping experience. The sprinkle of flaky sea salt elevates the caramel, cutting through the richness for a perfectly balanced flavor. If you love desserts that surprise and delight, this recipe belongs in your collection.

This recipe fits perfectly with BrekCakes’ mission to make baking fun and approachable. While the cupcakes look impressive, the steps stay simple—no fancy techniques required. For example, you’ll use a basic chocolate batter and store-bought caramel sauce if you’re short on time. Plus, the recipe adapts easily for different occasions, from birthday parties to cozy nights in. If you’re new to lava-style desserts, check out our guide to mastering molten cakes for extra tips. And if caramel isn’t your thing, our classic vanilla cupcakes offer a lighter alternative.

Why I Love This Recipe

I’ll never forget the first time I made Decadent Salted Caramel Lava Cupcakes for a friend’s birthday. Her reaction—eyes wide, laughing as caramel dripped onto her plate—made all the effort worthwhile. Since then, these cupcakes have become my go-to for celebrations, and even lazy Sundays when I crave something special. They remind me that baking isn’t just about the final product, but the joy it brings to others. Every time I pull them out of the oven, I feel like I’m sharing a little piece of happiness.

“`

Health and Nutrition

Why it’s good for your body

Decadent Salted Caramel Lava Cupcakes may seem indulgent, but they offer surprising health perks when enjoyed mindfully. First, dark chocolate in the batter delivers antioxidants that fight inflammation and support heart health. Additionally, the caramel filling provides quick energy, making these cupcakes a smart pick-me-up before or after a workout. Meanwhile, the sea salt topping balances sweetness and aids hydration by replenishing electrolytes.

Moreover, Decadent Salted Caramel Lava Cupcakes contain eggs and dairy, which supply protein for muscle repair. The moderate sugar content also means you can satisfy cravings without overloading your system. For instance, pairing one cupcake with a protein-rich snack like Greek yogurt creates a balanced treat. Finally, the portion-controlled size helps you enjoy dessert without overindulging.

Ultimately, Decadent Salted Caramel Lava Cupcakes prove that treats can be both delicious and functional. The key lies in savoring them as part of a varied diet. So go ahead—relish every bite knowing these cupcakes bring more than just flavor to the table.

How it fits in a healthy lifestyle

Decadent Salted Caramel Lava Cupcakes fit seamlessly into balanced eating habits when enjoyed intentionally. For example, they work well as an occasional dessert after a nutrient-dense meal packed with veggies and lean protein. If you follow flexible dieting, you can easily factor them into your daily macros without guilt.

These cupcakes also cater to specific dietary needs. Swap regular flour for almond flour to make them gluten-free, or use coconut sugar for a lower-glycemic option. Craving more wholesome treats? Explore our healthy dessert swaps for inspiration. For those monitoring sugar intake, try halving the caramel or pairing a cupcake with our protein-packed snacks to stabilize blood sugar.

Remember, balance is key. Enjoy Decadent Salted Caramel Lava Cupcakes as part of an overall healthy routine—whether as a post-dinner delight or a celebratory bite. Life’s too short to skip the sweet moments.

Print
clock clock iconcutlery cutlery iconflag flag iconfolder folder iconinstagram instagram iconpinterest pinterest iconfacebook facebook iconprint print iconsquares squares iconheart heart iconheart solid heart solid icon

Decadent Salted Caramel Lava Cupcakes


  • Author: Chef Emy

Description

Rich chocolate cupcakes with a gooey salted caramel center, perfect for indulging your sweet tooth.


Ingredients

Scale

For the Crust:

  • 1 cup all-purpose flour
  • 1/2 cup cocoa powder
  • 1 tsp baking powder
  • 1/2 tsp salt
  • 1/2 cup unsalted butter, softened
  • 3/4 cup granulated sugar
  • 2 large eggs
  • 1 tsp vanilla extract
  • 1/2 cup milk
  • 12 salted caramel candies
  • Sea salt for garnish

Instructions

1. Prepare the Crust:

  1. Preheat oven to 350°F (175°C) and line a muffin tin with cupcake liners.
  2. In a bowl, whisk together flour, cocoa powder, baking powder, and salt.
  3. In another bowl, cream butter and sugar until light and fluffy. Beat in eggs one at a time, then stir in vanilla.
  4. Alternately add the dry ingredients and milk to the butter mixture, mixing until just combined.
  5. Fill each cupcake liner halfway with batter. Place a caramel candy in the center of each, then cover with remaining batter.
  6. Bake for 18-20 minutes or until tops spring back when lightly touched. Let cool slightly before serving.
  7. Sprinkle with sea salt before serving for an extra burst of flavor.

Notes

You can customize the seasonings to taste.

“`html

How to Prepare This Dish

Steps and time-saving tips

Start by preheating your oven to 350°F and lining a cupcake tin with paper liners. Next, whisk together the flour, cocoa powder, baking powder, and salt in a medium bowl. In a separate large bowl, beat the butter and sugar until light and fluffy, then mix in the eggs one at a time. Gradually add the dry ingredients to the wet mixture, alternating with milk, and stir until just combined. Meanwhile, melt the caramel sauce slightly for easier handling. Fill each cupcake liner halfway with batter, then spoon a teaspoon of caramel into the center before covering with more batter. Bake for 18-20 minutes, or until the tops spring back when touched. For a time-saving tip, use store-bought caramel sauce if you’re in a hurry, but warm it slightly to ensure smooth pouring. Let the cupcakes cool for 5 minutes before drizzling with extra caramel and a pinch of sea salt for that perfect sweet-and-salty finish.

Mistakes I’ve made and learned from

When I first made these Decadent Salted Caramel Lava Cupcakes, I overfilled the liners, causing the caramel to spill out during baking. Now I stick to filling them halfway, which keeps the lava center intact. Another issue I ran into was using caramel that was too thick, making it hard to work with. A quick fix is to warm it gently—just enough to loosen it without turning it into a runny mess. If you’re new to baking with caramel, check out my guide on working with caramel for more tips. Also, don’t skip the sea salt garnish—it balances the sweetness perfectly. For more troubleshooting, my post on common cupcake fails covers how to avoid dry or sunken cupcakes. Trust me, these small adjustments make all the difference!

“`

Cultural Connection and Variations

Where this recipe comes from

Decadent Salted Caramel Lava Cupcakes trace their roots to the irresistible marriage of French patisserie and American indulgence. French chefs perfected caramel centuries ago, while the modern cupcake craze took off in U.S. bakeries. Together, they create a dessert that feels both classic and contemporary. Some say the salted caramel twist emerged in Brittany, where bakers balanced sweet caramel with coarse sea salt. Others argue it evolved in trendy New York kitchens. Either way, this treat now bridges cultures with every molten bite.

Around the world, bakers adapt Decadent Salted Caramel Lava Cupcakes to local tastes. In Mexico, some add a sprinkle of chili powder for heat. Japanese versions might use matcha-infused batter for earthy contrast. My grandma, meanwhile, swore by a dash of bourbon in the caramel. No matter the variation, the core appeal remains: that moment when warm caramel spills from tender cake. Whether served at Parisian cafés or Midwestern potlucks, these cupcakes turn any occasion into a celebration.

How it fits in today’s cooking

Today, Decadent Salted Caramel Lava Cupcakes thrive as both a nostalgic favorite and a modern showstopper. They’re a hit at holiday gatherings, especially when paired with spiced chai cupcakes for a festive dessert spread. Busy home cooks also love them for quick indulgence—microwave the caramel for a shortcut version. Meanwhile, food bloggers keep reinventing the recipe, swapping in coconut sugar or adding espresso for depth.

What makes these cupcakes timeless? They balance simplicity and drama. You’ll find them at birthday parties, date nights, or even as a solo treat after a long day. For those who crave variety, try pairing them with vegan red velvet cupcakes to please every guest. Whether you stick to tradition or experiment, Decadent Salted Caramel Lava Cupcakes prove some flavors never go out of style.

Taste and Texture

What makes it delicious

Decadent Salted Caramel Lava Cupcakes deliver a symphony of rich, indulgent flavors and textures. The first bite reveals a moist, tender chocolate cake that gives way to a warm, gooey caramel center. Meanwhile, the subtle sea salt cuts through the sweetness, creating a perfect balance. As you savor each mouthful, the aroma of melted caramel and cocoa fills the air, making every bite irresistible. The silky caramel oozes luxuriously, while the fluffy cake crumb melts effortlessly on your tongue. Decadent Salted Caramel Lava Cupcakes truly shine because of their contrast—creamy filling meets soft cake, all wrapped in a delicate, slightly crisp frosting.

Boosting the flavor

Elevate your Decadent Salted Caramel Lava Cupcakes with a few easy tweaks. First, drizzle extra caramel sauce on top for an even more luscious finish. Alternatively, sprinkle flaky sea salt just before serving to intensify the sweet-salty contrast. For a deeper chocolate flavor, swap regular cocoa powder with Dutch-process cocoa. If you love texture, crumble some homemade toffee bits over the frosting. These small changes add layers of complexity without overwhelming the original recipe. Experiment freely—each twist makes these cupcakes even more memorable.

Tips for Success

Best practices for results

Always bring ingredients like eggs and butter to room temperature before mixing to ensure a smooth batter for your Decadent Salted Caramel Lava Cupcakes. Additionally, use a piping bag to fill the cupcake liners evenly, which helps prevent overflow during baking. For the best lava effect, insert chilled caramel squares into the center of each cupcake just before baking—this keeps the filling molten. Finally, let the cupcakes cool slightly before serving so the caramel sets slightly but stays gooey inside.

Mistakes to avoid

Overmixing the batter can lead to dense cupcakes instead of the light, fluffy texture you want. To avoid this, gently fold dry ingredients into wet ones just until combined. Another common mistake is overbaking, which dries out the caramel center. For perfect results, check for doneness a few minutes early using a toothpick test. If you struggle with caramel consistency, review our caramel troubleshooting guide for solutions. Also, ensure your oven temperature is accurate—an oven thermometer helps prevent under or overbaking, as explained in our baking tools essentials post.

Serving and Pairing Suggestions

How to serve this dish

Elevate your dessert game by serving Decadent Salted Caramel Lava Cupcakes warm for that irresistible molten center. For a stunning presentation, dust them lightly with powdered sugar or drizzle extra caramel sauce on top. Meanwhile, a sprinkle of flaky sea salt enhances both flavor and visual appeal. These cupcakes shine at dinner parties, holiday gatherings, or even as a special weekend treat. To make them extra festive, pair them with edible gold flakes or fresh berries for a pop of color.

What goes well with it

Complement the rich flavors of Decadent Salted Caramel Lava Cupcakes with a creamy scoop of vanilla bean ice cream. The cool contrast balances the warm caramel perfectly. Alternatively, try a cup of spiced chai tea, as its aromatic warmth highlights the dessert’s sweetness. For a decadent twist, serve them alongside our Double Chocolate Muffins or Cinnamon Roll Cups for a dessert spread that impresses every time.

How do you make the caramel center for Decadent Salted Caramel Lava Cupcakes?

The caramel center is made by melting caramel candies or homemade caramel with a pinch of sea salt. Once cooled slightly, spoon a small amount into the center of each cupcake batter before baking. This creates the signature molten lava effect when you bite into Decadent Salted Caramel Lava Cupcakes.

Can I use store-bought caramel sauce for lava cupcakes?

Yes, thick store-bought caramel sauce works well, but reduce it slightly on the stove to thicken it further. This prevents the filling from leaking out of Decadent Salted Caramel Lava Cupcakes during baking. For best results, chill the caramel in the freezer for 15 minutes before adding it to the batter.

What’s the best way to store leftover Salted Caramel Lava Cupcakes?

Store cooled cupcakes in an airtight container at room temperature for up to 2 days. For longer storage, refrigerate for up to 5 days and reheat for 10-15 seconds in the microwave to restore the lava effect. Decadent Salted Caramel Lava Cupcakes taste best when fresh, so enjoy them within 24 hours if possible.

Why did my caramel lava cupcakes sink in the middle?

Sinking usually occurs if the cupcakes are underbaked or if too much caramel filling is used. For perfect Decadent Salted Caramel Lava Cupcakes, bake until the edges are set but the center still jiggles slightly, and use no more than 1 teaspoon of caramel per standard-sized cupcake.

Best Keto Lemon Bread – Zesty Low-Carb Delight

best-keto-lemon-bread-delight

“`html

Introduction

There’s something magical about the bright, tangy flavor of lemon that instantly lifts your mood. If you’re craving a treat that’s both refreshing and guilt-free, this Zesty Keto Lemon Bread Delight is about to become your new favorite. Whether you’re following a keto lifestyle or simply love desserts with a citrusy punch, this recipe delivers soft, moist bread with a vibrant lemon twist. Plus, it’s packed with wholesome ingredients that keep carbs low without sacrificing flavor. Trust me, one bite of this sunny loaf will make you wonder how something so delicious can also be so good for you.

About This Recipe

Zesty Keto Lemon Bread Delight is a low-carb, sugar-free twist on classic lemon bread, designed to satisfy your sweet tooth while staying true to keto principles. Unlike traditional recipes loaded with sugar and flour, this version uses almond flour, erythritol, and fresh lemon juice to create a light yet satisfying texture. The result? A perfectly balanced treat that’s tangy, slightly sweet, and utterly irresistible. For anyone exploring keto baking, this recipe proves that you don’t have to miss out on beloved flavors. In fact, it might just become your go-to dessert for brunches, afternoon snacks, or even a quick breakfast.

This recipe aligns perfectly with BrekCakes’ mission to make keto living delicious and accessible. If you’re new to keto baking, you’ll appreciate how straightforward the process is—no fancy techniques or hard-to-find ingredients required. Meanwhile, seasoned bakers will love the flexibility to tweak the recipe, like adding a drizzle of keto lemon glaze for extra zing. And if you’re looking for more keto-friendly sweets, our almond flour baking guide offers plenty of inspiration. Whether you’re meal prepping or treating yourself, Zesty Keto Lemon Bread Delight fits effortlessly into your routine.

Why I Love This Recipe

I’ll never forget the first time I baked Zesty Keto Lemon Bread Delight. It was a rainy afternoon, and I needed a pick-me-up that wouldn’t derail my keto progress. The moment I pulled the golden loaf from the oven, the citrus aroma filled my kitchen, and I knew I’d stumbled onto something special. Since then, it’s been my go-to for potlucks, family gatherings, and even solo indulgence. There’s something deeply comforting about its bright flavor and tender crumb—proof that eating well doesn’t mean sacrificing joy. Every slice feels like a little celebration, and that’s exactly what good food should do.

“`

Health and Nutrition

Why it’s good for your body

Zesty Keto Lemon Bread Delight packs a nutritious punch while satisfying your sweet cravings. First, its low-carb ingredients keep blood sugar levels steady, making it ideal for keto dieters. Additionally, almond flour provides healthy fats and protein, which support muscle repair and energy. Meanwhile, fresh lemon zest delivers a burst of vitamin C to boost immunity and skin health.

Moreover, this recipe avoids refined sugars, relying instead on natural sweeteners like erythritol. As a result, you enjoy a guilt-free treat without energy crashes. Furthermore, eggs in Zesty Keto Lemon Bread Delight contribute high-quality protein and choline, which aids brain function. The combination of coconut oil and almond flour also promotes heart health by reducing inflammation.

Finally, the tangy lemon flavor not only enhances taste but also aids digestion. Because it’s grain-free, Zesty Keto Lemon Bread Delight suits gluten-sensitive diets while keeping macros balanced. Whether you need a post-workout snack or a midday pick-me-up, this bread delivers both flavor and nourishment.

How it fits in a healthy lifestyle

Zesty Keto Lemon Bread Delight fits seamlessly into a mindful eating plan. If you follow a ketogenic diet, it’s a perfect low-carb option to stay in ketosis. For gluten-free lifestyles, almond flour ensures a delicious alternative to traditional baked goods. Even if you’re not strictly keto, this recipe supports balanced macros with its high-fat, moderate-protein profile.

Pair it with a morning coffee for sustained energy or enjoy it as a post-dinner dessert without derailing your goals. For more keto-friendly ideas, explore our Keto Meal Prep Guide to simplify your routine. If you love citrus flavors, our Lemon Blueberry Muffins offer another nutrient-packed option. With Zesty Keto Lemon Bread Delight, you can indulge smartly while staying on track.

Print
clock clock iconcutlery cutlery iconflag flag iconfolder folder iconinstagram instagram iconpinterest pinterest iconfacebook facebook iconprint print iconsquares squares iconheart heart iconheart solid heart solid icon

Zesty Keto Lemon Bread Delight


  • Author: Chef Emy

Description

A moist and tangy keto-friendly lemon bread with a delightful citrus flavor.


Ingredients

Scale

For the Crust:

  • 1.5 cups almond flour
  • 1/4 cup coconut flour
  • 1/2 cup granulated erythritol
  • 1 tsp baking powder
  • 1/4 tsp salt
  • 3 large eggs
  • 1/3 cup melted butter
  • 1/4 cup unsweetened almond milk
  • Zest of 2 lemons
  • 1/4 cup fresh lemon juice
  • 1 tsp vanilla extract

Instructions

1. Prepare the Crust:

  1. Preheat oven to 350°F (175°C) and grease a loaf pan.
  2. In a bowl, mix almond flour, coconut flour, erythritol, baking powder, and salt.
  3. In another bowl, whisk eggs, melted butter, almond milk, lemon zest, lemon juice, and vanilla.
  4. Combine wet and dry ingredients until smooth.
  5. Pour batter into the loaf pan and bake for 30 minutes or until a toothpick comes out clean.
  6. Let cool before slicing.

Notes

You can customize the seasonings to taste.

How to Prepare This Dish

Steps and time-saving tips

Start by preheating your oven to 350°F and greasing a loaf pan with coconut oil or butter. In a large bowl, whisk together almond flour, coconut flour, baking powder, and a pinch of salt until well combined. In another bowl, beat the eggs lightly before adding melted butter, fresh lemon juice, and lemon zest for that zesty kick. Gradually mix the wet ingredients into the dry ones, stirring gently to avoid overworking the batter. If the mixture feels too thick, add a splash of unsweetened almond milk to loosen it up. Pour the batter into the prepared pan and smooth the top with a spatula. Bake for 40-45 minutes or until a toothpick comes out clean. Let the Zesty Keto Lemon Bread Delight cool for 10 minutes before transferring it to a wire rack. For extra flavor, drizzle a simple glaze made of powdered erythritol and lemon juice over the top once cooled. To save time, prep the dry ingredients the night before or use a food processor to blend the batter in seconds.

Mistakes I’ve made and learned from

When I first made Zesty Keto Lemon Bread Delight, I overmixed the batter, which made it dense instead of light and fluffy. Now, I fold the ingredients just until combined for the perfect texture. Another mistake? Skipping the cooling step—I once sliced it too soon, and it crumbled apart. Patience pays off! If you’re new to keto baking, check out my guide on avoiding common keto baking mistakes to dodge these pitfalls. Also, if your bread browns too quickly, tent it with foil halfway through baking. For more lemon-inspired treats, try my easy keto lemon cookies—they’re a hit with the same bright flavor!

Cultural Connection and Variations

Where this recipe comes from

The Zesty Keto Lemon Bread Delight traces its roots to a beautiful blend of tradition and modern dietary trends. Originally inspired by classic lemon pound cakes, this recipe reimagines the dessert with a keto-friendly twist. Many cultures celebrate citrus-infused baked goods, especially in Mediterranean regions where lemons grow abundantly. For instance, Italians bake torta al limone, while Greeks enjoy portokalopita, an orange-infused phyllo cake. Meanwhile, the Zesty Keto Lemon Bread Delight offers a low-carb alternative that still captures that bright, tangy flavor.

In my family, we’ve always paired lemon desserts with summer gatherings. However, this version became a year-round favorite after swapping traditional flour for almond flour and sugar for erythritol. Some bakers add poppy seeds for crunch, while others drizzle a sugar-free glaze for extra sweetness. No matter the variation, the Zesty Keto Lemon Bread Delight keeps its signature refreshing kick. Across the globe, cooks adapt similar recipes to local tastes—whether it’s adding coconut in the tropics or lavender in Provence.

How it fits in today’s cooking

Today, the Zesty Keto Lemon Bread Delight fits perfectly into health-conscious kitchens without sacrificing flavor. Busy home cooks love it because it’s easy to whip up for breakfast or as an afternoon treat. Plus, it aligns with low-carb and gluten-free lifestyles, making it a versatile crowd-pleaser. Many bakers even incorporate it into holiday spreads, pairing it with keto-friendly desserts like rich chocolate cake for contrast.

Modern twists keep the recipe fresh. Some add yogurt for moisture, while others experiment with zesting different citrus fruits. You’ll also find it featured in meal-prep routines alongside staples like blueberry muffins. Whether you enjoy it warm from the oven or as a grab-and-go snack, the Zesty Keto Lemon Bread Delight proves that comfort food can be both nostalgic and nourishing.

Taste and Texture

What makes it delicious

Zesty Keto Lemon Bread Delight bursts with bright, tangy lemon flavor that dances on your tongue. The moist, tender crumb melts in your mouth, while a subtle almond flour base adds a nutty richness. Each bite delivers a refreshing citrus punch, balanced by a hint of vanilla and the gentle crunch of golden edges. The aroma alone—fresh lemon zest mingling with warm butter—will make your kitchen smell irresistible. Whether you enjoy it plain or toasted, Zesty Keto Lemon Bread Delight offers a satisfyingly soft yet slightly dense texture that keeps you coming back for more.

Boosting the flavor

For an extra flavor kick, try drizzling your Zesty Keto Lemon Bread Delight with a simple keto lemon glaze or topping it with whipped coconut cream. A sprinkle of toasted coconut flakes adds crunch and tropical flair. If you love bold contrasts, pair it with a tart berry chia jam for a sweet-tangy combo. Alternatively, fold fresh blueberries into the batter before baking for juicy bursts of flavor. Small tweaks can elevate this treat from delightful to unforgettable.

Tips for Success

Best practices for results

Always measure your almond flour correctly for the best texture in your Zesty Keto Lemon Bread Delight. Spoon it into the measuring cup and level it off—never pack it down. Additionally, use fresh lemon zest to maximize that bright, tangy flavor. For even baking, rotate the loaf pan halfway through the cook time. Finally, let the bread cool completely before slicing to prevent crumbling.

Mistakes to avoid

Overmixing the batter can make your Zesty Keto Lemon Bread Delight dense instead of light. Stir just until the ingredients combine to keep it tender. Another common error is skipping the parchment paper lining, which helps with easy removal. If you’re new to keto baking, check out our guide on keto baking basics for more tips. Also, avoid substituting coconut flour for almond flour without adjusting the ratios—our almond vs. coconut flour breakdown explains why this matters.

Serving and Pairing Suggestions

How to serve this dish

Slice your Zesty Keto Lemon Bread Delight into thick, even pieces for a beautiful presentation. For a special touch, dust the top with powdered erythritol or add a few fresh lemon zest curls. Meanwhile, serve it on a rustic wooden board for brunch gatherings or as a light dessert after dinner. If you’re hosting a tea party, arrange small squares on a tiered stand alongside other keto-friendly treats. The bright citrus flavor makes it perfect for spring celebrations or holiday brunches.

What goes well with it

Pair your Zesty Keto Lemon Bread Delight with a creamy cup of keto bulletproof coffee to balance the tangy lemon notes. Alternatively, enjoy it with a refreshing glass of iced herbal tea for a light afternoon snack. For a heartier option, serve it alongside our keto berry chia pudding to create a satisfying low-carb breakfast spread. Each pairing enhances the bread’s zesty flavor while keeping your meal perfectly balanced.

How many carbs are in Zesty Keto Lemon Bread Delight?

Zesty Keto Lemon Bread Delight typically contains around 3-4 net carbs per slice, making it a perfect low-carb treat. The exact count may vary slightly depending on ingredients like almond flour and sweeteners used in your recipe.

Can I make Zesty Keto Lemon Bread Delight without almond flour?

Yes, you can substitute almond flour with coconut flour, but you’ll need to adjust the quantities since coconut flour absorbs more moisture. For best results, follow a tested Zesty Keto Lemon Bread Delight recipe that specifies coconut flour measurements.

Does Zesty Keto Lemon Bread Delight need refrigeration?

Zesty Keto Lemon Bread Delight can stay fresh at room temperature for 2-3 days if stored in an airtight container. For longer storage, refrigerate it for up to a week or freeze individual slices for up to 3 months.

What sweetener works best for Zesty Keto Lemon Bread Delight?

Erythritol-based sweeteners like Swerve or monk fruit blends work well in Zesty Keto Lemon Bread Delight, providing sweetness without spiking blood sugar. Avoid liquid stevia for this recipe as it can make the texture too dense.

Best Festive Christmas Fruit Cake Recipe

best-festive-christmas-fruit-cake

“`html

Introduction

There’s something magical about the aroma of a freshly baked Festive Christmas Fruit Cake Recipe filling your home during the holidays. Whether you’re hosting a cozy family gathering or simply craving a slice of nostalgia, this cake brings warmth and joy to every bite. Rich with spices, soaked fruits, and a tender crumb, it’s the kind of dessert that sparks memories and creates new traditions. Plus, with its stunning presentation, it doubles as a centerpiece that’ll impress your guests. If you’ve ever wanted to master this classic, you’re in the right place—let’s bake a cake that’ll make this Christmas unforgettable.

About This Recipe

A Festive Christmas Fruit Cake Recipe isn’t just another dessert—it’s a celebration in every slice. Packed with candied fruits, nuts, and warm spices like cinnamon and nutmeg, this cake embodies the spirit of the season. Unlike store-bought versions, a homemade fruit cake lets you control the quality of ingredients, ensuring a moist, flavorful result every time. Moreover, it’s a versatile treat. Serve it as-is, drizzle it with brandy, or even transform it into a showstopping holiday dessert with a layer of marzipan.

This recipe fits perfectly with our blog’s mission to deliver approachable yet impressive bakes. Whether you’re a beginner or a seasoned baker, we break down each step to guarantee success. For instance, soaking the fruits ahead of time deepens the flavors, while the slow bake ensures an even texture. If you’re looking for more festive inspiration, check out our holiday cookie collection to pair with your cake. Ultimately, this Festive Christmas Fruit Cake Recipe isn’t just about taste—it’s about creating moments worth savoring.

Why I Love This Recipe

This Festive Christmas Fruit Cake Recipe holds a special place in my heart because it reminds me of my grandmother’s kitchen. Every December, she’d bake a dozen loaves, wrapping them in cheesecloth and brandy to age until Christmas Eve. The first bite always transported me back to those snowy mornings, surrounded by family and laughter. Now, I continue her tradition, tweaking the recipe slightly to make it my own. Whether I’m gifting slices to neighbors or enjoying it with coffee, this cake feels like a hug in dessert form—a timeless reminder of love and togetherness.

“`

Health and Nutrition

Why it’s good for your body

The Festive Christmas Fruit Cake Recipe packs a nutritious punch while delighting your taste buds. First, it’s loaded with dried fruits like raisins, apricots, and cranberries, which provide natural sweetness along with fiber and antioxidants. These nutrients support digestion and help combat inflammation. Additionally, the recipe often includes nuts such as almonds or walnuts, adding healthy fats and plant-based protein to keep you satisfied.

Moreover, the Festive Christmas Fruit Cake Recipe uses spices like cinnamon and nutmeg, which not only enhance flavor but also offer anti-inflammatory and blood sugar-balancing benefits. Unlike overly processed desserts, this cake relies on wholesome ingredients, making it a smarter indulgence. Furthermore, the dried fruits contribute iron and potassium, essential for energy and heart health.

Finally, when you bake the Festive Christmas Fruit Cake Recipe at home, you control the ingredients, avoiding excessive refined sugars or artificial additives. Whether you enjoy a small slice as a treat or share it with loved ones, this cake delivers both flavor and nourishment. With every bite, you’re treating your body to a blend of vitamins, minerals, and joy.

How it fits in a healthy lifestyle

The Festive Christmas Fruit Cake Recipe fits perfectly into a balanced diet when enjoyed mindfully. For those watching sugar intake, you can easily reduce added sweeteners or opt for natural alternatives like honey or maple syrup. If you follow a gluten-free diet, simply swap regular flour for a gluten-free blend—many bakers swear by almond or oat flour for a lighter texture.

This cake also aligns with heart-healthy eating habits, thanks to its nuts and dried fruits, which promote good cholesterol levels. Pair a slice with a cup of herbal tea or a protein-rich snack like Greek yogurt to balance blood sugar. For more gluten-free dessert inspiration, check out our gluten-free desserts guide. If you’re curious about other nutrient-dense holiday treats, explore our healthy holiday baking tips to keep your celebrations both delicious and nourishing.

Print
clock clock iconcutlery cutlery iconflag flag iconfolder folder iconinstagram instagram iconpinterest pinterest iconfacebook facebook iconprint print iconsquares squares iconheart heart iconheart solid heart solid icon

Festive Christmas Fruit Cake


  • Author: Chef Emy

Description

A rich and moist fruit cake packed with dried fruits, nuts, and warm spices, perfect for Christmas celebrations.


Ingredients

Scale

For the Crust:

  • 2 cups mixed dried fruits (raisins, currants, cherries, apricots)
  • 1 cup chopped nuts (walnuts, almonds)
  • 1 cup all-purpose flour
  • 1/2 cup unsalted butter, softened
  • 1/2 cup brown sugar
  • 2 eggs
  • 1 tsp vanilla extract
  • 1 tsp ground cinnamon
  • 1/2 tsp ground nutmeg
  • 1/4 tsp ground cloves
  • 1/4 cup brandy or orange juice
  • 1 tsp baking powder
  • 1/4 tsp salt

Instructions

1. Prepare the Crust:

  1. Preheat oven to 325°F (160°C). Grease and line a 9-inch cake pan.
  2. In a bowl, soak the dried fruits and nuts in brandy or orange juice for 15 minutes.
  3. In a separate bowl, cream butter and sugar until light and fluffy. Add eggs one at a time, then mix in vanilla.
  4. Sift flour, baking powder, salt, and spices together. Gradually fold into the butter mixture.
  5. Drain the soaked fruits and nuts, then fold into the batter until evenly distributed.
  6. Pour batter into the prepared pan and bake for 50-60 minutes or until a toothpick comes out clean.
  7. Let the cake cool completely before slicing. Optionally, brush with extra brandy for flavor.

Notes

You can customize the seasonings to taste.

How to Prepare This Dish

Steps and time-saving tips

Start by soaking your dried fruits in warm orange juice or rum for at least an hour—this plumps them up and adds deep flavor to your Festive Christmas Fruit Cake Recipe. Meanwhile, preheat your oven to 300°F and line your cake pan with parchment paper for easy removal later. Cream the butter and sugar until fluffy, then whisk in the eggs one at a time to avoid curdling. Fold in the flour gently, alternating with the soaked fruits, to keep the batter light. For even baking, tap the pan on the counter to remove air bubbles before sliding it into the oven. Bake for about 2 hours, but check early with a skewer—overbaking dries out the cake. If the top browns too fast, tent it with foil. Let the cake cool completely before wrapping it in cheesecloth soaked in brandy for that classic moist texture. Pro tip: Prep the fruits the night before to save time, and use a food processor to chop nuts quickly.

Mistakes I’ve made and learned from

My first Festive Christmas Fruit Cake Recipe turned out dense because I overmixed the batter—now I fold ingredients just until combined. Another time, I skipped soaking the fruits, and the cake lacked that rich, boozy depth. Lesson learned! For perfectly even slices, I chill the cake overnight before cutting, as I discovered in my guide to slicing dense cakes. And if your oven runs hot (like mine does), rotate the pan halfway through baking to prevent uneven browning. Trust me, a little patience pays off—this method for storing moist cakes keeps it fresh for weeks.

Cultural Connection and Variations

Where this recipe comes from

The Festive Christmas Fruit Cake Recipe carries centuries of tradition, blending spices, dried fruits, and spirits into a rich, celebratory dessert. Originating in medieval Europe, it evolved as a way to preserve seasonal fruits with honey and spices. Over time, British colonists spread it worldwide, and today, every culture adds its own twist. For instance, in the Caribbean, rum-soaked fruits dominate, while Italians often include pine nuts and citrus zest.

In my family, the Festive Christmas Fruit Cake Recipe always marked the start of the holidays. We’d soak the fruits weeks ahead, letting them plump with brandy until baking day. Meanwhile, in Japan, they lighten the texture with matcha or adzuki beans, proving how adaptable this treat is. Whether it’s served with a dollop of clotted cream in England or as a dense, spiced loaf in Germany, the cake unites cultures through shared warmth and nostalgia.

How it fits in today’s cooking

Today, the Festive Christmas Fruit Cake Recipe remains a holiday staple, but modern cooks give it fresh twists. Some swap refined sugar for maple syrup or load it with gluten-free flour for dietary needs. Others, like the bakers at Brek Cakes, reinvent it as a vegan showstopper. Despite changes, the essence stays—each slice delivers comfort and tradition.

Beyond December, this cake fits into year-round baking too. Mini versions make charming gifts, and leftover slices star in holiday trifles. Whether you honor the classic recipe or experiment with new flavors, the Festive Christmas Fruit Cake Recipe keeps connecting generations, one bite at a time.

Taste and Texture

What makes it delicious

The Festive Christmas Fruit Cake Recipe delivers a rich, indulgent experience with every bite. Imagine a moist, dense crumb infused with warm spices like cinnamon and nutmeg, balanced by the natural sweetness of plump raisins, candied cherries, and citrus zest. Each slice bursts with chewy fruit and a hint of boozy depth if you soak the dried fruits in rum or brandy. Meanwhile, the aroma alone—fragrant vanilla, toasted nuts, and caramelized sugar—will fill your kitchen with holiday cheer. Whether you enjoy it plain or glazed, the Festive Christmas Fruit Cake Recipe offers a nostalgic, comforting texture that melts slightly on the tongue yet holds its shape beautifully.

Boosting the flavor

Elevate your Festive Christmas Fruit Cake Recipe by brushing the baked cake with a spiced syrup made from orange juice and honey for extra moisture. Alternatively, fold in dark chocolate chunks or swap traditional raisins for spiced figs to add earthy complexity. For a festive finish, top it with a drizzle of vanilla rum glaze or serve it warm with a scoop of cinnamon ice cream. A pinch of cardamom or a splash of espresso in the batter can also deepen the flavors, making each bite even more memorable.

Tips for Success

Best practices for results

Always soak your dried fruits in rum or brandy overnight for a richer flavor in your Festive Christmas Fruit Cake Recipe. Meanwhile, use room-temperature butter to ensure a smooth, even batter. For best results, line your cake pan with parchment paper to prevent sticking and promote even baking. Additionally, bake the cake low and slow to avoid a dry texture—this helps the flavors meld perfectly. Finally, wrap the cooled cake in cheesecloth and feed it with alcohol weekly for a moist, festive treat.

Mistakes to avoid

One common mistake is overmixing the batter, which can make the Festive Christmas Fruit Cake Recipe dense instead of tender. Instead, gently fold the ingredients until just combined. Another error is skipping the fruit-soaking step, which leads to a less flavorful cake. For more tips on balancing moisture, check out our guide on baking moist cakes. Also, avoid opening the oven door too often, as temperature fluctuations cause uneven baking. If you’re unsure about doneness, learn how to test cake doneness properly.

Serving and Pairing Suggestions

How to serve this dish

Slice your Festive Christmas Fruit Cake Recipe into thick wedges for a cozy holiday dessert. For a stunning centerpiece, dust the top with powdered sugar or drizzle with a simple vanilla glaze. Meanwhile, arrange the slices on a vintage cake stand with fresh cranberries and rosemary sprigs for a festive touch. Serve it warm with a scoop of cinnamon ice cream during Christmas gatherings, or pack individual slices in decorative boxes as edible gifts. Whether you enjoy it at brunch or as an after-dinner treat, this cake brings holiday cheer to any table.

What goes well with it

Pair your Festive Christmas Fruit Cake Recipe with a spiced chai latte for a cozy winter combo. The warm spices in the drink highlight the cake’s rich flavors. Alternatively, try it with a scoop of homemade eggnog ice cream for a decadent twist. If you prefer savory contrasts, serve it alongside a sharp cheddar cheese board—the tangy cheese balances the cake’s sweetness. For more holiday inspiration, explore our holiday dessert ideas or whip up a batch of gingerbread cookies to complete your festive spread.

How long does a Festive Christmas Fruit Cake need to soak?

For the best flavor, soak your Festive Christmas Fruit Cake for at least 1-2 months before serving. This allows the dried fruits to fully absorb the alcohol or juice, creating a rich, moist texture. Some bakers even start soaking their fruit mixture 3-6 months ahead for an extra decadent cake.

Can I make a Festive Christmas Fruit Cake without alcohol?

Absolutely! You can substitute the alcohol in a Festive Christmas Fruit Cake with apple juice, orange juice, or strong brewed tea. These alternatives still provide moisture and flavor while keeping the recipe family-friendly. The cake will taste slightly different but remain delicious.

What’s the secret to a moist Festive Christmas Fruit Cake?

The key to a moist Festive Christmas Fruit Cake lies in proper soaking and storage. Always use plenty of quality dried fruits soaked in liquid, and wrap the baked cake tightly in cheesecloth soaked with your chosen liquid (rum, brandy, or juice). Store it in an airtight container, “feeding” it weekly with more liquid.

How do I prevent my Festive Christmas Fruit Cake from being too dense?

To avoid a dense Festive Christmas Fruit Cake, cream the butter and sugar thoroughly to incorporate air, and don’t overmix the batter after adding flour. Using a combination of baking powder and soda helps lift the heavy fruit mixture. Also, make sure to properly prepare your fruits by dusting them lightly with flour before folding them in.

Best Strawberry Cheesecake Delight – Creamy & Decadent

best-strawberry-cheesecake-delight

“`html

Introduction

There’s something magical about the first bite of a creamy, dreamy dessert that melts all your worries away. If you’ve ever craved a treat that feels like a hug in dessert form, this Indulgent Strawberry Cheesecake Delight is your answer. Picture velvety cheesecake paired with sweet, juicy strawberries, all nestled in a buttery crust—pure bliss in every forkful. Whether you’re celebrating a special occasion or just treating yourself after a long day, this recipe promises to deliver joy with every slice. Trust me, one taste and you’ll understand why it’s a favorite in my kitchen.

About This Recipe

Indulgent Strawberry Cheesecake Delight isn’t just another dessert—it’s a showstopper that balances rich, tangy cream cheese with the bright freshness of strawberries. Unlike traditional cheesecakes, this version keeps things simple without sacrificing flavor, making it perfect for both beginners and seasoned bakers. The creamy filling contrasts beautifully with the crisp graham cracker crust, while the strawberry topping adds a burst of color and natural sweetness. Plus, it’s versatile: serve it at summer picnics, holiday gatherings, or even as a decadent weeknight treat.

What makes this recipe stand out is how effortlessly it fits into any occasion. For instance, if you’re looking for more crowd-pleasing desserts, our Classic New York Cheesecake offers another timeless option. Meanwhile, if strawberries aren’t in season, you can swap them for other berries or even try a drizzle of chocolate. The key lies in the balance of textures and flavors, which keeps everyone coming back for seconds. And if you’re curious about mastering the perfect crust, our guide on Perfect Graham Cracker Crust breaks it down step by step.

This blog thrives on recipes that are as enjoyable to make as they are to eat, and Indulgent Strawberry Cheesecake Delight nails that balance. It’s approachable yet impressive, comforting yet elegant—a dessert that feels like home while still wowing your guests. Whether you’re baking for loved ones or just indulging a sweet tooth, this recipe delivers every time.

Why I Love This Recipe

This Indulgent Strawberry Cheesecake Delight holds a special place in my heart because it’s the dessert I turn to when I want to create memories. I first made it for my mom’s birthday, and now it’s become our family’s go-to celebration cake. The way the strawberries glisten on top reminds me of summer evenings spent picking fresh berries, and the creamy filling brings back cozy moments shared over dessert. It’s more than just a recipe—it’s a little piece of happiness I get to share with everyone I love.

“`

Health and Nutrition

Why it’s good for your body

Indulgent Strawberry Cheesecake Delight packs a surprising nutritional punch while satisfying your sweet tooth. First, fresh strawberries deliver a hefty dose of vitamin C, which boosts immunity and supports glowing skin. Additionally, the creamy filling provides a good source of calcium and protein, helping to strengthen bones and keep you full longer. Moreover, the natural sweetness of strawberries reduces the need for excessive added sugars, making this dessert a smarter choice.

Furthermore, Indulgent Strawberry Cheesecake Delight contains antioxidants from both strawberries and any graham cracker crust, which fight inflammation in the body. Meanwhile, the dessert’s balanced macronutrients—carbs, fats, and proteins—help stabilize energy levels. Of course, moderation is key, but enjoying a slice means treating yourself without derailing your health goals. Finally, the joy of savoring this dessert can even support mental well-being by reducing stress and elevating mood.

How it fits in a healthy lifestyle

Indulgent Strawberry Cheesecake Delight fits perfectly into a balanced diet when enjoyed mindfully. For those watching sugar intake, pairing a small portion with a protein-rich snack can help balance blood sugar levels. If you follow a gluten-free diet, simply swap the crust for a gluten-free alternative—our gluten-free dessert guide offers great tips. Heart-healthy eaters will appreciate that strawberries support cardiovascular health, and opting for lighter cream cheese can reduce saturated fat.

Planning ahead helps too. Serve Indulgent Strawberry Cheesecake Delight as a celebratory treat rather than an everyday indulgence. Pair it with a nutrient-dense meal, like a balanced dinner, to keep your overall diet on track. Remember, healthy living isn’t about deprivation—it’s about making smarter choices while still enjoying life’s sweet moments.

Print
clock clock iconcutlery cutlery iconflag flag iconfolder folder iconinstagram instagram iconpinterest pinterest iconfacebook facebook iconprint print iconsquares squares iconheart heart iconheart solid heart solid icon

Indulgent Strawberry Cheesecake Delight


  • Author: Chef Mia

Description

A creamy and rich strawberry cheesecake with a buttery graham cracker crust, topped with fresh strawberry sauce.


Ingredients

Scale

For the Crust:

  • 1 1/2 cups graham cracker crumbs
  • 1/4 cup granulated sugar
  • 6 tbsp unsalted butter, melted
  • 24 oz cream cheese, softened
  • 3/4 cup granulated sugar
  • 3 large eggs
  • 1 tsp vanilla extract
  • 1 cup sour cream
  • 2 cups fresh strawberries, hulled and sliced
  • 1/4 cup water
  • 1/4 cup granulated sugar
  • 1 tbsp cornstarch

Instructions

1. Prepare the Crust:

  1. Preheat oven to 325°F (165°C). Mix graham cracker crumbs, 1/4 cup sugar, and melted butter. Press into the bottom of a 9-inch springform pan.
  2. In a large bowl, beat cream cheese and 3/4 cup sugar until smooth. Add eggs one at a time, then mix in vanilla and sour cream.
  3. Pour filling over crust. Bake for 50-55 minutes until center is almost set. Cool completely.
  4. For the strawberry sauce: In a saucepan, combine strawberries, water, 1/4 cup sugar, and cornstarch. Cook over medium heat until thickened, about 10 minutes. Cool slightly, then spread over cheesecake.
  5. Refrigerate for at least 4 hours before serving.

Notes

You can customize the seasonings to taste.

How to Prepare This Dish

Steps and time-saving tips

Start by preheating your oven to 325°F to ensure it’s ready when you need it. Meanwhile, crush graham crackers into fine crumbs and mix them with melted butter until the texture resembles wet sand. Press this mixture firmly into the bottom of a springform pan, creating an even crust. Next, beat cream cheese until smooth, then gradually add sugar and vanilla, whisking until fluffy. Gently fold in whipped cream to keep the filling light and airy. Pour this over the crust and smooth the top with a spatula. Bake for 45 minutes, then let it cool completely before chilling in the fridge for at least 4 hours. While the cheesecake sets, slice fresh strawberries and toss them with a touch of sugar to enhance their natural sweetness. Once chilled, layer the strawberries on top and drizzle with homemade strawberry glaze for a glossy finish. To save time, use store-bought graham cracker crumbs or prepare the crust a day ahead. If you’re short on time, chill the cheesecake in the freezer for 2 hours instead—just don’t skip this step, or the texture won’t set properly.

Mistakes I’ve made and learned from

I once rushed the cooling process and ended up with a cracked cheesecake—turns out, letting it rest at room temperature first is non-negotiable. Now, I follow my own guide to preventing cracks, which includes running a knife around the edges right after baking. Another blunder? Overmixing the batter, which trapped too much air and caused uneven baking. These days, I mix just until combined, and my tips for the perfect texture keep things silky every time. If your strawberries release too much juice, pat them dry before layering to avoid a soggy top. Trust me, a little patience goes a long way with this Indulgent Strawberry Cheesecake Delight.

Cultural Connection and Variations

Where this recipe comes from

The Indulgent Strawberry Cheesecake Delight carries a rich history, blending classic American dessert traditions with European influences. Cheesecake itself dates back to ancient Greece, but the creamy, strawberry-topped version we love today became popular in 20th-century America. Families often serve it at summer gatherings when strawberries peak, turning it into a symbol of warmth and celebration.

Around the world, bakers put their own spin on this dessert. In Japan, they lighten the texture with whipped cream and matcha layers. Meanwhile, Italian versions might swap strawberries for figs or citrus. My grandma added a splash of vanilla and fresh lemon zest to her Indulgent Strawberry Cheesecake Delight, making it tangier than most. No matter the variation, the joy it brings stays the same.

How it fits in today’s cooking

Today, the Indulgent Strawberry Cheesecake Delight remains a star at birthdays, holidays, and even casual brunches. Modern cooks adapt it for dietary needs, using almond flour crusts or dairy-free cream cheese. Some even turn it into portable cheesecake bars for easy sharing.

Seasonal twists keep it fresh year-round. In winter, pomegranate seeds replace strawberries, while spring calls for rhubarb compote. For busy home bakers, no-bake versions save time without sacrificing flavor. Whether you stick to tradition or experiment, this dessert fits perfectly into quick dessert rotations and special occasions alike.

Taste and Texture

What makes it delicious

Indulgent Strawberry Cheesecake Delight delivers a symphony of flavors and textures that dance on your palate. First, the velvety cheesecake layer melts in your mouth with its rich, creamy tang, perfectly balanced by the sweet-tart burst of fresh strawberries. Meanwhile, the buttery graham cracker crust adds a satisfying crunch, creating a delightful contrast. Every bite releases a fragrant aroma of vanilla and citrus zest, elevating the experience. Whether you savor it chilled or slightly softened, Indulgent Strawberry Cheesecake Delight feels like a luxurious treat that lingers deliciously.

Boosting the flavor

Take your Indulgent Strawberry Cheesecake Delight to the next level with a few easy tweaks. For a deeper berry flavor, swirl in homemade strawberry compote before chilling. Alternatively, drizzle warm white chocolate ganache over each slice for an extra layer of decadence. A pinch of cardamom or a splash of almond extract in the cheesecake batter can also add subtle warmth. Finally, top with toasted coconut flakes or a sprinkle of sea salt to highlight the dessert’s natural sweetness. With these simple upgrades, every bite becomes unforgettable.

Tips for Success

Best practices for results

Always use room-temperature cream cheese for your Indulgent Strawberry Cheesecake Delight to ensure a smooth, lump-free filling. Meanwhile, pre-bake the crust for just 10 minutes to prevent sogginess. For the best texture, chill the cheesecake for at least 4 hours before adding the strawberry topping. Additionally, pat the strawberries dry before arranging them to keep the glaze shiny and intact. Finally, slice with a warm knife for clean, professional edges every time.

Mistakes to avoid

Overmixing the batter can introduce too much air, causing cracks in your Indulgent Strawberry Cheesecake Delight. Instead, mix just until the ingredients combine. Another common mistake is skipping the water bath, which helps bake the cheesecake evenly. If you’re unsure about the technique, check out our water bath guide for foolproof results. Also, avoid overbaking—the center should still jiggle slightly when you pull it from the oven. For more troubleshooting tips, our cheesecake cracks fix covers simple solutions.

Serving and Pairing Suggestions

How to serve this dish

For a stunning presentation, slice the Indulgent Strawberry Cheesecake Delight into neat portions and place each on a chilled dessert plate. Meanwhile, drizzle a swirl of strawberry sauce around the plate and top with fresh mint leaves for a pop of color. Alternatively, serve it family-style on a cake stand for brunch or holiday gatherings. If you want to elevate the experience, add a dollop of whipped cream and a few extra strawberries on the side. No matter how you serve it, this dessert will steal the show.

What goes well with it

Pair the Indulgent Strawberry Cheesecake Delight with a warm cup of vanilla chai tea for a cozy contrast to its creamy texture. If you prefer something cooler, try a glass of sparkling rosé to highlight the fruity notes. For a complete dessert spread, serve it alongside our Decadent Chocolate Truffles or a scoop of Homemade Vanilla Bean Ice Cream. Each option enhances the rich flavors while keeping the focus on this irresistible treat.

What makes an Indulgent Strawberry Cheesecake Delight so creamy?

The creaminess of an Indulgent Strawberry Cheesecake Delight comes from blending full-fat cream cheese with sour cream or heavy whipping cream. Using room-temperature ingredients ensures a smooth texture, while baking it in a water bath prevents cracks. This dessert is all about rich, velvety layers that melt in your mouth.

Can I make Indulgent Strawberry Cheesecake Delight ahead of time?

Yes! Indulgent Strawberry Cheesecake Delight actually tastes better when made 1–2 days in advance, as the flavors deepen. Store it covered in the fridge, and add fresh strawberry toppings just before serving for the best texture and presentation.

How do you prevent a soggy crust in Strawberry Cheesecake Delight?

Pre-bake your graham cracker crust for 8–10 minutes and let it cool completely before adding the filling. For extra protection, brush the crust with melted white chocolate or egg white to create a moisture barrier. This keeps your Indulgent Strawberry Cheesecake Delight crust crisp and delicious.

What’s the best way to decorate an Indulgent Strawberry Cheesecake Delight?

Fresh strawberry slices arranged in a circular pattern or a glossy strawberry glaze make stunning toppings. For extra elegance, pipe whipped cream rosettes around the edges or drizzle with white chocolate. The vibrant red strawberries against the creamy backdrop make this dessert irresistible.

Best New York Cheesecake – Creamy and Decadent Recipe

best-new-york-cheesecake-recipe

“`html

Introduction

There’s something undeniably magical about a perfectly baked cheesecake—creamy, rich, and just sweet enough to feel like a celebration. If you’ve ever dreamed of recreating that iconic diner-style dessert at home, this Decadent New York Cheesecake Recipe is your golden ticket. Whether you’re hosting a special occasion or simply treating yourself, this recipe delivers that velvety texture and buttery crust you crave. Plus, it’s easier to make than you might think. Let’s dive into why this classic dessert deserves a spot in your baking repertoire.

About This Recipe

A Decadent New York Cheesecake Recipe isn’t just any dessert—it’s a masterpiece of simplicity and indulgence. Unlike lighter variations, this version boasts a dense, velvety filling with a subtle tang from cream cheese, balanced by a crisp graham cracker crust. What sets it apart? The method. By baking it low and slow in a water bath, you achieve that signature crack-free top and luxuriously smooth texture. This recipe matters because it’s a crowd-pleaser that never goes out of style. Whether you’re a beginner or a seasoned baker, mastering this classic opens the door to endless variations, like adding swirls of fruit compote or chocolate ganache.

At BrekCakes, we celebrate recipes that strike the perfect balance between approachable and extraordinary. This Decadent New York Cheesecake Recipe fits right in with our philosophy of elevating everyday baking. If you’re looking for more inspiration, check out our guide to perfecting pie crusts or explore our favorite dessert hacks to streamline your process. After all, great baking is about joy as much as it is about technique.

Why I Love This Recipe

This Decadent New York Cheesecake Recipe holds a special place in my heart because it’s the first dessert I ever made for my family’s holiday gathering. I remember the nervous excitement as I pulled it from the oven, praying for no cracks. When it sliced perfectly and earned rave reviews, I felt like a baking champion. Years later, it’s still my go-to for birthdays, potlucks, or just because. There’s something deeply satisfying about its simplicity—how a handful of basic ingredients can transform into something so luxurious. Every time I make it, I’m reminded why baking is more than following steps; it’s about creating moments worth savoring.

“`

Health and Nutrition

Why it’s good for your body

While the Decadent New York Cheesecake Recipe might seem indulgent, it actually offers several surprising health benefits. First, cream cheese provides a good source of calcium and protein, which support strong bones and muscle repair. Additionally, eggs in the recipe deliver essential vitamins like B12 and choline, promoting brain health and energy levels.

Moreover, the Decadent New York Cheesecake Recipe includes antioxidants if you top it with fresh berries. For instance, strawberries or blueberries add fiber and vitamin C, boosting immunity and digestion. Meanwhile, the buttery graham cracker crust offers whole grains, contributing to heart health when enjoyed in moderation.

Finally, this dessert can even uplift your mood. Since the Decadent New York Cheesecake Recipe contains natural fats and sugars, it triggers serotonin release, helping you feel happier. Just remember to savor it mindfully for maximum satisfaction.

How it fits in a healthy lifestyle

Balancing treats like the Decadent New York Cheesecake Recipe with nutritious meals keeps your diet enjoyable and sustainable. For example, pairing a small slice with a protein-rich meal stabilizes blood sugar and prevents overindulgence. If you follow a gluten-free diet, simply swap the crust for almond flour or oats.

Planning ahead also helps. Bake this dessert for special occasions, or freeze individual portions to avoid daily temptation. For more tips on mindful eating, explore our guide on healthy dessert swaps. Alternatively, if you love cheesecake but want lighter options, try our protein-packed cheesecake variation for an extra nutrient boost.

Ultimately, the Decadent New York Cheesecake Recipe fits perfectly into a flexible, balanced lifestyle. Enjoy it guilt-free by focusing on portion control and pairing it with wholesome foods.

Print
clock clock iconcutlery cutlery iconflag flag iconfolder folder iconinstagram instagram iconpinterest pinterest iconfacebook facebook iconprint print iconsquares squares iconheart heart iconheart solid heart solid icon

Decadent New York Cheesecake


  • Author: Chef Emy

Description

A rich and creamy classic New York-style cheesecake with a buttery graham cracker crust.


Ingredients

Scale

For the Crust:

  • 2 cups graham cracker crumbs
  • 1/2 cup unsalted butter, melted
  • 1/4 cup granulated sugar
  • 4 (8 oz) packages cream cheese, softened
  • 1 1/4 cups granulated sugar
  • 1 tsp vanilla extract
  • 4 large eggs
  • 2/3 cup sour cream
  • 2/3 cup heavy cream

Instructions

1. Prepare the Crust:

  1. Preheat oven to 325°F (165°C). Mix graham cracker crumbs, melted butter, and 1/4 cup sugar in a bowl. Press firmly into the bottom of a 9-inch springform pan.
  2. In a large bowl, beat cream cheese until smooth. Gradually add 1 1/4 cups sugar and vanilla, mixing well. Add eggs one at a time, beating just until blended.
  3. Stir in sour cream and heavy cream until smooth. Pour filling over crust. Bake for 55-60 minutes or until center is almost set.
  4. Turn off oven and leave cheesecake inside with door slightly open for 1 hour. Remove and cool completely before refrigerating for at least 4 hours.

Notes

You can customize the seasonings to taste.

How to Prepare This Dish

Steps and time-saving tips

Start by preheating your oven to 325°F and greasing a 9-inch springform pan. Meanwhile, crush graham crackers into fine crumbs and mix them with melted butter and sugar. Press this mixture firmly into the pan’s base, then bake for 10 minutes to set the crust. While it cools, beat cream cheese until smooth, then gradually add sugar, eggs, vanilla, and sour cream. Whisk everything until creamy, but avoid overmixing to prevent air bubbles. Pour the filling over the crust and smooth the top with a spatula. Bake for 50-60 minutes until the edges are set but the center still jiggles slightly. Turn off the oven, crack the door, and let the cheesecake cool inside for an hour to prevent cracks. Finally, chill it for at least 4 hours—or better yet, overnight—for the perfect texture. To save time, use a food processor for the crust and room-temperature ingredients for smoother blending.

Mistakes I’ve made and learned from

I once rushed the cooling process and ended up with a cracked Decadent New York Cheesecake Recipe—heartbreaking after all that effort! Now, I always let it cool gradually in the oven, just like my perfect cheesecake tips suggest. Another blunder? Overbaking. I used to rely solely on time, but now I check for that slight jiggle in the center. If you’re new to baking, my common baking mistakes guide covers these pitfalls in detail. Trust me, patience pays off with cheesecake!

Cultural Connection and Variations

Where this recipe comes from

The Decadent New York Cheesecake Recipe traces its roots to the bustling diners and delis of mid-20th century Manhattan. Bakers aimed to create a richer, creamier version of traditional European cheesecakes by adding extra egg yolks and cream cheese. Today, this iconic dessert symbolizes indulgence, often gracing special occasions like birthdays or anniversaries. Meanwhile, in Italy, bakers might swap cream cheese for ricotta, while Germans sometimes incorporate quark for a lighter texture.

In my family, the Decadent New York Cheesecake Recipe became a Thanksgiving staple after my aunt discovered it in a 1980s cookbook. She’d top it with cranberry compote instead of classic strawberries, blending holiday flavors with that signature velvety base. Across the South, you might find a splash of bourbon in the batter, while West Coast versions often feature avocado or matcha swirls for a trendy twist.

How it fits in today’s cooking

Modern cooks still adore the Decadent New York Cheesecake Recipe because it balances nostalgia with versatility. Meal preppers bake mini versions in muffin tins for portion-controlled treats, while gluten-free bloggers use almond crusts like in our gluten-free desserts guide. It’s also a star of holiday spreads, especially when paired with seasonal toppings like spiced pumpkin or peppermint.

Thanks to its creamy texture, this cheesecake adapts beautifully to dietary trends. Vegan bakers replicate it with cashew cream, and keto followers sweeten it with monk fruit. For effortless entertaining, many lean on make-ahead tricks from our entertaining tips. Whether served at a dinner party or enjoyed solo with coffee, this classic never loses its charm.

Taste and Texture

What makes it delicious

The Decadent New York Cheesecake Recipe delivers a luxurious sensory experience with every bite. Its velvety, creamy filling melts on your tongue, while the buttery graham cracker crust adds a satisfying crunch. Rich cream cheese and a hint of vanilla create a smooth, slightly tangy flavor that lingers pleasantly. Meanwhile, the golden top layer offers a delicate caramelized aroma, making each slice as fragrant as it is indulgent. Whether served chilled or slightly softened, the Decadent New York Cheesecake Recipe balances sweetness and richness perfectly, leaving you craving just one more forkful.

Boosting the flavor

Elevate your Decadent New York Cheesecake Recipe with a few creative tweaks. For a citrusy twist, swirl in fresh lemon zest or top with a tangy berry compote to contrast the creamy base. Alternatively, drizzle warm caramel or chocolate ganache for extra decadence. If you love spice, a sprinkle of cinnamon or a dash of bourbon in the batter adds depth. Pair your cheesecake with a scoop of homemade vanilla ice cream for a cool, creamy contrast. These simple enhancements make an already irresistible dessert even more memorable.

Tips for Success

Best practices for results

Always bring cream cheese and eggs to room temperature before mixing to ensure a smooth batter for your Decadent New York Cheesecake Recipe. Meanwhile, use a water bath to prevent cracks, and avoid overmixing the filling to keep the texture creamy. For best results, chill the cheesecake overnight before serving to let the flavors fully develop. Additionally, line your pan with parchment paper for easy removal and clean slices every time.

Mistakes to avoid

One common mistake is baking the Decadent New York Cheesecake Recipe at too high a temperature, which causes cracks. Instead, bake low and slow for even cooking. Another error is skipping the water bath, which leads to uneven baking. For more troubleshooting tips, check out our guide on fixing cracked cheesecake. Also, avoid opening the oven door too early, as sudden temperature changes can make the center sink. Learn how to test doneness properly with our perfect cheesecake doneness guide.

Serving and Pairing Suggestions

How to serve this dish

Elevate your Decadent New York Cheesecake Recipe by serving it chilled on a sleek cake stand for a touch of elegance. Meanwhile, garnish each slice with fresh berries or a drizzle of caramel sauce to add color and contrast. For special occasions like holidays or dinner parties, pair it with a dollop of whipped cream and a dusting of cocoa powder. Alternatively, serve it as a showstopping dessert at brunch alongside coffee or mimosas. No matter how you present it, this cheesecake always impresses.

What goes well with it

A hot cup of coffee or espresso beautifully balances the rich creaminess of the Decadent New York Cheesecake Recipe. The bold flavors cut through the sweetness, creating a perfect harmony. If you prefer something cooler, try pairing it with a glass of cold milk or a scoop of vanilla ice cream for extra indulgence. For a fruity twist, serve it with our Homemade Berry Compote or a side of Citrus Salad to brighten each bite. These pairings enhance the dessert without overpowering its classic flavor.

What makes a New York cheesecake different from regular cheesecake?

A Decadent New York Cheesecake Recipe typically uses extra cream cheese and heavy cream for a richer, denser texture compared to lighter versions. It also often includes sour cream for tanginess and a classic graham cracker crust for contrast.

How do you prevent cracks in New York cheesecake?

To avoid cracks in your Decadent New York Cheesecake Recipe, bake it in a water bath at low temperature and let it cool gradually in the oven. Avoid overmixing the batter, which can incorporate too much air and lead to cracking.

Can I make New York cheesecake without a springform pan?

While a springform pan is ideal for this Decadent New York Cheesecake Recipe, you can use a regular cake pan lined with parchment paper. Just be extra careful when removing the cheesecake to maintain its beautiful presentation.

How long should New York cheesecake chill before serving?

For best results with your Decadent New York Cheesecake Recipe, let it chill in the refrigerator for at least 4 hours, though overnight is ideal. This allows the flavors to develop fully and gives the cheesecake its signature firm yet creamy texture.

Best Homemade Twix Bites – Easy & Irresistible Recipe

best-homemade-twix-bites-recipe

“`html

Introduction

There’s something magical about biting into a buttery shortbread crust, layered with gooey caramel, and dipped in smooth chocolate. If you’ve ever craved the perfect balance of crunch and sweetness, this Irresistible Homemade Twix Bites Recipe will hit the spot. Whether you’re a busy parent looking for a quick treat or a dessert lover eager to impress, these bite-sized delights bring joy to every occasion. Plus, making them at home means you control the ingredients, avoiding preservatives while savoring every decadent bite. Trust me, once you try these, store-bought versions just won’t compare.

About This Recipe

The Irresistible Homemade Twix Bites Recipe captures everything we love about the classic candy bar but in a fresher, more customizable form. Unlike mass-produced snacks, these bites let you tweak the caramel thickness, chocolate type, or even add a sprinkle of sea salt for extra flair. Moreover, they fit perfectly into any gathering, from holiday parties to casual movie nights. If you’ve tried our Easy Homemade Caramel Sauce, you’ll recognize the rich, velvety layer in this recipe. Similarly, fans of our Perfect Shortbread Cookies will appreciate the crumbly, buttery base that makes these bites unforgettable.

What sets this recipe apart is its simplicity. Even if you’re new to baking, you’ll find the steps straightforward and rewarding. Meanwhile, the combination of textures and flavors ensures everyone will ask for seconds. Additionally, these Twix bites store well, so you can prep them ahead for last-minute cravings or gifts. Ultimately, this recipe isn’t just about dessert—it’s about creating moments of happiness, one bite at a time.

Why I Love This Recipe

I’ll never forget the first time I made these Irresistible Homemade Twix Bites for a friend’s birthday. Seeing her eyes light up after the first bite reminded me why I love baking—it’s a way to share joy. The recipe also brings back childhood memories of unwrapping Twix bars after school, but now I get to recreate that nostalgia with my own twist. Every time I make them, I experiment with dark chocolate or a pinch of flaky salt, making each batch uniquely delicious. For me, these bites aren’t just a treat—they’re a little piece of love wrapped in chocolate.

“`

Health and Nutrition

Why it’s good for your body

Irresistible Homemade Twix Bites Recipe packs a surprising nutritional punch while satisfying your sweet tooth. First, the recipe uses wholesome ingredients like almond flour and natural sweeteners, which offer more fiber and fewer refined sugars than store-bought alternatives. Additionally, dark chocolate, a key component, delivers antioxidants that support heart health and reduce inflammation.

Moreover, Irresistible Homemade Twix Bites Recipe includes healthy fats from nuts and coconut oil, which help keep you full longer. Unlike processed candy bars, these bites avoid artificial preservatives, making them a cleaner choice for mindful indulgence. Furthermore, the recipe allows for customization, so you can adjust sweetness or swap ingredients to fit dietary needs without sacrificing flavor.

Finally, portion control becomes effortless with these bite-sized treats. Because each piece is small, you can enjoy Irresistible Homemade Twix Bites Recipe without overdoing it. Whether you need an energy boost or a guilt-free dessert, this recipe balances taste and nutrition in every bite.

How it fits in a healthy lifestyle

Irresistible Homemade Twix Bites Recipe fits seamlessly into a balanced diet when enjoyed mindfully. For those following gluten-free or dairy-free lifestyles, simple swaps like using coconut oil instead of butter make these treats accessible. Pair them with a protein-rich snack, like our Almond Flour Banana Bread, to create a satisfying combo that stabilizes blood sugar.

If you prioritize heart health, the dark chocolate and nuts in this recipe provide monounsaturated fats and flavonoids. These nutrients support cardiovascular wellness when consumed as part of a varied diet. For more ideas on balancing treats with nutrition, explore our Healthy Dessert Swaps Guide to keep cravings in check without deprivation.

Ultimately, Irresistible Homemade Twix Bites Recipe proves that indulgence and health can coexist. By choosing homemade over processed options, you take control of ingredients and portions, making it easier to stay on track with your wellness goals.

Print
clock clock iconcutlery cutlery iconflag flag iconfolder folder iconinstagram instagram iconpinterest pinterest iconfacebook facebook iconprint print iconsquares squares iconheart heart iconheart solid heart solid icon

Irresistible Homemade Twix Bites


  • Author: Chef Emy

Description

Delicious bite-sized homemade Twix bars with a buttery shortbread base, gooey caramel, and rich chocolate coating.


Ingredients

Scale

For the Crust:

  • 1 cup all-purpose flour
  • 1/4 cup granulated sugar
  • 1/2 cup unsalted butter, softened
  • 1 cup soft caramels
  • 1 tbsp heavy cream
  • 1 cup semi-sweet chocolate chips
  • 1 tsp coconut oil

Instructions

1. Prepare the Crust:

  1. Preheat oven to 350°F (175°C). Line an 8×8 inch baking pan with parchment paper.
  2. In a bowl, mix flour, sugar, and butter until crumbly. Press evenly into the prepared pan and bake for 15-18 minutes until golden. Let cool completely.
  3. Melt caramels with heavy cream in a microwave-safe bowl, stirring every 30 seconds until smooth. Pour over the cooled shortbread and spread evenly. Chill for 30 minutes.
  4. Cut the chilled caramel shortbread into small bite-sized rectangles.
  5. Melt chocolate chips with coconut oil in a double boiler or microwave. Dip each caramel shortbread bite into the melted chocolate, coating completely. Place on parchment paper to set.
  6. Chill for 15 minutes until chocolate hardens. Serve and enjoy!

Notes

You can customize the seasonings to taste.

How to Prepare This Dish

Steps and time-saving tips

Start by preheating your oven to 350°F and lining a baking sheet with parchment paper. Mix the flour, sugar, and melted butter in a bowl until the dough comes together. Press the mixture evenly into the prepared pan, then bake for 15 minutes until golden. While the shortbread cools, whisk the caramel ingredients in a saucepan over medium heat until smooth and thick. Spread the caramel over the baked layer and let it set for 20 minutes. Meanwhile, melt the chocolate in a double boiler or microwave, stirring frequently to avoid burning. Drizzle or spread the chocolate over the caramel layer, then chill the tray for 30 minutes until firm. Finally, slice into bite-sized squares and enjoy your Irresistible Homemade Twix Bites Recipe. To save time, use store-bought caramel or chocolate, but homemade layers truly elevate the flavor.

Mistakes I’ve made and learned from

I once rushed the caramel step and ended up with a grainy texture because I didn’t stir constantly. Now, I keep the heat low and whisk nonstop for silky results. Another time, I skipped chilling the layers and ended up with messy, uneven cuts. Patience pays off—letting each layer set properly ensures clean slices. If you’re new to candy-making, my guide to perfect caramel breaks down the science. For chocolate lovers, my tempering tutorial helps avoid streaks or blooming. Trust me, these small tweaks make your Irresistible Homemade Twix Bites Recipe foolproof.

Cultural Connection and Variations

Where this recipe comes from

The Irresistible Homemade Twix Bites Recipe takes inspiration from the classic Twix candy bar, which first delighted taste buds in the UK back in 1967. Over time, this caramel-coated, chocolate-dipped treat became a global favorite, with each culture adding its own twist. For example, in some European bakeries, you might find hazelnut praline replacing the traditional caramel, while in the U.S., home cooks often experiment with sea salt or peanut butter layers.

In my family, the Irresistible Homemade Twix Bites Recipe became a holiday staple after my aunt brought her version to a Christmas potluck. She used crushed shortbread cookies instead of the usual base, giving them a buttery crunch that everyone adored. Meanwhile, friends from Australia swear by adding a sprinkle of coconut to the caramel layer for a tropical flair. No matter where you enjoy them, these little bites carry a universal appeal—perfect for sharing at gatherings or savoring solo with a cup of coffee.

How it fits in today’s cooking

Today, the Irresistible Homemade Twix Bites Recipe fits seamlessly into modern cooking trends. With more people embracing homemade treats over store-bought snacks, these bites offer a fun, customizable project. For instance, health-conscious bakers swap in dates for caramel or use dark chocolate for a richer finish. They’re also a hit at parties, especially when paired with other bite-sized desserts like mini cheesecakes or chocolate truffles.

Beyond special occasions, this recipe thrives in everyday cooking too. Busy parents love whipping up a batch for lunchbox surprises, while food bloggers showcase seasonal variations—think pumpkin spice caramel in fall or peppermint chocolate in winter. Whether you stick to the classic or experiment with new flavors, the Irresistible Homemade Twix Bites Recipe proves that some traditions only get better with time.

Taste and Texture

What makes it delicious

Irresistible Homemade Twix Bites Recipe delivers a symphony of textures and flavors in every bite. First, you’ll notice the buttery, crisp shortbread base that crumbles just right. Next, the velvety caramel layer melts in your mouth with a rich, toasty sweetness. Finally, the smooth chocolate coating adds a cool, glossy finish that snaps with each bite. Warm vanilla and toasted notes from the caramel mingle with deep cocoa aromas, making these bites impossible to resist. Whether you savor them slowly or pop them whole, Irresistible Homemade Twix Bites Recipe balances crunch, creaminess, and decadence perfectly.

Boosting the flavor

Elevate your Irresistible Homemade Twix Bites Recipe with a few creative tweaks. Try swapping dark chocolate for milk chocolate to intensify richness, or sprinkle flaky sea salt over the caramel for a sweet-salty contrast. For extra depth, fold a pinch of espresso powder into the shortbread dough—it enhances the buttery flavor without overpowering it. If you love nutty undertones, drizzle the finished bites with salted almond butter or roll the edges in crushed candied pecans. These small upgrades make an already irresistible treat even more memorable.

Tips for Success

Best practices for results

Always chill the dough before shaping your Irresistible Homemade Twix Bites Recipe to prevent sticking and ensure clean cuts. Meanwhile, use parchment paper for easy removal and a perfect texture. For a smooth caramel layer, warm it slightly before spreading, and press firmly to bond the layers. Additionally, temper your chocolate properly to achieve that signature snap. Finally, store the bites in an airtight container to keep them fresh for days.

Mistakes to avoid

Avoid rushing the caramel step, as undercooking it leads to a runny filling. Instead, cook it until golden for the right consistency. Similarly, don’t skip greasing the pan, or the shortbread base may stick. If your chocolate seizes, try our guide to fixing seized chocolate for a quick solution. Also, overhandling the dough makes it tough, so work gently. For more troubleshooting, check out our common baking mistakes post to perfect your technique.

Serving and Pairing Suggestions

How to serve this dish

Make your Irresistible Homemade Twix Bites Recipe shine by arranging them on a decorative platter with a drizzle of melted chocolate for extra elegance. For parties, stack them in mini cupcake liners or place them in small gift boxes as sweet favors. Alternatively, serve them alongside a scoop of vanilla ice cream for a decadent dessert. These bites also make a delightful addition to holiday cookie trays or afternoon tea spreads. Whatever the occasion, their buttery caramel and chocolate layers will steal the show.

What goes well with it

Pair your Irresistible Homemade Twix Bites Recipe with a warm cup of spiced chai latte to balance the sweetness with aromatic spices. If you prefer something cold, try a creamy vanilla milkshake for a nostalgic treat. For a contrasting flavor, serve them with fresh berries like strawberries or raspberries, which cut through the richness. If you love dessert pairings, explore our Decadent Chocolate Truffles or Salted Caramel Brownies for a full indulgence spread. Each option enhances the experience while keeping the focus on these irresistible bites.

What ingredients do I need for Irresistible Homemade Twix Bites Recipe?

You’ll need simple ingredients like shortbread cookies, caramel, chocolate chips, and a pinch of salt. These Irresistible Homemade Twix Bites mimic the classic candy bar flavors with a homemade touch. Optional additions include vanilla extract or sea salt for extra flavor.

How long do Homemade Twix Bites last?

Store your Irresistible Homemade Twix Bites in an airtight container at room temperature for up to 1 week. For longer freshness, refrigerate them for up to 2 weeks. The chocolate coating helps preserve the caramel and shortbread layers.

Can I make Irresistible Homemade Twix Bites gluten-free?

Yes! Swap regular shortbread cookies for gluten-free versions and ensure your other ingredients are certified gluten-free. These Irresistible Homemade Twix Bites will taste just as delicious without gluten. Always check labels to avoid cross-contamination.

What’s the trick to getting the chocolate coating smooth on Twix Bites?

Melt chocolate slowly using a double boiler or microwave in short bursts, stirring frequently. For Irresistible Homemade Twix Bites, let the caramel layer set completely before dipping to prevent clumping. A fork or dipping tool helps achieve an even coating.

Best Festive Fall Fruit Salad – Easy Recipe

best-festive-fall-fruit-salad

“`html

Introduction

There’s something magical about the flavors of fall—warm spices, crisp apples, and juicy pears all coming together in a vibrant dish. If you’re craving a refreshing yet cozy treat that celebrates the season, this Festive Fall Fruit Salad Recipe is your perfect match. Whether you’re hosting a holiday gathering or simply treating yourself, this colorful medley brings joy to every bite. Plus, it’s effortless to whip up, making it a go-to for busy weeknights or last-minute potlucks. Let’s dive into why this recipe deserves a spot on your table.

About This Recipe

The Festive Fall Fruit Salad Recipe is a delightful blend of seasonal fruits like apples, pears, and pomegranate seeds, tossed with a hint of cinnamon and honey for that extra warmth. Unlike heavy desserts, this dish feels light yet satisfying, making it ideal for balancing indulgent holiday meals. What sets it apart is its versatility. You can serve it as a side dish, dessert, or even a breakfast topping. For more inspiration on seasonal recipes, check out our autumn baking ideas.

Beyond its delicious taste, this recipe matters because it embraces simplicity without sacrificing flavor. Fall often brings hectic schedules, so having a quick, nutritious option matters. The Festive Fall Fruit Salad Recipe also fits our blog’s tone—approachable, wholesome, and full of personality. If you love easy yet impressive dishes, you’ll adore our quick holiday desserts collection too. Whether you’re a seasoned cook or a beginner, this recipe welcomes everyone to the table with open arms.

Why I Love This Recipe

This Festive Fall Fruit Salad Recipe holds a special place in my heart because it reminds me of family gatherings during the holidays. My grandmother always made a similar version, and the aroma of cinnamon and fresh fruit instantly transports me back to her kitchen. It’s more than just a dish—it’s a memory on a plate. I also love how adaptable it is. Some days, I add a handful of toasted nuts for crunch, or a drizzle of maple syrup for extra sweetness. No matter how I tweak it, the result always feels like a celebration of the season.

“`

Health and Nutrition

Why it’s good for your body

Festive Fall Fruit Salad Recipe packs a powerful nutritional punch with its vibrant mix of seasonal fruits. First, it delivers a hefty dose of antioxidants, which help combat inflammation and protect your cells. Additionally, the natural sugars in the fruit provide quick energy without the crash of processed sweets. Moreover, the fiber content keeps digestion smooth and promotes long-lasting fullness.

Beyond that, Festive Fall Fruit Salad Recipe supports immune health thanks to vitamin C-rich ingredients like apples and pomegranates. These nutrients strengthen your body’s defenses, especially during colder months. Furthermore, the potassium in pears and grapes helps regulate blood pressure, while the antioxidants in cranberries may boost heart health. With every bite, you’re nourishing your body with essential vitamins and minerals.

Finally, this dish is naturally low in calories yet high in flavor, making it a guilt-free treat. Whether you enjoy it as a snack or dessert, Festive Fall Fruit Salad Recipe keeps your health goals on track. Its hydrating properties also help maintain optimal fluid balance, especially when paired with water-rich fruits like oranges. Truly, it’s a delicious way to fuel your body.

How it fits in a healthy lifestyle

Festive Fall Fruit Salad Recipe effortlessly fits into a balanced diet, whether you’re gluten-free, vegan, or simply mindful of nutrition. Its whole-food ingredients align with clean eating principles, and you can easily pair it with protein-rich options like yogurt or nuts for a satisfying meal. If you’re exploring more heart-healthy recipes, check out our avocado toast variations for another nutrient-dense option.

For those managing weight or sugar intake, this salad offers natural sweetness without refined sugars. It’s also a fantastic way to meet daily fruit recommendations, especially if you struggle with cravings. Plus, its simplicity makes meal prep a breeze. If you love quick, wholesome dishes, our overnight oats recipes provide another easy solution for busy mornings. Together, these choices help you build a sustainable, health-forward routine.

Print
clock clock iconcutlery cutlery iconflag flag iconfolder folder iconinstagram instagram iconpinterest pinterest iconfacebook facebook iconprint print iconsquares squares iconheart heart iconheart solid heart solid icon

Festive Fall Fruit Salad


  • Author: Chef Emy

Description

A vibrant and refreshing fruit salad featuring seasonal fall fruits with a hint of cinnamon and honey.


Ingredients

Scale

For the Crust:

  • 2 apples, diced
  • 2 pears, diced
  • 1 cup red grapes, halved
  • 1 cup pomegranate seeds
  • 1/4 cup honey
  • 1 tsp cinnamon
  • 1 tbsp lemon juice

Instructions

1. Prepare the Crust:

  1. Wash and dice all fruits, then combine in a large bowl.
  2. Drizzle honey and lemon juice over the fruits, then sprinkle with cinnamon.
  3. Gently toss until all fruits are evenly coated.
  4. Chill for at least 30 minutes before serving.

Notes

You can customize the seasonings to taste.

“`html

How to Prepare This Dish

Steps and time-saving tips

Start by washing and drying all your fruit for the Festive Fall Fruit Salad Recipe thoroughly. Slice apples and pears into thin, bite-sized pieces, then toss them with a squeeze of lemon juice to prevent browning. Meanwhile, peel and segment oranges, removing any seeds. Next, gently fold in pomegranate arils and halved grapes for a burst of color and sweetness. In a small bowl, whisk together honey, cinnamon, and a splash of orange juice to create a light dressing. Drizzle this over the fruit and toss everything carefully to coat. For the best flavor, chill the salad for at least 30 minutes before serving. If you’re short on time, prep the fruit ahead and store it in airtight containers, then mix the dressing and combine everything just before serving. This Festive Fall Fruit Salad Recipe stays fresh for up to two days in the fridge, making it perfect for meal prep or holiday gatherings.

Mistakes I’ve made and learned from

I once rushed the prep for this Festive Fall Fruit Salad Recipe and skipped the lemon juice, only to find my apples turned brown by serving time. Now, I always take that extra minute to toss them—it makes all the difference. Another lesson? Over-mixing can crush delicate fruits like pomegranate arils, so I fold everything gently. If you’re new to working with pomegranates, check out my guide on seeding pomegranates for stress-free prep. I also learned the hard way that dressing the salad too early makes it soggy. For more tips on keeping ingredients crisp, my freshness hacks post covers simple tricks that save time and texture.

“`

Cultural Connection and Variations

Where this recipe comes from

The Festive Fall Fruit Salad Recipe captures the essence of autumn, blending seasonal produce with warmth and nostalgia. Many cultures celebrate harvest time with fruit-centric dishes, but this version leans into the cozy, spiced flavors of American and European traditions. In the South, for example, cooks might add pecans or a drizzle of bourbon caramel, while Mediterranean variations could feature pomegranate seeds and a touch of honey. Families often pass down their own twists, like tossing in candied ginger or swapping apples for persimmons.

Interestingly, the Festive Fall Fruit Salad Recipe also mirrors global traditions. In Mexico, similar fruit mixes pair with chili powder for a sweet-spicy kick. Meanwhile, German cooks might layer fruits with quark or yogurt for a creamy texture. No matter the region, this dish thrives on adaptability. Some versions even incorporate roasted squash or a sprinkle of cinnamon to deepen the fall vibe. Whether served at Thanksgiving or a casual weekend brunch, it’s a dish that invites creativity.

How it fits in today’s cooking

Today, the Festive Fall Fruit Salad Recipe remains a staple for its simplicity and versatility. Busy home cooks love how it doubles as a healthy dessert or a vibrant side dish. Many modern adaptations include meal-prep shortcuts, like pre-chopped fruits or a squeeze of citrus to keep ingredients fresh. It’s also a hit at holiday gatherings, offering a lighter counterpoint to rich dishes like classic pumpkin pie or spiced apple cake.

Seasonal eating trends have only boosted its popularity. Nutritionists praise its fiber-rich ingredients, while food bloggers spotlight vegan or paleo tweaks. Some even serve it warm with a scoop of coconut yogurt for a cozy breakfast. Whether you’re honoring family traditions or experimenting with new flavors, this recipe fits seamlessly into today’s kitchens. After all, few dishes bridge nostalgia and modern health trends as effortlessly as a fruit salad celebrating fall’s bounty.

Taste and Texture

What makes it delicious

The Festive Fall Fruit Salad Recipe bursts with juicy sweetness and warm, spiced undertones. Crisp apples and tender pears offer a satisfying crunch, while plump pomegranate seeds add a playful pop. Meanwhile, cinnamon-kissed citrus dressing ties everything together with a fragrant, zesty finish. Each bite of this Festive Fall Fruit Salad Recipe feels like a cozy autumn hug—bright, refreshing, and layered with seasonal charm.

Boosting the flavor

For extra depth, drizzle the salad with a touch of honey vanilla yogurt dip to balance the tartness. Alternatively, sprinkle toasted pecans for a buttery crunch that pairs perfectly with the fruit. If you love warm spices, a pinch of cinnamon-cardamom sugar will elevate the aroma. Experiment with a splash of orange juice in the dressing for a brighter twist. With these tweaks, your fruit salad will shine even brighter.

Tips for Success

Best practices for results

Chop all fruit into even, bite-sized pieces so every forkful of your Festive Fall Fruit Salad Recipe has balanced flavors. Additionally, toss the fruit gently with the dressing to prevent bruising, especially if using softer varieties like pears or plums. For the best texture, serve the salad immediately after mixing, or refrigerate it for up to an hour to let the flavors meld. Finally, always taste and adjust the honey or citrus in the dressing before adding it to the fruit.

Mistakes to avoid

Avoid overloading the salad with heavy dressings, as this can make the fruit soggy. Instead, use a light hand when coating the ingredients. Another common mistake is skipping the acid in the dressing, which helps keep the fruit fresh and bright. For more dressing tips, check out our guide on perfect salad dressings. Also, don’t mix the salad too far in advance, or the colors may dull. If you need make-ahead strategies, our meal prep basics can help you plan better.

Serving and Pairing Suggestions

How to serve this dish

Bring out the vibrant colors of your Festive Fall Fruit Salad Recipe by serving it in a rustic wooden bowl or a sleek white platter. For a special touch, drizzle a light honey glaze over the top and sprinkle with chopped mint or pomegranate seeds. This dish shines at holiday gatherings, brunches, or even as a refreshing side for Thanksgiving dinner. Alternatively, layer it in individual mason jars for a portable yet elegant presentation at picnics or potlucks.

What goes well with it

Pair your Festive Fall Fruit Salad Recipe with a warm cup of spiced apple cider to enhance its cozy autumn flavors. For a heartier meal, serve it alongside our Pumpkin Spice Pancakes for a brunch that feels like a hug in a bowl. If you prefer something savory, try it with our Roasted Butternut Squash Soup to balance the sweetness with rich, earthy notes.

What fruits are best for a Festive Fall Fruit Salad Recipe?

Seasonal fruits like apples, pears, pomegranate seeds, and grapes work perfectly in a Festive Fall Fruit Salad Recipe. You can also add cranberries or persimmons for extra color and flavor. These fruits hold up well and complement the autumn theme.

How do you keep a Festive Fall Fruit Salad from turning brown?

Toss cut apples and pears in a little lemon juice or honey to prevent browning in your Festive Fall Fruit Salad Recipe. Storing it in an airtight container in the fridge also helps maintain freshness for up to 24 hours.

Can you make a Festive Fall Fruit Salad ahead of time?

Yes, you can prepare this Festive Fall Fruit Salad Recipe 4-6 hours in advance. Just wait to add delicate fruits like bananas until serving time. The flavors often improve as they meld together in the fridge.

What dressing goes well with a Festive Fall Fruit Salad?

A light maple-yogurt dressing or cinnamon-honey glaze enhances the flavors in a Festive Fall Fruit Salad Recipe without overpowering the natural sweetness. For a dairy-free option, try an orange-vanilla syrup.

Best Ambrosia Salad Recipe – Fresh and Heavenly 🍍🍊🥥

best-ambrosia-salad-recipe-fresh

“`html

Introduction

There’s something magical about a dish that brings back memories of sunny picnics, family gatherings, and the simple joy of fresh, vibrant flavors. That’s exactly what you’ll find with this Heavenly Fresh Ambrosia Salad Recipe. Whether you’re craving a nostalgic treat or a light, fruity side dish for your next potluck, this recipe delivers a burst of tropical sweetness in every bite. Perfect for any occasion, it’s a crowd-pleaser that effortlessly combines simplicity and indulgence. Plus, it’s so easy to make that you’ll wonder why you haven’t tried it sooner.

About This Recipe

The Heavenly Fresh Ambrosia Salad Recipe is a classic dessert salad that balances creamy textures with the bright, natural flavors of pineapple, oranges, and coconut. Unlike heavier desserts, this dish feels light yet satisfying, making it ideal for summer barbecues, holiday feasts, or even a quick weekday treat. What sets it apart is its versatility. You can customize it with your favorite fruits or even add a sprinkle of nuts for extra crunch. Meanwhile, the creamy dressing ties everything together without overpowering the fresh ingredients.

This recipe fits perfectly with the tone of our blog, which celebrates approachable, delicious dishes that anyone can master. Whether you’re a seasoned cook or a beginner, you’ll appreciate how straightforward and rewarding this recipe is. If you love easy-to-make desserts that still impress, you’ll also enjoy our No-Bake Cheesecake or our Summer Fruit Salad. Both share the same spirit of simplicity and freshness that make cooking enjoyable.

Beyond its taste, the Heavenly Fresh Ambrosia Salad Recipe carries a sense of tradition. Many families have their own version, passed down through generations. By making it, you’re not just preparing a dish—you’re keeping a piece of culinary history alive. And because it’s so adaptable, you can put your own spin on it, creating new memories along the way.

Why I Love This Recipe

This recipe holds a special place in my heart because it reminds me of my grandmother’s kitchen. She used to make it for every family gathering, and the moment I taste that creamy, fruity combination, I’m transported back to those warm, laughter-filled afternoons. What I love most is how it brings people together. Whether it’s a potluck or a quiet dinner at home, this dish always sparks conversation and smiles. It’s more than just a salad—it’s a little bowl of happiness.

“`

Health and Nutrition

Why it’s good for your body

Heavenly Fresh Ambrosia Salad Recipe packs a vibrant mix of nutrients that fuel your body and delight your taste buds. First, the juicy pineapple and oranges deliver a hefty dose of vitamin C, which boosts immunity and supports glowing skin. Meanwhile, the creamy coconut adds healthy fats that keep you satisfied and promote heart health.

Additionally, this dish offers a natural energy lift without refined sugars. The fruits provide just enough sweetness while supplying fiber to aid digestion. Plus, the light yogurt or whipped topping option keeps Heavenly Fresh Ambrosia Salad Recipe lower in calories than heavier desserts.

Finally, the colorful ingredients mean you get a variety of antioxidants. These compounds fight inflammation and may reduce the risk of chronic diseases. Whether you enjoy it as a side or a treat, Heavenly Fresh Ambrosia Salad Recipe turns nutrition into something truly delicious.

How it fits in a healthy lifestyle

Heavenly Fresh Ambrosia Salad Recipe fits seamlessly into balanced eating habits. For gluten-free diets, it’s a naturally safe choice that doesn’t sacrifice flavor. If you’re watching your heart health, the fruit-based recipe avoids processed ingredients and excess sodium.

This salad also works well for meal prep. Pair it with a protein-packed lunch to create a satisfying, well-rounded meal. Or, serve it as a lighter dessert alternative after enjoying one of our balanced dinner recipes. The versatility makes it easy to enjoy without derailing your goals.

With wholesome ingredients and simple prep, Heavenly Fresh Ambrosia Salad Recipe proves that healthy eating can be both effortless and enjoyable. It’s a smart way to satisfy cravings while nourishing your body.

Print
clock clock iconcutlery cutlery iconflag flag iconfolder folder iconinstagram instagram iconpinterest pinterest iconfacebook facebook iconprint print iconsquares squares iconheart heart iconheart solid heart solid icon

Heavenly Fresh Ambrosia Salad


  • Author: Chef Emy

Description

A refreshing and creamy fruit salad with tropical flavors, perfect for any occasion.


Ingredients

Scale

For the Crust:

  • 1 can (20 oz) pineapple chunks, drained
  • 1 can (11 oz) mandarin oranges, drained
  • 1 cup shredded coconut
  • 1 cup mini marshmallows
  • 1/2 cup sour cream
  • 1/2 cup whipped topping

Instructions

1. Prepare the Crust:

  1. In a large bowl, combine pineapple chunks, mandarin oranges, shredded coconut, and mini marshmallows.
  2. Gently fold in sour cream and whipped topping until all ingredients are evenly coated.
  3. Cover and refrigerate for at least 1 hour before serving to allow flavors to blend.

Notes

You can customize the seasonings to taste.

“`html

How to Prepare This Dish

Steps and time-saving tips

Start by gathering all your ingredients for the Heavenly Fresh Ambrosia Salad Recipe. First, drain the canned pineapple and mandarin oranges well to avoid excess liquid. Next, whisk together the sour cream and marshmallow creme in a large bowl until smooth. Then, gently fold in the coconut flakes, mini marshmallows, and drained fruit. For a time-saving tip, use pre-shredded coconut and pre-cut fruit to speed up prep. After mixing, cover the bowl and chill the salad for at least two hours to let the flavors meld. Meanwhile, toast the pecans lightly in a dry skillet for extra crunch, but keep an eye on them to prevent burning. Right before serving, stir in the toasted pecans and fresh grapes for a burst of color and texture. If you’re short on time, skip toasting the nuts, though they add a deeper flavor. Finally, garnish with a sprinkle of coconut or a few extra marshmallows for a festive touch. This Heavenly Fresh Ambrosia Salad Recipe comes together effortlessly and tastes even better the next day.

Mistakes I’ve made and learned from

When I first made the Heavenly Fresh Ambrosia Salad Recipe, I didn’t drain the fruit thoroughly, which turned the salad watery. Now I pat the pineapple and oranges dry with a paper towel for the perfect consistency. Another time, I overmixed the ingredients and ended up with a mushy texture instead of the light, fluffy salad I wanted. A gentle fold preserves the airy feel, as I learned from my salad-making tips. I also once skipped chilling time, but the flavors hadn’t blended yet, so it tasted uneven. Patience pays off, just like with my no-bake desserts. These small adjustments made all the difference, and now my ambrosia salad turns out perfectly every time.

“`

Cultural Connection and Variations

Where this recipe comes from

The Heavenly Fresh Ambrosia Salad Recipe traces its roots to the American South, where cooks first mixed citrus, coconut, and marshmallows into a creamy, refreshing dish. Many families served it at church potlucks or holiday gatherings, turning it into a nostalgic staple. Over time, variations popped up—some added pineapple for extra tang, while others tossed in maraschino cherries for a pop of color. In the Caribbean, cooks might swap canned fruit for fresh mango or papaya, giving the dish a tropical twist. Meanwhile, in the Midwest, you’ll often find a heavier hand with whipped cream or even sour cream for a richer texture.

In my family, the Heavenly Fresh Ambrosia Salad Recipe always made an appearance at Easter brunch. My grandma insisted on hand-shredding the coconut, claiming it made all the difference. Today, I keep her tradition alive but sometimes sneak in Greek yogurt for a lighter touch. Whether you stick to the classic or experiment with local fruits, this dish bridges generations and cultures with every sweet, creamy bite.

How it fits in today’s cooking

Modern cooks love the Heavenly Fresh Ambrosia Salad Recipe because it’s endlessly adaptable. Health-conscious versions skip the marshmallows and use coconut milk instead of whipped cream, while busy parents appreciate how quickly it comes together for weeknight desserts. During summer, it’s a hit at picnics alongside other easy-to-make dishes like no-bake cheesecake.

Holidays still shine as the perfect time to serve this dish, especially when paired with festive favorites like pumpkin spice latte cake. Whether you’re honoring tradition or giving it a contemporary spin, the Heavenly Fresh Ambrosia Salad Recipe remains a crowd-pleaser—proof that some flavors never go out of style.

Taste and Texture

What makes it delicious

The Heavenly Fresh Ambrosia Salad Recipe 🍍🍊🥥 delivers a burst of tropical sweetness with every bite. Juicy pineapple and mandarin oranges bring a bright, tangy flavor, while shredded coconut adds a subtly nutty richness. Creamy whipped topping binds everything together, creating a luscious, velvety texture that contrasts perfectly with the crisp crunch of mini marshmallows. Meanwhile, a hint of citrus zest lifts the aroma, making it as fragrant as it is refreshing. Whether you serve it chilled or at room temperature, the Heavenly Fresh Ambrosia Salad Recipe 🍍🍊🥥 feels like a sunny escape in every spoonful.

Boosting the flavor

For an extra layer of depth, try folding in toasted coconut flakes or a drizzle of honey for caramelized sweetness. If you love a citrusy kick, a splash of fresh lime juice will brighten the flavors even more. Alternatively, swap the whipped topping for Greek yogurt to add a tangy twist. Pair this dish with a light, fruity dessert like strawberry shortcake or serve it alongside a refreshing mango smoothie for a complete tropical experience. Small tweaks can make this classic salad feel brand new.

Tips for Success

Best practices for results

Always drain canned fruits thoroughly to prevent the Heavenly Fresh Ambrosia Salad Recipe from becoming watery. For the best texture, fold in the whipped topping gently to keep the mixture light and fluffy. Additionally, chill the salad for at least two hours before serving to let the flavors meld beautifully. If you prefer a sweeter taste, use fresh pineapple instead of canned, but make sure to pat it dry first.

Mistakes to avoid

Avoid overmixing the ingredients, as this can break down the fruit and make the salad mushy. Instead, combine everything just until evenly distributed. Many people also forget to toast the coconut flakes, which adds a deeper flavor to the Heavenly Fresh Ambrosia Salad Recipe. For more tips on handling coconut, check out our guide on how to toast coconut. Lastly, don’t skip the citrus juice—it keeps the fruit fresh and bright. Learn more about balancing flavors in our citrus in cooking article.

Serving and Pairing Suggestions

How to serve this dish

Serve the Heavenly Fresh Ambrosia Salad Recipe in a large glass bowl to showcase its vibrant colors. For a festive touch, garnish with toasted coconut flakes or fresh mint leaves. Meanwhile, this dish shines at potlucks, holiday gatherings, or even as a refreshing side for summer barbecues. If you want to impress guests, layer it in individual parfait glasses for an elegant presentation. The Heavenly Fresh Ambrosia Salad Recipe also makes a delightful addition to brunch spreads, pairing perfectly with lighter fare.

What goes well with it

Pair the Heavenly Fresh Ambrosia Salad Recipe with a crisp white wine like Riesling to balance its sweetness. Alternatively, try it alongside our Grilled Lemon Herb Chicken for a light yet satisfying meal. For dessert, serve it with our Vanilla Bean Panna Cotta to enhance the tropical flavors. Each pairing highlights the salad’s refreshing qualities while adding depth to your menu.

What fruits are in Heavenly Fresh Ambrosia Salad Recipe 🍍🍊🥥?

The Heavenly Fresh Ambrosia Salad Recipe 🍍🍊🥥 typically includes pineapple chunks, mandarin oranges, shredded coconut, and maraschino cherries. Some variations also add mini marshmallows or grapes for extra sweetness. The combination of tropical fruits gives this salad its signature refreshing taste.

How long does Heavenly Fresh Ambrosia Salad last in the fridge?

Heavenly Fresh Ambrosia Salad Recipe 🍍🍊🥥 stays fresh for 3-4 days when stored in an airtight container in the refrigerator. The citrus juices help preserve the fruits, but the texture may soften over time. For best results, serve within 48 hours of preparation.

Can I make Heavenly Fresh Ambrosia Salad ahead of time?

Yes! The Heavenly Fresh Ambrosia Salad Recipe 🍍🍊🥥 actually tastes better when made 4-6 hours ahead, allowing the flavors to meld. Just wait to add any whipped cream or marshmallows until right before serving to maintain their texture. This makes it perfect for potlucks and holiday meals.

Is Heavenly Fresh Ambrosia Salad gluten-free?

The basic Heavenly Fresh Ambrosia Salad Recipe 🍍🍊🥥 is naturally gluten-free as it contains only fruits, coconut, and dairy. Always check labels on packaged ingredients like marshmallows or whipped topping if you need strict gluten-free compliance. Many people enjoy this dessert salad as a safe gluten-free option.

Best Strawberry Yogurt Bowl – Easy & Healthy Recipe

best-strawberry-yogurt-bowl

“`html

Introduction

There’s something magical about starting your day with a bowl that’s as vibrant as it is nourishing. If you’re craving a breakfast that feels indulgent yet wholesome, this Delicious Strawberry Yogurt Bowl Recipe is your answer. Bursting with fresh strawberries, creamy yogurt, and crunchy toppings, it’s a symphony of textures and flavors that will brighten your morning. Whether you’re rushing out the door or savoring a slow weekend, this recipe delivers simplicity and satisfaction in every bite. Plus, it’s versatile enough to suit your mood—swap ingredients, adjust sweetness, or pile on the toppings. Ready to fall in love with breakfast again?

About This Recipe

The Delicious Strawberry Yogurt Bowl Recipe is more than just a meal—it’s a celebration of fresh, accessible ingredients coming together in perfect harmony. At its core, this recipe combines tangy yogurt with ripe strawberries, creating a balance of sweetness and creaminess that’s hard to resist. But what truly sets it apart is its adaptability. You can customize it with granola for crunch, honey for warmth, or even chia seeds for an extra nutrient boost. It’s a dish that fits seamlessly into busy mornings, post-workout refuels, or even as a light dessert.

On BrekCakes, we champion recipes that are both effortless and rewarding, and this yogurt bowl checks every box. It aligns with our philosophy of making healthy eating feel exciting, not restrictive. For more inspiration, explore our guide to quick breakfast ideas or dive into our tips for meal prepping like a pro. Whether you’re a seasoned home cook or a kitchen newbie, this recipe invites you to play, experiment, and enjoy the process. After all, food should be as fun as it is fueling.

Why I Love This Recipe

This Delicious Strawberry Yogurt Bowl Recipe holds a special place in my heart because it reminds me of summer mornings at my grandma’s house. She’d pile fresh-picked strawberries over thick yogurt, and we’d eat it on the porch while the day warmed up. Now, whenever I make it, I’m transported back to those lazy, sun-drenched moments. Beyond nostalgia, though, I love how this recipe meets me wherever I am—whether I need a five-minute fix or a creative outlet to unwind. It’s proof that the simplest dishes often carry the most joy.

“`

Health and Nutrition

Why it’s good for your body

The Delicious Strawberry Yogurt Bowl Recipe packs a nutritious punch while satisfying your sweet cravings. First, fresh strawberries deliver a hefty dose of vitamin C, which boosts immunity and promotes glowing skin. Additionally, yogurt provides probiotics that support gut health, helping digestion run smoothly. Together, these ingredients create a balanced snack or light meal.

Moreover, the Delicious Strawberry Yogurt Bowl Recipe offers a smart way to curb sugar cravings without processed sweets. Natural honey or maple syrup adds just enough sweetness while keeping refined sugars at bay. Meanwhile, the protein from yogurt keeps you full longer, preventing unnecessary snacking. As a result, you get sustained energy without the crash.

Finally, this recipe adapts easily to dietary needs. For instance, you can swap dairy yogurt for a plant-based alternative to keep it vegan. Whether you enjoy it for breakfast or a post-workout treat, the Delicious Strawberry Yogurt Bowl Recipe fuels your body with wholesome ingredients. With every bite, you nourish yourself without sacrificing flavor.

How it fits in a healthy lifestyle

The Delicious Strawberry Yogurt Bowl Recipe fits seamlessly into a balanced diet. If you follow a gluten-free lifestyle, this recipe naturally meets your needs. It also works well for heart-healthy eating, thanks to the antioxidants in strawberries and the low-fat options for yogurt. For those tracking macros, it’s easy to adjust toppings like nuts or seeds for extra protein or healthy fats.

Busy mornings? Prep the ingredients ahead for a quick, nutritious breakfast. Pair it with a refreshing green smoothie to start your day strong. If you need a post-workout recharge, the Delicious Strawberry Yogurt Bowl Recipe delivers the perfect mix of carbs and protein. For more ideas on healthy snacks, check out our easy energy ball recipes. No matter your routine, this recipe keeps health simple and delicious.

Print
clock clock iconcutlery cutlery iconflag flag iconfolder folder iconinstagram instagram iconpinterest pinterest iconfacebook facebook iconprint print iconsquares squares iconheart heart iconheart solid heart solid icon

Delicious Strawberry Yogurt Bowl


  • Author: Chef Emy

Description

A refreshing and healthy yogurt bowl topped with fresh strawberries and crunchy granola.


Ingredients

Scale

For the Crust:

  • 1 cup Greek yogurt
  • 1/2 cup fresh strawberries, sliced
  • 1/4 cup granola
  • 1 tbsp honey
  • 1 tsp chia seeds

Instructions

1. Prepare the Crust:

  1. In a bowl, add the Greek yogurt as the base.
  2. Top with sliced strawberries and granola.
  3. Drizzle honey over the top and sprinkle with chia seeds.
  4. Serve immediately and enjoy.

Notes

You can customize the seasonings to taste.

How to Prepare This Dish

Steps and time-saving tips

Start by gathering all your ingredients for the Delicious Strawberry Yogurt Bowl Recipe so everything is within reach. First, wash and hull the fresh strawberries, then slice them into thin pieces. Meanwhile, grab a medium-sized mixing bowl and spoon in the creamy Greek yogurt. If you prefer a sweeter taste, gently stir in a drizzle of honey or maple syrup. For extra texture, toss in a handful of granola and fold it into the yogurt until just combined. Next, layer the sliced strawberries on top, arranging them in a circular pattern for a beautiful presentation. Drizzle another touch of honey over the strawberries if you like, then sprinkle with chia seeds or crushed nuts for crunch. Finally, chill the bowl in the fridge for 5-10 minutes to let the flavors meld—though you can enjoy it right away if you’re in a hurry. To save time, prep the strawberries the night before or use pre-sliced ones from the store. Another trick is to mix the yogurt and sweetener in advance so it’s ready to assemble in minutes.

Mistakes I’ve made and learned from

When I first made this Delicious Strawberry Yogurt Bowl Recipe, I used watery yogurt, which made the bowl soggy after sitting for a while. Now I always opt for thick Greek yogurt—it holds up better and tastes richer. Another lesson? Don’t overmix the granola or it loses its crunch. I’ve also learned that slicing strawberries too thin can make them mushy, especially if they’re very ripe. For the perfect balance, I follow the tips from my guide to picking the best strawberries. And if you’re meal-prepping, keep the toppings separate until serving to avoid sogginess, just like I do with my overnight oats. Trust me, these small tweaks make a big difference!

Cultural Connection and Variations

Where this recipe comes from

The Delicious Strawberry Yogurt Bowl Recipe feels like a love letter to summer mornings and sunny brunches. While yogurt bowls have roots in Mediterranean and Middle Eastern cultures, where people often enjoy thick, strained yogurt with honey and fruit, this version leans into the American obsession with fresh strawberries. In Greece, you might find a similar dish called “yiaourti me meli,” but they’ll drizzle it with thyme honey instead of maple syrup. Meanwhile, in Turkey, “yoğurtlu meyve” often features pomegranate seeds or figs alongside strawberries.

My grandmother used to make her own twist on the Delicious Strawberry Yogurt Bowl Recipe by layering homemade yogurt with crushed pistachios and rosewater. Today, I keep her spirit alive by swapping in local honey or adding a sprinkle of granola for crunch. Some families fold in chia seeds for extra protein, while others pile on tropical fruits like mango. No matter where you go, this dish adapts beautifully to local tastes and traditions.

How it fits in today’s cooking

The Delicious Strawberry Yogurt Bowl Recipe still shines because it’s fast, fresh, and endlessly customizable. Busy parents love it for quick breakfasts, while fitness fans treat it as a post-workout refuel. Some modern cooks even turn it into a dessert by blending frozen strawberries into the yogurt for a creamy, ice-cream-like texture. For more morning inspiration, check out our easy breakfast ideas to pair with this bowl.

Seasonal eating also keeps this recipe relevant. When strawberries peak in summer, the bowl tastes even sweeter. Yet, thanks to frozen fruit, you can enjoy it year-round. Some bakers even use it as a lighter alternative to heavy cakes, like those in our healthy dessert swaps guide. Whether you’re craving nostalgia or a nutrient-packed snack, this recipe fits seamlessly into modern life.

Taste and Texture

What makes it delicious

The Delicious Strawberry Yogurt Bowl Recipe bursts with bright, juicy sweetness from fresh strawberries, balanced by the cool, tangy creaminess of Greek yogurt. Each spoonful delivers a refreshing contrast—silky yogurt against the slight crunch of granola or the pop of chia seeds. Meanwhile, a drizzle of honey adds a floral depth, while vanilla extract infuses a warm, comforting aroma. Whether you enjoy it chilled or slightly softened, the Delicious Strawberry Yogurt Bowl Recipe feels indulgent yet light, making it perfect for breakfast or a satisfying snack.

Boosting the flavor

For an extra flavor kick, try swapping Greek yogurt with coconut yogurt to introduce a tropical twist. Alternatively, sprinkle toasted coconut flakes or a pinch of cinnamon for warmth and texture. If you love a touch of crunch, add our Homemade Granola Recipe for a nutty contrast. Craving more fruit? Layer in ripe mango or blueberries, or pair it with our Berry Chia Jam for a vibrant, jammy swirl. Small tweaks can transform this bowl into a whole new experience!

Tips for Success

Best practices for results

Always use fresh, ripe strawberries for the best flavor in your Delicious Strawberry Yogurt Bowl Recipe. Meanwhile, opt for thick Greek yogurt to ensure a creamy texture. For extra sweetness, drizzle honey just before serving rather than mixing it in too early. Additionally, chill your bowl for 10 minutes beforehand to keep everything refreshing. Finally, layer your toppings evenly so every bite has the perfect balance.

Mistakes to avoid

Avoid using watery yogurt, as it can make your Delicious Strawberry Yogurt Bowl Recipe soggy. Instead, strain regular yogurt or stick with Greek varieties. Also, don’t slice strawberries too far in advance—they release juice and turn mushy. For more tips on handling fresh fruit, check out our guide on storing berries properly. Another common mistake is overloading toppings, which overwhelms the yogurt base. For balanced flavor pairings, explore our favorite yogurt toppings for inspiration.

Serving and Pairing Suggestions

How to serve this dish

Make your Delicious Strawberry Yogurt Bowl Recipe shine by serving it in a wide, shallow bowl to showcase the vibrant colors. For a special touch, drizzle honey in a zigzag pattern over the yogurt and arrange fresh strawberry slices in a circular design. Alternatively, layer the ingredients in a clear glass for a stunning parfait effect. This dish works beautifully for brunch gatherings, as a light dessert, or even as a refreshing snack after a workout. To elevate the presentation, sprinkle crushed pistachios or edible flowers on top just before serving.

What goes well with it

Pair your Delicious Strawberry Yogurt Bowl Recipe with a tall glass of homemade iced lavender latte for a soothing, aromatic breakfast combo. The floral notes perfectly balance the sweetness of the strawberries. If you prefer something heartier, serve it alongside a slice of our fluffy almond flour banana bread for a satisfying contrast in textures. For a midday pick-me-up, try it with a scoop of our creamy coconut chia pudding to add extra protein and healthy fats. Each pairing enhances the flavors while keeping the meal light and nutritious.

What are the best toppings for a Delicious Strawberry Yogurt Bowl?

Fresh strawberries, granola, chia seeds, and honey are perfect toppings for a Delicious Strawberry Yogurt Bowl. You can also add sliced almonds, coconut flakes, or dark chocolate chips for extra crunch and flavor. These toppings complement the creamy yogurt and sweet strawberries beautifully.

Can I use frozen strawberries for a Delicious Strawberry Yogurt Bowl?

Yes, frozen strawberries work well in a Delicious Strawberry Yogurt Bowl if fresh ones aren’t available. Thaw them slightly or blend them into a compote for a smoother texture. Just drain excess liquid to keep your yogurt bowl from becoming too watery.

Is Greek yogurt or regular yogurt better for a Delicious Strawberry Yogurt Bowl?

Greek yogurt is thicker and higher in protein, making it ideal for a hearty Delicious Strawberry Yogurt Bowl. Regular yogurt works too but has a thinner consistency. Choose plain or lightly sweetened yogurt to control the sweetness of your bowl.

How can I make a vegan Delicious Strawberry Yogurt Bowl?

Use dairy-free yogurt like coconut or almond yogurt as the base for your vegan Delicious Strawberry Yogurt Bowl. Top it with plant-based granola, fresh strawberries, and maple syrup instead of honey. This version is just as tasty and refreshing!