Best Strawberry Tart Recipe – Irresistible & Easy

best-strawberry-tart-recipe-easy

“`html

Introduction

There’s something magical about the first bite of a perfectly made strawberry tart—the buttery crust, the creamy filling, and the burst of fresh strawberries. Whether you’re hosting a summer gathering or simply treating yourself, this Irresistible Strawberry Tart Recipe delivers a taste of pure joy. It’s the kind of dessert that makes people pause, savor, and ask for seconds. Even better, it’s surprisingly simple to make, so you can impress without stress. If you’ve ever wanted to recreate that bakery-quality tart at home, you’re in the right place.

About This Recipe

An Irresistible Strawberry Tart Recipe combines a crisp, golden crust with a luscious pastry cream and ripe, juicy strawberries. Unlike overly complicated desserts, this tart balances elegance with approachability. It’s perfect for special occasions yet easy enough for a weekend baking project. The recipe matters because it elevates simple ingredients into something extraordinary. Fresh strawberries shine here, and the contrast of textures—crunchy, creamy, and juicy—creates a memorable experience.

This recipe fits our blog’s tone because it’s both practical and inspiring. We believe great baking should feel achievable, not intimidating. For example, our flaky pie crust guide helps you master the base, while our pastry cream tutorial ensures the filling turns out silky every time. Whether you’re a beginner or a seasoned baker, this tart offers a rewarding challenge with stunning results. Plus, it’s versatile—swap strawberries for seasonal fruits, and you’ve got a year-round dessert.

Why I Love This Recipe

This Irresistible Strawberry Tart Recipe holds a special place in my heart because it reminds me of summers at my grandmother’s house. She’d let me arrange the strawberries on top, turning baking into a shared adventure. Even now, the scent of buttery crust takes me back to her kitchen. Beyond nostalgia, I love how this recipe balances simplicity and sophistication. It’s forgiving enough for mistakes yet impressive enough to make you proud. Every time I serve it, I watch faces light up—and that’s the real magic.

“`

Health and Nutrition

Why it’s good for your body

The Irresistible Strawberry Tart Recipe packs a nutritious punch while satisfying your sweet tooth. First, fresh strawberries deliver a hefty dose of vitamin C, which boosts immunity and supports glowing skin. Additionally, the natural sweetness of strawberries means you can cut back on refined sugars without sacrificing flavor. Moreover, the buttery crust provides a source of healthy fats, giving you sustained energy throughout the day.

Beyond vitamins, the Irresistible Strawberry Tart Recipe includes fiber from the strawberries and whole-grain flour if you choose that option. Fiber aids digestion and helps keep you full longer. Furthermore, antioxidants in strawberries combat inflammation, promoting heart health. When you indulge in this tart, you also get a dose of potassium, which supports muscle function and hydration.

Finally, the Irresistible Strawberry Tart Recipe balances indulgence with nourishment. Unlike heavily processed desserts, this tart uses real ingredients you can recognize. For instance, swapping artificial fillings for fresh strawberries ensures you avoid unnecessary additives. Whether you enjoy a slice as a treat or share it with friends, you’re fueling your body with wholesome goodness.

How it fits in a healthy lifestyle

The Irresistible Strawberry Tart Recipe fits seamlessly into a balanced diet. If you’re watching your sugar intake, you can easily reduce the sweetener or opt for natural alternatives like honey. For a gluten-free version, try almond flour instead of traditional crust—just like our guide on gluten-free baking tips recommends.

This tart also works well for meal prep. Make it ahead for gatherings or slice it into portions for controlled indulgence. Pair it with protein-rich yogurt or nuts to create a satisfying snack. If you’re exploring heart-healthy desserts, check out our heart-smart sweets for more inspiration. With simple swaps and mindful servings, the Irresistible Strawberry Tart Recipe becomes a delicious part of your wellness routine.

Print
clock clock iconcutlery cutlery iconflag flag iconfolder folder iconinstagram instagram iconpinterest pinterest iconfacebook facebook iconprint print iconsquares squares iconheart heart iconheart solid heart solid icon

Irresistible Strawberry Tart


  • Author: Chef Emy

Description

A delightful and visually stunning strawberry tart with a buttery crust and creamy filling.
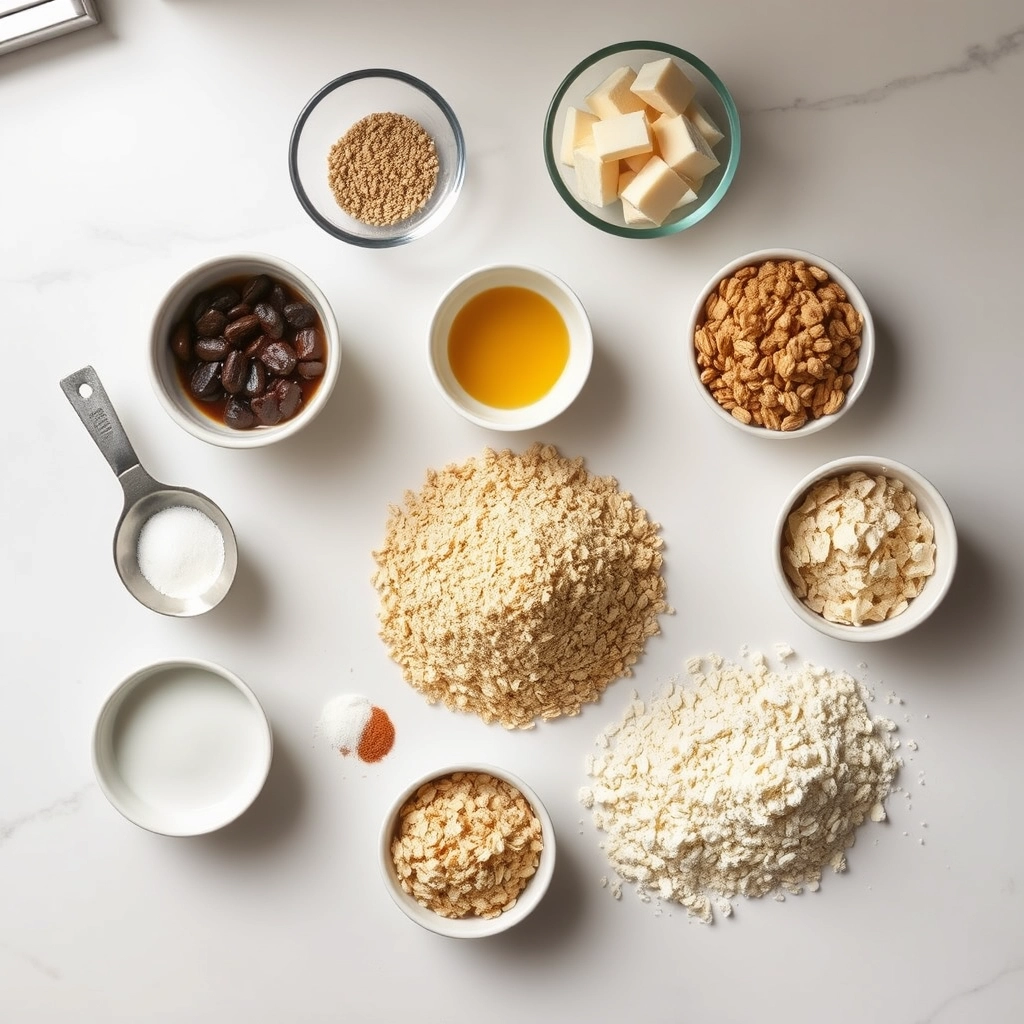
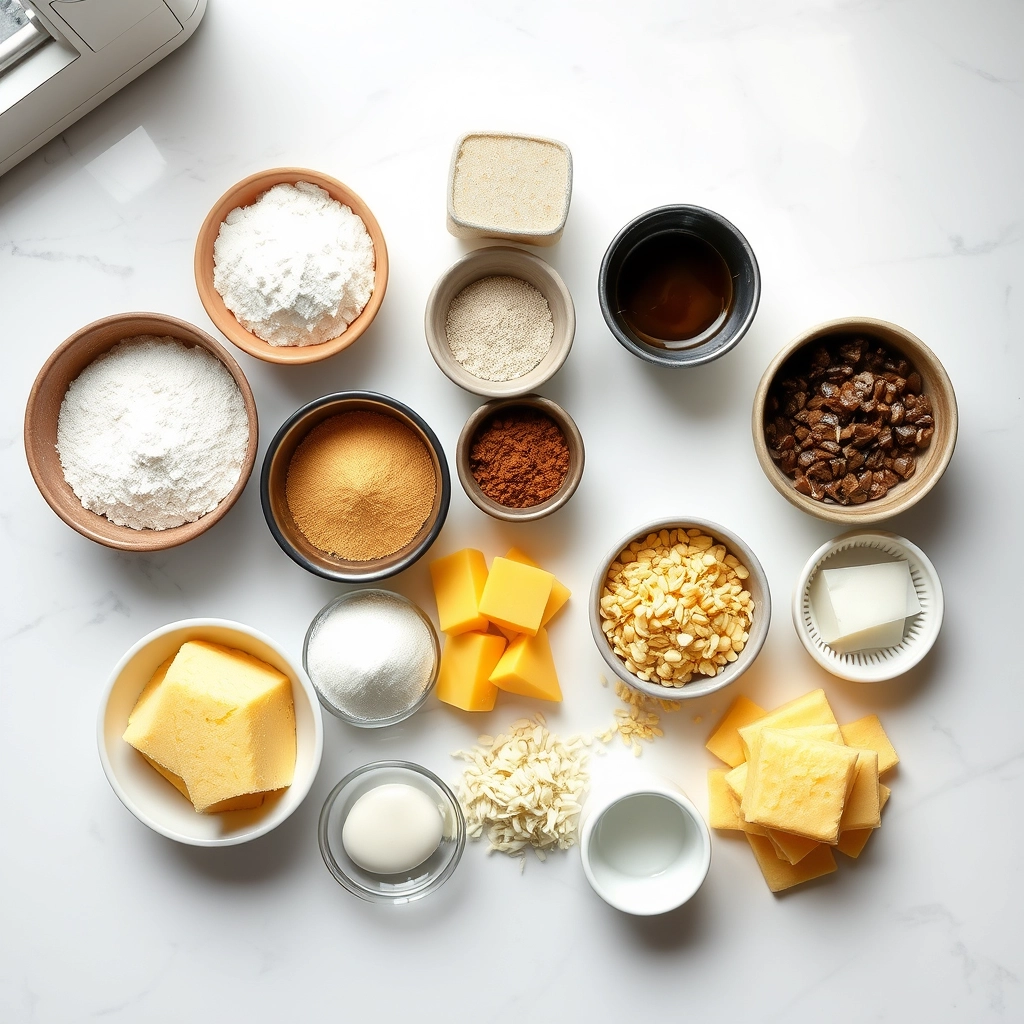
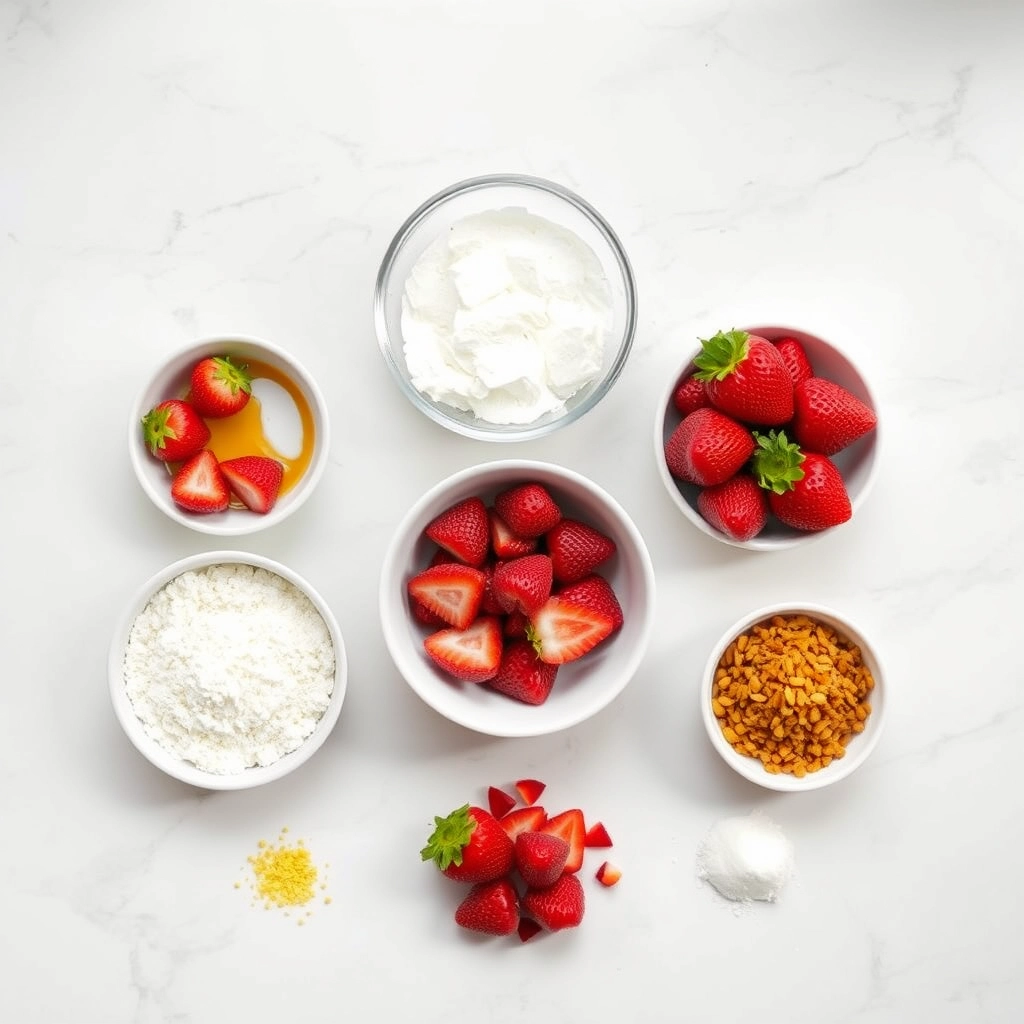

Ingredients

Scale

For the Crust:

  • 1 1/2 cups all-purpose flour
  • 1/2 cup unsalted butter, chilled and cubed
  • 1/4 cup granulated sugar
  • 1/4 teaspoon salt
  • 1 large egg yolk
  • 2 tablespoons ice water
  • 8 oz cream cheese, softened
  • 1/4 cup powdered sugar
  • 1 teaspoon vanilla extract
  • 1 lb fresh strawberries, hulled and sliced
  • 1/4 cup strawberry jam, warmed

Instructions

1. Prepare the Crust:

  1. Preheat oven to 375°F (190°C). In a food processor, combine flour, sugar, and salt. Add chilled butter and pulse until mixture resembles coarse crumbs.
  2. Add egg yolk and ice water, pulsing until dough comes together. Press dough into a 9-inch tart pan, covering the bottom and sides evenly. Prick with a fork and bake for 15-18 minutes until golden. Let cool.
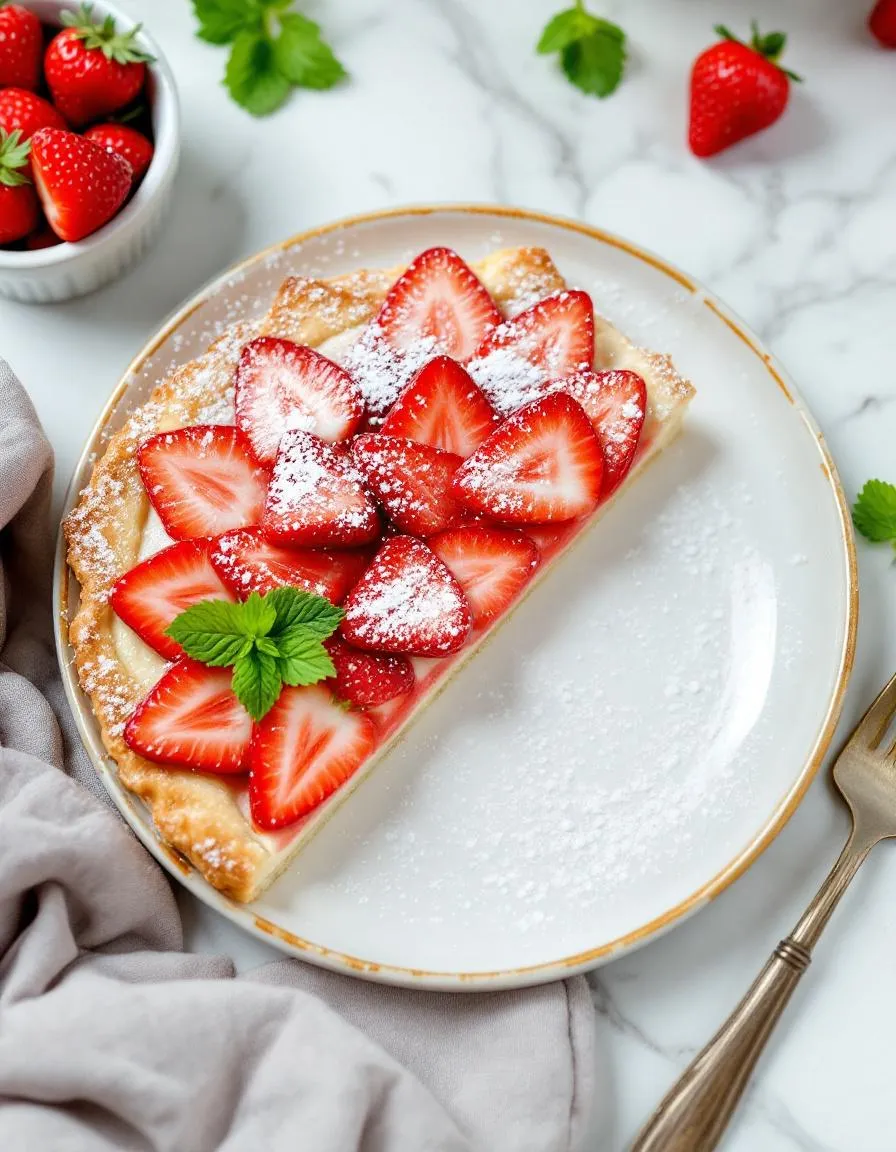
  3. In a bowl, beat cream cheese, powdered sugar, and vanilla until smooth. Spread evenly over the cooled crust. Arrange strawberry slices on top in a decorative pattern. Brush with warmed strawberry jam for a glossy finish. Chill for at least 1 hour before serving.

Notes

You can customize the seasonings to taste.

How to Prepare This Dish

Steps and time-saving tips

Start by preheating your oven to 375°F so it’s ready when you need it. While it heats, whisk together the flour, sugar, and salt in a large bowl for the tart crust. Cut cold butter into small cubes and work it into the dry mix until crumbly, then drizzle in ice water a tablespoon at a time until the dough just comes together. Press the dough into a tart pan, prick the bottom with a fork, and blind bake for 15 minutes to prevent sogginess. Meanwhile, mix the creamy filling by whisking softened cream cheese, sugar, and vanilla until smooth. Once the crust cools, spread the filling evenly and layer fresh strawberry slices on top in a decorative pattern. For a glossy finish, brush the strawberries with warmed apricot jam. Chill the tart for at least an hour before serving to let everything set. To save time, prep the crust and filling a day ahead and assemble just before serving.

Mistakes I’ve made and learned from

I once rushed the crust and skipped blind baking, which left it soggy under the filling—now I never skip that step! Another time, I overmixed the dough, making it tough instead of tender. The key is to stop as soon as it holds together. If your strawberries release too much juice, pat them dry before arranging to avoid a watery tart. For more foolproof crust tips, check out my guide on perfect pie crust. And if you’re new to working with fresh fruit desserts, my fruit tart tips will help you avoid common pitfalls. Trust me, a little patience pays off with this Irresistible Strawberry Tart Recipe!

Cultural Connection and Variations

Where this recipe comes from

The Irresistible Strawberry Tart Recipe carries the sweetness of summer and the warmth of tradition. Originating in France, where patisseries showcase glossy, jewel-like tarts, this dessert quickly won hearts worldwide. In Provence, bakers often layer the crust with almond cream, while in the U.S., many home cooks opt for a simple pastry cream or even mascarpone for extra richness. Meanwhile, in Italy, you might find a similar crostata di fragole, where the strawberries mingle with a hint of citrus zest.

My grandmother put her own spin on the Irresistible Strawberry Tart Recipe by adding a drizzle of balsamic reduction, a trick she learned from a Northern Italian neighbor. Across cultures, families tweak the recipe to match local tastes—some add mint, others a dusting of powdered sugar. No matter the variation, the tart remains a celebration of ripe strawberries and buttery crust. Whether served at a Parisian café or a Midwestern potluck, it always feels like a little piece of sunshine.

How it fits in today’s cooking

Today, the Irresistible Strawberry Tart Recipe still shines as a versatile dessert. Modern cooks love it for its balance of elegance and simplicity, making it perfect for everything from brunch gatherings to summer dessert spreads. Many bakers now experiment with gluten-free crusts or vegan fillings, proving how adaptable this classic remains. Some even turn it into mini tarts for easy, individual servings—ideal for picnics or quick sweet treats.

Seasonal eating trends have also brought the tart back into the spotlight. When strawberries peak in June, food bloggers and home chefs alike rush to share their versions. Yet, thanks to year-round availability, this dessert never truly fades. Whether you stick to tradition or reinvent it, the Irresistible Strawberry Tart Recipe keeps connecting people through shared bites of joy.

Taste and Texture

What makes it delicious

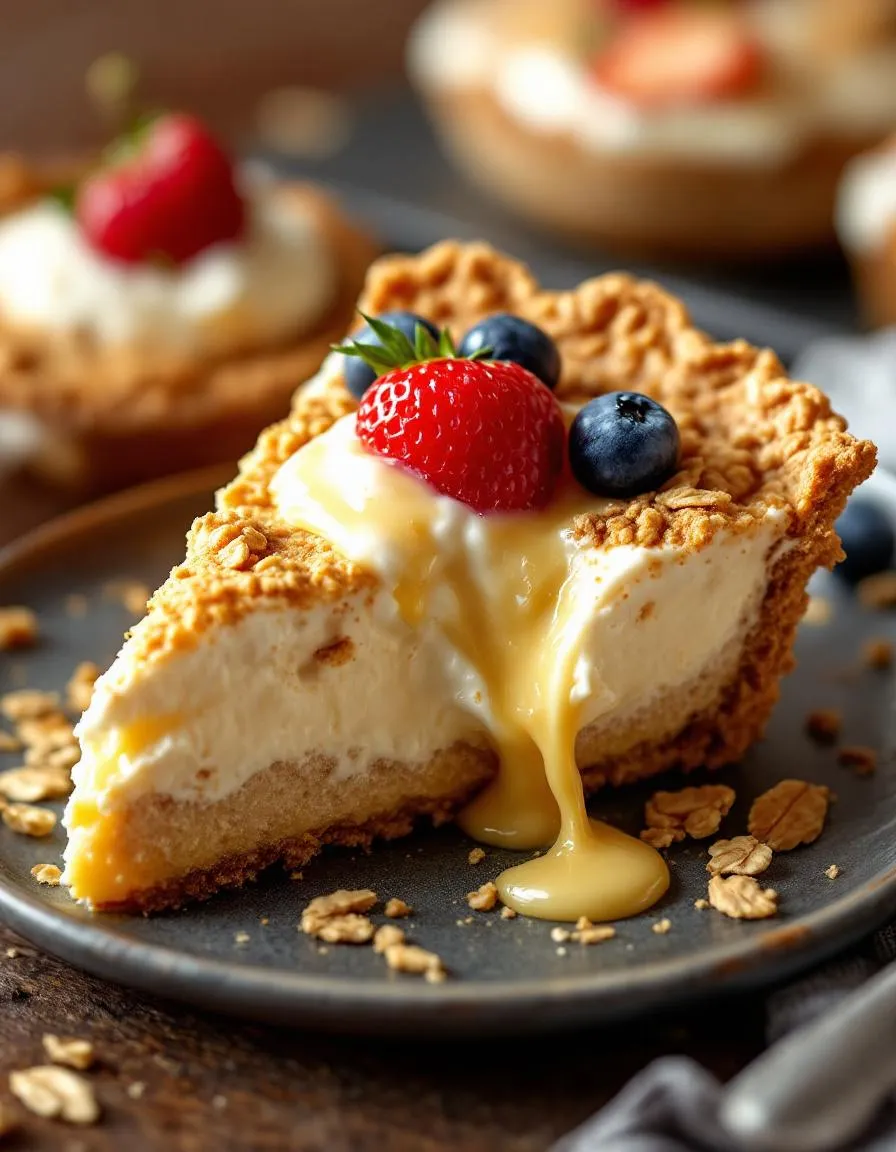
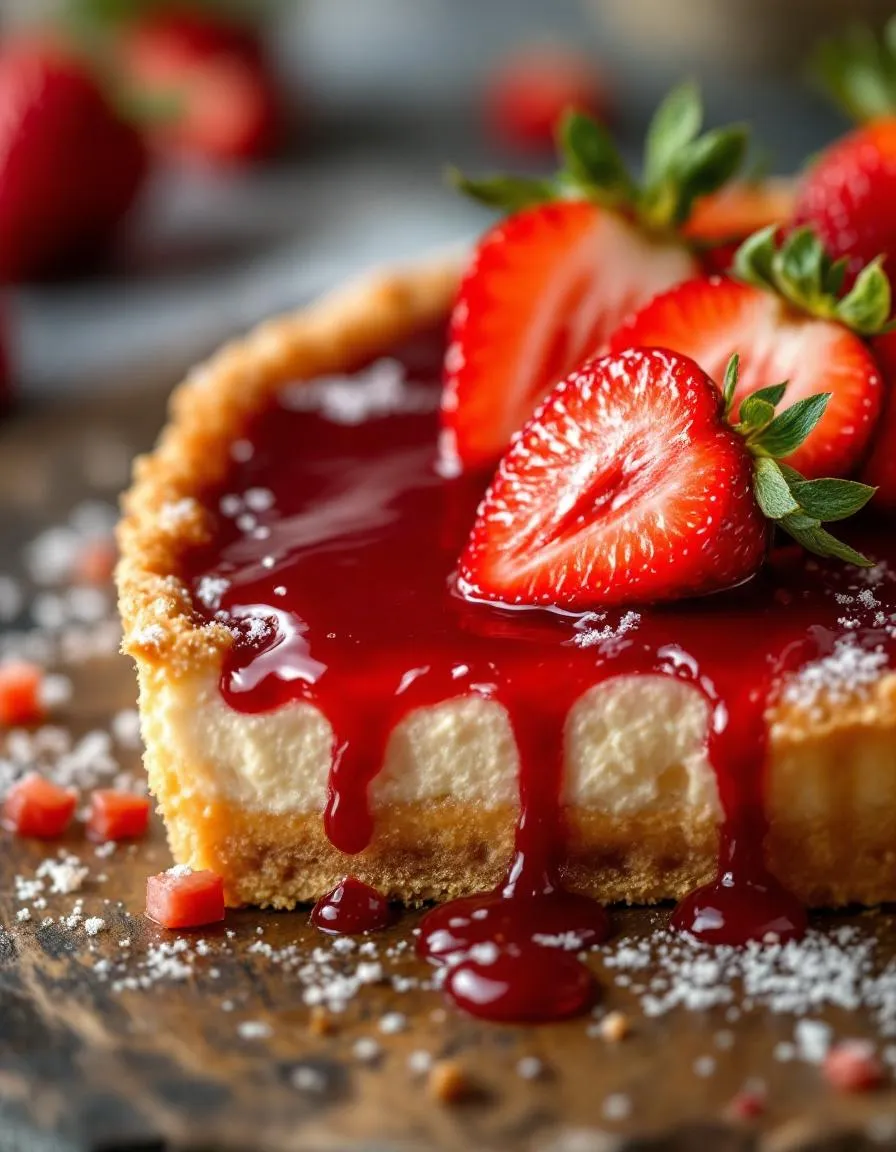
The Irresistible Strawberry Tart Recipe delivers a symphony of flavors and textures that dance on your palate. First, the buttery, flaky crust crumbles delicately with each bite, while the velvety pastry cream underneath adds a luscious, creamy contrast. Juicy, sun-ripened strawberries burst with sweet-tart freshness, their natural fragrance mingling with hints of vanilla and citrus zest. Meanwhile, a glossy strawberry glaze enhances every layer, tying the dessert together with a subtle shine and just the right amount of sweetness. Whether served chilled or at room temperature, the Irresistible Strawberry Tart Recipe balances crisp, tender, and silky textures for a truly unforgettable treat.

Boosting the flavor

Elevate your Irresistible Strawberry Tart Recipe with a few easy tweaks. For a deeper berry flavor, macerate the strawberries with a splash of balsamic vinegar or a drizzle of honey before arranging them. Alternatively, fold a pinch of cardamom or lavender into the pastry cream for an aromatic twist. A dollop of homemade whipped cream or a scoop of vanilla bean ice cream adds richness, while a sprinkle of toasted almonds introduces a satisfying crunch. Experiment with fresh mint or basil leaves for a refreshing herbal note that brightens every bite.

Tips for Success

Best practices for results

Always chill the dough for at least 30 minutes before rolling it out to prevent shrinking during baking. Use ripe, fresh strawberries for the Irresistible Strawberry Tart Recipe to ensure natural sweetness and vibrant color. Meanwhile, preheat your oven thoroughly so the crust bakes evenly. For a glossy finish, lightly brush the strawberries with warmed apricot jam after assembling. Finally, let the tart cool completely before slicing to keep the layers intact.

Mistakes to avoid

Avoid overworking the dough, as this can make the crust tough instead of flaky. If you struggle with soggy bottoms, try blind baking the crust first, just like we recommend in our perfect pie crust guide. Another common mistake is slicing strawberries too thick, which can make the tart harder to cut. For evenly thin slices, use a sharp knife or a mandoline. Also, don’t skip the cornstarch in the filling—it thickens the juices and prevents a runny mess. For more tips on balancing sweet and tart flavors, check out our fruit dessert tips.

Serving and Pairing Suggestions

How to serve this dish

Showcase your Irresistible Strawberry Tart Recipe by arranging it on a rustic wooden board or elegant cake stand for a stunning centerpiece. Meanwhile, dust the top with powdered sugar or drizzle melted chocolate for extra flair. For special occasions like Mother’s Day or summer brunches, add fresh mint leaves or edible flowers to brighten the presentation. Alternatively, serve individual slices with a dollop of whipped cream to make each plate feel indulgent.

What goes well with it

Pair your Irresistible Strawberry Tart Recipe with a chilled glass of sparkling rosé to highlight its fruity sweetness. If you prefer non-alcoholic options, try a citrusy homemade lemonade for a refreshing contrast. For a richer experience, serve it alongside a scoop of vanilla bean ice cream or a slice of our classic cheesecake to create a delightful dessert duo. Each pairing balances the tart’s vibrant flavors while adding layers of texture.

What’s the secret to making the perfect crust for an irresistible strawberry tart?

The key to a flawless crust for your irresistible strawberry tart is using cold butter and minimal handling. Chill the dough before baking to prevent shrinkage, and blind bake it for a crisp base that complements the juicy strawberries.

Can I use frozen strawberries for an irresistible strawberry tart?

Yes, but thaw and drain frozen strawberries thoroughly to avoid excess moisture. Fresh strawberries work best for an irresistible strawberry tart, but frozen berries can be a good alternative when properly prepared.

How do I prevent my irresistible strawberry tart from getting soggy?

Brush the baked crust with melted chocolate or egg white to create a moisture barrier. Also, assemble your irresistible strawberry tart just before serving to maintain the perfect texture.

What’s the best way to arrange strawberries on top of the tart?

Start from the outer edge and work inward in concentric circles for a stunning presentation. For an irresistible strawberry tart, choose uniformly sized berries and alternate the stem ends for visual appeal.

Best Mint Chocolate Double Delights – Irresistible Cookies

best-mint-chocolate-delights-cookies

“`html

Introduction

There’s something magical about the combination of mint and chocolate—cool, refreshing, and utterly indulgent. If you’ve ever craved a cookie that delivers a double dose of delight, you’re in for a treat. These Mint Chocolate Double Delights – Irresistible Cookies Recipe! are the perfect blend of rich cocoa and fresh mint, creating a flavor explosion in every bite. Whether you’re baking for a holiday gathering, a cozy night in, or just because, these cookies promise to steal the show. Plus, they’re surprisingly easy to make, so you can enjoy homemade goodness without the stress.

About This Recipe

If you love the classic pairing of mint and chocolate, these Mint Chocolate Double Delights – Irresistible Cookies Recipe! will quickly become a favorite. These cookies feature a soft, chewy chocolate base studded with melty chocolate chips, topped with a creamy mint layer, and finished with a drizzle of dark chocolate. The result? A dessert that’s as visually stunning as it is delicious. Perfect for cookie exchanges, dessert tables, or even as a sweet gift, these treats fit right in with our blog’s focus on crowd-pleasing recipes that balance simplicity and wow factor.

What makes this recipe stand out is its versatility. You can customize the mint layer with peppermint extract for a bold kick or a milder spearmint for a subtler flavor. Meanwhile, the chocolate base uses pantry staples, so you likely already have everything you need. If you’re looking for more baking inspiration, check out our Decadent Chocolate Recipes or explore our guide to Baking Tips for Beginners. No matter your skill level, these cookies deliver consistent, irresistible results every time.

Why I Love This Recipe

I’ll never forget the first time I made these Mint Chocolate Double Delights – Irresistible Cookies Recipe! for my family. The moment they took a bite, their faces lit up, and I knew I had a winner. There’s something deeply satisfying about how the cool mint balances the rich chocolate, creating a harmony of flavors that feels both nostalgic and exciting. Over the years, I’ve tweaked the recipe to perfection, and now it’s my go-to for birthdays, potlucks, or just a little pick-me-up. Every time I bake them, they disappear faster than I can plate them—and that’s the best compliment a home baker can get.

“`

Health and Nutrition

Why it’s good for your body

Mint Chocolate Double Delights – Irresistible Cookies Recipe! packs more than just irresistible flavor. First, the dark chocolate chunks deliver antioxidants, which help combat oxidative stress. Meanwhile, fresh mint leaves or natural mint extract can aid digestion and freshen your breath. Additionally, these cookies often include wholesome ingredients like almond flour or oats, adding fiber and healthy fats.

Moreover, Mint Chocolate Double Delights – Irresistible Cookies Recipe! offers a satisfying sweetness without excessive refined sugar, especially if you opt for natural sweeteners like honey or coconut sugar. The combination of protein-rich nuts and slow-digesting carbs also helps stabilize energy levels. As a result, you curb cravings while enjoying a treat.

Finally, dark chocolate in Mint Chocolate Double Delights – Irresistible Cookies Recipe! supports heart health by improving circulation and reducing inflammation. Whether you savor one as an afternoon pick-me-up or share them with friends, these cookies bring both joy and nourishment.

How it fits in a healthy lifestyle

Mint Chocolate Double Delights – Irresistible Cookies Recipe! fits perfectly into balanced eating when enjoyed mindfully. For gluten-free diets, simply swap regular flour for almond or oat flour. If you prioritize heart health, dark chocolate’s flavonoids make these cookies a smarter choice than traditional desserts.

Pair them with a protein source like Greek yogurt or a handful of nuts to balance blood sugar. For more gluten-free baking tips, explore our Gluten-Free Baking Guide. You can also tweak the recipe with collagen powder for an extra protein boost, ideal for active lifestyles.

Remember, moderation is key. Enjoy Mint Chocolate Double Delights – Irresistible Cookies Recipe! as part of a varied diet rich in whole foods. Craving more wholesome dessert ideas? Check out our Healthy Dessert Swaps for inspiration.

Print
clock clock iconcutlery cutlery iconflag flag iconfolder folder iconinstagram instagram iconpinterest pinterest iconfacebook facebook iconprint print iconsquares squares iconheart heart iconheart solid heart solid icon

Mint Chocolate Double Delights – Irresistible Cookies


  • Author: Chef Emy

Description

Deliciously soft and chewy mint chocolate cookies with a double dose of chocolate for an irresistible treat.


Ingredients

Scale

For the Crust:

  • 1 cup all-purpose flour
  • 1/2 cup cocoa powder
  • 1/2 teaspoon baking soda
  • 1/4 teaspoon salt
  • 1/2 cup unsalted butter, softened
  • 3/4 cup granulated sugar
  • 1 large egg
  • 1 teaspoon peppermint extract
  • 1 cup semi-sweet chocolate chips
  • 1/2 cup white chocolate chips

Instructions

1. Prepare the Crust:

  1. Preheat oven to 350°F (175°C) and line a baking sheet with parchment paper.
  2. In a medium bowl, whisk together flour, cocoa powder, baking soda, and salt.
  3. In a separate large bowl, beat butter and sugar until light and fluffy. Add egg and peppermint extract, mixing well.
  4. Gradually add the dry ingredients to the wet mixture, stirring until just combined.
  5. Fold in semi-sweet and white chocolate chips.
  6. Drop tablespoon-sized dough balls onto the prepared baking sheet, spacing them 2 inches apart.
  7. Bake for 10-12 minutes or until edges are set but centers are still soft.
  8. Let cookies cool on the baking sheet for 5 minutes before transferring to a wire rack.

Notes

You can customize the seasonings to taste.

“`html

How to Prepare This Dish

Steps and time-saving tips

Start by preheating your oven to 350°F and lining your baking sheets with parchment paper. Meanwhile, cream together softened butter and sugar in a large bowl until light and fluffy. Beat in the eggs one at a time, then add a splash of vanilla extract for extra flavor. In a separate bowl, whisk the dry ingredients—flour, cocoa powder, baking soda, and salt—to ensure even distribution. Gradually fold the dry mixture into the wet ingredients, but avoid overmixing to keep the Mint Chocolate Double Delights – Irresistible Cookies Recipe! tender. For a time-saving hack, use a cookie scoop to portion the dough evenly. Press a few chocolate chips into each cookie for extra richness before baking. Bake for 10-12 minutes until the edges set but the centers stay soft. Let them cool slightly on the tray before transferring to a wire rack. For the mint drizzle, simply whisk powdered sugar with a touch of milk and peppermint extract, then zigzag it over the cooled cookies. If you’re short on time, skip the drizzle or use melted chocolate instead.

Mistakes I’ve made and learned from

I once rushed the creaming step and ended up with dense Mint Chocolate Double Delights – Irresistible Cookies Recipe!—lesson learned: take the full 3-5 minutes to whip the butter and sugar properly. Another time, I overbaked the cookies, losing that perfect chewiness. Now I set a timer for 9 minutes and check early, since ovens vary. If your cookies spread too much, try chilling the dough for 30 minutes first, as I detail in my cookie baking guide. Also, don’t skip sifting the cocoa powder; lumps can create bitter pockets, something I cover in my common baking mistakes post. Trust me, these small tweaks make all the difference between good and unforgettable cookies.

“`

Cultural Connection and Variations

Where this recipe comes from

Mint Chocolate Double Delights – Irresistible Cookies Recipe! brings together two beloved flavors in a way that feels both nostalgic and fresh. The combination of mint and chocolate has deep roots in European confectionery, especially in after-dinner treats like thin mints or peppermint patties. However, this cookie version takes those flavors and turns them into a chewy, decadent dessert perfect for sharing. In some parts of the world, bakers add a dash of espresso powder to enhance the chocolate, while others fold in chopped nuts for extra crunch.

My family always made Mint Chocolate Double Delights – Irresistible Cookies Recipe! during the holidays, but with a twist. Instead of green food coloring, we used fresh mint leaves steeped in the butter for a more natural flavor. Friends from the South swear by adding a pinch of sea salt on top, while my cousin in Australia swaps the chocolate chips for white chocolate. No matter where you go, this recipe adapts beautifully to local tastes and traditions.

How it fits in today’s cooking

Today, Mint Chocolate Double Delights – Irresistible Cookies Recipe! remains a crowd-pleaser because it balances richness with refreshing mint. Many home cooks now use plant-based butter or gluten-free flour to make it inclusive, proving how versatile these cookies can be. They’re perfect for holiday cookie swaps, but also fit right into everyday baking routines. For a fun twist, try sandwiching them with vanilla bean ice cream for an indulgent dessert.

Modern bakers also love how easily this recipe pairs with other treats. Serve them alongside salted caramel brownies for a dessert spread that impresses guests. Whether you stick to the classic version or experiment with new ingredients, these cookies always deliver comfort and joy. After all, who can resist the timeless combo of mint and chocolate?

Taste and Texture

What makes it delicious

Mint Chocolate Double Delights – Irresistible Cookies Recipe! delivers a burst of refreshing coolness paired with rich, velvety chocolate in every bite. The cookies boast a crisp outer edge with a delightfully chewy center, creating the perfect contrast. Fresh mint extract infuses each morsel with a bright, invigorating aroma, while melty chocolate chunks add a decadent, creamy richness. Meanwhile, a hint of vanilla rounds out the flavors, making these cookies irresistibly balanced. Whether warm from the oven or cooled to perfection, Mint Chocolate Double Delights – Irresistible Cookies Recipe! satisfies cravings with its harmonious blend of textures and bold, layered taste.

Boosting the flavor

Elevate your Mint Chocolate Double Delights – Irresistible Cookies Recipe! by swapping milk chocolate for dark chocolate chunks to intensify the depth of flavor. For a festive twist, sprinkle crushed candy canes on top before baking—their peppermint crunch enhances the minty freshness. Alternatively, drizzle melted white chocolate over cooled cookies for an elegant finish. If you love experimenting with flavors, try adding a pinch of espresso powder to amplify the chocolate notes, just like in our Chocolate Espresso Cookies. For more inspiration on balancing mint and chocolate, explore our Mint Chocolate Cupcakes guide. Small tweaks make these cookies even more unforgettable!

Tips for Success

Best practices for results

Always chill the dough for at least 30 minutes before baking your Mint Chocolate Double Delights – Irresistible Cookies Recipe! This step prevents spreading and ensures thick, chewy cookies. Meanwhile, use high-quality mint extract and fresh chocolate chunks for the best flavor. Additionally, line your baking sheets with parchment paper to guarantee even baking and easy removal. Finally, let the cookies cool on the tray for 5 minutes before transferring them to a rack—this helps them set perfectly.

Mistakes to avoid

One common mistake is overmixing the dough, which can make your Mint Chocolate Double Delights – Irresistible Cookies Recipe! tough instead of tender. Instead, mix just until the ingredients combine. Another error is baking at the wrong temperature—always preheat your oven and use an oven thermometer for accuracy. If your cookies spread too much, check out our guide on cookie texture fixes. Also, avoid substituting butter with margarine, as it changes both flavor and texture. For more baking essentials, explore our must-have tools list to set yourself up for success.

Serving and Pairing Suggestions

How to serve this dish

For a stunning presentation, arrange your Mint Chocolate Double Delights – Irresistible Cookies Recipe! on a sleek white platter with fresh mint leaves sprinkled between them. Alternatively, stack them in a clear glass jar for a charming, rustic look. These cookies shine at holiday gatherings, but they also make a delightful treat for afternoon tea or a sweet ending to brunch. To elevate the experience, serve them slightly warmed so the chocolate melts just enough to enhance the rich, minty flavor.

What goes well with it

Pair Mint Chocolate Double Delights – Irresistible Cookies Recipe! with a cold glass of milk for a classic combination that balances the cookies’ richness. If you prefer something bolder, try them with a cup of peppermint mocha coffee—the warmth and caffeine kick complement the minty sweetness perfectly. For a dessert spread, serve them alongside our Decadent Chocolate Truffles or Vanilla Bean Ice Cream to create a luxurious contrast of flavors and textures.

What makes Mint Chocolate Double Delights – Irresistible Cookies Recipe! so special?

Mint Chocolate Double Delights – Irresistible Cookies Recipe! stands out with its perfect balance of rich chocolate and refreshing mint flavors. The double chocolate chips and creamy mint filling create a delightful texture contrast, making these cookies a crowd-pleaser for any occasion.

Can I use peppermint extract instead of mint extract in Mint Chocolate Double Delights?

Yes, you can substitute peppermint extract for mint extract in Mint Chocolate Double Delights – Irresistible Cookies Recipe! Peppermint extract will give a stronger, cooler mint flavor, so start with half the amount and adjust to taste. The cookies will still turn out deliciously refreshing.

How do I store Mint Chocolate Double Delights cookies to keep them fresh?

Store Mint Chocolate Double Delights – Irresistible Cookies Recipe! in an airtight container at room temperature for up to 5 days. For longer freshness, freeze the cookies in a sealed bag for up to 3 months—just thaw at room temperature before serving.

Can I make Mint Chocolate Double Delights gluten-free?

Absolutely! For a gluten-free version of Mint Chocolate Double Delights – Irresistible Cookies Recipe!, substitute the all-purpose flour with a 1:1 gluten-free flour blend. Just ensure your chocolate chips and other ingredients are certified gluten-free to avoid cross-contamination.

Best Homemade Oatmeal Cream Pies – Irresistible Recipe

best-homemade-oatmeal-cream-pies

“`html

Introduction

There’s something undeniably comforting about biting into a soft, chewy oatmeal cookie sandwich filled with fluffy vanilla cream. If you’ve ever craved the nostalgic taste of store-bought oatmeal cream pies but wanted a fresher, homemade twist, these Irresistible Homemade Oatmeal Cream Pies will hit the spot. Whether you’re baking for a family gathering, a cozy night in, or just because, this recipe delivers that perfect balance of warmth and sweetness. Plus, making them from scratch means you control every ingredient, ensuring a treat that’s as wholesome as it is delicious.

About This Recipe

Irresistible Homemade Oatmeal Cream Pies combine two tender oatmeal cookies with a velvety cream filling, creating a dessert that feels both familiar and special. Unlike the packaged versions, these pies boast real butter, wholesome oats, and a from-scratch cream center that melts in your mouth. What makes them stand out? First, the cookies bake up perfectly soft yet sturdy enough to hold the filling. Second, the cream uses simple ingredients like marshmallow fluff and butter for that iconic fluffy texture. Finally, this recipe fits seamlessly into any home baker’s repertoire, whether you’re a beginner or a seasoned pro.

This blog celebrates approachable, crowd-pleasing recipes, and these oatmeal cream pies embody that spirit. They’re ideal for sharing, gifting, or savoring solo with a glass of milk. If you love classic treats with a homemade upgrade, you’ll also adore our Decadent Chocolate Chip Cookies or our Vanilla Bean Cupcakes. What ties them all together? A focus on quality ingredients, foolproof methods, and flavors that spark joy.

Why I Love This Recipe

These Irresistible Homemade Oatmeal Cream Pies remind me of baking with my grandma, who always had a jar of oatmeal cookies ready for after-school snacks. When I finally perfected this recipe, it felt like capturing a piece of that warmth in every bite. I love how the spices in the cookies pair with the sweet cream, creating a harmony that’s hard to resist. Most importantly, they’re a hit with kids and adults alike, making them my go-to for potlucks or lazy Sunday treats. Every time I make them, I’m reminded why homemade beats store-bought every time.

“`

Health and Nutrition

Why it’s good for your body

Irresistible Homemade Oatmeal Cream Pies pack more nutritional benefits than you might expect. First, oats deliver a hearty dose of fiber, which keeps your digestion running smoothly and helps stabilize blood sugar levels. Additionally, these treats contain healthy fats from ingredients like butter or coconut oil, supporting brain function and energy. Moreover, the natural sweetness from molasses or honey offers a better alternative to refined sugars.

Because Irresistible Homemade Oatmeal Cream Pies include whole grains, they provide lasting energy without the crash. Oats also contain beta-glucans, a type of soluble fiber known to support heart health by lowering cholesterol. Furthermore, you can customize the recipe with add-ins like nuts or seeds for extra protein and healthy fats. Even better, these cream pies satisfy cravings while offering more nutrients than store-bought versions.

Finally, making Irresistible Homemade Oatmeal Cream Pies at home lets you control the ingredients. You can reduce sugar, use organic oats, or swap in dairy-free options. As a result, you enjoy a treat that’s both delicious and nourishing. Whether as an occasional indulgence or a mindful snack, these cream pies deliver flavor and nutrition in every bite.

How it fits in a healthy lifestyle

Irresistible Homemade Oatmeal Cream Pies fit perfectly into a balanced diet when enjoyed in moderation. Pair them with a protein-rich snack like Greek yogurt or a handful of almonds to create a satisfying, well-rounded treat. If you follow a gluten-free diet, simply swap regular flour for a gluten-free blend to keep these cream pies just as tasty.

For those focused on heart health, the oats in Irresistible Homemade Oatmeal Cream Pies contribute to lower cholesterol levels. You can also explore our guide to healthy baking swaps to make them even lighter. Meanwhile, if you’re meal prepping, these cream pies freeze well, so you can enjoy them without overindulging. Check out our tips for meal-prepping desserts to keep your sweet treats organized and portion-controlled.

Ultimately, Irresistible Homemade Oatmeal Cream Pies prove that treats can be part of a healthy lifestyle. By choosing wholesome ingredients and mindful portions, you savor every bite without guilt.

Print
clock clock iconcutlery cutlery iconflag flag iconfolder folder iconinstagram instagram iconpinterest pinterest iconfacebook facebook iconprint print iconsquares squares iconheart heart iconheart solid heart solid icon

Irresistible Homemade Oatmeal Cream Pies


  • Author: Chef Emy

Description

Soft, chewy oatmeal cookies sandwiched with a sweet vanilla cream filling – a nostalgic homemade version of the classic treat.


Ingredients

Scale

For the Crust:

  • 1 cup unsalted butter, softened
  • 3/4 cup brown sugar
  • 1/2 cup granulated sugar
  • 2 large eggs
  • 1 teaspoon vanilla extract
  • 1 1/2 cups all-purpose flour
  • 1 teaspoon baking soda
  • 1 teaspoon ground cinnamon
  • 1/2 teaspoon salt
  • 3 cups old-fashioned oats
  • 1/2 cup shortening
  • 2 cups powdered sugar
  • 1 teaspoon vanilla extract
  • 2 tablespoons milk

Instructions

1. Prepare the Crust:

  1. Preheat oven to 350°F (175°C). Line baking sheets with parchment paper.
  2. In a large bowl, cream together butter, brown sugar, and granulated sugar until light and fluffy. Beat in eggs one at a time, then stir in vanilla.
  3. Combine flour, baking soda, cinnamon, and salt; gradually add to the creamed mixture. Stir in oats.
  4. Drop dough by tablespoonfuls onto prepared baking sheets, spacing 2 inches apart. Bake for 10-12 minutes until edges are golden. Cool completely.
  5. For filling: Beat shortening, powdered sugar, vanilla, and milk until light and fluffy. Spread filling on flat side of half the cookies; top with remaining cookies.
  6. Store in airtight container at room temperature for up to 3 days.

Notes

You can customize the seasonings to taste.

“`html

How to Prepare This Dish

Steps and time-saving tips

Start by preheating your oven to 350°F and lining two baking sheets with parchment paper. In a large bowl, whisk together the flour, oats, baking soda, cinnamon, and salt until evenly combined. Next, cream the butter and sugars in a separate bowl until light and fluffy, then beat in the eggs and vanilla. Gradually fold the dry ingredients into the wet mixture until just combined—overmixing can make the cookies tough. Drop tablespoon-sized scoops of dough onto the prepared sheets, spacing them about 2 inches apart. Bake for 10-12 minutes until the edges turn golden but the centers stay soft. Let the cookies cool completely on the sheets before filling.

While the cookies cool, whip the cream cheese, butter, and powdered sugar until smooth and fluffy. For a time-saving hack, use a stand mixer with the paddle attachment to speed up the process. Once the cookies are ready, spread a generous layer of filling on the flat side of half the cookies, then top with the remaining halves. Gently press to create perfect Irresistible Homemade Oatmeal Cream Pies. If the filling feels too soft, chill the assembled pies for 15-20 minutes to firm up. Store leftovers in an airtight container to keep them fresh for days.

Mistakes I’ve made and learned from

Early on, I rushed the cooling step and ended up with melted filling oozing everywhere. Now, I always let the cookies cool completely—patience pays off! Another lesson? Measuring flour correctly matters. Once, I packed it too tightly, resulting in dry, crumbly cookies. I’ve since learned the spoon-and-level method, which you can read about in my baking tips guide. Also, don’t skip the chilling step if your kitchen is warm. I learned this the hard way after my first batch spread too thin. For more troubleshooting, check out my common cookie mistakes post. Trust me, these small adjustments make all the difference!

“`

Cultural Connection and Variations

Where this recipe comes from

Irresistible Homemade Oatmeal Cream Pies trace their roots back to the classic American lunchbox treat, but with a nostalgic twist. Many of us remember the store-bought version from childhood, but baking them at home adds warmth and love to every bite. In the South, families often add a dash of molasses or cinnamon to the filling, while Midwestern bakers might swap in maple syrup for a deeper flavor. Some even say the recipe evolved from Scottish oatcakes, blending old-world traditions with American ingenuity.

Around the world, similar treats take on unique forms. In Australia, they pair oatmeal cookies with golden syrup, while British bakers favor a layer of vanilla custard. My grandma, however, swore by her secret ingredient—a pinch of nutmeg in the cream filling—which made her Irresistible Homemade Oatmeal Cream Pies the star of every family reunion. Whether you stick to tradition or experiment, these treats always carry a sense of comfort and connection.

How it fits in today’s cooking

Today, Irresistible Homemade Oatmeal Cream Pies bridge the gap between nostalgia and modern convenience. Busy home cooks love them as a make-ahead dessert for potlucks or a sweet surprise in lunchboxes. Many also adapt the recipe to fit dietary needs, like using gluten-free oats or vegan butter. For a seasonal twist, some add pumpkin spice in the fall or dip half the cookie in chocolate for a festive touch.

These pies also shine in holiday baking spreads, often alongside classics like holiday cookie recipes or as a companion to comfort food desserts. Whether you’re reviving a family tradition or starting a new one, Irresistible Homemade Oatmeal Cream Pies remind us that some flavors never go out of style.

Taste and Texture

What makes it delicious

Irresistible Homemade Oatmeal Cream Pies deliver a nostalgic yet elevated treat with layers of flavor and texture. The soft, chewy oatmeal cookies boast warm notes of cinnamon and brown sugar, while the velvety cream filling melts luxuriously in your mouth. Each bite balances sweetness with a hint of molasses depth, and the fragrant vanilla ties everything together. Meanwhile, the slight crispness at the edges of the cookies contrasts perfectly with the pillowy center. Whether enjoyed fresh or stored for later, Irresistible Homemade Oatmeal Cream Pies offer a comforting, bakery-style experience that’s impossible to resist.

Boosting the flavor

For an extra flavor kick, try swapping the vanilla extract with bourbon vanilla for a richer aroma. Alternatively, a sprinkle of flaky sea salt on top enhances the sweetness while adding subtle complexity. If you love spice, a dash of nutmeg or cardamom in the cookie dough introduces warmth. For a fun twist, sandwich the cream with a layer of homemade caramel sauce or drizzle melted chocolate over the finished pies. Craving crunch? Toasted pecans or walnuts add texture, much like our cinnamon pecan cookies. Experiment freely—these small tweaks make each batch uniquely delicious!

Tips for Success

Best practices for results

Always chill the dough for at least 30 minutes before baking to prevent spreading and ensure thick, chewy Irresistible Homemade Oatmeal Cream Pies. Meanwhile, use parchment paper for even baking and easy removal. For the creamiest filling, beat the butter and marshmallow fluff until fully smooth, then gradually add powdered sugar. Additionally, measure your oats correctly—pack them lightly to avoid dry cookies. Finally, let the pies cool completely before assembling so the filling stays perfectly fluffy.

Mistakes to avoid

Avoid overmixing the dough, as this can make your Irresistible Homemade Oatmeal Cream Pies tough instead of tender. Instead, stir just until the ingredients combine. Another common error is baking on an ungreased tray, which often leads to sticking. For foolproof results, check out our guide on essential baking tools to pick the right equipment. Also, resist the urge to skip the cooling step—warm cookies will melt the filling. If you struggle with timing, our baking time tips can help you nail it every time.

Serving and Pairing Suggestions

How to serve this dish

Serve your Irresistible Homemade Oatmeal Cream Pies warm for a gooey, melt-in-your-mouth experience or at room temperature for a firmer texture. For a charming presentation, stack them on a rustic wooden board or arrange them on a vintage cake stand. Meanwhile, drizzle a light dusting of powdered sugar over the top or add a dollop of whipped cream for extra flair. These treats shine at holiday cookie swaps, cozy family gatherings, or even as a sweet surprise in lunchboxes. No matter the occasion, Irresistible Homemade Oatmeal Cream Pies always steal the show.

What goes well with it

Pair your Irresistible Homemade Oatmeal Cream Pies with a steaming mug of spiced chai tea for a cozy contrast to their rich sweetness. Alternatively, try them alongside a scoop of vanilla bean ice cream for an indulgent dessert twist. If you love balancing flavors, serve them with our Classic Lemonade to cut through the richness with a refreshing zing. For a brunch-friendly combo, enjoy them with our Cold Brew Coffee, which enhances the warm cinnamon notes in every bite.

What ingredients do I need for Irresistible Homemade Oatmeal Cream Pies?

You’ll need rolled oats, flour, butter, brown sugar, eggs, vanilla extract, and spices like cinnamon for the cookies. For the creamy filling, combine marshmallow fluff, powdered sugar, butter, and a splash of vanilla to achieve that signature Irresistible Homemade Oatmeal Cream Pie texture.

How do I store Irresistible Homemade Oatmeal Cream Pies to keep them fresh?

Store your Irresistible Homemade Oatmeal Cream Pies in an airtight container at room temperature for up to 3 days. For longer freshness, refrigerate them for up to a week—just let them sit at room temperature for 10 minutes before serving to soften the filling.

Can I freeze Irresistible Homemade Oatmeal Cream Pies?

Yes! Freeze unfilled oatmeal cookies in a single layer before stacking, and store the cream filling separately. When ready to enjoy, thaw both components and assemble your Irresistible Homemade Oatmeal Cream Pies for a fresh-baked taste.

What’s the secret to making the cream filling extra fluffy?

Whip room-temperature butter and marshmallow fluff together for at least 3–5 minutes until light and airy. This step ensures your Irresistible Homemade Oatmeal Cream Pies have that dreamy, cloud-like filling reminiscent of the classic store-bought version.

Ultimate Nutella Cheesecake Brownies Recipe

ultimate-nutella-cheesecake-brownies

“`html

Introduction

If you’ve ever craved a dessert that combines rich chocolate, creamy Nutella, and velvety cheesecake in one irresistible bite, these Decadent Nutella Cheesecake Brownies are your dream come true. Imagine sinking your teeth into a fudgy brownie base swirled with a luscious Nutella cheesecake layer—each bite is pure bliss. Whether you’re baking for a special occasion or just treating yourself, this recipe delivers indulgence in every slice. Trust me, once you try these brownies, they’ll become your go-to dessert for satisfying sweet tooth cravings and impressing guests alike.

About This Recipe

Decadent Nutella Cheesecake Brownies are the ultimate fusion of two beloved desserts: brownies and cheesecake. The recipe starts with a dense, chocolatey brownie base, then tops it with a smooth Nutella-infused cheesecake layer. Finally, a marbled swirl ties everything together for a stunning presentation. What makes this dessert stand out is its perfect balance of textures and flavors—chewy, creamy, and intensely chocolatey all at once.

This recipe matters because it’s more than just a treat; it’s an experience. Whether you’re a seasoned baker or a beginner, the steps are straightforward, and the results are consistently impressive. Plus, Nutella adds a unique hazelnut richness that elevates the classic cheesecake brownie. If you love easy yet showstopping desserts, you’ll appreciate how this recipe fits seamlessly into any occasion, from weeknight cravings to holiday gatherings.

At Brekcakes, we specialize in recipes that blend simplicity with indulgence, and these Decadent Nutella Cheesecake Brownies are no exception. If you’re looking for more crowd-pleasing desserts, check out our Classic Chocolate Chip Cookies or our Red Velvet Cupcakes. Each recipe shares the same commitment to flavor and accessibility, making them perfect for bakers of all levels.

Why I Love This Recipe

I’ll never forget the first time I made these Decadent Nutella Cheesecake Brownies. A friend requested them for her birthday, and the moment we took that first bite, we knew they were something special. The way the Nutella cheesecake melts into the brownie base creates a harmony of flavors that feels like a hug in dessert form. Now, I make them whenever I need a guaranteed smile—whether for potlucks, family nights, or just because. There’s something magical about how such simple ingredients come together to create pure joy.

“`

Health and Nutrition

Why it’s good for your body

Decadent Nutella Cheesecake Brownies deliver more than just irresistible flavor. First, they provide a quick energy boost thanks to the natural sugars in Nutella and the carbohydrates in the brownie base. Additionally, hazelnuts in Nutella offer healthy fats and a small dose of protein, which help keep you satisfied longer. While these brownies are a treat, they also include dairy from the cream cheese, contributing calcium for strong bones.

Moreover, Decadent Nutella Cheesecake Brownies contain antioxidants from cocoa, which may support heart health. Dark chocolate, a key ingredient, has been linked to improved mood and reduced stress. Of course, moderation is key, but enjoying one of these brownies can be a delightful way to indulge without completely derailing your nutrition goals. Finally, the rich flavors mean a small portion often satisfies cravings, helping you avoid overeating.

How it fits in a healthy lifestyle

Decadent Nutella Cheesecake Brownies can fit into a balanced diet when enjoyed mindfully. Pair them with a protein-rich snack like Greek yogurt or nuts to balance blood sugar levels. If you follow a gluten-free diet, simply swap the flour for a gluten-free alternative—many of our readers love using almond flour for extra nutrition. For more gluten-free baking tips, check out our guide on gluten-free baking.

These brownies also work well as an occasional dessert in a heart-healthy eating plan. Dark chocolate and hazelnuts contain monounsaturated fats, which support cardiovascular health. If you’re looking for other ways to enjoy treats guilt-free, explore our article on healthy dessert swaps. Remember, balance is everything—savoring Decadent Nutella Cheesecake Brownies as part of a varied diet keeps both your taste buds and body happy.

Print
clock clock iconcutlery cutlery iconflag flag iconfolder folder iconinstagram instagram iconpinterest pinterest iconfacebook facebook iconprint print iconsquares squares iconheart heart iconheart solid heart solid icon

Decadent Nutella Cheesecake Brownies


  • Author: Chef Emy

Description

Rich and fudgy brownies swirled with creamy Nutella cheesecake for an indulgent dessert.


Ingredients

Scale

For the Crust:

  • 1 cup all-purpose flour
  • 1/2 cup unsweetened cocoa powder
  • 1/2 tsp salt
  • 1 cup unsalted butter, melted
  • 2 cups granulated sugar
  • 4 large eggs
  • 2 tsp vanilla extract
  • 8 oz cream cheese, softened
  • 1/2 cup Nutella
  • 1/4 cup powdered sugar

Instructions

1. Prepare the Crust:

  1. Preheat oven to 350°F (175°C). Line a 9×9 inch baking pan with parchment paper.
  2. In a bowl, whisk together flour, cocoa powder, and salt. Set aside.
  3. In another bowl, mix melted butter and sugar. Add eggs one at a time, then stir in vanilla.
  4. Gradually fold dry ingredients into the wet mixture until just combined. Spread 2/3 of the batter into the prepared pan.
  5. Beat cream cheese, Nutella, and powdered sugar until smooth. Drop spoonfuls over the brownie batter, then swirl with a knife.
  6. Bake for 30-35 minutes until edges are set but center is slightly soft. Cool completely before slicing.

Notes

You can customize the seasonings to taste.

“`html

How to Prepare This Dish

Steps and time-saving tips

Start by preheating your oven to 350°F and lining an 8×8 baking pan with parchment paper for easy removal later. In a large bowl, whisk together melted butter and sugar until smooth, then mix in eggs and vanilla. Gradually fold in flour and cocoa powder until just combined—overmixing can make the brownies dense. Spread half the batter into the pan, then dollop generous spoonfuls of Nutella on top. Use a knife to swirl it gently for that marbled effect. Next, beat cream cheese, sugar, and egg until creamy, then layer it over the Nutella swirl. Finally, drop the remaining brownie batter on top and bake for 30-35 minutes. Let the Decadent Nutella Cheesecake Brownies cool completely before slicing to avoid a gooey mess. For a time-saving hack, melt the butter in the microwave and use room-temperature cream cheese to ensure a lump-free cheesecake layer. If you’re short on time, chill the brownies in the fridge for an hour instead of waiting for them to cool at room temperature.

Mistakes I’ve made and learned from

I once rushed the cooling process and ended up with Decadent Nutella Cheesecake Brownies that fell apart—patience is key! Another time, I overmixed the batter, resulting in a cakey texture instead of fudgy perfection. Now, I stop stirring as soon as the flour disappears. If your Nutella sinks to the bottom, try chilling it slightly before swirling, or layer it between the batter as I’ve learned from my brownie baking tips. For the cheesecake layer, room-temperature ingredients are non-negotiable unless you want lumps. Trust me, I’ve been there. If you’re new to baking, my beginner dessert recipes guide has more troubleshooting advice to help you avoid common pitfalls.

“`

Cultural Connection and Variations

Where this recipe comes from

The Decadent Nutella Cheesecake Brownies weave together two beloved treats—brownies and cheesecake—with the rich, hazelnut magic of Nutella. While brownies trace their roots to early 20th-century America, cheesecake dates back to ancient Greece. Combining them with Nutella, a modern Italian creation, makes this dessert a delicious cultural mash-up. In my family, these brownies became a holiday staple after my aunt brought a pan to Thanksgiving, and now we argue over who gets the corner pieces.

Around the world, bakers put their own spin on similar desserts. In France, you might find a chocolate-hazelnut gateau, while in Italy, Nutella often stars in crostatas or stuffed pastries. Some bakers add espresso powder to deepen the chocolate flavor, while others swirl in peanut butter for an American twist. The Decadent Nutella Cheesecake Brownies, however, stand out because they balance fudgy brownie texture with creamy cheesecake—a combo that wins over every crowd.

How it fits in today’s cooking

Today, the Decadent Nutella Cheesecake Brownies fit perfectly into both special occasions and everyday indulgences. They’re a hit at potlucks, birthday parties, and even as a sweet pick-me-up during busy weeks. Modern cooks love how adaptable they are—swap the Nutella for a dairy-free alternative, or add a sprinkle of sea salt for gourmet flair. For those who love easy desserts, this recipe pairs wonderfully with a scoop of homemade vanilla ice cream or a drizzle of caramel.

Seasonal twists keep the recipe fresh year-round. In winter, cinnamon or orange zest adds warmth, while summer calls for fresh berries on the side. Whether you’re baking for a crowd or treating yourself, the Decadent Nutella Cheesecake Brownies deliver comfort with every bite. And if you’re looking for more crowd-pleasers, try pairing them with these classic chocolate chip cookies for the ultimate dessert spread.

Taste and Texture

What makes it delicious

Decadent Nutella Cheesecake Brownies deliver an irresistible mix of rich, gooey chocolate and velvety cheesecake. The brownie base bakes up fudgy and dense, while the Nutella swirl adds a sweet, nutty depth that melts on your tongue. Meanwhile, the creamy cheesecake layer balances everything with a tangy contrast, creating a perfect bite every time. As you take a forkful, the crackly top gives way to a moist center, and the aroma of toasted hazelnuts and cocoa fills the air. Each slice of Decadent Nutella Cheesecake Brownies feels indulgent yet balanced, making it impossible to stop at just one piece.

Boosting the flavor

For an extra flavor boost, try folding mini chocolate chips into the brownie batter or topping warm slices with a drizzle of salted caramel sauce for a sweet-and-salty twist. If you love texture, sprinkle crushed hazelnuts over the cheesecake layer before baking. Alternatively, swap Nutella for a dark chocolate hazelnut spread to deepen the richness. A dusting of sea salt right before serving also enhances the chocolate notes. For more pairing ideas, check out these decadent dessert sauces to elevate your brownie experience even further.

Tips for Success

Best practices for results

Always line your baking pan with parchment paper to ensure your Decadent Nutella Cheesecake Brownies release easily without sticking. For the smoothest cheesecake layer, make sure your cream cheese sits at room temperature for at least 30 minutes before mixing. Additionally, gently swirl the Nutella into the batter with a knife instead of overmixing to create perfect marbling. Finally, let the brownies cool completely before slicing so they hold their shape beautifully.

Mistakes to avoid

Avoid overbaking the brownies, as they will continue to set while cooling. Pull them from the oven when the edges are firm but the center still has a slight wobble. Also, resist the urge to skip sifting the cocoa powder, as lumps can create uneven texture in your Decadent Nutella Cheesecake Brownies. For more precision, use an oven thermometer to confirm your bake temperature. If your swirls sink, check out our guide on layering batter techniques for foolproof marbling every time.

Serving and Pairing Suggestions

How to serve this dish

Decadent Nutella Cheesecake Brownies deserve a show-stopping presentation. For a special touch, dust them with powdered sugar or drizzle melted Nutella on top. Meanwhile, serve them warm with a scoop of vanilla ice cream for an irresistible contrast. These brownies shine at holiday gatherings, but they also make a delightful treat for weekend brunch. Finally, arrange them on a rustic wooden board for a cozy, inviting look.

What goes well with it

Pair Decadent Nutella Cheesecake Brownies with a rich cup of homemade mocha latte to enhance their chocolatey depth. Alternatively, a glass of cold milk balances their richness perfectly. For a festive twist, try serving them alongside berry chia pudding to add a refreshing, fruity contrast. Each pairing elevates the indulgent experience.

How do you make Decadent Nutella Cheesecake Brownies from scratch?

To make Decadent Nutella Cheesecake Brownies, start with a rich brownie base, swirl in a creamy Nutella cheesecake layer, and bake until perfectly fudgy. The key is to use high-quality cocoa powder and fresh cream cheese for the best flavor and texture.

Can I substitute Nutella with another spread in Decadent Nutella Cheesecake Brownies?

While Nutella gives Decadent Nutella Cheesecake Brownies their signature hazelnut-chocolate flavor, you can use alternatives like peanut butter or cookie butter for a twist. Just note that the taste and texture will differ slightly from the original recipe.

How long do Decadent Nutella Cheesecake Brownies stay fresh?

Decadent Nutella Cheesecake Brownies stay fresh for up to 4 days when stored in an airtight container at room temperature. For longer storage, refrigerate them for up to a week or freeze for up to 3 months.

What’s the best way to serve Decadent Nutella Cheesecake Brownies?

Serve Decadent Nutella Cheesecake Brownies slightly warmed with a scoop of vanilla ice cream or a drizzle of extra Nutella for an indulgent dessert. They’re also delicious at room temperature with a dusting of powdered sugar.

Homemade Peanut Butter and Jelly Pop Tarts Recipe

homemade-peanut-butter-jelly-poptarts

“`html

Introduction

Few things bring back childhood nostalgia like the classic peanut butter and jelly combo. Now imagine that comforting flavor tucked inside a flaky, golden pastry—warm, sweet, and utterly irresistible. That’s exactly what you get with these Irresistible Peanut Butter and Jelly Pop Tarts. Whether you’re craving a quick breakfast, a fun snack, or a dessert that hits all the right notes, this recipe delivers. Plus, it’s a fantastic way to put a homemade spin on a store-bought favorite. Trust me, one bite and you’ll wonder why you didn’t make these sooner.

About This Recipe

Irresistible Peanut Butter and Jelly Pop Tarts take the simple joy of PB&J and elevate it into something truly special. Instead of relying on pre-packaged pastries, this recipe lets you craft every layer from scratch. You’ll start with a buttery, tender dough, fill it with creamy peanut butter and fruity jam, then bake until golden. The result? A handheld treat that’s crispy on the outside, gooey in the middle, and packed with flavor. Importantly, this recipe fits perfectly with our blog’s mission to reinvent familiar favorites with a homemade twist. After all, why settle for ordinary when you can make something extraordinary?

Beyond taste, these pop tarts offer versatility. You can customize the jam flavor, drizzle them with glaze, or even add a sprinkle of sea salt for balance. They’re also great for meal prep—just stash them in the freezer and reheat whenever a craving strikes. If you love easy yet impressive recipes, you’ll adore our Homemade Cinnamon Rolls or Classic Chocolate Chip Cookies. Like those staples, this recipe proves that a little effort goes a long way in creating unforgettable treats.

Why I Love This Recipe

Irresistible Peanut Butter and Jelly Pop Tarts hold a special place in my heart because they remind me of lazy Saturday mornings with my family. My mom would let us help roll out the dough and spoon on the filling, turning baking into a shared adventure. Now, whenever I make them, that same warmth comes rushing back. There’s something magical about how the peanut butter melts slightly while the jam stays sweet and tangy—it’s pure comfort in every bite. Plus, seeing friends’ faces light up when I serve these? That’s the real reward.

“`

Health and Nutrition

Why it’s good for your body

Irresistible Peanut Butter and Jelly Pop Tarts pack a nutritious punch while satisfying your sweet tooth. First, peanut butter delivers plant-based protein, which helps keep you full and supports muscle repair. Additionally, the natural fats in peanut butter promote heart health and steady energy levels. Meanwhile, the jelly provides a burst of antioxidants from fruit, helping combat inflammation.

Moreover, Irresistible Peanut Butter and Jelly Pop Tarts offer a balanced mix of carbs, fats, and protein. This trio works together to stabilize blood sugar, preventing energy crashes. Furthermore, whole-grain options can boost fiber intake, aiding digestion and long-term satiety. Even better, these pop tarts often contain less added sugar than traditional pastries, making them a smarter indulgence.

Finally, Irresistible Peanut Butter and Jelly Pop Tarts bring joy to your day, which matters for overall well-being. After all, enjoying food you love supports a positive relationship with eating. So whether you grab one for breakfast or a snack, you’re fueling your body and mood.

How it fits in a healthy lifestyle

Irresistible Peanut Butter and Jelly Pop Tarts fit seamlessly into a balanced diet when enjoyed mindfully. Pair them with a protein-rich side like Greek yogurt or a handful of nuts to create a satisfying meal. For those watching sugar intake, opt for versions with reduced sugar or natural sweeteners.

If you follow specific dietary needs, you’ll love that many recipes for Irresistible Peanut Butter and Jelly Pop Tarts can adapt. For example, gluten-free flour blends work perfectly for a celiac-friendly treat. Looking for more heart-healthy swaps? Try almond butter instead of peanut butter, as highlighted in our guide to healthy baking substitutions.

Busy mornings don’t have to derail your nutrition goals. Keep these pop tarts on hand for a quick, wholesome option. For more ideas on balancing treats with nutrients, explore our meal-prep breakfasts to streamline your routine. With a little planning, Irresistible Peanut Butter and Jelly Pop Tarts become a delicious part of your healthy lifestyle.

Print
clock clock iconcutlery cutlery iconflag flag iconfolder folder iconinstagram instagram iconpinterest pinterest iconfacebook facebook iconprint print iconsquares squares iconheart heart iconheart solid heart solid icon

Irresistible Peanut Butter and Jelly Pop Tarts


  • Author: Chef Emy

Description

A fun and delicious twist on the classic PB&J, these homemade pop tarts are perfect for breakfast or a sweet snack.


Ingredients

Scale

For the Crust:

  • 2 cups all-purpose flour
  • 1/2 teaspoon salt
  • 1 tablespoon granulated sugar
  • 1 cup unsalted butter, cold and cubed
  • 1/4 cup ice water
  • 1/2 cup creamy peanut butter
  • 1/4 cup strawberry jelly
  • 1 egg, beaten (for egg wash)
  • 1/2 cup powdered sugar
  • 1 tablespoon milk

Instructions

1. Prepare the Crust:

  1. In a large bowl, whisk together flour, salt, and sugar. Cut in the cold butter until the mixture resembles coarse crumbs.
  2. Gradually add ice water, 1 tablespoon at a time, until the dough comes together. Divide into two discs, wrap in plastic, and chill for 30 minutes.
  3. Roll out one disc of dough into a rectangle about 1/8-inch thick. Cut into smaller rectangles (about 3×4 inches).
  4. Spread a thin layer of peanut butter and jelly on half of the rectangles, leaving a small border. Top with another rectangle and press edges with a fork to seal.
  5. Brush tops with egg wash and bake at 375°F for 18-20 minutes until golden. Let cool.
  6. Mix powdered sugar and milk to make a glaze. Drizzle over cooled pop tarts and let set before serving.

Notes

You can customize the seasonings to taste.

How to Prepare This Dish

Steps and time-saving tips

Start by preheating your oven to 375°F and lining a baking sheet with parchment paper. Meanwhile, whisk together the flour, sugar, and salt in a large bowl. Cut cold butter into small cubes, then use your fingers or a pastry cutter to blend it into the dry ingredients until the mixture resembles coarse crumbs. Next, drizzle in ice water one tablespoon at a time, stirring gently until the dough just comes together. Roll the dough out on a floured surface to about ⅛-inch thickness, then cut into rectangles. Spread a thin layer of peanut butter on half the rectangles, leaving a small border, and top with a spoonful of jelly. Place the remaining rectangles on top, press the edges with a fork to seal, and prick the tops to vent. Bake for 15-18 minutes until golden. For a time-saving hack, use store-bought pie crust or prepare the dough the night before. Let the Irresistible Peanut Butter and Jelly Pop Tarts cool slightly before serving—they’ll hold their shape better.

Mistakes I’ve made and learned from

I once rushed the dough and added too much water, which made my Irresistible Peanut Butter and Jelly Pop Tarts tough instead of flaky. Now I measure carefully and stop mixing as soon as the dough forms clumps. Another blunder? Overfilling the pastries—jelly oozed everywhere during baking! A thin, even layer works best, as I learned from my guide to perfect pastry crusts. If your filling still leaks, try chilling the assembled tarts for 10 minutes before baking. Oh, and don’t skip venting the tops—steam needs an escape route, or you’ll end up with puffed-up pockets (trust me). For more troubleshooting, check out my baking fails and fixes post. These small adjustments made all the difference!

Cultural Connection and Variations

Where this recipe comes from

Irresistible Peanut Butter and Jelly Pop Tarts take a nostalgic American classic and give it a playful twist. Originally, pop tarts gained fame as a quick breakfast staple in the 1960s, but homemade versions like this one bring warmth and creativity to the table. Families often put their own spin on them, swapping fillings or adding toppings like crushed peanuts or a drizzle of chocolate. Meanwhile, in other parts of the world, similar pastries might feature local jams, nut butters, or even savory fillings—proof that the love for handheld treats crosses borders.

In my kitchen, Irresistible Peanut Butter and Jelly Pop Tarts became a weekend tradition. My grandma used to fold extra jelly into the corners, claiming it made every bite sweeter. Some bakers opt for almond butter or honey instead, while others layer in fresh fruit for a tangy contrast. No matter the variation, these pop tarts always carry a sense of comfort, whether served at bake sales, after-school snacks, or lazy Sunday brunches.

How it fits in today’s cooking

Today, Irresistible Peanut Butter and Jelly Pop Tarts still win hearts as a versatile treat. Busy parents pack them in lunchboxes, while food bloggers reinvent them with gluten-free crusts or vegan fillings. They’ve even found a place in holiday baking, showing up as fun alternatives to traditional pies. For a modern twist, some cooks pair them with a scoop of homemade ice cream or crumble them over yogurt bowls.

What keeps them relevant? Their simplicity and adaptability. Whether you’re whipping up a batch for a cozy breakfast or experimenting with flavors like spiced berry jam, these pop tarts fit effortlessly into today’s cooking routines. They remind us that some flavors never go out of style—especially when they come with a side of nostalgia.

Taste and Texture

What makes it delicious

Irresistible Peanut Butter and Jelly Pop Tarts deliver a nostalgic yet elevated treat with every bite. The flaky, buttery crust shatters delicately, giving way to a creamy, rich peanut butter filling that melts smoothly on your tongue. Meanwhile, the sweet-tart jelly bursts with fruity brightness, balancing the nutty depth. Warm from the oven, the aroma of toasted pastry and roasted peanuts fills the air, making it impossible to resist. Each layer—crisp, gooey, and velvety—creates a harmony of textures that keeps you reaching for more. Irresistible Peanut Butter and Jelly Pop Tarts aren’t just a snack; they’re a sensory celebration.

Boosting the flavor

For an extra flavor kick, try swapping classic grape jelly for homemade strawberry chia jam to add a fresh, slightly seedy crunch. Alternatively, drizzle melted dark chocolate over the top for a decadent contrast to the salty-sweet filling. A sprinkle of flaky sea salt right before serving heightens every note. If you love experimenting, pair these pop tarts with a scoop of vegan vanilla ice cream to create a warm-and-cool dessert experience. Small tweaks make these treats even more unforgettable.

Tips for Success

Best practices for results

Always chill the dough before rolling it out to prevent sticking and ensure clean edges on your Irresistible Peanut Butter and Jelly Pop Tarts. Additionally, use parchment paper when baking to guarantee an even golden crust without over-browning. For the best texture, spread the peanut butter and jelly evenly but leave a small border around the edges to prevent leaks. Finally, seal the tarts firmly with a fork to lock in the filling and create that classic pop tart look.

Mistakes to avoid

Avoid overfilling the tarts, as too much peanut butter or jelly can cause messy spills during baking. Instead, stick to a thin, even layer for the perfect balance. Also, don’t skip the egg wash—it gives your Irresistible Peanut Butter and Jelly Pop Tarts that glossy, bakery-style finish. If your dough feels sticky, check out our guide on handling sticky dough for easy fixes. For more tips on avoiding common baking pitfalls, explore our baking mistakes article to keep your treats flawless every time.

Serving and Pairing Suggestions

How to serve this dish

Serve Irresistible Peanut Butter and Jelly Pop Tarts warm for a gooey, comforting treat that feels like a hug in every bite. For a brunch spread, arrange them on a rustic wooden board with fresh berries and a dusting of powdered sugar. Meanwhile, during holidays, stack them high on a festive platter with edible glitter for a touch of magic. If you want to impress guests, drizzle melted peanut butter over the top and add a dollop of whipped cream. No matter the occasion, these pop tarts always steal the spotlight.

What goes well with it

Pair Irresistible Peanut Butter and Jelly Pop Tarts with a cold glass of milk for a classic combo that never disappoints. Alternatively, try them alongside a creamy vanilla latte for a cozy morning treat. If you love contrast, serve them with a tangy fruit salad to balance the sweetness. For more brunch inspiration, check out our Fluffy Pancakes or Homemade Granola to create a full spread everyone will adore.

Are Irresistible Peanut Butter and Jelly Pop Tarts vegan?

No, Irresistible Peanut Butter and Jelly Pop Tarts contain dairy and other animal-derived ingredients, making them unsuitable for a vegan diet. Always check the packaging for the most up-to-date ingredient list if you have dietary restrictions.

How do you make homemade Irresistible Peanut Butter and Jelly Pop Tarts?

To make homemade Irresistible Peanut Butter and Jelly Pop Tarts, prepare a flaky pastry dough, spread peanut butter and jelly between two layers, seal the edges, and bake until golden. You can add a simple glaze or sprinkles for extra flair.

Where can I buy Irresistible Peanut Butter and Jelly Pop Tarts?

Irresistible Peanut Butter and Jelly Pop Tarts are available at most major grocery stores, Walmart, Target, and online retailers like Amazon. Check the Pop-Tarts section or the breakfast aisle for this flavor.

Can you toast Irresistible Peanut Butter and Jelly Pop Tarts?

Yes, toasting Irresistible Peanut Butter and Jelly Pop Tarts enhances their flavor and gives them a warm, crispy texture. Use a toaster or toaster oven for about 1-2 minutes, but be careful not to overheat as the filling can become very hot.

Best Rainbow Fruit Parfait with Vanilla Greek Yogurt

best-rainbow-fruit-parfait-yogurt

“`html

Introduction

There’s something undeniably joyful about digging into a vibrant, colorful dish that tastes as good as it looks. If you’re craving a treat that’s both refreshing and indulgent, this Rainbow Fruit Parfait with Vanilla Greek Yogurt is your answer. Layers of juicy seasonal fruits, creamy vanilla-infused yogurt, and a hint of crunch come together in a dessert that feels like sunshine in a glass. Whether you’re serving it at brunch, packing it for a picnic, or simply treating yourself, this parfait delivers a burst of flavor and nutrition in every spoonful. Plus, it’s so easy to customize with your favorite fruits—making it a versatile staple for any occasion.

About This Recipe

A Rainbow Fruit Parfait with Vanilla Greek Yogurt is more than just a pretty dish. It’s a balanced blend of textures and flavors that satisfies your sweet tooth while keeping things light and wholesome. The vanilla Greek yogurt adds a rich, tangy creaminess, while the rainbow of fresh fruits brings natural sweetness and a boost of vitamins. This recipe fits perfectly into a health-conscious lifestyle without sacrificing indulgence. Moreover, it’s a fantastic way to get kids excited about eating fruit, and it’s just as appealing to adults looking for a guilt-free dessert.

What makes this recipe stand out is its simplicity. You don’t need fancy techniques or hard-to-find ingredients. In fact, you can whip it up in minutes with whatever fruits you have on hand. If you love easy, no-bake treats, you’ll also adore our No-Bake Strawberry Cheesecake Jars, which share the same effortless charm. And if you’re looking for more ways to enjoy Greek yogurt, our Greek Yogurt Breakfast Bowls offer endless inspiration for morning meals.

This blog celebrates recipes that are as practical as they are delicious, and the Rainbow Fruit Parfait with Vanilla Greek Yogurt embodies that spirit. It’s a dish that adapts to your preferences, whether you’re meal prepping for the week or impressing guests at a dinner party. Best of all, it proves that eating well doesn’t mean skipping the fun—every colorful layer is a reminder that healthy food can be exciting.

Why I Love This Recipe

This Rainbow Fruit Parfait with Vanilla Greek Yogurt holds a special place in my heart because it’s the first recipe I ever made with my niece. She loved arranging the fruit layers, and her excitement over the “rainbow” we created was priceless. Beyond the nostalgia, I appreciate how effortlessly it comes together on busy mornings. It’s my go-to when I need a quick yet satisfying breakfast or a light dessert that doesn’t weigh me down. Every bite feels like a little celebration—simple, bright, and full of love.

“`

Health and Nutrition

Why it’s good for your body

Rainbow Fruit Parfait with Vanilla Greek Yogurt packs a powerful nutritional punch while delighting your taste buds. First, the vibrant mix of fresh fruits delivers essential vitamins and antioxidants. For instance, berries boost immunity, while citrus fruits support skin health. Additionally, the Greek yogurt base provides a hefty dose of protein and probiotics, which aid digestion and keep you full longer.

Moreover, this parfait balances natural sugars with fiber, preventing energy crashes. The colorful fruit layers also mean you get a variety of phytonutrients, each with unique benefits. Meanwhile, the vanilla Greek yogurt adds calcium for strong bones without excessive added sugar. Together, these ingredients make Rainbow Fruit Parfait with Vanilla Greek Yogurt a smart choice for sustained energy and overall wellness.

Finally, this dish is as versatile as it is nutritious. You can customize it with seasonal fruits or swap in dairy-free yogurt for dietary preferences. Whether you enjoy it for breakfast or a snack, Rainbow Fruit Parfait with Vanilla Greek Yogurt fuels your body with wholesome goodness.

How it fits in a healthy lifestyle

Rainbow Fruit Parfait with Vanilla Greek Yogurt effortlessly fits into a balanced diet. If you follow a gluten-free or heart-healthy eating plan, this dish checks all the boxes. The natural ingredients align with clean eating goals, and the protein-rich yogurt supports muscle recovery after workouts. Plus, it’s a fantastic way to meet daily fruit intake recommendations without feeling like a chore.

For busy mornings, this parfait saves time while keeping nutrition on track. Pair it with a nutritious smoothie for a complete meal, or enjoy it solo as a satisfying snack. If you’re meal prepping, layer the ingredients in jars for grab-and-go convenience. And if you love exploring wholesome desserts, try pairing it with our guilt-free dessert options for a sweet yet balanced treat.

Rainbow Fruit Parfait with Vanilla Greek Yogurt adapts to your lifestyle, whether you need a post-workout refuel or a light, nutrient-dense breakfast. It’s proof that eating well can be simple, delicious, and full of color.

Print
clock clock iconcutlery cutlery iconflag flag iconfolder folder iconinstagram instagram iconpinterest pinterest iconfacebook facebook iconprint print iconsquares squares iconheart heart iconheart solid heart solid icon

Rainbow Fruit Parfait with Vanilla Greek Yogurt


  • Author: Chef Emy

Description

A colorful and healthy layered parfait with fresh fruits and creamy vanilla Greek yogurt.


Ingredients

Scale

For the Crust:

  • 2 cups vanilla Greek yogurt
  • 1 cup strawberries, sliced
  • 1 cup mango, diced
  • 1 cup pineapple, diced
  • 1 cup kiwi, sliced
  • 1 cup blueberries
  • 1/4 cup granola
  • 1 tbsp honey (optional)

Instructions

1. Prepare the Crust:

  1. In a clear glass or bowl, start by adding a layer of vanilla Greek yogurt.
  2. Add a layer of strawberries, followed by another layer of yogurt.
  3. Continue layering with mango, pineapple, kiwi, and blueberries, alternating with yogurt between each fruit layer.
  4. Top with granola and drizzle with honey if desired.
  5. Serve immediately or refrigerate for up to 2 hours before serving.

Notes

You can customize the seasonings to taste.

How to Prepare This Dish

Steps and time-saving tips

Start by gathering all your ingredients for the Rainbow Fruit Parfait with Vanilla Greek Yogurt to streamline the process. Wash and chop your favorite colorful fruits like strawberries, kiwis, blueberries, and mangoes into bite-sized pieces. Meanwhile, gently whisk the vanilla Greek yogurt to soften it for easier layering. If you prefer a sweeter taste, drizzle a touch of honey into the yogurt and fold it in. Next, grab clear glasses or bowls to showcase the vibrant layers. Begin with a spoonful of yogurt at the bottom, then add a layer of fruit, repeating until the glass is full. For a crunchier texture, sprinkle granola between the layers. Finally, chill the parfaits for 10 minutes before serving to let the flavors meld. To save time, prep the fruit the night before and store it in airtight containers. Another tip is to use pre-cut fruit from the store if you’re in a hurry, but fresh always tastes best.

Mistakes I’ve made and learned from

When I first made Rainbow Fruit Parfait with Vanilla Greek Yogurt, I layered the fruit too thickly, making it hard to get a balanced bite. Now, I aim for even, thin layers so every spoonful has a mix of yogurt and fruit. Another blunder was using overly ripe bananas—they turned mushy and made the parfait soggy. I learned that firmer fruits like apples or grapes hold up better. If you’re unsure about fruit selection, check out my guide on choosing the best fruits for desserts. Also, I once skipped chilling the parfaits, and the yogurt layers didn’t set properly. Trust me, that 10-minute wait makes a difference! For more yogurt-based tips, my yogurt hacks for better texture post has saved me from many kitchen mishaps.

Cultural Connection and Variations

Where this recipe comes from

The Rainbow Fruit Parfait with Vanilla Greek Yogurt feels like a celebration on a spoon. While parfaits trace their roots to France, where they originally featured layers of custard or ice cream, this vibrant twist embraces a healthier, modern approach. Families in the Mediterranean often swap Greek yogurt for heavier creams, turning it into a breakfast staple. Meanwhile, in Japan, you might find delicate fruit parfaits topped with matcha or red bean paste, showcasing local flavors.

In my own kitchen, Rainbow Fruit Parfait with Vanilla Greek Yogurt became a summer tradition. My grandmother piled seasonal berries high, while my aunt added crunchy granola for texture. Some regions toss in tropical fruits like mango or kiwi, while others stick to classic strawberries and blueberries. No matter the variation, the dish always feels like a sweet, colorful hug.

How it fits in today’s cooking

Today, Rainbow Fruit Parfait with Vanilla Greek Yogurt fits perfectly into fast-paced, health-conscious lifestyles. Busy parents love it as a quick, nutrient-packed breakfast, while fitness enthusiasts layer it with protein-rich ingredients. It’s also a star at brunch gatherings, especially when paired with easy brunch ideas that keep things light and fresh.

Modern twists include dairy-free yogurts or superfood add-ins like chia seeds. Some even turn it into dessert by drizzling honey or tossing in crumbled decadent desserts like brownie bits. Whether you enjoy it as a morning boost or a sweet treat, this parfait proves that simple, wholesome food never goes out of style.

Taste and Texture

What makes it delicious

Rainbow Fruit Parfait with Vanilla Greek Yogurt delights the senses with every spoonful. The creamy, velvety yogurt melts on your tongue, while the medley of fresh fruits—juicy strawberries, tart blueberries, and sweet mango—bursts with vibrant flavors. Each layer offers a satisfying contrast, from the crisp crunch of granola to the tender chew of ripe kiwi. Fragrant vanilla infuses every bite, balancing the natural sweetness of the fruits. Meanwhile, a drizzle of honey adds a floral depth that ties everything together. Whether you savor it slowly or dig right in, Rainbow Fruit Parfait with Vanilla Greek Yogurt delivers a refreshing, indulgent experience.

Boosting the flavor

Elevate your Rainbow Fruit Parfait with Vanilla Greek Yogurt by experimenting with bold twists. For a tropical kick, swap the granola for toasted coconut flakes or add a sprinkle of cinnamon for warmth. A dollop of homemade berry compote introduces a tangy richness, while a handful of chopped nuts lends extra crunch. If you love aromatic flavors, try folding in a dash of cardamom or orange zest into the yogurt. Craving more decadence? Drizzle with salted caramel sauce for a sweet-and-salty finish. With these easy tweaks, your parfait becomes even more irresistible.

Tips for Success

Best practices for results

Always use fresh, ripe fruit for your Rainbow Fruit Parfait with Vanilla Greek Yogurt to ensure vibrant flavors and textures. Meanwhile, drain excess liquid from the yogurt before layering to prevent a soggy parfait. Additionally, chill your serving glasses beforehand to keep the dessert cool and refreshing. For the best presentation, alternate colorful fruits evenly and gently press each layer to create clean, defined stripes. Finally, drizzle honey or sprinkle granola on top just before serving to maintain crunch.

Mistakes to avoid

Avoid overloading the parfait with too much yogurt, as it can overpower the fruit layers and make the dessert heavy. Instead, aim for balanced proportions by following our guide to perfect dessert layering. Another common mistake is cutting fruit too far in advance, which leads to browning and loss of freshness. To prevent this, prep your fruit right before assembling and consider using a splash of citrus juice. For more tips on keeping fruit vibrant, check out our fruit prep techniques.

Serving and Pairing Suggestions

How to serve this dish

Make your Rainbow Fruit Parfait with Vanilla Greek Yogurt shine by layering it in a clear glass or mason jar. This way, the vibrant colors peek through for a stunning visual effect. For extra flair, top it with a drizzle of honey, a sprinkle of granola, or fresh mint leaves. Serve it chilled at brunch gatherings, summer picnics, or even as a festive holiday dessert. Meanwhile, kids love it as a fun after-school snack. No matter the occasion, this parfait brings both taste and beauty to the table.

What goes well with it

Pair your Rainbow Fruit Parfait with Vanilla Greek Yogurt with a refreshing iced matcha latte for a balanced, energizing breakfast. The earthy matcha contrasts beautifully with the sweet, creamy yogurt. Alternatively, serve it alongside fluffy blueberry pancakes for a hearty brunch spread. If you crave something savory, try it with a light spinach feta quiche to balance the parfait’s sweetness. Each pairing enhances the dish’s flavors while keeping the meal satisfying.

What fruits work best in a Rainbow Fruit Parfait with Vanilla Greek Yogurt?

For a vibrant Rainbow Fruit Parfait with Vanilla Greek Yogurt, use colorful fruits like strawberries, mangoes, kiwis, blueberries, and blackberries. These fruits add natural sweetness and texture while creating the rainbow effect. You can also mix in bananas or peaches for extra variety.

Can I make Rainbow Fruit Parfait with Vanilla Greek Yogurt ahead of time?

Yes, you can assemble the Rainbow Fruit Parfait with Vanilla Greek Yogurt 4–6 hours in advance. Store it covered in the fridge to keep the yogurt fresh and prevent the fruit from drying out. For best results, add crunchy toppings like granola just before serving.

Is Rainbow Fruit Parfait with Vanilla Greek Yogurt healthy?

Absolutely! Rainbow Fruit Parfait with Vanilla Greek Yogurt is packed with protein, vitamins, and antioxidants. The Greek yogurt provides probiotics, while fresh fruits add fiber and natural sugars. Just watch portion sizes if you’re mindful of calories.

What can I substitute for vanilla Greek yogurt in this parfait?

If you don’t have vanilla Greek yogurt, try plain Greek yogurt with a dash of honey or maple syrup. Coconut yogurt or skyr also work well in a Rainbow Fruit Parfait. Avoid watery yogurts, as they won’t hold the layers properly.

Best Decadent Chocolate Sweetheart Cupcakes Recipe

best-chocolate-sweetheart-cupcakes-recipe

“`html

Introduction

There’s something undeniably magical about biting into a rich, moist cupcake that melts on your tongue and fills your heart with joy. If you’ve ever craved a dessert that feels like a warm hug, these Decadent Chocolate Sweetheart Cupcakes are your answer. Perfect for Valentine’s Day, anniversaries, or just because, they combine deep cocoa flavor with a tender crumb and luscious frosting. Whether you’re baking for someone special or treating yourself, this recipe promises to deliver pure indulgence in every bite. Trust me, one taste and you’ll understand why these cupcakes steal the spotlight at every gathering.

About This Recipe

Decadent Chocolate Sweetheart Cupcakes are more than just a dessert—they’re a celebration of love, comfort, and irresistible chocolatey goodness. These cupcakes feature a velvety batter made with high-quality cocoa, ensuring a deep, luxurious flavor. Topped with a silky buttercream or a glossy ganache, they strike the perfect balance between sweetness and richness. What makes them stand out? Their versatility. You can dress them up with sprinkles, edible glitter, or even fresh berries for a personalized touch. Plus, they fit seamlessly into any occasion, from romantic dates to family brunches.

At Brek Cakes, we believe baking should feel joyful and approachable. That’s why this recipe avoids complicated techniques while still delivering professional-level results. If you’re new to baking, you’ll appreciate the straightforward steps. Meanwhile, seasoned bakers can experiment with fillings or flavored frostings, like the ones in our Ultimate Guide to Buttercream Variations. For more inspiration, check out our Valentine’s Day Dessert Ideas to pair these cupcakes with other love-themed treats.

Beyond taste, these cupcakes carry emotional weight. They evoke memories of shared moments, whether it’s baking with a loved one or surprising someone with a homemade gift. The aroma alone—warm chocolate wafting through the kitchen—creates an instant sense of comfort. In a world that often feels rushed, taking time to bake and savor these Decadent Chocolate Sweetheart Cupcakes becomes a small but meaningful act of self-care or connection.

Why I Love This Recipe

I’ll never forget the first time I made these cupcakes for my best friend’s birthday. She had just gone through a tough breakup, and I wanted to remind her how loved she was. The way her face lit up after the first bite—that’s the power of Decadent Chocolate Sweetheart Cupcakes. They’re not just dessert; they’re a gesture of kindness, a way to say “I care” without words. Over the years, I’ve baked them for holidays, potlucks, and even just lazy Sundays when I needed a pick-me-up. Every time, they bring people together and create little moments of happiness. That’s why this recipe holds a special place in my heart—and my kitchen.

“`

Health and Nutrition

Why it’s good for your body

Decadent Chocolate Sweetheart Cupcakes offer more than just irresistible flavor. First, dark chocolate, a key ingredient, packs antioxidants that support heart health and reduce inflammation. Additionally, these cupcakes often include cocoa powder, which may improve blood flow and boost mood. While they’re a treat, Decadent Chocolate Sweetheart Cupcakes can still contribute to a balanced diet when enjoyed mindfully.

Moreover, many recipes incorporate healthier swaps like Greek yogurt or avocado for added moisture and nutrients. These alternatives provide protein and healthy fats, making each bite more satisfying. Furthermore, portion control matters, and these cupcakes come in single servings, helping you indulge without overdoing it. Decadent Chocolate Sweetheart Cupcakes also pair well with nutrient-dense toppings like fresh berries or a sprinkle of nuts for extra fiber and vitamins.

Finally, enjoying treats like these can support mental well-being by satisfying cravings in a controlled way. After all, a little indulgence keeps you on track with long-term health goals. So go ahead and savor Decadent Chocolate Sweetheart Cupcakes—they’re a delicious way to treat yourself without guilt.

How it fits in a healthy lifestyle

Decadent Chocolate Sweetheart Cupcakes fit seamlessly into a balanced diet when enjoyed in moderation. For example, pairing one with a protein-rich snack like almonds or a glass of milk can stabilize blood sugar and keep cravings in check. If you’re following a gluten-free diet, try using almond flour or a gluten-free blend for a version that suits your needs.

For those focused on heart health, dark chocolate’s flavonoids make these cupcakes a smarter choice than sugar-heavy desserts. You can also explore our guide to healthy baking swaps to tweak the recipe further. And if you’re meal prepping, freeze a batch to enjoy single servings without temptation. For more tips on balancing treats and nutrition, check out our post on mindful dessert eating. With a little planning, Decadent Chocolate Sweetheart Cupcakes can be part of a joyful, health-conscious lifestyle.

Print
clock clock iconcutlery cutlery iconflag flag iconfolder folder iconinstagram instagram iconpinterest pinterest iconfacebook facebook iconprint print iconsquares squares iconheart heart iconheart solid heart solid icon

Decadent Chocolate Sweetheart Cupcakes


  • Author: Chef Emy

Description

Rich, moist chocolate cupcakes with a luscious chocolate ganache filling and velvety vanilla buttercream frosting.


Ingredients

Scale

For the Crust:

  • 1 1/2 cups all-purpose flour
  • 1 cup granulated sugar
  • 1/2 cup unsweetened cocoa powder
  • 1 tsp baking soda
  • 1/2 tsp salt
  • 1 cup water
  • 1/3 cup vegetable oil
  • 1 tbsp white vinegar
  • 2 tsp vanilla extract
  • 1/2 cup heavy cream
  • 4 oz semi-sweet chocolate chips
  • 1 cup unsalted butter, softened
  • 3 cups powdered sugar
  • 2 tbsp milk

Instructions

1. Prepare the Crust:

  1. Preheat oven to 350°F (175°C). Line a muffin tin with cupcake liners.
  2. Whisk together flour, sugar, cocoa powder, baking soda, and salt in a large bowl.
  3. Add water, oil, vinegar, and vanilla to dry ingredients. Mix until smooth.
  4. Fill cupcake liners 2/3 full. Bake for 18-20 minutes. Cool completely.
  5. For ganache: Heat cream until steaming. Pour over chocolate chips, let sit for 2 minutes, then stir until smooth.
  6. For frosting: Beat butter until creamy. Gradually add powdered sugar and milk until fluffy.
  7. Core cooled cupcakes and fill with ganache. Pipe frosting on top.

Notes

You can customize the seasonings to taste.

How to Prepare This Dish

Steps and time-saving tips

Start by preheating your oven to 350°F and lining a muffin tin with cupcake liners. Meanwhile, whisk together the dry ingredients—flour, cocoa powder, baking soda, and salt—in a large bowl. In a separate bowl, beat the butter and sugar until light and fluffy, then mix in the eggs one at a time. Alternate adding the dry ingredients and buttermilk to the butter mixture, stirring just until combined. For extra-rich Decadent Chocolate Sweetheart Cupcakes, fold in melted chocolate or chocolate chips. Spoon the batter into the liners, filling each two-thirds full, and bake for 18-20 minutes. Let them cool completely before frosting.

To save time, measure all your ingredients before starting. If you’re in a rush, use room-temperature butter for quicker creaming. For a smoother frosting, sift the powdered sugar first. If you’re doubling the batch, bake one tray at a time for even cooking. And if you’re short on buttermilk, make a quick substitute by adding a tablespoon of lemon juice or vinegar to regular milk. These small tweaks ensure your Decadent Chocolate Sweetheart Cupcakes turn out perfectly every time.

Mistakes I’ve made and learned from

I once overmixed the batter, and my Decadent Chocolate Sweetheart Cupcakes came out dense instead of fluffy. Now, I stir just until the ingredients combine, and they rise beautifully. Another time, I skipped the cooling step and slathered on frosting too soon—it melted into a messy puddle. Patience pays off! If you’re new to baking, check out my guide to common cupcake mistakes to avoid similar pitfalls. And if your oven runs hot (like mine does), invest in an oven thermometer. Trust me, it’s a game-changer. For more frosting tips, my perfect frosting consistency post covers all the basics.

Cultural Connection and Variations

Where this recipe comes from

Decadent Chocolate Sweetheart Cupcakes have a rich history tied to love and celebration. Many trace their roots to early 20th-century American bakeries, where bakers crafted them as miniature indulgences for Valentine’s Day. However, the idea of chocolate-filled treats spans cultures. For instance, in France, they might layer ganache for a silkier texture, while in Mexico, bakers often add a hint of cinnamon or chili for warmth.

In my family, we’ve always made Decadent Chocolate Sweetheart Cupcakes with a splash of espresso to deepen the chocolate flavor. My grandmother swore it was the secret to their irresistible taste. Meanwhile, some bakers in the South swap butter for buttermilk, creating a tangy twist. No matter the variation, these cupcakes carry a universal charm—perfect for birthdays, anniversaries, or just because.

How it fits in today’s cooking

Today, Decadent Chocolate Sweetheart Cupcakes remain a staple for romantic gestures and everyday joy. Modern cooks love how versatile they are, whether dressed up with edible gold dust for weddings or kept simple for a weekend baking project. They’ve also found a place in gluten-free and vegan kitchens, with swaps like almond flour or aquafaba.

Social media has given these cupcakes new life, with bakers sharing creative spins like salted caramel fillings or matcha-infused frosting. For those short on time, quick dessert hacks make them achievable even on busy weeknights. Whether you’re honoring tradition or experimenting, Decadent Chocolate Sweetheart Cupcakes continue to win hearts—one bite at a time.

Taste and Texture

What makes it delicious

Decadent Chocolate Sweetheart Cupcakes deliver a rich, velvety experience with every bite. The deep cocoa flavor melts on your tongue, while the moist, tender crumb practically dissolves in your mouth. A hint of vanilla and a touch of espresso powder elevate the chocolate, making it taste even more luxurious. Meanwhile, the smooth, creamy frosting adds a luscious contrast—light yet indulgent, with just the right sweetness. As you take a bite, the aroma of warm chocolate and butter wafts up, teasing your senses before you even taste it. Decadent Chocolate Sweetheart Cupcakes aren’t just dessert; they’re a full sensory celebration.

Boosting the flavor

For an extra flavor boost, try folding mini chocolate chips into the batter for pockets of melty goodness. Alternatively, a sprinkle of flaky sea salt on top of the frosting balances the sweetness and enhances the chocolate’s depth. If you love fruity contrasts, swirl in a raspberry jam filling or top with fresh berries for a tart twist. Craving more decadence? Drizzle with salted caramel sauce or pair with a scoop of vanilla bean ice cream. These small tweaks make Decadent Chocolate Sweetheart Cupcakes even more irresistible.

Tips for Success

Best practices for results

For the best Decadent Chocolate Sweetheart Cupcakes, always measure your ingredients precisely, especially the cocoa powder and flour. Meanwhile, bring eggs and butter to room temperature before mixing to ensure a smooth batter. Additionally, use high-quality dark chocolate for the frosting to enhance the rich flavor. Finally, fill cupcake liners only two-thirds full to prevent overflow and achieve perfect domes.

Mistakes to avoid

Avoid overmixing the batter, as this can make your Decadent Chocolate Sweetheart Cupcakes dense instead of light. Instead, gently fold ingredients until just combined. Furthermore, don’t skip the cooling step before frosting, or your buttercream may melt. For more frosting tips, check out our guide on perfect buttercream. Also, resist opening the oven door too early, as sudden temperature drops can cause sinking. Learn more about baking troubleshooting to fix common issues.

Serving and Pairing Suggestions

How to serve this dish

Decadent Chocolate Sweetheart Cupcakes shine when you serve them with a touch of elegance. For a romantic touch, arrange them on a tiered stand with fresh rose petals or edible gold dust. Meanwhile, if you’re hosting a brunch, pair them with a mini dessert spread featuring fresh berries and whipped cream. These cupcakes also make a stunning centerpiece for Valentine’s Day or anniversaries when topped with heart-shaped sprinkles or a drizzle of raspberry sauce. No matter the occasion, always let them cool slightly before serving to enhance their rich chocolate flavor.

What goes well with it

Elevate your Decadent Chocolate Sweetheart Cupcakes by pairing them with a warm cup of homemade mocha latte. The coffee’s bold notes perfectly balance the sweetness. Alternatively, try serving them alongside a light vanilla bean ice cream for a delightful contrast in temperatures and flavors. For a festive twist, offer a glass of sparkling rosé to complement the cupcakes’ rich cocoa depth.

What makes Decadent Chocolate Sweetheart Cupcakes so moist?

Decadent Chocolate Sweetheart Cupcakes stay incredibly moist thanks to a combination of sour cream or buttermilk in the batter, which adds richness and locks in moisture. The melted chocolate and a touch of oil also help create that perfect, tender crumb you love in these cupcakes.

Can I make Decadent Chocolate Sweetheart Cupcakes ahead of time?

Absolutely! Decadent Chocolate Sweetheart Cupcakes taste even better the next day as the flavors deepen. Store them unfrosted in an airtight container at room temperature for up to 2 days, or freeze them for up to 3 months—just thaw and frost before serving.

What’s the best frosting for Decadent Chocolate Sweetheart Cupcakes?

A silky chocolate ganache or classic cream cheese frosting pairs perfectly with Decadent Chocolate Sweetheart Cupcakes. For a romantic touch, try pink vanilla buttercream swirls or a dusting of edible glitter to match the “sweetheart” theme.

How do I prevent my Decadent Chocolate Sweetheart Cupcakes from sinking?

To avoid sinking, make sure your leavening agents (baking powder/soda) are fresh, and don’t overmix the batter. Bake Decadent Chocolate Sweetheart Cupcakes at the right temperature (usually 350°F) and resist opening the oven door too early—this causes sudden temperature drops.

Best Decadent Dark Chocolate Chunk Pistachio Cookies

best-dark-chocolate-pistachio-cookies

“`html

Introduction

There’s something magical about biting into a warm, chewy cookie that’s studded with rich dark chocolate and crunchy pistachios. Whether you’re craving a sweet treat to unwind after a long day or need a showstopping dessert to impress guests, these Decadent Dark Chocolate Chunk Pistachio Cookies deliver every time. The contrast of bittersweet chocolate and nutty pistachios creates a flavor explosion that feels indulgent yet balanced. Plus, the aroma alone will make your kitchen smell like a cozy bakery. Trust me, one bite and you’ll understand why these cookies deserve a permanent spot in your recipe rotation.

About This Recipe

Decadent Dark Chocolate Chunk Pistachio Cookies are more than just a dessert—they’re a celebration of texture and flavor. Unlike ordinary chocolate chip cookies, this recipe elevates the classic with high-quality dark chocolate chunks and roasted pistachios for a sophisticated twist. The dark chocolate adds depth, while the pistachios bring a buttery crunch that keeps you coming back for more. Moreover, these cookies strike the perfect balance between crisp edges and a soft, fudgy center, making them irresistible fresh from the oven or days later (if they last that long).

This recipe fits perfectly with the warm, approachable tone of Brek Cakes, where we believe baking should feel joyful and achievable. Whether you’re a seasoned baker or a beginner, these cookies come together with simple techniques and pantry-friendly ingredients. For more inspiration, check out our guide to perfect cookie textures or explore our tips for baking with nuts to customize your creations. After all, great baking starts with understanding the basics, and this recipe is a delicious way to practice.

Beyond taste, these cookies also offer a touch of elegance. The vibrant green pistachios against the dark chocolate make them visually stunning, perfect for gifting or serving at gatherings. They’re versatile too—pair them with coffee for an afternoon pick-me-up or crumble them over ice cream for an easy dessert upgrade. Ultimately, Decadent Dark Chocolate Chunk Pistachio Cookies prove that a little effort yields big rewards, and that’s what makes them so special.

Why I Love This Recipe

I’ll never forget the first time I made these cookies. It was a rainy Sunday, and I wanted to bake something that felt like a hug in cookie form. The moment I tasted one, still warm and slightly gooey, I knew I’d found my forever recipe. What I love most is how the pistachios add a subtle saltiness that cuts through the richness of the chocolate, creating a harmony of flavors. They also remind me of holiday baking with my family, where we’d always include nuts for extra crunch. Now, every time I bake these Decadent Dark Chocolate Chunk Pistachio Cookies, they bring back those cozy memories—and make a few new ones too.

“`

Health and Nutrition

Why it’s good for your body

Decadent Dark Chocolate Chunk Pistachio Cookies pack a surprising nutritional punch while satisfying your sweet tooth. First, dark chocolate delivers powerful antioxidants like flavonoids, which support heart health and may reduce inflammation. Additionally, pistachios add plant-based protein and healthy fats, keeping you fuller longer. Together, these ingredients create a treat that balances indulgence with nourishment.

Moreover, Decadent Dark Chocolate Chunk Pistachio Cookies offer a natural energy boost. The combination of complex carbs from whole grains and healthy fats provides steady fuel without a sugar crash. Meanwhile, dark chocolate contains magnesium, which aids muscle function and relaxation. For those mindful of sugar intake, these cookies can be adapted with natural sweeteners for a lower-glycemic option.

Finally, pistachios contribute fiber and essential nutrients like vitamin B6, promoting digestion and metabolism. Unlike overly processed desserts, Decadent Dark Chocolate Chunk Pistachio Cookies use real, wholesome ingredients. Whether you enjoy them as an afternoon pick-me-up or a post-workout reward, they deliver both flavor and functional benefits.

How it fits in a healthy lifestyle

Decadent Dark Chocolate Chunk Pistachio Cookies fit seamlessly into balanced eating habits. For gluten-free diets, simply swap in almond or oat flour—they’ll still taste rich and satisfying. If you’re prioritizing heart health, the monounsaturated fats in pistachios and dark chocolate’s polyphenols make these cookies a smart occasional treat.

Pair them with a protein source like Greek yogurt for a balanced snack, or crumble them over overnight oats for added texture. They also work well in moderation for active lifestyles, offering quick energy before a workout or recovery nutrients afterward. For more ideas on mindful indulgence, explore our guide to healthy dessert swaps. With thoughtful portions, these cookies prove that delicious and nutritious can go hand in hand.

Print
clock clock iconcutlery cutlery iconflag flag iconfolder folder iconinstagram instagram iconpinterest pinterest iconfacebook facebook iconprint print iconsquares squares iconheart heart iconheart solid heart solid icon

Decadent Dark Chocolate Chunk Pistachio Cookies


  • Author: Chef Emy

Description

Rich, chewy cookies loaded with dark chocolate chunks and crunchy pistachios for a perfect balance of flavors and textures.


Ingredients

Scale

For the Crust:

  • 1 cup unsalted butter, softened
  • 1 cup brown sugar
  • 1/2 cup granulated sugar
  • 2 large eggs
  • 2 tsp vanilla extract
  • 2 1/2 cups all-purpose flour
  • 1 tsp baking soda
  • 1/2 tsp salt
  • 1 1/2 cups dark chocolate chunks
  • 1 cup shelled pistachios, roughly chopped

Instructions

1. Prepare the Crust:

  1. Preheat oven to 350°F (175°C) and line baking sheets with parchment paper.
  2. In a large bowl, cream together butter, brown sugar, and granulated sugar until light and fluffy.
  3. Beat in eggs one at a time, then stir in vanilla extract.
  4. In a separate bowl, whisk together flour, baking soda, and salt. Gradually add to the wet ingredients, mixing until just combined.
  5. Fold in dark chocolate chunks and chopped pistachios.
  6. Drop rounded tablespoons of dough onto prepared baking sheets, spacing them 2 inches apart.
  7. Bake for 10-12 minutes or until edges are golden but centers are still soft. Cool on baking sheets for 5 minutes before transferring to wire racks.

Notes

You can customize the seasonings to taste.

How to Prepare This Dish

Steps and time-saving tips

Start by preheating your oven to 350°F and lining a baking sheet with parchment paper. This ensures your Decadent Dark Chocolate Chunk Pistachio Cookies won’t stick and bake evenly. In a large bowl, whisk together softened butter, brown sugar, and granulated sugar until creamy. Crack in one egg and a splash of vanilla extract, then mix until smooth. Gradually fold in the dry ingredients—flour, baking soda, and a pinch of salt—just until combined. Overmixing can make the cookies tough, so stop as soon as the flour disappears. Next, gently stir in the dark chocolate chunks and chopped pistachios for that rich, nutty crunch. Scoop tablespoon-sized dough balls onto the sheet, spacing them two inches apart. Bake for 10-12 minutes until the edges turn golden but the centers stay soft. Let them cool on the sheet for five minutes before transferring to a wire rack. For a time-saving hack, freeze extra dough balls for up to three months—just bake straight from frozen, adding a minute or two to the time.

Mistakes I’ve made and learned from

I once rushed the butter step, using it straight from the fridge, and my Decadent Dark Chocolate Chunk Pistachio Cookies spread into thin, greasy puddles. Now I always let it soften at room temperature for 30 minutes—or microwave it in 5-second bursts if I’m short on time. Another blunder? Skipping the parchment paper. The cookies stuck stubbornly, and I lost half the batch. Lesson learned: never underestimate nonstick liners. If you’re new to baking, check out my guide on common baking mistakes to dodge similar pitfalls. Also, if your cookies bake unevenly, your oven might need calibration—here’s how I fixed mine using a simple oven temperature test. Trust me, a little patience upfront saves heartache later!

Cultural Connection and Variations

Where this recipe comes from

Decadent Dark Chocolate Chunk Pistachio Cookies weave together rich flavors with a story that spans continents. Originally inspired by Middle Eastern desserts like baklava, which often pair pistachios with honey or chocolate, this recipe modernizes tradition. Bakers in Iran and Turkey have used pistachios for centuries, but adding dark chocolate chunks gives these cookies a bold, contemporary twist. Meanwhile, in Italy, bakers might swap pistachios for hazelnuts, while French patisseries could use almond flour for a delicate texture.

In my family, Decadent Dark Chocolate Chunk Pistachio Cookies became a holiday staple after a cousin brought them to a Christmas cookie exchange. Now, we tweak the recipe yearly—sometimes adding orange zest or a sprinkle of sea salt. Across the U.S., regional twists emerge too. In the Southwest, bakers might mix in chili powder for heat, while coastal towns could fold in dried cranberries for tartness. No matter the variation, these cookies always deliver comfort with every chewy, nutty bite.

How it fits in today’s cooking

Today, Decadent Dark Chocolate Chunk Pistachio Cookies bridge nostalgia and modern cravings. They’re a favorite for holiday baking, but their easy prep makes them perfect for weeknight treats too. Busy home cooks often streamline the recipe by using quality store-bought dough as a base, then folding in pistachios and chocolate. Health-conscious bakers might opt for coconut sugar or gluten-free flour, proving how adaptable this classic can be.

Social media has also revived interest in these cookies, with food bloggers showcasing them as edible gifts or pairing them with dairy-free hot cocoa for cozy nights in. Whether you’re baking them for a crowd or savoring one fresh from the oven, Decadent Dark Chocolate Chunk Pistachio Cookies remind us that some flavors never go out of style.

Taste and Texture

What makes it delicious

Decadent Dark Chocolate Chunk Pistachio Cookies deliver a symphony of rich flavors and satisfying textures. First, the deep, bittersweet notes of dark chocolate chunks melt luxuriously on your tongue, while the buttery cookie base adds a tender, chewy contrast. Meanwhile, crunchy pistachios bring a nutty earthiness and subtle saltiness that balances the sweetness. As you take a bite, the aroma of toasted nuts and warm vanilla fills the air, making every mouthfeel irresistible. Whether enjoyed fresh from the oven or cooled, these cookies strike the perfect harmony between gooey, crisp, and indulgent.

Boosting the flavor

Elevate your Decadent Dark Chocolate Chunk Pistachio Cookies with a few creative tweaks. For extra depth, swap dark chocolate for a mix of milk and white chocolate chunks, or sprinkle flaky sea salt on top before baking. If you love texture, fold in shredded coconut or drizzle melted chocolate over the cooled cookies. Pair them with a scoop of homemade vanilla ice cream for a decadent dessert, or enjoy alongside a glass of spiced chai latte to highlight the warm, nutty flavors. Small changes make a big impact!

Tips for Success

Best practices for results

Always chill the dough for at least 30 minutes before baking to prevent spreading and ensure thick, chewy Decadent Dark Chocolate Chunk Pistachio Cookies. For even baking, use parchment paper and rotate the sheet halfway through. Additionally, measure your flour correctly by spooning it into the cup and leveling it off—this avoids dense cookies. Finally, let the cookies cool on the tray for 5 minutes before transferring them to a rack, as they firm up perfectly during this time.

Mistakes to avoid

Avoid overmixing the dough once you add the dry ingredients, as this can make your Decadent Dark Chocolate Chunk Pistachio Cookies tough. Instead, mix just until combined for a tender texture. Also, don’t skip toasting the pistachios—raw nuts lack depth, while toasted ones add rich flavor. For more on proper nut preparation, check out our guide on toasting nuts. Finally, resist overbaking; pull the cookies when the edges are set but the centers still look slightly soft. If you’re unsure about doneness, our cookie doneness tips can help.

Serving and Pairing Suggestions

How to serve this dish

Serve these Decadent Dark Chocolate Chunk Pistachio Cookies warm for an irresistible melt-in-your-mouth experience. For a stunning presentation, arrange them on a rustic wooden board with a sprinkle of crushed pistachios and sea salt. Alternatively, stack them high on a vintage cake stand for holiday gatherings or afternoon tea parties. Since they pair beautifully with seasonal flavors, consider serving them alongside spiced cider in winter or fresh berries in summer. No matter the occasion, these cookies always steal the show.

What goes well with it

Elevate your cookie experience by pairing Decadent Dark Chocolate Chunk Pistachio Cookies with a creamy latte or a bold espresso—the bitterness balances the rich chocolate perfectly. For a dessert spread, try them with a scoop of vanilla bean ice cream or a drizzle of salted caramel sauce for extra indulgence. If you love contrasting textures, serve them with a side of whipped berry yogurt to cut through the richness. Each pairing enhances the cookies’ nutty, chocolatey depth.

What makes Decadent Dark Chocolate Chunk Pistachio Cookies so rich?

Decadent Dark Chocolate Chunk Pistachio Cookies get their richness from high-quality dark chocolate chunks and buttery pistachios. The combination of melted butter and brown sugar also creates a chewy, caramel-like texture that enhances the indulgent flavor.

Can I substitute milk chocolate for dark chocolate in these cookies?

While you can use milk chocolate, it will change the flavor profile of Decadent Dark Chocolate Chunk Pistachio Cookies. Dark chocolate balances the sweetness and adds depth, but milk chocolate will make them sweeter and less intense.

How do I store Decadent Dark Chocolate Chunk Pistachio Cookies to keep them fresh?

Store these cookies in an airtight container at room temperature for up to 5 days. For longer freshness, freeze them in a sealed bag—they’ll stay delicious for up to 3 months.

Are Decadent Dark Chocolate Chunk Pistachio Cookies gluten-free?

Traditional recipes aren’t gluten-free, but you can easily adapt them by using a 1:1 gluten-free flour blend. Just ensure your dark chocolate chunks and pistachios are also certified gluten-free for safety.

Best Homemade Peanut Butter Cups – Easy Recipe

best-homemade-peanut-butter-cups

Introduction

If you’ve ever craved a sweet treat that feels like a hug in dessert form, you’re in the right place. Today, I’m sharing my recipe for Irresistible Homemade Peanut Butter Cups—a decadent, nostalgic delight that’s easier to make than you might think. Whether you’re a seasoned baker or a kitchen newbie, these little cups of joy will win over your heart (and your taste buds) in no time.

Irresistible Homemade Peanut Butter Cups combine creamy peanut butter, rich chocolate, and a touch of sea salt for a perfect balance of sweet and savory. Unlike store-bought versions, you control the quality of ingredients, making them a healthier indulgence. Plus, they’re customizable—swap in dark chocolate or almond butter if you prefer. This recipe aligns with brekcakes.com’s mission to deliver approachable, crowd-pleasing desserts that spark joy. For more inspiration, check out my easy dessert recipes or explore chocolate treats for similar delights.

Why I Love This Recipe

These Irresistible Homemade Peanut Butter Cups hold a special place in my heart because they remind me of baking with my mom. She’d let me lick the spoon after mixing the peanut butter filling, and that simple joy stuck with me. Now, I love sharing this recipe because it brings people together—whether as a gift, a party snack, or a midnight craving fix. Every bite feels like a little celebration.

Health and Nutrition

Why it’s good for your body

Irresistible Homemade Peanut Butter Cups pack a nutritious punch while satisfying your sweet tooth. First, peanut butter delivers plant-based protein, which helps keep you full and supports muscle repair. Additionally, dark chocolate, a key ingredient, contains antioxidants that combat inflammation and promote heart health. Together, these ingredients make Irresistible Homemade Peanut Butter Cups a smarter indulgence than store-bought alternatives loaded with preservatives.

Moreover, you control the sugar content when crafting Irresistible Homemade Peanut Butter Cups. By using natural sweeteners like honey or maple syrup, you reduce refined sugar intake without sacrificing flavor. Furthermore, peanuts provide healthy fats that support brain function and energy levels. Unlike processed snacks, these cups offer sustained energy rather than a sugar crash.

Finally, Irresistible Homemade Peanut Butter Cups include essential nutrients like magnesium and vitamin E. Magnesium aids muscle relaxation, while vitamin E boosts skin health. Whether you enjoy them as a post-workout treat or an afternoon pick-me-up, these cups deliver both taste and nourishment. With every bite, you’re choosing a treat that loves your body back.

How it fits in a healthy lifestyle

Irresistible Homemade Peanut Butter Cups fit seamlessly into balanced eating habits. For gluten-free diets, simply ensure your ingredients meet dietary needs, as the recipe naturally avoids gluten. If you’re focused on heart health, the monounsaturated fats in peanut butter support cholesterol levels, especially when paired with dark chocolate’s flavonoids.

These cups also work well for meal preppers. Whip up a batch and store them for portion-controlled snacks throughout the week. Pair them with a protein-packed smoothie bowl for a satisfying breakfast or enjoy them alongside a nutrient-dense avocado toast for a balanced lunch. Because you customize the ingredients, Irresistible Homemade Peanut Butter Cups adapt to your goals, whether you’re boosting protein, cutting sugar, or simply craving a wholesome treat.

Print

clock clock iconcutlery cutlery iconflag flag iconfolder folder iconinstagram instagram iconpinterest pinterest iconfacebook facebook iconprint print iconsquares squares iconheart heart iconheart solid heart solid icon

Irresistible Homemade Peanut Butter Cups


  • Author:
    Chef Emy

Description

Delicious homemade peanut butter cups with a rich chocolate shell and creamy peanut butter filling.


Ingredients


Scale

For the Crust:

  • 1 cup semi-sweet chocolate chips
  • 1/2 cup creamy peanut butter
  • 2 tablespoons powdered sugar
  • 1 tablespoon butter, softened
  • 1/4 teaspoon vanilla extract
  • Pinch of salt


Instructions

1. Prepare the Crust:

  1. Line a mini muffin tin with paper liners.
  2. Melt half of the chocolate chips in a microwave-safe bowl in 30-second intervals, stirring until smooth.
  3. Spoon a small amount of melted chocolate into each liner, spreading it up the sides slightly. Freeze for 10 minutes.
  4. In a separate bowl, mix peanut butter, powdered sugar, butter, vanilla, and salt until smooth.
  5. Place a small scoop of peanut butter mixture into each chocolate-lined cup.
  6. Melt the remaining chocolate and spoon over the peanut butter layer, spreading to cover completely.
  7. Chill in the refrigerator for at least 30 minutes until set.

Notes

You can customize the seasonings to taste.


How to Prepare This Dish

Steps and time-saving tips

Start by lining a muffin tin with paper liners to make cleanup a breeze. Melt high-quality chocolate chips in a microwave-safe bowl, stirring every 30 seconds to avoid burning. Meanwhile, mix creamy peanut butter with powdered sugar and a pinch of salt until smooth. Drizzle a spoonful of melted chocolate into each liner, then layer a teaspoon of the peanut butter mixture on top. Cover with another spoonful of chocolate and gently tap the tin to remove air bubbles. Chill the Irresistible Homemade Peanut Butter Cups in the fridge for at least 30 minutes to set. For a quicker finish, pop them in the freezer for 15 minutes. If you’re short on time, use pre-melted chocolate or store-bought peanut butter filling, but homemade always tastes richer. Keep leftovers in an airtight container—if they last that long!

Mistakes I’ve made and learned from

I once rushed the melting process and scorched my chocolate, leaving a bitter taste. Now I swear by the low-and-slow microwave method or a double boiler. Another blunder? Skipping the parchment liners—peeling off foil left messy edges. Trust me, the right liners save frustration. If your peanut butter filling feels too sticky, check out my guide to perfect peanut butter consistency for fixes. And if you’re doubling the batch, avoid overcrowding the fridge; space them out like I learned in my chilling chocolate tips. Every mistake taught me patience pays off with these treats.

Cultural Connection and Variations

Where this recipe comes from

Irresistible Homemade Peanut Butter Cups trace their roots back to the early 20th century, when peanut butter became a staple in American pantries. However, the idea of combining chocolate and peanut butter likely goes even further, with cultures like the Aztecs and Mayans enjoying similar pairings. Today, this treat holds a special place in family kitchens, especially during holidays like Halloween or Christmas when homemade versions outshine store-bought ones.

Around the world, variations pop up with local twists. In Mexico, some cooks add a pinch of cinnamon or chili powder for warmth. Meanwhile, in Australia, vegemite might sneak into the mix for a salty kick. Families often tweak the recipe too, like using almond butter for allergies or swapping dark chocolate for milk chocolate. No matter the version, Irresistible Homemade Peanut Butter Cups always bring people together with their rich, nostalgic flavor.

How it fits in today’s cooking

Irresistible Homemade Peanut Butter Cups remain a favorite because they blend simplicity with indulgence. Modern cooks love customizing them, whether by using vegan chocolate or adding sea salt for gourmet flair. They fit perfectly into today’s trends, from no-bake desserts to mindful snacking.

These treats also shine in seasonal spreads, like Easter baskets or Valentine’s Day gifts. For busy families, they’re a quick project that kids can help with, making them a staple in family-friendly recipes. Whether you’re craving nostalgia or a modern twist, Irresistible Homemade Peanut Butter Cups deliver every time.

Taste and Texture

What makes it delicious

Irresistible Homemade Peanut Butter Cups deliver a perfect balance of sweet, salty, and rich flavors that melt in your mouth. The velvety peanut butter filling contrasts beautifully with the crisp, dark chocolate shell, creating a satisfying crunch before giving way to a creamy center. Each bite releases a nutty, fragrant aroma that makes it impossible to stop at just one. Meanwhile, a hint of sea salt enhances the natural sweetness, elevating the entire experience. Whether you savor them slowly or devour them in seconds, Irresistible Homemade Peanut Butter Cups offer pure indulgence with every bite.

Boosting the flavor

For an extra flavor kick, try swirling a spoonful of homemade caramel sauce into the peanut butter filling before layering the chocolate. Alternatively, sprinkle crushed toasted nuts or a dash of cinnamon for warmth and texture. If you prefer a bolder contrast, dip the finished cups in dark chocolate ganache for an even richer finish. Experimenting with these small tweaks ensures your Irresistible Homemade Peanut Butter Cups stay exciting every time you make them.

Tips for Success

Best practices for results

Always use high-quality chocolate for your Irresistible Homemade Peanut Butter Cups, as it melts smoothly and delivers the best flavor. Meanwhile, lightly grease your muffin liners to ensure easy removal once set. For a perfect texture, chill the peanut butter filling before layering it with the chocolate. Additionally, tap the molds gently on the counter to eliminate air bubbles and create a smooth finish. Finally, refrigerate the cups for at least an hour so they firm up properly.

Mistakes to avoid

Avoid overheating the chocolate, as it can seize and become grainy. Instead, melt it slowly using a double boiler or in short microwave bursts. Many people also skip tempering the chocolate, which can lead to dull or streaky results. For a glossy finish, follow our guide on how to temper chocolate. Another common mistake is using natural peanut butter, which often separates and creates a runny filling. For a stable consistency, opt for a no-stir variety or try our recommended best peanut butter for baking.

Serving and Pairing Suggestions

How to serve this dish

Serve your Irresistible Homemade Peanut Butter Cups on a decorative platter for a crowd-pleasing dessert. For special occasions, arrange them in mini cupcake liners or drizzle melted chocolate over the top for an elegant touch. Meanwhile, stack them in a glass jar for a casual yet charming presentation at brunch or potlucks. If you want to elevate the experience, garnish each cup with a sprinkle of sea salt or crushed peanuts for extra texture and flavor.

What goes well with it

Pair your Irresistible Homemade Peanut Butter Cups with a cold glass of milk for a classic combo that highlights their creamy richness. Alternatively, try them alongside a cup of dark roast coffee to balance the sweetness with bold, earthy notes. For a fun twist, serve them with our Salted Caramel Brownies or Vanilla Bean Ice Cream to create a decadent dessert spread. Each pairing enhances the flavors while keeping the focus on these irresistible treats.

What ingredients do I need for Irresistible Homemade Peanut Butter Cups?

You only need a few simple ingredients: high-quality chocolate (dark, milk, or semi-sweet), creamy peanut butter, powdered sugar, a pinch of salt, and optional vanilla extract. These Irresistible Homemade Peanut Butter Cups come together with pantry staples for a delicious treat.

How do I prevent my peanut butter cups from sticking to the muffin liners?

Lightly grease the liners with coconut oil or cooking spray before adding the chocolate layer. For Irresistible Homemade Peanut Butter Cups that release easily, chill them thoroughly before peeling off the liners.

Can I use natural peanut butter for homemade peanut butter cups?

Yes, but opt for a no-stir natural peanut butter to avoid separation. The thicker consistency helps create the perfect texture for Irresistible Homemade Peanut Butter Cups. You may need to adjust powdered sugar slightly for sweetness.

How long do homemade peanut butter cups last in the fridge?

Store Irresistible Homemade Peanut Butter Cups in an airtight container in the refrigerator for up to 2 weeks. For best texture, let them sit at room temperature for 5 minutes before serving.

Best Classic Yellow Cake – Moist & Fluffy Recipe

best-classic-yellow-cake-recipe

Introduction

There’s something undeniably comforting about a Classic Yellow Cake Recipe. Whether it reminds you of childhood birthdays, family gatherings, or simply the joy of a homemade treat, this timeless dessert holds a special place in many hearts. Today, I want to share my go-to version—a tender, buttery cake with just the right balance of sweetness. Moreover, it pairs perfectly with everything from chocolate frosting to fresh berries, making it a versatile favorite for any occasion.

A Classic Yellow Cake Recipe is more than just a dessert—it’s a celebration of simplicity and tradition. Unlike overly complicated bakes, this cake relies on pantry staples like flour, sugar, eggs, and butter to create something truly magical. For years, I’ve tweaked and perfected this recipe to ensure it delivers a moist crumb and rich flavor every time. Additionally, it fits seamlessly into the brekcakes.com philosophy: approachable, reliable, and always delicious. If you’re new to baking, this recipe is a fantastic starting point. On the other hand, seasoned bakers will appreciate its foolproof method and consistent results. For more baking inspiration, check out my essential baking tips or explore my favorite frosting pairings to take your cake to the next level.

Why I Love This Recipe

This Classic Yellow Cake Recipe holds a special place in my heart because it was the first cake I ever baked entirely on my own. I remember standing on a step stool as a kid, carefully measuring each ingredient, and feeling so proud when it came out of the oven. Even now, the smell of it baking brings back those warm memories. Beyond nostalgia, though, I love how forgiving and adaptable it is—whether I’m making it for a last-minute celebration or as the base for an elaborate layer cake, it never lets me down.

Health and Nutrition

Why it’s good for your body

Classic Yellow Cake Recipe brings more than just delicious flavor to the table. First, it contains eggs, which provide high-quality protein and essential nutrients like choline for brain health. Additionally, butter and milk contribute healthy fats and calcium, supporting bone strength. While it’s a treat, Classic Yellow Cake Recipe can still fit into a balanced diet when enjoyed mindfully.

Moreover, the simple ingredients in Classic Yellow Cake Recipe mean fewer processed additives compared to store-bought alternatives. For example, real vanilla extract offers antioxidants, while sugar in moderation provides quick energy. If you opt for whole-grain flour, you’ll even add fiber to support digestion. Ultimately, this cake delivers comfort and satisfaction, which matters just as much as physical nourishment.

Finally, baking Classic Yellow Cake Recipe at home lets you control portion sizes and ingredient quality. You can tweak recipes to reduce sugar or use healthier fats without sacrificing taste. Whether for a celebration or a small indulgence, this classic dessert reminds us that joy is part of wellness too.

How it fits in a healthy lifestyle

Classic Yellow Cake Recipe works well in moderation as part of a balanced diet. Pair a slice with fresh berries or a dollop of Greek yogurt to add fiber and protein. If you’re watching sugar intake, try reducing the amount slightly or using natural sweeteners like honey or maple syrup. For gluten-free needs, swap all-purpose flour for a blend like almond or oat flour—just check out our gluten-free baking guide for best results.

Planning ahead helps too. Bake Classic Yellow Cake Recipe for special occasions rather than daily treats, and store leftovers properly to avoid overindulging. If you love baking but want lighter options, explore our healthy dessert swaps for inspiration. Remember, balance is key—enjoying small portions of your favorites keeps both your body and taste buds happy.

Print

clock clock iconcutlery cutlery iconflag flag iconfolder folder iconinstagram instagram iconpinterest pinterest iconfacebook facebook iconprint print iconsquares squares iconheart heart iconheart solid heart solid icon

Classic Yellow Cake


  • Author:
    Chef Emy

Description

A moist and fluffy classic yellow cake perfect for any occasion.


Ingredients


Scale

For the Crust:

  • 2 1/2 cups all-purpose flour
  • 2 1/2 teaspoons baking powder
  • 1/2 teaspoon salt
  • 1 cup unsalted butter, softened
  • 2 cups granulated sugar
  • 4 large eggs
  • 1 teaspoon vanilla extract
  • 1 cup whole milk


Instructions

1. Prepare the Crust:

  1. Preheat oven to 350°F (175°C). Grease and flour two 9-inch round cake pans.
  2. In a medium bowl, whisk together flour, baking powder, and salt.
  3. In a large bowl, beat butter and sugar until light and fluffy. Add eggs one at a time, then stir in vanilla.
  4. Alternately add the flour mixture and milk to the butter mixture, beginning and ending with the flour mixture.
  5. Divide batter evenly between the prepared pans. Bake for 25-30 minutes or until a toothpick inserted comes out clean.
  6. Cool cakes in pans for 10 minutes, then transfer to wire racks to cool completely.

Notes

You can customize the seasonings to taste.


How to Prepare This Dish

Steps and time-saving tips

Start by preheating your oven to 350°F and greasing two 9-inch round cake pans. Meanwhile, whisk together flour, baking powder, and salt in a medium bowl. In a large mixing bowl, cream softened butter and sugar until light and fluffy. Then, beat in eggs one at a time, followed by vanilla extract. Alternate adding the dry ingredients and whole milk, mixing just until combined. Divide the batter evenly between the pans and smooth the tops. Bake for 25-30 minutes or until a toothpick comes out clean. Let the cakes cool in the pans for 10 minutes before transferring them to a wire rack. For a time-saving trick, prep your dry ingredients the night before and store them in an airtight container. Also, use room-temperature eggs and butter—they blend faster and create a smoother batter.

Mistakes I’ve made and learned from

I once overmixed the batter, which made my Classic Yellow Cake Recipe dense instead of light. Now, I stop stirring as soon as the flour disappears. Another blunder? Pulling the cakes out too early. They sank in the middle, and I had to start over. A foolproof fix? Trust the toothpick test. If you’re new to baking, check out my guide to common baking mistakes to dodge similar pitfalls. Also, if your layers ever turn out uneven, don’t panic—my cake leveling tips will save the day. Every mishap taught me something, and now I share those lessons so your cake turns out perfect the first time.

Cultural Connection and Variations

Where this recipe comes from

The Classic Yellow Cake Recipe holds a special place in American baking history, tracing its roots back to the 19th century when vanilla and butter became pantry staples. Bakers loved its simplicity and versatility, often pairing it with chocolate frosting for birthday celebrations. Meanwhile, in Europe, similar cakes like the French “génoise” or the British “Victoria sponge” leaned on lighter textures, but the American version embraced richness with extra eggs and butter.

Families often put their own spin on the Classic Yellow Cake Recipe too. Some add a splash of citrus zest for brightness, while others swap buttermilk for regular milk to create a tangier crumb. In the South, you might find it layered with fruit preserves or crowned with a glossy caramel glaze. No matter the variation, this cake carries nostalgia—whether it’s the scent of a childhood kitchen or the centerpiece at a summer potluck.

How it fits in today’s cooking

Today, the Classic Yellow Cake Recipe remains a go-to for bakers who crave timeless comfort. It’s a star at birthdays, but it also shines as an everyday treat, especially when paired with a decadent chocolate frosting. Modern twists include gluten-free flour blends or vegan substitutes, proving its adaptability. Some even repurpose it into cupcakes or trifle layers, like those inspired by our berry trifle dessert.

Seasonal bakers love dressing it up too. Think pumpkin spice in fall or fresh berries in summer. Whether you’re keeping it classic or experimenting, the Classic Yellow Cake Recipe bridges tradition and creativity. It’s proof that some flavors never go out of style.

Taste and Texture

What makes it delicious

A Classic Yellow Cake Recipe delivers pure comfort with its tender, buttery crumb and subtle vanilla sweetness. Each bite melts in your mouth, thanks to the perfect balance of fluffy texture and rich flavor. The golden-brown exterior adds a delicate crispness, while the inside stays moist and airy. Fresh eggs and high-quality butter create a luxurious richness, while a hint of vanilla extract wraps the cake in a warm, fragrant aroma. Whether enjoyed plain or dressed up, a Classic Yellow Cake Recipe never fails to satisfy with its timeless, crowd-pleasing appeal.

Boosting the flavor

Elevate your Classic Yellow Cake Recipe with easy tweaks that amplify its deliciousness. For a citrusy twist, add a teaspoon of lemon zest to the batter or drizzle the baked cake with a bright lemon glaze. If you love extra richness, swap regular milk for buttermilk to create a tangier, more tender crumb. Top slices with fresh berries and a dollop of homemade whipped cream for a refreshing contrast. A dusting of cinnamon or a splash of almond extract can also add depth, making every bite even more memorable.

Tips for Success

Best practices for results

For the perfect Classic Yellow Cake Recipe every time, start by bringing all ingredients to room temperature. This ensures even mixing and a smooth batter. Additionally, measure your flour correctly by spooning it into the measuring cup and leveling it off. Overpacking the flour can make the cake dense. Furthermore, cream the butter and sugar thoroughly until light and fluffy, as this creates the ideal texture. Finally, avoid overmixing the batter once you add the dry ingredients to keep the cake tender.

Mistakes to avoid

One common mistake when making the Classic Yellow Cake Recipe is opening the oven door too early. This can cause the cake to sink, so wait until at least the minimum bake time has passed. Another error is using cold eggs, which can lead to a lumpy batter. Instead, follow our guide on how to properly store baking ingredients to keep everything at the right temperature. Also, don’t skip greasing and flouring the pans, or the cake may stick. For more pan prep tips, check out our post on best cake pan preparation methods to ensure easy release every time.

Serving and Pairing Suggestions

How to serve this dish

For a stunning presentation, slice your Classic Yellow Cake Recipe into even layers and stack them with fluffy frosting in between. Top it with fresh berries or edible flowers for a pop of color. Alternatively, dust the cake with powdered sugar for a simple yet elegant finish. Serve it at room temperature to let the buttery flavor shine, making it perfect for birthdays, picnics, or afternoon tea. If you want to elevate the experience, pair each slice with a dollop of whipped cream or a scoop of vanilla ice cream.

What goes well with it

A warm cup of coffee or tea balances the sweetness of the Classic Yellow Cake Recipe beautifully, especially if you prefer a slightly bitter contrast. For a refreshing twist, try serving it with a glass of cold milk or a fruity iced tea. If you love layered desserts, consider pairing it with our Homemade Berry Compote for a burst of tangy flavor. Another great match is our Vanilla Bean Whipped Cream, which adds a light, creamy texture to every bite.

What makes a classic yellow cake different from white cake?

A classic yellow cake gets its signature color and rich flavor from using whole eggs, while white cake typically uses only egg whites. The yolks in a yellow cake recipe also add moisture and a slightly denser texture compared to the lighter, fluffier white cake.

Can I substitute oil for butter in a classic yellow cake?

Yes, you can substitute oil for butter in a classic yellow cake recipe, but it will change the texture and flavor. Oil creates a moister crumb, while butter adds richness and that traditional bakery-style taste. For best results, use a 1:1 ratio when swapping.

How do I make my yellow cake more moist?

For an extra-moist classic yellow cake, try adding ingredients like sour cream, buttermilk, or a tablespoon of mayonnaise to your batter. These ingredients add fat and acidity, which help retain moisture during baking. Also avoid overmixing the batter, as this can lead to a dry texture.

What’s the best frosting for classic yellow cake?

Chocolate buttercream is the most popular pairing with classic yellow cake, creating the beloved “yellow cake with chocolate frosting” combination. For a lighter option, vanilla buttercream or cream cheese frosting also complement the cake’s flavor beautifully. The mild sweetness of yellow cake makes it versatile for many frosting types.